ASUSTeK Computer UGPZ5 Bluetooth Module User Manual UserMan MSQUGPZ5
ASUSTeK Computer Inc Bluetooth Module UserMan MSQUGPZ5
UserManual.wiki
>
ASUSTeK Computer
>
UGPZ5 User Manual
>
Users Manual 3
Contents
1.
Users Manual 6 rev
2.
Users Manual 1
3.
Users Manual 2
4.
Users Manual 3
5.
Users Manual 4
6.
Users Manual 5
Users Manual 3
Navigation menu
Upload a User Manual
Namespaces
Wiki Guide
HTML
PDF
Info
Views
User Manual
Discussion / Help
Navigation
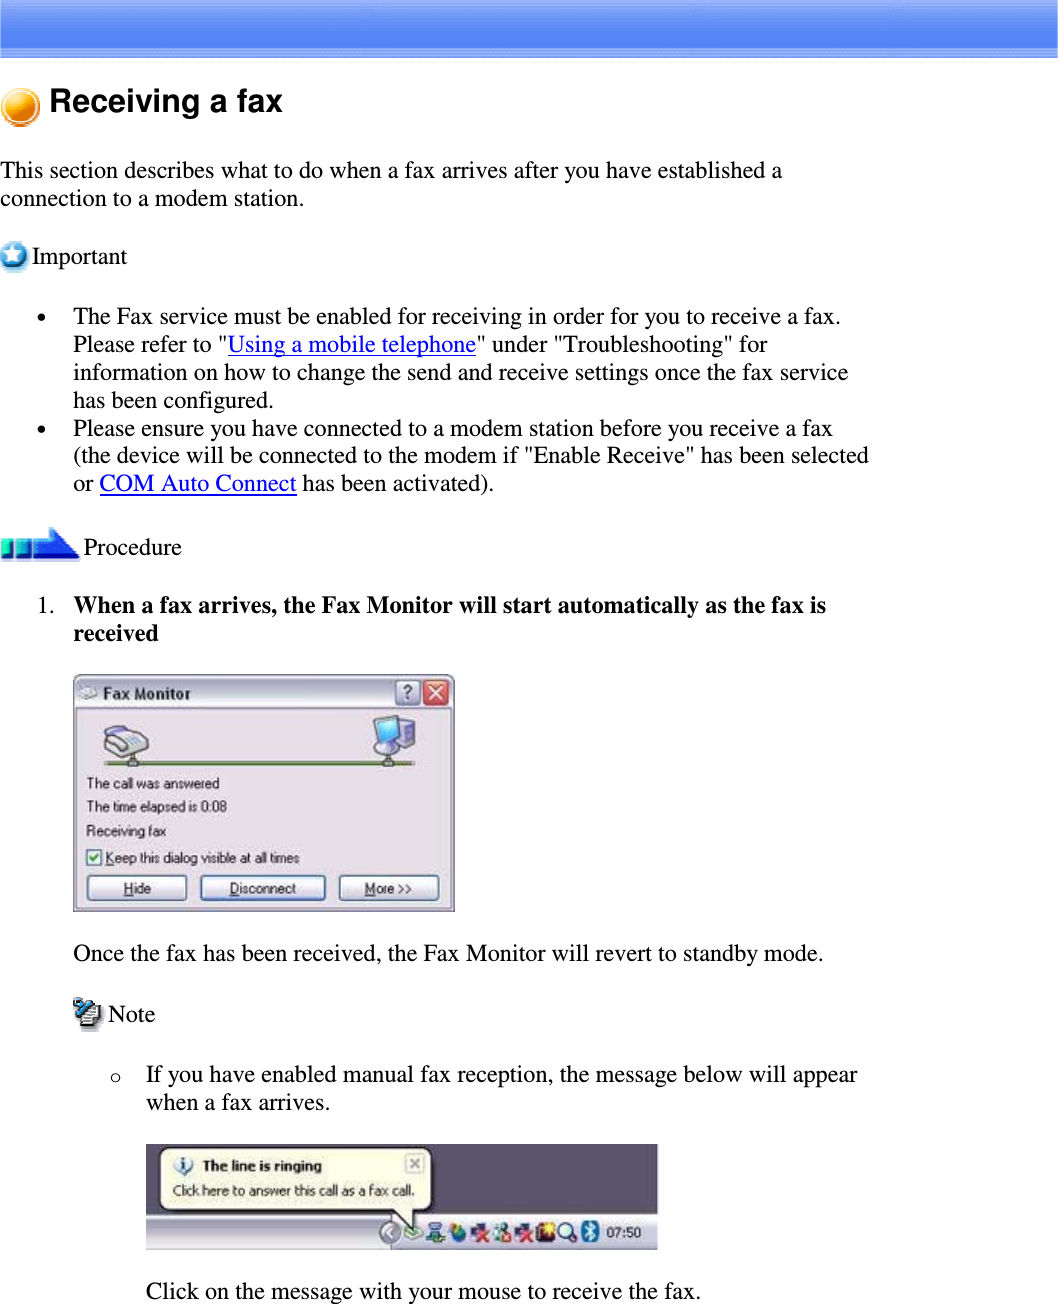
![Using a mobile telephone for fax transmissions [FAX]This section describes how to send a fax using a mobile telephone as a modem.Setting up the mobile telephoneInstalling a modemSetting fax informationSending a faxReceiving a faxImportant• Please ensure that any drivers used to connect the PC to the mobile telephonehave been installed.• A Bluetooth passkey (PIN code) is required for you to connect to the mobiletelephone. Please make a note of your Bluetooth passkey before you start the set-up process.• A fax application is required for you to be able to send and receive faxes. Thedescription below is based on a example using Microsoft Fax, which is installedwith Windows XP as standard.If you are going to use a commercially available fax application, then please referto the manual that came with the application for information on how to send andreceive faxes.Setting up the mobile telephoneSet up and register the mobile telephone as a fax service.Procedure1. Turn on the mobile telephone, and set it to be connectable via BluetoothNote](https://usermanual.wiki/ASUSTeK-Computer/UGPZ5.Users-Manual-3/User-Guide-507445-Page-1.png)
![oPlease refer to the instruction manual for information on how to operatethe telephone.2. Right-clickontheBluetoothiconinthetasktray,andthenclickon[AddNew Connection]NoteoAlternatively, click [Start][All Programs][Bluetooth][BluetoothSettings], and then click on [New Connection] from the active [BluetoothSettings] window.The [Add New Connection Wizard (Welcome to the Add New ConnectionWizard)] window will appear.3. Select [Custom Mode], and then click on the [Next] button](https://usermanual.wiki/ASUSTeK-Computer/UGPZ5.Users-Manual-3/User-Guide-507445-Page-2.png)
![The [Add New Connection Wizard (Searching for Bluetooth devices)] windowwill appear.Once the program has finished searching for the devices, the [Add NewConnection Wizard (Select Device)] window will appear.4. Select the device name of the mobile telephone from [Device List], and thenclick on the [Next] buttonThe [Add New Connection Wizard (Searching for Services)] window will appear.](https://usermanual.wiki/ASUSTeK-Computer/UGPZ5.Users-Manual-3/User-Guide-507445-Page-3.png)
![5. If you are connecting to the mobile telephone for the first time, enter thepasskey for the device from the [Bluetooth Passkey (PIN Code)] window, andthen click on the [OK] button.Once the program has finished searching for the services, the [Add NewConnection Wizard (Select Service)] window will appear.](https://usermanual.wiki/ASUSTeK-Computer/UGPZ5.Users-Manual-3/User-Guide-507445-Page-4.png)
![6. Select "Fax" under [Select Service], and then click on the [Next] buttonThe [Add New Connection Wizard (Connecting to Remote Device)] screen willappear.The COM port and modem registration process will then be automaticallyperformed.Once theCOM port and modem (standard 33600 bps type) registration is complete,](https://usermanual.wiki/ASUSTeK-Computer/UGPZ5.Users-Manual-3/User-Guide-507445-Page-5.png)
![the [Add New Connection Wizard (Setting Connection Name)] screen willappear.7. Configure the type and name of the icon to appear after registration, andclick on the [Next] button.Please click only on the [Next] button once you are satisfied with theconfiguration.The [Add New Connection Wizard (Completing the Add New ConnectionWizard)] screen will appear.8. Click on the [Finish] buttonThe settings will be registered, and the icon will appear on the [BluetoothSettings] screen.Setting fax informationConfigure send/receive settings and register fax information.Procedure1. Select [Start][Control Panel], and then double-click on the [Printers andOther Hardware] icon](https://usermanual.wiki/ASUSTeK-Computer/UGPZ5.Users-Manual-3/User-Guide-507445-Page-6.png)
![NoteoIf the control panel is displayed in "Classic view", and you use Windows2000, please start from Step (2).2. Double-click on the [Printers and Faxes] iconThe [Printers & Faxes] window will appear.3. Click on "Set up faxing" in the [Printers and Faxes] windowA window showing installed programs will appear, and a Fax icon will have beencreated in the [Printers and Faxes] screen.4. Click on "Send a fax" under "Printer Tasks" on the left side of the window](https://usermanual.wiki/ASUSTeK-Computer/UGPZ5.Users-Manual-3/User-Guide-507445-Page-7.png)
![If you have not yet configured a fax device, the [Fax Configuration Wizard]window will appear. In the window you can enter settings pertaining to the sender(yourself).NoteoIf the fax configuration information has already been registered, the [SendFax Wizard] window, which can be viewed under "Sending a fax" below,will appear instead of the [Fax Configuration Wizard] window.](https://usermanual.wiki/ASUSTeK-Computer/UGPZ5.Users-Manual-3/User-Guide-507445-Page-8.png)
![5. Enter the sender information, and click on the [Next] buttonNoteoThe sender information that you configure here will be automaticallyappended as header information when you send a fax.The [Fax Configuration Wizard (Select Device for Sending or Receiving Faxes)]window will appear.6. Select a device to be used for fax transmissions, enable the device for sendingor receiving, and then click on the [Next] button](https://usermanual.wiki/ASUSTeK-Computer/UGPZ5.Users-Manual-3/User-Guide-507445-Page-9.png)
![NoteoIf [Enable Receive] is selected, the device will be on standby for receivingfaxes even if it is not sending or receiving anything, and therefore will bein continuous connection to the wireless modem when COM AutoConnect is on).Please decide whether to select this option based on to the desiredobjective and/or frequency of transmission.The [Fax Configuration Wizard (Transmitting Subscriber Identification (TSID))]window will appear.7. Click on the [Next] buttonIt is important that you do not change the transmitter subscriber identification.](https://usermanual.wiki/ASUSTeK-Computer/UGPZ5.Users-Manual-3/User-Guide-507445-Page-10.png)
![The [Fax Configuration Wizard (Completing the Fax Configuration Wizard)]window will appear.8. Click on the [Finish] buttonThe fax information will be have been registered, and the [Fax Console] windowwill appear.This will complete the fax set-up process.](https://usermanual.wiki/ASUSTeK-Computer/UGPZ5.Users-Manual-3/User-Guide-507445-Page-11.png)

![2. Double-click on the [Fax] icon in the Control PanelThe [Fax Console] window will appear.3. In the [Fax Console] window, double-click on the fax that has arrivedAn image of the received fax will be displayed.Related topic: "Sending a fax"](https://usermanual.wiki/ASUSTeK-Computer/UGPZ5.Users-Manual-3/User-Guide-507445-Page-14.png)
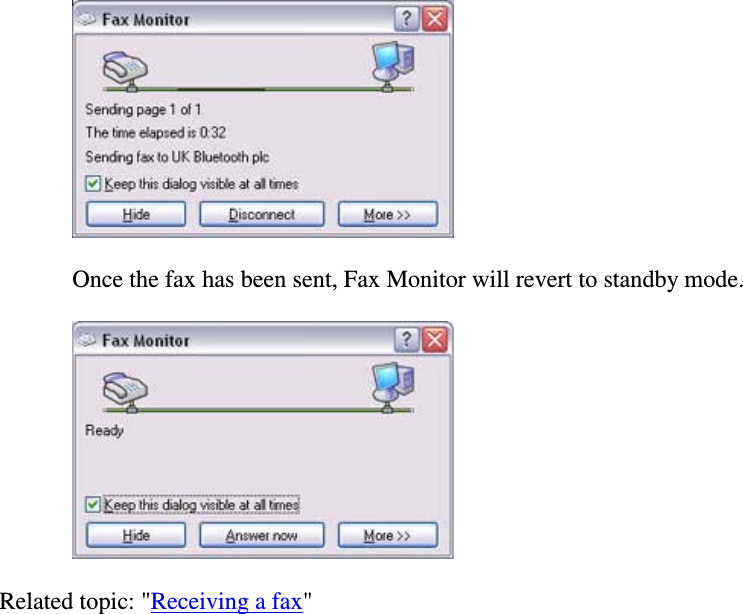
![Sending a faxThis section describes how to send a fax from the Fax Console.Important• The Fax service must be enabled for sending in order for you to send a fax.Please refer to "Using a mobile telephone" under "Troubleshooting" for how tochange the send and receive settings once the service has been configured.""Procedure1. Double-click on the [Fax] icon in the Control PanelThe [Fax Console] window will appear.](https://usermanual.wiki/ASUSTeK-Computer/UGPZ5.Users-Manual-3/User-Guide-507445-Page-15.png)
![2. In the [Fax Console] window, click [File][Send fax]The [Send Fax Wizard (Starting the Send Fax Wizard)] window will appear.3. Click on the [Next] buttonThe [Send Fax Wizard (Recipient Information)] window will appear.4. Enter the name and fax number of the destination party, and then click onthe [Next] button](https://usermanual.wiki/ASUSTeK-Computer/UGPZ5.Users-Manual-3/User-Guide-507445-Page-16.png)
![The [Send Fax Wizard (Preparing the Cover Page)] window will appear.5. Specify the cover page template, subject line, and note (body text), and thenclick on the [Next] buttonThe [Send Fax Wizard (Schedule)] window will appear.6. If you wish to send the fax immediately,select"Now",andthenclickonthe[Next] button](https://usermanual.wiki/ASUSTeK-Computer/UGPZ5.Users-Manual-3/User-Guide-507445-Page-17.png)
![The [Send Fax Wizard (Completing the Send Fax Wizard)] window will appear.7. Confirm the destination information and transmission details, and then clickon the [Finish] buttonThe software will automatically dial the number and send the fax.](https://usermanual.wiki/ASUSTeK-Computer/UGPZ5.Users-Manual-3/User-Guide-507445-Page-18.png)
![Printing documents and images [HCRP] [SPP]This section describes how to print using a Bluetooth-compatible printer.Setting up the printerPrintingImportant• Please ensure that any printer-specific drivers have been installed on the PCbefore you have established a Bluetooth connection.• A Bluetooth passkey (PIN code) is required for you to connect to the printer.Please make a note of your Bluetooth passkey before you start the set-up process.Setting up the printerProcedure1. Turn on the printer2. Right-clickontheBluetoothiconinthetasktray,andthenclickon[AddNew Connection]](https://usermanual.wiki/ASUSTeK-Computer/UGPZ5.Users-Manual-3/User-Guide-507445-Page-20.png)
![NoteoAlternatively, click [Start][All Programs][Bluetooth][BluetoothSettings], and then click on [New Connection] from the active [BluetoothSettings] window.The [Add New Connection Wizard (Welcome to the Add New ConnectionWizard)] window will appear.3. Confirm that [Express Mode] has been selected, and then click on the [Next]buttonThe [Add New Connection Wizard (Searching for Bluetooth devices)] windowwill appear.](https://usermanual.wiki/ASUSTeK-Computer/UGPZ5.Users-Manual-3/User-Guide-507445-Page-21.png)
![Once the program has finished searching for the devices, the [Add NewConnection Wizard (Device Selection)] window will appear.4. Select the device name of the printer from [Device List], and then click on the[Next] buttonThe [Add New Connection Wizard (Searching for Services)] window will appear.](https://usermanual.wiki/ASUSTeK-Computer/UGPZ5.Users-Manual-3/User-Guide-507445-Page-22.png)
![5. If you are connecting to the printer for the first time, enter the passkey forthe device from the [Bluetooth Passkey (PIN Code)] window, and then clickon the [OK] button.Once the services have been detected successfully, connection to the device andcreation of the HCRP port will be performed automatically.If you have not yet installed a printer, a message prompting you to install a printerwill appear.6. Click on the [OK] button](https://usermanual.wiki/ASUSTeK-Computer/UGPZ5.Users-Manual-3/User-Guide-507445-Page-23.png)
![The [Add Printer Wizard (Starting the Add Printer Wizard)] window will appear.7. Click on the [Next] buttonThe [Add Printer Wizard (Local Printer or Network Printer)] window will appear.8. Select "Local printer attached to this computer", remove the check next to"Automatically detect and install my Plug and Play printer", and then clickon the [Next] button](https://usermanual.wiki/ASUSTeK-Computer/UGPZ5.Users-Manual-3/User-Guide-507445-Page-24.png)
![The [Add Printer Wizard (Select Printer Port)] window will appear.9. Select the desired port, and then click on the [Next] buttonThe [Add Printer Wizard (Install Printer Software)] window will appear.10. Select the [Manufacturer] and [Printer] as pertains to the printer to beinstalled,orclickonthe[UseDevice]button,andthenclickonthe[Next]button](https://usermanual.wiki/ASUSTeK-Computer/UGPZ5.Users-Manual-3/User-Guide-507445-Page-25.png)
![Please install the printer according to the instructions in the windows that follow.Once installation is complete, a message of confirmation will appear in the [AddNew Connection Wizard (Printer Settings)] window.11. Click on [Next]The [Add New Connection Wizard (Connection Name Settings)] window willappear.](https://usermanual.wiki/ASUSTeK-Computer/UGPZ5.Users-Manual-3/User-Guide-507445-Page-26.png)
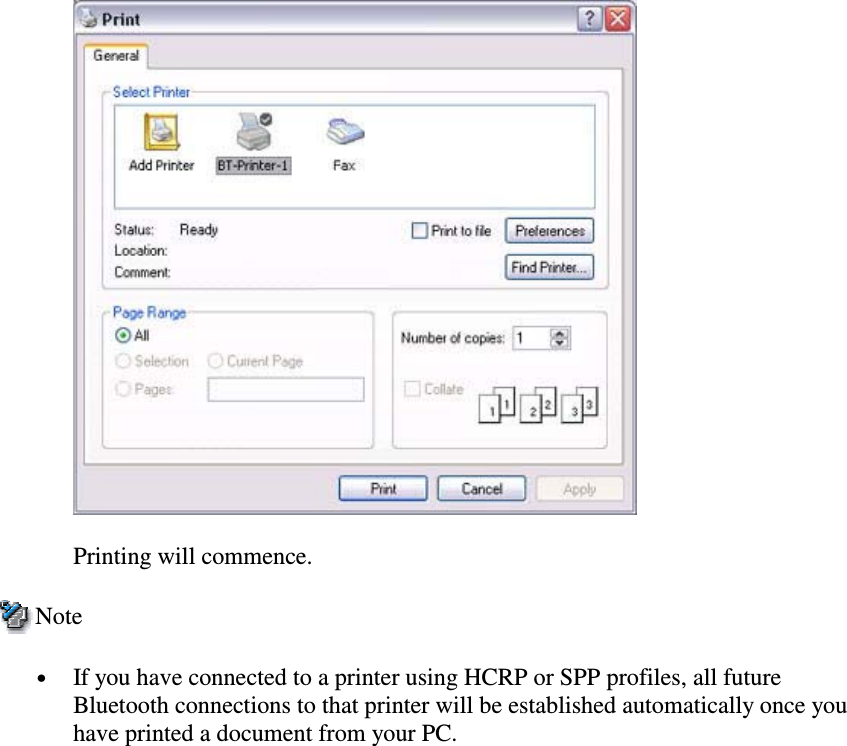
![12. Enter the type and name of the icon displayed after registration, and thenclick on the [Next] buttonPlease click on the [Next] button if you are satisfied with the settings.NoteoYou can change the connection icon and icon name."Changing the connection icon name""Changing the connection icon"PrintingTry to print from the message pad.1. Click [File][Print]The [Print] screen will appear.2. Select wireless printer from under [Select Printer], and then click on the[Print] button](https://usermanual.wiki/ASUSTeK-Computer/UGPZ5.Users-Manual-3/User-Guide-507445-Page-27.png)
![Printing images directly from a digital camera orother device [BIP]If you have a printer that supports BIP (Basic Imaging Profile), you can send imagesdirectly to a printer to be printed out, without having to perform any special set-upprocedure.Printing image files on a printer (using icons)Printing image files on a printer (by right-clicking the mouse)Note• Below is a list of file types (extensions) of images that can be printed out directly.oBitmap (*.bmp)oJPEG (*.jpg; *.jpeg)oPNG (*.png)ProcedurePrinting image files on a printer (using icons)1. Turn on the printer2. ClickontheBluetoothInformation Exchanger icon on the DesktopNoteoAlternatively, open Explorer and click on the Bluetooth InformationExchanger folder for the same result.](https://usermanual.wiki/ASUSTeK-Computer/UGPZ5.Users-Manual-3/User-Guide-507445-Page-29.png)
![The [Bluetooth Information Exchanger] window will appear.3. Double-click on the [Image Transfer] iconA list of devices will appear in the [Image Transfer] window.](https://usermanual.wiki/ASUSTeK-Computer/UGPZ5.Users-Manual-3/User-Guide-507445-Page-30.png)
![NoteoIf your desired printer does not appear in the list, please confirm that theprinter has been turned on, and then click on [Bluetooth][SearchDevices]A device search will be performed.4. Drag and drop the file to be sent on top of the icon of the destination printerThe file will be sent to the printer.If the file has been sent to the printer successfully, the message below will appear,and the image will be printed out. Please click on the [OK] button.The message below will appear if the file transmission was unsuccessful. Pleaseclick on the [OK] button to close the message, and repeat the printing procedure.](https://usermanual.wiki/ASUSTeK-Computer/UGPZ5.Users-Manual-3/User-Guide-507445-Page-31.png)
![NoteoIf the printer does not support the BIP profile, the message below willappear.Printing image files to a printer (by right-clicking the mouse)1. Turn on the printer2. Right-click on the file to be sent, and then click on the destination printerunder [to Bluetooth]](https://usermanual.wiki/ASUSTeK-Computer/UGPZ5.Users-Manual-3/User-Guide-507445-Page-32.png)
![NoteoIf your desired device does not appear in the list, please confirm that thedevice has been turned on, and then click on [to Bluetooth] [SearchOther Devices]Once the device has been detected, the message below will appear. Pleaseselect the destination device, and click on the [Send] button.A window indicating that the file is being sent to the printer will appear.If the file has been sent to the printer successfully, the message below will appear,and the image will be printed out. Please click on the [OK] button.The message below will appear if the file transmission was unsuccessful. Please](https://usermanual.wiki/ASUSTeK-Computer/UGPZ5.Users-Manual-3/User-Guide-507445-Page-33.png)
![click on the [OK] button to close the message, and repeat the printing procedure.NoteoIf the printer does not support the BIP profile, the message below willappear.](https://usermanual.wiki/ASUSTeK-Computer/UGPZ5.Users-Manual-3/User-Guide-507445-Page-34.png)
![Printing business card data [OPP]If you have a printer that supports OPP (Object Push Profile), you can directly sendbusiness card data that conforms to the "vCard" standard to a printer and print it out.Printing business card data (using icons)Printing business card data (by right-clicking the mouse)ProcedurePrinting business card data (using icons)1. Turn on the printer2. ClickontheBluetoothInformation Exchanger icon on the DesktopNoteoAlternatively, open Explorer and click on the Bluetooth InformationExchanger folder for the same result.](https://usermanual.wiki/ASUSTeK-Computer/UGPZ5.Users-Manual-3/User-Guide-507445-Page-35.png)
![The [Bluetooth Information Exchanger] window will appear.3. Double-click on the [Object Push] iconA list of devices will appear in the [Object Push] window.](https://usermanual.wiki/ASUSTeK-Computer/UGPZ5.Users-Manual-3/User-Guide-507445-Page-36.png)
![Here, the image will be sent to the target printer.NoteoIf your desired printer does not appear in the list, please confirm that theprinter has been turned on, and then click on [Bluetooth][SearchDevices]A device search will be performed.4. Drag and drop the business card data to be sent on top of the icon of thedestination printer](https://usermanual.wiki/ASUSTeK-Computer/UGPZ5.Users-Manual-3/User-Guide-507445-Page-37.png)
![The business card will be sent to the printer.If the business card has been sent to the printer successfully, the message belowwill appear, and the image will be printed out. Please click on the [OK] button.The message below will appear if the business card transmission wasunsuccessful. Please click on the [OK] button to close the message, and repeat theprinting procedure.](https://usermanual.wiki/ASUSTeK-Computer/UGPZ5.Users-Manual-3/User-Guide-507445-Page-38.png)
![Printing business card data (by right-clicking the mouse)1. Turn on the printer2. Right-clickonthebusinesscarddatatobesent,andthenclickonthedestination printer under [to Bluetooth]NoteoIf your desired device does not appear in the list, please confirm that thedevice has been turned on, and then click on [to Bluetooth] [SearchOther Devices]Once the device has been detected, the message below will appear. Pleaseselect the destination device, and click on the [Send] button.](https://usermanual.wiki/ASUSTeK-Computer/UGPZ5.Users-Manual-3/User-Guide-507445-Page-39.png)
![The business card will be sent to the printer.If the business card has been sent to the printer successfully, the message belowwill appear, and the image will be printed out. Please click on the [OK] button.The message below will appear if the business card transmission wasunsuccessful. Please click on the [OK] button to close the message, and repeat theprinting procedure.](https://usermanual.wiki/ASUSTeK-Computer/UGPZ5.Users-Manual-3/User-Guide-507445-Page-40.png)