ASUSTeK Computer UGPZ5 Bluetooth Module User Manual UserMan MSQUGPZ5
ASUSTeK Computer Inc Bluetooth Module UserMan MSQUGPZ5
UserManual.wiki
>
ASUSTeK Computer
>
UGPZ5 User Manual
>
Users Manual 2
Contents
1.
Users Manual 6 rev
2.
Users Manual 1
3.
Users Manual 2
4.
Users Manual 3
5.
Users Manual 4
6.
Users Manual 5
Users Manual 2
Navigation menu
Upload a User Manual
Namespaces
Wiki Guide
HTML
PDF
Info
Views
User Manual
Discussion / Help
Navigation
![Certain modems require you to configure initialization commands separately.Please click on the [Additional initialization Command Settings] button, enter theinitialization commands in the following window, and then click on the [OK]button.NoteoPlease refer to the modem or mobile phone instruction manual for furtherdetails on the initialization commands.7. Enter the connection name (optional), telephone number (of your provider'saccess point), user name and password (as issued by your provider), and thenclick on the [Finish] button.](https://usermanual.wiki/ASUSTeK-Computer/UGPZ5.Users-Manual-2/User-Guide-507443-Page-1.png)
![ImportantoThe sample entries shown in the window are provided solely for purposeof explanation. Please use your own telephone number, ID and passwordaccording to the arrangement with your provider.The settings will be registered, and an icon will appear in the [Bluetooth Settings]window.Connecting to the InternetYou can connect to the Internet by following the procedure below if the connectiondestination registered when you configured the wireless modem has been set as thedefault connection destination.1. Start your browser, e-mail application or other applicationImportantoPlease enter the e-mail settings separately if you are going to use e-mail(the set-up method will vary with the application).](https://usermanual.wiki/ASUSTeK-Computer/UGPZ5.Users-Manual-2/User-Guide-507443-Page-2.png)
![2. Enter the URL of the Web page you wish to display and then press the[Enter] key, or use the e-mail tool to send/receive items or perform otheractivities.The [Dial-up Connection] window will appear.3. Click on the [Connect] buttonImportantoA connection will be automatically established with the modem station ifCOM Auto Connect is available. If COM Auto Connect is not available,please manually connect to the modem station.The following message will appear once you have connected to the Internet.4. End the connectionThe window below will appear if you double-click on the icon in the task bar.](https://usermanual.wiki/ASUSTeK-Computer/UGPZ5.Users-Manual-2/User-Guide-507443-Page-3.png)
![Please click on the [Disconnect] button when you want to disconnect from theInternet.Alternatively, please right-click on the icon,andthenclickon[Disconnect].Note• You can start an application to make an automatic connection to the Internet, butyou can also make a manual connection using the connection destination icon.The procedure is described below.1. From the [Bluetooth Settings] window, right-click on the connectiondestination icon, and then click on [Connect] from the menu that appears](https://usermanual.wiki/ASUSTeK-Computer/UGPZ5.Users-Manual-2/User-Guide-507443-Page-4.png)

![You will be able to browse Web pages using your browser and send and receivee-mail.ImportantoPlease enter the e-mail settings separately if you are going to use e-mail(the set-up method will vary with the application).2. End the connectionRight-click on the icon, and then click [Disconnect] to end the connection.The following message will appear. Click on the [Yes] button.When the icon appears as shown below, the connection will have ended.](https://usermanual.wiki/ASUSTeK-Computer/UGPZ5.Users-Manual-2/User-Guide-507443-Page-6.png)
![Connecting to the Internet using a mobile telephone[DUN]This section describes how to connect to the Internet via a telephone line, using a mobiletelephone.Configuring a mobile telephone for use as a modemConnecting to the InternetImportant• In order to connect to the Internet, you must have already signed up with aprovider and obtained a connection ID and password. Please ensure you haveconfirmed the ID, password and telephone number of your provider's access pointbefore you begin the set-up process.• A Bluetooth passkey (PIN code) is required for you to connect to the mobiletelephone. Please make a note of your Bluetooth passkey before you start the set-up process.Configuring a mobile telephone for use as a modemProcedure1. Turn on the mobile telephone, and set it to be connectable via BluetoothNoteoPlease refer to the mobile telephone instruction manual for information onhow to operate the device.](https://usermanual.wiki/ASUSTeK-Computer/UGPZ5.Users-Manual-2/User-Guide-507443-Page-7.png)
![2. Right-clickontheBluetoothiconinthetasktray,andthenclickon[AddNew Connection]NoteoAlternatively, click [Start][All Programs][Bluetooth][BluetoothSettings], and then click on [New Connection] from the active [BluetoothSettings] window.The [Add New Connection Wizard (Welcome to the Add New ConnectionWizard)] window will appear.3. Confirm that [Express Mode] has been selected, and then click on the [Next]buttonThe [Add New Connection Wizard (Searching for Bluetooth devices)] window](https://usermanual.wiki/ASUSTeK-Computer/UGPZ5.Users-Manual-2/User-Guide-507443-Page-8.png)
![will appear.4. Select the device name of the mobile telephone from [Device List], and thenclick on the [Next] buttonThe [Add New Connection Wizard (Searching for Services)] window will appear.](https://usermanual.wiki/ASUSTeK-Computer/UGPZ5.Users-Manual-2/User-Guide-507443-Page-9.png)
![Once a service has been detected successfully, connection to the device and COMport creation will be performed automatically, after which the [Add NewConnection Wizard (Modem Settings)] window will appear.5. If you are connecting to a mobile telephone for the first time, enter thepasskey for the wireless modem station under [Bluetooth Passkey (PINcode)],andthenclickonthe[OK]buttonOnce the program has finished searching for the devices, the [Add NewConnection Wizard (Device Selection)] window will appear.6. Click on the [Next] button](https://usermanual.wiki/ASUSTeK-Computer/UGPZ5.Users-Manual-2/User-Guide-507443-Page-10.png)
![Certain modems require you to configure initialization commands separately.Please click on the [Additional Initialization Command Settings] button, enter theinitialization commands in the following window, and then click on the [OK]button.NoteoPlease refer to the modem or mobile phone instruction manual for furtherdetails on the initialization commands.7. Enter the connection name (optional), telephone number (of your provider'saccess point), user name and password (as issued by your provider), and thenclick on the [Finish] button.](https://usermanual.wiki/ASUSTeK-Computer/UGPZ5.Users-Manual-2/User-Guide-507443-Page-11.png)
![ImportantoThe sample entries shown in the window are provided solely for purposeof explanation. Please use your own telephone number, ID and passwordaccording to the arrangement with your provider.The settings will be registered, and an icon will appear in the [Bluetooth Settings]window.Connecting to the InternetYou can connect to the Internet by following the procedure below if the connectiondestination registered when you configured the mobile telephone has been set as thedefault connection destination.1. Start your browser, e-mail application or other applicationImportantoPlease enter the e-mail settings separately if you are going to use e-mail(the set-up method will vary with the application).](https://usermanual.wiki/ASUSTeK-Computer/UGPZ5.Users-Manual-2/User-Guide-507443-Page-12.png)
![2. Enter the URL of the Web page you wish to display and then press the[Enter] key, or use the e-mail tool to send/receive items or perform otheractivities.The [Dial-up Connection] window will appear.3. Click on the [Connect] buttonImportantoA connection will be automatically established with the mobile telephoneif COM Auto Connect is available. If COM Auto Connect is not available,please manually connect to the mobile telephone.The following message will appear once you have connected to the Internet.4. End the connectionThe window below will appear if you double-click on the icon in the task bar.](https://usermanual.wiki/ASUSTeK-Computer/UGPZ5.Users-Manual-2/User-Guide-507443-Page-13.png)
![Please click on the [Disconnect] button when you want to disconnect from theInternet.Alternatively, please right-click on the icon,andthenclickon[Disconnect].Note• You can start an application to make an automatic connection to the Internet, butyou can also make a manual connection using the connection destination icon.The procedure is described below.1. From the [Bluetooth Settings] window, right-click on the connectiondestination icon, and then click on [Connect] from the menu that appears](https://usermanual.wiki/ASUSTeK-Computer/UGPZ5.Users-Manual-2/User-Guide-507443-Page-14.png)

![You will be able to browse Web pages using your browser and send and receivee-mail.ImportantoPlease enter the e-mail settings separately if you are going to use e-mail(the set-up method will vary with the application).2. End the connectionRight-clickontheicon,andthenclick [Disconnect] to end a connection.The following message will appear. Click on the [Yes] button.When the icon appears as shown below, the connection will have been ended.](https://usermanual.wiki/ASUSTeK-Computer/UGPZ5.Users-Manual-2/User-Guide-507443-Page-16.png)
![Connecting to a LAN using an access point (PAN)[PAN]This section describes how to connect to a network (for example, a company LAN or apersonal home network) using a PAN profile-compatible access point.Please refer to "Using an access point (LAP) to connect to a LAN" if you are using aLAP profile-compatible access point.Setting up the access pointConnecting to a LAN (PAN)Important• The access point must be started and a normal connection already established tothe network before the access point is set up. Please refer to the access pointinstruction manual for information on how to set up the access point.• A Bluetooth passkey (PIN code) is required for you to connect to the access point.Please make a note of your Bluetooth passkey before you start the set-up process.Setting up the access pointProcedure1. Turn on the access point, and confirm that a connection has been establishedwith the network2. Right-clicktheBluetoothiconinthetasktray,andthenclickon[AddNewConnection]](https://usermanual.wiki/ASUSTeK-Computer/UGPZ5.Users-Manual-2/User-Guide-507443-Page-17.png)
![NoteoAlternatively, click [Start][All Programs][Bluetooth][BluetoothSettings], and then click on [New Connection] from the active [BluetoothSettings] window.The [Add New Connection Wizard (Welcome to the Add New ConnectionWizard)] window will appear.3. Confirm that [Express Mode] has been selected, and then click on the [Next]buttonThe [Add New Connection Wizard (Searching for Bluetooth devices)]window will appear.](https://usermanual.wiki/ASUSTeK-Computer/UGPZ5.Users-Manual-2/User-Guide-507443-Page-18.png)
![Once the program has finished searching for the devices, the [Add NewConnection Wizard (Device Selection)] window will appear.4. Select the device name of the access point from [Device List], and then clickon the [Next] buttonThe [Add New Connection Wizard (Searching for Services)] window will appear.](https://usermanual.wiki/ASUSTeK-Computer/UGPZ5.Users-Manual-2/User-Guide-507443-Page-19.png)
![You will be asked for the Bluetooth passkey in the window that appears.5. Enter the passkey under [Bluetooth Passkey (PIN code)], and then click onthe [OK] buttonService detection and COM port creation will be performed automatically.The [Add New Connection Wizard (Connection Name Settings)] window willappear.6. Enter the type and name of the icon displayed after registration, and thenclick on the [Next] buttonPlease click on the [Next] button if you are satisfied with the settings.](https://usermanual.wiki/ASUSTeK-Computer/UGPZ5.Users-Manual-2/User-Guide-507443-Page-20.png)
![The [Add New Connection Wizard (Completing the Add New ConnectionWizard)] window will appear.7. Click on the [Finish] buttonThe access point icon will be registered in the [Bluetooth Settings] window.This will complete the access point set-up process."Connecting to a LAN (PAN)"](https://usermanual.wiki/ASUSTeK-Computer/UGPZ5.Users-Manual-2/User-Guide-507443-Page-21.png)
![Connecting to a LAN (PAN)Procedure1. Right-clickontheconnectioniconinthe[BluetoothSettings]window,andthen click on [Connect]You will be asked for the Bluetooth passkey in the window that appears.2. Enter the passkey under [Bluetooth Passkey (PIN code)], and then click onthe [OK] buttonA connection will be initiated.](https://usermanual.wiki/ASUSTeK-Computer/UGPZ5.Users-Manual-2/User-Guide-507443-Page-22.png)
![Once you have connected to the network, Internet Explorer will startautomatically, and you will be able to exchange data with other computers on thenetwork.NoteoPlease follow the procedure below if you need to set up a proxy server toconnect to the Internet (the following procedure is not necessary if the PCyou are going to use has already been set up as a proxy server).1 Select [Internet Options...] from the [Tools] menu in InternetExplorerThe [Internet Options] window will appear.2 Click on the [Connections] tab, and then click on the [LANSettings...] button3 Enter the IP address and port number of the proxy server under[Proxy Server], and then click on the [OK] button](https://usermanual.wiki/ASUSTeK-Computer/UGPZ5.Users-Manual-2/User-Guide-507443-Page-23.png)
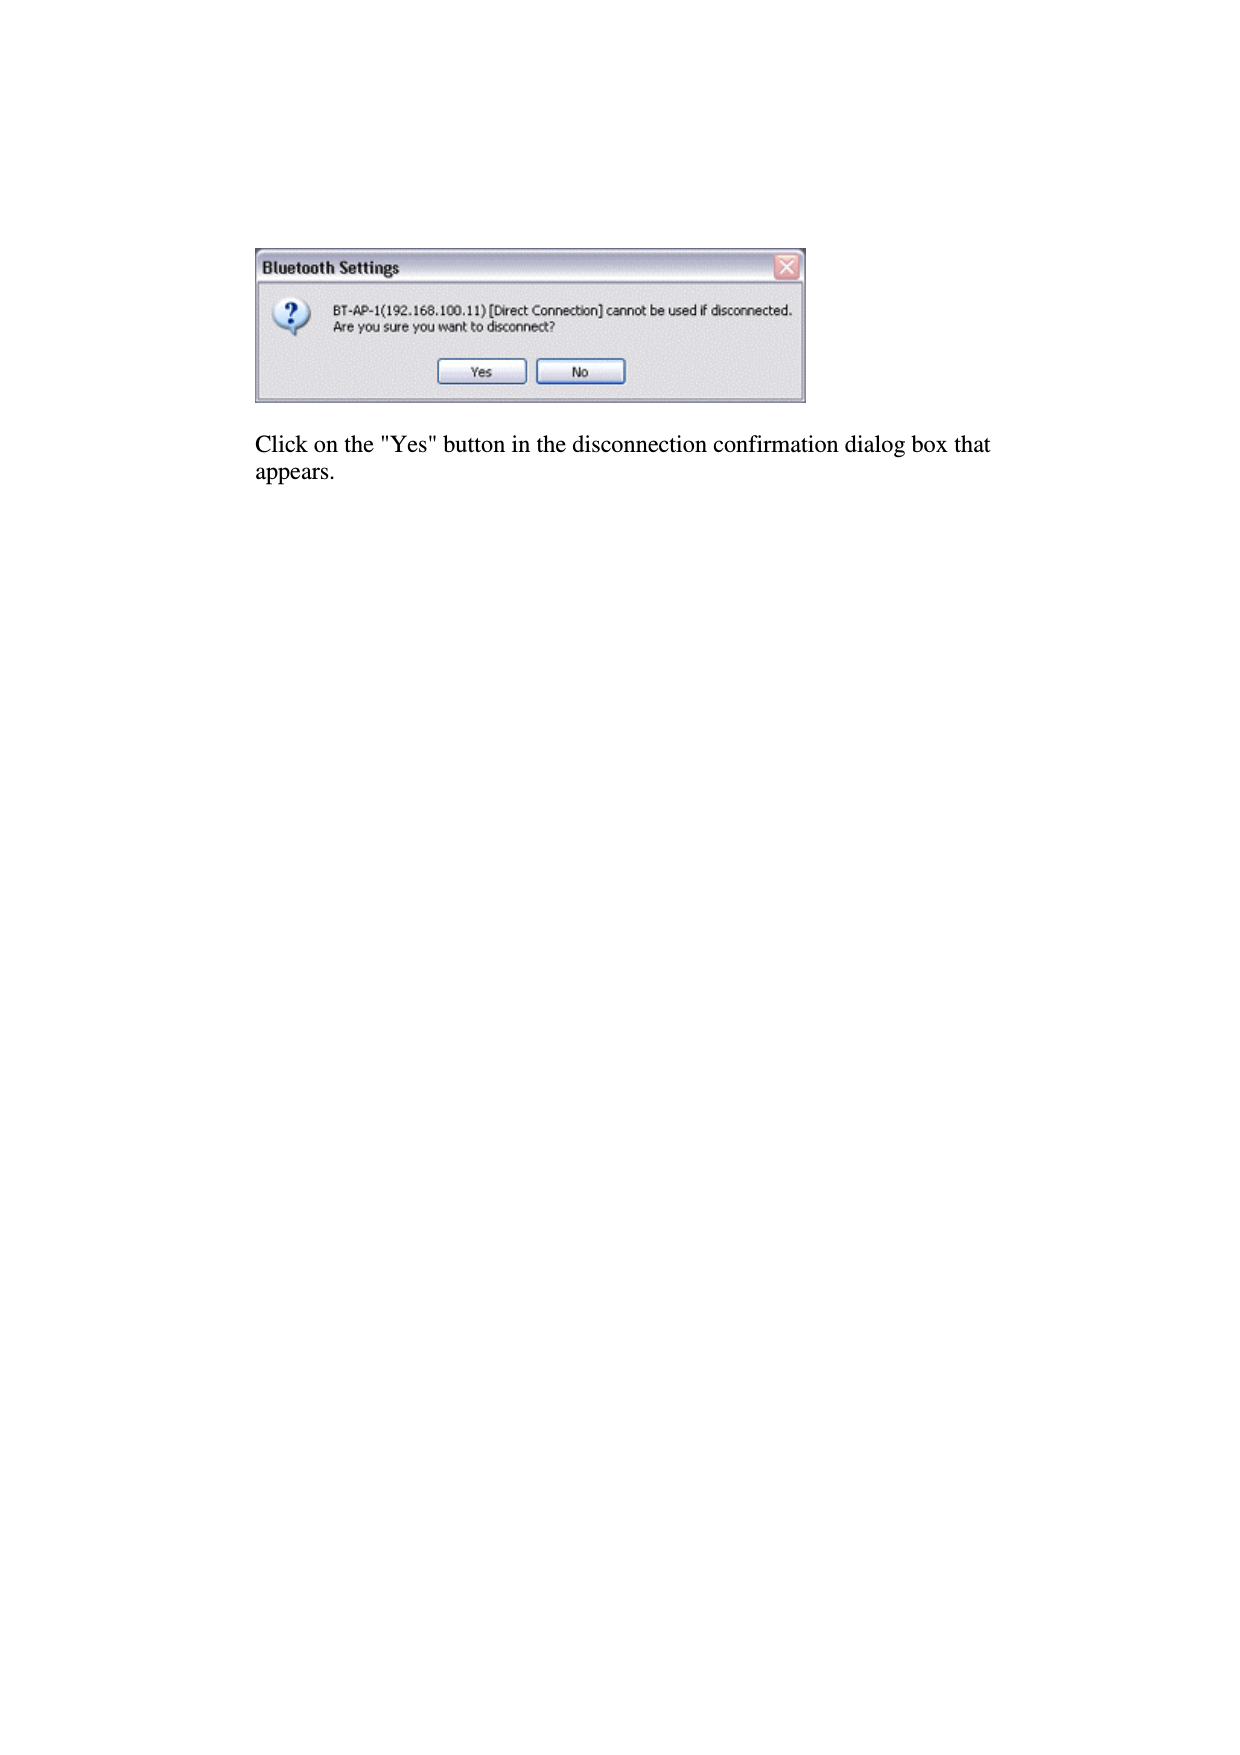
![3. End the connectionRight-click either on the connection icon under the [Bluetooth Settings] windowor on the iconinthetasktray,andthenclickon[Disconnect].Click on the "Yes" button in the disconnection confirmation dialog box thatappears.](https://usermanual.wiki/ASUSTeK-Computer/UGPZ5.Users-Manual-2/User-Guide-507443-Page-24.png)
![Connecting to a LAN using an access point (LAP)[LAP]This section describes how to connect to a network (for example, a company LAN or apersonal home network) using a LAP profile-compatible access point.Please refer to "Using an access point (PAN) to connect to a LAN if you are using a PANprofile-compatible access point.Setting up the access pointConnecting to a LAN (LAP)Important• The access point must have been started and a normal connection alreadyestablished to the network before the access point is set up. Please refer to theaccess point instruction manual for information on how to set up the access point.• A Bluetooth passkey (PIN code) is required for you to connect to the access point.Please make a note of your Bluetooth passkey before you start the set-up process.Setting up the access pointProcedure1. Turn on the access point, and confirm that a connection has been establishedwith the network2. Right-clicktheBluetoothiconinthetasktray,andthenclickon[AddNewConnection]](https://usermanual.wiki/ASUSTeK-Computer/UGPZ5.Users-Manual-2/User-Guide-507443-Page-25.png)
![NoteoAlternatively, click [Start][All Programs][Bluetooth][BluetoothSettings], and then click on [New Connection] from the active [BluetoothSettings] window.The [Add New Connection Wizard (Welcome to the Add New ConnectionWizard)] window will appear.3. Confirm that [Express Mode] has been selected, and then click on the [Next]buttonThe [Add New Connection Wizard (Searching for Bluetooth devices)]window will appear.](https://usermanual.wiki/ASUSTeK-Computer/UGPZ5.Users-Manual-2/User-Guide-507443-Page-26.png)
![Once the program has finished searching for the devices, the [Add NewConnection Wizard (Device Selection)] window will appear.4. Select the device name of the access point from [Device List], and then clickon the [Next] buttonThe [Add New Connection Wizard (Searching for Services)] window will appear.](https://usermanual.wiki/ASUSTeK-Computer/UGPZ5.Users-Manual-2/User-Guide-507443-Page-27.png)
![You will be asked for the Bluetooth passkey in the window that appears.5. Enter the passkey under [Bluetooth Passkey (PIN code)], and then click onthe [OK] buttonService detection and COM port creation will be performed automatically.The [Add New Connection Wizard (Create Connection Destination)] window willappear.6. Enter the connection name, user name and password, then click on the [Next]button](https://usermanual.wiki/ASUSTeK-Computer/UGPZ5.Users-Manual-2/User-Guide-507443-Page-28.png)
![NoteoThe user name and password are entered here to allow you to connect tothe access point.The [Add New Connection Wizard (Confirm Dial-up Settings)] window willappear.7. Click on the [Confirm Settings] button](https://usermanual.wiki/ASUSTeK-Computer/UGPZ5.Users-Manual-2/User-Guide-507443-Page-29.png)
![The [Internet Options] window will appear.8. Configure the connection method, and then click on the [OK] buttonSet the connection destination used for the LAN connection set up in (6) above asthe default connection destination, and then select "Always dial my defaultconnection."9. Click on the [Next] button](https://usermanual.wiki/ASUSTeK-Computer/UGPZ5.Users-Manual-2/User-Guide-507443-Page-30.png)
![The [Add New Connection Wizard (Connection Name Settings)] window willappear.10. Enter the type and name of the icon displayed after registration, and thenclick on the [Next] buttonPlease click on the [Next] button if you are satisfied with the settings.The [Add New Connection Wizard (Completing the Add New ConnectionWizard)] window will appear.](https://usermanual.wiki/ASUSTeK-Computer/UGPZ5.Users-Manual-2/User-Guide-507443-Page-31.png)
![11. Click on the [Finish] buttonThe access point icon will be registered in the [Bluetooth Settings] window.This will complete the access point set-up process."Connecting to a LAN (LAP)"](https://usermanual.wiki/ASUSTeK-Computer/UGPZ5.Users-Manual-2/User-Guide-507443-Page-32.png)
![Connecting to a LAN (LAP)Procedure1. Right-clickontheconnectioniconinthe[BluetoothSettings]window,andthen click on [Connect]The [Dial-up Connection] window will appear.2. Confirm that "Direct connection" has been selected under [ConnectionDestination], and then click on the [Connect] button](https://usermanual.wiki/ASUSTeK-Computer/UGPZ5.Users-Manual-2/User-Guide-507443-Page-33.png)
![A connection will be initiated.NoteoThis is an example of what happens when you use "Direct connection" asa connection name under "Connect to access point." If a name differentfrom the connection name is used, that name will appear under[Connection Destination].oPlease simply click on [Settings] if no user name or password have beenentered (i.e., if those fields have been left blank)oPlease change the connection destination if a different connection name(for a dial-up connection) appears in [Connection Destination].Related topic"Changing the default connection destination"Once you connect to the network, Internet Explorer will start automatically, andyou will be able to exchange data with other computers on the network.NoteoPlease follow the procedure below if you need to set up a proxy server toconnect to the Internet (the following procedure is not necessary if the PCyou are going to use has already been set up as a proxy server).1 Select [Internet Options...] from the [Tools] menu in InternetExplorerThe [Internet Options] window will appear.2 Click on the [Connections] tab, and then click on the [Settings...]button](https://usermanual.wiki/ASUSTeK-Computer/UGPZ5.Users-Manual-2/User-Guide-507443-Page-34.png)
![3 Enter the IP address and port number of the proxy server under[Proxy Server], and then click on the [OK] button3. End the connectionRight-click either on the connection icon under the [Bluetooth Settings] windowor on the iconinthetasktray,andthenclickon[Disconnect].](https://usermanual.wiki/ASUSTeK-Computer/UGPZ5.Users-Manual-2/User-Guide-507443-Page-35.png)
![Using a modem station for fax transmissions [FAX]This section describes how to send a fax using a Bluetooth wireless modem station.Setting up the modem stationInstalling a modemSetting fax informationSending a faxReceiving a faxImportant• Please refer to the modem station instruction manual for information on how toconnect the station to a telephone line.• Please ensure that any drivers used to connect the PC to the modem have beeninstalled.• A Bluetooth passkey (PIN code) is required for you to connect to the modemstation. Please make a note of your Bluetooth passkey before you start the set-upprocess.• A fax application is required for you to be able to send and receive faxes. Thedescription below is based on a example using Microsoft Fax, which is installedwith Windows XP as standard.If you are going to use a commercially available fax application, then please referto the manual that came with the application for information on how to send andreceive faxes.Setting up the modem stationSet up and register the modem station as a fax service.Procedure1. Turn on the wireless modem station](https://usermanual.wiki/ASUSTeK-Computer/UGPZ5.Users-Manual-2/User-Guide-507443-Page-37.png)
![2. Right-clickontheBluetoothiconinthetasktray,andthenclickon[AddNew Connection]NoteoAlternatively, click [Start][All Programs][Bluetooth][BluetoothSettings], and then click on [New Connection] from the active [BluetoothSettings] window.The [Add New Connection Wizard (Welcome to the Add New ConnectionWizard)] window will appear.3. Select [Custom Mode], and then click on the [Next] buttonThe [Add New Connection Wizard (Searching for Bluetooth devices)] windowwill appear.](https://usermanual.wiki/ASUSTeK-Computer/UGPZ5.Users-Manual-2/User-Guide-507443-Page-38.png)
![Once the program has finished searching for the devices, the [Add NewConnection Wizard (Select Device)] window will appear.4. Select the device name of the wireless modem station from [Device List], andthen click on the [Next] buttonThe [Add New Connection Wizard (Searching for Services)] window will appear.](https://usermanual.wiki/ASUSTeK-Computer/UGPZ5.Users-Manual-2/User-Guide-507443-Page-39.png)
![5. If you are connecting to the wireless modem station for the first time, enterthe passkey for the device from the [Bluetooth Passkey (PIN Code)] window,andthenclickonthe[OK]buttonOnce the program has finished searching for the services, the [Add NewConnection Wizard (Select Service)] window will appear.](https://usermanual.wiki/ASUSTeK-Computer/UGPZ5.Users-Manual-2/User-Guide-507443-Page-40.png)
![6. Select "Fax" under [Select Service], and then click on the [Next] buttonThe [Add New Connection Wizard (Connecting to Remote Device)] screen willappear.The COM port and modem registration process will then be automaticallyperformed.Once the COM port and modem (standard 33600 bps type) registration iscomplete,the [Add New Connection Wizard (Setting Connection Name)] screen willappear.](https://usermanual.wiki/ASUSTeK-Computer/UGPZ5.Users-Manual-2/User-Guide-507443-Page-41.png)
![7. Configure the type and name of the icon to appear after registration,and click on the [Next] button.Please click only on the [Next] button once you are satisfied with theconfiguration.The [Add New Connection Wizard (Completing the Add New ConnectionWizard)] screen will appear.8. Click on the [Finish] buttonThe settings will be registered, and the icon will appear on the [BluetoothSettings] screen.Setting FAX informationConfigure send/receive settings and register fax information.Procedure1. Select [Start][Control Panel], and then double-click on the [Printers andOther Hardware] iconNote](https://usermanual.wiki/ASUSTeK-Computer/UGPZ5.Users-Manual-2/User-Guide-507443-Page-42.png)
![oIf the control panel is displayed in "Classic view", and you use Windows2000, please start from Step (2).2. Double-click on the [Printers and Faxes] iconThe [Printers & Faxes] window will appear.3. Click on "Install a local fax printer" in the [Printers and Faxes] windowA window showing installed programs will appear, and a Fax icon will have beencreated in the [Printers and Faxes] screen.4. Click on "Send a fax" under "Printer Tasks" on the left side of the window](https://usermanual.wiki/ASUSTeK-Computer/UGPZ5.Users-Manual-2/User-Guide-507443-Page-43.png)
![If you have not yet configured a fax device, the [Fax Configuration Wizard]window will appear. In the window you can enter settings pertaining to the sender(yourself).NoteoIf the fax configuration information has already been registered, the [SendFax Wizard] window, which can be viewed under "Sending a fax" below,will appear instead of the [Fax Configuration Wizard] window.](https://usermanual.wiki/ASUSTeK-Computer/UGPZ5.Users-Manual-2/User-Guide-507443-Page-44.png)
![5. Enter the sender information, and click on the [Next] buttonNoteoThe sender information that you configure here will be automaticallyappended as header information when you send a fax.The [Fax Configuration Wizard (Select Device for Sending or Receiving Faxes)]window will appear.6. Select a device to be used for fax transmissions, enable the device for sendingor receiving, and then click on the [Next] button](https://usermanual.wiki/ASUSTeK-Computer/UGPZ5.Users-Manual-2/User-Guide-507443-Page-45.png)
![NoteoIf [Enable Receive] is selected, the device will be on standby for receivingfaxes even if it is not sending or receiving anything, and therefore will bein continuous connection to the wireless modem (when COM AutoConnect is on).Please decide whether to select this option based on the desired objectiveand/or frequency of transmission.The [Fax Configuration Wizard (Transmitting Subscriber Identification (TSID))]window will appear.7. Click on the [Next] buttonIt is important that you do not change the transmitter subscriber identification.](https://usermanual.wiki/ASUSTeK-Computer/UGPZ5.Users-Manual-2/User-Guide-507443-Page-46.png)
![The [Fax Configuration Wizard (Completing the Fax Configuration Wizard)]window will appear.8. Click on the [Finish] buttonThe fax information will be have been registered, and the [Fax Console] windowwill appear.This will complete the fax set-up process.](https://usermanual.wiki/ASUSTeK-Computer/UGPZ5.Users-Manual-2/User-Guide-507443-Page-47.png)

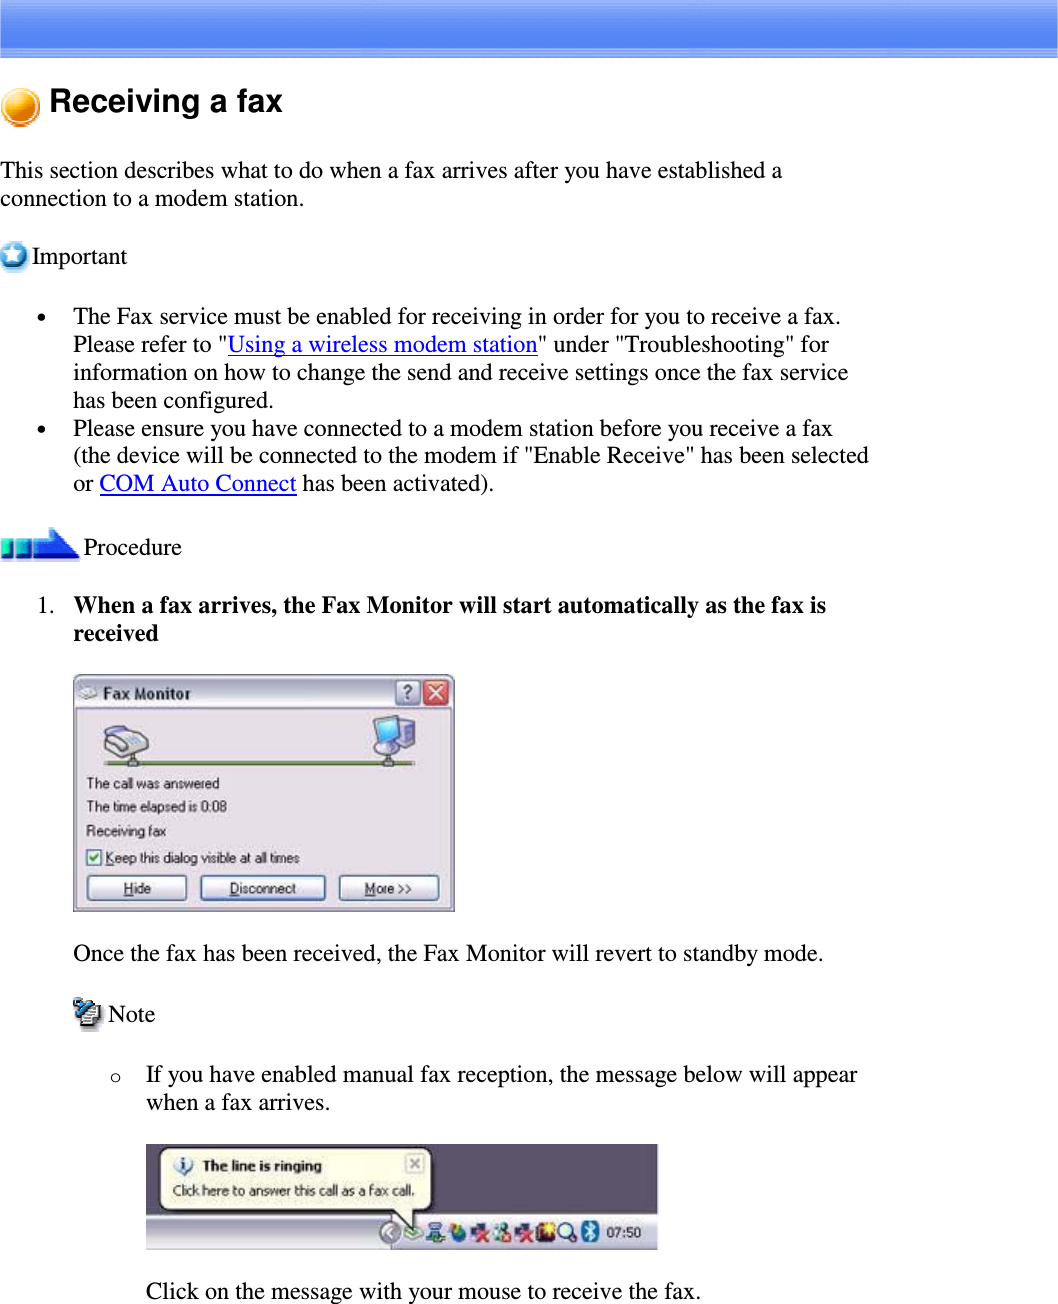
![2. Double-click on the [Fax] icon in the Control PanelThe [Fax Console] window will appear.3. In the [Fax Console] window, double-click on the fax that has arrivedAn image of the received fax will be displayed.Related topic: "Sending a fax"](https://usermanual.wiki/ASUSTeK-Computer/UGPZ5.Users-Manual-2/User-Guide-507443-Page-50.png)
![Sending a faxThis section describes how to send a fax from the Fax Console.Important• The Fax service must be enabled for sending in order for you to send a fax.Please refer to "Using a wireless modem station" under "Troubleshooting" forhow to change the send and receive settings once the service has been configured.Procedure1. Double-click on the [Fax] icon in the Control PanelThe [Fax Console] window will appear.2. In the [Fax Console] window, click [File][Send fax]The [Send Fax Wizard (Starting the Send Fax Wizard)] window will appear.](https://usermanual.wiki/ASUSTeK-Computer/UGPZ5.Users-Manual-2/User-Guide-507443-Page-51.png)
![3. Click on the [Next] buttonThe [Send Fax Wizard (Recipient Information)] window will appear.4. Enter the name and fax number of the destination party, and then click onthe [Next] buttonThe [Send Fax Wizard (Preparing the Cover Page)] window will appear.](https://usermanual.wiki/ASUSTeK-Computer/UGPZ5.Users-Manual-2/User-Guide-507443-Page-52.png)
![5. Specify the cover page template, subject line, and note (body text), and thenclick on the [Next] buttonThe [Send Fax Wizard (Schedule)] window will appear.6. If you wish to send the fax immediately,select"Now",andthenclickonthe[Next] buttonThe [Send Fax Wizard (Completing the Send Fax Wizard)] window will appear.](https://usermanual.wiki/ASUSTeK-Computer/UGPZ5.Users-Manual-2/User-Guide-507443-Page-53.png)
![7. Confirm the destination information and transmission details, and then clickon the [Finish] buttonThe software will automatically dial the number and send the fax.Once the fax has been sent, Fax Monitor will revert to standby mode.](https://usermanual.wiki/ASUSTeK-Computer/UGPZ5.Users-Manual-2/User-Guide-507443-Page-54.png)

![Setting COM Auto ConnectThe Auto Connect mode will normally be enabled when you set up a fax transmission (aconnection will automatically be established to the modem when you try to send a fax).If the fax transmission fails, the PC will automatically attempt to re-send the fax;however, if the Auto Connect mode has been enabled, transmission errors will repeatedlyappear if the PC cannot establish a Bluetooth connection to the modem relatively quickly.In such cases, please deactivate the Auto Connect mode as instructed below.Procedure1. In the [Bluetooth Settings] window, click on [File][COM Auto ConnectSettings]The [COM Auto Connect Settings] window will appear.](https://usermanual.wiki/ASUSTeK-Computer/UGPZ5.Users-Manual-2/User-Guide-507443-Page-56.png)
![2. Remove the check next to the port you use for faxing, and then click on the[OK] button.Please establish manual fax connections for future fax transmissions.](https://usermanual.wiki/ASUSTeK-Computer/UGPZ5.Users-Manual-2/User-Guide-507443-Page-57.png)
![Using a commercially available fax applicationCommercially available fax applications will not automatically start on receipt of a fax,even if you have specified that faxes should be received automatically.Please follow the instructions below to enable the application to start automatically onreceipt of a fax transmission.Procedure1. In the [Bluetooth Settings] window, right-click on the fax icon pertaining tothe connection destination, and then click on [Details]The detailed modem settings window will appear.2. Check [Start application when connected] under [Options]](https://usermanual.wiki/ASUSTeK-Computer/UGPZ5.Users-Manual-2/User-Guide-507443-Page-58.png)
![Clicking on the [Browse...] button will open the [Open File] window.Please select the executable file (*.exe) pertaining to the desired fax application,and then click on the [Open...] button.NoteoThe specified file will differ depending on your desired application. Forfurther information, please either refer to the application instructionmanual, or contact the relevant manufacturer.](https://usermanual.wiki/ASUSTeK-Computer/UGPZ5.Users-Manual-2/User-Guide-507443-Page-59.png)
![3. Click on the [OK] buttonWhen you next start Fax, the specified fax application will start automatically.](https://usermanual.wiki/ASUSTeK-Computer/UGPZ5.Users-Manual-2/User-Guide-507443-Page-60.png)