ASUSTeK Computer W5G00UGPZ50 NOTEBOOK P.C. BLUETOOTH DEVICE User Manual USERS MANUAL 1
ASUSTeK Computer Inc NOTEBOOK P.C. BLUETOOTH DEVICE USERS MANUAL 1
Contents
- 1. USERS MANUAL 1
- 2. USERS MANUAL 2
- 3. USERS MANUAL 3
- 4. USERS MANUAL 4
- 5. USERS MANUAL 5
USERS MANUAL 1
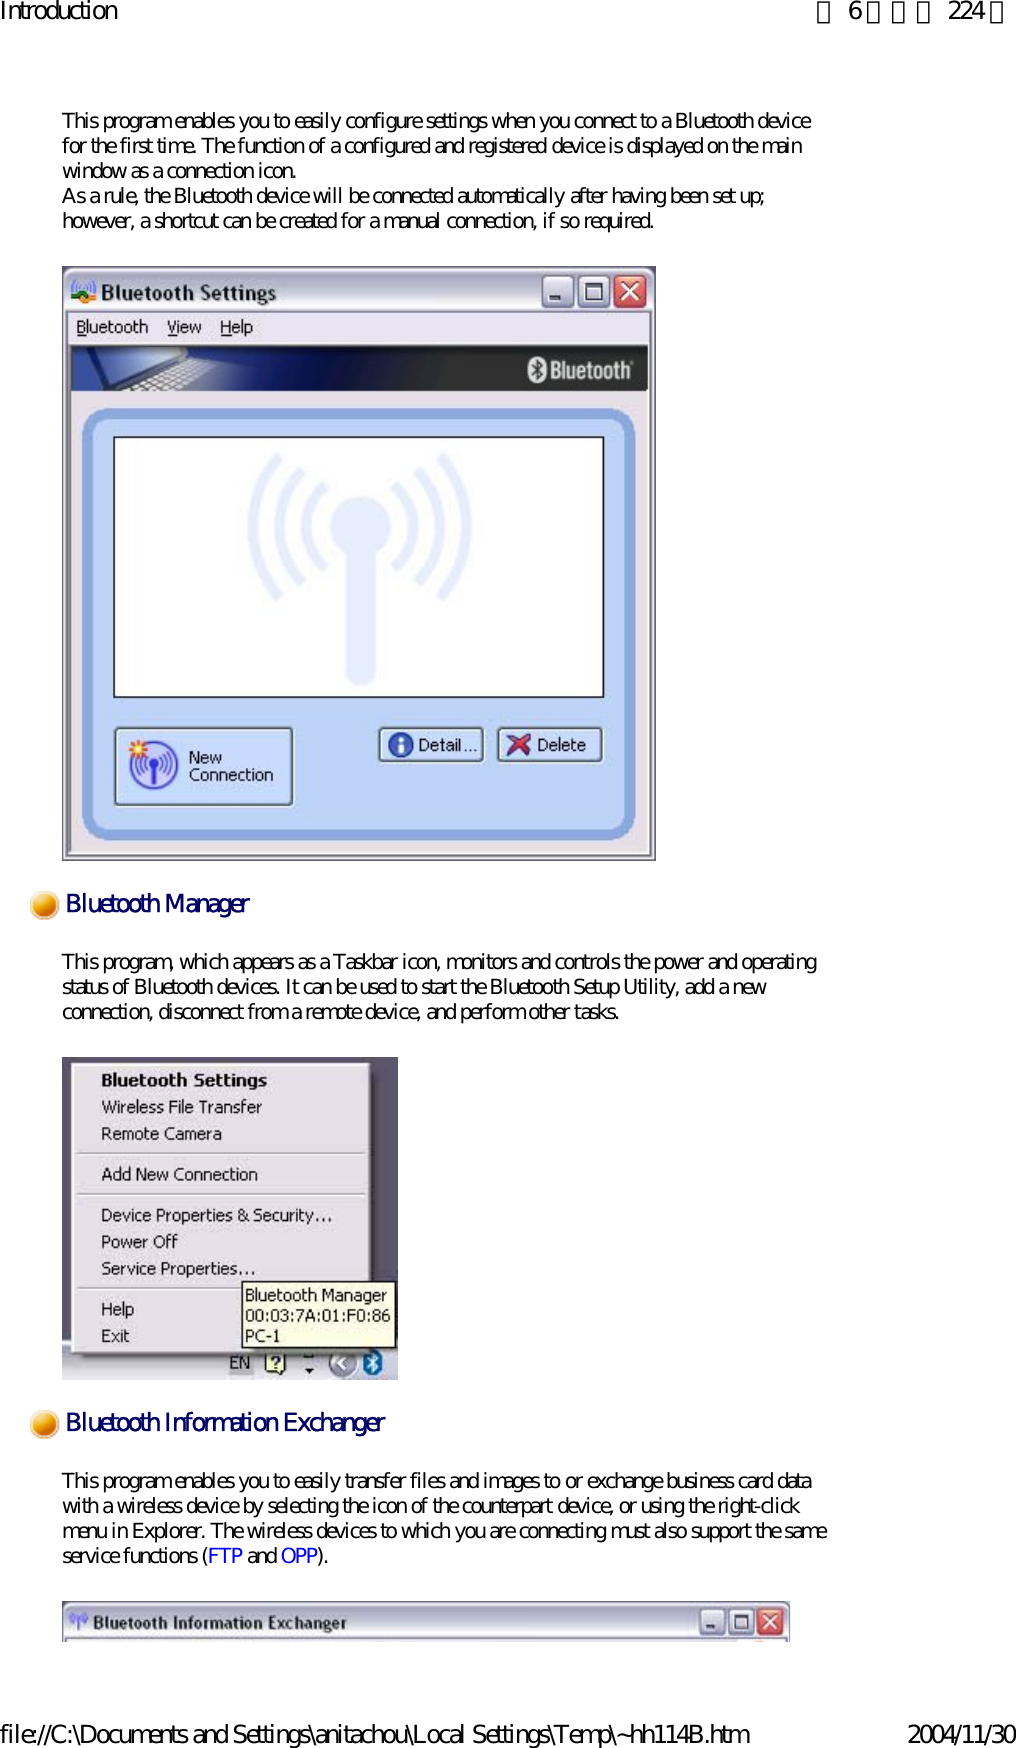
 2003, 2004 TOSHIBA Corporation All Rights ReservedBluetooth is a global standard telecommunications method that enables data to be exchanged wirelessly between personal computers, peripheral components, mobile telephones and other electronic devices.Data can be readily exchanged between Bluetooth devices if they have been registered as components able to communicate with each other. A maximum of seven Bluetooth devices may be connected together. By using Bluetooth to connect to a mouse, keyboard, modem, printer, or other device, you can do away with messy cabling and not have to be concerned about space restrictions, which will allow you to work more comfortably. NextIntroductionWhat is Bluetooth?](https://usermanual.wiki/ASUSTeK-Computer/W5G00UGPZ50.USERS-MANUAL-1/User-Guide-494440-Page-1.png)

![Introduction 第 10 頁,共 224 頁file://C:\Documents and Settings\anitachou\Local Settings\Temp\~hh114B.htm 2004/11/30The procedure below is used to set up Bluetooth devices using the Bluetooth Utility. zIt is assumed that the set-up is performed from the [Bluetooth Settings] window. NextNote: Enter Bluetooth passkey (PIN code), if required by the device.: During these stages of the set-up process, the Bluetooth device must be set to Connectability mode.* Simply turning the power on will activate Connectability mode in certain devices. Please refer to the device instruction manual for further details.Flow of operation](https://usermanual.wiki/ASUSTeK-Computer/W5G00UGPZ50.USERS-MANUAL-1/User-Guide-494440-Page-10.png)
![Introduction 第 11 頁,共 224 頁file://C:\Documents and Settings\anitachou\Local Settings\Temp\~hh114B.htm 2004/11/30Methods for registering new devices using the Bluetooth Utility shall now be described.A Bluetooth mouse shall be connected and set up using [Bluetooth Settings] as an example.[Bluetooth Settings] provides two set-up methods: "Express Mode" and "Custom Mode."zExpress Mode[Bluetooth Settings] will automatically detect and register services. If several services (profiles) are supported by the device, the service that has been set to the highest priority shall be selected and registered.Express Mode is normally recommended for device set-up.zCustom ModeAfter having been detected, the services supported by the device are displayed as a list, from which you can select the desired function(s).Custom Mode must be used to set up a device if, for example, you wish to use a modem station to send a fax (because in Express Mode, the DUN profile will be automatically selected since it has a higher priority than the FAX profile). The differences between setting up the same device (a Bluetooth mouse) using Express Mode and Custom Mode are described on the following pages.zExpress Mode Set-up zCustom Mode Set-upThe procedure for setting up the device using Express Mode shall now be described. 1. Click [Start]→[All Programs]→[Bluetooth]→[Bluetooth Settings].(Under Windows 2000, click [Start]→[Programs]→[Bluetooth]→[Bluetooth Settings].) {The same result can be achieved by right-clicking on the Bluetooth icon in the task tray and selecting [Bluetooth Settings] from the menu that appears.Starting Bluetooth SettingsProcedureNoteBasic settingsExpress Mode Set-up](https://usermanual.wiki/ASUSTeK-Computer/W5G00UGPZ50.USERS-MANUAL-1/User-Guide-494440-Page-11.png)
![Introduction 第 12 頁,共 224 頁file://C:\Documents and Settings\anitachou\Local Settings\Temp\~hh114B.htm 2004/11/30 The [Bluetooth Settings] window below will appear when other devices have already been registered.Please click the [New Connection] button to open the [Add New Connection Wizard] window. If no devices have been registered yet, please proceed directly to "Detecting Bluetooth Devices." (continued in "Detecting Bluetooth Devices"...) Next (...continued from previous step)Detecting Bluetooth devicesProcedure](https://usermanual.wiki/ASUSTeK-Computer/W5G00UGPZ50.USERS-MANUAL-1/User-Guide-494440-Page-12.png)
![Introduction 第 13 頁,共 224 頁file://C:\Documents and Settings\anitachou\Local Settings\Temp\~hh114B.htm 2004/11/30(pp)The [Add New Connection Wizard (Welcome to the Add New Connection Wizard)] window will appear.1. Switch the mouse power ON to make it connectable via Bluetooth.Please refer to the mouse instruction manual for details on this procedure.2. Confirm that [Express Mode] has been selected in the [Add New Connection Wizard (Welcome to the Add New Connection Wizard)] window, and click on the [Next] button.Searching for Bluetooth devices will start.When the mouse has been detected, the name and address of the device will appear in the [Add New Connection Wizard (Select Device)] window.](https://usermanual.wiki/ASUSTeK-Computer/W5G00UGPZ50.USERS-MANUAL-1/User-Guide-494440-Page-13.png)
![Introduction 第 14 頁,共 224 頁file://C:\Documents and Settings\anitachou\Local Settings\Temp\~hh114B.htm 2004/11/30 {If no device is found, please confirm that the device has been made connectable via Bluetooth, and click on the [Update] button.A further device search will be performed. (→ continued in [Detecting Services]...) NextNote (...continued from previous step)When the mouse has been detected, the name and address of the device will appear in the [Add New Connection Wizard (Select Device)] window.1. Select the mouse device name from [Device List] and click on the [Next] button.Detecting servicesProcedure](https://usermanual.wiki/ASUSTeK-Computer/W5G00UGPZ50.USERS-MANUAL-1/User-Guide-494440-Page-14.png)
![Introduction 第 15 頁,共 224 頁file://C:\Documents and Settings\anitachou\Local Settings\Temp\~hh114B.htm 2004/11/30Bluetooth device detection will commence. {If several services (profiles) are supported by the device, the service that has been set to the highest priority shall be automatically selected and set up in Express Mode.Please use Custom Mode if you wish to select desired services manually. {When a service has been detected, a window prompting you to enter the Bluetooth passkey (PIN code) may appear. Please enter the passkey and click on the [OK] button.Please refer to your device instruction manual for information on which passkey to use.{If you have not entered your Bluetooth passkey after a certain amount of time has Note](https://usermanual.wiki/ASUSTeK-Computer/W5G00UGPZ50.USERS-MANUAL-1/User-Guide-494440-Page-15.png)
![Introduction 第 16 頁,共 224 頁file://C:\Documents and Settings\anitachou\Local Settings\Temp\~hh114B.htm 2004/11/30passed, the connection process will be cancelled for security reasons. Please perform the passkey entry process again.A message will appear prompting you to prepare the device for connection.2. Click on the [OK] button {When the settings information has been registered, a window prompting you to enter your Bluetooth passkey (PIN code) may appear. Please enter your passkey and click on the [OK] button.Please refer to your device instruction manual for information on which passkey to use.{If you have not entered your Bluetooth passkey after a certain amount of time has passed, the connection process will be cancelled for security reasons. Please perform the passkey entry process again. The [Add New Connection Wizard (Connection Name Setup)] window will appear if a service has been properly detected. 3. Select the type and name of the icon to be displayed once the device has been registered, and click on the [Next] button.Note](https://usermanual.wiki/ASUSTeK-Computer/W5G00UGPZ50.USERS-MANUAL-1/User-Guide-494440-Page-16.png)
![Introduction 第 17 頁,共 224 頁file://C:\Documents and Settings\anitachou\Local Settings\Temp\~hh114B.htm 2004/11/30 {If you wish to change the icon, please click on the [Change Icon] button and select your preferred icon from the list that appears. (→ continued in [Registering Settings Information]...) NoteNext (...continued from previous step)The [Add New Connection Wizard (Completing the Add New Connection Wizard)] window will appear. 1. Click on the [Finish] buttonRegistering settings informationProcedure](https://usermanual.wiki/ASUSTeK-Computer/W5G00UGPZ50.USERS-MANUAL-1/User-Guide-494440-Page-17.png)
![Introduction 第 18 頁,共 224 頁file://C:\Documents and Settings\anitachou\Local Settings\Temp\~hh114B.htm 2004/11/30The [Bluetooth Settings] window will appear.The icons of the registered devices will appear, and the devices will be ready to use.zThe connection icons and icon names can be changed.Changing a connection icon name Changing a connection icon NoteCustom Mode Setup](https://usermanual.wiki/ASUSTeK-Computer/W5G00UGPZ50.USERS-MANUAL-1/User-Guide-494440-Page-18.png)
![Introduction 第 19 頁,共 224 頁file://C:\Documents and Settings\anitachou\Local Settings\Temp\~hh114B.htm 2004/11/30The procedure for setting up the device using Custom Mode shall now be described. 1. Click [Start]→[All Programs]→[Bluetooth]→[Bluetooth Settings].(Under Windows 2000, click [Start]→[Programs]→[Bluetooth]→[Bluetooth Settings].) {The same result can be achieved by right-clicking on the Bluetooth icon in the task tray and selecting [Bluetooth Settings] from the menu that appears. The [Bluetooth Settings] window below will appear when other devices have already been registered.Please click the [New Connection] button to open the [Add New Connection Wizard] window If no devices have been registered yet please proceed directly to"DetectingStarting Bluetooth SettingsProcedureNoteCustom Mode Set-up](https://usermanual.wiki/ASUSTeK-Computer/W5G00UGPZ50.USERS-MANUAL-1/User-Guide-494440-Page-19.png)
![Introduction 第 20 頁,共 224 頁file://C:\Documents and Settings\anitachou\Local Settings\Temp\~hh114B.htm 2004/11/30window. If no devices have been registered yet, please proceed directly to Detecting Bluetooth Devices". (continued in "Detecting Bluetooth Devices"...) Next (...continued from previous step)The [Add New Connection Wizard (Welcome to the Add New Connection Wizard)] window will appear. 1. Switch the mouse power ON to make it connectable via Bluetooth.Please refer to the mouse instruction manual for details on this procedure.2. Confirm that [Custom Mode] has been selected in the [Add New Connection Wizard (Welcome to the Add New Connection Wizard)] window, and click on the [Next] button.Searching for Bluetooth devices will start.Detecting Bluetooth devicesProcedure](https://usermanual.wiki/ASUSTeK-Computer/W5G00UGPZ50.USERS-MANUAL-1/User-Guide-494440-Page-20.png)
![Introduction 第 21 頁,共 224 頁file://C:\Documents and Settings\anitachou\Local Settings\Temp\~hh114B.htm 2004/11/30When the mouse has been detected, the name and address of the device will appear in the [Add New Connection Wizard (Select Device)] window. {If no device is found, please confirm that the device has been made connectable via Bluetooth, and click on the [Update] button.A further device search will be performed. (→ continued in [Detecting Services]...) Next Note](https://usermanual.wiki/ASUSTeK-Computer/W5G00UGPZ50.USERS-MANUAL-1/User-Guide-494440-Page-21.png)
![Introduction 第 22 頁,共 224 頁file://C:\Documents and Settings\anitachou\Local Settings\Temp\~hh114B.htm 2004/11/30(...continued from previous step)When the mouse has been detected, the name and address of the device will appear in the [Add New Connection Wizard (Select Device)] window.1. Select the mouse device name from [Device List] and click on the [Next] buttonBluetooth device detection will commence.Detecting servicesProcedure](https://usermanual.wiki/ASUSTeK-Computer/W5G00UGPZ50.USERS-MANUAL-1/User-Guide-494440-Page-22.png)
![Introduction 第 23 頁,共 224 頁file://C:\Documents and Settings\anitachou\Local Settings\Temp\~hh114B.htm 2004/11/30 {When a service has been detected, a window prompting you to enter the Bluetoothpasskey (PIN code) may appear. Please enter the passkey and click on the [OK] button.Please refer to your device instruction manual for information on which passkey to use. {If you have not entered your Bluetooth passkey after a certain amount of time has passed, the connection process will be cancelled for security reasons. Please perform the passkey entry process again.{If you try to register a device that has already been registered, the following message will appear, and you will not be able to proceed with further operation.Please click on the [OK] button to close the message. The services supported by the device will be displayed.2. Select the desired service and click on the [Next] buttonNote](https://usermanual.wiki/ASUSTeK-Computer/W5G00UGPZ50.USERS-MANUAL-1/User-Guide-494440-Page-23.png)
![Introduction 第 24 頁,共 224 頁file://C:\Documents and Settings\anitachou\Local Settings\Temp\~hh114B.htm 2004/11/30{When a device supports several servicesIf the device supports several services, you can use Custom Mode to manually select the services (profiles) you wish to use from the list that appears under [Select Services].Example: List of wireless modem station services If Express Mode is used to perform the set-up, the highest-priority service in the device will be automatically selected and configured. 3. Click on the [OK] button. {When the settings information has been registered, a window prompting you to enter the Bluetooth passkey (PIN code) may appear. Please enter the passkey and click on the [OK] button.Please refer to your device instruction manual for information on which passkey to use. {If you have not entered your Bluetooth passkey after a certain amount of time has passed, the connection process will be cancelled for security reasons. Please perform the passkey entry process again. The [Add New Connection Wizard (Connection Name Setup)] window will appear if a service has been properly detected.NoteNote](https://usermanual.wiki/ASUSTeK-Computer/W5G00UGPZ50.USERS-MANUAL-1/User-Guide-494440-Page-24.png)
![Introduction 第 25 頁,共 224 頁file://C:\Documents and Settings\anitachou\Local Settings\Temp\~hh114B.htm 2004/11/304. Select the type and name of the icon to be displayed once the device has been registered, and click on the [Next] button. {If you wish to change the icon, please click on the [Change Icon] button and select your preferred icon from the list that appears. (→ continued in [Registering Settings Information]...)NextNote](https://usermanual.wiki/ASUSTeK-Computer/W5G00UGPZ50.USERS-MANUAL-1/User-Guide-494440-Page-25.png)
![Introduction 第 26 頁,共 224 頁file://C:\Documents and Settings\anitachou\Local Settings\Temp\~hh114B.htm 2004/11/30 (...continued from previous step)The [Add New Connection Wizard (Completing the Add New Connection Wizard)] window will appear. 1. Click on the [Finish] buttonThe [Bluetooth Settings] window will appear.The icons of the registered devices will appear, and the devices will be ready to use.Registering settings informationProcedure](https://usermanual.wiki/ASUSTeK-Computer/W5G00UGPZ50.USERS-MANUAL-1/User-Guide-494440-Page-26.png)
![Introduction 第 27 頁,共 224 頁file://C:\Documents and Settings\anitachou\Local Settings\Temp\~hh114B.htm 2004/11/30{The connection icons and icon names can be changed.Changing a connection icon nameChanging a connection icon NoteYou can use a Bluetooth wireless modem to connect to the Internet via a telephone line. →Setting up the modem station→Connecting to the Internet zIn order to connect to the Internet, you must have already signed up with a provider and obtained a connection ID and password. Please ensure you have confirmed the ID, password and telephone number of your provider's access point before you begin the set-up process. zPlease refer to your instruction manual for information on connecting the modem station to a telephone line. zA Bluetooth passkey (PIN code) is required for you to connect to the modem station. Please make a note of your Bluetooth passkey before you start the set-up process. 1. Turn on the wireless modem station2. Right-click the Bluetooth icon in the task tray, and then click on [Add New Connection]ImportantSetting up the modem stationProcedureConnecting to the Internet using a modem station [DUN]](https://usermanual.wiki/ASUSTeK-Computer/W5G00UGPZ50.USERS-MANUAL-1/User-Guide-494440-Page-27.png)
![Introduction 第 28 頁,共 224 頁file://C:\Documents and Settings\anitachou\Local Settings\Temp\~hh114B.htm 2004/11/30 {Alternatively, click [Start]→[All Programs]→[Bluetooth]→[Bluetooth Settings], and then click on [New Connection] from the active [Bluetooth Settings] window. The [Add New Connection Wizard (Welcome to the Add New Connection Wizard)] window will appear. 3. Confirm that [Express Mode] has been selected, and then click on the [Next] buttonThe [Add New Connection Wizard (Searching for Bluetooth devices)] window will appear.Note](https://usermanual.wiki/ASUSTeK-Computer/W5G00UGPZ50.USERS-MANUAL-1/User-Guide-494440-Page-28.png)
![Introduction 第 29 頁,共 224 頁file://C:\Documents and Settings\anitachou\Local Settings\Temp\~hh114B.htm 2004/11/304. Select the device name of the wireless modem station from [Device List], and then click on the [Next] buttonThe [Add New Connection Wizard (Searching for Services)] window will appear.Once a service has been detected successfully, connection to the device and COM port creation will be performed automatically, after which the [Add New Connection Wizard (Modem Settings)] window will appear.5. If you are connecting to a wireless modem station for the first time, enter the passkey for the modem station under [Bluetooth Passkey (PIN code)], and then click on the [OK] button](https://usermanual.wiki/ASUSTeK-Computer/W5G00UGPZ50.USERS-MANUAL-1/User-Guide-494440-Page-29.png)
![Introduction 第 30 頁,共 224 頁file://C:\Documents and Settings\anitachou\Local Settings\Temp\~hh114B.htm 2004/11/30Once the program has finished searching for the devices, the [Add New Connection Wizard (Device Selection)] window will appear.6. Click on the [Next] buttonCertain modems require you to configure initialization commands separately.Please click on the [Additional initialization Command Settings] button, enter the initialization commands in the following window, and then click on the [OK] button. {Please refer to the modem or mobile phone instruction manual for further details on the initialization commands. Note](https://usermanual.wiki/ASUSTeK-Computer/W5G00UGPZ50.USERS-MANUAL-1/User-Guide-494440-Page-30.png)
![Introduction 第 31 頁,共 224 頁file://C:\Documents and Settings\anitachou\Local Settings\Temp\~hh114B.htm 2004/11/307. Enter the connection name (optional), telephone number (of your provider's access point), user name and password (as issued by your provider), and then click on the [Finish] button. {The sample entries shown in the window are provided solely for purpose of explanation. Please use your own telephone number, ID and password according to the arrangement with your provider. The settings will be registered, and an icon will appear in the [Bluetooth Settings] window.You can connect to the Internet by following the procedure below if the connection destination registered when you configured the wireless modem has been set as the default connection destination. 1. Start your browser, e-mail application or other application {Please enter the e-mail settings separately if you are going to use e-mail (the set-up method will vary with the application). 2. Enter the URL of the Web page you wish to display and then press the [Enter] key, or use the e-mail tool to send/receive items or perform other activities. The [Dial-up Connection] window will appear.3. Click on the [Connect] buttonImportantConnecting to the InternetImportant](https://usermanual.wiki/ASUSTeK-Computer/W5G00UGPZ50.USERS-MANUAL-1/User-Guide-494440-Page-31.png)
![Introduction 第 32 頁,共 224 頁file://C:\Documents and Settings\anitachou\Local Settings\Temp\~hh114B.htm 2004/11/30{A connection will be automatically established with the modem station if COM Auto Connect is available. If COM Auto Connect is not available, please manually connect to the modem station. The following message will appear once you have connected to the Internet.4. End the connection The window below will appear if you double-click on the icon in the task bar. Please click on the [Disconnect] button when you want to disconnect from the Internet.Alternatively, please right-click on the icon, and then click on [Disconnect].Important](https://usermanual.wiki/ASUSTeK-Computer/W5G00UGPZ50.USERS-MANUAL-1/User-Guide-494440-Page-32.png)
![Introduction 第 33 頁,共 224 頁file://C:\Documents and Settings\anitachou\Local Settings\Temp\~hh114B.htm 2004/11/30zYou can start an application to make an automatic connection to the Internet, but you can also make a manual connection using the connection destination icon.The procedure is described below. 1. From the [Bluetooth Settings] window, right -click on the connection destination icon, and then click on [Connect] from the menu that appearsA window indicating that the connection is being established will appear.If the connection has been established successfully, the connection icon and task tray will appear as shown below. Note](https://usermanual.wiki/ASUSTeK-Computer/W5G00UGPZ50.USERS-MANUAL-1/User-Guide-494440-Page-33.png)
![Introduction 第 34 頁,共 224 頁file://C:\Documents and Settings\anitachou\Local Settings\Temp\~hh114B.htm 2004/11/30 You will be able to browse Web pages using your browser and send and receive e-mail. {Please enter the e-mail settings separately if you are going to use e-mail (the set-up method will vary with the application). 2. End the connectionRight-click on the icon, and then click [Disconnect] to end the connection. The following message will appear. Click on the [Yes] button.When the icon appears as shown below, the connection will have ended. ImportantConnecting to the Internet using a mobile telephone[DUN]](https://usermanual.wiki/ASUSTeK-Computer/W5G00UGPZ50.USERS-MANUAL-1/User-Guide-494440-Page-34.png)
![Introduction 第 35 頁,共 224 頁file://C:\Documents and Settings\anitachou\Local Settings\Temp\~hh114B.htm 2004/11/30This section describes how to connect to the Internet via a telephone line, using a mobile telephone. →Configuring a mobile telephone for use as a modem→Connecting to the Internet zIn order to connect to the Internet, you must have already signed up with a provider and obtained a connection ID and password. Please ensure you have confirmed the ID, password and telephone number of your provider's access point before you begin the set-up process. zA Bluetooth passkey (PIN code) is required for you to connect to the mobile telephone. Please make a note of your Bluetooth passkey before you start the set-up process. 1. Turn on the mobile telephone, and set it to be connectable via Bluetooth{Please refer to the mobile telephone instruction manual for information on how to operate the device. 2. Right-click on the Bluetooth icon in the task tray, and then click on [Add New Connection]ImportantConfiguring a mobile telephone for use as a modemProcedureNoteConnecting to the Internet using a mobile telephone[DUN]](https://usermanual.wiki/ASUSTeK-Computer/W5G00UGPZ50.USERS-MANUAL-1/User-Guide-494440-Page-35.png)
![Introduction 第 36 頁,共 224 頁file://C:\Documents and Settings\anitachou\Local Settings\Temp\~hh114B.htm 2004/11/30{Alternatively, click [Start]→[All Programs]→[Bluetooth]→[Bluetooth Settings], and then click on [New Connection] from the active [Bluetooth Settings] window. The [Add New Connection Wizard (Welcome to the Add New Connection Wizard)] window will appear.3. Confirm that [Express Mode] has been selected, and then click on the [Next] buttonThe [Add New Connection Wizard (Searching for Bluetooth devices)] window will appear.4. Select the device name of the mobile telephone from [Device List], and then click on the [Next] buttonNote](https://usermanual.wiki/ASUSTeK-Computer/W5G00UGPZ50.USERS-MANUAL-1/User-Guide-494440-Page-36.png)
![Introduction 第 37 頁,共 224 頁file://C:\Documents and Settings\anitachou\Local Settings\Temp\~hh114B.htm 2004/11/30The [Add New Connection Wizard (Searching for Services)] window will appear.Once a service has been detected successfully, connection to the device and COM port creation will be performed automatically, after which the [Add New Connection Wizard (Modem Settings)] window will appear. 5. If you are connecting to a mobile telephone for the first time, enter the passkey for the wireless modem station under [Bluetooth Passkey (PIN code)], and then click on the [OK] button](https://usermanual.wiki/ASUSTeK-Computer/W5G00UGPZ50.USERS-MANUAL-1/User-Guide-494440-Page-37.png)
![Introduction 第 38 頁,共 224 頁file://C:\Documents and Settings\anitachou\Local Settings\Temp\~hh114B.htm 2004/11/30Once the program has finished searching for the devices, the [Add New Connection Wizard (Device Selection)] window will appear.6. Click on the [Next] buttonCertain modems require you to configure initialization commands separately.Please click on the [Additional Initialization Command Settings] button, enter the initialization commands in the following window, and then click on the [OK] button. {Please refer to the modem or mobile phone instruction manual for further details on the initialization commands. 7. Enter the connection name (optional), telephone number (of your provider's access point), user name and password (as issued by your provider), and then click on the [Finish] button.Note](https://usermanual.wiki/ASUSTeK-Computer/W5G00UGPZ50.USERS-MANUAL-1/User-Guide-494440-Page-38.png)
![Introduction 第 39 頁,共 224 頁file://C:\Documents and Settings\anitachou\Local Settings\Temp\~hh114B.htm 2004/11/30 {The sample entries shown in the window are provided solely for purpose of explanation. Please use your own telephone number, ID and password according to the arrangement with your provider. The settings will be registered, and an icon will appear in the [Bluetooth Settings] window.You can connect to the Internet by following the procedure below if the connection destination registered when you configured the mobile telephone has been set as the default connection destination. 1. Start your browser, e-mail application or other application {Please enter the e-mail settings separately if you are going to use e-mail (the set-up method will vary with the application). 2. Enter the URL of the Web page you wish to display and then press the [Enter] key, or use the e-mail tool to send/receive items or perform other activities.The [Dial-up Connection] window will appear.3. Click on the [Connect] buttonImportantConnecting to the InternetImportant](https://usermanual.wiki/ASUSTeK-Computer/W5G00UGPZ50.USERS-MANUAL-1/User-Guide-494440-Page-39.png)
![Introduction 第 40 頁,共 224 頁file://C:\Documents and Settings\anitachou\Local Settings\Temp\~hh114B.htm 2004/11/30{A connection will be automatically established with the mobile telephone if COM Auto Connect is available. If COM Auto Connect is not available, please manually connect to the mobile telephone. The following message will appear once you have connected to the Internet.4. End the connection The window below will appear if you double-click on the icon in the task bar. Please click on the [Disconnect] button when you want to disconnect from the Internet.Alternatively, please right-click on the icon, and then click on [Disconnect].Important](https://usermanual.wiki/ASUSTeK-Computer/W5G00UGPZ50.USERS-MANUAL-1/User-Guide-494440-Page-40.png)
![Introduction 第 41 頁,共 224 頁file://C:\Documents and Settings\anitachou\Local Settings\Temp\~hh114B.htm 2004/11/30zYou can start an application to make an automatic connection to the Internet, but you can also make a manual connection using the connection destination icon.The procedure is described below. 1. From the [Bluetooth Settings] window, right -click on the connection destination icon, and then click on [Connect] from the menu that appearsA window indicating that the connection is being established will appear.If the connection has been established successfully, the connection icon and task tray will appear as shown below. You will be able to browse Web pages using your browser and send and receive e-mail. Note](https://usermanual.wiki/ASUSTeK-Computer/W5G00UGPZ50.USERS-MANUAL-1/User-Guide-494440-Page-41.png)
![Introduction 第 42 頁,共 224 頁file://C:\Documents and Settings\anitachou\Local Settings\Temp\~hh114B.htm 2004/11/30pg gy{Please enter the e-mail settings separately if you are going to use e-mail (the set-up method will vary with the application). 2. End the connectionRight-click on the icon, and then click [Disconnect] to end a connection.The following message will appear. Click on the [Yes] button.When the icon appears as shown below, the connection will have been ended. ImportantThis section describes how to connect to a network (for example, a company LAN or a personal home network) using a LAP profile-compatible access point.Please refer to "Using an access point (PAN) to connect to a LAN if you are using a PAN profile-compatible access point.Connecting to a LAN using an access point (LAP) [LAP]](https://usermanual.wiki/ASUSTeK-Computer/W5G00UGPZ50.USERS-MANUAL-1/User-Guide-494440-Page-42.png)
![Introduction 第 43 頁,共 224 頁file://C:\Documents and Settings\anitachou\Local Settings\Temp\~hh114B.htm 2004/11/30→Setting up the access point→Connecting to a LAN (LAP) zThe access point must have been started and a normal connection already established to the network before the access point is set up. Please refer to the access point instruction manual for information on how to set up the access point.zA Bluetooth passkey (PIN code) is required for you to connect to the access point. Please make a note of your Bluetooth passkey before you start the set-up process. 1. Turn on the access point, and confirm that a connection has been established with the network 2. Right-click the Bluetooth icon in the task tray, and then click on [Add New Connection] {Alternatively, click [Start]→[All Programs]→[Bluetooth]→[Bluetooth Settings], and then click on [New Connection] from the active [Bluetooth Settings] window. The [Add New Connection Wizard (Welcome to the Add New Connection Wizard)] window will appear. 3. Confirm that [Express Mode] has been selected, and then click on the [Next] buttonImportantSetting up the access pointProcedureNote](https://usermanual.wiki/ASUSTeK-Computer/W5G00UGPZ50.USERS-MANUAL-1/User-Guide-494440-Page-43.png)
![Introduction 第 44 頁,共 224 頁file://C:\Documents and Settings\anitachou\Local Settings\Temp\~hh114B.htm 2004/11/30 The [Add New Connection Wizard (Searching for Bluetooth devices)] window will appear.Once the program has finished searching for the devices, the [Add New Connection Wizard (Device Selection)] window will appear. 4. Select the device name of the access point from [Device List], and then click on the [Next] button](https://usermanual.wiki/ASUSTeK-Computer/W5G00UGPZ50.USERS-MANUAL-1/User-Guide-494440-Page-44.png)
![Introduction 第 45 頁,共 224 頁file://C:\Documents and Settings\anitachou\Local Settings\Temp\~hh114B.htm 2004/11/30The [Add New Connection Wizard (Searching for Services)] window will appear. You will be asked for the Bluetooth passkey in the window that appears.5. Enter the passkey under [Bluetooth Passkey (PIN code)], and then click on the [OK] buttonService detection and COM port creation will be performed automatically.The [Add New Connection Wizard (Create Connection Destination)] window will appear.6. Enter the connection name, user name and password, then click on the [Next] button](https://usermanual.wiki/ASUSTeK-Computer/W5G00UGPZ50.USERS-MANUAL-1/User-Guide-494440-Page-45.png)
![Introduction 第 46 頁,共 224 頁file://C:\Documents and Settings\anitachou\Local Settings\Temp\~hh114B.htm 2004/11/30 {The user name and password are entered here to allow you to connect to the access point. The [Add New Connection Wizard (Confirm Dial-up Settings)] window will appear. 7. Click on the [Confirm Settings] buttonThe [Internet Options] window will appear.8. Configure the connection method, and then click on the [OK] buttonSet the connection destination used for the LAN connection set up in (6) above as the default connection destination, and then select "Always dial my default connection." Note](https://usermanual.wiki/ASUSTeK-Computer/W5G00UGPZ50.USERS-MANUAL-1/User-Guide-494440-Page-46.png)
![Introduction 第 47 頁,共 224 頁file://C:\Documents and Settings\anitachou\Local Settings\Temp\~hh114B.htm 2004/11/309. Click on the [Next] buttonThe [Add New Connection Wizard (Connection Name Settings)] window will appear. 10. Enter the type and name of the icon displayed after registration, and then click on the [Next] buttonPlease click on the [Next] button if you are satisfied with the settings.](https://usermanual.wiki/ASUSTeK-Computer/W5G00UGPZ50.USERS-MANUAL-1/User-Guide-494440-Page-47.png)
![Introduction 第 48 頁,共 224 頁file://C:\Documents and Settings\anitachou\Local Settings\Temp\~hh114B.htm 2004/11/30The [Add New Connection Wizard (Completing the Add New Connection Wizard)] window will appear.11. Click on the [Finish] buttonThe access point icon will be registered in the [Bluetooth Settings] window. This will complete the access point set-up process.→"Connecting to a LAN (LAP)" 1. Right-click on the connection icon in the [Bluetooth Settings] window, and then click on [Connect]The [Dial-up Connection] window will appearProcedureConnecting to a LAN (LAP)](https://usermanual.wiki/ASUSTeK-Computer/W5G00UGPZ50.USERS-MANUAL-1/User-Guide-494440-Page-48.png)