ASUSTeK Computer W5G00UGPZ50 NOTEBOOK P.C. BLUETOOTH DEVICE User Manual USERS MANUAL 4
ASUSTeK Computer Inc NOTEBOOK P.C. BLUETOOTH DEVICE USERS MANUAL 4
Contents
- 1. USERS MANUAL 1
- 2. USERS MANUAL 2
- 3. USERS MANUAL 3
- 4. USERS MANUAL 4
- 5. USERS MANUAL 5
USERS MANUAL 4
![Introduction 第 193 頁,共 224 頁file://C:\Documents and Settings\anitachou\Local Settings\Temp\~hh114B.htm 2004/11/303. Enter "Pocket PC", and then hit the [Enter] keyThe new name will appear.This section provides detailed information on the settings categories in Bluetooth Manager. Main menuCategory DescriptionBluetooth Settings Opens [Bluetooth Settings] window.Wireless File Transfer Open the [Wireless File Transfer] window.Bluetooth Manager](https://usermanual.wiki/ASUSTeK-Computer/W5G00UGPZ50.USERS-MANUAL-4/User-Guide-494443-Page-1.png)
![Introduction 第 194 頁,共 224 頁file://C:\Documents and Settings\anitachou\Local Settings\Temp\~hh114B.htm 2004/11/30Remote Camera Open the [Remote Camera] window.Add New Connection Opens the [Add New Connection Wizard] window.Device Properties&Security Displays Bluetooth device information on your PC.[General] tabAllows you to confirm the name, address and other settings displother devices. z[Device Name] is the only category able to be changed. If ywish to change the name of a device, enter the new name, aclick on the [OK] or [Apply] button.zClick on the [Default] button to restore the initial settings. [Security] tabSecurity-related (user) settings can be configured under this tab.Note](https://usermanual.wiki/ASUSTeK-Computer/W5G00UGPZ50.USERS-MANUAL-4/User-Guide-494443-Page-2.png)
![Introduction 第 195 頁,共 224 頁file://C:\Documents and Settings\anitachou\Local Settings\Temp\~hh114B.htm 2004/11/30zClick on the [Default] button to restore the initial settings.1) Selecting Non-connectable mode will cause connection requesrejected from any device, including registered ones. Device detecwill still be possible.2) Selecting Non-pairable mode will make it impossible to bond another device in a new connection relationship. Connection willpossible when a request has been received from a registered deviDevice detection will still be possible.3) Devices to which you have initially connected by entering a Pwill not require you to do so for future connections. Connection wbe possible even if Link Level Security has been selected. NoteCategory DescriptionDiscoverability modeNon-discoverable modeOther devices will not be able to detect yours.Discoverable mode Other devices will be able to detect yours.Connectability modeNon-connectable modeOther devices will not be able to connect to yours.1)Connectable mode Other devices will be able to connect to yours.Pairing modeNon-pairable mode2)You will not receive pairing requests initiated from remote devices.Pairable mode You will receive pairing requests initiated from remote devices.Security modeNon-secure mode No security will be enforced.Link Level Security Enforced3)Requires Bluetooth passkey(PIN code) to be entered onconnection with another device.Encryption Encrypts data to be transmitted.Power off Turns off Bluetooth(Turned off)](https://usermanual.wiki/ASUSTeK-Computer/W5G00UGPZ50.USERS-MANUAL-4/User-Guide-494443-Page-3.png)
![Introduction 第 196 頁,共 224 頁file://C:\Documents and Settings\anitachou\Local Settings\Temp\~hh114B.htm 2004/11/30zCommunication using Bluetooth will be impossible once itbeen turned off. When you next wish to use Bluetooth, plearight-click on the Bluetooth icon in the task tray, and then c[Power ON].Important→(Turned on)Service Properties Ensures security against various kinds of access from remote devHere you can enable or disable the following four typical serviceare accessed remotely.zThis function is designed to provide robust security againstfrom remote devices. The "enable/disable" controls only reaccess made from remote devices. You will still be able to remote devices from your local device, regardless of the insettings. zRemove the tick from each button to disable the related (sefunction.NoteCategory DescriptionBluetooth Information Exchange Service Ticking the box enables a (serverfunction that allows files, images,business cards to be transferred frremote device using Bluetooth Information Exchanger.](https://usermanual.wiki/ASUSTeK-Computer/W5G00UGPZ50.USERS-MANUAL-4/User-Guide-494443-Page-4.png)
![Introduction 第 197 頁,共 224 頁file://C:\Documents and Settings\anitachou\Local Settings\Temp\~hh114B.htm 2004/11/30 PAN Networking Service Ticking the box enables a (serverfunction that allows networking toperformed from a remote device uPAN Networking Service.Bluetooth COM Port Service Ticking the box enables a (serverfunction that allows COM Serviceperformed from a remote locationthe Serial Port Service.AV Remote Control Service Ticking the box enables a (serverfunction that allows remote controperformed from a remote device uAV Remote Control Service.Help Displays the Bluetooth Utility User Guide.Exit Exits Bluetooth Manager. zWhen you exit Bluetooth Manager, Bluetooth communicatibe disabled. When you next wish to use Bluetooth, please c[Start]→[All Programs]→[Bluetooth]→[Bluetooth SettingWindows 2000, click on [Start]→[Programs]→[Bluetooth][Bluetooth Settings]). ImportantThis section provides detailed information on the settings categories in Bluetooth InformationExchanger.Main windowBluetooth Information Exchanger](https://usermanual.wiki/ASUSTeK-Computer/W5G00UGPZ50.USERS-MANUAL-4/User-Guide-494443-Page-5.png)
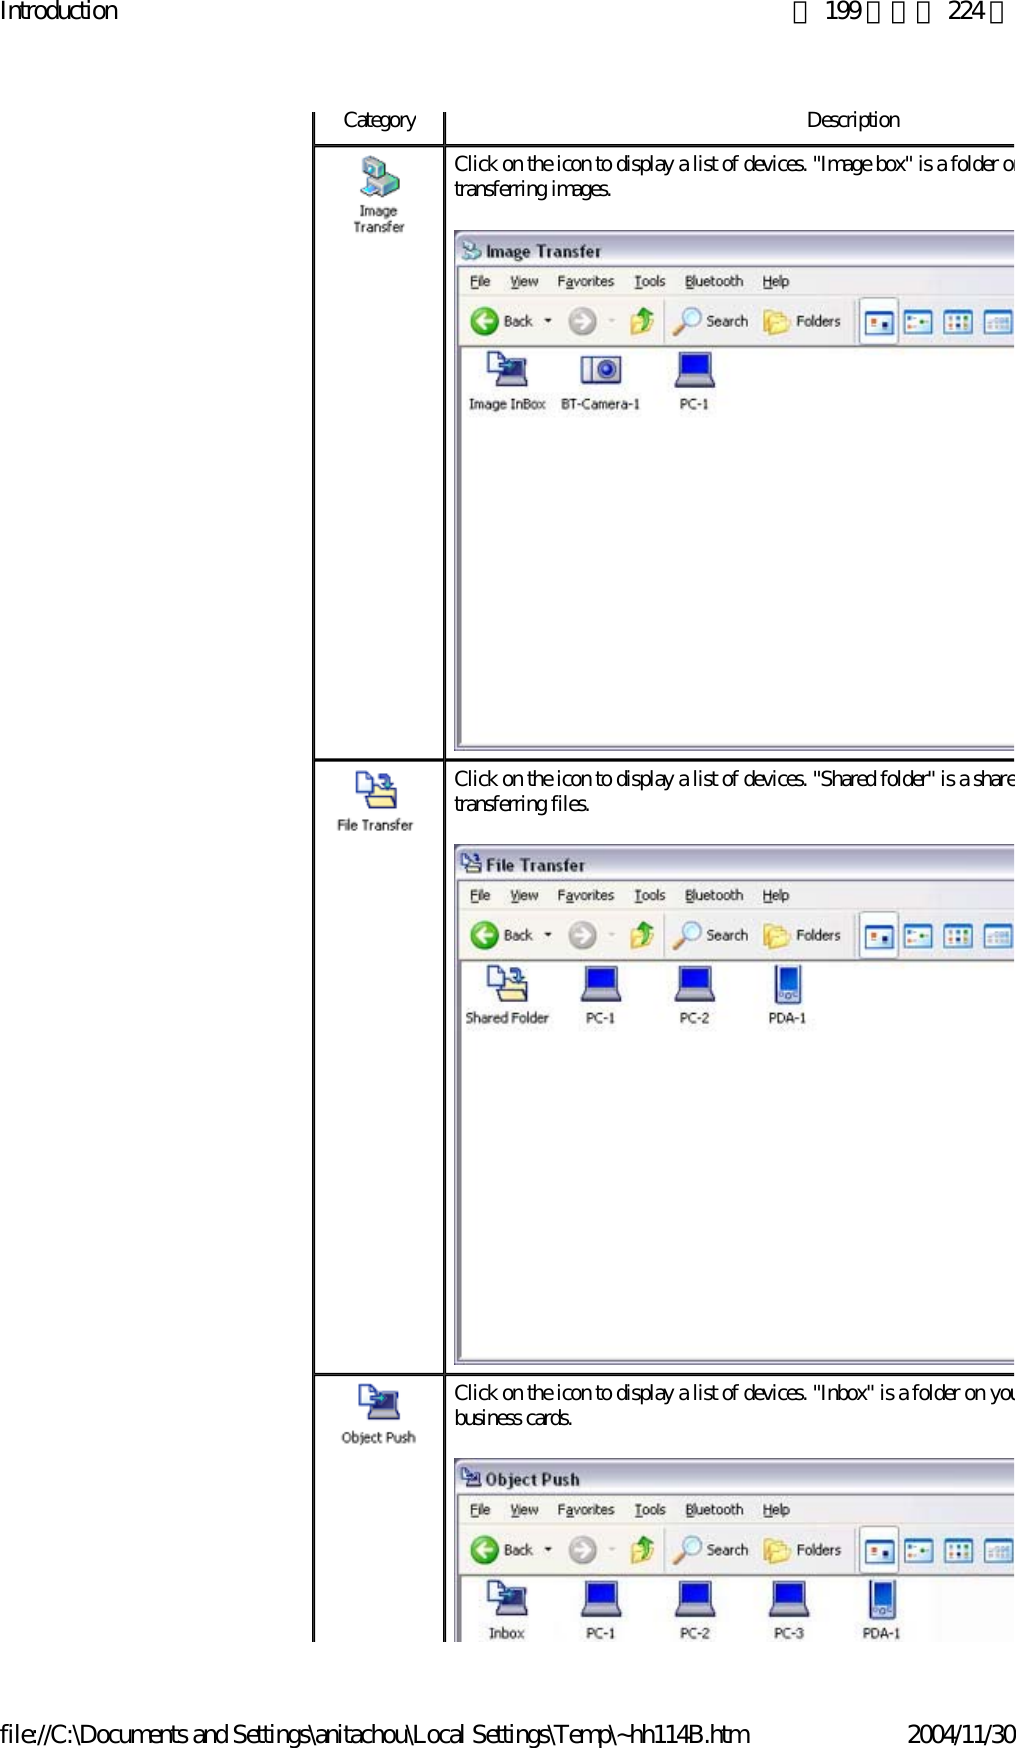
![Introduction 第 198 頁,共 224 頁file://C:\Documents and Settings\anitachou\Local Settings\Temp\~hh114B.htm 2004/11/30 Three folders are available for data exchange: "Image transfer", "File transfer" and "ObjePush". Bluetooth menuCategory DescriptionDevice Discovery Detects Bluetooth devices.Configuration Allows detailed setting of categories related to Bluetooth InformatiExchanger.-[General] tab-[Mode] tab-[Inbox/Business Card] tab-[Shared folder] tab-[Image box] tab-[Associate] tab-[Transfer mode] tab-[Service security] tab-[Service class] tab-[Information] tab-[Version] tabHelp Displays Bluetooth Utility User Guide.Data exchange folders](https://usermanual.wiki/ASUSTeK-Computer/W5G00UGPZ50.USERS-MANUAL-4/User-Guide-494443-Page-6.png)
![Introduction 第 200 頁,共 224 頁file://C:\Documents and Settings\anitachou\Local Settings\Temp\~hh114B.htm 2004/11/30This section provides detailed information on the settings categories in Remote Camera.■[Bluetooth] menuMain windowMenuCategory DescriptionDevice Search Searches for remote cameras.Properties [Filter for Search Devices]Remote Camera](https://usermanual.wiki/ASUSTeK-Computer/W5G00UGPZ50.USERS-MANUAL-4/User-Guide-494443-Page-8.png)
![Introduction 第 201 頁,共 224 頁file://C:\Documents and Settings\anitachou\Local Settings\Temp\~hh114B.htm 2004/11/30The program may discover devices other than digital cameras, depeon which profiles are supported by those devices.Adjusting the setting to "Loose filtering" will increase the likelihoodevices other than those intended will be detected.The further you slide the setting towards "Tight filtering", the strictwill be the criteria determining device detection, and the lower the likelihood will be that irrelevant devices will be included.Please adjust the filtration level according to the results of the searc[Multi Shot]Allows you to set the number of consecutive images captured by yodigital camera in the dialog box below (between 2 and 16 inclusive[Pixel Size]Images will be sent to your PC after having been automatically converted to the size specified in the dialog box below, regardless osize of the original image data.](https://usermanual.wiki/ASUSTeK-Computer/W5G00UGPZ50.USERS-MANUAL-4/User-Guide-494443-Page-9.png)
![Introduction 第 202 頁,共 224 頁file://C:\Documents and Settings\anitachou\Local Settings\Temp\~hh114B.htm 2004/11/30■[Help] menu A list of cameras that have been registered as remote cameras will be displayed.Clicking on this button will execute a search for remote cameras.Images transferred to the PC from a remote camera will be displayed.Clicking on this button will display the folders on the hard drive where images that havetransferred to the PC have been stored. [Inbox settings]Opens the "Browse folders..." dialog box and allows you to select tfolder where you would like your captured images to be saved.Exit Exits Remote Camera.Category DescriptionImage monitor version informationDisplays version information for the image monitor.List of cameras[Camera Search...] buttonDisplay images[Explorer...] button](https://usermanual.wiki/ASUSTeK-Computer/W5G00UGPZ50.USERS-MANUAL-4/User-Guide-494443-Page-10.png)
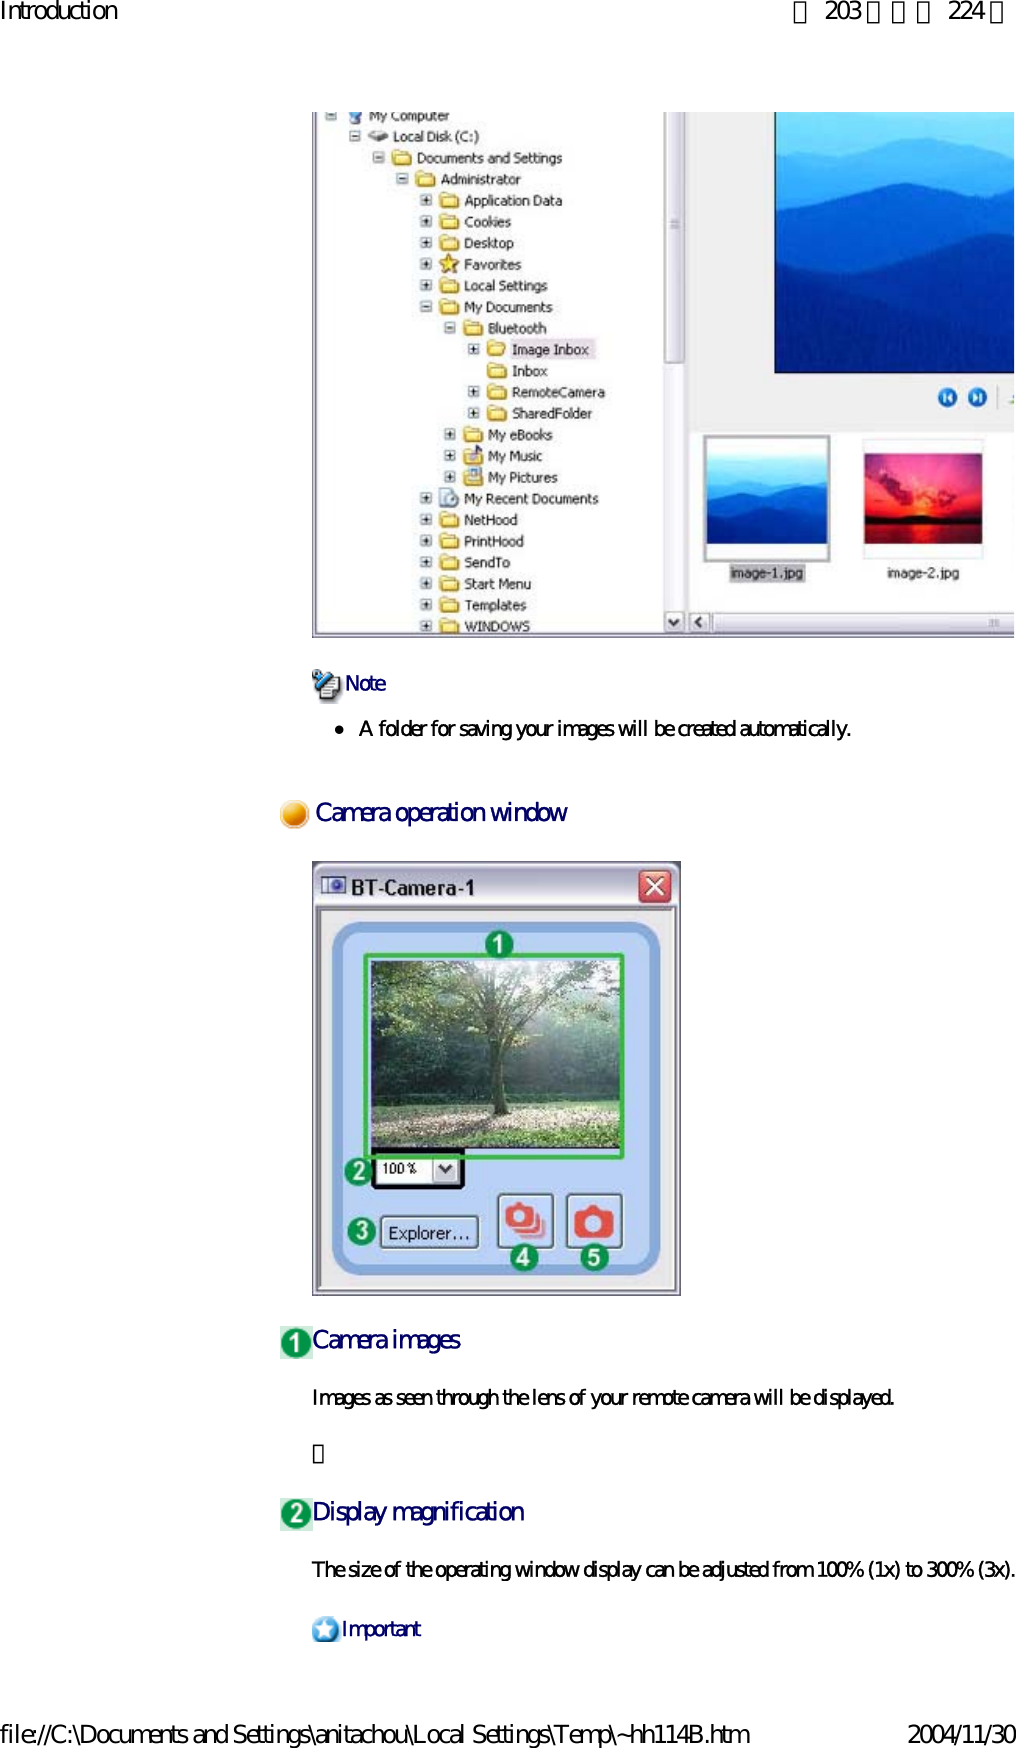
![Introduction 第 204 頁,共 224 頁file://C:\Documents and Settings\anitachou\Local Settings\Temp\~hh114B.htm 2004/11/30zIncreasing the size of the operating window will impede its ability to display imageand will have an adverse effect on other processes being performed by your PC. Pladjust the magnification as appropriate for your intended use. Clicking on this button will display the folders on the hard drive where images that have transferred to the PC have been stored. Clicking this button will cause the camera to take the number of images specified in [Consecutive image settings] under the [Bluetooth] menu and then send those images to yPC.Clicking this button will cause the camera to take one picture and then send the image toPC. [Explorer...] buttonShutter button (consecutive images)Shutter button (single images)Bluetooth Local COM](https://usermanual.wiki/ASUSTeK-Computer/W5G00UGPZ50.USERS-MANUAL-4/User-Guide-494443-Page-12.png)
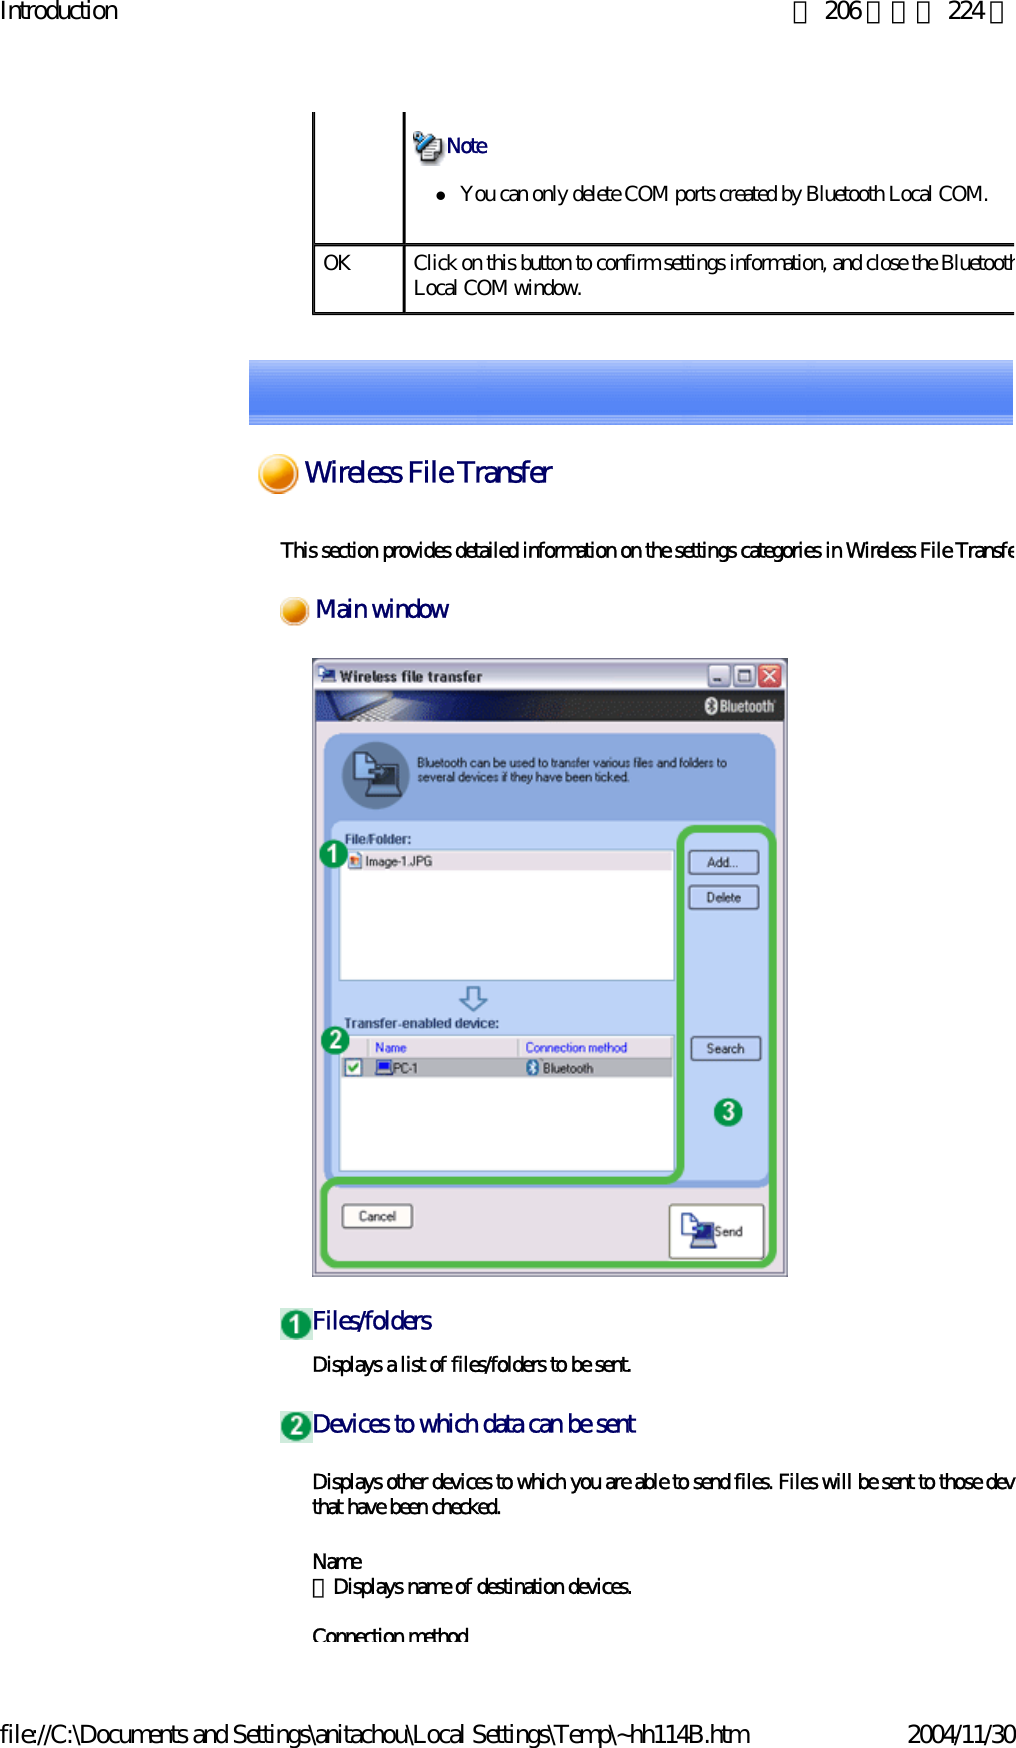
![Introduction 第 205 頁,共 224 頁file://C:\Documents and Settings\anitachou\Local Settings\Temp\~hh114B.htm 2004/11/30This section provides detailed information on the settings categories in Bluetooth Local COMDisplays a list of configured ports. Displays the function of each port.Ports displayed as "Toshiba BT Port (COMxx)" are TOSHIBA Bluetooth virtual COM pDisplays the application used to create those COM ports.The following information will appear for ports created by Bluetooth Local COM. Main windowPortDescriptionOwnerCOM port for client Local COM - ClientCOM port for server Local COM - Server [(name of service supplied by port)]Function buttonsCategory DescriptionAdd Starts the Add COM Port Wizard.zThere can be up to 64 ports. If COM ports 1 to 64 already exist, you wnot be able to add another port. NoteDelete Deletes selected port.](https://usermanual.wiki/ASUSTeK-Computer/W5G00UGPZ50.USERS-MANUAL-4/User-Guide-494443-Page-13.png)
![Introduction 第 207 頁,共 224 頁file://C:\Documents and Settings\anitachou\Local Settings\Temp\~hh114B.htm 2004/11/30 Connection method Displays method used to connect to other devices.zIf a device to which you would like to send data is not listed, you can click on the [Search] button to search for other devices. NoteFunction buttonsCategory DescriptionAdd Displays the window below, from where you can add files and/or folders yowould like to send.Delete By selecting a file from the list and clicking on the "Delete" button, you canremove that file (i.e., the file will not be sent).Search Searches for Bluetooth devices.Cancel Closes the "Wireless File Transfer" window. Send Sends a file.This section describes possible causes and countermeasures to be considered when your Bluedevice cannot be configured properly, functions abnormally or presents other problems relateits operation.The section "What you need to know about using Bluetooth " describes the basic concepbe aware of when using Bluetooth. Should you still encounter problems after having readthrough this information, please refer to the following list, which has been arranged accoto application. Basic understandingTroubleshooting](https://usermanual.wiki/ASUSTeK-Computer/W5G00UGPZ50.USERS-MANUAL-4/User-Guide-494443-Page-15.png)
![Introduction 第 208 頁,共 224 頁file://C:\Documents and Settings\anitachou\Local Settings\Temp\~hh114B.htm 2004/11/30to application.zGeneral operation of the Bluetooth UtilityzUsing a wireless modem stationzUsing an access pointzUsing a printerzUsing a Bluetooth headset zUsing a keyboard or mouse zUsing a camera zUsing a PDA zUsing a mobile telephone Troubleshooting by applicationzPlease refer to "What you need to know about using Bluetooth " for an understandithe basic concepts to be aware of when using Bluetooth. zIf the Bluetooth icon does not appear in the task tray, Bluetooth Manager will not bactive, which will prevent you from being able to use any of the functions of the Bluetooth Utility.Start the utilities as instructed below to enable Bluetooth Manager to start automatiand allow all functions to be utilized.Bluetooth Settings(from Windows XP)[Start] > [All Programs] > [Bluetooth] > [Bluetooth Settings](from Windows 2000)[Start] > [Programs] > [Bluetooth] > [Bluetooth Settings]Remote Camera(from Windows XP)[Start] > [All Programs] > [Bluetooth] > [Remote Camera](from Windows 2000)[Start] > [Programs] > [Bluetooth] > [Remote Camera]Wireless File Transfer(from Windows XP)[Start] > [All Programs] > [Bluetooth] > [Wireless File Transfer](from Windows 2000)[Start] > [Programs] > [Bluetooth] > [Wireless File Transfer]ImportantBluetooth ManagerBluetooth icon does not appear in task trayGeneral operation of the Bluetooth Utility](https://usermanual.wiki/ASUSTeK-Computer/W5G00UGPZ50.USERS-MANUAL-4/User-Guide-494443-Page-16.png)
![Introduction 第 209 頁,共 224 頁file://C:\Documents and Settings\anitachou\Local Settings\Temp\~hh114B.htm 2004/11/30zThe wireless communication switch is turned off. Please switch it on.zThe other device(s) may have been set to Non -discoverable mode.Please check the mode settings on the device.zThe other device may be using a profile that is not supported by the Bluetooth UtilPlease check the profile being used on the other device.zThe following profiles are compatible with Bluetooth Settings.DUN, FAX, LAP, SPP, HID, HCRP, FTP, OPP, HSP, PAN and BIPDevices running profiles other than those above will not be able to be registered wiBluetooth Settings.zSelect and right-click on a file, and then you can choose either the FTP or OPP prouse when you click on [Send to Bluetooth Device].If neither profile is supported by the destination device, the file will not be able to bsent from the right-click menu.The transmission will also fail if you use FTP to send a file to a device that only supports the OPP profile.Should this occur, please click on [Bluetooth] →[Profiles] under [Bluetooth InformExchanger] to configure the Transfer mode. zThe other device may have a certain security level enforced (Non -connectable moetc). Please confirm the security settings of the other device.Please enter the correct password if you are asked to enter one. zSee "Using a camera"Bluetooth SettingsClicking on the [New Connection] button brings up the message "Unable to prepare Bluetooth."Remote device(s) cannot be detectedServices on a remote device are undiscoverableBluetooth Information ExchangerAn error occurs when you try to send a file using the right -click menu.Cannot open shared folder on remote device using [File Transfer].Remote CameraBluetooth Local COMCannot add port](https://usermanual.wiki/ASUSTeK-Computer/W5G00UGPZ50.USERS-MANUAL-4/User-Guide-494443-Page-17.png)
![Introduction 第 210 頁,共 224 頁file://C:\Documents and Settings\anitachou\Local Settings\Temp\~hh114B.htm 2004/11/30zA maximum of 64 virtual COM ports can be added. You will be unable to add anoport if 64 ports have already been configured.zPlease refer to "What you need to know about using Bluetooth " for an understandithe basic concepts to be aware of when using Bluetooth. zIf the modem station is connected to and is being used by another device, the modestation will be undetectable even if you search for it. zIf the modem station is connected to and is being used by another device, no other device will be able to connect to the modem station.zThe Bluetooth passkey (PIN code) comprises a sequence of alphanumeric characterwith the letters able to be rendered in upper and lower case.If [Caps Lock] is on, the Bluetooth passkey may not be able to be entered correctlyzPlease ensure that the telephone cable is connected from the socket to the "LINE" terminal on the modem station. {If the telephone cable has come loose because it has not been fully inserted inthe socket, the resulting poor contact may prevent data from being transmitteaccurately.{Communication will be impossible if the interior of the cable has been brokePlease replace the cable with another one. zPlease ensure that the two slide switches on the underside of the main unit have beto the "NORMAL" and "MODEM" positions respectively. ImportantModem station cannot be detectedCannot connect to modem stationBluetooth passkey entry failedCannot connect to telephone lineNoteChIUsing a wireless modem station](https://usermanual.wiki/ASUSTeK-Computer/W5G00UGPZ50.USERS-MANUAL-4/User-Guide-494443-Page-18.png)
![Introduction 第 211 頁,共 224 頁file://C:\Documents and Settings\anitachou\Local Settings\Temp\~hh114B.htm 2004/11/30zThe telephone number of the connection (i.e., the telephone number for the access of your Internet service provider) may not be correct. Please check the telephone number.zThe user ID and/or password for the provider with whom you have signed up may been entered incorrectly. Please check the user ID and password.zThe default connection may have been configured with different settings. Please seconnection configured for mobile telephone use as the default connection.zWhen you place a call using a company switchboard or other exchange, the systemrequire you to enter a "0" before the telephone number itself. Please check the typetelephone line you are using.zOnce you have registered a wireless modem station as your fax server, you will neeenter the fax settings from the [Printer and Faxes] window in the Control Panel.Please refer to "Using a modem station for fax transmissions " for information on tconfiguration procedure.zThe telephone number of the fax destination may have been entered incorrectly. Plcheck the telephone number.zIf the setting under COM Auto Connect Settings has been set to "Off", a connectionot automatically be established with the modem. Please connect to the modem manually.zWhen you place a call using a company switchboard or other exchange, the systemrequire you to enter a "0" before the telephone number itself. Please check the typetelephone line you are using.zThe fax service may not have been enabled for sending (or receiving).Please check the settings by following the procedure below.1. Open [Printers and Faxes] from the Control Panel, right -click on the [Fax]and then click on [Properties]The [Fax properties] window will appear.2. Select the [Device] tab, right-click on the modem you wish to use, and theon [Properties]Cannot connect to the InternetCannot send or receive faxes](https://usermanual.wiki/ASUSTeK-Computer/W5G00UGPZ50.USERS-MANUAL-4/User-Guide-494443-Page-19.png)
![Introduction 第 212 頁,共 224 頁file://C:\Documents and Settings\anitachou\Local Settings\Temp\~hh114B.htm 2004/11/303. Select the [Send] tab, and then confirm that "Enable device to send" has bechecked.4. Select the [Receive] tab, and then confirm that "Enable device to receive" hbeen checked (when you wish to receive faxes)](https://usermanual.wiki/ASUSTeK-Computer/W5G00UGPZ50.USERS-MANUAL-4/User-Guide-494443-Page-20.png)
![Introduction 第 213 頁,共 224 頁file://C:\Documents and Settings\anitachou\Local Settings\Temp\~hh114B.htm 2004/11/305. Click on the [OK] buttonzPlease refer to "What you need to know about using Bluetooth " for an understandithe basic concepts to be aware of when using Bluetooth. zIf the access point is connected to and is being used by another device, the access pwill be undetectable even if you search for it.zIf the access point is connected to and is being used by another device, no other dewill be able to connect to the access point.zThe LAN cable may not be properly connected to the access point. Please check thconnection status.{If the LAN cable has come loose because it has not been fully inserted into thsocket, the resulting poor contact may prevent data from being transmitted accurately.{Communication will be impossible if the interior of the LAN cable has been broken Please replace the cable with another oneImportantAccess point cannot be detectedCannot connect to access pointCannot connect to LANNoteUsing an access point](https://usermanual.wiki/ASUSTeK-Computer/W5G00UGPZ50.USERS-MANUAL-4/User-Guide-494443-Page-21.png)

![Introduction 第 218 頁,共 224 頁file://C:\Documents and Settings\anitachou\Local Settings\Temp\~hh114B.htm 2004/11/30If the mobile telephone is connected to and is being used by another device, the motelephone will be undetectable even if you search for it. zIf the mobile telephone is connected to and is being used by another device, no othdevice will be able to connect to the mobile telephone.zPlease use the appropriate transfer method, according to the profiles supported by ymobile telephone.If OPP is supported: right-click on a file to send itIf BIP is supported: use "Image transfer" under Bluetooth Information Exchanger tsend imageszThe telephone number of the connection (i.e., the telephone number for the access of your Internet service provider) may not be correct. Please check the telephone number.zThe user ID and/or password for the provider with whom you have signed up may been entered incorrectly. Please check the user ID and password.zThe default connection may have been configured with different settings. Please seconnection configured for mobile telephone use as the default connection.zOnce you have registered a mobile telephone as your fax server, you will need to ethe fax settings from the [Printer and Faxes] window in the Control Panel.Please refer to "Using a modem station for fax transmissions " for information on tconfiguration procedure.zThe telephone number of the fax destination may have been entered incorrectly. Plcheck the telephone number.zIf the setting under COM Auto Connect Settings has been set to "Off", a connectionot automatically be established with the modem. Please connect to the mobile telephone manually.zThe fax service may not have been enabled for sending (or receiving).Please check the settings by following the procedure below.1. Open [Printers and Faxes] from the Control Panel, right -click on the [Fax]and then click on [Properties]Cannot connect to mobile telephoneCannot send images to mobile telephoneCannot connect to the InternetCannot send or receive faxes](https://usermanual.wiki/ASUSTeK-Computer/W5G00UGPZ50.USERS-MANUAL-4/User-Guide-494443-Page-26.png)
![Introduction 第 219 頁,共 224 頁file://C:\Documents and Settings\anitachou\Local Settings\Temp\~hh114B.htm 2004/11/30The [Fax properties] window will appear.2. Select the [Device] tab, right-click on the modem you wish to use, and theon [Properties] 3. Select the [Send] tab, and then confirm that "Enable device to send" has bechecked.](https://usermanual.wiki/ASUSTeK-Computer/W5G00UGPZ50.USERS-MANUAL-4/User-Guide-494443-Page-27.png)
![Introduction 第 220 頁,共 224 頁file://C:\Documents and Settings\anitachou\Local Settings\Temp\~hh114B.htm 2004/11/304. Select the [Receive] tab, and then confirm that "Enable device to receive" hbeen checked when you wish to receive faxes)5. Click on the [OK] buttonThis glossary provides definitions for Bluetooth -related terminology.You will be able to look up the meanings of any uncertain terms here. A2DP Profile Abbreviation of Advanced Audio Distribution.A Bluetooth profile allowing you to adjust the sound quality of wireless headsets and otaudio devices. AVRCP Profile Abbreviation of Audio/Video Remote Control Profile. A Bluetooth profile enabling remtlf ti tb t d idR t tl d b idbGlossary](https://usermanual.wiki/ASUSTeK-Computer/W5G00UGPZ50.USERS-MANUAL-4/User-Guide-494443-Page-28.png)
![Quick Start Guide - Introduction 第 1 頁,共 160 頁file://C:\Documents and Settings\anitachou\Local Settings\Temp\~hh3F24.htm 2004/11/30The Quick Start Guide is intended to those who wish to get started right away using Bluetooth, and describes basic concepts to be aware of as well as ways to connect to Bluetooth devices.The Quick Start Guide comprises the following items.What you need to know about using BluetoothDescribes the basic concepts you need to be aware of when using Bluetooth devices.It is recommended that you read this section before starting the set-up process. Trying out your Bluetooth deviceDescribes the procedures used for actually configuring and then using your Bluetooth device. Please read this according to your desired purpose and device. TroubleshootingDescribes possible causes and countermeasures to be considered when your Bluetooth device cannot be configured properly, functions abnormally or presents other problems related to its operation. GlossaryExplains the technical jargon used in this guide. You can use a Bluetooth wireless modem to connect to the Internet via a telephone line. →Setting up the modem station→Connecting to the Internet zIn order to connect to the Internet, you must have already signed up with a provider and obtained a connection ID and password. Please ensure you have confirmed the ID, password and telephone number of your provider's access point before you begin the set-up processImportantIntroductionConnecting to the Internet using a modem station [DUN]](https://usermanual.wiki/ASUSTeK-Computer/W5G00UGPZ50.USERS-MANUAL-4/User-Guide-494443-Page-34.png)
![Quick Start Guide - Introduction 第 2 頁,共 160 頁file://C:\Documents and Settings\anitachou\Local Settings\Temp\~hh3F24.htm 2004/11/30and telephone number of your providers access point before you begin the setup process. zPlease refer to your instruction manual for information on connecting the modem station to a telephone line. zA Bluetooth passkey (PIN code) is required for you to connect to the modem station. Please make a note of your Bluetooth passkey before you start the set-up process. 1. Turn on the wireless modem station2. Right-click the Bluetooth icon in the task tray, and then click on [Add New Connection] {Alternatively, click [Start]→[All Programs]→[Bluetooth]→[Bluetooth Settings], and then click on [New Connection] from the active [Bluetooth Settings] window. The [Add New Connection Wizard (Welcome to the Add New Connection Wizard)] window will appear. 3. Confirm that [Express Mode] has been selected, and then click on the [Next] buttonSetting up the modem stationProcedureNote](https://usermanual.wiki/ASUSTeK-Computer/W5G00UGPZ50.USERS-MANUAL-4/User-Guide-494443-Page-35.png)
![Quick Start Guide - Introduction 第 3 頁,共 160 頁file://C:\Documents and Settings\anitachou\Local Settings\Temp\~hh3F24.htm 2004/11/30The [Add New Connection Wizard (Searching for Bluetooth devices)] window will appear.4. Select the device name of the wireless modem station from [Device List], and then click on the [Next] buttonThe [Add New Connection Wizard (Searching for Services)] window will appear.](https://usermanual.wiki/ASUSTeK-Computer/W5G00UGPZ50.USERS-MANUAL-4/User-Guide-494443-Page-36.png)
![Quick Start Guide - Introduction 第 4 頁,共 160 頁file://C:\Documents and Settings\anitachou\Local Settings\Temp\~hh3F24.htm 2004/11/30Once a service has been detected successfully, connection to the device and COM port creation will be performed automatically, after which the [Add New Connection Wizard (Modem Settings)] window will appear.5. If you are connecting to a wireless modem station for the first time, enter the passkey for the modem station under [Bluetooth Passkey (PIN code)], and then click on the [OK] buttonOnce the program has finished searching for the devices, the [Add New Connection Wizard (Device Selection)] window will appear.6. Click on the [Next] buttonCertain modems require you to configure initialization commands separately.Please click on the [Additional initialization Command Settings] button, enter the initialization commands in the following window, and then click on the [OK] button.](https://usermanual.wiki/ASUSTeK-Computer/W5G00UGPZ50.USERS-MANUAL-4/User-Guide-494443-Page-37.png)
![Quick Start Guide - Introduction 第 5 頁,共 160 頁file://C:\Documents and Settings\anitachou\Local Settings\Temp\~hh3F24.htm 2004/11/30 {Please refer to the modem or mobile phone instruction manual for further details on the initialization commands. 7. Enter the connection name (optional), telephone number (of your provider's access point), user name and password (as issued by your provider), and then click on the [Finish] button. {The sample entries shown in the window are provided solely for purpose of explanation. Please use your own telephone number, ID and password according to the arrangement with your provider. The settings will be registered, and an icon will appear in the [Bluetooth Settings] window.NoteImportant](https://usermanual.wiki/ASUSTeK-Computer/W5G00UGPZ50.USERS-MANUAL-4/User-Guide-494443-Page-38.png)
![Quick Start Guide - Introduction 第 6 頁,共 160 頁file://C:\Documents and Settings\anitachou\Local Settings\Temp\~hh3F24.htm 2004/11/30You can connect to the Internet by following the procedure below if the connection destination registered when you configured the wireless modem has been set as the default connection destination. 1. Start your browser, e-mail application or other application {Please enter the e-mail settings separately if you are going to use e-mail (the set-up method will vary with the application). 2. Enter the URL of the Web page you wish to display and then press the [Enter] key, or use the e-mail tool to send/receive items or perform other activities. The [Dial-up Connection] window will appear.3. Click on the [Connect] button{A connection will be automatically established with the modem station if COM Auto Connect is available. If COM Auto Connect is not available, please manually connect to the modem station. The following message will appear once you have connected to the Internet.4. End the connection The window below will appear if you double-click on the icon in the task bar.Connecting to the InternetImportantImportant](https://usermanual.wiki/ASUSTeK-Computer/W5G00UGPZ50.USERS-MANUAL-4/User-Guide-494443-Page-39.png)
![Quick Start Guide - Introduction 第 7 頁,共 160 頁file://C:\Documents and Settings\anitachou\Local Settings\Temp\~hh3F24.htm 2004/11/30 Please click on the [Disconnect] button when you want to disconnect from the Internet.Alternatively, please right-click on the icon, and then click on [Disconnect].zYou can start an application to make an automatic connection to the Internet, but you can also make a manual connection using the connection destination icon.The procedure is described below. 1. From the [Bluetooth Settings] window, right -click on the connection destination icon, and then click on [Connect] from the menu that appearsA window indicating that the connection is being established will appear.Note](https://usermanual.wiki/ASUSTeK-Computer/W5G00UGPZ50.USERS-MANUAL-4/User-Guide-494443-Page-40.png)
![Quick Start Guide - Introduction 第 8 頁,共 160 頁file://C:\Documents and Settings\anitachou\Local Settings\Temp\~hh3F24.htm 2004/11/30If the connection has been established successfully, the connection icon and task tray will appear as shown below. You will be able to browse Web pages using your browser and send and receive e-mail. {Please enter the e-mail settings separately if you are going to use e-mail (the set-up method will vary with the application). 2. End the connectionRight-click on the icon, and then click [Disconnect] to end the connection. The following message will appear. Click on the [Yes] button.Important](https://usermanual.wiki/ASUSTeK-Computer/W5G00UGPZ50.USERS-MANUAL-4/User-Guide-494443-Page-41.png)
![Quick Start Guide - Introduction 第 9 頁,共 160 頁file://C:\Documents and Settings\anitachou\Local Settings\Temp\~hh3F24.htm 2004/11/30When the icon appears as shown below, the connection will have ended. This section describes how to connect to the Internet via a telephone line, using a mobile telephone. →Configuring a mobile telephone for use as a modem→Connecting to the Internet zIn order to connect to the Internet, you must have already signed up with a provider and obtained a connection ID and password. Please ensure you have confirmed the ID, password and telephone number of your provider's access point before you begin the set-up process. zA Bluetooth passkey (PIN code) is required for you to connect to the mobile telephone. Please make a note of your Bluetooth passkey before you start the set-up process. 1. Turn on the mobile telephone, and set it to be connectable via Bluetooth{Please refer to the mobile telephone instruction manual for information on how to operate the device. ImportantConfiguring a mobile telephone for use as a modemProcedureNoteConnecting to the Internet using a mobile telephone [DUN]](https://usermanual.wiki/ASUSTeK-Computer/W5G00UGPZ50.USERS-MANUAL-4/User-Guide-494443-Page-42.png)
![Quick Start Guide - Introduction 第 10 頁,共 160 頁file://C:\Documents and Settings\anitachou\Local Settings\Temp\~hh3F24.htm 2004/11/302. Right-click on the Bluetooth icon in the task tray, and then click on [Add New Connection] {Alternatively, click [Start]→[All Programs]→[Bluetooth]→[Bluetooth Settings], and then click on [New Connection] from the active [Bluetooth Settings] window. The [Add New Connection Wizard (Welcome to the Add New Connection Wizard)] window will appear.3. Confirm that [Express Mode] has been selected, and then click on the [Next] buttonThe [Add New Connection Wizard (Searching for Bluetooth devices)] window will appear.Note](https://usermanual.wiki/ASUSTeK-Computer/W5G00UGPZ50.USERS-MANUAL-4/User-Guide-494443-Page-43.png)
![Quick Start Guide - Introduction 第 11 頁,共 160 頁file://C:\Documents and Settings\anitachou\Local Settings\Temp\~hh3F24.htm 2004/11/304. Select the device name of the mobile telephone from [Device List], and then click on the [Next] buttonThe [Add New Connection Wizard (Searching for Services)] window will appear.](https://usermanual.wiki/ASUSTeK-Computer/W5G00UGPZ50.USERS-MANUAL-4/User-Guide-494443-Page-44.png)
![Quick Start Guide - Introduction 第 12 頁,共 160 頁file://C:\Documents and Settings\anitachou\Local Settings\Temp\~hh3F24.htm 2004/11/30Once a service has been detected successfully, connection to the device and COM port creation will be performed automatically, after which the [Add New Connection Wizard (Modem Settings)] window will appear. 5. If you are connecting to a mobile telephone for the first time, enter the passkey for the wireless modem station under [Bluetooth Passkey (PIN code)], and then click on the [OK] buttonOnce the program has finished searching for the devices, the [Add New Connection Wizard (Device Selection)] window will appear.6. Click on the [Next] buttonCertain modems require you to configure initialization commands separately.Please click on the [Additional Initialization Command Settings] button, enter the initialization commands in the following window, and then click on the [OK] button.](https://usermanual.wiki/ASUSTeK-Computer/W5G00UGPZ50.USERS-MANUAL-4/User-Guide-494443-Page-45.png)
![Quick Start Guide - Introduction 第 13 頁,共 160 頁file://C:\Documents and Settings\anitachou\Local Settings\Temp\~hh3F24.htm 2004/11/30 {Please refer to the modem or mobile phone instruction manual for further details on the initialization commands. 7. Enter the connection name (optional), telephone number (of your provider's access point), user name and password (as issued by your provider), and then click on the [Finish] button. {The sample entries shown in the window are provided solely for purpose of explanation. Please use your own telephone number, ID and password according to the arrangement with your provider. The settings will be registered, and an icon will appear in the [Bluetooth Settings] window.You can connect to the Internet by following the procedure below if the connection destination registered when you configured the mobile telephone has been set as the default connection destination. 1Start your browser email application or other applicationNoteImportantConnecting to the Internet](https://usermanual.wiki/ASUSTeK-Computer/W5G00UGPZ50.USERS-MANUAL-4/User-Guide-494443-Page-46.png)
![Quick Start Guide - Introduction 第 14 頁,共 160 頁file://C:\Documents and Settings\anitachou\Local Settings\Temp\~hh3F24.htm 2004/11/301.Start your browser, e-mail application or other application {Please enter the e-mail settings separately if you are going to use e-mail (the set-up method will vary with the application). 2. Enter the URL of the Web page you wish to display and then press the [Enter] key, or use the e-mail tool to send/receive items or perform other activities.The [Dial-up Connection] window will appear.3. Click on the [Connect] button{A connection will be automatically established with the mobile telephone if COM Auto Connect is available. If COM Auto Connect is not available, please manually connect to the mobile telephone. The following message will appear once you have connected to the Internet.4. End the connection The window below will appear if you double-click on the icon in the task bar.ImportantImportant](https://usermanual.wiki/ASUSTeK-Computer/W5G00UGPZ50.USERS-MANUAL-4/User-Guide-494443-Page-47.png)
![Quick Start Guide - Introduction 第 15 頁,共 160 頁file://C:\Documents and Settings\anitachou\Local Settings\Temp\~hh3F24.htm 2004/11/30 Please click on the [Disconnect] button when you want to disconnect from the Internet.Alternatively, please right-click on the icon, and then click on [Disconnect].zYou can start an application to make an automatic connection to the Internet, but you can also make a manual connection using the connection destination icon.The procedure is described below. 1. From the [Bluetooth Settings] window, right -click on the connection destination icon, and then click on [Connect] from the menu that appearsA window indicating that the connection is being established will appear.Note](https://usermanual.wiki/ASUSTeK-Computer/W5G00UGPZ50.USERS-MANUAL-4/User-Guide-494443-Page-48.png)
![Quick Start Guide - Introduction 第 16 頁,共 160 頁file://C:\Documents and Settings\anitachou\Local Settings\Temp\~hh3F24.htm 2004/11/30If the connection has been established successfully, the connection icon and task tray will appear as shown below. You will be able to browse Web pages using your browser and send and receive e-mail. {Please enter the e-mail settings separately if you are going to use e-mail (the set-up method will vary with the application). 2. End the connectionRight-click on the icon, and then click [Disconnect] to end a connection.The following message will appear. Click on the [Yes] button.When the icon appears as shown below, the connection will have been ended.Important](https://usermanual.wiki/ASUSTeK-Computer/W5G00UGPZ50.USERS-MANUAL-4/User-Guide-494443-Page-49.png)
![Quick Start Guide - Introduction 第 17 頁,共 160 頁file://C:\Documents and Settings\anitachou\Local Settings\Temp\~hh3F24.htm 2004/11/30 This section describes how to connect to a network (for example, a company LAN or a personal home network) using a LAP profile-compatible access point.Please refer to "Using an access point (PAN) to connect to a LAN if you are using a PAN profile-compatible access point.→Setting up the access point→Connecting to a LAN (LAP) zThe access point must have been started and a normal connection already established to the network before the access point is set up. Please refer to the access point instruction manual for information on how to set up the access point.zA Bluetooth passkey (PIN code) is required for you to connect to the access point. Please make a note of your Bluetooth passkey before you start the set-up process. 1. Turn on the access point, and confirm that a connection has been established with the network 2. Right-click the Bluetooth icon in the task tray, and then click on [Add New Connection]ImportantSetting up the access pointProcedureConnecting to a LAN using an access point (LAP) [LAP]](https://usermanual.wiki/ASUSTeK-Computer/W5G00UGPZ50.USERS-MANUAL-4/User-Guide-494443-Page-50.png)
![Quick Start Guide - Introduction 第 18 頁,共 160 頁file://C:\Documents and Settings\anitachou\Local Settings\Temp\~hh3F24.htm 2004/11/30 {Alternatively, click [Start]→[All Programs]→[Bluetooth]→[Bluetooth Settings], and then click on [New Connection] from the active [Bluetooth Settings] window. The [Add New Connection Wizard (Welcome to the Add New Connection Wizard)] window will appear. 3. Confirm that [Express Mode] has been selected, and then click on the [Next] button The [Add New Connection Wizard (Searching for Bluetooth devices)] window will appear.Once the program has finished searching for the devices the [Add NewNote](https://usermanual.wiki/ASUSTeK-Computer/W5G00UGPZ50.USERS-MANUAL-4/User-Guide-494443-Page-51.png)
![Quick Start Guide - Introduction 第 19 頁,共 160 頁file://C:\Documents and Settings\anitachou\Local Settings\Temp\~hh3F24.htm 2004/11/30Once the program has finished searching for the devices, the [Add New Connection Wizard (Device Selection)] window will appear. 4. Select the device name of the access point from [Device List], and then click on the [Next] buttonThe [Add New Connection Wizard (Searching for Services)] window will appear. You will be asked for the Bluetooth passkey in the window that appears.5. Enter the passkey under [Bluetooth Passkey (PIN code)], and then click on the [OK] button](https://usermanual.wiki/ASUSTeK-Computer/W5G00UGPZ50.USERS-MANUAL-4/User-Guide-494443-Page-52.png)
![Quick Start Guide - Introduction 第 20 頁,共 160 頁file://C:\Documents and Settings\anitachou\Local Settings\Temp\~hh3F24.htm 2004/11/30Service detection and COM port creation will be performed automatically.The [Add New Connection Wizard (Create Connection Destination)] window will appear.6. Enter the connection name, user name and password, then click on the [Next] button {The user name and password are entered here to allow you to connect to the access point. The [Add New Connection Wizard (Confirm Dial-up Settings)] window will appear. 7. Click on the [Confirm Settings] buttonNote](https://usermanual.wiki/ASUSTeK-Computer/W5G00UGPZ50.USERS-MANUAL-4/User-Guide-494443-Page-53.png)
![Quick Start Guide - Introduction 第 21 頁,共 160 頁file://C:\Documents and Settings\anitachou\Local Settings\Temp\~hh3F24.htm 2004/11/30The [Internet Options] window will appear.8. Configure the connection method, and then click on the [OK] buttonSet the connection destination used for the LAN connection set up in (6) above as the default connection destination, and then select "Always dial my default connection." 9. Click on the [Next] buttonThe [Add New Connection Wizard (Connection Name Settings)] window will appear. 10.Enter the type and name of the icon displayed after registration, and then click on the](https://usermanual.wiki/ASUSTeK-Computer/W5G00UGPZ50.USERS-MANUAL-4/User-Guide-494443-Page-54.png)
![Quick Start Guide - Introduction 第 22 頁,共 160 頁file://C:\Documents and Settings\anitachou\Local Settings\Temp\~hh3F24.htm 2004/11/3010.Enter the type and name of the icon displayed after registration, and then click on the[Next] buttonPlease click on the [Next] button if you are satisfied with the settings. The [Add New Connection Wizard (Completing the Add New Connection Wizard)] window will appear.11. Click on the [Finish] buttonThe access point icon will be registered in the [Bluetooth Settings] window. This will complete the access point set-up process.→"Connecting to a LAN (LAP)" 1. Right-click on the connection icon in the [Bluetooth Settings] window, and then click on [Connect]ProcedureConnecting to a LAN (LAP)](https://usermanual.wiki/ASUSTeK-Computer/W5G00UGPZ50.USERS-MANUAL-4/User-Guide-494443-Page-55.png)
![Quick Start Guide - Introduction 第 23 頁,共 160 頁file://C:\Documents and Settings\anitachou\Local Settings\Temp\~hh3F24.htm 2004/11/30The [Dial-up Connection] window will appear.2. Confirm that "Direct connection" has been selected under [Connection Destination], and then click on the [Connect] button A connection will be initiated. {This is an example of what happens when you use "Direct connection" as a connection name under "Connect to access point." If a name different from the connection name is used, that name will appear under [Connection Destination]. {Please simply click on [Settings] if no user name or password have been entered (i.e., if those fields have been left blank){Please change the connection destination if a different connection name (for a dial-up connection) appears in [Connection Destination].Related topic→"Changing the default connection destination" Once you connect to the network, Internet Explorer will start automatically, and you will be able to exchange data with other computers on the network.Note](https://usermanual.wiki/ASUSTeK-Computer/W5G00UGPZ50.USERS-MANUAL-4/User-Guide-494443-Page-56.png)
![Quick Start Guide - Introduction 第 24 頁,共 160 頁file://C:\Documents and Settings\anitachou\Local Settings\Temp\~hh3F24.htm 2004/11/30w beabetoecagedata w t ot e co pute s o t e etwo .{Please follow the procedure below if you need to set up a proxy server to connect to the Internet (the following procedure is not necessary if the PC you are going to use has already been set up as a proxy server).1 Select [Internet Options...] from the [Tools] menu in Internet Explorer The [Internet Options] window will appear.2 Click on the [Connections] tab, and then click on the [Settings...] button 3 Enter the IP address and port number of the proxy server under [Proxy Server], and then click on the [OK] buttonNote](https://usermanual.wiki/ASUSTeK-Computer/W5G00UGPZ50.USERS-MANUAL-4/User-Guide-494443-Page-57.png)
![Quick Start Guide - Introduction 第 25 頁,共 160 頁file://C:\Documents and Settings\anitachou\Local Settings\Temp\~hh3F24.htm 2004/11/30 3. End the connection Right-click either on the connection icon under the [Bluetooth Settings] window or on the icon in the task tray, and then click on [Disconnect].Click on the "Yes" button in the disconnection confirmation dialog box that appears. This section describes how to connect to a network (for example, a company LAN or a personal home network) using a PAN profile-compatible access point.Please refer to "Using an access point (LAP) to connect to a LAN" if you are using a LAP profile-compatible access point.→Setting up the access point→Connecting to a LAN (PAN) zThe access point must be started and a normal connection already established to the network before the access point is set up. Please refer to the access point instruction manual for information on how to set up the access point. zA Bluetooth passkey (PIN code) is required for you to connect to the access point. Please make a note of your Bluetooth passkey before you start the set-up process. ImportantSetting up the access pointProcedureConnecting to a LAN using an access point (PAN) [PAN]](https://usermanual.wiki/ASUSTeK-Computer/W5G00UGPZ50.USERS-MANUAL-4/User-Guide-494443-Page-58.png)
![Quick Start Guide - Introduction 第 26 頁,共 160 頁file://C:\Documents and Settings\anitachou\Local Settings\Temp\~hh3F24.htm 2004/11/301. Turn on the access point, and confirm that a connection has been established with the network2. Right-click the Bluetooth icon in the task tray, and then click on [Add New Connection] {Alternatively, click [Start]→[All Programs]→[Bluetooth]→[Bluetooth Settings], and then click on [New Connection] from the active [Bluetooth Settings] window. The [Add New Connection Wizard (Welcome to the Add New Connection Wizard)] window will appear. 3. Confirm that [Express Mode] has been selected, and then click on the [Next] button The [Add New Connection Wizard (Searching for Bluetooth devices)] window will appear.Note](https://usermanual.wiki/ASUSTeK-Computer/W5G00UGPZ50.USERS-MANUAL-4/User-Guide-494443-Page-59.png)
![Quick Start Guide - Introduction 第 27 頁,共 160 頁file://C:\Documents and Settings\anitachou\Local Settings\Temp\~hh3F24.htm 2004/11/30Once the program has finished searching for the devices, the [Add New Connection Wizard (Device Selection)] window will appear. 4. Select the device name of the access point from [Device List], and then click on the [Next] buttonThe [Add New Connection Wizard (Searching for Services)] window will appear.](https://usermanual.wiki/ASUSTeK-Computer/W5G00UGPZ50.USERS-MANUAL-4/User-Guide-494443-Page-60.png)
![Quick Start Guide - Introduction 第 28 頁,共 160 頁file://C:\Documents and Settings\anitachou\Local Settings\Temp\~hh3F24.htm 2004/11/30 You will be asked for the Bluetooth passkey in the window that appears.5. Enter the passkey under [Bluetooth Passkey (PIN code)], and then click on the [OK] buttonService detection and COM port creation will be performed automatically.The [Add New Connection Wizard (Connection Name Settings)] window will appear. 6. Enter the type and name of the icon displayed after registration, and then click on the [Next] buttonPlease click on the [Next] button if you are satisfied with the settings.The [Add New Connection Wizard (Completing the Add New Connection Wizard)] window will appear.7. Click on the [Finish] buttonThe access point icon will be registered in the [Bluetooth Settings] window.](https://usermanual.wiki/ASUSTeK-Computer/W5G00UGPZ50.USERS-MANUAL-4/User-Guide-494443-Page-61.png)
![Quick Start Guide - Introduction 第 29 頁,共 160 頁file://C:\Documents and Settings\anitachou\Local Settings\Temp\~hh3F24.htm 2004/11/30 This will complete the access point set-up process.→"Connecting to a LAN (PAN)" 1. Right-click on the connection icon in the [Bluetooth Settings] window, and then click on [Connect]You will be asked for the Bluetooth passkey in the window that appears.2. Enter the passkey under [Bluetooth Passkey (PIN code)], and then click on the [OK] buttonA connection will be initiatedProcedureConnecting to a LAN (PAN)](https://usermanual.wiki/ASUSTeK-Computer/W5G00UGPZ50.USERS-MANUAL-4/User-Guide-494443-Page-62.png)
![Quick Start Guide - Introduction 第 30 頁,共 160 頁file://C:\Documents and Settings\anitachou\Local Settings\Temp\~hh3F24.htm 2004/11/30A connection will be initiated. Once you have connected to the network, Internet Explorer will start automatically, and you will be able to exchange data with other computers on the network.{Please follow the procedure below if you need to set up a proxy server to connect to the Internet (the following procedure is not necessary if the PC you are going to use has already been set up as a proxy server). 1 Select [Internet Options...] from the [Tools] menu in Internet Explorer The [Internet Options] window will appear. 2 Click on the [Connections] tab, and then click on the [LAN Settings...] button 3 Enter the IP address and port number of the proxy server under [Proxy Server], and then click on the [OK] buttonNote](https://usermanual.wiki/ASUSTeK-Computer/W5G00UGPZ50.USERS-MANUAL-4/User-Guide-494443-Page-63.png)
![Quick Start Guide - Introduction 第 31 頁,共 160 頁file://C:\Documents and Settings\anitachou\Local Settings\Temp\~hh3F24.htm 2004/11/30 3. End the connection Right-click either on the connection icon under the [Bluetooth Settings] window or on the icon in the task tray, and then click on [Disconnect].Click on the "Yes" button in the disconnection confirmation dialog box that appears. You can use the PAN profile to build a network of Bluetooth -enabled devices. →Operating as a server→Operating as a clientA personal area network comprises a client -server architecture. The device to which other devices connect is called the "server", and a device that connects to the server is called a "client."The client-server relationship is not necessarily a fixed one. The first of two devices to establish a connection can be the server when one other device is present, and can be the client in other instances.Building a personal area network [PAN]](https://usermanual.wiki/ASUSTeK-Computer/W5G00UGPZ50.USERS-MANUAL-4/User-Guide-494443-Page-64.png)
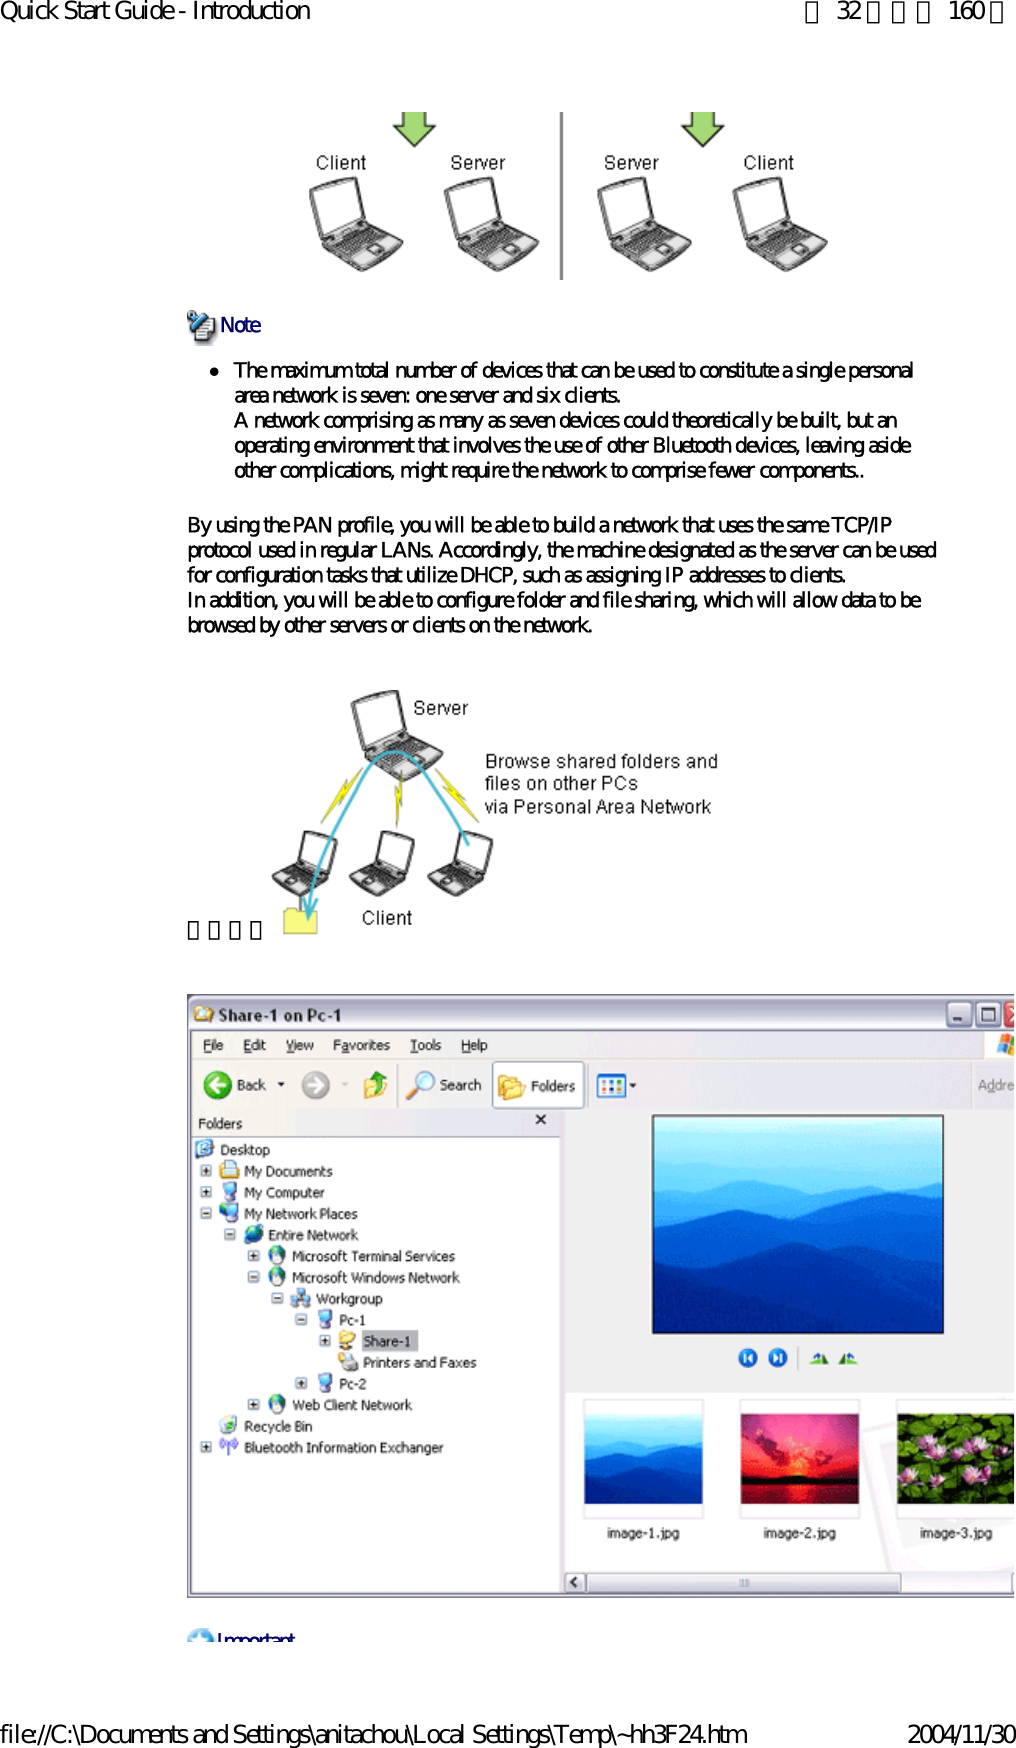
![Quick Start Guide - Introduction 第 33 頁,共 160 頁file://C:\Documents and Settings\anitachou\Local Settings\Temp\~hh3F24.htm 2004/11/30zPlease refer to Windows Help for further information on TCP/IP, DHCP and configurations for sharing. The following icon will appear in the tasktray when the PAN server function has been activated.Should the icon not appear, please follow the procedure below to activate the PAN server function.1. Right-click the Bluetooth icon in the task tray and make sure the Option [Use PAN Group Ad-hoc Network] is enabled. A message will appear asking you to confirm whether you wish to activate the PAN group ad-hoc network. 2. Click the [Yes] button The PAN server will be activated, and an icon will accordingly appear in the tasktray. Other devices that use the PAN profile will now be able to connect over the network. zWhen using the device as the server, make sure that all user accounts have a password set for the security reasons. By clicking on the icon, the [Bluetooth PAN Server] window will appear. In the graphic below, one client has established a connection. zWhen you try to connect to another server as a client, the task tray icon will disappear, and your machine will not be able to function as a server in response to connection requests originating from other devices.Connecting to a server as a client is performed from the [Bluetooth Settings] window, as described below.ImportantOperating as a serverImportantNoteOperating as a clientProcedure](https://usermanual.wiki/ASUSTeK-Computer/W5G00UGPZ50.USERS-MANUAL-4/User-Guide-494443-Page-66.png)
![Quick Start Guide - Introduction 第 34 頁,共 160 頁file://C:\Documents and Settings\anitachou\Local Settings\Temp\~hh3F24.htm 2004/11/301. Right-click on the Bluetooth icon in the task tray, and click on [Add New Connection] {Alternatively, click on [Start]→[All Programs]→[Bluetooth]→[Bluetooth Settings], and then on [New Connection] from the [Bluetooth Settings] window. 2. Confirm that [Express Mode] has been selected, and then click on the [Next] button 3. Click on the [Next] button in the advisory dialog boxThe [Add New Connection Wizard (Searching for Bluetooth devices)] window will appear. Note](https://usermanual.wiki/ASUSTeK-Computer/W5G00UGPZ50.USERS-MANUAL-4/User-Guide-494443-Page-67.png)
![Quick Start Guide - Introduction 第 35 頁,共 160 頁file://C:\Documents and Settings\anitachou\Local Settings\Temp\~hh3F24.htm 2004/11/30Once the program has finished searching for the devices, the [Add New Connection Wizard (Device Selection)] window will appear.4. Select the name of the device designated as the server from [Device List], and then click on the [Next] buttonThe [Add New Connection Wizard (Searching for Services)] window will appear. The [Add New Connection Wizard (Confirm Connection Name)] window will appear.](https://usermanual.wiki/ASUSTeK-Computer/W5G00UGPZ50.USERS-MANUAL-4/User-Guide-494443-Page-68.png)
![Quick Start Guide - Introduction 第 36 頁,共 160 頁file://C:\Documents and Settings\anitachou\Local Settings\Temp\~hh3F24.htm 2004/11/305. Click on the [Next] buttonThe registered icon will appear in the [Bluetooth Settings] window.■Connecting to a server1. Right-click on the icon in the [Bluetooth Settings] window, and then click on [Connect]Once you have connected, the icon will change to indicate that the device is connected.Procedure](https://usermanual.wiki/ASUSTeK-Computer/W5G00UGPZ50.USERS-MANUAL-4/User-Guide-494443-Page-69.png)
![Quick Start Guide - Introduction 第 37 頁,共 160 頁file://C:\Documents and Settings\anitachou\Local Settings\Temp\~hh3F24.htm 2004/11/30 ■Ending a connection to a server1. Right-click on the icon in the [Bluetooth Settings] window, and then click on [Disconnect]A message confirming whether you wish to disconnect will appear. Click on the [Yes] button.Once you have disconnected, the icon will change to indicate that the device is not connected. ProcedureUsing a modem station for fax transmissions [FAX]](https://usermanual.wiki/ASUSTeK-Computer/W5G00UGPZ50.USERS-MANUAL-4/User-Guide-494443-Page-70.png)
![Quick Start Guide - Introduction 第 38 頁,共 160 頁file://C:\Documents and Settings\anitachou\Local Settings\Temp\~hh3F24.htm 2004/11/30This section describes how to send a fax using a Bluetooth wireless modem station.→Setting up the modem station→Installing a modem →Setting fax information→Sending a fax→Receiving a faxzPlease refer to the modem station instruction manual for information on how to connect the station to a telephone line. zPlease ensure that any drivers used to connect the PC to the modem have been installed.zA Bluetooth passkey (PIN code) is required for you to connect to the modem station. Please make a note of your Bluetooth passkey before you start the set -up process.zA fax application is required for you to be able to send and receive faxes. The description below is based on a example using Microsoft Fax, which is installed with Windows XP as standard. If you are going to use a commercially available fax application , then please refer to the manual that came with the application for information on how to send and receive faxes. Set up and register the modem station as a fax service.1. Turn on the wireless modem station2. Right-click on the Bluetooth icon in the task tray, and then click on [Add New Connection] ImportantSetting up the modem stationProcedure](https://usermanual.wiki/ASUSTeK-Computer/W5G00UGPZ50.USERS-MANUAL-4/User-Guide-494443-Page-71.png)
![Quick Start Guide - Introduction 第 39 頁,共 160 頁file://C:\Documents and Settings\anitachou\Local Settings\Temp\~hh3F24.htm 2004/11/30{Alternatively, click [Start]→[All Programs]→[Bluetooth]→[Bluetooth Settings], and then click on [New Connection] from the active [Bluetooth Settings] window. The [Add New Connection Wizard (Welcome to the Add New Connection Wizard)] window will appear.3. Select [Custom Mode], and then click on the [Next] button The [Add New Connection Wizard (Searching for Bluetooth devices)] window will appear.Once the program has finished searching for the devices, the [Add New Connection Wizard (Select Device)] window will appear.4. Select the device name of the wireless modem station from [Device List], and then click on the [Next] buttonNote](https://usermanual.wiki/ASUSTeK-Computer/W5G00UGPZ50.USERS-MANUAL-4/User-Guide-494443-Page-72.png)
![Quick Start Guide - Introduction 第 40 頁,共 160 頁file://C:\Documents and Settings\anitachou\Local Settings\Temp\~hh3F24.htm 2004/11/30 The [Add New Connection Wizard (Searching for Services)] window will appear. 5. If you are connecting to the wireless modem station for the first time, enter the passkey for the device from the [Bluetooth Passkey (PIN Code)] window, and then click on the [OK] buttonOnce the program has finished searching for the services the [Add New Connection](https://usermanual.wiki/ASUSTeK-Computer/W5G00UGPZ50.USERS-MANUAL-4/User-Guide-494443-Page-73.png)
![Quick Start Guide - Introduction 第 41 頁,共 160 頁file://C:\Documents and Settings\anitachou\Local Settings\Temp\~hh3F24.htm 2004/11/30Once the program has finished searching for the services, the [Add New Connection Wizard (Select Service)] window will appear.6. Select "Fax" under [Select Service], and then click on the [Next] buttonThe [Add New Connection Wizard (Connecting to Remote Device)] screen will appear.The COM port and modem registration process will then be automatically performed. Once the COM port and modem (standard 33600 bps type) registration is complete,the [Add New Connection Wizard (Setting Connection Name)] screen will appear.7. Configure the type and name of the icon to appear after registration,and click on the [Next] button.Please click only on the [Next] button once you are satisfied with the configuration.](https://usermanual.wiki/ASUSTeK-Computer/W5G00UGPZ50.USERS-MANUAL-4/User-Guide-494443-Page-74.png)
![Quick Start Guide - Introduction 第 42 頁,共 160 頁file://C:\Documents and Settings\anitachou\Local Settings\Temp\~hh3F24.htm 2004/11/30The [Add New Connection Wizard (Completing the Add New Connection Wizard)] screen will appear.8. Click on the [Finish] buttonThe settings will be registered, and the icon will appear on the [Bluetooth Settings] screen. Configure send/receive settings and register fax information. 1. Select [Start]→[Control Panel], and then double-click on the [Printers and Other Hardware] icon{If the control panel is displayed in "Classic view", and you use Windows 2000, please start from Step (2). 2. Double-click on the [Printers and Faxes] iconThe [Printers & Faxes] window will appear.3. Click on "Install a local fax printer" in the [Printers and Faxes] windowSetting FAX informationProcedureNote](https://usermanual.wiki/ASUSTeK-Computer/W5G00UGPZ50.USERS-MANUAL-4/User-Guide-494443-Page-75.png)
![Quick Start Guide - Introduction 第 43 頁,共 160 頁file://C:\Documents and Settings\anitachou\Local Settings\Temp\~hh3F24.htm 2004/11/30A window showing installed programs will appear, and a Fax icon will have been created in the [Printers and Faxes] screen.4. Click on "Send a fax" under "Printer Tasks" on the left side of the windowIf you have not yet configured a fax device, the [Fax Configuration Wizard] window will appear. In the window you can enter settings pertaining to the sender (yourself). Note](https://usermanual.wiki/ASUSTeK-Computer/W5G00UGPZ50.USERS-MANUAL-4/User-Guide-494443-Page-76.png)
![Quick Start Guide - Introduction 第 44 頁,共 160 頁file://C:\Documents and Settings\anitachou\Local Settings\Temp\~hh3F24.htm 2004/11/30{If the fax configuration information has already been registered, the [Send Fax Wizard] window, which can be viewed under " Sending a fax" below, will appear instead of the [Fax Configuration Wizard] window. 5. Enter the sender information, and click on the [Next] button {The sender information that you configure here will be automatically appended as header information when you send a fax. The [Fax Configuration Wizard (Select Device for Sending or Receiving Faxes)] window will appear.6. Select a device to be used for fax transmissions, enable the device for sending or receiving, and then click on the [Next] buttonNoteNote](https://usermanual.wiki/ASUSTeK-Computer/W5G00UGPZ50.USERS-MANUAL-4/User-Guide-494443-Page-77.png)
![Quick Start Guide - Introduction 第 45 頁,共 160 頁file://C:\Documents and Settings\anitachou\Local Settings\Temp\~hh3F24.htm 2004/11/30{If [Enable Receive] is selected, the device will be on standby for receiving faxes even if it is not sending or receiving anything, and therefore will be in continuous connection to the wireless modem (when COM Auto Connect is on).Please decide whether to select this option based on the desired objective and/or frequency of transmission. The [Fax Configuration Wizard (Transmitting Subscriber Identification (TSID))] window will appear.7. Click on the [Next] buttonIt is important that you do not change the transmitter subscriber identification. The [Fax Configuration Wizard (Completing the Fax Configuration Wizard)] window will appear. 8. Click on the [Finish] buttonThe fax information will be have been registered, and the [Fax Console] window will Note](https://usermanual.wiki/ASUSTeK-Computer/W5G00UGPZ50.USERS-MANUAL-4/User-Guide-494443-Page-78.png)
![Quick Start Guide - Introduction 第 46 頁,共 160 頁file://C:\Documents and Settings\anitachou\Local Settings\Temp\~hh3F24.htm 2004/11/30 The fax information will be have been registered, and the [Fax Console] window willappear.This will complete the fax set-up process. Related topics: "Sending a fax" and "Receiving a fax"This section describes how to send a fax from the Fax Console. zThe Fax service must be enabled for sending in order for you to send a fax.Please refer to "Using a wireless modem station" under "Troubleshooting" for how to change the send and receive settings once the service has been configured. 1. Double-click on the [Fax] icon in the Control Panel The [Fax Console] window will appear.2. In the [Fax Console] window, click [File] →[Send fax]The [Send Fax Wizard (Starting the Send Fax Wizard)] window will appear. 3. Click on the [Next] buttonImportantProcedureSending a fax](https://usermanual.wiki/ASUSTeK-Computer/W5G00UGPZ50.USERS-MANUAL-4/User-Guide-494443-Page-79.png)
![Quick Start Guide - Introduction 第 47 頁,共 160 頁file://C:\Documents and Settings\anitachou\Local Settings\Temp\~hh3F24.htm 2004/11/30The [Send Fax Wizard (Recipient Information)] window will appear.4. Enter the name and fax number of the destination party, and then click on the [Next] buttonThe [Send Fax Wizard (Preparing the Cover Page)] window will appear.5. Specify the cover page template, subject line, and note (body text), and then click on the [Next] button](https://usermanual.wiki/ASUSTeK-Computer/W5G00UGPZ50.USERS-MANUAL-4/User-Guide-494443-Page-80.png)
![Quick Start Guide - Introduction 第 48 頁,共 160 頁file://C:\Documents and Settings\anitachou\Local Settings\Temp\~hh3F24.htm 2004/11/30The [Send Fax Wizard (Schedule)] window will appear. 6. If you wish to send the fax immediately, select "Now", and then click on the [Next] buttonThe [Send Fax Wizard (Completing the Send Fax Wizard)] window will appear.7. Confirm the destination information and transmission details, and then click on the [Finish] button](https://usermanual.wiki/ASUSTeK-Computer/W5G00UGPZ50.USERS-MANUAL-4/User-Guide-494443-Page-81.png)
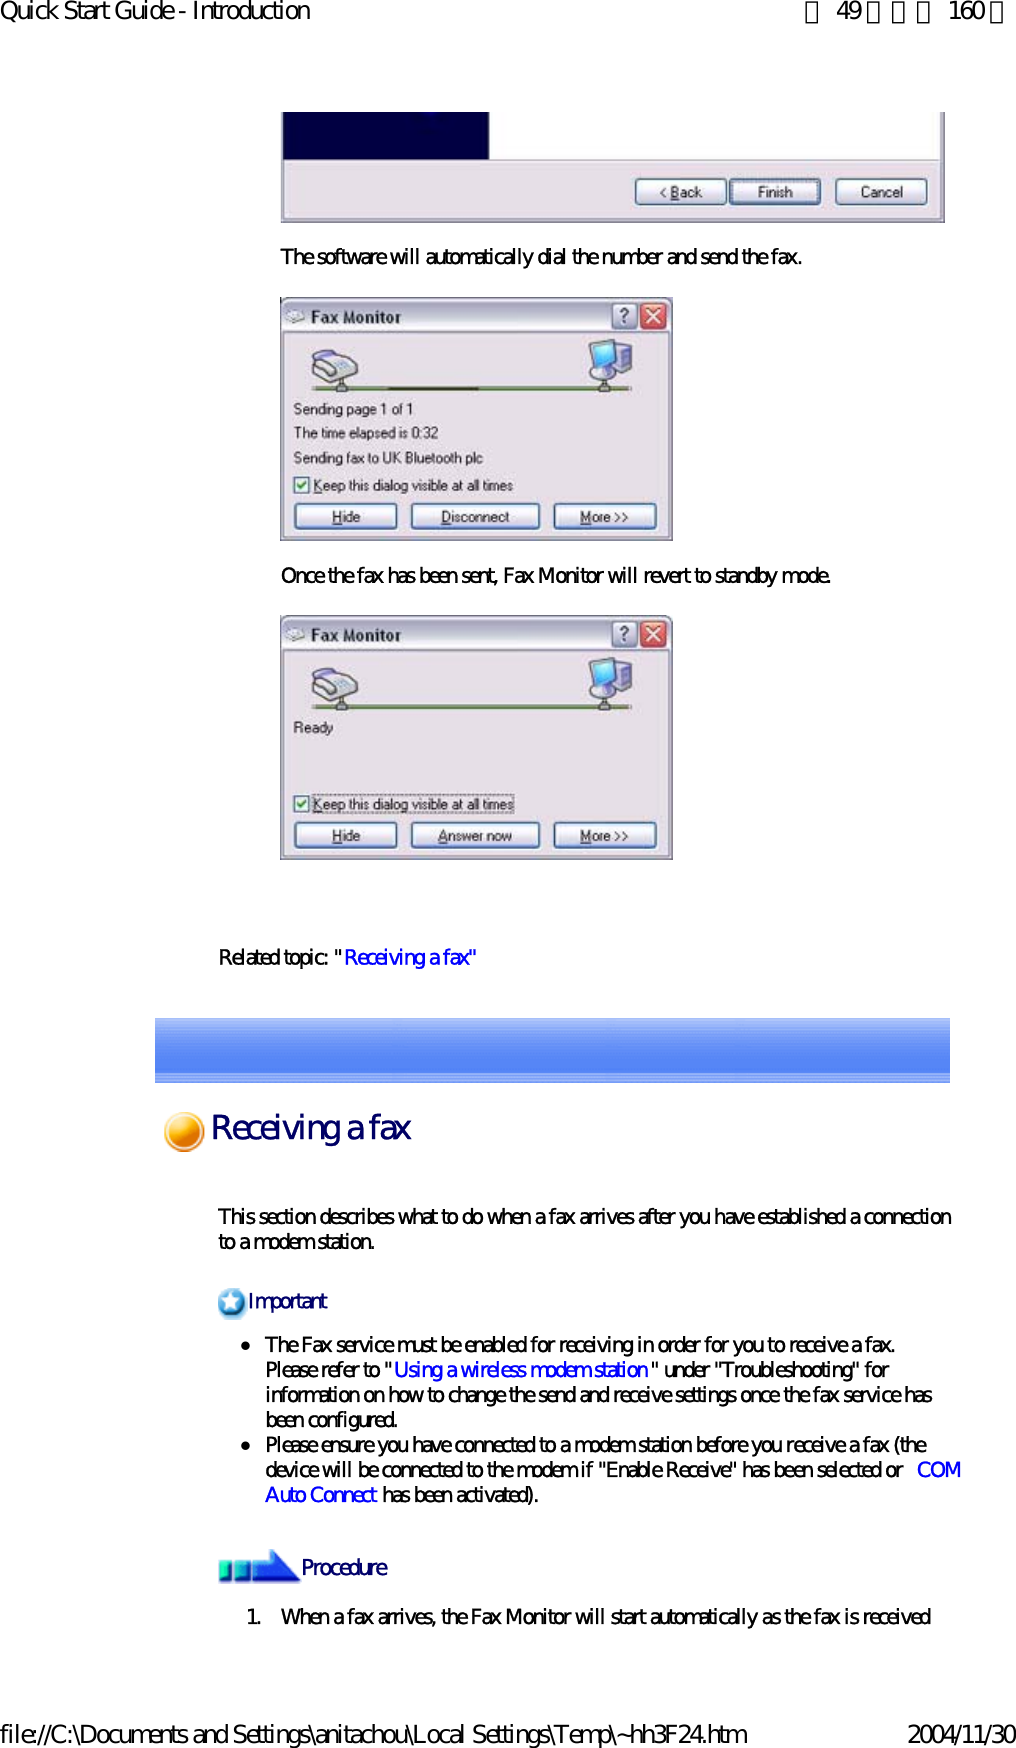
![Quick Start Guide - Introduction 第 50 頁,共 160 頁file://C:\Documents and Settings\anitachou\Local Settings\Temp\~hh3F24.htm 2004/11/30 Once the fax has been received, the Fax Monitor will revert to standby mode. {If you have enabled manual fax reception, the message below will appear when a fax arrives.Click on the message with your mouse to receive the fax.2. Double-click on the [Fax] icon in the Control PanelThe [Fax Console] window will appear.3. In the [Fax Console] window, double-click on the fax that has arrivedAn image of the received fax will be displayed.Note](https://usermanual.wiki/ASUSTeK-Computer/W5G00UGPZ50.USERS-MANUAL-4/User-Guide-494443-Page-83.png)
![Quick Start Guide - Introduction 第 51 頁,共 160 頁file://C:\Documents and Settings\anitachou\Local Settings\Temp\~hh3F24.htm 2004/11/30 Related topic: "Sending a fax"This section describes how to send a fax using a mobile telephone as a modem. →Setting up the mobile telephone→Installing a modem→Setting fax information→Sending a fax→Receiving a faxzPlease ensure that any drivers used to connect the PC to the mobile telephone have been installed.zA Bluetooth passkey (PIN code) is required for you to connect to the mobile telephone. Please make a note of your Bluetooth passkey before you start the set -up process.zA fax application is required for you to be able to send and receive faxes. The description below is based on a example using Microsoft Fax, which is installed with Windows XP as standard.If you are going to use a commercially available fax application , then please refer to the manual that came with the application for information on how to send and receive faxes. ImportantSetting up the mobile telephoneUsing a mobile telephone for fax transmissions [FAX]](https://usermanual.wiki/ASUSTeK-Computer/W5G00UGPZ50.USERS-MANUAL-4/User-Guide-494443-Page-84.png)
![Quick Start Guide - Introduction 第 52 頁,共 160 頁file://C:\Documents and Settings\anitachou\Local Settings\Temp\~hh3F24.htm 2004/11/30Set up and register the mobile telephone as a fax service.1. Turn on the mobile telephone, and set it to be connectable via Bluetooth{Please refer to the instruction manual for information on how to operate the telephone. 2. Right-click on the Bluetooth icon in the task tray, and then click on [Add New Connection] {Alternatively, click [Start]→[All Programs]→[Bluetooth]→[Bluetooth Settings], and then click on [New Connection] from the active [Bluetooth Settings] window. The [Add New Connection Wizard (Welcome to the Add New Connection Wizard)] window will appear.3. Select [Custom Mode], and then click on the [Next] button ProcedureNoteNote](https://usermanual.wiki/ASUSTeK-Computer/W5G00UGPZ50.USERS-MANUAL-4/User-Guide-494443-Page-85.png)
![Quick Start Guide - Introduction 第 53 頁,共 160 頁file://C:\Documents and Settings\anitachou\Local Settings\Temp\~hh3F24.htm 2004/11/30The [Add New Connection Wizard (Searching for Bluetooth devices)] window will appear.Once the program has finished searching for the devices, the [Add New Connection Wizard (Select Device)] window will appear.4. Select the device name of the mobile telephone from [Device List], and then click on the [Next] button The [Add New Connection Wizard (Searching for Services)] window will appear.](https://usermanual.wiki/ASUSTeK-Computer/W5G00UGPZ50.USERS-MANUAL-4/User-Guide-494443-Page-86.png)
![Quick Start Guide - Introduction 第 54 頁,共 160 頁file://C:\Documents and Settings\anitachou\Local Settings\Temp\~hh3F24.htm 2004/11/30 5. If you are connecting to the mobile telephone for the first time, enter the passkey for the device from the [Bluetooth Passkey (PIN Code)] window, and then click on the [OK] button.Once the program has finished searching for the services, the [Add New Connection Wizard (Select Service)] window will appear.6. Select "Fax" under [Select Service], and then click on the [Next] buttonThe [Add New Connection Wizard (Connecting to Remote Device)] screen will appear.The COM port and modem registration process will then be automatically performed.](https://usermanual.wiki/ASUSTeK-Computer/W5G00UGPZ50.USERS-MANUAL-4/User-Guide-494443-Page-87.png)
![Quick Start Guide - Introduction 第 55 頁,共 160 頁file://C:\Documents and Settings\anitachou\Local Settings\Temp\~hh3F24.htm 2004/11/30The COM port and modem registration process will then be automatically performed. Once the COM port and modem (standard 33600 bps type) registration is complete,the [Add New Connection Wizard (Setting Connection Name)] screen will appear.7. Configure the type and name of the icon to appear after registration, and click on the [Next] button. Please click only on the [Next] button once you are satisfied with the configuration.The [Add New Connection Wizard (Completing the Add New Connection Wizard)] screen will appear. 8. Click on the [Finish] button The settings will be registered, and the icon will appear on the [Bluetooth Settings] screen.](https://usermanual.wiki/ASUSTeK-Computer/W5G00UGPZ50.USERS-MANUAL-4/User-Guide-494443-Page-88.png)
![Quick Start Guide - Introduction 第 56 頁,共 160 頁file://C:\Documents and Settings\anitachou\Local Settings\Temp\~hh3F24.htm 2004/11/30Configure send/receive settings and register fax information. 1. Select [Start]→[Control Panel], and then double-click on the [Printers and Other Hardware] icon {If the control panel is displayed in "Classic view", and you use Windows 2000, please start from Step (2). 2. Double-click on the [Printers and Faxes] iconThe [Printers & Faxes] window will appear.3. Click on "Set up faxing" in the [Printers and Faxes] windowA window showing installed programs will appear, and a Fax icon will have been created in the [Printers and Faxes] screen.4. Click on "Send a fax" under "Printer Tasks" on the left side of the windowSetting fax informationProcedureNote](https://usermanual.wiki/ASUSTeK-Computer/W5G00UGPZ50.USERS-MANUAL-4/User-Guide-494443-Page-89.png)
![Quick Start Guide - Introduction 第 57 頁,共 160 頁file://C:\Documents and Settings\anitachou\Local Settings\Temp\~hh3F24.htm 2004/11/30If you have not yet configured a fax device, the [Fax Configuration Wizard] window will appear. In the window you can enter settings pertaining to the sender (yourself). {If the fax configuration information has already been registered, the [Send Fax Wizard] window, which can be viewed under " Sending a fax" below, will appear instead of the [Fax Configuration Wizard] window. 5. Enter the sender information, and click on the [Next] button NoteNote](https://usermanual.wiki/ASUSTeK-Computer/W5G00UGPZ50.USERS-MANUAL-4/User-Guide-494443-Page-90.png)
![Quick Start Guide - Introduction 第 58 頁,共 160 頁file://C:\Documents and Settings\anitachou\Local Settings\Temp\~hh3F24.htm 2004/11/30{The sender information that you configure here will be automatically appended as header information when you send a fax. The [Fax Configuration Wizard (Select Device for Sending or Receiving Faxes)] window will appear. 6. Select a device to be used for fax transmissions, enable the device for sending or receiving, and then click on the [Next] button{If [Enable Receive] is selected, the device will be on standby for receiving faxes even if it is not sending or receiving anything, and therefore will be in continuous connection to the wireless modem (when COM Auto Connect is on).Please decide whether to select this option based on to the desired objective and/or frequency of transmission. The [Fax Configuration Wizard (Transmitting Subscriber Identification (TSID))] window will appear. 7. Click on the [Next] buttonIt is important that you do not change the transmitter subscriber identification.Note](https://usermanual.wiki/ASUSTeK-Computer/W5G00UGPZ50.USERS-MANUAL-4/User-Guide-494443-Page-91.png)
![Quick Start Guide - Introduction 第 59 頁,共 160 頁file://C:\Documents and Settings\anitachou\Local Settings\Temp\~hh3F24.htm 2004/11/30The [Fax Configuration Wizard (Completing the Fax Configuration Wizard)] window will appear. 8. Click on the [Finish] buttonThe fax information will be have been registered, and the [Fax Console] window will appear.This will complete the fax set-up process. Related topics: "Sending a fax" and "Receiving a fax" This section describes how to send a fax from the Fax Console. zThe Fax service must be enabled for sending in order for you to send a fax.Please refer to "Using a mobile telephone" under "Troubleshooting" for how to change the send and receive settings once the service has been configured."" 1Doubleclick on the [Fax] icon in the Control PanelImportantProcedureSending a fax](https://usermanual.wiki/ASUSTeK-Computer/W5G00UGPZ50.USERS-MANUAL-4/User-Guide-494443-Page-92.png)
![Quick Start Guide - Introduction 第 60 頁,共 160 頁file://C:\Documents and Settings\anitachou\Local Settings\Temp\~hh3F24.htm 2004/11/301.Double-click on the [Fax] icon in the Control PanelThe [Fax Console] window will appear. 2. In the [Fax Console] window, click [File] →[Send fax]The [Send Fax Wizard (Starting the Send Fax Wizard)] window will appear. 3. Click on the [Next] buttonThe [Send Fax Wizard (Recipient Information)] window will appear.4. Enter the name and fax number of the destination party, and then click on the [Next] button](https://usermanual.wiki/ASUSTeK-Computer/W5G00UGPZ50.USERS-MANUAL-4/User-Guide-494443-Page-93.png)
![Quick Start Guide - Introduction 第 61 頁,共 160 頁file://C:\Documents and Settings\anitachou\Local Settings\Temp\~hh3F24.htm 2004/11/30The [Send Fax Wizard (Preparing the Cover Page)] window will appear. 5. Specify the cover page template, subject line, and note (body text), and then click on the [Next] buttonThe [Send Fax Wizard (Schedule)] window will appear.6. If you wish to send the fax immediately, select "Now", and then click on the [Next] button](https://usermanual.wiki/ASUSTeK-Computer/W5G00UGPZ50.USERS-MANUAL-4/User-Guide-494443-Page-94.png)
![Quick Start Guide - Introduction 第 62 頁,共 160 頁file://C:\Documents and Settings\anitachou\Local Settings\Temp\~hh3F24.htm 2004/11/30The [Send Fax Wizard (Completing the Send Fax Wizard)] window will appear. 7. Confirm the destination information and transmission details, and then click on the [Finish] buttonThe software will automatically dial the number and send the fax.Once the fax has been sent, Fax Monitor will revert to standby mode.](https://usermanual.wiki/ASUSTeK-Computer/W5G00UGPZ50.USERS-MANUAL-4/User-Guide-494443-Page-95.png)
![Quick Start Guide - Introduction 第 63 頁,共 160 頁file://C:\Documents and Settings\anitachou\Local Settings\Temp\~hh3F24.htm 2004/11/30 Related topic: "Receiving a fax" This section describes what to do when a fax arrives after you have established a connection to a modem station.zThe Fax service must be enabled for receiving in order for you to receive a fax. Please refer to "Using a mobile telephone" under "Troubleshooting" for information on how to change the send and receive settings once the fax service has been configured.zPlease ensure you have connected to a modem station before you receive a fax (the device will be connected to the modem if "Enable Receive" has been selected or COM Auto Connect has been activated). 1. When a fax arrives, the Fax Monitor will start automatically as the fax is received Once the fax has been received, the Fax Monitor will revert to standby mode. {If you have enabled manual fax reception, the message below will appear when a fax arrives.Click on the message with your mouse to receive the fax.2. Double-click on the [Fax] icon in the Control PanelThe [Fax Console] window will appearImportantProcedureNoteReceiving a fax](https://usermanual.wiki/ASUSTeK-Computer/W5G00UGPZ50.USERS-MANUAL-4/User-Guide-494443-Page-96.png)