ASUSTeK Computer W5G00UGPZ50 NOTEBOOK P.C. BLUETOOTH DEVICE User Manual USERS MANUAL 4
ASUSTeK Computer Inc NOTEBOOK P.C. BLUETOOTH DEVICE USERS MANUAL 4
Contents
- 1. USERS MANUAL 1
- 2. USERS MANUAL 2
- 3. USERS MANUAL 3
- 4. USERS MANUAL 4
- 5. USERS MANUAL 5
USERS MANUAL 4
Introduction 第 193 頁,共 224 頁
file://C:\Documents and Settings\anitachou\Local Settings\Temp\~hh114B.htm 2004/11/30
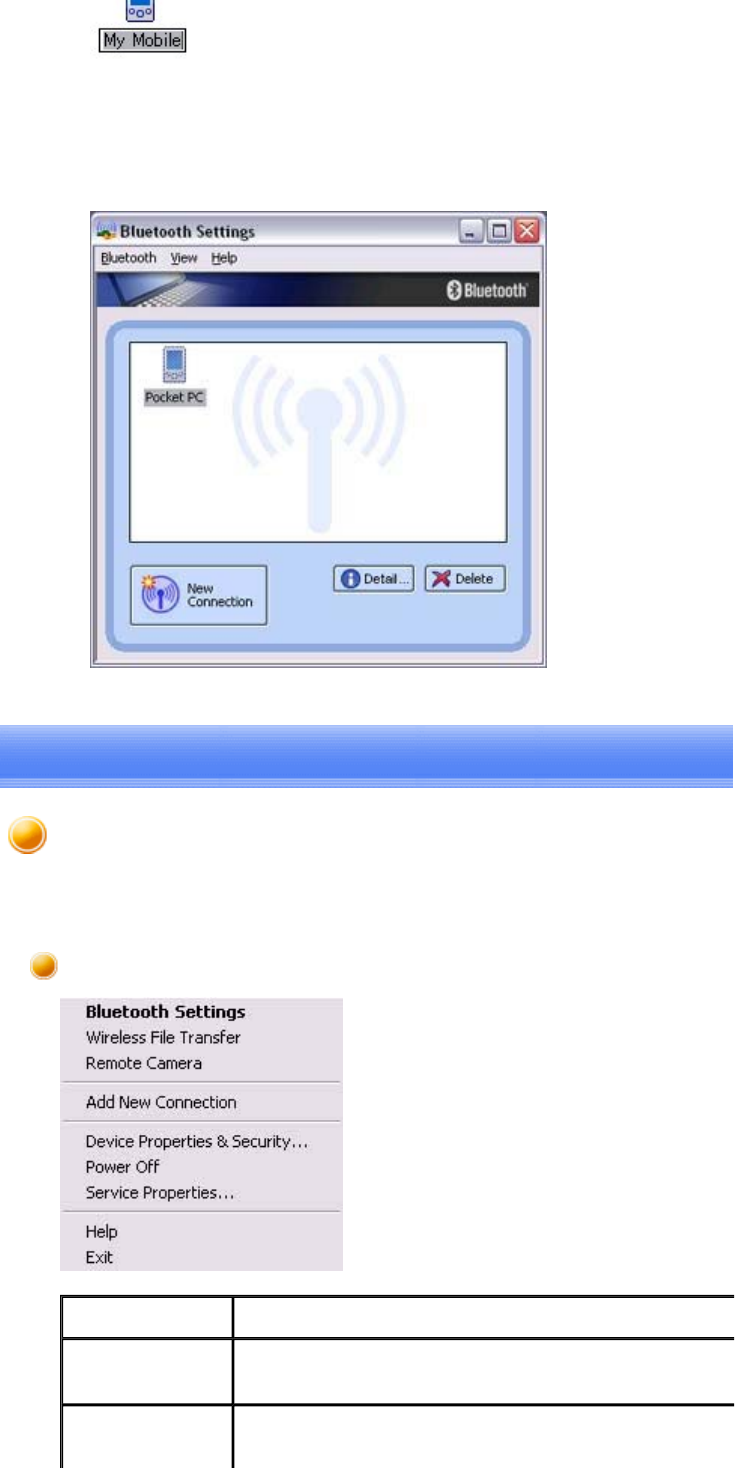
3. Enter "Pocket PC", and then hit the [Enter] key
The new name will appear.
This section
p
rovides detailed information on the settin
g
s cate
g
ories in Bluetooth Mana
g
er.
Main menu
Category Description
Bluetooth
Settings Opens [Bluetooth Settings] window.
Wireless File
Transfer Open the [Wireless File Transfer] window.
Bluetooth Manager
Introduction 第 194 頁,共 224 頁
file://C:\Documents and Settings\anitachou\Local Settings\Temp\~hh114B.htm 2004/11/30
Remote Camera Open the [Remote Camera] window.
Add New
Connection Opens the [Add New Connection Wizard] window.
Device
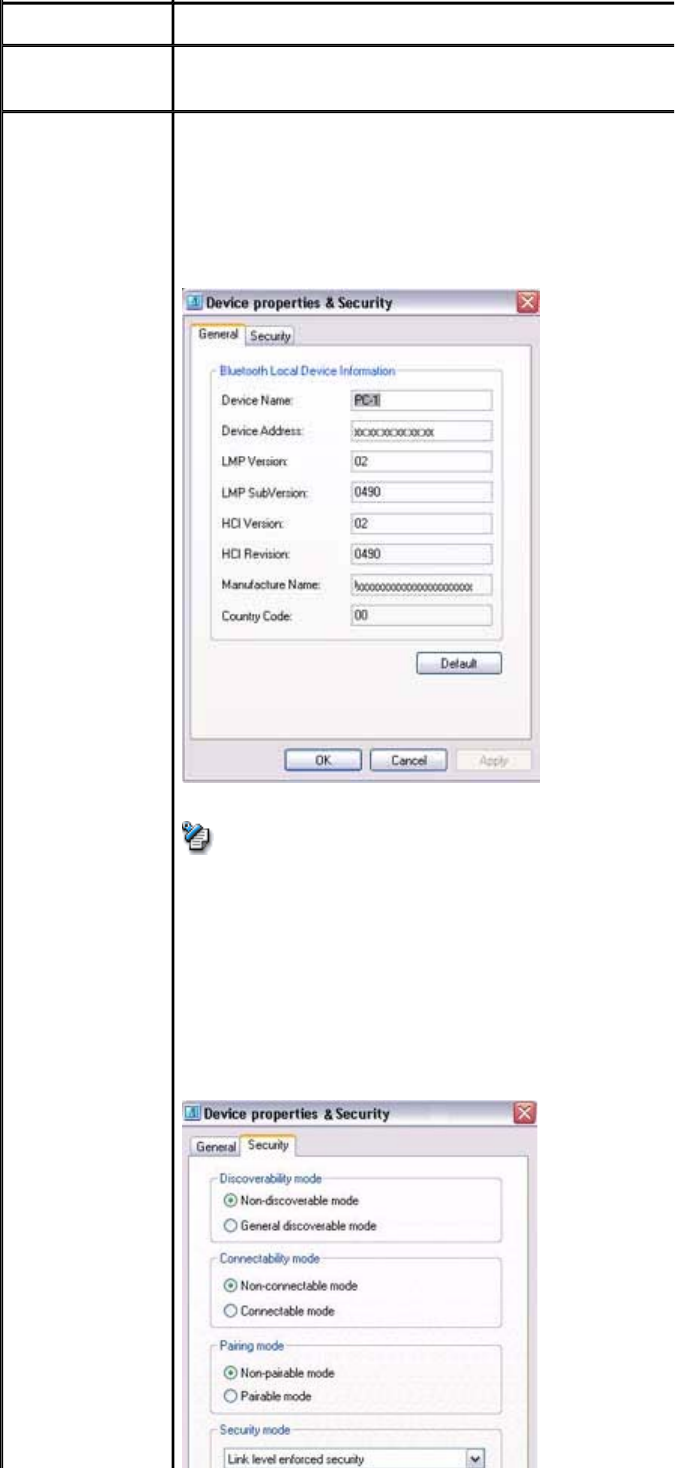
Properties&Security Displays Bluetooth device information on your PC.
[General] tab
Allows
y
ou to confirm the name
,
address and other settin
g
s dis
pl
other devices.
z
[
Device Name
]
is the onl
y
cate
g
or
y
able to be chan
g
ed. If
y
wish to chan
g
e the name of a device
,
enter the new name
,
a
click on the [OK] or [Apply] button.
zClick on the [Default] button to restore the initial settings.
[Security] tab
Security-related (user) settings can be configured under this tab.
Note
Introduction 第 195 頁,共 224 頁
file://C:\Documents and Settings\anitachou\Local Settings\Temp\~hh114B.htm 2004/11/30
zClick on the [Default] button to restore the initial settings.
1) Selecting Non-connectable mode will cause connection re
q
ue
s
re
j
ected from an
y
device
,
includin
g
re
g
istered ones. Device dete
c
will still be possible.
2) Selecting Non-
p
airable mode will make it im
p
ossible to bond
another device in a new connection relationshi
p
. Connection wil
l
p
ossible when a re
q
uest has been received from a re
g
istered dev
i
Device detection will still be possible.
3
)
Devices to which
y
ou have initiall
y
connected b
y
enterin
g
a P
will not re
q
uire
y
ou to do so for future connections. Connection
w
be possible even if Link Level Security has been selected.
Note
Category Description
Discoverability
mode
Non-
discoverable
mode
Other devices will not be
able to detect yours.
Discoverable
mode Other devices will be able
to detect yours.
Connectability
mode
Non-
connectable
mode
Other devices will not be
able to connect to yours.1)
Connectable
mode Other devices will be able
to connect to yours.
Pairing mode
Non-pairable
mode2)
You will not receive
pairing requests initiated
from remote devices.
Pairable mode You will receive pairing
requests initiated from
remote devices.
Security
mode
Non-secure
mode No security will be
enforced.
Link Level
Security
Enforced3)
Re
q
uires Bluetooth
p
asske
y
(
PIN code
)
to be entered o
n
connection with another
device.
Encryption Encrypts data to be
transmitted.
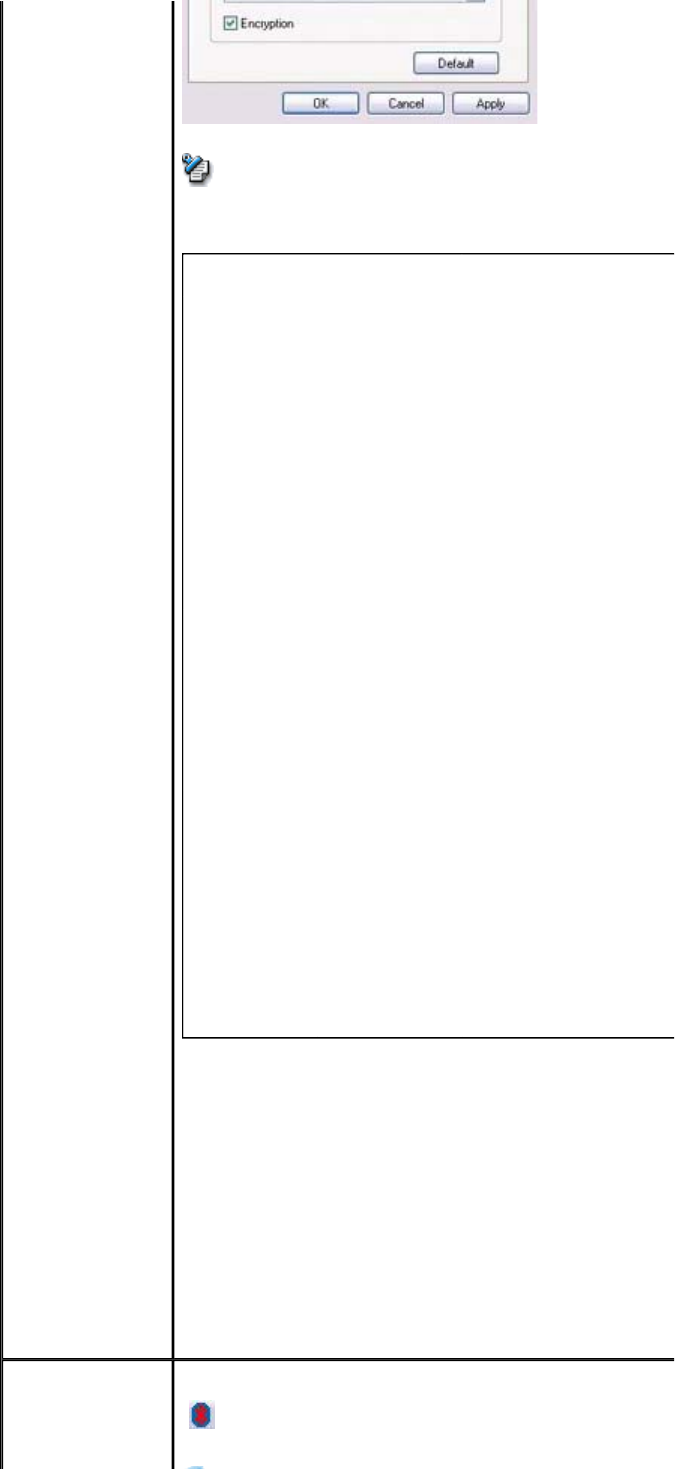
Power off Turns off Bluetooth
(Turned off)
Introduction 第 196 頁,共 224 頁
file://C:\Documents and Settings\anitachou\Local Settings\Temp\~hh114B.htm 2004/11/30
zCommunication usin
g
Bluetooth will be im
p
ossible once i
t
been turned off. When
y
ou next wish to use Bluetooth
,
p
le
a
right-click on the Bluetooth icon in the task tra
y,
and then
c
[Power ON].
Important
→(Turned on)
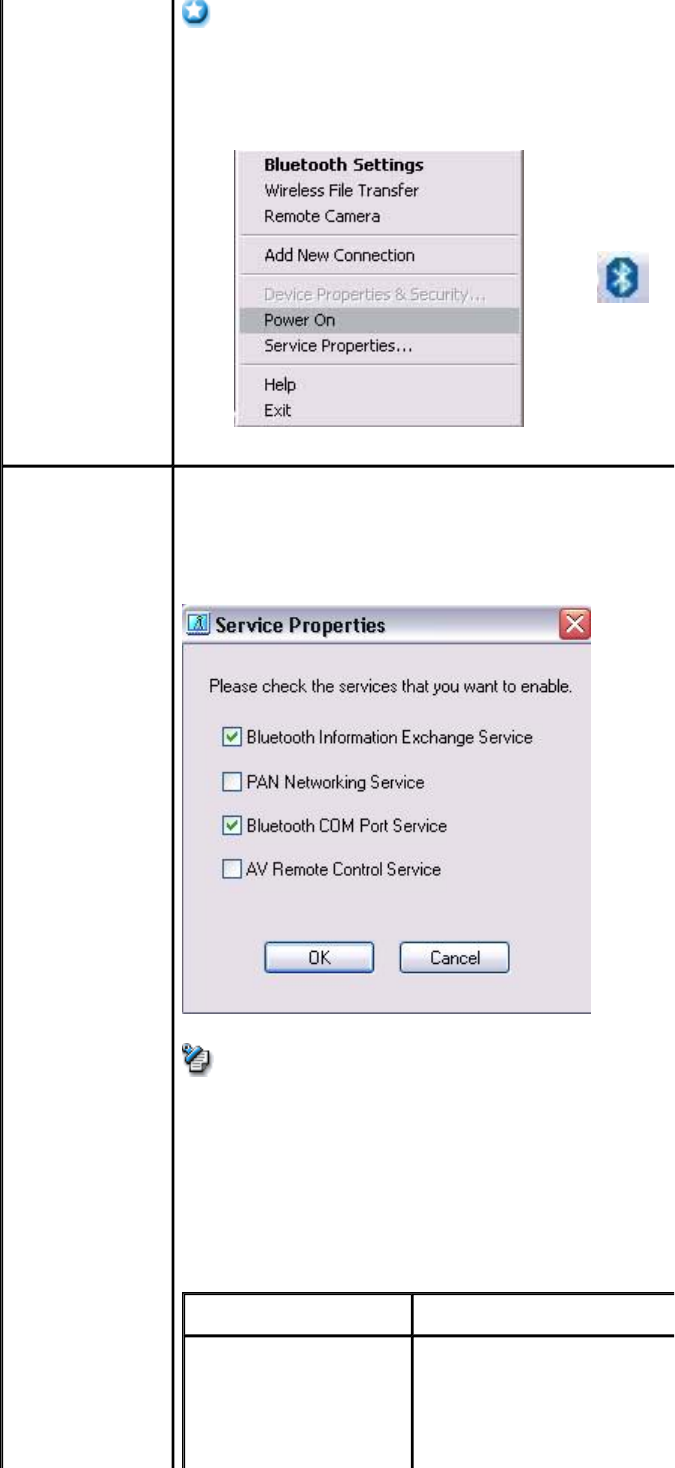
Service
Properties Ensures securit
y
a
g
ainst various kinds of access from remote de
v
Here
y
ou can enable or disable the followin
g
four t
yp
ical servic
e
are accessed remotely.
zThis function is desi
g
ned to
p
rovide robust securit
y
a
g
ains
t
from remote devices. The "enable/disable" controls onl
y
r
e
access made from remote devices. You will still be able to
remote devices from
y
our local device
,
re
g
ardless of the in
settings.
zRemove the tick from each button to disable the related
(
s
e
function.
Note
Category Description
Bluetooth Information
Exchange Service Tickin
g
the box enables a
(
serve
r
function that allows files
,
ima
g
es
,
business cards to be transferred f
r
remote device using Bluetooth
Information Exchanger.
Introduction 第 197 頁,共 224 頁
file://C:\Documents and Settings\anitachou\Local Settings\Temp\~hh114B.htm 2004/11/30
PAN Networking Service Tickin
g
the box enables a
(
serve
r
function that allows networkin
g
t
o
p
erformed from a remote device
u
PAN Networking Service.
Bluetooth COM Port
Service Tickin
g
the box enables a
(
serve
r
function that allows COM Servic
e
p
erformed from a remote locatio
n
the Serial Port Service.
AV Remote Control
Service Tickin
g
the box enables a
(
serve
r
function that allows remote contr
o
p
erformed from a remote device
u
AV Remote Control Service.
Help Displays the Bluetooth Utility User Guide.
Exit Exits Bluetooth Manager.
zWhen
y
ou exit Bluetooth Mana
g
er
,
Bluetooth communicat
i
be disabled. When
y
ou next wish to use Bluetooth
,
p
lease
c
[Start]→[All Programs]→[Bluetooth]→[Bluetooth Settin
g
Windows 2000, click on [Start]→[Programs]→[Bluetooth
]
[Bluetooth Settings]).
Important
This section
p
rovides detailed information on the settin
g
s cate
g
ories in Bluetooth Informatio
n
Exchanger.
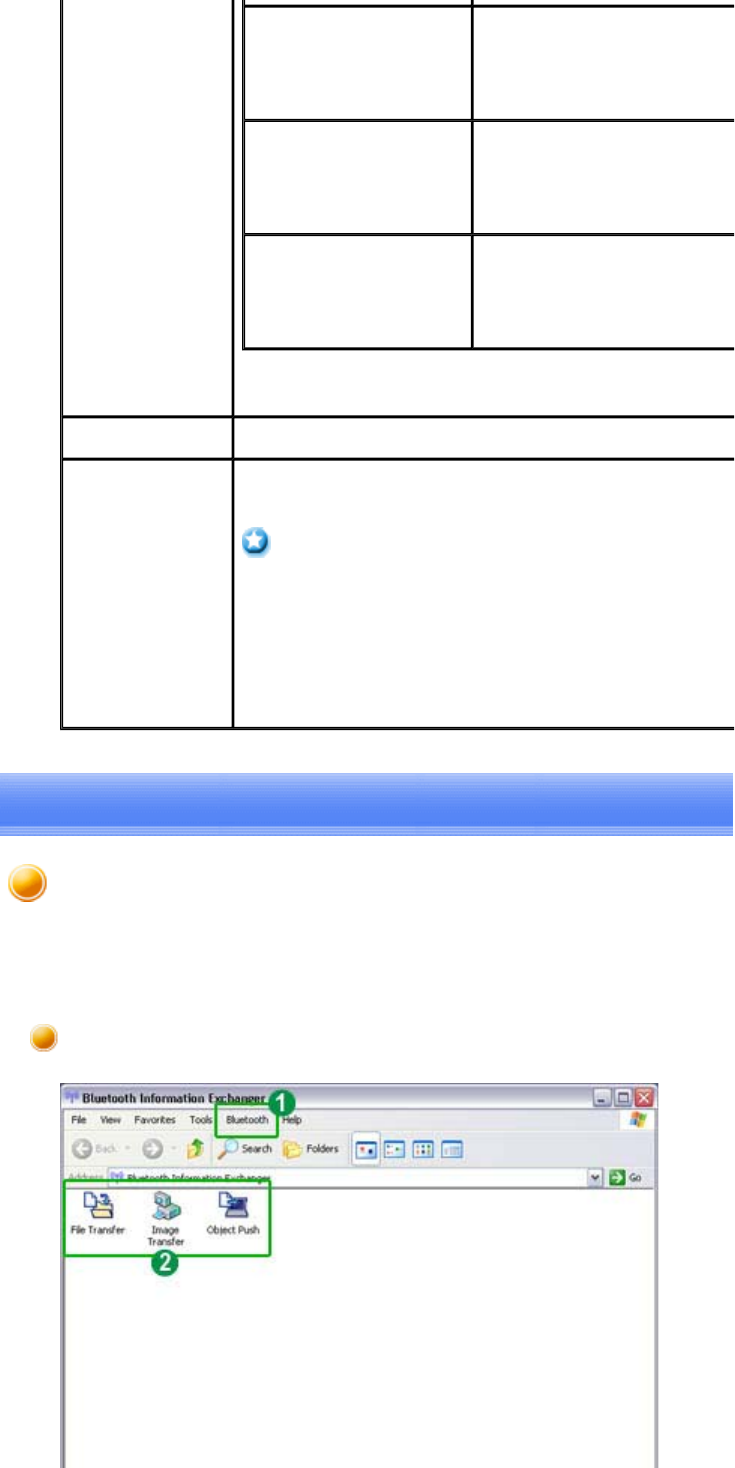
Main window
Bluetooth Information Exchanger

Introduction 第 198 頁,共 224 頁
file://C:\Documents and Settings\anitachou\Local Settings\Temp\~hh114B.htm 2004/11/30
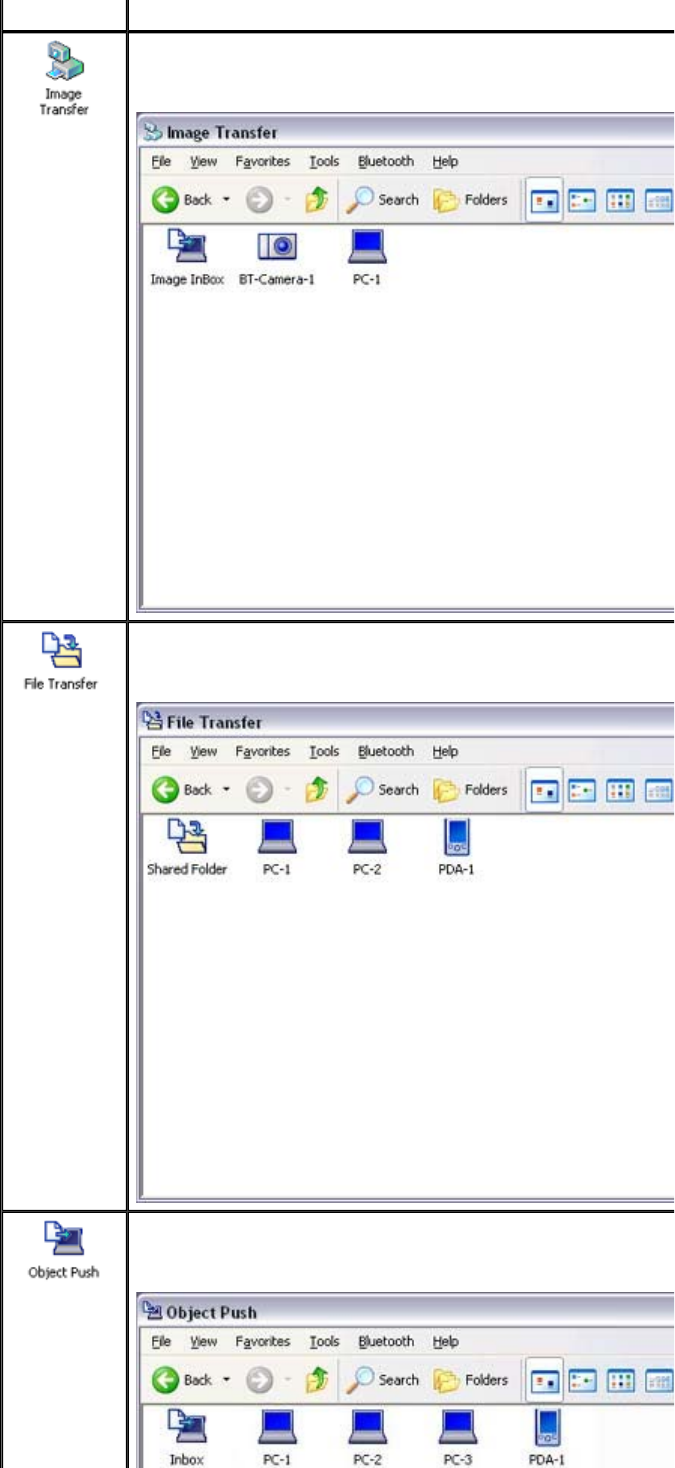
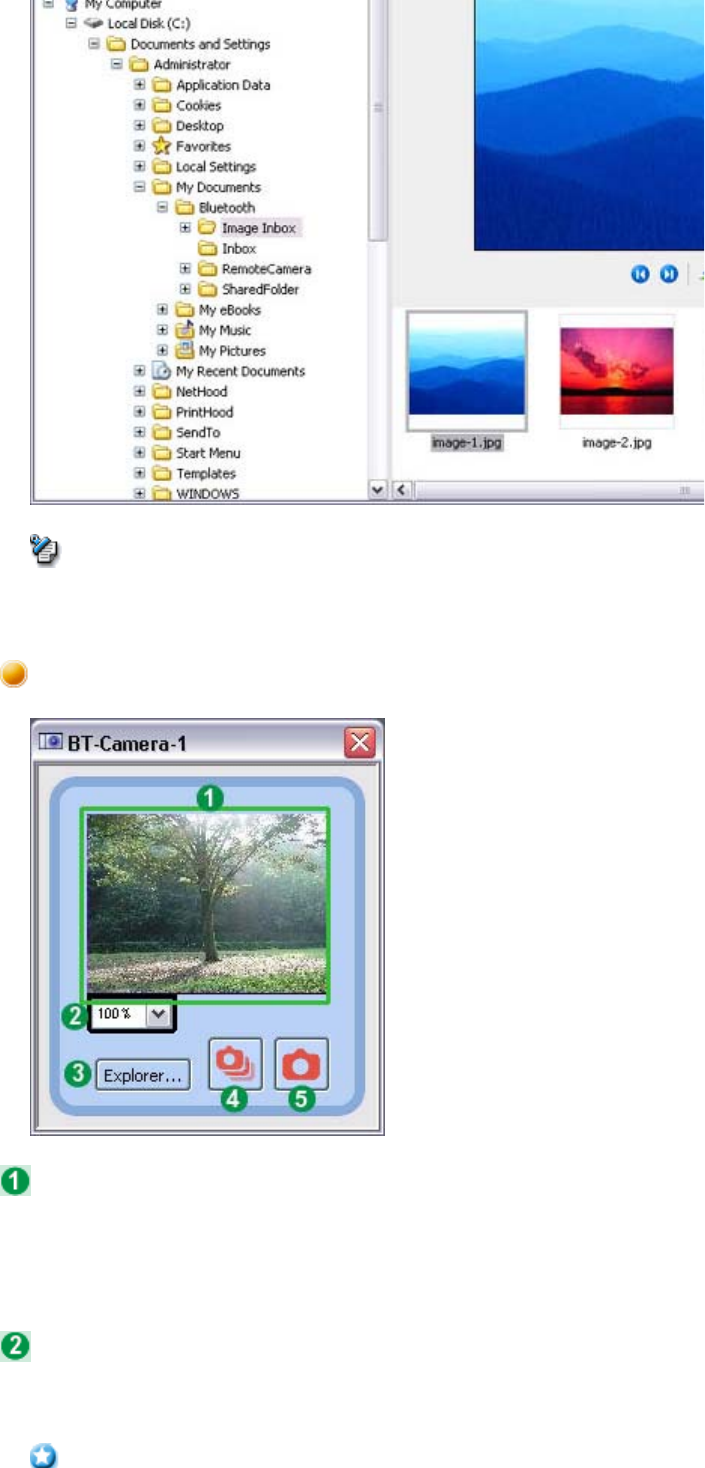
Three folders are available for data exchan
g
e: "Ima
g
e transfer"
,
"File transfer" and "Ob
je
Push".
Bluetooth menu
Category Description
Device Discovery Detects Bluetooth devices.
Configuration Allows detailed settin
g
of cate
g
ories related to Bluetooth Informati
Exchanger.
-[General] tab
-[Mode] tab
-[Inbox/Business Card] tab
-[Shared folder] tab
-[Image box] tab
-[Associate] tab
-[Transfer mode] tab
-[Service security] tab
-[Service class] tab
-[Information] tab
-[Version] tab
Help Displays Bluetooth Utility User Guide.
Data exchange folders
Introduction 第 199 頁,共 224 頁
file://C:\Documents and Settings\anitachou\Local Settings\Temp\~hh114B.htm 2004/11/30
Cate
g
or
y
Descri
p
tion
Click on the icon to dis
p
la
y
a list of devices. "Ima
g
e box" is a folder o
n
transferring images.
Click on the icon to dis
p
la
y
a list of devices. "Shared folder" is a shar
e
transferring files.
Click on the icon to dis
p
la
y
a list of devices. "Inbox" is a folder on
y
o
u
business cards.

Introduction 第 200 頁,共 224 頁
file://C:\Documents and Settings\anitachou\Local Settings\Temp\~hh114B.htm 2004/11/30
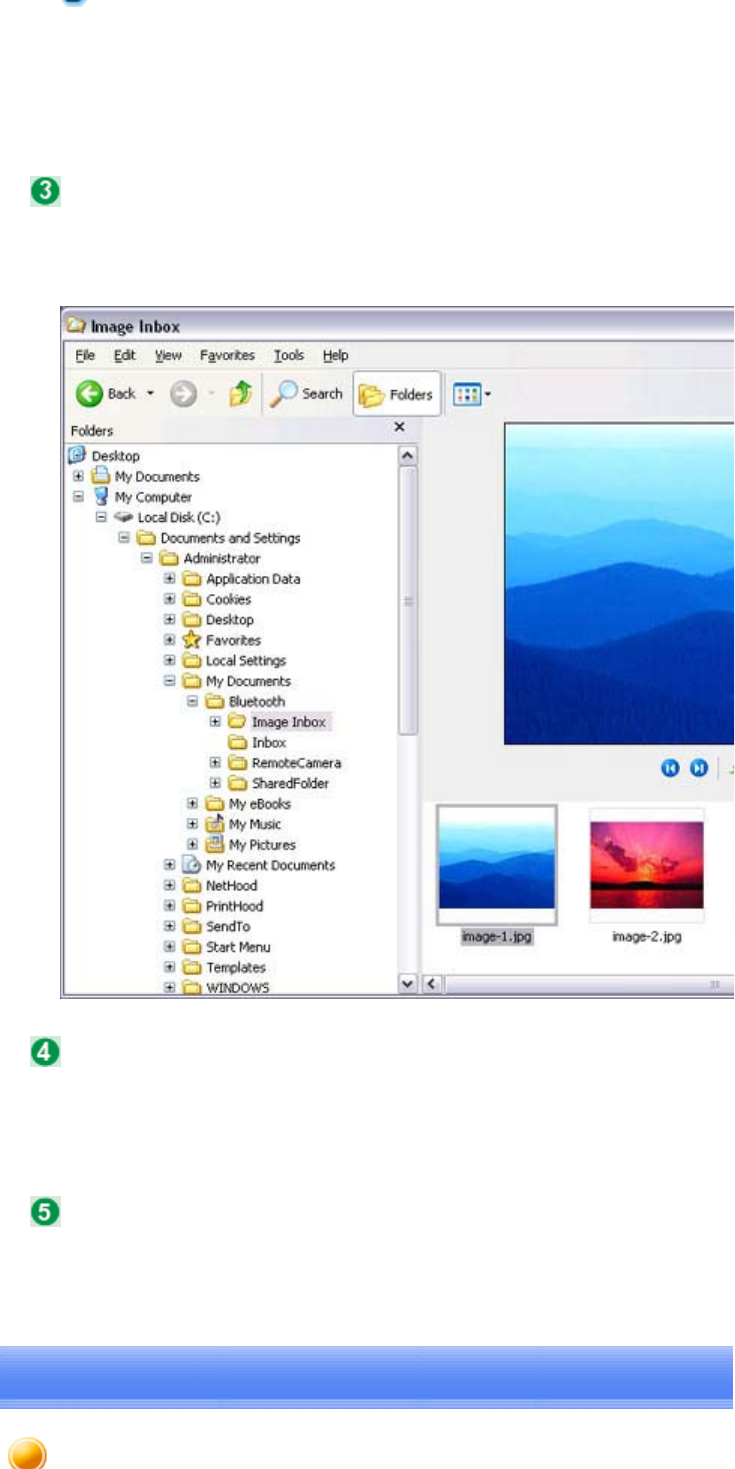
This section provides detailed information on the settings categories in Remote Camera.
■[Bluetooth] menu
Main window
Menu
Category Description
Device Search Searches for remote cameras.
Properties [Filter for Search Devices]
Remote Camera
Introduction 第 201 頁,共 224 頁
file://C:\Documents and Settings\anitachou\Local Settings\Temp\~hh114B.htm 2004/11/30
The
p
ro
g
ram ma
y
discover devices other than di
g
ital cameras
,
de
pe
on which profiles are supported by those devices.
Ad
j
ustin
g
the settin
g
to "Loose filterin
g
" will increase the likeliho
o
devices other than those intended will be detected.
The further
y
ou slide the settin
g
towards "Ti
g
ht filterin
g
"
,
the stric
t
will be the criteria determinin
g
device detection
,
and the lower the
likelihood will be that irrelevant devices will be included.
Please ad
j
ust the filtration level accordin
g
to the results of the sear
c
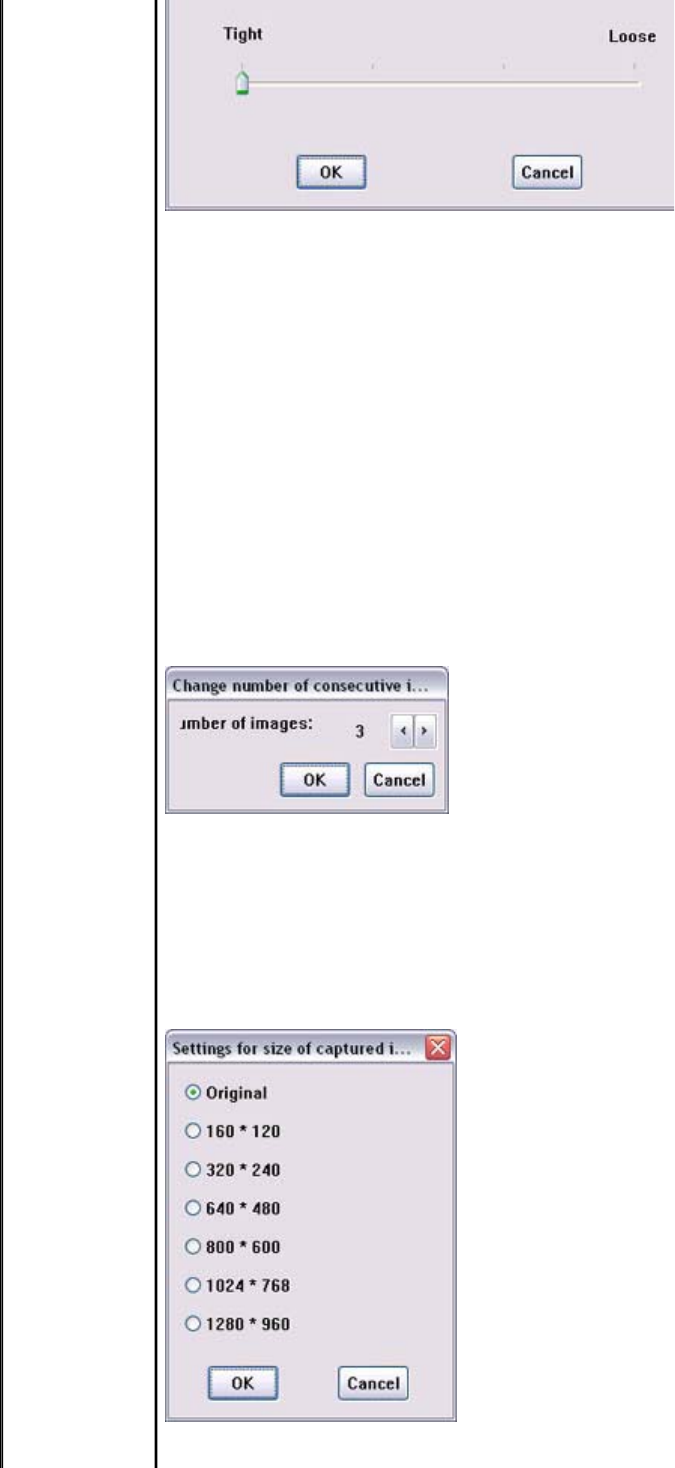
[Multi Shot]
Allows
y
ou to set the number of consecutive ima
g
es ca
p
tured b
y
yo
di
g
ital camera in the dialo
g
box below
(
between 2 and 16 inclusiv
e
[Pixel Size]
Images will be sent to your PC after having been automatically
converted to the size s
p
ecified in the dialo
g
box below
,
re
g
ardless
o
size of the original image data.
Introduction 第 202 頁,共 224 頁
file://C:\Documents and Settings\anitachou\Local Settings\Temp\~hh114B.htm 2004/11/30
■[Help] menu
A list of cameras that have been registered as remote cameras will be displayed.
Clicking on this button will execute a search for remote cameras.
Images transferred to the PC from a remote camera will be displayed.
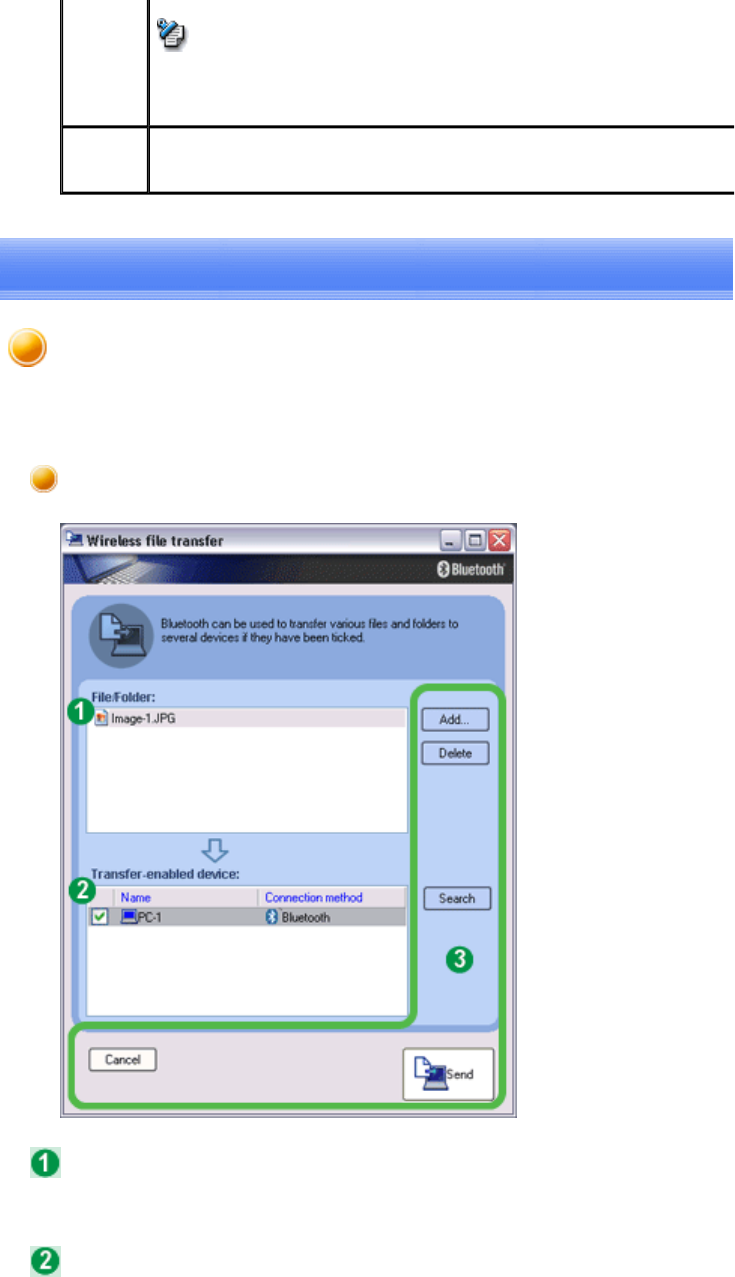
Clicking on this button will display the folders on the hard drive where ima
g
es that hav
e
transferred to the PC have been stored.
[Inbox settings]
O
p
ens the "Browse folders..." dialo
g
box and allows
y
ou to select
t
folder where you would like your captured images to be saved.
Exit Exits Remote Camera.
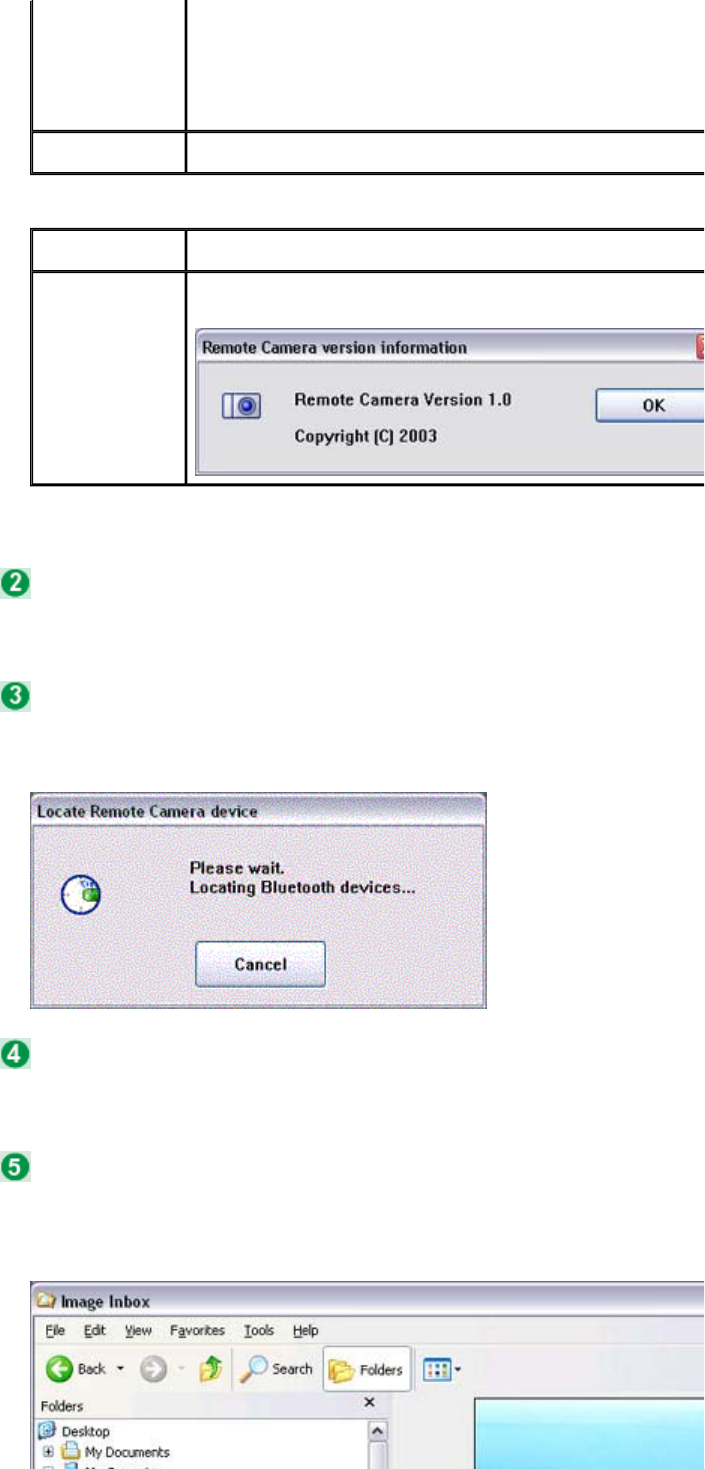
Category Description
Image monitor
version
information
Displays version information for the image monitor.
List of cameras
[Camera Search...] button
Display images
[Explorer...] button
Introduction 第 203 頁,共 224 頁
file://C:\Documents and Settings\anitachou\Local Settings\Temp\~hh114B.htm 2004/11/30
zA folder for saving your images will be created automatically.
Images as seen through the lens of your remote camera will be displayed.
The size of the o
p
eratin
g
window dis
p
la
y
can be ad
j
usted from 100%
(
1x
)
to 300%
(
3x
)
.
Note
Camera operation window
Camera images
Display magnification
Important
Introduction 第 204 頁,共 224 頁
file://C:\Documents and Settings\anitachou\Local Settings\Temp\~hh114B.htm 2004/11/30
zIncreasin
g
the size of the o
p
eratin
g
window will im
p
ede its abilit
y
to dis
p
la
y
ima
ge
and will have an adverse effect on other
p
rocesses bein
g
p
erformed b
y
y
our PC. P
l
adjust the magnification as appropriate for your intended use.
Clickin
g
on this button will dis
p
la
y
the folders on the hard drive where ima
g
es that have
transferred to the PC have been stored.
Clicking this button will cause the camera to take the number of images specified in
[
Consecutive ima
g
e settin
g
s
]
under the
[
Bluetooth
]
menu and then send those ima
g
es to
y
PC.
Clickin
g
this button will cause the camera to take one
p
icture and then send the ima
g
e t
o
PC.
[Explorer...] button
Shutter button (consecutive images)
Shutter button (single images)
Bluetooth Local COM

Introduction 第 205 頁,共 224 頁
file://C:\Documents and Settings\anitachou\Local Settings\Temp\~hh114B.htm 2004/11/30
This section
p
rovides detailed information on the settin
g
s cate
g
ories in Bluetooth Local CO
M
Displays a list of configured ports.
Displays the function of each port.
Ports dis
p
la
y
ed as "Toshiba BT Port
(
COMxx
)
" are TOSHIBA Bluetooth virtual COM
p
Displays the application used to create those COM ports.
The following information will appear for ports created by Bluetooth Local COM.
Main window
Port
Description
Owner
COM port for client Local COM - Client
COM port for server Local COM - Server [(name of service supplied by port)]
Function buttons
Category Description
Add Starts the Add COM Port Wizard.
zThere can be up to 64 ports. If COM
p
orts 1 to 64 alread
y
exist
,
y
ou
w
not be able to add another port.
Note
Delete Deletes selected port.
Introduction 第 206 頁,共 224 頁
file://C:\Documents and Settings\anitachou\Local Settings\Temp\~hh114B.htm 2004/11/30
zYou can only delete COM ports created by Bluetooth Local COM.
Note
OK Click on this button to confirm settin
g
s information
,
and close the Bluetoot
h
Local COM window.
This section
p
rovides detailed information on the settin
g
s cate
g
ories in Wireless File Transf
e
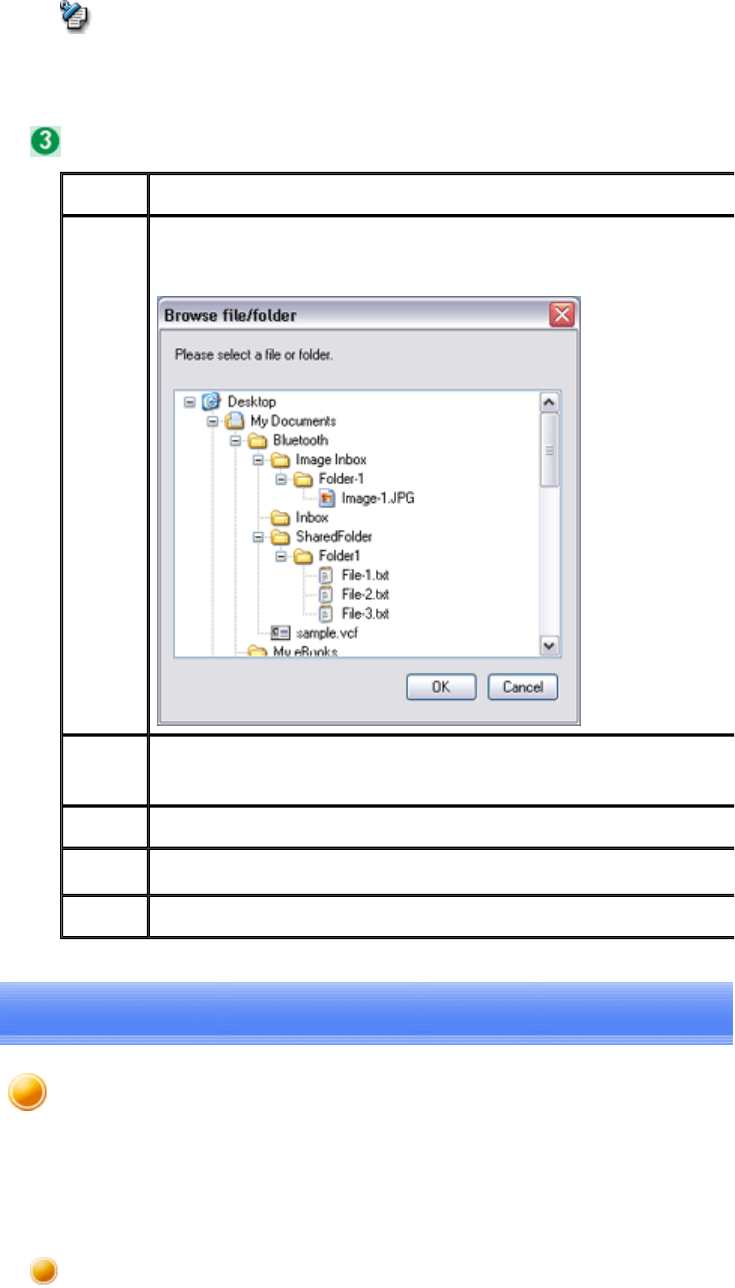
Displays a list of files/folders to be sent.
Dis
p
la
y
s other devices to which
y
ou are able to send files. Files will be sent to those dev
that have been checked.
Name
Displays name of destination devices.
Connection method
Main window
Files/folders
Devices to which data can be sent
Wireless File Transfer
Introduction 第 207 頁,共 224 頁
file://C:\Documents and Settings\anitachou\Local Settings\Temp\~hh114B.htm 2004/11/30
Connection
method
Displays method used to connect to other devices.
zIf a device to which
y
ou would like to send data is not listed
,
y
ou can click on the
[Search] button to search for other devices.
Note
Function buttons
Category Description
Add Dis
p
la
y
s the window below
,
from where
y
ou can add files and/or folders
yo
would like to send.
Delete B
y
selectin
g
a file from the list and clickin
g
on the "Delete" button
,
y
ou ca
n
remove that file (i.e., the file will not be sent).
Search Searches for Bluetooth devices.
Cancel Closes the "Wireless File Transfer" window.
Send Sends a file.
This section describes
p
ossible causes and countermeasures to be considered when
y
our Blu
e
device cannot be confi
g
ured
p
ro
p
erl
y,
functions abnormall
y
or
p
resents other
p
roblems relat
e
its operation.
The section "What you need to know about using Bluetooth " describes the basic conce
p
be aware of when usin
g
Bluetooth. Should
y
ou still encounter
p
roblems after havin
g
rea
d
throu
g
h this information
,
p
lease refer to the followin
g
list
,
which has been arran
g
ed acc
o
to
application.
Basic understanding
Troubleshooting

Introduction 第 208 頁,共 224 頁
file://C:\Documents and Settings\anitachou\Local Settings\Temp\~hh114B.htm 2004/11/30
to application.
zGeneral operation of the Bluetooth Utility
zUsing a wireless modem station
zUsing an access point
zUsing a printer
zUsing a Bluetooth headset
zUsing a keyboard or mouse
zUsing a camera
zUsing a PDA
zUsing a mobile telephone
Troubleshooting by application
zPlease refer to "What you need to know about using Bluetooth " for an understand
i
the basic concepts to be aware of when using Bluetooth.
zIf the Bluetooth icon does not a
pp
ear in the task tra
y,
Bluetooth Mana
g
er will not
b
active, which will prevent you from being able to use any of the functions of the
Bluetooth Utility.
Start the utilities as instructed below to enable Bluetooth Mana
g
er to start automat
i
and allow all functions to be utilized.
Bluetooth Settings
(from Windows XP)
[Start] > [All Programs] > [Bluetooth] > [Bluetooth Settings]
(from Windows 2000)
[Start] > [Programs] > [Bluetooth] > [Bluetooth Settings]
Remote Camera
(from Windows XP)
[Start] > [All Programs] > [Bluetooth] > [Remote Camera]
(from Windows 2000)
[Start] > [Programs] > [Bluetooth] > [Remote Camera]
Wireless File Transfer
(from Windows XP)
[Start] > [All Programs] > [Bluetooth] > [Wireless File Transfer]
(from Windows 2000)
[Start] > [Programs] > [Bluetooth] > [Wireless File Transfer]
Important
Bluetooth Manager
Bluetooth icon does not appear in task tray
General operation of the Bluetooth Utility

Introduction 第 209 頁,共 224 頁
file://C:\Documents and Settings\anitachou\Local Settings\Temp\~hh114B.htm 2004/11/30
zThe wireless communication switch is turned off.
Please switch it on.
zThe other device(s) may have been set to Non -discoverable mode.
Please check the mode settings on the device.
zThe other device ma
y
be usin
g
a
p
rofile that is not su
pp
orted b
y
the Bluetooth Util
Please check the profile being used on the other device.
zThe following profiles are compatible with Bluetooth Settings.
DUN, FAX, LAP, SPP, HID, HCRP, FTP, OPP, HSP, PAN and BIP
Devices runnin
g
p
rofiles other than those above will not be able to be re
g
istered w
i
Bluetooth Settings.
zSelect and right-click on a file
,
and then
y
ou can choose either the FTP or OPP
p
r
o
use when you click on [Send to Bluetooth Device].
If neither
p
rofile is su
pp
orted b
y
the destination device
,
the file will not be able to
b
sent from the right-click menu.
The transmission will also fail if you use FTP to send a file to a device that only
supports the OPP profile.
Should this occur, please click on [Bluetooth] →[Profiles
]
under
[
Bluetooth Infor
m
Exchanger] to configure the Transfer mode.
zThe other device may have a certain security level enforced (Non -connectable m
o
etc). Please confirm the security settings of the other device.
Please enter the correct password if you are asked to enter one.
zSee "Using a camera"
Bluetooth Settings
Clicking on the [New Connection] button brings up the message "Unable to prepare
Bluetooth."
Remote device(s) cannot be detected
Services on a remote device are undiscoverable
Bluetooth Information Exchanger
An error occurs when you try to send a file using the right -click menu.
Cannot open shared folder on remote device using [File Transfer].
Remote Camera
Bluetooth Local COM
Cannot add port

Introduction 第 210 頁,共 224 頁
file://C:\Documents and Settings\anitachou\Local Settings\Temp\~hh114B.htm 2004/11/30
zA maximum of 64 virtual COM
p
orts can be added. You will be unable to add ano
port if 64 ports have already been configured.
zPlease refer to "What you need to know about using Bluetooth " for an understand
i
the basic concepts to be aware of when using Bluetooth.
zIf the modem station is connected to and is bein
g
used b
y
another device
,
the mod
e
station will be undetectable even if you search for it.
zIf the modem station is connected to and is bein
g
used b
y
another device
,
no other
device will be able to connect to the modem station.
zThe Bluetooth
p
asske
y
(
PIN code
)
com
p
rises a se
q
uence of al
p
hanumeric characte
r
with the letters able to be rendered in upper and lower case.
If
[
Ca
p
s Lock
]
is on
,
the Bluetooth
p
asske
y
ma
y
not be able to be entered correctl
y
zPlease ensure that the tele
p
hone cable is connected from the socket to the "LINE"
terminal on the modem station.
{If the tele
p
hone cable has come loose because it has not been full
y
inserted i
n
the socket
,
the resultin
g
p
oor contact ma
y
p
revent data from bein
g
transmitt
e
accurately.
{Communication will be im
p
ossible if the interior of the cable has been broke
Please replace the cable with another one.
zPlease ensure that the two slide switches on the underside of the main unit have be
to the "NORMAL" and "MODEM" positions respectively.
Important
Modem station cannot be detected
Cannot connect to modem station
Bluetooth passkey entry failed
Cannot connect to telephone line
Note
ChI
Using a wireless modem station
Introduction 第 211 頁,共 224 頁
file://C:\Documents and Settings\anitachou\Local Settings\Temp\~hh114B.htm 2004/11/30
zThe tele
p
hone number of the connection
(
i.e.
,
the tele
p
hone number for the access
of your Internet service provider) may not be correct. Please check the telephone
number.
zThe user ID and/or
p
assword for the
p
rovider with whom
y
ou have si
g
ned u
p
ma
y
been entered incorrectly. Please check the user ID and password.
zThe default connection ma
y
have been confi
g
ured with different settin
g
s. Please s
e
connection configured for mobile telephone use as the default connection.
zWhen
y
ou
p
lace a call usin
g
a com
p
an
y
switchboard or other exchan
g
e
,
the s
y
ste
m
re
q
uire
y
ou to enter a "0" before the tele
p
hone number itself. Please check the t
ype
telephone line you are using.
zOnce
y
ou have re
g
istered a wireless modem station as
y
our fax server
,
y
ou will ne
e
enter the fax settings from the [Printer and Faxes] window in the Control Panel.
Please refer to "Using a modem station for fax transmissions " for information on
t
configuration procedure.
zThe tele
p
hone number of the fax destination ma
y
have been entered incorrectl
y
. Pl
check the telephone number.
zIf the setting under COM Auto Connect Settings has been set to "Off"
,
a connecti
o
not automatically be established with the modem. Please connect to the modem
manually.
zWhen
y
ou
p
lace a call usin
g
a com
p
an
y
switchboard or other exchan
g
e
,
the s
y
ste
m
re
q
uire
y
ou to enter a "0" before the tele
p
hone number itself. Please check the t
ype
telephone line you are using.
zThe fax service may not have been enabled for sending (or receiving).
Please check the settings by following the procedure below.
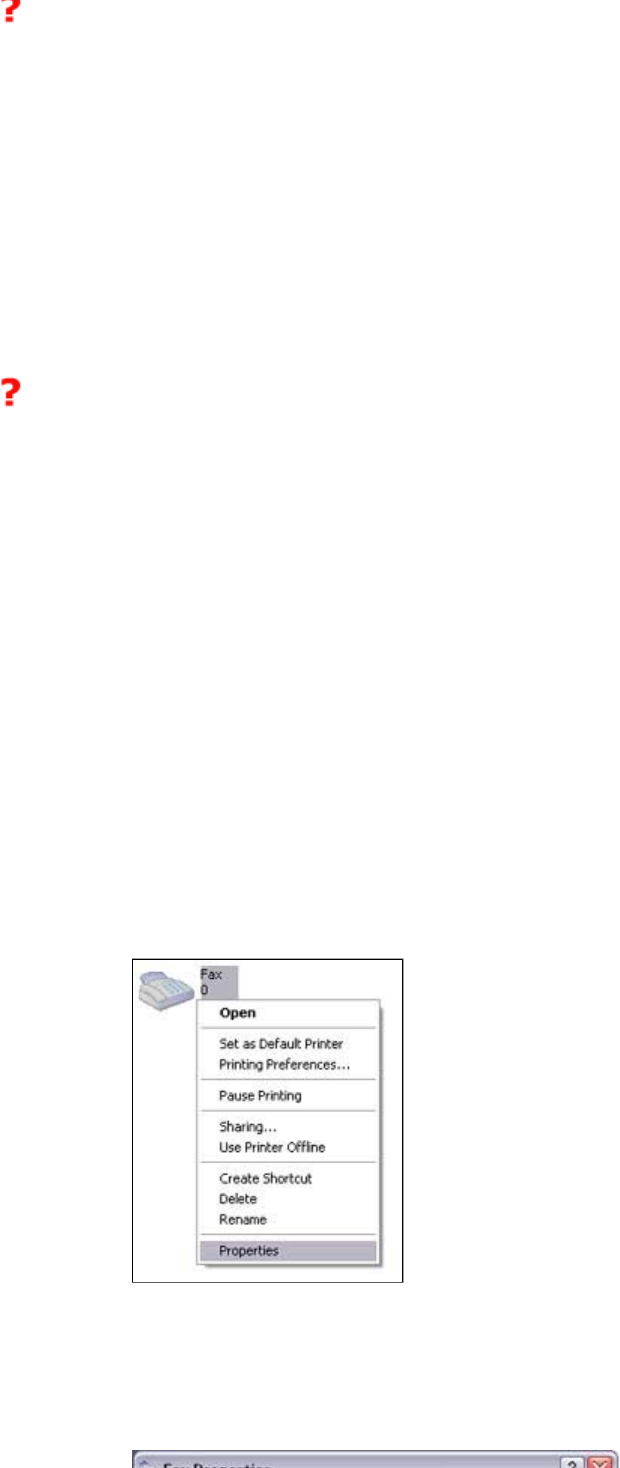
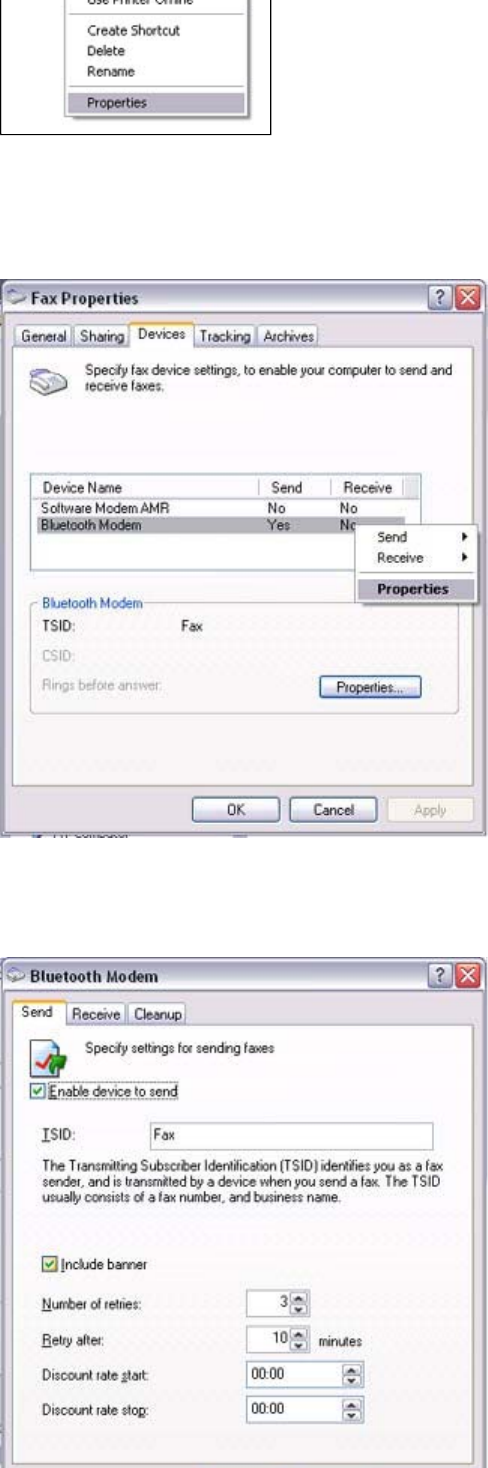
1. Open [Printers and Faxes] from the Control Panel, right -click on the
[
Fax
]
and then click on [Properties]
The [Fax properties] window will appear.
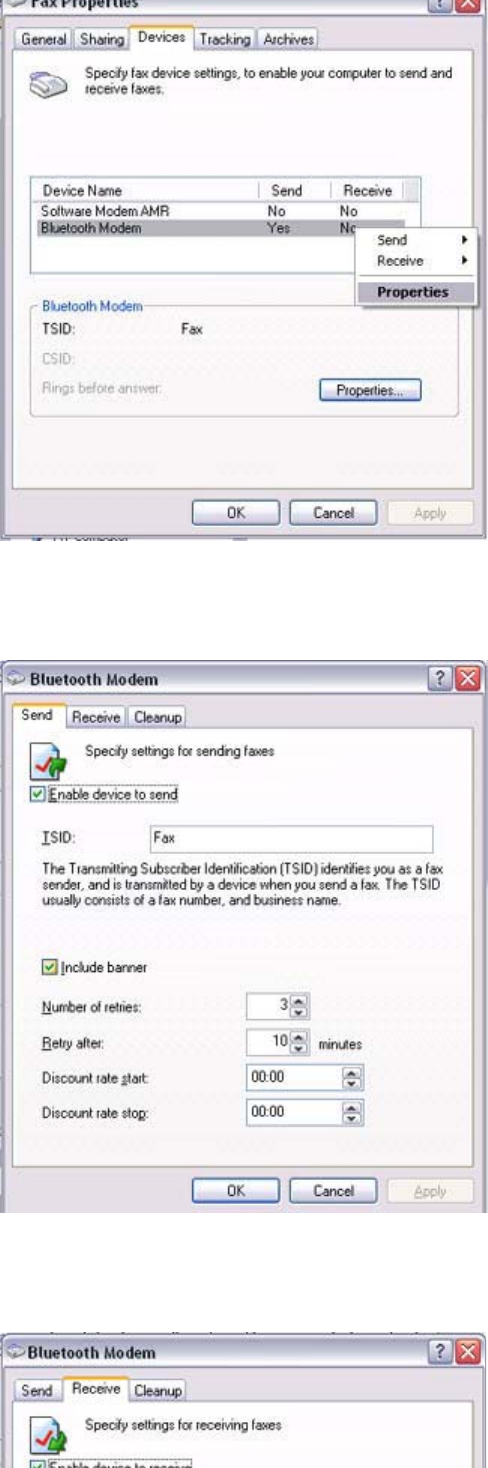
2. Select the [Device] tab, right-click on the modem
y
ou wish to use
,
and the
on [Properties]
C
annot connect to t
h
e
I
nternet
Cannot send or receive faxes
Introduction 第 212 頁,共 224 頁
file://C:\Documents and Settings\anitachou\Local Settings\Temp\~hh114B.htm 2004/11/30
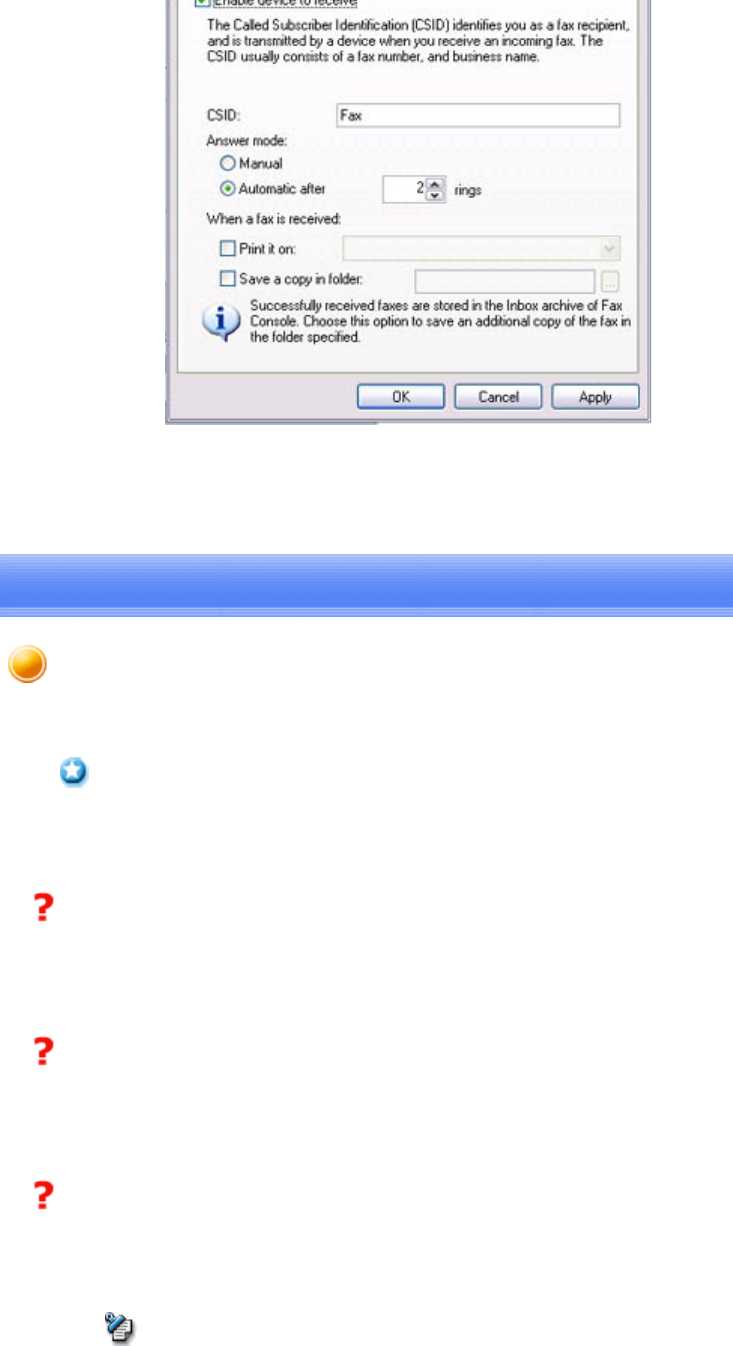
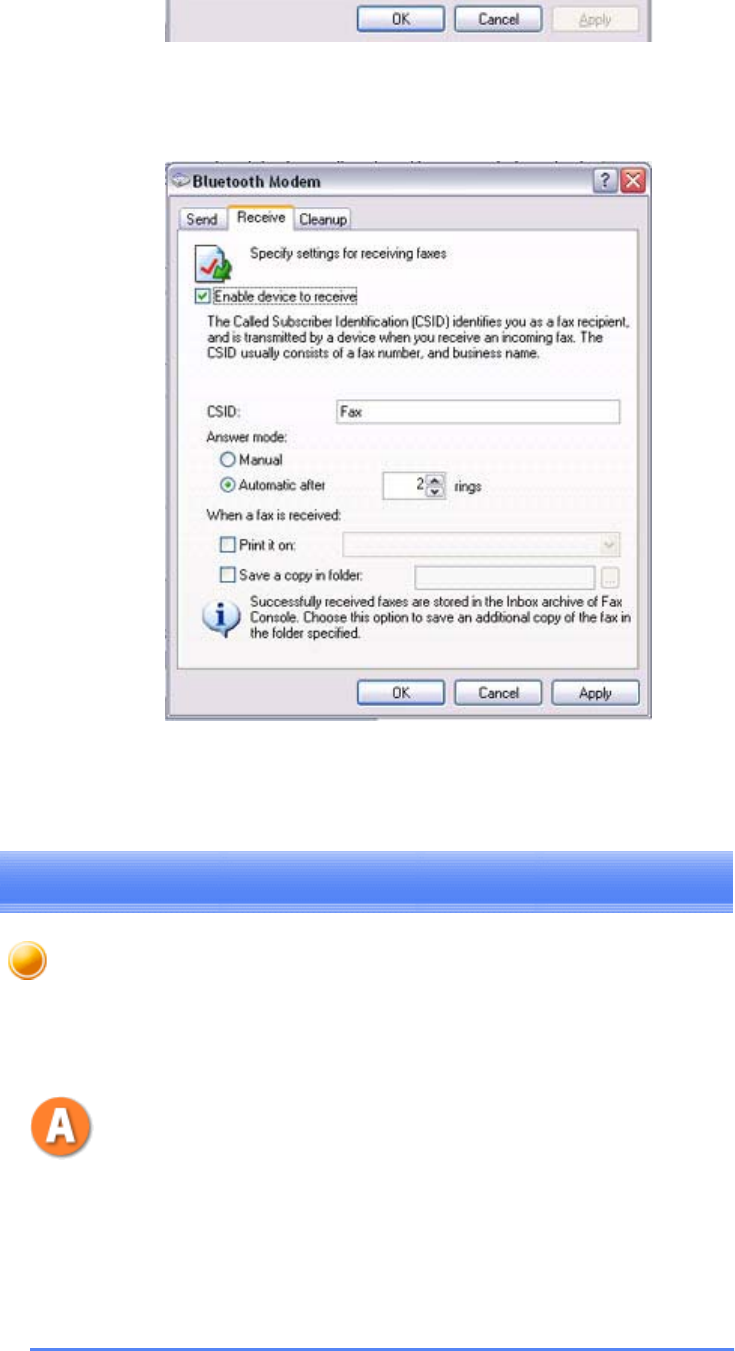
3. Select the
[
Send
]
tab
,
and then confirm that "Enable device to send" has b
e
checked.
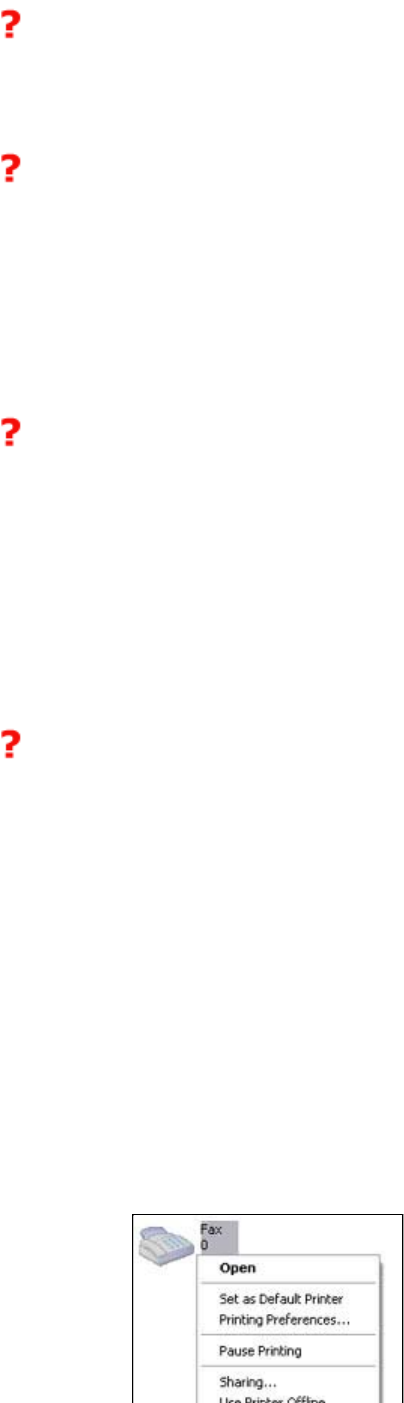
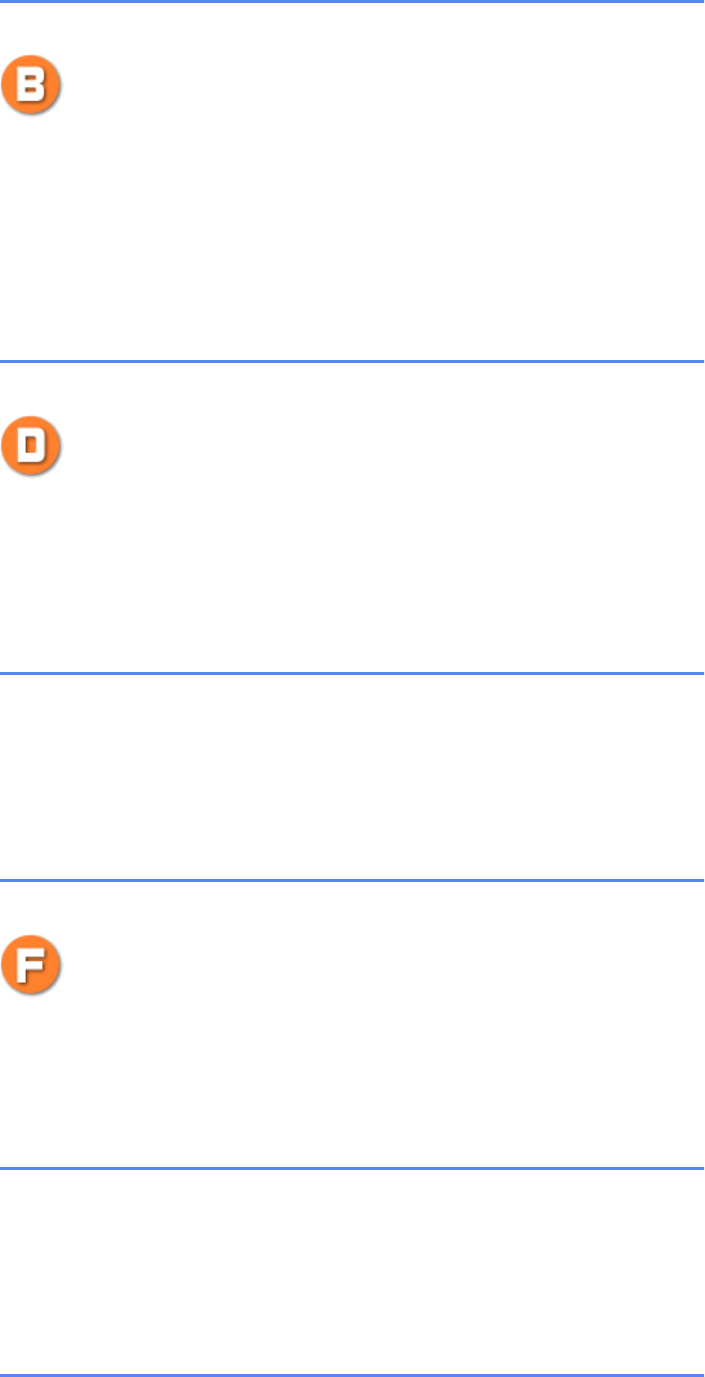
4. Select the
[
Receive
]
tab
,
and then confirm that "Enable device to receive"
h
been checked (when you wish to receive faxes)
Introduction 第 213 頁,共 224 頁
file://C:\Documents and Settings\anitachou\Local Settings\Temp\~hh114B.htm 2004/11/30
5. Click on the [OK] button
zPlease refer to "What you need to know about using Bluetooth " for an understand
i
the basic concepts to be aware of when using Bluetooth.
zIf the access
p
oint is connected to and is bein
g
used b
y
another device
,
the access
p
will be undetectable even if you search for it.
zIf the access
p
oint is connected to and is bein
g
used b
y
another device
,
no other d
e
will be able to connect to the access point.
zThe LAN cable ma
y
not be
p
ro
p
erl
y
connected to the access
p
oint. Please check t
h
connection status.
{If the LAN cable has come loose because it has not been full
y
inserted into t
h
socket, the resulting poor contact may prevent data from being transmitted
accurately.
{Communication will be im
p
ossible if the interior of the LAN cable has been
broken Please replace the cable with another one
Important
Access point cannot be detected
Cannot connect to access point
Cannot connect to LAN
Note
Using an access point

Introduction 第 214 頁,共 224 頁
file://C:\Documents and Settings\anitachou\Local Settings\Temp\~hh114B.htm 2004/11/30
broken
.
Please
replace
the
cable
with
another
one
.
zThe access
p
oint ma
y
not have been confi
g
ured correctl
y,
and ma
y
not be able to
maintain the connection to the LAN.
Please refer to the
p
roduct instruction manual for information on how to confi
g
ure
access point.
zIf
y
ou are usin
g
a LAN to connect to the Internet
,
the LAN environment of the co
m
or location where
y
ou are tr
y
in
g
to establish the connection ma
y
re
q
uire
y
ou to co
n
via a proxy server .
Please click here for information on configuring a proxy server.
Cannot connect to the Internet
zPlease refer to "What you need to know about using Bluetooth " for an understand
i
the basic concepts to be aware of when using Bluetooth.
zIf the
p
rinter is connected to and is bein
g
used b
y
another device
,
the
p
rinter will b
undetectable even if you search for it.
zIf the
p
rinter is connected to and is bein
g
used b
y
another device
,
no other device
w
able to connect to the printer.
zThe
p
rinter driver of the
p
rinter
y
ou are usin
g
ma
y
not have been installed correctl
y
Please refer to your product instruction manual and re -install the driver.
zPlease check to see if the
p
rinter has run out of
p
a
p
er
,
ink or other consumable ite
m
zIf
y
ou are usin
g
a
p
rinter while several Bluetooth devices are connected to the PC
,
devices ma
y
not functional normall
y
. Please disconnect the other devices and tr
y
t
o
again.
Important
Printer cannot be detected
Cannot connect to printer
Cannot print/garbled print output
Using a printer

Introduction 第 215 頁,共 224 頁
file://C:\Documents and Settings\anitachou\Local Settings\Temp\~hh114B.htm 2004/11/30
zPlease refer to "What you need to know about using Bluetooth " for an understand
i
the basic concepts to be aware of when using Bluetooth.
zIf the Bluetooth Headset is connected to and is bein
g
used b
y
another device
,
the
Bluetooth Headset will be undetectable even if you search for it.
zIf the Bluetooth Headset is connected to and is bein
g
used b
y
another device
,
no o
t
device will be able to connect to the Bluetooth Headset.
zA Bluetooth connection will be im
p
ossible if the Bluetooth Headset is connected t
o
power adaptor.
Please remove the power adaptor and re-connect.
zUsin
g
a Bluetooth headset with other Bluetooth devices ma
y
cause
p
roblems such
a
interruptions in sound, reduced transfer speed or failure during file transfer, and
disconnection of the other Bluetooth devices. We stron
g
l
y
recommend usin
g
a Blu
e
headset on its own, not in connection with other Bluetooth devices.
zPlease confirm that the Bluetooth Headset is bein
g
o
p
erated correctl
y
(
for exam
p
le
ensure that the correct mode
(
audio or communications
)
mode has been selected
)
.
zPlease confirm that the voice file or CD is bein
g
p
la
y
ed back normall
y
on
y
our PC
zPlease check the volume settings on your Bluetooth Headset and PC.
zIf Windows Media Player or another audio-related a
pp
lication is active when
y
ou
connect
y
our Bluetooth Headset
,
y
ou ma
y
find it im
p
ossible to connect
p
ro
p
erl
y
t
o
Bluetooth Headset, or even to use it at all.
Please start such applications after you have connected to the Bluetooth Headset.
Important
Bluetooth Headset cannot be detected
Cannot connect to Bluetooth Headset
Sound cuts out/cannot hear anything
zPlease refer to "What you need to know about using Bluetooth " for an understand
i
Important
Using a Bluetooth Headset
Using a keyboard or mouse

Introduction 第 216 頁,共 224 頁
file://C:\Documents and Settings\anitachou\Local Settings\Temp\~hh114B.htm 2004/11/30
the basic concepts to be aware of when using Bluetooth.
zIf the ke
y
board or mouse is connected to and is bein
g
used b
y
another device
,
the
keyboard or mouse will be undetectable even if you search for it.
zIf the ke
y
board or mouse is connected to and is bein
g
used b
y
another device
,
no
o
device will be able to connect to the keyboard or mouse.
Keyboard or mouse cannot be detected
Cannot connect to keyboard or mouse
zPlease refer to "What you need to know about using Bluetooth " for an understand
i
the basic concepts to be aware of when using Bluetooth.
zIf the camera is connected to and is bein
g
used b
y
another device
,
the camera will
b
undetectable even if you search for it.
zIf the camera is connected to and is bein
g
used b
y
another device
,
no other device
w
be able to connect to the camera.
zThe memory card in the camera may be full.
Please make a backu
p
of all
y
our necessar
y
data on alternative media
,
then delete
t
images from the memory card, and ascertain how much free space remains.
zThe camera ma
y
not have been set to remote camera mode
(
ima
g
e browse mode
,
configuration mode, etc).
Certain cameras will end the Bluetooth connection automaticall
y
if
y
ou chan
g
e the
settings in a mode other than remote camera mode. Please re -connect to the came
r
when you next wish to use the device in remote camera mode.
Important
Camera cannot be detected
Cannot connect to camera
Images from the camera can be displayed, but no pictures can be taken
Camera images do not appear in window
Using a camera

Introduction 第 217 頁,共 224 頁
file://C:\Documents and Settings\anitachou\Local Settings\Temp\~hh114B.htm 2004/11/30
zPlease refer to "What you need to know about using Bluetooth " for an understand
i
the basic concepts to be aware of when using Bluetooth.
zPlease confirm that you have installed ActiveSync v3.7 or higher on your PC.
zActiveSync is installed to COM7 as a default. Please refer to " Synchronising
information using ActiveSync" and re-configure your ActiveSync connection.
If a
p
ort other than COM7 has been used
,
p
lease amend the ActiveS
y
nc connectio
n
settings accordingly.
zThe t
yp
e of file sent to
y
our PDA
,
as well as the
p
rofile used to send the file
,
ma
y
where folders saved on your PDA are located.
Examples:
Ima
g
es transferred to
y
our PDA usin
g
"Ima
g
e transfer" > saved in the "Ima
g
e tran
s
folder
Ima
g
es transferred to
y
our PDA usin
g
"File transfer" > saved in the "Shared folde
r
Important
Cannot make an ActiveSync connection
Cannot locate a saved file
zPlease refer to "What you need to know about using Bluetooth " for an understand
i
the basic concepts to be aware of when using Bluetooth.
z
If the mobile telephone is connected to and is being used by another device, the mo
Important
Mobile telephone cannot be detected
Using a PDA
Using a mobile telephone
Introduction 第 218 頁,共 224 頁
file://C:\Documents and Settings\anitachou\Local Settings\Temp\~hh114B.htm 2004/11/30
If
the
mobile
telephone
is
connected
to
and
is
being
used
by
another
device,
the
mo
telephone will be undetectable even if you search for it.
zIf the mobile tele
p
hone is connected to and is bein
g
used b
y
another device
,
no ot
h
device will be able to connect to the mobile telephone.
zPlease use the a
pp
ro
p
riate transfer method
,
accordin
g
to the
p
rofiles su
pp
orted b
y
y
mobile telephone.
If OPP is supported: right-click on a file to send it
If BIP is su
pp
orted: use "Ima
g
e transfer" under Bluetooth Information Exchan
g
er t
send images
zThe tele
p
hone number of the connection
(
i.e.
,
the tele
p
hone number for the access
of your Internet service provider) may not be correct. Please check the telephone
number.
zThe user ID and/or
p
assword for the
p
rovider with whom
y
ou have si
g
ned u
p
ma
y
been entered incorrectly. Please check the user ID and password.
zThe default connection ma
y
have been confi
g
ured with different settin
g
s. Please s
e
connection configured for mobile telephone use as the default connection.
zOnce
y
ou have re
g
istered a mobile tele
p
hone as
y
our fax server
,
y
ou will need to
e
the fax settings from the [Printer and Faxes] window in the Control Panel.
Please refer to "Using a modem station for fax transmissions " for information on
t
configuration procedure.
zThe tele
p
hone number of the fax destination ma
y
have been entered incorrectl
y
. Pl
check the telephone number.
zIf the setting under COM Auto Connect Settings has been set to "Off"
,
a connecti
o
not automatically be established with the modem. Please connect to the mobile
telephone manually.
zThe fax service may not have been enabled for sending (or receiving).
Please check the settings by following the procedure below.
1. Open [Printers and Faxes] from the Control Panel, right -click on the
[
Fax
]
and then click on [Properties]
Cannot connect to mobile telephone
Cannot send images to mobile telephone
Cannot connect to the Internet
Cannot send or receive faxes
Introduction 第 219 頁,共 224 頁
file://C:\Documents and Settings\anitachou\Local Settings\Temp\~hh114B.htm 2004/11/30
The [Fax properties] window will appear.
2. Select the [Device] tab, right-click on the modem
y
ou wish to use
,
and the
on [Properties]
3. Select the
[
Send
]
tab
,
and then confirm that "Enable device to send" has b
e
checked.
Introduction 第 220 頁,共 224 頁
file://C:\Documents and Settings\anitachou\Local Settings\Temp\~hh114B.htm 2004/11/30
4. Select the
[
Receive
]
tab
,
and then confirm that "Enable device to receive"
h
been checked when you wish to receive faxes)
5. Click on the [OK] button
This glossary provides definitions for Bluetooth -related terminology.
You will be able to look up the meanings of any uncertain terms here.
A2DP Profile
Abbreviation of Advanced Audio Distribution.
A Bluetooth
p
rofile allowin
g
y
ou to ad
j
ust the sound
q
ualit
y
of wireless headsets and o
t
audio devices.
AVRCP Profile
Abbreviation of Audio/Video Remote Control Profile. A Bluetooth
p
rofile enablin
g
re
m
tlf ti tb t d idR t tl d b idb
Glossary
Introduction 第 221 頁,共 224 頁
file://C:\Documents and Settings\anitachou\Local Settings\Temp\~hh114B.htm 2004/11/30
con
t
ro
l
f
unc
ti
ons
t
o
b
e sen
t
an
d
rece
i
ve
d
.
R
emo
t
e con
t
ro
l
comman
d
s can
b
e rece
i
ve
d
by
Bluetooth Utility.
Bluetooth Profile
A s
p
ecification that
g
uarantees the connection to the service function of a remote Bluet
o
device.
For a Bluetooth device to send and receive information to and from another device
,
bot
h
devices must support shared profiles designated for each function, such as dial -up
networking, faxing, printing and human interface devices.
DHCP
Abbreviation of Dynamic Host Configuration Protocol
DHCP is a function that automaticall
y
sets u
p
IP addresses. This function will allow
y
o
u
avoid having to set up IP addresses on each computer.
DUN Profile
A Bluetooth profile for Dial-up Networking.
This profile enables you to establish a dial -u
p
Bluetooth connection with a wireless m
o
station, mobile telephone, or similar device.
FAX Profile
A Bluetooth
p
rofile that enables
y
ou to establish a Bluetooth connection with a wireles
s
modem station, mobile telephone, or similar device to send or receive a fax.
FTP
Abbreviation of File Transfer Profile.
A Bluetooth
p
rofile that enables
y
ou to browse folders on a wireless device and transfe
r
to and from the local device.
Introduction 第 222 頁,共 224 頁
file://C:\Documents and Settings\anitachou\Local Settings\Temp\~hh114B.htm 2004/11/30
GAVDP Profile
Abbreviation of Generic Audio-Video Distribution Profile. This is a Bluetooth profile.
HCRP
Abbreviation of Hardco
py
Cable Re
p
lacement Profile. A Bluetooth
p
rofile that establis
h
connection to a device only when you print, unlike SPP (Serial Port Profile).
HID Profile
Abbreviation of Human Interface Device Profile.
A Bluetooth
p
rofile that enables
y
ou to connect to a wireless mouse
,
ke
y
board or other
i
device.
LAP
Abbreviation of LAN Access Profile.
A Bluetooth
p
rofile that enables
y
ou to establish a Bluetooth connection to a LAN acce
s
point to access a LAN via PPP.
OPP
Abbreviation of Object Push Profile.
A Bluetooth
p
rofile that enables
y
ou to exchan
g
e business cards with a wireless device.

Introduction 第 223 頁,共 224 頁
file://C:\Documents and Settings\anitachou\Local Settings\Temp\~hh114B.htm 2004/11/30
Passkey
Also known as a PIN code
This is a
p
assword consistin
g
of u
p
to 16 al
p
hanumeric characters that enables a conne
c
to be established to a wireless device. You need to know the
p
asske
y
in order to connec
device that requires authentication.
Even when the authentication settin
g
has been disabled in the User Mode Pro
p
erties of
t
Bluetooth Utilit
y,
the
p
asske
y
entr
y
dialo
g
box will a
pp
ear automaticall
y
if authenticati
o
re
q
uired
,
enablin
g
y
ou to authenticate a device. A link ke
y
will be created once
y
ou ha
v
authenticated a device
,
eliminatin
g
the need for a
p
asske
y
to connect to that device in t
h
future.
Pairing
A securit
y
function. In order for Bluetooth devices to authenticate each other
,
a
p
asske
y
code
)
is entered in each terminal when the
y
are connected for the first time
,
and a secre
t
bit link key is generated. This action is known as "pairing."
SPP
Abbreviation of Serial Port Profile.
A Bluetooth
p
rofile that enables communication with a device throu
g
h a virtual serial
po
confi
g
ured for a Bluetooth connection. This can be used for
p
rinters and
p
rinter ada
p
ter
s
PDAs, using a method different from HCRP or ActiveSync .
TCP/IP
Abbreviation of Transmission Control Protocol/Internet Protocol.
Standard communications
p
rotocol
(
convention for enablin
g
data communication
)
used
Internet. Usin
g
the same
p
rotocol enables com
p
uters to exchan
g
e data with each other.
vCARD
Common standard for electronic business cards.

Introduction 第 224 頁,共 224 頁
file://C:\Documents and Settings\anitachou\Local Settings\Temp\~hh114B.htm 2004/11/30
Names
,
(
e
)
mail addresses
,
tele
p
hone numbers and other information are exchan
g
ed in t
h
form of electronic business cards
(
in *.vcf format
),
allowin
g
all
p
arties to easil
y
re
g
iste
r
other's data in their address books.
The standard is extensivel
y
com
p
atible with Microsoft Outlook
,
Lotus Or
g
anizer and ot
h
mail/schedule management software.
FEDERAL COMMUNICATIONS COMMISSION
INTERFERENCE STATEMENT
This equipment has been tested and found to comply with the limits for a Class B
digital device, pursuant to Part 15 of the FCC Rules. These limits are designed
to provide reasonable protection against harmful interference in a residential
installation. This equipment generates, uses and can radiate radio frequency
energy and, if not installed and used in accordance with the instructions, may
cause harmful interference to radio communications. However, there is no
guarantee that interference will not occur in a particular installation. If this
equipment does cause harmful interference to radio or television reception,
which can be determined by turning the equipment off and on, the user is
encouraged to try to correct the interference by one or more of the following
measures:
-- Reorient or relocate the receiving antenna.
-- Increase the separation between the equipment and receiver.
-- Connect the equipment into an outlet on a circuit different from that to which
the receiver is connected.
-- Consult the dealer or an experienced radio/TV technician for help.
CAUTION:
Any changes or modifications not expressly approved by the grantee of this
device could void
the user's authority to operate the equipment.
FCC RF Radiation Exposure Statement
This equipment complies with FCC RF radiation exposure limits set forth for an
uncontrolled environment. This equipment should be installed and operated with
a minimum distance of 20cm between the radiator and your body.
Quick Start Guide - Introduction 第 1 頁,共 160 頁
file://C:\Documents and Settings\anitachou\Local Settings\Temp\~hh3F24.htm 2004/11/30
The Quick Start Guide is intended to those who wish to get started right away using Bluetooth, and
describes basic concepts to be aware of as well as ways to connect to Bluetooth devices.
The Quick Start Guide comprises the following items.
What you need to know about using Bluetooth
Describes the basic concepts you need to be aware of when using Bluetooth devices.
It is recommended that you read this section before starting the set-up process.
Trying out your Bluetooth device
Describes the procedures used for actually configuring and then using your Bluetooth
device. Please read this according to your desired purpose and device.
Troubleshooting
Describes possible causes and countermeasures to be considered when your Bluetooth
device cannot be configured properly, functions abnormally or presents other problems
related to its operation.
Glossary
Explains the technical jargon used in this guide.
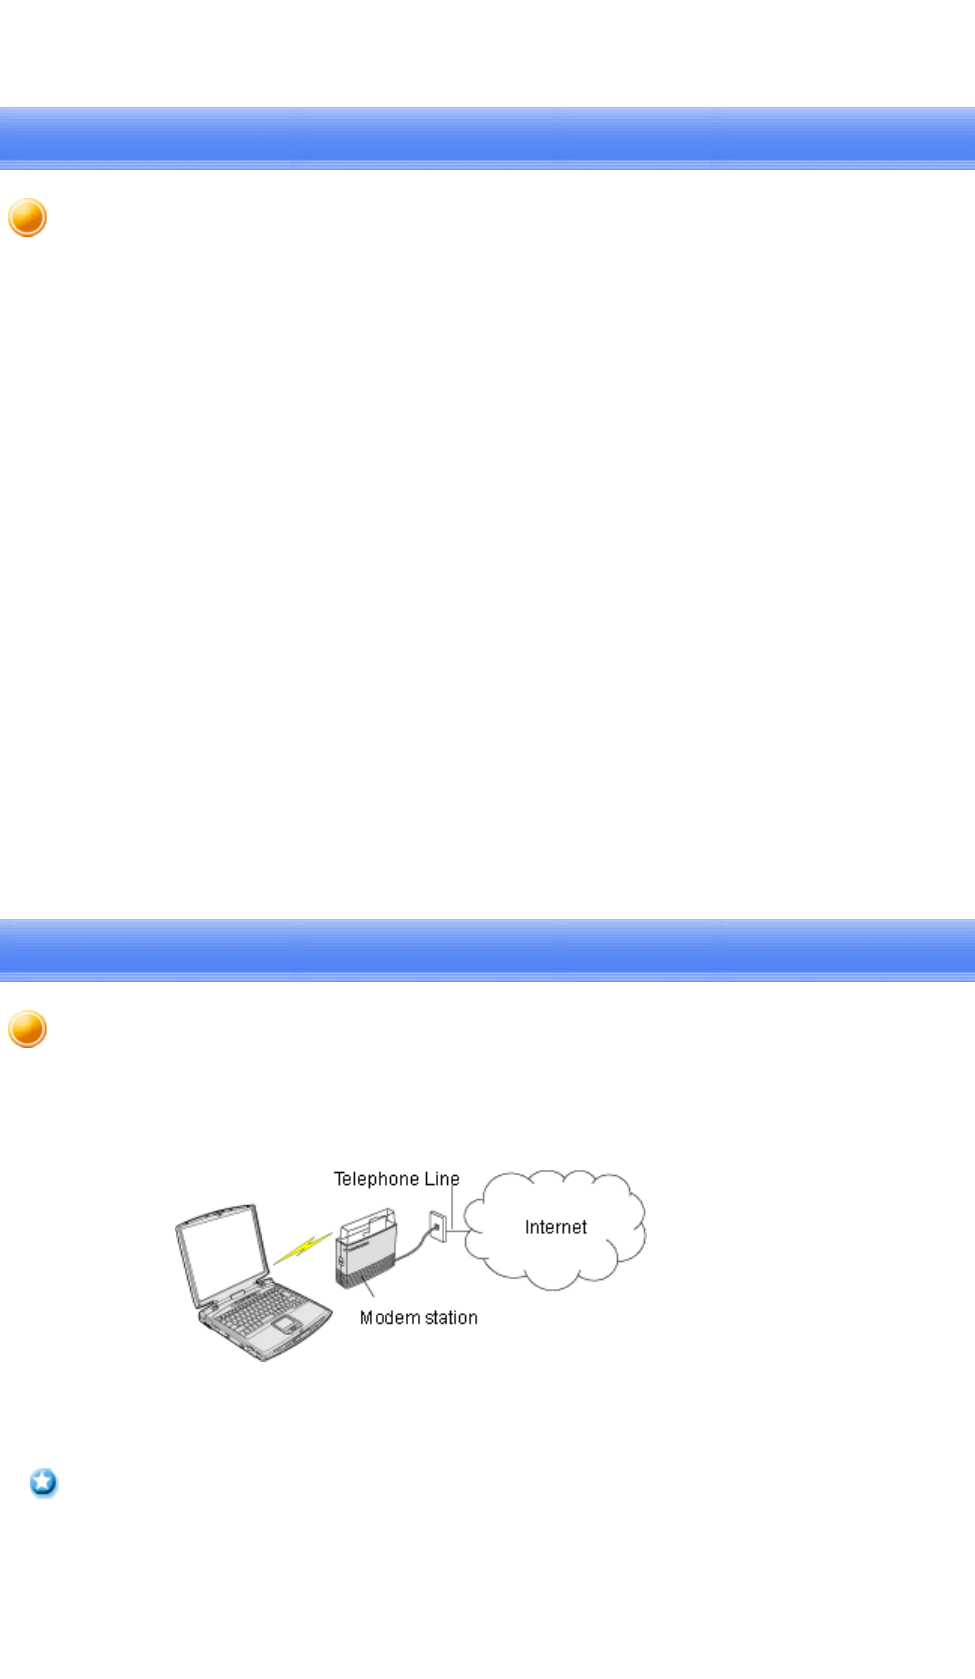
You can use a Bluetooth wireless modem to connect to the Internet via a telephone line.
→Setting up the modem station
→Connecting to the Internet
zIn order to connect to the Internet, you must have already signed up with a provider and
obtained a connection ID and password. Please ensure you have confirmed the ID, password
and telephone number of your provider
'
s access point before you begin the set
-
up process
Important
Introduction
Connecting to the Internet using a modem station [DUN]
Quick Start Guide - Introduction 第 2 頁,共 160 頁
file://C:\Documents and Settings\anitachou\Local Settings\Temp\~hh3F24.htm 2004/11/30
and
telephone
number
of
your
providers
access
point
before
you
begin
the
set
up
process
.
zPlease refer to your instruction manual for information on connecting the modem station to a
telephone line.
zA Bluetooth passkey (PIN code) is required for you to connect to the modem station. Please
make a note of your Bluetooth passkey before you start the set-up process.
1. Turn on the wireless modem station
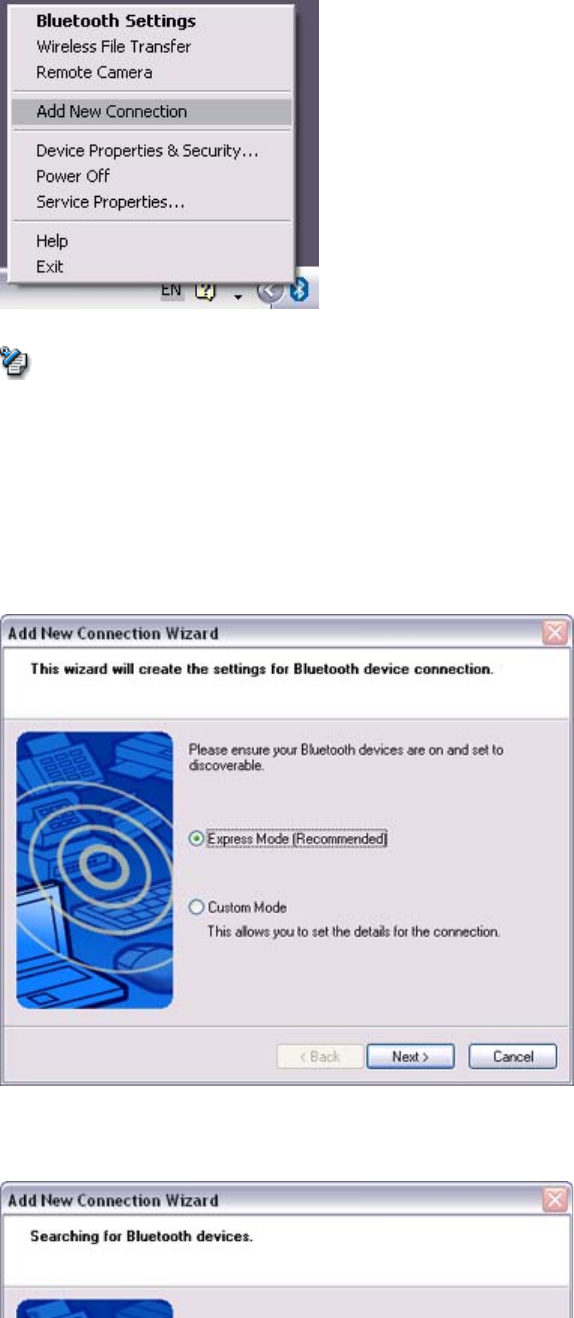
2. Right-click the Bluetooth icon in the task tray, and then click on [Add New
Connection]
{Alternatively, click [Start]→[All Programs]→[Bluetooth]→[Bluetooth Settings],
and then click on
[
New Connection
]
from the active
[
Bluetooth Settin
g
s
]
window.
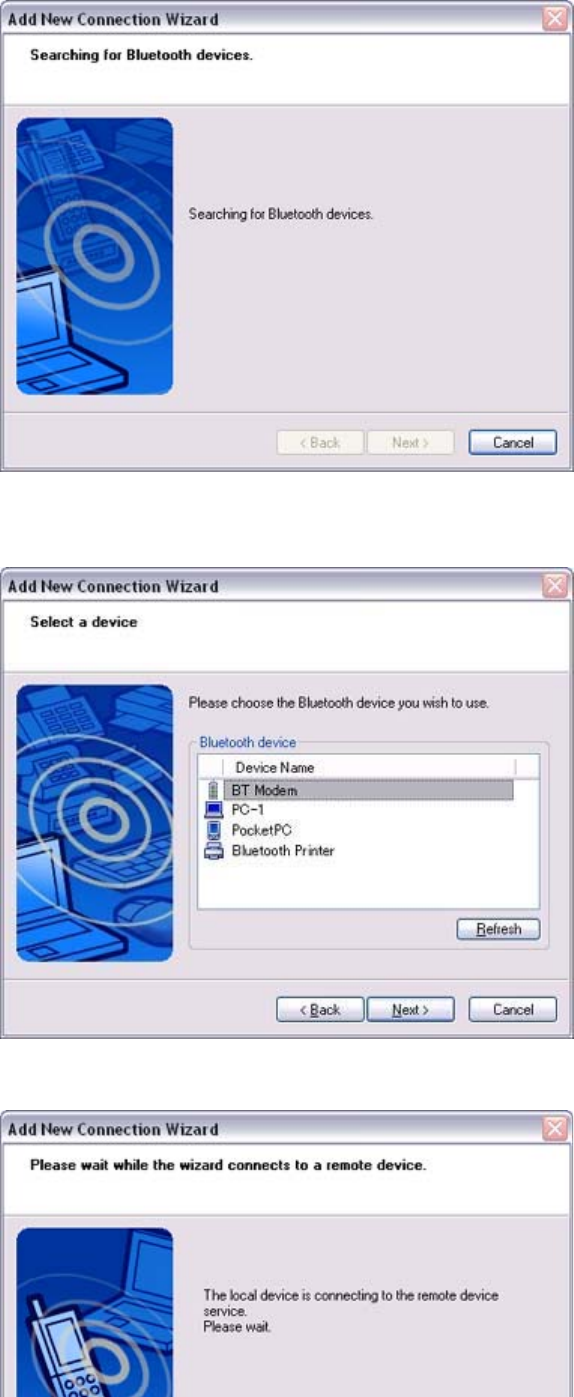
The [Add New Connection Wizard (Welcome to the Add New Connection Wizard)]
window will appear.
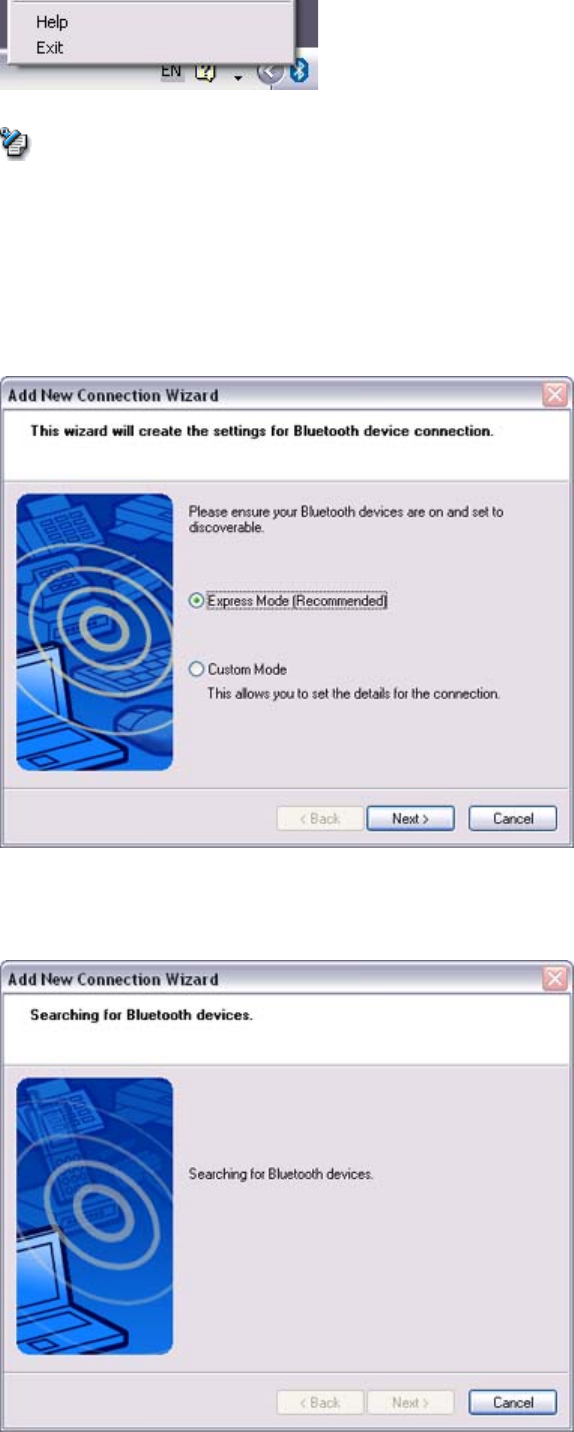
3. Confirm that [Express Mode] has been selected, and then click on the [Next] button
Setting up the modem station
Procedure
Note
Quick Start Guide - Introduction 第 3 頁,共 160 頁
file://C:\Documents and Settings\anitachou\Local Settings\Temp\~hh3F24.htm 2004/11/30
The
[
Add New Connection Wizard
(
Searchin
g
for Bluetooth devices
)]
window will
appear.
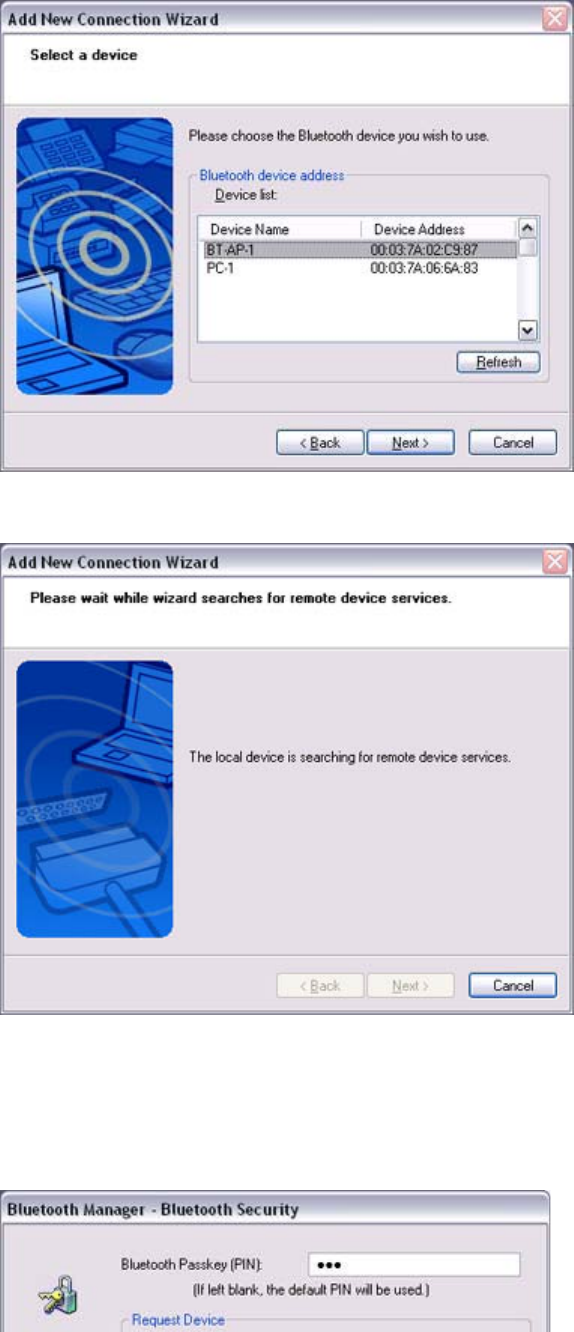
4. Select the device name of the wireless modem station from [Device List], and then
click on the [Next] button
The [Add New Connection Wizard (Searching for Services)] window will appear.
Quick Start Guide - Introduction 第 4 頁,共 160 頁
file://C:\Documents and Settings\anitachou\Local Settings\Temp\~hh3F24.htm 2004/11/30
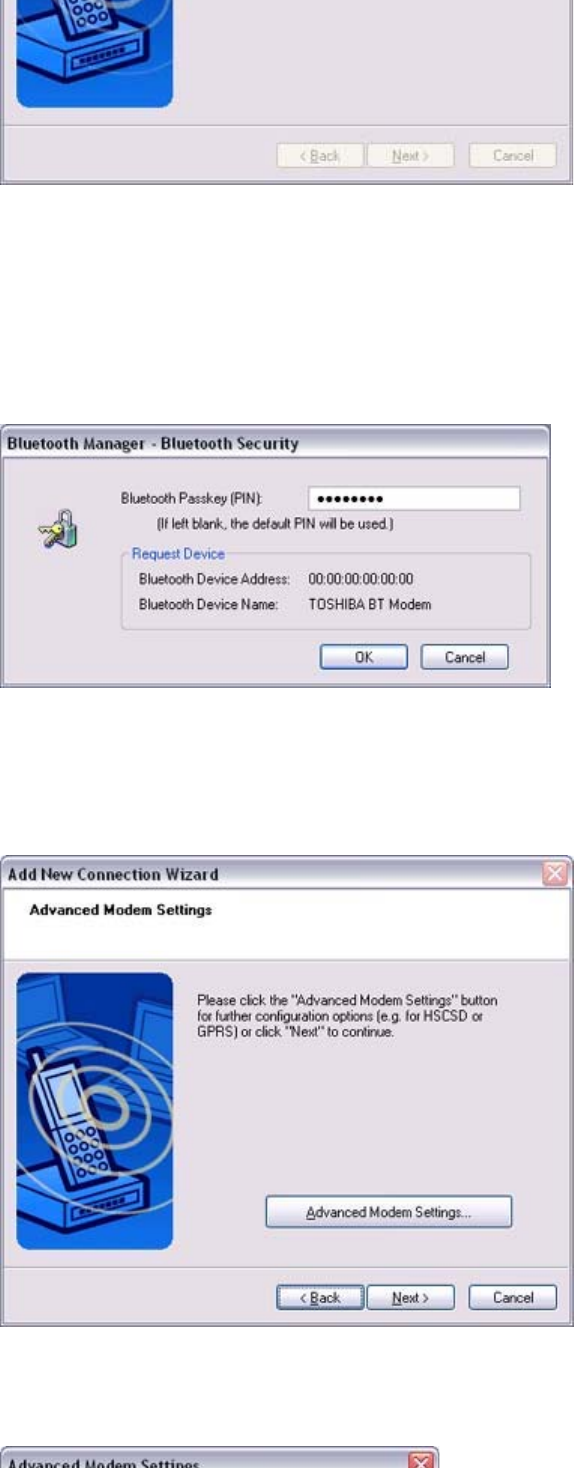
Once a service has been detected successfully, connection to the device and COM port
creation will be
p
erformed automaticall
y,
after which the
[
Add New Connection Wizard
(Modem Settings)] window will appear.
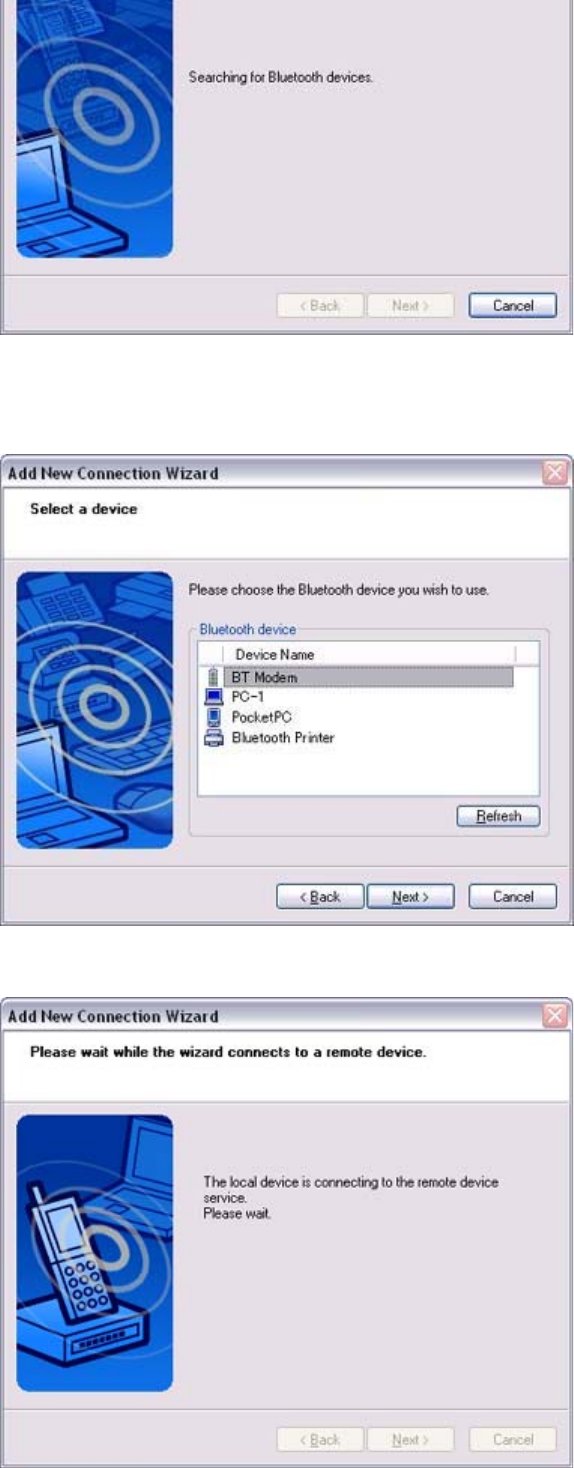
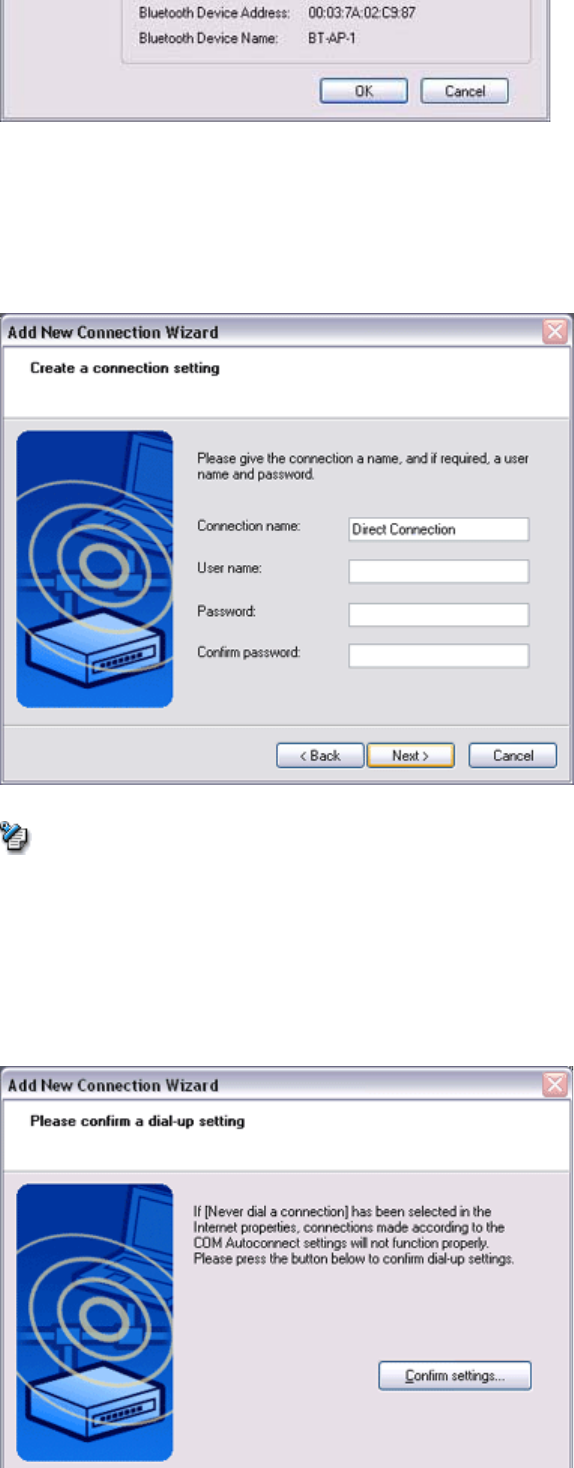
5. If you are connecting to a wireless modem station for the first time, enter the passkey
for the modem station under [Bluetooth Passkey (PIN code)], and then click on the
[OK] button
Once the program has finished searching for the devices, the [Add New Connection
Wizard (Device Selection)] window will appear.
6. Click on the [Next] button
Certain modems require you to configure initialization commands separately.
Please click on the [Additional initialization Command Settings] button, enter the
initialization commands in the following window, and then click on the [OK] button.
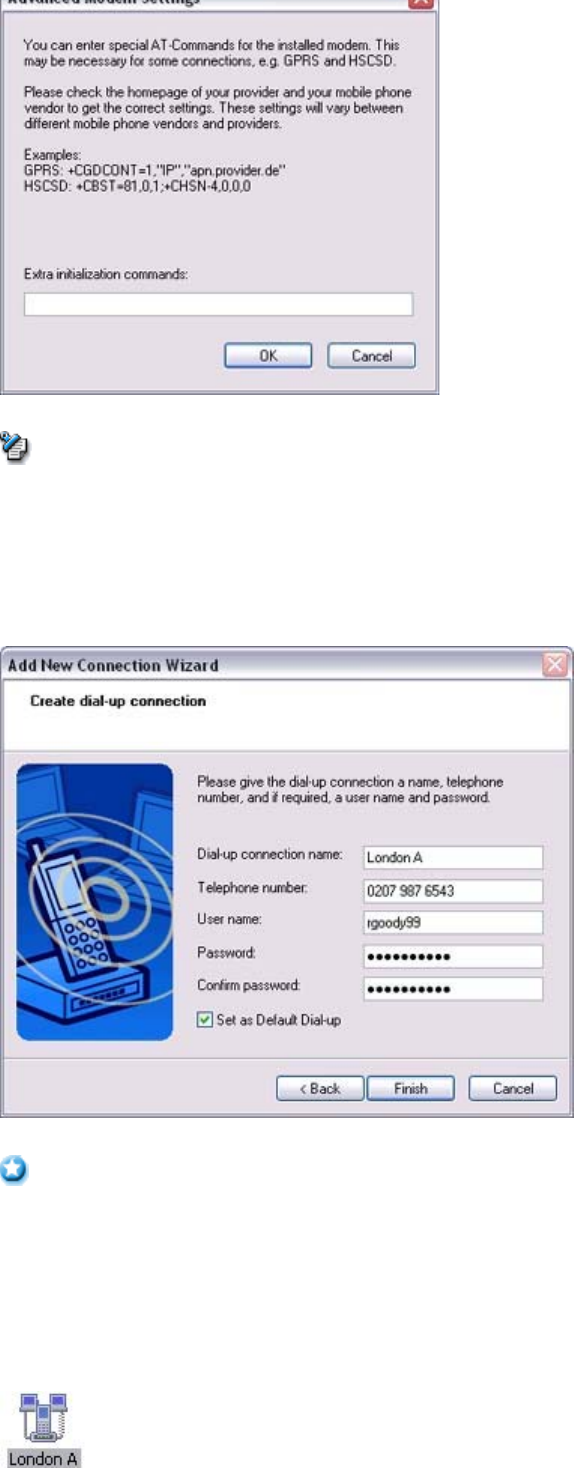
Quick Start Guide - Introduction 第 5 頁,共 160 頁
file://C:\Documents and Settings\anitachou\Local Settings\Temp\~hh3F24.htm 2004/11/30
{Please refer to the modem or mobile phone instruction manual for further details
on the initialization commands.
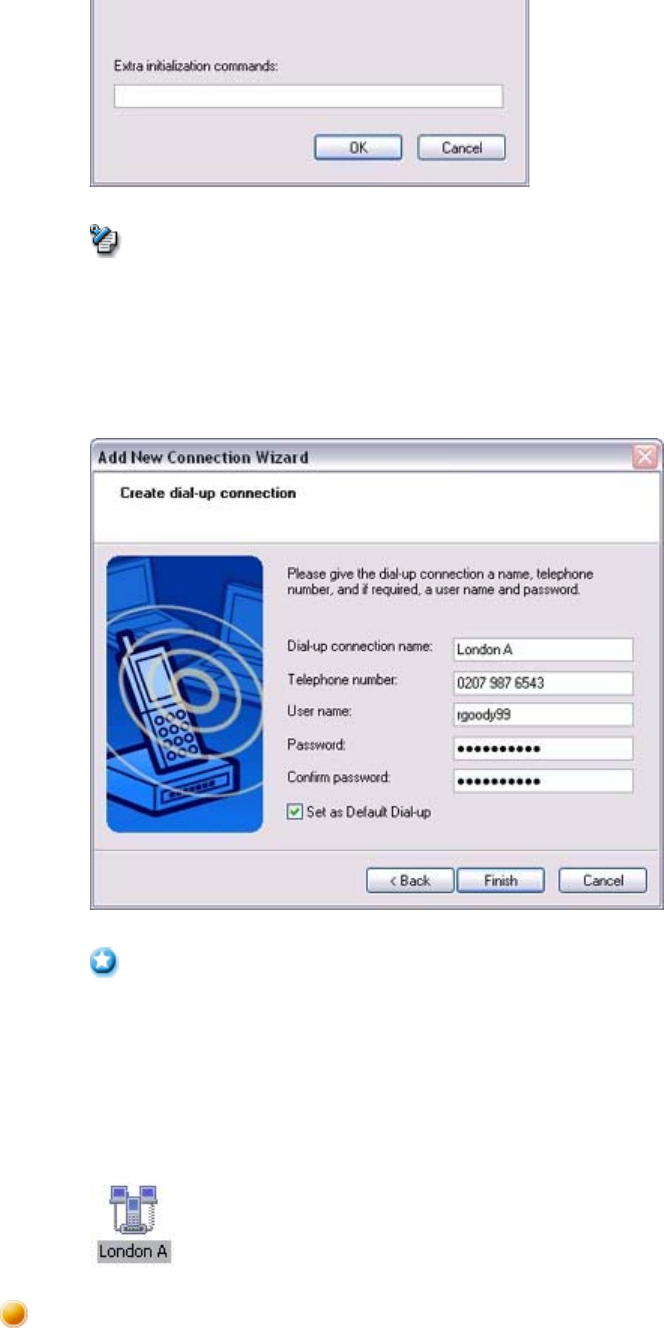
7. Enter the connection name (optional), telephone number (of your provider's access
point), user name and password (as issued by your provider), and then click on the
[Finish] button.
{The sample entries shown in the window are provided solely for purpose of
explanation. Please use your own telephone number, ID and password according
to the arrangement with your provider.
The settings will be registered, and an icon will appear in the [Bluetooth Settings]
window.
Note
Important
Quick Start Guide - Introduction 第 6 頁,共 160 頁
file://C:\Documents and Settings\anitachou\Local Settings\Temp\~hh3F24.htm 2004/11/30
You can connect to the Internet by following the procedure below if the connection destination
registered when you configured the wireless modem has been set as the default connection
destination.
1. Start your browser, e-mail application or other application
{Please enter the e-mail settings separately if you are going to use e-mail (the set-
up method will vary with the application).
2. Enter the URL of the Web page you wish to display and then press the [Enter] key, or
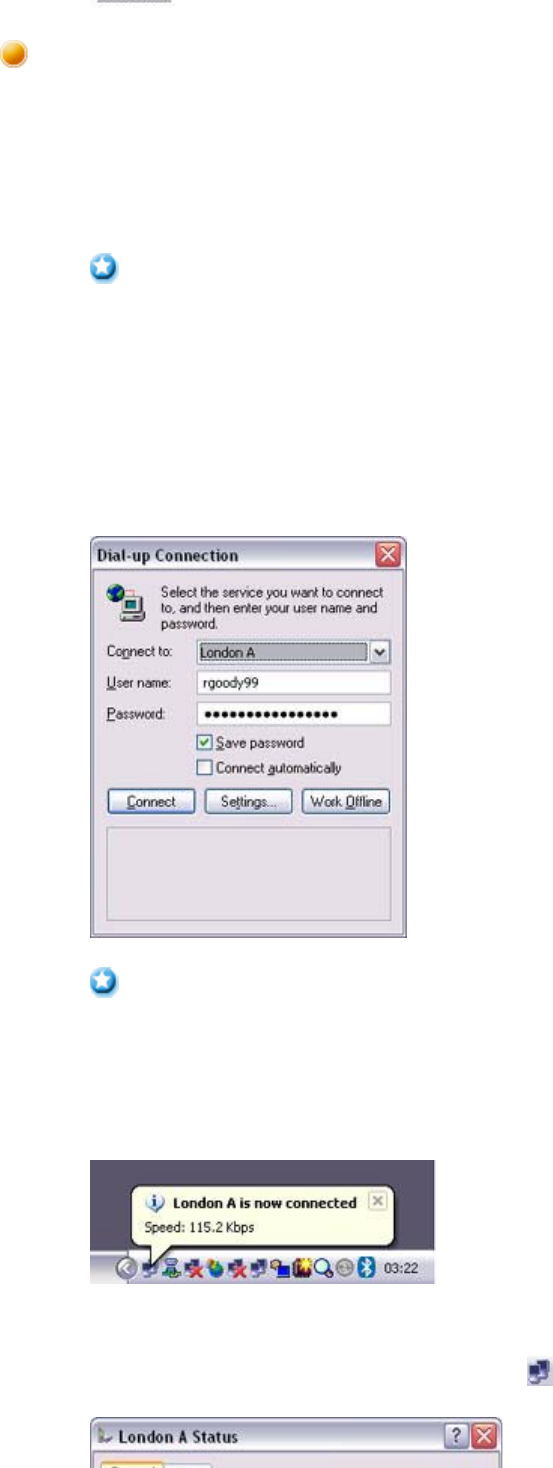
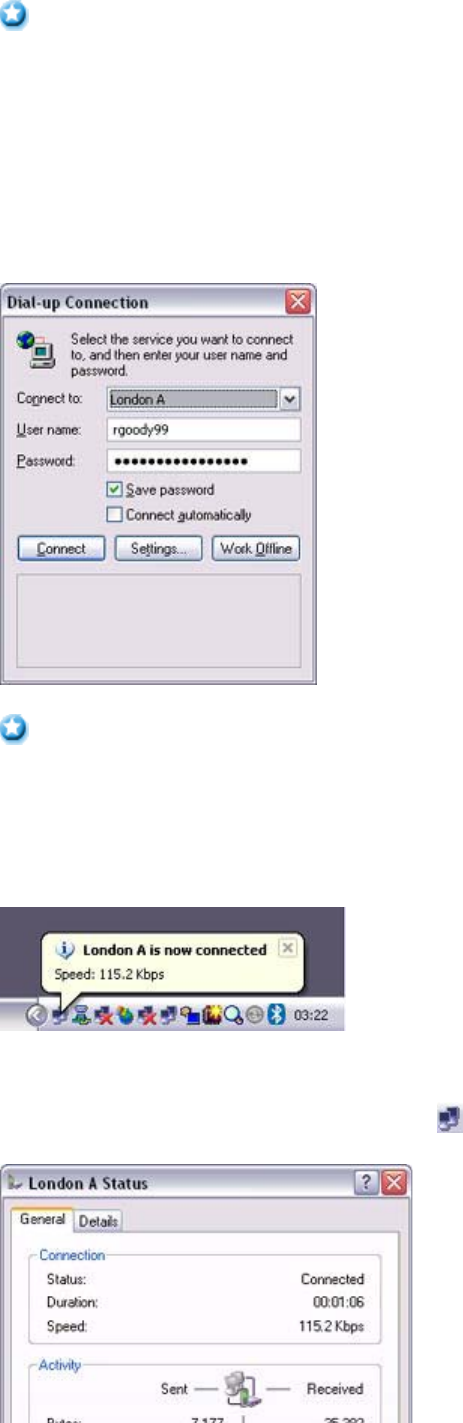
use the e-mail tool to send/receive items or perform other activities.
The [Dial-up Connection] window will appear.
3. Click on the [Connect] button
{A connection will be automatically established with the modem station if COM
Auto Connect is available. If COM Auto Connect is not available, please
manually connect to the modem station.
The following message will appear once you have connected to the Internet.
4. End the connection
The window below will appear if you double-click on the icon in the task bar.
Connecting to the Internet
Important
Important
Quick Start Guide - Introduction 第 7 頁,共 160 頁
file://C:\Documents and Settings\anitachou\Local Settings\Temp\~hh3F24.htm 2004/11/30
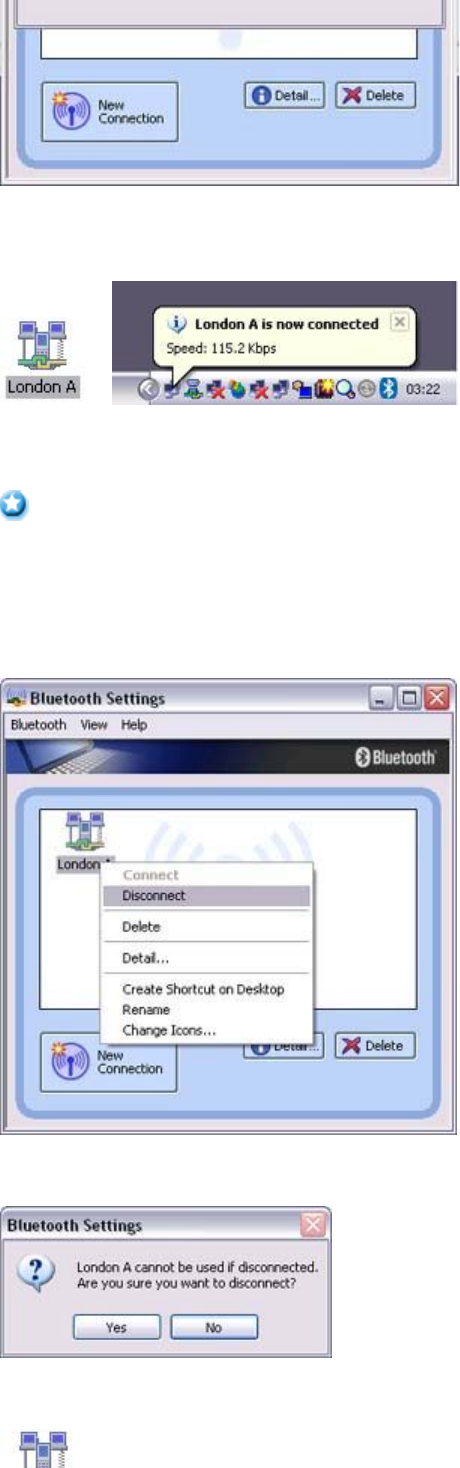
Please click on the [Disconnect] button when you want to disconnect from the Internet.
Alternatively, please right-click on the icon, and then click on [Disconnect].
zYou can start an application to make an automatic connection to the Internet, but you can
also make a manual connection using the connection destination icon.
The procedure is described below.
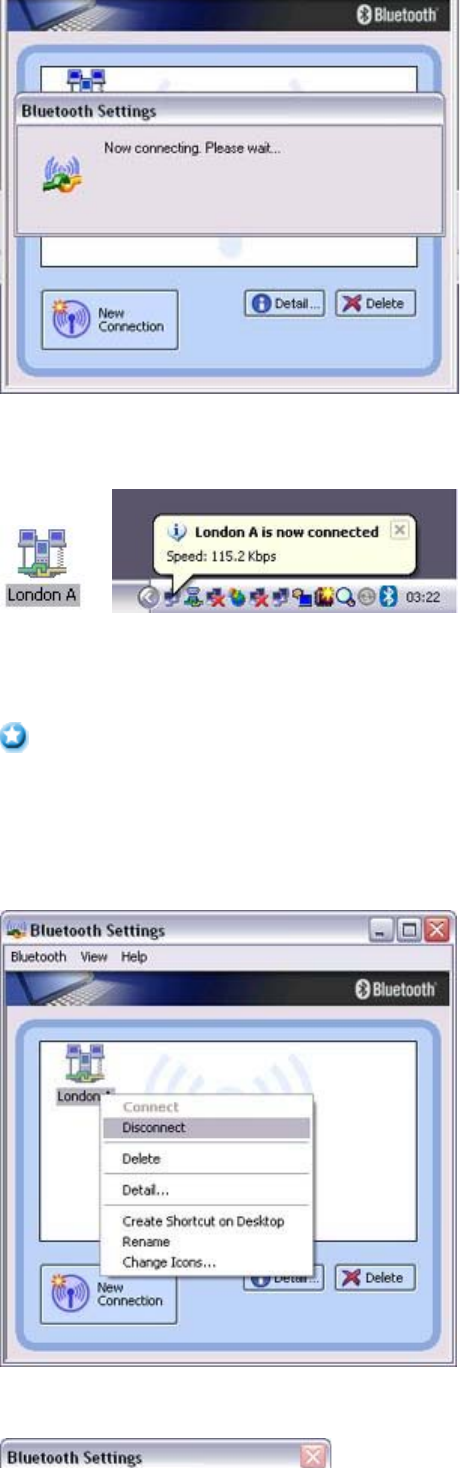
1. From the [Bluetooth Settings] window, right -click on the connection destination icon,
and then click on [Connect] from the menu that appears
A window indicating that the connection is being established will appear.
Note
Quick Start Guide - Introduction 第 8 頁,共 160 頁
file://C:\Documents and Settings\anitachou\Local Settings\Temp\~hh3F24.htm 2004/11/30
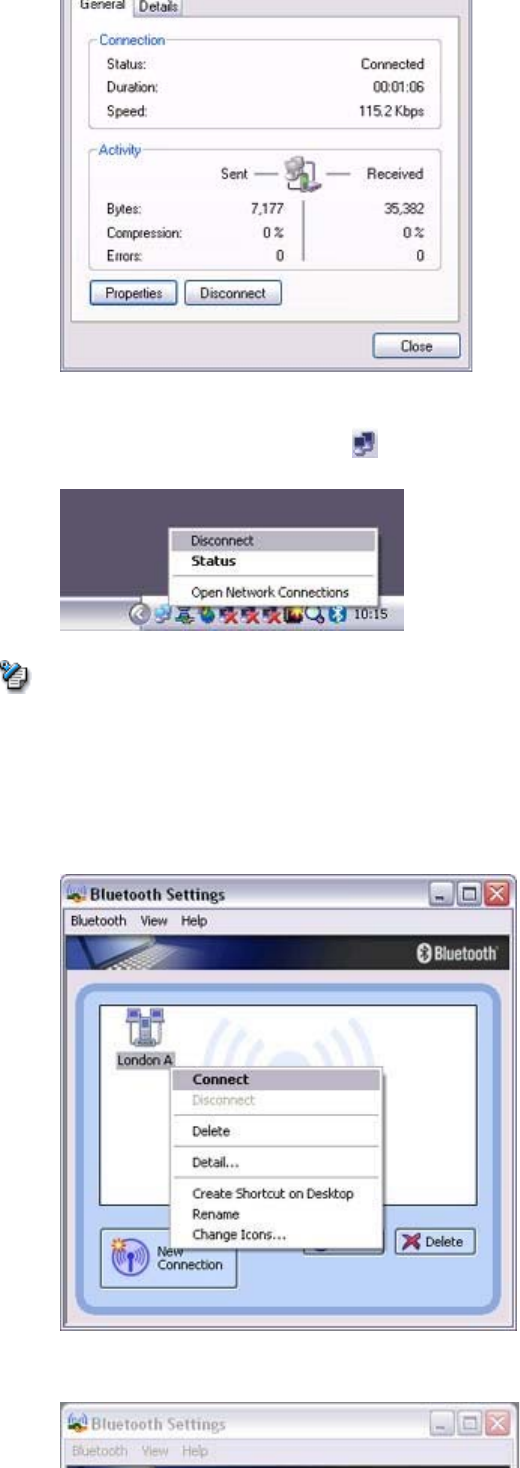
If the connection has been established successfully, the connection icon and task tray
will appear as shown below.
You will be able to browse Web pages using your browser and send and receive e-
mail.
{Please enter the e-mail settings separately if you are going to use e-mail (the set-
up method will vary with the application).
2. End the connection
Right-click on the icon, and then click [Disconnect] to end the connection.
The following message will appear. Click on the [Yes] button.
Important
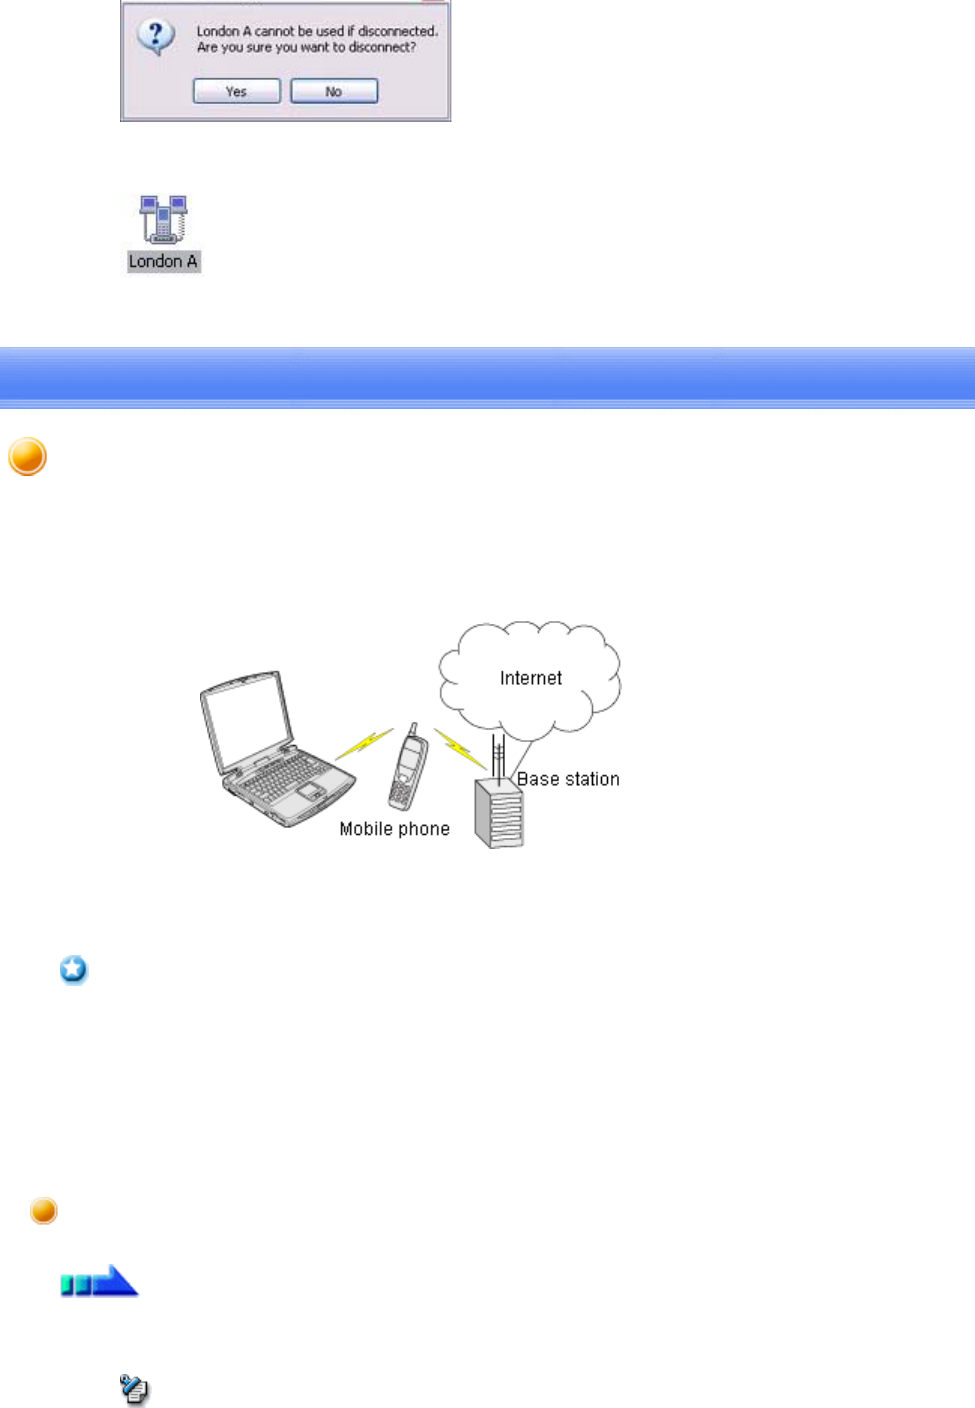
Quick Start Guide - Introduction 第 9 頁,共 160 頁
file://C:\Documents and Settings\anitachou\Local Settings\Temp\~hh3F24.htm 2004/11/30
When the icon appears as shown below, the connection will have ended.
This section describes how to connect to the Internet via a telephone line, using a mobile
telephone.
→Configuring a mobile telephone for use as a modem
→Connecting to the Internet
zIn order to connect to the Internet, you must have already signed up with a provider and
obtained a connection ID and password. Please ensure you have confirmed the ID,
password and telephone number of your provider's access point before you begin the set-
up process.
zA Bluetooth passkey (PIN code) is required for you to connect to the mobile telephone.
Please make a note of your Bluetooth passkey before you start the set-up process.
1. Turn on the mobile telephone, and set it to be connectable via Bluetooth
{Please refer to the mobile telephone instruction manual for information on how to
operate the device.
Important
Configuring a mobile telephone for use as a modem
Procedure
Note
Connecting to the Internet using a mobile telephone [DUN]
Quick Start Guide - Introduction 第 10 頁,共 160 頁
file://C:\Documents and Settings\anitachou\Local Settings\Temp\~hh3F24.htm 2004/11/30
2. Right-click on the Bluetooth icon in the task tray, and then click on [Add New
Connection]
{Alternatively, click [Start]→[All Programs]→[Bluetooth]→[Bluetooth Settings],
and then click on
[
New Connection
]
from the active
[
Bluetooth Settin
g
s
]
window.
The [Add New Connection Wizard (Welcome to the Add New Connection Wizard)]
window will appear.
3. Confirm that [Express Mode] has been selected, and then click on the [Next] button
The [Add New Connection Wizard (Searching for Bluetooth devices)] window will
appear.
Note
Quick Start Guide - Introduction 第 11 頁,共 160 頁
file://C:\Documents and Settings\anitachou\Local Settings\Temp\~hh3F24.htm 2004/11/30
4. Select the device name of the mobile telephone from [Device List], and then click on
the [Next] button
The [Add New Connection Wizard (Searching for Services)] window will appear.
Quick Start Guide - Introduction 第 12 頁,共 160 頁
file://C:\Documents and Settings\anitachou\Local Settings\Temp\~hh3F24.htm 2004/11/30
Once a service has been detected successfully, connection to the device and COM port
creation will be
p
erformed automaticall
y,
after which the
[
Add New Connection Wizard
(Modem Settings)] window will appear.
5. If you are connecting to a mobile telephone for the first time, enter the passkey for the
wireless modem station under [Bluetooth Passkey (PIN code)], and then click on the
[OK] button
Once the program has finished searching for the devices, the [Add New Connection
Wizard (Device Selection)] window will appear.
6. Click on the [Next] button
Certain modems require you to configure initialization commands separately.
Please click on the [Additional Initialization Command Settings] button, enter the
initialization commands in the following window, and then click on the [OK] button.
Quick Start Guide - Introduction 第 13 頁,共 160 頁
file://C:\Documents and Settings\anitachou\Local Settings\Temp\~hh3F24.htm 2004/11/30
{Please refer to the modem or mobile phone instruction manual for further details
on the initialization commands.
7. Enter the connection name (optional), telephone number (of your provider's access
point), user name and password (as issued by your provider), and then click on the
[Finish] button.
{The sample entries shown in the window are provided solely for purpose of
explanation. Please use your own telephone number, ID and password according
to the arrangement with your provider.
The settings will be registered, and an icon will appear in the [Bluetooth Settings]
window.
You can connect to the Internet by following the procedure below if the connection destination
registered when you configured the mobile telephone has been set as the default connection
destination.
1
Start your browser e
mail application or other application
Note
Important
Connecting to the Internet
Quick Start Guide - Introduction 第 14 頁,共 160 頁
file://C:\Documents and Settings\anitachou\Local Settings\Temp\~hh3F24.htm 2004/11/30
1
.
Start
your
browser,
e
-
mail
application
or
other
application
{Please enter the e-mail settings separately if you are going to use e-mail (the set-
up method will vary with the application).
2. Enter the URL of the Web page you wish to display and then press the [Enter] key, or
use the e-mail tool to send/receive items or perform other activities.
The [Dial-up Connection] window will appear.
3. Click on the [Connect] button
{A connection will be automatically established with the mobile telephone if COM
Auto Connect is available. If COM Auto Connect is not available, please
manually connect to the mobile telephone.
The following message will appear once you have connected to the Internet.
4. End the connection
The window below will appear if you double-click on the icon in the task bar.
Important
Important

Quick Start Guide - Introduction 第 15 頁,共 160 頁
file://C:\Documents and Settings\anitachou\Local Settings\Temp\~hh3F24.htm 2004/11/30
Please click on the [Disconnect] button when you want to disconnect from the Internet.
Alternatively, please right-click on the icon, and then click on [Disconnect].
zYou can start an application to make an automatic connection to the Internet, but you can
also make a manual connection using the connection destination icon.
The procedure is described below.
1. From the [Bluetooth Settings] window, right -click on the connection destination icon,
and then click on [Connect] from the menu that appears
A window indicating that the connection is being established will appear.
Note
Quick Start Guide - Introduction 第 16 頁,共 160 頁
file://C:\Documents and Settings\anitachou\Local Settings\Temp\~hh3F24.htm 2004/11/30
If the connection has been established successfully, the connection icon and task tray
will appear as shown below.
You will be able to browse Web pages using your browser and send and receive e-mail.
{Please enter the e-mail settings separately if you are going to use e-mail (the set-
up method will vary with the application).
2. End the connection
Right-click on the icon, and then click [Disconnect] to end a connection.
The following message will appear. Click on the [Yes] button.
When the icon appears as shown below, the connection will have been ended.
Important
Quick Start Guide - Introduction 第 17 頁,共 160 頁
file://C:\Documents and Settings\anitachou\Local Settings\Temp\~hh3F24.htm 2004/11/30
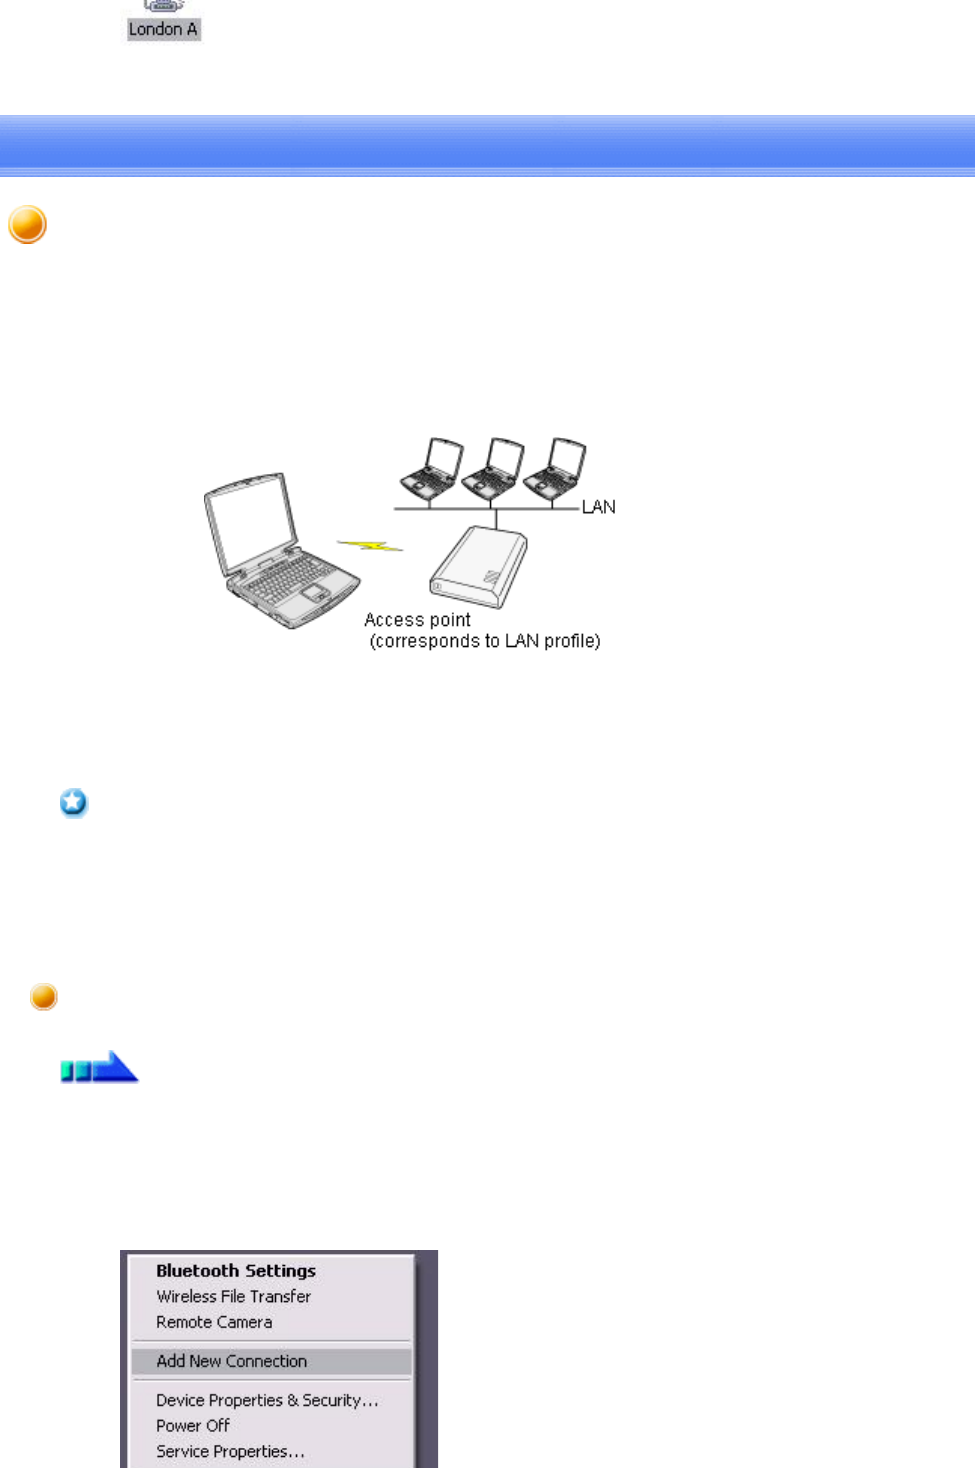
This section describes how to connect to a network (for example, a company LAN or a personal
home network) using a LAP profile-compatible access point.
Please refer to "Using an access point (PAN) to connect to a LAN if you are using a PAN profile-
compatible access point.
→Setting up the access point
→Connecting to a LAN (LAP)
zThe access point must have been started and a normal connection already established to
the network before the access point is set up. Please refer to the access point instruction
manual for information on how to set up the access point.
zA Bluetooth passkey (PIN code) is required for you to connect to the access point. Please
make a note of your Bluetooth passkey before you start the set-up process.
1. Turn on the access point, and confirm that a connection has been established with the
network
2. Right-click the Bluetooth icon in the task tray, and then click on [Add New
Connection]
Important
Setting up the access point
Procedure
Connecting to a LAN using an access point (LAP) [LAP]
Quick Start Guide - Introduction 第 18 頁,共 160 頁
file://C:\Documents and Settings\anitachou\Local Settings\Temp\~hh3F24.htm 2004/11/30
{Alternatively, click [Start]→[All Programs]→[Bluetooth]→[Bluetooth Settings],
and then click on [New Connection] from the active [Bluetooth Settings] window.
The [Add New Connection Wizard (Welcome to the Add New Connection
Wizard)] window will appear.
3. Confirm that [Express Mode] has been selected, and then click on the [Next] button
The [Add New Connection Wizard (Searching for Bluetooth devices)] window
will appear.
Once the program has finished searching for the devices the [Add New
Note
Quick Start Guide - Introduction 第 19 頁,共 160 頁
file://C:\Documents and Settings\anitachou\Local Settings\Temp\~hh3F24.htm 2004/11/30
Once
the
program
has
finished
searching
for
the
devices,
the
[Add
New
Connection Wizard (Device Selection)] window will appear.
4. Select the device name of the access point from [Device List], and then click on the
[Next] button
The [Add New Connection Wizard (Searching for Services)] window will appear.
You will be asked for the Bluetooth passkey in the window that appears.
5. Enter the passkey under [Bluetooth Passkey (PIN code)], and then click on the [OK]
button
Quick Start Guide - Introduction 第 20 頁,共 160 頁
file://C:\Documents and Settings\anitachou\Local Settings\Temp\~hh3F24.htm 2004/11/30
Service detection and COM port creation will be performed automatically.
The [Add New Connection Wizard (Create Connection Destination)] window will
appear.
6. Enter the connection name, user name and password, then click on the [Next] button
{The user name and password are entered here to allow you to connect to the
access point.
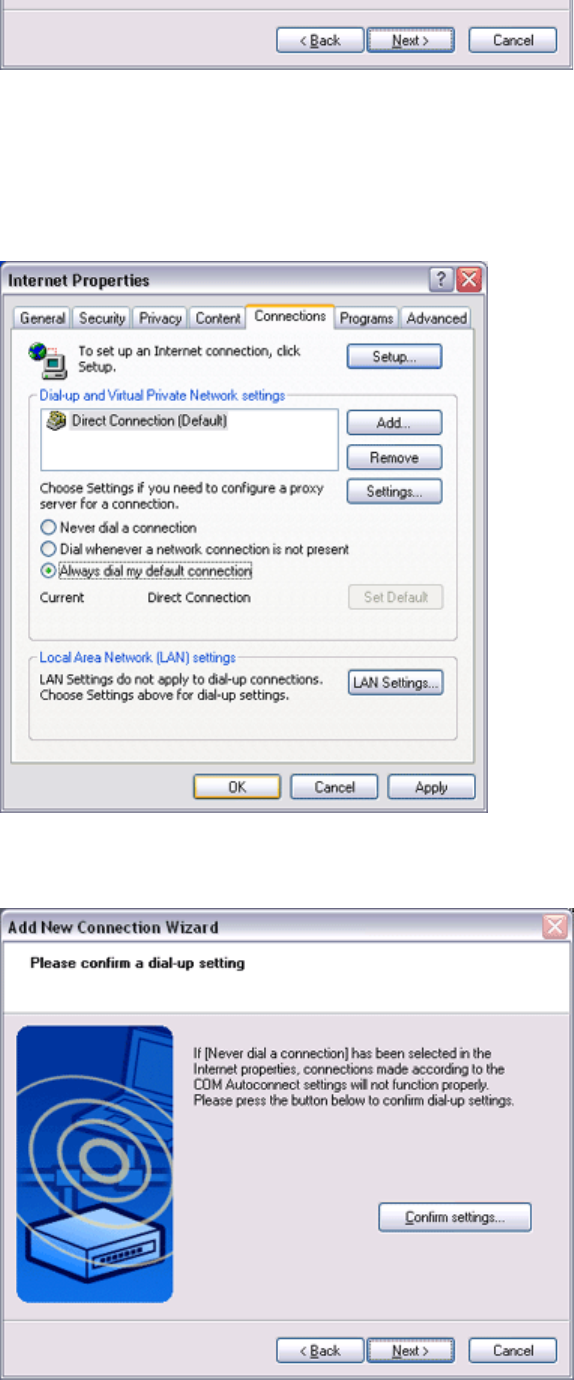
The [Add New Connection Wizard (Confirm Dial-up Settings)] window will appear.
7. Click on the [Confirm Settings] button
Note
Quick Start Guide - Introduction 第 21 頁,共 160 頁
file://C:\Documents and Settings\anitachou\Local Settings\Temp\~hh3F24.htm 2004/11/30
The [Internet Options] window will appear.
8. Configure the connection method, and then click on the [OK] button
Set the connection destination used for the LAN connection set up in (6) above as the
default connection destination, and then select "Always dial my default connection."
9. Click on the [Next] button
The [Add New Connection Wizard (Connection Name Settings)] window will appear.
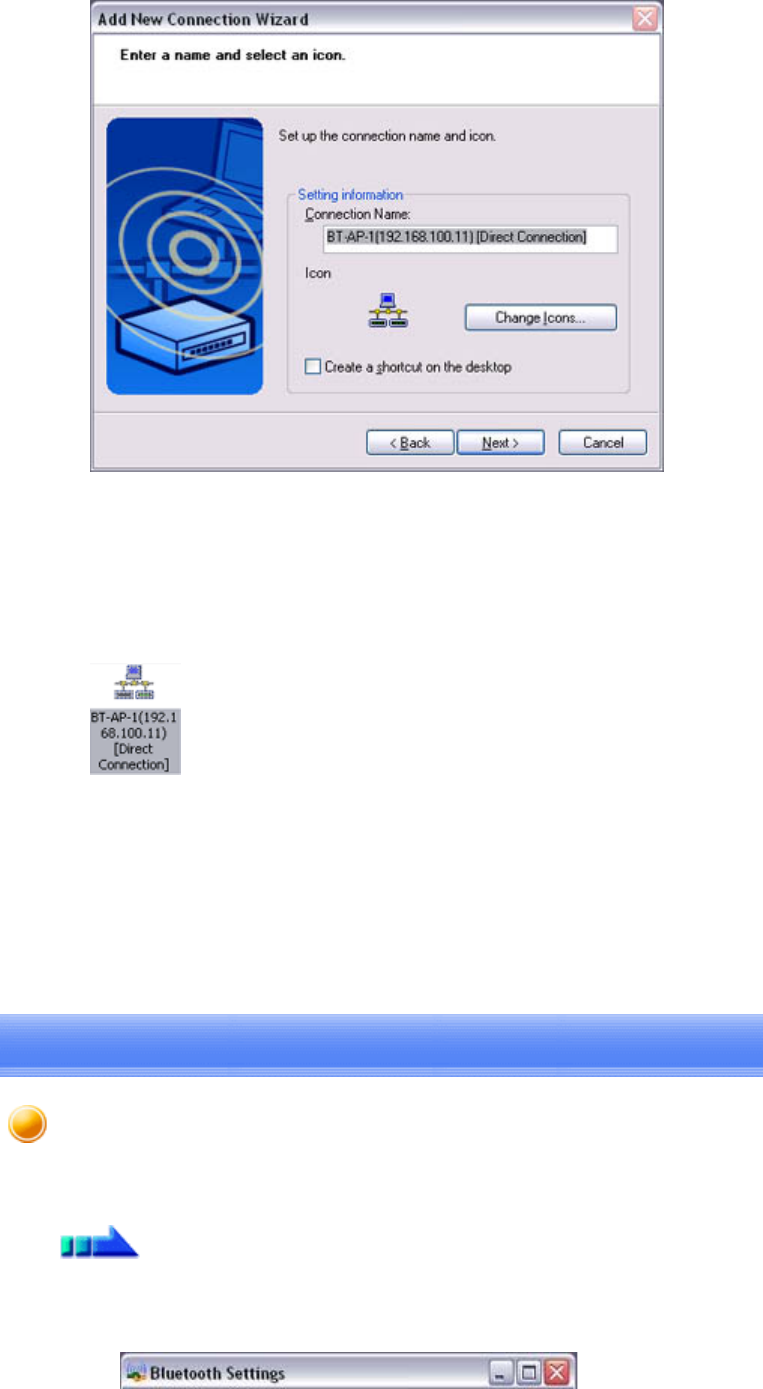
10.
Enter
the
type
and
name
of
the
icon
displayed
after
registration,
and
then
click
on
the
Quick Start Guide - Introduction 第 22 頁,共 160 頁
file://C:\Documents and Settings\anitachou\Local Settings\Temp\~hh3F24.htm 2004/11/30
10.
Enter the type and name of the icon displayed after registration, and then click on the
[Next] button
Please click on the [Next] button if you are satisfied with the settings.
The [Add New Connection Wizard (Completing the Add New Connection Wizard)]
window will appear.
11. Click on the [Finish] button
The access point icon will be registered in the [Bluetooth Settings] window.
This will complete the access point set-up process.
→"Connecting to a LAN (LAP)"
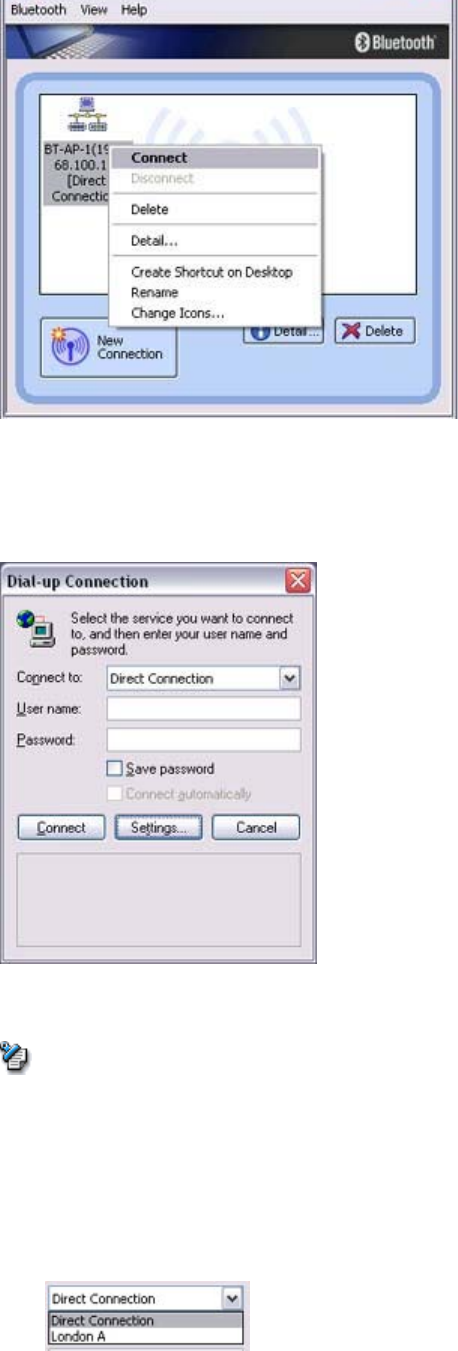
1. Right-click on the connection icon in the [Bluetooth Settings] window, and then click
on [Connect]
Procedure
Connecting to a LAN (LAP)
Quick Start Guide - Introduction 第 23 頁,共 160 頁
file://C:\Documents and Settings\anitachou\Local Settings\Temp\~hh3F24.htm 2004/11/30
The [Dial-up Connection] window will appear.
2. Confirm that "Direct connection" has been selected under [Connection Destination],
and then click on the [Connect] button
A connection will be initiated.
{This is an example of what happens when you use "Direct connection" as a
connection name under "Connect to access point." If a name different from the
connection name is used, that name will appear under [Connection Destination].
{Please simply click on [Settings] if no user name or password have been entered
(i.e., if those fields have been left blank)
{Please change the connection destination if a different connection name (for a
dial-up connection) appears in [Connection Destination].
Related topic→"Changing the default connection destination"
Once you connect to the network, Internet Explorer will start automatically, and you
w
ill
be
ab
l
e
to
e
x
c
h
a
n
ge
data
w
i
t
h
ot
h
e
r
co
m
pute
r
s
o
n
t
h
e
n
etwo
rk
.
Note
Quick Start Guide - Introduction 第 24 頁,共 160 頁
file://C:\Documents and Settings\anitachou\Local Settings\Temp\~hh3F24.htm 2004/11/30
w beabetoecagedata w t ot e co pute s o t e etwo .
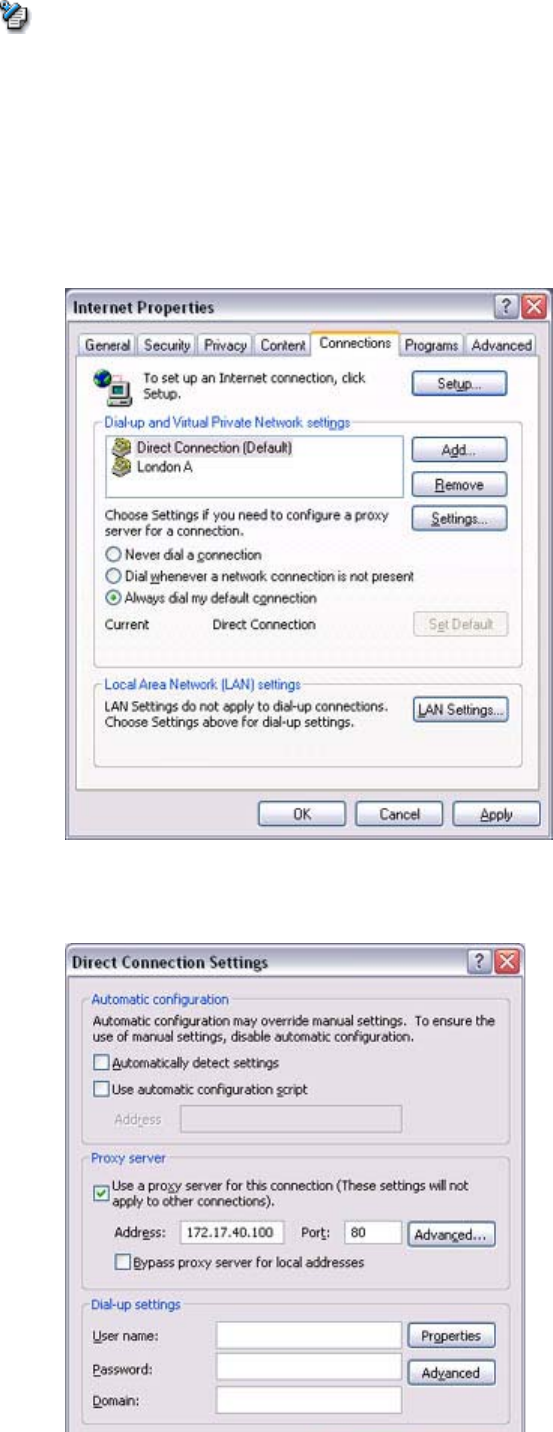
{Please follow the procedure below if you need to set up a proxy server to connect
to the Internet (the following procedure is not necessary if the PC you are going to
use has already been set up as a proxy server).
1 Select [Internet Options...] from the [Tools] menu in Internet Explorer
The [Internet Options] window will appear.
2 Click on the [Connections] tab, and then click on the [Settings...] button
3 Enter the IP address and port number of the proxy server under [Proxy Server],
and then click on the [OK] button
Note
Quick Start Guide - Introduction 第 25 頁,共 160 頁
file://C:\Documents and Settings\anitachou\Local Settings\Temp\~hh3F24.htm 2004/11/30
3. End the connection
Right-click either on the connection icon under the [Bluetooth Settings] window or on
the icon in the task tray, and then click on [Disconnect].
Click on the "Yes" button in the disconnection confirmation dialog box that appears.
This section describes how to connect to a network (for example, a company LAN or a personal
home network) using a PAN profile-compatible access point.
Please refer to "Using an access point (LAP) to connect to a LAN" if you are using a LAP profile-
compatible access point.
→Setting up the access point
→Connecting to a LAN (PAN)
zThe access point must be started and a normal connection already established to the
network before the access point is set up. Please refer to the access point instruction
manual for information on how to set up the access point.
zA Bluetooth passkey (PIN code) is required for you to connect to the access point. Please
make a note of your Bluetooth passkey before you start the set-up process.
Important
Setting up the access point
Procedure
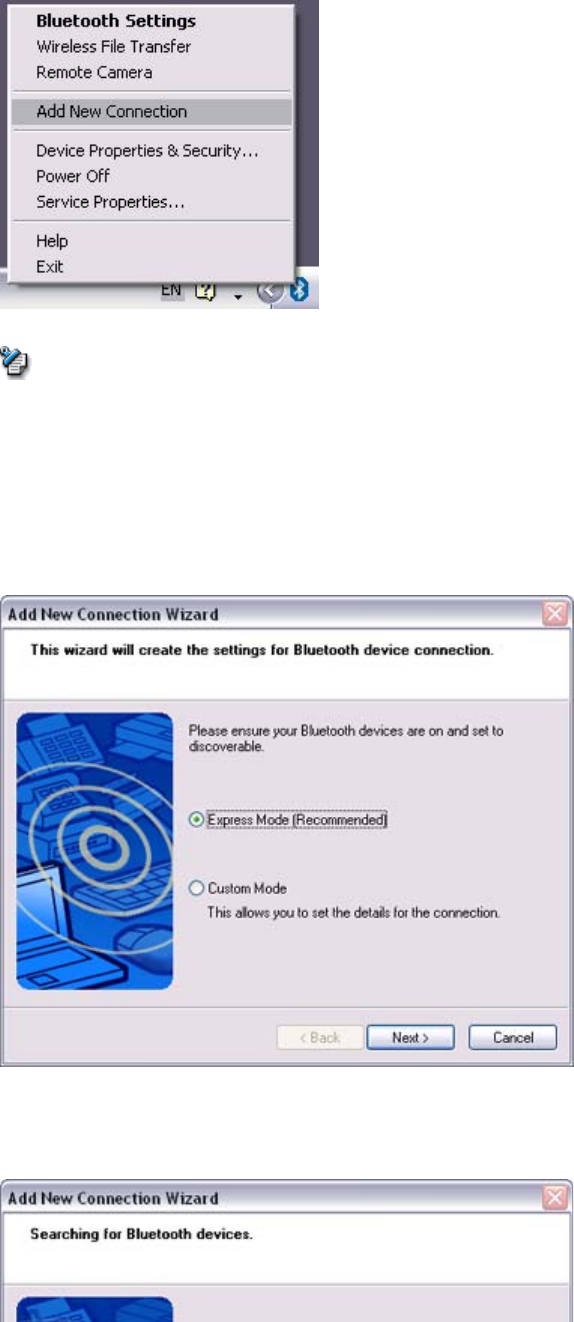
Connecting to a LAN using an access point (PAN) [PAN]
Quick Start Guide - Introduction 第 26 頁,共 160 頁
file://C:\Documents and Settings\anitachou\Local Settings\Temp\~hh3F24.htm 2004/11/30
1. Turn on the access point, and confirm that a connection has been established with the
network
2. Right-click the Bluetooth icon in the task tray, and then click on [Add New
Connection]
{Alternatively, click [Start]→[All Programs]→[Bluetooth]→[Bluetooth Settings],
and then click on [New Connection] from the active [Bluetooth Settings] window.
The [Add New Connection Wizard (Welcome to the Add New Connection
Wizard)] window will appear.
3. Confirm that [Express Mode] has been selected, and then click on the [Next] button
The [Add New Connection Wizard (Searching for Bluetooth devices)] window
will appear.
Note
Quick Start Guide - Introduction 第 27 頁,共 160 頁
file://C:\Documents and Settings\anitachou\Local Settings\Temp\~hh3F24.htm 2004/11/30
Once the program has finished searching for the devices, the [Add New
Connection Wizard (Device Selection)] window will appear.
4. Select the device name of the access point from [Device List], and then click on the
[Next] button
The [Add New Connection Wizard (Searching for Services)] window will appear.
Quick Start Guide - Introduction 第 28 頁,共 160 頁
file://C:\Documents and Settings\anitachou\Local Settings\Temp\~hh3F24.htm 2004/11/30
You will be asked for the Bluetooth passkey in the window that appears.
5. Enter the passkey under [Bluetooth Passkey (PIN code)], and then click on the [OK]
button
Service detection and COM port creation will be performed automatically.
The [Add New Connection Wizard (Connection Name Settings)] window will appear.
6. Enter the type and name of the icon displayed after registration, and then click on the
[Next] button
Please click on the [Next] button if you are satisfied with the settings.
The [Add New Connection Wizard (Completing the Add New Connection Wizard)]
window will appear.
7. Click on the [Finish] button
The access point icon will be registered in the [Bluetooth Settings] window.
Quick Start Guide - Introduction 第 29 頁,共 160 頁
file://C:\Documents and Settings\anitachou\Local Settings\Temp\~hh3F24.htm 2004/11/30
This will complete the access point set-up process.
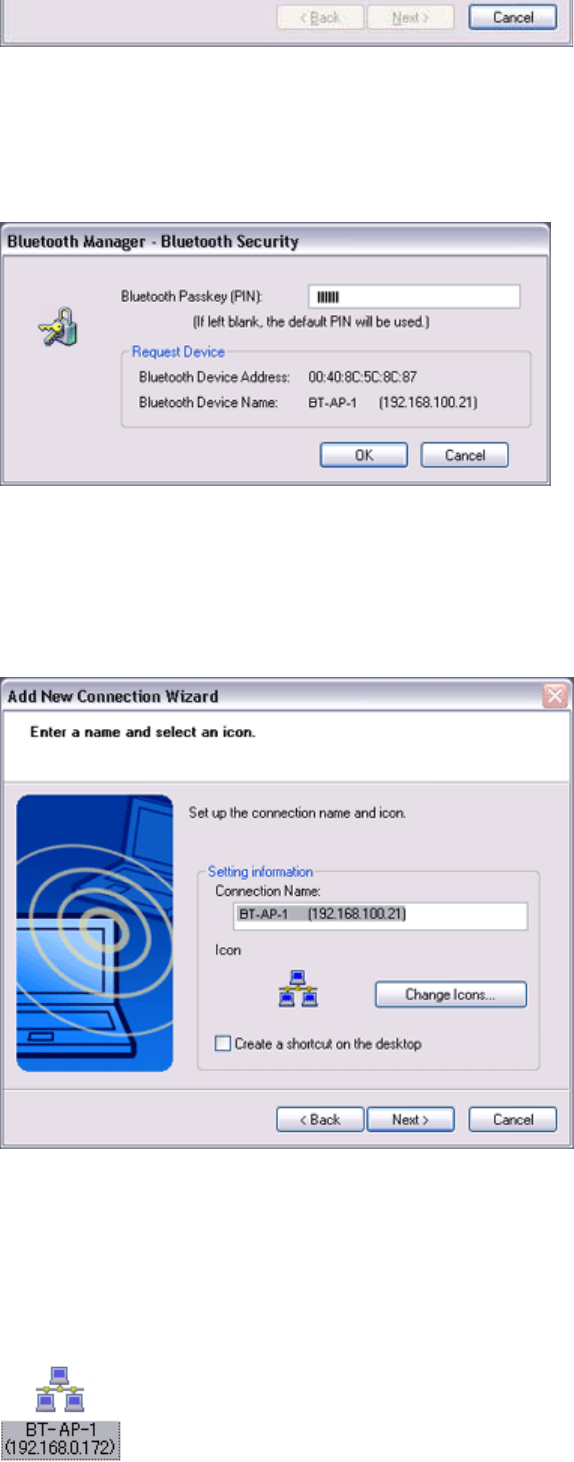
→"Connecting to a LAN (PAN)"
1. Right-click on the connection icon in the [Bluetooth Settings] window, and then click
on [Connect]
You will be asked for the Bluetooth passkey in the window that appears.
2. Enter the passkey under [Bluetooth Passkey (PIN code)], and then click on the [OK]
button
A connection will be initiated
Procedure
Connecting to a LAN (PAN)
Quick Start Guide - Introduction 第 30 頁,共 160 頁
file://C:\Documents and Settings\anitachou\Local Settings\Temp\~hh3F24.htm 2004/11/30
A
connection
will
be
initiated
.
Once you have connected to the network, Internet Explorer will start automatically, and
you will be able to exchange data with other computers on the network.
{Please follow the procedure below if you need to set up a proxy server to connect
to the Internet (the following procedure is not necessary if the PC you are going to
use has already been set up as a proxy server).
1 Select [Internet Options...] from the [Tools] menu in Internet Explorer
The [Internet Options] window will appear.
2 Click on the [Connections] tab, and then click on the [LAN Settings...] button
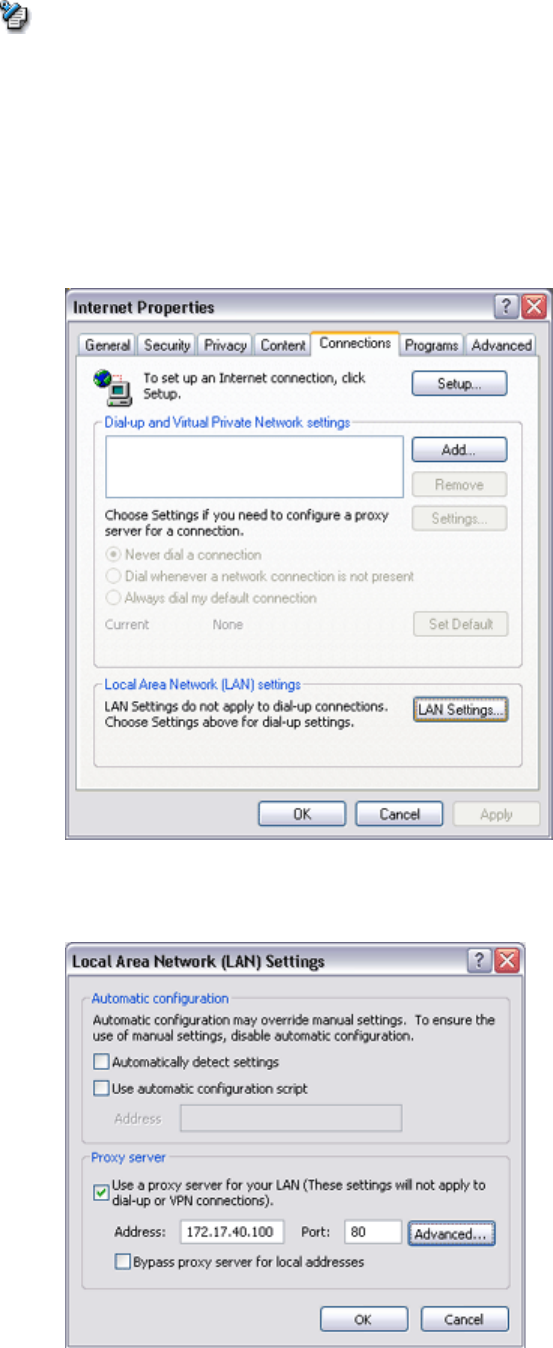
3 Enter the IP address and port number of the proxy server under [Proxy Server],
and then click on the [OK] button
Note
Quick Start Guide - Introduction 第 31 頁,共 160 頁
file://C:\Documents and Settings\anitachou\Local Settings\Temp\~hh3F24.htm 2004/11/30
3. End the connection
Right-click either on the connection icon under the [Bluetooth Settings] window or on
the icon in the task tray, and then click on [Disconnect].
Click on the "Yes" button in the disconnection confirmation dialog box that appears.
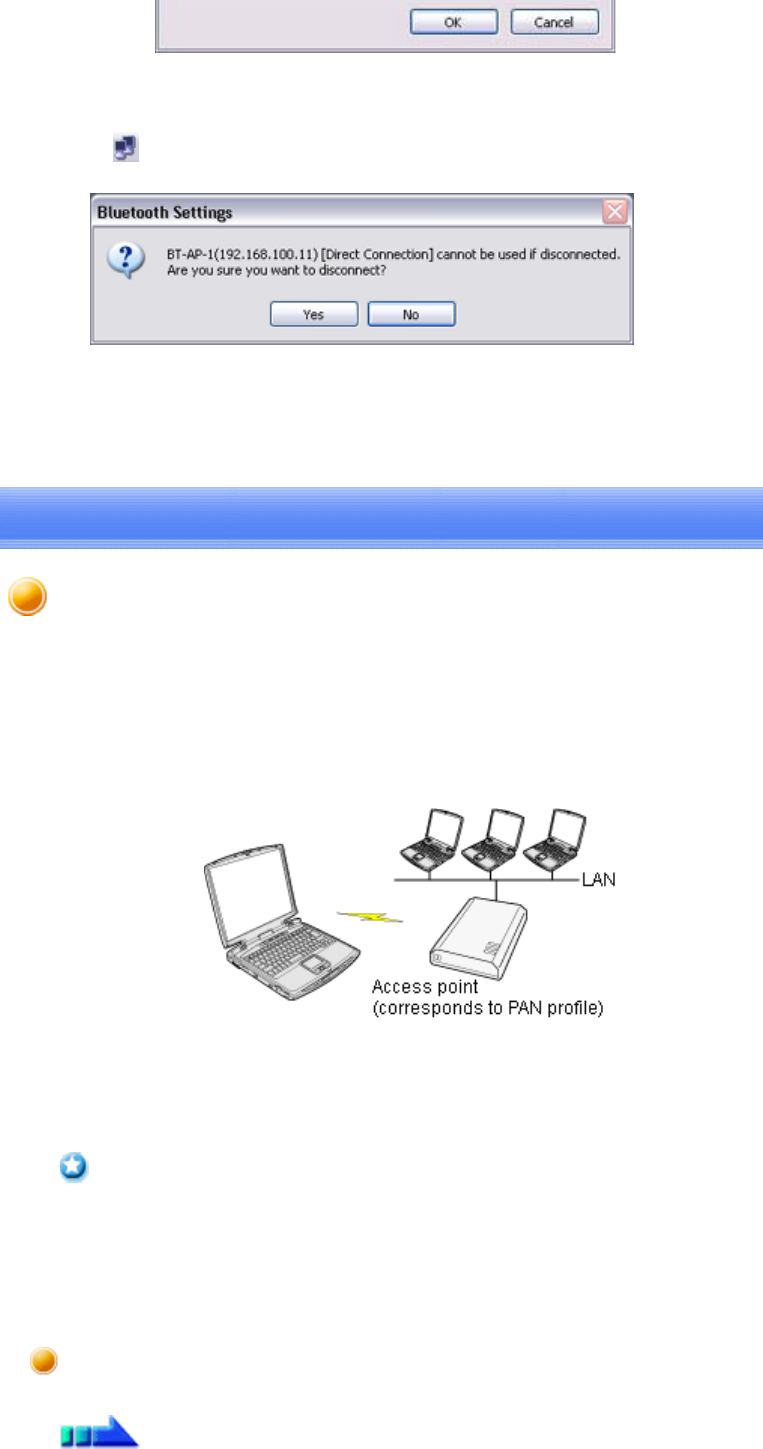
You can use the PAN profile to build a network of Bluetooth -enabled devices.
→Operating as a server
→Operating as a client
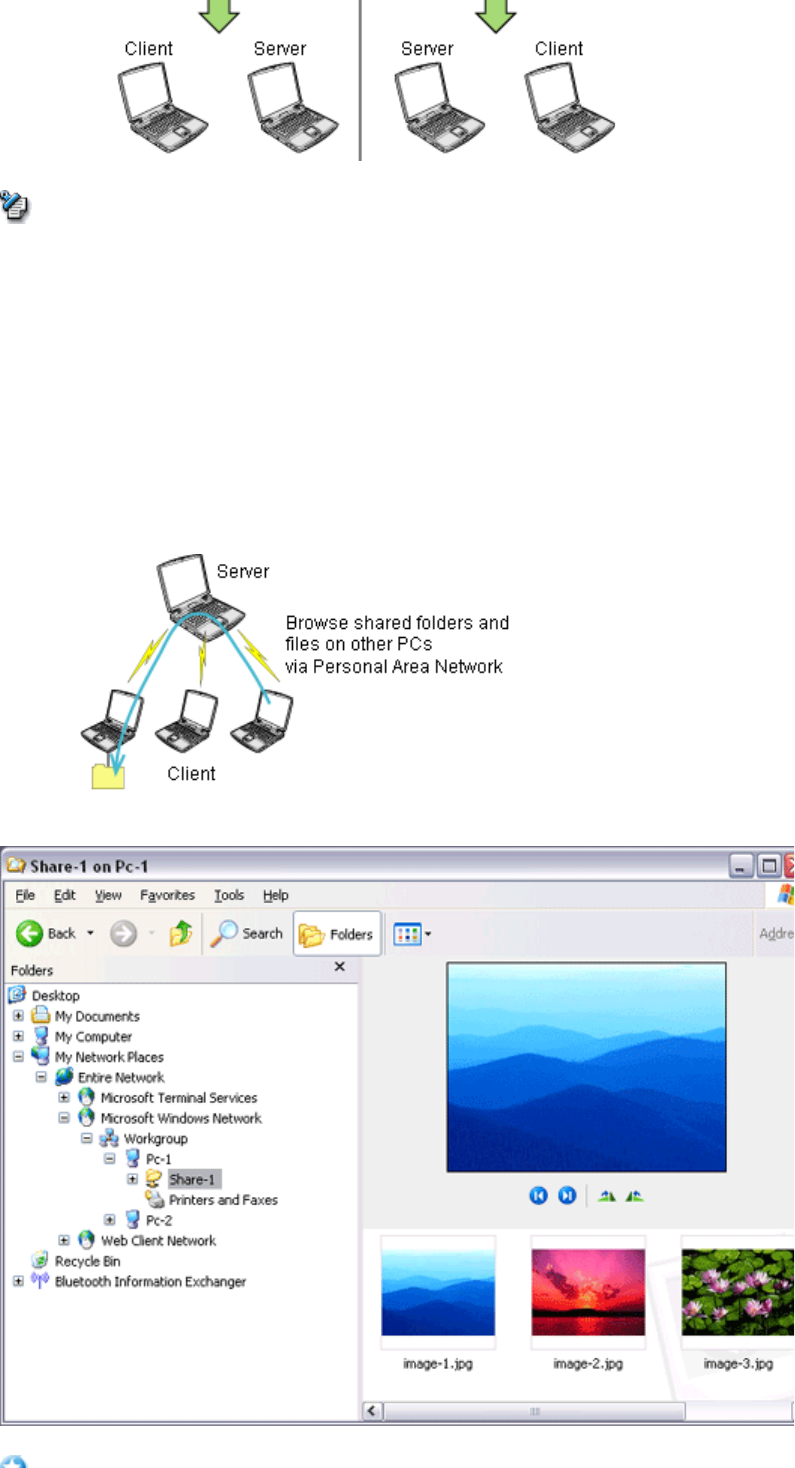
A personal area network comprises a client -server architecture. The device to which other
devices connect is called the "server", and a device that connects to the server is called a
"client."
The client-server relationship is not necessarily a fixed one. The first of two devices to
establish a connection can be the server when one other device is present, and can be the
client in other instances.
Building a personal area network [PAN]
Quick Start Guide - Introduction 第 32 頁,共 160 頁
file://C:\Documents and Settings\anitachou\Local Settings\Temp\~hh3F24.htm 2004/11/30
zThe maximum total number of devices that can be used to constitute a single personal
area network is seven: one server and six clients.
A network comprising as many as seven devices could theoretically be built, but an
operating environment that involves the use of other Bluetooth devices, leaving aside
other complications, might require the network to comprise fewer components..
By using the PAN profile, you will be able to build a network that uses the same TCP/IP
protocol used in regular LANs. Accordingly, the machine designated as the server can be used
for configuration tasks that utilize DHCP, such as assigning IP addresses to clients.
In addition, you will be able to configure folder and file sharing, which will allow data to be
browsed by other servers or clients on the network.
Note
Important
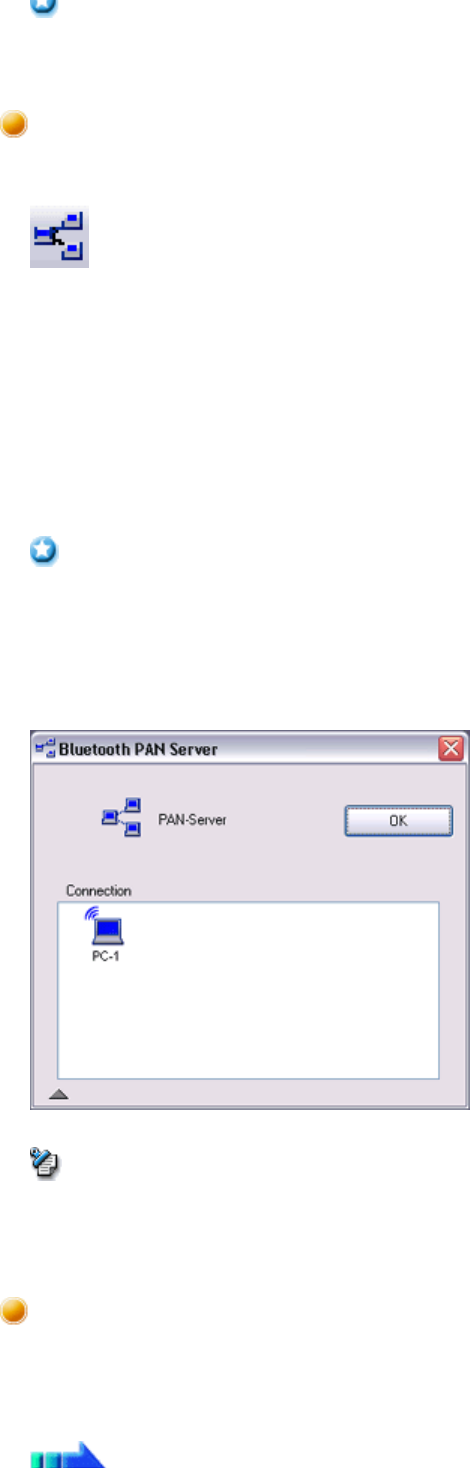
Quick Start Guide - Introduction 第 33 頁,共 160 頁
file://C:\Documents and Settings\anitachou\Local Settings\Temp\~hh3F24.htm 2004/11/30
zPlease refer to Windows Help for further information on TCP/IP, DHCP and
configurations for sharing.
The following icon will appear in the tasktray when the PAN server function has been
activated.
Should the icon not appear, please follow the procedure below to activate the PAN server
function.
1. Right-click the Bluetooth icon in the task tray and make sure the Option [Use PAN
Group Ad-hoc Network] is enabled.
A message will appear asking you to confirm whether you wish to activate the PAN
group ad-hoc network.
2. Click the [Yes] button
The PAN server will be activated, and an icon will accordingly appear in the tasktray.
Other devices that use the PAN profile will now be able to connect over the network.
zWhen using the device as the server, make sure that all user accounts have a password
set for the security reasons.
By clicking on the icon, the [Bluetooth PAN Server] window will appear.
In the graphic below, one client has established a connection.
zWhen you try to connect to another server as a client, the task tray icon will disappear,
and your machine will not be able to function as a server in response to connection
requests originating from other devices.
Connecting to a server as a client is performed from the [Bluetooth Settings] window, as
described below.
Important
Operating as a server
Important
Note
Operating as a client
Procedure
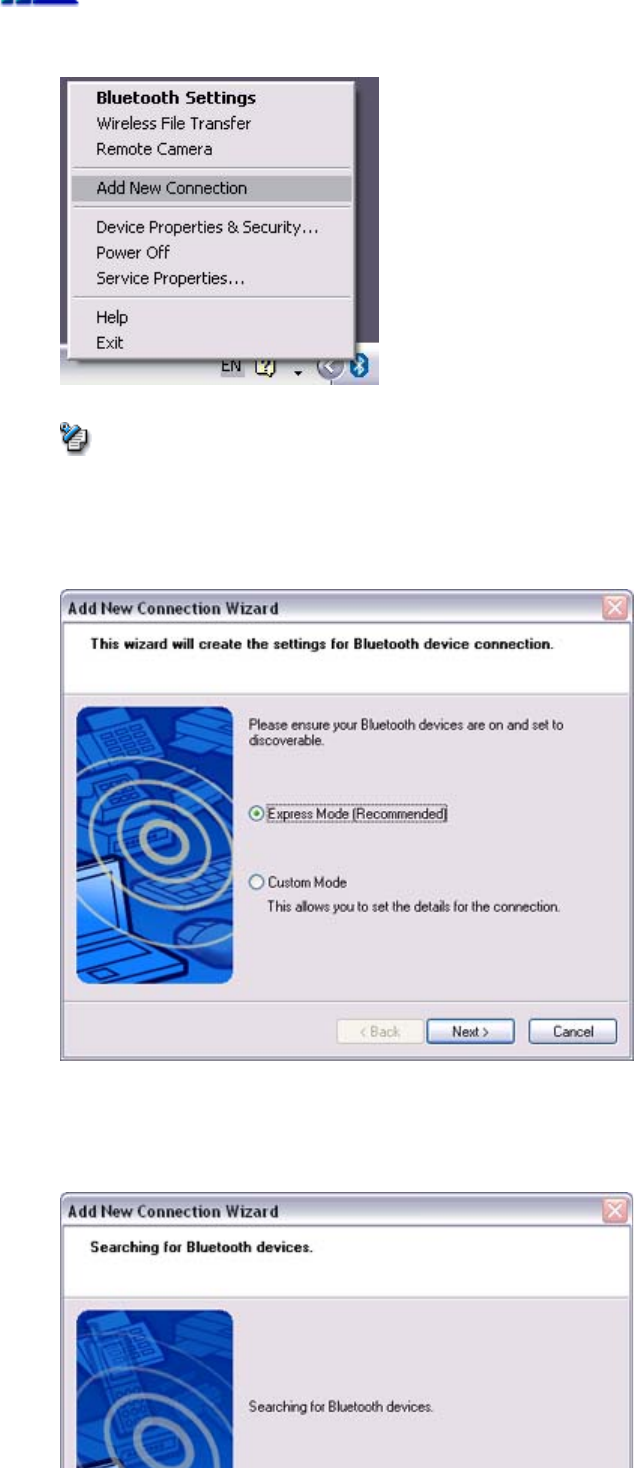
Quick Start Guide - Introduction 第 34 頁,共 160 頁
file://C:\Documents and Settings\anitachou\Local Settings\Temp\~hh3F24.htm 2004/11/30
1. Right-click on the Bluetooth icon in the task tray, and click on [Add New Connection]
{Alternatively, click on [Start]→[All Programs]→[Bluetooth]→[Bluetooth
Settings], and then on [New Connection] from the [Bluetooth Settings] window.
2. Confirm that [Express Mode] has been selected, and then click on the [Next] button
3. Click on the [Next] button in the advisory dialog box
The [Add New Connection Wizard (Searching for Bluetooth devices)] window will
appear.
Note
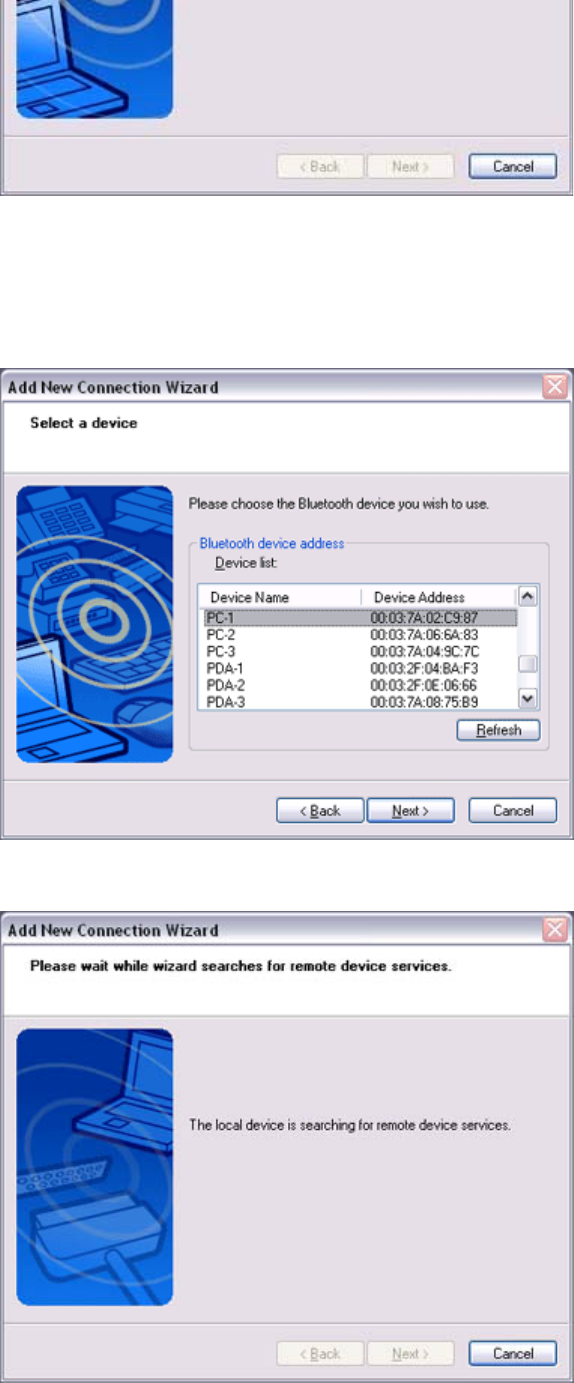
Quick Start Guide - Introduction 第 35 頁,共 160 頁
file://C:\Documents and Settings\anitachou\Local Settings\Temp\~hh3F24.htm 2004/11/30
Once the program has finished searching for the devices, the [Add New
Connection Wizard (Device Selection)] window will appear.
4. Select the name of the device designated as the server from [Device List], and then
click on the [Next] button
The [Add New Connection Wizard (Searching for Services)] window will appear.
The [Add New Connection Wizard (Confirm Connection Name)] window will appear.
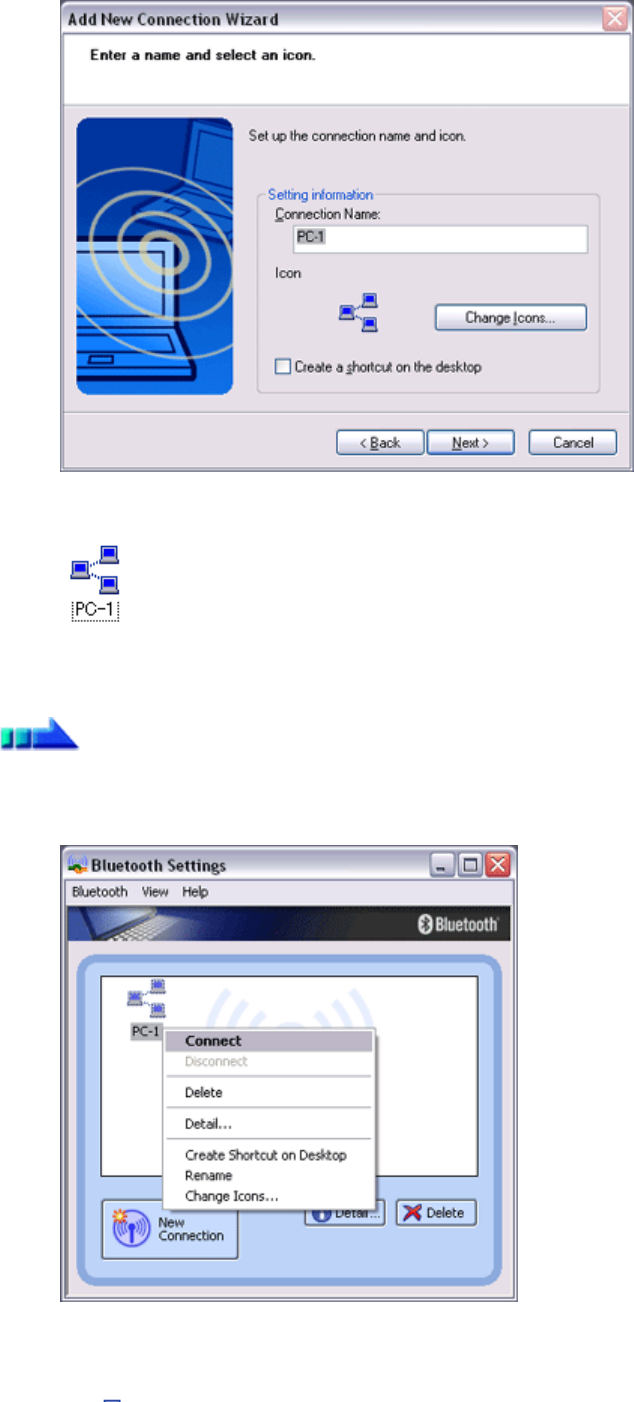
Quick Start Guide - Introduction 第 36 頁,共 160 頁
file://C:\Documents and Settings\anitachou\Local Settings\Temp\~hh3F24.htm 2004/11/30
5. Click on the [Next] button
The registered icon will appear in the [Bluetooth Settings] window.
■Connecting to a server
1. Right-click on the icon in the [Bluetooth Settings] window, and then click on
[Connect]
Once you have connected, the icon will change to indicate that the device is
connected.
Procedure
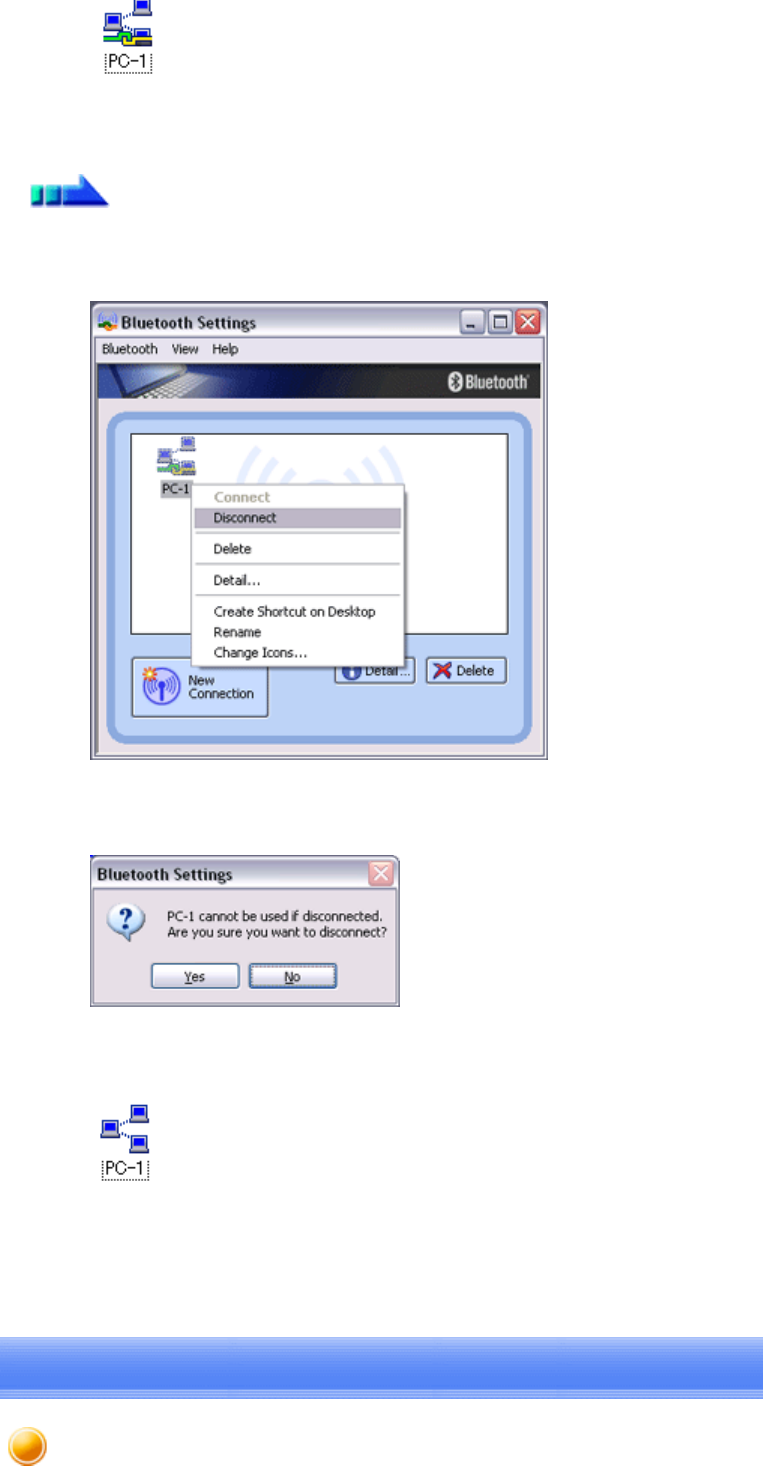
Quick Start Guide - Introduction 第 37 頁,共 160 頁
file://C:\Documents and Settings\anitachou\Local Settings\Temp\~hh3F24.htm 2004/11/30
■Ending a connection to a server
1. Right-click on the icon in the [Bluetooth Settings] window, and then click on
[Disconnect]
A message confirming whether you wish to disconnect will appear. Click on the [Yes]
button.
Once you have disconnected, the icon will change to indicate that the device is not
connected.
Procedure
Using a modem station for fax transmissions [FAX]
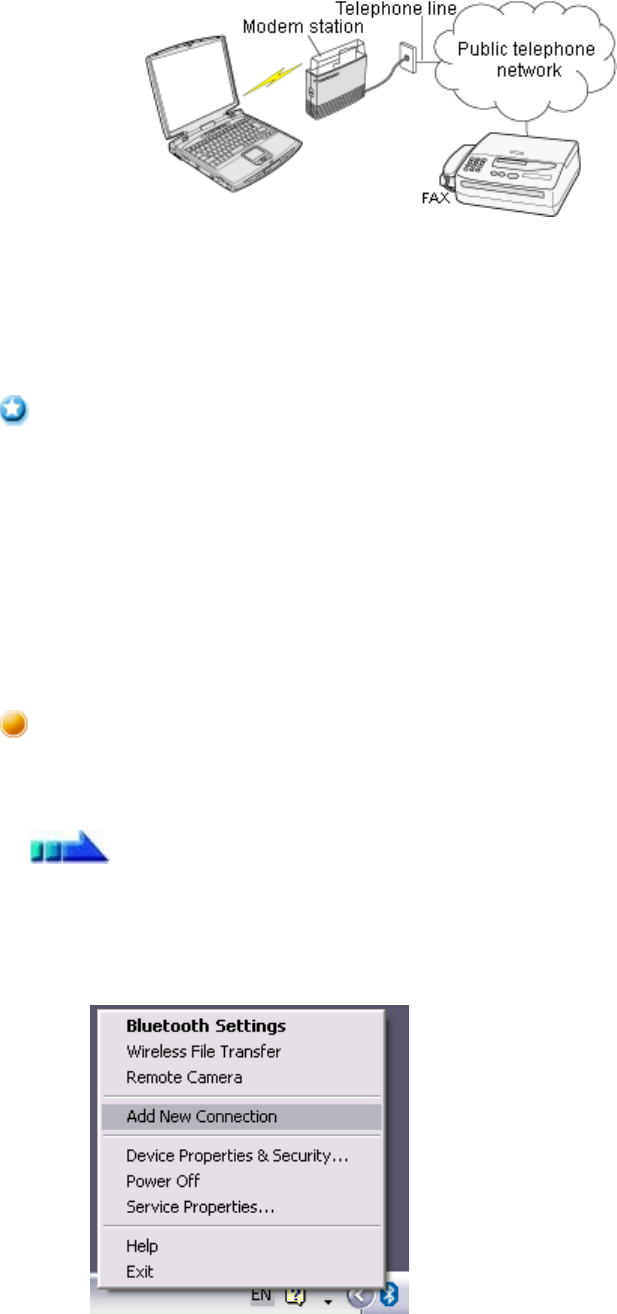
Quick Start Guide - Introduction 第 38 頁,共 160 頁
file://C:\Documents and Settings\anitachou\Local Settings\Temp\~hh3F24.htm 2004/11/30
This section describes how to send a fax using a Bluetooth wireless modem station.
→Setting up the modem station
→Installing a modem
→Setting fax information
→Sending a fax
→Receiving a fax
zPlease refer to the modem station instruction manual for information on how to connect the
station to a telephone line.
zPlease ensure that any drivers used to connect the PC to the modem have been installed.
zA Bluetooth passkey (PIN code) is required for you to connect to the modem station. Please
make a note of your Bluetooth passkey before you start the set -up process.
zA fax application is required for you to be able to send and receive faxes. The description
below is based on a example using Microsoft Fax, which is installed with Windows XP as
standard.
If you are going to use a commercially available fax application , then please refer to the
manual that came with the application for information on how to send and receive faxes.
Set up and register the modem station as a fax service.
1. Turn on the wireless modem station
2. Right-click on the Bluetooth icon in the task tray, and then click on [Add New
Connection]
Important
Setting up the modem station
Procedure
Quick Start Guide - Introduction 第 39 頁,共 160 頁
file://C:\Documents and Settings\anitachou\Local Settings\Temp\~hh3F24.htm 2004/11/30
{Alternatively, click [Start]→[All Programs]→[Bluetooth]→[Bluetooth Settings],
and then click on [New Connection] from the active [Bluetooth Settings]
window.
The [Add New Connection Wizard (Welcome to the Add New Connection Wizard)]
window will appear.
3. Select [Custom Mode], and then click on the [Next] button
The [Add New Connection Wizard (Searching for Bluetooth devices)] window will
appear.
Once the program has finished searching for the devices, the [Add New Connection
Wizard (Select Device)] window will appear.
4. Select the device name of the wireless modem station from [Device List], and then
click on the [Next] button
Note
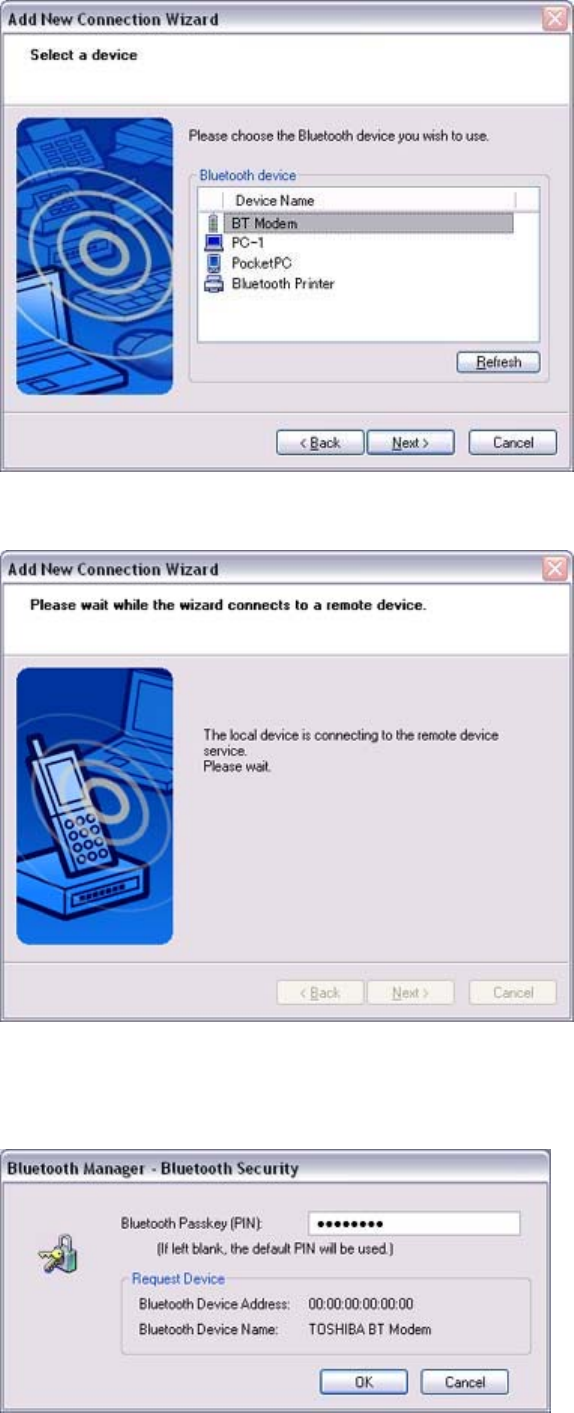
Quick Start Guide - Introduction 第 40 頁,共 160 頁
file://C:\Documents and Settings\anitachou\Local Settings\Temp\~hh3F24.htm 2004/11/30
The [Add New Connection Wizard (Searching for Services)] window will appear.
5. If you are connecting to the wireless modem station for the first time, enter the
passkey for the device from the [Bluetooth Passkey (PIN Code)] window, and then
click on the [OK] button
Once the program has finished searching for the services the [Add New Connection
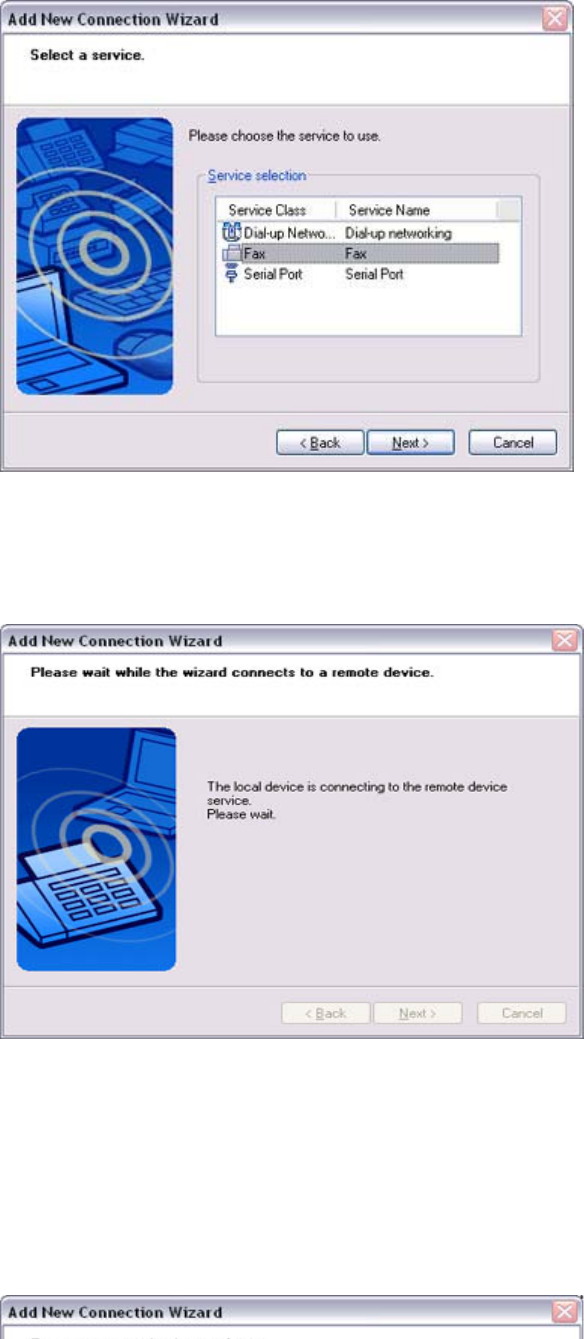
Quick Start Guide - Introduction 第 41 頁,共 160 頁
file://C:\Documents and Settings\anitachou\Local Settings\Temp\~hh3F24.htm 2004/11/30
Once
the
program
has
finished
searching
for
the
services,
the
[Add
New
Connection
Wizard (Select Service)] window will appear.
6. Select "Fax" under [Select Service], and then click on the [Next] button
The [Add New Connection Wizard (Connecting to Remote Device)] screen will
appear.
The COM port and modem registration process will then be automatically performed.
Once the COM port and modem (standard 33600 bps type) registration is complete,
the [Add New Connection Wizard (Setting Connection Name)] screen will appear.
7. Configure the type and name of the icon to appear after registration,
and click on the [Next] button.
Please click only on the [Next] button once you are satisfied with the configuration.
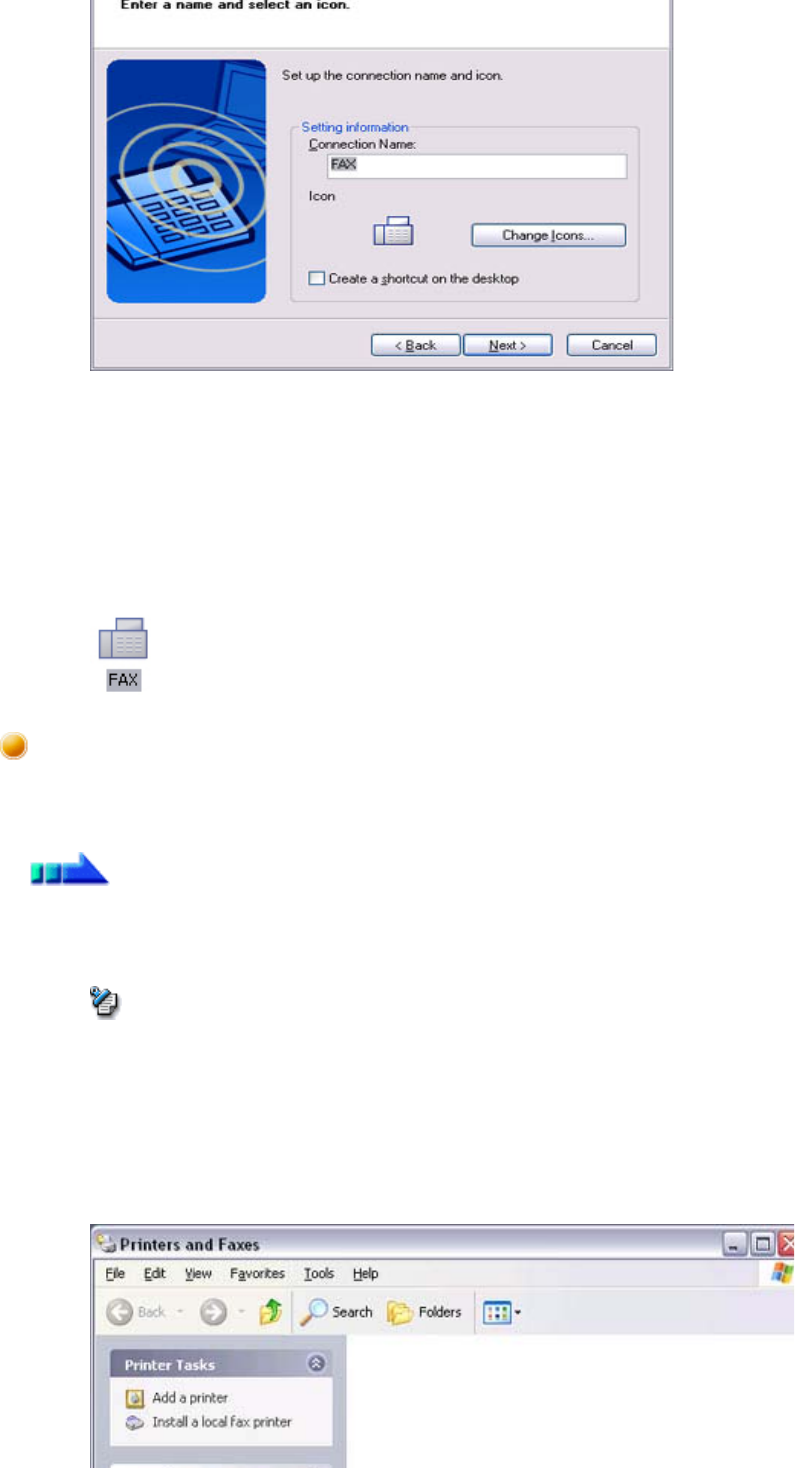
Quick Start Guide - Introduction 第 42 頁,共 160 頁
file://C:\Documents and Settings\anitachou\Local Settings\Temp\~hh3F24.htm 2004/11/30
The [Add New Connection Wizard (Completing the Add New Connection Wizard)]
screen will appear.
8. Click on the [Finish] button
The settings will be registered, and the icon will appear on the [Bluetooth Settings]
screen.
Configure send/receive settings and register fax information.
1. Select [Start]→[Control Panel], and then double-click on the [Printers and Other
Hardware] icon
{If the control panel is displayed in "Classic view", and you use Windows 2000,
please start from Step (2).
2. Double-click on the [Printers and Faxes] icon
The [Printers & Faxes] window will appear.
3. Click on "Install a local fax printer" in the [Printers and Faxes] window
Setting FAX information
Procedure
Note
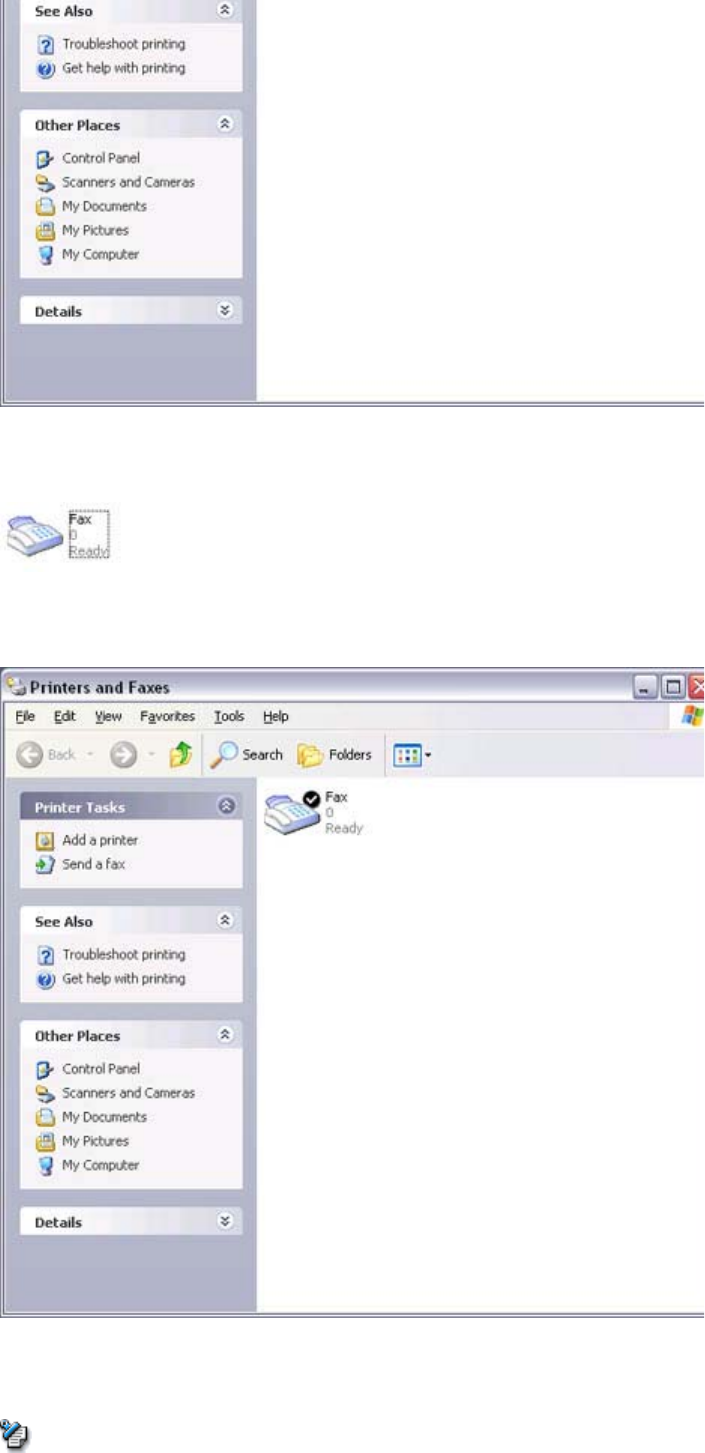
Quick Start Guide - Introduction 第 43 頁,共 160 頁
file://C:\Documents and Settings\anitachou\Local Settings\Temp\~hh3F24.htm 2004/11/30
A window showing installed programs will appear, and a Fax icon will have been
created in the [Printers and Faxes] screen.
4. Click on "Send a fax" under "Printer Tasks" on the left side of the window
If you have not yet configured a fax device, the [Fax Configuration Wizard] window
will appear. In the window you can enter settings pertaining to the sender (yourself).
Note
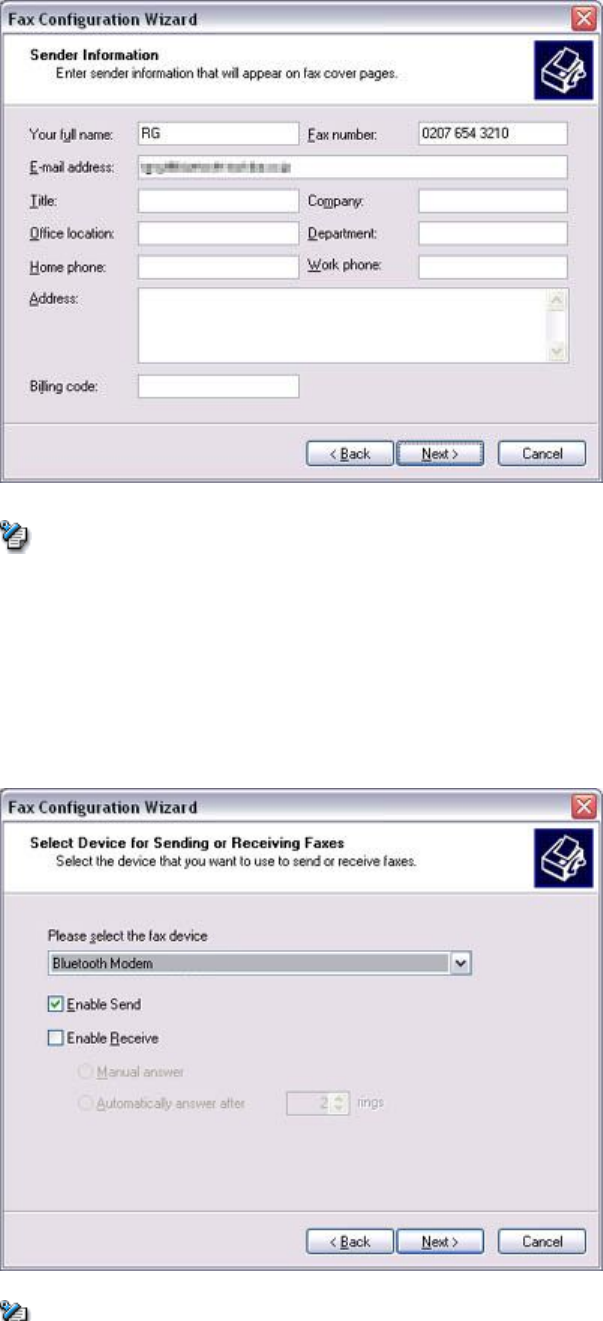
Quick Start Guide - Introduction 第 44 頁,共 160 頁
file://C:\Documents and Settings\anitachou\Local Settings\Temp\~hh3F24.htm 2004/11/30
{If the fax confi
g
uration information has alread
y
been re
g
istered
,
the
[
Send Fax
Wizard] window, which can be viewed under " Sending a fax" below, will appear
instead of the [Fax Configuration Wizard] window.
5. Enter the sender information, and click on the [Next] button
{The sender information that you configure here will be automatically appended
as header information when you send a fax.
The [Fax Configuration Wizard (Select Device for Sending or Receiving Faxes)]
window will appear.
6. Select a device to be used for fax transmissions, enable the device for sending or
receiving, and then click on the [Next] button
Note
Note
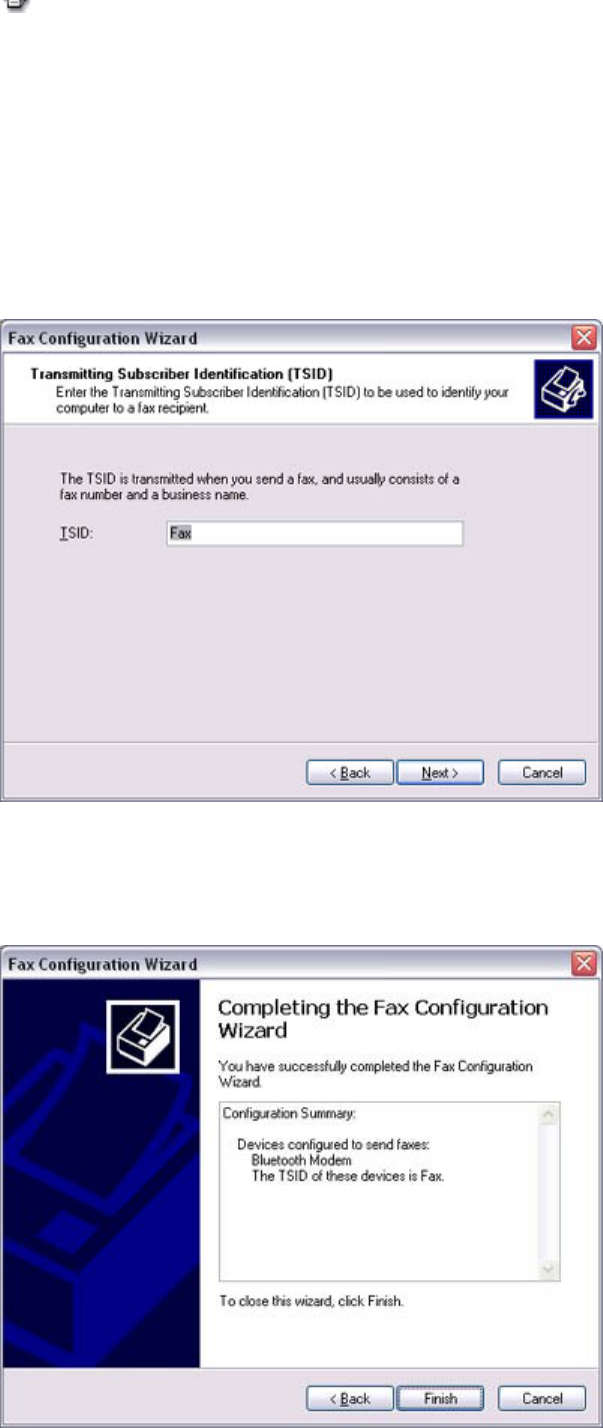
Quick Start Guide - Introduction 第 45 頁,共 160 頁
file://C:\Documents and Settings\anitachou\Local Settings\Temp\~hh3F24.htm 2004/11/30
{If [Enable Receive] is selected, the device will be on standby for receiving faxes
even if it is not sending or receiving anything, and therefore will be in
continuous connection to the wireless modem (when COM Auto Connect is on).
Please decide whether to select this option based on the desired objective and/or
frequency of transmission.
The [Fax Configuration Wizard (Transmitting Subscriber Identification (TSID))]
window will appear.
7. Click on the [Next] button
It is important that you do not change the transmitter subscriber identification.
The [Fax Configuration Wizard (Completing the Fax Configuration Wizard)] window
will appear.
8. Click on the [Finish] button
The
fax
information
will
be
have
been
registered,
and
the
[Fax
Console]
window
will
Note
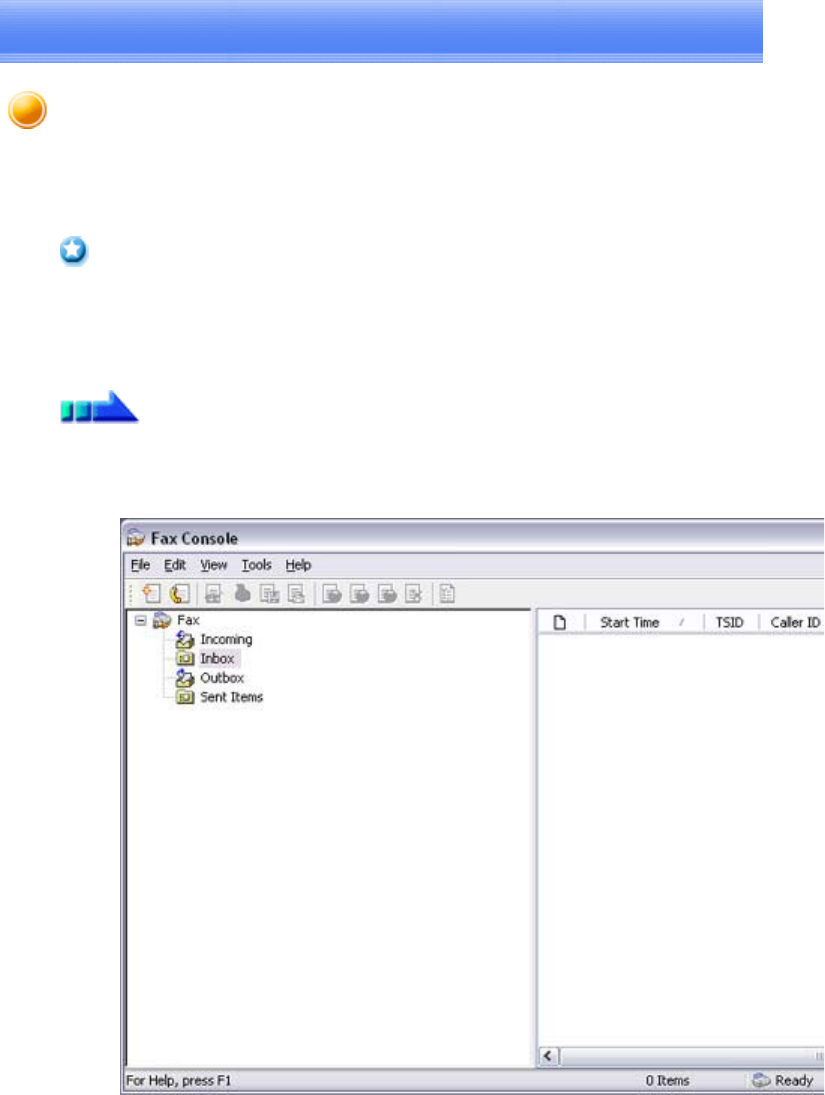
Quick Start Guide - Introduction 第 46 頁,共 160 頁
file://C:\Documents and Settings\anitachou\Local Settings\Temp\~hh3F24.htm 2004/11/30
The fax information will be have been registered, and the [Fax Console] window will
appear.
This will complete the fax set-up process.
Related topics: "Sending a fax" and "Receiving a fax"
This section describes how to send a fax from the Fax Console.
zThe Fax service must be enabled for sending in order for you to send a fax.
Please refer to "Using a wireless modem station" under "Troubleshooting" for how to
change the send and receive settings once the service has been configured.
1. Double-click on the [Fax] icon in the Control Panel
The [Fax Console] window will appear.
2. In the [Fax Console] window, click [File] →[Send fax]
The [Send Fax Wizard (Starting the Send Fax Wizard)] window will appear.
3. Click on the [Next] button
Important
Procedure
Sending a fax
Quick Start Guide - Introduction 第 47 頁,共 160 頁
file://C:\Documents and Settings\anitachou\Local Settings\Temp\~hh3F24.htm 2004/11/30
The [Send Fax Wizard (Recipient Information)] window will appear.
4. Enter the name and fax number of the destination party, and then click on the [Next]
button
The [Send Fax Wizard (Preparing the Cover Page)] window will appear.
5. Specify the cover page template, subject line, and note (body text), and then click on
the [Next] button
Quick Start Guide - Introduction 第 48 頁,共 160 頁
file://C:\Documents and Settings\anitachou\Local Settings\Temp\~hh3F24.htm 2004/11/30
The [Send Fax Wizard (Schedule)] window will appear.
6. If you wish to send the fax immediately, select "Now", and then click on the [Next]
button
The [Send Fax Wizard (Completing the Send Fax Wizard)] window will appear.
7. Confirm the destination information and transmission details, and then click on the
[Finish] button
Quick Start Guide - Introduction 第 49 頁,共 160 頁
file://C:\Documents and Settings\anitachou\Local Settings\Temp\~hh3F24.htm 2004/11/30
The software will automatically dial the number and send the fax.
Once the fax has been sent, Fax Monitor will revert to standby mode.
Related topic: "Receiving a fax"
This section describes what to do when a fax arrives after you have established a connection
to a modem station.
zThe Fax service must be enabled for receiving in order for you to receive a fax.
Please refer to "Using a wireless modem station" under "Troubleshooting" for
information on how to change the send and receive settings once the fax service has
been configured.
zPlease ensure you have connected to a modem station before you receive a fax (the
device will be connected to the modem if "Enable Receive" has been selected or COM
Auto Connect has been activated).
1. When a fax arrives, the Fax Monitor will start automatically as the fax is received
Important
Procedure
Receiving a fax
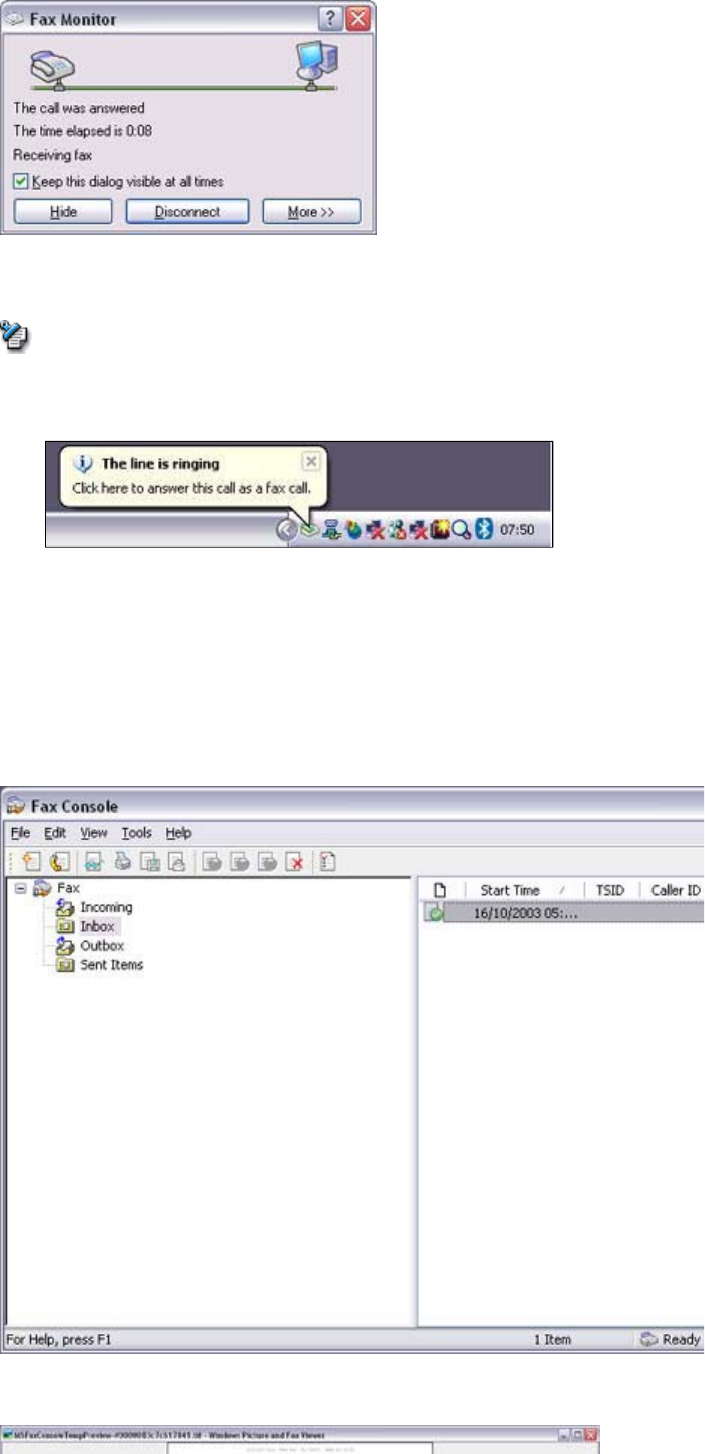
Quick Start Guide - Introduction 第 50 頁,共 160 頁
file://C:\Documents and Settings\anitachou\Local Settings\Temp\~hh3F24.htm 2004/11/30
Once the fax has been received, the Fax Monitor will revert to standby mode.
{If you have enabled manual fax reception, the message below will appear when a
fax arrives.
Click on the message with your mouse to receive the fax.
2. Double-click on the [Fax] icon in the Control Panel
The [Fax Console] window will appear.
3. In the [Fax Console] window, double-click on the fax that has arrived
An image of the received fax will be displayed.
Note
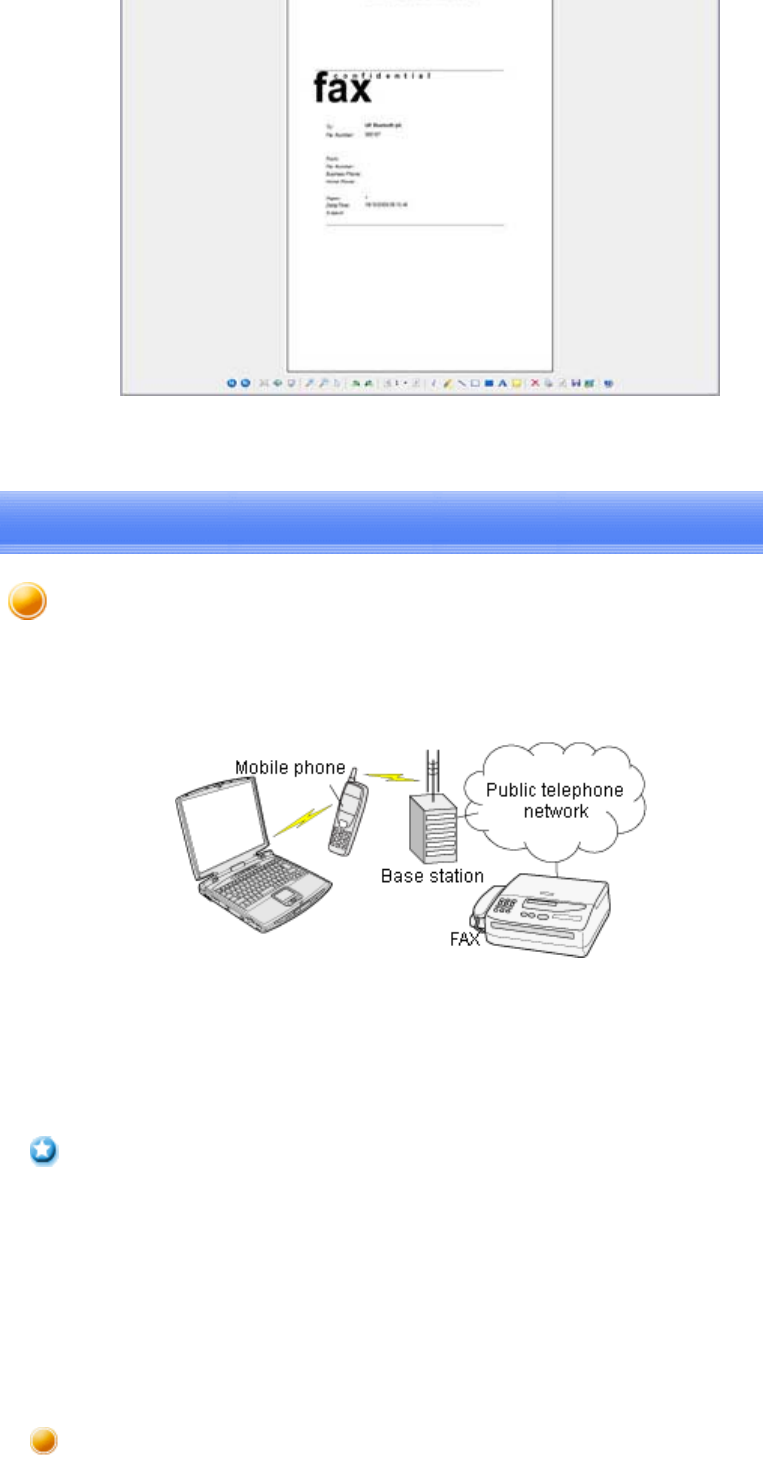
Quick Start Guide - Introduction 第 51 頁,共 160 頁
file://C:\Documents and Settings\anitachou\Local Settings\Temp\~hh3F24.htm 2004/11/30
Related topic: "Sending a fax"
This section describes how to send a fax using a mobile telephone as a modem.
→Setting up the mobile telephone
→Installing a modem
→Setting fax information
→Sending a fax
→Receiving a fax
zPlease ensure that any drivers used to connect the PC to the mobile telephone have been
installed.
zA Bluetooth passkey (PIN code) is required for you to connect to the mobile telephone.
Please make a note of your Bluetooth passkey before you start the set -up process.
zA fax application is required for you to be able to send and receive faxes. The description
below is based on a example using Microsoft Fax, which is installed with Windows XP as
standard.
If you are going to use a commercially available fax application , then please refer to the
manual that came with the application for information on how to send and receive faxes.
Important
Setting up the mobile telephone
Using a mobile telephone for fax transmissions [FAX]
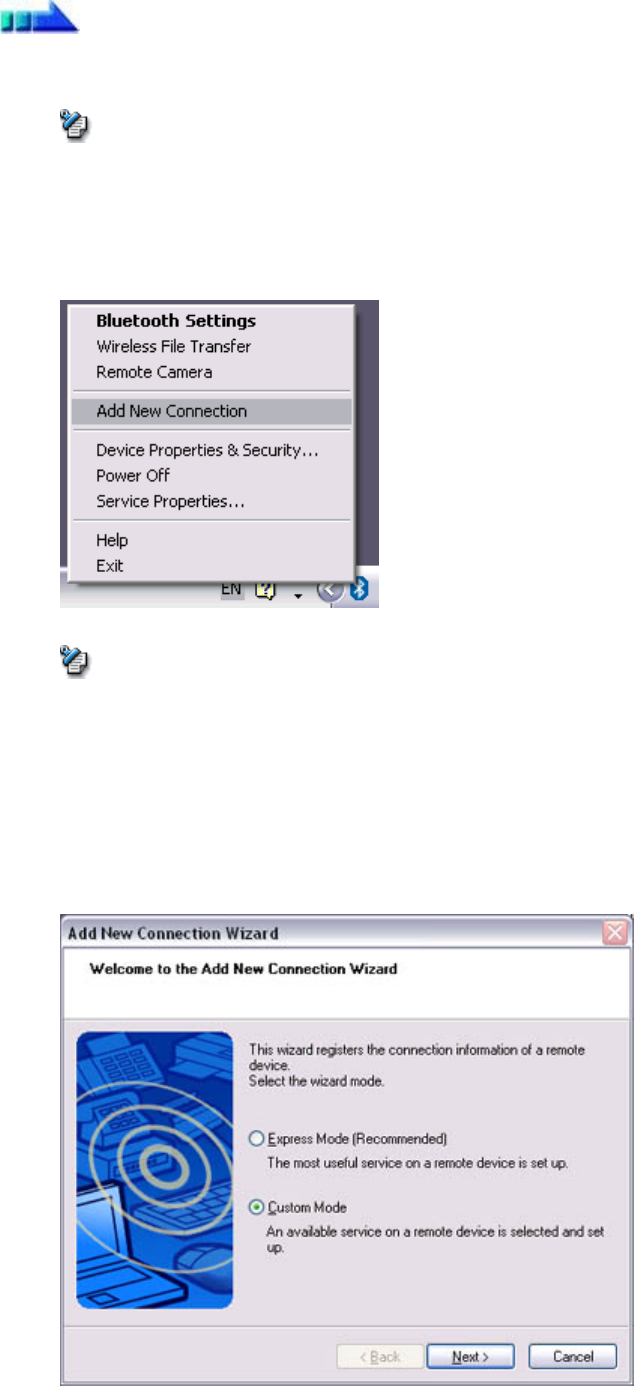
Quick Start Guide - Introduction 第 52 頁,共 160 頁
file://C:\Documents and Settings\anitachou\Local Settings\Temp\~hh3F24.htm 2004/11/30
Set up and register the mobile telephone as a fax service.
1. Turn on the mobile telephone, and set it to be connectable via Bluetooth
{Please refer to the instruction manual for information on how to operate the
telephone.
2. Right-click on the Bluetooth icon in the task tray, and then click on [Add New
Connection]
{Alternatively, click [Start]→[All Programs]→[Bluetooth]→[Bluetooth Settings],
and then click on [New Connection] from the active [Bluetooth Settings]
window.
The [Add New Connection Wizard (Welcome to the Add New Connection Wizard)]
window will appear.
3. Select [Custom Mode], and then click on the [Next] button
Procedure
Note
Note
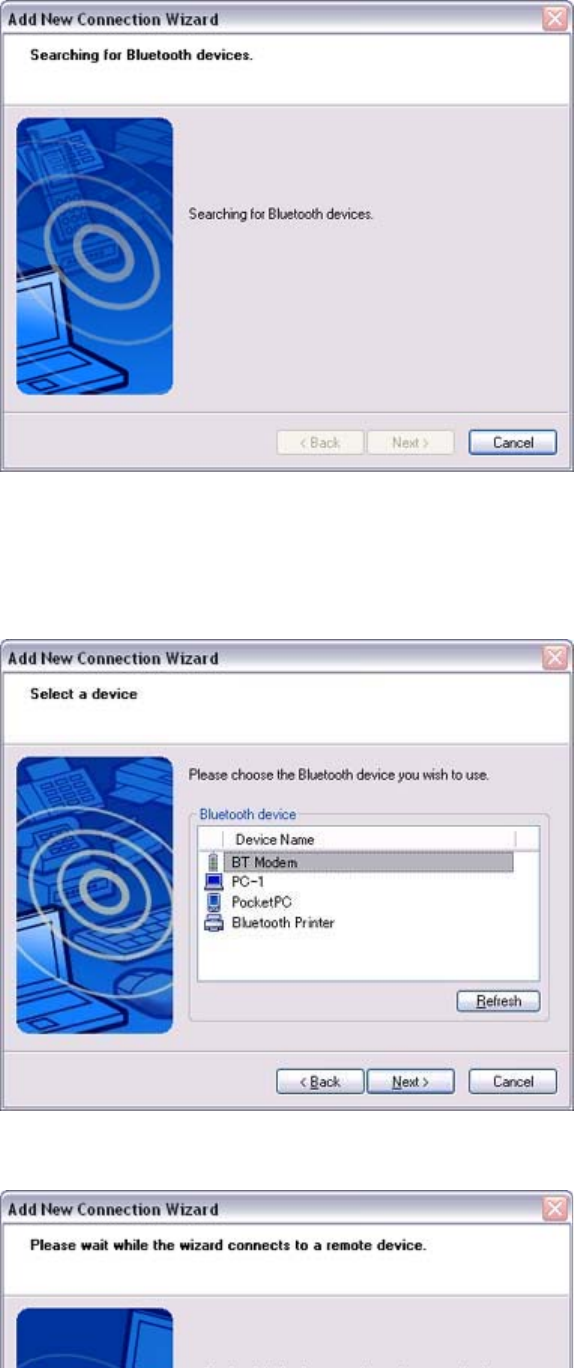
Quick Start Guide - Introduction 第 53 頁,共 160 頁
file://C:\Documents and Settings\anitachou\Local Settings\Temp\~hh3F24.htm 2004/11/30
The [Add New Connection Wizard (Searching for Bluetooth devices)] window will
appear.
Once the program has finished searching for the devices, the [Add New Connection
Wizard (Select Device)] window will appear.
4. Select the device name of the mobile telephone from [Device List], and then click on
the [Next] button
The [Add New Connection Wizard (Searching for Services)] window will appear.
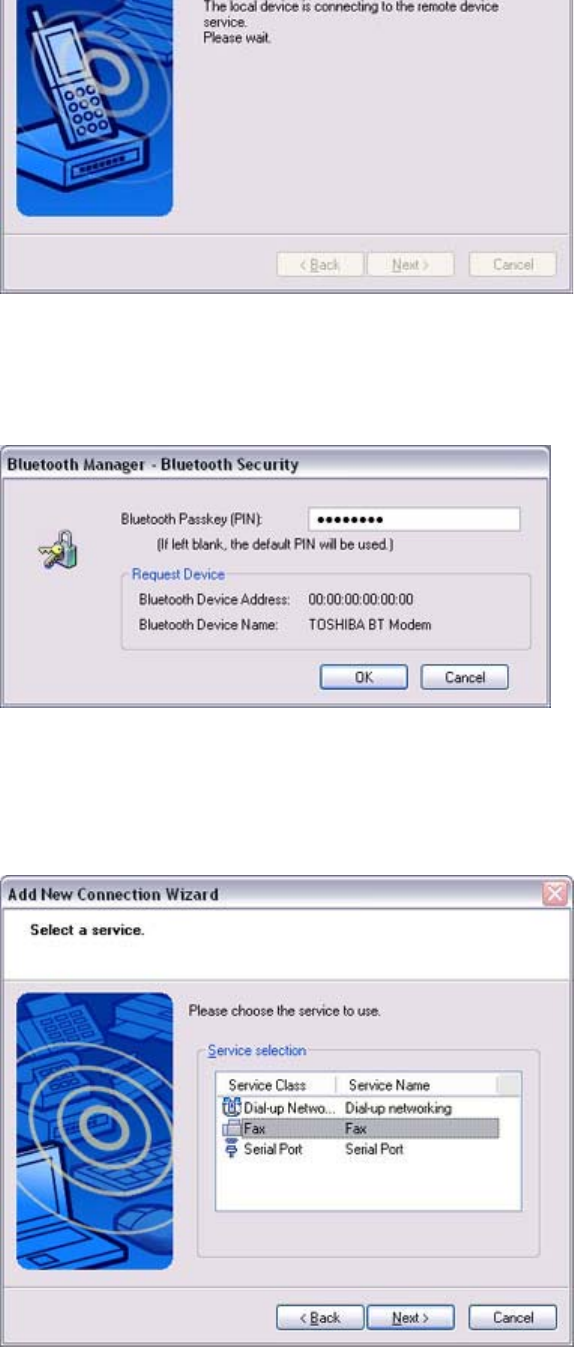
Quick Start Guide - Introduction 第 54 頁,共 160 頁
file://C:\Documents and Settings\anitachou\Local Settings\Temp\~hh3F24.htm 2004/11/30
5. If you are connecting to the mobile telephone for the first time, enter the passkey for
the device from the [Bluetooth Passkey (PIN Code)] window, and then click on the
[OK] button.
Once the program has finished searching for the services, the [Add New Connection
Wizard (Select Service)] window will appear.
6. Select "Fax" under [Select Service], and then click on the [Next] button
The [Add New Connection Wizard (Connecting to Remote Device)] screen will
appear.
The
COM
port
and
modem
registration
process
will
then
be
automatically
performed.
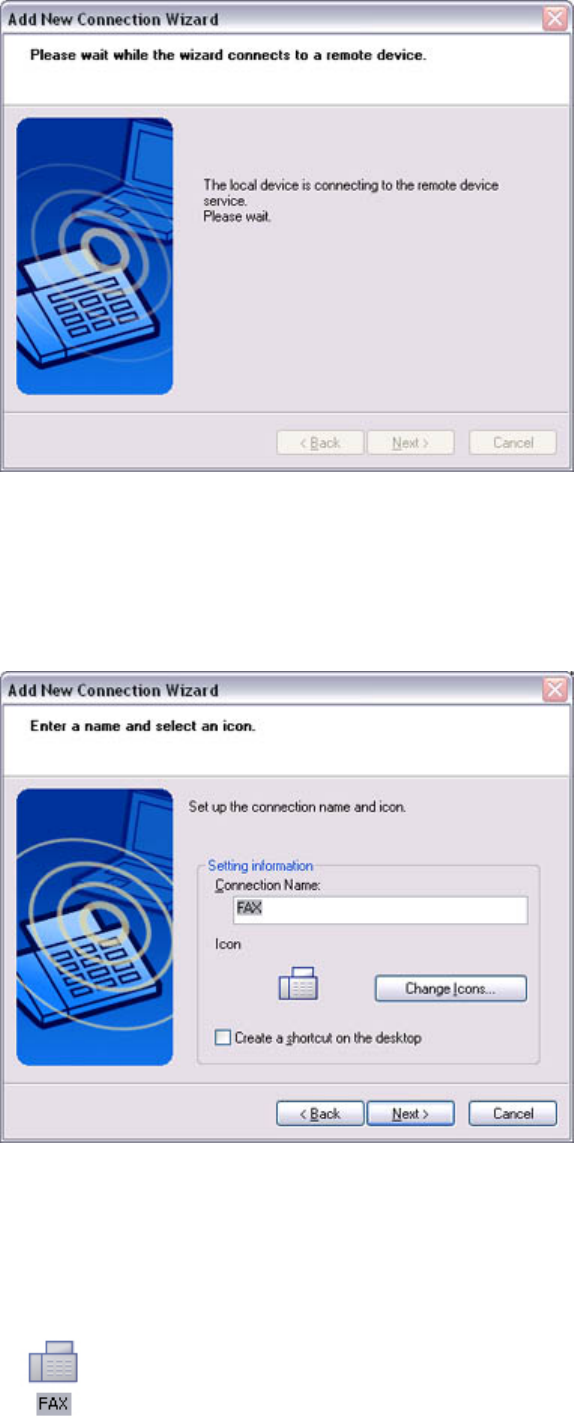
Quick Start Guide - Introduction 第 55 頁,共 160 頁
file://C:\Documents and Settings\anitachou\Local Settings\Temp\~hh3F24.htm 2004/11/30
The
COM
port
and
modem
registration
process
will
then
be
automatically
performed.
Once the
COM port and modem (standard 33600 bps type) registration is complete,
the [Add New Connection Wizard (Setting Connection Name)] screen will appear.
7. Configure the type and name of the icon to appear after registration, and click on the
[Next] button.
Please click only on the [Next] button once you are satisfied with the configuration.
The [Add New Connection Wizard (Completing the Add New Connection Wizard)]
screen will appear.
8. Click on the [Finish] button
The settings will be registered, and the icon will appear on the [Bluetooth Settings]
screen.

Quick Start Guide - Introduction 第 56 頁,共 160 頁
file://C:\Documents and Settings\anitachou\Local Settings\Temp\~hh3F24.htm 2004/11/30
Configure send/receive settings and register fax information.
1. Select [Start]→[Control Panel], and then double-click on the [Printers and Other
Hardware] icon
{If the control panel is displayed in "Classic view", and you use Windows 2000,
please start from Step (2).
2. Double-click on the [Printers and Faxes] icon
The [Printers & Faxes] window will appear.
3. Click on "Set up faxing" in the [Printers and Faxes] window
A window showing installed programs will appear, and a Fax icon will have been
created in the [Printers and Faxes] screen.
4. Click on "Send a fax" under "Printer Tasks" on the left side of the window
Setting fax information
Procedure
Note
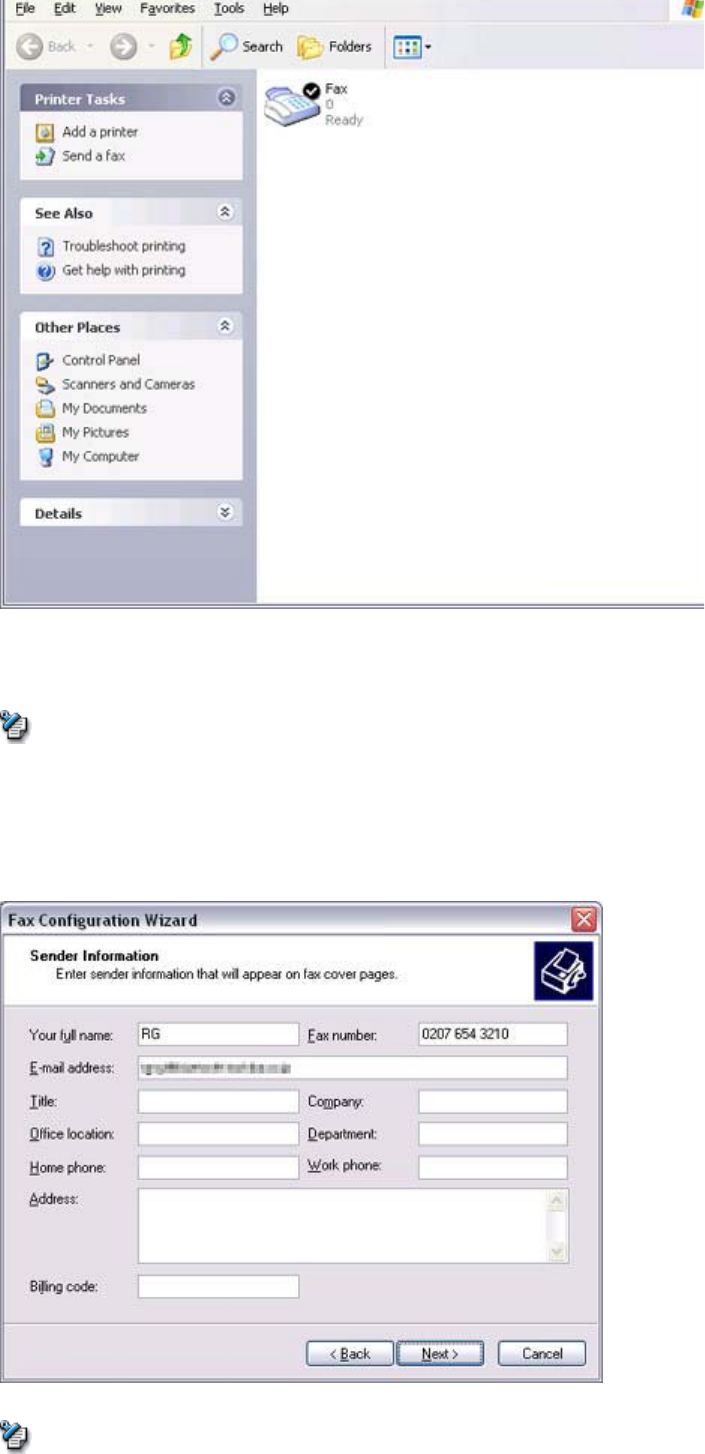
Quick Start Guide - Introduction 第 57 頁,共 160 頁
file://C:\Documents and Settings\anitachou\Local Settings\Temp\~hh3F24.htm 2004/11/30
If you have not yet configured a fax device, the [Fax Configuration Wizard] window
will appear. In the window you can enter settings pertaining to the sender (yourself).
{If the fax configuration information has already been registered, the [Send Fax
Wizard] window, which can be viewed under " Sending a fax" below, will appear
instead of the [Fax Configuration Wizard] window.
5. Enter the sender information, and click on the [Next] button
Note
Note
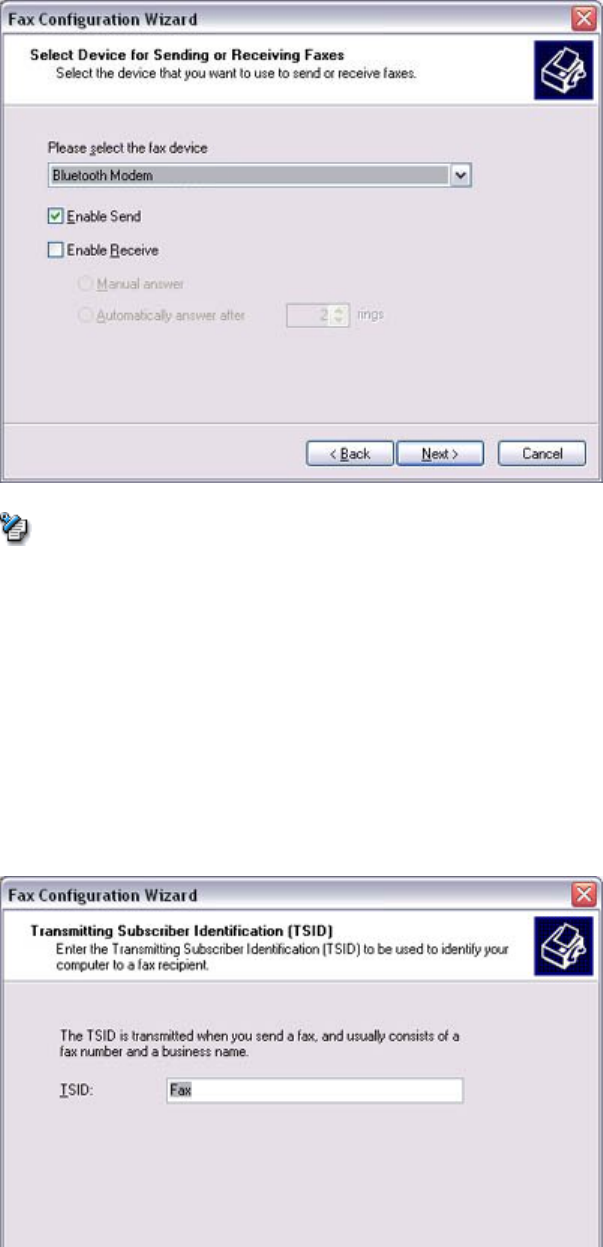
Quick Start Guide - Introduction 第 58 頁,共 160 頁
file://C:\Documents and Settings\anitachou\Local Settings\Temp\~hh3F24.htm 2004/11/30
{The sender information that you configure here will be automatically appended
as header information when you send a fax.
The [Fax Configuration Wizard (Select Device for Sending or Receiving Faxes)]
window will appear.
6. Select a device to be used for fax transmissions, enable the device for sending or
receiving, and then click on the [Next] button
{If [Enable Receive] is selected, the device will be on standby for receiving faxes
even if it is not sending or receiving anything, and therefore will be in
continuous connection to the wireless modem (when COM Auto Connect is
on).
Please decide whether to select this option based on to the desired objective
and/or frequency of transmission.
The [Fax Configuration Wizard (Transmitting Subscriber Identification (TSID))]
window will appear.
7. Click on the [Next] button
It is important that you do not change the transmitter subscriber identification.
Note
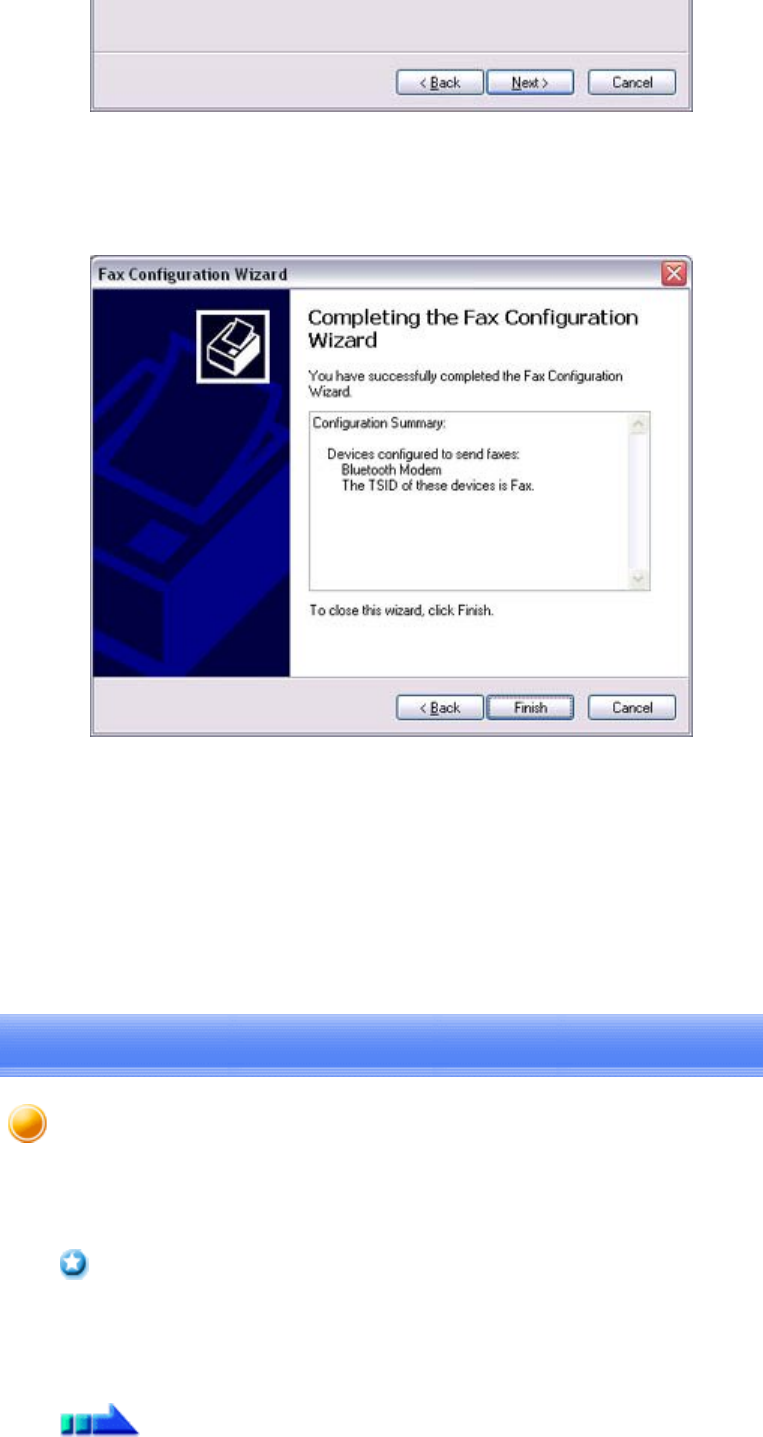
Quick Start Guide - Introduction 第 59 頁,共 160 頁
file://C:\Documents and Settings\anitachou\Local Settings\Temp\~hh3F24.htm 2004/11/30
The [Fax Configuration Wizard (Completing the Fax Configuration Wizard)] window
will appear.
8. Click on the [Finish] button
The fax information will be have been registered, and the [Fax Console] window will
appear.
This will complete the fax set-up process.
Related topics: "Sending a fax" and "Receiving a fax"
This section describes how to send a fax from the Fax Console.
zThe Fax service must be enabled for sending in order for you to send a fax.
Please refer to "Using a mobile telephone" under "Troubleshooting" for how to change
the send and receive settings once the service has been configured.""
1
Double
click on the [Fax] icon in the Control Panel
Important
Procedure
Sending a fax

Quick Start Guide - Introduction 第 60 頁,共 160 頁
file://C:\Documents and Settings\anitachou\Local Settings\Temp\~hh3F24.htm 2004/11/30
1
.
Double
-
click
on
the
[Fax]
icon
in
the
Control
Panel
The [Fax Console] window will appear.
2. In the [Fax Console] window, click [File] →[Send fax]
The [Send Fax Wizard (Starting the Send Fax Wizard)] window will appear.
3. Click on the [Next] button
The [Send Fax Wizard (Recipient Information)] window will appear.
4. Enter the name and fax number of the destination party, and then click on the [Next]
button
Quick Start Guide - Introduction 第 61 頁,共 160 頁
file://C:\Documents and Settings\anitachou\Local Settings\Temp\~hh3F24.htm 2004/11/30
The [Send Fax Wizard (Preparing the Cover Page)] window will appear.
5. Specify the cover page template, subject line, and note (body text), and then click on
the [Next] button
The [Send Fax Wizard (Schedule)] window will appear.
6. If you wish to send the fax immediately, select "Now", and then click on the [Next]
button
Quick Start Guide - Introduction 第 62 頁,共 160 頁
file://C:\Documents and Settings\anitachou\Local Settings\Temp\~hh3F24.htm 2004/11/30
The [Send Fax Wizard (Completing the Send Fax Wizard)] window will appear.
7. Confirm the destination information and transmission details, and then click on the
[Finish] button
The software will automatically dial the number and send the fax.
Once the fax has been sent, Fax Monitor will revert to standby mode.
Quick Start Guide - Introduction 第 63 頁,共 160 頁
file://C:\Documents and Settings\anitachou\Local Settings\Temp\~hh3F24.htm 2004/11/30
Related topic: "Receiving a fax"
This section describes what to do when a fax arrives after you have established a connection
to a modem station.
zThe Fax service must be enabled for receiving in order for you to receive a fax.
Please refer to "Using a mobile telephone" under "Troubleshooting" for information on
how to change the send and receive settings once the fax service has been configured.
zPlease ensure you have connected to a modem station before you receive a fax (the
device will be connected to the modem if "Enable Receive" has been selected or COM
Auto Connect has been activated).
1. When a fax arrives, the Fax Monitor will start automatically as the fax is received
Once the fax has been received, the Fax Monitor will revert to standby mode.
{If
y
ou have enabled manual fax rece
p
tion
,
the messa
g
e below will a
pp
ear when a
fax arrives.
Click on the message with your mouse to receive the fax.
2. Double-click on the [Fax] icon in the Control Panel
The [Fax Console] window will appear
Important
Procedure
Note
Receiving a fax