ATEC AV420A 42 Inches TFT LCD TV User Manual
ATEC Co., Ltd. 42 Inches TFT LCD TV Users Manual
ATEC >
Contents
User Manual 5
LCD TV Overview and Installation
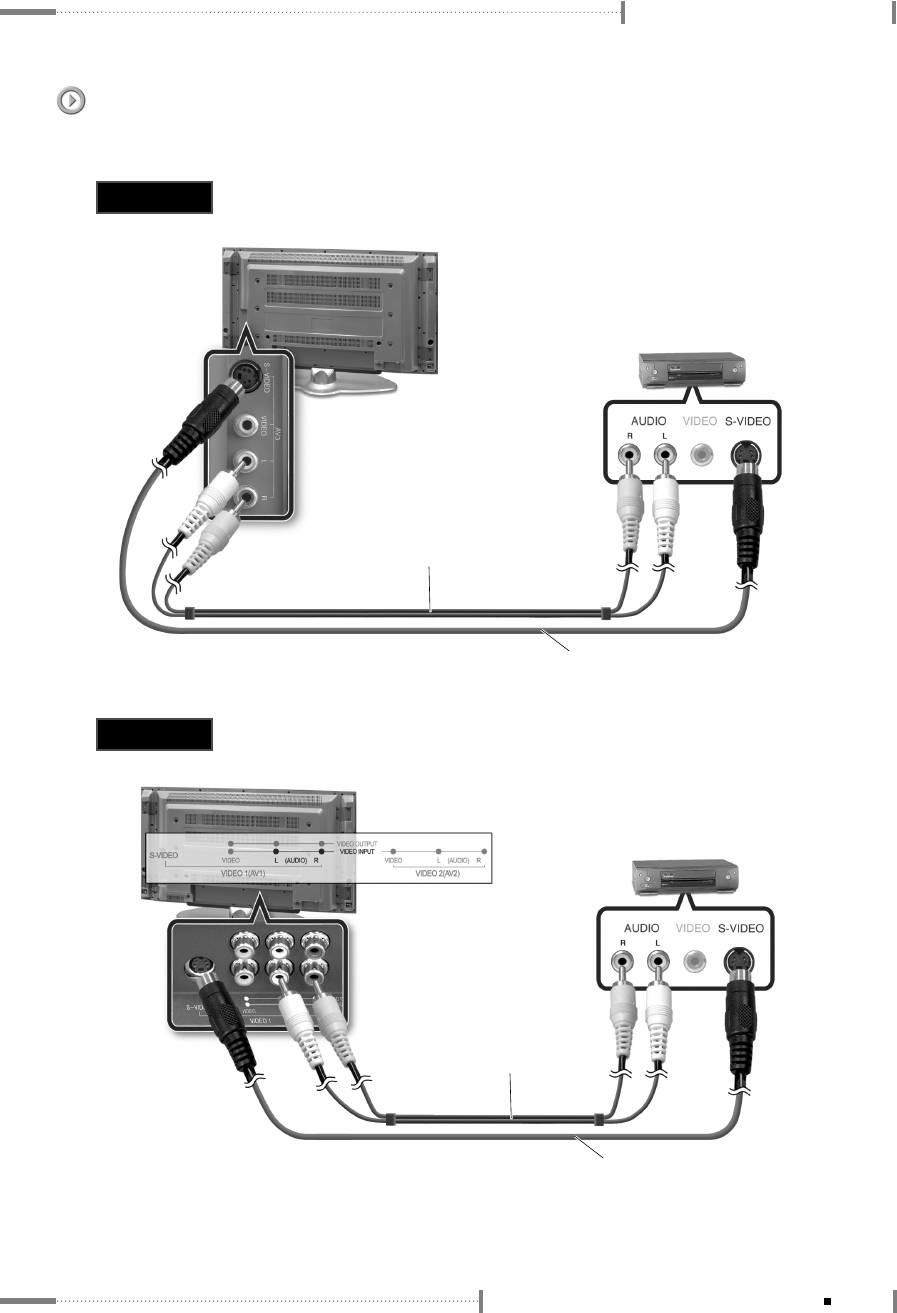
When connecting to the S-video connector
Different jacks on the rear panel are used for different external devices.
VCR
Audio cable (Optional)
S-Video cable (Optional)
VCR
Audio cable (Optional)
S-Video cable (Optional)
Method 1
Method 2
1-21
Connecting the LCD TV and Peripheral Devices
LCD TV Overview and Installation
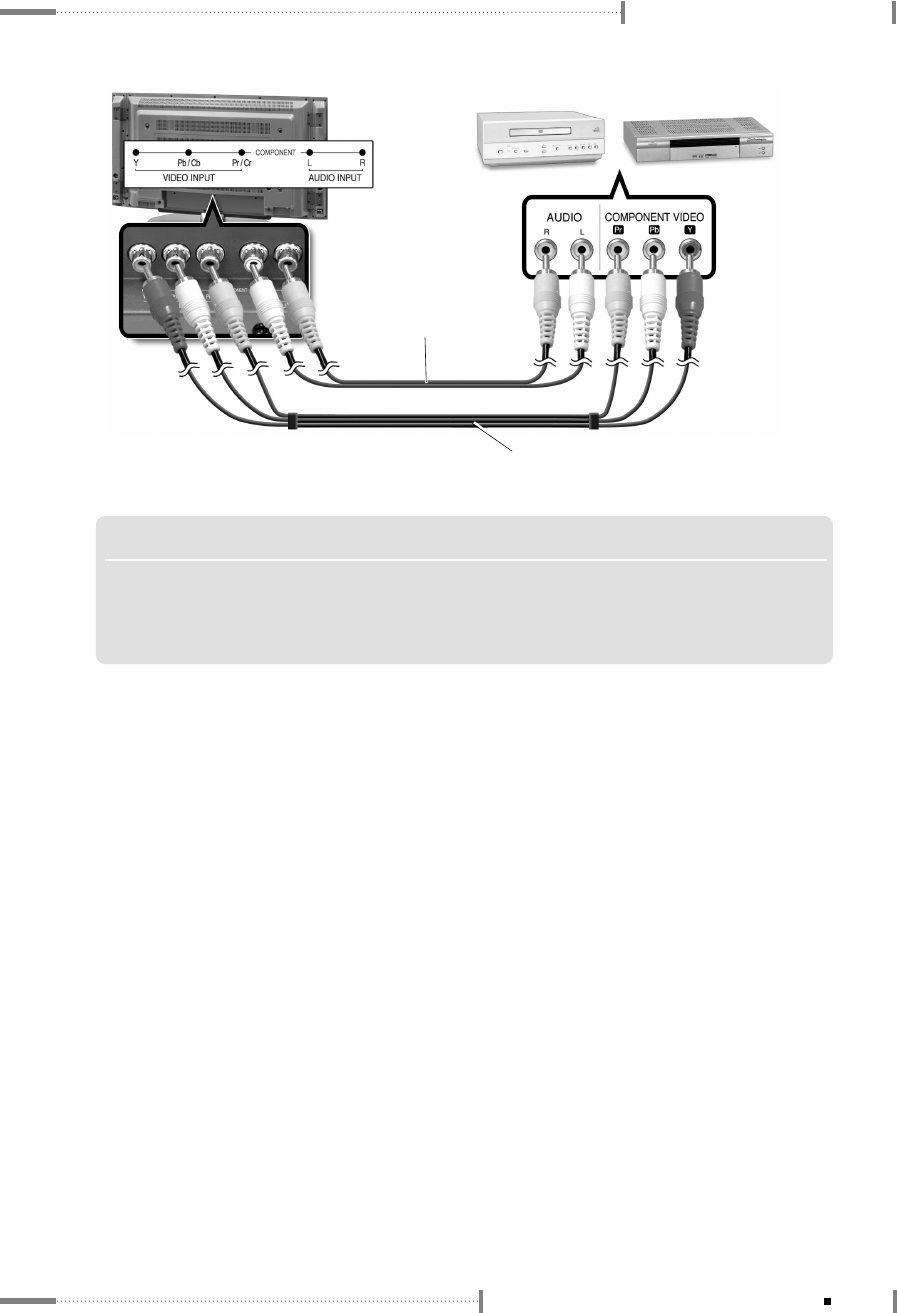
Connecting a DVD Player & Set-Top Box (Connecting to Y, Pb, Pr)
Connect a set of audio cables between the component AUDIO IN jacks of the LCD
Display and the AUDIO OUT jacks of the DVD Player.
1
Connect video cables between the Y, Pb and Pr inputs on the LCD Display and the Y, Pb
and Pr outputs on the DVD Player.
2
Turn on the TV power, and press the <SOURCE> button on the remote control to select the
DVD mode (component).
3
Turn on the DVD Player power or Set-Top Box power to view high quality video.
4
NOTE S
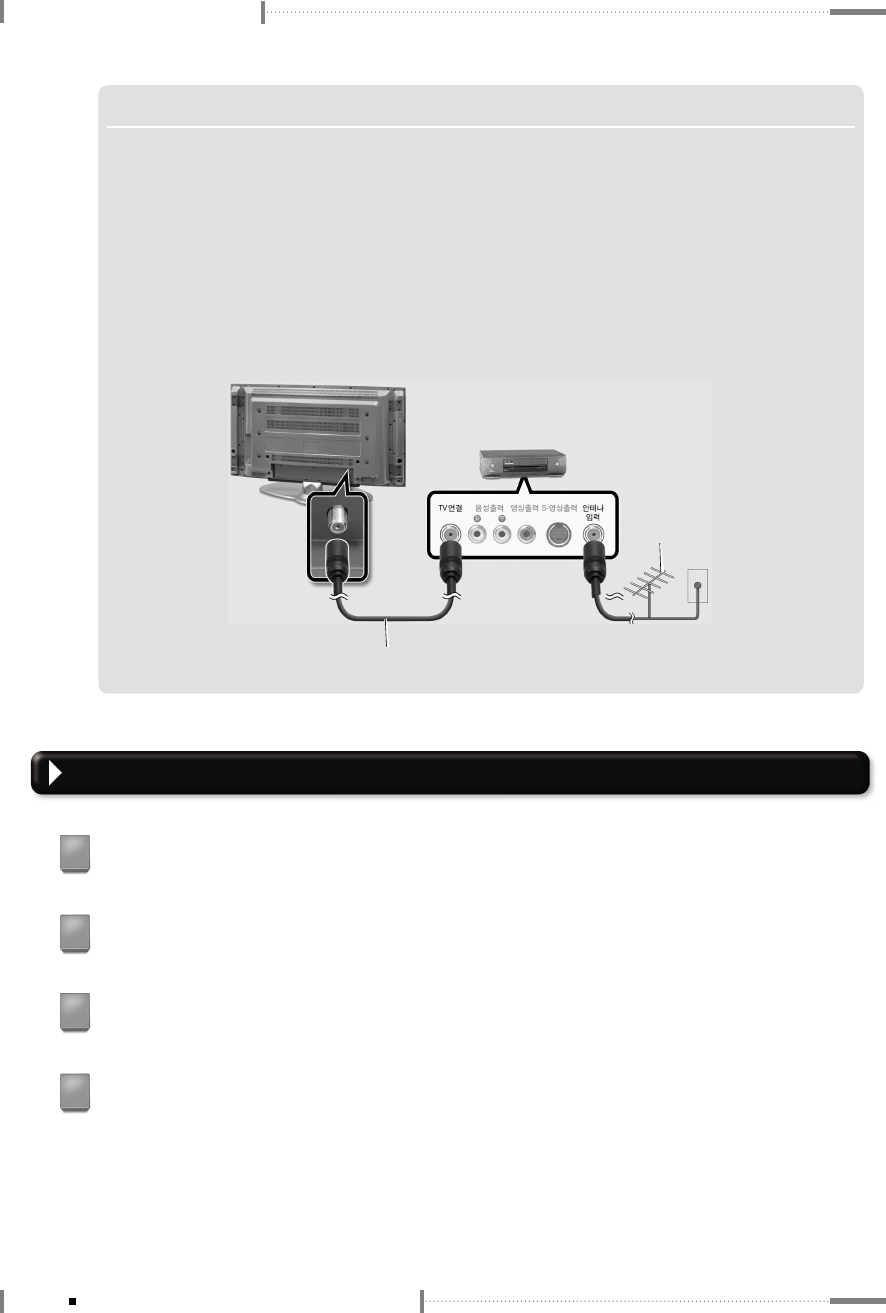
▶▶Connecting VCR (when connecting to the antenna input connector)
Different jacks on the rear panel are used for different external devices.
❶
Connect the external antenna cable to the VCR.
❷
Connect the 75
Ω
coaxial cable to the VCR and TV.
❸
Set the channel selection switch on the rear panel of the VCR to channel 3 or 4, and turn on the VCR
power.
❹
Turn on the TV power and switch the channel to the same channel that was set on the VCR (3 or 4).
❺
Insert a video tape into the VCR, and press the <PLAY> button.
VCR
75Ωcoaxial cable
External Antenna
1-22 Connecting the LCD TV and Peripheral Devices
LCD TV Overview and Installation
DVD or Set top
Audio cable (Optional)
Component cable (Optional)
NOTE S
▶
For an explanation of Component video, see your DVD Player's manual.
▶
When connecting the DVD player or set top box, connect the component cable to the
Component jack.
1-23
Connecting the LCD TV and Peripheral Devices
LCD TV Overview and Installation
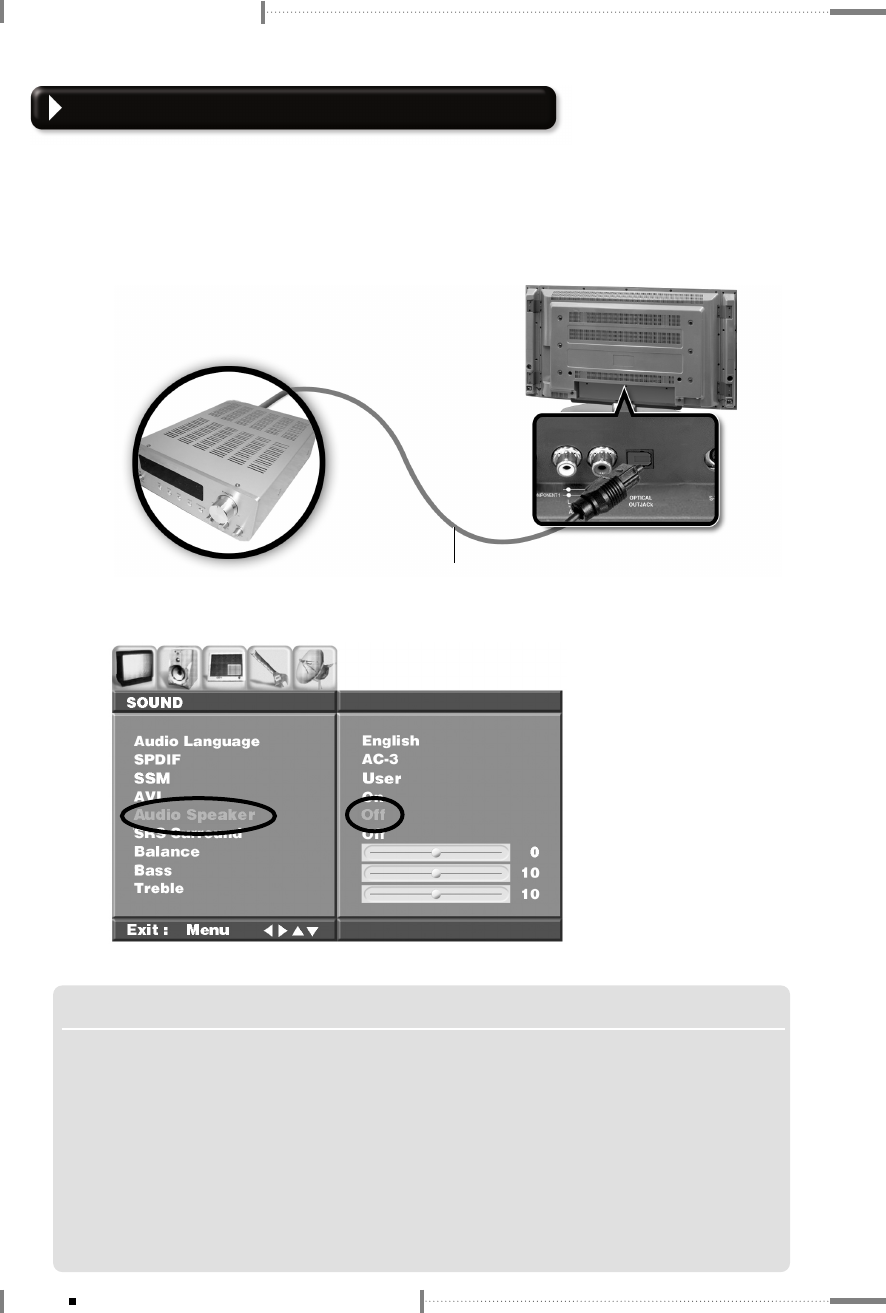
Connecting to a digital (AC3) amplifier
"Digital" refers to surround sound technology for movie theatres used for the latest movies
and it can be used at home to obtain realistic sound effects. You can enjoy realistic sound effects
from a movie or live concert DVD disc by connecting the product to a 6-channel amplifier with
a digital converter or digital (AC3) processor.
Make sure that the TV speakers are
set to OFF when using an external
sound device.
Digital (AC3)
Amplifier with a Converter
Optical Voice Cable (sold separately)
NOTE S
▶▶To enjoy digital (AC3) sound with the product, make sure that:
- The input signal to the product is digital (AC3).
- Connect the product to a 6-channel amplifier with five speakers and one subwoofer that has a
digital (AC3) converter or processor.
▶
Since the voice output from the product is broadband, set the volume appropriately.
Otherwise, the speakers may get damaged by sudden high pitched sounds.
▶
Make sure to turn off the amplifier before plugging or unplugging the product’s power cord.
Otherwise, the amplifier may get damaged.
1-24 Connecting the LCD TV and Peripheral Devices
LCD TV Overview and Installation
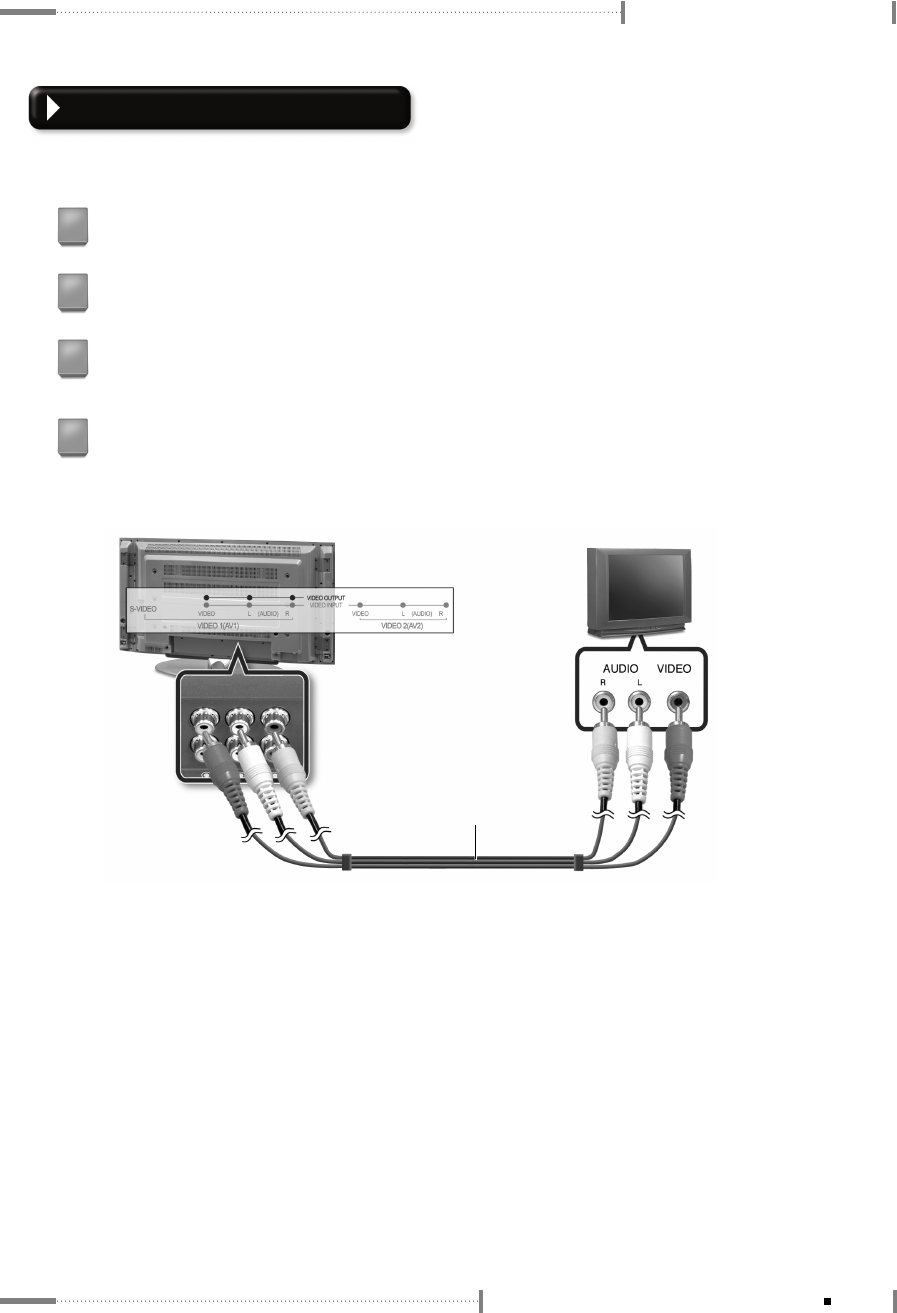
Connecting an External TV
The video output of this LCD TV can be transmitted to other external TVs.
Connect the audio/video cables to the video output jack on the LCD TV.
1
Connect the other end of the audio/video cables to the video input jack on the external TV.
2
Turn on the LCD TV power, and then turn on the external TV power.
3
Audio/Video cable (Optional)
TV
Check the video on the external TV and use the external TV remote control to select
the input mode. The same screen showing on the LCD TV will be displayed on the
external TV.
4
1-25
Connecting the LCD TV and Peripheral Devices

LCD TV Overview and Installation
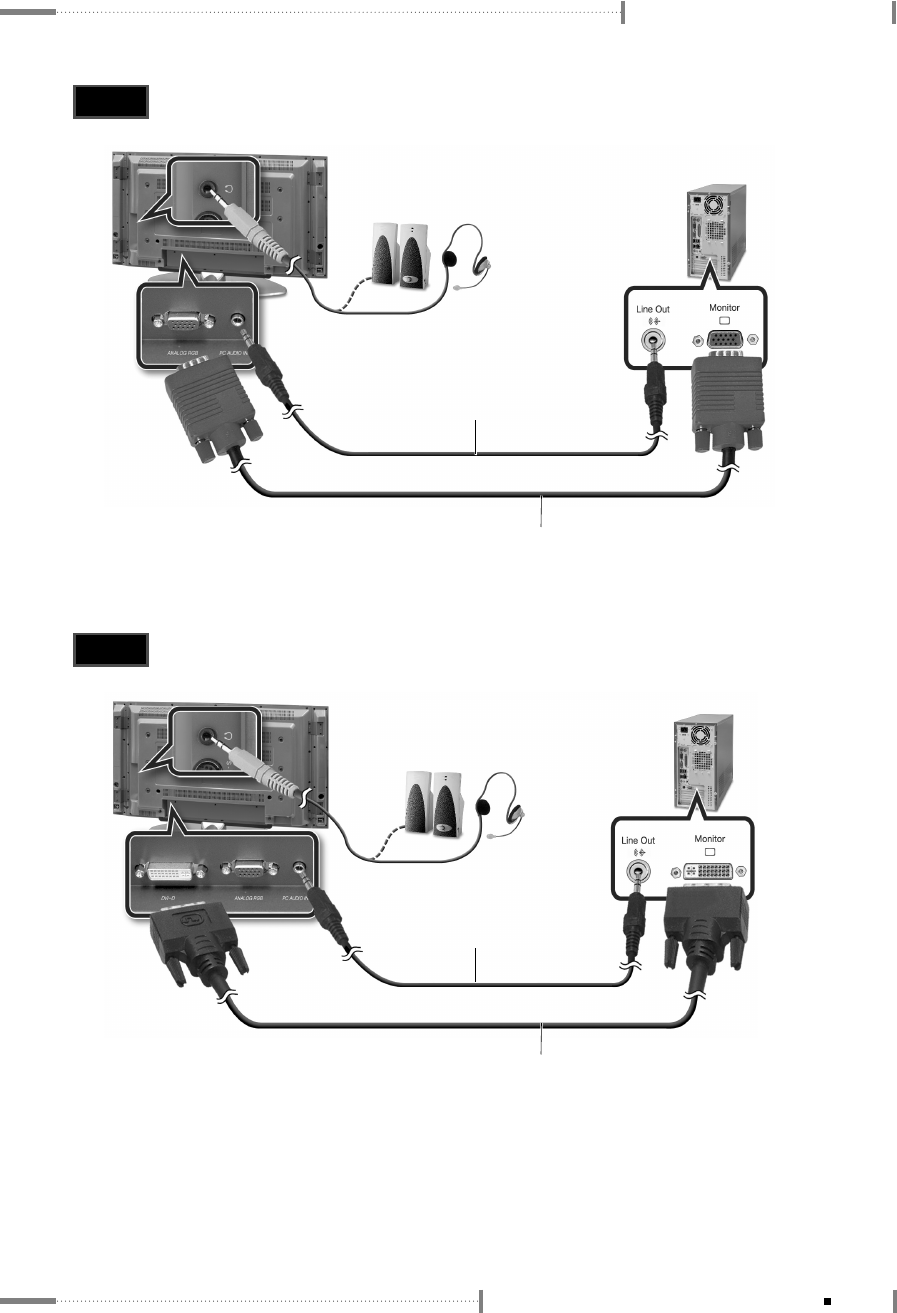
Connecting to a PC
When used as a monitor, this LCD TV supports resolutions of 1600x1200 @ 60Hz (UXGA) /
1280x1024 @ 85Hz (SXGA). For best performance, please select 1280x768 @ 60Hz /
1360x768 @ 60Hz (WXGA).
Turn off your PC and LCD TV.
1
Turn on the PC power and verify the PC settings. (For best performance, please set the
resolution to 1280x768 @ 60Hz / 1360x768 @ 60Hz (WXGA).)
2
Connect a PC VGA or DVI cable between your PC and the ANALOG RGB or DVI-D of
the LCD TV. Then fasten the screws on both sides of the cable.
3
Connect a PC Audio Cable between the Sound Output Jack of the sound card on the
PC and the AV3 Composite of the LCD TV.
4
Connect a Power cable to the Power connector on the rear of your LCD TV.
5
Power on the computer before turning on the LCD TV.
6
Turn on the TV power and press the <PC> button on the remote control to select the PC
input mode.
7
1-26 Connecting the LCD TV and Peripheral Devices
LCD TV Overview and Installation
DVI
PC
Headphone
(optional)
or
Speaker
(optional)
Audio cable (optional)
DVI cable
RGB
Audio cable (optional)
Headphone
(optional)
or
PC
Speaker
(optional)
VGA cable
1-27
Connecting the LCD TV and Peripheral Devices