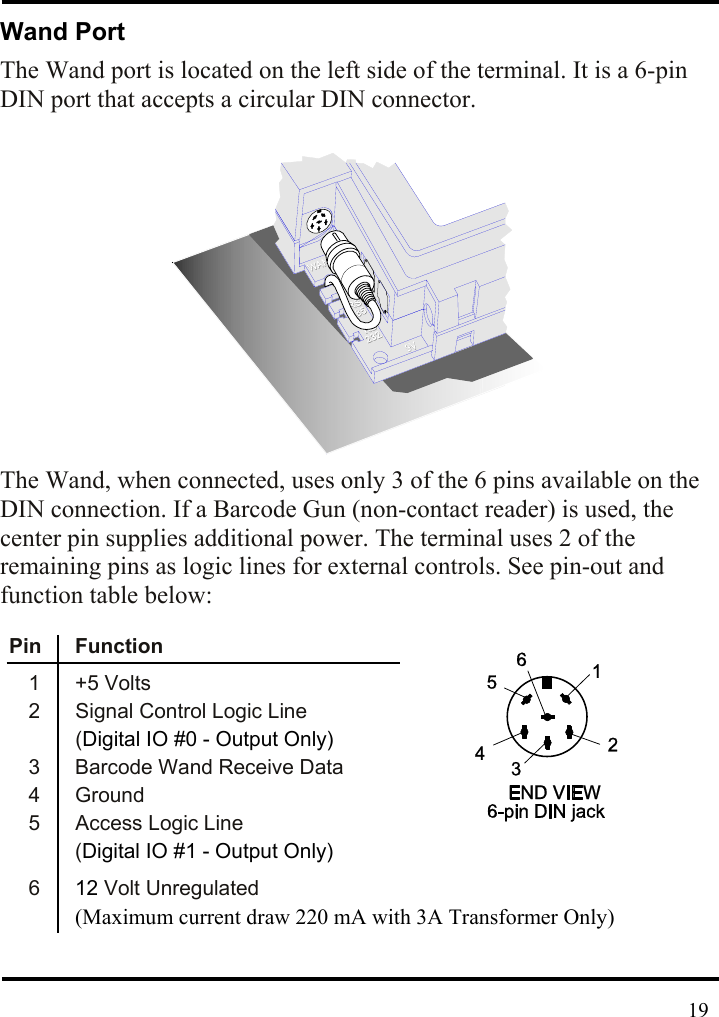
Acroprint Time Recorder 1012 ENTRY CONTROL BADGE READER User Manual Micro computer Electronic Time Clock

Acroprint Time Recorder Company ENTRY CONTROL BADGE READER Micro computer Electronic Time Clock

USERS MANUAL 4

 Wand Port The Wand port is located on the left side of the terminal. It is a 6-pin DIN port that accepts a circular DIN connector.                 The Wand, when connected, uses only 3 of the 6 pins available on the DIN connection. If a Barcode Gun (non-contact reader) is used, the center pin supplies additional power. The terminal uses 2 of the remaining pins as logic lines for external controls. See pin-out and function table below:   Pin   Function 1  +5 Volts    2  Signal Control Logic Line (Digital IO #0 - Output Only)  3  Barcode Wand Receive Data 4 Ground 5  Access Logic Line (Digital IO #1 - Output Only) 6  12 Volt Unregulated     (Maximum current draw 220 mA with 3A Transformer Only)    19
  Wand and Y-Cable Disconnect power to the terminal before connecting the Barcode Wand. The wand is capable of reading bar code stripes by passing it directly over the label. Check the software manual to identify the codes your terminal will read.                 The Y-cable shown below allows for connection of both a wand and other external devices. The single end of the cable is plugged into the terminal. A wand can be connected to one split and another device to the other. See appendix for External Relay Box part number.        Y-cable (splitter)   Barcode Wand 20
 Parallel Port The parallel port is located on the right back of the DC7000 Terminal. It is a 25 pin female port, which will accept a 25-pin male connector.               This type of parallel port is typically used on IBM® PC or IBM-PC compatible computers. The DC7000 Terminal provides strain relief if the connector is locked in by the securing screws. Securing the parallel cable to the wall or mounting surface can obtain additional strain relief.               21
 Parallel Cable The parallel port is used for additional digital I/O or for printing.   A standard parallel print cable is used with a simple ASCII parallel printer. Shown below is a parallel interface cable. Since this is the same cable that is used to connect an IBM-PC or compatible to a printer, it will likely be available from most computer dealers off-the-shelf. One end is a male DB-25 connector; the other end is a 36-pin Centronics-type connector to match the parallel port on the printer.            Note:    Schematic connections are shown from END VIEW.   (As viewed from the outside of the connectors.)   22Parallel CableSchematic
5. CompanionProducts              Readers Description / Illustration              Part Number                   Barcode Wand    74-0106-002 and Holder   External                           Visible 74-0111-000 Barcode                         Infrared 74-0111-002 Slot Reader Power Supplies Description/Illustration Part Number Lighter Power  72-0160-000 12 VDC Adaptor 120VAC to 9VAC, 1A  56-0113-000 Power Supply 120/240VAC to 12VAC, 3A  56-0128-000 Power Supply (Required for Terminals with Fingerprint   Reader, Modem or Wireless Communication)    Note:  Comes with Std. 2-Blade US Plug    75-0166-000                  Optional Available Adaptors                           Continental Europe   75-0167-000                                 U.K. / Ireland   75-0168-000                      Australia / New Zealand   75-0169-000                               S.Africa / India   75-0170-000  23
 External Relay Box, External Buzzer  External Relay Box                 120 V 01-0121-000                                     240 V 01-0121-002    External Buzzer  01-0122-000              24
Cables  Description/Illustration Part Number “Standard” Modular Cable                                 length - 7 feet  72-0146-000                                     - 50 feet  72-0146-004 Y-Cable (splitter)  72-0159-000   DB-25 RS-232 Host Cable Assembly Includes DB-25 Female (RS-232/host) to RJ-11   Female adaptor and “Standard” Modular Cable.                              length - 7 feet  25-0116-000                                     - 50 feet  25-0116-007  DB-9 RS-232 Host Cable Assembly Includes DB-9 (RS-232/host) to RJ-11 female   adaptor and “Standard” Modular Cable.                            length -   7 feet  25-0116-004                                    - 50 feet  25-0116-008  9 Pin RS-232 to USB Adaptor  63-0181-000        25
Cables, Converter, Badge Racks Description / Illustration Modem Adaptor Cable Assembly Includes DB-25 Male (modem) to RJ-11   male adaptor and “Standard” Modular Cable.                                length - 7 feet  25-0123-000 Teflon Cable (available by the foot)  55-0124-000 Junction Box  63-0169-000 RS-232 to RS-485 Converter Assembly Includes RS-232 to RS-485 converter           with DB-9 / RJ-11 Connectors and   “Standard” Modular Cable.                                length - 7 feet  25-0134-001   40 Pocket Badge Rack (Plastic)  81-0117-000 (8¼" wide x 225/8” high) (2) 12 Pocket Badge Racks (Plastic)  81-0116-003 (37/8" wide x 14" high)  40 Pocket Badge Rack (Metal)  81-0113-000 (41/2" wide x 32" high)     26
6. Appendix  Units with Acroprint Data Collection Firmware  Acroprint Data Collection Terminal Setup Instructions  Configuring procedure for entering the DATE & TIME:  Swipe the Configuration Badge 000000000 (This badge is provided with each terminal) Select option 1    for DATE <Press ENTER> Select the Day, Month, Year DDMMYYYY <Press ENTER> Select the Time HH:MM <Press ENTER> (Time is entered in military time, 2:00 pm = 14:00)  Configuring procedure for selecting PORTS:  Swipe the Configuration Badge 000000000 (This badge is provided with each terminal.) Select option 2 for Ports <press ENTER> Select option 0 for RS232 <press ENTER> Select the baud rate 0 for 1200, 1 for 2400, 2 for 4800, 3 for 9600 and 4 for 19,200 baud. <press ENTER>  (For modem terminal only) Select option 1 for Modem <press ENTER>   Select the Modem baud. <press ENTER> Select the Answer Window HHMMHHMM for starting and ending times < press ENTER> (time is in military format, Example: Clock will not answer during business hours and only answer between the hours of 8:00 pm and 6:00 am, then select 20000600.)   27
(For RS485 terminals only) Select option 1 for RS485 <press ENTER>   Select the baud rate 0 for 1200, 1 for 2400, 2 for 4800, 3 for 9600 and 4 for 19,200 baud. <press ENTER>  (For Ethernet terminals only) Select option 2 for Ethernet <press ENTER> Select the baud rate option 3 for 9600 baud <press ENTER> (Leave this as the default for Ethernet.) Select the TCPIP address <press ENTER> (Your network administrator will have this information.) Select the GATEWAY address <press ENTER> (Your network administrator will have this information.) Select the PORT VALUE <press ENTER> (Default number 10001. Select the save value in the ATR9800 software.) Select the NETMASK PART BITS NUMBER <press ENTER> (Your network administrator will obtain this information. The Default Subnet Mask TCPIP number contains four groups of numbers separated by“.”. To determine the NETMASK VALUE obtain your default Subnet IP number from the Network administrator XXX.125.125.125 for your server Default Subnet, convert  each 125 (your numbers will be different) to binary and count the number of zero’s in the binary number and enter this number. 125 = 01111101 in binary. Each 125 has two zeros, therefore the Netmask bits number is set to 6. Select the TERMINAL TRANSACTION PRINTER TYPE <press ENTER> (default is parallel port)  Select TRANSACTION TIME OUT <press ENTER> (This controls how long the terminal will restrict between badge swipes. Example: You want to keep your employees off the terminal for at least 30 minutes for lunch, then set Transaction Time out to 30.) Select TERMINAL ID <press ENTER> (default is 1, select the ID for terminal, each terminal MUST have a unique ID)  28The terminal MUST be powered down and back up to accept the new TCPIP information.
  Configuring procedure for selecting the READERS:  Swipe the Configuration Badge 000000000 (This badge is provided with each terminal.) (Select any combination 1234 to activate the readers. 1 for Internal Barcode, 2 for External Barcode, 3 for Internal Magnetic Stripe and 4 for Internal Proximity Reader) Note, if 4 is selected then the External Barcode Reader will be disabled.   Note, if you turned OFF all readers you will be unable to read the configuration badge. The following procedure will allow you to re-enable the readers. Press the IN, then the OUT and then the ENTER key within 1 second. The terminal will go into a testing mode. Press the Clear key followed by Press the IN, then the OUT and then the ENTER key within 1 second or before the time is displayed.                 29
 Electrical Connections           Parallel Port Connector on DC7000  Digital IO Mode       Printer Mode 1  Digital IO #7  1  Strobe 2  Digital IO #8  2  Printer Data 0 3  Digital IO #9  3  Printer Data 1 4  Digital IO #10  4  Printer Data 2 5  Digital IO #11  5  Printer Data 3 6  Digital IO #12  6  Printer Data 4 7  Digital IO #13  7  Printer Data 5 8  Digital IO #14  8  Printer Data 6 9  Digital IO #15  9  Printer Data 7 10 N/A  10 /ACK 11  Digital IO #2  11  Busy 12  Digital IO #3  12  PE 13  Digital IO #4  13  Slct 14 N/A  14 /Auto Feed 15  Digital IO #5  15  /Error 16  Digital IO #6  16  /Init 17-25 Ground  17  /Slct    18-25 Ground  14 25 1 13   30
   DC7000 Wand Connector Socket 1 +5 Volts 2  Signal Control Logic Line (Digital IO #0 - Output Only) 3  Barcode Wand Receive Date 4 Ground 5  Access Logic Line (Digital IO #1 - Output Only) 6 +12 Volts Unregulated (Max Current Draw 220mA with 3A Transformer Only)       DC7000 RS232 Connector 1 Not Used 2 CTS 3  Transmit Data (from DC7000) 4  Receive Data (to DC7000) 5 Ground 6  Not Used         31
            DC7000 RS485 / Modem Connector       Modem    RS485    1 Not Used      1  (GND Jumper Option)     2 N/A        2  N/A     3 TIP        3  Data (-)     4 RING       4  Data (+)     5 N/A        5  N/A     6 Not Used      6  (GND Jumper Option)                                 DC7000 Ethernet Connector     1 Data (TX +)     2  Data (TX -)     3  Data (RX +)    4 Ground (-)    5 Ground (-)     6  Data (RX -)    7 Power (+)    8 Power (+)      1  2  3  4  5  6  7  8 32
Specifications IO Points 0–1 Output High:  4.0 milliamps out of MAX,    V out = 4.2 Volts MIN Low:  4.0 milliamps in MAX,    V out = 0.4 Volts MAX Input: Not Applicable  IO Points 2–15  Output High:  1.6 milliamps out of MAX,    V out = 2.4 Volts MIN Low:  2.0 milliamps in MAX,    V out = 0.4 Volts MAX Input: Input Voltage Range: 0–5 Volts High:  2.2 Volts MIN Low:  0.8 volts MAX  NOTE:    If a barcode wand is used, the wand’s current must be   included in your total current calculation.           IBM® is a registered trademark of International Business Machines.    33
              5640 Departure Drive Raleigh, NC 27616 919.872.5800 www.acroprint.com     P/N 06-0333-000 Rev. pL 11/09/05   34

Navigation menu