Aerohive Networks AP1130 Access Point User Manual AP1130 Installation Guide
Aerohive Networks, Inc. Access Point AP1130 Installation Guide
Contents
- 1. Installation Guide (Antenna Install) 8/28/2015
- 2. Installation Guide (Antenna Install)
- 3. Installation Guide Updated 10/19/2015
- 4. Revised Installation Manual (10/28/2015)
Revised Installation Manual (10/28/2015)

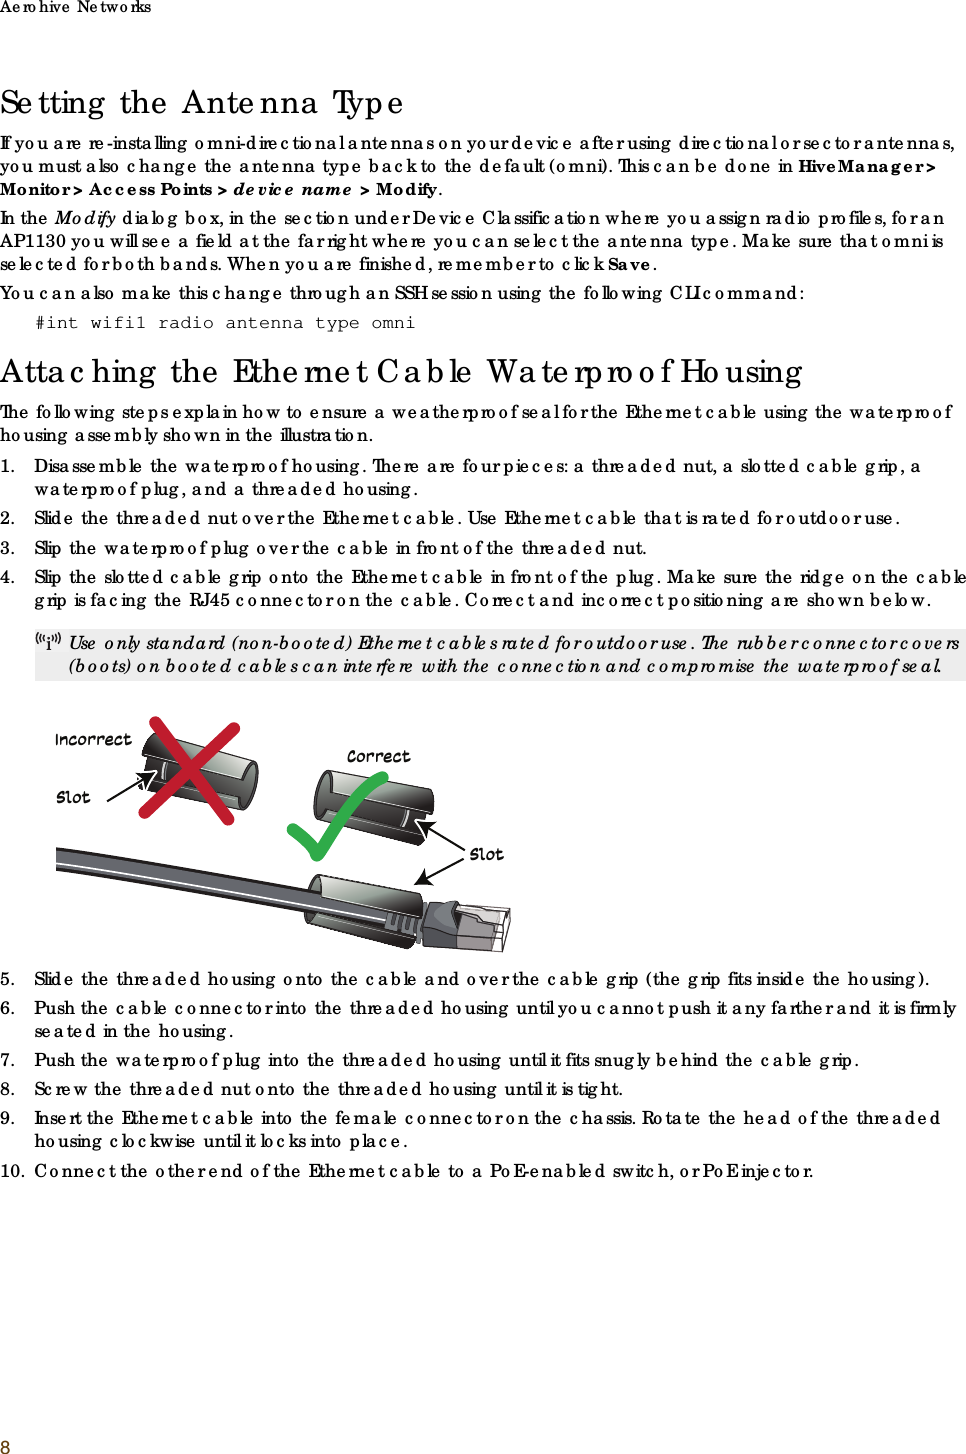
![Aerohive Networks9Accessing the Reset ButtonThe Reset button is located on the right side panel. To access it, remove the screw that covers the button. Use a paper clip or similar tool to push the button in between 1 and 5 seconds to reboot the device, or for 5 seconds or more to return the device to the factory default settings. When you are done, replace the cover screw firmly to cover the access point and restore the device to its weatherproof state.Using the Antenna Alignment BuzzerThe AP1130 has an audible buzzer signal to help you align antennas for the best coverage. By default, the buzzer is enabled and will beep with changing frequency based on the signal strengths that are determined during the alignment process. The better the signal strength, the more frequent the beeps.You can enable, configure, and disable the buzzer using the following CLI command through a Console connection to the device.CLI Syntax: exec antenna-alignment interface <wifix> peer <mac_addr> [count [numbers]] [interval [numbers]] [text-size [numbers]] [beep [static]|[adaptive]|[disable]]•beep: Set the antenna buzzer mode, which the device uses to indicate the quality of antenna alignment by increasing the frequency of audible beeps as the signal strength improves. The default is adaptive.•static: Set the antenna buzzer to beep when the signal strength falls between 0 and 80 dB.•adaptive: Set the antenna buzzer to beep based on the signal strengths that are determined during the alignment process.•disable: Disable the antenna buzzer.AP1130 LEDsThe AP1130 has a Status LED on the bottom of the unit, and a Signal Strength LED and three connectivity LEDs on the right panel. The LED colors and what they indicate are described below.Status LED•Dark: no power to the device.•Amber (steady): the device has not made a CAPWAP connection.•Amber (flashing): the device is undergoing a firmware upgrade.•White: the device is operating properly.Signal Strength LED:•Dark: no signal or not in use.•Amber: the signal is weak (no neighbor has been found with a signal strength greater than -60 dBm).Step 5. Threaded housingConnectorStep 2. Threaded nutStep 4. slotted cable gripStep 3. Waterproof plugThe slot must be at the connector end of the grip.Reset button](https://usermanual.wiki/Aerohive-Networks/AP1130.Revised-Installation-Manual-10-28-2015/User-Guide-2796143-Page-9.png)