Arcadyan Technology WA4001CB WLAN ACCESS POINT User Manual P74841 F5D7233 man indd
Arcadyan Technology Corporation WLAN ACCESS POINT P74841 F5D7233 man indd
Contents
USER MANUAL 2 OF 7
16
Connecting and Configuring your Router
Connecting and Configuring your Router
Adapter Mode
Installation
1. Mode Selecting Adapter Mode
1. Mode Selecting Adapter Mode
1.
1
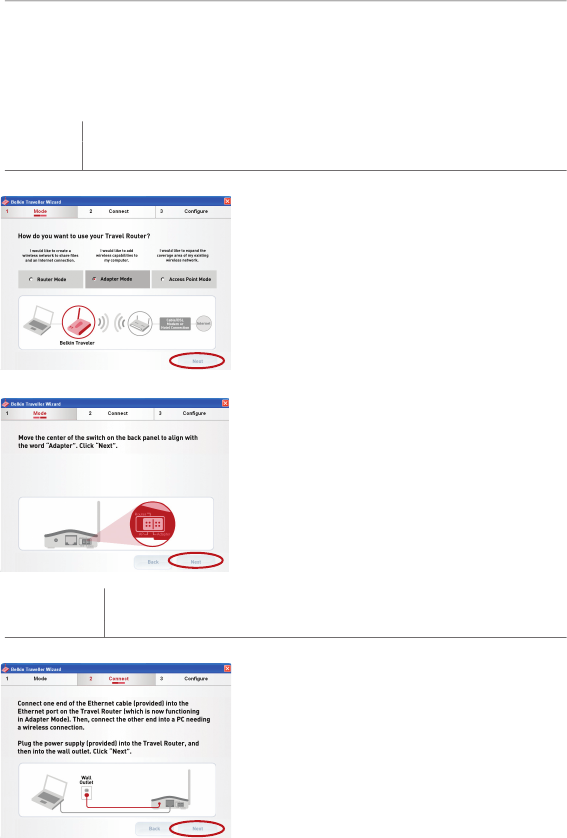
Select “Adapter Mode”, then
click “Next”.
1.2
Move the center of the switch on
the back panel to align with the
word “Adapter”. Click “Next”.
2
. Connect
Connecting the Cables
. Connect
2.1
Connect one end of the included
Ethernet cable to the Router (which
is now functioning in Adapter
Mode) and the other end into your
PC’s RJ45 port. Next, plug the
included USB power cable into
the Router with the USB end in
the PC’s USB port, or plug the
included power supply into the
Router and then into a wall outlet.
Click “Next”.
Connecting and Configuring your Router
17
section
2
1
3
4
5
6
7
8
9
10
11
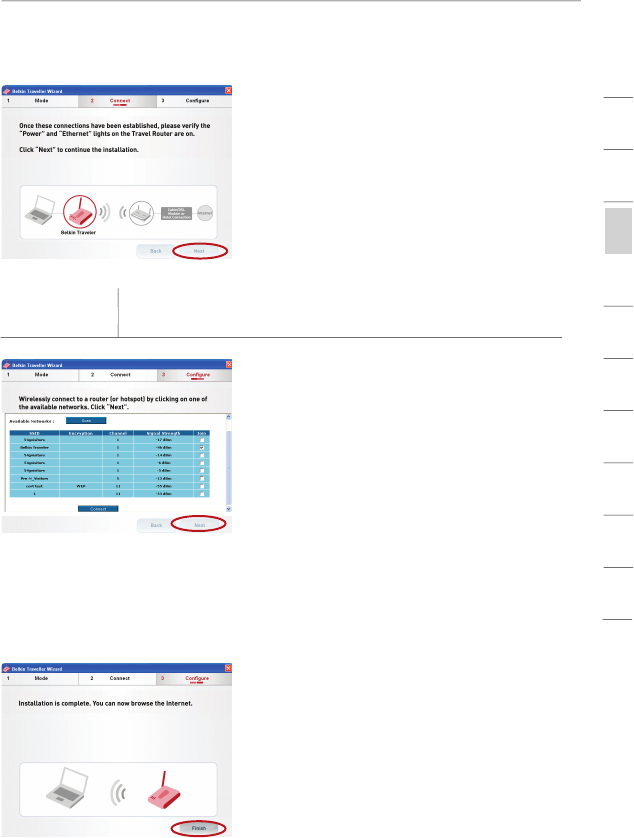
2.2
Check to make sure that the
Ethernet and Power LEDs on the
front of the Router are on. Click
“Next” to go to the Router’s home
page on the Web.
3.1
Wirelessly connect to a network
from the “Available Networks”
window. Select a network by
clicking “Join” and then “Connect”.
The status window will tell you
the current status of the network
to which the Router is currently
connected. Click “Next”.
Note:
If you do not see the page
pictured here once you have
established a connection with the
Router
, p
Router, pRouter
lease refer to the “Using
the Adapter Mode” section in this
manual on page 67.
3.2
Your installation is now complete.
However, if you would like to set
up any advanced features (such as
security features), you may click the
“Advanced Features” button or type
“192.168.2.225” into the navigation
bar of your web browser.
3
. Configure
Configuration for Adapter Mode
. Configure

18
Connecting and Configuring your Router
Connecting and Configuring your Router
Access Point Mode Installation
1. Mode Selecting the Access Point Mode
1. Mode Selecting the Access Point Mode
1.
1
Select “Access Point Mode”.
Click “Next”.
1.2
Move the center of the switch on
the back panel to align with the
word “AP”. Click “Next”.
2
. Connect
Connecting the Cables
. Connect
2.1
Connect one end of the included
Ethernet cable to the Router (which
is now functioning in Access Point
Mode) and the other end to a
cable/DSL modem. Next, plug the
included power supply into the
Router and click “Next”.
Connecting and Configuring your Router
19
section
2
1
3
4
5
6
7
8
9
10
11
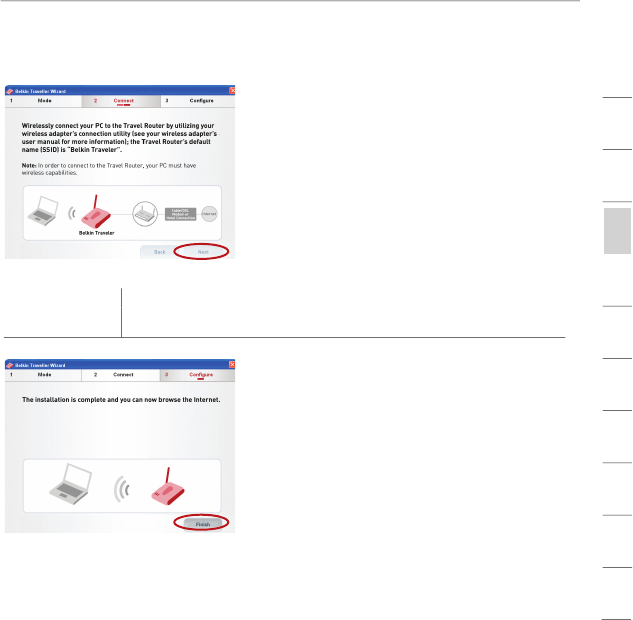
2.2
From your PC, wirelessly connect
to the Router using your PC’s
built-in wireless card or external
wireless adapter. The network
name (SSID) of the Router is
“Belkin Traveler”. Once you have
wirelessly connected, click “Next”.
3.1
Once you have established a
connection with the Router, your
installation is complete. However,
if you would like to set up any
advanced features (such as security
features), you may click the
“Advanced Features” button or type
“192.168.2.254” into the navigation
bar of your web browser.
3
. Configure
Confi
guration for Access Point Mode
. Configure

20
Using the Web-Based Advanced User Interface
The Web-Based Advanced User Interface is a web-based tool that you
can use to set up the Router if you don’t want to use the Easy Install
Wizard. You can also use it to manage advanced Router functions.
From the Web-Based Advanced User Interface window, you can
perform the following tasks:
• View the Router’s current settings and status
•
Configure the Router to connect to your ISP with the settings that
they provided you
•
Change current network settings such as the internal IP address,
the IP address pool, DHCP settings, and more
•
Set the Router’s firewall to work with specific applications via
port forwarding
•
Set up security features such as client restrictions, MAC address
filtering, WEP, and WPA
•
Enable the DMZ feature for a single computer on your network
•
Change the Router’s internal password
•
Enable/disable UPnP (Universal Plug-and-Play)
•
Reset the Router
•
Back up your configuration settings
•
Reset the Router’s default settings
•
Update the Router’s firmware
You can access the Router’s Web-Based Advanced User Interface
using your Internet browser. In the navigation bar of your browser,
type “192.168.2.1” (you do not need to type in “http://” or “www”).
Press the “Enter” key.
PLEASE NOTE:
If you have difficulty accessing the Router’s
Web-Based Advanced User Interface, go to the section of this User
Manual entitled “Manually Configuring Network Settings”.
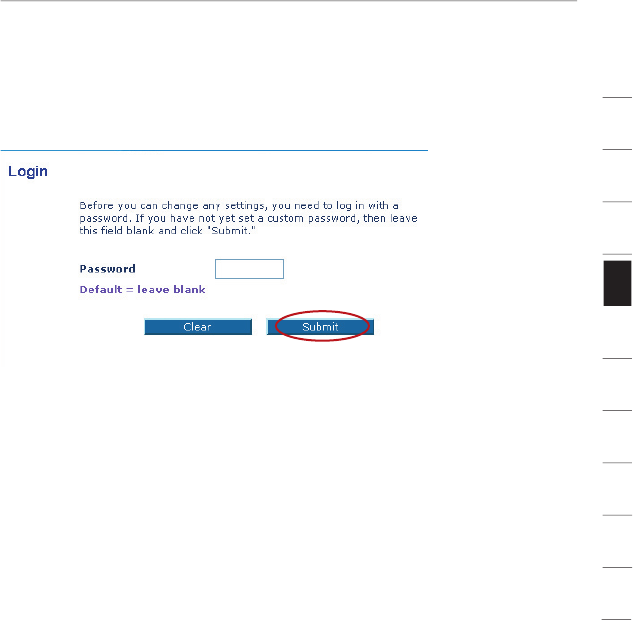
Logging into the Router
You will see the Router’s home page in your browser window. The
home page is visible to any user who wants to see it. To make any
changes to the Router’s settings, you have to log in. Clicking the
“Login” button or clicking on any one of the links on the home page
Using the Web-Based Advanced User Interface
21
section
2
1
3
4
5
6
7
8
9
10
11
will take you to the login screen. The Router ships with no password.
In the login screen, leave the password field blank and click “Submit”
to log in.
Logging out of the Router
One computer at a time can log into the Router to make changes to
Router settings. Once a user has logged in to make changes, there
are two ways that the computer can be logged out. The first is to
click the “Logout” button. The second method is automatic. The
login will time out after a specified period of time. The default login
time-out is 10 minutes. This can be changed to any period of time
from 1 to 99 minutes. For more information, see the section in this
manual entitled “Login Time-Out”.
22
Using the Web-Based Advanced User Interface
Using the Web-Based Advanced User Interface
Using the Web-Based Advanced User Interface
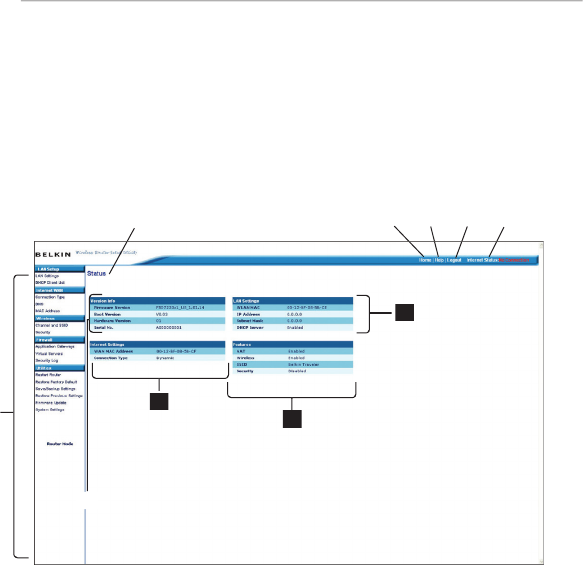
The home page is the first page you will see when you access the
Web-Based Advanced User Interface (UI). The home page provides
a quick view of the Router’s status and settings. All advanced setup
pages can be reached from this page.
1. Quick-Navigation Links
You can go directly to any of the Router’s UI pages by clicking
directly on these links. The links are divided into logical
categories and grouped by tabs to make finding a particular
setting easier to find. Clicking on the purple header of each tab
will show you a short description of the tab’s function.
2. Home Button
The “Home” button is available in every page of the UI. Pressing
this button will take you back to the home page.
3. Internet Status Indicator
This indicator is visible in all pages of the UI, indicating the connection
status of the Router. When the indicator says “connection OK”
in GREEN, the Router is connected to the Internet. When the
Router is not connected to the Internet, the indicator will read “no
connection” in RED. The indicator is automatically updated when
you make changes to the settings of the Router.
(1)
(10)
(2)
(5)
(4)
(3)
(9)
(8)
(7)
(6)

Using the Web-Based Advanced User Interface
23
section
2
1
3
4
5
6
7
8
9
10
11
4. Login/Logout Button
This button enables you to log in and out of the Router with the
press of one button. When you are logged into the Router, this
button will change to read “Logout”. Logging into the Router will
take you to a separate login page where you will need to enter a
password. When you are logged into the Router, you can make
changes to the settings. When you are finished making changes,
you can log out of the Router by clicking the “Logout” button.
For more information about logging into the Router, see the
section called “Logging into the Router”.
5. Help Button
The “Help” button gives you access to the Router’s help pages.
Help is also available on many pages by clicking “more info” next
to certain sections of each page.
6. LAN Settings
Shows you the settings of the Local Area Network (LAN) side of
the Router. Changes can be made to the settings by clicking on
any one of the links (IP Address, Subnet Mask, DHCP Server) or
by clicking the “LAN” “Quick Navigation” link on the left side of
the screen.
7. Features
Shows the status of the Router’s NAT, firewall, and wireless
features. Changes can be made to the settings by clicking on any
one of the links or by clicking the “Quick Navigation” links on the
left side of the screen.
8. Internet Settings
Shows the settings of the Internet/WAN side of the Router that
connects to the Internet. Changes to any of these settings can
be made by clicking on the links or by clicking on the
“Internet/WAN” “Quick Navigation” link on the left side of
the screen.
9. Version Info
Shows the firmware version, boot-code version, hardware
version, and serial number of the Router.
10. Page Name
The page you are on can be identified by this name. This User
Manual will sometimes refer to pages by name. For instance
“LAN > LAN Settings” refers to the “LAN Settings” page.
24
Using the Web-Based Advanced User Interface
Using the Web-Based Advanced User Interface
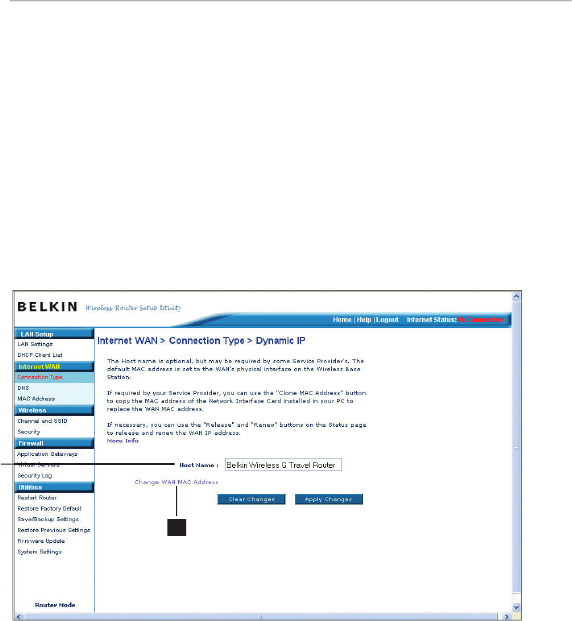
Setting your Connection Type
Setting your Internet Service Provider (ISP) Connection
Type to Dynamic IP
A dynamic connection is the most common connection type used with cable
modems. Setting the connection type to “dynamic” in many cases is enough
to complete the connection to your ISP. Some dynamic connections may
require a host name. If your ISP assigned you a host name, you can enter it in
the space provided. Some dynamic connections may require that you clone
the MAC address of the PC that was originally connected to the modem.
1. Host Name
If a host name must be visible to your ISP, enter the host name
your ISP has provided here. Click “Apply Changes”
(3)
. If your
ISP did not assign you a host name, or you are uncertain about
whether your ISP requires a visible host name, leave this field blank.
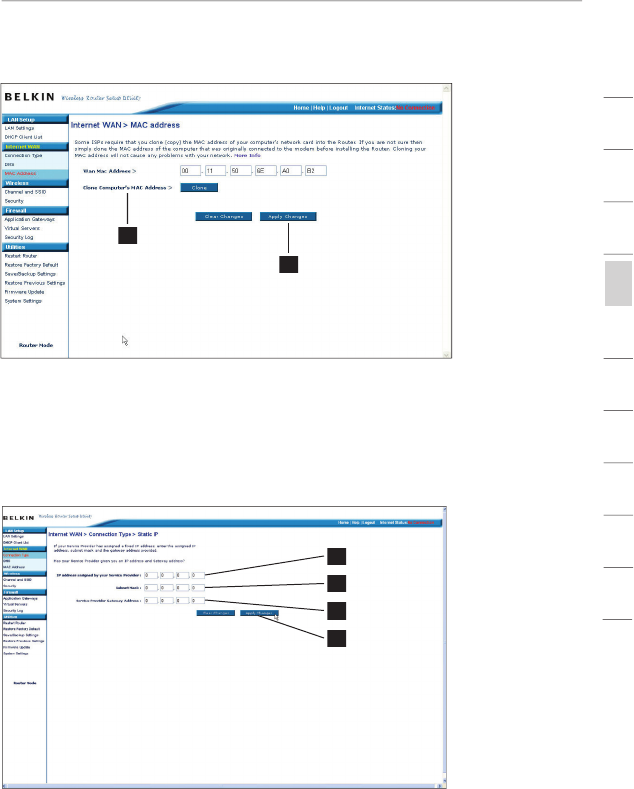
2. Change WAN MAC Address
If your ISP requires a specific MAC address to connect to the
service, you can enter a specific MAC address or clone the
current computer’s MAC address through this link.
(1)
(2)
Using the Web-Based Advanced User Interface
25
section
2
1
3
4
5
6
7
8
9
10
11
Setting your Internet Service Provider (ISP) Connection Type to Static IP
A static IP connection is less common than other connection types. If your
ISP uses static IP addressing, you will need your IP address, subnet mask, and
ISP gateway address. This information is available from your ISP. Type in your
information, then click “Apply Changes”
(4)
. After you apply the changes, if your
Router is set up properly, the “Internet Status” indicator will read “Connected”.
1. IP Address
Provided by your ISP. Enter your IP address here.
2. Subnet Mask
Provided by your ISP. Enter your subnet mask here.
3. ISP Gateway Address
Provided by your ISP. Enter the ISP gateway address here.
(2)
(3)
(1)
(2)
(3)
(4)