Arcadyan Technology WA4001CB WLAN ACCESS POINT User Manual P74841 F5D7233 man indd
Arcadyan Technology Corporation WLAN ACCESS POINT P74841 F5D7233 man indd
Contents
USER MANUAL 6 OF 7
Using the Web-Based Advanced User Interface
61
section
2
1
3
4
5
6
7
8
9
10
11
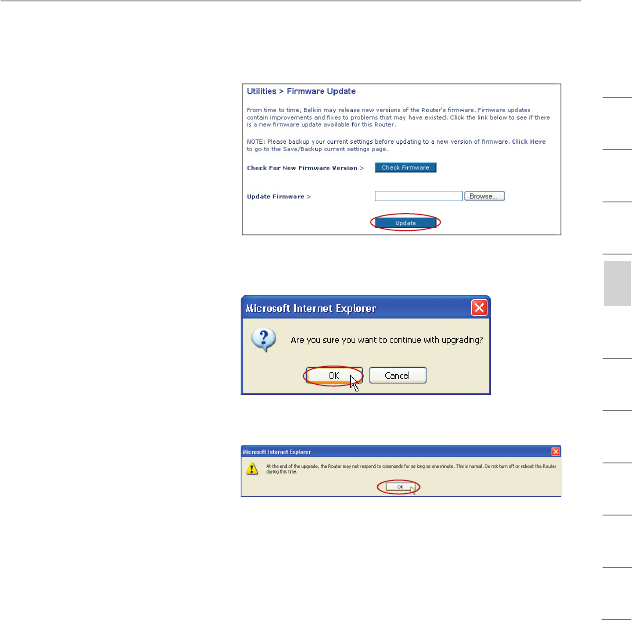
3.
The “Update Firmware”
box will now display
the location and name
of the firmware file
you just selected.
Click “Update”.
4.
You will be asked if you
are sure you want to
continue. Click “OK”.
5.
You will see one more
message. This message
tells you that the Router
may not respond for as
long as one minute as
the firmware is loaded
into the Router and
the Router is rebooted.
Click “OK”.
6.
A 60-second countdown will appear on the screen. When the
countdown reaches zero, the Router’s firmware update will be
complete. The Router’s home page should appear automatically.
If not, type in the Router’s address (default = 192.168.2.1) into
the navigation bar of your browser.
The firmware update is complete.
62
Manually Configuring Network Settings
In order for your computer to properly communicate with your Router, you will
need to change your PC’s TCP/IP settings to DHCP.
Manually Configuring Network Adapters in Windows 2000, NT, or XP
1.
Click “Start”, “Settings”, then “Control Panel”.
2.
Double-click on the “Network and dial-up connections” icon
(Windows 2000) or the “Network” icon (Windows XP).
3.
Right-click on the “Local Area Connection” associated with your
network adapter and select “Properties” from the drop-down menu.
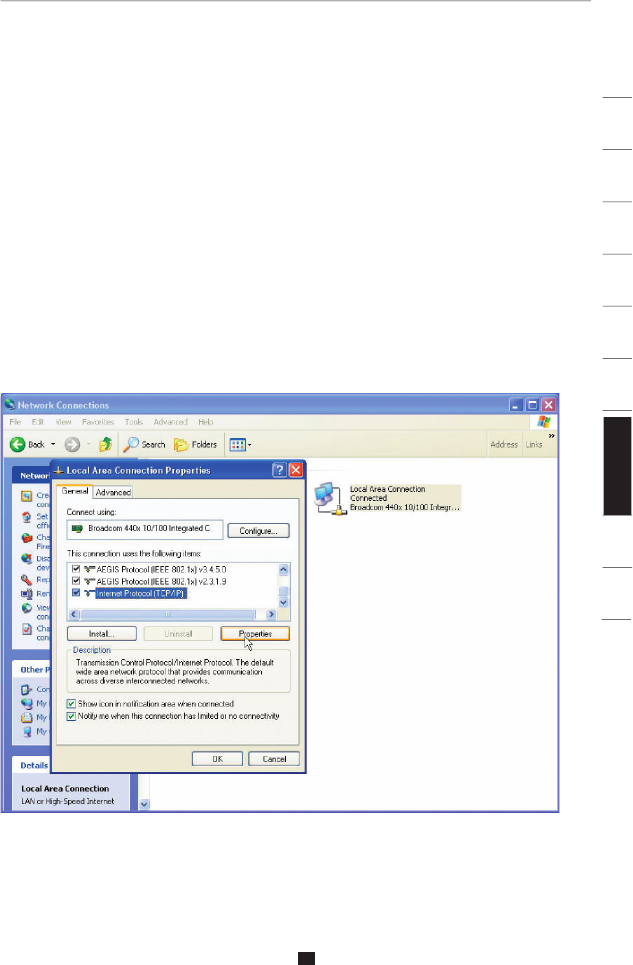
4.
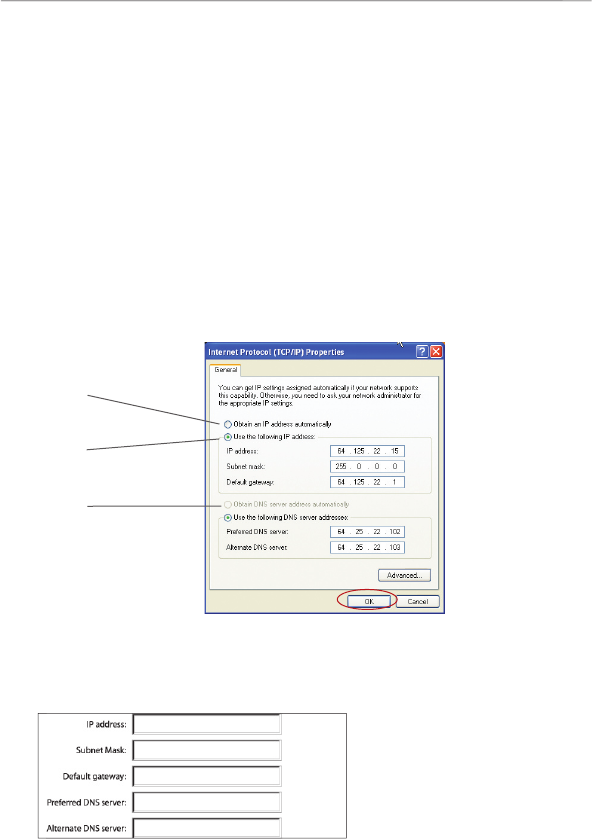
In the “Local Area Connection Properties” window, click “Internet
Protocol (TCP/IP)” and click the “Properties” button. The following
screen will appear:
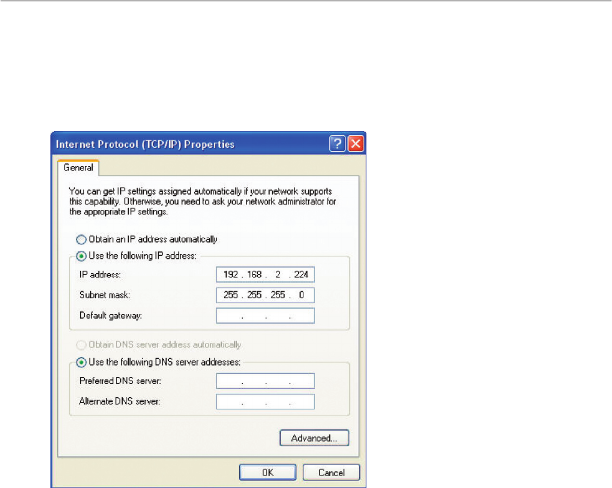
5.
If “Use the following IP address”
(2)
is selected, your Router
will need to be set up for a static IP connection type. Write the
address information in the table below. You will need to enter this
information into the Router.
6.
If not already selected, select “Obtain an IP address automatically”
(1)
and “Obtain DNS server address automatically”
(3)
. Click “OK”.
Your network adapter/s is/are now configured for use with the Router.
(1)
(2)
(3)
Manually Configuring Network Settings
63
section
2
1
3
4
5
6
7
8
9
10
11
Manually Configuring Network Adapters in Windows 98SE or Me
1.
Right-click on “My Network Neighborhood” and select
“Properties” from the drop-down menu.
2.
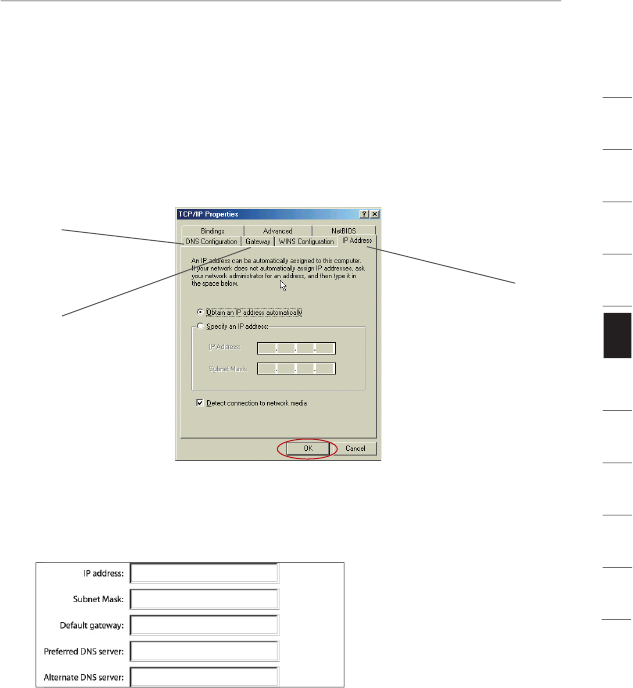
Select “TCP/IP -> settings” for your installed network adapter.
You will see the following window.
3.
If “Specify an IP address” is selected, your Router will need
to be set up for a static IP connection type. Write the address
information in the table below. You will need to enter this
information into the Router.
(1)
(2)
(3)
4.
Write in the IP address and subnet mask from the “IP Address”
tab
(3)
.
5.
Click the “Gateway” tab
(2)
. Write the gateway address down in
the chart.
6.
Click the “DNS Configuration” tab
(1)
. Write the DNS address(es)
in the chart.
7.
If not already selected, select “Obtain IP address automatically”
in the “IP Address” tab. Click “OK”.
Restart the computer. When the computer restarts, your network
adapter/s is/are now configured for use with the Router.
64
Recommended Web Browser Settings
In most cases, you will not need to make any changes to your web
browser’s settings. If you are having trouble accessing the Internet or
the Web-Based Advanced User Interface, then change your browser’s
settings to the recommended settings in this section.
Internet Explorer 4.0 or Higher
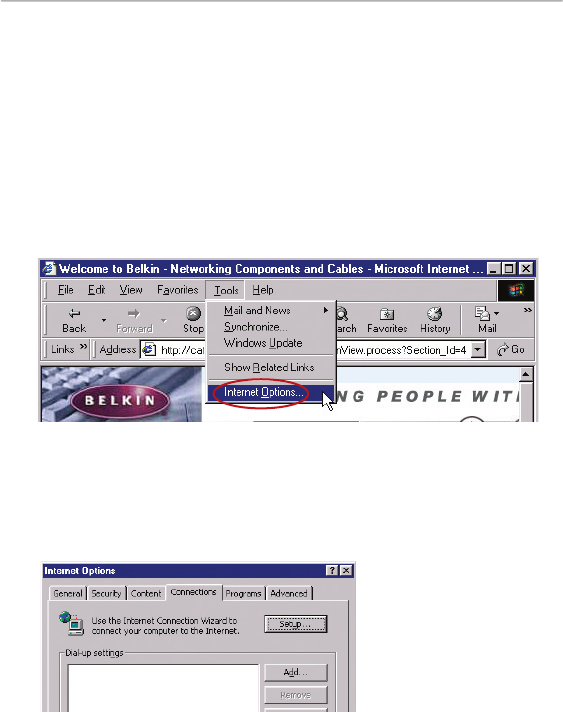
1.
Start your web browser. Select “Tools” then “Internet Options”.
2.
In the “Internet Options” screen, there are three selections:
“Never dial a connection”, “Dial whenever a network connection
is not present”, and “Always dial my default connection”. If you
can make a selection, select “Never dial a connection”. If you
cannot make a selection, go to the next step.
3.
Under the “Internet Options” screen, click on “Connections” and
select “LAN Settings…”.
Recommended Web Browser Settings
65
section
2
1
3
4
5
6
7
8
9
10
11
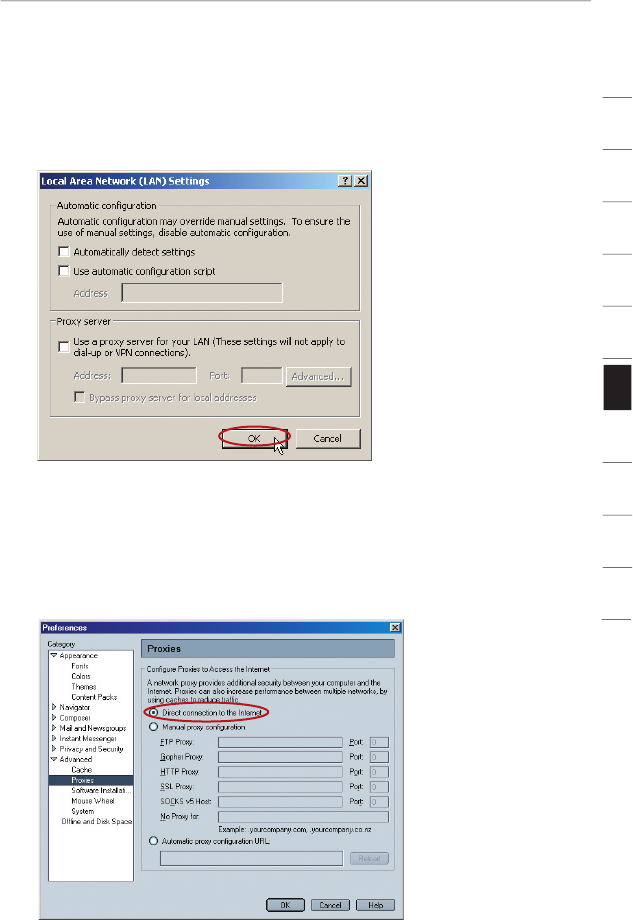
4.
Make sure there are no check marks next to any of the displayed
options: “Automatically detect settings”, “Use automatic
configuration script”, and “Use a proxy server”. Click “OK”. Then
click “OK” again in the “Internet Options” page.
Netscape
®
Navigator
®
4.0 or Higher
1.
Start Netscape. Click on “Edit” then “Preferences”.
2.
In the “Preferences” window, click on “Advanced” then select
“Proxies”. In the “Proxies” window, select “Direct connection to
the Internet”.
Using the Access Point Mode
666666
Using the Access Point ModeUsing the Adapter ModeUsing the Access Point Mode
Note:
This advanced feature should be employed by advanced users
only. The Router can be configured to work as a wireless-network
access point. Using this mode will defeat the NAT IP sharing feature
and DHCP server. In Access Point (AP) mode, the Router will need to
be configured with an IP address that is in the same subnet as the
rest of the network to which you will bridge. The default IP address is
192.168.2.254 and the default subnet mask is 255.255.255.0. These
can be customized to meet your needs.
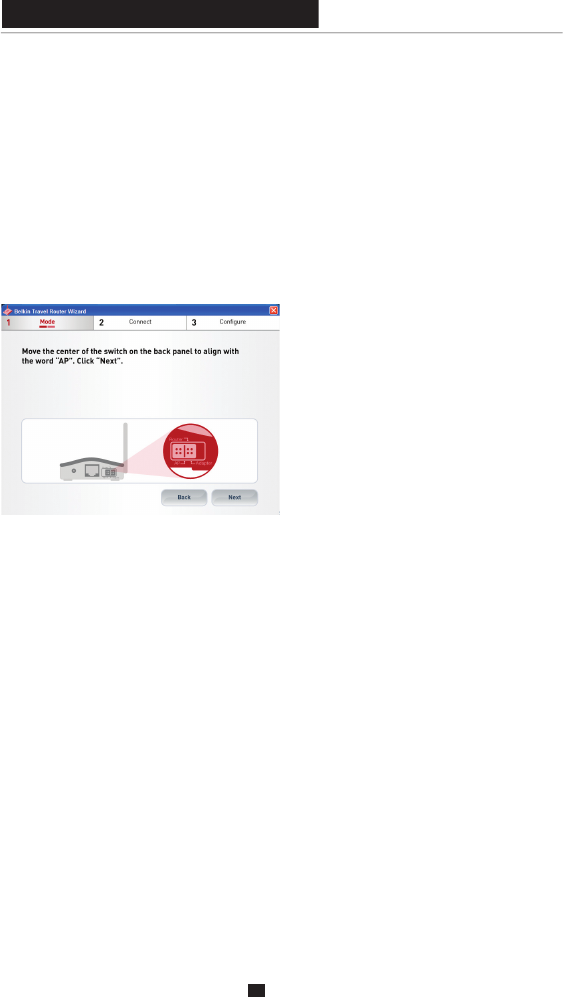
1.
Move the center of the
button on the back panel to
align with the word “AP”.
2.
Enable the AP mode my selecting “Enable” in the “Use as Access
Point only” page. When you select this option, you will be able to
change the IP settings.
3.
Set your IP settings to match your network. Click
“Apply Changes”.
4.
Connect a cable from the WAN port on the Router to your
existing network.
The Router is now acting as an access point. To access the Router’s
Web-Based Advanced User Interface again, type the IP address you
specified into your browser’s navigation bar. You can set the encryption
settings, MAC address filtering, SSID, and channel normally.
Using the Adapter Mode
676767
section
2
1
3
4
5
6
7
8
9
10
11
Setting Up your Computer to Use the Web-Based Advanced
User Interface
The default IP address of the Router (while functioning in Adapter
Mode) is 192.168.2.225. You will need to set your computer’s IP
address to the same subnet (e.g., 192.168.2.224) before you can
access the Web-Based Advanced User Interface. Perform the
following steps from Windows 98SE, Me, 2000, or XP:
1.
Move the center of the switch on the back panel to align with the
word “Adapter”.
2.
Go to the Windows Control Panel and double-click on the
“Network” icon or the “Network Connections” icon.
3.
Right-click on the “Local Area Connection” button for your Router
and select “Properties”.
4.
In the “General” window, select the Internet Protocol TCP/IP
settings for your Router and click on “Properties”.
5.
Select the “Use the following IP address” radio button.
68
Using the Adapter Mode
Using the Adapter Mode
6.
Enter an IP address in the same subnet as the access point (for
example, 192.168.2.224).
7.
Enter the following subnet mask: 255.255.255.0. Click “OK”.
Warning:
Once you have configured your Router, you must repeat
steps 1 through 3 and select “Obtain an IP automatically” or set a
valid IP for your computer on the same subnet as the network to
which you are connecting.
Connect Using Adapter Mode
Using your Internet browser, you can access the Web-Based
Advanced User Interface. In your browser, type “192.168.2.225” (do
not type in “http://” or “www”). Then press the “Enter” key.
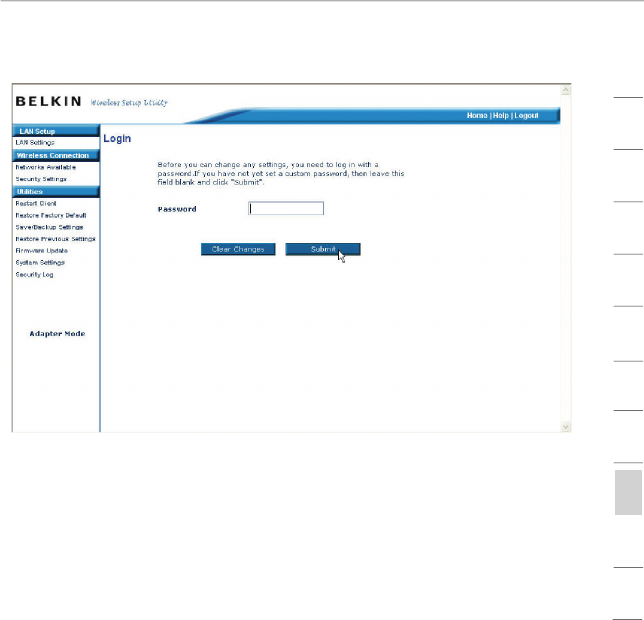
Logging into the Web-Based Advanced User Interface
You will see the Web-Based Advanced User Interface home page in
your browser window. The home page is visible to any user who wants
to see it. To make any changes to the Router’s settings, you have to
log in. Clicking the “Login” button or clicking on any one of the links
on the home page will take you to the login screen. The Router ships
with no password. In the login screen, leave the password blank and
click “Submit” to log in.
Using the Adapter Mode
69
Using the Adapter Mode
section
2
1
3
4
5
6
7
8
9
10
11
Using the Adapter Mode
Logging Out of the Web-Based Advanced User Interface
One computer at a time can log into the Router to make changes to
the Router’s settings. Once a user has logged in to make changes,
there are two ways that the computer can be logged out. The first is
to click the “Logout” button. The second method is automatic. The
login will time out after a specified period of time. The default login
time-out is 10 minutes. This can be changed to any period of time
from 1 to 99 minutes.
Login Time-Out
The login time-out option allows you to set the period of time that you
can be logged into the Router’s Web-Based Advanced User Interface.
The timer starts when activity stops. For example, you have made
some changes in the Web-Based Advanced User Interface, and then
left your computer alone without clicking “Logout”. If the time-out
is set to 10 minutes (the default setting), then 10 minutes after you
leave, the login session will expire. You will have to log into the
Router again to make any more changes. The login time-out option
provides additional security.
Note:
Only one computer can be logged into the Router’s Web-Based
Advanced User Interface at one time.
70
Using the Adapter Mode
Using the Adapter Mode
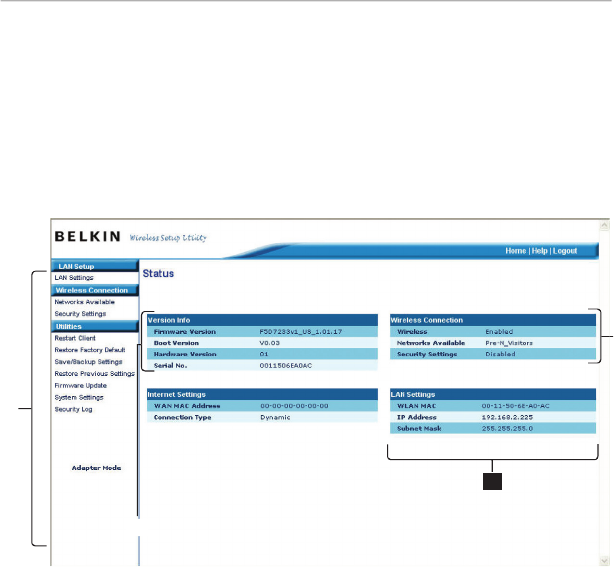
Understanding the Web-Based Advanced User Interface
The home page is the first page you will see when you access the
Web-Based Advanced User Interface (UI). The home page provides a
quick view of the Router’s status and settings. All setup pages can be
reached from this page.
Status
1. Quick-Navigation Links
You can go directly to any of the pages by clicking directly on
these links. The links are divided into logical categories and
grouped by tabs to make finding a particular setting easy.
2. Version Information
Shows the firmware version, boot-code version, and
hardware version.
3. LAN Settings
Shows the settings of the Local Area Network (LAN) side of the Router.
Changes can be made to the settings by clicking the quick-navigation
links on the left side of the screen.
4. Wireless Connection
Shows the status of the Router’s wireless setting. Changes can
be made to the settings by clicking the quick-navigation links on
the left side of the screen.
(1)
(2)
(3)
(4)