Arcadyan Technology WA4001CB WLAN ACCESS POINT User Manual P74841 F5D7233 man indd
Arcadyan Technology Corporation WLAN ACCESS POINT P74841 F5D7233 man indd
Contents
USER MANUAL 4 OF 7

38
Using the Web-Based Advanced User Interface
Using the Web-Based Advanced User Interface
128-Bit WEP
As a result of 64-bit WEP’s potential security weaknesses, a more
secure method of 128-bit encryption was developed. 128-bit
encryption includes a key length of 104 bits plus 24 additional bits of
system-generated data (128 bits total). Some hardware manufacturers
refer to 128-bit as 104-bit encryption.
Most of the new wireless equipment in the market today supports
both 64-bit and 128-bit WEP encryption, but you might have older
equipment that only supports 64-bit WEP. All Belkin wireless products
will support both 64-bit and 128-bit WEP.
Encryption Keys
After selecting either the 64-bit or 128-bit WEP encryption mode, it is
critical that you generate an encryption key. If the encryption key is
not consistent throughout the entire wireless network, your wireless
networking devices will be unable to communicate with one another
on your network and you will not be able to successfully communicate
within your network.
You can enter your key by typing in the hex key manually, or you can
type in a passphrase in the “Passphrase” field and click “Generate”
to create a key. A hex (hexadecimal) key is a combination of numbers
and letters from A–F and 0–9. For 64-bit WEP, you need to enter 10
hex keys. For 128-bit WEP, you need to enter 26 hex keys.
For instance:
AF 0F 4B C3 D4 = 64-bit WEP key
C3 03 0F AF 0F 4B B2 C3 D4 4B C3 D4 E7 = 128-bit WEP key
The WEP passphrase is NOT the same as a WEP key. Your Router
uses this passphrase to generate your WEP keys, but different
hardware manufacturers might have different methods on generating
the keys. If you have multiple vendors’ equipment in your network,
the easiest thing to do is to use the hex WEP key from your Router or
access point and enter it manually into the hex WEP key table in your
Router’s configuration screen.

Using the Web-Based Advanced User Interface
39
section
2
1
3
4
5
6
7
8
9
10
11
WPA (Wi-Fi Protected Access)
WPA (Wi-Fi Protected Access) is a new Wi-Fi standard that was
designed to improve upon the security features of WEP. To use WPA
security, the drivers and software of your wireless equipment must
be upgraded to support WPA. These updates will be found on the
wireless vendor’s website. There are two types of WPA security,
WPA-PSK (no server) and WPA (with radius server).
WPA-PSK (no server)
uses what is known as a pre-shared key
as the network key. A network key is basically a password that is
between eight and 63 characters long. It can be a combination of
letters, numbers, or characters. Each client uses the same network
key to access the network. Typically, this is the mode that will be
used in a home environment.
For a list of Belkin wireless products that support WPA, please visit
our website at
www.belkin.com/networking.
40
Using the Web-Based Advanced User Interface
Using the Web-Based Advanced User Interface
Sharing the Same Network Keys
Most Wi-Fi products ship with security turned off. So once you have
your network working, you need to activate WEP or WPA and make
sure your wireless networking devices are sharing the same
network key.
Using the Web-Based Advanced User Interface
41
section
2
1
3
4
5
6
7
8
9
10
11
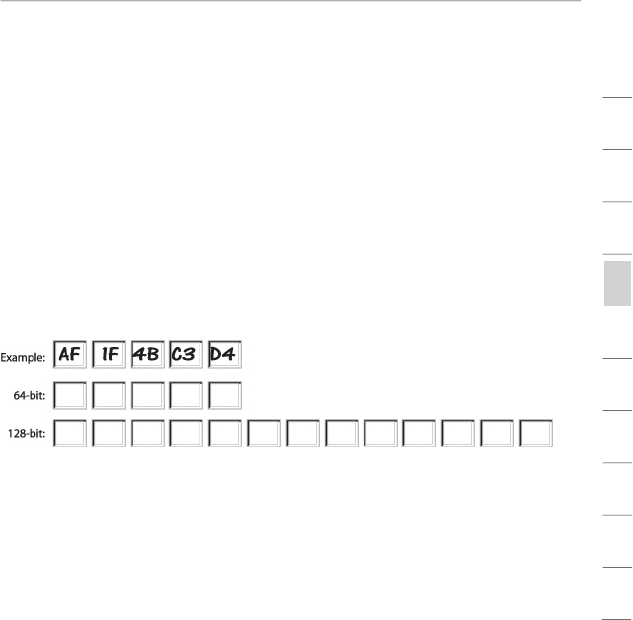
Using a Hexadecimal Key
A hexadecimal key is a combination of numbers and letters from A–F
and 0–9. 64-bit keys are five two-digit numbers. 128-bit keys are 13
two-digit numbers.
For instance:
AF 0F 4B C3 D4 = 64-bit key
C3 03 0F AF 0F 4B B2 C3 D4 4B C3 D4 E7 = 128-bit key
In the boxes below, make up your key by writing in two characters
between A–F and 0–9 in each box. You will use this key to program
the encryption settings on your Router and your wireless computers.
42
Using the Web-Based Advanced User Interface
Using the Web-Based Advanced User Interface
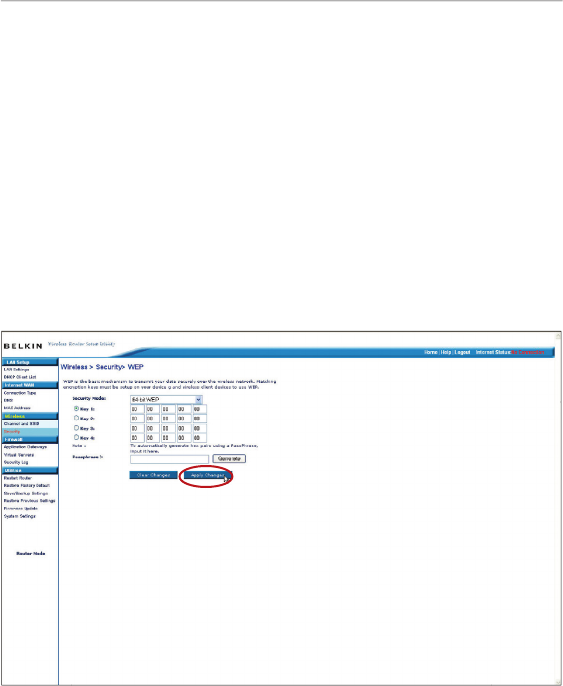
WEP Setup
64-Bit WEP Encryption
1.
Select “64-bit WEP” from the drop-down menu.
2.
After selecting your WEP encryption mode, you can enter
your key by typing in the hex key manually, or you can type a
passphrase in the “Passphrase” field and click “Generate” to
create a key.
A hex (hexadecimal) key is a combination of numbers and letters
from A–F and 0–9. For 64-bit WEP, you need to enter 10 hex keys.
For instance: AF 0F 4B C3 D4 = 64-bit WEP key
3.
Click “Apply Changes”. Encryption in the Router is now set. Each
of the computers on your wireless network will now need to be
configured with the same security settings.
WARNING:
If you are configuring the Wireless G Travel Router or
access point from a computer with a wireless client, you will need to
ensure that security is turned ON for this wireless client. If this is not
done, your client will lose its wireless connection.
Using the Web-Based Advanced User Interface
43
section
2
1
3
4
5
6
7
8
9
10
11
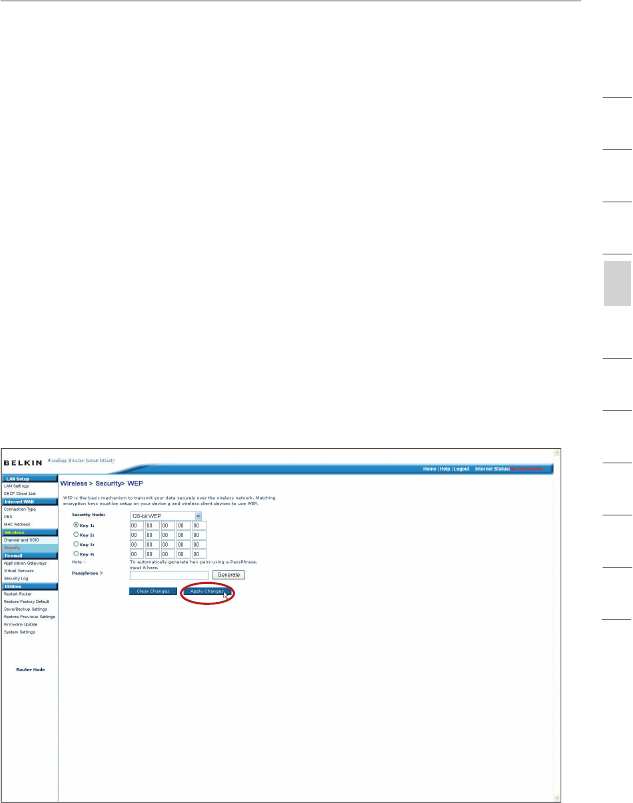
128-Bit WEP Encryption
1.
After selecting your WEP encryption mode, you can enter
your key by typing in the hex key manually, or you can type a
passphrase in the “Passphrase” field and click “Generate” to
create a key.
A hex (hexadecimal) key is a combination of numbers and letters
from A–F and 0–9. For 128-bit WEP, you need to enter 26 hex keys.
For instance: C3 03 0F AF 0F 4B B2 C3 D4 4B C3 D4 E7 = 128-bit WEP key
2.
Click “Apply Changes”. Encryption in the Router is now set. Each
of the computers on your wireless network will now need to be
configured with the same security settings.
WARNING:
If you are configuring the Wireless G Travel Router or
access point from a computer with a wireless client, you will need to
ensure that security is turned ON for this wireless client. If this is not
done, your client will lose its wireless connection.

44
Using the Web-Based Advanced User Interface
Using the Web-Based Advanced User Interface
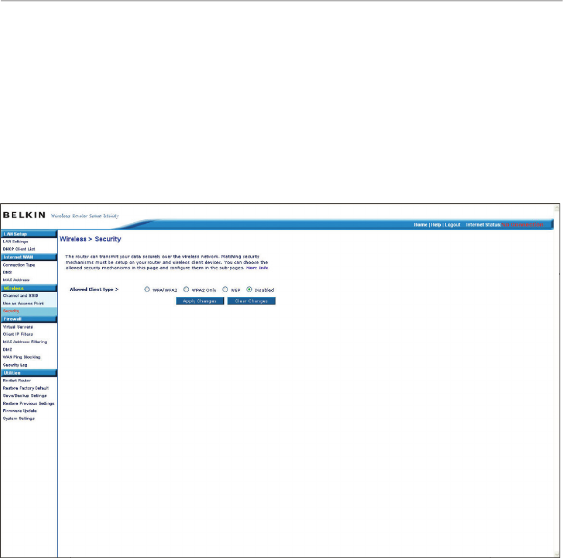
Changing the Wireless Security Settings
Your Router is equipped with WPA (Wi-Fi Protected Access), the
latest wireless security standard. It also supports the legacy security
standard, WEP (Wired Equivalent Privacy). By default, wireless
security is disabled. To enable security, you must first determine
which standard you want to use. To access the security settings, click
“Security” on the “Wireless” tab.
WPA Setup
Note:
To use WPA security, all your clients must be upgraded to
drivers and software that support it. At the time of this User Manual’s
publication, a security patch download is available, for free, from
Microsoft. This patch works only with the Windows XP operating
system. You also need to download the latest driver for your Belkin
Wireless G Desktop or Notebook Network Card from the Belkin
support site. Other operating systems are not supported at this time.
Microsoft’s patch only supports devices with WPA-enabled drivers
such as Belkin 802.11g products.
WPA uses a so-called pre-shared key as the security key. A
pre-shared key is a password that is between eight and 63 characters
long. It can be a combination of letters, numbers, and other
characters. Each client uses the same key to access the network.
Typically, this mode will be used in a home environment.
WPA2 is the second generation of WPA, offering a more advanced
encryption technique over WPA.
Using the Web-Based Advanced User Interface
45
section
2
1
3
4
5
6
7
8
9
10
11
WPA/WPA2 Setup
1.
Select “WPA/WPA2” or “WPA2 only” from the “Allowed Client Type”.
2.
Select “Pre-shared key” as the authentication type.
3.
Enter your pre-shared key. This can be from eight to 63
characters and can be letters, numbers, or symbols. This same
key must be used on all of the clients that you set up. This
pre-shared key will allow users full access to your network
including shared files and printers.
4.
Click “Apply Changes” to finish. You must now set all clients to
match these settings.
5.
Enter your pre-shared key for guest access. This can be from
eight to 63 characters and can be letters, numbers, or symbols.
This guest pre-shared key allows users only Internet access.
6.
Click “Apply Changes” to finish. You must now set all clients to
match these settings depending on the type of access you want
them to have.
46
Using the Web-Based Advanced User Interface
Using the Web-Based Advanced User Interface
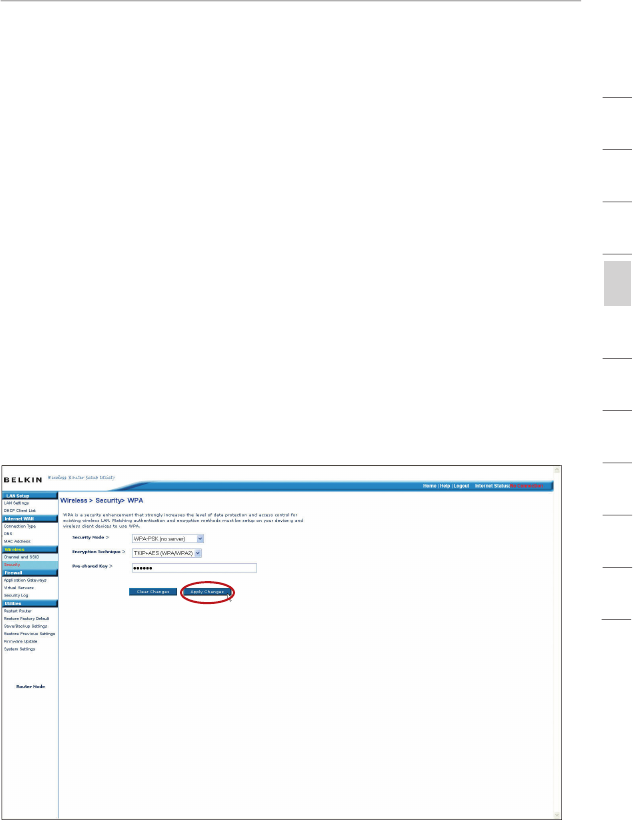
Setting WPA-PSK (no server)
1.
From the “Security Mode” drop-down menu, select “WPA-PSK (no server)”.
2.
For “Encryption Technique”, select “TKIP” or “AES”. This setting
will have to be identical on the clients that you set up.
3.
Enter your pre-shared key. This can contain eight to 63
characters (letters, numbers, and/or symbols). This same key
must be used on all of the clients that you set up. For example,
your PSK might be something like: “Smith family network key”.
4.
Click “Apply Changes”. You must now configure all clients to
match these settings.
Configuring your Belkin Wireless G Cards to Use Security Features
Please N
ote:
This section will provide you with information on how to
configure your Belkin Wireless G Cards to use security features.
At this point, you should already have your Router or access point set
up to use WPA or WEP. To establish a wireless connection, you will
need to set up your Wireless Notebook Card and Wireless Desktop
Card to use the same security settings.
Using the Web-Based Advanced User Interface
47
section
2
1
3
4
5
6
7
8
9
10
11
Connecting your computer to a wireless network that requires a
64-bit or 128-bit WEP key:
1.
Double-click the “Signal Indicator” icon to bring up the “Wireless
Network” screen. The “Advanced” button will allow you to view
and configure more Router options.
2.
Under the “Wireless Network Properties” tab, select a network
name from the “Available Networks” list and click “Configure”.
3.
Under “Data Encryption”, select “WEP”.
4
.
Ensure that there is no check in the box next to “Network key is
provided for me automatically”. If you are using this computer
to connect to a corporate network, please ask your network
administrator whether this box needs to be checked.
5.
Type your WEP key in the network key box (designated as “Key”
in Belkin’s wireless configuration utility).
Important:
A WEP key is a combination of numbers and letters
from A–F and 0–9. For 128-bit WEP, you need to enter 26 keys. For
64-bit WEP, you need to enter 10 keys. This network key needs to
match the key you assign to your Router or access point.
6.
Click “OK”.
48
Using the Web-Based Advanced User Interface
Using the Web-Based Advanced User Interface
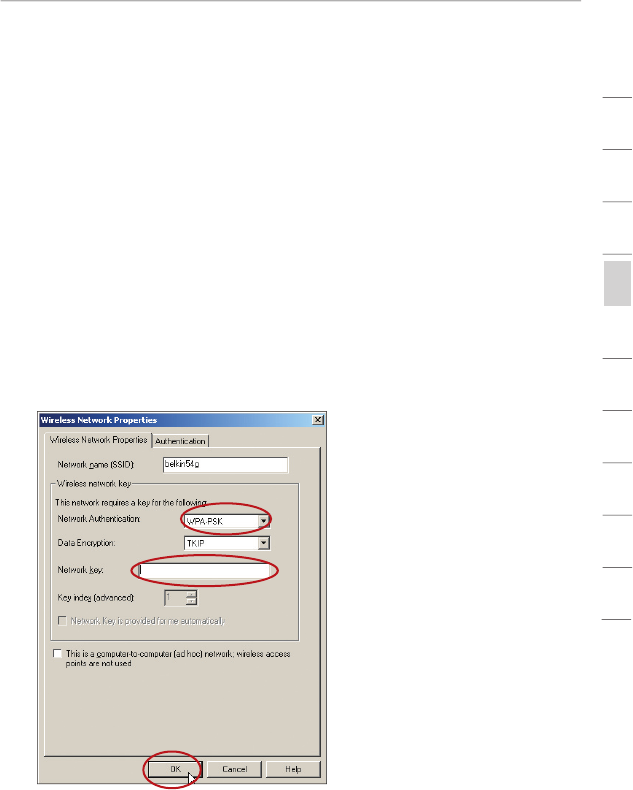
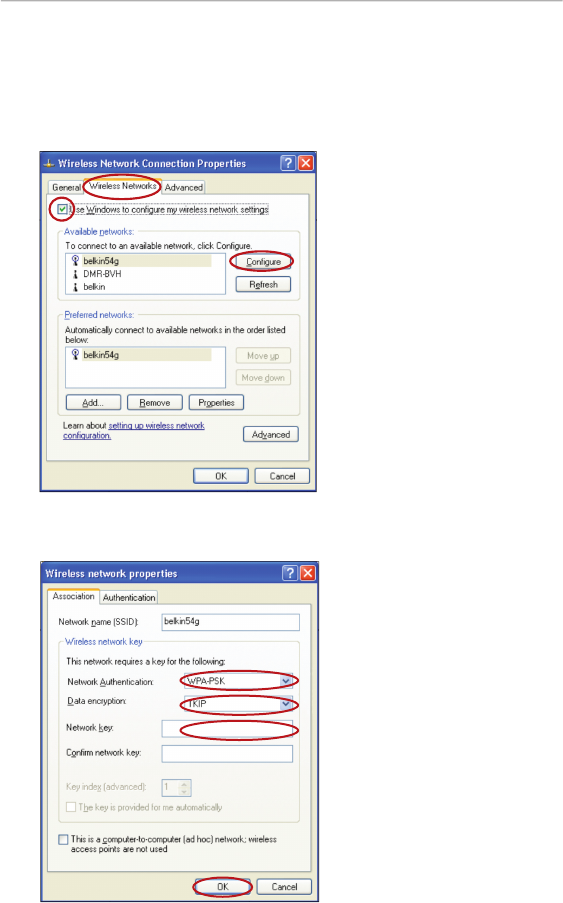
Connecting your computer to a wireless network that requires
WPA-PSK (no server):
1.
Double-click the “Signal Indicator” icon to bring up the “Wireless
Network” screen. The “Advanced” button will allow you to view
and configure more Router options.
2.
Under the “Wireless Networks” tab, select a network name from
the “Available networks” list and click “Configure”.
3.
Under “Network Authentication”, select “WPA-PSK (No Server)”.
4
.
Type your WPA key in the network key box, designated as “Key”
on Belkin’s wireless configuration utility.
Important:
WPA-PSK is a combination of numbers and letters from
A–Z and 0–9. For WPA-PSK, your key can contain from eight to 63
keys. This network key needs to match the key you assign to your
Router or access point.
5.
Click “OK”.

Using the Web-Based Advanced User Interface
49
section
2
1
3
4
5
6
7
8
9
10
11
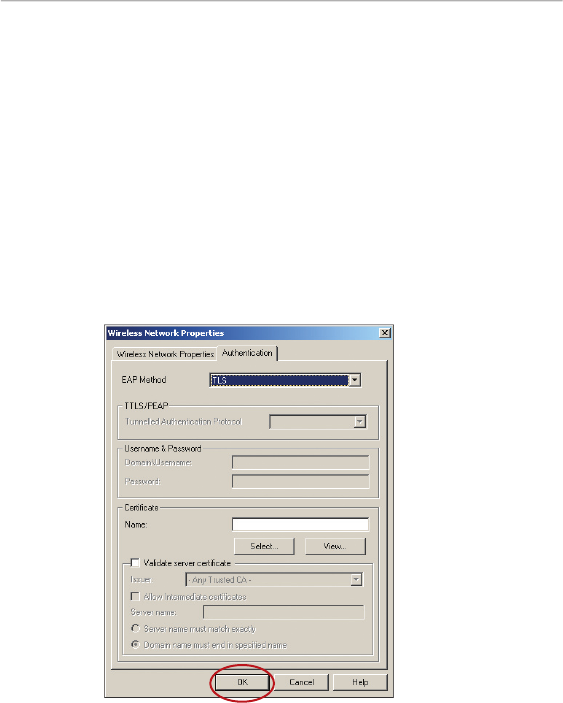
Connecting your computer to a wireless network that requires
WPA (with radius server):
1.
Double-click the “Signal Indicator” icon to bring up the “Wireless
Network” screen. The “Advanced” button will allow you to view
and configure more Router options.
2.
Under the “Wireless Networks” tab, select a network name from
the “Available networks” list and click “Configure”.
3.
Under “Network Authentication”, select WPA.
4
.
Under the “Authentication” tab, select the settings that are
indicated by your network administrator.
5
.
Click “OK”.
Setting Up WPA for Wireless Desktop and Wireless
Notebook Cards that are NOT Manufactured by Belkin
If you do NOT have a Belkin WPA Wireless Desktop or Wireless
Notebook Card and your computer is not equipped with WPA-enabled
software, download Microsoft’s “Windows XP Support Patch for
Wireless Protected Access”, which is available for free download.
Please Note:
The file that Microsoft has made available works only with
Windows XP. Other operating systems are not supported at this time.
Important:
You also need to ensure that the wireless-card
manufacturer supports WPA and that you have downloaded and
installed the latest driver from the manufacturer’s support site.
Supported Operating Systems:
• Windows XP Professional
• Windows XP Home Edition
Setting Up Windows XP Wireless Network Utility to Use
WPA-PSK
In order to use WPA-PSK, ensure you are using the Windows Wireless
Network Utility by doing the following:
1.
Under Windows XP, click “Start > Control Panel > Network Connections”.
2.
Right-click on “Wireless Network Connection
Properties
”, and
select “Properties”.
50
Using the Web-Based Advanced User Interface
Using the Web-Based Advanced User Interface
3.
Clicking on the “Wireless Networks” tab will display the following
screen. Ensure the “Use Windows to configure my wireless
network settings” box is checked.
4.
Under the “Wireless Networks” tab, click the “Configure” button
and you will see the following screen.