Arcadyan Technology WG4005F BARRICADETM 54Mbps g WIRELESS BROADBAND ROUTER User Manual 00
Arcadyan Technology Corporation BARRICADETM 54Mbps g WIRELESS BROADBAND ROUTER 00
Contents
users manual 2
TCP/IP C
ONFIGURATION
3-6
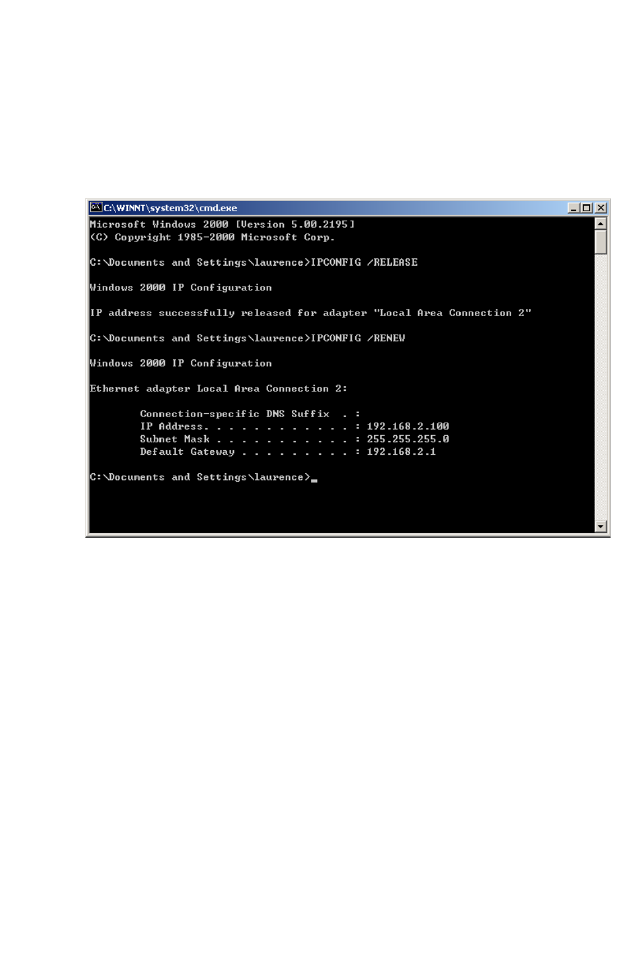
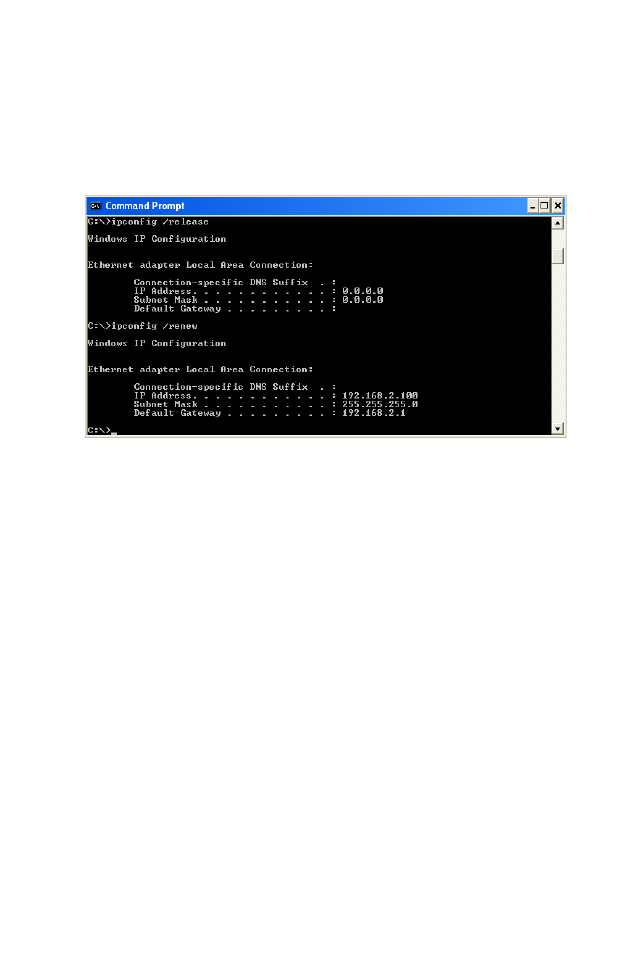
3. Type “IPCONFIG /RENEW” and press the Enter key. Verify that
your IP Address is now 192.168.2.xxx, your Subnet Mask is
255.255.255.0 and your Default Gateway is 192.168.2.1. These values
confirm that your Barricade is functioning correctly.
4. Type “EXIT” and press the Enter key to close the Command Prompt
window.
C
ONFIGURING
T
HE
C
LIENT
PC
3-7
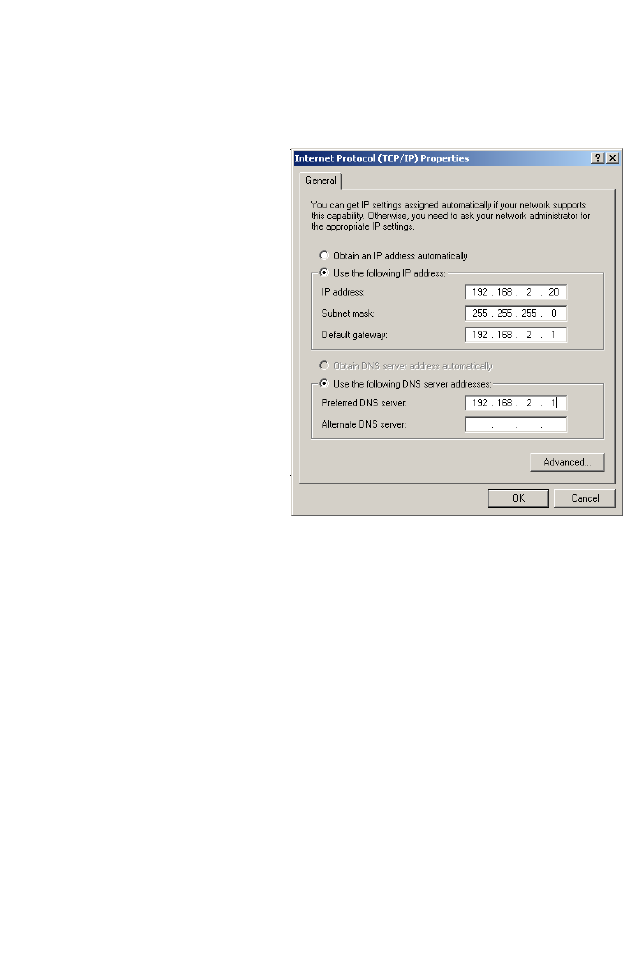
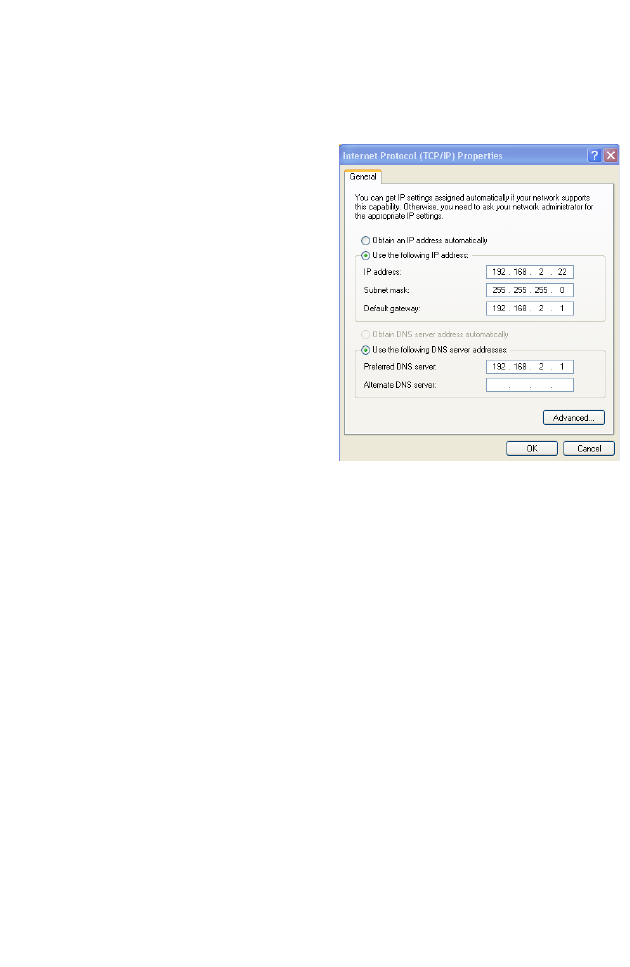
Manual IP Configuration
1. Follow steps 1-4 in “DHCP IP Configuration” on page 3-3.
2. Select Use the
following IP address.
Enter an IP address
based on the default
network 192.168.2.x
(where x is
between 2
and 254), and use
255.255.255.0
for the
subnet mask. Use
192.168.2.1 for the
Default gateway field.
3. Select Use the
following DNS server
addresses.
4.
Enter the IP address for the
Barricade
in the Preferred DNS server field
.
This automatically relays DNS requests to the DNS server(s) provided
by your ISP. Otherwise, add a specific
DNS server into the Alternate
DNS Server field and click
OK
to close the dialog boxes
.
5. Record the configured information in the following table.
TCP/IP Configuration Setting
IP Address ____.____.____.____
Subnet Mask ____.____.____.____
Preferred DNS Server ____.____.____.____
Alternate DNS Server ____.____.____.____
Default Gateway ____.____.____.____
TCP/IP C
ONFIGURATION
3-8
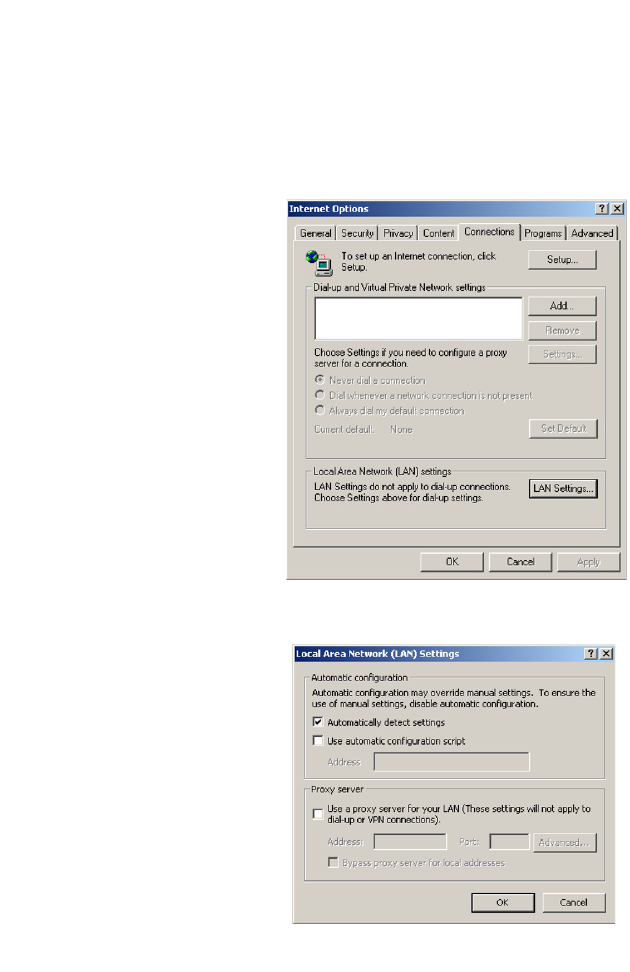
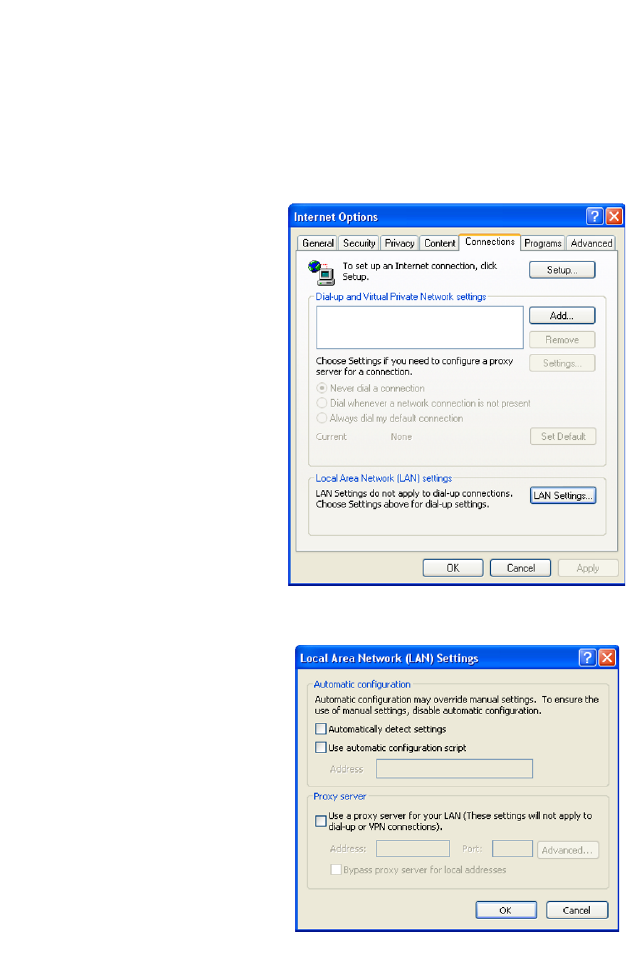
Disable HTTP Proxy
You need to verify that the “HTTP Proxy” feature of your web browser is
disabled. This is so that your browser can view the Barricade’s HTML
configuration pages.
1. To disable the proxy in
Internet Explorer, click
Tools. Click Internet
Options... and then
the Connections tab,
shown on the right.
In
the Local Area Network
(LAN) settings section,
click
LAN Settings...
to display the Local
Area Network (LAN)
Settings pop-up window
below.
2. In the Proxy server
section, ensure the Use
a proxy server for
your LAN (These
settings will not apply
to dial-up or VPN
connections) check
box is not ticked.
3. Click OK.
C
ONFIGURING
T
HE
C
LIENT
PC
3-9
Windows XP
DHCP IP Configuration
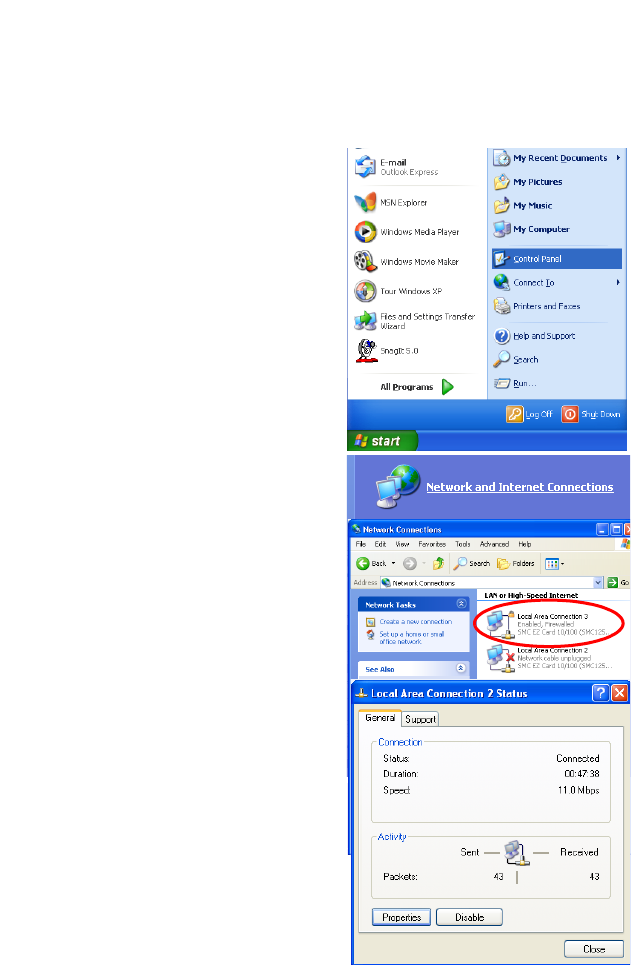
1. On the Windows desktop,
click Start/Control Panel.
2. In the Control Panel window,
click Network and Internet
Connections.
3. The Network Connections
window will open. Locate and
double-click the Local Area
Connection icon for the
Ethernet adapter that is
connected to the Barricade.
4. In the connection status screen,
click Properties.
TCP/IP C
ONFIGURATION
3-10
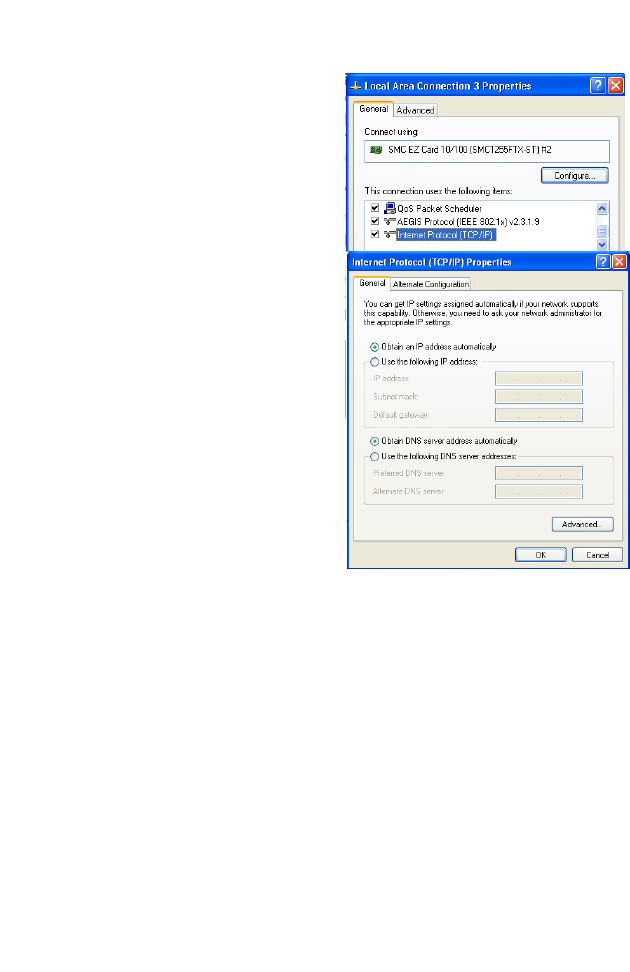
5. Double-click Internet
Protocol (TCP/IP).
6. If Obtain an IP address
automatically and Obtain
DNS server address
automatically are already
selected, your computer is
already configured for DHCP.
If not, select these options
now and click OK.
C
ONFIGURING
T
HE
C
LIENT
PC
3-11
Obtain IP Settings From Your Barricade
Now that you have configured your computer to connect to your
Barricade, it needs to obtain new network settings. By releasing old DHCP
IP settings and renewing them with settings from your Barricade, you can
verify that you have configured your computer correctly.
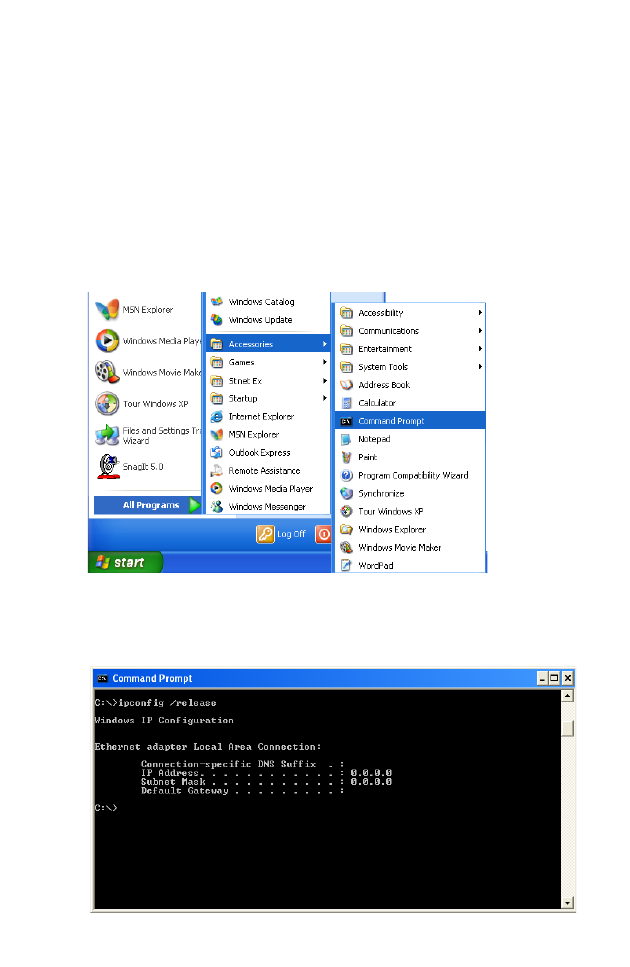
1. On the Windows desktop, click Start/Programs/Accessories/
Command Prompt.
2. In the Command Prompt window, type “IPCONFIG /RELEASE”
and press the Enter key.
TCP/IP C
ONFIGURATION
3-12
3. Type “IPCONFIG /RENEW” and press the Enter key. Verify that
your IP Address is now 192.168.2.xxx, your Subnet Mask is
255.255.255.0 and your Default Gateway is 192.168.2.1. These values
confirm that your Barricade is functioning correctly.
4. Type “EXIT” and press the Enter key to close the Command Prompt
window.
Your computer is now configured to connect to the Barricade.
C
ONFIGURING
T
HE
C
LIENT
PC
3-13
Manual IP Configuration
1. Follow steps 1-5 in “DHCP IP Configuration” on page 3-9.
2. Select Use the following IP
Address.
3. Enter an IP address based on
the default network
192.168.2.x (where x is
between 2 and 254), and use
255.255.255.0
for the subnet
mask. Use
192.168.2.1 for the
Default gateway field.
4. Select Use the following
DNS server addresses.
5. Enter the IP address for the Barricade in the Preferred DNS server
field. This automatically relays DNS requests to the DNS server(s)
provided by your ISP. Otherwise, add a specific DNS server into the
Alternate DNS Server field and click OK to close the dialog boxes.
6. Record the configured information in the following table.
TCP/IP Configuration Setting
IP Address ____.____.____.____
Subnet Mask ____.____.____.____
Preferred DNS Server ____.____.____.____
Alternate DNS Server ____.____.____.____
Default Gateway ____.____.____.____
TCP/IP C
ONFIGURATION
3-14
Disable HTTP Proxy
You need to verify that the “HTTP Proxy” feature of your web browser is
disabled. This is so that your browser can view the Barricade’s HTML
configuration pages.
1. To disable the proxy in
Internet Explorer, click
Tools. Click Internet
Options... and then
the Connections tab,
shown on the right.
In
the Local Area Network
(LAN) settings section,
click
LAN Settings...
to display the Local
Area Network (LAN)
Settings pop-up window
below.
2. In the Proxy server
section, ensure the Use
a proxy server for
your LAN (These
settings will not apply
to dial-up or VPN
connections) check
box is not ticked.
3. Click OK.
C
ONFIGURING
T
HE
C
LIENT
PC
3-15
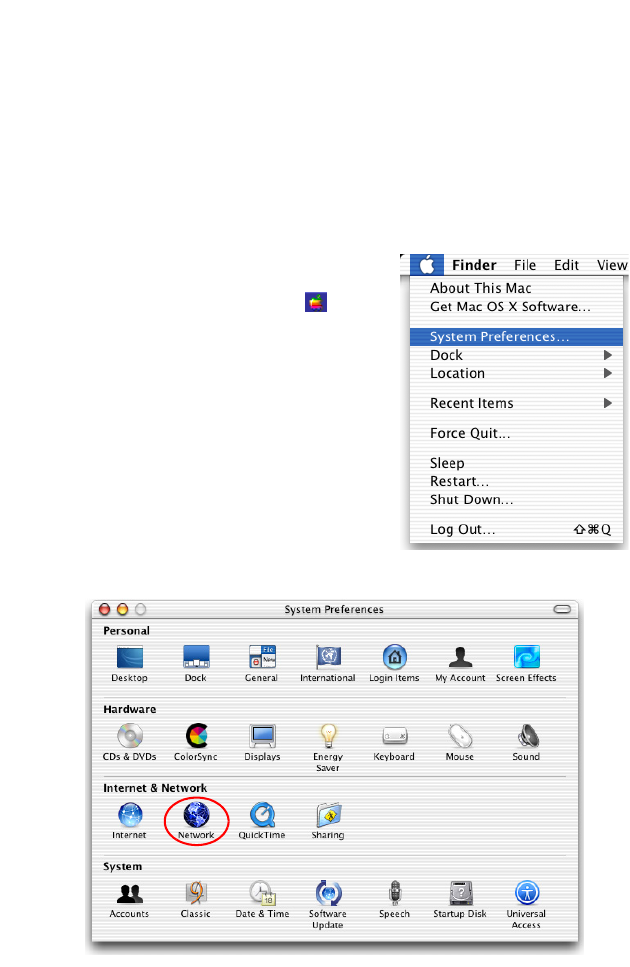
Configuring Your Macintosh Computer
You may find that the instructions here do not exactly match your
operating system. This is because these steps and screen shots were created
using Mac OS 10.2. Mac OS 7.x and above are similar, but may not be
identical to Mac OS 10.2.
Follow these instructions:
1. Pull down the Apple Menu . Click
System Preferences.
2. Double-click the Network icon in the
Systems Preferences window.
C
ONFIGURING
Y
OUR
M
ACINTOSH
C
OMPUTER
3-16
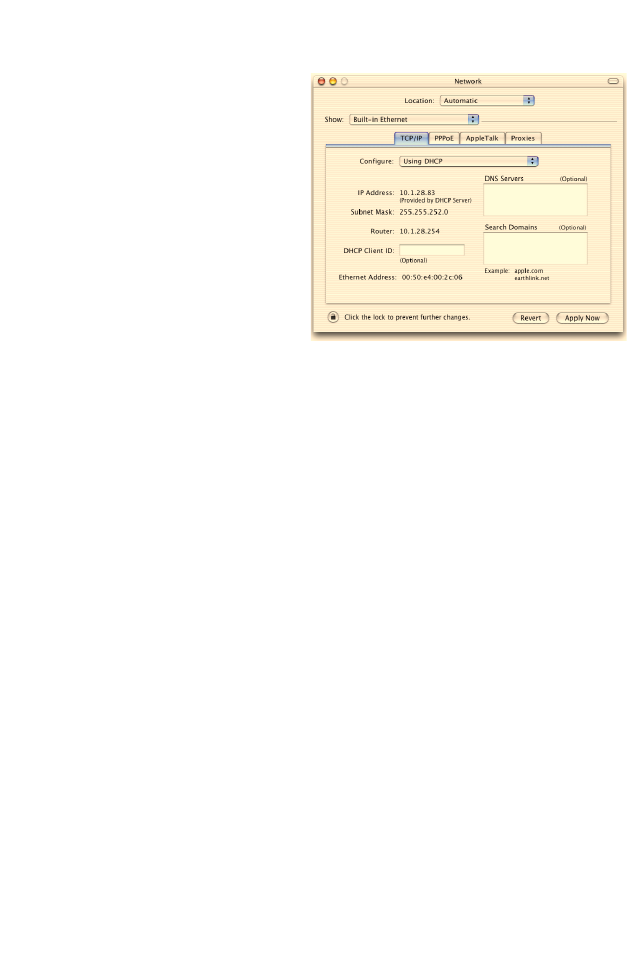
3. If Using DHCP Server is
already selected in the
Configure field, your
computer is already
configured for DHCP. If
not, select this option.
4. Your new settings are shown in the TCP/IP tab. Verify that your IP
Address is now 192.168.2.xxx, your Subnet Mask is 255.255.255.0 and
your Default Gateway is 192.168.2.1. These values confirm that your
Barricade is functioning.
5. Close the Network window.
Now your computer is configured to connect to the Barricade.
C
ONFIGURING
T
HE
C
LIENT
PC
3-17
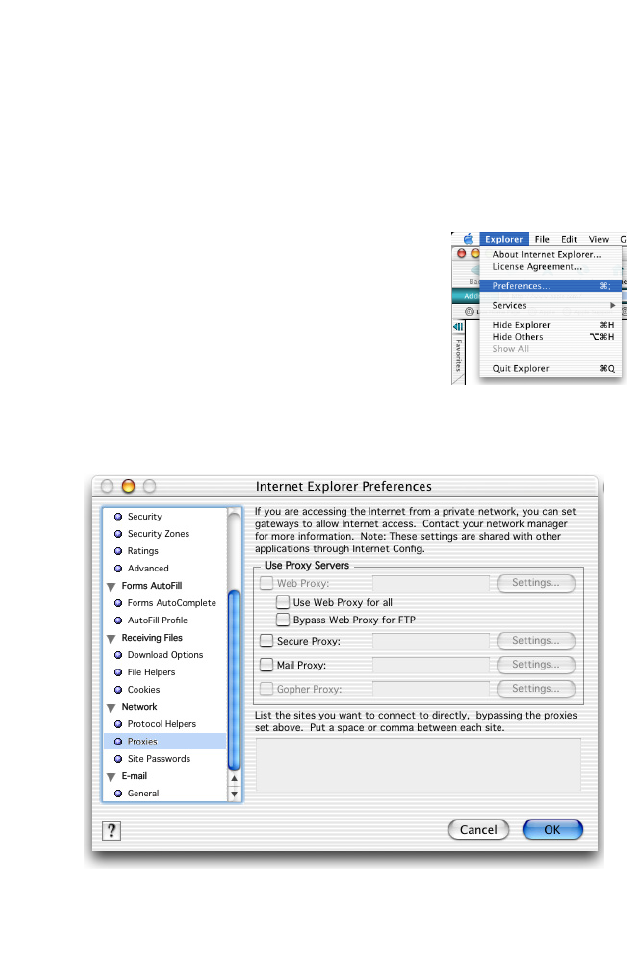
Disable HTTP Proxy
You need to verify that the “HTTP Proxy” feature of your web browser is
disabled. This is so that your browser can view the Barricade’s HTML
configuration pages. The following steps are for Internet Explorer.
Internet Explorer
1. Open Internet Explorer and click the Stop
button. Click Explorer/Preferences.
2. In the Internet Explorer Preferences window,
under Network, select Proxies.
3. Uncheck all check boxes and click OK.

C
ONFIGURING
Y
OUR
M
ACINTOSH
C
OMPUTER
3-18

4-1
C
HAPTER
4
C
ONFIGURING
THE
B
ARRICADE
After you have configured TCP/IP on a client computer, use a web
browser to configure the Barricade. The Barricade can be configured by
any Java-supported browser such as Internet Explorer 5.5 or above. Using
the web management interface, you can configure the Barricade and view
statistics to monitor network activity.
To access the Barricade’s management interface, enter the IP address of
the Barricade in your web browser:
http://192.168.2.1
(The Barricade automatically switches to Port 80 for management access.)

C
ONFIGURING
THE
B
ARRICADE
4-2
Navigating the Web Browser Interface
The Barricade’s management interface consists of a Setup Wizard, a Home
Network Settings section, a Security section and an Advanced Settings
section.
Setup Wizard: Use the Setup Wizard for quick and easy configuration of
your Internet connection and basic LAN settings. Go to “Setup Wizard”
on page 4-5.
Home Network Settings: Use the Home Network Settings section to
configure your LAN, WAN and wireless settings. Go to “Home Network
Settings” on page 4-13.
Security: In this section, you can easily configure your wireless security
settings. Go to “Security” on page 4-27.
Advanced Settings: Advanced Settings supports more advanced
functions like NAT, system maintenance, SNMP and UPnP. Go to
“Advanced Settings” on page 4-51.

N
AVIGATING
THE
W
EB
B
ROWSER
I
NTERFACE
4-3
Making Configuration Changes
Configurable parameters have a dialog box or a drop-down list. Once a
configuration change has been made on a page, be sure to click the Apply
or Save Settings or NEXT button at the bottom of the page to enable
the new setting.
Note: To ensure proper screen refresh after a command entry, be sure
that Internet Explorer 5.5 is configured as follows: Under the
menu Tools/Internet Options.../General/Temporary Internet
Files/Settings..., the setting for Check for newer versions of
stored pages should be Every visit to the page.
C
ONFIGURING
THE
B
ARRICADE
4-4
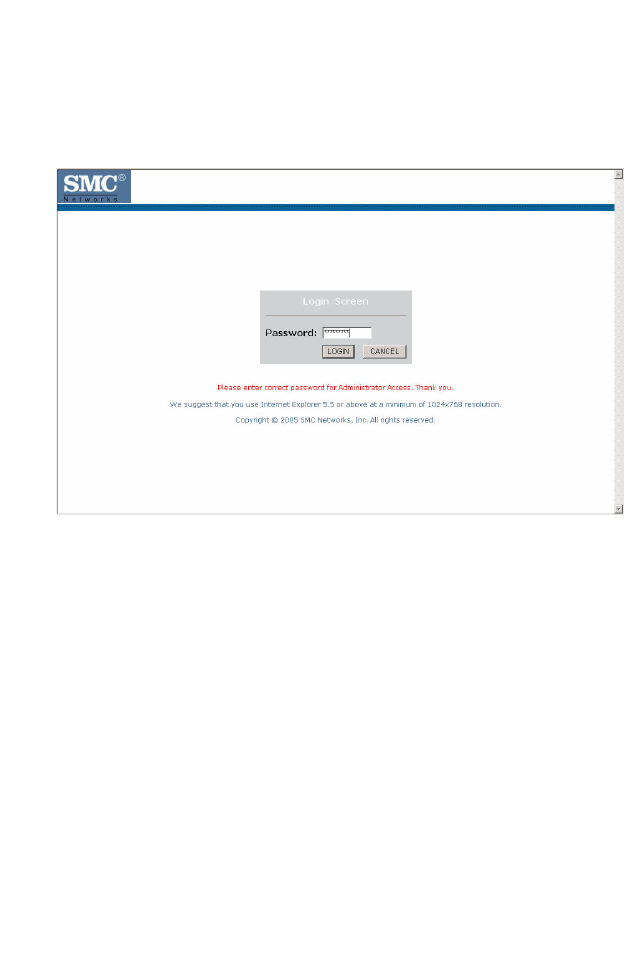
Login Screen
The Login screen automatically appears first.
Enter the default password “smcadmin” and then click LOGIN.
Note: Your password is case sensitive.
S
ETUP
W
IZARD
4-5
Setup Wizard
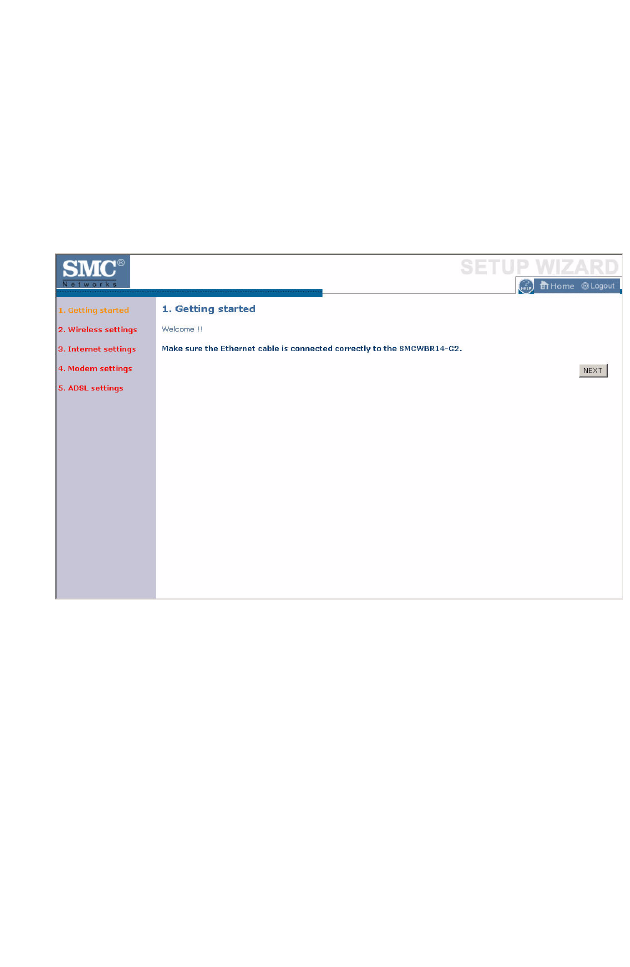
Getting Started
The Setup Wizard automatically appears by clicking on the Setup Wizard
button of the left-hand menu. The first item in the Setup Wizard is Getting
Started.
Simply click NEXT to proceed to the following screen and configure your
Wireless Settings.

C
ONFIGURING
THE
B
ARRICADE
4-6
Wireless Settings
Enter your wireless network settings on this page. You must specify a
common radio channel and SSID (Service Set ID) to be used by the
Barricade and all of its wireless clients. Be sure you configure all of its
clients to the same value. For security purposes, you should change the
default SSID immediately.
Parameter Description
Wireless Network
Name (SSID)
The Service Set ID (SSID) is the name of your wireless
network. The SSID must be the same on the Barricade
and all of its wireless clients. (Default: SMC)
Broadcast Wireless
Network Name
Enable or disable the broadcasting of the SSID. If you
disable broadcast of the SSID, only devices that have the
correct SSID can connect. This nullifies the wireless
network “discovery” feature of some products such as
Windows XP. (Default: Enable)
Wireless Mode This device supports the following modes: 11g only, 11b
only, and 11b/g mixed mode.
(Default: 11b/g Mixed mode)

S
ETUP
W
IZARD
4-7
Wi-Fi Channel
Number
The radio channel used by the Barricade and its clients to
communicate with each other. This channel must be the
same on the Barricade and all of its wireless clients.
The Barricade will automatically assign itself a radio
channel, or you may select one manually. (Default
channel: 6)
Extend Range Increases the range of the Barricade. (Default: Disable)
Parameter Description
C
ONFIGURING
THE
B
ARRICADE
4-8
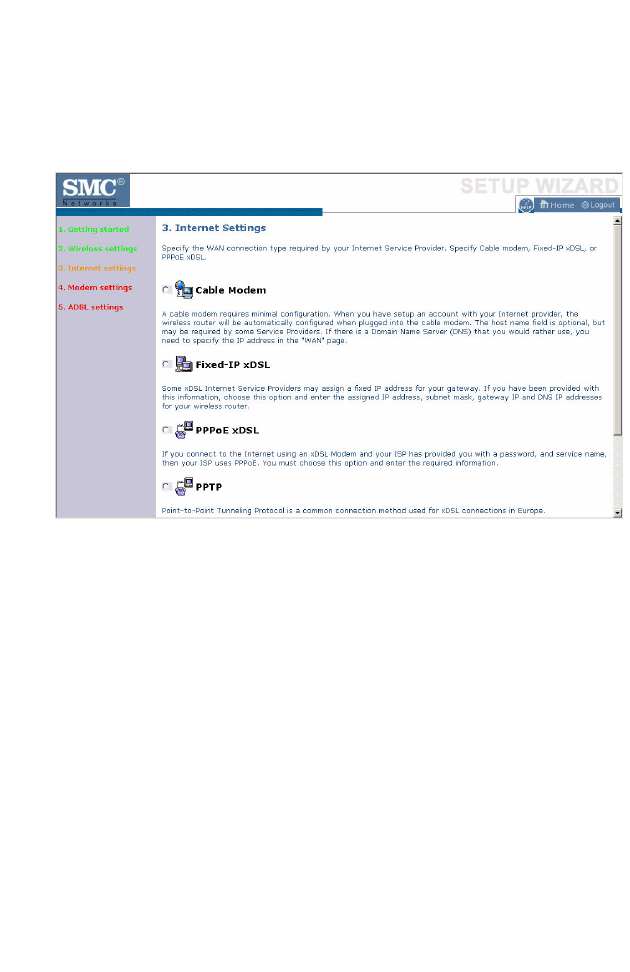
Internet Settings
Specify the WAN connection type required by your Internet Service
Provider. Specify Cable modem, Fixed-IP xDSL, PPPoE xDSL or PPTP.
Select your connection type to proceed. Click BACK to go back and
change your settings.
S
ETUP
W
IZARD
4-9
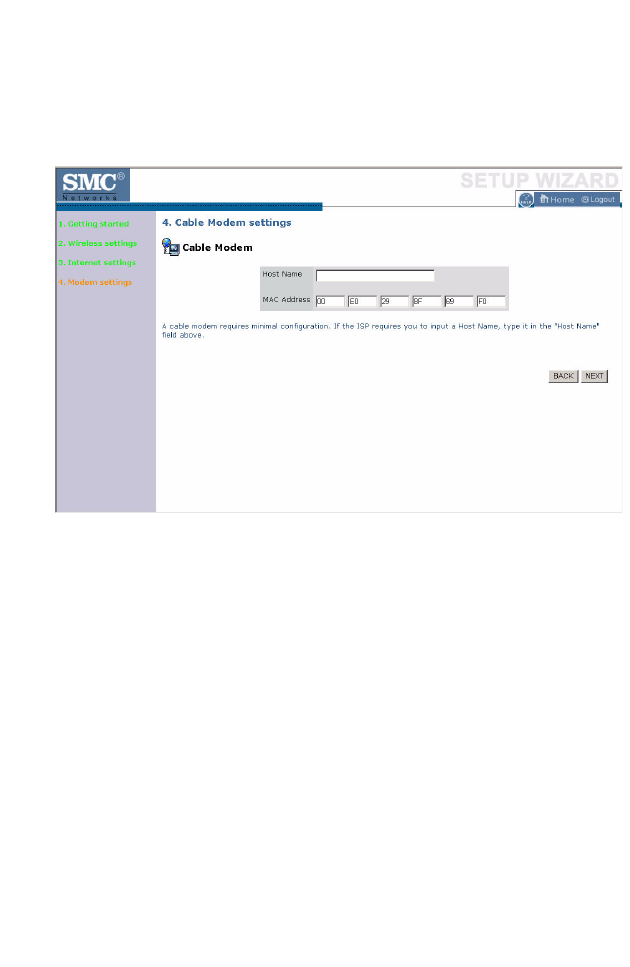
Cable Modem Settings
If the ISP requires you to input a Host Name, type it in the Host Name
field. The MAC Address field will be filled automatically.
Click NEXT to proceed, or BACK to change your settings.
C
ONFIGURING
THE
B
ARRICADE
4-10
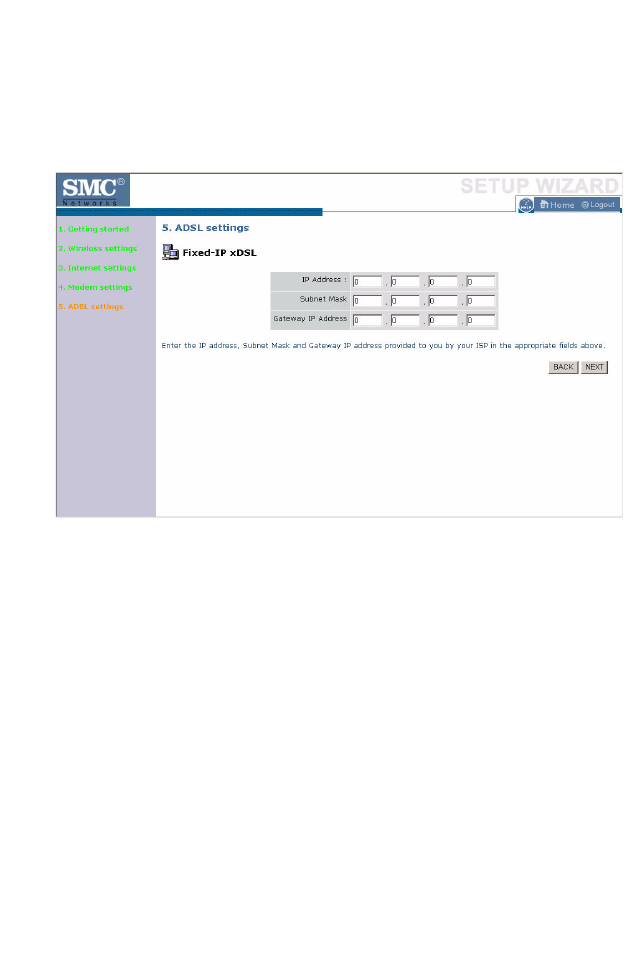
ADSL Settings - Fixed-IP xDSL
Enter the IP address, Subnet Mask, and Gateway IP address provided to
you by your ISP in the appropriate fields below.
Click NEXT to proceed, or BACK to change your settings.
S
ETUP
W
IZARD
4-11
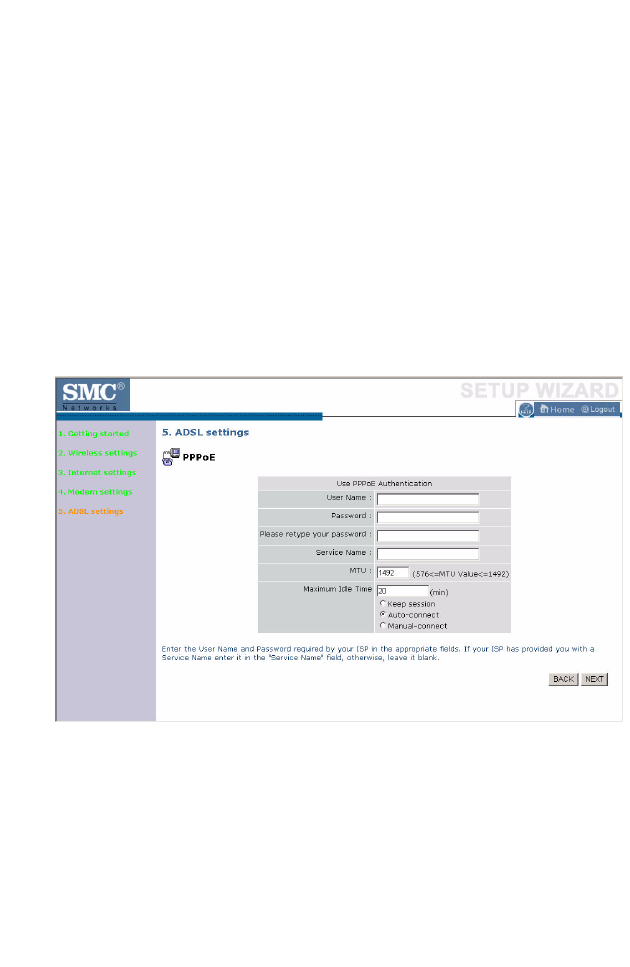
ADSL Settings - PPPoE
Enter the User Name and Password required by your ISP in the
appropriate fields. If your ISP has provided you with a Service Name enter
it in the Service Name field, otherwise, leave it blank. Leave the Maximum
Transmission Unit (MTU) at the default value (1454) unless you have a
particular reason to change it. Enter the maximum idle time for the
Internet connection. After this time has been exceeded the connection will
be terminated. Check Keep session to keep the session alive. Check the
Auto-connect check box to automatically re-establish the connection as
soon as you attempt to access the Internet again. Check the Manual-
connect check box to manually re-establish the connection.
Click NEXT to proceed, or BACK to change your settings.
Note: Clicking NEXT will not automatically connect the Barricade to
the Internet. The Barricade will only connect when you explicitly
request it to, for example, by launching your web browser.

C
ONFIGURING
THE
B
ARRICADE
4-12
ADSL Settings - PPTP
Enter the User ID and Password required by your ISP in the appropriate
fields. Enter the Idle Time Out for the Internet connection. This is the
period of time for which the connection to the Internet is maintained
during inactivity. The default setting is 10 minutes. If your ISP charges you
by the minute, you should change the Idle Time Out to one minute. After
the Idle Time Out has expired, set the action you wish the Barricade to
take. You can tell the device to connect manually or automatically as soon
as you try to access the Internet again, or to keep the session alive.
Click NEXT to proceed, or BACK to change your settings.
H
OME
N
ETWORK
S
ETTINGS
4-13
Home Network Settings
Clicking the Home icon at any time, returns you to this home page. The
Main Menu links are used to navigate to other menus that display
configuration parameters and statistics.
The Barricade’s Home Network Settings interface contains four main
menu items as described in the following table.
Menu Description
Status Provides WAN connection type and status, firmware and hardware
version numbers, system IP settings, as well as DHCP, NAT, and firewall
information.
Displays the number of attached clients, the firmware versions, the
physical MAC address for each media interface, and the hardware version
and serial number.
Shows the security and DHCP client log.
LAN
Settings
Sets the TCP/IP configuration for the Barricade LAN interface and
DHCP clients.
WAN
Settings
Specifies the Internet connection settings.
Wireless Configures the radio frequency, SSID, and security for wireless
communications.
C
ONFIGURING
THE
B
ARRICADE
4-14
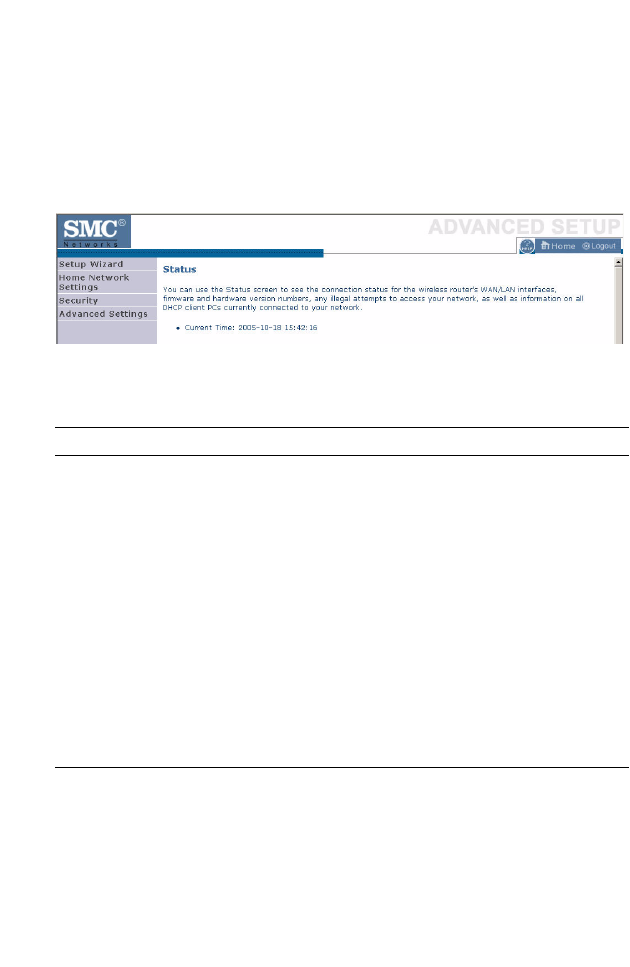
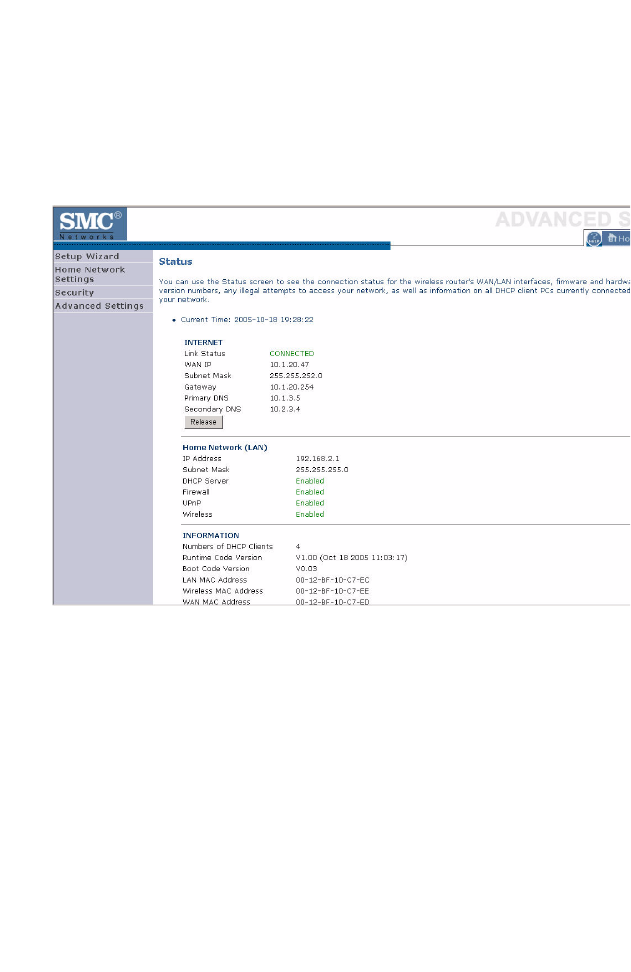
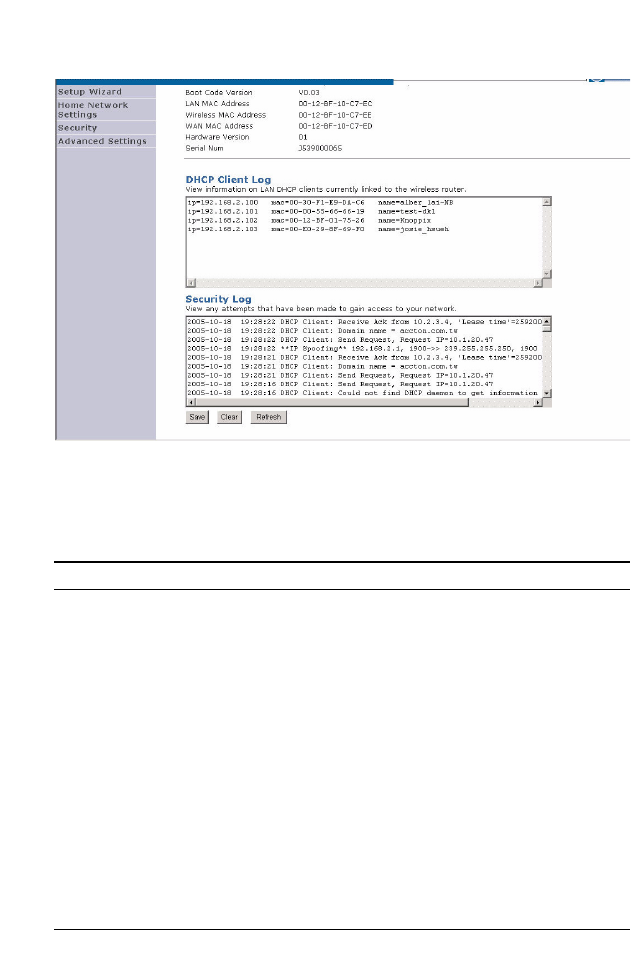
Status
The Status screen displays WAN/LAN connection status, firmware and
hardware version numbers, as well as information on DHCP clients
connected to your network. You can also view the Security Log.
H
OME
N
ETWORK
S
ETTINGS
4-15
The security file, SMCWBR14G2_logfile.log, may be saved by clicking
Save and choosing a location.
The following items are included on the Status screen:
Parameter Description
Current Time Displays the current time.
INTERNET Displays WAN connection status.
Renew Click on this button to establish a connection to the WAN.
Home Network
(LAN)
Displays system IP settings, as well as DHCP Server, Firewall,
UPnP and Wireless status.
INFORMATION Displays the number of attached clients, the firmware versions,
the physical MAC address for each media interface and for the
Barricade, as well as the hardware version and serial number.
DHCP Client Log Displays information on DHCP clients on your network.
Security Log Displays illegal attempts to access your network.
Save Click on this button to save the security log file.
Clear Click on this button to delete the access log.
Refresh Click on this button to refresh the screen.
C
ONFIGURING
THE
B
ARRICADE
4-16
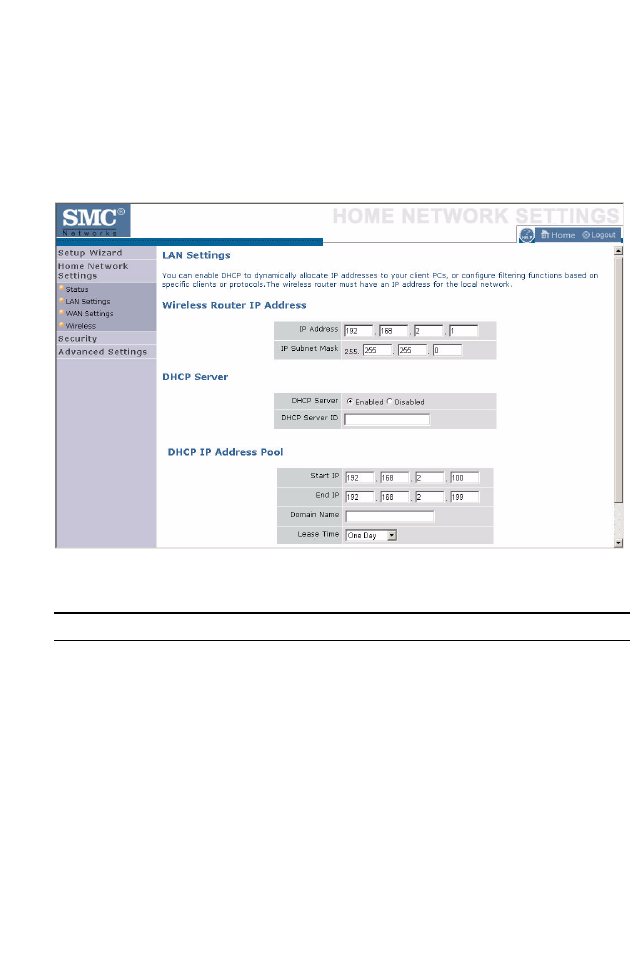
LAN Settings
You can enable DHCP to dynamically allocate IP addresses to your client
PCs, or configure filtering functions based on specific clients or protocols.
The Barricade must have an IP address for the local network.
The LAN Settings parameters are listed below.
Parameter Description
Wireless Router IP
Address
IP Address The IP address of the Barricade.
IP Subnet Mask The IP subnet mask.
DHCP Server
DHCP Server DHCP allows individual computers to obtain the TCP/IP
configuration at startup from a centralized DHCP server. To
dynamically assign an IP address to a client PC, enable the
DHCP (Dynamic Host Configuration Protocol) function.
DHCP Server ID Enter the DHCP Server ID here.

H
OME
N
ETWORK
S
ETTINGS
4-17
DHCP IP Address
Pool
The DHCP IP Address Pool is the range of IP addresses set
aside for dynamic assignment to the computers on your
network.
Start IP This field indicates the first of the contiguous IP addresses in
the IP address pool.
End IP This field indicates the last of the contiguous IP addresses in
the IP address pool.
Domain Name The domain name is the name you assign to your network.
Lease Time The length of time the DHCP server will reserve the IP
address for each computer. Setting lease times for shorter
intervals such as one day or one hour frees IP addresses after
the specified period of time. This also means that a particular
computer’s IP address may change over time. If you have set
any advanced features such as DMZ, this is dependent on the
IP address. For this reason, you will not want the IP address
to change.
Parameter Description
C
ONFIGURING
THE
B
ARRICADE
4-18
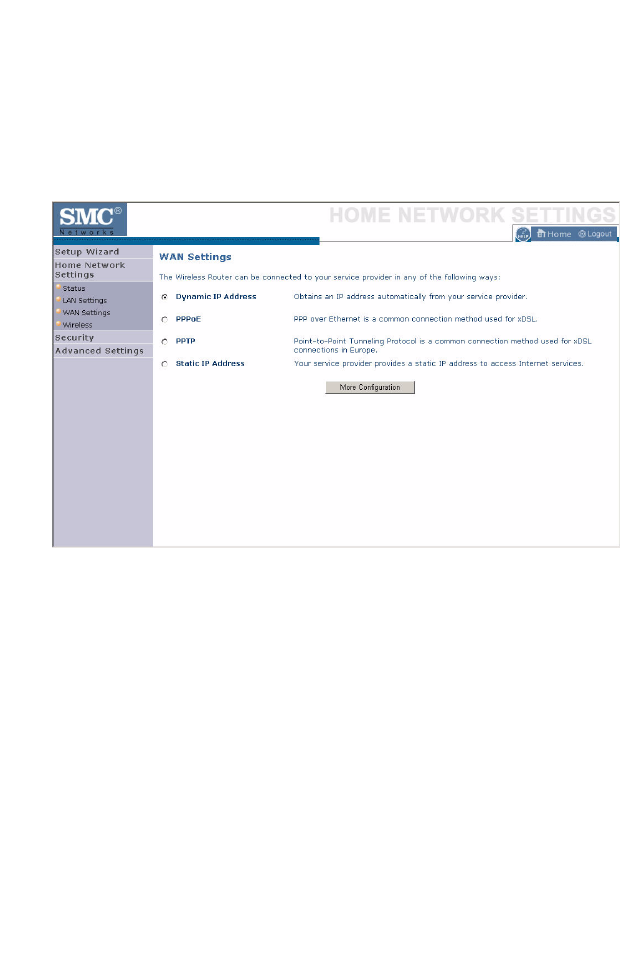
WAN Settings
Specify the WAN connection type required by your Internet Service
Provider. Specify Dynamic IP Address, PPPoE, PPTP or Static IP
Address.
Select the connection type and click More Configuration.
H
OME
N
ETWORK
S
ETTINGS
4-19
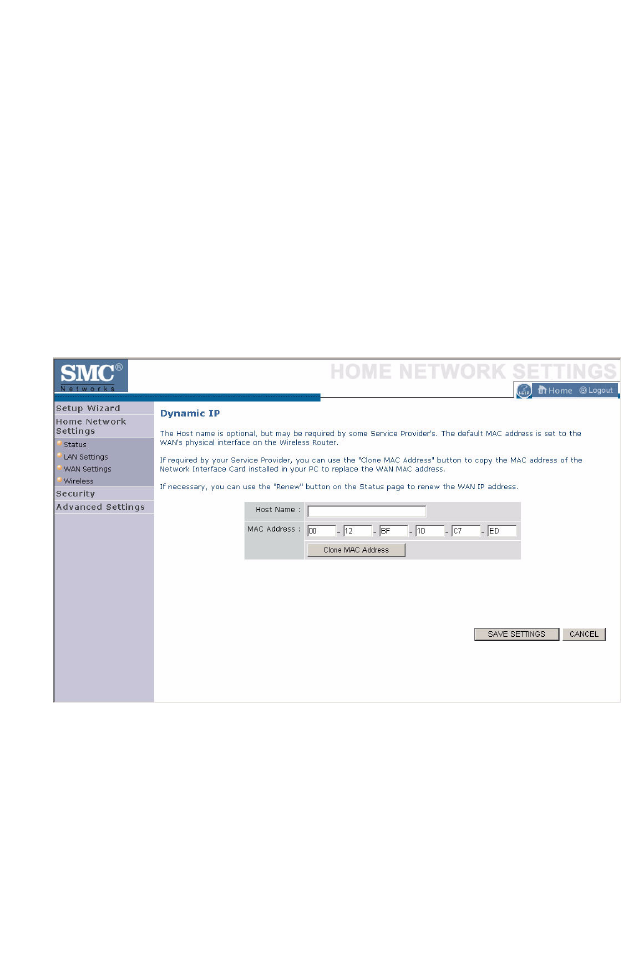
Dynamic IP
The Host name is optional, but may be required by some Service
Provider’s. The default MAC address is set to the WAN’s physical interface
on the Barricade.
If required by your Service Provider, you can use the Clone MAC
Address button to copy the MAC address of the Network Interface Card
(NIC) installed in your PC to replace the WAN MAC address.
If necessary, you can use the Renew button on the Status page to renew
the WAN IP address.
Note: Make sure you record the MAC address that you clone, so that if
you lose your settings you will be able to re-connect to the
Internet.
Click Save Settings to proceed, or Cancel to change your settings.
C
ONFIGURING
THE
B
ARRICADE
4-20
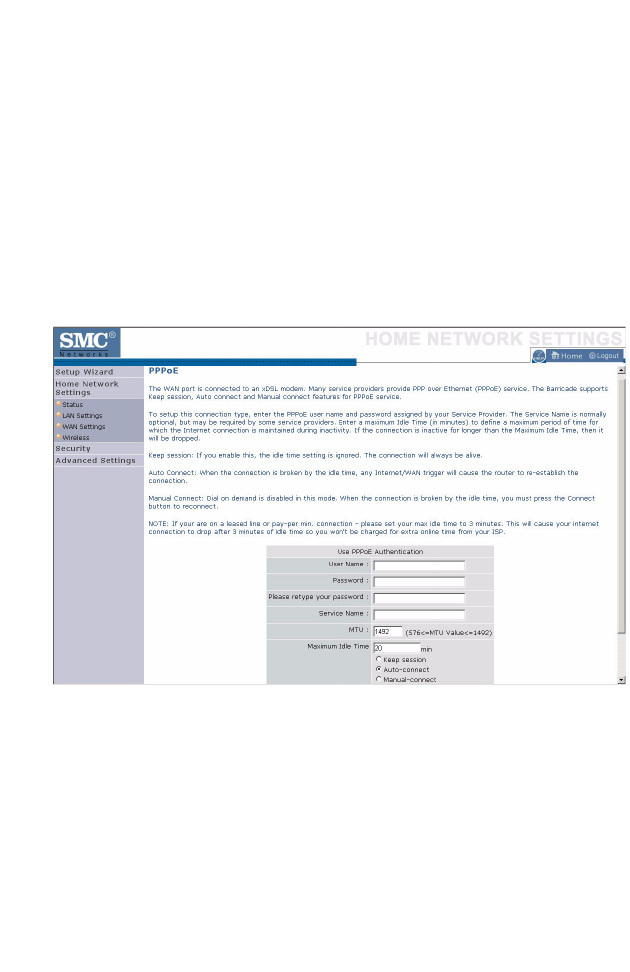
PPPoE
Enter the PPPoE user name and password assigned by your Service
Provider. The Service Name is normally optional, but may be required by
some service providers. Enter a Maximum Idle Time (in minutes) to define
a maximum period of time for which the Internet connection is
maintained during inactivity. If the connection is inactive for longer than
the Maximum Idle Time, then it will be dropped. You can enable the
Auto-reconnect option to automatically re-establish the connection as
soon as you attempt to access the Internet again.
Click Save Settings to proceed, or Cancel to change your settings.