Arima Communication 3600 3G Pocket PC phone with BT and WLAN User Manual Ch01 Xda Star IM Eng indd
Arima Communication Corporation 3G Pocket PC phone with BT and WLAN Ch01 Xda Star IM Eng indd
Contents
- 1. User manual 1
- 2. User manual 2
- 3. User manual 3
User manual 1

Chapter 1
Before using your O2 Xda Flame
1.1 What’s in the box?
1.2 Familiarizing yourself with your O2 Xda Flame
1.3 Features
1.4 LED status
1.5 Display information
10
1
Before using your O2 Xda Flame
1. Before using your O2 Xda Flame
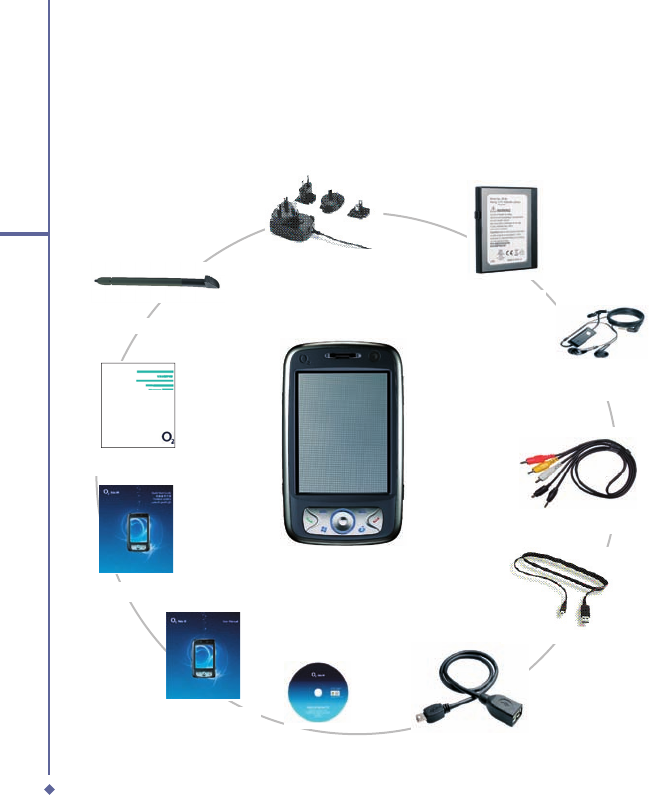
1.1 What’s in the box?
Thank you for selecting the O
2
Xda Flame. Please check if your package comes with the
following items. If any of them is missing, please contact your retailer.
• O2 Xda Flame – your
Windows Mobile-based
Pocket PC phone
• Universal AC adapter with
four plugs for different
countries
• Getting Started
CD
• Warranty Card
• Quick Start Guide
• User Manual
• Additional Stylus
• USB Host cable
• High quality stereo
wired headset
• Battery
• TV-Out AV cable
• Mini USB cable
11
1
Before using your O2 Xda Flame
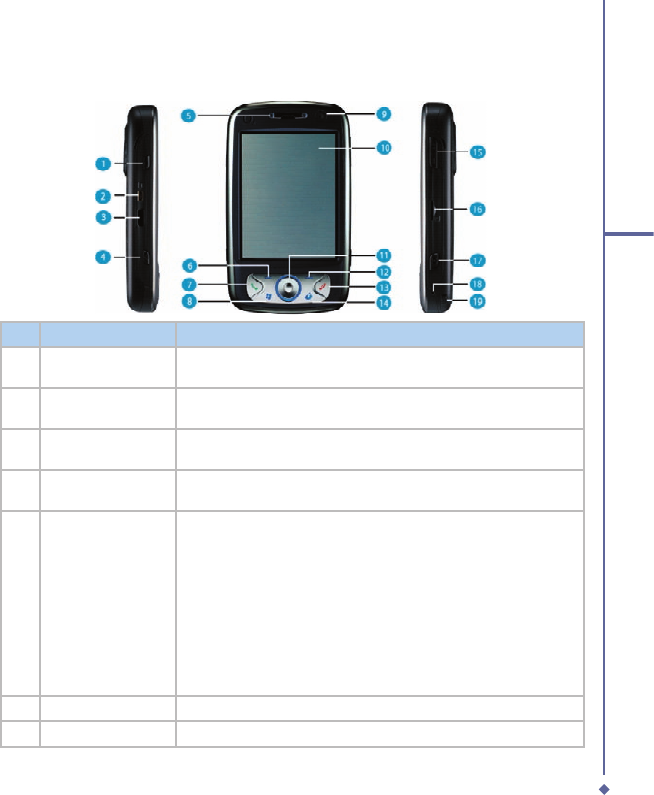
1.2 Familiarizing yourself with your O2 Xda Flame
No.
Item
Description
1
Record
Press and hold to record a voice note. Press and release
immediately to access
Notes
.
2
TV Out connector.
To project image to TV or projector, connect the plug and play TV
out cable here..
3
Infrared port
Enables you to exchange files or data with other devices without
cables or wires.
4
Wireless Manager
Key
Quick access to Wireless Manager Menu
5
Notification LEDs
The LED indicator indicates the status of your phone by showing
different colors
Static amber: the phone is being charged
Green: mobile network is detected
Blue: Bluetooth is activated
Orange: Wireless LAN is activated
LED blinks alternately between orange and blue: Bluetooth and
Wireless LAN are on
LED blinks amber: for notifications.
6
Left Soft Key
Press to access menus on the left.
7
Call Key
Press to make or receive a call, or press to launch Phone screen..
12
1
Before using your O2 Xda Flame
No.
Item
Description
8
Windows Start menu
Press to bing up the Start menu.
9
Camera for video
For making video telephony with another party, who also has a 3G
phone with this feature..
10
Touch screen
Use the stylus to select items on the screen..
11
Navigation pad
Press to navigate up/down and right/left through any of the drop-
down menus or program instructions; confirm your selection by
pressing the center key.(See
1.4 Keypad functions
).
12
Right Soft Key
Press to access menus on the right.
13
End Key
Press to end a call or exit from application..
14
Infotainment Plus
Press to enter infotainment plus.
15
Volume
Press up/down to increase/decrease the volume.
16
External memory
expansion slot
Insert your Micro SD card here into this slot for expansion of
memory. This is an optional accessory.
17
Camera & Video key
Press to launch the camera function and take a picture or high
quality video.
18
Soft reset
Press here with the stylus to soft reset your O
2
Xda Flame. For
information about hard reset, please see
2.11 Resetting your O
2
Xda Flame
.
19
Stylus & stylus
holder
Storage place for your stylus when it is not in use..
13
1
Before using your O2 Xda Flame
No.
Item
Description
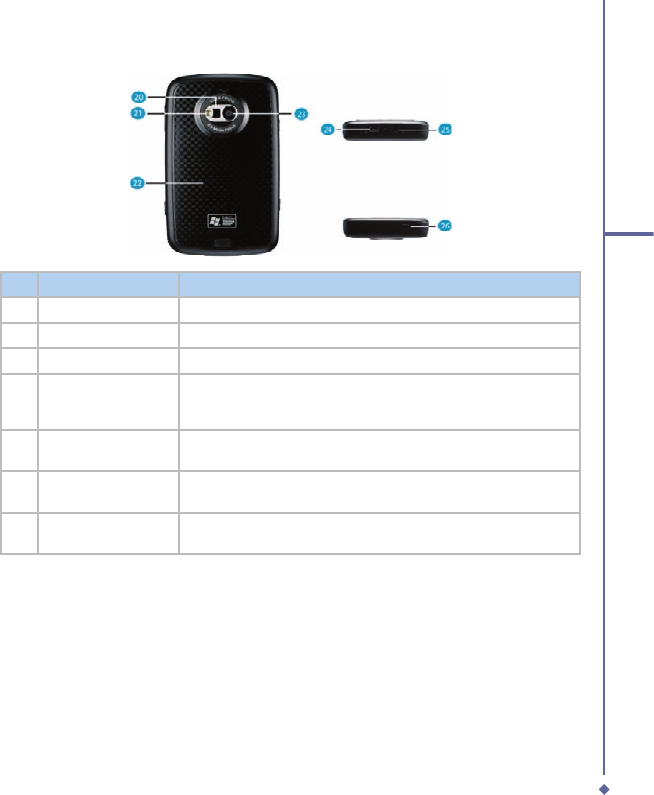
20
Self-portrait mirror
The preview mirror for self-portrait.
21
Flash light
White LED strobe flash
22
Battery cover
To remove or replace battery, push and slide out the battery cover.
23
Camera lens
The CMOS camera supports 2 mega-pixel resolution with auto-
focus function for high quality color photos or high quality video
recording when switched to video mode. .
24
Mini-USB connector
Connect the USB data cable for PC for synchronization of
information, data transmission and also battery charging.
25
Earphone plug
Plug in the stereo headset and listen to audio files or use the
phone’s handsfree kit.
26
Power button
Long press to turn your phone on/off. Short press to turn the
display illumination on/off.

14
1
Before using your O2 Xda Flame
1.3 Features
Like a standard cell phone, your O
2
Xda Flame supports basic dialing features. However, it
also integrates Personal Digital Assistant (PDA) capability. The following section provides
more information about the phone’s features:
• Touchscreen: 3.6” TFT LCD display with 65536 effective colors . (Hardware supports 262K
colors).
• 5-way navigation key.
• Windows Start menu key and O
2
Infotainment Plus key.
• Stereo speaker (with receiver) & Omnidirectional mono microphone.
• Mini-USB connector for connecting your phone with a PC for synchronization of
information, data transmission and also battery charging.
• Camera: 2 Megapixels with Auto Focus.
• Connections: IrDA, Bluetooth, and Wireless LAN, USB.
• Microsoft Windows Mobile 5.0: Pocket MSN, Pocket Outlook, Pocket Explorer, and Offi ce
tools (Word, Excel, and PowerPoint). Also features Windows Media Player 10, Terminal
Service Client, Pictures & Videos, calculator, games, ActiveSync, and File Explorer.
• O
2
programs: O
2
Connect, O
2
SMS Plus, O
2
Plus Basic, O
2
Phone Plus, O
2
AutoInstall, O
2
MediaPlus, O
2
Infotainment Plus, O
2
Plus Advanced
and O
2
AutoConfi g.
• Other programs: FM Radio, Java, Self Diagnostics, GPRS Monitor, Adobe Reader
LE, Jeyo SMS Backup, Jeyo MobileExtender, CodeWallet Pro, WorldMate, Power
Management, SRS Enhancer, and Album & Image Edit.

15
1
Before using your O2 Xda Flame
1.4 LED Status
The O
2
Xda Flame has a LED light that varies in color depending on the status of the phone.
The colors of the LED will vary depending upon whether or not the GSM network is available.
Missed calls, unread messages and low battery condition statuses are given
priority over the status of Wireless LAN and Bluetooth, for all of these conditions
the LED blinks Amber ( a brighter amber for low battery).
GSM On
Wireless LAN Off and Bluetooth Off - blinks Green.
Wireless LAN on and Bluetooth Off - alternates between Green and Orange.
Wireless LAN Off and Bluetooth On - alternates between Green and Blue.
Wireless LAN On and Bluetooth On - alternates between Orange and Blue
GSM Off
Wireless LAN Off and Bluetooth Off - no change
Wireless LAN on and Bluetooth Off - blinks Orange
Wireless LAN Off and Bluetooth On - blinks Blue
Wireless LAN On and Bluetooth On - alternates between Orange and Blue
When charging the battery the LED is Amber and notifi cations are indicated by the
LED fl ashing.
Once charging is complete the above statuses are applied.
16
1
Before using your O2 Xda Flame
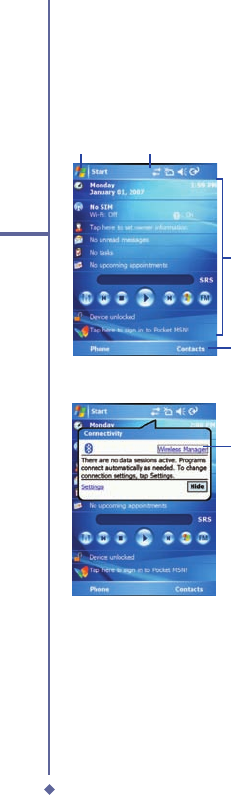
1.5 Display information
The screen displays the following
information:
Start menu Status & icon area
Main
Display
Command
bar
Pop-up
menu
Windows Start menu
Tap on the Windows Start menu on the top
left of the screen to bring up a menu. To
return to the
Today
screen at any time, Tap
Start
>
Today
.
Status & icon area
This area shows your current mode, such
as
Phone
mode or
MSN Sign In
mode. The
rest of the area displays notifi cation icons
such as time, signal strength, message
arrival, etc.
Main Display
Depending on the current mode or program,
this area shows the major features of the
mode. On the
Today
screen, this area
contains shortcuts to certain programs. To
change the
Today
screen settings, tap
Start
>
Settings
>
Today
.
Command bar
Depending on the mode, this area contains
different features such as input panel and
commands to create or edit a fi le.
Pop-up menu
This feature allows you to quickly access
an item. To access a pop-up menu, simply
tap the icon on the screen and tap again
to perform an action. To cancel it, tap other
places on the screen.
17
1
Before using your O2 Xda Flame
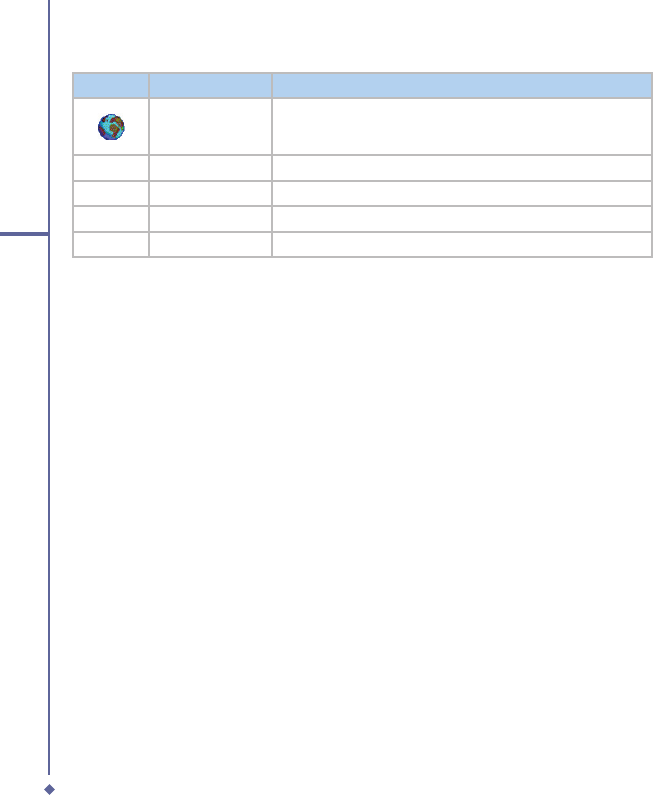
Start menu area
Tap
Start
to bring up a list of menu options.
No.
Description
1
Quick access to a program.
2
Recently accessed programs.
3
Access program folder. Please refer to the following
Programs
table for a detailed
program list.
4
Device settings. Please refer to the following
Settings
table for a detailed setting list.
5
Help information.
18
1
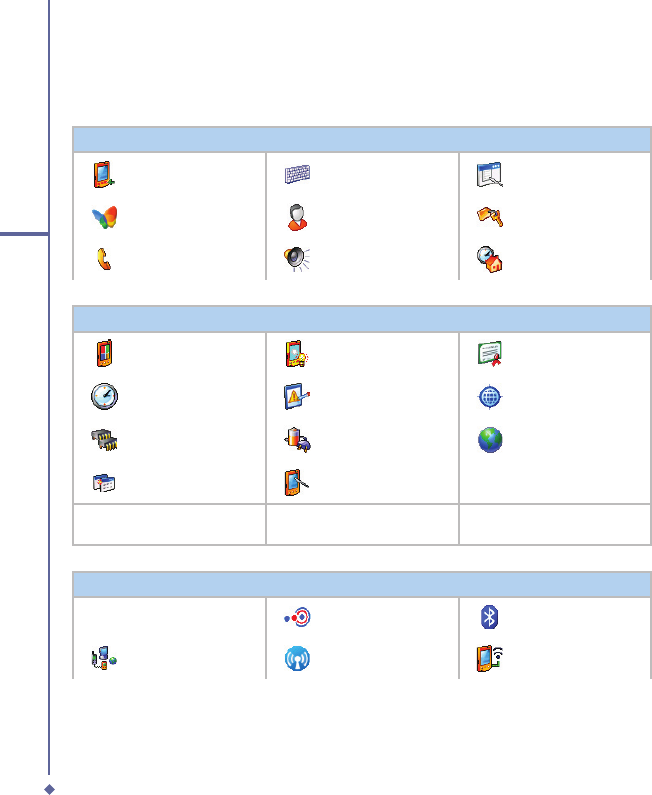
Before using your O2 Xda Flame
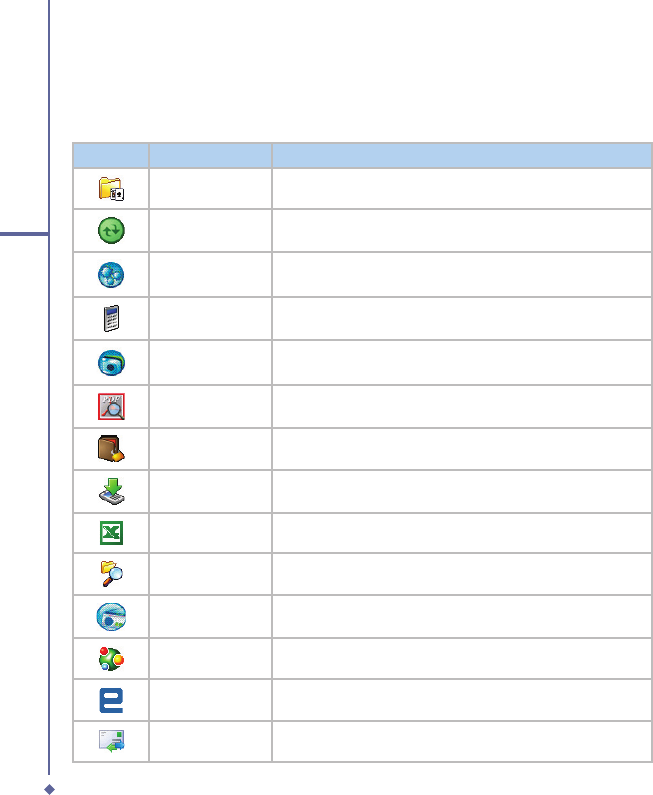
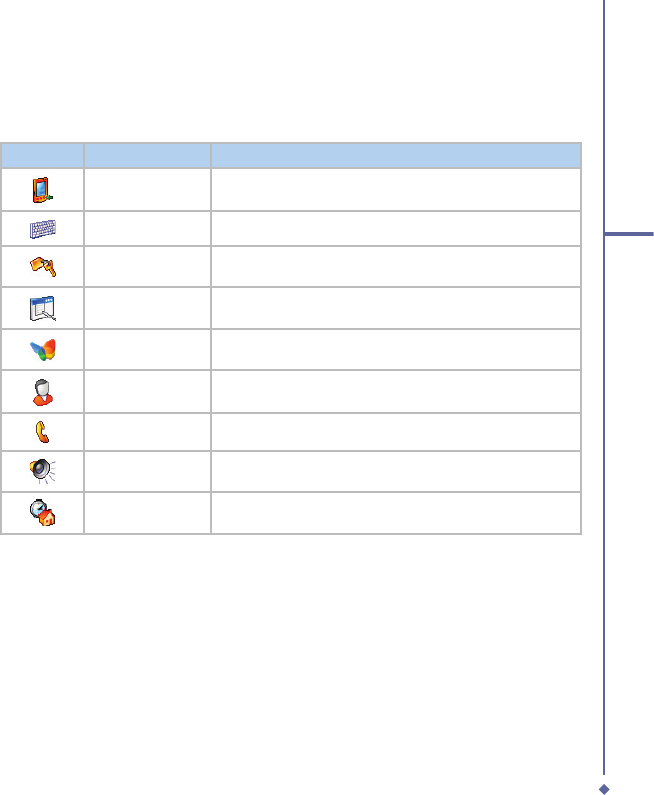
Programs
Your O2 Xda Flame contains a list of programs, allowing you to get the most out of your
phone.
Icons
Programs
Description
Games
Provides games such as Bubblebreaker and Solitaire.
ActiveSync
Synchronizes information between your O2 Xda Flame and a
PC.
Auto Configurator
Configures your network operator setting.
Calculator
Performs mathematical calculations.
Camera
Takes photos and shoot video clips.
Adobe PDF
Supports viewing of PDF files.
CodeWallet Pro 5
Holds your secret financial numbers/passwords (Option to
install in O
2
AutoInstaller).
Download Agent
Manages your downloaded content for installation.
Excel Mobile
Creates, views and edits Excel files.
File Explorer
Views all the files on your O2 Xda Flame.
FM Radio
Enables you to listen to the radio.
GPRS Monitor
Keeps track of your GPRS daily traffic.
Java
Installs and run your Java applications.
Jeyo SMS Backup
Backs up and restores SMS messages (Option to install in O
2
AutoInstaller).
19
1
Before using your O2 Xda Flame
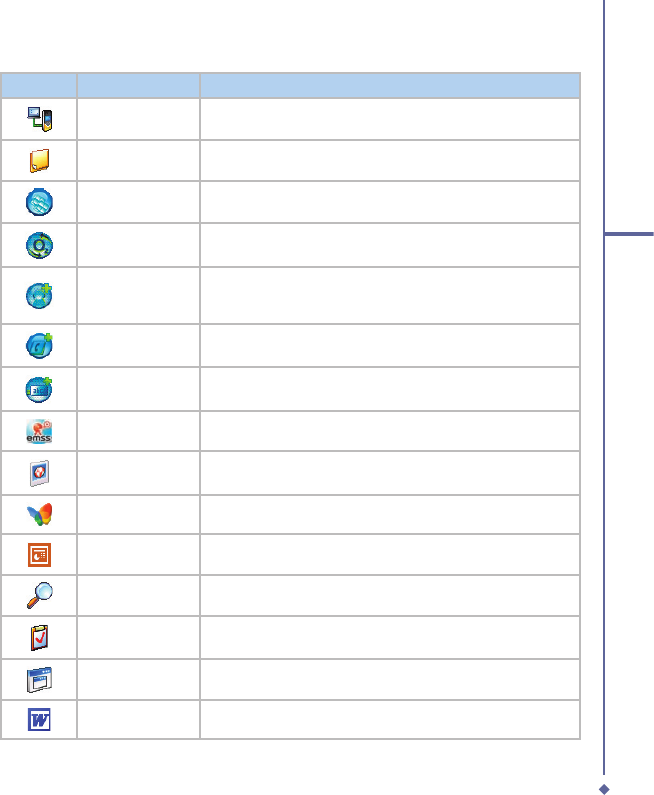
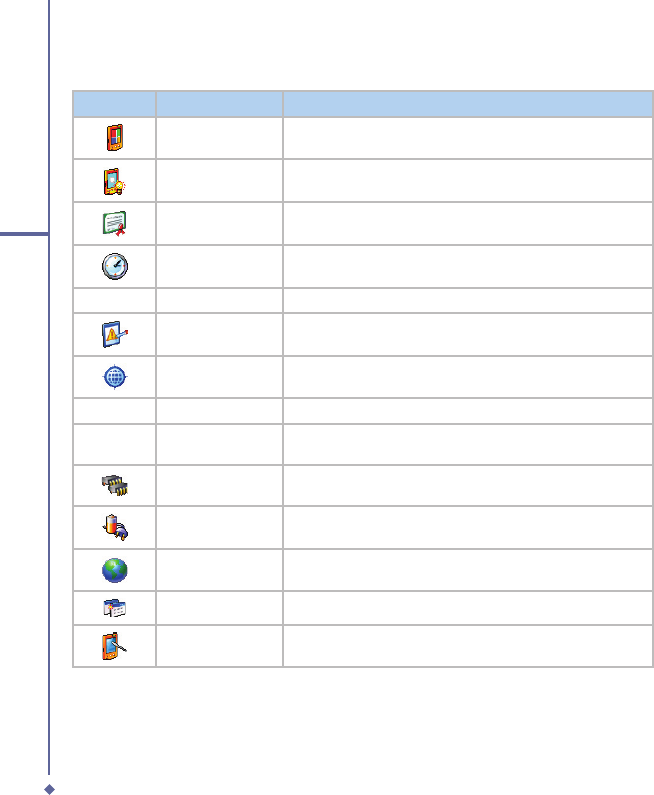
Icons
Programs
Description
Modem Link
Links your O2 Xda Flame to a modem.
Notes
Creates notes, drawings, and recordings manually or by typing.
O
2
AutoInstaller
User can choose to install O
2
selected programs.
O
2
Connect
Connect to the O
2
website and downloads the latest software
updates.
O
2
MediaPlus
Integrates Windows MediaPlayer with Radio and Pictures &
Photos programs. An outstanding integrated interface for quick
access.
O
2
Phone Plus
Features smart dialing and a block list (Option to install in O
2
AutoInstaller).
O
2
SMS Plus
Besides SMS messaging services, also provides chat and
vCard sending features.
Image Editor
Edits your photos on your O
2
Xda Flame.
Pictures & Videos
Views your images and videos.
Pocket MSN
Access for MSN services.
PowerPoint
Mobile
Views PowerPoint files on your O
2
Xda Flame.
Search
Searches for a program or file on your O
2
Xda Flame.
Tasks
Keeps track of your appointments and creates meeting
requests.
Terminal Service
Allows you to connect to a defined terminal server.
Word Mobile
Creates, views and edits Word files.
20
1
Before using your O2 Xda Flame
Icons
Programs
Description
WorldMate
Contains handy traveling information such as time zones, area
codes, currency conversions and clothing sizes (Option to
install in O
2
AutoInstaller).
Internet Sharing
Allows the user to share internet access
Remote Control
Turns the device into a multifunction remote control.
WiFi
Turns on / off wireless functionality.
SIM Toolkit
Details very depending on your service provider.
21
1
Before using your O2 Xda Flame
Settings menu
The Settings menu lists a range of different applications.
Personal
Icons
Settings
Description
Buttons
Assigns an application program to a hardware button.
Input
Sets up the input method option of your O
2
Xda Flame.
Lock
Restricts access to your O
2
Xda Flame and prevents
unauthorized use.
Menus
Customizes the
Start
menu list.
MSN Options
Provides complete MSN settings such as passwords, Hotmail
account, and Messenger.
Owner Information
Displays and sets your personal information.
Phone
Configures your O
2
Xda Flame settings.
Sounds &
Notifications
Customizes the notification type, event and volume.
Today
Arranges the appearance and items displayed on the
Today
screen.
22
1
Before using your O2 Xda Flame
System
Icons
Settings
Description
About
Shows important information relating to your O
2
Xda Flame.
Backlight
Configures the backlight settings and adjusts the brightness
level to save power.
Certificates
Information about the certificate issuer and expiration date.
Clock & Alarms
Sets the time and alarm.
Device Information
Displays your system information.
Error Reporting
Reports your system errors to the Microsoft help center.
GPS
Configures GPS settings.
Headset Volume
Adjust the maximum volume of your headset.
In4Mobility Fee
Jeibi Ein
Enables Arabic support.
Memory
Displays the memory allocation status and the programs
currently running.
Power
Displays battery status and settings.
Regional Settings
Customizes formats and settings for the region you use.
Remove Programs
Removes programs from your O
2
Xda Flame.
Screen
Sets orientation of your screen and recalibrates for
alignment.
23
1
Before using your O2 Xda Flame
Connections
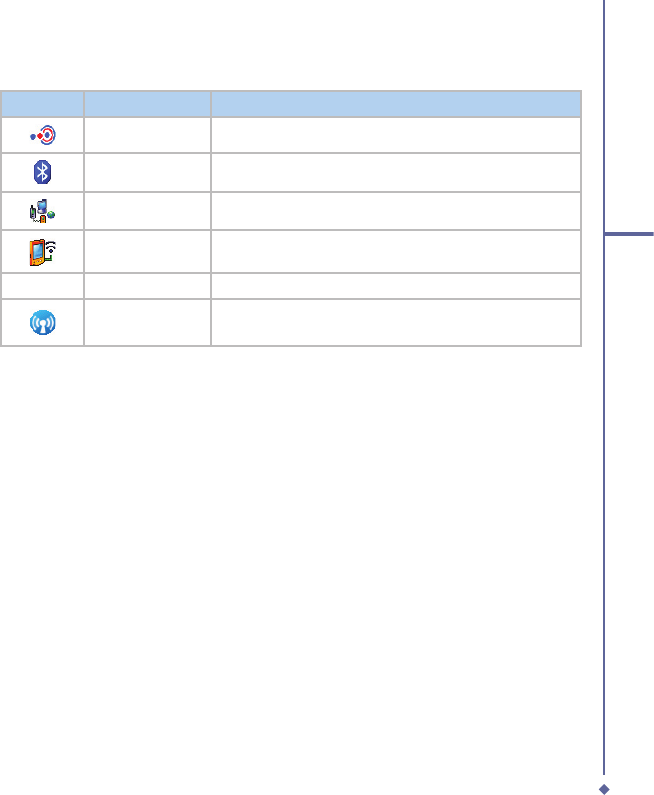
Icons
Settings
Description
Beam
Sets your O
2
Xda Flame to receive or disables IrDA signals.
Bluetooth
Sets up Bluetooth connection.
Connections
Configures connection settings.
Wi-F
Configures Wireless Networks.
USB to PC
Enables advanced network functionality.
Wireless Manager
Activates phone, GPRS, Bluetooth and Wireless
LAN.
24
1
Before using your O2 Xda Flame
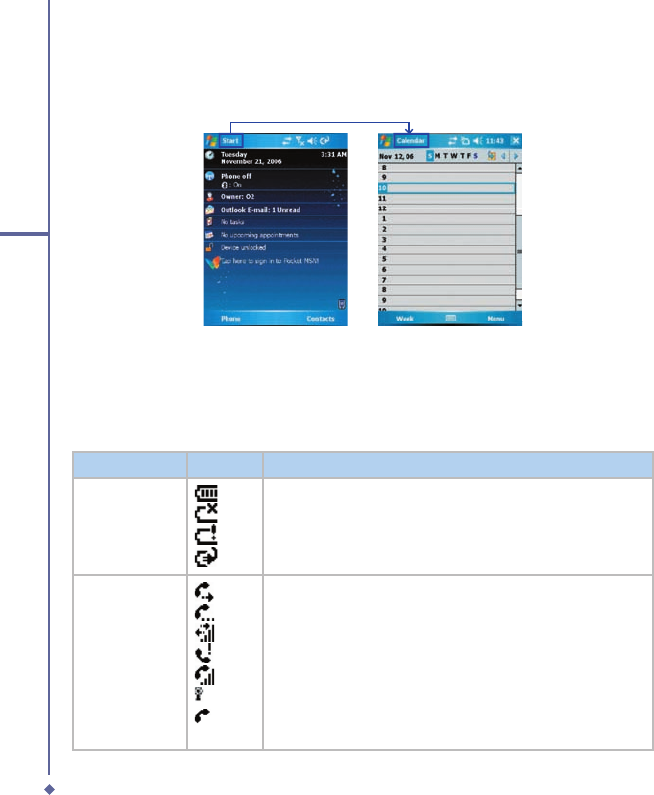
Status and icons area
This area indicates the application or menu you are using:
When you go from the
Today
screen to the
Calendar
screen, the area changes from
Calendar screen, the area changes from Calendar
Start
to
Calendar
.
The icon display is on the top right of the
Today
screen. Please refer to the following table for
some of the more frequently encountered icons. Alternatively, tap the icon with your stylus and
its defi nition will be displayed; this will also enable you to change settings.
Type
Icons
Description
Battery
Battery full
Low battery
Battery alert
Battery charging
Calls
Call forward
Call on hold
Data call
Missed call
Voice call
Wireless LAN network in range
Make a call
25
1
Before using your O2 Xda Flame
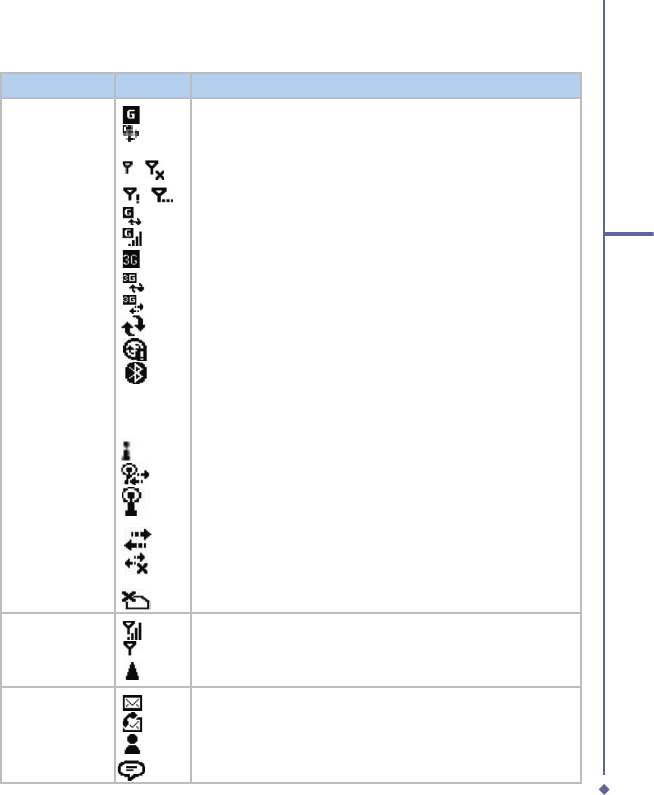
Type
Icons
Description
Connection
/
/
GPRS in range
GPRS connected
Radio connected / Radio off
No radio service / Radio searching
GPRS synchronisation
GPRS signal strength
3G in range
3G synchronisation
3G Connected
Synchronisation
Synchronisation Error
Bluetooth
Wireless LAN on
WiFi connected
Wireless LAN in range
Data connected
Data disconected
No SIM card
Signal Strength
Strong signal
No signal
Roaming
Message
New SMS / MMS message(s)
New voice mail(s)
New instant message(s)
Push
26
1
Before using your O2 Xda Flame
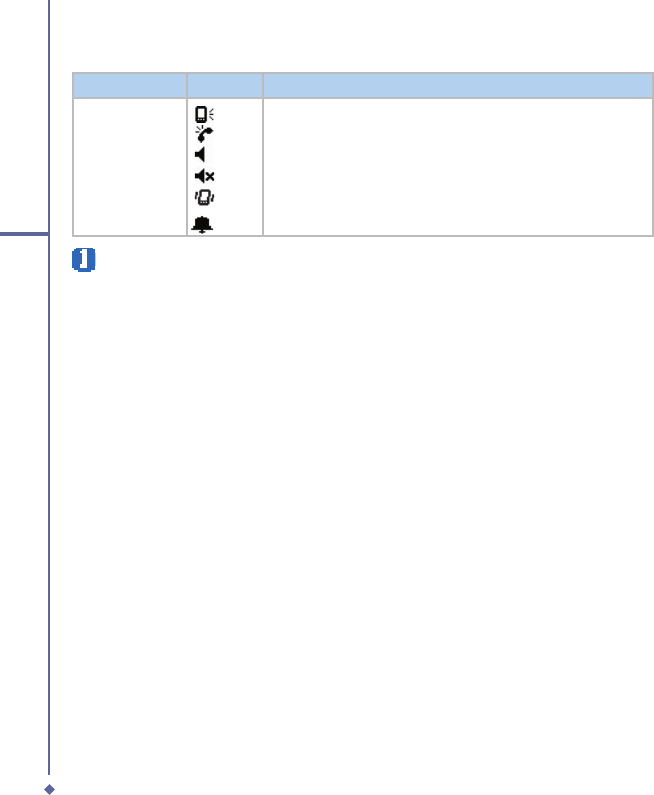
Type
Icons
Description
Volume
System volume
Phone volume
Ringer on
Ringer off
Vibrate on
Alarm
Please note
Your O2 Xda Flame is designed to notify in a number of ways including an alert tone,
vibration, an icon on the screen or a fl ash of light. To choose reminder types and sounds
for your O2 Xda Flame, tap Start > Settings > Personal > Sounds & Notifi cations.
27
1
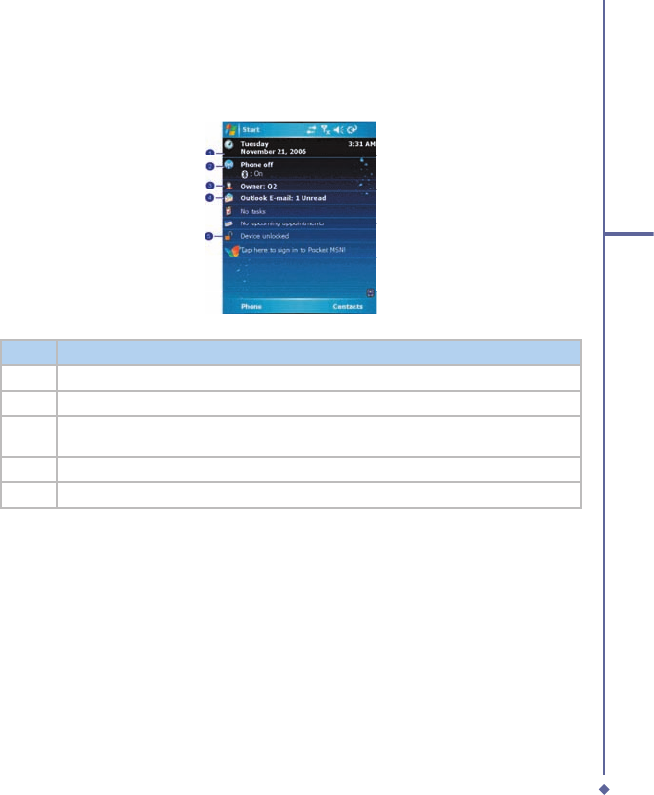
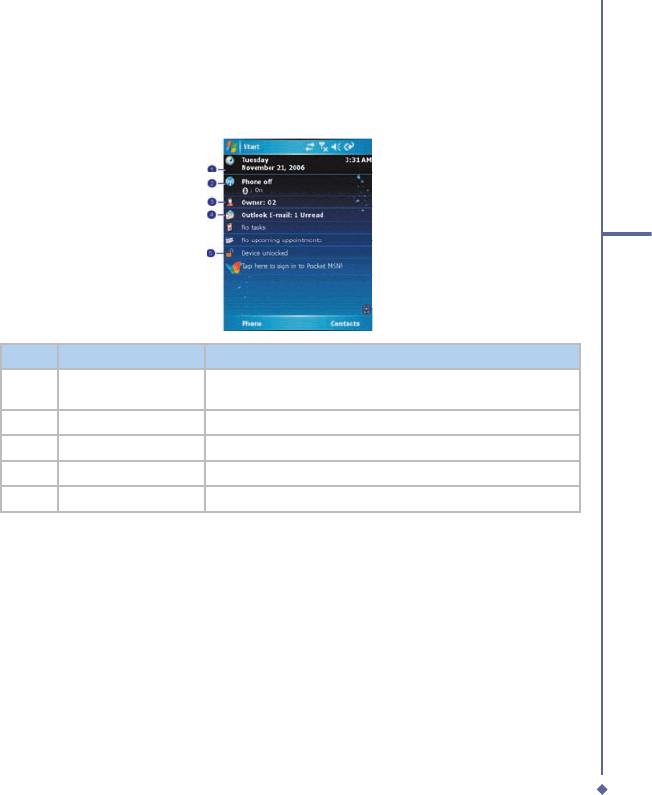
Before using your O2 Xda Flame
Main Display
The main body of the
Today
screen displays the following items for quick access and
convenient viewing:
No.
Function
Description
1
Divert Profile
Displays date and time. Tap the phone icon to set divert
profile
2
Wireless Manager
Tap to control wireless connections.
3
Owner Information
Tap to change the owner details.
4
E-Mail
Displays staus of unread e-mails.
5
Locking
Locked or unlocked status.
28
1
Before using your O2 Xda Flame
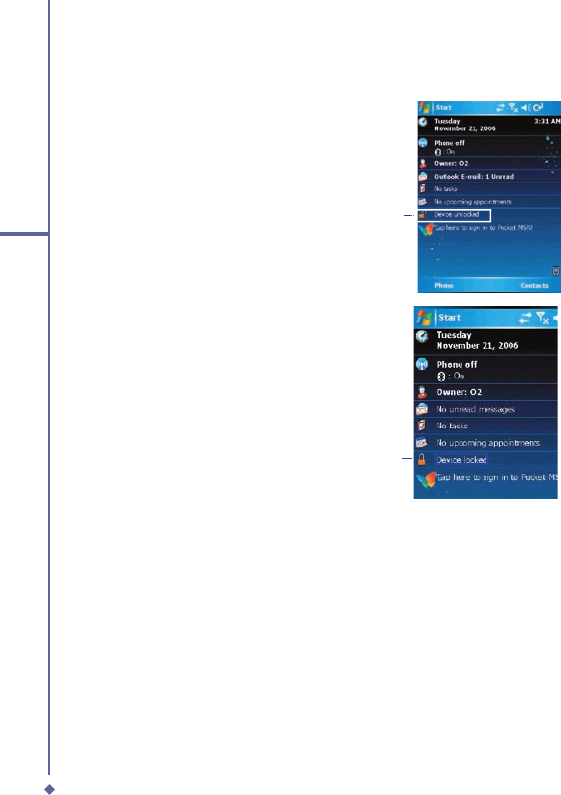
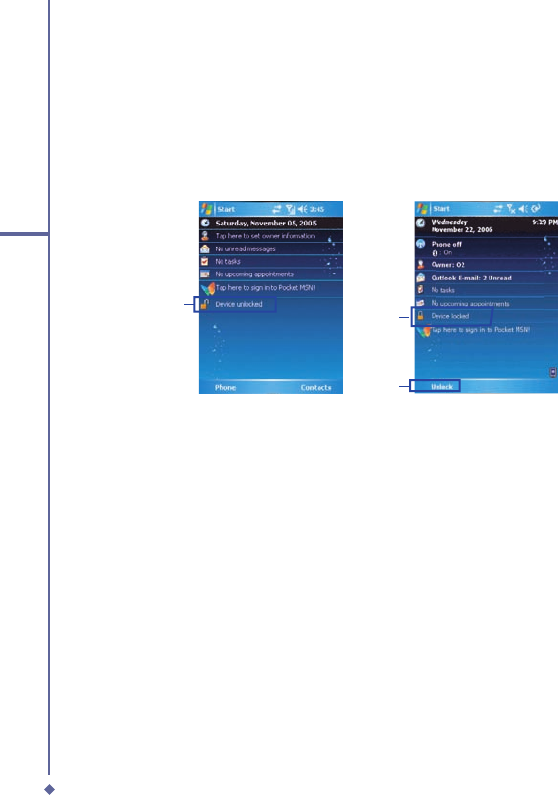
To lock/unlock your O
2
Xda Flame:
1. Tap
Device Unlocked
to lock the
phone; the screen will now display
Device locked
.
1
2. Tap
Unlock
on the command bar to
unlock the phone and tap the
Unlock
button on the screen again to confi rm.
Now the screen indicates
Device
unlocked
.
2

Chapter 2
Getting started
2.1 Inserting the battery & SIM card
2.2 SIM card
2.3 Battery
2.4 Switching the device on or off
2.5 Screen tapping and Calibration
2.6 Screen Orientation
2.7 Entering information
2.8 Recording a message
2.9 Data backup
2.10 Memory expansion
2.11 Resetting your O2 Xda Flame
28
2
Getting started
2. Getting started
Before start using your O
2
Xda Flame, you
need a fully charged battery and a valid SIM
card.
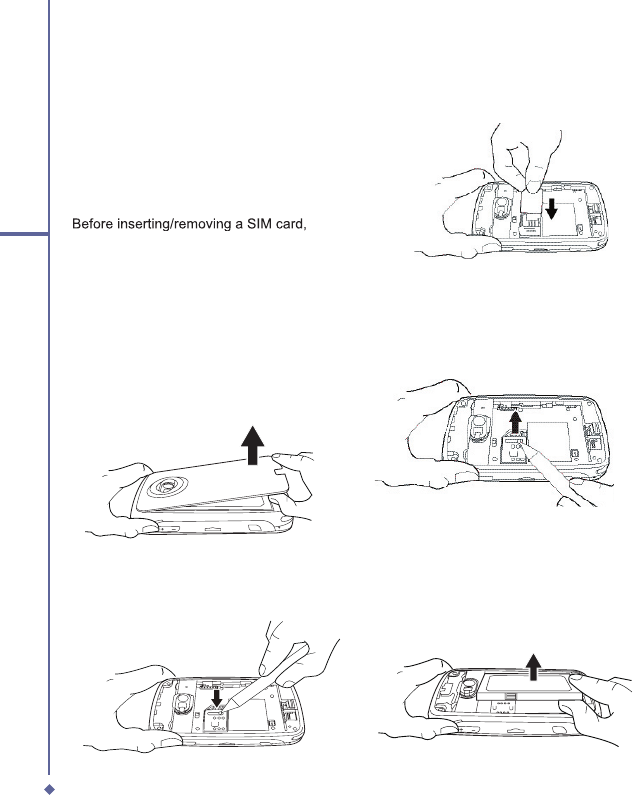
2.1 Inserting the battery &
SIM card
1. Remove the battery cover by gently
pulling the clip downwards and than
lift out the rear cover in the direction
shown below.
2. Unlock the SIM card holder by pushing
it towards you and lifting it up.
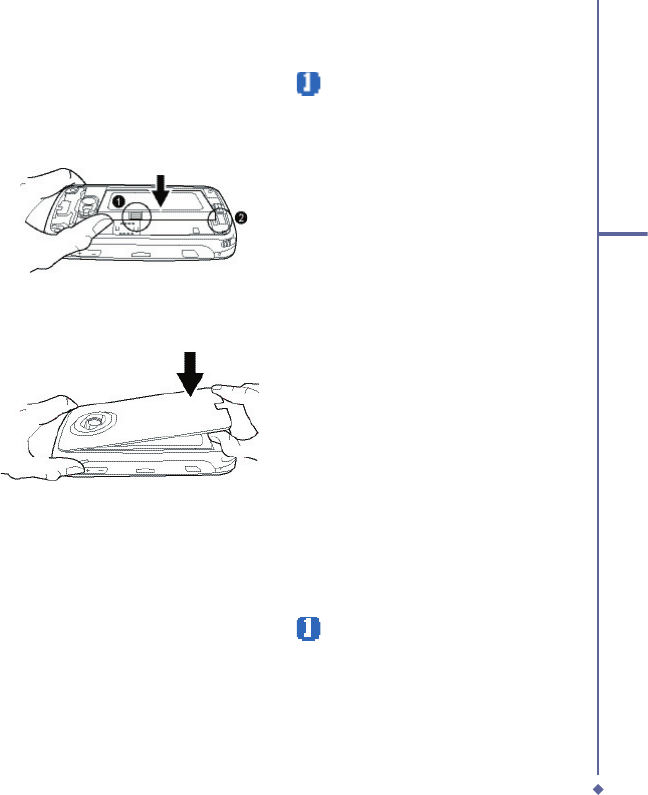
4. Gently press down the SIM card holder
and lock it by sliding it away from you
as shown below. Make sure the holder
does not bounce back upwards.
5. Slide the battery into place with the
metal connectors facing down and
away from you. Push down the back
edge until it clips into place.
Before inserting/removing a SIM card,
please make sure that your O
2
Xda Flame
is powered off and is not connected to any
power supply via USB cable or AC adapter.
3. Insert the SIM card with the metallic
part facing down and the clipped corner
to the left.
29
2
Getting started
2.2 SIM card
Before using your O
2
Xda Flame, you must
contact a network operator to get a personal
SIM (Subscriber Identity Module).
The SIM card contains your O
2
Xda Flame
number, the services included in your
subscription, and your personal data such as
your phonebook and messages. The phone
is unusable (except for emergency calls)
until a valid SIM card is inserted. Your O
2
Xda Flame will display a warning message if
the SIM card is not inserted properly.
Please note
If the phone or the SIM card is lost
or stolen, you should contact your
network operator immediately in order
to prevent unauthorized use.
Copy SIM contacts to phone
memory
To copy your SIM contacts to your O
2
Xda
Flame, tap
Contacts
>
[fi nd the contact]
>
Menu
>
Copy Contact
.
2.3 Battery
Your O
2
Xda Flame contains a removable
and rechargeable Li-ion polymer battery.
Battery life will depend on actual usage,
network coverage and whether the device is
on standby mode.
Battery life estimates:
• Talk-time: 4-6 hrs.
• Standby: 200-260 hrs (approximate).
The above timings are based on the
assumption that the user only uses one
function at a time. Battery life may also
vary depending on how frequently the user
switches between functions. For battery
safety, please refer to
Chapter 1
� ������
�����������
Please note
Using any battery pack or AC adapter
(charger) not specifi ed/endorsed by
O2 on this phone may be dangerous
and may invalidate any warranty and
approval given to the phone. Unplug
the charger from the power supply
when it is not in use.
7. Slide the cover back into place and
push down until it clicks.
6. Once the battery has been inserted push
the side facing you down until it clips into
place (
1
). Slide the clip (
2
) on the right
of the battery compartment towards the
battery.
30
2
Getting started
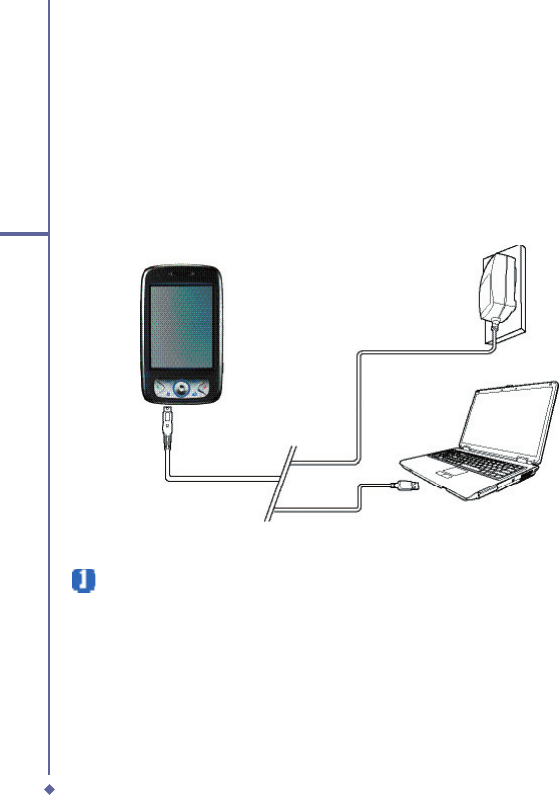
Charging the battery
A new battery must be fully charged (for 8 hours) before being used for the fi rst time. You may
charge the battery in the following ways:
• AC Adapter: Connect the battery
charger to a suitable main power socket
and the charger plug into the connector
of your O2 Xda Flame. Note the
orientation when plugged in.
• USB Cable: Connect your O2 Xda
Flame to your PC’s USB port with the
USB cable supplied in your package
as shown below.
Please note
• When charging, make sure that the phone has its battery inserted. Place the battery’s
metallic end towards phone’s metallic part. Please refer to 2.1 Inserting the Battery & 2.2
SIM card on inserting the battery correctly.
• During charging, the LED lights up amber. When charging is completed, the amber light
goes off.

31
2
Getting started
Checking the battery
The
battery indicator displays the charge level of the battery. Check the icon at the top right
corner of the
Today
screen.
•
Full battery power
•
Low battery power
•
Battery empty
•
Battery charging
Low battery indication
When the battery voltage falls below the working level, a warning message appears on the
screen and a warning tone sounds to alert you, if you activate the warning sounds for system
events (Please see
Chapter �. Settings
). Save the data you are working on at the moment,
perform synchronization with your PC, and turn off your O
2
Xda Flame. (For more details
about data safety, please see
�� Data Backup
).
2.4 Switching the device on or off
• Press the Power button on the top of the phone to switch on your device. When you switch
on the device for the fi rst time, your device will power up and automatically begin the
initiation/calibration process. See
��� Screen tapping & calibration
for further details.
• To switch off your device, press the Power button again.
Please note
Switching off your device will suspend the screen display and the device will enter sleep
mode to save battery power. When your device is in sleep mode, press the Power
button to wake up the device; the device will then display the Today screen.
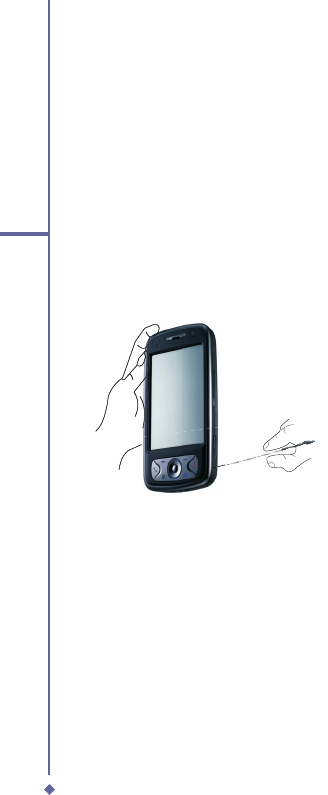
2.5 Screen tapping and Calibration
When you fi rst start up your O
2
Xda Flame, you will be asked to calibrate the screen by
tapping the center of a cross with your stylus as it moves around the screen. This process
ensures that, when you tap the screen with your stylus, the tapped item is activated.
To align the screen taps, the screen fi rst needs to be aligned to do this:
1. Tap
Start
>
Start > Start
Settings
>
System
tab >
Screen
.
2. Tap the
Align Screen
button on the
General
tab to recalibrate the screen as described
above.
Please note
When aligning the touchscreen, tap the target fi rmly and accurately.

32
2
Getting started
2.6 Screen Orientation
To switch the orientation of your touchscreen between Portrait and Landscape modes:
Landscape mode
1. Tap
Start
>
Start > Start
Settings
>
System
tab >
Screen
.
2. On the
General
tab, select the
Orientation
by tapping
Portrait
,
Landscape (right-
handed)
, and
Landscape (left-handed)
.
The
Portrait
mode allows you to get a better view or a better operation of certain programs
on your O
2
Xda Flame, while
Landscape
may be optimal for viewing longer text fi les.
2.7 Entering information
You can enter information on your O
2
Xda Flame in the following ways:
•
Synchronizing
: Using
ActiveSync
, exchange information between your PC and device.
(For more information, see
Chapter 11 Synchronization
).
•
Typing
: Using the input panel or the keyboard, enter typed text into the device. You can
do this by tapping keys on the screen soft keyboard, by pressing the keyboard, or by using
the handwriting recognition software
•
Writing
: Using the stylus, write directly on the screen.
•
Drawing
: Using the stylus, draw directly on the screen.
•
Recording
: Create a standalone recording or embed a recording into a document or note.
Block Recognizer
With the
Block Recognizer
, you can input character strokes (using the stylus) similar to
those used on other devices.
1. Tap the arrow next to the keyboard, and then
Block Recognizer
.
2. Write a letter in the box. When you write a letter, it is converted to typed text on the screen.
For specifi c instructions on using the Block Recognizer, tap the question mark next to the
writing area.
Portrait mode
33
2
Getting started
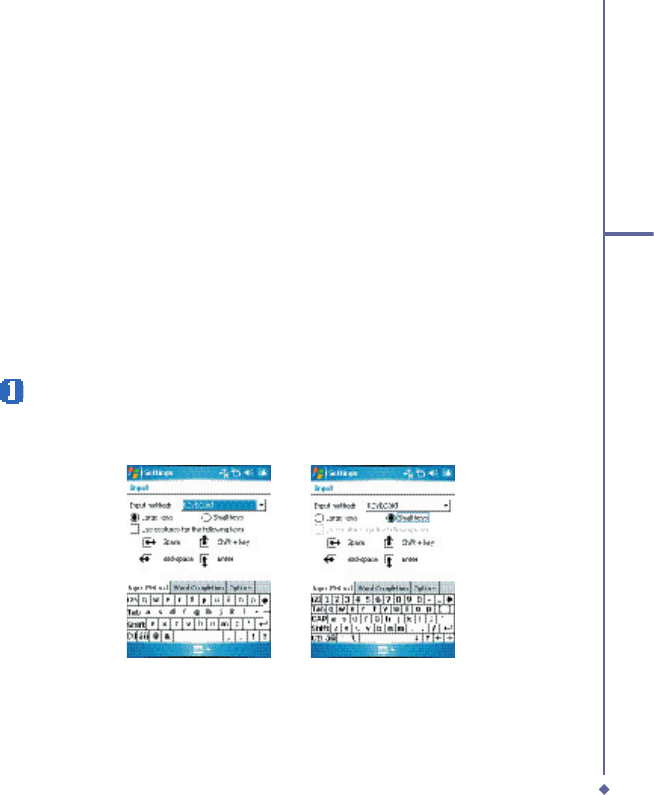
Keyboard
To show or hide the input panel, tap the input panel button. To see your choices, tap the
arrow next to the input panel button. Tap the arrow next to the
Input Panel
button, and then
Keyboard
.
1. To type lowercase letters, tap the keys with the stylus. To type a single capital letter or
symbol, tap the
Shift
key. To tap multiple capital letters or symbols, tap the
CAP
key. You
can also tap and hold the stylus on the key and drag up to type a single capital letter.
2. To add a space, in addition to tapping the space bar, you can tap and hold any key and
drag the stylus to the right. To backspace one character, instead of tapping the backspace
key, you can tap and hold any key and drag the stylus to the left across at least two other
characters.
3. To insert a carriage return, tap and hold the stylus anywhere on the keyboard and drag
down. When you use the input panel, your O
2
Xda Flame anticipates the word you are
typing or writing and displays it above the input panel. When you tap the displayed word,
it is automatically inserted into your text at the insertion point. The more you use your O
2
Xda Flame, the more words it learns to anticipate.
Please note
To change the keyboard size displayed on the screen, tap the arrow beside the
keyboard icon and select Options. Under the Input screen, you may select either Large
keys or Small keys by tapping on its radio button.
4. To change word suggestion options, such as number of words suggested at one time, tap
Start
>
Settings
> the
Personal
tab >
Input
> the
Word Completion
tab. Alternatively,
tap the input panel icon, then
Options…
> the
Word Completion
tab.

34
2
Getting started
To punctuate in Transcriber:
1. Tap the keyboard button on the tool bar.
2. Tap the desired punctuation.
3. Tap the keyboard button again to hide the
keyboard.
To learn writing in Transcriber:
1. Tap
on the tool bar.
2. A Letter Shapes Selector screen will
appear:
• At the bottom of the screen, select the
character you wish to explore.
• At the top of the screen, tap the picture
of this character. It will slowly redraw,
showing the writing sequence.
• Select how often you write the character
using that method. When you fi nish
selecting all the letters, you can save
these as a profi le by tapping
File
>
Save
,
and enter a name for the profi le.
Using Profi les
Letter Shape Selector
supports two
Letter Shape Selector supports two Letter Shape Selector
profi les:
Master
or
Master or Master
Guest
:
•
Master
is typically used by the primary
Master is typically used by the primary Master
user. This profi le is unaffected by any
Guest
user settings.
•
Guest
is for temporary device usage by
another person.
Letter Recognizer
With the
Letter Recognizer
, you can write
letters using the stylus just as you would on
paper.
1. Tap the arrow next to the input panel
button, and then
Letter Recognizer
.
2. Write a letter in the box.
When you write a letter, it is converted
to typed text on the screen. For specifi c
instructions on using
Letter Recognizer
,
with
Letter Recognizer
open, tap the
Letter Recognizer open, tap the Letter Recognizer
question mark next to the writing area.
Transcriber
Transcriber
allows you to write anywhere
Transcriber allows you to write anywhere Transcriber
on the screen using the stylus, just as
you would write on paper. Unlike
Letter
Recognizer
and
Recognizer and Recognizer
Block Recognizer
, you
can write a sentence or more than one
sentence. Pause and let
Transcriber
change the written characters to typed
characters.
1. Tap the arrow next to the input panel
button, and then
Transcriber
.
2. Write anywhere on the screen.
For specifi c instructions on using
Transcriber
, with
Transcriber
open, tap
Transcriber open, tap Transcriber
the question mark in the lower right-hand
corner of the screen.
35
2
Getting started
Writing on the screen
In any program that accepts writing, such as
Notes
, and in the
Notes
tab in
Calendar
,
Contacts
, and
Tasks
, you can use your
stylus to write directly on the screen. Write
as you would on paper. You can edit and
format what you have written and convert
information into typed text at a later time.
Tap the pen button to switch to writing mode.
This action displays lines on the screen to
help you write. Some programs that accept
writing may not have the pen button. See the
manual for each particular program to fi nd
out how to switch to writing mode.
Please note
T9 is the entry mode. When you enter
a word, it tries to automatically match
the letters you have selected with the
most likely completed word.
Tips for good recognition:
1. Write clearly.
2. Write on the lines and draw descanters
below the line. Write the cross of the “t”
and apostrophes below the top line so
that they are not confused with the word
above. Write periods and commas above
the bottom line.
3. For better recognition, use a zoom level
of 150% or higher by tapping
Settings
>
Input
>
Options
tab to change the
default zoom levels.
4. Write the letters of a word closely and
leave big gaps between words so that the
device can easily tell where words begin
and end.
5. Hyphenated words, foreign words that
use special characters such as accents,
and some punctuation cannot be
converted. If you edit or add to a word
after attempting to recognize it, the new
writing will not be included if you attempt
to recognize it again.
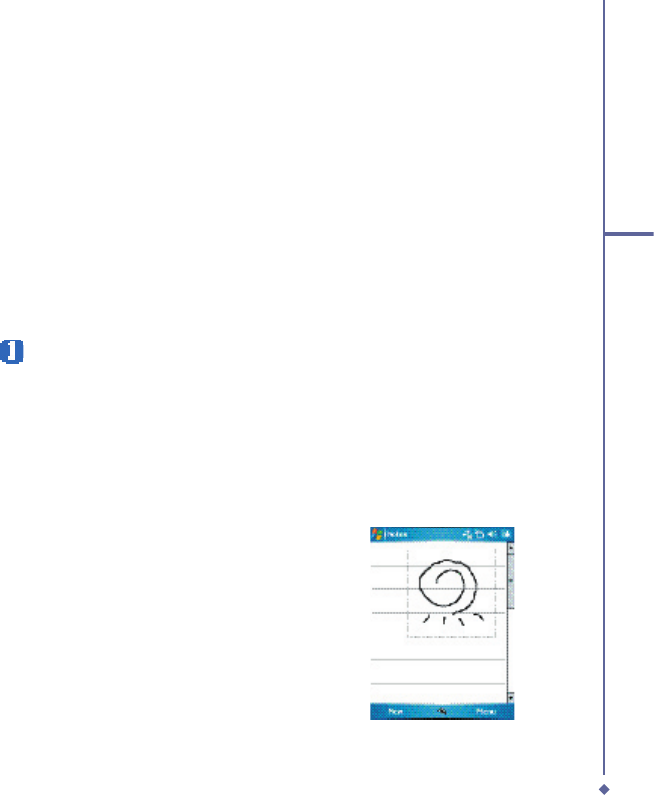
Drawing on the screen
You can draw on the screen in the same way
that you write on the screen. The difference
between writing and drawing on the screen
is how you select items and how they can be
edited. For example, selected drawings can
be resized, while writing cannot.
To create a drawing:
Cross three ruled lines on your fi rst stroke.
A drawing box appears. Subsequent strokes
in or touching the drawing box become part
of the drawing. Drawings that do not cross
three ruled lines will be treated as writing.
36
2
Getting started
To select a drawing:
If you want to edit or format a drawing, you
must select it fi rst.
1. Tap and hold the stylus on the drawing
until the selection handle appears. To
select multiple drawings, deselect the pen
button and drag to select drawings you
want.
2. You can cut, copy, and paste selected
drawings by tapping and holding the
selected drawing and tapping an editing
command on the pop-up menu, or by
tapping the command on the Edit menu.
To resize a drawing, make sure the
Pen button is not selected, and drag a
selection handle. To change the zoom
level so it is easier to work or view your
drawing, tap Tools and select a zoom
level.
2.8 Recording a message
In any program where you can write or draw
on the screen, you can also quickly capture
thoughts, reminders, and phone numbers by
recording a message. In
Calendar
,
Tasks
,
and
Contacts
, you can include a recording
in the
Notes
tab.
In the
Notes
program, you can either
create a standalone recording, or include
a recording in a written note. If you want to
include the recording in a note, open the
note fi rst.
In the Messaging program, you can also add
a recording to an E-mail message.
To create a recording:
1. To add a recording to a note, open
the note before recording. Tap
Start
>
Programs
>
Notes
.
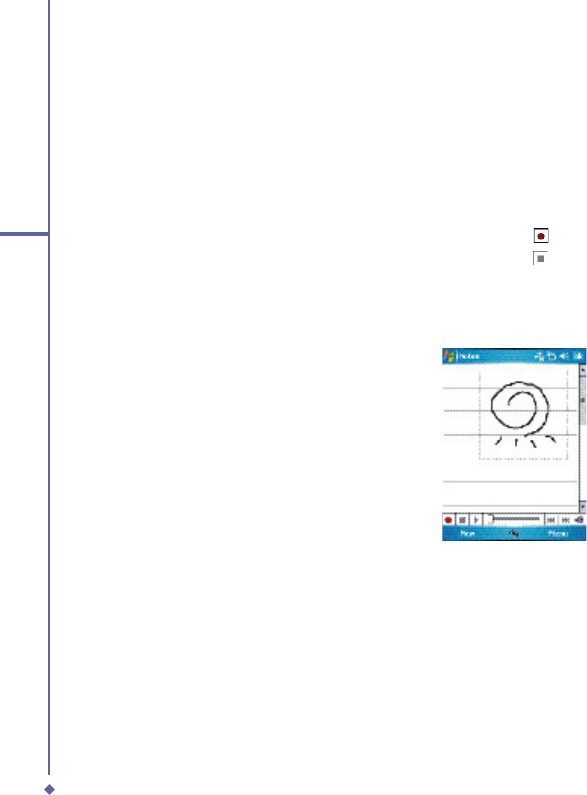
2. If there is no Record/Playback toolbar,
tap
Menu
>
View Recording Toolbar
.
3. Hold your device’s microphone near your
mouth or another sound source.
4. To start recording, tap
.
5. To stop recording, tap
. The new
recording appears in the note list or as an
embedded icon.
6. To play a recording, tap in the open note
or tap the recording in the note list.
You can also access the Record/Playback
toolbar by pressing the Record button, which
is the fi rst button from the top on the left side
of your O
2
Xda Flame.
To quickly create a recording, hold down the
Record button. When you hear the beep,
recording has begun. Release the button
when you are fi nished.
The new recording is stored in the open
note, or as a standalone recording, if no note
is opened.
37
2
Getting started
2.9 Data backup
Your O
2
Xda Flame supports 2GB ROM
capacity; however, you may need to backup
data and any new programs that you install
in the ROM to guard against data loss. To
back up your Contact, Calendar, etc., please
connect your PC with the O
2
Xda Flame;
ActiveSync will start automatically.
2.10 Memory expansion
To expand your O
2
Xda Flame’s memory,
please insert a Micro SD card into the card
slot on the top of the phone. Make sure the
card is inserted correctly.
Please note
Your O2 Xda Flame does not come
with a Micro SD card supplied. This is
an optional accessory. Please contact
your supplier for further details.
2.11 Resetting your O2 Xda
Flame
Your O
2
Xda Flame can be reset in the
following two ways: a
soft reset
or a
hard
reset
. Executing
soft reset
allows you to
reboot your O
2
Xda Flame; only some data
in opened programs may be lost. Your O
2
Xda Flame returns to the same status as
the last time you used it. However, a
hard
reset
turns the battery off, returns the
device to its default settings, and deletes
all programs, fi les, contacts and other
information you have saved to the device. It
is therefore extremely important to back up
data to a storage card or your computer on
a regular basis in case a
hard reset
has to
be performed.
To perform a soft reset
If your O
2
Xda Flame responds slowly, stops
responding, or freezes, you can soft reset
it. A soft reset causes the O
2
Xda Flame
to restart and adjust memory allocation.
Unsaved data in any opened applications
may be lost. Use the stylus to press and hold
the Reset button, as shown below.
38
2
Getting started
A hard reset clears memory, deletes all
data (such as owner information under
Setup Wizard
and
AutoConfi gurator
) and
restores the O
2
Xda Flame to its default
settings. The action will erase all data that
you have created and programs you have
installed, but will keep all the preinstalled
programs that were in the phone when your
O
2
Xda Flame was fi rst delivered to you.
Press and hold the power button, and then
use the stylus to press the soft reset button
at the same time. Be sure you have backed
up all your data in a Micro SD card or on
your PC before performing a hard reset.

Chapter 3
Settings
3.1 Personal settings
3.2 System settings
3.3
Connection settings
44
3
Settings
3. Settings
The following is an overview of the Settings menu.
Personal
Buttons
Input
Menus
MSN Options
Owner Information
Lock
Phone
Sounds &
Notifications
Today
System
About
Backlight
Certificates
Clock & Alarms
Error Reporting
GPS
Memory
Power
Regional Settings
Remove Programs
Screen
Device Information
Headset Volume
WOW HD Settings
In4Mobility Fee
Jeibi Ein
Connections
USB to PC
Beam
Bluetooth
Connections
Wireless Manager
Wi-Fi
45
3
Settings
3.1 Personal settings
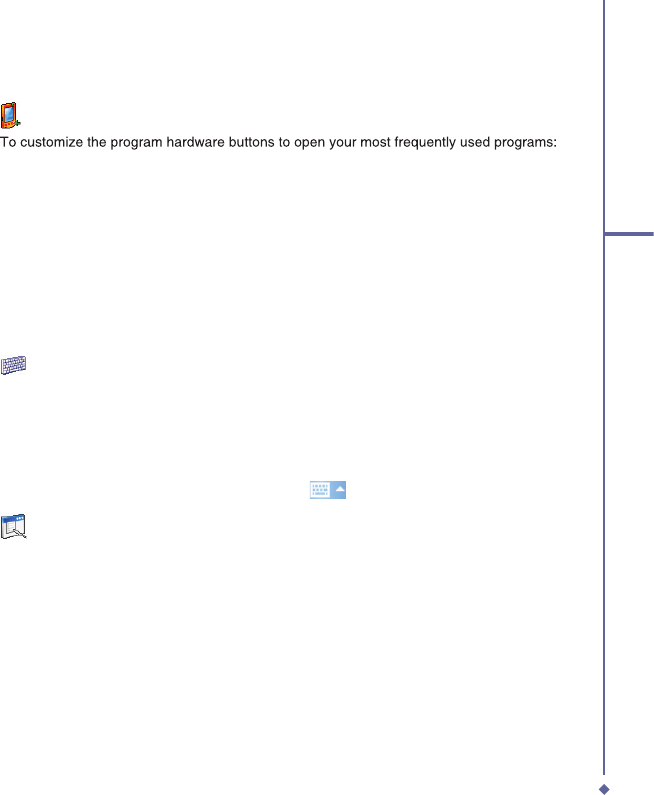
Buttons
To customize the program hardware buttons to open your most frequently used programs:
1. Tap the
Start
>
Settings
> the
Personal
tab >
Buttons
> the
Program Buttons
tab.
2. Under
Select a Button
, tap the button you want to assign to a program and then select a
program from
Assign a Program
.
In the
Up/Down Control
tab,
Delay before First Repeat
changes the time elapsed before
scrolling begins.
Repeat Rate
changes the time it takes to scroll from one item to the next.
Press and hold the Up/Down control to scroll through the items, in a list, to adjust.
In the
Backlight
tab check the
Light Sensor Enable
box to set the time settings for the
backlight. From the drop down lists choose when to switch the backlight off when using AC
Power and Battery Power.
Input
1. Tap
Start
>
Settings
> the
Personal
tab >
Input
.
2. On the
Input Method
tab, select a desired input method. On the
Word Completion
tab,
select the desired settings for word completion. On the
Options
tab, select the desired
options for writing and recording. These options apply to any program on the device where
you can record or write.
You can also change input options by tapping the
arrow and Options.
Menus
Only 7 programs are allowed in the Start menu. To add frequent programs to the Start menu:
1. Tap
Start
>
Settings
> the
Personal
tab >
Menus
.
2. Select the programs you want, then tap
OK
.
46
3
Settings
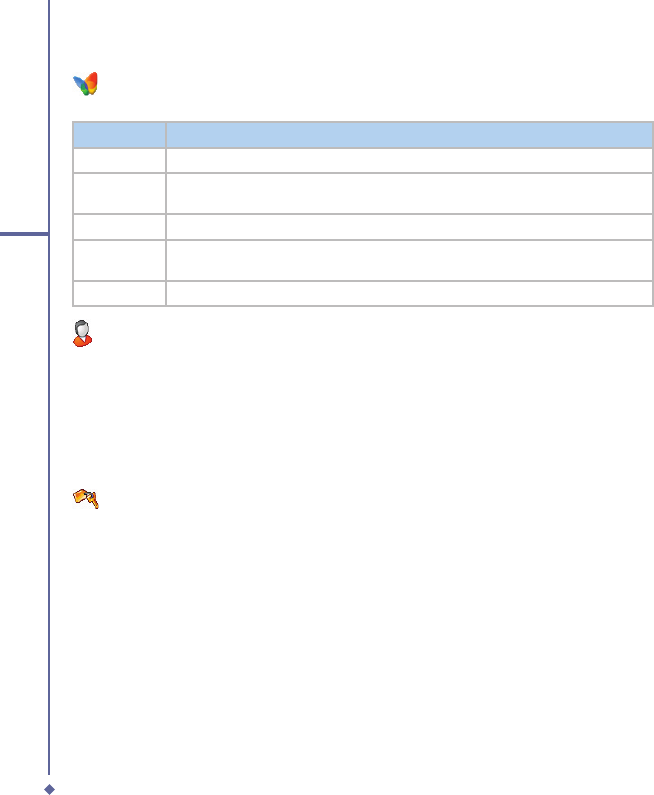
MSN Options
Under MSN Options, you can confi gure settings for MSN applications.
Option
Description
General
To increase phone security, you can select
Clear Saved Password
.
Hotmail
Select the
E-mail delivery options
, filtering level of junk mail, and choose
whether to activate
Download new e-mail automatically
.
Messenger
Enter your display name
when you sign in to MSN Messenger.
SMS
Select to activate SMS for receiving MSN Messenger messages when data
connection is temporarily unavailable.
Switch User
Press Switch User button to sign in with a new login name.
Owner Information
1. Tap
Start
>
Settings
> the
Personal
tab >
Owner Information
.
2. On the
Identifi cation
tab, enter your personal information.
3. On the
Notes
tab, enter any additional text you want to display when the device is turned
on, such as: “Welcome!’
4. On the
Options
tab, select which message will display when your O
2
Xda Flame is turned
on.
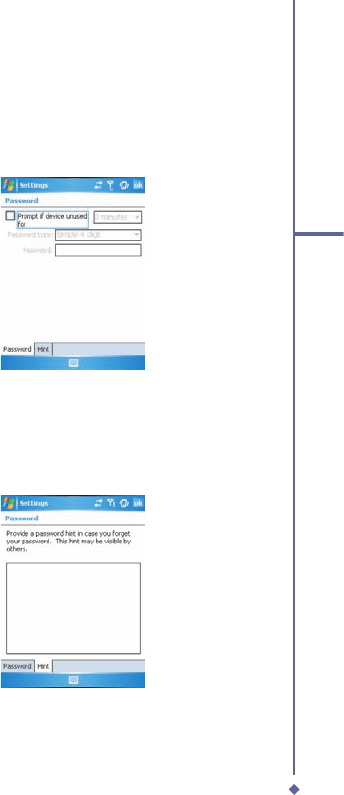
Lock
A strong password must have at least 7 characters that are a combination of uppercase and
lowercase letters, numbers, and punctuation.
1. Tap
Start
>
Settings
> the
Personal
tab >
Lock
.
2. To enable this function, select how long your mobile device must be turned off before the
password is required for using the device by tapping
Prompt if device unused for
.
3. Select the type of password you want: Simple 4-digit or Strong alphanumeric.
4. Enter the password and:
• If your device is confi gured to connect to a network, use a strong password to help
protect network security.
• If you forget your password, you must hard reset before you can access your device.
This will erase all fi les and data created and programs installed. For more information
about clearing memory.
• If you’ve used ActiveSync to create a backup fi le, all program data can be restored.

47
3
Settings
Phone
You can easily view and change settings, such as ring type, ring tone and keypad tone. You
can also protect your phone from unauthorized use. There are two ways to change phone
settings:
• Tap
Start
>
Settings
> the
Personal
tab >
Phone
.
• To change phone settings from the Phone keypad, tap
Menu
>
Options
.
Phone tab
Under the Phone tab, you can set up the following items:
Ring type
You can change the way you are notifi ed of incoming calls. For example, you can choose to
be notifi ed by a ring, vibration, or combination of both. Tap the
Ring type
list and select the
desired option.
Ring tone
Tap the
Ring tone
list, then select the sound you want to use.
1. To set .wav or .mid fi les as ring tones, use ActiveSync on your PC to copy the fi le to the
\Windows\Rings folder on your device. Select the sound from the
Ring tone
list.
2. To download ring tones, you can make a connection to the Internet and download ring
tones compatible with .wav or .mid.
Keypad tone
You can change the tone you hear when entering a phone number on the keypad. If set
to
Long tones
, the tone is heard continuously for as long as the number on the keypad is
pressed. If set to
Short tones
, the tone is heard only for one or two seconds.
1. Tap the
Keypad
list, then select the option you want.
2. To prevent tones from being heard when entering a phone number, select
Off
.
Security
You may check the
Require PIN when phone is used
option to enhance your phone
security. Tap
Change PIN
to change your SIM PIN number.
48
3
Settings
Services tab
The Services tab is primarily used to set options for incoming calls, such as
Call Forwarding
,
Call Waiting
, and
Caller ID
. To change service settings from the phone dial screen, tap
Menu
>
Options
> the
Services
tab > select a service >
Get Settings
.
Option
Description
Call Barring
Blocks incoming and/or outgoing calls.
Caller ID
Displays your name and/or phone number for outgoing calls.
Call Forwarding
Forwards all or selected incoming calls to a different number.
Call Waiting
Notifies you of an incoming call while you are on the phone.
Voice Mail/SMS
Set up voice mail and SMS service center number.
Network tab
With network settings, you can view available networks, determine the order in which your O
2
Xda Flame accesses another network (if the current one is unavailable) and specify whether
you want to change networks manually or automatically. The current network will remain
active until you change it, lose your signal, or change your SIM card.
�The network currently in use will be listed at the top of the screen. When your current
network is unavailable, tap Select Network to select an alternate.

49
3
Settings
Sounds & Notifi cation
Turning off sounds and notifi cations helps conserve battery power. To change the ring type
and volume:
1. Tap
Start
>
Settings
> the
Personal
tab >
Sounds & Notifi cations
.
2. On the
Sounds
tab, you can select when to play a sound.
3. On the
Notifi cations
tab, you can customize how you are notifi ed about different events.
Select the event name and type of reminder. You can select a special sound, a message,
or a fl ashing light.
Today
To change the theme of your
Today
screen:
1. Tap
Start
>
Settings
> the
Personal
tab >
Today
.
2. On the
Appearance
tab, select the desired theme. To use your own background, select
Use this picture as the background
, then tap
Browse
to locate the desired fi le.
3. Choose a folder, then tap the fi le you want and tap
OK
.
Please note
The recommended picture size for the background is 240x320 in JPEG format. To beam
a theme to a friend, select the desired theme and tap Beam on the Appearance tab.
Customizing the displayed information:
1. Tap
Start
>
Settings
> the
Personal
tab >
Today
> the
Items
tab.
2. Select the information you want displayed on the
Today
screen.
3. To customize the information further, select an information type and tap
Options
(not
available for all information types).

50
3
Settings
3.2 System settings
About
The Version tab displays important device information, including amount of memory installed.
On the Device ID tab, you may need to change the device name if unable to connect to a
network because another device, with the same name, is already connected.
Backlight
Using the backlight, on battery power, substantially reduces battery life. Tap
Start
>
Settings
> the
System
tab >
Backlight
.
• Tap the
Battery power
tab to turn ON/OFF the backlight when using battery power.
• Tap the
External power
tab to turn ON/OFF the backlight when using external power.
• Tap the
Brightness
tab to adjust the brightness level.
Certifi cates
This item displays the name of the certifi cate issuer and expiration date.
Clock & Alarms
Tap
Start
>
Settings
> the
System
tab >
Clock & Alarms
.
• If you visit a particular time zone often, select it as your
Visiting time zone
on the
Time
tab so you can quickly see the correct date and time.
• You can use your device as a travel alarm clock by setting up to 3 seperate alarms in the
Alarms
tab. Tap the alarm icon to select the type of alarm.
• Tap the
More
tab to display the clock in the title bar of all programs.
Please note
To change the way the date or time is displayed on your O2 Xda Flame, go to Regional
Settings by tapping Start > Settings > the System tab > Regional Settings.
Device Information
This feature displays system information.
Error Reporting
This feature allows you to report system errors to the Microsoft Help Center. Tap
Start
>
Settings
> the
System
tab >
Error Reporting
and select
Enable/Disable Error Reporting
.
51
3
Settings
GPS
Under the
Programs
tab, you can choose the port your phone uses for GPS data.
Under the
Hardware
tab, you can specify the hardware port to which your GPS device is
connected. Settings include
GPS hardware
port and
Baud rate
.
Under the
Access
tab, you can activate
Manage GPS automatically
. You are strongly
advised to activate this feature; doing so will enable Windows Mobile to manage access to
your GPS device, and allows multiple programs to obtain GPS data simultaneously.
Headset Volume Limitation
Use the slide bar to limit the maximum volume of the headphones.
Memory
You may need to stop a program if it becomes unstable or the program memory is low. Tap
Start
>
Settings
> the
System
tab >
Memory
.
• The
Main
tab displays the amount of memory the system has allocated to fi le and data
storage versus program storage. This tab also displays the amount of memory in use
versus the available memory.
• The
Storage Card
tab displays how much memory is available on the storage card
inserted in your device.
• The
Running Programs
tab displays the list of currently active programs. You can stop
a program by selecting it on the list and tapping
Stop
, or just tap
Stop All
to stop all
programs.
You may need to stop a program if it becomes unstable or program memory is low.
Power
Tap
Start
>
Settings
> the
System
tab >
Power
.
• The
Battery
tab displays the battery power remaining. Battery power depends on battery
type and usage.
• On the
Advanced
tab, you can select options for turning off your device to conserve
battery power.
• The
CPU Power
tab alows you to manually choose how much power is given to the PDA
processor.

52
3
Settings
Regional Settings
This feature allows you to customize the units and formats for your current region. To access
this feature, tap
Start
>
Settings
> the
System
tab >
Regional Settings
.
Remove Programs
Remove Programs
allows you to uninstall programs saved in your phone’s storage memory.
It also shows total available storage memory. Select a program that you want to remove from
the program box and tap
Remove
.
Screen
Under the
General
tab, you can adjust the screen’s orientation and alignment. For more
information, please refer to
Chapter 1. Before using your O
2
Chapter 1. Before using your O2
Chapter 1. Before using your O
Xda Flame
2 Xda Flame
2
.
Under the
Clear Type
tab, you can select
Enable Clear Type
to smooth the edges of screen
fonts for many programs.
Under the
Text Size
tab, you can adjust the text size to see more content or increase the
readability in many programs.
WOW HD Settings
• The
WOW HD Settings
tab allows you to choose the effect of the sound system.
• Use the slider bars in the
TruBass
tab to change the bass levels.
• The
About
tab displays the version information of the SRS WOW HD.
In4Mobility Fee Jeibi Ein
• In4Mobility Fee Jeibi Ein enables Arabic support for Arabizer.

53
3
Settings
3.3 Connection settings
For detailed information, please refer to
Chapter 10. Wireless Connectivity

Chapter 4
Basic phone functions
4.1 Making a call
4.2
Ending a call
4.3
Receiving/Ignoring a call
4.4
International calls
4.5 Video telephony
4.6 Emergency calls
4.7 In-call options
4.8
Contact information
4.9
Device security
54
4
Basic phone functions
4. Basic phone functions
Like a standard mobile phone, you can use your O
2
Xda Flame to make / receive calls and
send SMS messages. You can also take notes while talking, dial directly from
Contacts
, and
easily transfer contacts between your SIM card and your O
2
Xda Flame.
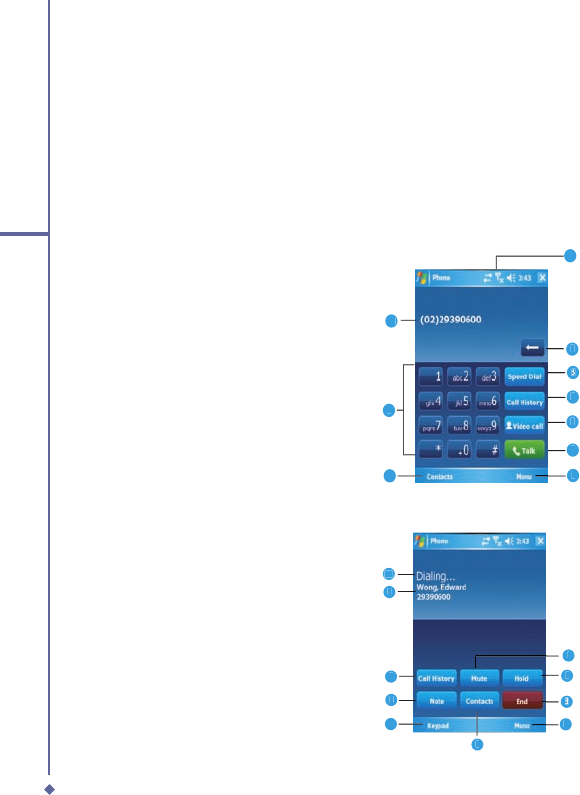
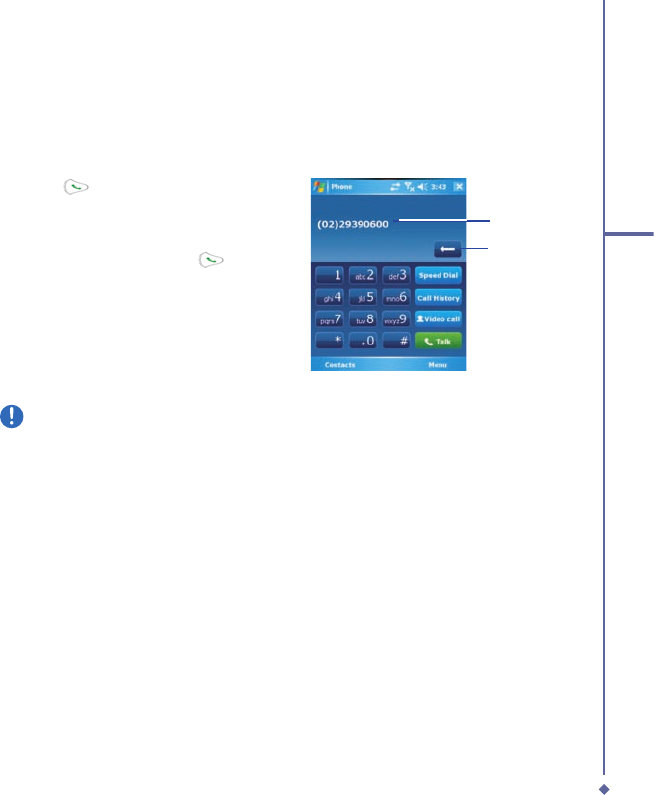
The
Phone Dialler screen
To access the Phone Dialler screen, tap
Start
>
Phone
, or tap
Phone
on the
Today
screen.
From this screen, you can access
Contacts
,
Call History
,
Speed Dial
, and more options
under
Menu
. The Phone Dialler screen has the following features:
1. Signal strength
2. Clear numbers
3. Speed dial
4. Received, dialed and missed call history
5. Make / Stop a video call
6. Call Make / End
7. Access more options
8. Contact list
9. Touchscreen keypad
10.The number you entered
1
2
2
3
2
3
2
4
5
6
7
8
9
10
When a call is connected, the screen displays the following:
1. Call Mute
2. Call Hold
3. Call End
4. Access more options
5. Contact list
6. Return to the Phone Dialler screen
7. Note creation for the call
8. Received, dialed and missed call history
9. The name and number of the contact
you are calling
10. Call status
1
2
2
3
2
3
2
4
5
8
7
6
9
10
55
4
Basic phone functions
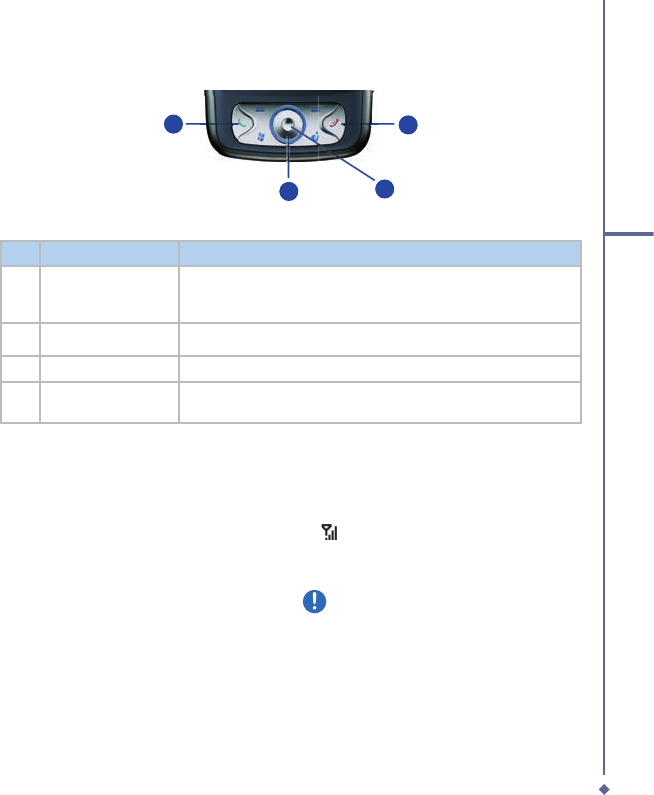
The navigation pad and dialing
2
3
1
4
No.
Item
Description
1
Call key
Press to activate the Phone Dialer screen, dial a phone number or
accept an incoming call. During a call, press and hold to turn the
speakerphone ON or OFF.
2
Navigation key
Press for 4 ways (Up/Down/Left/Right) navigation through a list.
3
Centre key
Press to select a menu item.
4
End call
Press to end a call, return to standby screen or end a GPRS
connection.
Entering your
PIN
Most SIM cards are preset with a PIN
(Personal Identifi cation Number). This PIN
is provided by the Network Operator, which
you need to enter whenever you use your
device.
1. Enter the preset PIN assigned by the
Network Operator.
2. Tap
Enter
.
If your PIN is entered incorrectly three times,
the SIM card will be blocked. If this happens,
you can unblock it with the PIN Unblocking
Key (
PUK) from the Network Operator.
Checking your connection
By default, your O
2
Xda Flame will
automatically connect to your registered
network once you have inserted a SIM card
and entered the required PIN code. An
icon indicates that you are connected to a
Network Operator network, or an affi liated
provider. A full strength signal is indicated
by
. The stronger the signal strength, the
more bars the icon shows; no bars indicates
no signal.
Warning
In many countries you are required
by law to turn off your phone onboard
an aircraft. Turning off the power of
your O2 Xda Flame doesn’t turn off the
phone function. You must disconnect
the connection to the wireless network.
23
14

56
4
Basic phone functions
While Flying
You can turn off the wireless connections while still using the O
2
Xda Flame for other
purposes.
1. Tap
Settings
in the
Start
menu.
2. Tap the
Connections
tab >
Wireless
Manager
.
3. Tap
All Wireless Off
; when all buttons/
icons are colorless, wireless functions
are off. Your Xda Exec Atom is now safe
to use on a fl ight.
Adjusting the
phone volume
You may adjust phone volume in the following ways:
1. During a call, press the volume buttons
on the side of your device.
2. Alternatively, tap
to bring up a pop-up
menu. You can adjust:
• Ring volume
• Device volume
• Vibrate mode: If this feature is activated,
appears in the status and icon area.
• Mute/Unmute the phone by tapping
On/Off.
Adjusting the conversation phone volume
should only be done during a call. Adjusting
the volume at another time will affect the
ring, notifi cation and MP3 sound levels.
57
4
Basic phone functions
4.1 Making a call
With your O
2
Xda Flame, you can make a call by entering the phone number, or selecting a
number from
Contacts
,
Speed Dial
, and
Call History
.
Making a call from the Phone Dialler screen
1. Press
or tap
Phone
on the
Today
screen to bring up the Phone Dialler
screen.
2. Tap the number on the keypad, then tap
the
Talk
button or press the
.
Input digits
Erase the
input digits
Please note
If you tap a wrong number, you can back space by tapping the back arrow key to erase
individual numbers, one at a time.
58
4
Basic phone functions
Making a call from Contacts
1. Tap
Contacts
on the
Today
screen or Phone Dialler screen.
2. Tap the entry, and then tap
Call
or
Call Mobile
.
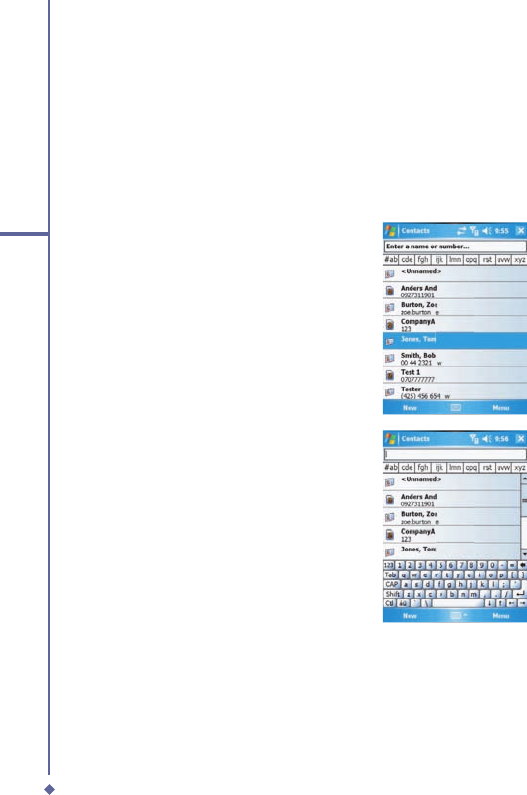
To view/search the contact list:
When you access
Contacts
, you see a contact list. You may view contacts in the following
ways:
• Tap
Menu
>
View by
and select
Name
or
Company
.
• Tap
Menu
>
Filter
and select
Filter and select Filter
All
contacts
,
Recently viewed
or
No
categories
.
• Tap
Menu
>
Options
. Set up the
List
view settings
by selecting
Show
alphabetical index
or
Show contact
names only
.
To search for a contact, tap the
Enter a
name or number
bar and enter the fi rst
name or number bar and enter the fi rst name or number
letter of the desired contact’s name. A list of
names with similar letters will be displayed.
Scroll up or down to the desired item.
59
4
Basic phone functions
Making a call from Call History:
1. In the Phone Dialler screen, tap
Call History
.
2. Find a number from different
Call Histories
by tapping
Menu
>
Filter
and selecting
Filter and selecting Filter
All
Calls
,
Missed
,
Outgoing
,
Incoming
, and
By Caller
.
3. Alternatively, scroll to the number by using the up/down navigation keys and press the
center navigation key to select the number.
4. Scroll to Call Mobile and press the center navigation key to call the number.
Call History
icons include:
Incoming calls
Outgoing calls
Missed calls
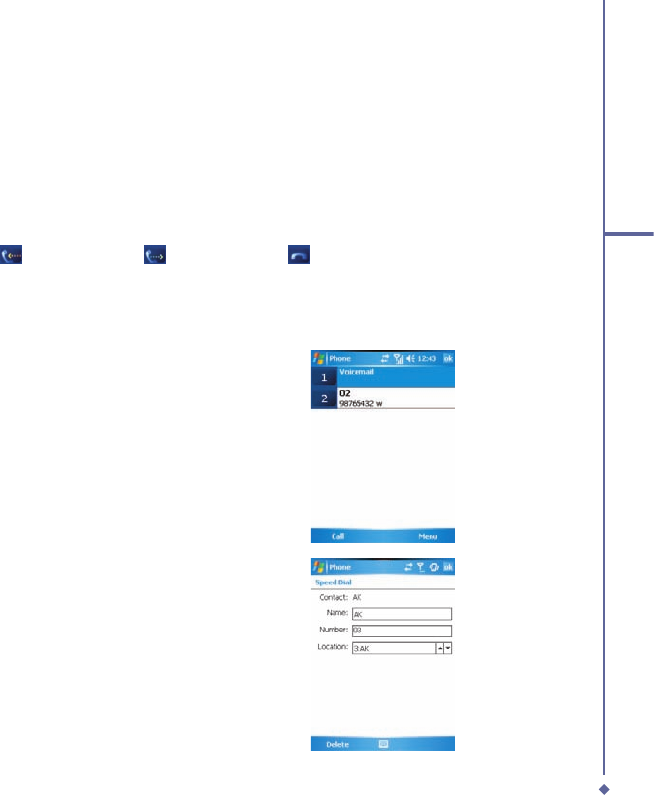
Making a call from Speed Dial
The
Speed Dial
enables you to call frequently-used numbers with a single tap. To create a
Speed Dial
entry, you must have the number already stored in
Contacts
.
1.
From the Phone Dialler screen, tap
Speed Dial
>
Menu
tab >
New
.
2.
Tap the desired contact name and
number.
3.
In the
Location
fi eld, tap the ▲/▼
arrows to select an available location
to assign as the new
Speed Dial
entry. (The fi rst
Speed Dial
location is
reserved for your voice mail).
60
4
Basic phone functions
By memorizing a number’s position in the
Speed Dial
list, you can dial the number by
pressing and holding its position number.
By default, the
Location
function will give
the next available position in the
Speed Dial
setting screen. If you want to put a number in
a position already occupied, the new number
will replace the number already there.
Please note
To delete a Speed Dial entry, go to
the Speed Dial list, tap and hold the
contact name in the box to the right of
the assigned speed dial number and
tap Delete.
Checking your Voice Mail
By default, the fi rst
Speed Dial
location
is your voice mailbox. When you insert
your SIM card into your O
2
Xda Flame, it
will automatically detect and set the voice
mailbox number of your network operator.
On the Phone Dialler screen, tap
Speed Dial
and select
Voice Mail
, and then press
or tap
Call
to call the voice mail center.
4.2 Ending a call
Once an incoming or outgoing call is in
progress, you can press the
, or tap
End
on the Phone Dialler screen to hang up.
Please note
Alternatively, press the silver button on
the wired stereo headset to end a call.
4.3 Receiving/Ignoring a
call
When you receive a phone call, a notifi cation
message will appear.
To answer the incoming call, tap
Answer
or
Answer or Answer
press
.
To ignore or reject a call, tap
Ignore
or press
to mute the phone and reject the call.
This may divert the call to your voice mail,
depending on your network operator.
Please note
Alternatively, press the silver button on
the wired stereo headset to receive a
call. Please see ?? In-call options.
4.4 International calls
When you make an international call from
any country, you need to insert a special
international access code. If you enter the
“+” symbol as a prefi x before the number you
are calling, then you do not need to enter the
access code for the country you are calling
from.
To make an international call:
1. Tap and hold the 0 key until the + sign
appears. The + replaces the international
prefi x of the country you are calling from.
2. Enter the full phone number. It should
include the country code, area code
(without the leading zero) and phone
number.
3. Tap
Talk
or press the
.
61
4
Basic phone functions
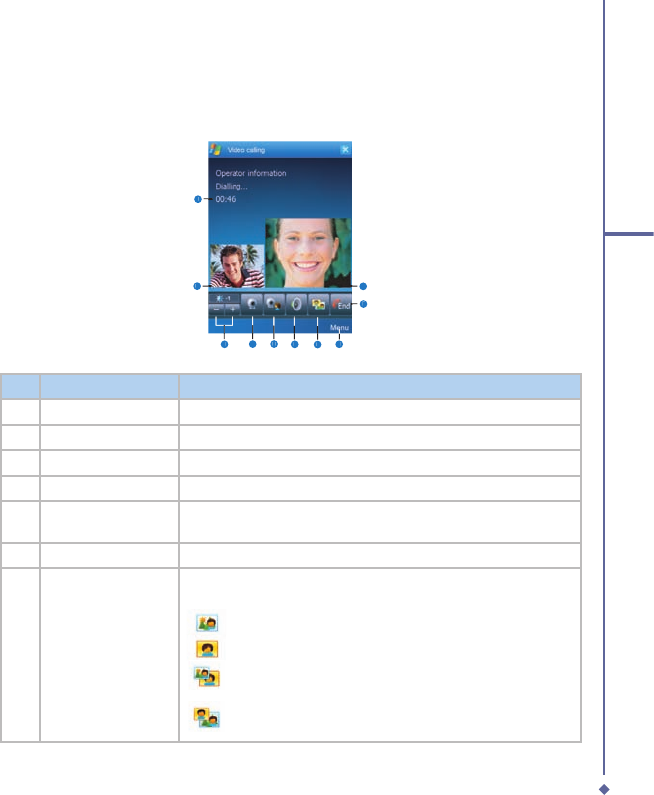
4.5 Video Telephony
Tapping the Video Call button allows you to communicate with other O
2
Xda Flame users via
the camera phone.
1
2
3
4
5
6
7
8
9
10
No.
Item
Description
1
Call Duration
Displays the length of the video call.
2
Callers Image
Displays the users image
3
Brightness
Use + and - to increase or decrease the screen brightness.
4
Camera On
Turn on or off the callers image.
5
Internal / External
Camera
Switch between using the camera facing you or the camera point
away from you.
6
Loud
Mute the speaker
7
View Mode
There are 4 view modes available, tap this button to switch
between them:
Only Receipient - Displays onlt the person you are calling.
Only Sender - Only displays your image.
Standard Mode - Displays both the caller and the receiver.
The sender is small.
Sender is large - The senders image is large and the
receivers image is small.
62
4
Basic phone functions
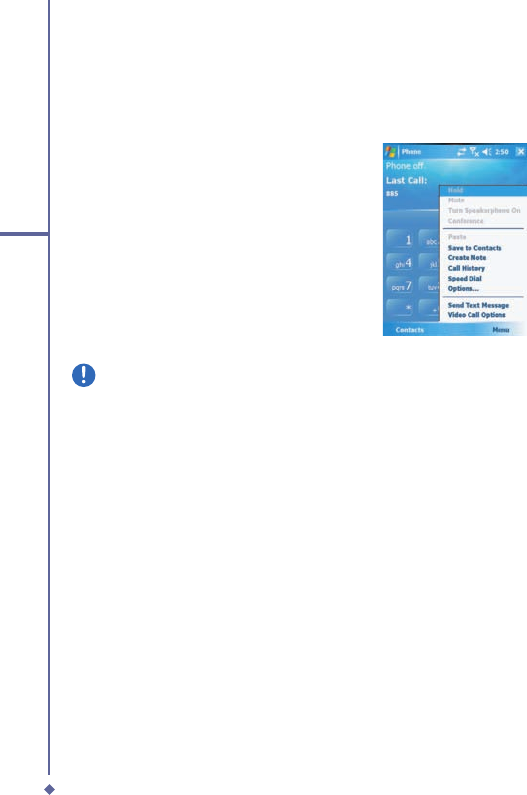
8
Menu
You can Hold, Mute, switch Voice, Night Mode, Conference, Paste,
Save to contacts, Create Note, call History, Speed dial, Options,
Video call options:
Hold - Places the current call on hold
Mute - Mutes the speaker
Switch Voice - Switch between handsfree and speaker
Night Mode - Change the light condions of the camera.
Conference
Paste
Save to contacts
Create note
Call history
Speed dial
Options
Video call options - There are 3 tabs: General, Services and About.
General - Select the Default Video setting for when the
senders camera is off;, Select the file to use as the default
image, choose the ringtone to play when a video call is being
received, show the talk time, name and number.
Services - Select the service you want and tap Get settings
About - Details of the Software version..
9
End
End the call.
10
Recievers Image
See the person who recives your call.
4.6 Emergency calls
Enter the international emergency number 112, then tap
Talk
or press the
.
Additional emergency numbers may be included on your SIM card. Contact your network
operator for more information.
If your O
2
Xda Flame has been put into Device Lock mode, you have to unlock the device
fi rst before placing an emergency call. (Refer to Page ??, Section ?)
1. Press the “Unlock” on Left soft key.
2. Press again “Unlock” appear on the middle of screen.

63
4
Basic phone functions
Muting a call
When there is an incoming call, you may
mute your microphone by pressing the
Mute
button on the Phone Dialler screen or tap
Menu
tab >
Mute
.
Putting a call on hold
During a call, you may choose to put the call
on hold to receive or make a second call.
To put a call on hold, tap
Hold
or tap
Menu
>
Hold
.
To accept/end another incoming call:
1. Tap
Answer
to take the 2nd call and hold
Answer to take the 2nd call and hold Answer
the 1st one.
2. To end the 2nd call and go back to the
1st, tap
End
or press the
.
To swap between two calls, tap
Swap
or tap
the
Menu
tab >
Swap
.
Setting up conference calls
In either of the following two situations, you
can set up a conference call:
• When you put a call on hold, dial a 2nd
number and wait for it to be picked up.
• When you accept a 2nd incoming call and
the fi rst one still in progress.
4.7 In-call options
Adjusting the earpiece volume
During a call, you can adjust the earpiece
volume on your wired stereo headset by
turning the volume button to the right/left
to increase/decrease the volume (with the
silver button facing towards you).
Volume
On / Off
Button
Turning on the speakerphone
Your device has a speakerphone allowing
you to talk handsfree or let other people
listen to the conversation.
1. During the call, press and hold the
or tap the
Menu
tab >
Turn
Speakerphone On
.
2. To turn the speakerphone off, tap the
feature again.
Warning
To avoid damaging your hearing, do
not hold your O2 Xda Flame against
your ear when in speakerphone mode.
64
4
Basic phone functions
To make a conference call:
1. In either of the above two situations, tap
Conference
.
2. If the conference connection is successful, the word
Conference
will appear at the top of
the Phone Dialler screen.
3. To add additional people to your conference call, tap
Hold
to enter the new number and
then tap
Resume
to return and continue.
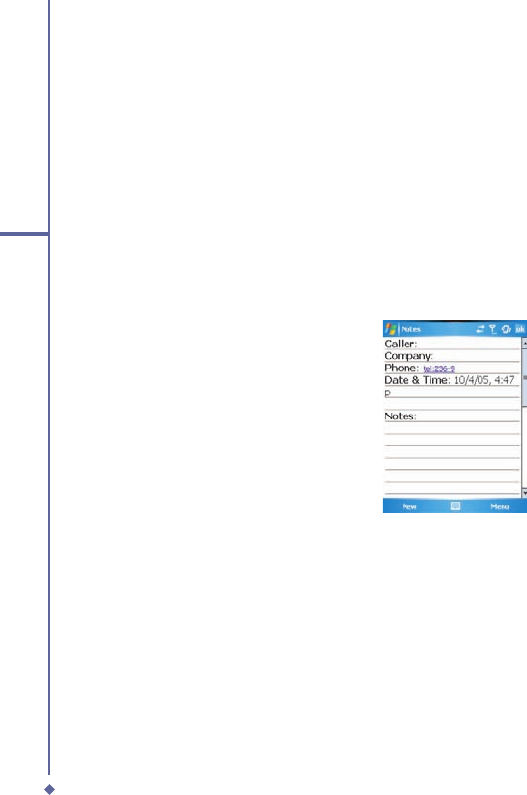
Adding a note
Regardless of whether you call from the Phone Dialler screen,
Contacts
,
Call History
, or
Speed Dial
, you can take notes during/after a call. The note can be saved as an attachment
to your call in one of the
Call History
folders.
Writing a note
1.
During/After a call, tap
Note
.
2.
Use any of the input methods to record
your note and tap
OK
. You can fi nish
your note during or after the call.
Viewing a note
1. In the
Call History
list, tap and hold the desired number, then tap
View Note
in the pop-up
menu. The icon indicates a note.
2. Alternatively, go to
Notes
, and then tap the name of the fi le on the list.

65
4
Basic phone functions
4.8 Contact information
Contacts can be imported in the following ways:
• From your SIM card: Use your SIM card in your O
2
Xda Flame and another device; while
using the other device you create one or more new contacts on the SIM card.
• From your
Call History
: New contact numbers can be found in incoming or missed calls.
Why import contacts?
• You can back up your SIM numbers to your O
2
Xda Flame.
• Creating contacts in
Contacts
creates more detailed records.
• Only
Contacts
can have
Photo Contacts
for an individual contact entry.
SIM Contacts
To copy your SIM contacts to
Contacts
on your phone:
1. Select the contact with the SIM card icon next to it [insert icon]
2. Tap
Menu
>
Save to Contacts
to go to the Contacts screen to add further details.
3. Press
OK
to save the details.
66
4
Basic phone functions
Call History
To view the
Call History
, tap
Phone
on the
Today
screen and tap
Call History
on the Phone
Dialler screen.
Alternatively, you can add a new contact
when just ending a call. Tap
Menu
tab >
Save to Contacts
. Enter the caller’s name
and other information and tap
OK
when
fi nished editing.
Alternatively, go to
Call History
, tap and
hold the number to bring up the pop up
menu and select
Save to Contacts
.
Please note
When the contact is created, the call details in the Call History will be amended and
displayed under the name, not the phone number.
Photo Contacts
Photo Contacts
allow you to assign still or animated photos to entries in
Contacts
. When a
person (for whom you have previously assigned a photo in
Photo Contacts
) calls you, that
photo will appear on your O
2
Xda Flame’s incoming call screen. Use the rich set of features
provided to have the photos displayed with the size, position and animated template you
want.
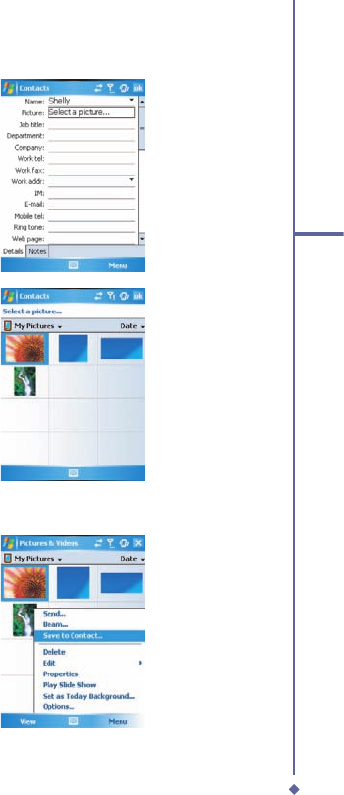
Creating a new photo contact
You can create a photo contact in the following ways:
1. Tap
Contacts
on the
Today
screen or Tap
Phone
>
Contacts
button>
New
tab.
2. Enter the Contact’s name and other information.
67
4
Basic phone functions
3.
Scroll to the
Picture
fi eld and tap
Select
a picture
.
4.
Tap on a desired picture and it will be
assigned to the entry. (To delete the
picture from the
Contacts
edit screen
tap
Menu
tab >
Remove Picture
).
Alternatively, you can assign a picture to a contact.
1.
Tap
Start
>
Programs
>
Pictures &
Videos
>
My Pictures
folder.
2.
Tap the desired picture to view and tap
Menu
>
Save
>
Save to Contact
.
68
4
Basic phone functions
4.9 Device security
You can guarantee your phone’s security by making use of the following security features:
Device lock
The keypad lock turns off keypad functionality. This is a helpful feature when your O
2
Xda
Flame is turned off and in your pocket, when you don’t want it pressed accidentally.
12
3
1. Tap
Device unlocked
on the
Today
screen to lock the keypad.
2. Once you lock the phone, this area displays
Device locked
.
3. To unlock your keypad, tap
Unlock
on the bottom left of the
Today
screen and tap
Unlock
again to confi rm.
69
4
Basic phone functions
Device lock
This phone lock feature protects your O
2
Xda Flame from unauthorized access. When the
phone lock is activated, your O
2
Xda Flame will automatically lock after a specifi ed period
of inactivity. A screen will be displayed requiring your O
2
Xda Flame’s “lock password” to be
entered before access is granted.
1.
Tap
Start
>
Settings
>
Personal
tab >
Lock
.
2.
Check the
Prompt if device unused
for
option and set the prompt
for option and set the prompt for
notifi cation time.
3.
Select the type of password you would
like to use:
Simple PIN
or
Strong
alphanumeric
. A strong password
must have at least 7 characters that
are a combination of uppercase and
lowercase letters, numbers, and
punctuation.
4.
Enter the password and confi rm if
necessary.
To disable the Phone lock feature of your O
2
Xda Flame, uncheck the
Prompt if device
unused for
option.
unused for option.unused for
In case you forget your password, you can
provide a password hint in the Hint tab
under the
Password
tab.

70
4
Basic phone functions
Locking your SIM card
You can protect your O
2
Xda Flame from unauthorized use by assigning a PIN (Personal
Identifi cation Number). Your fi rst PIN is assigned by the Network Operator.
1. Tap
Start
>
Phone
or alternatively tap the
Phone
button on the
Today
screen.
2. On the Phone Dialler screen, tap
Menu
tab >
Options
>
Phone
tab.
3. Check the
Require PIN when phone is used
option.
4. To change the PIN, at any time, tap
Change PIN
.

Chapter 5
Messaging
5.1 Text
5.2
Multimedia messages (MMS)
5.3 Voicemail
5.4
E-mail
5.5
Pocket MSN

72
5
Messaging
5. Messaging
You can receive E-mail and text messages in
Messaging
. Text messages are sent and
received through your network operator by using a phone number as the message address.
Your phone supports the following messaging services:
•
SMS (Short Messaging Service)
allows you to send short messages. To send an SMS
message, your must register for SMS service with your network operator. For more
information, please contact your network provider.
•
MMS (Multimedia Messaging Service)
allows you to send multimedia messages. In
an MMS message, you can include text, pictures, photos, sound fi les or recorded voice.
To send an MMS message, your must register and confi gure the MMS service with your
network operator. For more information, please contact your network provider.
•
Chat
allows you to send messages back and forth with friends. This feature is network
dependent. This feature is supported by the O
2
SMS Plus application.
•
Voice Mail
: You can forward a call to your voice mail box when you are unable to receive a
call. The voice mail center will send you a notifi cation.
•
E-mail
: You can send or receive E-mails with your O
2
Xda Flame by either synchronizing
your Outlook E-mails or connecting to the Internet.
•
IMS (Instant Messaging service)
: Your O
2
Xda Flame is equipped with the Pocket MSN
application. To send instant messages, you need to connect to the Internet.
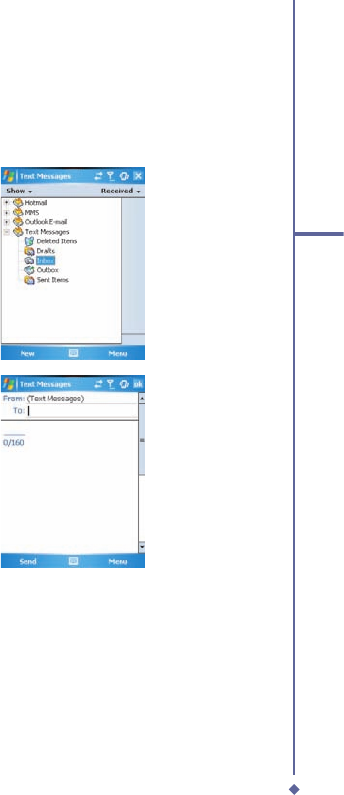
73
5
Messaging
5.1 Text
Write a text message
To create a text message:
1. Tap
Start
>
Messaging
and select the
Inbox
folder.
2. Tap the
New
tab and add recipients in
the
To:
fi eld. Alternatively, tap the
Menu
tab >
Add Recipient
.
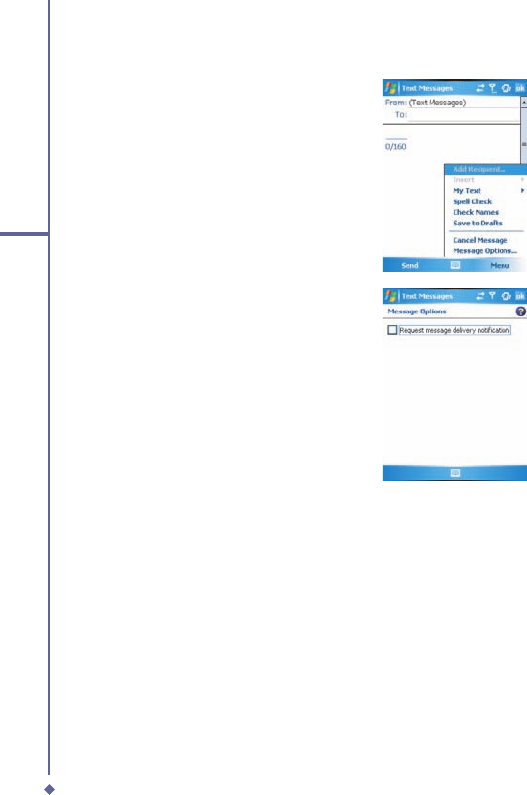
74
5
Messaging
3. Tap on the edit screen to start editing.
For the entry method, please refer to
??
Entering information
.
4. To add predefi ned text, tap
Menu
>
My
Text
and select a text.
5. When you fi nish editing text, you can
start the spell check by tapping
Menu
>
Spell Check
.
6. To save a message to the draft box, tap
Menu
>
Save to Drafts
.
7. Before you send a message, you can
choose to receive a delivery notifi cation
by tapping
Menu
>
Message Options
and checking the
Request message
delivery notifi cation
box.
8. To send a message, tap
Send
.
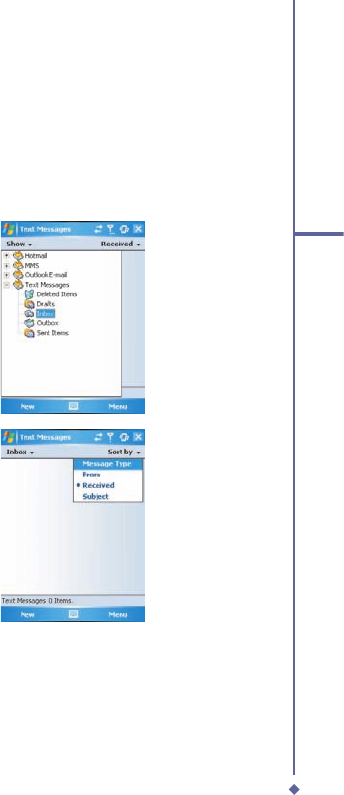
75
5
Messaging
Read messages
Text messages are automatically received when your phone is turned on. Otherwise,
messages are held by your network operator until the next time your phone is connected to
the operator network.
To read text message(s):
1. Tap
Start
>
Messaging
.
2. Select the
Text Messages
folder and
a sub-folder under
Text Messages
,
such as
Inbox
,
Outbox
,
Sent Items
, or
Deleted Items
.
3.
Select how to sort the messages.
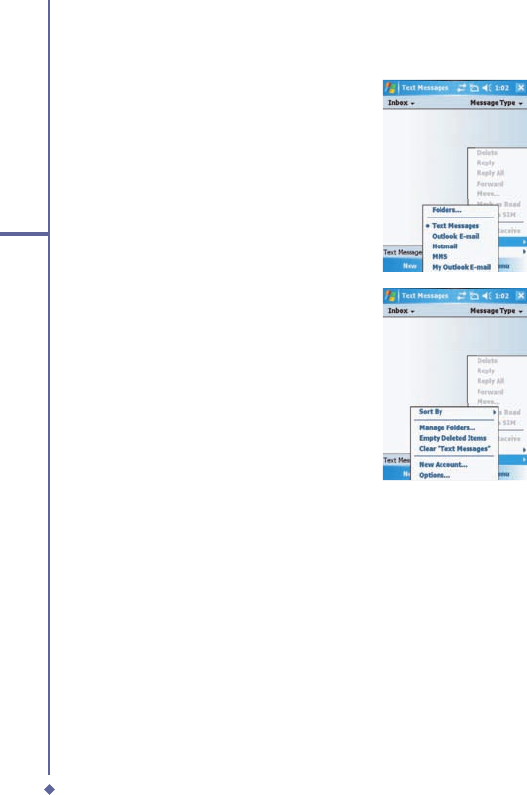
76
5
Messaging
4.
Tap
Menu
to access more options:
•
Tap
Go To
to switch your current
account to
Text Messages, Outlook E-
Mail, Hotmail, MMS and My Outllook
E-mail.
•
Tap
Tools
to
Sort By
,
Manage Folders
,
Empty Deleted Items
,
Clear “Text
Messages”
, create a
New Account
,
and view
Options
(change settings for
Accounts
,
Message
,
Address
, and
Storage
).
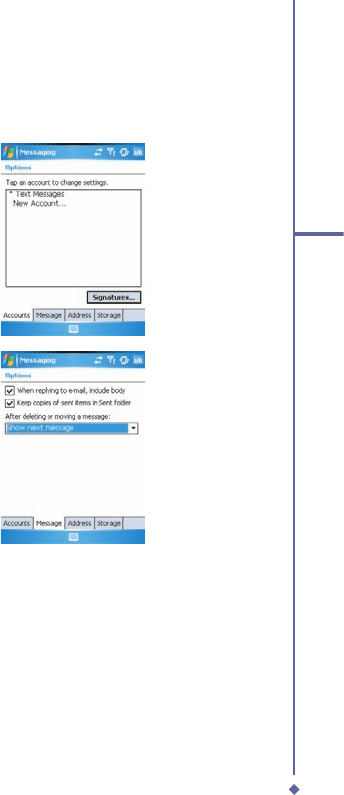
77
5
Messaging
Settings
Text Message settings allow you to customize
Accounts
,
Message
,
Address
and
Storage
.
To access available options tap
Menu
>
Tools
>
Options
•
Accounts
: Tap an account to change
settings. For example, tap
Text
Messages
to change
Request delivery
notifi cations
and
Use Unicode when
necessary
. Tap
New Account
to set up
a new account, or tap
Signatures…
to
use signatures to designate accounts.
•
Message: Set up the following
messaging features—When replying
to e-mail, include body. Keep copies
of sent items in Sent folder and the
display after deleting or moving a
message feature.
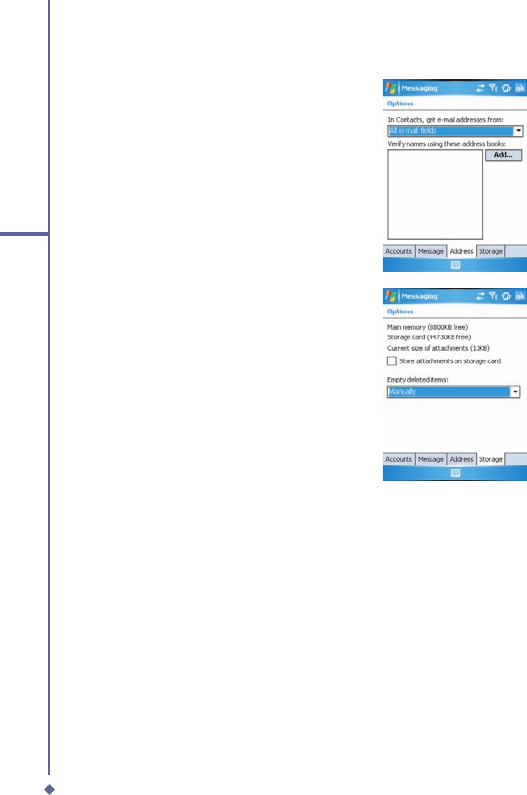
78
5
Messaging
•
Address
: Select whether to get E-mail
from all contacts with E-mail addresses;
alternatively, you can verify names by
defi ning their E-mail addresses.
•
Storage
: Check the memory space
of your phone, storage card and
attachments,
Store attachments on
storage card
and specify how you want
to empty your deleted items.
5.2 Multimedia messages (MMS)
Your O
2
Xda Flame allows you to create and share your own MMS messages (with photos,
videos, text, and audio) with your friends and family. You can even use the O
2
Xda Flame’s
built-in camera to snap photos and send them immediately by composing an MMS message.
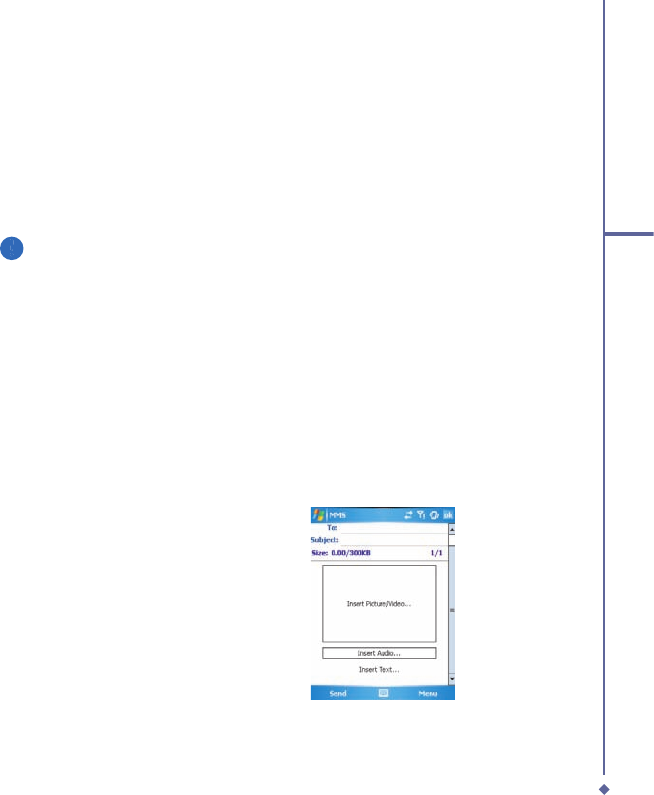
79
5
Messaging
Launching the MMS composer screen
You can access MMS directly by tapping
Start
>
Messaging
and selecting the
MMS
folder.
Your device also provides several ways to launch the MMS composer screen:
• From
Pictures & Photos
: Select any picture in the
My Pictures
folder, tap
Menu
>
Send
and select an account
—
MMS
. At this point, you will be directed to the MMS composer
screen in
Messaging
.
• From
Camera
(Optional): Capture a picture or a video clip. Select the fi le and send via
MMS.
Please note
You must confi gure the profi les, connections and downloading settings before you can
send and receive MMS messages.
Create an MMS message
In the
Inbox
, you will see messages listed with the following parameters:
• Receive from
• Time when the message was received
• Subject of the message
Creating an MMS Message
MMS messages are created by combing various slides. Each slide can consist of a photo, an
audio or video clip, audio, or text.
1. Tap
Start
>
Messaging
>
MMS
folder.
In the MMS
Inbox
, tap
New
. You will
automatically be taken to a blank MMS
composition screen.
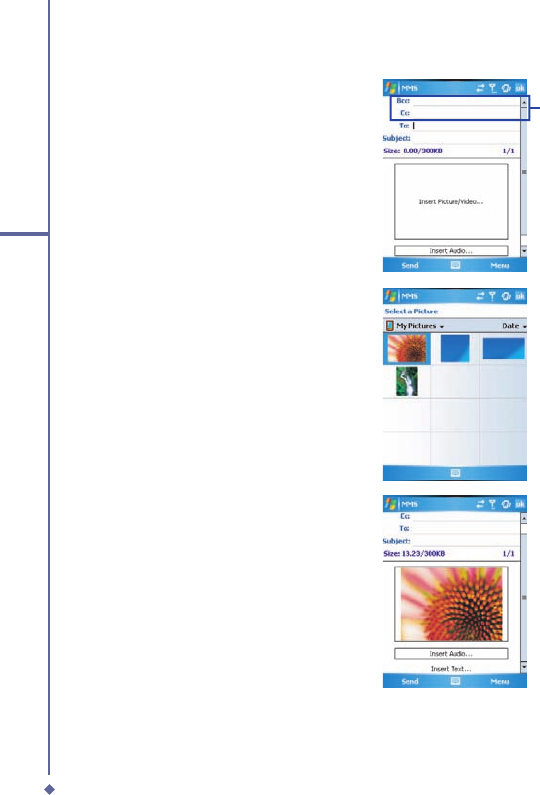
80
5
Messaging
2.
Enter the recipient’s address
To:
and
the Subject of the message.
Scroll up to view the
Bcc and Cc fi elds.
3.
Tap
Menu
to view more options: tap
Insert Picture/Video
or
Menu
>
Insert
>
Picture
to access the image selection
screen.
4.
Select an image and insert it to your
message. You can also insert an audio
fi le or text.

81
5
Messaging
5.
Tap
Menu
to get more editing options.
For details, please refer to the following
MMS menu options.
The MMS composition screen menu includes the following options:
Items
Description
Add Recipient
Add a new contact from your
Contacts
list.
Check Names
This option helps you search for the names beginning with letters
entered in the
To
,
Bcc
, or
Cc
fields.
Template
The current MMS message can be saved as a template and used at a
later date.
Insert (Picture,
Video, Audio, or
Sound Recorder)
Select the file type to insert into your message. If the message contains
an audio or image file, then a video file cannot be inserted.
• If you select to insert
Sound Recorder
, a record screen displays:
Record time
in seconds
Play
Tap
Menu
>
Select
and specify the file name & save the file.
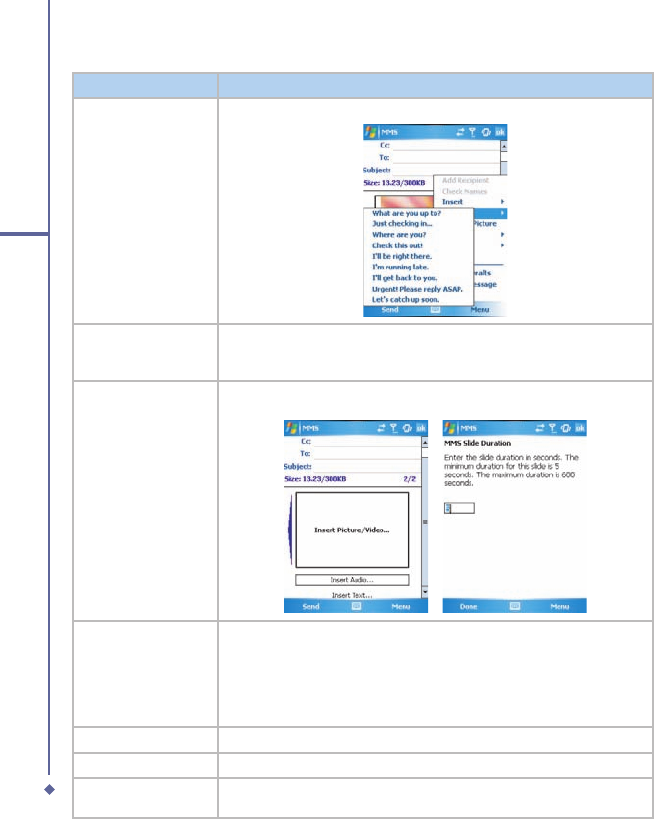
82
5
Messaging
Items
Description
My Text
A list of pre-defined text that can be inserted into your MMS message.
Remove Recipient/
Subject, Picture/
Video/Audio/Text)
Depending on the cursor location, the
Remove
item varies. If the cursor
is on the
Insert Audio
field this item shows
Remove Audio
.
Slides (Insert,
Delete, Next,
Previous, Duration)
You can create/delete slides in your message, navigate between the
next and previous slides, or specify the display duration of each slide.
Options
More options include
•
Background Color
: Select a background color from a color palette
for your message.
•
Send options
: Choose the priority of the message from the drop
down menu (Low Normal or High). Check delivery report, read report
and hide sender to activate the options.
Preview
To view the composed message before sending, tap
Replay
.
Save to Drafts
Save the message to your drafts folder.
Cancel Message
To cancel the sending of the composed message and return to the
Inbox. Before canceling, you can save the message to the drafts folder.

83
5
Messaging
MMS folder options:
In each message box, you can tap and hold an individual message to see various options.
Items
Description
Delete
Delete the selected message. The deleted message will be stored in the
Deleted Items
folder.
Reply
Reply only to the selected message’s sender. After selecting this
option, you are taken to the message composition page where you can
compose a message as a reply. You can change the subject and other
fields.
Reply All
Reply to all the senders and recipients present in the
Cc
and
Bcc
fields.
You can change the subject and other fields.
Forward
Forward the selected message to other recipients. On selecting this
option, you are taken to the page where your original message is
retained and you can edit it before sending. You can change the subject
and other fields.
Move
Move the selected message to a different folder. The folder list is
displayed to select the folder where the message is to be moved to.
Mark as Read/
Unread
Mark the selected message as read or unread. The read and unread
feature depends on whether the message is read or not.
Download Message
Download the message from the server.
Send/Receive
Refresh and download pending messages.
Go To
Switch between different accounts (SMS, MMS or Outlook)
84
5
Messaging
Items
Description
Tools
This option helps you to
Sort
By
,
Manage Folders
,
Empty Deleted
Items
,
Clear “MMS”
, create
New Account
, and access more features.
•
Sort by:
Choose how to view the MMS messages by
Message
Type
,
From
,
Received
, and
Subject
.:
•
Manage Folders
: On selecting this option, you get the MMS folder
list, where you can create new folders, rename, delete and view
folder options.
Please note
System folders (including Inbox, Deleted Items, Drafts, Outbox,
and Sent Items) cannot be deleted.
•
Empty Deleted Items
: An alert message asks if you want to delete
all messages permanently, which cannot be recovered once deleted.
•
Clear MMS
: Clear all the messages and subfolders under the MMS
folder. Tap
Yes
to confirm deletion.
•
New Account
: To create a new E-mail account.
•
Options
: You can edit account settings for your messages, address
book and storage. Please refer to
Settings under 6.1 Text
.
MMS Settings
This option helps you to set the
MMSC settings
,
Send
setttings,
Receive
settings,
General
and
About
.
•
MMSC settings:
From the list choose the profile that you want to use
to send the MMS. Tap edit to see the profile name and the
MMSC
,
Data
Connection
,
Gateway
,
IP Address
and
Port
•
Send:
From the drop down menus choose the
Priority
(Low, Normal
or High)
, Validity Period
(Maximum, 1 week, 1 day, 12 hours),
Deffered
Delivery
(Immediate, After 1 hour, After 1 day, After 1 week, custom),
Message Type
( Personal, Advertisement, Informational, Automatic),
Message Size
( 30KB, 100KB, 300KB). Check
Delivery Report, Read
report and Hide Sender
to activate these options.
report and Hide Sender to activate these options.report and Hide Sender
.•
Receive:
Choose the type of reception you receive when you are
at
Home
or
Roaming
, choose from Automatic, Manual or Restricted.
Check the boxes to choose which messages to allow,
Personal
,
Informational
,
Advertisement
or
Automatic.
Check the box to
Reject
Anonymous
Messages.
•
General:
Choose the number of attempts it takes to send the
message from 1 ~ 6.
•
About:
Deatisl about the product version.

85
5
Messaging
Read MMS messages
You have several options when viewing a message:
1. Use playback controls (
Play
/
Pause
,
Stop
) to view a message. You can pause it anytime.
2. Tap
Objects
to see a list of fi les. If you want to save a particular fi le, tap it and then choose
Save from the Tools menu
.
3. To view slides manually, use the navigation buttons to scroll through the message.
5.3 Voicemail
Most mobile network operators offer this external voice mail service to subscribers. This
function enables you to divert received calls to a voice mail center where callers can leave
voice messages under the following circumstances:
• if your phone is switched off or is not able to receive signals
• if you did not answer the call
• if you are currently on the phone
You will be notifi ed of a voice mail message by an icon in the
Today
screen. If the voice mail
service is not included in your mobile network operator’s package, you will have to subscribe
to the service separately and confi gure the settings manually. The voice mail service is
network dependent. Contact your mobile network operator for more details.
Please note
The voice mail service is SIM card and network dependent.
To call the voice mail center
Tap
Phone
>
Speed Dial
and call from
Speed Dial 1
. Alternatively, enter the voice mail
center number on the Phone Dialer screen and tap Talk or press
Call key
.
Please note
For more details about Speed Dial, please refer to 5.1 Making a call.
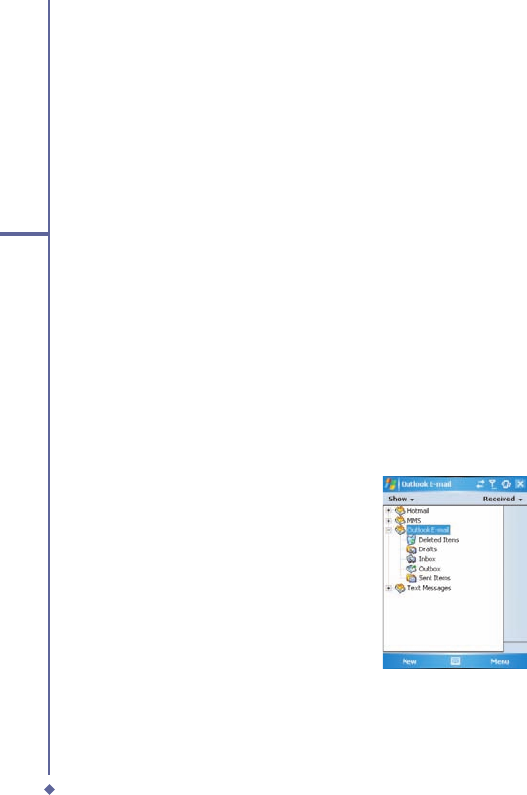
86
5
Messaging
5.4 E-mail
The
Outlook
E-mail account on your O
2
Xda Flame is used to store messages that you send
and receive through synchronization with a PC. Account names appear when you open the
folder list, located on the left, under the navigation bar, in the message list view.
You can receive E-mail and text messages in
Messaging
. E-mail messages are sent by using
an address received from your Internet network operator (
ISP), an E-mail network operator
or your employer. You can also send and receive E-mail by synchronizing with your PC, or
by connecting to a Post Offi ce Protocol 3 (
POP3) or Internet Message Access Protocol 4
(
IMAP4) mail server. Aside from the default Outlook E-mail account, you need to manually set
up other E-mail accounts.
How you download copies of messages depends on how you receive messages:
• If you receive E-mail messages through a remote E-mail server, follow the instructions as
described in the following
Downloading messages from a server
.
• If you receive E-mail messages through
ActiveSync
, begin synchronization. For more
information, please refer to
Chapter 3. Synchronization
.
With synchronization, messages are synchronized between your O
2
Xda Flame and the
PC by using
ActiveSync
and
Microsoft Exchange
or
Outlook
. For more information, see
Chapter 3. Synchronization
.
Setting up an account:
1. Open
Messaging
on your O
2
Xda
Flame by tapping
Start
>
Messaging
.
2.
Select the Outlook E-mail folder.
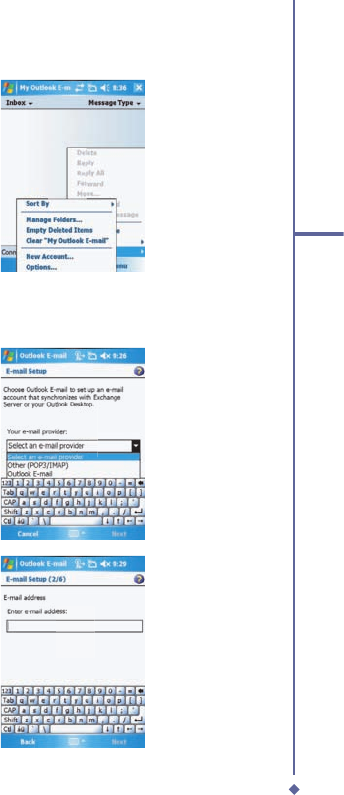
87
5
Messaging
3.
Tap
Menu
>
Tools
>
New Account
and
set up an account.
4.
The
E-mail Setup
screen will prompt
you to fi ll in the necessary information to
complete the setup.
5 From the drop down menu select Other
(POP3/IMAP)
6.
Fill in your E-mail address and tap
Next
.
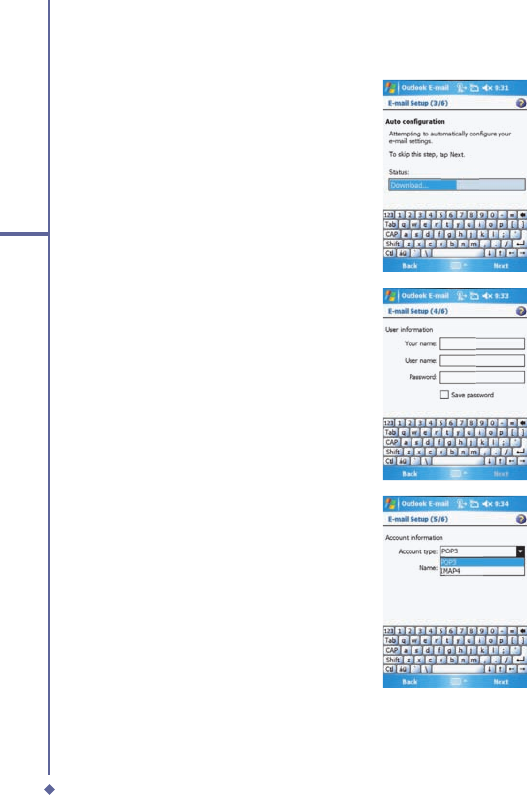
88
5
Messaging
7.
The
E-mail Setup
will attempt to
connect your O
2
Xda Flame to your
E-mail server and automatically
download the necessary connection
settings. If the auto confi guration is
unsuccessful, contact your ISP or
network administrator. If you know your
E-mail settings, press
Next
to proceed.
8. Enter
Your name
,
User name
and
Password
, and tap
Next
. If you check
the
Save password
box, your device
will not ask for your password the next
time you log in to an E-mail account.
However, other people can access your
account if you lose the device.
9. Select the appropriate
Account type
that your E-mail provider supports
(
POP3
or
IMAP4
). Enter a
Name
for
your E-mail account and tap
Next
.
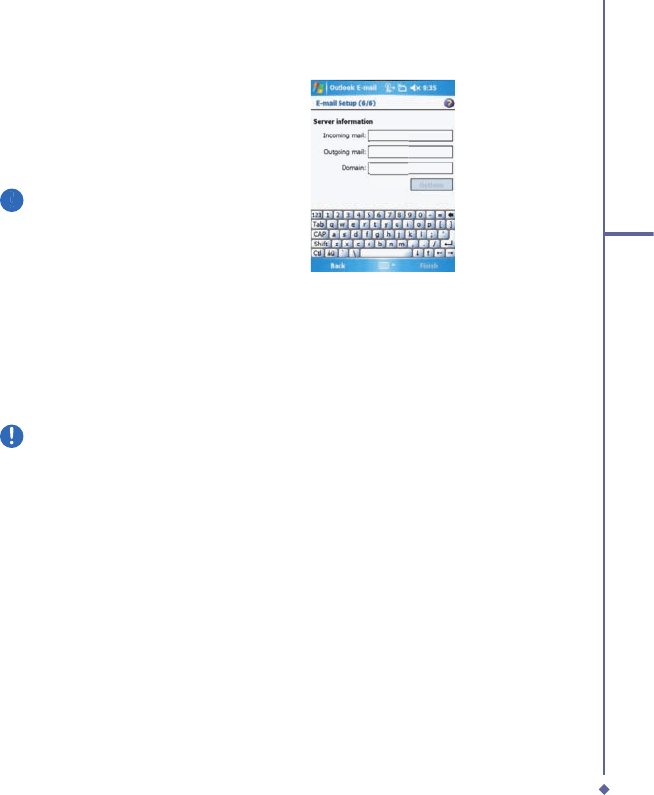
89
5
Messaging
10. Enter your E-mail provider’s server
name information for
Incoming mail
and
Outgoing mail
, and tap
Finish
.
Please note
For security reason, some fi xed line
ISPs may restrict access to their
outgoing mail servers to their own ISP
network infrastructure. In this case,
you may need to use the Outgoing
mail server (if available) provided by
your mobile operator.
When fi nished, your new E-mail account will be displayed under this menu. You can start
connecting to your E-mail server at this point. You can set up several E-mail accounts,
including Outlook.
Please note
To delete an account, go to the account’s folder. Tap and hold the account’s name and
tap delete.
Downloading messages from a server
In
Messaging
, select Outlook E-mail or another account to open a connection to the Internet
or your corporate network, depending on the account.
1. Select an account and ensure that the account is selected (marked by a bullet).
2. Tap
Menu
>
Download Message
. The messages on your device and E-mail server
are synchronized. New messages are downloaded to your O
2
Xda Flame
Inbox
folder,
messages in your O
2
Xda Flame
Outbox
folder are sent, and messages deleted from the
server are removed from your O
2
Xda Flame
Inbox
. Tap a message in the message list to
open it. For E-mail viewing menu options, please refer to the following section.
To cancel downloading a message, tap
Menu
>
Do not download
.
3. If you read a message, you can mark it as read or unread by tapping
Menu
>
Mark as
Read
or
Mark as Unread
.
4. When fi nished, tap
Accounts
>
Disconnect
.
90
5
Messaging
E-mail viewing screen options:
After selecting an E-mail from an account, tap
Menu
to access the following options:
Items
Description
Delete
Delete the selected message. The deleted message will be stored in the
Deleted Items
folder.
Reply
Reply to only the selected message’s sender. After selecting this
option, you are taken to the message composition page where you can
compose a message as a reply. You can change the subject and other
fields.
Reply All
Reply to all the senders and recipients present in
Cc
and
Bcc
fields. You
can change the subject and other fields.
Forward
Forward the selected message to other recipients. On selecting this
option, you are taken to the page where your original message is
retained and you can edit it before sending. You can change the subject
and other fields.
Move
Move the selected message to a different folder. The folder list is
displayed to select the folder where the message is to be moved.
Mark as Read/
Unread
Mark the selected message as read or unread. The read and unread
feature depends on whether the message is read or not.
Download Message
Download the message from the server.
Send/Receive
Refresh and download the pending messages
Go To
.Go to other messaging accounts such as Text Messages, Outlook E-
mail, Hotmail and MSN
Tools
Use to
sort
,
Manage Folders
,
Empty deleted items
,
Clear
the Outlook
Clear the Outlook Clear
folder, setup a
new account
and using
options
change the details of
the accounts.

91
5
Messaging
Receiving attachments
An attachment sent with an E-mail message or downloaded from the server appears as an
icon at the bottom of the message in its own window panel. Tapping the attachment icon
opens the attachment if it is fully downloaded. You can mark an attachment for downloading
(IMAP4 account only) the next time you connect.
For Outlook E-mail attachment through synchronization:
1. Start
ActiveSync
on your PC.
2. Click
File
>
Mobile Device
and then select your mobile device.
3. Click
Tools
> and then click
Options
.
4. Select the message account >
Settings
and then select
Include File Attachments
.
Through a remote IMAP4 E-mail server:
1. From
Messaging
, tap
Accounts
>
Accounts...
>
IMAP4
.
2. Tap
Next until you reach Server Information
>
Options
.
3. Tap
Next
twice >
Get full copy of messages and When getting full copy get
attachments
.
Embedded images and objects cannot be received as attachments. An embedded message
can be viewed as an attachment when using
IMAP4
to receive E-mail. However, this feature
does not work if
TNEF
(Transport Neutral Encapsulated Format) is enabled so that you can
receive meeting requests.
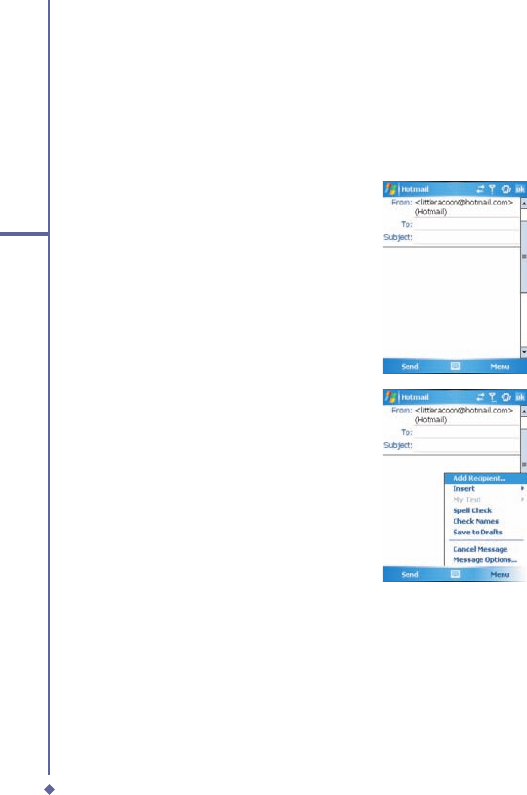
92
5
Messaging
Creating an E-mail
1. Tap
Start
>
Messaging
and select
Outlook E-Mail
or the desired E-mail
account. For account menu options,
please refer to the following section.
2.
Tap New.
3.
Enter the E-mail address of one or
more recipients, separating them with
a semicolon. To access addresses and
phone numbers from
Contacts
, tap
To
or tap
Menu
>
Add Recipient…
.
4. Enter your message. To quickly add
common messages, tap
My Text
and
tap a desired message.
5. To check spelling, tap
Menu
>
Spell
Check
. For E-mail composition menu
options, please refer to the following:
6.
Tap
Send
. If you are working offl ine,
the message is moved to the
Outbox
folder and will be sent the next time you
connect.
93
5
Messaging
Account menu options:
When you select an account, tap
Menu
to access the following options:
Items
Description
Delete
Delete the selected message. The deleted message will be stored in the
Deleted Items
folder.
Reply
Reply to only the selected message’s sender. After selecting this
option, you are taken to the message composition page where you can
compose a message as a reply. You can change the subject and other
fields.
Reply All
Reply to all senders and recipients present in the
Cc
and
Bcc
fields. You
can change the subject and other fields.
Forward
Forward the selected message to other recipients. On selecting this
option, you are taken to the page where your original message is
retained and you can edit it before sending. You can change the subject
and other fields.
Move
Move the selected message to a different folder. The folder list is
displayed to select the folder where the message is to be moved.
Mark as Read/
Unread
Mark the selected message as read or unread. The read and unread
feature depends on whether the message is read or not.
Download Message
Download the message from the server.
Send/Receive
Refresh and download pending messages.
Go To
.Go to other messaging accounts such as Text Messages, Outlook E-
mail, Hotmail and MSN
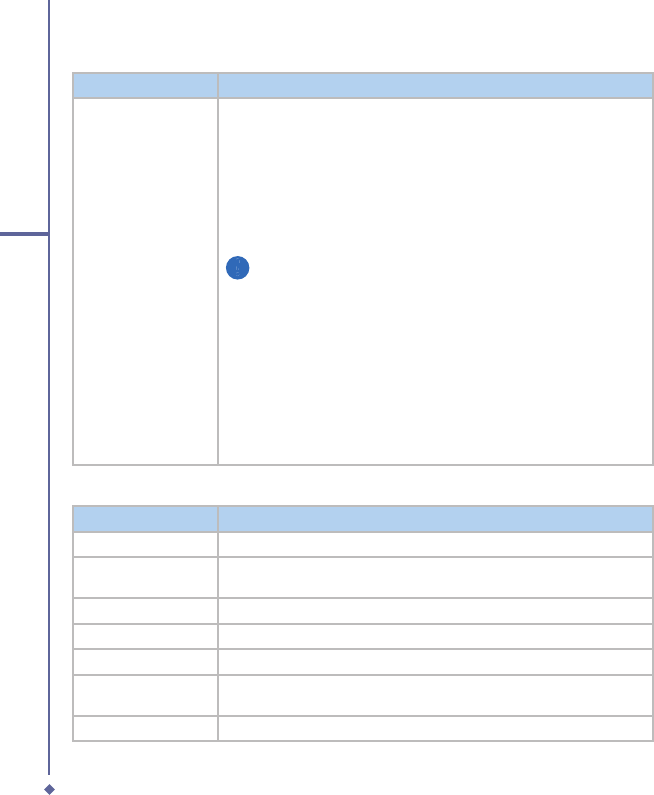
94
5
Messaging
Items
Description
Tools
This option helps you to
Sort By
,
Manage Folders
,
Empty Deleted
Items
,
Clear “Hotmail”
, create
New Account
, and access more
features.
•
Sort By
: Choose between
Message Type
,
From
,
Received
and
Subject
•
Manage Folders
: On selecting this option, you get the list of MMS
folders where you can create new folders, rename, delete and view
folder options.
Please note
System folders (including Inbox, Deleted Items, Drafts, Outbox,
and Sent Items) cannot be deleted.
•
Empty Deleted Items
: An alert message asks if you want to delete
all messages permanently, which cannot be recovered once deleted.
•
Clear MMS
: To clear all messages and subfolders under Deleted
Items. Tap
Yes
to confirm.
•
New Account
: To create a new E-mail account.
•
Options
: You can edit the account settings for your messages,
address book and storage. Please refer to the following Options
menu.
E-mail composition menu options include the following:
Items
Description
Add Recipient
Add a new contact from your
Contacts
list.
Insert (Picture, voice
note, and File)
Select the file you would like to insert into your message. If the message
contains an audio or image file, then video files cannot be inserted.
My Text
Select or edit a preset message.
Spell Check
To check the spelling of your message content.
Save to Drafts
Save the message to your draft folder.
Cancel Message
Cancels sending of the composed message and returns to the Inbox.
Before canceling, you can save the message to the drafts folder.
Message Options
Specify settings such as
Priority
,
Security
and
Language
.

95
5
Messaging
Managing messages and folders
Each E-mail account and text message
account has its own folder hierarchy with
fi ve default folders:
Inbox
,
Outbox
,
Deleted
Items
,
Drafts
, and
Sent Items
. The
messages you receive and send through the
mail account are stored in these folders. You
can also create additional folders within each
hierarchy. The behavior of the folders you
create depends on whether you are using
an
Outlook E-Mail
,
Text Messages
,
POP3
,
MMS
, or
IMAP4
account.
If you use an
Outlook E-Mail
account,
E-mail messages will automatically be
synchronized with your device. You can
synchronize additional folders by designating
them for
ActiveSync
. The folders you create
and the messages you move will then be
mirrored on the server.
If you use a
Text Messages
account,
messages are stored in the
Inbox
folder.
If you use a
POP3
account and move E-
mail messages to a folder you created, the
link between the messages on the device
and their copies on the mail server will be
broken. The next time you connect, the
mail server will see that the messages are
missing from the device Inbox folder and
delete them from the server. This prevents
you from having duplicate copies of a
message, but it also means that you will
no longer have access to messages that
you move to folders created from anywhere
except the device.
If you use an IMAP4 account, folders you
create and E-mail messages you move are
mirrored on the server. Therefore, messages
are available to you anytime you connect to
your mail server, whether from your device
or a PC. This synchronization of folders
occurs whenever you connect to your mail
server, create new folders, or rename/delete
folders when connected.
5.5 Pocket MSN
When starting Pocket MSN the following screen
is displayed. Tapping Options displays General,
Hotmail, Messenger, SMS and Switch User.
MSN Messenger features include:
• Seeing who is online.
• Sending and receiving instant messages.
• Having instant message conversations
with groups of contacts.
• Notifying contacts of your online status.
• Blocking contacts from seeing your status
or sending you messages.
To use
MSN Messenger
, you need a
Microsoft Passport
account or a
Microsoft
Exchange E-mail
account that your
employer provides. Once you do, you will
need to:
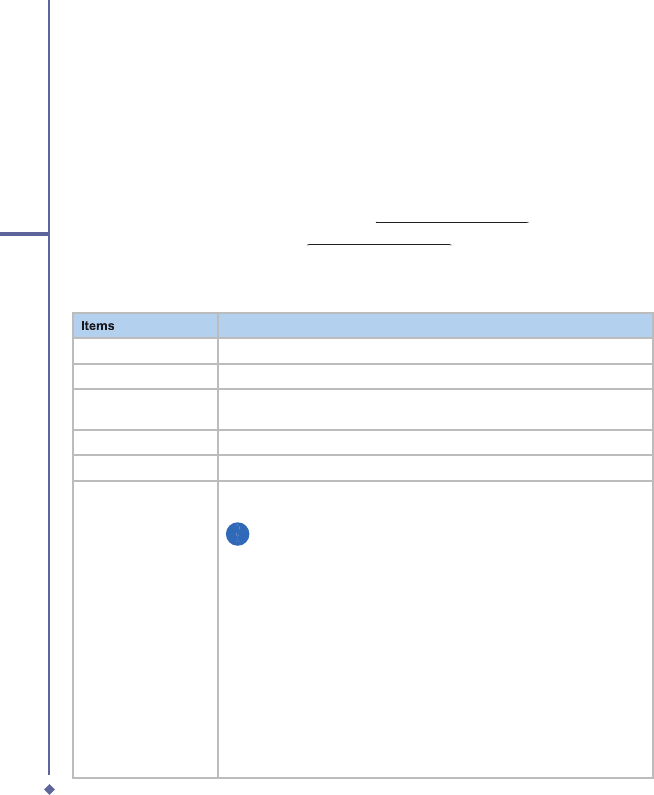
96
5
Messaging
• Set up an account on
MSN Messenger
.
• Sign in to
MSN Messenger
.
Setting up an account
Before you can use
MSN Messenger
, you must set up the instant messaging account(s) to
use. For
MSN Messenger
service, you must have a
MSN Messenger service, you must have a MSN Messenger
Microsoft Passport
or
Hotmail
account.
For
Exchange Instant Messaging
, you must have an
Exchange account
.
• To set up a Microsoft Passport account, go to
http://www.passport.com
http://www.passport.com
.
• To set up a Hotmail account, go to
http://www.hotmail.com
http://www.hotmail.com
.
• To set up an Exchange account, check with your company network administrator.
MSN Messenger composition menu options include the following:
Items
Description
Chats
Displays all current people being chatted to.
Sign In / Sign Out
Sign or out of MSN messenger
My Status
Display your status to your contacts (Online, Busy, Be Right Back, Away,
On The Phone, Out To Lunch, Appear Offline)
Add a Contact
Tap to add a new contact.
Edit My Text
Edit the predfined messages.
Options
Under the options select from the following tabs: General,
Hotmail
,
Messenger, SMS,
and
Switch User•
Please note
System folders (including Inbox, Deleted Items, Drafts, Outbox,
Sy and Sent Items) cannot be deleted.
•
General
: Tap the box to cleat the saved password.
•
Hotmail
: Select E-mail delivery options (Off, Use filters and For
all new e-mail); Select the Junk mail folder (Default, Enhanced,
Exclusive); Tap the check box to “Download new e-mail
automatically”
•
Messenger
: Enter your display name; Tap “Update presence
information for all contacts automatically”..
•
SMS
: Tap the check box to use SMS to keep my messages and
contacts up-to-date.
•
Switch User
: Tap the Switch User box to change the current MSN
user,
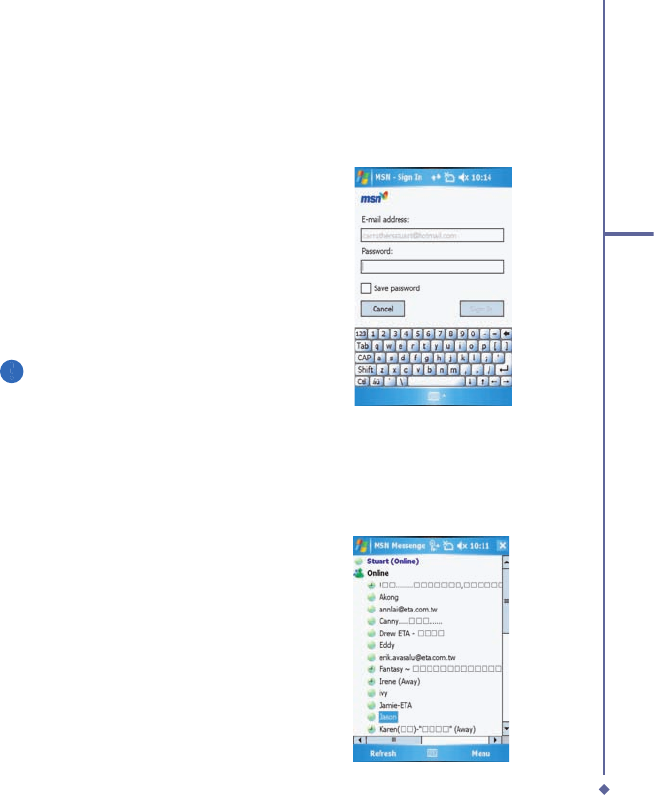
97
5
Messaging
MSN Messenger
The hotmail mail inbox behaves in the same
way as all other e-mail in boxes.
Signing in
1. To use
MSN Messenger Service
, set
up a connection to the Internet; to use
Exchange Instant Messaging
, set up a
connection to your corporate network.
2. Tap
Start
>
Program
>
Pocket MSN
>
MSN Messenger
>
MSN Messenger > MSN Messenger
Tap here to sign in
.
3. Enter your sign-in name and password
for the selected account(s). Your
sign-in name is usually in the form:
username@domain.com.
Please note
Signing in to an Exchange account
may take several minutes, depending
upon your connection speed.
Using
1. Once signed in the following screens will
be dsiplayed.
2. Enter your hotmail username and
password.
3. A list of your contacts and their status is
displayed.
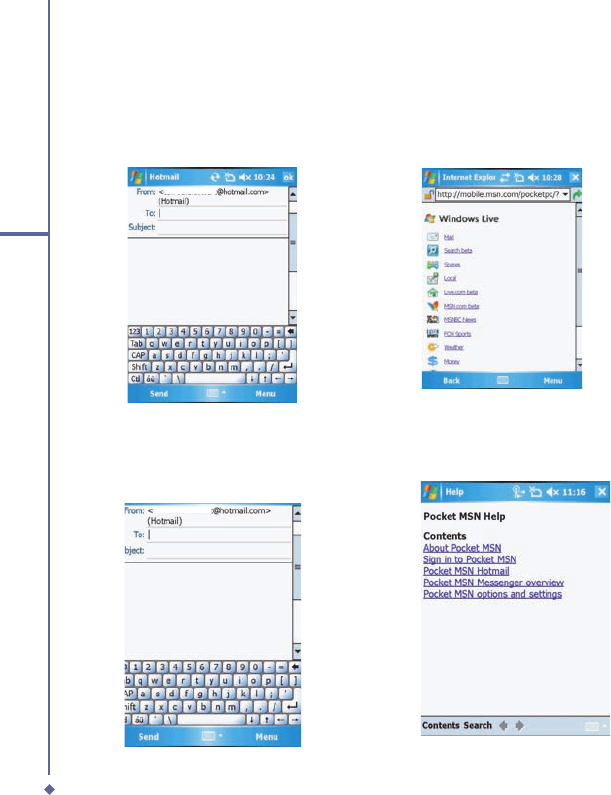
98
5
Messaging
MSN Mobile Home
Loads Internet explorer and displays the mobile.
msn.com/pocketpc website.
1. Tap the links for further infromation.
Pocket MSN Help
Displays the help file of MSN Messenger
1. Tap the items on the list for further
information..
MSN Hotmail
The hotmail mail inbox behaves in the same
way as all other e-mail in boxes. (See section
6.4)
Compose Hotmail
Composing hotmail e-mails is done in the same
way as all other e-mail accounts. (See section
6.4)