Arima Communication 3600 3G Pocket PC phone with BT and WLAN User Manual Ch06 Xda Star IM Eng Camera indd
Arima Communication Corporation 3G Pocket PC phone with BT and WLAN Ch06 Xda Star IM Eng Camera indd
Contents
- 1. User manual 1
- 2. User manual 2
- 3. User manual 3
User manual 2

Chapter 6
Camera
6.1 Using the Camera
6.2 Capture mode
6.3 Setup menu
6.4 Photo Album
6.5 View mode
6.6 Edit Mode
6.7 Recording
100
6
Camera and Video
6.1 Using the Camera
Your O
2
Xda Flame features a digital camera that allows you to snap new photos (including
self-portraits) or shoot video clips with accompanying audio. They are stored in
Pictures and
Videos
, which provides many powerful features to manage, organize, and manipulate image,
video, and audio fi les.
Landscape mode
Save to the Album
The integrated camera features the following:
• When in
Photo Capture mode
, you can capture standard still images.
• In
Video
or
Video MMS Capture mode
, you can capture “live” video streams (with audio if
desired), then share them with others or play them on the O
2
Xda Flame or desktop PC.
• In
Photo ID and MMS Capture mode
, you can capture images for contacts or MMS use.
• In
Photo Frame Capture mode
, you can place captured images into attractive frames
(templates).
You can even send captured fi les via
E-mail
or
MMS
. Just
Snap and Send
a newly captured
image or
Select and Send
an existing image. Of course, you can also get image, video,
and audio fi les from received
E-mail
, a
Memory Card
,
Infrared beaming
,
Bluetooth
or
synchronized from a PC via
ActiveSync
, and organize them into
Albums
and slideshows.
101
6
Camera and Video
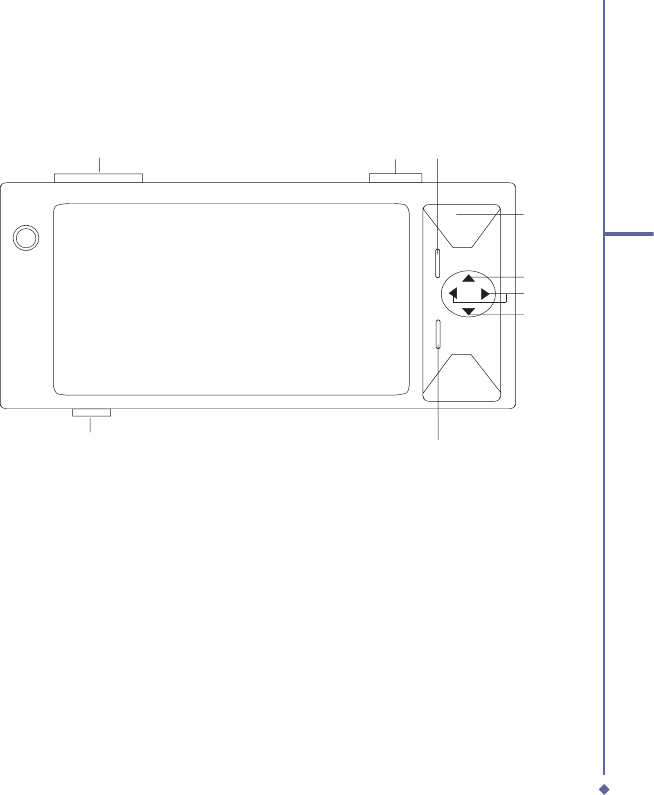
Shooting mode Shoot
Switch Camera Setting
Picture & Video
Mode
To “Today”
Zoom In
Brightness
Zoom Out
Camera Buttons
102
6
Camera and Video
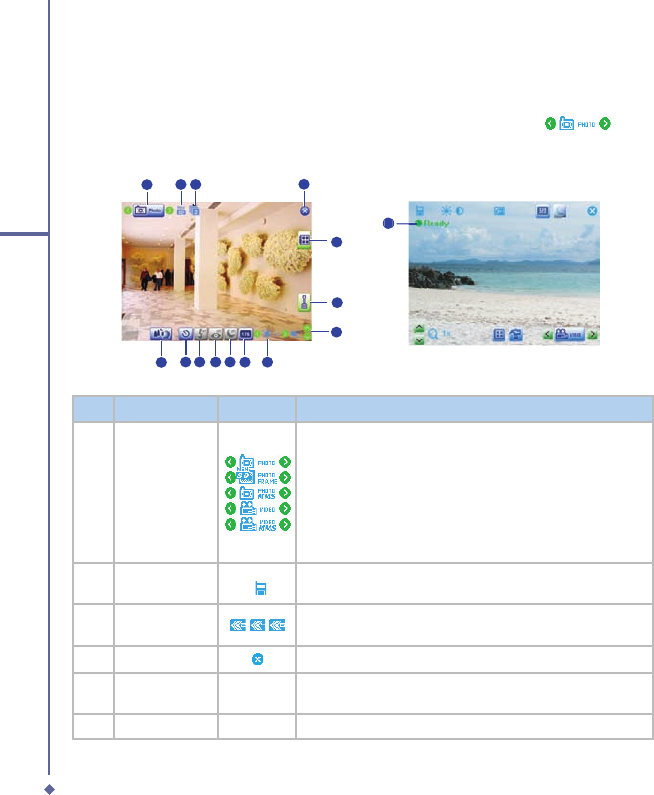
6.2 Capture mode
Your O
2
Xda Flame has a number of capture modes. The following section shows how to use
photo capture mode and video capture mode. To switch capture modes, tap
.
Photo/Video mode
12 3 4
5
6
7
8
9
10111213
14
14
No.
Item
Icons
Description
1
Capture mode
Photo
MMS Photo
Video
MMS Video
Contact Picture
Frame Photo
Multi Shot
2
Storage
/
MicroSD™ (Memory card) / PDA; indicating the current
location of saved files.
3
Continuous
shot
Select to take one or a series of photos. (This feature is
disabled in video capture mode).
4
Exit
Exit the screen.
5
Pictures &
Videos
Where your captured or recorded files are saved. You can
view or edit these files under
Album
.
6
Setup menu
A detailed setup menu.
103
6
Camera and Video
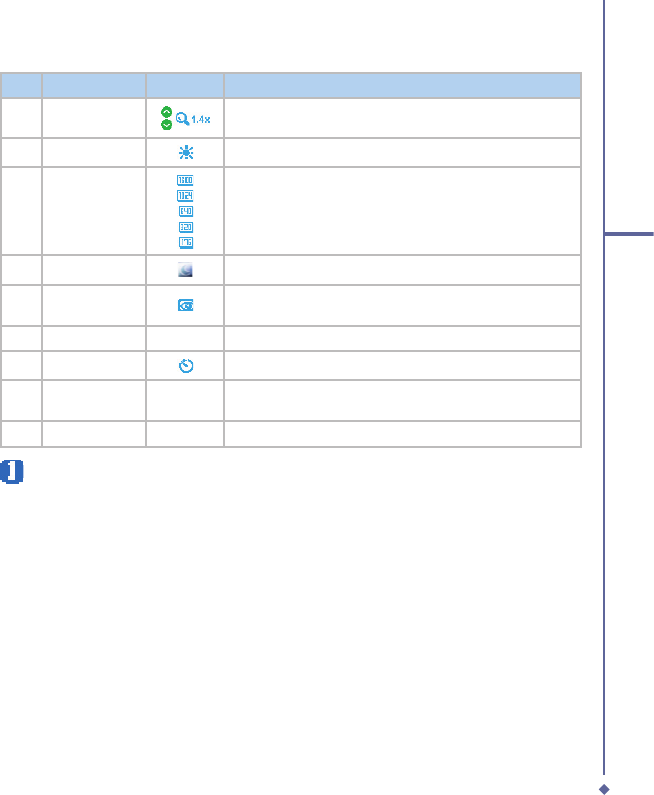
No.
Item
Icons
Description
7
Zoom In/Out
Zoom range: 1.0x, 1.2x, 1.4x, 1.6x, 1.8x, and 2.0x.
8
Brightness
Current brightness level.
9
Photo
resolution
1600 x 1200 UXGA
1024 x 768 XGA
640 x 480 VGA (default)
320 x 240 QVGA (also for video)
176 x 144 QCIF (also for video)
10
Night Mode
Enables a kind of “night vision” for dark conditions.
11
Quick view
A quick view after you take a shot. Select to turn this
feature on/off.
12
Flash light
Indicates whether Flash is on/off
13
Timer
Indicates whether Timer is on/off.
14
Self Portrait
Mode
Switch between Normal Mode and Self Portrait Mode.
15
Record mode
●Ready
Indicates recording status.
Please note
Not all the icons described above will be displayed at the same time. Some will be
displayed only when certain functions are operating.
104
6
Camera and Video
Shoot a picture
1. Press the
Camera
key on the right side of your O
2
Xda Flame or tap
Start
>
Programs
>
Camera
.
2. Tap
to select the desired capture mode:
Photo
,
Photo (ID, MMS)
or select a
Photo Frame
. For more settings, please refer to
7.2 Setup menu
.
3. Press the center navigation key or the
Camera
key to take a snapshot.
4. After you take a photo, the image will be automatically saved to
Pictures & Videos
.
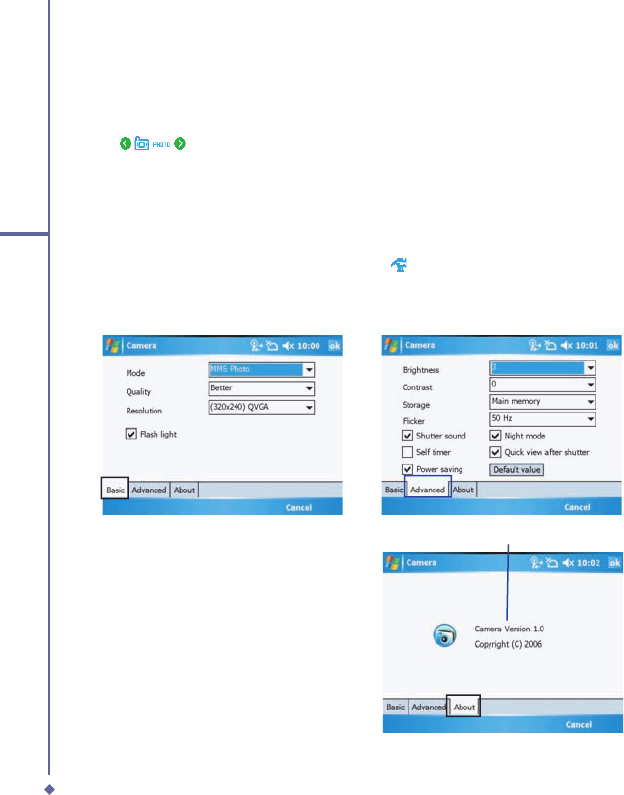
6.3 Setup menu
When you are in camera mode, you can tap on the
icon to access the setup menu. The
menu has three submenus: General, Advanced and Capture Settings. You can press the
navigation keys (left and right) or use the stylus to tap on desired menu options.
Product information
105
6
Camera and Video
Basic Menu
Under the
Basic
menu, you can adjust the following items:
Item
Description
Mode
Select a capture mode from
Photo
,
Photo Frame
,
Photo (ID, MMS)
,
Video
,
and
Video MMS
.
Please note
The Capture Mode you select determines the resolution ranges. See
the following Resolution for details.
Quality
Set image quality at
Normal
,
Better
and
Better and Better
Best
.
Resolution
Resolution options vary according to the
Capture Mode
you select.
•
Photo
: 1600 x 1200 UXGA, 1024 x 768 XGA, *640 x 480 VGA, 320 x 240
QVGA, 176 x 144 QCIF
•
MMS Photo
: 320 x 240 QVGA and 176 x 144 QCIF
•
Video
: 352 x 288 CIF, 176 x 144 QCIF
•
MMS
Video
: 176 x 144 QCIF
•
Contact picture
: 320 x 240 QVGA and 176 x 144 QCIF
•
Frame Photo
: 640 x 480 VGA
•
Multishot
: 1600 x 1200 UXGA, 1024 x 768 XGA, *640 x 480 VGA, 320 x
240 QVGA, 176 x 144 QCIF•
Please note
• When you select Multishot you will be asked to choose the number of
shots from 2, 4 or 6.
• When you select Frame Photo you can choose your Digital Frame
from Heart, Flower, Snowman, Halloween and Snow Scene. Tap
Preview frame to see the available frames.
• When you select Video and MMS Video , the system will ask you to
specify the Format from 3GP or MP4
• When you select MMS Video the system will ask you to specify the File
Size from 50K, 100K, 150K, 200K,, 250K or 300K.
• When you select Video or MMS Video , the system will ask you to
check if you want to mute the microphone.
Flash Light
Select to activate/deactivate the Flash.
106
6
Camera and Video
Advanced menu
Under the
Advanced
menu, you can adjust the following items:
Item
Description
Brightness
The
Brightness
level ranges from -3 to +3. The default value is 0.
Contrast
The
Contrast
level ranges from -3 to +3. The default value is 0.
Storage
Storage locations:
Main Memory
and
Memory Card
.
Flicker
Select the
Flicker Control
value from
50Hz
to
60Hz
.
Shutter Sound
Activate
Shutter Sound
to hear a clicking sound when you take a shot. The
default value is set to On.
Self Timer
When the
Timer
is activated, the icon
Timer is activated, the icon Timer
appears on the screen. When you
press the Center key or Camera key,
starts to blink for ten seconds. The
default setting is Off.
Power Saving
Check the box to enable power saving mode.
Night Mode
Select to activate or deactivate
Night Mode
. The default setting is Off.
Quick View
A quick view after you take a shot. Select to turn this feature on/off.
Default Value
Tap
Default Value
to reset all setup menu options to default values.
107
6
Camera and Video
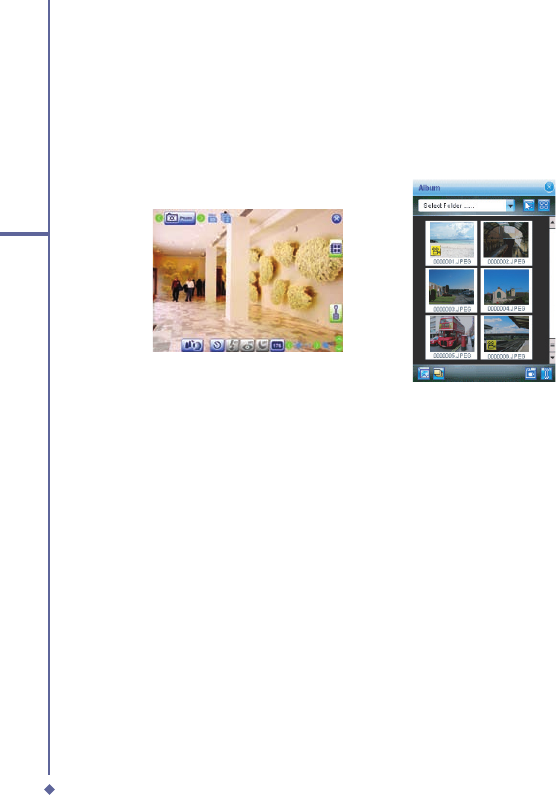
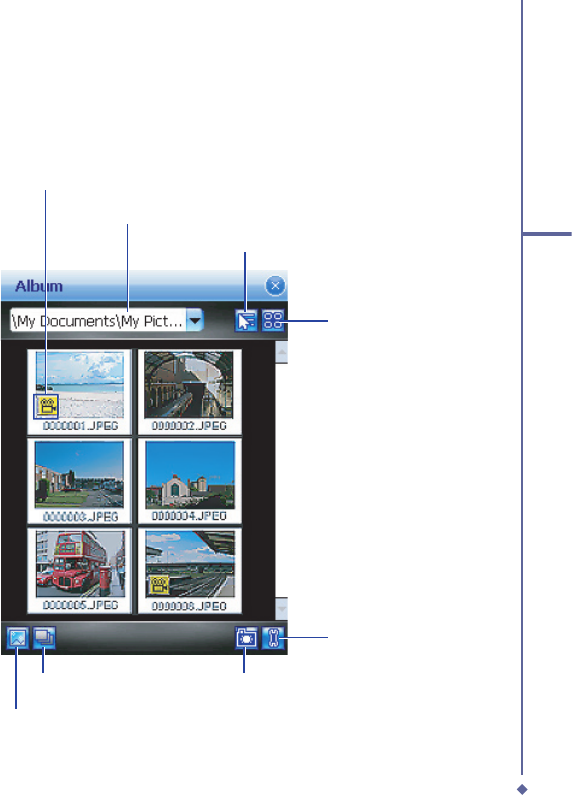
6.4 Photo Album
Photos and video clips that you take are stored in Album, where you can view your image fi les
and manage photos or video clips that you take, set them as Wallpaper or Caller ID, and so
on.
Select a folder
Sort the image fi les
File display
Single view
Slide show Go to Camera
Video clips indicator
Tools
108
6
Camera and Video
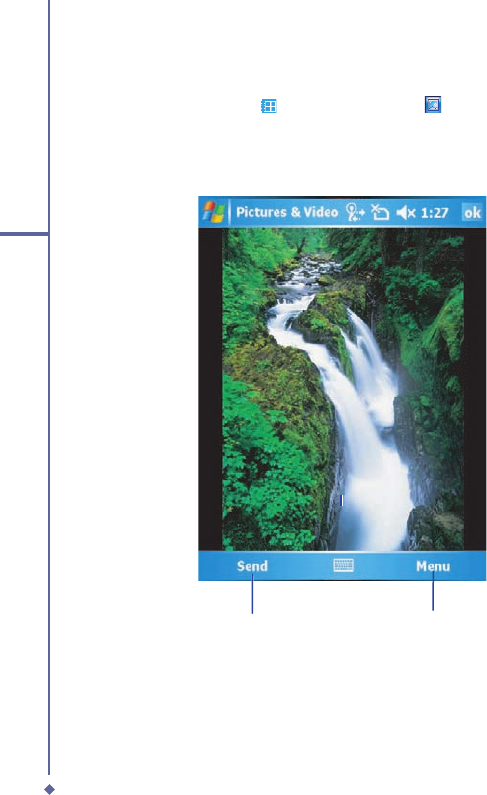
6.5 View mode
In Capture mode, you can tap
to enter Album and tap
to enter Single View Mode. When
you select the Single View icon, you can view the pictures saved on a Mini SD card or the
PDA’s memory.
Photo View mode
Send
Send
Send
Menu

109
6
Camera and Video
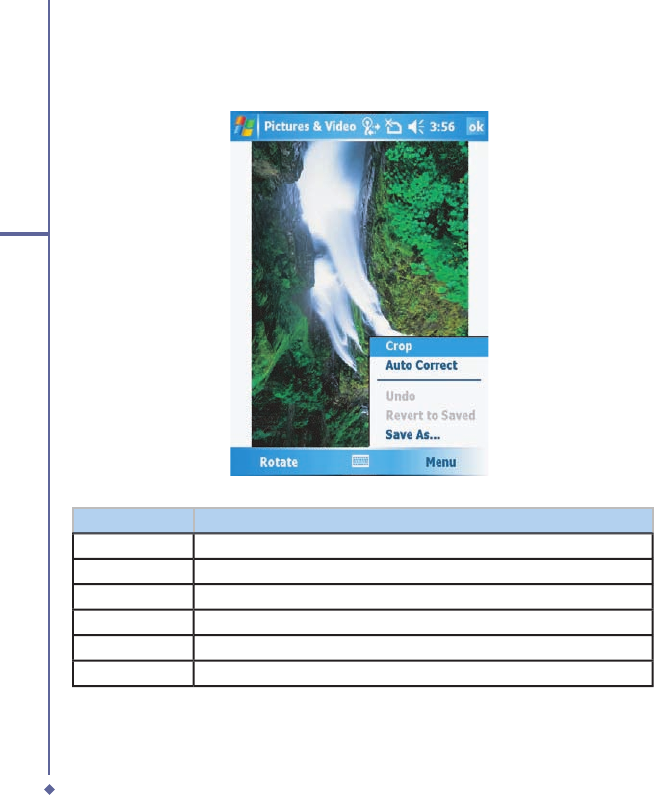
The
Menu
includes the following features:
Option
Description
Zoom
Zoom in/out of the image.
Play Slide Show
Play all the images in the folder in a slideshow.
Set as todays
background
Save an image as the background for today
Beam picture
Transmit photos or video clips to another device.
Save
Save a file to another location or as a photo contact..
Advanced Edit
Launches the Image Editor see section ??
Edit
Rotate, Crop, Auto Correct, Undo, revert to saved and Save as images.
Properties
Displays the Name, File Type, Dimensions, File Size, Date Created and
Protected.
Options
There are 2 tabs
General - Resize the picture (Original size, Large (640 x 480), Medium (320
x 240) and Small (160 x 120); Rotate the picture Left or Right by 90 degrees
Slide Show - Optimize the slide show for viewing either Portrait or
Landscape pictures; Check the box to play the screensaver when connected
to a PC.
110
6
Camera and Video
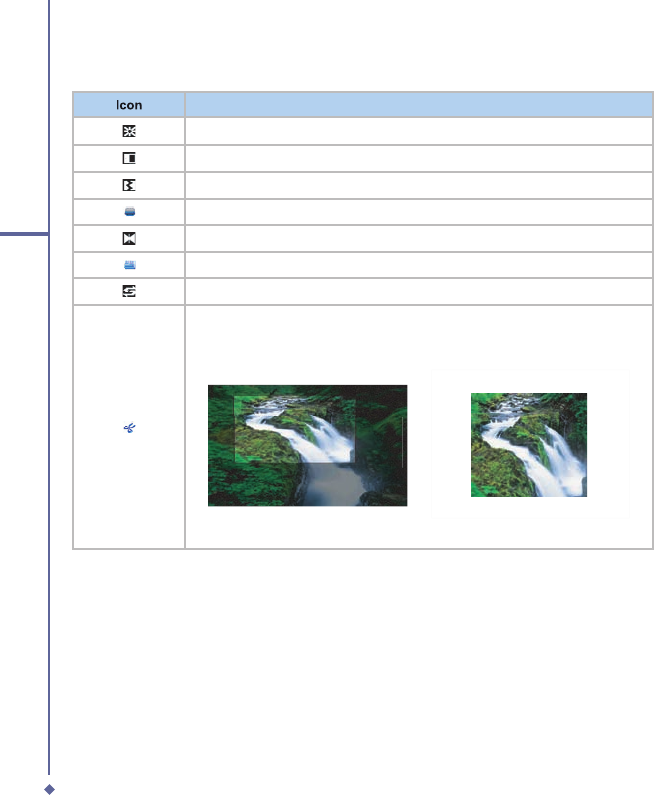
In More Tools
Icon
Description
To adjust Brightness level.
To adjust Contrast level.
To adjust image sharpness.
To adjust blur level.
To flip or mirror the image.
To adjust image scale.
Rotate the image.
Crop the image. First, select a rectangle on the needed area and click on this
area. When the Crop function is selected, other icons will be dimmed till the
action is completed or aborted.
Before crop
After crop
111
6
Camera and Video
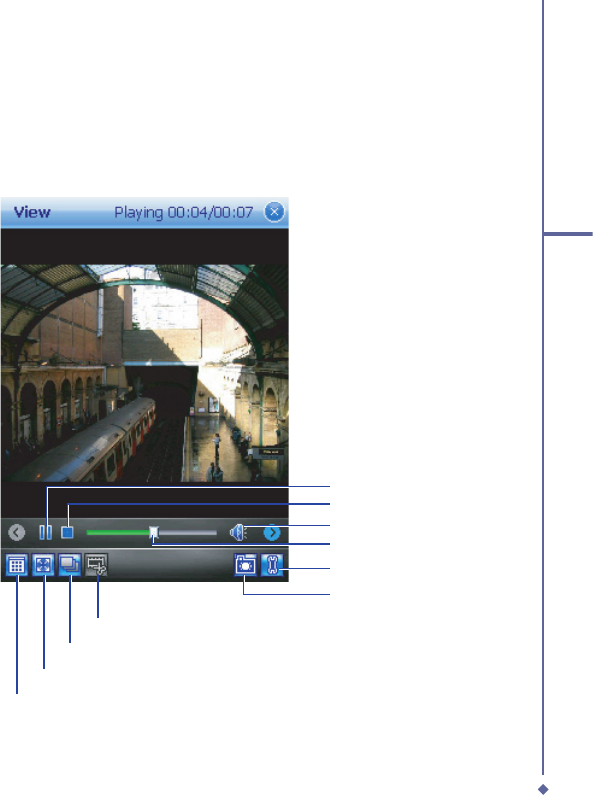
6.6 Edit Mode
Under
Pictures & Videos
, you can select an image and tap
Menu
>
Edit
or
Advanced
Edit
to enter the
Edit the image.
These features allow you to edit images easily by scaling,
rotating, cropping, framing, morphing, clip art pasting, etc.
Edit
Back to thumbnail
Tools
Stop
Full screen view
Slide show
Extract
Go to Camera
Process scroll bar
Play/pause
Volume
112
6
Camera and Video
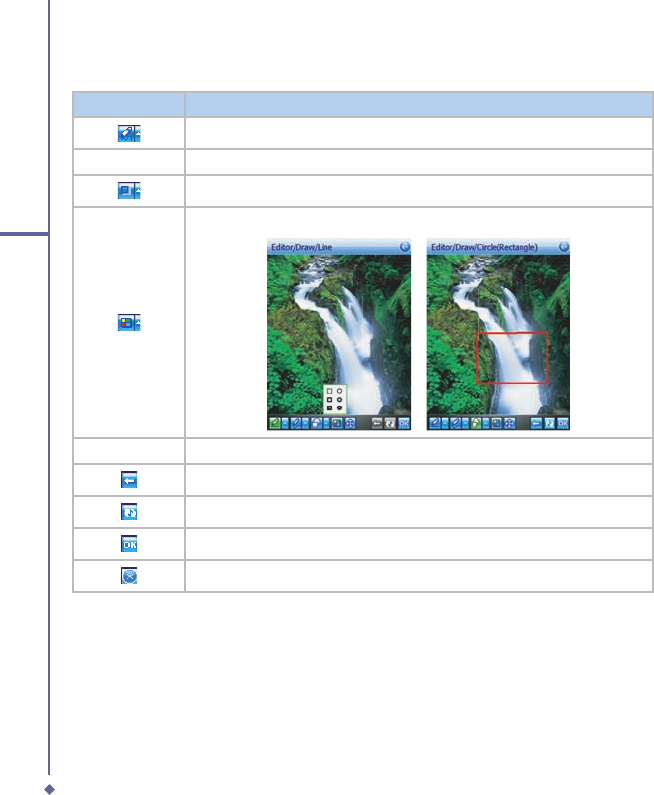
Draw
Icon
Description
Draw a straight line and select line size.
Draw a curved line and select line size.
Draw a circle or rectangle.
Select the color of the line.
Hold the stylus on the screen and drag it around the screen.
Undo the last action.
Delete all drawings, but stay in the
Draw
page.
To confirm all actions and return to the
Edit
mode.
Remove all drawings and return to the
Edit
mode.
113
6
Camera and Video
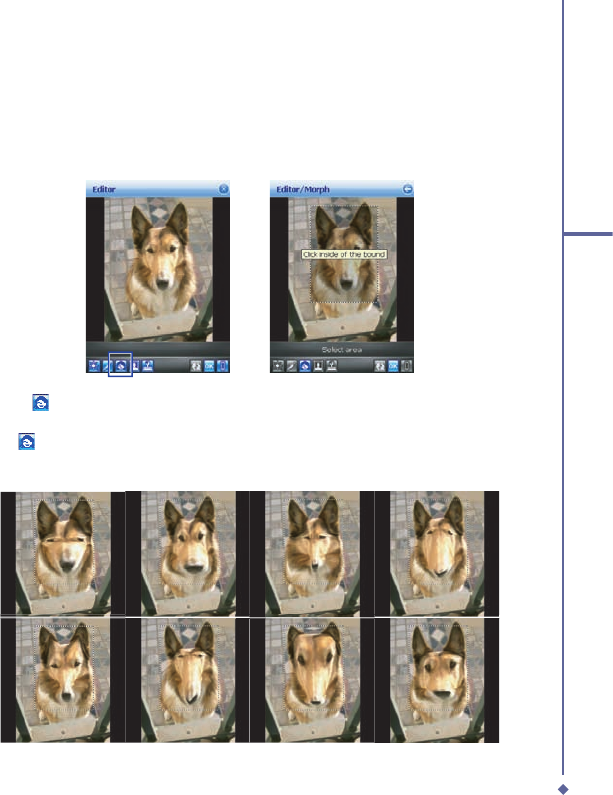
Morph
Morph
allows you to freely edit facial expressions. There are several icons available under
the edit screen. To morph a picture:
1. First, select a rectangle on the desired area and click on the area. When the
Morph
function is selected, others icons will be dimmed till the action is completed or aborted.
2. Click on
to start
Morph
; use the stylus to drag out a rectangle on the needed area and
then click on the area.
3. Press
to change to a different facial expression. (Alternatively, you can use the
Navigation Pad up/down/left/right to change.)
114
6
Camera and Video
Please note
In this process, you can click anywhere outside the selected area to abort the operation.
4. Before saving the edited picture, you can tap
to clear the edited result.
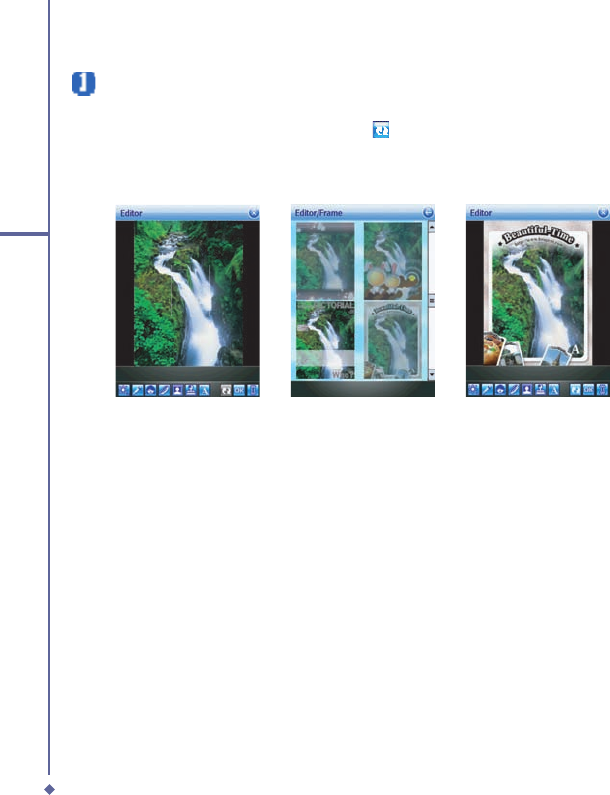
Frame
In
Frame
, you can select a frame and apply it to the selected image.
To select a frame:
1. Tap the frame icon [insert icon]
2. Use the navigation pad (up/down/left/down) or scroll bar to see all available frames.
3. Tap the required frame to select the frame
4. After selection, tap
OK
to save the image.
To cancel a frame:
1. Tap the frame icon again.
2. Select the fi rst one without a frame.
3. Tap
OK
to confi rm that all stamps are attached and return to the previous screen mode.
115
6
Camera and Video
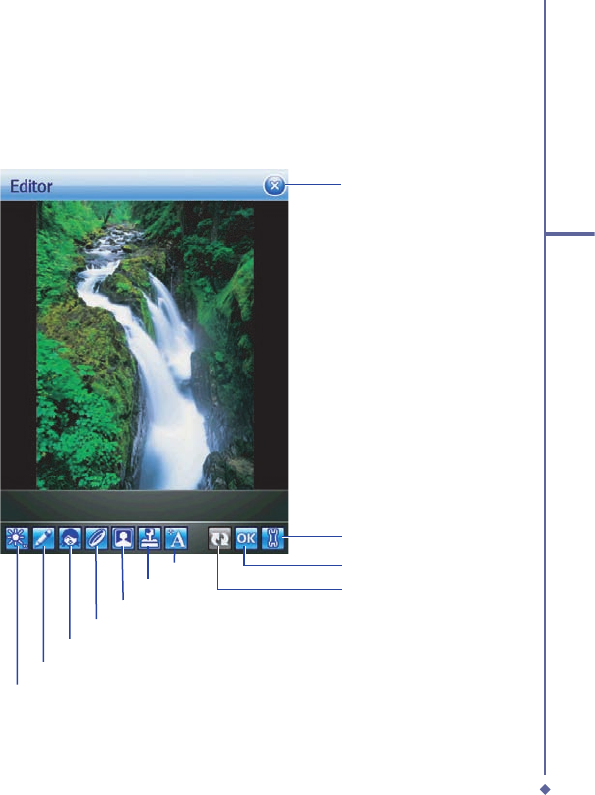
Draw
Tools
Morph
Filter
Reset
Go to Album
Exit Edit mode
Clip Art
More Tools
Advanced Edit
The advanced edit function allows greater editing functions
Frame
Text Edit
116
6
Camera and Video
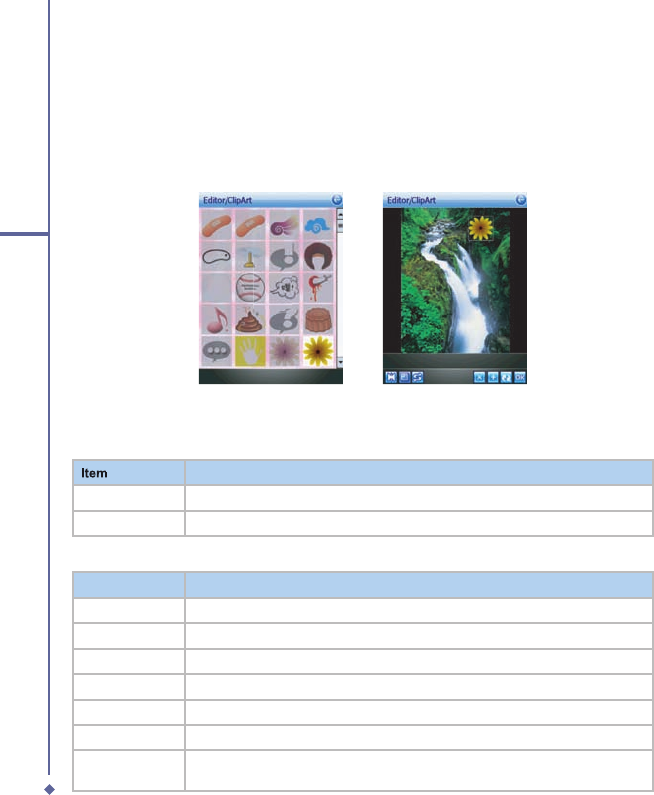
ClipArt
This feature allows you to select
ClipArt
and apply it to add interest to the desired image.
1. Tap on the desired
ClipArt
and click on
OK
.
2. The ClipArt will be shown at the center of the image.
3. The user can move the
ClipArt
by dragging it.
ClipArt Library ClipArt Edit
In the ClipArt Library:
Item
Description
Cancel
Abort the action and return to the edit screen.
OK
To confirm the selection and open
ClipArt Edit
.
In ClipArt Edit:
Item
Description
Flip
To Flip the stamp.
Scale
To Scale the stamp.
Rotate
To Rotate the stamp.
Delete
To clear the current stamp.
Add
Add one more stamp from the list and enter the ClipArt Library.
Reset
Remove all attached ClipArt.
OK
To confirm that all stamps are attached and return to the upper level (Edit
Mode).

117
6
Camera and Video
Reset
Before you save the edited picture, you can use
Reset
to clear all edited results.
OK/Exit the Edit mode
To confi rm that all stamps are attached and return to the edit screen:
• When no edit function is conducted or saved, it will return to the view screen without any
pop-up notifi cation.
• Back to any edit function that was conducted
• When you have edited the image and tapped
Album
or pressed any key to exit, there will
be a pop-up notifi cation asking you, “File has been changed. Save it?” Tap
Yes
to enter
the
Save
dialog,
No
to exit without saving and
Cancel
to remain in the Edit mode.
Save, Open, About
The
Save
dialog includes the following details:
•
Name
: You can change fi le name.
•
Folder
: Just select default folder in
Device
or
Storage card
.
•
Type
: JPEG or BMP type.
•
Location
: Main Memory or Storage Card.
When you conduct any editing command, the icon will be enabled. After saving, you will
remain in the edit mode. The icon will be dimmed if you don’t do any editing work.
Please note
If the resolution of the saved picture is larger than 320X240, the edited image will be
saved in 320X240 only. The edited image will be saved as a new fi le. The fi le name will
be edit_xxxxx.jpg where ‘xxxxx’ is the original fi le name.
Select
Open
to return to the
Open Image
window.
118
6
Camera and Video
About
displays the version details of the editor.
Option
Description
Rotate
Tap to rotate the image clockwise 90 degrees.
Crop
Tap and drag a square around the area to be cropped.
Auto Correct
Tap to correct the colour balance of the image.
Undo
Tap to undo the last image.
Revert to Saved
Undo all current changes and return to the last saved version.
Save As
Tap to save the edited image under a different name.
119
6
Camera and Video
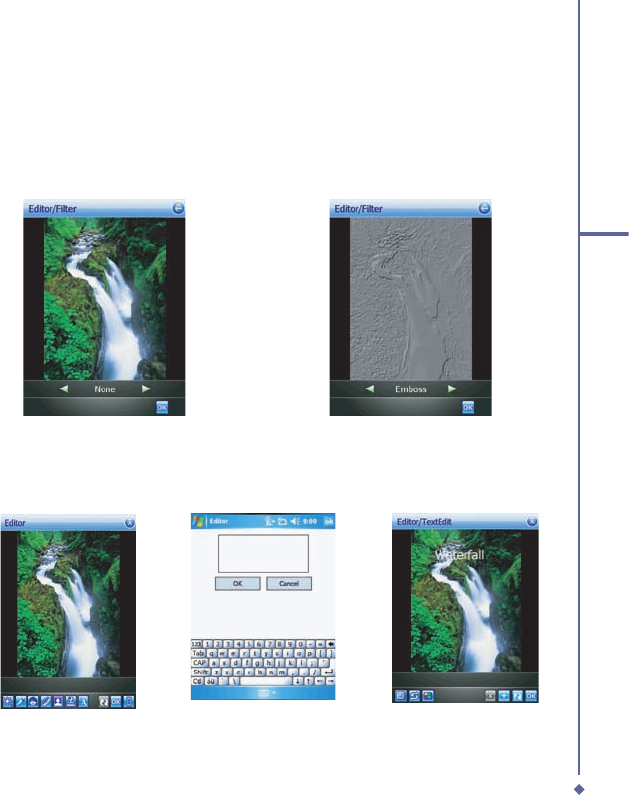
Filter
In
Filter
, you can apply an effect to the selected image,
1. Scroll left or right to see a preview of the effect.Choose from None, Ancient, Edge, Emboss,
Invert or Grayscale.
2. Tap Ok to return to the
Editor
Text Editor
The text editor allows you to add text to the selected image.
Selected Clipart Text Editing
Text Writer
Before Filter
After Filter
120
6
Camera and Video
6.7 Recording
In addition to taking still images the camera can be used to record video.
1. Press the
Camera
key on the right side of your O
2
Xda Flame or Tap
Start
>
Programs
>
Camera
.
2. Tap the
icon to switch to
Video
or
Video MMS
mode.
3. When you see
●Ready
shown in the screen press the Center nagivation key or Camera
key to start recording.
4. During the recording process, the blinking
● 00:00:00
indicates that the video capturing is
working; this icon will be followed by recording time and Frame rate information.
5. To stop recording, press the Center navigation key or Camera key. The recorded video clip
will be automatically saved to
Pictures & Videos
.
In the Text Writer:
Item
Description
Cancel
Abort the action and return to the edit screen.
OK
To confirm the text and open
Text Edit
.
In Text Edit:
Item
Description
Font Size
To increase or decrease the font size.
Rotate
To Rotate the the text clockwise or anti-clockwise.
Color
To change the color of the font.
Delete
To clear the current text.
Add
Add more text using the write text field..
Reset
Remove all attached Text.
OK
To confirm that all text is attached and return to the upper level (Edit Mode).

Chapter 7
O2 MediaPlus & SRS
7.1 My FM Radio
7.2
My Music
7.3
My Pictures
7.4 My Videos
7.5
My Settings
7.6 SRS
112
7
O2 MediaPlus & SRS
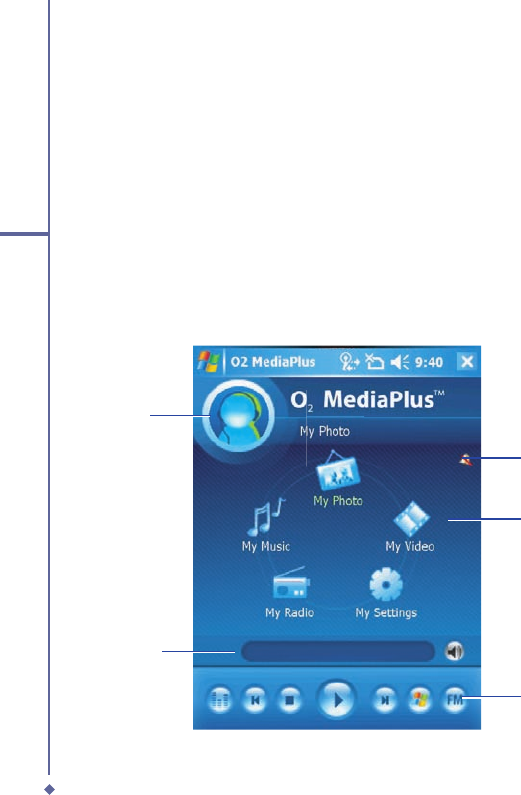
7. O2 MediaPlus & SRS
This application provides a user-friendly way to manage media fi les and gives easy access to
different entertainment players like the FM Radio and Windows Media Player. This application
also includes the following features:
• A music library management system
• A photo library management system
• A video library management system
• A powerful alarm program
• Personalization
In addition, this chapter guides you through
SRS
an application that can boost the audio
levels of the music fi les played on your O
2
Xda Flame.
Context graphics
Now playing
Alarm indicator
Play process
Personised
Graphics
113
7
O2 MediaPlus & SRS
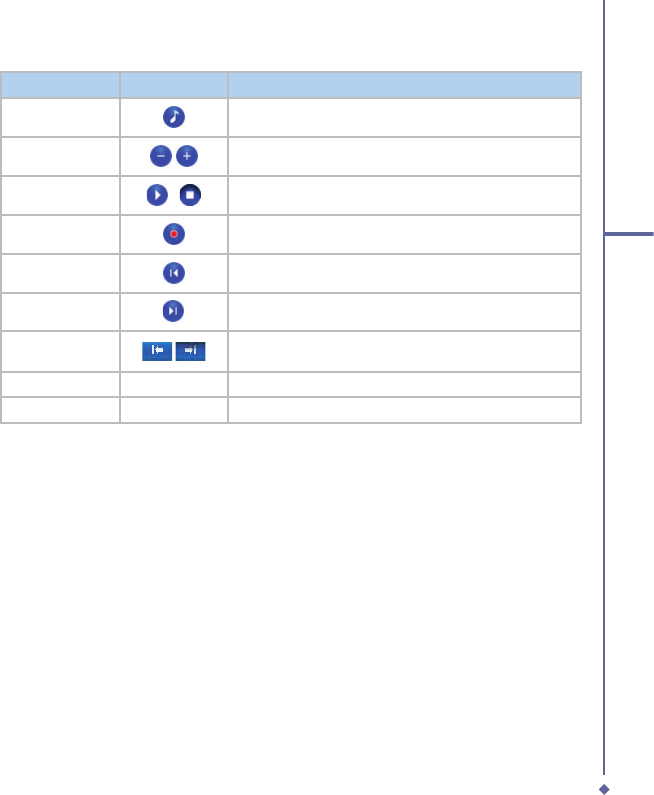
Item
Icon
Description
Equalizer
This is only visible when Windows Media Player is the
current player.
Play/Stop
/
Tap once to play and tap again to Stop.
Previous
Go to the previous track.
Next
Go to the next track.
Mute
To mute/unmute
Windows Media Player 10
or
FM Radio
.
Windows Media
Player
Launch the
Windows Media Player
FM
Launch the FM radio.
114
7
O2 MediaPlus & SRS
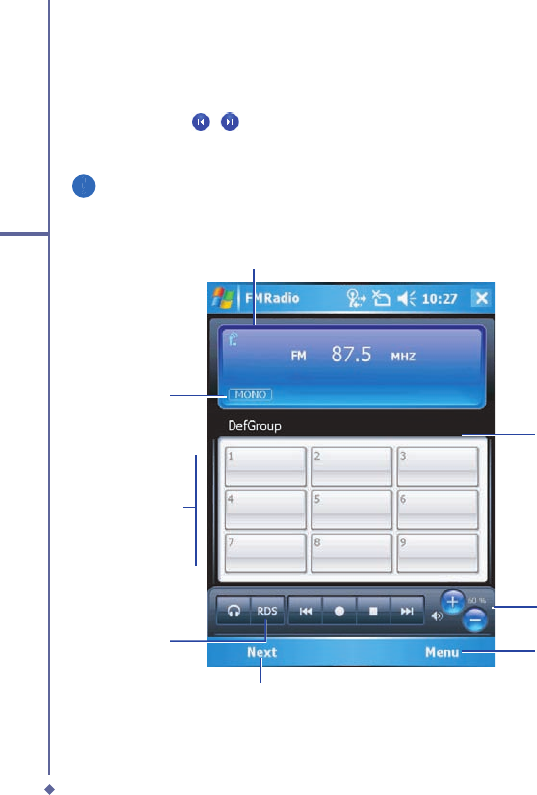
7.1 My FM Radio
You can listen to
FM Radio
through your O
2
Xda Flame. You can search channels by tapping
and holding on the
/
Key. This application also includes 8 user-defi ned favorites (each
favorite contains up to 20 preset channels), volume control, mute button, record button to
record audio fi les, and fi ne tuning of channels.
Please note
The FM Radio can be used only when the headset is plugged in (as an external
antenna).
Frequency tuning
Current channel
Volume Control
Mono/Stereo/
Record indicator
18 preset
channels
Tap to save the
channel or press
center key
Access more
features
Turn RDS
on/off
115
7
O2 MediaPlus & SRS
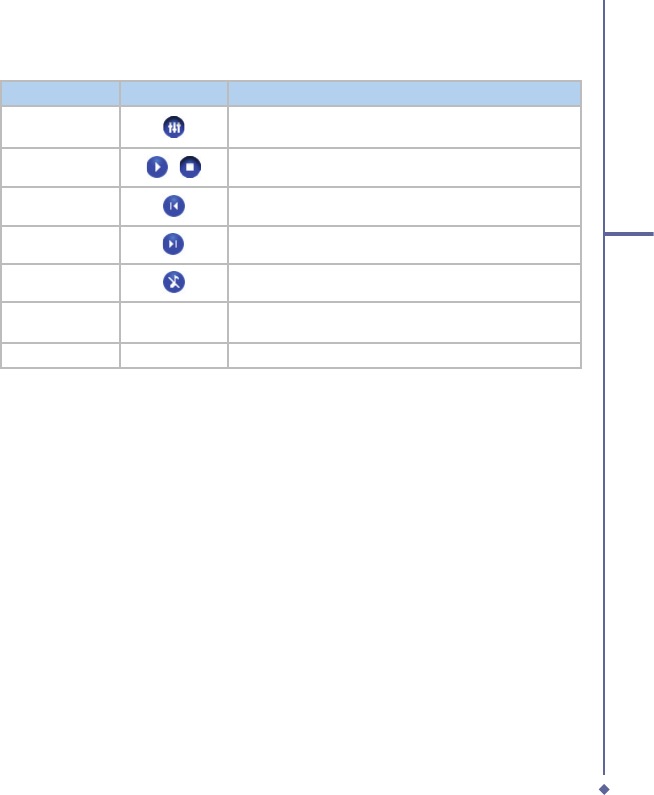
Item
Icon
Description
Mute
Mute/Unmute audio output.
Volume
Increase/Decrease volume output.
Play/Stop
/
Tap once to play an audio file and tap again to stop.
Record
Tap to Start recording and tap again to stop.
Previous
Go to previous preset channel.
Next
Go to next preset channel.
Frequency
Tuning
Tune the channel forward/backward at 0.1MHZ.Tap and
hold to fast forward/backward scan.
Choose output
/
Toggle between the Headset, Bluetooth headset and Speakers.
RDS
Tap to switch between RDS and Preset Modes.
Tap
Menu
to access the following features:
•
Auto Search
: Launch auto-scanning function
•
Set frequency
: Enter the frequency manually.
•
Save Channel
: Save the current frequency with a name and a channel.
•
Edit Channel
: Edit current focused channel.Tap and hold, then change the text on the
channel to edit mode.
•
Group
: Use a selected group, Edit a group, rename and delete a group .
•
Clear
: Delete a channel.
•
FM record fi le
: Open saved recordings.
•
Schedule recording
: Choose a frequency, date, time and duration to record. See set tasks.
•
Sleeping mode
: Choose when to turn the radio off.
•
Setting
: You can adjust recording options such as output fi le format,
•
Help:
Displays help for the application.
•
About
: Version info of this program.
•
Exit
: Exit FM Radio program.
FM Radio
will be muted during a voice call. Hanging up the voice call will resume the
FM Radio
.

116
7
O2 MediaPlus & SRS
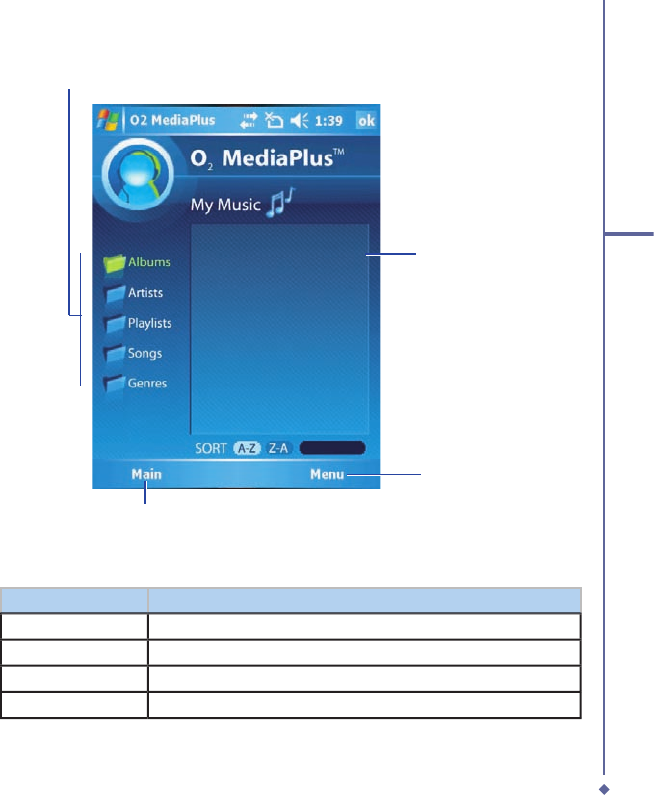
7.2 My Music
My Music
is a powerful music library management system. It can manage music fi les by
album, artist, and genre. As a song or playlist is tapped,
Windows Media Player 10
is
launched to play audio and video fi les stored on your O
2
Xda Flame.
You can play fi les in either
Windows Media
or
MP3
formats (this includes fi les with the
extensions .asf, .wma, .wmv, and .mp3.) To fi nd contents in Windows Media Format for your
O
2
Xda Flame, please go to
http://www.windowsmedia.com
http://www.windowsmedia.com
.
When launched for the fi rst time,
My Music
scans all folders for all supported music fi les,
and catalogs them into a music library for later use. For all subsequent launches,
My Music
just reads the media libraries, instead of scanning again. The media library is updated only
if
Menu
>
Update Library
is tapped again. When a Micro SD card is inserted, as there is no
library for this card, a dialog box pops up asking for rescan confi rmation.
117
7
O2 MediaPlus & SRS
Music category
File sorting
Go back to the main page
Access more
features
Tap
Menu
to access the following features:
Item
Description
Libary
Access
All
songs or songs saved in the
Device
or
Memory Card
.
.
Update Library
Scan all folders to update the media library.
New PlayList:
Create a new Playlist
Edit PlayList:
Edit a Playlist. The current highlighted Playlist will be edited.
118
7
O2 MediaPlus & SRS
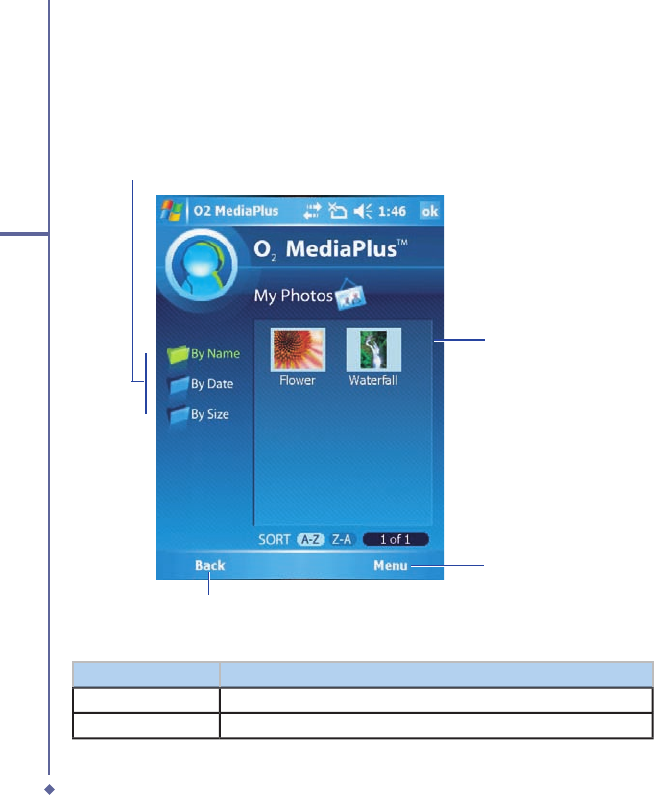
7.3 My Photos
My Pictures provides a simple thumbnail view of your photo. As a thumbnail picture is tapped,
the camera album will be launched to view the selected picture.
My Pictures
supports JPEG
and BMP. Pictures are saved to
\My Documents\My Pictures
by default.
Picture category
Go back to the main page
Access more
features
Photo thumbnail
Menu
Item
Description
Views
See the videos either as Thumbnails or a List.
Folder
See all the folders on the device.
119
7
O2 MediaPlus & SRS
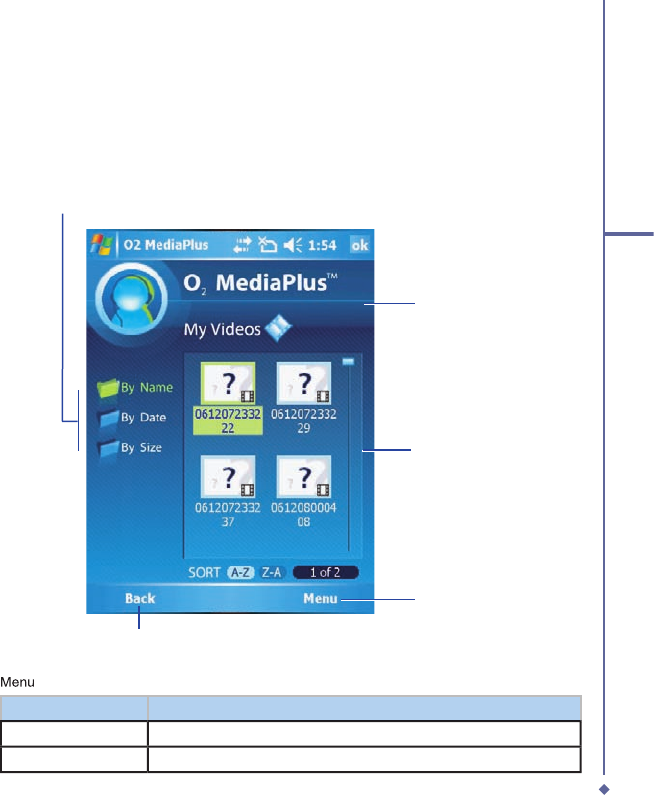
7.4 My Videos
My Videos
provides a simple video browser and easy access to the camera video viewer
Use the navigation keys to navigate through thumbnails. As a thumbnail video is tapped, the
camera video viewer will be launched to view the selected video.
My Video
supports video
formats supported by Windows Media Player, and 3gp as well. Videos are saved to
\My
Documents\My Pictures
by default.
File sorting
Video category
Go back to the main page
Access more
features
Video thumbnail
Menu
Item
Description
Views
See the videos either as Thumbnails or a List.
Folder
See all the folders on the device.
120
7
O2 MediaPlus & SRS
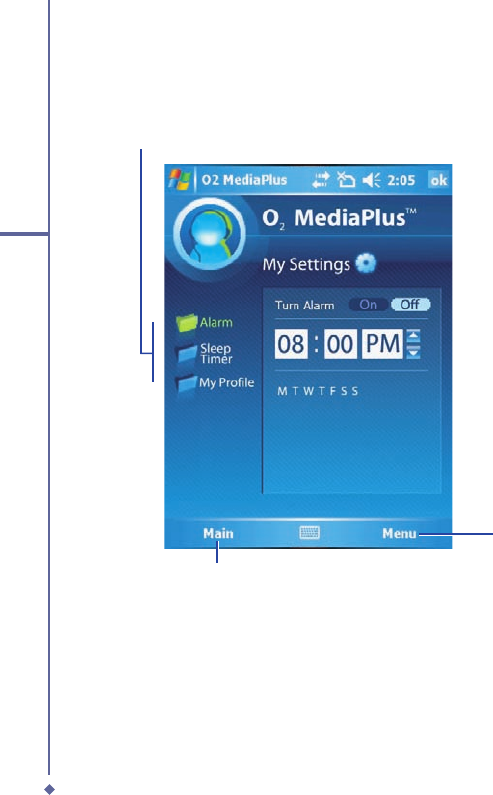
7.5 My Settings
Under
My Settings
, you may customize
Alarm
,
Sleep Timer
, and
Profi le
features.
Access more settings
Go back to the main page
Access more
features
121
7
O2 MediaPlus & SRS
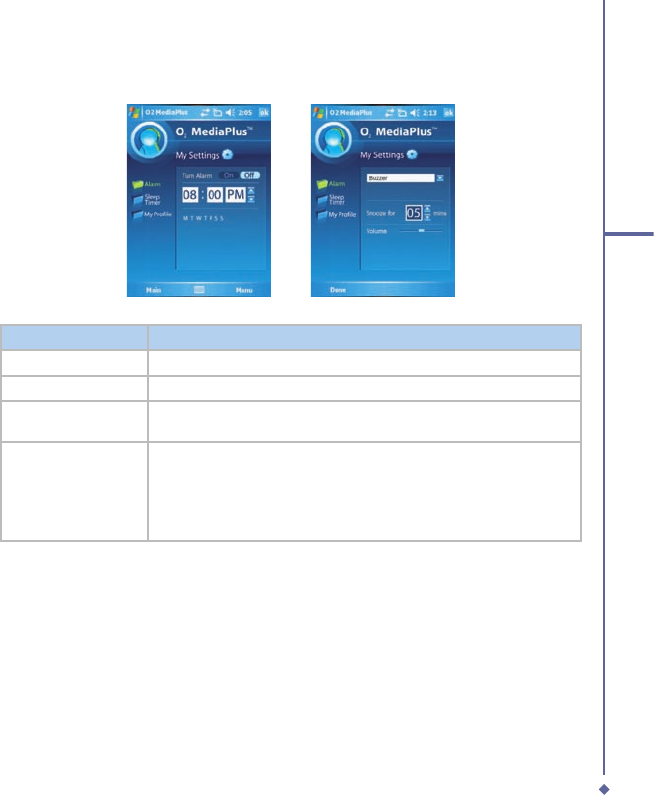
Alarm
Item
Description
Turn Alarm On
When this feature is selected, an input alarm time box is displayed.
Turn Alarm Off
Cancels the alarm.
Time
Tap the hours or minutes and use the up and down arrows to change
the time. Tap M, T, W, T, F, S or S to select the day of the week.
Details
•
Alarm type
: settings include
Buzzer
,
FM Radio
, and
Music
. As
music is selected, a file explorer pops up to ask for the location of
the alarm music.
•
Snooze for
: Time, in minutes, to snooze when the alarm goes off.
•
Volume
122
7
O2 MediaPlus & SRS
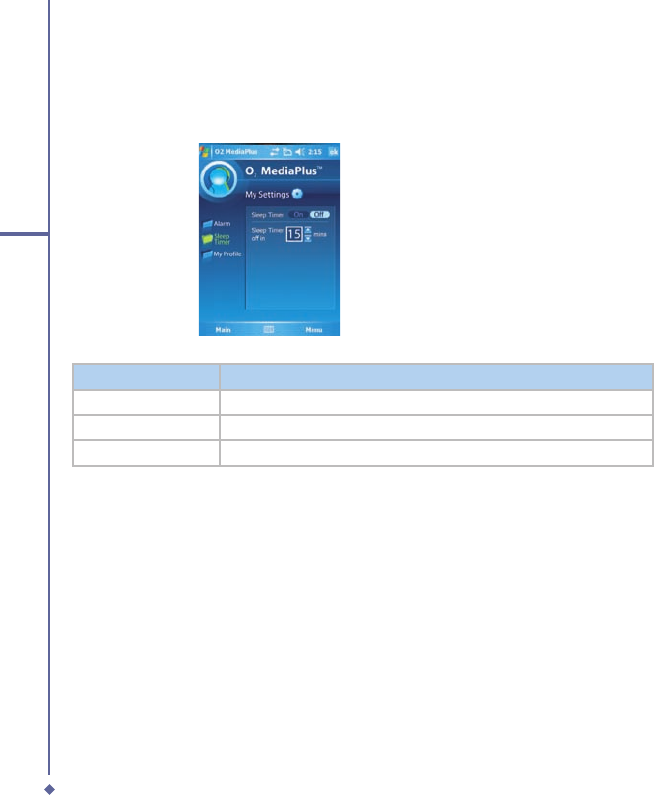
Sleep Timer
This sleep timer is for both the
FM radio
and
Windows Media Player
. When the sleep timer
expires, the Media Center closes both
FM radio
and
Windows Media Player
.
Item
Description
Turn On
Starts counting down.
Turn Off
Turns off the
Sleep timer
.
Sleep Timer Off in
Tap the Up or Down key to set the expiration time, in minutes.
123
7
O2 MediaPlus & SRS
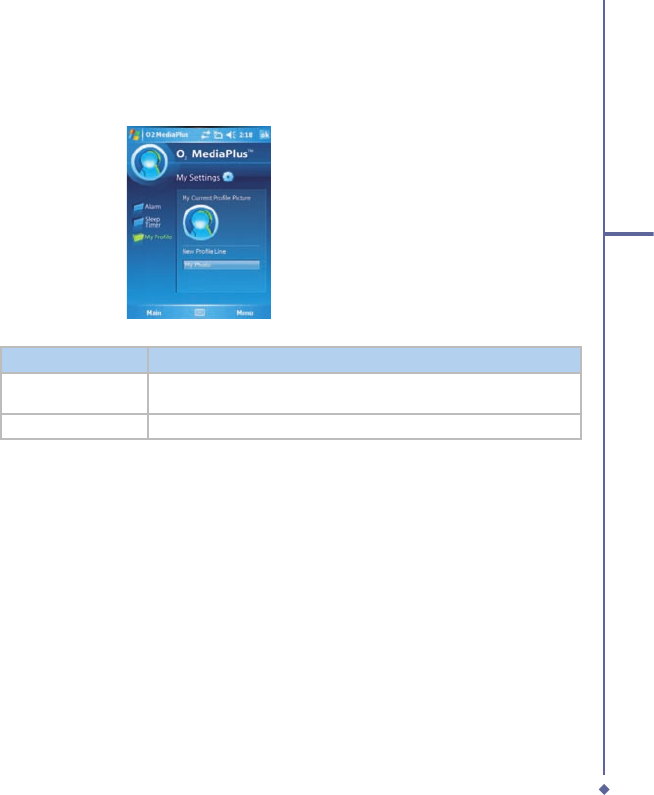
Profi le
This feature allows you to change the background image or add text.
Item
Description
Current Profile
Picture
To change the profile image.
New Profile Line
When you select a
Personal image
, you can
Add Text
to go with it.
124
7
O2 MediaPlus & SRS
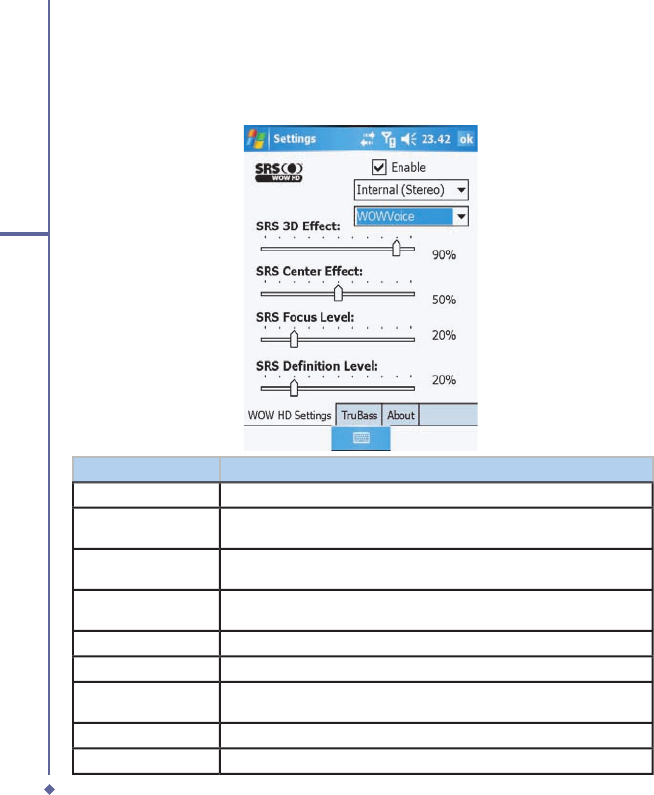
7.6 SRS
Your O
2
Xda Flame has the latest digital compression technology providing the best quality
of audio sound.
Item
Description
WOW HD Settings
tab
Enable
Check to Enable SRS. From the drop down lists choose Internal (Mono),
Internal (Stereo) or Headphones,
Preset Levela
There are 22 preset levels to meet most of your audio requirements,
however if you want to customize the levels see the settings below
Levels
From SRS 3D Effect, SRS Center Effect, SRS Focus Level and SRS
Definition Level use the slider bar select the required level.
TruBass
tab
SRS TruBass Level
Use the slider bar to select the required level.
SRS TruBass Speaker
Size
Use the slider bar to select the speaker size to be used from 400Hz to
40 Hz
About
tab
Displays information about the application.

Chapter 8
O2 Infotainment Plus
8.1 Introduction to Infotainment
136
8
O2 Infotainment Plus
8.1 Introduction to Infotainment
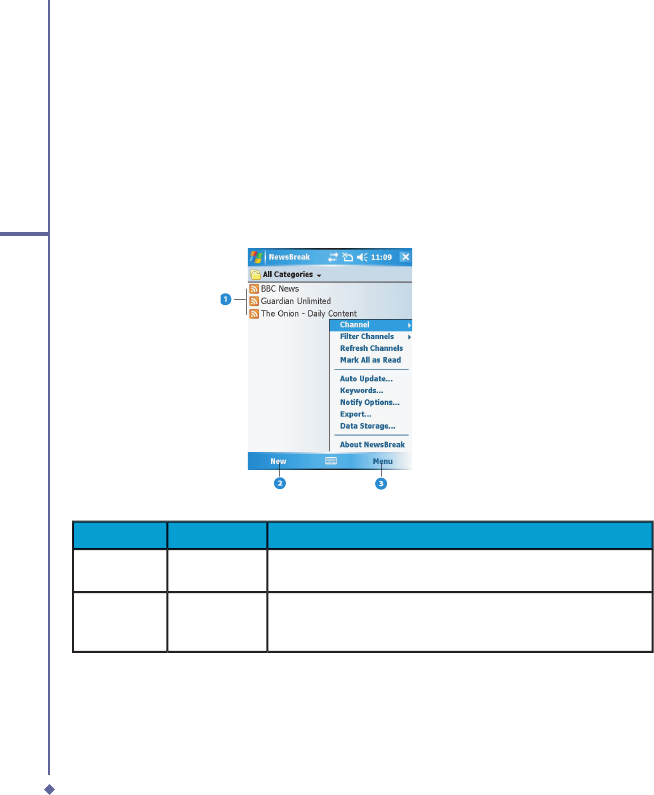
Infotainment includes a variety of applications such as NewsBreak, an application to help you
stay up-to-date with the latest news via the internet.
Newsbreak
1. To start Newsbreak go to
Start
>
Programs
>
Newsbreak
.
Note: For fi rst time use you will need to add News Channels using the New Channel wizard.
Follow the on screen instructions to set up the channels.
Number
Item
Description
1
Categories
Choose the categories to see and add and delete
categories
2
New
Tap to add a new channel: Choose from a list of known
channels, Search online for channels, Import from a fi le or
URL and add a known channel URL.
1
23

137
8
O2 Infotainment Plus
Number
Item
Description
3
Menu
Tap the Menu button to list the following items: Channel,
Filter Channels, Refresh Channels,Mark All as Read, Auto
Update, Keywords, Notify Options, Export, Data Storage
and About NewsBreak.
Channel
- Highlight one of the channels to:
Change
Properties
(URL and Title, Refresh frequency, details and
password), Category (Choose a new category to move the
channel to.), Delete, Rename and add a
New
channel.
Filter Channels
- Select which channels to list.
Refresh Channels
- Update the information in the
channels.
Mark All as Read
- Unbold the channels to show that they
have been read.
Auto Update
- Choose when to update the channel
information.
Keywords
- Add keywords to identify new articles
containing these words.
Notify Options
- Choose between: No Notifi cations, Notify
when items are received and Notify when items matching
keywords are found.
Export
- Choose where to export the channel to.
Data Storage
- Check the box to store the channel data on
a Micro SD Card.
About NewsBreak
- details of the software version and
manufacturer.
2.Select the channel to viewed
Tap
Menu
to see the following options: Next Channel, Previous Channel, Channel
Properties, Mark All as Read, Mark All as Unread, Refresh, New Headlines Only, Keyword
Matches Only and Sort By.
3. Tap a news article to read.
Tap
Menu
to see the following options: Next Headline, Previous Headline, Fit to screen,
Text Size, Clear Type, Save Link to File, Send Link via Email.
4. Tap
Done
to return to the channel contents. Tap
Done
again to return to the list of
channels.

138
8
O2 Infotainment Plus

Chapter 9
Applications
9.1 Outlook
9.2 Word Mobile
9.3
Excel Mobile
9.4
PowerPoint Mobile
9.5 Pictures & Videos
9.6
Calculator
9.7
Games
9.8
File Explorer
9.9
Searching for Files
9.10
O2 Connect
9.11
O2 SMS Plus
9. 12 Remote Control
9.13 Adobe PDF Viewer
9.14 JAVA Midlet
9.15 USB OTG Connection
148
9
Applications
9. Applications
Your phone comes with a number of
additional applications. These smart, powerful
applications allow you to manage your phone more conveniently. The applications include O
2
Connect, O
2
SMS Plus, Adobe PDF and JAVA Midlet.
9.1 Outlook
The
Outlook
application allows you to synchronize
Outlook
data between your O
2
Xda
Flame and PC. This data includes
Outlook E-mail
(for more information, see
Chapter 6.
Messaging
),
Calendar
,
Contacts
,
Tasks
and
Notes
.
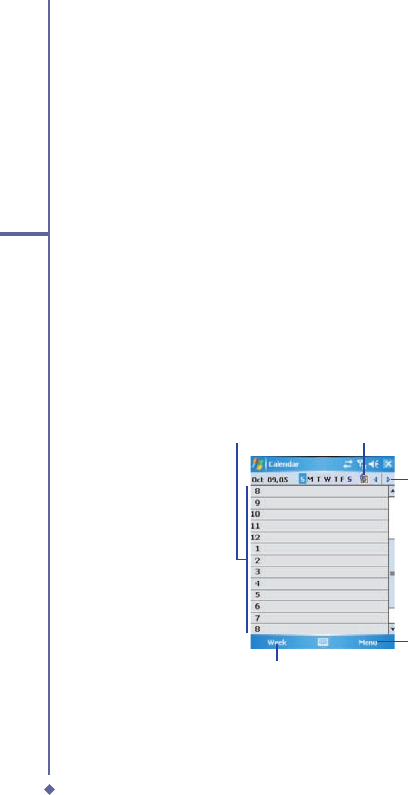
Calendar
Use
Calendar
to schedule appointments, including meetings and other events. You can
Calendar to schedule appointments, including meetings and other events. You can Calendar
check your appointments in one of several view types (
Day
,
Week
,
Month
, and
Agenda
) and
set
Calendar
to remind you of appointments with a sound or other method. Appointments for
Calendar to remind you of appointments with a sound or other method. Appointments for Calendar
the day can be displayed on the
Today
screen.
If you use
Outlook
on your PC, you can synchronize appointments between your O
2
Xda
Flame and PC.
Go to today’s
appointments
Scroll to
another date
Tap to see
appointment details
Change the
calendar view type
Tap to access
more options
149
9
Applications
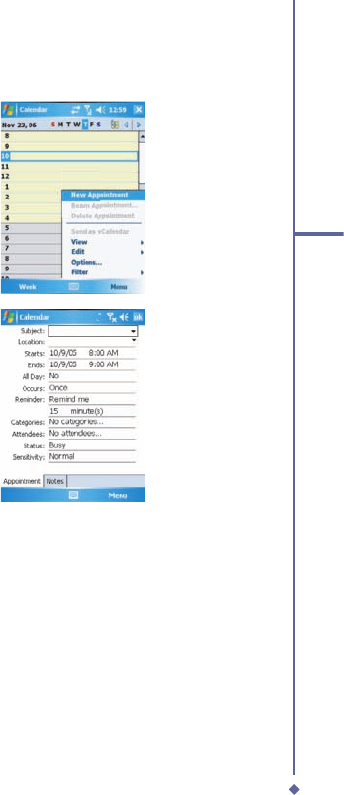
Create or change an appointment:
1. Select a view type from
Day
,
Week
,
Month
,
Year
, and
Agenda
. Tap
Menu
>
New Appointment
.
2. Enter the appointment details. When
fi nished, tap
OK
to return to the
calendar.
150
9
Applications
Send a meeting request
Use the Calendar to schedule meetings via e-mail with contacts who use Microsoft
®
Outlook
® Outlook
®
or Outlook Mobile.
1. Tap
Start
>
Calendar
.
2. Schedule a new appointment, or open an existing one, and tap
Edit
.
3. Tap
Attendees
.
4. Tap the name of the contact you want to invite.
5. To invite each additional attendee, tap
Add
and tap the name.
6. Tap
OK
. The meeting request will be sent to the attendees the next time you synchronize
your device with your PC.
Please note
When attendees accept your meeting request, the meeting is automatically added to
their schedules. When their response is sent back, your calendar is updated.
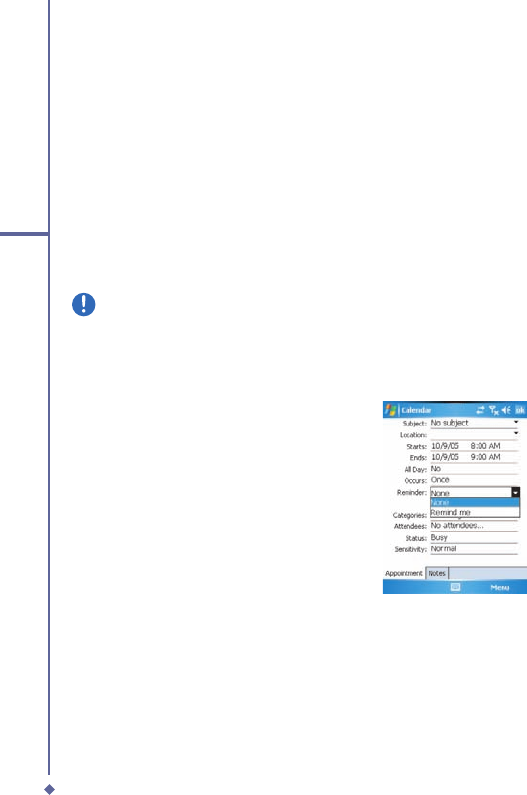
Set a reminder for an appointment:
1. In the
Calendar
, tap the
Appointment
>
Reminder
>
Reminder > Reminder
Remind me
.
151
9
Applications
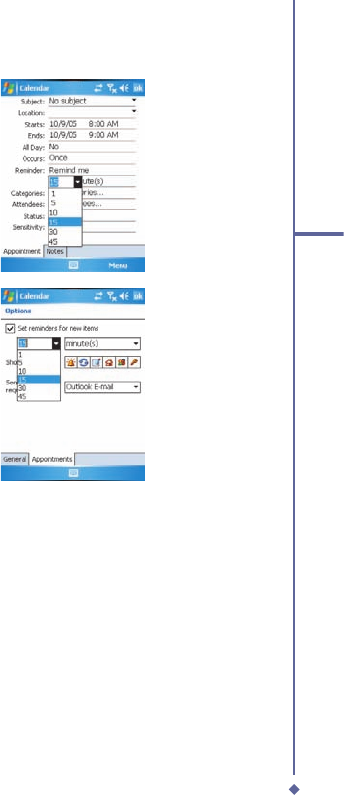
2. To change how many minutes, hours,
days and weeks before the appointment
you are to be reminded, tap the minutes
displayed/
To choose between minutes, hours, days
and weeks tap minutes and select from the
drop down list.
3. To automatically set a reminder for all
new appointments, in the calendar,
tap the
Menu
>
Options
> the
Appointments
tab >
Set reminders for
new items
.
Beam an appointment
To beam an appointment, in the calendar list, tap
Menu
>
Beam Appointment…
. When using
infrared (IR), align the IR ports between the devices so they are unobstructed & near each
other.

152
9
Applications
Contacts
Contacts is your address book and
information storage for the people and
businesses you communicate with. Store
phone numbers, E-mail addresses, home
addresses, and any other information that
relates to a contact, such as a birthday or an
anniversary date. You can also add a picture
or assign a ring tone to a contact.
From the contact list, you can quickly
communicate with people. Tap a contact in
the list for a summary of contact information.
From there, you can call or send a message.
There are several ways to organize your
contacts. View contacts by name or
company. Or, assign one or more category
to contacts, so you can quickly fi lter them.
If you use Microsoft
®
Outlook on your PC,
you can synchronize contacts between your
device and PC.
Create a contact
1. Tap
Start
>
Contacts
.
2. Tap
New
and enter contact information.
3. When fi nished, tap
OK
.
Please note
• If your contact list has been fi ltered by
a category when you create a contact,
that category is automatically assigned
to the new contact.
• If someone not on your list of contacts
calls you or sends you a message, you
can create a contact from Call History
or from the message by tapping Menu >
Save to Contacts.
• To include a nickname, title, and more,
while creating a contact, tap the Name
arrow. For an existing contact, tap the
contact, tap Menu > Edit, and tap the
Name arrow.
• If most of the contacts you create have
phone numbers that begin with the
same area code, in the contact list, tap
Menu > Options and enter that area
code in the Area code box.
Find a contact
1. Tap
Start
>
Contacts
.
2. If you are not in
Name
view, tap
Menu
>
View By
>
Name
.
3. Do one of the following:
• Begin entering a name or phone number
in the provided text box until the contact
you want is displayed. To show all
contacts again, tap the text box and clear
the text, or tap the arrow to the right of
the text box.
• Use the alphabetical index displayed at
the top of the contact list.
• Filter the list by categories. In the contact
list, tap
Menu
>
Filter
. Then, tap a
category you’ve assigned to a contact.
To show all contacts again, select
All
Contacts
.

153
9
Applications
Please note
• To search for a contact by entering
a name or number, or by using the
alphabetical index, you must be in
Name view. To switch to Name view,
tap Menu > View By > Name.
• You can locate your contacts by the
name of the company they work for. In
the contact list, tap Menu > View By,
and tap Company. Tap the company to
see contacts who work there.
• When working in Company view, you
can fi lter by categories you’ve assigned
to contacts. Then, only the companies
with contacts that have that category
assigned to them will appear on the
list.
Beam a contact
To beam a contact on the contact list, tap
and hold the contact. On the pop-up menu,
tap
Send Contact
>
Beam
.
When using infrared (IR), align the IR
ports between the devices so that they are
unobstructed and within close range.
To change options:
1. On the contact list, tap
Menu
>
Options
.
2. To increase the available space for
displaying contacts on the list, uncheck
Show alphabetical index
tabs.
3. The area code for a new contact is
automatically entered based on the
information in
Country/Region
settings.
Using the summary screen
When you tap a contact on the contact list, a
summary screen is displayed. To change the
contact information, tap
Edit
.
Tasks
Use
Tasks
to keep track of errands. A
variety of task information can be displayed
on the
Today
screen. If you use
Microsoft
®
Outlook
on your PC, you can synchronize
tasks between your device and PC.
Create a task:
1. Tap
Start
>
Programs
>
Tasks
.
2. Tap
Menu
>
New
, enter a subject for the
task and fi ll in information such as start
and due date.
3. When fi nished, tap
OK
.
Please note
An easy way to create a task is to
copy an existing one. In the task list,
select the task you want to copy. Tap
Menu > Edit > Copy, and then tap
Menu > Edit > Paste.
You can easily create a short, to-do type
task. Simply tap the
Tap here to add a
new task
box, enter a subject, and press
Enter
. If the task entry box is not available,
tap
Menu
>
Options
and select the
Show
Tasks entry bar
check box.
Tasks entry bar check box.Tasks entry bar

154
9
Applications
In the Calendar and Tasks programs, you
can set reminders to notify you in advance of
appointments and task due dates.
1. From the program, tap the item you want
to set a reminder for.
2. Tap
Edit
, and in the
Reminder
box, tap
Reminder box, tap Reminder
Remind me
.
In Calendar, the default reminder is set
15 minutes before an appointment.
In Tasks, the default reminder is set at
8:00AM of the day a task is due.
3. Tap
OK
.
Please note
To set a reminder for a task, you
must fi rst enable the sounds for
Notifi cations by tapping Start >
Settings > the Personal tab > Sounds
& Notifi cations.
Beam a task
To beam a task, in the task list, tap and hold
the task. On the pop-up menu, tap
Beam
Task
.
Notes
Notes
help you to quickly capture ideas,
notes, and thoughts. You can create a note
using written and typed text, drawings, and
recordings. You can also share your notes
with others through E-mail, infrared, and PC
synchronization.
To create documents with advanced
formatting or templates, such as bulleted
lists and tabs, use word processing software
developed for your device, such as Word
Mobile.
To create a note:
1. Tap
Start
>
Programs
>
Notes
>
New
.
2. Create your note by writing, drawing,
typing, and recording. See
2.7 Entering
information
about using the input panel,
writing and drawing on the screen, and
creating recordings.
3. To insert the date in a note, deselect and
make sure that no drawings are selected.
Next, tap and hold anywhere on the note
and tap
Insert Date
.
To send a note by E-mail:
In the Notes, Word Mobile, Excel Mobile,
PowerPoint Mobile, and Pictures programs,
you can send fi les and information to other
devices via E-mail.
1. First you must set up
Messaging
to send
and receive messages.
2. From the program, select the item you
want to send.
3. Tap
Menu
>
Send
.
A new message is created with the item
attached.
4. Select the account to send from.
5. Enter the recipient name and subject and
tap
Send
.
The message will be sent the next time
you synchronize your device.
Beam a note
To beam a note, on the note list, tap and
hold the note. On the pop-up menu, tap
Beam File
.

155
9
Applications
Change options:
1. In the note list, tap
Menu
>
Options
.
2. From the template list, you can select a
pre-designed template to use with all new
notes.
3. If you store most of your notes and
recordings on a memory card, in
Save
to
, tap
Memory card
to have new items
automatically saved to the card.
4. If you record a message for your Note
choose whether to Switch to Notes or Stay in
the current program.
9.2 Word Mobile
You can create and edit documents and
templates in
Word Mobile
, just as you would
do in
Word
, on your PC.
Word Mobile
documents can be saved as .psw, .doc,
.rtf, or .txt fi les. After you close a document
and name it, the document is automatically
placed on the
Word Mobile
document list.
Synchronizing Word Mobile
documents
Word Mobile
documents can be
synchronized with Word documents on your
PC. To synchronize fi les, select the fi le type
for synchronization in ActiveSync Options
settings on your PC. When you select
Files
,
a
\My Documents
folder is created on your
PC’s desktop. Place all the fi les you want
to synchronize with the device in this folder.
Please note that password-protected fi les
cannot be synchronized.
All
Word Mobile
fi les stored in
\My
Documents
and its subfolders are
synchronized with the PC.
ActiveSync
will convert the documents during
synchronization. When you delete a fi le
on your PC or your device, the fi le will be
deleted in the other location the next time
you synchronize. For more information on
synchronization, or fi le conversion, see
ActiveSync Help
on the PC.
Document conversion
Word documents (.doc) and templates (.dot),
created in Word 6.0 or later on the PC, are
converted to Word Mobile documents (.psw)
and templates (.psw). The conversion takes
place during these actions:
• During fi le synchronization.
• When you copy a
Word
fi le from the PC
to your O
2
Xda Flame.
• When you open an E-mail message, with
an attached Word fi le, on your device.
Word Mobile documents are converted
to Word documents when they are
synchronized or copied back to the PC.
During conversion from Word to Word
Mobile, most simple text and paragraph
formatting will be retained and displayed, but
some formatting attributes can be changed
or lost.

156
9
Applications
9.3 Excel Mobile
Not only can you edit Excel workbooks and
templates created on your PC, you can
create and edit workbooks and templates on
your device with Excel Mobile.
• View, edit, and create charts & graphs,
that can be embedded as objects in
a worksheet or placed on a separate
worksheet.
• Enter formulas and functions and then
fi lter data to see the desired subset of
information.
• Split panes to view different parts of a
worksheet at the same time.
• Freeze the top and left-most panes in a
worksheet to keep row and column labels
or other data visible as you scroll.
When you close a newly created workbook,
it is automatically named and placed in the
Excel Mobile workbook list. You can easily
rename the workbook and move it to another
folder or a memory card.
Please note
Work in full-screen mode to see as
much of your workbook as possible.
Tap View > Zoom and select a
percentage so that you can easily read
the worksheet.
Synchronizing Excel Mobile
workbooks
Excel Mobile workbooks can be
synchronized with Excel workbooks on your
PC. To synchronize fi les, select the fi le type
for synchronization in ActiveSync Options
settings on your PC. When you select
Files
, a
My Documents
folder is created
on your PC’s desktop. Place all the fi les you
want to synchronize with the device in this
folder. Password-protected fi les cannot be
synchronized.
All
Excel Mobile
fi les stored in
My
Documents
and its subfolders are
synchronized with the PC.
ActiveSync
converts documents during synchronization.
When you delete a fi le on your PC or
device, the fi le will be deleted in the other
location the next time you synchronize. For
more information on synchronization or fi le
conversion, see
ActiveSync Help
on the
PC.
Workbook conversion
Excel fi les (.xls) and templates (.xlt), created
in Excel version 5.0/95, or later, on the PC,
are converted to Excel Mobile workbook
(.pxl) or template (.pxt) fi les. The conversion
takes place during the following actions:
• File synchronization.
• When you copy an Excel fi le to your
device from the PC.
• When you open an E-mail message with
an Excel fi le attached.

157
9
Applications
Excel Mobile workbooks are converted
to Excel workbooks when they are
synchronized or copied back to the PC.
During conversion from Excel to Excel
Mobile, most simple text and paragraph
formatting will be retained and displayed, but
some formatting attributes can be changed
or lost.
9.4 PowerPoint Mobile
With PowerPoint Mobile, you can open
and view slideshow presentations created
on your PC. Whether the presentation
is opened from an e-mail message,
downloaded from a fi le share or the Internet,
copied to the device via a memory card, or
obtained by synchronizing with your PC,
slideshows created in *.ppt and *.pps format
with PowerPoint ‘97 and later can be viewed
on your device.
Many presentation elements built into the
slide shows, such as slide transitions and
animations, will play back on the device.
If the presentation is set up as a timed
slide show, one slide will advance to the
next automatically. Links to URLs are also
supported.
PowerPoint features not supported on
the device include:
• Notes: Notes written for slides will not be
visible.
• Rearranging or editing slides: PowerPoint
Mobile is a viewer only.
• Files created in *.ppt format earlier than
PowerPoint ‘97 and HTML fi les in *.htm
and *.mht formats are not supported.
Starting a slide show
presentation
1. Tap
Start
>
Programs
>
PowerPoint
Mobile
.
2. In the presentation list, tap the slide show
you want to view.
3. Tap the current slide to advance to the
next slide.
Please note
If the presentation is set up as a
timed slide show, slides will advance
automatically.
Changing the slide show
orientation
1. Tap
Start
>
Programs
>
PowerPoint
Mobile
.
2. Open the presentation you want to view,
tap ▲ arrow >
Show options
.
3. Tap the
Orientation
tab and select the
orientation you want.
Please note
Tap Default to view the presentation
in the orientation that best fi ts the size
and shape of the device screen.

158
9
Applications
Navigate between slides
If a presentation is set up as a timed
slideshow, slides will advance automatically.
However, if the presentation is not timed,
or you simply want to go to another slide
out of sequence, you can do that easily in a
PowerPoint Mobile
presentation.
1. Tap
Start
>
Programs
>
PowerPoint
Mobile
.
2. Open the presentation you want to view,
tap ▲ arrow >
Go to Slide
.
3. Tap the slide you want to view. Simply tap
the current slide to go to the next one.
Please note
If you have zoomed in to see a slide
in more detail, you cannot navigate to
another slide until you zoom out.
Tapping
Next
or
Previous
may play an
animation on a slide rather than navigate to
another slide.
Set slideshow playback options
You can override some of the playback
options stored in a PowerPoint presentation.
1. Tap
Start
>
Programs
>
PowerPoint
Mobile
.
2. Open the presentation you want to view,
tap ▲ arrow >
Show Options
.
3. Tap the
Playback
tab, select the
Override playback options for all fi les
check box, and do any of the following:
• To turn off builds and other animations,
select the
Show without animation
check box.
• To prevent slide transitions, select the
Show without slide transition
check
box.
• To use the timings recorded with each
slide in a presentation, select the
Use
slide timings, if present
check box.
• To automatically advance to the fi rst slide
after the last in a presentation, select the
Loop continuously
check box.
4. Tap
OK
.
Please note
To turn the presentation into a
continuously looping slideshow, select
both the Use timings, if present and
the Loop continuously check boxes.
Stop a slide show presentation
In the PowerPoint presentation, tap ▲
arrow >
End Show
.
Zoom in and out in a slide
Zoom in to see a portion of a slide in more
detail and zoom out to see the entire slide.
1. In a PowerPoint Mobile presentation, tap
▲ arrow >
Zoom In
.
2. Do one of the following:
• To zoom in another level, tap
.
• To zoom out, tap
.
• To return to the slideshow, tap
.

159
9
Applications
Please note
• If the presentation is set up as a timed
slideshow, the presentation will pause
during zoom.
• To view content not visible on the
device screen during zoom, simply tap
the slide and drag it up, down, or to
either side, until the content is visible.
9.5 Pictures & Videos
Use the Pictures & Videos program to take,
view, and edit pictures as well as record and
launch video clips stored on your device or
memory card. You can also send pictures
and video clips to others, or set a picture
as the background on the Today screen.
You can see your pictures individually, as
thumbnails, or as part of a slideshow. You
can edit pictures by cropping, rotating, and
adjusting the brightness and contrast.
Transferring pictures
Pictures stored on your PC can be
synchronized with Pictures & Videos on
your device. Picture synchronization is
not automatically selected in ActiveSync;
you need to tap the sync option Files in
ActiveSync on your desktop PC.
Finding and listing pictures:
1. Tap
Start
>
Programs
>
Pictures &
Videos
.
2. Tap
My Pictures
and select a folder from
the drop-down menu.
View pictures and launch video clips:
1. Tap
Start
>
Programs
>
Pictures &
Videos
.
2. Tap the picture or video clip you want to
see.
3. To view pictures or launch video clips
stored on a memory card, tap the folder
list (labeled
My Pictures
by default) and
tap the appropriate memory card option.
4. To view pictures or launch video clips
stored in the
My Pictures
folder on your
device, tap
My Pictures
.
Please note
To quickly assign a picture to a contact
while viewing a picture, tap Menu >
Save to contact, tap the name of the
contact and tap OK.
160
9
Applications
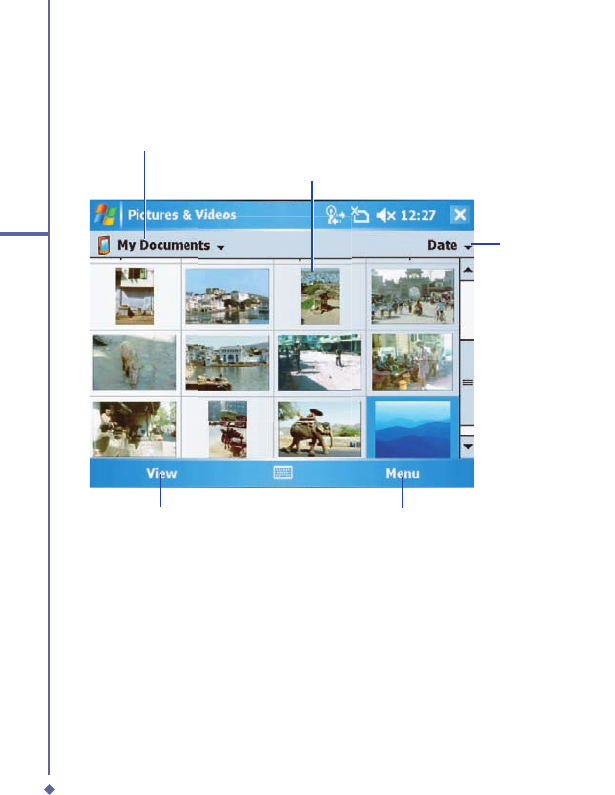
Photos and video clips that you take are stored in
Album
, where you can view your image
fi les and manage photos or video clips that you take, set them as Wallpaper or Caller ID, and
so on.
Select a folder
Sort the image fi les
View Menu
Video clips indicator
161
9
Applications
Menu
Option
Description
Send
Send photos or video clips via E-mail or MMS message.
Beam
Transmit photos or video clips to another device.
Save to contact
Save an image as a Photo Contact.
Delete
Delete a file.
Edit
Cut, Copy, Paste and create a New Folder
Properties
Displays the Name, File Type, Dimensions, File Size, Date Created and
Protected.
Play Slide Show
Play all the images in the folder in a slideshow.
Set as
Today
Background
Save an image as the background for today.
Options
There are 2 tabs
General
- Resize the picture (Original size, Large (640 x 480), Medium
(320 x 240) and Small (160 x 120); Rotate the picture Left or Right by
90 degrees
Slide Show
- Optimize the slide show for viewing either Portrait or
Landscape pictures; Check the box to play the screensaver when
connected to a PC.

162
9
Applications
Sort pictures and video clips
If you store a large number of pictures or
video clips on your device, you may fi nd it
helpful to sort them to quickly fi nd a specifi c
picture or clip. You can sort by name, date
and size.
1. Tap
Start
>
Programs
>
Pictures &
Videos
.
2. Tap the sort list (labeled
Date
by default)
and select the item you want to sort by.
Deleting an image
Hold the stylus fi rmly on the fi le name of the
picture you want to delete. Select
Delete
from the pop-up menu.
Edit pictures
You can rotate, crop, zoom and adjust
the brightness and color contrast of your
pictures.
1. Tap
Start
>
Programs
>
Pictures &
Videos
.
2. Tap the picture you want to edit.
3. Tap
Menu
>
Edit
and do any of the
following:
• To rotate a picture 90 degrees
counterclockwise, tap Rotate.
• To crop a picture, tap Menu > Crop. Then,
tap and drag to select the area to crop.
Tap outside the box to stop cropping.
• To adjust the brightness and contrast
levels, tap
Menu
>
AutoCorrect
.
Set pictures as background
You can use your own picture as the
background on the Today screen, and
specify how you want it displayed on
the screen, such as by adjusting the
transparency level.
1. Tap
Start
>
Programs
>
Pictures &
Videos
.
2. Select the picture you want to set as the
background.
3. Tap
Menu
>
Set as Today Background
.
4. In
Transparency
, select a higher
percentage for a more transparent picture
or a lower percentage for a more opaque
one.
5. Tap
OK
.
Saving pictures
Pictures can be either saved to contact or as
a new name.
1 Tap
Start
>
Programs
>
Pictures &
Videos
2. Select the picture you want to save.
3. Tap
Menu > Save.
Choose betwen
Save
to contact
or
Save As
>
9.6 Calculator
Your phone has a calculator application
that allows you to do basic math. To use
the calculator, tap
Start
>
Programs
>
Calculator
.
9.7 Games
Your phone is designed to provide you some
entertainment with games. To access these
games, tap
Start
>
Programs
>
Games
.
163
9
Applications
9.8 File Explorer
This feature allows you to view and manage all fi les saved in your O
2
Xda Flame or memory
card. To access File Explorer, tap
Start
>
Programs
>
File Explorer
. Select the source where
the fi les are saved.
To sort fi les by type, tap Sort by and select a method:
Name
,
Date
,
Size
and
Type
. Tap
Up
to
go up a level in the fi le hierarchy.
Tap Menu to access more options:
Option
Description
My Documents
Displays files saved in
My Document
.
Open Path
Create a new path to open a file.
Send
Send the selected document via E-mail.
Beam File
Send the file via Infrared or Bluetooth.
Refresh
Refresh the document display screen.
Show All Files
Show all the stored files.
New Folder
Create a new folder.
Rename
Rename a file.
Delete
Delete a file.
Edit
Manage the file list by using
Undo
,
Cut
,
Copy
,
Paste
,
Paste Shortcut
,
and
Select All
.
9.9 Searching for Files
This feature allows you to search for a fi le easily.
To fi nd a fi le:
1. Tap
Start
>
Programs
>
Search
.
2. Enter the fi le name in the
Search for
fi eld and select a fi le type in the
Search for fi eld and select a fi le type in the Search for
Type
fi eld.
3. Tap
Search
to start searching and the results will be displayed in the
Results
fi eld.
164
9
Applications
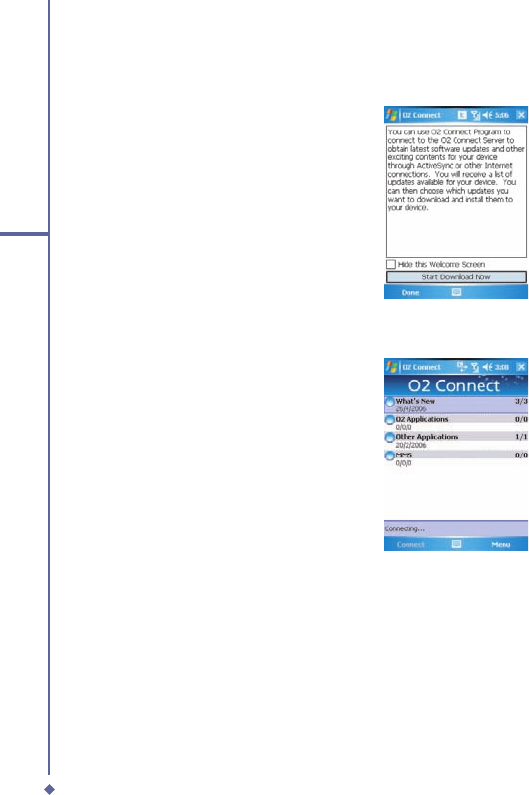
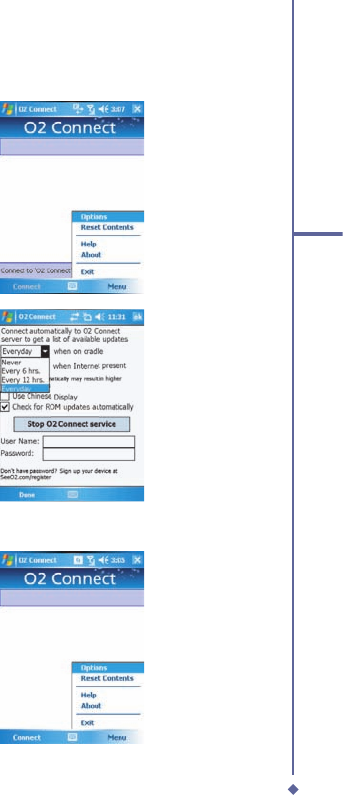
9.10 O2 Connect
O
2
Connect gives you direct access to
everything O
2
by keeping you updated on
the latest products, promotions, software
upgrades, downloads, helpdesk numbers,
repair center locations, and tips & tricks to
enhance your mobile lifestyle.
Accessing O2 Connect
You can access
O
2
Connect
via
ActiveSync
, GPRS or Wireless LAN.
Once connected, you can synchronize
information to your device and read it
offl ine. If you fi nd an item in
O
2
Connect
that to download, you can do so and install
it instantly, or choose to install later.
165
9
Applications
Options
Some content items require a user name
and password. You can save this user
name and password on your device so you
don’t have to enter them again; simply tap
Tools
>
Options
and then enter your user
name and password when prompted.
You can program the device to receive O
2
Connect updates at
Never, Every 6 and
12 hrs
and
Everyday
intervals through an
ActiveSync connection, or choose between
6
and
12
-hour intervals through an active
Internet connection.
Enabling/Disabling O2 Connect
To disable O
2
Connect, tap
Tools
>
Options
and then select
Stop O
2
Connect
service
.
To enable O
2
Connect, tap
Tools
>
Options
and then select
Start O
2
Connect
service
.
By default, if your O
2
Xda Flame is
connected to the Internet via ActiceSync,
O
2
Connect will make a connection to
the O
2
Server every 4 hours to refresh
contents. You will always have access to
the latest information.
166
9
Applications
9.11 O2 SMS Plus
O2 SMS Plus is an alternative SMS application that lets you:
• Send and receive SMS messages via a
chat-style user interface
• View incoming and outgoing SMS
messages in the same list window
• Write an SMS and schedule its delivery
• Send SMS messages to multiple
recipients
• Send and receive vCard contacts
via SMS from compatible devices
supporting SMS vCard transmission;
and
• Search for SMS messages that contain
a search string.
Opening O2 SMS Plus
To access O
2
SMS Plus, simply tap
Start
>
Program
>
O
2
SMS Plus
.
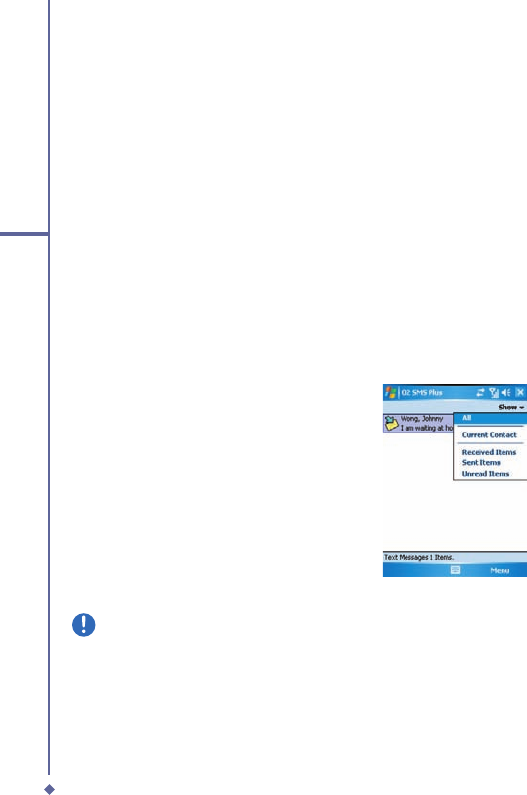
When you open
O
2
SMS Plus
, you will see a message list window on your screen. You can
control this list window to display
• Received messages only
• Sent messages only
• Messages from a selected contact only
• Both received and sent messages
• Unread messages only
Please note
Unread messages will be displayed in bold.
To read a message, simply tap on the message or use the appropriate directional keys on the
navigation pad to highlight it and then press the action key. Alternatively, you can navigate to
the message in the list window and see the full message displayed as a “ticker tape”, scrolling
across the screen, without opening.

167
9
Applications
Chatting with Contacts
To chat with someone on your contact list, follow these simple steps:
1. Select
Menu
>
Chat
>
Others
.
2. In the “
To
” fi eld, enter the destination phone number or select a name from the contact list
by tapping “
To
” or
Edit
>
Select Contact
.
3. Compose your message. To enter a preset text message, tap
Insert My Text
and select
the appropriate message. To enter emoticons, tap
Edit
>
Insert Emoticons
.
4. Tap
Send
.
Scheduling messages
To schedule SMS to be sent at a chosen date and time, follow these steps:
1. Select
Menu
>
Set Schedule
.
2. Scheduled SMS window displays. To create a schedule, select
Menu
>
Add
.
3. The message window displays.
4. In the “
To
” fi eld, select a name from the contact list by tapping “
To
” or
Menu
>
Select
Contact
.
5. In the “
Date
” and “
Time
” fi elds, select the date and time to send.
6. Compose your message. To enter a preset text message, tap “
My Text
” and select the
appropriate message. To enter emoticons, tap
Menu
>
Insert Emoticons
.
7. Tap
OK
when done.
Sending group messages
To send SMS to a group of people, follow these steps:
1. Select
Menu
>
Group SMS
.
2. In the “
To
” fi eld, select a name from the contact list by tapping “
To
” or
Menu
>
Edit
Recipients
to select groups. A group window is displayed. Check the groups you want to
include in the recipient list.
3. To select individual contact names, tap
Menu
>
Insert Contact
.
4. Tap
Done
to exit the select group window.
5. Compose your message. To enter a preset text message, tap
Insert My Text
and select
the appropriate message. To enter
Emoticons
, tap
Edit
>
Insert Emoticon
.
6. Tap
Send
.

168
9
Applications
Sending vCards
To send a vCard, follow these steps:
1. Select
Menu
>
Send vCard
.
2. In the “
To
” fi eld, select a name from the contact list by tapping “
To
” or tap
Menu
>
Select
Contact
3. Tap the
Contact Card
fi eld to select the name of the card to be sent.
4. Tap
Send
.
Note: You can choose whether to send the card in either vCard format or as text.
Editing / Adding Text
To edit the pre-set text, follow these steps:
1. Select
Menu
>
Edit My Text
2. Tap the text to be edited to highlight it.
3. Tap
Menu
>
Edit
and change the text.
4. Tap
Done
.
Note: To add new text tap Menu > Add. New Text will appear, follow the above steps to
change the new text.
169
9
Applications
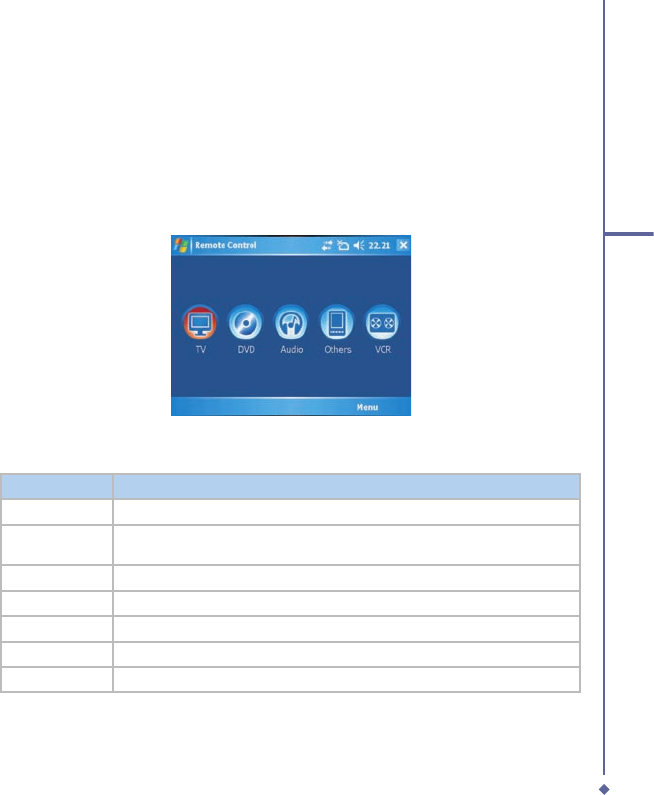
9.12 Remote Control
The O
2
Xda Flame can be used as a remote control to control TV’s, Videos, DVD’s and
anything else.
2.) Tap the
required item or tap
Menu
.
Item
Description
Add device
Add a device either by brand or manually.
Delete device
Tap to see a list of devices that have been setup. Select the device and tap
delete
to remove it.
Show label
Select whether to see labels below the icons.
Reset
Reseting removes all devices.
Help
Displays the help file.
About
Displays version information.
Exit
Closes the program.
1.) Tap
Programs
>
Remote
Control
to launch the remote control. When asked if you want
to switch the device to right hand mode tap
Yes
.

170
9
Applications
Adding a Device - By Brand
1) Tap
Menu
>
Add device
>
By brand
>
TV
,
DVD
,
Audio
or
VCR
.
2) From the drop down list choose the model
of your appliance and tap
Done
.
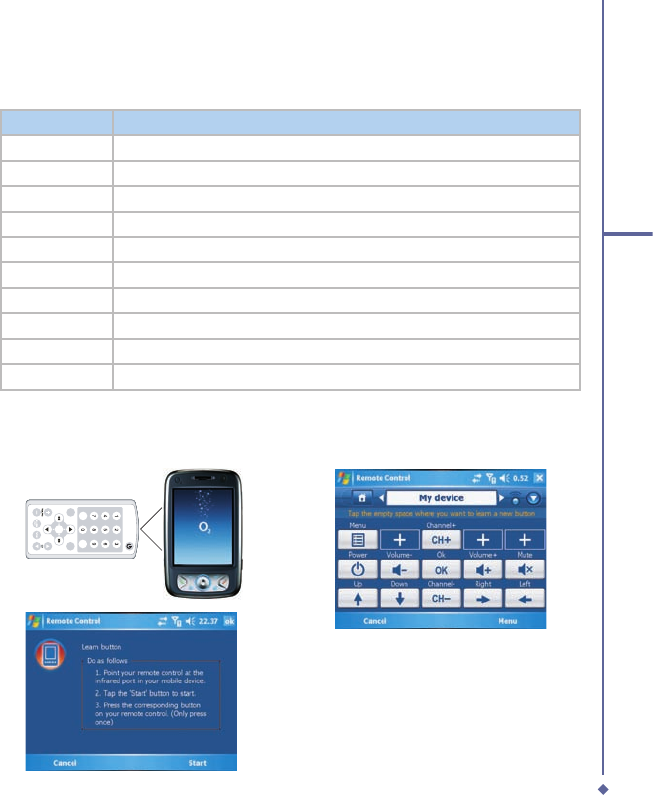
Adding a Device - Manually
1) Tap
Menu
>
Add device
>
Manually.
Select a profi le for the device and add a
name for the device. tap Done
2) The example below shows an
unconfi gured screen
3) The buttons now have to be confi gured.
This can be done either through tapping one
of the existing buttons or by tapping
Menu
>
Learn
button.
171
9
Applications
Item
Description
Add button
Tap to add a new button
Delete button
Tap to delete a button
Learn button
Use the existing remote control to train the O
2
Xda Flame
Move button
Tap to move a button
Shortcut
Add shortcuts to the navigation pad
Show label
Select whether to see labels below the icons.
Reset
Reseting removes all devices.
Help
Displays the help file.
About
Displays version information.
Exit
Closes the program.
Menu
Position the remote control as shown below
and follow the instructions on the screen
Learning buttons
To learn a button either tap the required
button or tap
Menu
>
Learn button
to
display additional buttons

172
9
Applications
Tap an empty button to select a button
image. Select a label image and enter a
name for button. Tap
Next
Line up the devices remote control and
follow the on screen instructions.
Using the Remote Control
Having confi gured the remote control to work
with your device(s) it is ready for use.
TV
Point the O
2
Xda Flame at the device and
tap the appropriate buttons.

173
9
Applications
9.13 Adobe PDF
Adobe PDF displays Portable Document Format fi les. These fi les usually have a .pdf
extension.
To open a PDF fi le
1. Launch ClearVue PDF by tapping
Start
>
Programs
>
ClearVue PDF
.
2. Tap
File
>
Open
to view a list of .pdf fi les on your O
2
Xda Flame > Tap the fi le you want to
view.
Moving around in a document
When a document is larger than one screen, scroll bars enable you to move around. You can
navigate around a .PDF fi le in the following ways:
• Tap the up/down and right/left arrows to move one line in the desired direction. You can
also use the navigation pad to move around the screen.
• Click and hold the space between the arrow and the scroll bar to move one screen to the
desired position.
• Use the left, right, up and down arrow keys on the soft keyboard to move to the desired
position.
• You can also tap and hold and then drag the screen to move around the document to the
desired position.
The Zoom feature
The
Zoom
feature allows you to enlarge or reduce the document content on display.
Zoom
is
available from the
View
menu.
To get a different view of a document, select from the preset
Zoom
settings or choose
Custom Zoom
.

174
9
Applications
9.14 JAVA Midlet
Your O
2
Xda Flame supports Java 2 Edition, J2ME. The MIDlet Manager allows you to
download Java applications, such as games and tools specifi cally designed for mobile
devices. The Java MIDlet Manager gives you a high level of fl exibility when installing and
managing additional J2ME applications from the Internet.
Installing from the Internet
You can install MIDlets/MIDlet suites directly from the Internet using Internet Explorer in
conjunction with the MIDlet Manager.
1. Connect to the Internet in the following
ways:
• Tap
Start
>
Programs
>
Java
>
Menu
>
Instal
l >
Browser
.
•
Tap Start > Programs > Java > Menu >
Install > URL.
• Alternatively, launch Internet Explorer.

175
9
Applications
2. Locate a MIDlets/MIDlet suite you wish to
download (this is normally .jad or .jar).
3. Select the MIDlets/MIDlet suite and
download it.
4. You will be asked to confi rm before the
download begins.
5. A progress screen is displayed while
fi les are downloaded. You can cancel the
download at any time.
Once your download is completed, the
MIDlet Manager will automatically start and
prompt you to install your new MIDlets/
MIDlet suite. You must confi rm that you want
to proceed; the installation of your MIDlets/
MIDlet suite is then completed. Alternatively,
you can cancel installation at any time.
Installing MIDlets from a PC
You can install
MIDlets/MIDlet
suite onto
your O
2
Xda Flame from your PC using the
USB cable, infrared or Bluetooth.
MIDlets
transferred to your O
2
Xda Flame using
infrared, Bluetooth, or as E-mail attachments
are, by default, saved in the
My Documents
directory.
To install
MIDlets
via a physical connection
(USB cable or cradle), use Windows
Explorer to copy your MIDlet fi le(s) from your
PC to
My Documents
on your device.
Once the fi le(s) have been copied to your
O
2
Xda Flame, you must install the MIDlet/
MIDlets suite:
1. Tap
Start
>
Programs
>
MIDlet
Manager
>
Manager > Manager
Menu
>
Install
>
Local
Files
.
2. The Install screen will open, presenting a
list of all available MIDlets/MIDlet suites.
3. Select one and choose Install from the
pop-up menu. You will be prompted to
confi rm your choice.
Running MIDlets
1. Tap
Start
>
Programs
>
MIDlet
Manager
.
2. Select a suite and press
Launch
to run
the MIDlet. The MIDlets/MIDlet suite
you selected will open within the MIDlet
Manager window.
Stopping MIDlets
Some MIDlets have an exit or stop command
within their menu structure, depending on
the MIDIet software developer.
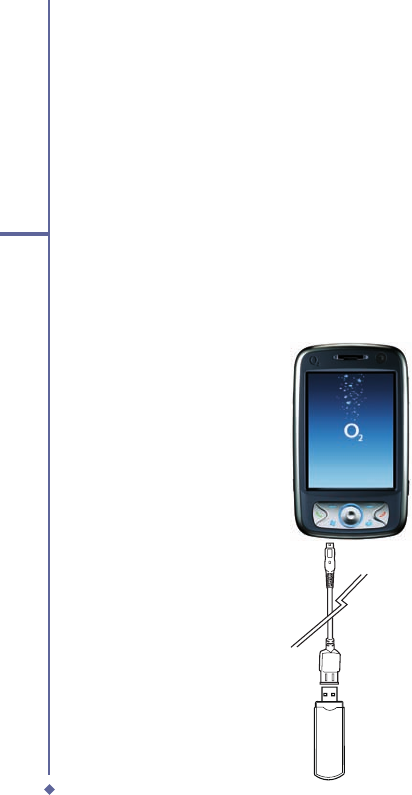
176
9
Applications
9.15 USB OTG Connection
The USB On-The-Go (OTG) Connection refers to the small connector on the bottom of the
phone. As previously mentioned this connector allows you to synchronise and charge the
mobile phone via the USB port.
In addition to this functionality you can also attacch other USB devices such a USB memory
sticks.
1. Attach the USB Host cable to the base of the O2 Xda Flame.
2. Attach the USB memory stick.
3, Files on the memory stick can be viewed by going to Today > File Explorer > Show

169
10
Wireless Connectivity
10.1 About Wireless
10.2 Wireless Manager
10.3 Wi-Fi Companion
10.4 Making a connection
10.5 Connecting to the Internet
Chapter 10
Wireless
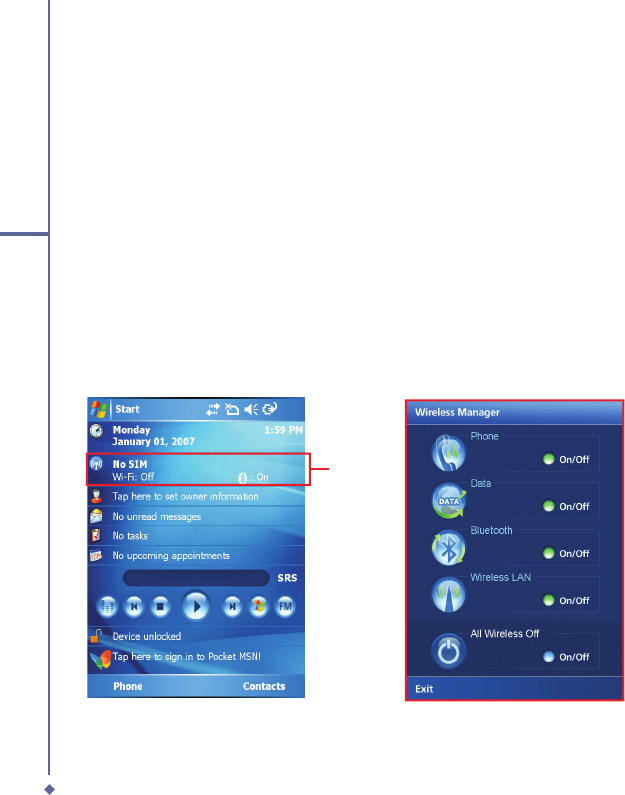
170
10
Wireless Connectivity
10.1 About Wireless
Your O
2
Xda Flame has powerful networking functions that enable you to connect to the
Internet using a number of different methods, including GPRS network or Bluetooth modem.
You can also use an external modem with this device to access the Internet.
You can set up connections to the Internet and incorporate a network at work to browse the
Internet, use E-mail, use instant messages, and synchronize with
ActiveSync
.
There are two types of
connection settings:
My ISP
and
My Work Network
.
My ISP
settings
are used to connect to the Internet, and
My Work Network
settings can be used to connect
to any private network, such as a corporate network. Fill in the settings and you are ready to
connect to the Internet.
10.2 Wireless Manager
Wireless Manager is an integrated interface that combines Bluetooth, Wi-Fi, and Phone in one
function page. To manage these wireless connections, tap
Start
>
Settings
>
Connections
tab >
Wireless
Manager
. You may also access Wireless Manager from Today screen.
Tap
All
to turn on/off all wireless connections. If you only want to turn off Bluetooth, for
example, tap
Bluetooth
and the button will become colorless. Tap
Menu
to set up these
wireless connections.
Wireless
Manager

171
10
Wireless Connectivity
GPRS
Before using GPRS to connect to the Internet, please contact your network operator
to confi rm that the service is enabled and supported on your SIM card. Using GPRS is
convenient for you while traveling or working at home. You can use this device to browse
web pages, read or send E-mail, text or MMS messages, and sign in Pocket MSN through
wireless network.
GPRS connection settings
1. Select
Start
>
Settings
>
Connections
tab > Connections >
Advanced
tab.
2. Tap
Select Networks
to open
Network Management
screen.
3. Select a desired network name from the list, or tap New to add available network to the list.
Tap Edit to modify existing network setup content.
4. Tap OK to save and exit.
Please Note:
The simplest way to get your O
2
Xda Flame connected to the network is to
activate O2 Auto Confi gurator (Please refer to Section 9.12 O2 Auto Confi gurator).
Activating GPRS connection
1. Tap
Start
>
Internet Explorer
.
2. Input an URL address you desire to browse in address fi eld and tap the arrow icon to go to
the URL.
3. After completing connection,
icon will become
icon.
4. Or you may select
Start
>
Settings
>
Connections
tab >
Connections
>
Tasks
tab
>
Manage Existing Connection
> tap and hold on a connection to open pop-up
Menu
>
Connect
.
After completing connection, you may go Internet surfi ng or send and receive E-mail.
Please note: If this device is under fl ight mode, please turn off fl ight mode beforehand. Tap
icon on Today screen, then tap “Wireless Manager” on the pop-up window. Tap on
“Phone” to turn the phone function on. The
icon will appear on Today screen when
GPRS is activated.
When using GPRS or connecting to the Internet, you will not able to answer a call. If you
make a call, your device will automatically disconnect to the Internet and reconnect to the
Internet after the conversation ends.
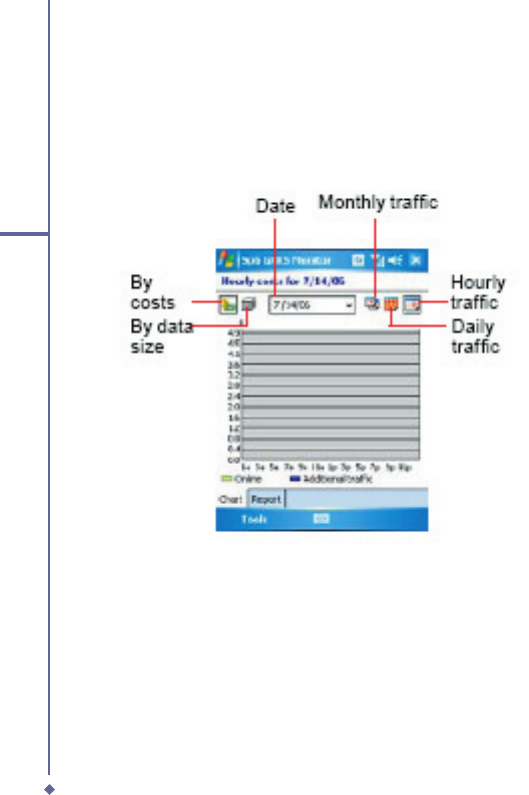
172
10
Wireless Connectivity
Spb GPRS Monitor
This program allows you to monitor GPRS traffi c and cost in hourly, daily, monthly or yearly
view. To monitor GPRS traffi c:
1. Tap Start > Programs > Spb GPRS Monitor > Chart tab.
2. Select an icon to view its details:
To view the GPRS report:
Tap
Start
>
Programs
>
Spb GPRS Monitor
>
Spb GPRS Monitor > Spb GPRS Monitor
Report
tab.
Connecting with your PC
If you want to connect this phone with your PC, please see Chapter 11 ActiveSync
Synchronization Tool.

173
10
Wireless Connectivity
Bluetooth
Bluetooth is a short-range wireless communications technology. With Bluetooth, you don’t
need to line up the devices to beam information. The two devices only need to be within a
range of about 10 meters. You may use Bluetooth in the following ways:
1. Exchange information, such as fi les, appointments, tasks, and contact cards, between
devices that have Bluetooth capabilities. For example, if you and a co-worker each have a
device with Bluetooth, you can beam items between your devices; these items could include
fi les, contact cards, appointments, tasks, etc.
2. Create a dial-up modem connection between your device and a Bluetooth phone. You can
then use the Bluetooth phone as a modem.
Bluetooth settings
To access the Bluetooth settings screen, tap
Start
>
Settings
>
Connections
tab >
Bluetooth
.
To turn on Bluetooth, check Turn on Bluetooth option; uncheck the option to turn off. If
Bluetooth is turned off, you cannot use Bluetooth to either send or receive information. In
order to conserve the battery power or where radio use is prohibited, you might want to turn
Bluetooth off.
By default, Bluetooth is turned off. If you turn it on, and then turn off your device, the Bluetooth
radio also turns off. When you turn on your device again, the Bluetooth radio automatically
turns on the radio. If you wish to turn on the radio, turn off Bluetooth fi rst, and then turn on the
radio. To make your device visible to other Bluetooth devices, check Make this device visible
to other devices option.
If Bluetooth radio is turned on, then all of the other Bluetooth devices within range (about 10
meters) can detect your device and attempt to beam information to it, establish a bond, or use
a Bluetooth service. In this mode, other devices can detect your device whether or not a bond
has been created; however, in order to receive a beam from another device, you must accept
it on your device.
Other Bluetooth devices can now detect your device and attempt to beam information to it,
establish a bond, or use a Bluetooth service. Note that, to receive beamed information, you
must accept it on your device by selecting
Make this device visible to other devices
; this
also turns on your Bluetooth radio. If you no longer want your device to be visible, uncheck
Turn on Bluetooth option or uncheck
Make this device visible to other devices
option to
leave the radio on, but not allow detection by other devices.

174
10
Wireless Connectivity
Bonds
To exchange information in a secure manner, you may use a bond to create a relationship
between your O
2
Xda Flame and another Bluetooth device. To create a bond, you need to
enter the same passcode on the two devices that you want to bond. You need only create a
bond once between two devices. Once a bond is created, the devices recognize the bond and
are able to exchange information without your needing to enter PIN again.
To create a bond:
You can create a bond between your device and another device that has Bluetooth. Once
you do this, Bluetooth doesn’t need to be in visible mode in order for you to beam information
between the two devices; you only need to have the Bluetooth radio turned on.
1. Tap
Start
>
Settings
>
Connections
tab
2. Tap
Bluetooth
>
Devices
tab >
New Partnership
. Your device searches for other
Bluetooth devices and displays them in the list.
3. Tap the name of the other device in the list, and then
Next
.
4. Enter a passcode of between 1 and 16 characters and tap
Next
.
5. Enter the same passcode on the other device.
6. In
Display Name
, edit the name of the other device if you want.
7. Tap
Finish
.
Please note:
Make sure that the two devices are within 10 meters of one another and that
Bluetooth is in visible mode on both devices
.
To accept a bond:
1. Please make sure that Bluetooth is activated and visible to other devices.
2. When prompted to bond with the other device, tap
Yes
.
3. Enter a passcode of between 1 and 16 characters , and tap
Next
. You must enter the same
passcode that was entered on the device requesting the bond.
4. In Display Name, edit the name of the device requesting the bond if you want.
5. Tap
Finish
.
The bond is created. You can now exchange information with the other device.

175
10
Wireless Connectivity
To rename a bond:
1. Tap
Start
>
Settings
>
Connections
tab.
2. Tap
Bluetooth
>
Devices
tab.
3. Tap the bond to rename.
4. In Display Name, enter a new name for the bond and then tap
Save
.
To delete a bond:
1. Tap
Start
>
Settings
>
Connections
tab.
2. Tap
Bluetooth
>
Devices
tab.
3. Tap and hold the bond and then tap
Delete
.
Beaming information with Bluetooth
1. Tap and hold an item to beam, such as an appointment in Calendar, a task in Tasks, a
contact card in Contacts, or a fi le in File Explorer.
2. Tap
Beam
type of item.
3. Tap the device to which you want to send the beam. The item is beamed to the device you
selected. If the device that you want to beam to does not appear in the list, make sure that it
is turned on, in visible mode, and within 10 meters of your device. Also, make sure that your
Bluetooth is turned on.
Receiving a Bluetooth beam:
1. Make sure that your device is confi gured to receive incoming beams and that Bluetooth is
in visible mode.
2. Make sure that your device is within 10 meters of the device beaming the information.
3. When prompted to receive an incoming beam, tap Yes. The information is now stored on
your device.

176
10
Wireless Connectivity
Using a Bluetooth phone as a modem
You can use a phone that has Bluetooth capabilities as a modem for your device.
To do this, you create a Bluetooth modem connection on your device and then send
information to the phone by using Bluetooth. The phone relays the information over the phone
line and then sends back to your device any information that you had requested over the
connection.
Once you create a modem connection to the Bluetooth phone, you can reuse it whenever you
want to use the phone as a modem.
1. Make sure that the Bluetooth phone is turned on, that your device’s and the phone’s
Bluetooth radios are turned on, and that your device and the phone are within 10 meters of
one another.
2. If you have not already done so, create a Bluetooth phone connection using the method
described below:
3. Tap
Start
>
Settings
>
Connections
tab >
Connections
> Add a new modem connection.
4. Enter a name for the connection.
5. In Select a modem list, tap
Bluetooth
>
Next
.
6. Make sure that the device is visible. Some phones may also need to be pairable in order to
accept a bonding request.
7. If the device appears in My Connections list, skip to step 14. If not, tap Add new device and
follow the remaining steps.
8. In the list, tap the device and then
Next
.
9. Enter a passcode of between 1 and 16 characters, and tap
Next
.
10. Enter the same passcode on the phone.
11. If you want, in Display Name, edit the name of the phone.
12. Tap
Finish
.
13. In My Connections list, tap the device, and then
Next
.
14. Enter the phone number to dial for this connection and tap
Next
.
15. In User name, Password, and Domain; enter the logon information for this connection and
tap Finish.
16. Start using the program that uses the Bluetooth phone connection; for example, Inbox to
send and receive E-mail, or Internet Explorer to browse the Web.
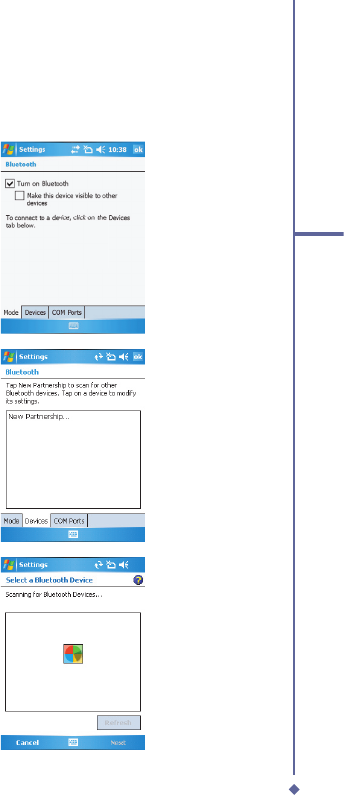
177
10
Wireless Connectivity
Bluetooth headset
To set up your O
2
Xda Flame with a Bluetooth headset, you may refer to the user guide with
your Bluetooth headset and the following instructions:
1. Tap
Start
>
Settings
>
Connections
tab >
Bluetooth
>
Mode
tab and check
Turn on Bluetooth
and
Make the
device discoverable to other devices
.
2. Tap >
Settings
>
Connections
tab >
Bluetooth
>
Devices
tab and tap New
Partnership to scan for other Bluetooth
devices.
3. Your O
2
Xda Flame starts scanning for
Bluetooth devices.
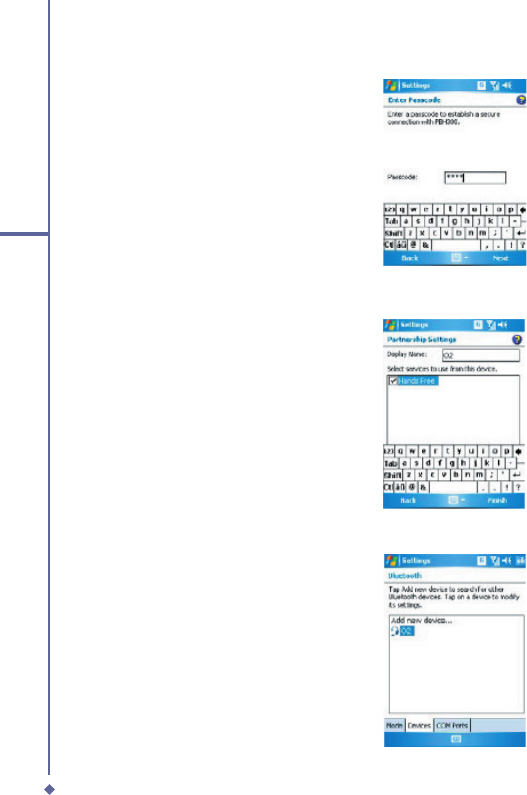
178
10
Wireless Connectivity
4. Enter the passcode for the located
Bluetooth Device. For information,
please refer to documents coming with
your Bluetooth headset.
5.Defi ne the display name and the type of
service your Bluetooth device offers.
6. When you fi nish setup, you will see the
Bluetooth device displayed in the menu.
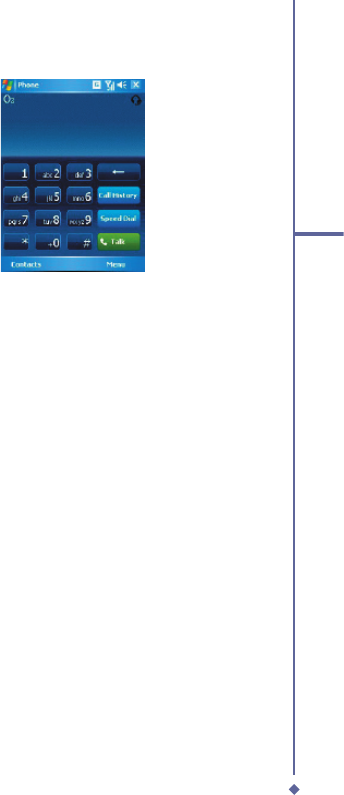
179
10
Wireless Connectivity
7. Also, there will be a Bluetooth headset
icon indicating the active connection
status.
COM ports
For example, when you purchase a Bluetooth GPS-supported navigation software; you can
register this device as an effective serial port by following the instructions on the manual of
that product and the steps below:
Tap
Start
>
Settings
>
Connections
tab >
Bluetooth
>
COM Ports
tab. To register a new
serial port:
1. Tap
New
Incoming
Port
to enter setup screen.
2. Select a port to be set.
3. Select
Finish

180
10
Wireless Connectivity
10.3 Wi-Fi Companion
Wi-Fi is a type of wireless local area network that communicates between two devices by high
frequency radio waves. Your O
2
Xda Flame supports Wireless LAN, which is IEEE 802.11b/g
compliant. It allows your device to connect to the Internet with detected wireless network.
To activate Wi-Fi
1.Tap Start > Settings > Connections tab > Wireless Manager.
2. Tap Wi-Fi to activate wireless network.
3. Tap
Done
to exit.
To check your Wi-Fi status
Tap Start > Settings > Connections tab > WiFi Utility > Wi-Fi Status tab and you may see the
details of your phone’s wireless LAN connection, including Status, ESSID, BSSID, BSS Mode,
Channel, Data Rate, IP Address, and Signal Strength.
To confi gure Wi-Fi settings
Tap
Start
>
Settings
>
Connections
tab >
WiFi Utility
> Setting tab and scroll to set the
desired value/mode for the following setting items: Adhoc Channel, Preamble, Data Rate,
Power Save, Power strength, and Auto Power off. Tab Set button to confi rm your setting.
To update IP info
Tap
Start
>
Settings
>
Connections
tab >
WiFi Utility
>
IP Info
tab >
Renew
or
Ping
button
to update IP information or locate the IP address of the other device.
To search IP address
Tap
Start
>
Settings
>
Connections
tab >
Wi-Fi Utility
>
Site Survey
tab > Re-scan button
to search the ESSID, Channel, RSSI, and BSSID of the Wireless LAN.
To change IP address
1. Tap
Start
>
Settings
>
Connections
tab >
Wi-Fi
>
Network
Adapters
tab.
2. In My network card connects to drop-down list, tap either The Internet or Work. If you
are connecting to your ISP at home, tap The Internet. If you are connecting to a private
network such as a corporate network at work, tap Work.
3. Tap the appropriate adapter in Tap an adapter to modify settings box.The IP address will
now appear in IP Address box on IP Address tab.
4. To change TCP/IP settings if your ISP or private network does not use dynamically-
assigned IP addresses, tap Use specifi c IP address and enter the requested information.
Contact your ISP or network administrator to get the IP address, Subnet mask, and/or
Default gateway (if needed).
5. To change DNS and WINS settings if your ISP or private network does not use dynamically-
assigned IP addresses, tap Name Servers tab and enter the requested information.

181
10
Wireless Connectivity
Servers that require an assigned IP address may also require a way to map computer
names to IP address. DNS and WINS are the resolution options supported on your O
2
Xda
Flame.
Getting Connected
Please note: After activating Wi-Fi, a new window, New Network Detected, will appear if any
is detected. Select Connect and enter your password to the local network. Tap Connect to
connect this device with local network. You may use Wi-Fi for up to 2 hours. The actual use
time will depend on the power status of your battery. While this feature is not in use, please
disable it to save power.

182
10
Wireless Connectivity
10.4 Making a connection
The simplest way to get your O
2
Xda Flame connected to the network is to activate
AutoConfi gurator (Please refer to
12.2 Auto-Confi gurator
). Below are the options you can
12.2 Auto-Confi gurator). Below are the options you can 12.2 Auto-Confi gurator
change manually:
CSD Line Type
This program allows you to choose the line type when you make a circuit switch data
connection.
To change a CSD Line type:
1. Tap the
Start
>
Settings
>
Connections
>
CSD Line Type
.
2. Defi ne the value for
Data Rate
. In
Connection element
, choose a type from that drop-
down menu. Tap
OK
.
Please note
The default setting on your O
2
Xda Flame is set for optimal use. Do not change this setting
unless you have trouble using the circuit switch data connection.
Wireless LAN
Wireless LAN is a type of local area network that communicates between two devices by
high frequency radio waves. Your phone supports Wireless LAN, which is IEEE 802.11b
compliant. Your phone has a preinstalled program, Wi-Fi, allowing you to confi gure Wireless
LAN settings.
To check your Wi-Fi status:
Tap
Start
>
Settings
>
Wi-Fi
>
Wi-Fi
Status
tab and you may see the details of your
phone’s wireless LAN connection, including Status, ESSID, BSSID, BSS Mode,
Channel, Data Rate, IP Address, and Signal Strength.
To confi gure Wi-Fi settings:
Tap
Start
>
Settings
>
Wi-Fi
>
the Setting
tab and scroll to set the desired value/mode
for the following setting items: Adhoc Channel, Preamble, Data Rate, Power Save, Power
Strength, and Auto Power off. Tab the Set button to confi rm your setting.
To update IP info:
Tap
Start
>
Settings
>
Wi-Fi
>
IP Info tab
> Renew or Ping button to update IP
information or locate the IP address of the other device.
To search IP address:

183
10
Wireless Connectivity
Tap
Start
>
Settings
>
Wi-Fi
>
Site Survey
tab > Re-scan button to search the ESSID,
RSSI, BSS and Channel of the Wireless
LAN.
Please note
Wen this feature is not in use, disable it to
save power.
Network Card Settings
You can connect directly to an Ethernet
network by inserting a network (Ethernet)
card. Once connected, you can view the
Internet or an intranet, or download E-mail.
Make sure that you purchase and confi gure
a network card compatible with your O
2
Xda
Flame.
To set up your network card:
1. Insert the network card into your O
2
Xda
Flame.
2. The fi rst time you insert the card, Network
Settings will appear automatically. To
change it later on, tap
Start
>
Settings
> the
Connections
tab >
Network
Cards
.
3. To enter specifi c server information, tap
the appropriate adapter.
4. To start a connection, insert the network
card and begin using the desired program.
To change network card settings:
1. Tap
Start
>
Settings
> the
Connections
tab >
Network
Cards
.
2. In the My network card connects to
drop-down list, tap either The Internet
or Work. If you are connecting to your
ISP at home, tap The Internet. If you are
connecting to a private network such as a
corporate network at work, tap Work.
3. Tap the appropriate adapter in the Tap
an adapter to modify settings box.
The IP address will now appear in the IP
Address box on the IP Address tab.
4. To change TCP/IP settings, if your
ISP or private network does not use
dynamically-assigned IP addresses, tap
Use specifi c IP address and enter the
requested information. Contact your ISP
or network administrator to get the IP
address, subnet mask, and/or default
gateway (if needed).
5. To change DNS and WINS settings if
your ISP or private network does not
use dynamically-assigned IP addresses,
tap the Name Servers tab and enter
the requested information. Servers that
require an assigned IP address may also
require a way to map computer names
to IP address. DNS and WINS are the
resolution options supported on your O
2
Xda
Flame.
Terminal Services Client
Using the Terminal Services Client,
you can log onto a PC running Terminal
Services or Remote Desktop and use all
of the programs available on that PC from

184
10
Wireless Connectivity
your mobile device. For example, instead of
running Pocket Word, you can run the PC
version of Word and access all of the .doc
fi les on that PC from your O
2
Xda Flame.
Connecting to a Terminal Server
Start a remote connection to the server via a
GPRS or Wireless LAN connection:
1. Tap
Start
>
Programs
>
Terminal
Services Client
.
2. To connect to a server you have
previously connected to, defi ne a server
in Recent servers. To connect to a new
server, enter the server’s name in the
Server box. Select the Limit size of
server desktop to fi t on this screen
check box only when using applications
that have been specifi cally sized for use
with the O
2
Xda Flame.
3. Tap Connect.
Please note
If the network administrator has
confi gured the Terminal Services Client
to reconnect to disconnected sessions,
and you previously disconnected from
a Terminal Server without ending the
session, the Terminal Services Client
reconnects to that session.
Navigating within the Terminal Services
Client
Once connected to the server, the PC’s
screen may more than fi ll your mobile
device’s
screen. If scroll bars are displayed on the
server’s screen, you will see more than one
set of
scroll bars on your O
2
Xda Flame: one to
scroll information on the PC, and one to
scroll the
PC display through the Terminal Services
window in the Terminal Services Client.
To ensure that you are scrolling the PC
display through the Terminal Services Client,
use
the fi ve directional buttons at the bottom of
the Terminal Services Client screen.
To better fi t information onto your mobile
device’s screen, select Limit size of server
desktop to fi t on this screen. For best
effect, maximize programs on the desktop
computer.
Disconnecting without ending a session:
The following commands must be accessed
from the Start menu in the Terminal Services
window used to access the PC’s commands.
Do not use the Start menu on your Xda
Flame.
1. In the Terminal Services window on your
PC, tap
Start
>
Shutdown
.
2. Tap Disconnect.
If your administrator has confi gured the
Terminal Services Client to reconnect to
disconnected sessions, you will be
reconnected to this session the next time
you connect to
this server.
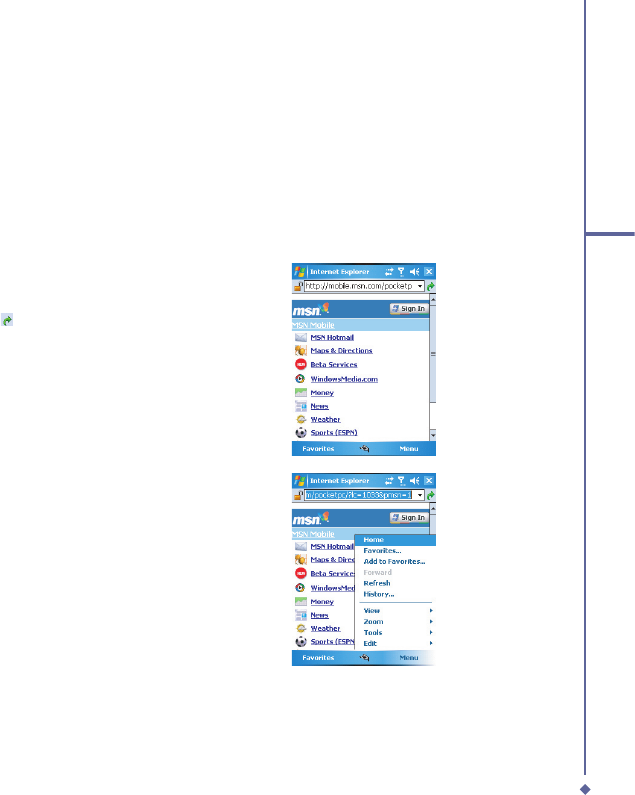
185
10
Wireless Connectivity
10.5 Connecting to the Internet
Once connected, you can use
Pocket Internet Explorer to surf the Internet. While surfi ng,
you can also download fi les and programs to be installed on your device from the Internet
or intranet. During synchronization with your PC, download your favorite links and mobile
favorites that are stored in the
Favorites
folder in Internet Explorer on the PC. To synchronize
and download your favorite links from your PC, in your PC’s ActiveSync, select
Favorites
in
the
Tools
menu >
Options
>
Sync
options.
Browsing the Internet
Open the Pocket Internet Explorer screen by tapping
Start
>
Internet Explorer
.
1. In the address bar that appears at
the top of the screen, enter the Web
address you want to connect to. Tap
to choose from previously entered
addresses.
2. Tap
Back
to go back to the previous
page.
3. Tap
Menu
>
Refresh
to refresh the web
page on the screen.
4. Tap
Menu
>
Home
to go back to the
Home page.
5. Tap
Favorites
and the favorite address
you want to view. To add a favorite link
while using your O
2
Xda Flame, go to
the page you want to add, tap and hold
on the page, and tap
Add to Favorites
on the pop-up menu.

186
10
Wireless Connectivity