Arima Communication 3600 3G Pocket PC phone with BT and WLAN User Manual Ch11 Xda Star IM Eng Synchronisation indd
Arima Communication Corporation 3G Pocket PC phone with BT and WLAN Ch11 Xda Star IM Eng Synchronisation indd
Contents
- 1. User manual 1
- 2. User manual 2
- 3. User manual 3
User manual 3

Chapter 11
Synchronization
11.1 About synchronization
11.2 Installing ActiveSync
11.3 Choosing your connection
11.4 Synchronizing information
11.5
ActiveSync Errors
182
11
Synchronization
11. Synchronization
11.1 About synchronization
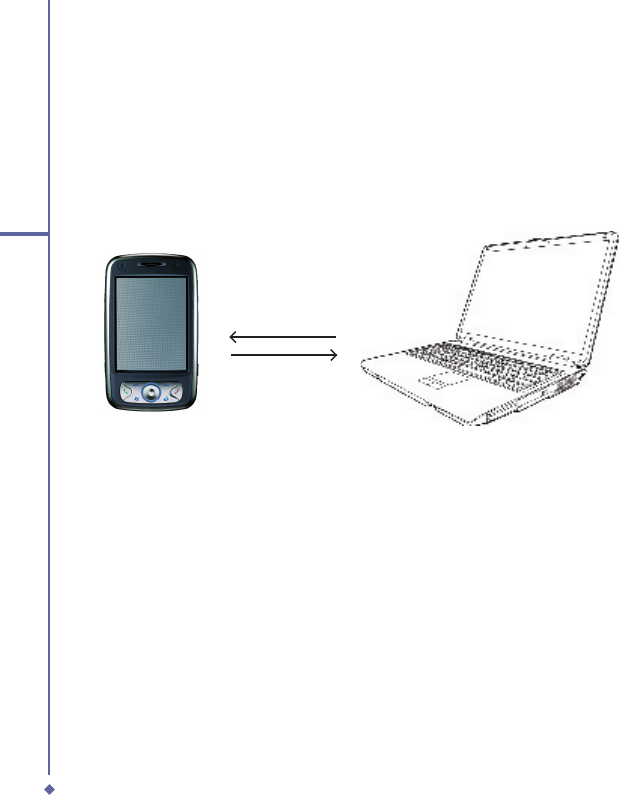
You can synchronize information between your PC or Microsoft® Exchange Server and your
O2 Xda Stealth with ActiveSync on both your O2 Xda Stealth and PC. Before synchronizing
information, please install ActiveSync 4.2 on the PC. Then you can:
● Synchronize information to get the latest information in all locations.
● Add or remove programs on your device.
● Transfer fi les between your device and a PC.
● Change synchronization settings and the synchronization schedule.
Once you install ActiveSync on your PC, you will be prompted to connect your device and
create a synchronization relationship with the device by using a USB cable or Bluetooth
connection. While you are setting up this relationship you can choose the information you
want to synchronize with either your PC or with Microsoft® Exchange Server.
USB/Bluetooth/IrDA/WiFi
Phone data PC data
183
11
Synchronization
11.2 Installing ActiveSync
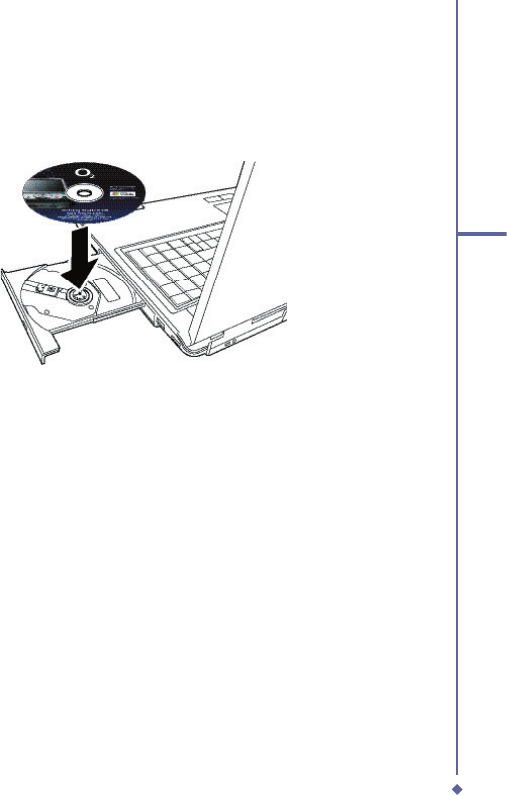
Please do not connect your device to the PC before installing ActiveSync 4.2 on the PC from
the Getting Started Disc included in your package. You may only connect the device to the PC
by USB cable or Bluetooth AFTER ActiveSync is installed.
Please note: Your O2 Xda Stealth has built-in ActiveSync already. To install ActiveSync 4.2
in your PC, please follow the instructions given when you run the Getting Started Disc. After
fi nish installing ActiveSync in your PC, you will be asked to build a partnership with your
device using one of the following connection methods:
● USB cable
● Bluetooth

184
11
Synchronization
11.3 Choosing your
synchronization type
USB cable
You can connect your device with other
devices via a mini-USB connector. You can
manually change
the connection settings as follows. The new
settings will be used when you connect your
device to the
PC next time.
1. Tap Start > Programs > ActiveSync.
2. Tap Menu tab > Connections.
3. Choose USB in the drop-down menus
and check Synchronize all PCs using this
connection.
Bluetooth connection
You can also synchronize your information
by using Bluetooth wireless connectivity
technology, which allows your device to
connect to a Bluetooth-compatible device
within 10 meters. For best connection
results, it is recommended that you connect
the device to the PC using USB to establish
a synchronization relationship before
connecting via Bluetooth.
To synchronize via Bluetooth connection:
1. Execute ActiveSync Help on the PC
and follow the instructions for confi guring
Bluetooth on your PC to support ActiveSync.
2. Tap Start > Programs > ActiveSync.
3. Tap Menu > Connect via Bluetooth. Make
sure that the device and the PC are within
10 meters or shorter.
4. Tap Sync.
5. After fi nishing the synchronization, tap
Menu > Disconnect Bluetooth.
6. Turn off Bluetooth to preserve battery
power if not used.
Please note: Before you connect to this PC
via Bluetooth, please make sure that you
have set up a Bluetooth partnership with the
PC: Tap Start > Settings > Connections >
Bluetooth.
For more details, please refer to Chapter 6
Getting Connected..
185
11
Synchronization
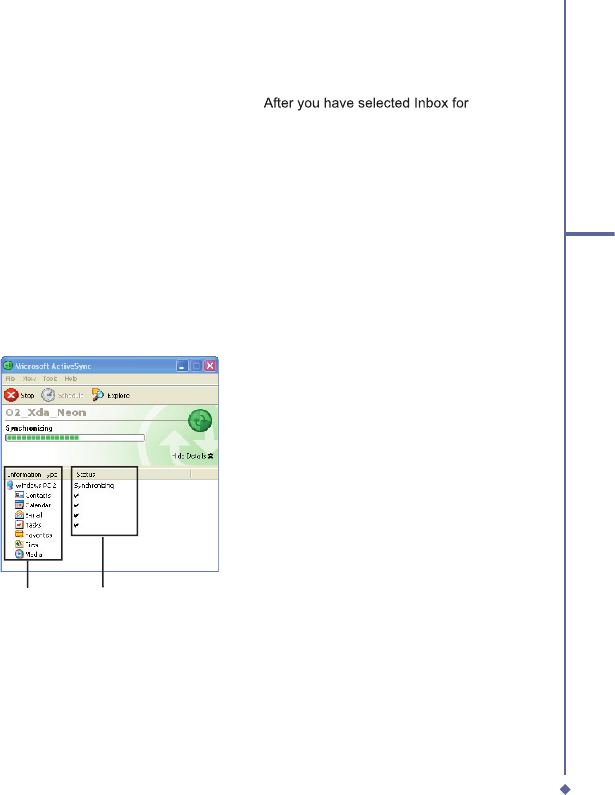
11.4 Using ActiveSync tools
Once you’ve established the connection
partnership between your device and
the other mobile device, you can start
synchronization. The information you can
synchronize includes Contacts, Calendar,
Outlook E-mail, Tasks, and Notes..
To select a specifi c data source:
1.Tap Start > Programs > ActiveSync.
2.Tap Menu > Options.
3.Launch ActiveSync on your PC, and turn
the synchronization for specifi c information
types on or off as necessary.
Outlook E-mail
After you have selected Inbox for
synchronization in ActiveSync, Microsoft®
Outlook E-mail messages are synchronized
as part of the general synchronization
process. During synchronization:
● Messages are updated from the Inbox
folder on your PC or the Microsoft®
Exchange server to the Inbox folder a of the
Outlook E-mail account on your device. You
can only synchronize information directly
with an Microsoft® Exchange Server if you
are running Microsoft® Outlook® 2002 or
later. By default, you’ll receive messages
from the last three days only, the fi rst
100 lines of each new message, and fi le
attachments of less than 100KB in size.
● Messages in the Outbox folder on your
device are transferred to Exchange or
Outlook and then sent from those programs.
● Messages on the two computers are
linked. When you delete a message on your
device, the message will also be deleted
from your PC the next time you synchronize.
● Messages in subfolders in other E-mail
folders in Outlook are synchronized only if
they have been selected for synchronization
in ActiveSync. For information on initiating
Outlook E-mail synchronization or changing
synchronization settings, see ActiveSync
Help on the PC or Connections Help.
Please note: Text messages (SMS) and
Multimedia messages (MMS) are not
received through synchronization. Instead,
they are sent to your device via your network
service provider.
Information for
Information for
synchronization
Status of
Status of
synchronization

186
11
Synchronization
Please note
Text messages (SMS) and Multimedia
messages (MMS) are not received
through synchronization. Instead,
they are sent to your device via your
network operator.
Calendar
You can synchronize calendar items on
your device with calendar items on your PC
or Microsoft® Exchange Server. You can
only synchronize information directly with
a Microsoft® Exchange Server if you are
running Microsoft® Outlook® 2002 or later.
Calendar synchronization is automatically
selected in ActiveSync.
Calendar items entered on one computer are
copied to the other during synchronization.
Handwritten notes and drawings are saved
as metafi les (pictures)..
Contacts
Contacts stored on your device can be
synchronized with Outlook contacts stored
on your PC or with Microsoft® Outlook®
2002 or later.
New items entered in one location are
copied to the other during synchronization.
Handwritten notes and drawings are saved
as pictures when synchronizing with your
PC, but are removed when synchronizing
with a server. For more information on
synchronization, see ActiveSync Help on
the PC.
Tasks
Tasks stored on your device can be
synchronized with Outlook on your PC. Task
synchronization is automatically selected in
ActiveSync.
New items entered on one computer
are copied to your device during
synchronization. Handwritten notes and
drawings are saved as metafi les (pictures).
For more information on synchronization,
see ActiveSync Help on the PC.
Notes
Notes can be synchronized between
your PC and phone either through notes
synchronization or fi le synchronization.
Notes synchronization synchronizes
the notes on your device with Outlook
Notes on your PC. File synchronization
synchronizes all notes on your device
with My Documents folder on your PC.
To synchronize your notes through
notes synchronization, fi rst select Notes
information type for synchronization
in ActiveSync. The next time you
synchronize, all notes in My Documents
and its subfolder on your device will
appear in Outlook Notes on your PC.
Notes that contain only text will appear
as regular notes in Outlook on your PC,
while notes containing written text or
drawings will appear in the device format.
In addition, all notes in Notes group in
Outlook on the PC will appear in Notes on
the device.
To synchronize your notes as fi les, in
ActiveSync, select Files information
type for synchronization and clear
Notes information type. When you

187
11
Synchronization
select Files, My Documents folder is
created on Toolyour PC’s desktop.
All .pwi fi les placed in My Documents
folder on your device and all .doc fi les
placed in \ My Documents folder on your
PC will be synchronized. Password-
protected fi les cannot be synchronized.
ActiveSync converts documents during
synchronization. For more information on
synchronization or fi le conversion, see
ActiveSync Help on the PC.
Please note: When you delete or change
an item on either your PC or device, the
item is changed or deleted in the other
location the next time you synchronize.
If you synchronize your notes using fi le
synchronization and then later decide
to use notes synchronization, all of your
notes will be synchronized with Outlook
on your PC and will no longer be stored
in My Documents folder.
11.5 ActiveSync Errors
Whenever ActiveSync cannot successfully
synchronize your information, it displays an
error on your device and your PC.
Viewing error information
Press Action button when the error text
is displayed. ActiveSync will then display
more information about the error that
has occurred. Some types of errors can
interfere with automatic synchronization.
If you suspect that a scheduled automatic
synchronization has not occurred, you
should attempt to manually synchronize
your information. Successfully completing
manual synchronization will reset automatic
synchronization. For more information,
see Synchronizing Information section of
ActiveSync Help on your PC.
Please note
: Most fi rewall applications are
intended to block network traffi c and secure
the PC from incoming network connections.
Since ActiveSync uses TCP ports for data
transfer with Devices, to avoid this potential
experience, you will need to manually allow
this traffi c to be un-blocked by Firewall
applications for the Device using ActiveSync.
You will need to add ActiveSync application
processes into Firewall Programs Exception
List.

Chapter 12
Managing your O2 Xda Flame
12.1 Self Diagnostics
12.2
O2 Auto-Confi gurator
12.3 Power Management
12.4
Removing Programs
12.5
Installing my own applications
12.6 O2 AutoInstall
192
12
Managing your O2Xda Flame
12. Managing your O2 Xda Flame
12.1 Self Diagnostics
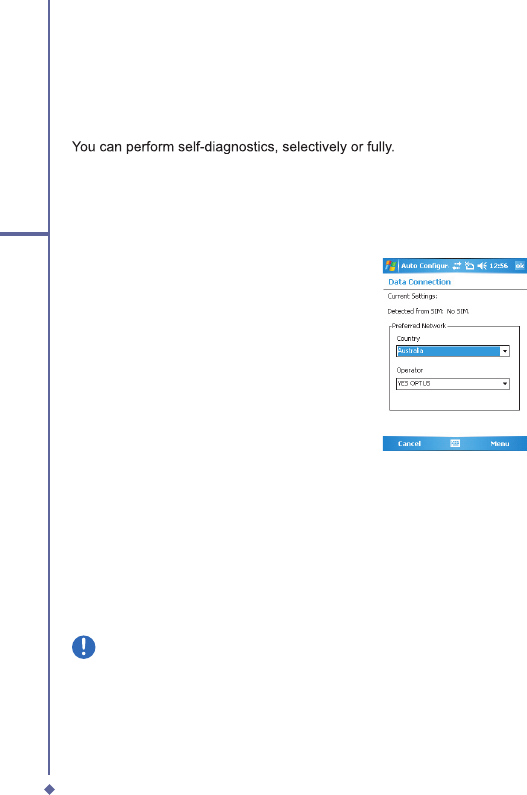
You can perform self-diagnostics, selectively or fully.
There are two test options: You can tap
Menu
to select all test items and tap run to start a
comprehensive test. You can also select desired testing items by checking the boxes.
12.2 O2 Auto-Confi gurator
This application provides a user-friendly
way to set up operator specifi c settings,
including GPRS, WAP, and MMS.
The auto-confi guration process can be performed as soon as the SIM card is accessible. It is
activated 2 ways.
1. During every cold/warm boot, the operator ID obtained from the SIM card will be compared
with the current setting. If they don’t match, a dialog box will ask if you want to perform
network confi guration now. Once confi rmed, the auto-confi gurator will be launched to
confi gure your device to the current preferred network.
2. When the auto-confi gurator is launched via the Programs menu, the same detection
process will be carried out and possible selections will be listed in the preferred network.
Please note
The Auto-Confi guration process is started only when the device is in the HOME network
(not international roaming).
193
12
Managing your O2 Xda Flame
12.3 Power Management
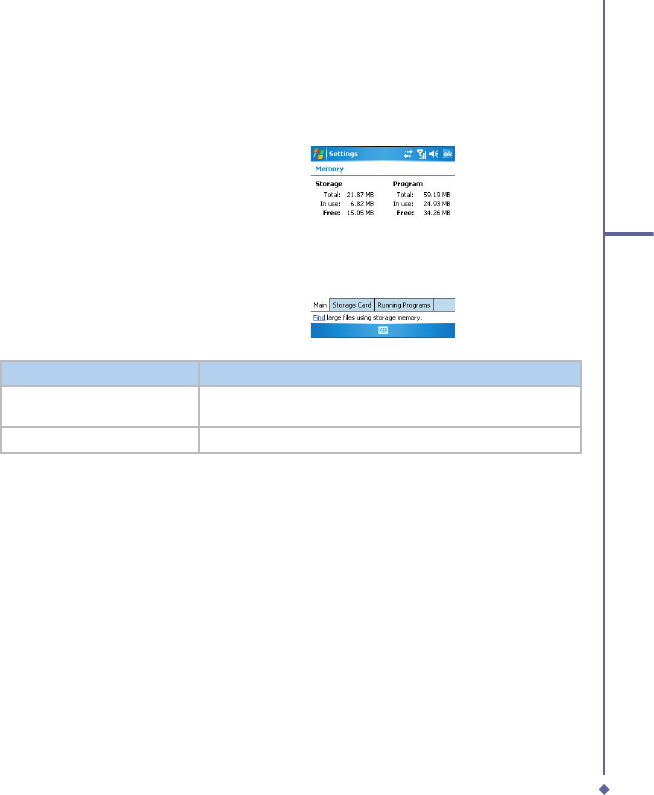
Memory Management
To access details on available memory
Start
>
Settings
>
System
>
Memory
Your device memory is made up of
• Main Storage
• Storage
• Program
• Storage Card (if available)
Memory
Purpose
Main Storage (non volatile)
Stores data at the root folder, including your PIN data, E-mails
and files stored under My Documents.
Program (volatile)
Dynamic memory for program execution
When the memory is insuffi cient, this device cannot automatically allocate memory, you may
follow the steps below to free up more memory:
Moving some fi les to mini SD card
1. Tap Start > File Explorer.
2. Tap and hold selected items.
3. Tap Cut on the pop-up menu.
4. Switch to Storage Card category
5. Tap and hold and then tap Paste.
Deleting the unwanted fi les
1. Tap Start > File Explorer.
2. Tap and hold selected items.
3. Select Delete.
194
12
Managing your O2Xda Flame
Saving attachments to microSD card
1. Tap
Start
>
Messaging
>
Menu
>
Tools
>
Options
>
Storage
tab.
2. If you have inserted a memory card, check Store attachments on storage card.
3. E-mail attachments will automatically be saved to memory card.
Clearing histories and deleting fi les from Internet Explorer
1. Tap
Start
>
Internet
Explorer
>
Explorer > Explorer
Menu
>
Tools
>
Options
>
Memory
tab.
2. Tap
Clear History and Delete Files
to delete browsed web page related record.
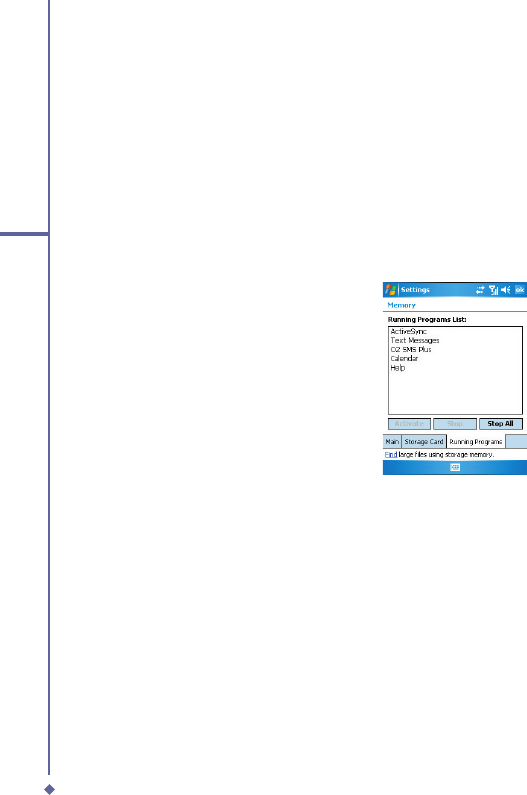
Device Performance
• Device performance can be affected by
the amount of free Program memory
available to run applications. Close
programs you are not using by tapping
Start
>
Settings
>
System
>
Memory
>
Running Programs
.
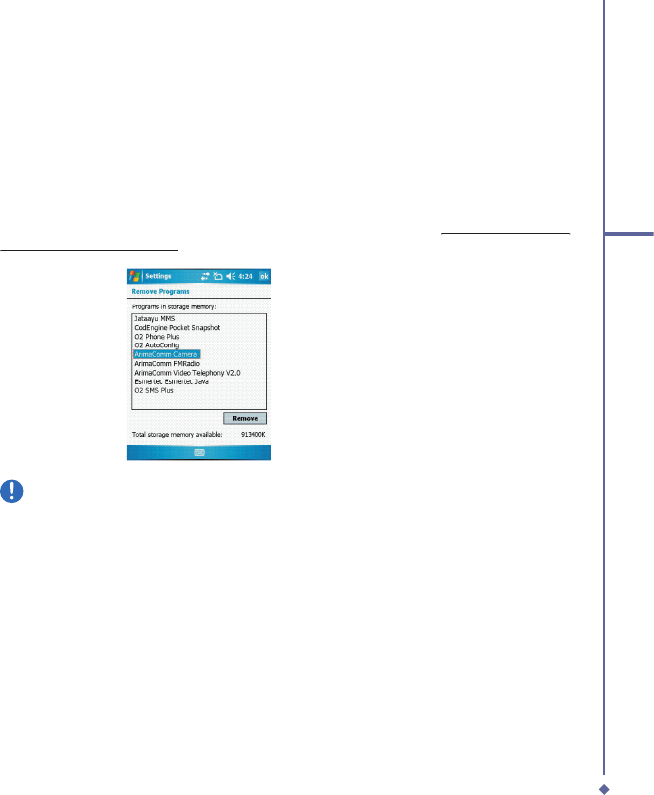
• Free up memory by removing unused
programs by tapping
Start
>
Settings
>
System
>
Remove Programs
.
195
12
Managing your O2 Xda Flame
12.4 Removing Programs
Your O
2
Xda Flame is powered by Windows Mobile 5.0. It allows installation and removal of
external applications downloaded from the web, purchased from stores or send to you from
friends over Bluetooth, E-mail or other means.
Application Tips
When you install new applications to your O
2
Xda Flame, you will be prompted if the
application you are trying to install is from an unknown publisher. You should only continue
if you are certain the application is from a trusted source. For example:
http://www.microsoft.
http://www.microsoft.
com/windowsmobile/catalog/
com/windowsmobile/catalog/
.
Please note
Always try to install applications to your Storage Card instead of the Device in order to
leave more Main Storage space for your PIN, E-mail and other system applications.
12.5 Installing my own applications
All programs pre-installed in the device will be saved in ROM (Read Only Memory) and are
not removable. Data saved in ROM will not be lost by accident. All programs that you installed
will be saved in RAM (Random Access Memory).As long as there is suffi cient space in this
device, you may install suitable programs by preference.

196
12
Managing your O2Xda Flame
Adding programs through ActiveSync
1. Before installing the program, please make sure that your O
2
Xda Flame processor is
suitable for the software. Tap Start > Settings > System tab > About >Version tab to check for
information of this device.
2. Download the desired software to your computer (Please select software that is designed
for Pocket PC and this device).
3. Read installation instructions, readme fi le, or accompanied programs provided to you.
4. Connect your computer with this device.
5. Install executive fi le to your computer.
If this fi le contains installation program, the installation wizard will automatically activate.
Please follow the instructions on screen. Once the installation on your computer is completed,
the program will automatically be installed to this device. If this fi le does not contain any
installation program, an error message will show on the screen and tell you this program is
invalid, which is not suitable for your computer. You must move this program to this device
manually. If you cannot fi nd any installation instructions for this program, please use “Browse”
function of ActiveSync to copy program fi le to Program Files folder in this device. After
completing installation, tap Start > Programs, and then select the program icon to launch that
program.
Adding programs through Internet
You may download software suitable for this device from Internet.
1.Before installing the program, please make sure that your O
2
Xda Flame processor is
suitable for the software.
Tap
Start
>
Settings
>
System
tab >
About
>
Version
tab to check information in this
device.
2.Directly download programs to this device by using Internet Explorer in this device. (Please
select programs designed for Pocket PC and this device)
3.Read installation instructions, readme fi le, or accompanied programs provided to you.
4.Run installation executive fi le in your computer.
Adding programs to Start menu
Tap
Start
>
Settings
>
Personal
tab >
Menu
.
1. Check the programs to be displayed on Start menu.
2. Tap OK to save settings and return to Personal tab screen.

197
12
Managing your O2 Xda Flame
12.6 O2 AutoInstall
O
2
Auto Installer provides you with a list of ready-to-install applications for your O
2
Xda
Flame. These optional applications can help you do more with your device. When you need
them, you can choose to install them anytime by tapping
Start
>
Programs
>
O
2
Auto
Install
> checking
Option
next to the application and tap
Next
to start.

198
12
Managing your O2Xda Flame
Chapter 13
TV Connection
13.1 Connecting to a TV
206
13
TV Connection and Control
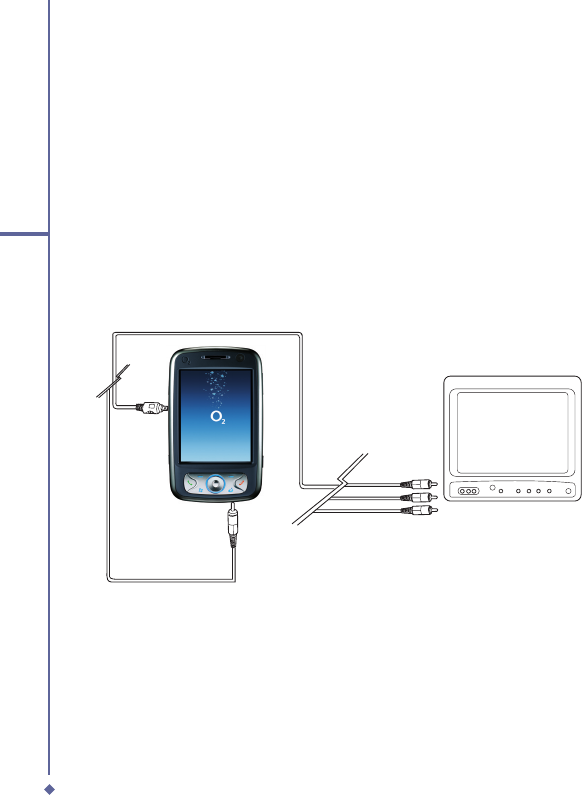
13.1 Connecting to a TV
The O
2
Xda Flame can be connected to a TV for better viewing of videos and pictures.
1. Connect to a TV by connecting the square end of the TV out cable to the TV out port and
the round jack into the bottom of the phone.
2. Connect the 3 coloured ends into the appropriate sockets of the TV.
3. Switch your TV to the AV channel and you will be able to see the same image as is on your
O
2
Xda Flame.
TV

Chapter 14
Troubleshooting
14.1 Glossary
14.2 Troubleshooting

208
14
Troubleshooting
14.1 Glossary
Roaming
Roaming allows your phone to be used
when not in your home country. Please
contact your network operator for more
information.
Handover
Handover allows you to move from one base
station to another, or from one network to
another, without affecting the call.
Tri-band
Your phone operates on different frequencies
in different countries. A tri-band phone can
switch between three frequencies (900, 1800
and 1900 Mhz). The O
2
Xda Flame is a tri-
band Pocket PC Phone.
SIM card
A SIM card is the little plastic card you get
from your network operator and holds the
unique data the network needs to identify
your phone and operate it.
PIN and PUK
Access to a phone is most often protected
by a code known as “PIN”– Personal
Identifi cation Number. Your SIM card comes
with a default PIN that you can change to
any code. If you forget your code, or by
mistake enter a faulty code three times, the
SIM card will lock. To unlock it, you must
enter the Personal Unblocking Key, or “PUK”
code, which you can get from your network
operator.
PIN2
PIN2 is a security code that you can obtain
from your network operator.
IMEI
IMEI stands for International Mobile
Equipment Identifi er and is a number that’s
unique to your phone.
WAP
Wireless Application Protocol (WAP) allows
you to access information and entertainment
services.
GPRS
General Packet Radio System is a service
that transmits data to and from your phone.
Charges are based on the amount of
transferred data rather than airtime.
CSD
A wireless service protocol used for WAP.
CSD stands for Circuit Switched Data.
This allows you to have continuous WAP
connection. You pay for the time spent
connected rather than the amount of data.
URL
Uniform Resource Locator or URL is an
address system used on the Internet. All
homepages have a unique address, allowing
browsers to distinguish one from an other.
APN
Access Point Name.
ISP
Internet Service Provider.

209
14
Troubleshooting
14.2 Troubleshooting
Why can’t I turn on my device when I
press the power key?
Either you didn’t press the key long enough,
or the device has shut down because the
battery power level is too low to make calls.
Please recharge the battery.
How do I suspend the screen display or
wake up the device?
Press and hold the power key to turn off the
device. If the screen display is off, press the
power key to wake up your device.
Why does my device display
“INSUFFICIENT MEMORY” when I open a
fi le or a program?
The device memory is shared by both
storage and programs. You can free up
some memory by removing some of the
rarely used programs you installed or
removing rarely used fi les.
Why doesn’t the screen respond
accurately to my stylus taps?
Tap
Start
>
Settings
>
System
tab >
Screen
>
General
tab. Select
Align Screen
to align the screen.
Why does my O
2
Xda Flame launch wrong
programs or ignore my command when I
press a device key?
Tap
Start
>
Settings
>
Personal
tab >
Buttons and check whether the programs
assigned to each key is correct. You
can change these key assignments by
preference
.
My phone displays ‘Insert SIM’, what
does this mean?
Insert the SIM card before you can use the
device. If it is already installed, remove and
clean the metal contacts area with a dry
cloth, and then insert it again. If the problem
persists, your SIM card may be damaged,
contact your service provider or call our
service hotline for help.
My phone displays ‘INVALID or Missing
SIM’, what does this mean?
The phone is SIM-locked and will not accept
the inserted SIM card.
Insert the correct SIM card or contact your
network operator.
My phone displays ‘EMERGENCY ONLY’,
what does this mean?
Your SIM card is not properly installed or
confi gured, or you are out of network range.
My phone displays ‘NO NETWORK’, what
does this mean?
Insert the SIM card before you can use the
device. If it is already installed, remove and
clean the metal contacts area with a dry
cloth, and then insert it again.
Some calls are not processed.?
Certain call barring function may have been
set to restrict device usage. Check the call
barring status and cancel as necessary.
Someone else is receiving my calls. What
is wrong?
Call Forward feature could have been
activated. Cancel call forwarding function as
necessary.
Can I send and receive emails and surf
the Mobile Internet on my phone?
Yes. Your phone has Web capability, which
means that you can access the Mobile
Internet from your phone. For sending and
receiving E-mails, please look in the user
manual or contact O
2
Customer Service.

210
14
Troubleshooting
My phone is not running well. How can I
check where my phone goes wrong?
Tap
Start
>
Programs
>
Self Diagnostics
to run diagnostic tests for your system.
Otherwise, have your warranty card and
phone ready and contact your local dealer.
Why does the screen freezes and does
not respond to my commands or input?
Reboot the system to free up memory. The
system shall operate more effi ciently. If the
system still lags after rebooting, you will
need to clean boot your O2 Xda Flame. To
clean boot, power off your O2 Xda Flame
and then press Windows key, OK key and
the Power key at the same time, for about
5 seconds. Your O2 Xda Flame will reset to
factory defaults and reboot.
Please note: When you perform a clean boot
on your O2 Xda Flame, all your personalized
settings, information, and programs installed
will be removed. The system will reset to
factory defaults.
My O2 Xda Flamre can’t form a successful
connection with ActiveSync.
Please make sure you have installed
ActiveSync 4.2 or later on your computer.
You can fi nd ActiveSync in the installation
CD, or you can download the latest version
from Microsoft’s website. Please make
sure you have connected your O2 Xda
Flame to the computer by plugging in the
USB cable to both your O2 Xda Flame and
the computer. Make sure that you are not
running another program that uses the
same serial port. If the connection still fails,
remove ActiveSync on your computer and
reinstall it.
Why are there double entries in my
Contacts list?
You may have selected Show SIM Contacts
in Contacts menu. If you have already
copied your SIM contacts to your O2 Xda
Flame, then you do not need to select this
option.
Why can’t my O2 Xda Flame make any
sound alerts?
Tap on the speaker icon on the top right
corner of the screen, and then adjust the
alert or ring volume. You could also use the
volume key on the left side of your O2 Xda
Flame to adjust volume.

Chapter 15
Safety Information
15.1 Safety Information
15.2 Phone Care
15.3 Driving Safety
15.4 Other Safety
15.5 Cautions

210
15
Safety Information
15.1 Safety information
Read this information
Your
O
2
Xda Flame Pocket PC Phone has been designed, manufactured and tested not
to exceed the limits for exposure to electromagnetic fi elds recommended by the Council
of the European Union and the FCC rule of the United States. These limits are part of
comprehensive guidelines developed by independent scientifi c organizations.
European standards provide for the amount of radio frequency electromagnetic energy
absorbed by the body when using a phone to be measured by reference to the Specifi c
Absorption Rate (SAR). The SAR limit for the general public is currently 2 watts per kilogram
averaged over 10 grams of body tissue of head tissue (<2.0W/kg @ 10g) and the FCC public
is currently 1.6 watts per kilogram averaged over 1 grams of head and body tissue (<1.6W/kg
@ 1g).
The maximum SAR values for the
O
2
Xda Flame are
• 0.751 W/kg @10g (CE)
• 0.461 W/kg @1g (FCC) head
• 0.339 W/kg @1g (FCC) body
15.2 Phone care
You should never
attempt to open the phone casing. There are no user-serviceable parts
You should never attempt to open the phone casing. There are no user-serviceable parts You should never
inside and you might damage sensitive electronic circuits and components. Unauthorized
disassembly will void the warranty.
You should never
leave your phone in the window of your car or otherwise expose it to
You should never leave your phone in the window of your car or otherwise expose it to You should never
strong sunlight or excessive heat for a prolonged period. This may damage it.
You should never
handle your phone with wet hands or expose it to moisture or liquids of
You should never handle your phone with wet hands or expose it to moisture or liquids of You should never
any kind. Continuous changes from a cold to a warm environment may lead to condensation
inside the phone, resulting in corrosion and possible damage.
If you pack your phone in your suitcase during travel, beware damage. Cramming a suitcase
may crack the LCD display. Remember to switch off your wireless connections during air
travel.
As with all other radio devices, touching the built-in antenna area during telephone
conversation may impair the quality and lead to shorter standby time due to increased power
consumption.

211
15
safety Information
The battery
Your phone is equipped with a high-performance Li-Ion battery. Optional battery types may
not be available; check with your local retailer. Observe the maintenance guidelines and
your battery should give you a long service life.
• At the beginning of the battery’s life, fully charge and discharge (let it go fl at) three times.
• Do not overcharge the Li-Ion battery, as this can result in a reduction in battery
performance and lifespan. The recommended maximum charge time is 2.5 hrs.
• Avoid repeated short charging. It is preferable to let the battery go fl at and then recharge
it completely.
• Avoid charging in strong heat or extreme cold. Ambient room temperature is preferable.
The battery has its optimum performance in an ambient temperature of +5 °C to +45 °C.
• Don’t store a battery near a fi re or heat source.
• Use only the battery approved by the manufacturer.
• Never replace the battery with a non-approved battery.
• Never soak the battery in water or any other fl uid.
• Never try to open the battery as it contains substances that might be harmful if swallowed
or allowed to come into contact with unprotected skin.
• Never short-circuit the battery, as it may overheat and cause a fi re. Keep it away from
jewellery and other metal objects.
• Never dispose of the battery in a fi re. It could explode and release harmful substances
into the environment.
• Never dispose of the battery with your regular household waste. Take it to a hazardous
material collection point.
• Do not touch the battery terminals.
Caution
There is a risk of explosion if a battery is replaced by an incorrect type.

212
15
Safety Information
The charger
• Use only the charger supplied with your phone.
• Never pull the charger cord to release it from the mains – pull the charger itself.
Memory card
• Do not remove or insert a memory card or turn off the handset while data on the card is
being edited.
• Do not touch the metal terminals with your hands or metal objects.
• Do not bend the memory card or subject it to violent impacts. Keep it away from water and
high temperatures.
• Keep all memory cards out of the reach of small children.
• Do not short circuit the contact points or expose it to liquids or moisture. When not in use,
keep it in the antistatic container it came in.
• Do not use force when inserting or handling the card, and do not expose it to excessive
heat or strong magnetic fi elds.
Cleaning and storing
• Your phone should always be handled with care and protected from dirt, dust and
dampness. To avoid scratches, never place your phone face down.
• If cleaning is necessary, switch the phone off and wipe carefully with a soft, slightly damp
(not wet) cloth. Use a cotton swab to clean the camera lens. Allow the phone to dry
completely before switching it on. Never use solvents for cleaning.
• If you are not going to use your phone for some time, fully charge the battery and store the
phone in a dry place away from direct sunlight. Your phone should be switched off during
storage. Recharge every 6 to 12 months.
• Never expose your phone to heat or strong sunlight.
• Never expose your phone to moisture or liquids of any kind.
• Do not paint your phone or otherwise block the keypad, microphone or earpiece function,
i.e. with stickers.
.

213
15
safety Information
15.3 Driving safety
Never use the handheld phones while
driving. It is an offence while driving to hold
a phone or cradle it in your neck, at any
point during the setup, making or taking of a
phone call, text message or any other data
related to mobile communication. Use of fully
installed car kits are still permitted, as are
the use of alternate handsfree accessories.
In the interest of safety, we would
recommend to use a cradle while using any
form of handsfree accessory.
While driving, we recommend that you use
voicemail wherever possible, and that you
can listen to your messages when you are
not in the car. If you must make a handsfree
call when driving, keep it brief.
An airbag infl ates with great force.
Do not
place objects, including both installed or
portable wireless equipment, in the area
over the airbag or in the airbag deployment
area. If in-vehicle wireless equipment is
improperly installed and the air bag infl ates,
serious injury could result.
Warning
Failure to follow these instructions may
lead to serious personal injury and
possible property damage.
15.4 Other safety
Most modern electronic equipment is
shielded from RF energy.
However, certain electronic equipment may
not be shielded against the RF signals from
your Pocket PC phone.
Pacemakers
The Health Industry Manufacturers’
Association recommends that a minimum
separation of six (6”) inches be maintained
between a phone and a pacemaker to avoid
potential interference with the pacemaker.
These recommendations are consistent
with the independent research by and
recommendations of Wireless Technology
Research.
If you have a pacemaker:
•
Always
keep your phone more than six
inches from your pacemaker when turned
on.
• Do not carry your phone in a breast
pocket.
• Use the ear opposite to the pacemaker to
minimize potential interference
• If you have any reason to suspect that
interference is taking place, turn your
phone
off
immediately.
off immediately.off
Hearing aids
Some digital phones may interfere with
some hearing aids. In the event of such
interference, call O
2
Customer Service to
discuss alternatives.
Other medical devices
If you use any other personal medical
device, consult the manufacturer of your
device to determine if it is adequately
shielded from external RF energy. Your
physician may be able to assist you in
obtaining this information.
Hospitals or healthcare facilities may be
using equipment that could be sensitive to
external RF energy.

214
15
Safety Information
Turn your phone
off
in healthcare facilities
off in healthcare facilities off
when any regulations posted in these areas
instruct you to do so.
Vehicles
RF signals may affect improperly installed or
inadequately shielded electronic systems in
motor vehicles. Check with the manufacturer
or its representative regarding your vehicle.
You should also consult the manufacturer of
any equipment added to your vehicle.
Posted facilities
Turn your phone
off
where posted notices
off where posted notices off
require you to do so.
Magnetic media
Magnetic fi elds generated by Pocket PC
Phone may damage data on magnetic
storage media, such as credit cards,
computer discs or tapes. Do not place your
phone next to such media.
You should never expose your phone to
strong magnetic fi elds as this may cause
temporary malfunction.
Aircraft
Regulations prohibit using your phone while
in the air. Switch
off
your phone before
off your phone before off
boarding an aircraft or turn off the wireless
connections.
Blasting areas
To avoid interfering with blasting operations,
turn your phone off when in a ‘blasting area’
or in areas posted: ‘Turn off two-way radio.’
Obey all signs and instructions.
Potentially explosive
environments
Turn your phone
off
when in any area with a
off when in any area with a off
potentially explosive environment and obey
all signs and instructions.
Sparks in such areas could cause an
explosion or fi re resulting in bodily injury or
even death.
Areas with a potentially explosive
environment are often, but not always,
clearly marked. They include fuelling areas
such as gas stations, below decks on boats,
fuel or chemical transfer or storage facilities,
vehicles using liquifi ed petroleum gas (such
as propane or butane), areas where the air
contains chemicals or articles, such as grain,
dust, or metal powders, and any other area
where you would normally be advised to turn
off your vehicle’s engine.
Choking
Keep your phone away from children as the
SIM card and other small parts present a
choking hazard.

215
15
safety Information
15.5 Cautions
Your Pocket PC Phone is a high quality
piece of equipment. Before operating, read
all instructions and cautionary markings on
(1) AC Adaptor (2) Battery and (3) Product
Using Battery.
•
Do not
use this equipment in an extreme
environment where high temperature or
high humidity exists.
•
Do not
abuse the equipment. Avoid
striking, shaking or giving it a shock.
When not using the unit, lay it down to
avoid possible damage due to instability.
•
Do not
expose this equipment to rain or
spilled beverages.
•
Do not
use unauthorized accessories.
•
Do not
disassemble the phone or
its accessories. If service or repair is
required, return the unit to an authorized
service center. If the unit is disassembled,
a risk of electric shock or fi re may result.
•
Do not
short-circuit the battery terminals
with metal items.

216
15
Safety Information

Chapter 16
Technical Data
16.1 Technical Specifi cations
16.2 EULA
16.3 Declaration of Conformity
16.4 About this guide

214
16
Technical Data
16.1 Technical
Specifi cations
Size:
74 (W) x 126 (L) x 17.5 (T) mm
Weight:
190g (battery included)
Talktime:
Up to 6 hours
Standby time:
Up to 200 hours (subject to
usage)
Main display:
Main Display 3.6” 480x640
262K VGA TFT LCD)
Camera:
Integrated 2 mega pixel auto focus
camera
Band:
Tri-band
GPRS:
Class 10
Accessories
Mini-USB cable, Battery, Mini host cable,
Wired Stereo Headset, AC adaptor,Stylus,
TV-out AV cable, Bluetooth Clip and Pouch,.
Contact O
2
Retail for more accessories.
Applications
• Microsoft Windows Mobile 5.0 standard
applications: Pocket MSN, Pocket
Outlook, Pocket Internet Explorer,
Windows Media Player 10, Excel Mobile,
PowerPoint Mobile, Word Mobile,
Terminal Services Client, Pictures &
Videos, Calculator, Games, ActiveSync,
File Explorer,
• Integrated MMS client
• O
2
MediaPlus media center
• FM radio
• SIM contacts
• Camera and video capture utility: camera,
camcorder
• JAVA: KVM, MIDP 2.0, CLDC 1.1
• Auto Confi gurator
• Self Diagnostics
• GPRS Monitor
• PDF Viewer
• Jeyo SMS Backup
• WorldMate
O2 Applications
• O
2
Connect
• O
2
SMS Plus
• O
2
AutoInstaller
• O
2
Phone Plus
• O
2
Plus
Leisure
Integrated Music Player, MP3 player, video
capture and playback, integrated 2 MP
camera.
Organizing features
Calendar, Alarm, Calculator.

215
16
Technical Data
16.2 EULA
16.3 Declaration of
Conformity
Important SAR Information
Your wireless phone is a radio transmitter
and receiver. It is designed and
manufactured not to exceed the emission
limits for exposure to radio frequency (RF)
energy set by the FCC of USA. These limits
are part of comprehensive guidelines and
establish permitted levels of RF energy for
the general population. The guidelines are
based on standards that were developed
by independent scientifi c organizations
through periodic and thorough evaluation
of scientifi c studies. The standards include
a substantial safety margin designed to
assure the safety of all persons, regardless
of age and health. The exposure standard
for wireless mobile phones employs a unit
of measurement known as the Specifi c
Absorption Rate, or SAR. The SAR limit set
by the FCC is 1.6 W/kg. *
Tests for SAR are conducted with the
phone transmitting at its highest certifi ed
power level in all tested frequency bands.
Although the SAR is determined at the
highest certifi ed power level, the actual
SAR level of the phone while operating can
be well below the maximum value. This is
because the phone is designed to operate
at multiple power levels so as to use only
the power required to reach the network.
In general, the closer you are to a wireless
base station antenna, the lower the power
output.
Before a phone model is available for sale
to the public, it must be tested and certifi ed
to the FCC that it does not exceed the limit
established by the government adopted
requirement for safe exposure. The tests
are performed in positions and locations
(e.g., at the ear and worn on the body) as
required by the FCC for each model. The
highest SAR value for this model phone
when tested for use at the ear is 0.461 W/Kg
and when worn on the body, as described in
this user guide, is 0.339 W/Kg. (Body-worn
measurements differ among phone models,
depending upon available accessories
and FCC requirements). While there may
be differences between the SAR levels of
various phones and at various positions,
they all meet the government requirement
for safe exposure.
* In the United States and Canada, the SAR
limit for mobile phones used by the public
is 1.6 watts/kg (W/kg) averaged over one
gram of tissue. The standard incorporates a
substantial margin of safety to give additional
protection for the public and to account for
any variations in measurements.
Use only the supplied or an approved
antenna. Unauthorized antennas,
modifi cations, or attachments could impair
call quality, damage the phone, or result in
violation of FCC regulations. Do not use
the phone with a damaged antenna. If a
damaged antenna comes into contact with
the skin, a minor burn may result. Please
contact your local dealer for replacement
antenna.
This transmitter must not be co-located
or operating in conjunction with any other
antenna or transmitter.

216
16
Technical Data
Body-worn Operation
This device was tested for typical body-worn
operations. To comply with RF exposure
requirements, a minimum separation
distance of 1.5 cm must be maintained
between the user’s body and the handset,
including the antenna. Third-party belt-clips,
holsters, and similar accessories used by
this device should not contain any metallic
components. Body-worn accessories that
do not meet these requirements may not
comply with RF exposure requirements and
should be avoided.
Use only the supplied or an approved
antenna. Unauthorized antennas,
modifi cations, or attachments could impair
call quality, damage the phone, or result
in violation of regulations. Do not use
the phone with a damaged antenna. If a
damaged antenna comes into contact with
the skin, a minor burn may result. Please
contact your local dealer for replacement
antenna.
FCC Part 15 Notice
This device complies with part 15 of the
FCC Rules. Operation is subject to the
following two conditions: (1) This device
may not cause harmful interference, and
(2) this device must accept any interference
received, including interference that may
cause undesired operation.
Warning: This device has been tested and
found to comply with the limits for a Class
B digital device pursuant to Part 15 of the
Federal Communications Commissions
Rules and Regulations. These limits are
designed to provide reasonable protection
against harmful interference when the
equipment is operated in a commercial
environment. This equipment generates,
uses, and can radiate radio frequency
energy and, if not installed and used in
accordance with the instruction manual,
may cause harmful interference to radio
communications. However, there is no
guarantee that interference will not occur in
a particular installation.
If this equipment does cause harmful
interference to radio or television
reception, which can be determined by
turning the equipment off and on, the
user is encouraged to try and correct the
interference by one or more of the following
measures:
. Relocate this device
. Increase the separation between the device
and the receiver
. Connect the device into an outlet on a
circuit different from that of other electronics.
Consult the dealer or an experienced radio
technician for help.
FCC Radiation Exposure Statement
Important Note: To comply with FCC RF
exposure compliance requirement, the
antenna used for this transmitter must not be
co-located or operating in conjunction with
any other transmitter.
Caution:
Any changes or modifi cations not expressly
approved by the party responsible for
compliance could void the user’s authority to
operate this equipment.
This equipment complies with FCC radiation
exposure limits set forth for an uncontrolled
environment. End users must follow the specific
operating instructions for satisfying RF exposure
compliance. To maintain compliance with FCC RF
exposure compliance requirements, please follow
operation instruction as documented in this manual.

217
16
Technical Data
16.4 About this guide
This document is provided as a user guide to the O
2
Xda Flame Pocket PC Phone and to this
system only. O
2
Xda Flame is a trademark of the O
2
group of companies.
Latest version of user guide can be found on our website http://SeeO2.com. Year of
Manufacturing:2007 Copyright Information
Mandatory statements
We hereby declare that the O
2
Xda Flame is in conformity with all essential requirements of
Directive 1999/5/EC.
減少電磁波影響,請妥適使用」「SAR標準值2.0W/
Kg;送測產品實測值為: 0.751 W/Kg
NCC聲明: (1) 經型式認證合格之低功率射頻電機,非
經許可,公司、商號或使用者均不得擅自變更頻率、加
大功率或變更原設計之特性及功能。(2) 低功率射頻電
機之使用不得影響飛航安全及干擾合法通信;經發現有
干擾現象時,應立即停用,並改善至無干擾時方得繼續
使用。(3)前項合法通信,指依電信規定操作之無線電通
信。低功率射頻電機須忍受合法通信或工業、科學及醫
療用電波輻射性電機設備之干擾。

218
16
Technical Data
減少電磁波影響,請妥適使用」「SAR標準值2.0W/
Kg;送測產品實測值為: 0.751 W/Kg
NCC聲明: (1) 經型式認證合格之低功率射頻電機,非
經許可,公司、商號或使用者均不得擅自變更頻率、加
大功率或變更原設計之特性及功能。(2) 低功率射頻電
機之使用不得影響飛航安全及干擾合法通信;經發現有
干擾現象時,應立即停用,並改善至無干擾時方得繼續
使用。(3)前項合法通信,指依電信規定操作之無線電通
信。低功率射頻電機須忍受合法通信或工業、科學及醫
療用電波輻射性電機設備之干擾。
1O2
on purchasing your O2 Xda Flame.
In the following quick tour, you will learn about the
basics and major features of your O
2
Xda Flame.
Congratulations
2O2
3O2
You are now
Npowered!
See how much more you can do with the Xda
Flame. Featuring the NVIDIA
®
Flame. Featuring the NVIDIA®
Flame. Featuring the NVIDIA
GoForce
® GoForce
®
®
5500
® 5500
®
GPU, the O
2
Xda Flame is your complete
handheld – doubling up as a photo camera, video
camcorder, movie player, music centre and console
gaming device. Now you can experience:
•
Smooth DVD-quality video
•
Superior quality music
•
Vivid, sharp photos
•
Console-class 3D gaming
•
Hours of multimedia indulgence with less drain
on the battery
Win Fabulous Prizes!
NVIDIA now makes it even more
rewarding for you to share the totally
unique sights and sounds of your life.
Upload your photos and videos to the
Xda Flame micro site. For more info on
the promo details visit:
www.SeeO2.com/fl ame.
You can also vote for what you think
is the best image, and each week,
the image with the most votes will be
entered into a fi nal draw to win fabulous
prizes from NVIDIA.
The Industry’s Most Advanced Texturing Capabilities
High-res textures
with
GoForce 3D
High-res textures
without
GoForce 3D
Complex
Texture Blending
without GoForce
Complex
Texture Blending
with GoForce
Images featuring GoForce graphics are taken from the game ‘Siege’ played on Xda Flame.
4O2
5O2
in the box
●
O2 Xda Flame
—your Windows
●
Mobile-based Pocket PC phone.
●
Stylus
—to operate the touch sensitive
screen.
●
Battery
—to power your O
2
Xda Flame.
●
Universal AC adapter
—to charge the
Universal AC adapter—to charge the Universal AC adapter
battery of your O
2
Xda Flame. It comes
with 4 removable plugs that suit your
needs.
●
High Quality Stereo
Wired Headset
—you
can use it to answer,
terminate, or toggle
between calls by pressing
the button on the headset
or listening to music or
FM radio.
●
Mini USB Cable
—to
connect your O
2
Xda
Flame to your PC.
●
Getting Started CD
—
contains all necessary
programs for your O
2
Xda Flame, including
ActiveSync 4.2.
●
User Manual
●
Quick Start Guide
—
●
This manual.
●
Limited Warranty
Statement
—Please
read through. It
contains all warranty
information regarding
your O
2
Xda Flame.
*O2 may change the contents of the O2 Xda Flame box in the future. The images here are purely to illustrate what’s in the box; the
*actual contents may look slightly different.
●
TV Out AV cable
—to
connect your O
2
Xda
Flame to a TV or projector.
●
USB Host cable
—to
connect USB Flash
drives to your O
2
Xda
Flame.

6O2
7O2
grand tour I
1. LED Indicator
The LED indicator indicates the status of
your phone by showing different colors;
Static amber: the phone is being
charged.
Green: mobile network is detected.
Blue: Bluetooth is activated.
Amber: Wireless LAN is activated.
LED blinks alternately between Amber
and Blue: When Bluetooth and Wireless
LAN are on LED blinks amber: for
notifi cations
2. Touch screen
Use the stylus to select items on the
screen.
3. Navigation pad
Press to navigate up/down and right/left
through any of the drop-down menus or
program instructions; confi rm your selection
by pressing the center key.
4. Right Soft key
Press to access menus on the right.
Before you start,
5. End key
Press to end a call or exit from
application.
6. Infotainment Plus Key
Quick access to Infotainment application.
7. Windows Start menu
Press to bring up the Start menu.
8. Call key
Press to make or receive a call, or press
to launch Phone screen.
9. Left Soft key
Press to access menus on the left.
10. Camera lens
The CMOS camera supports 2-mega-
pixel color photo and high quality video
recording.
11. Battery cover
To remove or replace battery, push and
slide out the battery cover.
12. Flash light
White LED strobe fl ash.
13. Self-portrait mirror
The preview mirror for self-portrait.
11
12
13
10
let’s familiarize ourselves with the phone.
8O2
9O2
grand tour I
1. Record key
Press and hold to record a voice note.
1.
Press and release to immediately
1.
access
Notes.
2. TV Out
1.
To project images to a TV or projector,
connect the plug and play TV out cable
here.
3. Infrared port
1.
This port allows you to exchange fi les
1.
or data with other devices wirelessly.
1
2
3
4
4. Wireless Manager key
Quick access to Wireless Manager Menu.
5. Volume keys
Press up / down to increase / decrease
the volume.
6. Micro SD Card slot
Insert Micro SD card here. This is an
optional accessory.
7. Camera & Video key
Press to launch the camera function and
take a picture or high quality video.
9
5
6
7
8
8. Soft reset
Press here with the stylus to soft reset
your phone.
9. Stylus & Stylus holder
Storage place for your stylus when it is
not in use.
10. Power button
Short Press : enter suspend mode
Short Press and hold : power off your
device
Long Press : Turn on your phone
(GSM on)
11. Mini-USB connector
Use this connector to synchronize
information with your desktop PC,
transmit data or recharge the battery.
12.
Earphone plug
Plug in the stereo headset and you
can listen to FM radio, audio fi les or
use the phone’s hands-free kit..
11 12
10
10O2
11O2
grand tour II
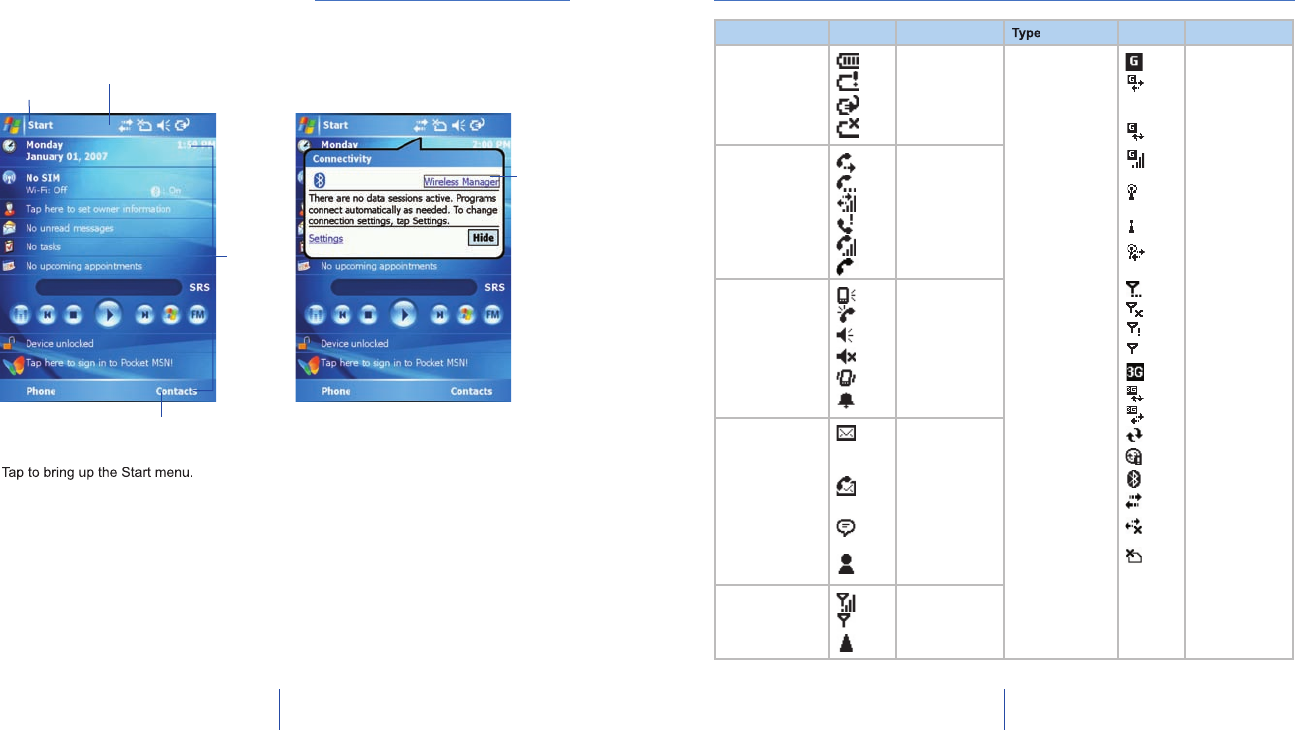
●Windows Start menu
●
Tap to bring up the Start menu.
● Status & icon area
●
Indicates your current mode and
●
displays notifi cation icons.
● Main Display
●
Depending on the current mode or
●
program, this area shows the major
●
features of the mode. On the Today
● ●
screen, this area contains shortcuts to
●
certain programs.
● Command bar
●
Depending on the mode, this area
●
contains different features such as input
●
panel and commands to create or edit
●
fi les.
● Pop up menu
●
This allows you to quickly access an
●
item. Tap on the icon and tap again to
●
perform an action. To cancel it, tap
●
other places on the screen.
A standard Windows
Start menu
Start menu
Status & icon area
Command bar
Main
Display
Pop up
menu
Today Screen displays the following information:
Type
Icons
Description
Battery
Battery full
Battery alert
Battery charging
Battery empty
Calls
Call forward
Call on hold
Data call
Missed call
Voice call
Make a call
Volume
System volume
Phone volume
Ringer on
Ringer off
Vibrate on
Alarm
Message
New SMS
/ MMS
message(s)
New voice
mail(s)
Push
Messages
New instant
message(s)
Signal Strength
Strong signal
No signal
Roaming
Type
Icons
Description
Connection
GPRS in range
Building
connection to
GPRS
GPRS Sync
Strong signal in
GPRS
Wi-Fi network
in range
Wi-Fi on
Wi-Fi
connected
Radio on
Radio off
No radio service
Radio connected
3G in range
3G Sync
3G connected
Sync
Sync error
Bluetooth
Data connected
Data
disconnected
No SIM card
12O2
13O2
get ready Now, you need to do more than
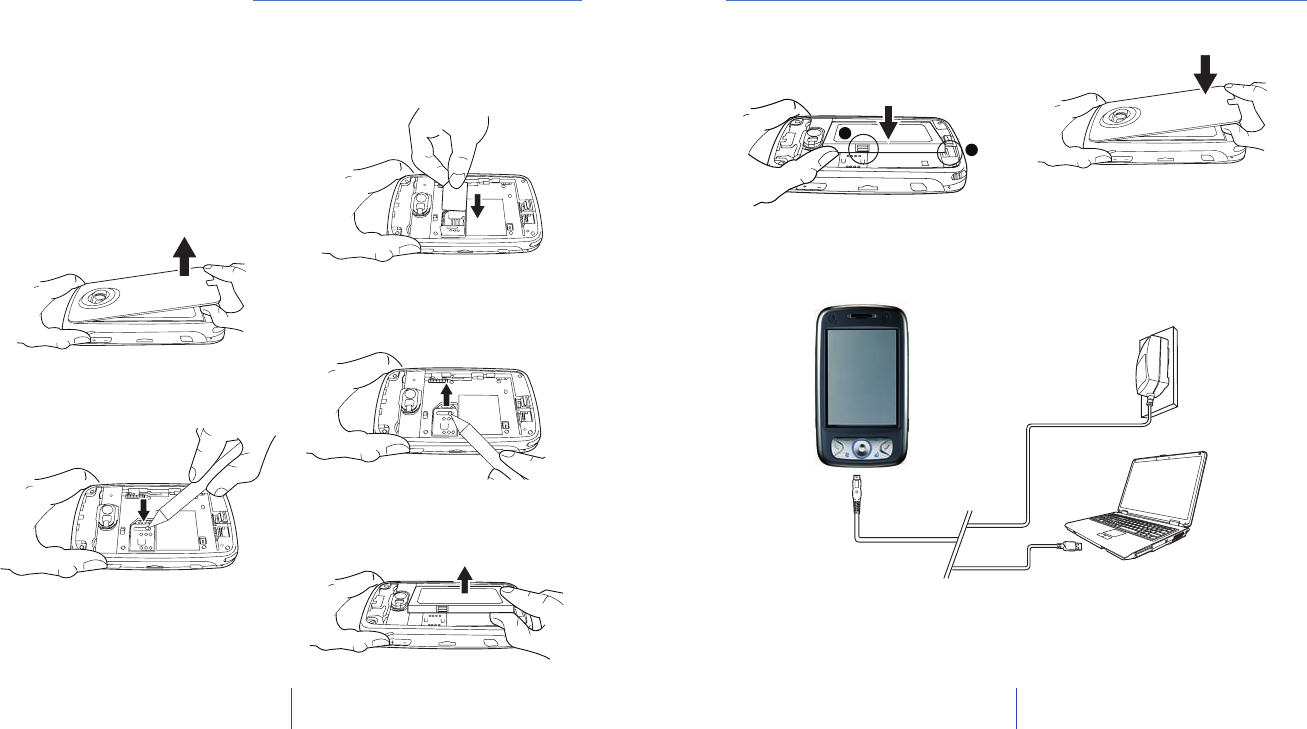
Inserting SIM card and battery for fi rst time use.
1. Remove the battery cover by gently
pulling the clip downwards and than
lift out the rear cover in the direction
shown below.
2. Unlock the SIM card holder by pushing
it towards you and lifting it up.
4. Gently press down the SIM card holder
and lock it by sliding it away from you
as shown below. Make sure the holder
does not bounce back upwards.
7. Slide the cover back into place and
push down until it clicks.
Note: Reverse the process to remove the
battery and SIM card.
● Universel AC Adapter: Connect the
battery charger to a suitable main power
socket and the charger plug into the
connector of your O2 Xda Flame.
● USB Cable: Connect your O2 Xda
Flame to your PC’s USB port with the
included USB cable as shown above.
Charging the battery
The battery is not fully charged when delivered. It takes approximately 4 hours for
a new or depleted battery to be fully charged.
just read. Use your hands, and let’s get your phone ready for use.
3. Insert the SIM card with the metallic
part facing down and the clipped corner
to the left.
5. Slide the battery into place with the
metal connectors facing down and
away from you. Push down the back
edge until it clips into place.
Before inserting/removing a SIM card,
please make sure that your O
2
Xda Flame
is powered off and is not connected to any
power supply via USB cable or AC adapter.
1
2
6. Once the battery has been inserted push
the side facing you down until it clips into
place (
1
). Slide the clip (
2
) on the right of the
battery compartment towards the battery.

14O2
15O2
power on
Power on your O
2
Xda Flame by pressing
the power button on top of the phone.
A welcome screen will appear and
prompt you to perform the touch-screen
introduction and calibration test.
Enter your PIN number for your SIM card
if prompted. You can enable/disable or
change the PIN of the SIM card in your
O
2
Xda Flame.
synchronization
Your O
2
Xda Flame is designed to
complement your PC as a PDA so that
you can synchronize information between
a PC or Microsoft
®
Exchange Server
® Exchange Server
®
TM
Exchange ServerTM
Exchange Server
and your O
2
Xda Flame.
Please note
If you enter the wrong PIN three times,
the SIM card will be blocked
automatically. To unblock your SIM,
contact your service provider.
To copy SIM Contacts to your phone, tap
the required contact from
Contacts
and
tap
Menu > Copy Contact.
●
First, install ActiveSync 4.2 or later on
●
the PC.
●
Choose a connection type between
●
your O
2
Xda Flame and your PC: USB
cable, Bluetooth or infrared.
●
Select the type of information
●
(Contacts, Calendar, Task, Note,
●
Outlook Email) you wish to
●
synchronize.
●
Start synchronizing information.
connectivity
Your O
2
Xda Flame has powerful net-
working functions that enable you to con-
nect to the Internet or Intranet by using
a number of different methods: GPRS /
WCDMA, Bluetooth, Wireless LAN, Net-
work card, and Terminal Server Client.
play & go
If your friends happen to see your cool new device, they might ask you: “What’s so
special about your phone?” Well, here are the answers.
● Surfi ng
●
You can access the Internet using
●
Internet Explorer. Moreover, the
●
O
2
Connect program links you to
●
●
the O
2
homepage (
seeo2.com
) and
●
●
provides you with the latest software
●
updates.
● Video Calling
You can make video calls by tapping
the
Video Call
button.
● Infotainment Plus
Enjoy enhanced movie viewing with
DVD-quality movie playback in SRS
WOW HD™ surround sound on the
large format VGA screen; or launch O
2
MediaPlus with Windows Media Player
10 and FM radio with RDS for more
entertainment options.
● Basic calling
Press the call key to enter the Phone
Dialer screen, so your O
2
Xda Flame
can make/receive calls.
● Messaging
Your O
2
Xda Flame supports all major
types of messaging services: SMS,
MMS, Chat, Voicemail, E-mail and
MSN Services, enabling you to exploit
the full range of communication
possibilities.
● Pictures & Videos
●
The built-in digital camera allows you
●
to snap photos and take video clips
●
with accompanying audio. You can
●
store them in your phone’s Album and
●
send them via MMS or E-mail.
● O2 MediaPlus
●
This user-friendly interface allows you
●
to easily manage media fi les and
●
gives easy access to different players
●
such as FM Radio and Windows
●
Media Player.

16O2
17O2
service and support
For more information about your O
2
PDA phone, answers to Frequently Asked Ques-
tions, documentation and software upgrades, please visit www.seeO2.com. You can
also register online to receive information on updates and promotions.
Should you have further enquiries or feedback, please log on to www.seeO
2
.com/con-
tactus to fi ll in the relevant forms, and our online support team will get back to you.
Alternatively, you may call us for assistance. For a complete list of customer service
phone numbers in your area, please refer to your O
2
Warranty Card
FAQs
Why does my phone not turn on when
I press the power button?
Either you didn’t press the key long enough,
or the phone has shut down because the
battery power level is too low to make calls.
Recharge the battery fully.
How do I suspend the screen display
or wake up the phone?
Press the power button to turn off the
phone. If the screen display is off, press the
power button to wake up your phone.
My phone displays ‘Insert SIM’, what
does this mean?
You must insert the SIM card before you
can use the phone. If it is already installed,
remove and clean the blank area with a dry
cloth, then insert again.
My phone displays ‘INVALID or
missing SIM card’, what does this
mean?
The phone is SIM-locked and will not
accept the inserted SIM card. Insert the
correct SIM card or contact your network
operator.
My phone displays ‘EMERGENCY
ONLY’, what does this mean?
Your SIM card is not properly installed or
confi gured, or you are out of network range.
My phone displays ‘NO NETWORK’,
what does this mean?
You’re outside network range or there is no
clear path to the transmitter. If you’re inside
a building, try moving towards a window.
Some calls are not processed. What
is wrong?
A call bar has been set to restrict phone
usage. Check the call barring status and
cancel as necessary.
Someone else is receiving my calls.
What is wrong?
Call Forward feature could have been
activated. Cancel call forwarding function
as necessary.
Can I send and receive emails and surf
the Mobile Internet on my phone?
Yes. Your phone has Web capability, which
means that you can access the Internet
from your phone. For sending and receiving
emails, please refer to the user manual or
contact O
2
Customer Service.
How do I take out the micro SD card
from the SD adapter?
The card slot on this phone is designed
for micro SD cards. To remove the micro
SD card from the SD card adapter,
please hold the SD card adapter with one
hand; slightly lift the end of the micro SD
card and pull.
Where can I check why my phone has
gone wrong?
Tap
Start
>
Programs > Self Diagnostics
to run diagnostic tests on your system.
Otherwise, have your warranty card and
phone ready and contact your local dealer.
phone care
● Handling
Do not expose the device to excessive
moisture and do not handle with wet
hands.
● Cleaning
– Never place your O
2
Xda Flame
–
face down as the screen can be
–
easily scratched.
– Switch off and wipe with a damp (Not
–
wet) cloth. Do Not use solvents.
– Use a cotton swab to clean the camera
–
lenses.
● Storage
– Avoid extremes of temperature.
– The screen is fragile and could be
–
damaged if forced into tight spaces.