Asia Pacific Satellite communications SO-2510 Thuraya Satellite Mobile Phone User Manual SO 2510Eng co indd
Asia Pacific Satellite communications Inc. Thuraya Satellite Mobile Phone SO 2510Eng co indd
Contents
- 1. User Manual Part1
- 2. User Manual Part2
- 3. User Manual Part3
User Manual Part1
www.thuraya.com

For your safety
For your safety 1
Battery Information
Battery Information 2
Taking Care of your Thuraya Mobile Phone
Taking Care of your Thuraya Mobile Phone 2
Certification information (SAR)
Certicationinformation(SAR) 3
SO-2510 Unpacking
SO-2510Unpacking 4
SO-2510Accessories 4
Your SO-2510
YourSO-2510 4
Keyandbuttondescription 5
Introduction
Introduction 8
HPA (High-Penetration Alerting)
HPA(High-PenetrationAlerting) 9
Initial steps
InsertingSIMcard 10
Connectthechargerandchargethebattery 10
SwitchthemobilephoneOn/Off 11
Enter your PIN 11
Emergencycall(SOS) 11
SetupWizard 12
Lock/UnlockinIdleScreen 12
Display
Displaylayout 13
Displaysymbols 13
Using softkey and menu
Softkeyaction 15
Menu navigation 15
Quickaccess 16
Stepbackonemenulevel 16
Exit the menu 16
Making and receiving call
Dialusingthekeypad 17
Receivingacall 17
High-PenetrationAlerting 18
Optionduringacall 19
New Message
Selectmode 19
SO-2510 I 02 Getting started
SO-2510 I 01 Before you start
CONTENTS...

Edit mode 19
ChangeInputmode 20
Inputsymbol 20
Inputnumber 21
Change language 22
eZitxtOn/Off 22
Dictionary 23
Tocleartext 23
SO-2510 I 02 Getting started
1. Messaging
1.1.NewMessage 26
1.2. Inbox 27
1.3. Draft 29
1.4.SentMessages 30
1.5.Outbox 31
1.6.Templates 32
1.7.Settings 32
1.8. Info Message 34
1.9.MemoryStatus 35
1.10.DeleteAll 35
2. Contacts
2.1.Search 38
2.2.AddName 39
2.3.CallerGroup 40
2.4.SpeedDials 41
2.5.ShortDialing 42
2.6.Copy 42
2.7. Delete 43
2.8.MemoryStatus 43
3. Call Logs
3.1. Missed Calls 44
3.2.ReceivedCalls 44
3.3. Dialed Calls 44
3.4.DeleteAll 45
3.5.CallDuration 45
4. Organizer
4.1.Alarm 46
4.2.Schedule 48
4.3.Calculator 49
4.4.Stopwatch 49
5. Navigation
5.1.Currentposition 50
5.2.Cont.position 50
5.3.Waypoints 51
5.4.Locationtrack 52
5.5.Setting 52
5.6.Qiblah&Prayer 53
6. Sound Setting
6.1.Ringingtone 54
SO-2510 I 03 Using the menu
6.2.SoundVolume 55
6.3.IncomingCallAlert 55
6.4.KeypadTone 55
6.5.KeypadToneVolume 55
7. Settings
7.1.Language 56
7.2.Wallpaper 57
7.3.GreetingMessage 57
7.4.Ownernumber 57
7.5.SendOwnerNumber 57
7.6.DTMFTone 57
7.7.Cost 58
7.8.DataConnection 59
7.9.SetupWizard 59
7.10.Backlight 61
7.11. LCD Contrast 61
7.12.AnswerMethod 61
7.13.AutoRedial 62
7.14.Time/Date 62
8. Network
8.1.Networkmode 64
8.2.SATRegistration 64
8.3.Preference 64
9. Security
9.1.PINcode 65
9.2.Securitycode 65
9.3.Changecodes 66
9.4. Fixed Dialing 67
9.5.ClosedUserGroup 69
9.6. IMEI Number 69
9.7.CallBarring 70
9.8.CallWaiting 71
9.9. Call Diverting 72
9.10.ResetFactorySettings 74
SO-2510 I 03 Using the menu
Troubleshooting
Troubleshooting 76
Quick access codes
Quickaccesscodes 77
Access codes
Quickaccesscodes 86
Security code
Securitycode 86
PIN & PUK
PIN&PUK 86
PIN2 & PUK2
PIN2&PUK2 86
Barring code
Barringcode 86
SO-2510 I 04 Additional

FCC FCC
FCC SAR Compliance Statement
The Federal Communications Commission (FCC) has adopted a safety standard for human exposure to Radio Frequency (RF)
electromagnetic energy emitted by FCC-certied equipment. This wireless mobile phone has been evaluated under FCC Bulletin
OET65C(01-01)andfoundtobecomplianttotherequirementsofuncontrolledenvironmentallimitsassetforthinCFR47Sections
2.1091, 2.1093 addressing RF Exposure from radio frequency devices when operated in accordance with the operation guidelines
described in this manual. Proper operation of this radio device according to the instructions in this publication will result in user
exposuresubstantiallybelowtheFCCrecommendedlimits.
YourwirelessphoneSO-2510isaradiotransmitter andreceiver.Itisdesignedandmanufactured nottoexceedtheemission limits
forexposure toradiofrequency (RF) energysetby the FederalCommunicationsCommissionof the U.S. Government.Theselimits
arepartofcomprehensiveguidelinesandestablishpermittedlevelsofRFenergyforthegeneralpopulation.Theguidelinesarebasedon
standardsthatweredevelopedbyindependentscienticorganizationsthroughperiodicandthoroughevaluationofscienticstudies.The
standardsincludeasubstantialsafetymargindesignedtoassurethesafetyofallpersons,regardlessofageandhealth.
Theexposurestandardforwirelessmobilephonesemploysa unitofmeasurementknownastheSpecic AbsorptionRate,orSAR.
The SAR limit set by the FCC is 1.6W/kg.* Tests for SAR are conducted using standard operating positions accepted by the FCC
withthephonetransmittingat its highestcertiedpowerlevel in alltestedfrequencybands.AlthoughtheSARis determinedatthe
highest certied power level, the actual SAR level of the phone while operating can be well below the maximum value. This is be-
causethephoneisdesignedtooperateatmultiplepowerlevelssoastouseonlythepowerrequiredtoreachthenetwork.Ingeneral,
thecloseryouaretoawirelessbasestationantenna,thelowerthepoweroutput.
Beforeaphonemodelisavailableforsaletothepublic,itmustbetestedandcertiedtotheFCCthatitdoesnotexceedthelimitestab-
lishedbythegovernment-adoptedrequirementforsafeexposure.Thetestsareperformedinpositionsandlocations(forexample,atthe
earandwornonthebody)asrequiredbytheFCCforeachmodel.ThehighestSARvalueforthismodelphoneasreportedtotheFCC
whentestedforuseattheearis0.37W/kg(withregardtoBody-wornmeasurements,thismobilephonecannotbeusedinabodyworn
positionbecauseinthispositionthephonecannotproperlyreceiveandtransmitthesatellitesignalandtheoperationisnotpracticable).
Thebody-wornoperationisrestrictedinuse.
WhiletheremaybedifferencesbetweentheSARlevelsofvariousphonesandatvariouspositions,theyallmeetthegovernmentrequire-
ment.
The FCC has granted an Equipment Authorization for this wireless mobile phone with all reported SAR levels evaluated as in
compliance with the FCC RF exposure guidelines. SAR information on this phone is on le with the FCC and can be found under
theDisplayGrantsectionofhttp://www.fcc.gov/oet/fccidaftersearchingonFCCID:TZ5SO-2510.
FCC RF Interference Statement
ThisdevicecomplieswithPart15oftheFCCRules.Operationissubjecttothefollowingtwoconditions:
1.Thisdevicemaynotcauseharmfulinterference,and
2.This device must accept any interference received, including interference that may cause undesired operation.
ThisequipmenthasbeentestedandfoundtocomplywiththelimitsofaClassBdigitaldevice,pursuanttoPart15oftheFCCRules.
These limits are designed to provide reasonable protection against harmful interference when the equipment is operated in a
residential environment. This equipment generates, uses, and radiates radio frequency energy, and if not installed and used in
accordancewiththeinstructions,maycauseharmfulinterference. However,thereisnoguaranteethatinterferencewillnotoccur.
Ifthisequipmentdoescauseinterferencetoradioortelevisionreception,whichcanbedeterminedbyturningtheequipmentoffand
on,theuserisencouragedtocorrecttheinterferencebyoneofthefollowingmeasures:
•Reorientorrelocatethereceivingantenna.
•Increaseseparationbetweentheequipmentandreceiver.
•Connecttheequipmenttoanoutletonacircuitdifferentfromwhichthereceiverisconnected.
•Consultthedealeroranexperiencedradio/TVtechnician.
IntheUnitedStatesandCanada,theSARlimitformobilephonesusedbythepublicis1.6watts/kilogram(W/kg)averagedoverone
gramoftissue.Thestandardincorporatesasubstantialmarginofsafetytogiveadditionalprotectionforthepublicandtoaccountfor
anyvariationsinmeasurements.SARvaluesmayvarydependingonnationalreportingrequirementsandthenetworkband.
FCC
www.thuraya.com
SO-2510
Thisequipmentgeneratesorusesradiofrequencyenergy.Changesormodicationstothisequipment
maycauseharmfulinterferenceunlessthemodicationsareexpresslyapprovedintheinstructionmanual.
Theusercouldlosetheauthoritytooperatethisequipmentifanunauthorizedchangeormodicationismade.
Caution

1
01
Before you start
02
03
04
Before you start
For your safety
ReadthesesimpleguidelinestheywillhelpyougetthemostoutofyourThurayaPhone.
Formoredetailedexplanationspleaserefertothecompleteuserguide.
PleasereadcarefullyandmakeyourselffamiliarwiththesafetymeasuresanduserinstructionsinthisManualbeforeyoustarttouse
yourSO-2510.UserInterfaceintheproductcouldbedifferentfromtheimageintheManual.
Thesettingsmaybedifferentdependingontheregion.Internalsoftwarecouldbepartiallychangedforimprovedperformancewithout
priornotice,andthecontentsofanychangescanbecheckedathttp://www.thuraya.com.
SWITCH ON SAFELY
Donotswitchthephoneonwhenwirelessphoneuseisprohibited
orwhenitmaycauseinterferenceordanger.
ROAD SAFETY COMES FIRST
Obeyalllocallaws.
Alwayskeepyourhandsfreetooperatethevehiclewhiledriving.
Yourrstconsiderationwhiledrivingshouldberoadsafety.
SWITCH OFF IN HOSPITALS
Followanyrestrictions.
Switchthephoneoffnearmedicalequipment.
SWITCH OFF IN AIRCRAFT
Followanyrestrictions.
Wirelessdevicescancauseinterferenceinaircraft.
SWITCH OFF WHEN REFUELING
Donotusethephoneatarefuelingpoint.
Donotusenearfuelorchemicals.
SWITCH OFF NEAR BLASTING
Followanyrestrictions.
Donotusethephonewhereblastingisinprogress.
SO-2510 I 01 Before you start
01
03
04
02 For your safety
For your safety 1
Battery Information
Battery Information 2
Taking Care of your Thuraya Mobile Phone
Taking Care of your Thuraya Mobile Phone 2
Certification information (SAR)
Certicationinformation(SAR) 3
FCC SAR Compliance Statement
FCCSARComplianceStatement 4
FCC RF Interference Statement
FCCRFInterferenceStatement 5
SO-2510 Unpacking
SO-2510Unpacking 7
SO-2510Accessories 7
Your SO-2510
YourSO-2510 7
Keyandbuttondescription 8

2
01
Before you start
3
01
Before you start
02
03
04
Before you start
Battery Information
Donotshort-circuitthebattery.Accidentalshort-circuitingcanoccurwhenametallicobjectsuchasacoin,clip,orpencausesdirect
connectionofthepositive(+)andnegative(-)terminalsofthebattery.(Theselooklikemetalstripsonthebattery.)Thismighthappen,
forexample,whenyoucarryasparebatteryinyourpocketorpurse.Short-circuitingtheterminalsmaydamagethebatteryorthe
connectingobject.
Taking Care of your Thuraya Mobile Phone
Yourdeviceisaproductofsuperiordesignandcraftsmanshipandshouldbetreatedwithcare.
Thesuggestionsbelowwillhelpyouprotectyourwarrantycoverage.
• Keepthedevicedry.Precipitation,humidityandalltypesofliquidsormoisturecancontainmineralsthatwillcorrodeelectronic
circuits.Ifyourdevicedoesgetwet,removethebatteryandallowthedevicetodrycompletelybeforereplacingit.
• Donotuseorstorethedeviceindusty,dirtyareas.Itsmovingpartsandelectroniccomponentscanbedamaged.
• Donotstorethedeviceinhotareas.Hightemperaturescanshortenthelifeofelectronicdevicesanddamagebatteries.
• Donotstorethedeviceincoldareas.Whenthedevicereturnstoitsnormaltemperature,moisturecanforminsidethedeviceand
damageelectroniccircuitboards.
• Donotattempttoopenthedeviceotherthanasinstructedinthisguide.
• Donotdrop,knock,orshakethedevice.Roughhandlingcanbreakinternalcircuitboardsandnemechanics.
• Useonlythesuppliedoranapprovedreplacementantenna.Unauthorizedantennas,modications,orattachmentscoulddamage
thedeviceandmayviolateregulationsgoverningradiodevices.
• Usethebatterychargersindoors.
• Alwayscreateabackupofdatayouwanttokeep(suchascontactsandcalendarnotes)beforesendingyourdevicetoa
servicefacility.
Certication information (SAR)
THIS DEVICE MEETS INTERNATIONAL GUIDELINES FOR EXPOSURE TO RADIO WAVES
Yourmobiledeviceisaradiotransmitterandreceiver.Itisdesignedandmanufacturednottoexceedthelimitsforexposuretoradio
frequency(RF)recommendedbyinternationalguidelines(ICNIRP).Theselimitsarepartofcomprehensiveguidelinesandestablish
permittedlevelsofRFenergyforthegeneralpopulation.Theguidelinesincludeasubstantialsafetymargindesignedtoassurethe
safetyofallpersons,regardlessofageandhealth.
4
01
Before you start
5
01
Before you start
02
03
04
Before you start
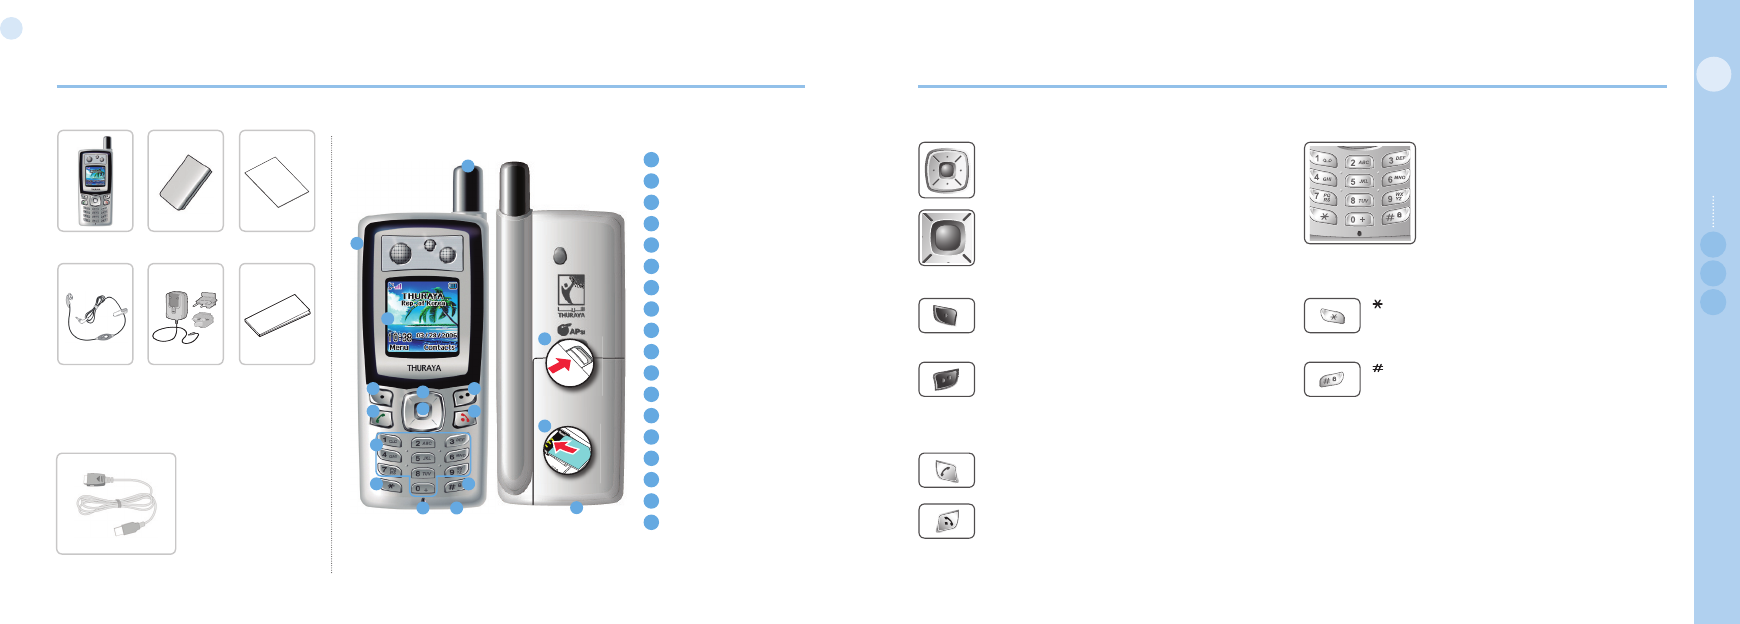
SO-2510 Unpacking
Handset Battery
Your SO-2510
1SATantenna
2Earspeaker
3LCDscreen
4 Left soft key
5Rightsoftkey
6Sendkey
7 End key
84waysnavigationkey
9Okkey
10 Numerickeypad
11 Starkey
12 Sharpkey
13 Microphone
14 Dockinghole
15 Battery hole
16 Chargesocket
17 SIMcardhole
18 USB/Datacableslot
SO-2510 Accessories
Datacable
1
2
3
4 5
6 7
8
9
10
11 12
13 16
Quickstartguide
Travel
charger
Usermanual&
Warrantycard
Ear set
17
18
15
Key and button description
Navigation Key
4-waydirectionkeyformovingfocusinmenuscreen.
Center Key
Thiskeyisusedtoselect/unselectandconrmmenu
options.
Left Soft Key
Thefunctionofthekeydependsonthetextshownon
thedisplayabovethekey.
Right Soft Key
Thefunctionofthekeydependsonthetextshownon
thedisplayabovethekey.
Send Key
Toacceptorinitiateacall.
End Key
Toendthecurrentconnection,ortorejectanincom-
ingcall.
Pressandholdtoturnthephoneonoroff.
Keypad
Usedtoenterphonenumbersandtoenter
textusingthenumberkeys,1to9,repeat-
edlyuntilthedesiredcharacterappears.
Alongkeypresson0keywilldisplaya‘+’.
Key
A long key press will put the phone into
a Manner mode.
Key
Pressandholdtolockthekeypad.
www.thuraya.com
SO-2510
SO-2510 I 02 Getting started
02
03
04
01
Introduction
Introduction 8
HPA (High-Penetration Alerting)
HPA (High-Penetration Alerting) 9
Initial steps
Inserting SIM card 10
Connect the charger and charge the battery 10
Switch the mobile phone On/Off 11
Enter your PIN 11
Emergency call (SOS) 11
Setup Wizard 12
Lock/Unlock in Idle Screen 12
Display
Display layout 13
Display symbols 13
Using softkey and menu
Softkey action 15
Menu navigation 15
Quick access 16
Step back one menu level 16
Exit the menu 16
Making and receiving call
Dial using the keypad 17
Receiving a call 17
High-Penetration Alerting 18
Option during a call 19
New Message
Select mode 19
Edit mode 19
Change Input mode 20
Input symbol 20
Input number 21
Change language 22
eZitxt On/Off 22
Dictionary 23
To clear text 23
8
02
Getting started
9
02
Getting started
03
04
Getting started 01
Introduction
Your SO-2510 is a high performance mobile phone using satellites for communication.
The combination of Satellite (SAT) communications and GPS (Global Positioning
System) technology allows phone communications without base stations. SAT phone
communications are similar to GSM and any GSM phone user can easily use it.
However, there are a few specifi c differences between GSM and SAT. These are
explained below.
While idle with SAT or communicating with a good quality signal, the antenna need not
be pulled out. However, the antenna should be pulled out to receive SAT calls or to
start SAT.
While watching the indicator for SAT signal strength, move around to achieve the best
connection quality for the mobile phone. SAT communication requires clear space
without obstructions. Avoid obstructions such as buildings, trees or mountains.
Also, it is important to direct the antenna of the mobile phone towards satellites.
HPA (High-Penetration Alerting)
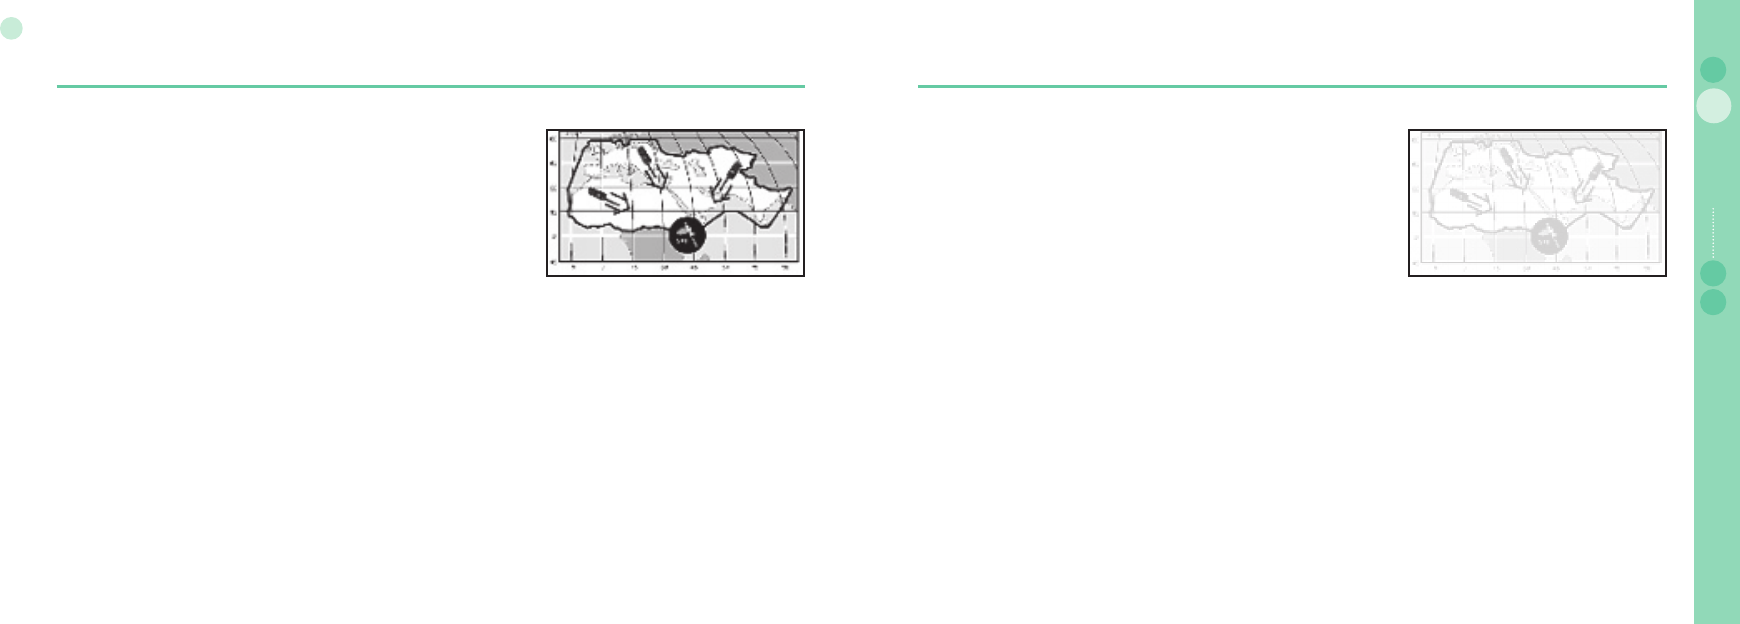
The Thuraya system features a 'High-Penetration Alerting' capability that allows
you to be notifi ed of incoming calls even when your mobile phone has poor signal
coverage. When the mobile phone receives a High-Penetration Alerting signal it will
alert you with an 'early ring' and a special display message (see page 18).
To answer the call, you must immediately extend the antenna and move the mobile
phone into a position that has a clear 'line of sight' to the satellite. When this has
occurred the mobile phone display will change, prompting you to answer the call
and proceed with the conversation. If the call is not answered promptly after the
High-Penetration Alerting signal is received, the calling party will be diverted to
voice mail and/or an announcement stating that you are not available to answer.
Just like GSM, the satellite coverage area is divided into many different regions.
The phone searches the network automatically (see page 64) and determines which
service region is active by registering its presence with the Thuraya system. If the
mobile phone has not been able to update this registration due to a weak signal,
the registration information will become out of date or 'stale'. This is indicated on
the display by a blinking SAT icon in the left of the signal strength indicator. This
condition will clear automatically once signal conditions improve and a call is made
or a period of time elapses. You also have the option to speed up that procedure by
manually having the mobile phone register with the Thuraya system.
This is accomplished with the function SAT Registration in the mobile phone's menu
(see page 64). Make sure you have good SAT signal strength before using this
function.
10
02
Getting started
11
02
Getting started
03
04
Getting started 01
Connect the charger and charge the battery
You should charge the battery supplied with the mobile phone as
soon as possible to obtain full battery charge.
To charge the battery :
1. Fit the correct country specifi c adapter into the charger.
2. Plug the charger plug into the charger socket.
3. Connect the charger to an AC source.
Initial steps
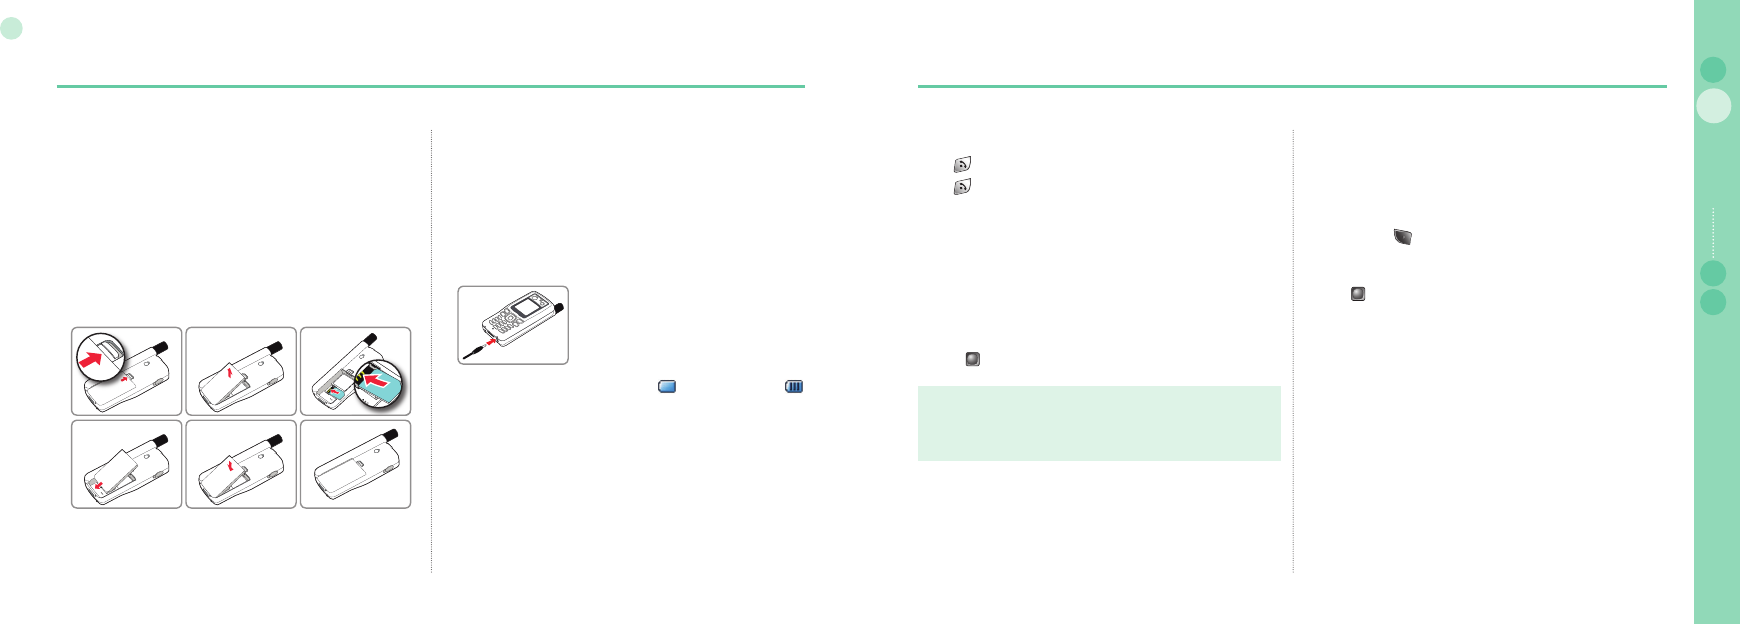
Inserting SIM card
The SIM card (Subscriber Identity Module) is the 'plug' to the
network and provides the phone number, memory for storing
phone numbers and short text messages (SMS).
To insert the SIM card :
1. Switch off the mobile phone before removing the battery and
inserting the SIM card.
2. Lift the battery from the back of the mobile phone and insert
the SIM card as shown in the pictures below.
While the battery is charging you see the symbol changing to
cyclically. The battery is fully charged after 2 hours and 30 minutes.
The charger stops charging automatically when the battery is full. As
long as the charger is not disconnected it restarts charging after a
while to keep the battery fully charged.
You may still use the mobile phone while charging the battery.
The internal clock for time, date (see page 62) and alarms (see page
46) will still keep running for about two hours if neither the battery nor
the charger is connected, but no alarm will sound unless a charged
battery is connected.
Emergency call (SOS)
Until you have entered the correct PIN, you can make only
emergency calls.
To make an emergency call before having entered the PIN.
In screen Press (SOS).
Or.
1. Enter a specifi c emergency number.
2. Press .
The softkey SOS is available even
when the SIM card in your mobile phone is not valid.
when you have a valid SIM card but no roaming with the
selected service provider is possible.
After the PIN is accepted, you have to make an emergency call in
the same way as you make a 'normal' call.
●
●
Switch the mobile phone On/Off
Press for 3 seconds to switch the mobile phone on.
Press for 3 seconds again to switch the mobile phone off.
Enter your PIN
The PIN (Personal Identifi cation Number; 4 to 8 digits) is initially
supplied together with the SIM card by your service provider and
can be changed later. (see page 65)
1. Enter PIN using keys on keypad.
Each digit entered is displayed as an *.
2. Press to confi rm PIN.
Note
If more than 3 errors are made when entering PIN code,
PUK code must be entered.
●

12
02
Getting started
13
02
Getting started
03
04
Getting started 01
Lock/Unlock in Idle Screen
The keypad may be locked so that a number can not be
accidentally dialed e.g. while the mobile is in your pocket or
handbag.
(e.g. It is to protect your personal information while you have left
the phone in a pocket, bag or some other place for a while, or
from the person who might have picked up your lost phone.)
Calls can be received while the phone is locked.
To Lock :
1. In idle screen, long press (#) key.
2. Locked.
To Unlock :
1. Press key.
2. Press key within 3 seconds.
3. If not pressing key within 3 seconds,
the locked mode will not change.
Note
Emergency calls may not be possible on all cellular telephone
networks or when certain network service are in use.
In uneven terrain or close to large buildings, the operating
range can be limited, which affects the connection.
With some service providers it may not be possible to make an
emergency call if no SIM card is inserted in the mobile phone.
●
●
●
Emergency numbers normally are : 112, 911, 999
Check with your network service provider for local emergency
numbers in your area.
Setup Wizard
Use this to set the basic details of the phone when booting initially.
You can either use or skip this function.
To change settings, use the applicable menu or Setup Wizard
Menu in Settings.
For more details, refer to Setup Wizard Menu in Settings.
Display
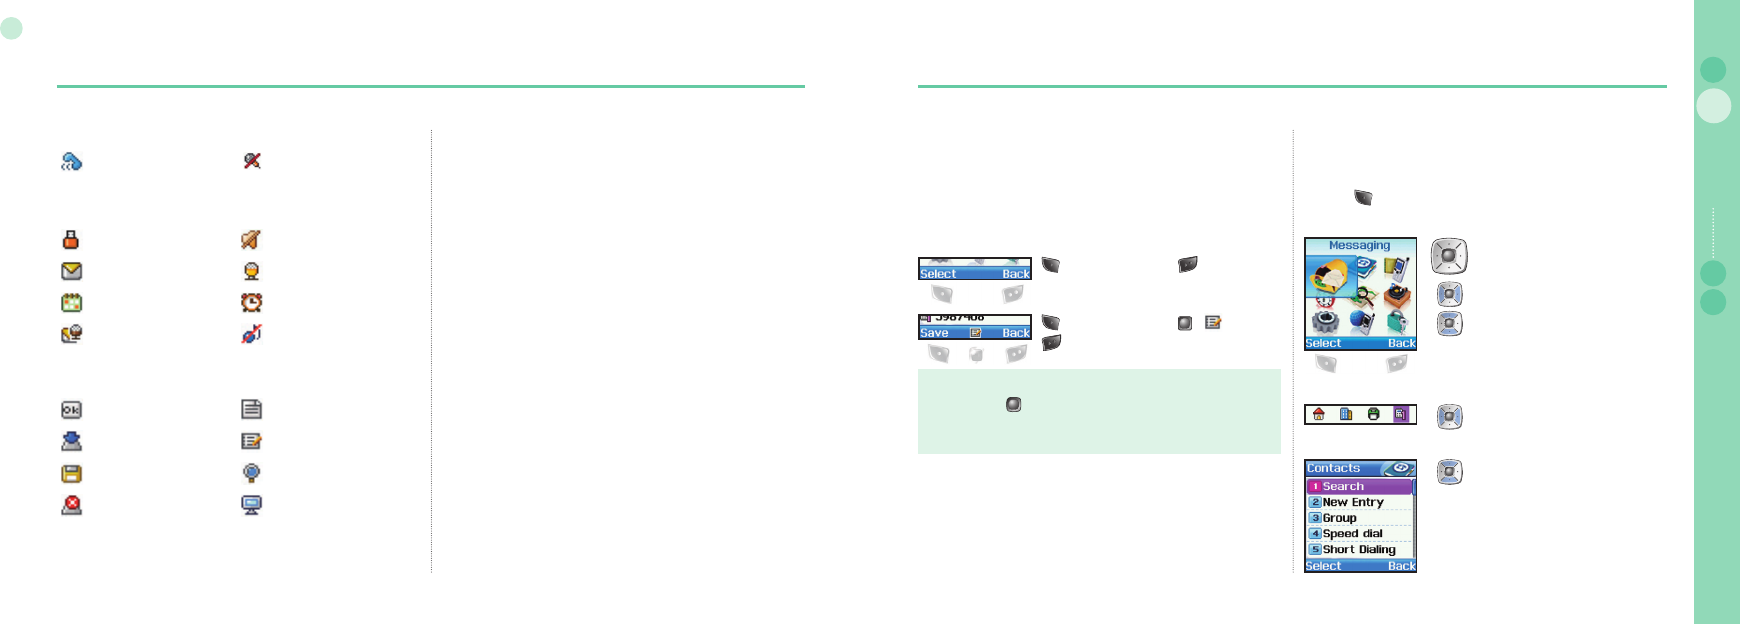
Display layout
The pattern of the display areas is as follows :
1. The indicator line shows mainly symbols which inform you
about the operating conditions of the mobile phone.
2. The main area shows data relating to calls, menu and their
submenus, and displays the editors for the Contacts and SMS
messages. In idle mode (standby), the network name, time
and date are displayed.
3. The softkey line operates together with the and
softkey and the OK key beneath this line.
It provides access to menus and controls.
(see 'Using softkey and Ok key' on page 14)
Indicator line
SAT area information
Display symbols
SAT HPA
Roaming
Signal type
SAT signal 1 SAT signal 2
SAT signal 3 SAT signal 4
SAT signal 5
Signal strength
HPA signal 01 ~ HPA signal 15
HPA strength
Battery almost discharged Low battery
Battery good Battery full
Battery strength
~
Time & Date line
Softkey comment line
14
02
Getting started
15
02
Getting started
03
04
Getting started 01
Using softkey and menu
You can, with these functions, execute and cancel Menu and
Sub menu items to obtain desired results quickly. While on call
or during editing numbers or text, changes to menu system
and approach to the wide functions are offered according to the
situation. Menu can be more easily used by carefully following the
items below.
In idle mode your mobile phone offers functions and settings
which allow you to adapt the mobile phone to your needs. You
access these functions through menus and submenus by scrolling
or by using the appropriate shortcut.
During a call or while you are editing a number or text, the
menu system changes and gives access to various functions,
depending on the context.
The following section describes the principles of using the menu.
: Select : Back
Softkey action
Softkey actions for function calls and navigation in menus
and lists are performed through entries in the softkey line in
conjunction with the corresponding keys below this line.
Depending on the number of softkey actions offered, the two
softkeys beneath the softkey line and the okay key can be used:
On call mute
Call status
ListOk
Softkey command
Speed dial Edit
Save Search
Undo View
Note
Command of is in the form of Icon.
Refer to page 14 where each icon and corresponding command
are shown.
●
: Save : (Edit)
: Back
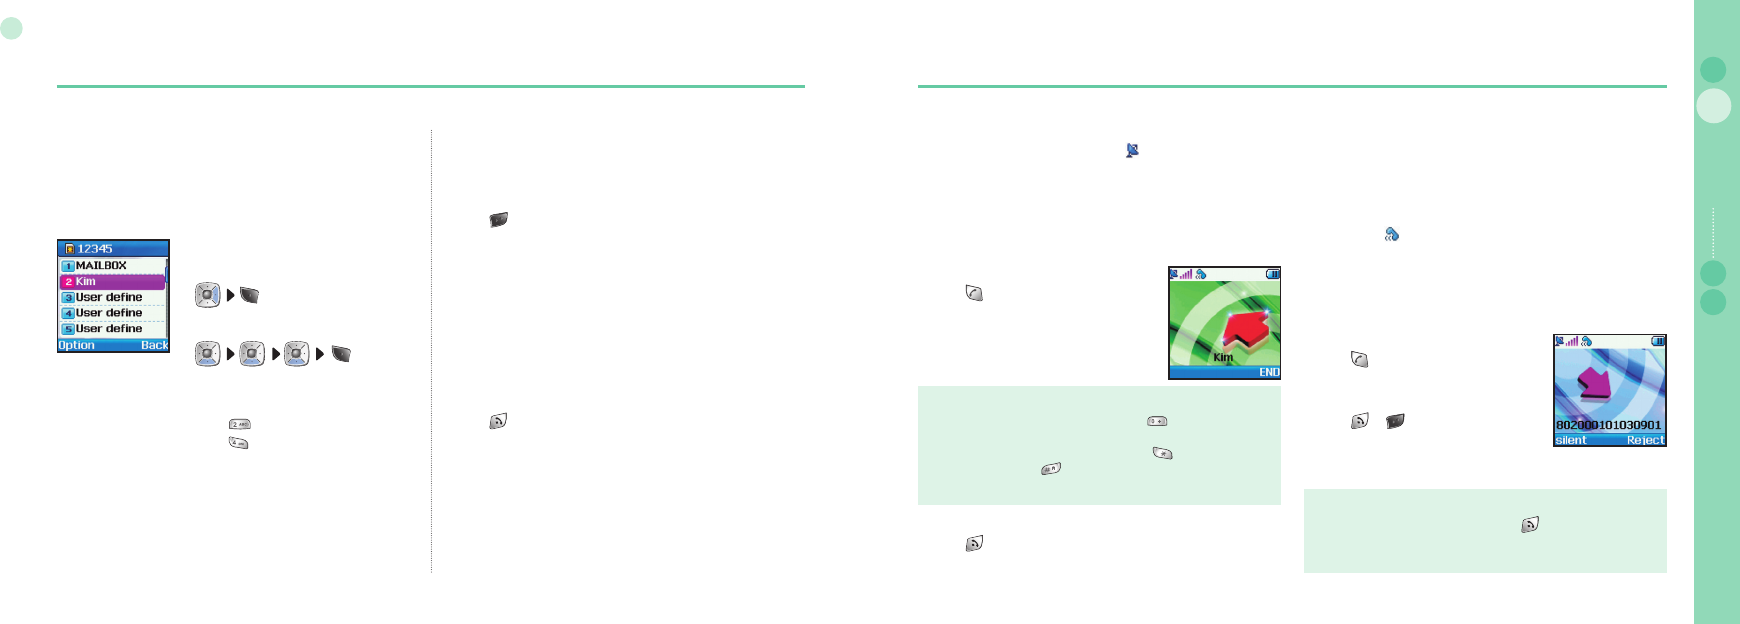
Menu navigation
Menu screen is composed of 9 menus. Use the navigation key
to move the focus to the desired menu icon, and execute by
pressing .
4 ways navigation key
Left / Right direction
Up / Down direction
Left / Right direction
Up / Down direction
Device connect Silent
Phone status
Unread SMS Voice mail
Schedule Alarm
Voice mail + SMS Incomming call silent
16
02
Getting started
17
02
Getting started
03
04
Getting started 01
Quick access
Menu items can be executed by using the key pad as well as by
using the navigation key and softkey as in menu navigation.
In the following example, Speed dial is described using both
methods.
1. In idle screen press Menu.
2. Scroll to [Contacts] and select.
3. Scroll to Speed dial and select.
Or. (Quick access)
1. in idle screen press Menu.
2. Press .
3. Press .
Step back one menu level
If you need to go back to a previous window or to move to higher
menu during menu execution:
1. Press .
Exit the menu
To go to idle screen during menu execution:
1. Press .
Making and receiving call
In order to make a call you must be connected to a network and
have an adequate SAT signal. When comes on in Indicator
line, call can be refused by using reject.
Dial using the keypad
Telephone numbers can be dialed using traditional method.
1. Enter phone number using keypad.
2. Press .
Note
To make an international call, long press for + is displayed
and then enter country code without the leading 0’s.
When entering a number, a long press on enters P(pause)
and a long press on enters W (Wait), but the number entering
cannot start with P or W.
●
●
How to end a call
1. Press .
Receiving a call
When there is an incoming call, it is displayed on the screen as
follows.
Ringtone (according to melody and volume of current setting)
can be heard.
A ashing is displayed.
If caller’s number is set to be displayed, the number will be
displayed on the screen. If the number is one stored in
contacts, corresponding name of contact is displayed on the
screen.
Accept a call
1. Press .
Reject a call
1. Press or .
●
●
●
Note
When in an existing call is used, press to reject an incoming
call using reject.
●
18
02
Getting started
19
02
Getting started
03
04
Getting started 01
Silent a call
If the ringtone of your phone is inconvenient, it can be turned off
by using silent.
1. Press .
Note
Sound volume during call can be increased/decreased by using
and other sound volumes can be changed by using the
sound setting menu.
●
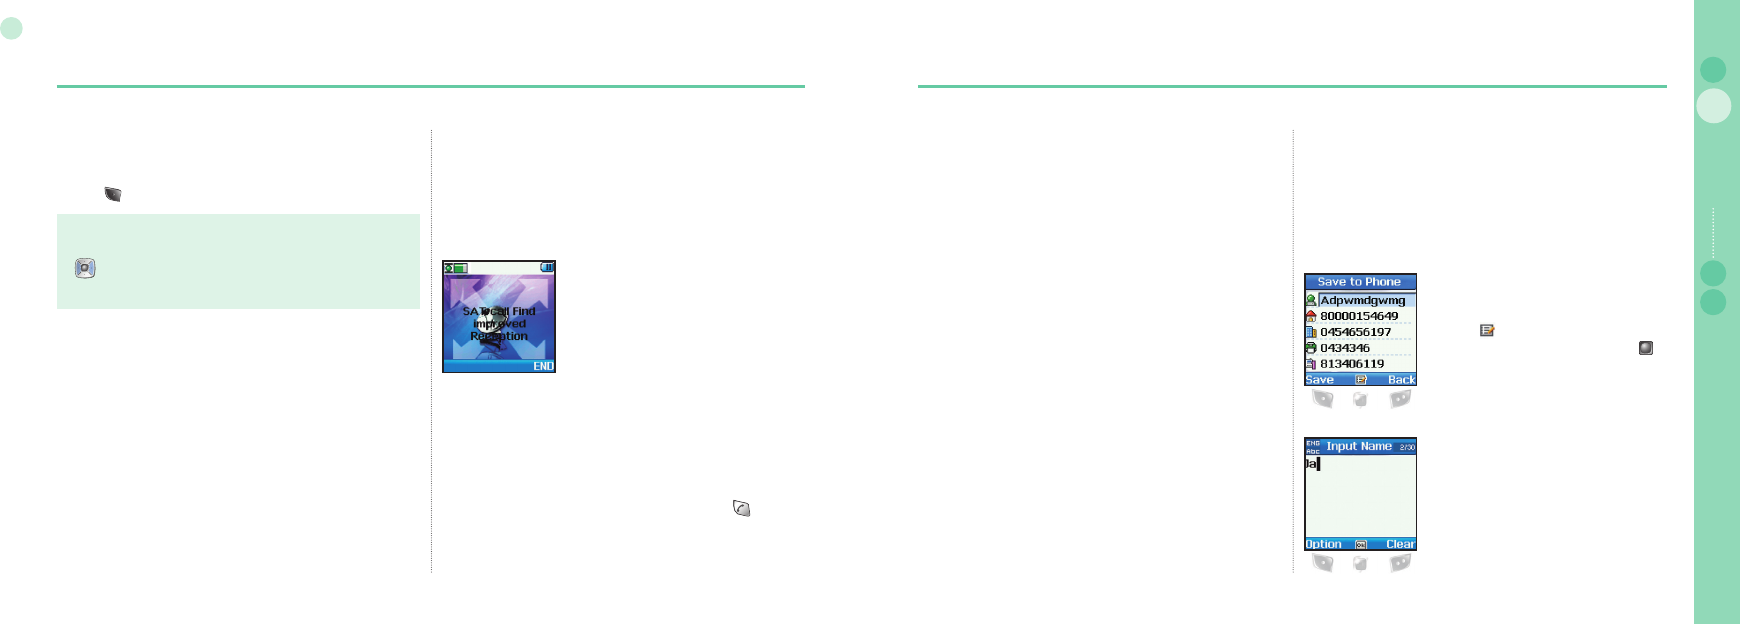
High-Penetration Alerting
You cannot receive an incoming call if the SAT signal to your
mobile phone is not good enough. In this situation, a message
box with “SAT Call Find Improved Reception” and a special
ringtone will be displayed on the screen, and signal on indicator
line changes to HPA signal.
You cannot receive calls in High-Penetration
Alerting mode.
You must move to a place of better SAT
signal to receive calls.
Otherwise, you can use reject or ringtone off.
To receive calls in HPA mode:
1. Move to a place with an improved signal .
2. Fully extend the antenna of SO-2510.
3. Point SO-2510 roughly towards satellites.
4. While watching signal on indicator, as soon as signal strength
is strong enough the warnings disappear from the display.
Now you can accept the call as usual by using the key.
Option during a call
Iincoming call:
When User1 is receiving a call from User3, while talking with
User2, User1 can ‘accept; or ‘reject’ the call from Uesr3. If the
call is rejected, the conversation between User1 and User2 is not
affected. If the call is accepted, User2 is put on hold and User1 is
connected to the call from User3. Using the option menu, User1
can swap over User2 and User3, or operate a multi-party call up
to 6 users including User1.
Outgoing call:
If User1 wants to make a call to User3, while talking with User2,
using the option menu puts User2 on hold and enters Ueser3’s
phone number. To include User2 in the conversation with User3,
select a multiparty call on the option menu.
User2 and User3 can be swapped over. Up to 6 users including
User1 can have a conversation simultaneously.
New Message
To enter Name, Message and Memo, follow the below
procedures.
In order to facilitate fast operation, the Select mode and Enter
mode are separated with SO-2510. In the Select mode, entry
cannot be made with keypad but can be made by using the Edit
mode.
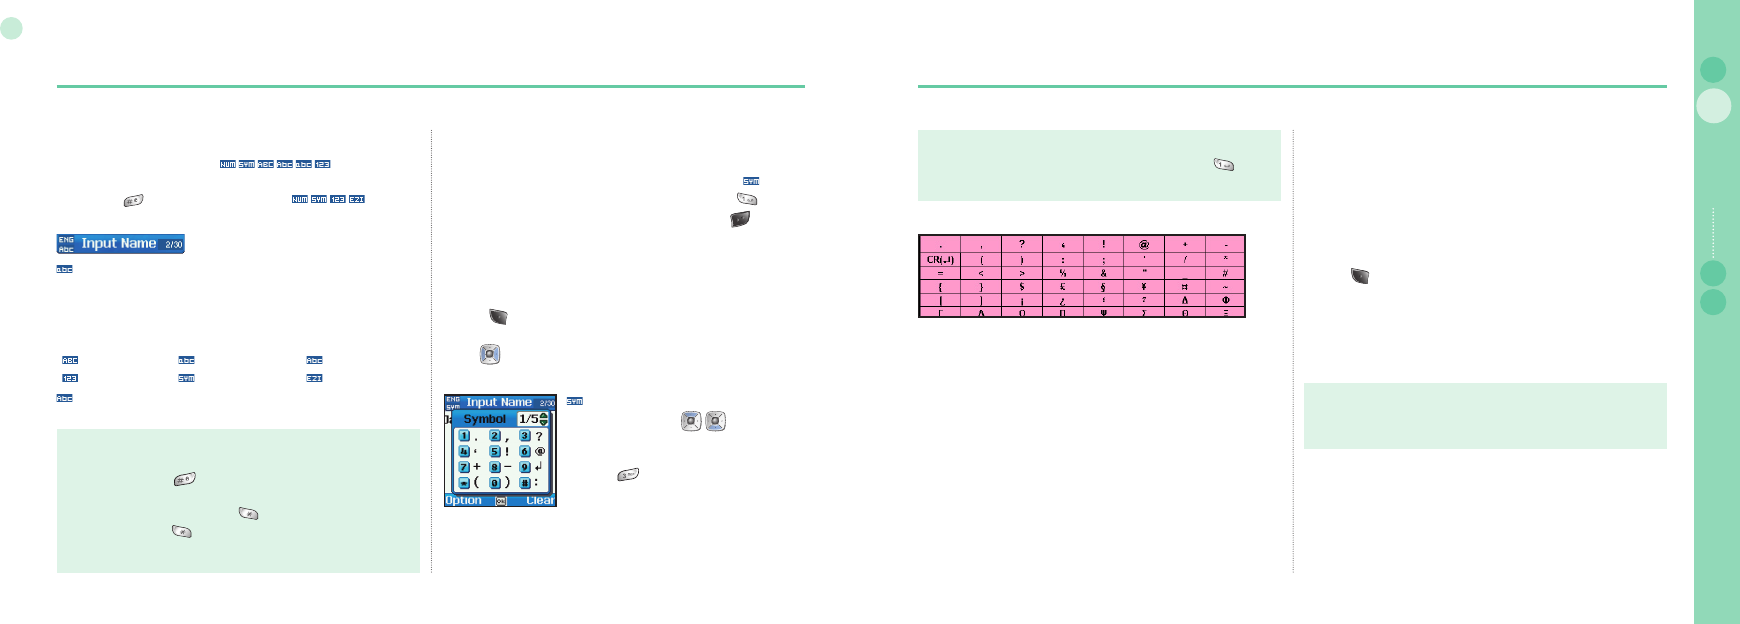
Select mode
Focus can be moved using navigation key,
and entry cannot be made in general text
box except number entry. When text entry is
possible, is displayed on softkey line.
That is, to enter name in select mode,
should be pressed to move into edit mode.
Edit mode
Desired characters can be entered. In edit
mode, navigation key can be used to put
space at the end of text row, as well as to
move cursor.
Text composition is restricted for each item,
20 Latin characters for name and 100 Latin
characters for schedule.
20
02
Getting started
21
02
Getting started
03
04
Getting started 01
Change Input mode
Entry status is displayed with .
Among these, change of capital/small characters can be done
by pressing (sharp key). To change to , Option
should be used.
shows whether current entry status is capital or small
characters.
Differentiating capital and small character is supported only with
Latin language and supported entry forms in Text entry are as
below.
: Capital : Small : Capital + Small
: Number : Special Character : eZitxt On
indicates number of current entered characters and available
characters for entry.
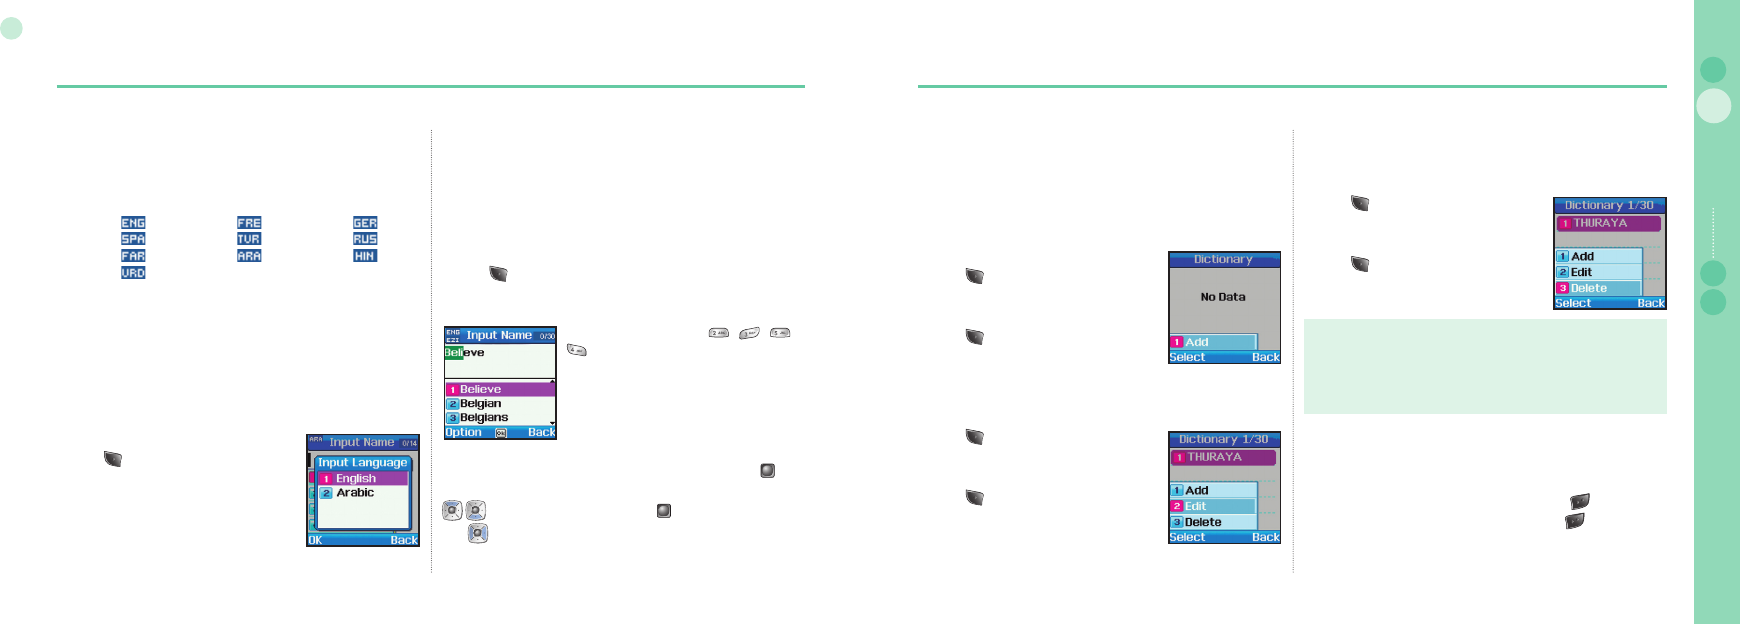
Input symbol
There are two ways to enter symbols.
One is in symbol pop up by changing entry status with ,
and the other is to obtain desired symbol by pressing .
To close the window without entering symbol, press key
(Close).
To make a symbol
In text editor
1. Press (option).
2. Scroll to Symbol and select.
3. Use to select a page.
4. Press desired symbols or numbers.
Note
In eZitxt status, capital/small character status is not shown.
However, pressing lets you know that capital/small character
entry is still operating.
To switch on or off eZitxt, press (for a few seconds).
Additionally, press shortly and a symbol input popup window
will be shown. Once text is input, the status will change to Tap
mode.
●
●
is composed of page 1~4 and change
of page is done with , and symbol
entry is done using keypad.
(e.g.) Entry of "?" is complete by
pressing .
Note
Special characters can be simply entered by pressing when
it is not for symbol or numbers.
●
Input number
There are two ways to enter numbers in text entry window.
One is to change entry status to numeric and the other is to press
desired number on keypad for 2 seconds.
To make a Number mode
In text editor
1. Press (option).
2. Scroll to 123 and select.
3. Scroll to NUM and select (Arabic, Urdu, Hindi Number).
4. Press desired numbers on the keypad.
Or.
1. Press desired numbers on the keypad for a few seconds.
Note
It is easier to change entry status to numeric when entering a
series of numbers.
●
The details of special characters are below.
22
02
Getting started
23
02
Getting started
03
04
Getting started 01
eZitxt On/Off
eZitxt is built in for faster entry of words. With eZitxt, you don’t
have to type in desired words. A few keys in combination entered
by user will recommend the nearest words.
To switch eZitxt On/Off
In text editor
1. Press (option).
2. Scroll to eZitxt and select.
3. Press desired numbers on the keypad.
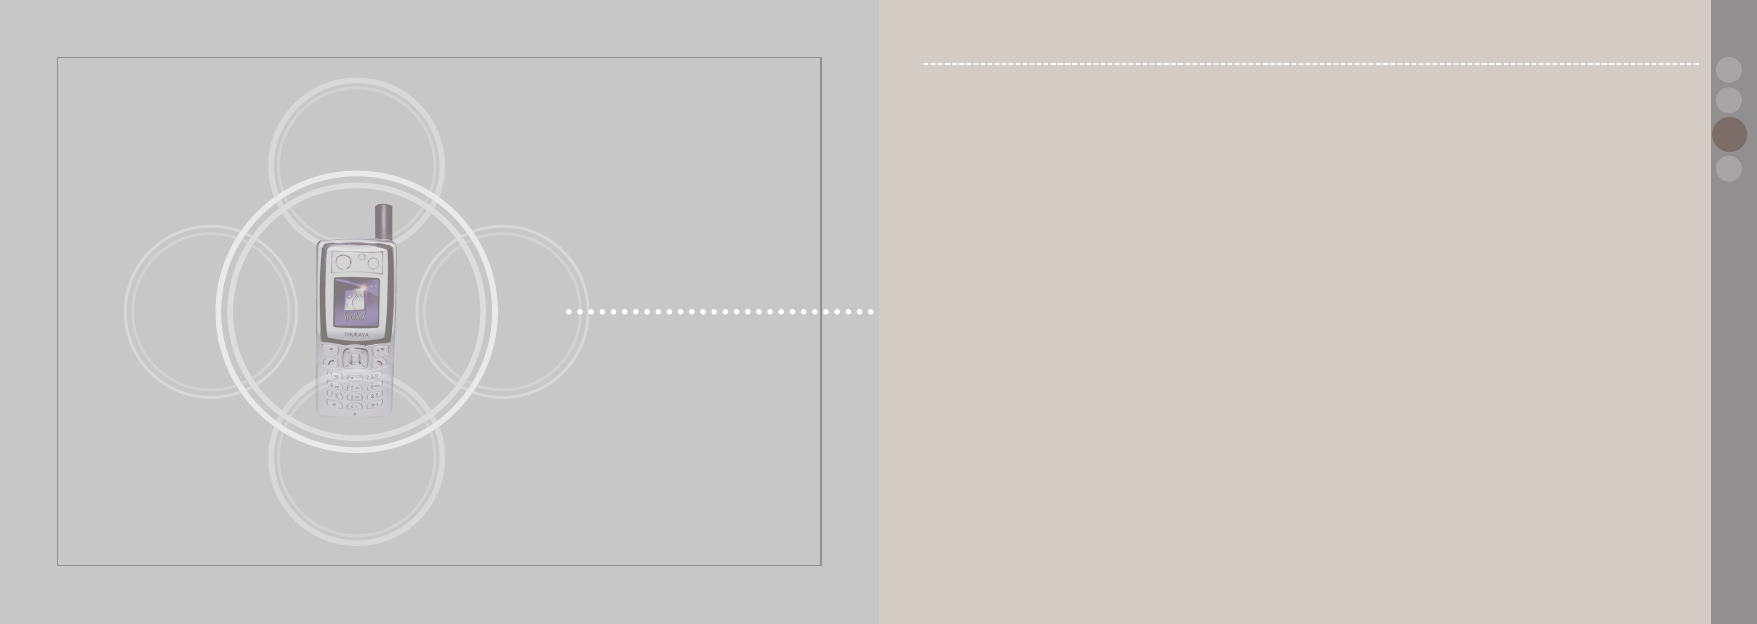
Change language
SO-2510 supports 10 languages.
Supported languages are:
1. English 2. French 3. German
4. Spanish 5. Turkish 6. Russian
7. Farsi 8. Arabic 9. Hindi
10. Urdu
The language is divided into System language and Input
language, and System language is for menu settings shown on
screen and Input language is for entering messages or name.
When composing a message, the user can use two languages.
English is supplied as basic, and the other language should be
set up by the user in <Settings - Language>. (see page 56)
To change entry language
In text editor
1. Press (option).
2. Scroll to Language and Ok.
3. Scroll to desire language and press Ok.
Results obtained through - - -
are two recommended words including
“Believe".
To enter the recommended word from eZitxt, repeatedly press
keypad of the word until desired word is found, and press to
enter, and in case desired word is not shown, move focus using
to the desired word and press .
Use to search more words.
To enter a new word which is used frequently, register it in
Dictionary located in Option for easy future use.
To delete the registered word
1. Press (option).
2. Scroll to Dictionary and select a word.
3. Dictionary list Move
4. Press (Delete).
Dictionary
In eZitxt only the words registered in eZi engine are recommended,
when new words or names are not recommended, the user has the
ability to insert a new word in the eZitxt dictionary.
To register a new word
In text editor
1. Press (option).
2. Scroll to Dictionary and select a word.
3. Dictionary List Move.
4. Press (Add).
5. Input new word.
To change the registered word
1. Press (option).
2. Scroll to Dictionary and select a word.
3. Dictionary List Move.
4. Press (Edit).
5. Change word.
Note
Using Dictionary ‘Add’ and ‘Edit’ functions may affect the Input
language. Particularly, when editing a word in the Dictionary,
the Input language in which a word is already saved, and the
Input language currently set up must be the same.
●
To clear text
To clear already entered text, a short press of the
key clears
one character at a time and a long press of the key clears all
of the entry.
www.thuraya.com
SO-2510
SO-2510 I 03 Using the menu
03
04
02
01
1. Messaging
1.1. New Message 26
1.2. Inbox 27
1.3. Draft 29
1.4. Sent Messages 30
1.5. Outbox 31
1.6. Templates 32
1.7. Settings 32
1.8. Info Message 34
1.9. Memory Status 35
1.10. Delete All 35
2. Contacts
2.1. Search 38
2.2. Add Name 39
2.3. Caller Group 40
2.4. Speed Dials 41
2.5. Short Dialing 42
2.6. Copy 42
2.7. Delete 43
2.8. Memory Status 43
3. Call Logs
3.1. Missed Calls 44
3.2. Received Calls 44
3.3. Dialed Calls 44
3.4. Delete All 45
3.5. Call Duration 45
4. Organizer
4.1. Alarm 46
4.2. Schedule 48
4.3. Calculator 49
4.4. Stopwatch 49
5. Navigation
5.1. Current position 50
5.2. Cont. position 50
5.3. Way points 51
5.4. Location track 52
5.5. Setting 52
5.6. Qiblah & Prayer 53
6. Sound Setting
6.1. Ringing tone 54
6.2. Sound Volume 55
6.3. Incoming Call Alert 55
6.4. Keypad Tone 55
6.5. Keypad Tone Volume 55
7. Settings
7.1. Language 56
7.2. Wallpaper 57
7.3. Greeting Message 57
7.4. Owner number 57
7.5. Send Owner Number 57
7.6. DTMF Tone 57
7.7. Cost 58
7.8. Data Connection 59
7.9. Setup Wizard 59
7.10. Backlight 61
7.11. LCD Contrast 61
7.12. Answer Method 61
7.13. Auto Redial 62
7.14. Time/Date 62
8. Network
8.1. Network mode 64
8.2. SAT Registration 64
8.3. Preference 64
9. Security
9.1. PIN code 65
9.2. Security code 65
9.3. Change codes 66
9.4. Fixed Dialing 67
9.5. Closed User Group 69
9.6. IMEI Number 69
9.7. Call Barring 70
9.8. Call Waiting 71
9.9. Call Diverting 72
9.10. Reset Factory Settings 74