Asia Pacific Satellite communications SO-2510 Thuraya Satellite Mobile Phone User Manual SO 2510Eng co indd

Asia Pacific Satellite communications Inc. Thuraya Satellite Mobile Phone SO 2510Eng co indd

Contents

User Manual Part2

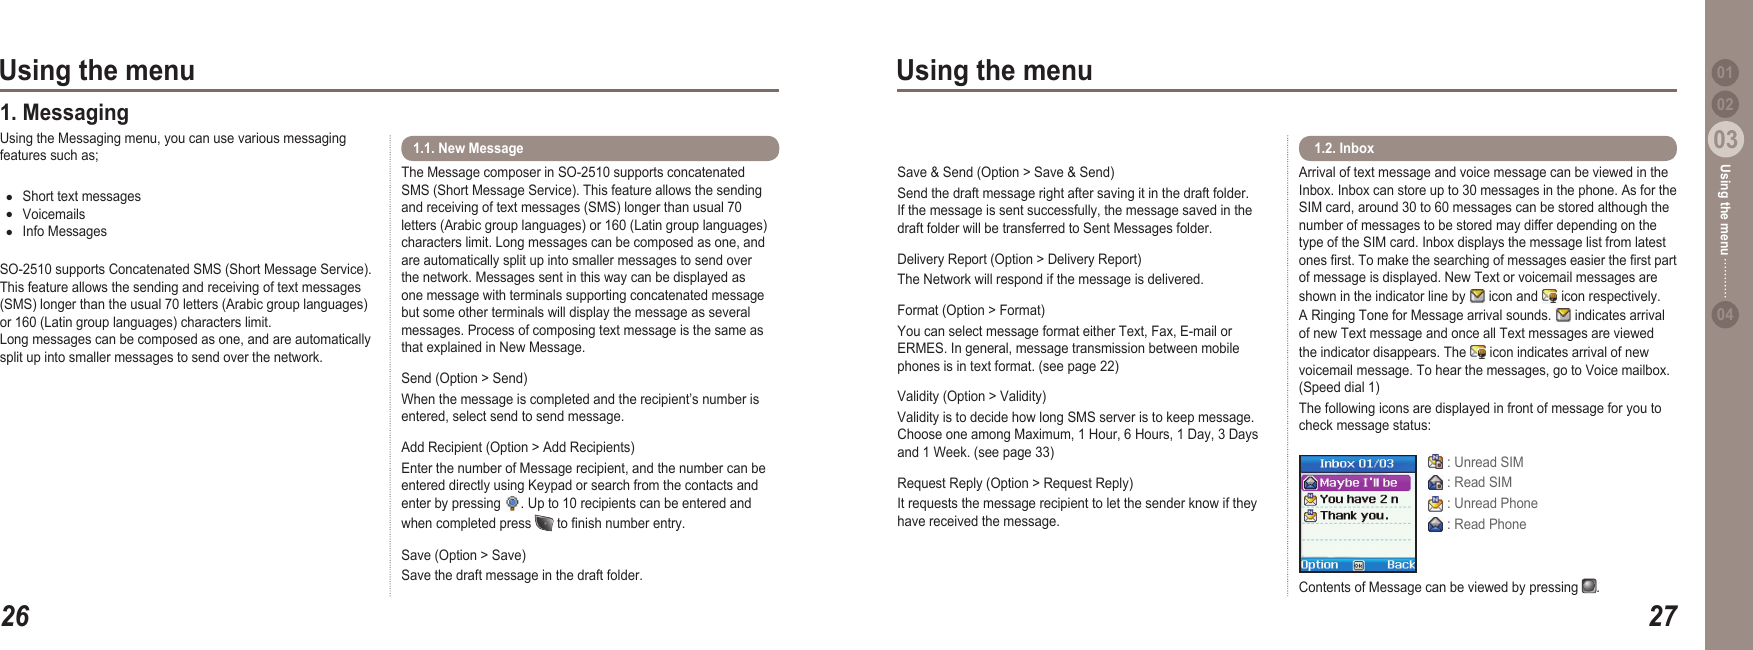
2603Using the menu2703Using the menu0204Using the menu 011. MessagingUsing the Messaging menu, you can use various messaging features such as;Short text messagesVoicemailsInfo MessagesSO-2510 supports Concatenated SMS (Short Message Service). This feature allows the sending and receiving of text messages (SMS) longer than the usual 70 letters (Arabic group languages) or 160 (Latin group languages) characters limit. Long messages can be composed as one, and are automatically split up into smaller messages to send over the network.●●●Arrival of text message and voice message can be viewed in the Inbox. Inbox can store up to 30 messages in the phone. As for the SIM card, around 30 to 60 messages can be stored although the number of messages to be stored may differ depending on the type of the SIM card. Inbox displays the message list from latest ones rst. To make the searching of messages easier the rst part of message is displayed. New Text or voicemail messages are shown in the indicator line by   icon and   icon respectively. A Ringing Tone for Message arrival sounds.   indicates arrival of new Text message and once all Text messages are viewed the indicator disappears. The   icon indicates arrival of new voicemail message. To hear the messages, go to Voice mailbox. (Speed dial 1) The following icons are displayed in front of message for you to check message status:  1.2. Inbox  : Unread SIM : Read SIM : Unread Phone : Read PhoneContents of Message can be viewed by pressing  .The Message composer in SO-2510 supports concatenated SMS (Short Message Service). This feature allows the sending and receiving of text messages (SMS) longer than usual 70 letters (Arabic group languages) or 160 (Latin group languages) characters limit. Long messages can be composed as one, and are automatically split up into smaller messages to send over the network. Messages sent in this way can be displayed as one message with terminals supporting concatenated message but some other terminals will display the message as several messages. Process of composing text message is the same as that explained in New Message.Send (Option > Send)When the message is completed and the recipient’s number is entered, select send to send message. Add Recipient (Option > Add Recipients)Enter the number of Message recipient, and the number can be entered directly using Keypad or search from the contacts and enter by pressing  . Up to 10 recipients can be entered and when completed press   to nish number entry.Save (Option > Save)Save the draft message in the draft folder.1.1. New MessageSave & Send (Option > Save & Send)Send the draft message right after saving it in the draft folder. If the message is sent successfully, the message saved in the draft folder will be transferred to Sent Messages folder.Delivery Report (Option > Delivery Report)The Network will respond if the message is delivered. Format (Option > Format)You can select message format either Text, Fax, E-mail or ERMES. In general, message transmission between mobile phones is in text format. (see page 22)Validity (Option > Validity)Validity is to decide how long SMS server is to keep message. Choose one among Maximum, 1 Hour, 6 Hours, 1 Day, 3 Days and 1 Week. (see page 33)Request Reply (Option > Request Reply)It requests the message recipient to let the sender know if they have received the message.
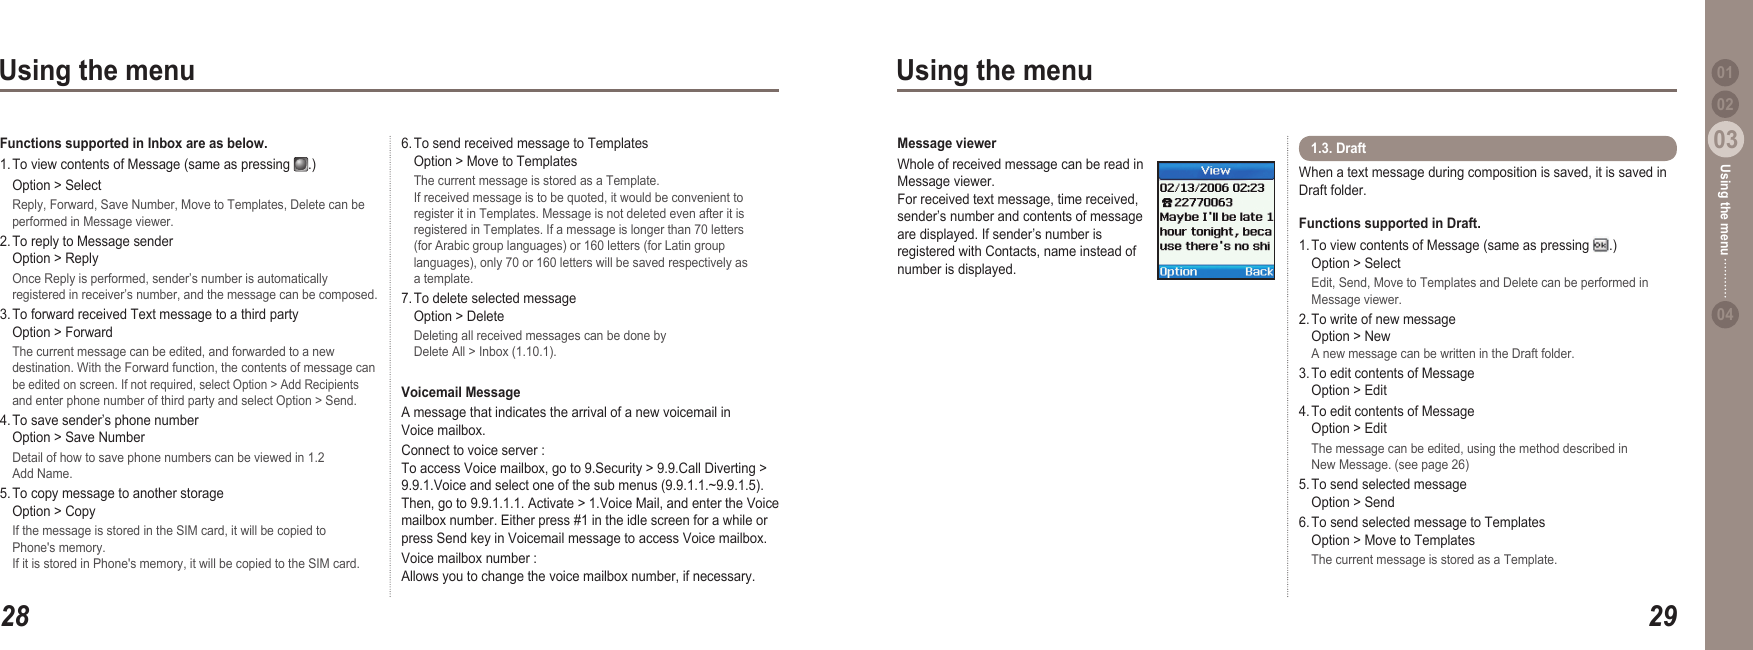
2803Using the menu2903Using the menu0204Using the menu 016. To send received message to Templates   Option > Move to Templates  The current message is stored as a Template.   If received message is to be quoted, it would be convenient to   register it in Templates. Message is not deleted even after it is   registered in Templates. If a message is longer than 70 letters   (for Arabic group languages) or 160 letters (for Latin group   languages), only 70 or 160 letters will be saved respectively as   a template. 7. To delete selected message   Option > Delete  Deleting all received messages can be done by   Delete All > Inbox (1.10.1).Voicemail MessageA message that indicates the arrival of a new voicemail in Voice mailbox. Connect to voice server :  To access Voice mailbox, go to 9.Security > 9.9.Call Diverting > 9.9.1.Voice and select one of the sub menus (9.9.1.1.~9.9.1.5). Then, go to 9.9.1.1.1. Activate > 1.Voice Mail, and enter the Voice mailbox number. Either press #1 in the idle screen for a while or press Send key in Voicemail message to access Voice mailbox.Voice mailbox number : Allows you to change the voice mailbox number, if necessary.Functions supported in Inbox are as below.  1. To view contents of Message (same as pressing  .)   Option > Select  Reply, Forward, Save Number, Move to Templates, Delete can be   performed in Message viewer.2. To reply to Message sender    Option > Reply  Once Reply is performed, sender’s number is automatically   registered in receiver’s number, and the message can be composed.3. To forward received Text message to a third party   Option > Forward  The current message can be edited, and forwarded to a new   destination. With the Forward function, the contents of message can  be edited on screen. If not required, select Option > Add Recipients   and enter phone number of third party and select Option > Send. 4. To save sender’s phone number    Option > Save Number  Detail of how to save phone numbers can be viewed in 1.2   Add Name.5. To copy message to another storage   Option > Copy  If the message is stored in the SIM card, it will be copied to   Phone's memory.   If it is stored in Phone's memory, it will be copied to the SIM card. When a text message during composition is saved, it is saved in Draft folder. Functions supported in Draft. 1. To view contents of Message (same as pressing  .)   Option > Select  Edit, Send, Move to Templates and Delete can be performed in   Message viewer.2. To write of new message    Option > New A new message can be written in the Draft folder. 3. To edit contents of Message    Option > Edit4. To edit contents of Message    Option > Edit  The message can be edited, using the method described in   New Message. (see page 26)5. To send selected message    Option > Send6. To send selected message to Templates   Option > Move to Templates  The current message is stored as a Template.1.3. Draft Message viewerWhole of received message can be read in Message viewer. For received text message, time received, sender’s number and contents of message are displayed. If sender’s number is registered with Contacts, name instead of number is displayed.
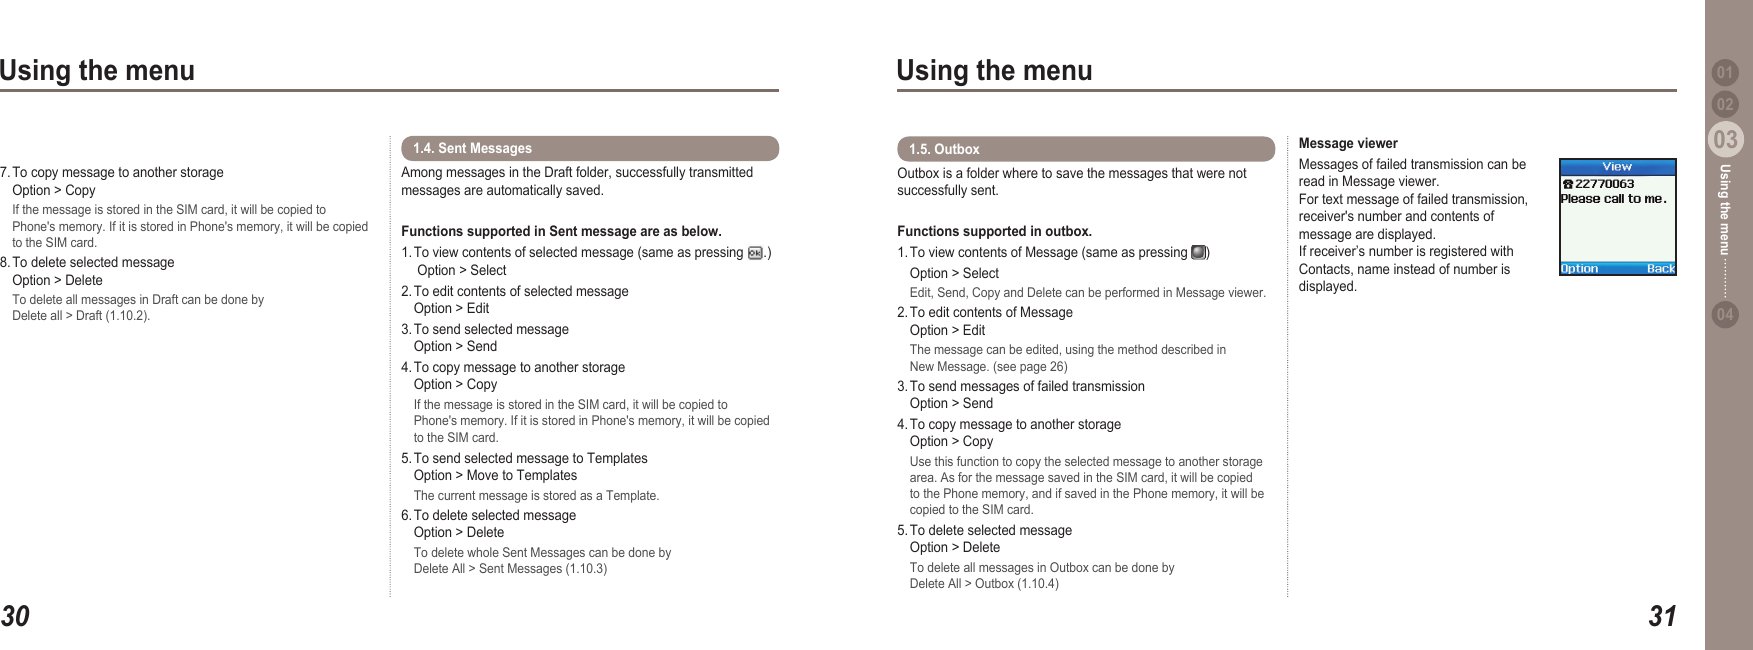
3003Using the menu3103Using the menu0204Using the menu 017. To copy message to another storage    Option > Copy  If the message is stored in the SIM card, it will be copied to   Phone's memory. If it is stored in Phone's memory, it will be copied   to the SIM card. 8. To delete selected message    Option > Delete  To delete all messages in Draft can be done by   Delete all > Draft (1.10.2).Among messages in the Draft folder, successfully transmitted messages are automatically saved. Functions supported in Sent message are as below. 1. To view contents of selected message (same as pressing  .)    Option > Select2. To edit contents of selected message   Option > Edit3. To send selected message   Option > Send4. To copy message to another storage    Option > Copy  If the message is stored in the SIM card, it will be copied to   Phone's memory. If it is stored in Phone's memory, it will be copied   to the SIM card.5. To send selected message to Templates   Option > Move to Templates  The current message is stored as a Template.6. To delete selected message    Option > Delete  To delete whole Sent Messages can be done by   Delete All > Sent Messages (1.10.3)1.4. Sent Messages Outbox is a folder where to save the messages that were not successfully sent.Functions supported in outbox.1. To view contents of Message (same as pressing  )   Option > Select  Edit, Send, Copy and Delete can be performed in Message viewer.2. To edit contents of Message   Option > Edit  The message can be edited, using the method described in   New Message. (see page 26)3. To send messages of failed transmission   Option > Send4. To copy message to another storage    Option > Copy  Use this function to copy the selected message to another storage   area. As for the message saved in the SIM card, it will be copied   to the Phone memory, and if saved in the Phone memory, it will be   copied to the SIM card.5. To delete selected message   Option > Delete  To delete all messages in Outbox can be done by   Delete All > Outbox (1.10.4)1.5. Outbox  Message viewerMessages of failed transmission can be read in Message viewer. For text message of failed transmission, receiver's number and contents of message are displayed. If receiver’s number is registered with Contacts, name instead of number is displayed.
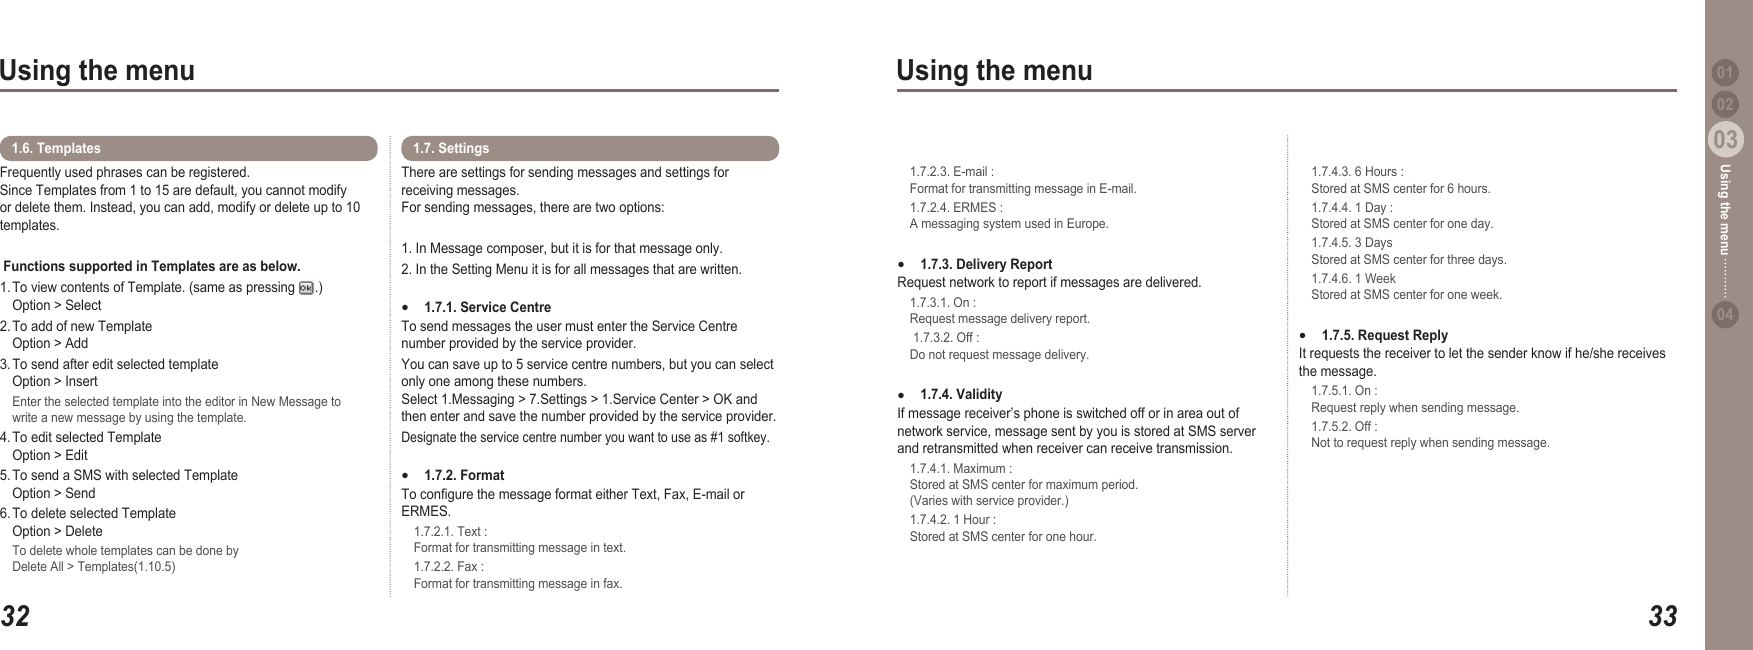
3203Using the menu3303Using the menu0204Using the menu 01Frequently used phrases can be registered. Since Templates from 1 to 15 are default, you cannot modify or delete them. Instead, you can add, modify or delete up to 10 templates.  Functions supported in Templates are as below. 1. To view contents of Template. (same as pressing  .)   Option > Select2. To add of new Template   Option > Add3. To send after edit selected template   Option > Insert  Enter the selected template into the editor in New Message to   write a new message by using the template.4. To edit selected Template   Option > Edit5. To send a SMS with selected Template   Option > Send6. To delete selected Template   Option > Delete  To delete whole templates can be done by   Delete All > Templates(1.10.5)1.6. TemplatesThere are settings for sending messages and settings for receiving messages. For sending messages, there are two options:1. In Message composer, but it is for that message only. 2. In the Setting Menu it is for all messages that are written. 1.7.1. Service Centre To send messages the user must enter the Service Centre number provided by the service provider.You can save up to 5 service centre numbers, but you can select only one among these numbers.  Select 1.Messaging > 7.Settings > 1.Service Center > OK and then enter and save the number provided by the service provider. Designate the service centre number you want to use as #1 softkey.1.7.2. Format To congure the message format either Text, Fax, E-mail or ERMES.  1.7.2.1. Text :   Format for transmitting message in text.  1.7.2.2. Fax :   Format for transmitting message in fax. ●●1.7. Settings   1.7.2.3. E-mail :    Format for transmitting message in E-mail.  1.7.2.4. ERMES :   A messaging system used in Europe.  1.7.3. Delivery Report Request network to report if messages are delivered.   1.7.3.1. On :    Request message delivery report.    1.7.3.2. Off :   Do not request message delivery. 1.7.4. Validity If message receiver’s phone is switched off or in area out of network service, message sent by you is stored at SMS server and retransmitted when receiver can receive transmission.   1.7.4.1. Maximum :    Stored at SMS center for maximum period.   (Varies with service provider.)   1.7.4.2. 1 Hour :   Stored at SMS center for one hour. ●●  1.7.4.3. 6 Hours :    Stored at SMS center for 6 hours.   1.7.4.4. 1 Day :   Stored at SMS center for one day.  1.7.4.5. 3 Days    Stored at SMS center for three days.   1.7.4.6. 1 Week    Stored at SMS center for one week.1.7.5. Request Reply It requests the receiver to let the sender know if he/she receives the message.  1.7.5.1. On :    Request reply when sending message.   1.7.5.2. Off :   Not to request reply when sending message.●
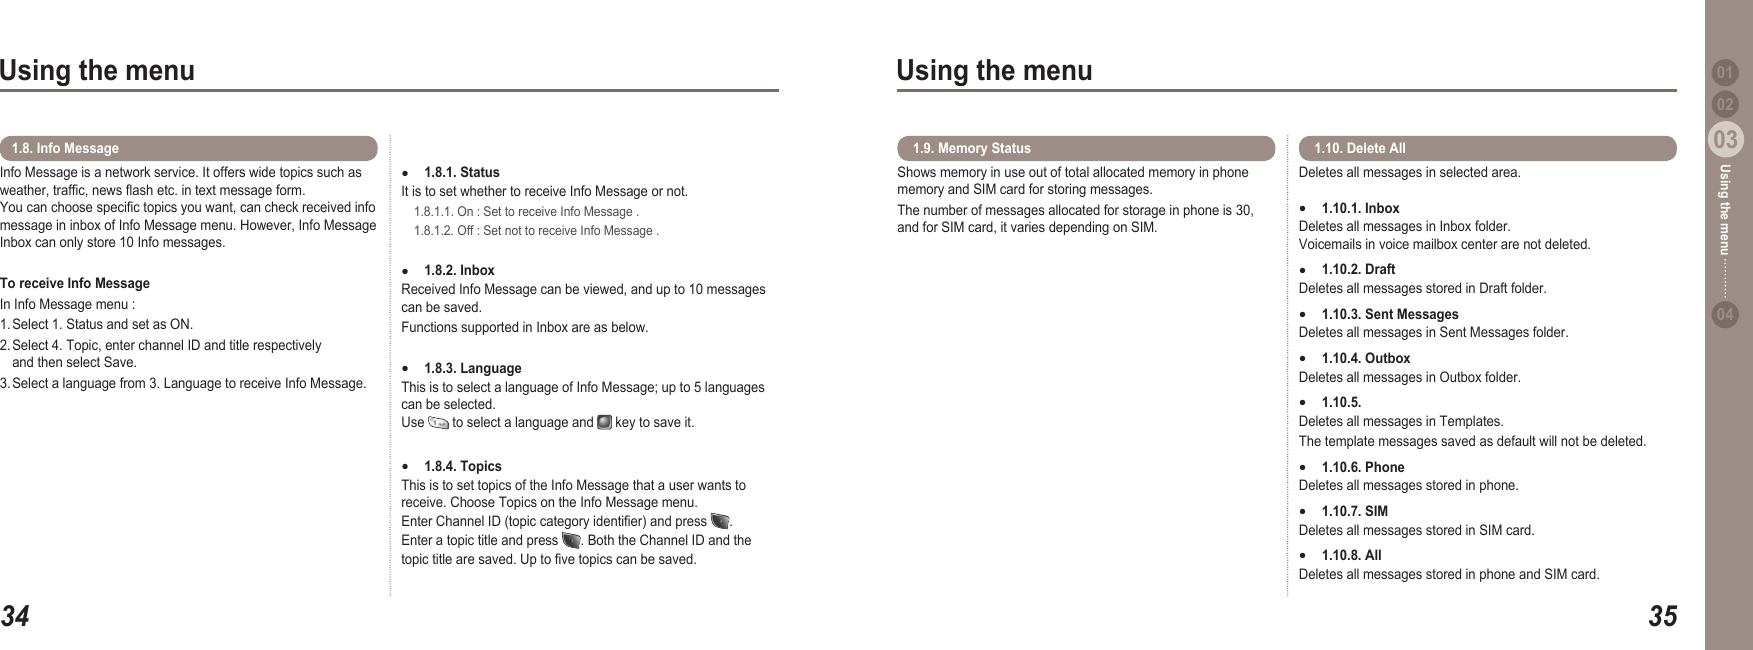
3403Using the menu3503Using the menu0204Using the menu 01Info Message is a network service. It offers wide topics such as weather, trafc, news ash etc. in text message form.  You can choose specic topics you want, can check received info message in inbox of Info Message menu. However, Info Message Inbox can only store 10 Info messages.To receive Info MessageIn Info Message menu :1. Select 1. Status and set as ON. 2. Select 4. Topic, enter channel ID and title respectively   and then select Save. 3. Select a language from 3. Language to receive Info Message.1.8. Info Message1.8.1. Status It is to set whether to receive Info Message or not.   1.8.1.1. On : Set to receive Info Message .   1.8.1.2. Off : Set not to receive Info Message . 1.8.2. Inbox  Received Info Message can be viewed, and up to 10 messages can be saved. Functions supported in Inbox are as below. 1.8.3. Language This is to select a language of Info Message; up to 5 languages can be selected. Use   to select a language and   key to save it.1.8.4. Topics This is to set topics of the Info Message that a user wants to receive. Choose Topics on the Info Message menu. Enter Channel ID (topic category identier) and press  . Enter a topic title and press  . Both the Channel ID and the topic title are saved. Up to ve topics can be saved.●●●●Shows memory in use out of total allocated memory in phone memory and SIM card for storing messages. The number of messages allocated for storage in phone is 30, and for SIM card, it varies depending on SIM.  1.9. Memory Status Deletes all messages in selected area. 1.10.1. Inbox Deletes all messages in Inbox folder. Voicemails in voice mailbox center are not deleted.1.10.2. Draft Deletes all messages stored in Draft folder. 1.10.3. Sent Messages Deletes all messages in Sent Messages folder. 1.10.4. Outbox Deletes all messages in Outbox folder. 1.10.5. Templates Deletes all messages in Templates. The template messages saved as default will not be deleted. 1.10.6. Phone Deletes all messages stored in phone. 1.10.7. SIM Deletes all messages stored in SIM card. 1.10.8. All Deletes all messages stored in phone and SIM card.●●●●●●●● 1.10. Delete All
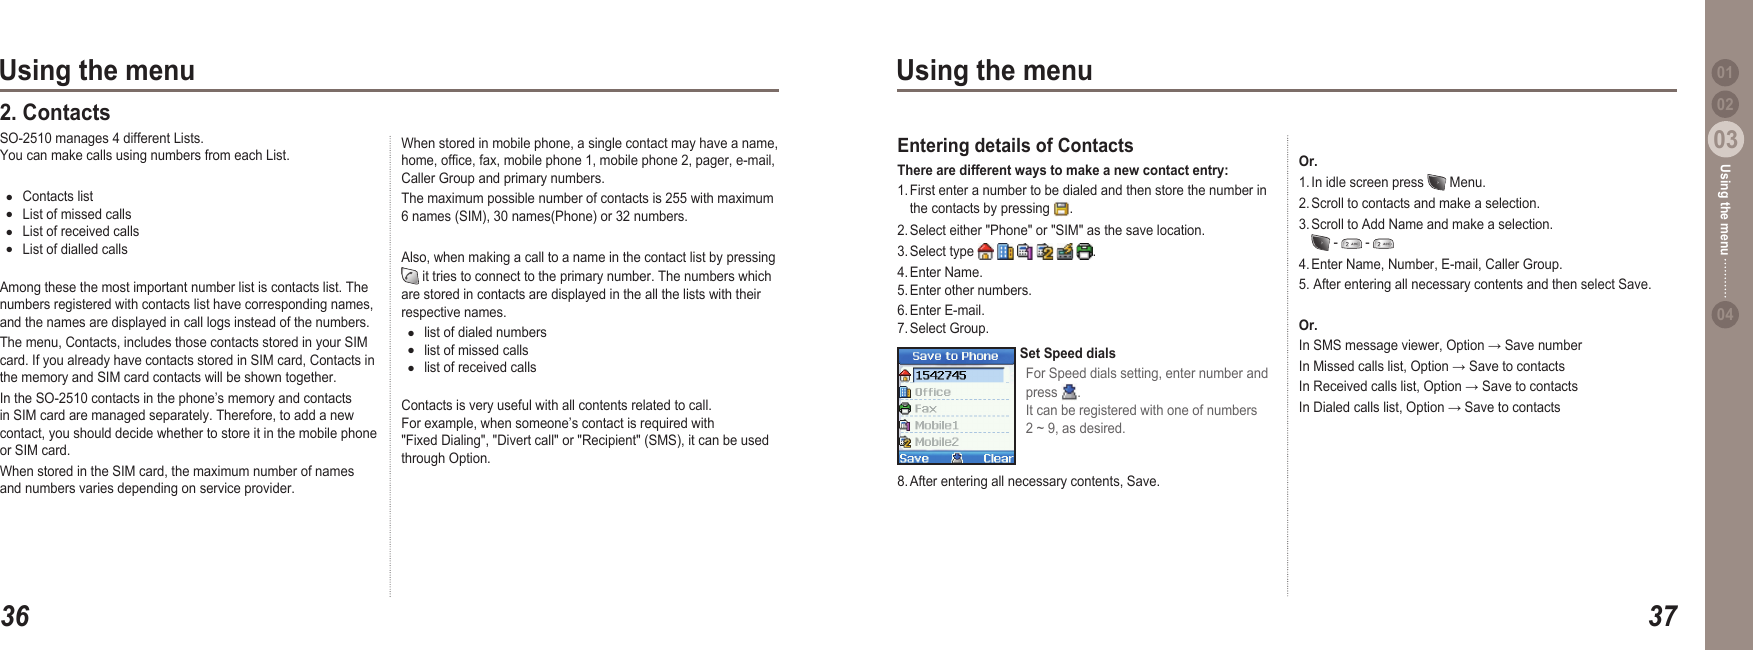
3603Using the menu3703Using the menu0204Using the menu 01When stored in mobile phone, a single contact may have a name, home, ofce, fax, mobile phone 1, mobile phone 2, pager, e-mail, Caller Group and primary numbers.The maximum possible number of contacts is 255 with maximum 6 names (SIM), 30 names(Phone) or 32 numbers.Also, when making a call to a name in the contact list by pressing   it tries to connect to the primary number. The numbers which are stored in contacts are displayed in the all the lists with their respective names.list of dialed numbers list of missed callslist of received callsContacts is very useful with all contents related to call.  For example, when someone’s contact is required with "Fixed Dialing", "Divert call" or "Recipient" (SMS), it can be used through Option.●●●2. Contacts SO-2510 manages 4 different Lists.  You can make calls using numbers from each List. Contacts listList of missed callsList of received callsList of dialled callsAmong these the most important number list is contacts list. The numbers registered with contacts list have corresponding names, and the names are displayed in call logs instead of the numbers. The menu, Contacts, includes those contacts stored in your SIM card. If you already have contacts stored in SIM card, Contacts in the memory and SIM card contacts will be shown together.  In the SO-2510 contacts in the phone’s memory and contacts in SIM card are managed separately. Therefore, to add a new contact, you should decide whether to store it in the mobile phone or SIM card. When stored in the SIM card, the maximum number of names and numbers varies depending on service provider. ●●●●Or.1. In idle screen press   Menu.2. Scroll to contacts and make a selection.3. Scroll to Add Name and make a selection.    -   -   4. Enter Name, Number, E-mail, Caller Group. 5. After entering all necessary contents and then select Save.Or.In SMS message viewer, Option → Save numberIn Missed calls list, Option → Save to contacts In Received calls list, Option → Save to contacts In Dialed calls list, Option → Save to contacts Entering details of Contacts   There are different ways to make a new contact entry: 1. First enter a number to be dialed and then store the number in   the contacts by pressing  .2. Select either "Phone" or "SIM" as the save location.3. Select type            .4. Enter Name. 5. Enter other numbers.6. Enter E-mail. 7. Select Group.Set Speed dialsFor Speed dials setting, enter number and press  . It can be registered with one of numbers 2 ~ 9, as desired.8. After entering all necessary contents, Save.
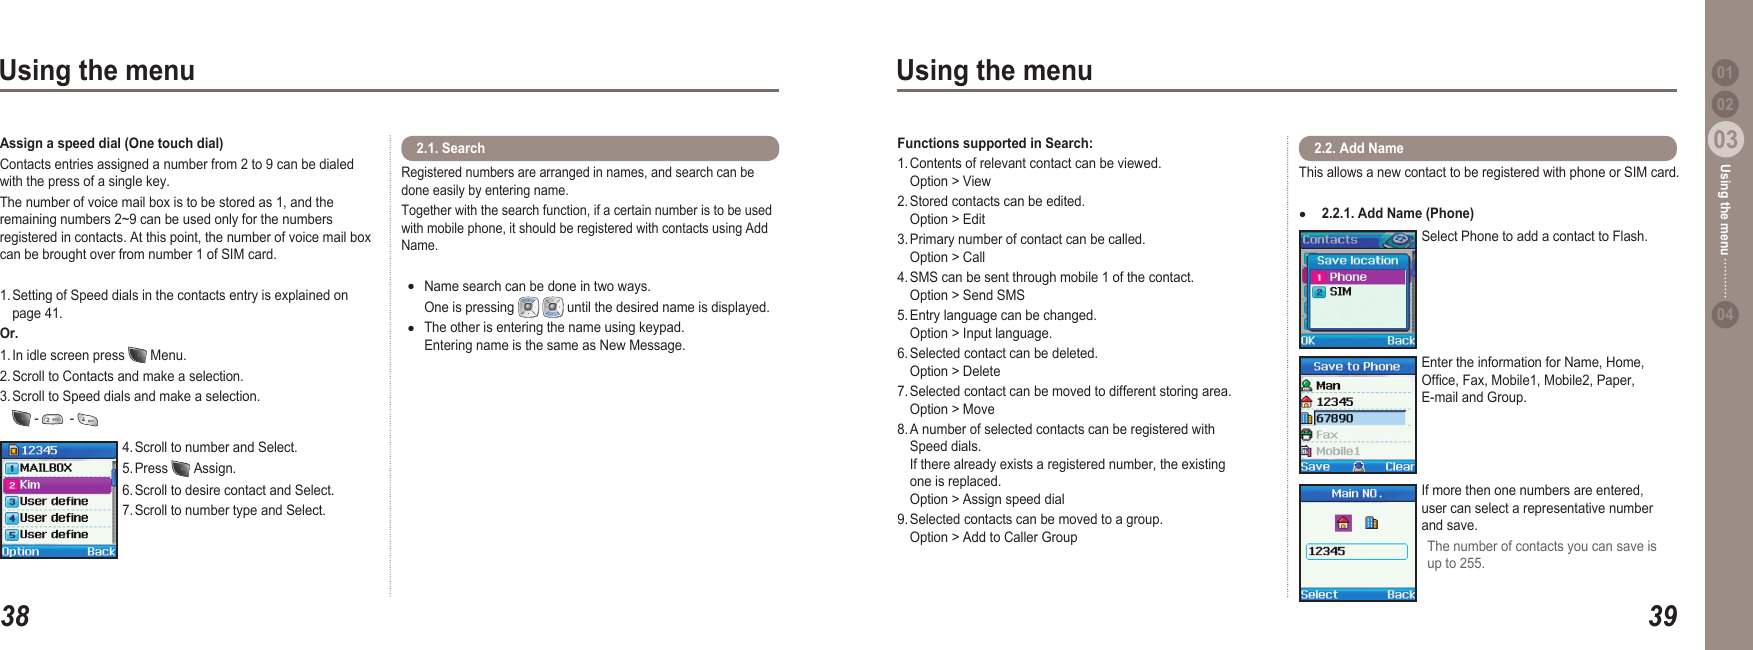
3803Using the menu3903Using the menu0204Using the menu 014. Scroll to number and Select.5. Press   Assign.6. Scroll to desire contact and Select.7. Scroll to number type and Select.Assign a speed dial (One touch dial)Contacts entries assigned a number from 2 to 9 can be dialed with the press of a single key. The number of voice mail box is to be stored as 1, and the remaining numbers 2~9 can be used only for the numbers registered in contacts. At this point, the number of voice mail box can be brought over from number 1 of SIM card.1. Setting of Speed dials in the contacts entry is explained on   page 41. Or.1. In idle screen press   Menu.2. Scroll to Contacts and make a selection. 3. Scroll to Speed dials and make a selection.   -    - Registered numbers are arranged in names, and search can be done easily by entering name. Together with the search function, if a certain number is to be used with mobile phone, it should be registered with contacts using Add Name.Name search can be done in two ways.   One is pressing    until the desired name is displayed.The other is entering the name using keypad.   Entering name is the same as New Message.●● 2.1. Search   Functions supported in Search:  1. Contents of relevant contact can be viewed.    Option > View2. Stored contacts can be edited.    Option > Edit3. Primary number of contact can be called.    Option > Call4. SMS can be sent through mobile 1 of the contact.   Option > Send SMS5. Entry language can be changed.     Option > Input language.6. Selected contact can be deleted.    Option > Delete7. Selected contact can be moved to different storing area.   Option > Move8. A number of selected contacts can be registered with   Speed dials.    If there already exists a registered number, the existing   one is replaced.   Option > Assign speed dial9. Selected contacts can be moved to a group.   Option > Add to Caller Group This allows a new contact to be registered with phone or SIM card. 2.2.1. Add Name (Phone)● 2.2. Add Name Select Phone to add a contact to Flash.Enter the information for Name, Home, Ofce, Fax, Mobile1, Mobile2, Paper, E-mail and Group.If more then one numbers are entered,  user can select a representative number and save.The number of contacts you can save is up to 255.
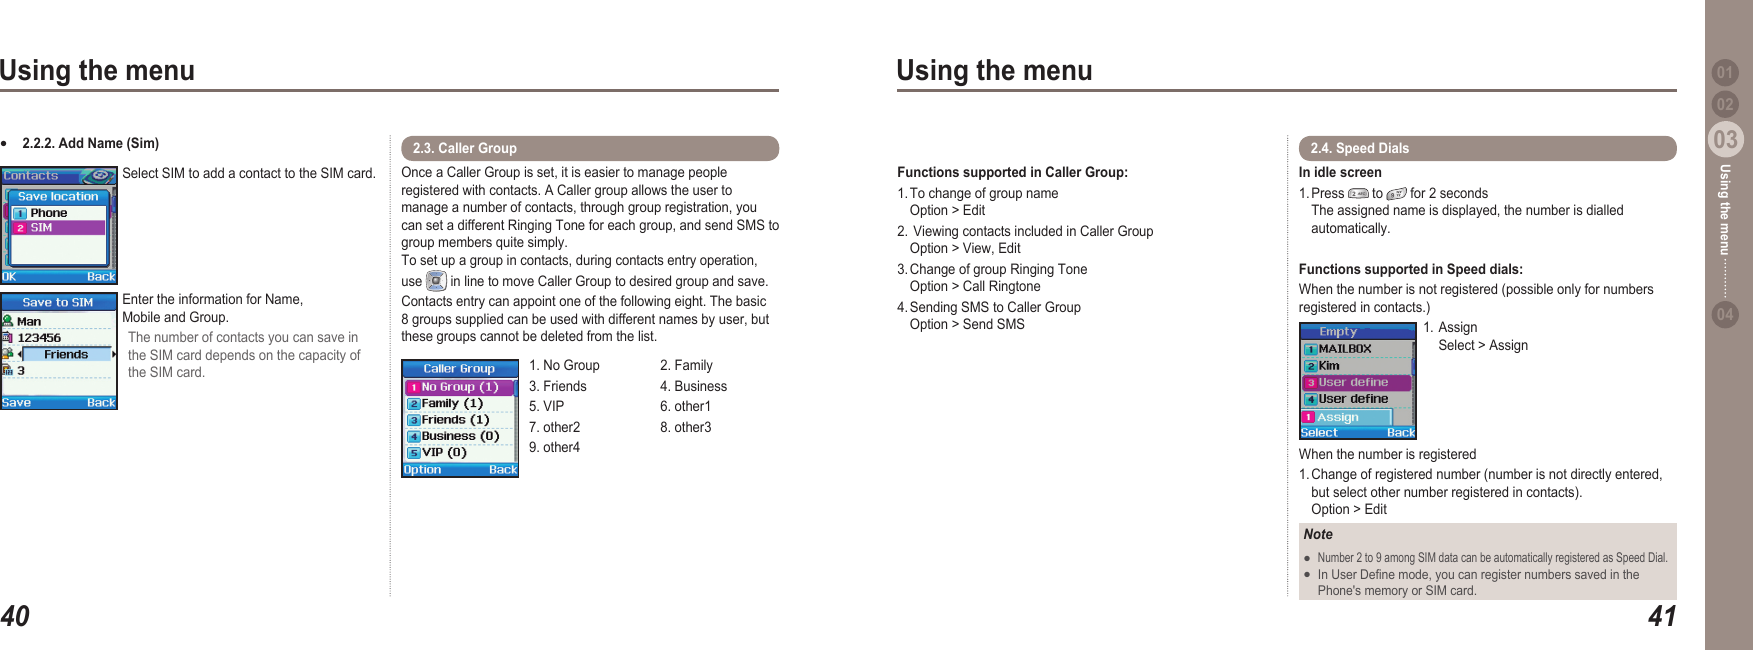
4003Using the menu4103Using the menu0204Using the menu 012.2.2. Add Name (Sim)●Select SIM to add a contact to the SIM card.Enter the information for Name,  Mobile and Group.The number of contacts you can save in the SIM card depends on the capacity of the SIM card.Functions supported in Caller Group:  1. To change of group name     Option > Edit2.  Viewing contacts included in Caller Group     Option > View, Edit 3. Change of group Ringing Tone    Option > Call Ringtone4. Sending SMS to Caller Group     Option > Send SMSOnce a Caller Group is set, it is easier to manage people registered with contacts. A Caller group allows the user to manage a number of contacts, through group registration, you can set a different Ringing Tone for each group, and send SMS to group members quite simply.  To set up a group in contacts, during contacts entry operation, use   in line to move Caller Group to desired group and save.  Contacts entry can appoint one of the following eight. The basic 8 groups supplied can be used with different names by user, but these groups cannot be deleted from the list.2.3. Caller Group 1. No Group  2. Family3. Friends  4. Business5. VIP  6. other17. other2  8. other39. other4In idle screen 1. Press   to   for 2 seconds   The assigned name is displayed, the number is dialled   automatically.Functions supported in Speed dials:  When the number is not registered (possible only for numbers registered in contacts.)1. Assign   Select > AssignWhen the number is registered1. Change of registered number (number is not directly entered,   but select other number registered in contacts).   Option > Edit2.4. Speed Dials NoteNumber 2 to 9 among SIM data can be automatically registered as Speed Dial. In User Dene mode, you can register numbers saved in the   Phone's memory or SIM card.●●
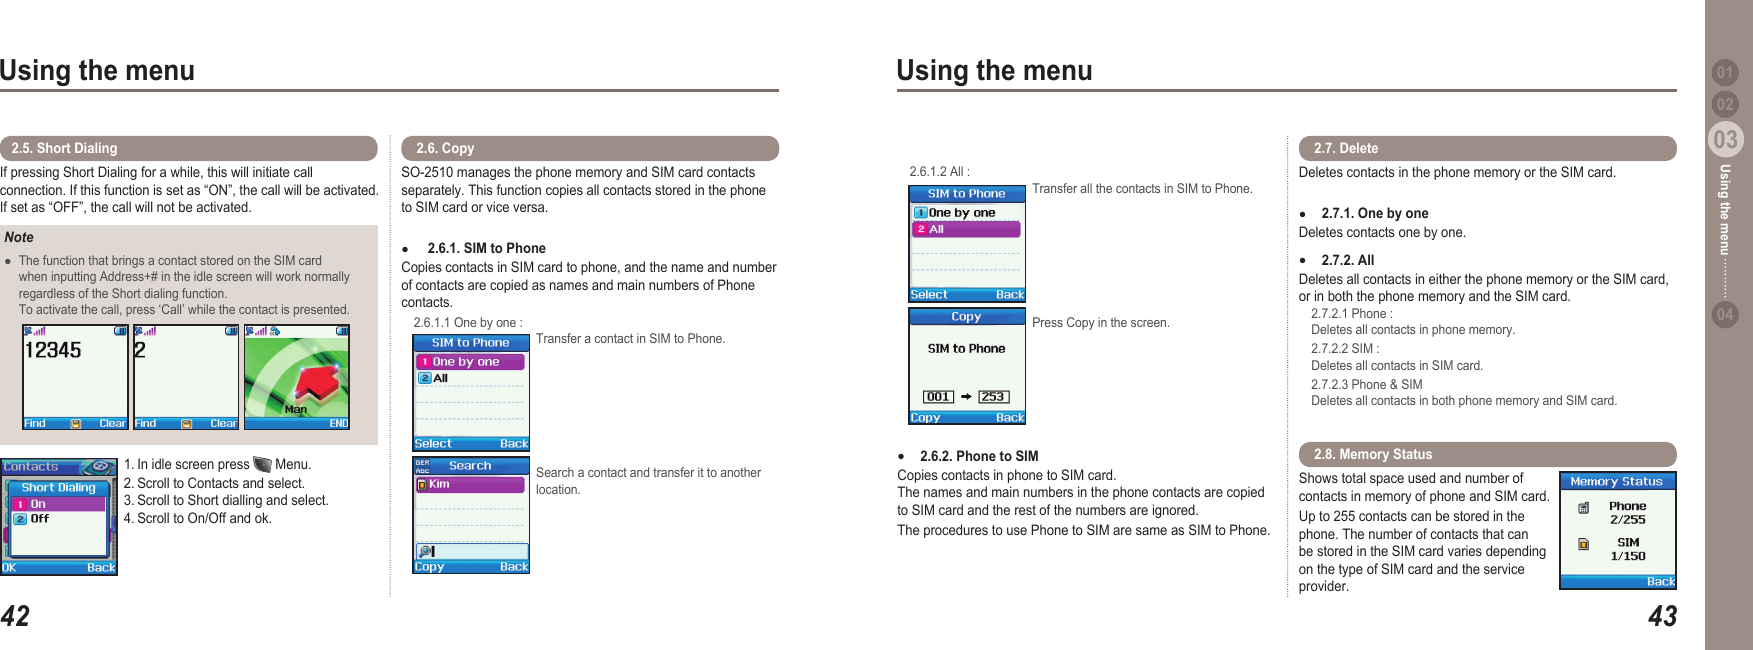
4203Using the menu4303Using the menu0204Using the menu 01NoteThe function that brings a contact stored on the SIM card   when inputting Address+# in the idle screen will work normally   regardless of the Short dialing function.    To activate the call, press ‘Call’ while the contact is presented.     ●If pressing Short Dialing for a while, this will initiate call connection. If this function is set as “ON”, the call will be activated. If set as “OFF”, the call will not be activated.2.5. Short Dialing 1. In idle screen press   Menu. 2. Scroll to Contacts and select. 3. Scroll to Short dialling and select. 4. Scroll to On/Off and ok.SO-2510 manages the phone memory and SIM card contacts separately. This function copies all contacts stored in the phone to SIM card or vice versa.  2.6.1. SIM to Phone  Copies contacts in SIM card to phone, and the name and number of contacts are copied as names and main numbers of Phone contacts.  2.6.1.1 One by one :   Transfer a contact in SIM to Phone. Search a contact and transfer it to another location.● 2.6. Copy  2.6.1.2 All :   Transfer all the contacts in SIM to Phone.  Press Copy in the screen. 2.6.2. Phone to SIM  Copies contacts in phone to SIM card. The names and main numbers in the phone contacts are copied to SIM card and the rest of the numbers are ignored. The procedures to use Phone to SIM are same as SIM to Phone.●Deletes contacts in the phone memory or the SIM card. 2.7.1. One by one Deletes contacts one by one.  2.7.2. All Deletes all contacts in either the phone memory or the SIM card, or in both the phone memory and the SIM card.     2.7.2.1 Phone :   Deletes all contacts in phone memory.   2.7.2.2 SIM :   Deletes all contacts in SIM card.   2.7.2.3 Phone & SIM   Deletes all contacts in both phone memory and SIM card. ●● 2.7. DeleteShows total space used and number of contacts in memory of phone and SIM card. Up to 255 contacts can be stored in the phone. The number of contacts that can be stored in the SIM card varies depending on the type of SIM card and the service provider.  2.8. Memory Status
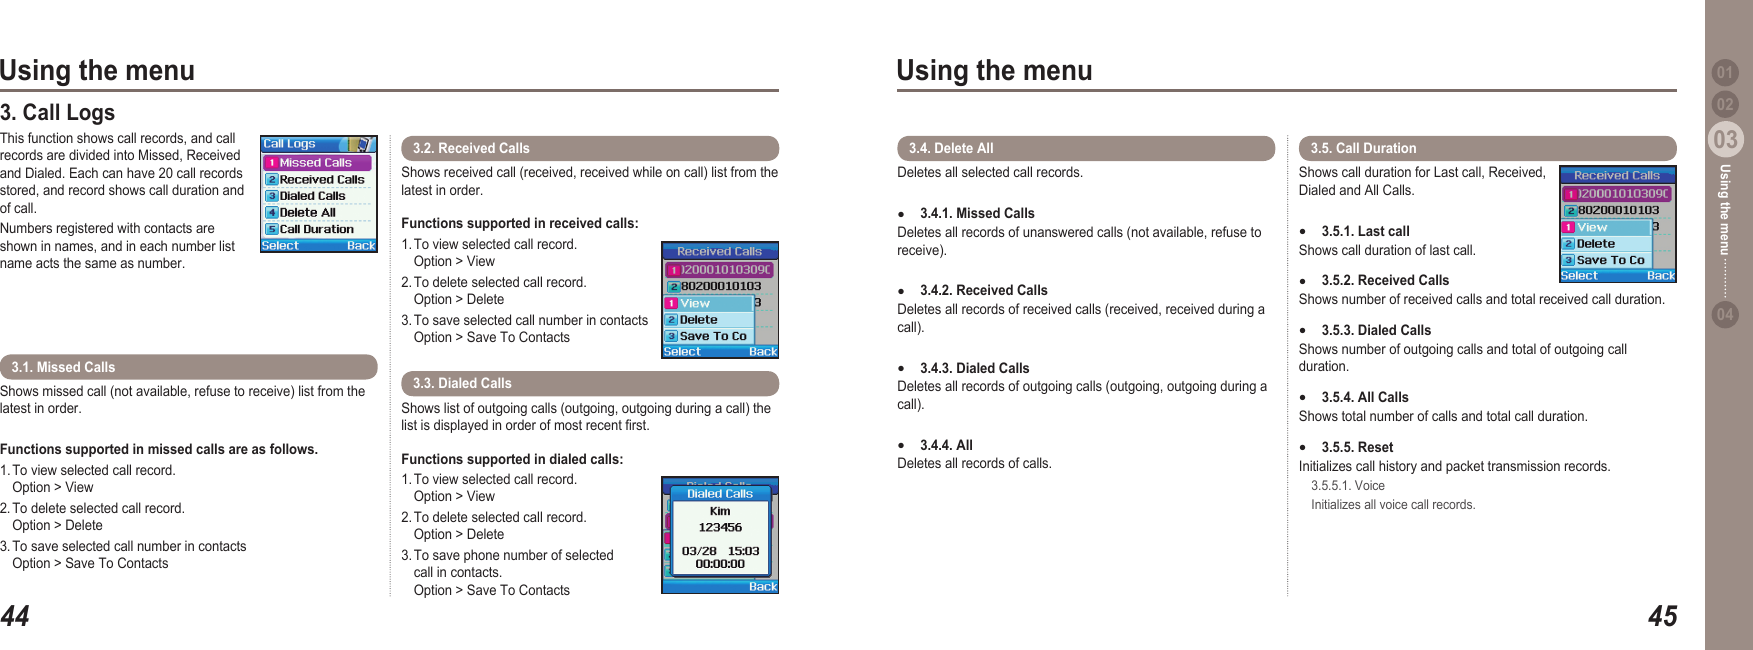
4403Using the menu4503Using the menu0204Using the menu 013. Call Logs This function shows call records, and call records are divided into Missed, Received and Dialed. Each can have 20 call records stored, and record shows call duration and of call. Numbers registered with contacts are shown in names, and in each number list name acts the same as number.Shows received call (received, received while on call) list from the latest in order. Functions supported in received calls: 1. To view selected call record.   Option > View2. To delete selected call record.   Option > Delete3. To save selected call number in contacts   Option > Save To Contacts3.2. Received CallsShows missed call (not available, refuse to receive) list from the latest in order. Functions supported in missed calls are as follows. 1. To view selected call record.   Option > View2. To delete selected call record.   Option > Delete3. To save selected call number in contacts   Option > Save To Contacts3.1. Missed Calls Shows list of outgoing calls (outgoing, outgoing during a call) the list is displayed in order of most recent rst. Functions supported in dialed calls:1. To view selected call record.    Option > View2. To delete selected call record.   Option > Delete3. To save phone number of selected   call in contacts.   Option > Save To Contacts3.3. Dialed Calls Shows call duration for Last call, Received, Dialed and All Calls. 3.5.1. Last call Shows call duration of last call. 3.5.2. Received CallsShows number of received calls and total received call duration. 3.5.3. Dialed Calls Shows number of outgoing calls and total of outgoing call duration.3.5.4. All CallsShows total number of calls and total call duration. 3.5.5. Reset Initializes call history and packet transmission records.   3.5.5.1. Voice  Initializes all voice call records. ●●●●●3.5. Call Duration  Deletes all selected call records. 3.4.1. Missed Calls Deletes all records of unanswered calls (not available, refuse to receive). 3.4.2. Received CallsDeletes all records of received calls (received, received during a call). 3.4.3. Dialed Calls Deletes all records of outgoing calls (outgoing, outgoing during a call). 3.4.4. AllDeletes all records of calls. ●●●●3.4. Delete All
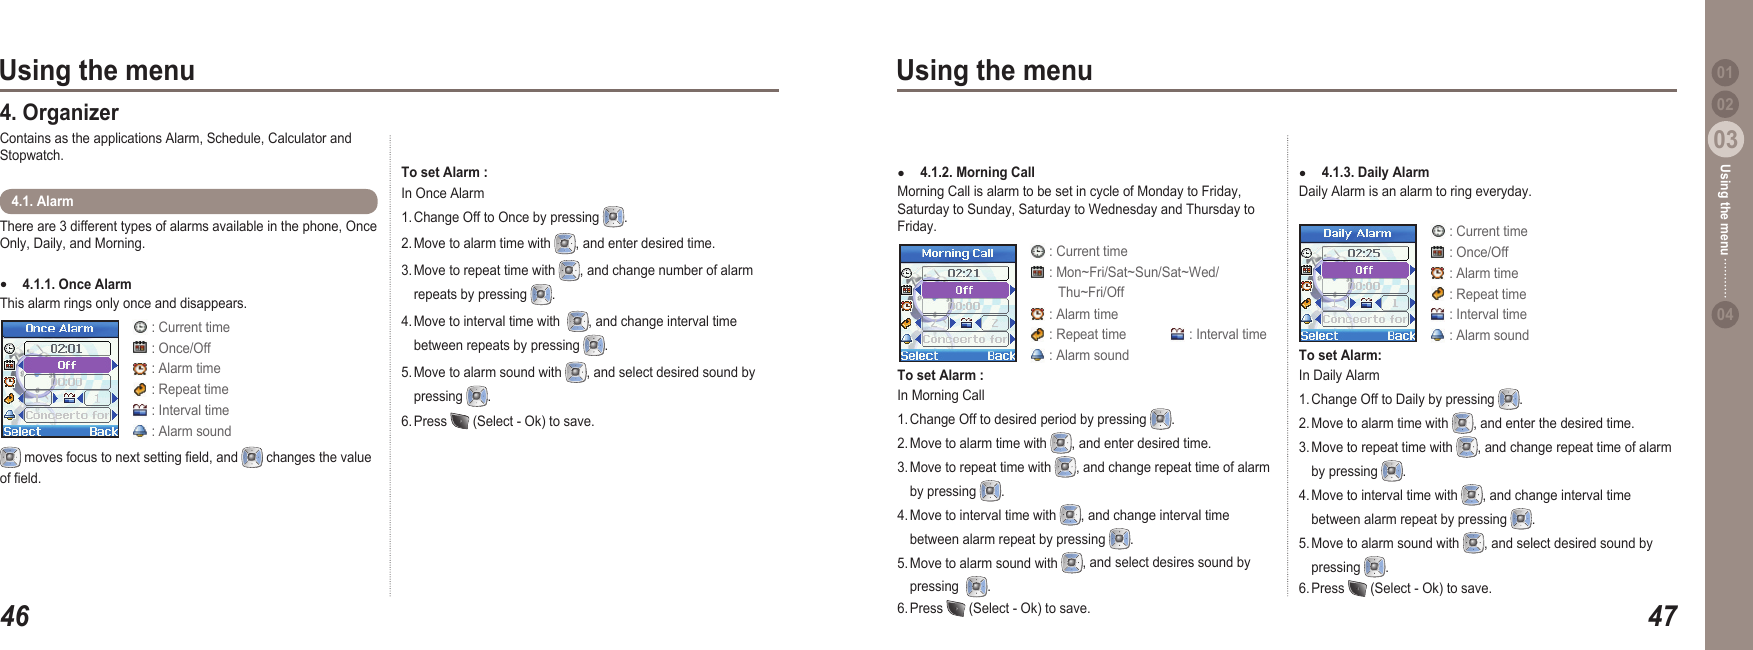
4603Using the menu4703Using the menu0204Using the menu 01There are 3 different types of alarms available in the phone, Once Only, Daily, and Morning.4.1.1. Once Alarm This alarm rings only once and disappears.●4.1. Alarm 4. Organizer Contains as the applications Alarm, Schedule, Calculator and Stopwatch.  moves focus to next setting eld, and   changes the value of eld.To set Alarm : In Once Alarm1. Change Off to Once by pressing  .2. Move to alarm time with  , and enter desired time. 3. Move to repeat time with  , and change number of alarm   repeats by pressing  .4. Move to interval time with   , and change interval time   between repeats by pressing  .5. Move to alarm sound with  , and select desired sound by   pressing  .6. Press   (Select - Ok) to save. 4.1.2. Morning Call Morning Call is alarm to be set in cycle of Monday to Friday, Saturday to Sunday, Saturday to Wednesday and Thursday to Friday. ●To set Alarm : In Morning Call 1. Change Off to desired period by pressing  . 2. Move to alarm time with  , and enter desired time.  3. Move to repeat time with  , and change repeat time of alarm   by pressing  . 4. Move to interval time with  , and change interval time   between alarm repeat by pressing  . 5. Move to alarm sound with  , and select desires sound by   pressing   . 6. Press   (Select - Ok) to save. : Current time : Once/Off : Alarm time : Repeat time : Interval time : Alarm sound : Current time : Mon~Fri/Sat~Sun/Sat~Wed/         Thu~Fri/Off : Alarm time : Repeat time   : Interval time : Alarm sound4.1.3. Daily Alarm Daily Alarm is an alarm to ring everyday. ●To set Alarm: In Daily Alarm1. Change Off to Daily by pressing  . 2. Move to alarm time with  , and enter the desired time. 3. Move to repeat time with  , and change repeat time of alarm   by pressing  .  4. Move to interval time with  , and change interval time   between alarm repeat by pressing  . 5. Move to alarm sound with  , and select desired sound by   pressing  . 6. Press   (Select - Ok) to save.  : Current time : Once/Off : Alarm time : Repeat time : Interval time : Alarm sound
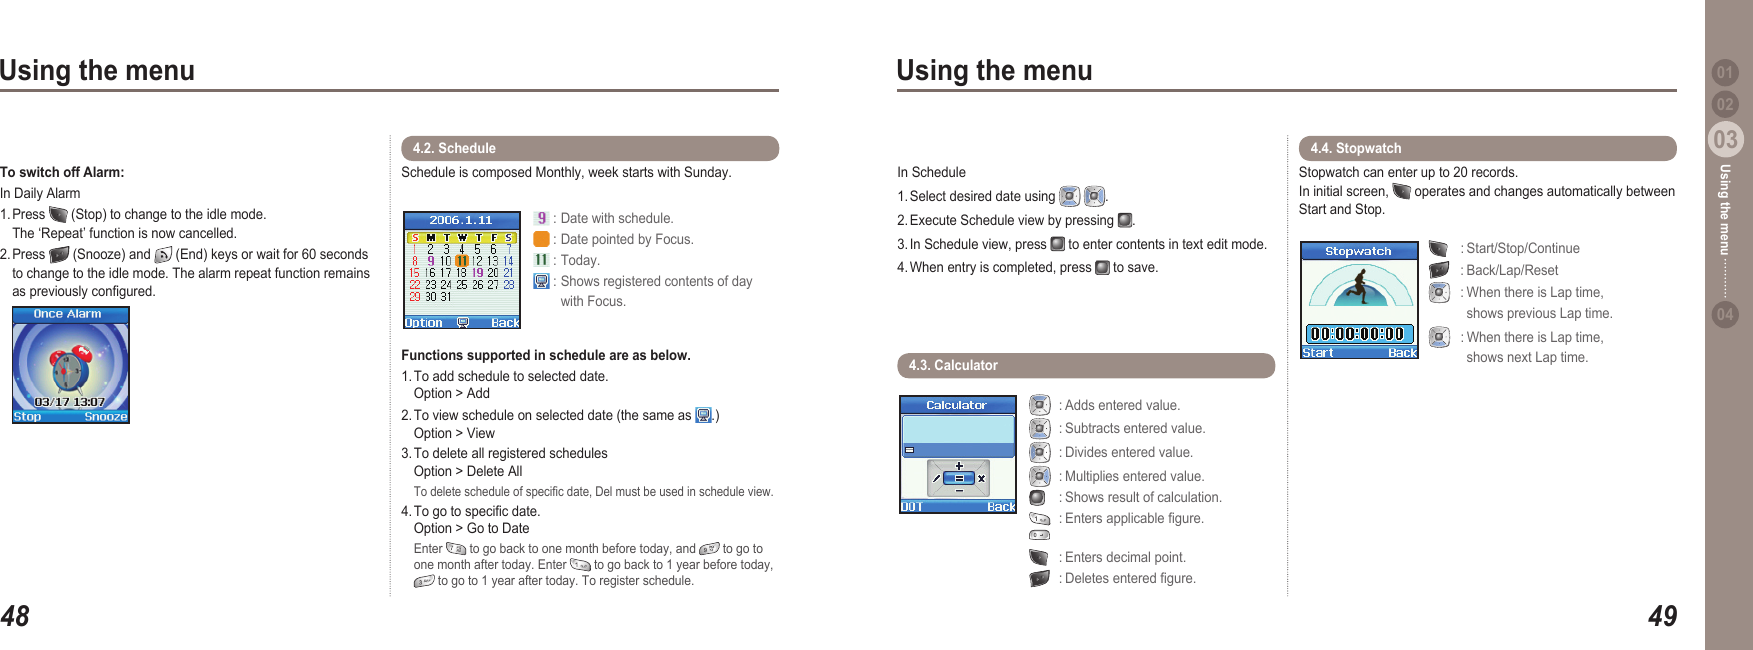
4803Using the menu4903Using the menu0204Using the menu 01To switch off Alarm: In Daily Alarm1. Press   (Stop) to change to the idle mode.   The ‘Repeat’ function is now cancelled.2. Press   (Snooze) and   (End) keys or wait for 60 seconds   to change to the idle mode. The alarm repeat function remains   as previously congured. In Schedule 1. Select desired date using    .2. Execute Schedule view by pressing  .3. In Schedule view, press   to enter contents in text edit mode. 4. When entry is completed, press   to save. Schedule is composed Monthly, week starts with Sunday. Functions supported in schedule are as below.1. To add schedule to selected date.   Option > Add2. To view schedule on selected date (the same as  .)   Option > View3. To delete all registered schedules    Option > Delete All To delete schedule of specic date, Del must be used in schedule view.4. To go to specic date.   Option > Go to Date  Enter   to go back to one month before today, and   to go to   one month after today. Enter   to go back to 1 year before today,    to go to 1 year after today. To register schedule.4.2. Schedule  : Date with schedule. : Date pointed by Focus. : Today. : Shows registered contents of day   with Focus.4.3. Calculator   : Adds entered value.  : Subtracts entered value.  : Divides entered value.  : Multiplies entered value.   : Shows result of calculation.  : Enters applicable gure.    : Enters decimal point.   : Deletes entered gure.Stopwatch can enter up to 20 records. In initial screen,   operates and changes automatically between Start and Stop.    : Start/Stop/Continue   : Back/Lap/Reset   : When there is Lap time,     shows previous Lap time.  : When there is Lap time,     shows next Lap time.4.4. Stopwatch
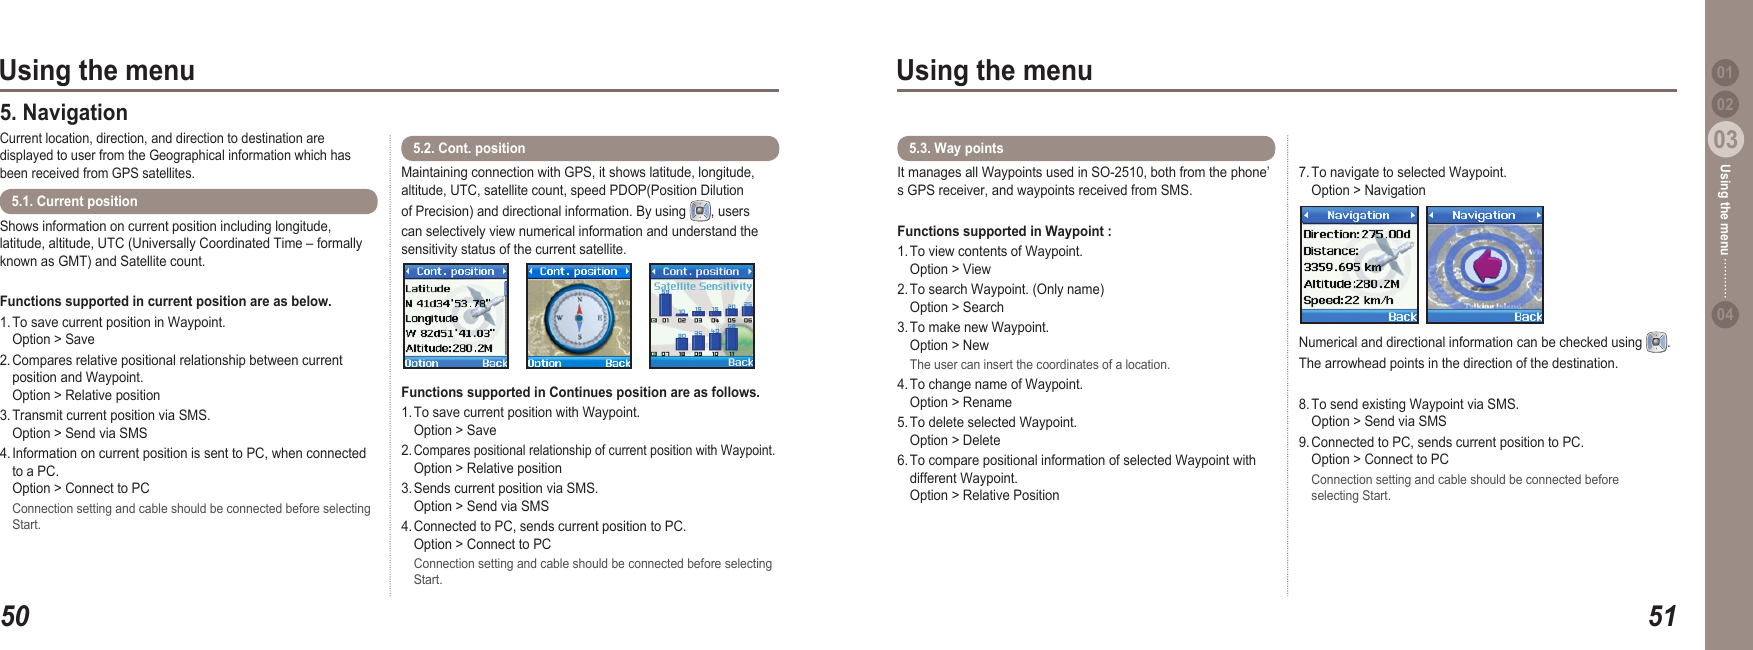
5003Using the menu5103Using the menu0204Using the menu 01Shows information on current position including longitude, latitude, altitude, UTC (Universally Coordinated Time – formally known as GMT) and Satellite count.Functions supported in current position are as below. 1. To save current position in Waypoint.   Option > Save2. Compares relative positional relationship between current   position and Waypoint.   Option > Relative position3. Transmit current position via SMS.    Option > Send via SMS4. Information on current position is sent to PC, when connected   to a PC.    Option > Connect to PC  Connection setting and cable should be connected before selecting   Start.5.1. Current position 5. Navigation Current location, direction, and direction to destination are displayed to user from the Geographical information which has been received from GPS satellites.Maintaining connection with GPS, it shows latitude, longitude, altitude, UTC, satellite count, speed PDOP(Position Dilution of Precision) and directional information. By using  , users can selectively view numerical information and understand the sensitivity status of the current satellite.Functions supported in Continues position are as follows. 1. To save current position with Waypoint.   Option > Save2. Compares positional relationship of current position with Waypoint.   Option > Relative position3. Sends current position via SMS.    Option > Send via SMS4. Connected to PC, sends current position to PC.   Option > Connect to PC  Connection setting and cable should be connected before selecting   Start.5.2. Cont. position It manages all Waypoints used in SO-2510, both from the phone’s GPS receiver, and waypoints received from SMS.Functions supported in Waypoint : 1. To view contents of Waypoint.   Option > View2. To search Waypoint. (Only name)   Option > Search3. To make new Waypoint.   Option > New  The user can insert the coordinates of a location. 4. To change name of Waypoint.   Option > Rename5. To delete selected Waypoint.   Option > Delete6. To compare positional information of selected Waypoint with   different Waypoint.   Option > Relative Position7. To navigate to selected Waypoint.   Option > Navigation5.3. Way points Numerical and directional information can be checked using  .  The arrowhead points in the direction of the destination.8. To send existing Waypoint via SMS.   Option > Send via SMS9. Connected to PC, sends current position to PC.    Option > Connect to PC  Connection setting and cable should be connected before   selecting Start.
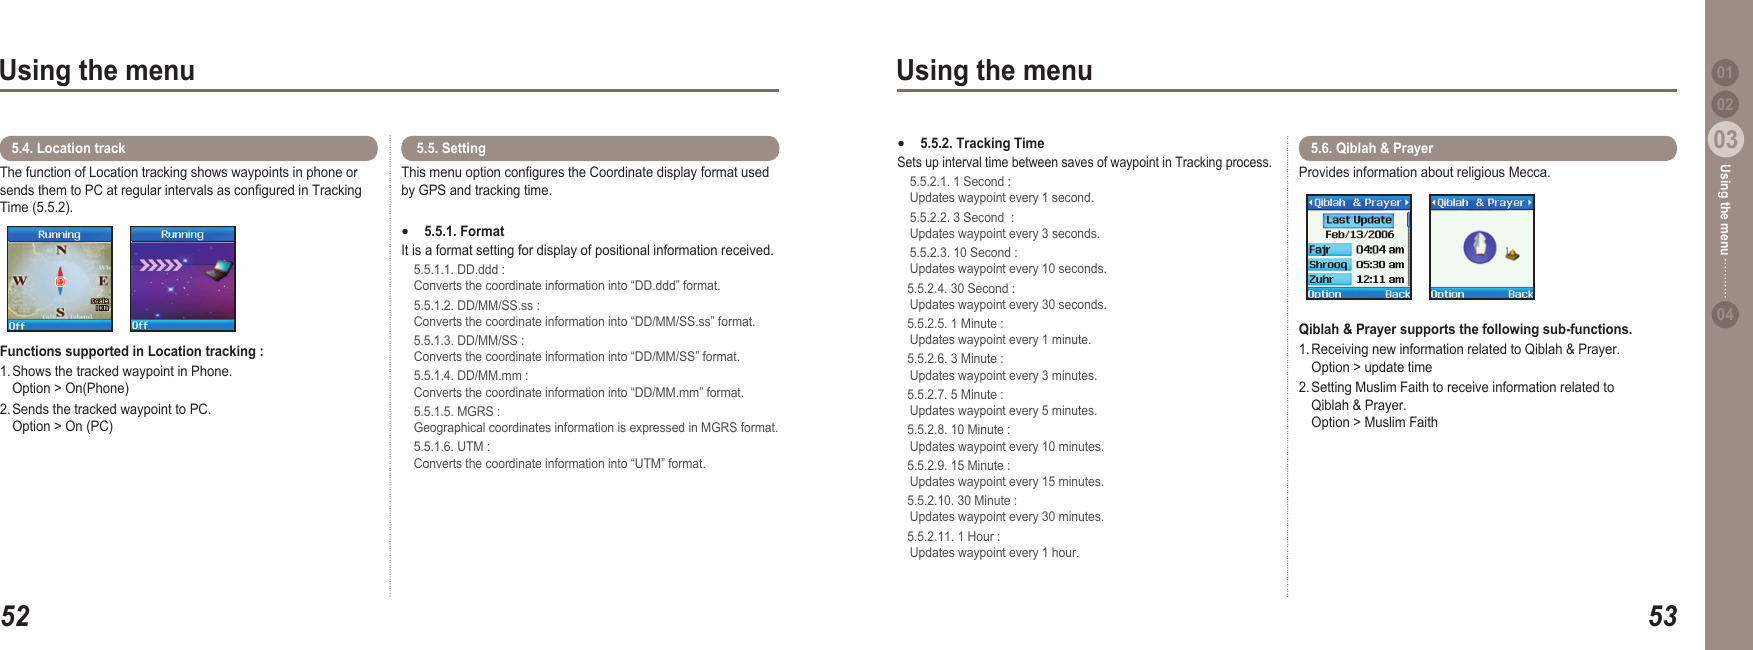
5203Using the menu5303Using the menu0204Using the menu 01The function of Location tracking shows waypoints in phone or sends them to PC at regular intervals as congured in Tracking Time (5.5.2). Functions supported in Location tracking :1. Shows the tracked waypoint in Phone.    Option > On(Phone)2. Sends the tracked waypoint to PC.    Option > On (PC)5.4. Location track This menu option congures the Coordinate display format used by GPS and tracking time.5.5.1. Format It is a format setting for display of positional information received.  5.5.1.1. DD.ddd :   Converts the coordinate information into “DD.ddd” format.   5.5.1.2. DD/MM/SS.ss :   Converts the coordinate information into “DD/MM/SS.ss” format.  5.5.1.3. DD/MM/SS :   Converts the coordinate information into “DD/MM/SS” format.   5.5.1.4. DD/MM.mm :   Converts the coordinate information into “DD/MM.mm” format.  5.5.1.5. MGRS :   Geographical coordinates information is expressed in MGRS format.   5.5.1.6. UTM :   Converts the coordinate information into “UTM” format. ● 5.5. Setting  5.5.2. Tracking Time Sets up interval time between saves of waypoint in Tracking process.   5.5.2.1. 1 Second :   Updates waypoint every 1 second.  5.5.2.2. 3 Second  :   Updates waypoint every 3 seconds.   5.5.2.3. 10 Second :   Updates waypoint every 10 seconds.    5.5.2.4. 30 Second :   Updates waypoint every 30 seconds.    5.5.2.5. 1 Minute :   Updates waypoint every 1 minute.    5.5.2.6. 3 Minute :   Updates waypoint every 3 minutes.    5.5.2.7. 5 Minute :   Updates waypoint every 5 minutes.    5.5.2.8. 10 Minute :   Updates waypoint every 10 minutes.    5.5.2.9. 15 Minute :   Updates waypoint every 15 minutes.    5.5.2.10. 30 Minute :   Updates waypoint every 30 minutes.    5.5.2.11. 1 Hour :   Updates waypoint every 1 hour. ●Provides information about religious Mecca.Qiblah & Prayer supports the following sub-functions.  1. Receiving new information related to Qiblah & Prayer.    Option > update time 2. Setting Muslim Faith to receive information related to   Qiblah & Prayer.    Option > Muslim Faith 5.6. Qiblah & Prayer
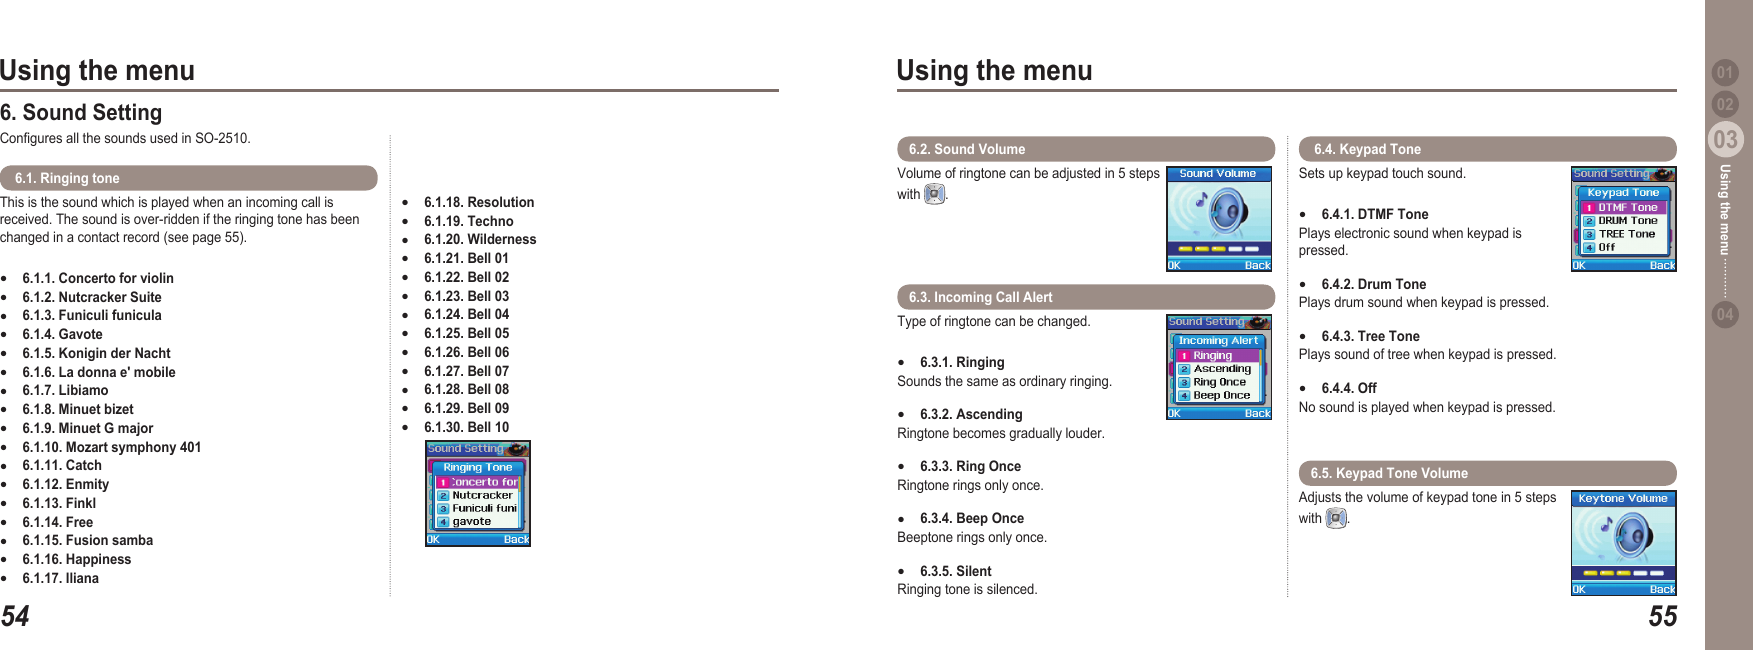
5403Using the menu5503Using the menu0204Using the menu 01This is the sound which is played when an incoming call is received. The sound is over-ridden if the ringing tone has been changed in a contact record (see page 55).6.1.1. Concerto for violin 6.1.2. Nutcracker Suite 6.1.3. Funiculi funicula 6.1.4. Gavote 6.1.5. Konigin der Nacht 6.1.6. La donna e' mobile 6.1.7. Libiamo 6.1.8. Minuet bizet 6.1.9. Minuet G major 6.1.10. Mozart symphony 401 6.1.11. Catch 6.1.12. Enmity 6.1.13. Finkl 6.1.14. Free 6.1.15. Fusion samba 6.1.16. Happiness 6.1.17. Iliana ●●●●●●●●●●●●●●●●● 6.1. Ringing tone  6. Sound Setting Congures all the sounds used in SO-2510.6.1.18. Resolution6.1.19. Techno 6.1.20. Wilderness6.1.21. Bell 01 6.1.22. Bell 02 6.1.23. Bell 03 6.1.24. Bell 04 6.1.25. Bell 05 6.1.26. Bell 06 6.1.27. Bell 07 6.1.28. Bell 08 6.1.29. Bell 09 6.1.30. Bell 10 ●●●●●●●●●●●●●Volume of ringtone can be adjusted in 5 steps with  . 6.2. Sound Volume Sets up keypad touch sound. 6.4.1. DTMF TonePlays electronic sound when keypad is pressed. 6.4.2. Drum Tone Plays drum sound when keypad is pressed. 6.4.3. Tree Tone Plays sound of tree when keypad is pressed. 6.4.4. Off No sound is played when keypad is pressed. ●●●● 6.4. Keypad Tone Type of ringtone can be changed.6.3.1. RingingSounds the same as ordinary ringing.6.3.2. Ascending Ringtone becomes gradually louder. 6.3.3. Ring Once Ringtone rings only once.6.3.4. Beep OnceBeeptone rings only once.6.3.5. SilentRinging tone is silenced.●●●●●6.3. Incoming Call AlertAdjusts the volume of keypad tone in 5 steps with  . 6.5. Keypad Tone Volume
5603Using the menu5703Using the menu0204Using the menu 017. Settings Basic settings for use of SO-2510 are arranged.With SO-2510 there are settings for System Language and Written Language. They are language used in menu expression and language used in text composition. eZitxt setting is included in Language setting.7.1. LanguageNoteSetting of language used in Info Message is separate from   setting described here.●To change Language In Language 1. Change System Language (English) to desired language by   pressing  .2. Move to Input Language with   and change to desired   language with.3. Move to eZitxt with   and change Off to On with  . 4. Press   to save. After the above process, screen change is as follows.Inputlanguage[English]Inputlanguage[German]This function changes the background of idle screen. Background consists of 1 animation picture and 4 still pictures, and different wallpaper setting is done by pressing  . 7.2. Wallpaper Sets whether you show your number to the receiver when making a call. Please note that the selections maybe over-ridden by the service provider.7.5.1. PresetShows the information regarding Calling line identication presentation.7.5.2. OnShows your number to the receiver when calling.  7.5.3. OffDoes not show your number to the receiver when calling.●●●7.5. Send Owner Number A message displayed on screen at time of booting, and entered in the same way as New Message. 7.3. Greeting MessageOwner number function is used to register the numbers to receive voice, fax, data on the SIM card. 7.4.1. Voice Sets up a number to receive voice calls.7.4.2. FaxSets up a number to receive fax.7.4.3. Data Sets up a number to receive data.●●●7.4. Owner number Uses functions during ARS calls. If this function is switched off, there could be restrictions when connected to phones internally connected with ARS.7.6.1. On Sends DTMF tone.  7.6.2. Off Does not send DTMF tone. ●●7.6. DTMF Tone
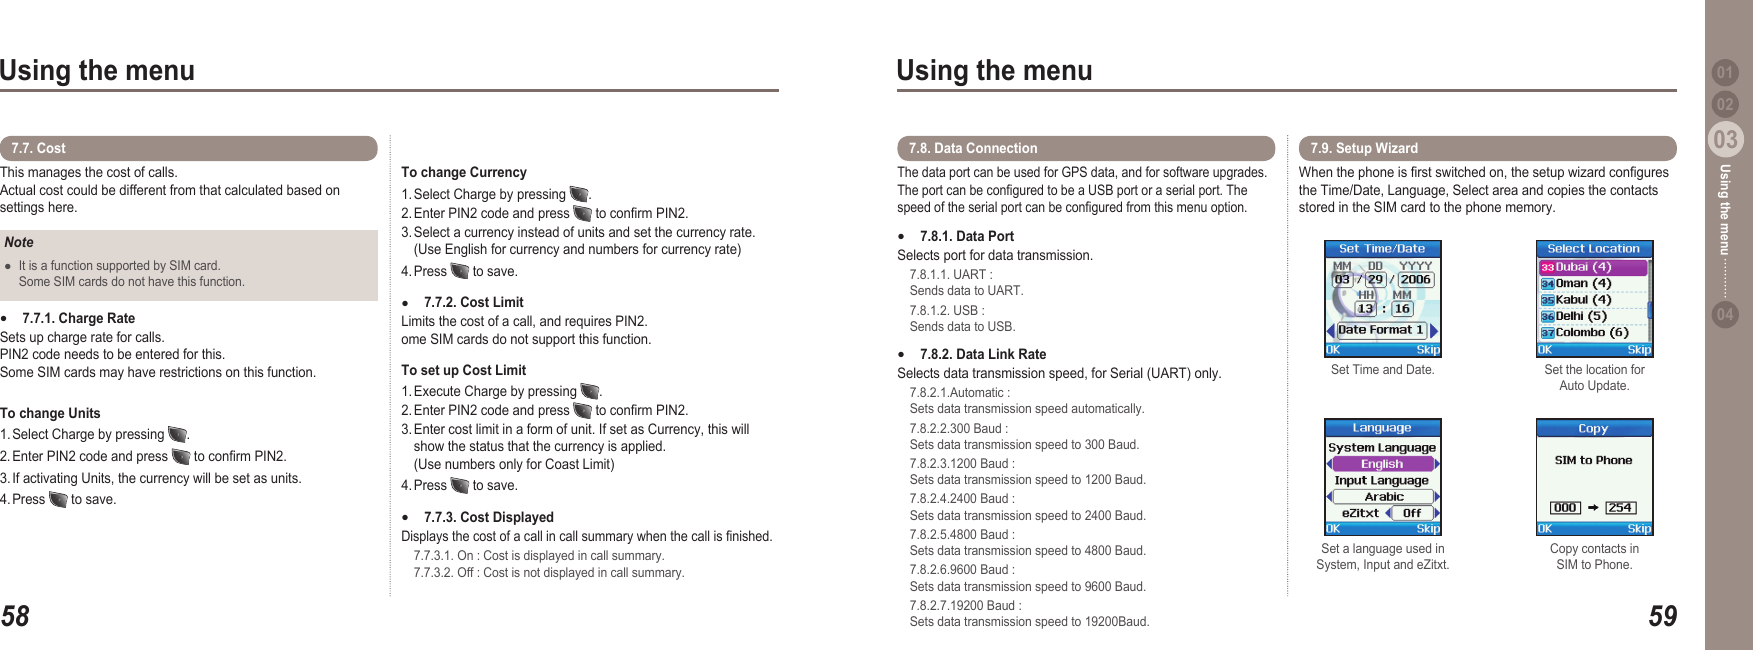
5803Using the menu5903Using the menu0204Using the menu 01This manages the cost of calls. Actual cost could be different from that calculated based on settings here.7.7. Cost To change Currency 1. Select Charge by pressing  .  2. Enter PIN2 code and press   to conrm PIN2.  3. Select a currency instead of units and set the currency rate.   (Use English for currency and numbers for currency rate)4. Press   to save.7.7.2. Cost Limit Limits the cost of a call, and requires PIN2. ome SIM cards do not support this function.To set up Cost Limit 1. Execute Charge by pressing  .  2. Enter PIN2 code and press   to conrm PIN2. 3. Enter cost limit in a form of unit. If set as Currency, this will   show the status that the currency is applied.   (Use numbers only for Coast Limit)4. Press   to save.7.7.3. Cost Displayed Displays the cost of a call in call summary when the call is nished.   7.7.3.1. On : Cost is displayed in call summary.    7.7.3.2. Off : Cost is not displayed in call summary.●●NoteIt is a function supported by SIM card.   Some SIM cards do not have this function. ●7.7.1. Charge Rate Sets up charge rate for calls.  PIN2 code needs to be entered for this. Some SIM cards may have restrictions on this function.To change Units  1. Select Charge by pressing  . 2. Enter PIN2 code and press   to conrm PIN2. 3. If activating Units, the currency will be set as units.  4. Press   to save.●The data port can be used for GPS data, and for software upgrades. The port can be congured to be a USB port or a serial port. The speed of the serial port can be congured from this menu option.7.8.1. Data Port Selects port for data transmission.  7.8.1.1. UART :   Sends data to UART.   7.8.1.2. USB :   Sends data to USB.7.8.2. Data Link Rate Selects data transmission speed, for Serial (UART) only.  7.8.2.1.Automatic :   Sets data transmission speed automatically.  7.8.2.2.300 Baud :   Sets data transmission speed to 300 Baud.  7.8.2.3.1200 Baud :   Sets data transmission speed to 1200 Baud.  7.8.2.4.2400 Baud :   Sets data transmission speed to 2400 Baud.  7.8.2.5.4800 Baud :   Sets data transmission speed to 4800 Baud.  7.8.2.6.9600 Baud :   Sets data transmission speed to 9600 Baud.  7.8.2.7.19200 Baud :    Sets data transmission speed to 19200Baud.●●7.8. Data Connection When the phone is rst switched on, the setup wizard congures the Time/Date, Language, Select area and copies the contacts stored in the SIM card to the phone memory. 7.9. Setup Wizard Set Time and Date.  Set the location for Auto Update. Set a language used in System, Input and eZitxt. Copy contacts in SIM to Phone.

Navigation menu