BERG Division of DEC ABID1 All-Bottle ID System (Liquid Dispensing Unit) User Manual Infititl2
BERG COMPANY Division of DEC International, Inc. All-Bottle ID System (Liquid Dispensing Unit) Infititl2
Contents
User Manual Part 3

SECTION
5
Configuration options include security options, data storage and display options
and country options (units of measure). These options are entered at the time of
software installation and can be modified as the need arises. This section
provides help with the following tasks:
Access Configuration Options ........................................................5-2
Register New Users.........................................................................5-4
Modify User Information ................................................................5-6
Unregister Users.............................................................................. 5-8
Enable/Disable User Passwords....................................................5-10
Security Level List ........................................................................5-12
Security Level Functions ..............................................................5-14
Enter Data Storage and Display Options ...................................... 5-16
Enter Unit of Measure and Cost Format .......................................5-18
Enable Server ID ...........................................................................5-19
Enable Reconciliation Report ....................................................... 5-20
Enable Inventory ...........................................................................5-21
Configuration Options
5-2 Infinity Installation/Service and User Manual
Access Configuration Options
Berg distributes Infinity configuration software on disks to provide protected access to these
options. Once the disks are used to enter configuration options, they should be locked away to
prevent unwanted changes to your Infinity configuration.
nTo access configuration options during software
installation:
1. Complete the Infinity installation process. The
Configuration screen appears at the end of the installation
process. If you're already viewing that screen, see the
remaining tasks in this section for help entering
configuration options. If you're not viewing that screen, see
the Software Installation section for help installing Infinity.
nTo access configuration options any time after
software installation:
1. Insert the Infinity CD in a CD drive.
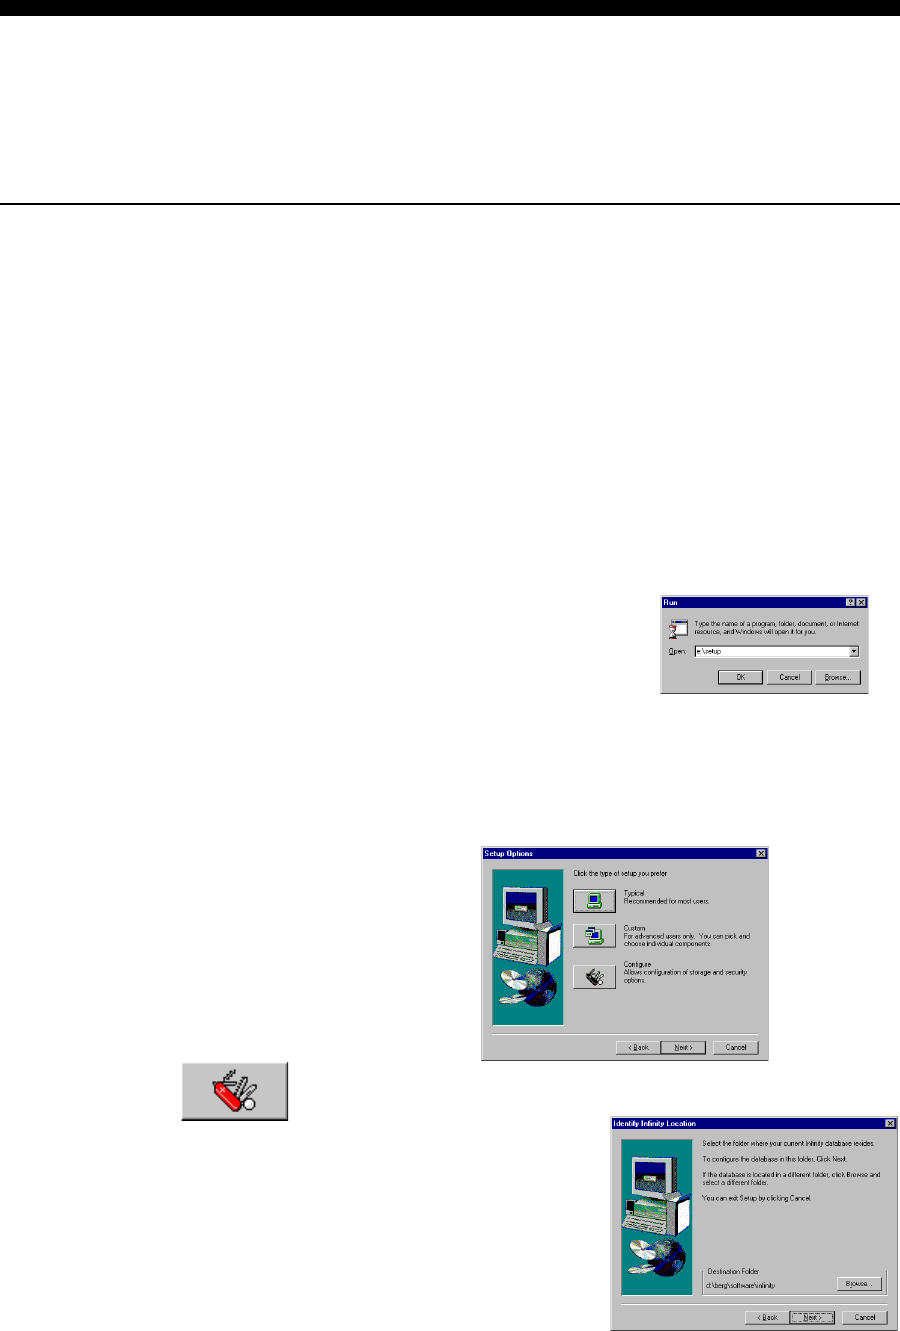
2. If the setup program doesn't
automatically start, click Start.
Click Run.Type e:\setup
(where e is the CD drive letter),
and click OK.
3. Follow the instructions on your screen. Click Next to
continue through the setup process or Back to return to a
previous screen. Click Cancel to stop the setup process.
4. Click Configure in the Setup Options screen.
5. Click Next to accept the
path of the database. To
select a different path
click Browse.
Configuration Options 5-3
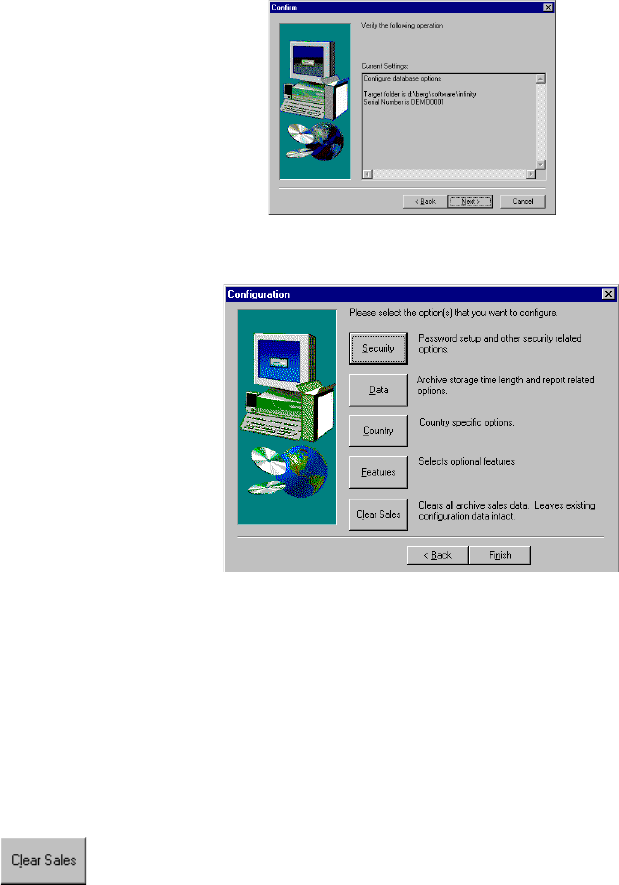
6. Click Next to verify the operation.
The Configuration screen appears. See the remaining tasks
in this section for help entering configuration options.
7. Click Finish after you've entered all your configuration
options to exit the setup process and return to Windows.
8. Remove the Infinity CD from the CD drive.
Note
qFor help with the Clear Sales procedure see Clear Sales from
the Database in the Database Management section.
5-4 Infinity Installation/Service and User Manual
Register New Users
Infinity offers protected access to the software through user registration, passwords and security
levels. Security is maintained by allowing security option changes only from the Infinity disks
with the correct serial number. (These disks should be locked away when not in use.) You can
register new users at any time with the correct disk. You can also choose to enable or disable
password protection. See Enable/Disable Passwords in this section.
nTo register new users:
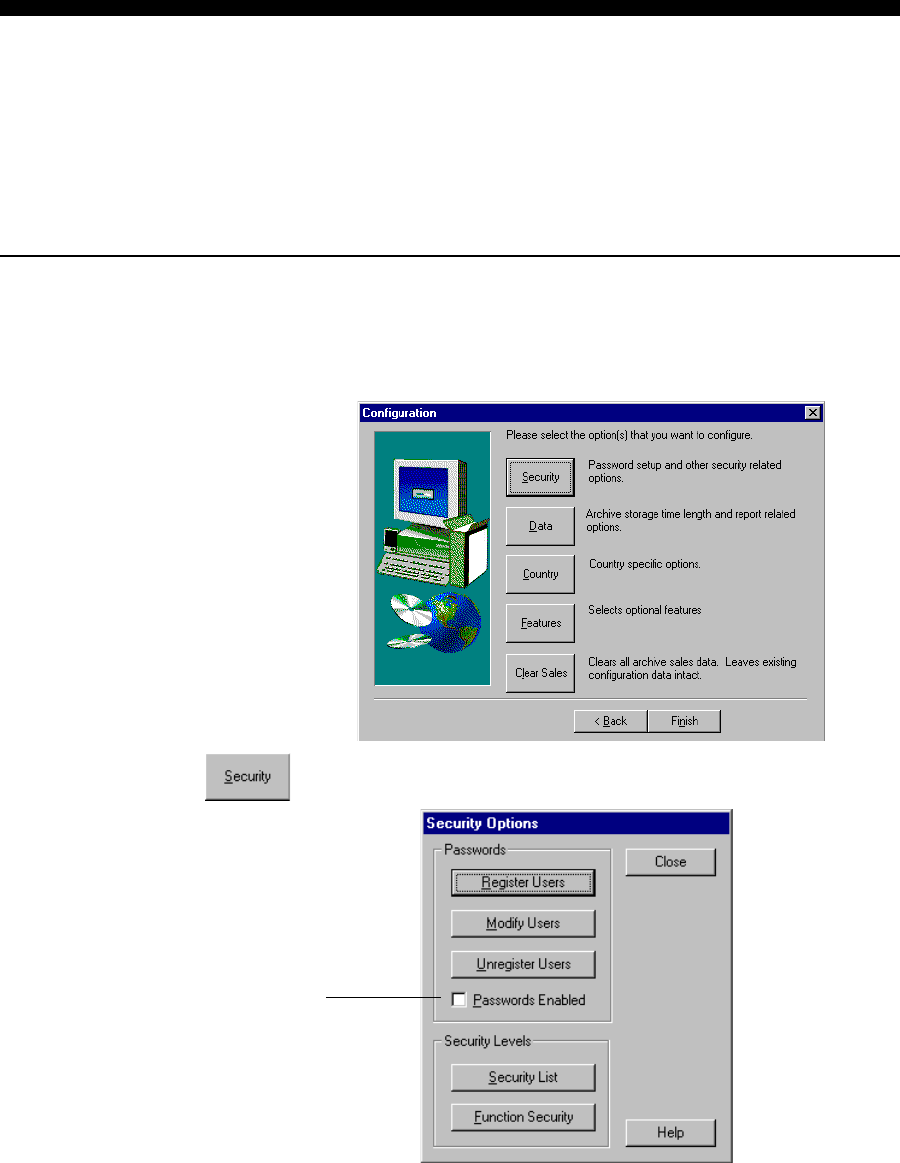
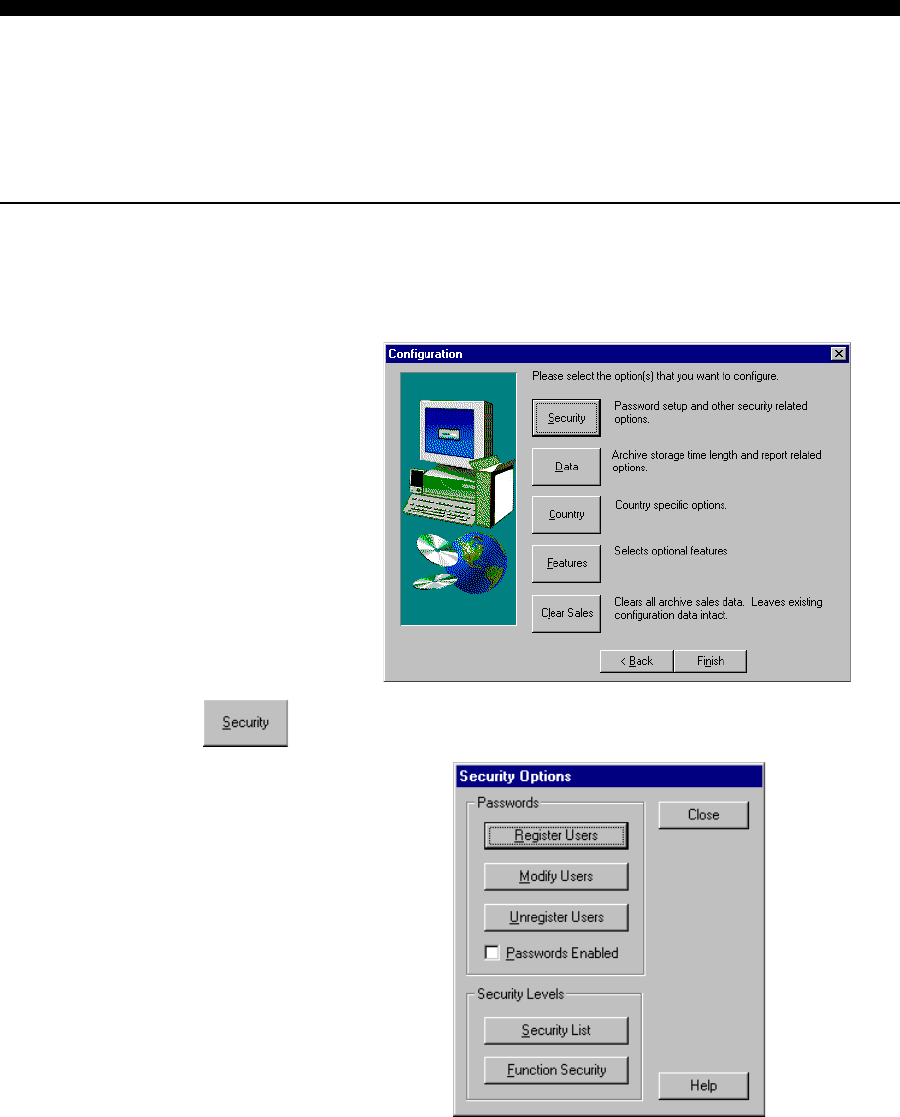
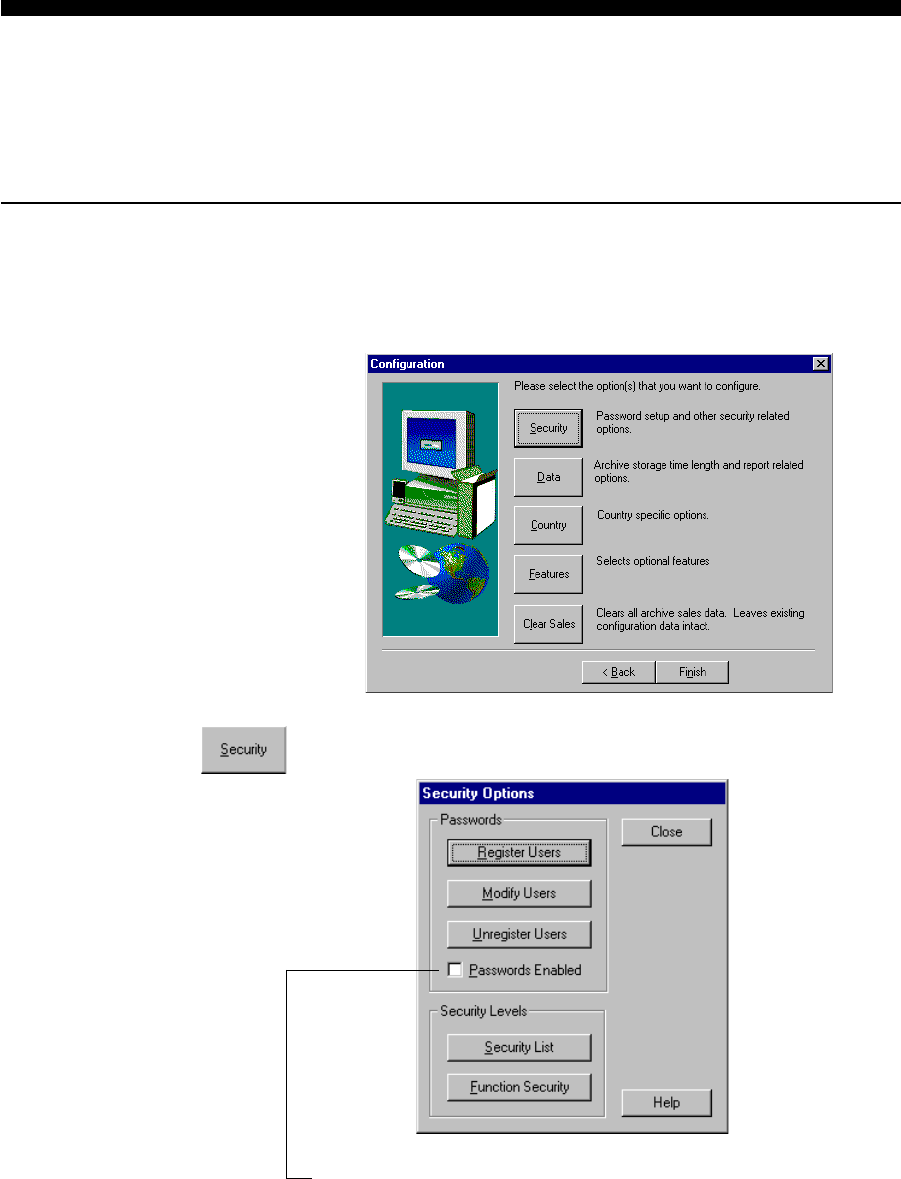
1. Access the Configuration screen. (See Access
Configuration Options in this section.)
2. Click Security.
3. Click Register Users.
If you don't check Passwords Enabled,
your registered users list does not
protect access to the software.
Configuration Options 5-5
Infinity Security Levels
lYou can customize the
number and names of your
security levels (or use the
Berg defaults). See Security
Level List in this section.
lYou can customize the Infinity
functions accessible on each
security level (or use the Berg
defaults). See Security Level
Functions in this section.
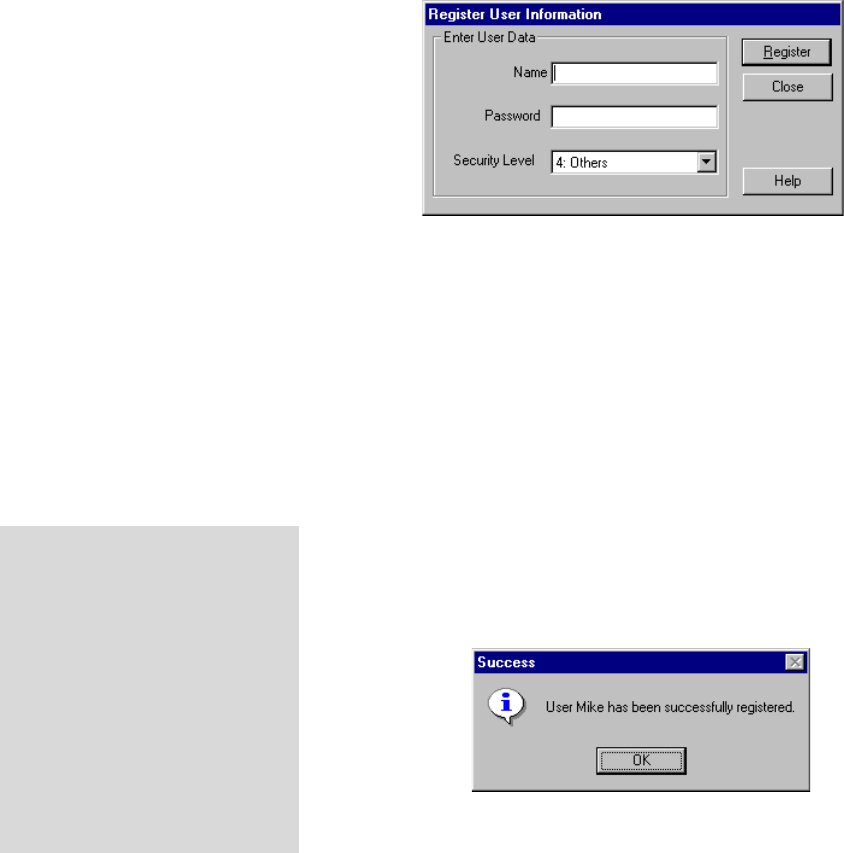
4. Type a user name in the Name field up to 16 characters long.
The user name is case sensitive; that is, upper and lower case
letters must be entered exactly as the user will enter them. If
you make a mistake, backspace or delete to change it.
5. Type a password in the Password field up to 14 characters
long. The password is also case sensitive. You won't be able
to read the password on the screen. If you make a mistake,
backspace or delete to change it.
6. Select a Security Level for the user (see sidebar).
7. Click Register to save the name, password and security level
for this user.
8. Click OK to confirm the registration.
9. Repeat steps 4-8 for each new user you want to register.
10. Click Close to exit the screen and return to the Security
Options screen.
Note
qThe Dealer should be included in the registered users list to
have access to the system.
5-6 Infinity Installation/Service and User Manual
Modify User Information
If you need to change a registered user's password or security level, use this procedure. If you
want to change a registered user's name, first unregister the user and then register the user again
with the correct name.
nTo modify user information:
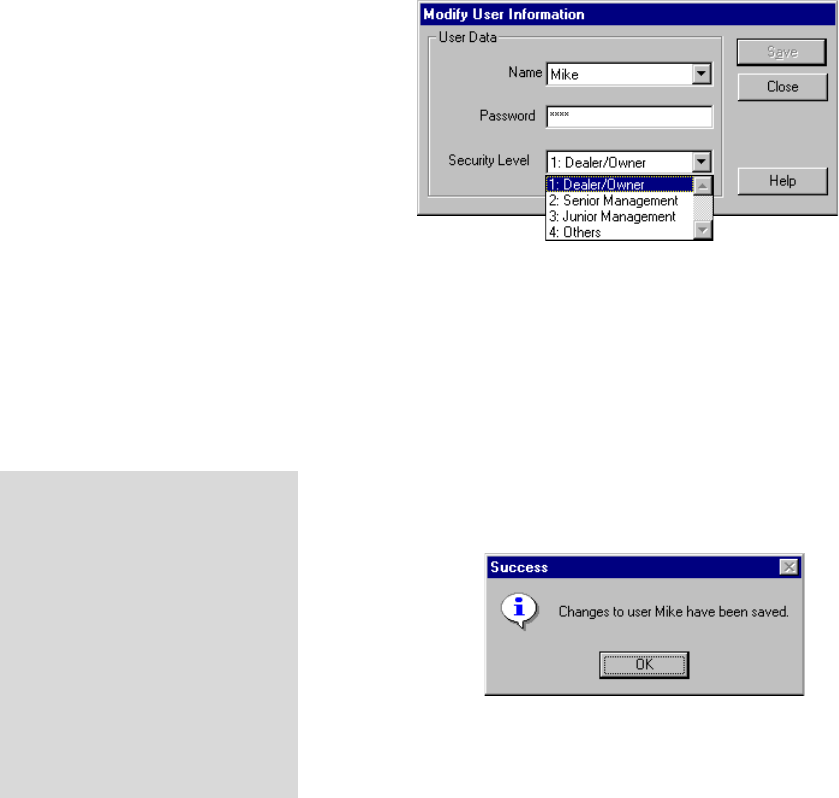
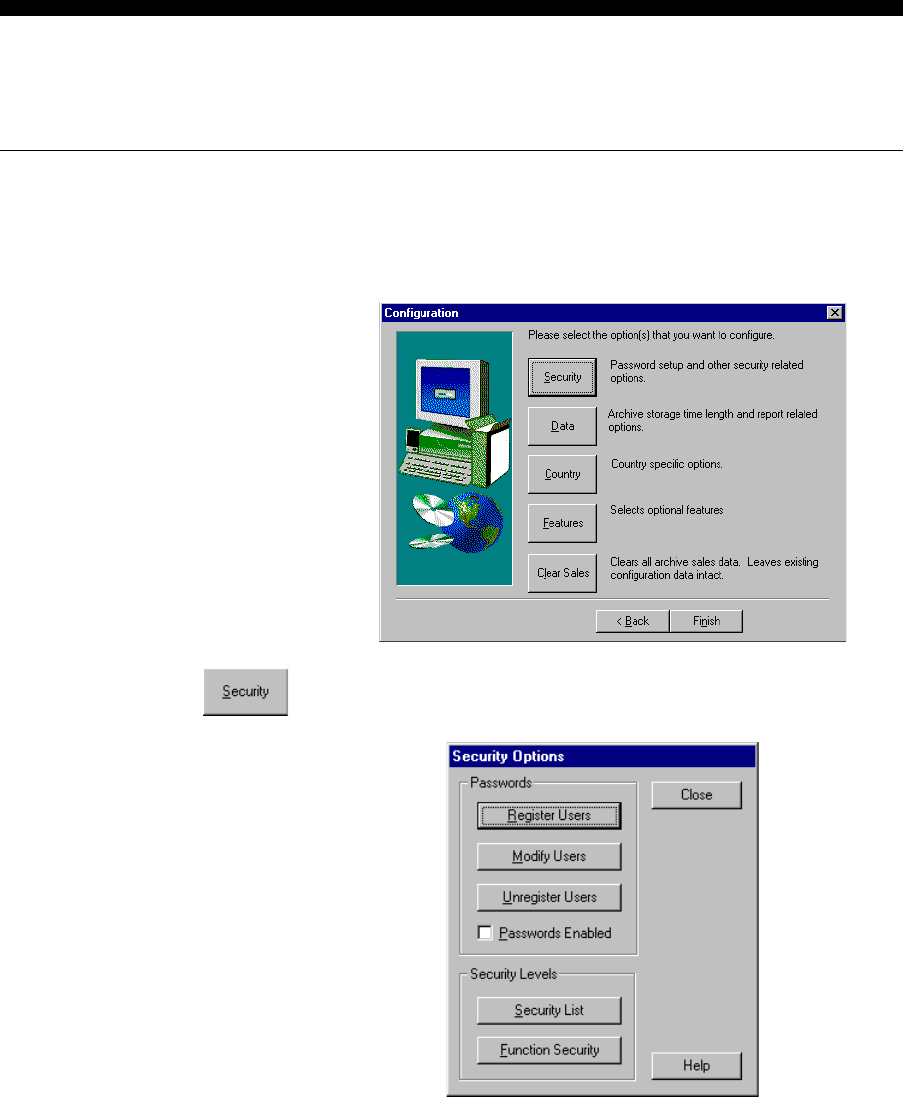
1. Access the Configuration screen. (See Access
Configuration Options in this section.)
2. Click Security.
3. Click Modify Users.
Configuration Options 5-7
4. Select the user name you want to modify from the drop
down list in the Name field.
5. Type in a new password in the Password field if you want
to change it.
6. Select a new Security Level for the user if you want to
change the level.
7. Click Save.
8. Click OK to confirm the save.
9. Click Close to exit the screen and return to the Security
Options screen.
Infinity Security Levels
lYou can customize the
number and names of your
security levels (or use the
Berg defaults). See Security
Level List in this section.
lYou can customize the Infinity
functions accessible on each
security level (or use the Berg
defaults). See Security Level
Functions in this section.
5-8 Infinity Installation/Service and User Manual
Unregister Users
You can remove registered users from the list and prevent their access to Infinity software.
nTo unregister users:
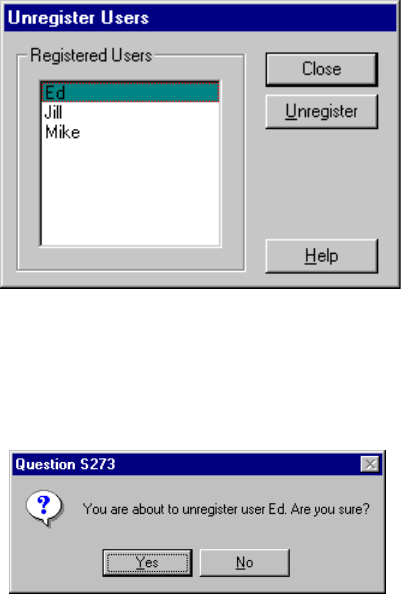
1. Access the Configuration screen. (See Access Configuration
Options in this section.)
2. Click Security.
3. Click Unregister Users.
Configuration Options 5-9
4. Select the user name you want to delete from the
Registered Users list.
5. Click Unregister to delete the user from the list.
6. Click Yes to confirm the deletion.
7. Click Close to exit the screen and return to the Security
Options screen.
5-10 Infinity Installation/Service and User Manual
Enable/Disable User Passwords
You can turn password protection on or off to control access to Infinity software and data.
Disabling passwords does not delete any registered users. It simply disables protected entry to the
system and lets anyone use the software.
nTo enable or disable user passwords:
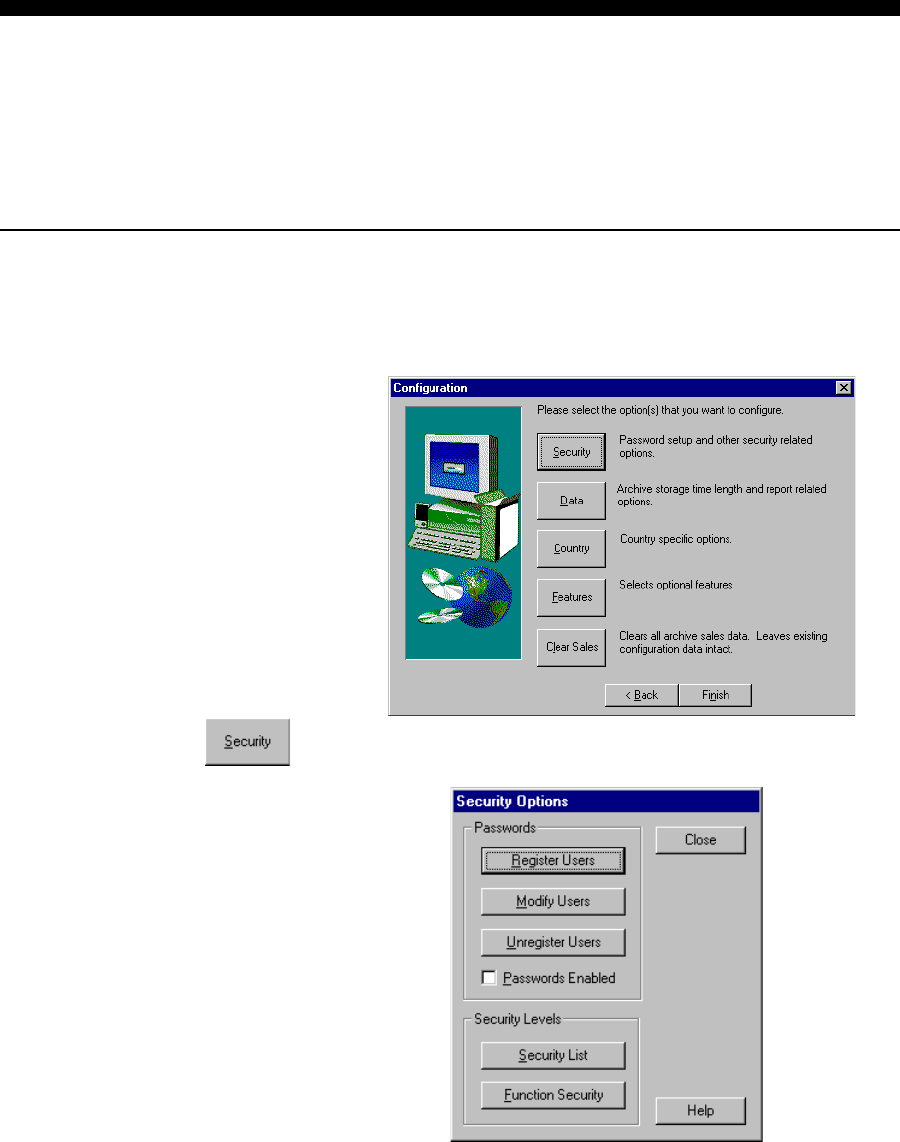
1. Access the Configuration screen. (See Access
Configuration Options in this section.)
2. Click Security.
3. Check Passwords Enabled if you want password protection
for the software. Uncheck it to disable password protection.
Configuration Options 5-11
4. Click Close to exit the screen and return to the Security
Options screen.
Note
qIf passwords are enabled you must register at least one user.
5-12 Infinity Installation/Service and User Manual
Security Level List
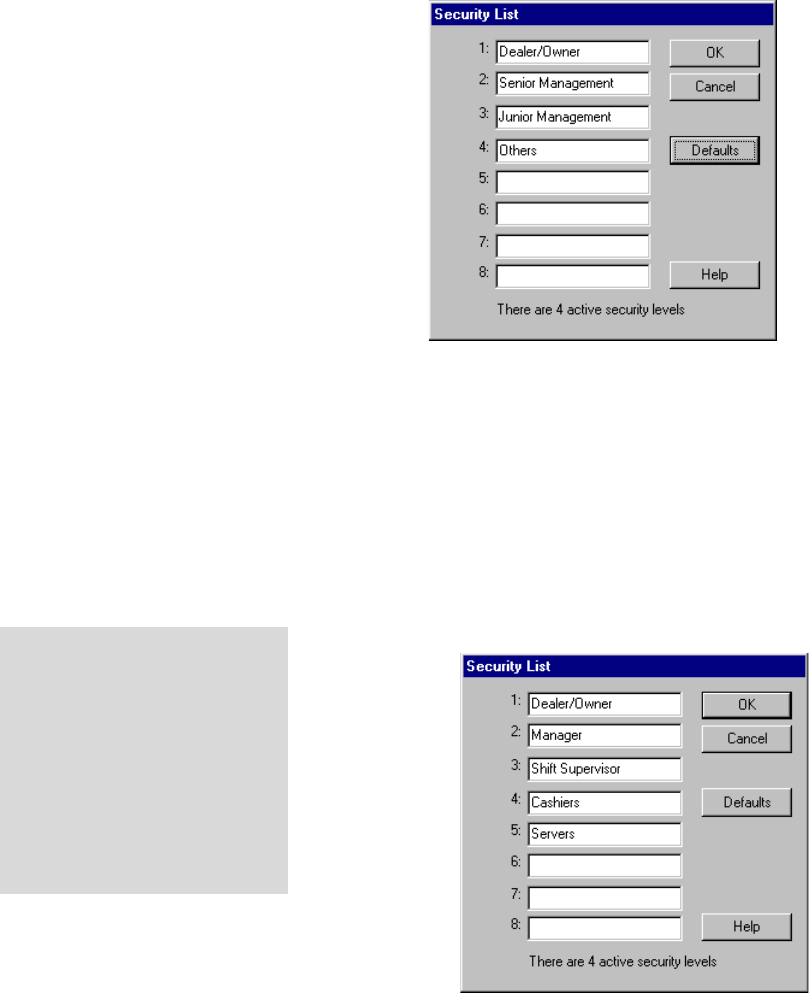
You can customize the number of security levels and the names of your security levels using the
Security List function. You can define between four and eight different security levels with
unique names for each level. To customize which Infinity functions are accessible at each
security level see Security Level Functions in this section.
nTo change the security levels on the security list:
1. Access the Configuration screen. (See Access
Configuration Options in this section.)
2. Click Security.
3. Click Security List.
Configuration Options 5-13
4. To add new security levels or rename current levels:
Type the correct name for each security level number.
(Highlight and delete any names you're replacing.)
Number 1 is the highest security clearance and 8 is the
lowest. You must define at least 4 security levels using the
numbers 1-4. All levels must be consecutive (you can't skip a
number). Each name can be up to 19 characters.
5. To delete a current security level:
Highlight and delete the security level name.
All levels must be consecutive so you can't delete any but the
lowest level(s). Any functions or users assigned to a deleted
security level will be reassigned to the lowest available
security level.
6. Click OK to save your changes and return to the Security
Options screen.
Defaults
Click Defaults to use these
default security levels:
1. Dealer/Owner
2. Senior Management
3.Junior Management
4.Others
5-14 Infinity Installation/Service and User Manual
Security Level Functions
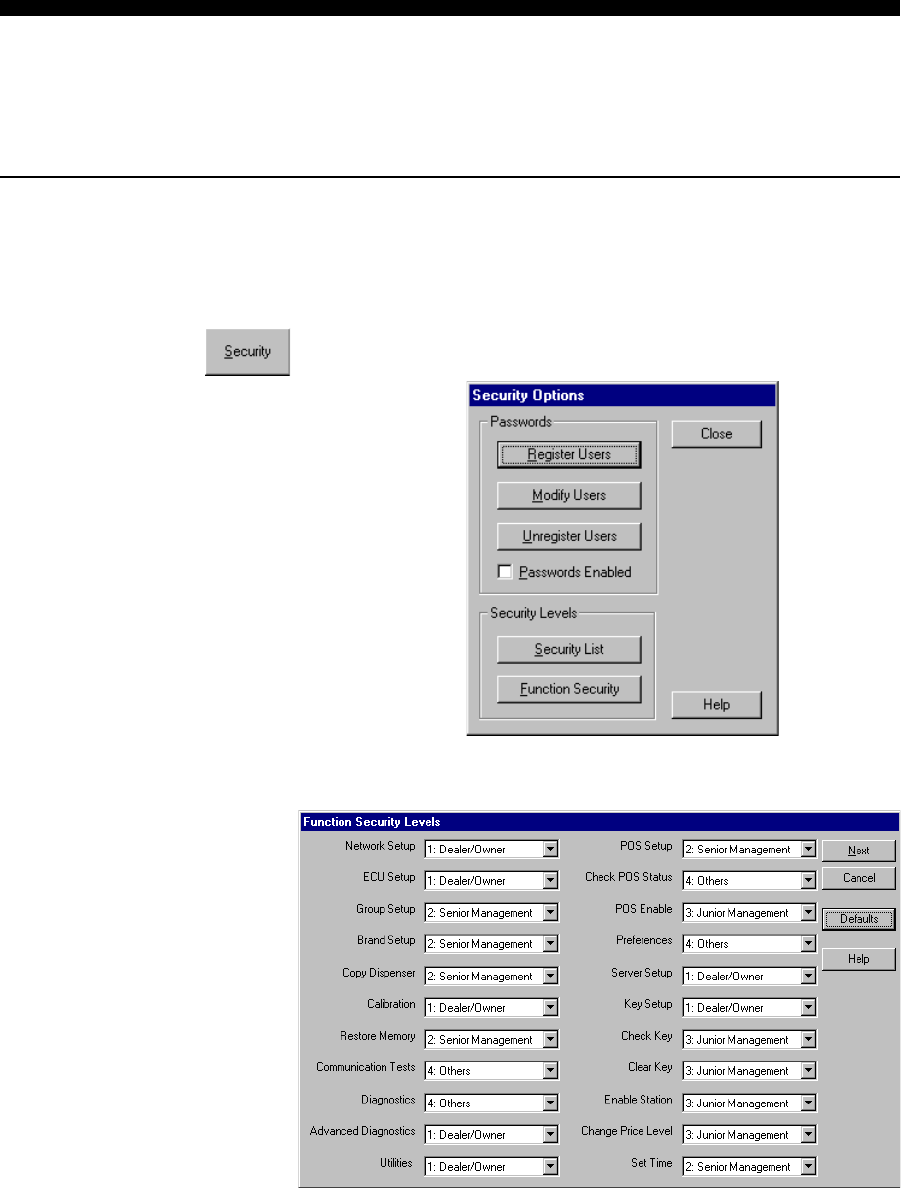
You can customize which Infinity functions are accessible at each of your security levels. To
customize the number and names of your security levels see Security Level List in this section.
nTo change the functions assigned to each security
level:
1. Access the Configuration screen. (See Access
Configuration Options in this section.)
2. Click Security.
3. Click Function Security.
Configuration Options 5-15
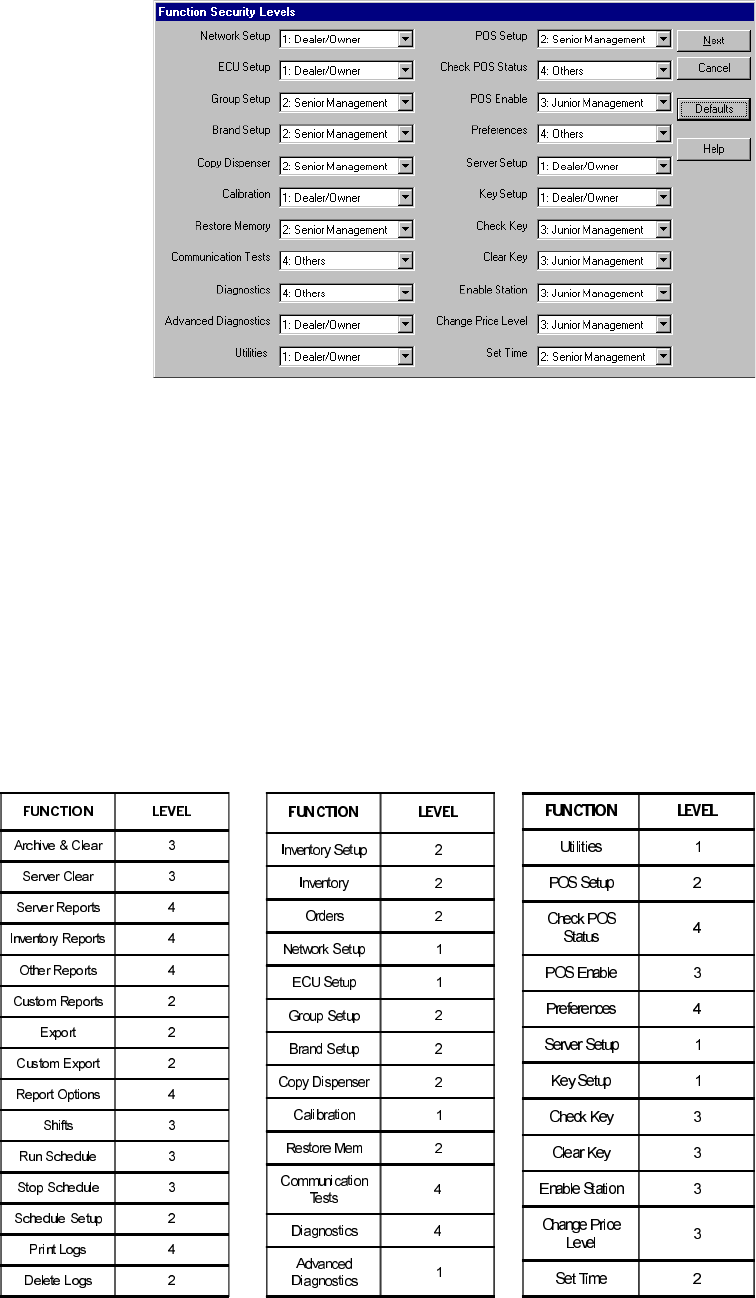
4. Using the drop-down menus, select the security level you
want for each function.
Use the lowest numbered level for your most restricted
functions.
5. Use the Next button or the Back button to move between the
two function screens.
6. Click OK to save your changes and return to the Security
Options screen.
Click Defaults to see these Berg security levels assigned to
each function.
5-16 Infinity Installation/Service and User Manual
Enter Data Storage and Display Options
The options for data storage and display include length of time to store sales records, the level of
detail saved in these records, the type of data stored for hourly sales reports and the schedule log
storage length.
nTo enter data storage and display options:
1. Access the Configuration screen. (See Access
Configuration Options in this section.)
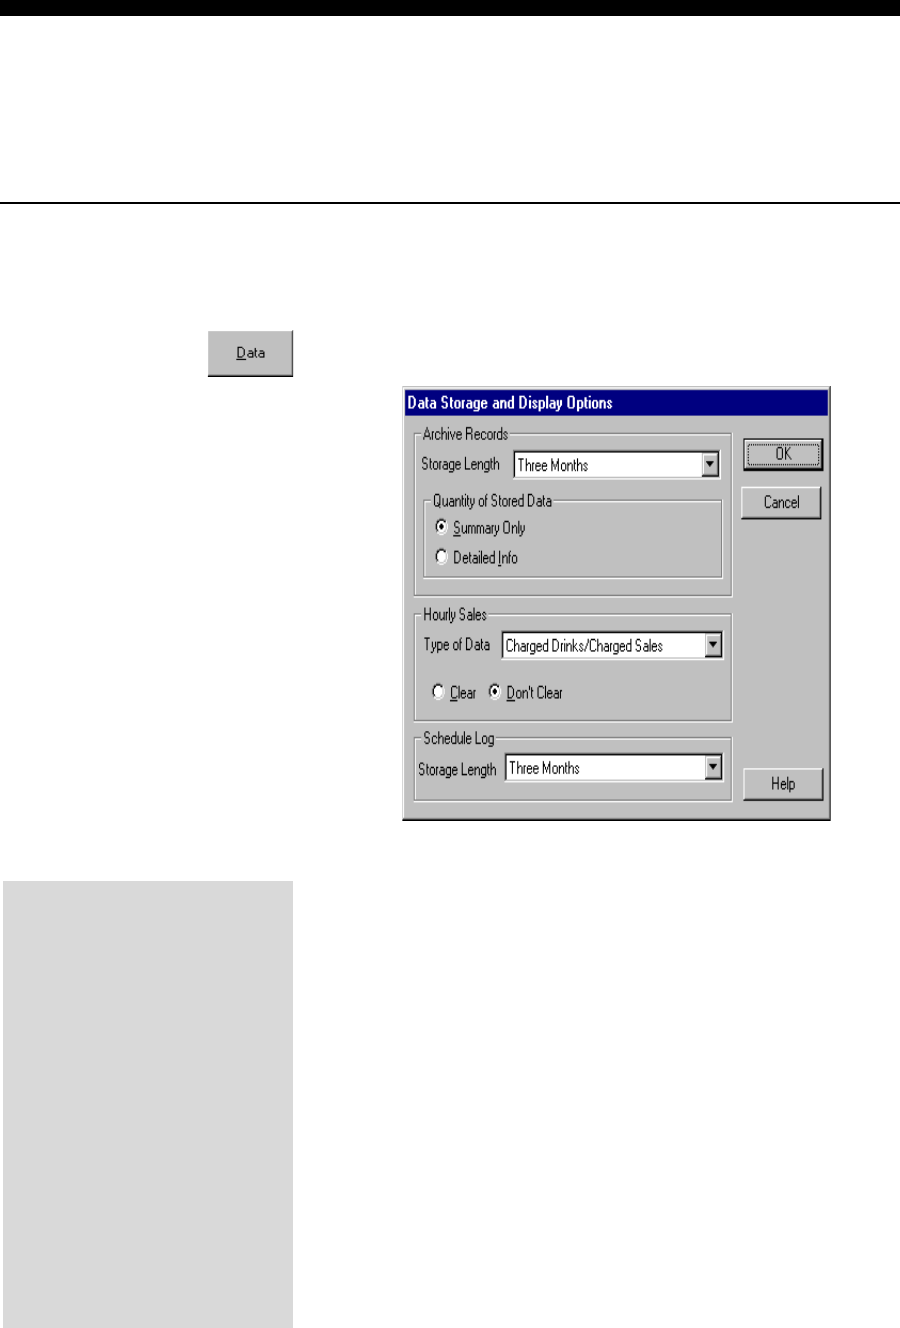
2. Click Data.
3. Select the archive record Storage Length from the drop
down list. Choose from one day, one week, one, three, six or
twelve months, forever or none (do not save any records).
Any sales data older than the specified time is cleared from
the computer when you run a Clear Sales (Z) report. If you
plan to archive and clear sales at regular intervals, specify a
Storage Length at least as long as that interval. The longer
the storage length, the more disk space it requires. The
default storage length is three months.
4. Select the Quantity of Stored Data stored in the archive
records.
Summary Only saves the amount of sales data found in
summary reports and takes up less disk space. This is the
default.
Detailed Info saves the amount of sales data found in
detailed reports.
Archive Records
lArchive records for a specific
date are only created at the
computer when you archive
and clear sales (Z) on that
date.
lThe archive record storage
length is the amount of time
the computer keeps archive
records. This determines
what data is available for
archive reports. If your
storage length is 3 months,
you won't be able to run
Infinity reports on any data
further back than 3 months.
Configuration Options 5-17
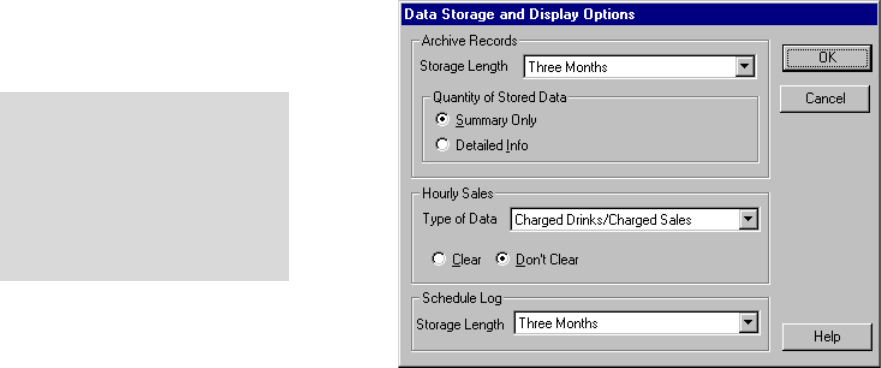
5. Select the Type of Data stored for hourly sales reports from
the drop down list. If you change this option for an existing
installation, you must do a restore station memory at the
ECUs.
The ECUs store hourly sales data for the preceding 48 hours
of sales activity. You can choose the Type of Data for the
ECU to store. Choose from these combinations: Charged
Drinks/Charged Sales, Charged Drinks/Comp Drinks, Comp
Drinks/Comp Sales, Charged + Comp Drinks/Charged Sales.
The default is Charged Drinks/Charged Sales. (See Glossary
of Report Terms and Hourly Sales (X4) Report in the Sample
Reports section.)
6. Select Clear to delete hourly sales data from the ECUs after
a Z report or select Don't Clear to keep hourly sales data
after a Z report. The default is Don't Clear.
7. Select the schedule log Storage Length from the drop down
list.
The Schedule Log is a running history of all events the
schedule program attempts. It can grow to be quite large, so
you should delete it as often as you plan to review it. Choose
from one day, one week, one, three, six or twelve months or
forever. The default is three months.
8. Click OK to save your entries and exit the screen or click
Cancel to exit without saving.
If Detailed Info is not selected,
you can't run a Detailed Sales
(X3) report on archive data
(you can only run it on current
or most recent archive data).
You also can't export detailed
archive data.
5-18 Infinity Installation/Service and User Manual
Enter Unit of Measure
The unit of measure is called a "country" option because usually it is the country you live in that
determines how you set this option.
nTo enter unit of measure:
1. Access the Configuration screen. (See Access
Configuration Options in this section.)
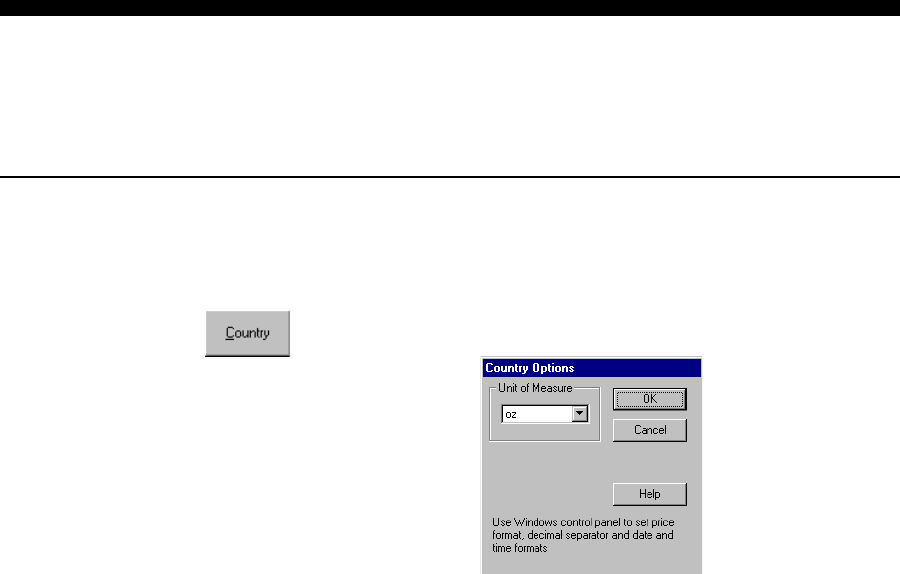
2. Click Country.
3. Select the Unit of Measure for calculating and displaying
fluid volumes. Choose from ounces (oz), milliliters (ml),
cubic centimeters (cc), centiliters (cl) or liters (l). You can't
change the unit of measure once you've set up any ECUs.
4. Click OK to save your entries and exit the screen or click
Cancel to exit without saving.
Notes
qThe format of prices you enter for each portion size in
Infinity is the format specified for currency in your
Windows operating system.
qInfinity also uses the operating system's Date and Time
formats.
Configuration Options 5-19
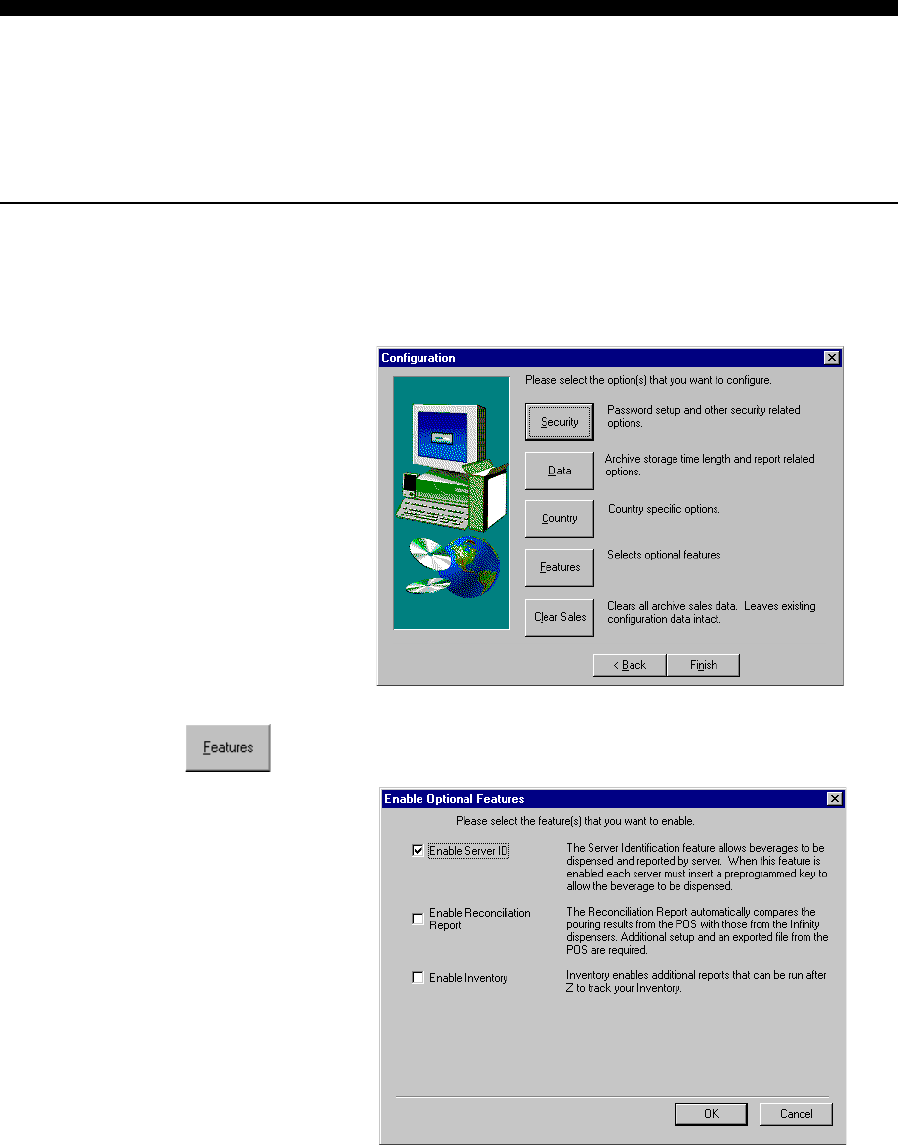
Enable Server ID
The server ID feature must be enabled in Infinity software to use any of the server ID menus.
Don't enable this feature if you don't have server IDit won't be of any use to you without the
necessary hardware.
nTo enable server ID:
1. Access the Configuration screen. (See Access
Configuration Options in this section.)
2. Click Features.
3. Check Enable Server ID.
4. Click OK to save your entry and return to the
Configuration screen.
5-20 Infinity Installation/Service and User Manual
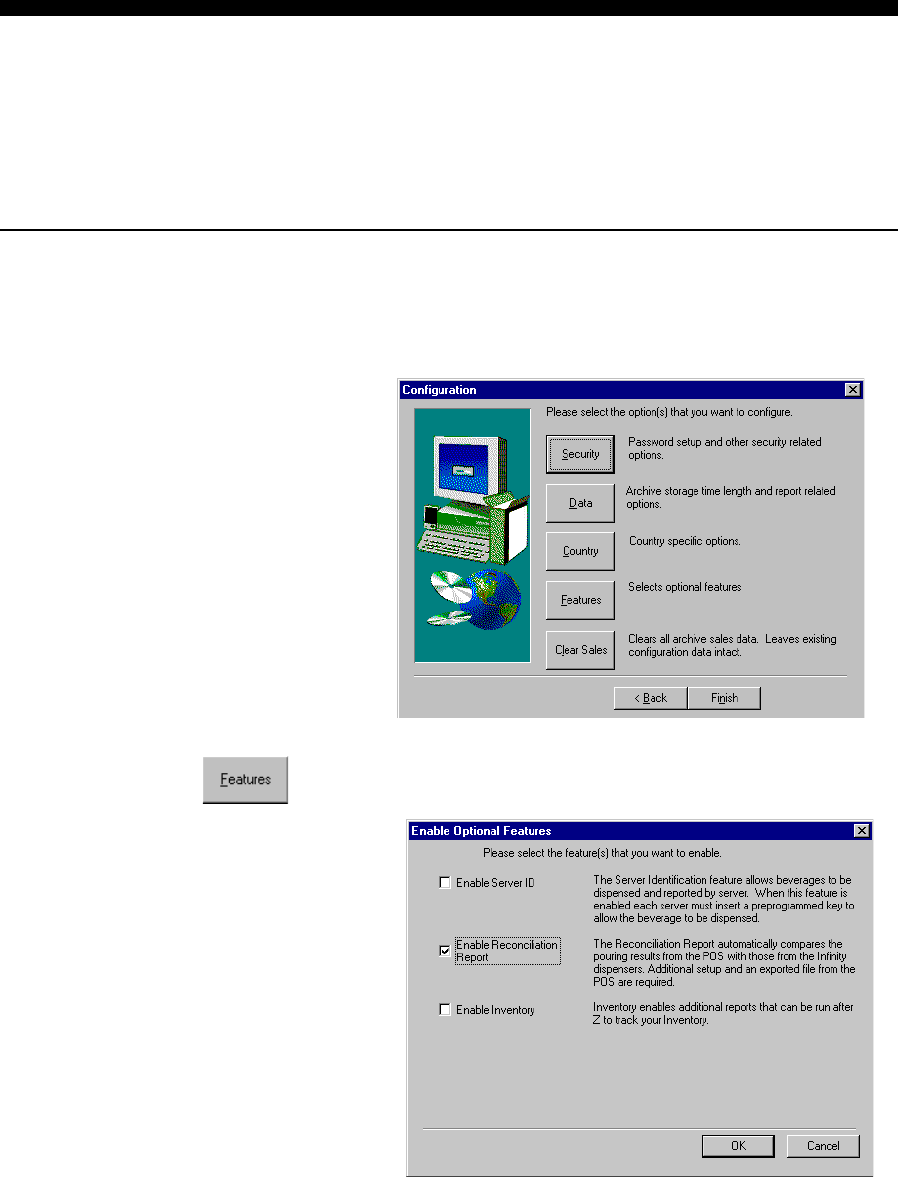
Enable Reconciliation Report
This feature must be enabled if you plan to run a Reconciliation report. If you don't select this
feature, you won't be able to perform setup tasks (such as entering PLUs) that are necessary to
the Reconciliation report. See the Reconciliation and Variance Reports section for more
information about this report.
nTo enable Reconciliation Report:
1. Access the Configuration screen. (See Access
Configuration Options in this section.)
2. Click Features.
3. Check Enable Reconciliation Report.
4. Click OK to save your entry and return to the
Configuration screen.
Configuration Options 5-21
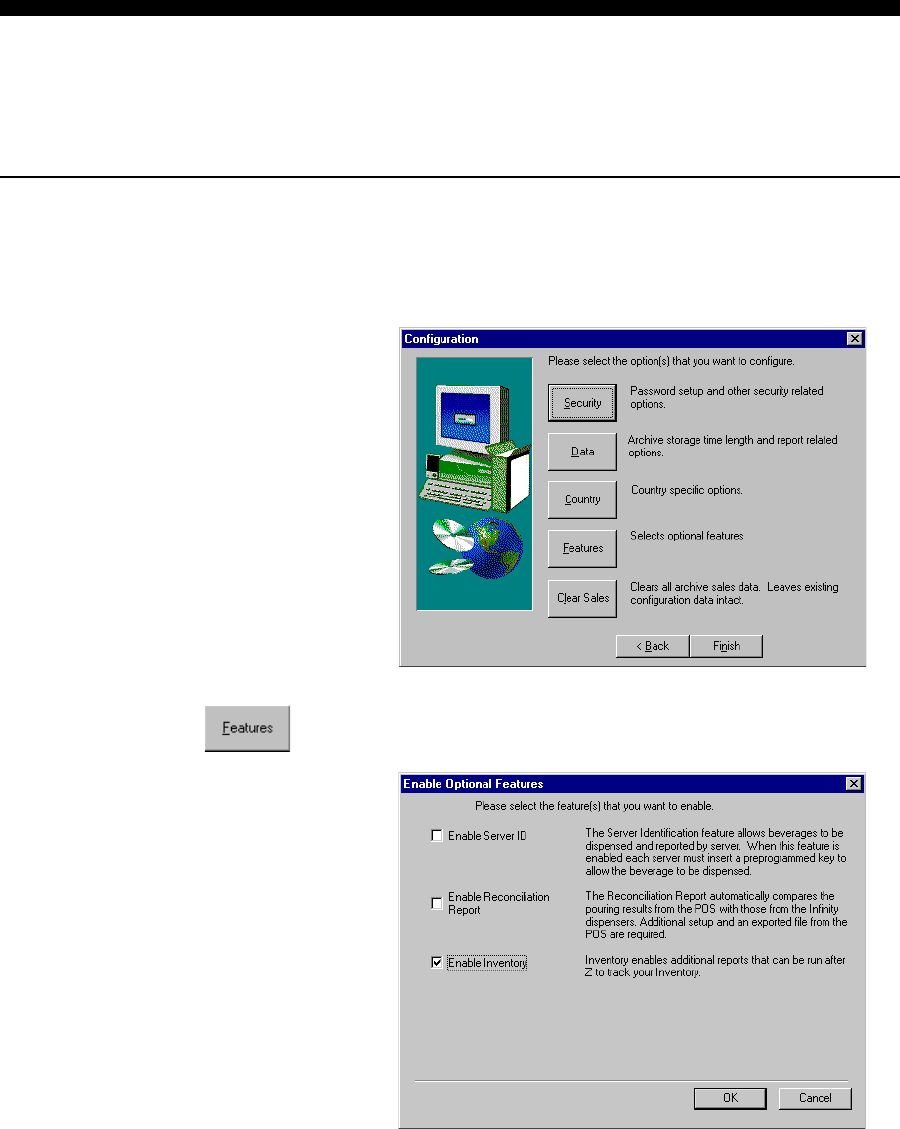
Enable Inventory
This feature must be enabled if you plan to use Inventory's product-tracking features. For a list of
other Inventory setup tasks see Inventory Setup Checklist in the Inventory section.
nTo enable Inventory:
1. Access the Configuration screen. (See Access
Configuration Options in this section.)
2. Click Features.
3. Check Enable Inventory.
4. Click OK to save your entry and return to the
Configuration screen.

SECTION
6
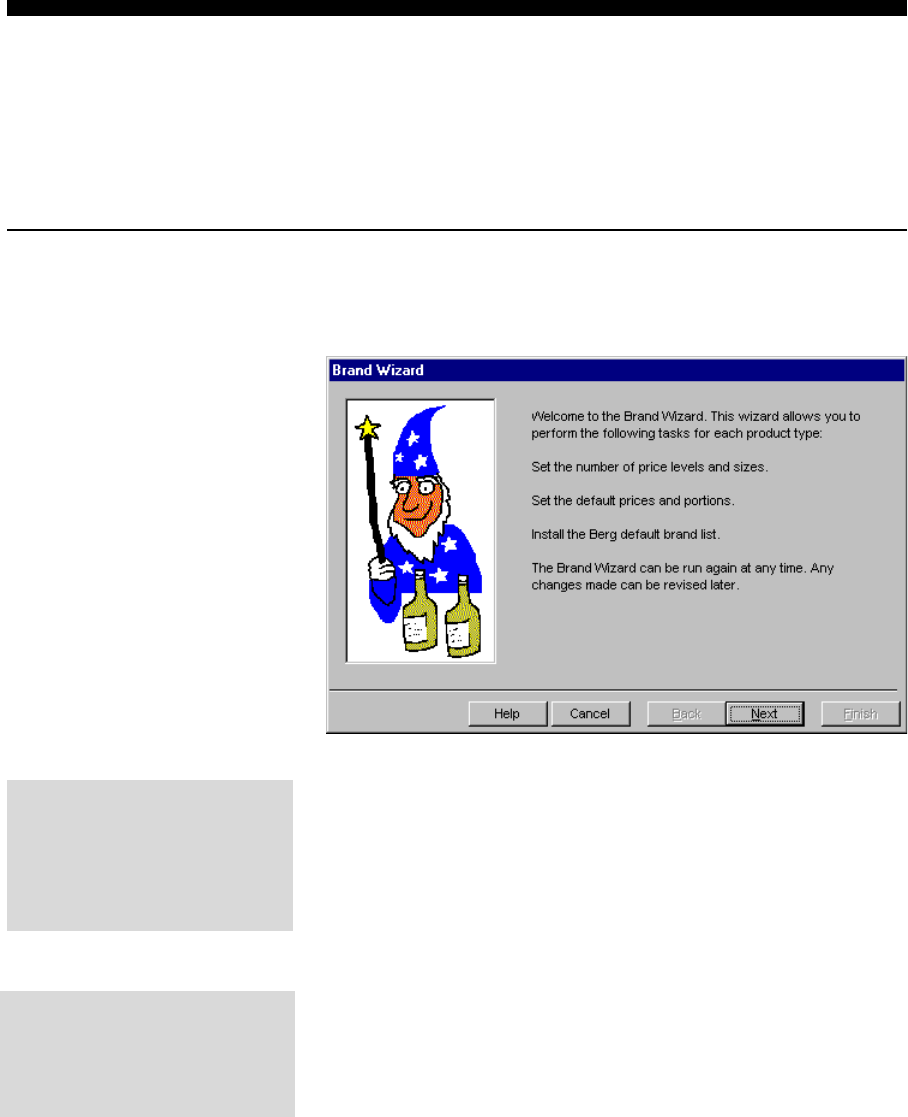
The Brand Wizard loads the Berg brand list to your computer. In the process of
loading the list, the Wizard gives you a chance to specify how many different
price levels and portion sizes you'll need and a place to enter default prices and
portions for each product type. The Wizard appears the first time you run
Manager at a new installation or you can run it any time from the Manager
menu.
Brand Wizard for New Installations ............................................... 6-2
Run Brand Wizard from the Menu .................................................6-8
Brand Wizard
6-2 Infinity Installation/Service and User Manual
Brand Wizard for New Installations
The Brand Wizard appears the first time you run Manager. The Wizard steps you through the
process of loading Bergs brand list to your computer. It covers everything you need to do to set
the number of price levels and sizes and the default prices and portions for each product type
before you load the Berg brand list.
nTo use the Brand Wizard:
1. Run Manager.
The first screen lists the tasks you can perform with the
Brand Wizard. Before the Wizard installs the Berg brand list,
you'll need to check the number of sizes, price levels and
default prices and portions for each product type and decide
if you want to set your own defaults or use the Berg defaults.
2. Click Next to proceed to the next screen or click Cancel to
exit the Wizard.
You dont have to use the Brand Wizard. If you click
Cancel, the Berg brand list is not loaded.
You can load the Berg brand list later using menu options.
See Run Brand Wizard from the Menu in this section and
Load Initial Brand List in the Brands, Cocktails, Prices and
Portions section.
Cancel
Click Cancel at any time to exit
the Brand Wizard and not load
the brand list.
Back
Click Back to return to a
previous screen.
Brand Wizard 6-3
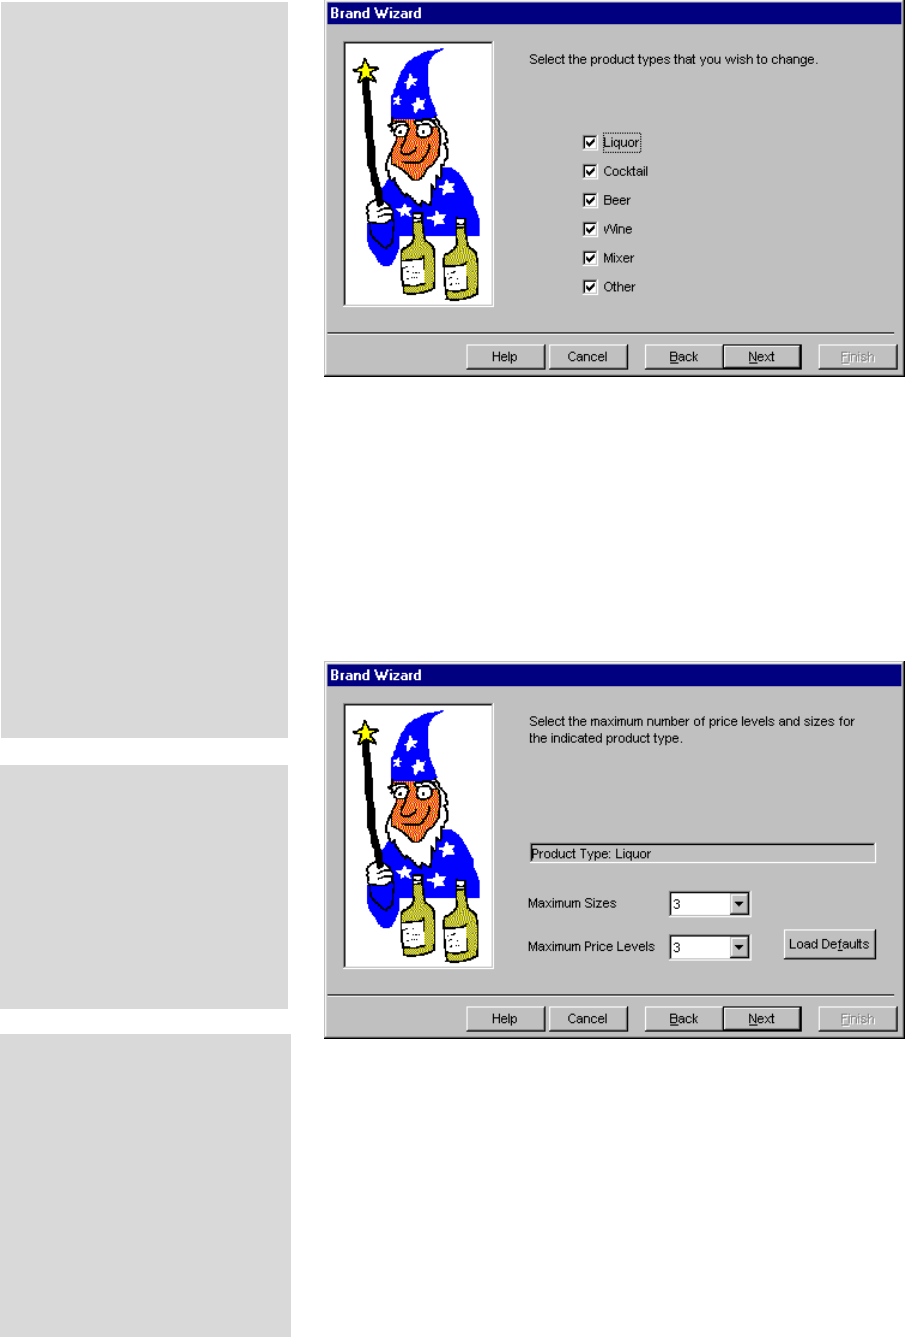
This screen shows you the six product types in the Berg
brand list.
3. Select the product type(s) you want to load and click Next.
Any product type(s) you don't select won't be loaded.
In the next steps, the Wizard gives you a chance to modify
the number of sizes, price levels and default prices and
portions for each product type you've selected.
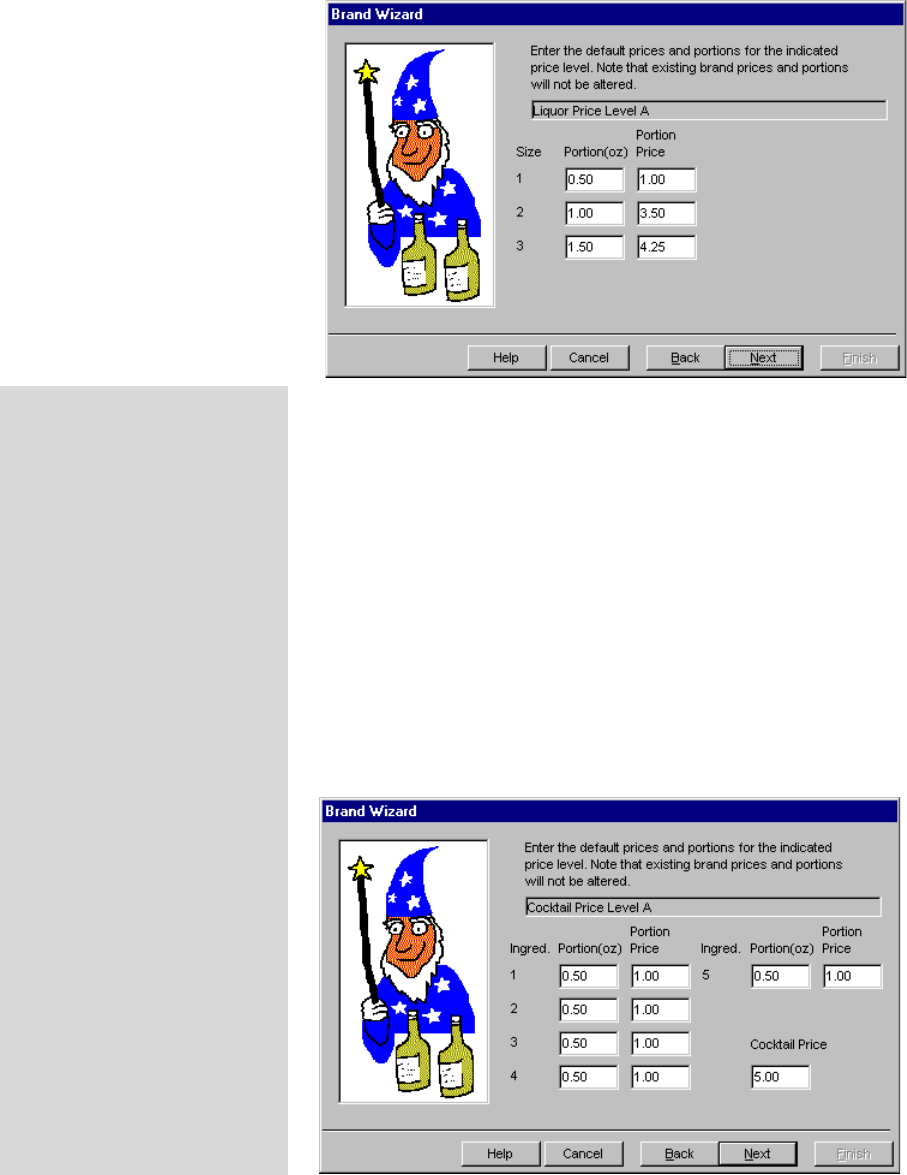
4. Select the maximum number of portion sizes and price levels
you want for the indicated product type and click Next.
You're not defining portion sizes or price levelsyou're just
saying how many different portion sizes and price levels
you'll need.
(For the cocktail product type, select the maximum number
of ingredients you want for a cocktail recipe.)
Load Defaults
If you want to use Berg's
default number of sizes and
price levels, click Load Defaults.
The Berg default sizes are 3 for
Liquor, Wine, Mixers and Other, 4
for Beer and 5 ingredients for
Cocktails. The Berg default price
levels are 3 for all product
types.
You can specify the number of
portion sizes and price levels,
but you can't specify their
designations. The minimum
number is 1. The higher sizes
and price levels are always the
ones eliminated. (If you choose
2 price levels they will be A and
B.)
Product Types
Product types are the
categories Infinity uses to
organize the brand list.
Liquor includes brands (e.g., Jim
Beam, Seagram's 7) that can be
assigned to Laser or All-Bottle
dispensers.
Cocktail includes names (e.g.,
Pina Colada, Screwdriver) that
can be assigned to Laser gun
buttons.
Beer includes brands (e.g.,
Budweiser, Heineken) that
can only be assigned to TAP 1
dispensers.
Wine includes names (e.g., Merlot,
Riesling) that can be assigned to
any dispenser.
Mixer includes names (e.g.,
Grenadine, Tomato Juice) that
can be assigned to any
dispenser.
Other includes your own custom
names that can be assigned to
any dispenser.
6-4 Infinity Installation/Service and User Manual
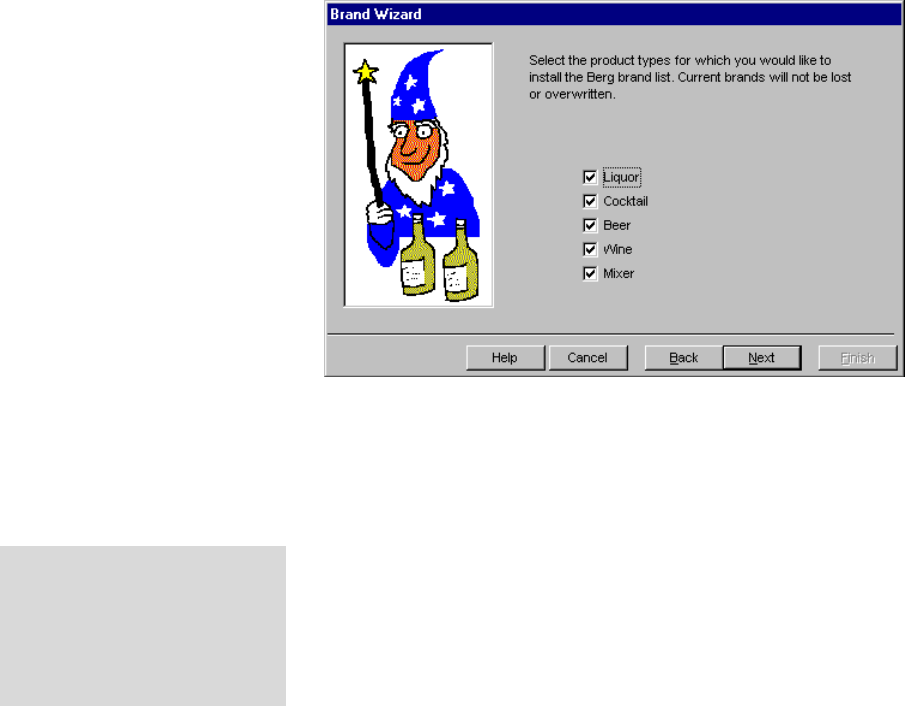
In this step of the Wizard, a new screen appears for each
price level of the indicated product type.
5. To enter your own default prices and portions, type the
correct Portion and Price for each Size listed and click
Next.
OR
Click Next to accept the Berg default prices and portions
displayed for the product type and price level.
The number of different portion sizes and price levels you'll
see is the number you specified in the previous step. You
don't need to type a decimal if you're entering a whole
number, e.g., type 6 for 6.00 oz, or 2 for $2.00.
Note that for cocktails you're entering default portion sizes
and prices for each Ingredient in the cocktail in addition to
a default Cocktail Price.
Default Prices and Portions
lDefaults are base prices and
portions which are entered for
each brand when the brand is
added to the brand list.
lEach brand in the list has
factory default prices and
portions according to its
product type. The Wizard lets
you replace these defaults
with your own. Setting your
own defaults is useful when
you have several brands within
a product type with the same
prices and portions.
lIf you dont want to set your
own default prices and
portions, you can load the
brand list with the factory
defaults. You can always
change the prices and
portions for specific brands
after the brand list is
installed.
lWhen you click Load Defaults
on the Modify Prices and
Portions screen, you'll see the
default prices and portions
you define here.
Brand Wizard 6-5
6. Repeat steps 4 and 5 for each product type you selected to
load. The Wizard displays the appropriate screen to change
the number of sizes and price levels and the default prices
and portions for each product type.
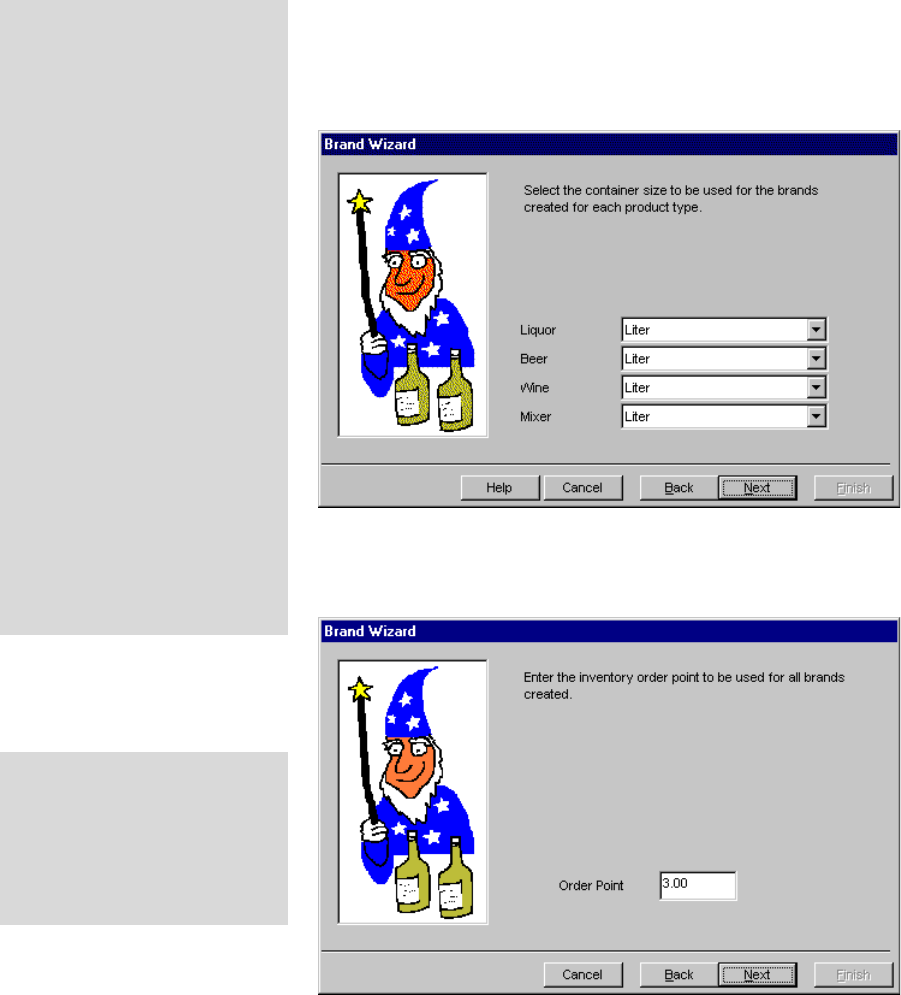
7. Select which product types from the Berg brand list you
want to load to your computer and click Next.
This step gives you a chance to select which product types of
the Berg brand list you want to load. (You may not need all
product types.) Any brands you already have in your brand
list are not affected by the new list. This step just loads the
brand names. Theres no harm in loading brand names and
then not using them. You can delete any unused brands later.
If you choose not to load one or more product types in this
step, any default prices and portions or number of sizes and
price levels youve entered for product types in previous
steps are still saved.
If you didn't select a particular product type at the start of the
Wizard you won't be able to select it now. (Click Back if you
want to get back to an earlier screen.)
Assign Brands to Dispensers
The Wizard only loads the brand
names. You'll still need to assign
specific brands to each of your
dispensers.
6-6 Infinity Installation/Service and User Manual
8. Select a container size for each product type and click Next.
9. If prompted, type in the Order Point for all brands and click
Next. (This screen only appears if you've enabled the
Inventory feature.) Order point is the minimum number of
containers of each brand you want on hand before re-
ordering.
Containers
lContainers are listed for each
brand on the Usage report.
The Wizard simply provides an
easy way to assign the same
container to all brands or to
all brands of a product type.
You can always assign a
different container to any of
your brands later on.
Specifying a container for each
brand is necessary if you're
using Inventory.
lSpecify the size and unit of
measure for your containers in
Container Setup.
lIf youre upgrading from a
previous Infinity release, any
bottle sizes you defined in
previous releases will be
converted to containers.
Please check all container
sizes using Container Setup.
Inventory
lFor further explanation of the
Inventory feature and a
checklist of setup tasks, see
the Inventory section.
Brand Wizard 6-7
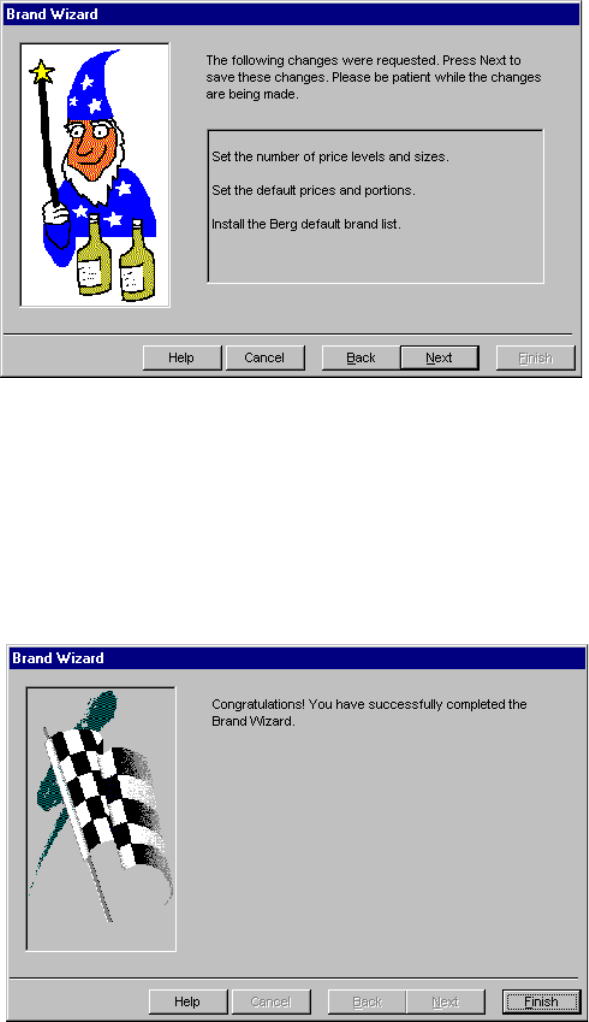
10. If you want to make changes to any previous steps in the
Wizard, click Back to return to the appropriate screen.
Click Next when you're ready to save any changes you've
made to the number of price levels and sizes and to default
prices and portions and to load the brand list for the product
types you've selected.
Wait while the Wizard loads the brand list.
11. Click Finish to exit the Wizard.
Notes
qWhen a brand is added to the brand list its prices and
portions are labeled with the "Standard" category name.
qIf you want to enter prices and portions other than the
defaults for a particular brand see Brand Prices and Portions
in the Brands, Cocktails, Prices and Portions section.
6-8 Infinity Installation/Service and User Manual
Run Brand Wizard From the Menu
You can run the Brand Wizard at any time from the Pouring menu of the Manager program. It's
a convenient way to load the brand list and set your defaults in one operation. Your existing
brands are not overwritten or changed by this process. You can also load the brand list or make
changes to defaults without the Wizard. See Load Initial Brand List, Select Sizes and Price Levels
and Price and Portion Defaults in the Brands, Cocktails, Prices and Portions section.
nTo run Brand Wizard from the menu:
1. Run Manager.
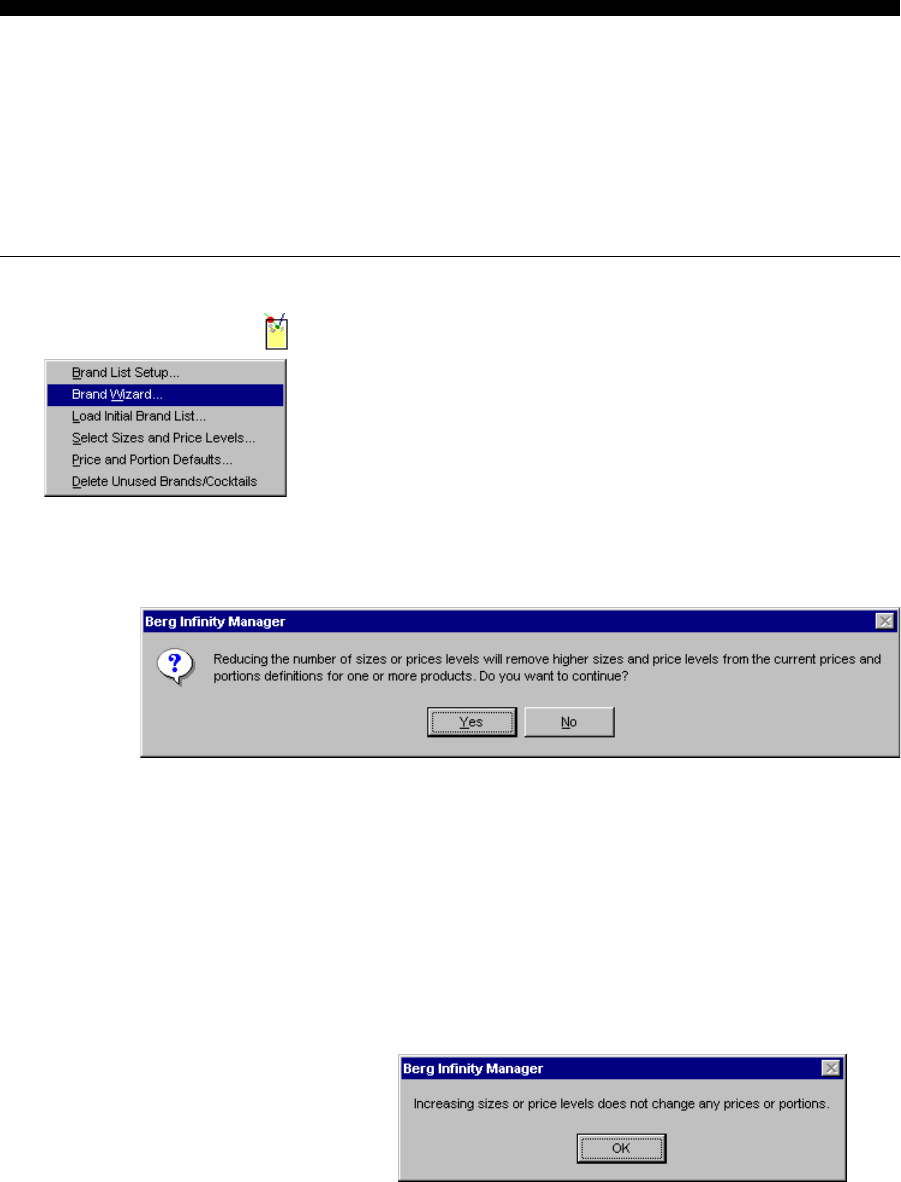
2. Pull down the Pouring menu and point to Brand
Operations. Click Brand Wizard.....
3. Follow the steps outlined in Brand Wizard for New
Installations in this section.
4. If you reduce the number of portion sizes and price levels, a
message will warn you the highest portion sizes and price
levels are the ones that will be eliminated.
Click Yes to continue (and remove the higher sizes and price
levels) or No to stop the process. If you eliminate previously
defined higher prices and portions, the changes are sent to
the ECUs.
OR
If you increase the number of portion sizes and price levels,
a message reminds you that no prices and portions are
affected by the change.
Click OK to continue the process.
Brand Wizard 6-9
Notes
qIf you increase the number of portion sizes and price levels,
remember to enter prices and portion sizes for the new sizes
and price levelsthey aren't automatically filled.
qDefining new default prices and portions doesn't change any
brand's currently defined prices and portions.
qYou can also set default prices and portions for a product
type when you enter a brand's prices and portions and use
the Save as Default button. See Brand Prices and Portions
in this section.

SECTION
7
With Infinity software installed, you can set up the system components in the
software. You begin with networks, which must be set up with a unique name
before any communication between Infinity hardware and software can take
place. You proceed by setting up each ECU and partition in the network, and
then move on to arranging the ECUs in stations and groups for managing and
reporting. As you set up your system, you can view a list of networks and ECUs
using the View Hardware Configuration feature. This section provides help with
the following tasks:
New Network Setup ........................................................................7-2
Remote Network Options................................................................7-4
Modify a Network ...........................................................................7-6
Rename a Network .......................................................................... 7-8
Delete a Network ..........................................................................7-10
New ECU Setup ............................................................................ 7-12
Enter Infinity ECU Options ..........................................................7-14
Enter TAP 1 ECU Options ...........................................................7-17
Enter 1544 Infinity ECU Options .................................................7-22
Modify an ECU (Infinity, TAP 1 or 1544 Infinity) ....................... 7-24
Delete an ECU (Infinity, TAP 1 or 1544 Infinity) ........................7-26
View Hardware Configuration ...................................................... 7-28
Network and ECU Setup
7-2 Infinity Installation/Service and User Manual
New Network Setup
Before you can set up a network, you must determine its unique name, know the COM port
number of the network connection and know the baud rate set at the ECUs' CPU board.
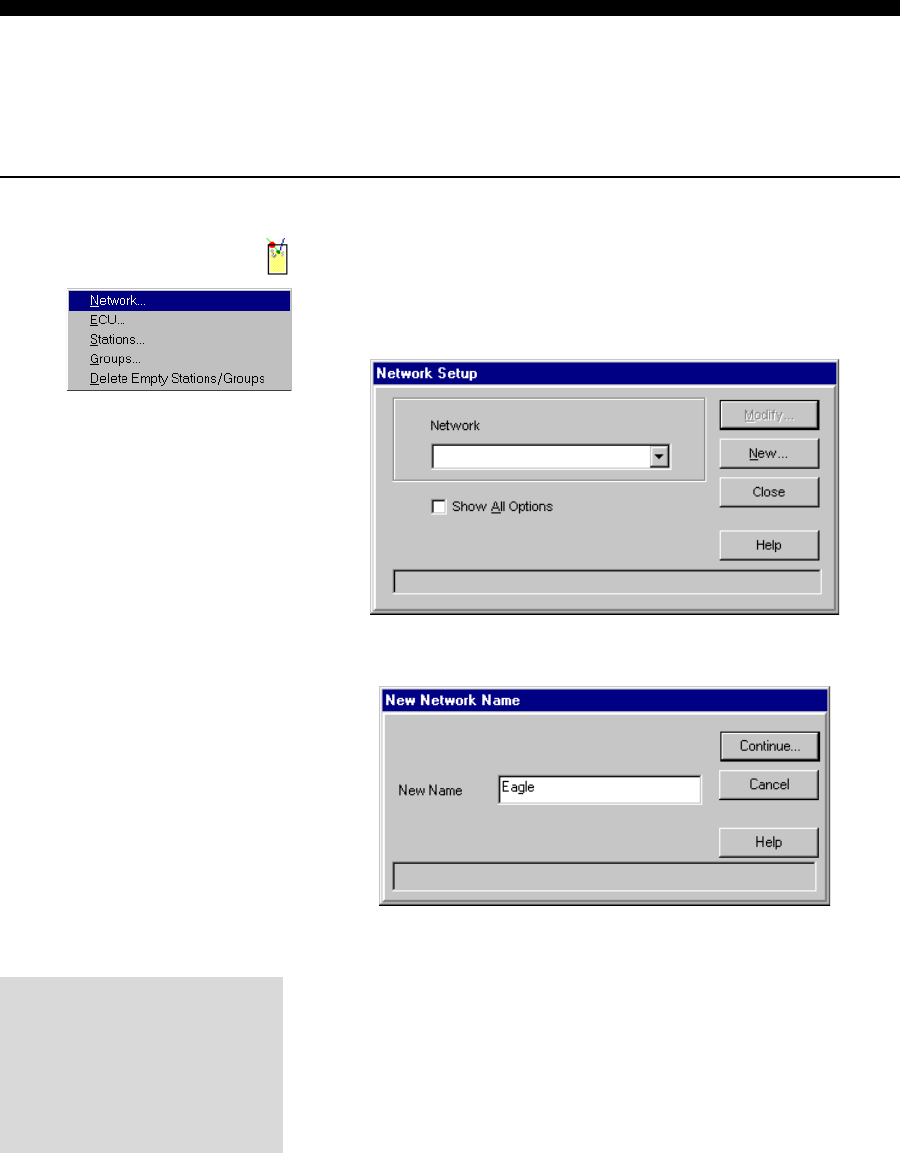
nTo set up a new network:
1. Run Manager.
2. Pull down the Equipment menu and point to Setup. Click
Network....
3. Click New....
4. Type in the network's unique name in the New Name field.
It can be up to 19 characters.
5. Click Continue... to proceed with setting up the network or
click Cancel to stop setting up a network.
View Hardware Configuration
If you want to see a list of all
the networks and ECUs you've
set up, see View Hardware
Configuration in this section.
Network and ECU Setup 7-3
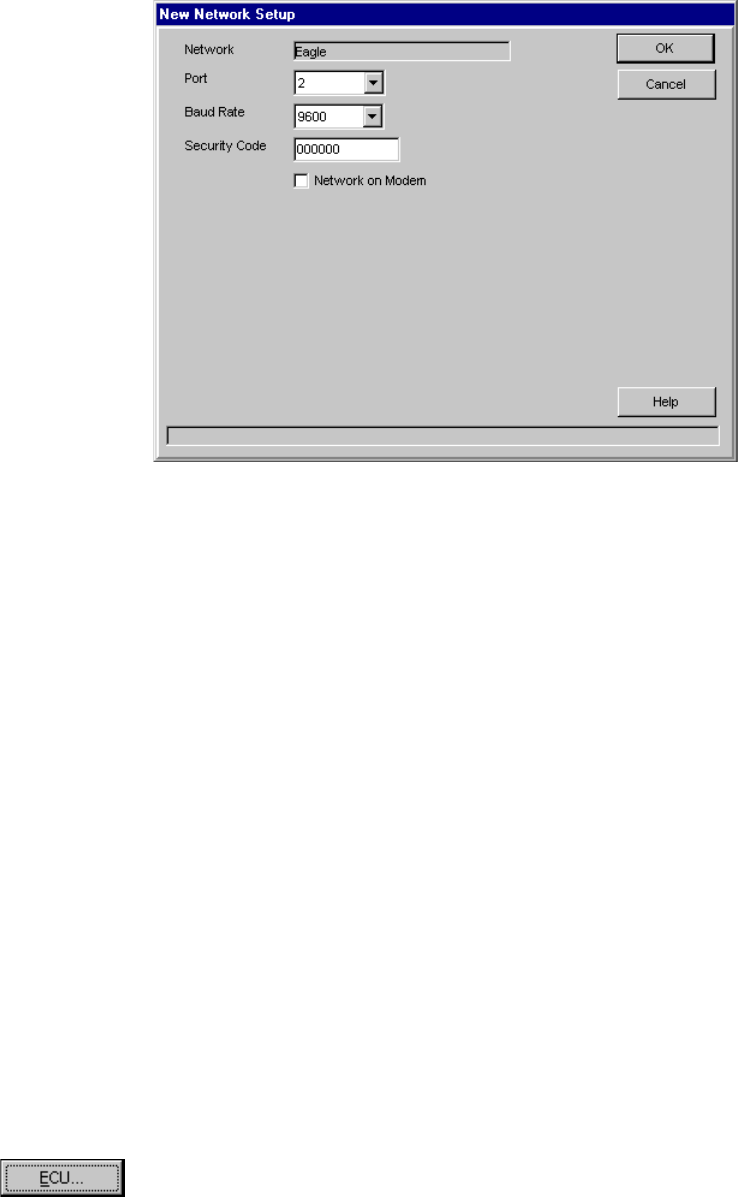
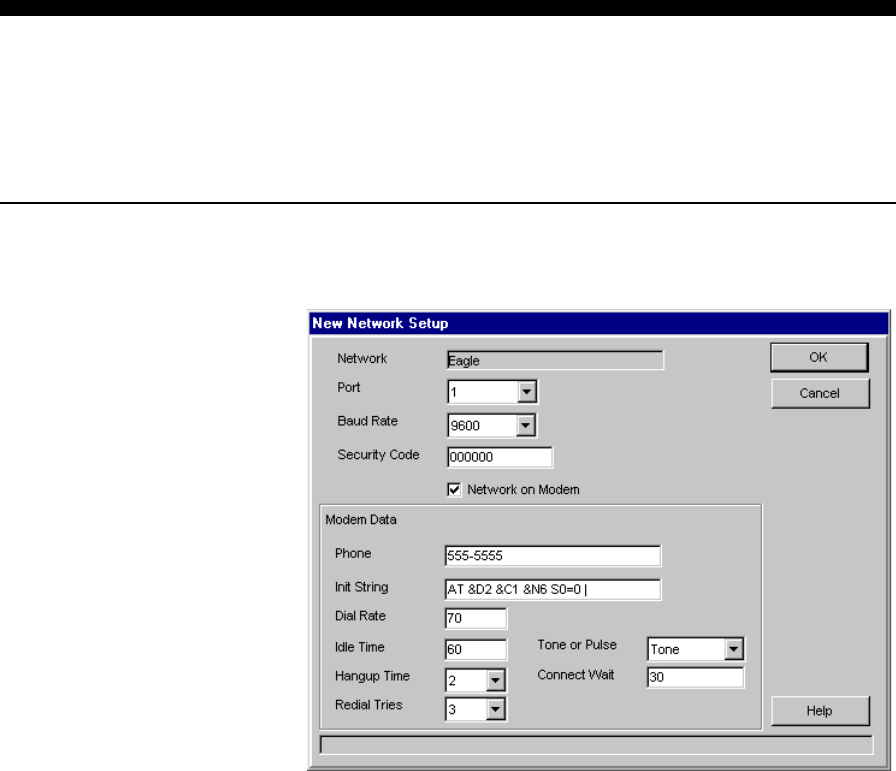
6. Select the correct Port number for the network from the list.
Port refers to the communication port at the computer used
for the network connection. Infinity supports ports 1-36.
7. Select the correct Baud Rate for the computer/network
communications. It must be the same baud rate set at the
ECUs during hardware installation. If you are setting up a
remote network the baud rate must also be supported by the
modems.
8. Type in a 6 character Security Code for the network. The
characters can be letters or numbers. The security code is
optional and provides an extra level of security (particularly
for modem communications).
9. If you are setting up a remote network, select Network on
Modem. Additional entry fields appear. See Remote
Network Options in this section for help with those fields.
If you are setting up a local network, leave Network on
Modem unchecked.
10. Click OK to save all your entries and exit the screen. Click
Cancel to exit the screen without saving.
Note
qAfter you set up a network you can use the ECU... shortcut
button to access the ECU Setup screen. Select Show All
Options, then click ECU....
7-4 Infinity Installation/Service and User Manual
Remote Network Options
If you are setting up a remote network, you must enter the specific details of the modem
communications on the New Network Setup screen. This task is a continuation of the New
Network Setup task in this section.
nTo enter remote network options:
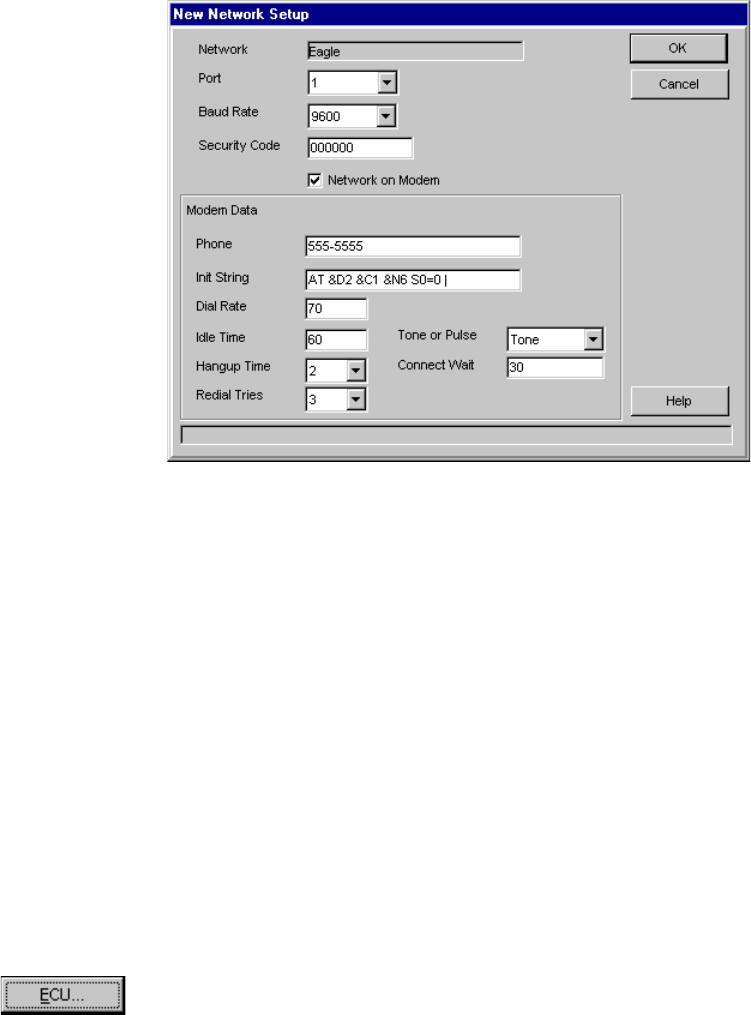
1. View the additional remote network options.
2. Type the exact phone number used to dial the remote
modem in the Phone entry field.
3. Type the initialization string for the computer modem in the
Init String field. The default (AT &D2 &C1 &N6 S0=0|)
sets Data Terminal Relay and Carrier Detect to normal,
turns off Auto Answer and forces the modem to use 9600
baud.
4. Type the millisecond duration of each tone in the computer
modem's dial in the Dial Rate field. 70 is the default.
5. Type the approximate number of seconds (0 to 999) the
computer modem waits (after a communication has
occurred) before hanging up in the Idle Time field. Set to 0
for the modem to disconnect when you exit Infinity
software or dial another remote network. The default is 60
seconds.
Network and ECU Setup 7-5
6. Select the number of seconds (2-9) the computer modem
waits after hanging up before attempting any other modem
operation in the Hangup Time field. The default is 2
seconds.
7. Select Tone or Pulse for the type of dialing used on the
computer modem's telephone line.
8. Type the number of seconds (1-30) to wait for the remote
modem to answer in the Connect Wait field. The default is
30 seconds.
9. Select the number of re-dials (1-9) if each succeeding
attempt fails in the Redial Tries field. The default is 3 tries.
10. Click OK to save all your entries and exit the screen. Click
Cancel to exit the screen without saving.
Note
qAfter you set up a network you can use the ECU... shortcut
button to access the ECU Setup screen. Select Show All
Options, then click ECU....
7-6 Infinity Installation/Service and User Manual
Modify a Network
You can make changes to existing network settings if necessary. Any network setting can be
modified.
nTo modify a local or remote network:
1. Run Manager.
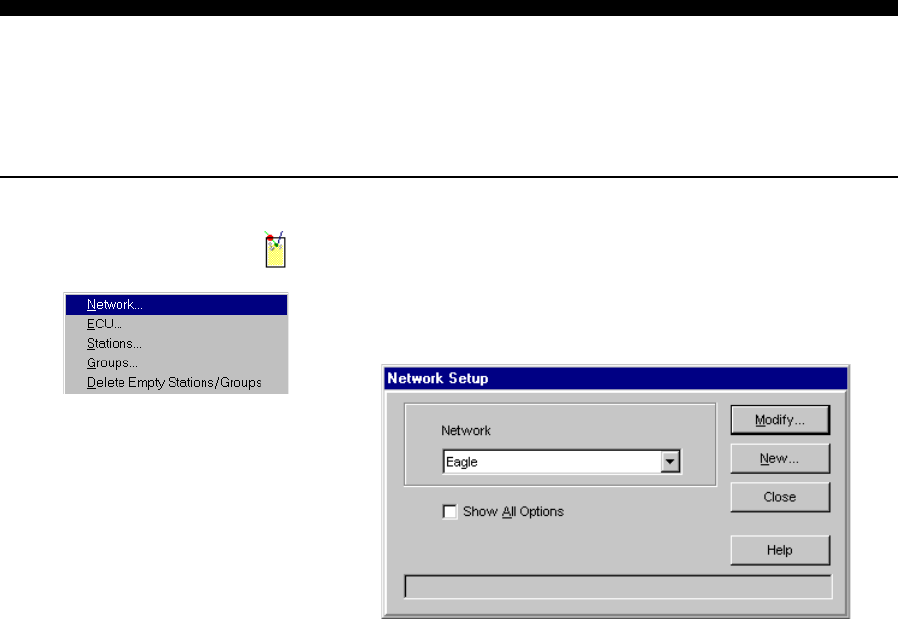
2. Pull down the Equipment menu and point to Setup. Click
Network....
3. Select the name of the network you want to modify.
4. Click Modify....
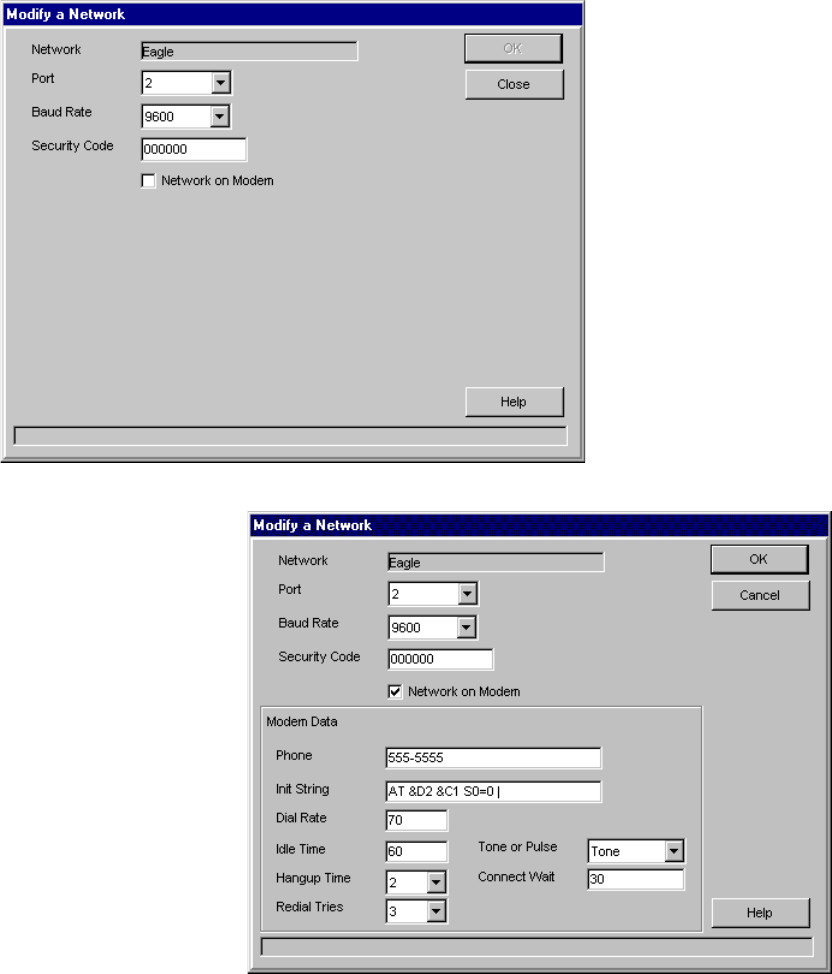
5. Select new entries for the network options you want to
modify. If you need help with the options, see New Network
Setup or Remote Network Options in this section. If you
decide not to make any changes, click Close to exit the
screen.
6. Click OK to save all your entries and exit the screen. Click
Cancel to exit the screen without saving your modifications.
7. Click Close to exit the Network Setup screen.
Network and ECU Setup 7-7
Entries that can
be modified for a
remote network
see Remote
Network Options
for help with
these options.
Entries that can be
modified for a local
networksee New
Network Setup for help
with these options.
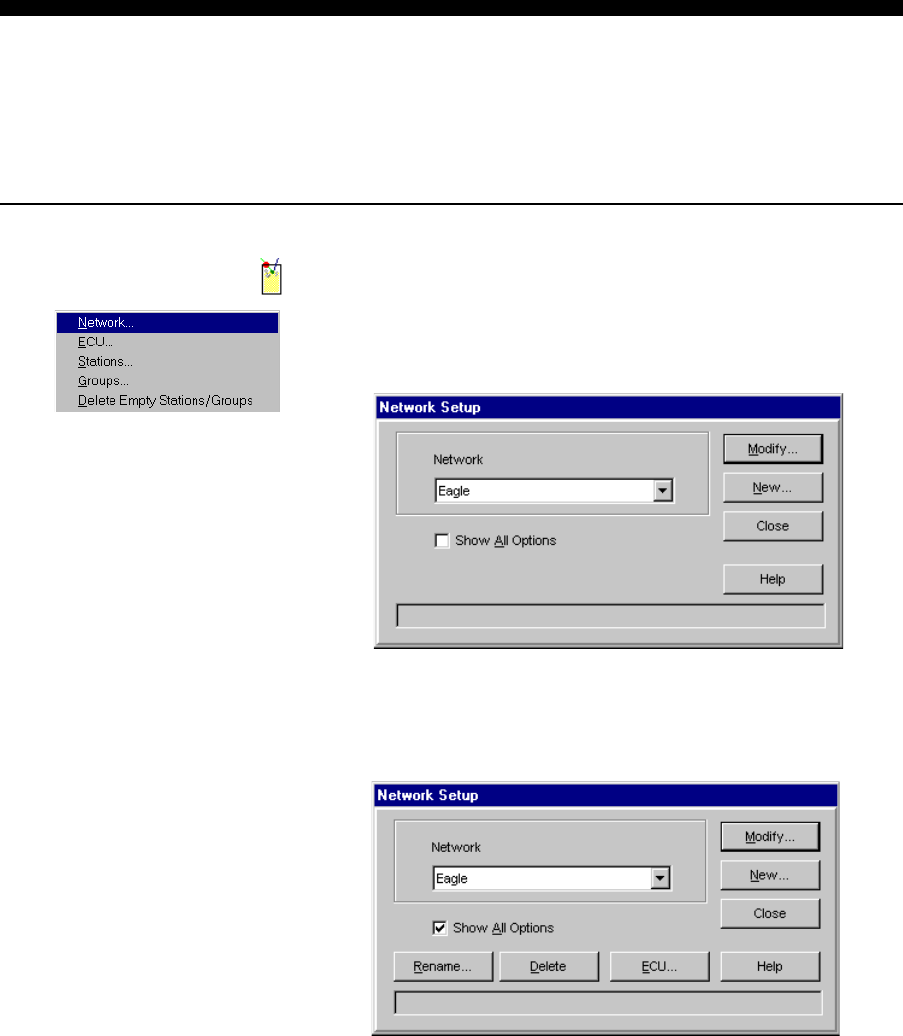
7-8 Infinity Installation/Service and User Manual
Rename a Network
If the only change you want to make to a network is its name, use this network setup feature. If
you want to modify any of the network's settings, see Modify a Local or Remote Network in this
section. You can rename a network at any time.
nTo rename a local or remote network:
1. Run Manager.
2. Pull down the Equipment menu and point to Setup. Click
Network....
3. Select the name of the network you want to rename.
4. Click Show All Options.
5. Click Rename....
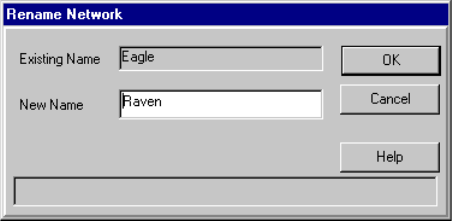
Network and ECU Setup 7-9
6. Type in a new unique name for the network in the New
Name field. It can be up to 19 characters.
7. Click OK to save all your entries and exit the screen. Click
Cancel to exit the screen without saving.
8. Click Close to exit the Network Setup screen.
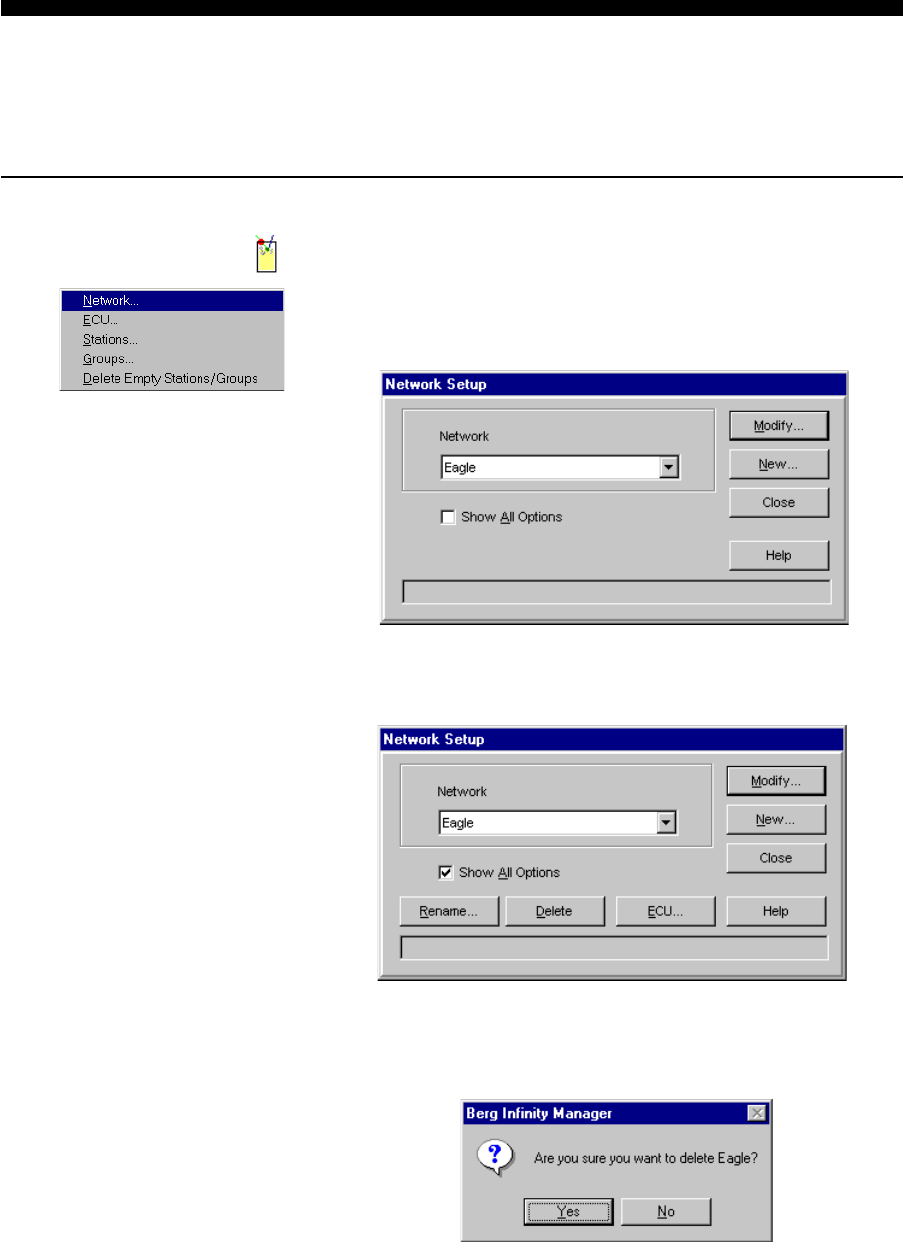
7-10 Infinity Installation/Service and User Manual
Delete a Network
You can delete a network if you need to. If you have ECUs set up in the network, deleting the
network means you delete the ECUs you have set up also.
nTo delete a local or remote network:
1. Run Manager.
2. Pull down the Equipment menu and point to Setup. Click
Network....
3. Select the name of the network you want to delete.
4. Click Show All Options.
5. Click Delete.
6. Click Yes to confirm the deletion.
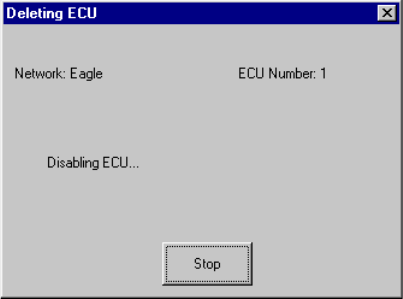
Network and ECU Setup 7-11
If you have ECUs set up in the network wait for the ECUs to
be deleted also.
7. Click Close to exit the Network Setup screen.
7-12 Infinity Installation/Service and User Manual
New ECU Setup
Once you've set up a network, you can set up the ECUs in the network. An ECU must be set up
with a network name and a unique ECU number.
nTo set up a new ECU:
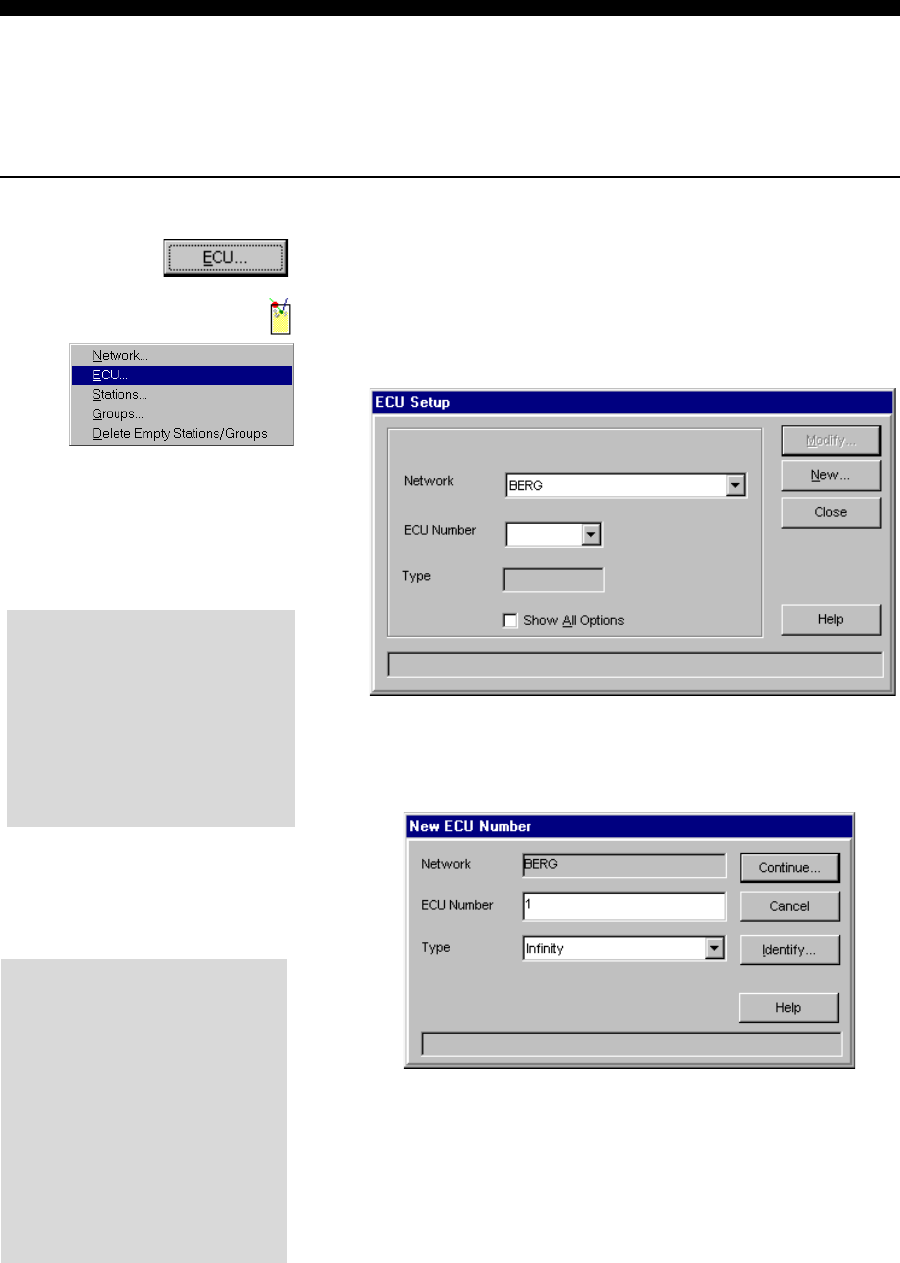
1. Access the ECU Setup screen with the shortcut button
(ECU...) after setting up a network. OR
Run Manager, pull down the Equipment menu, point to
Setup, and Click ECU....
2. Select the name of the Network.
3. Click New....
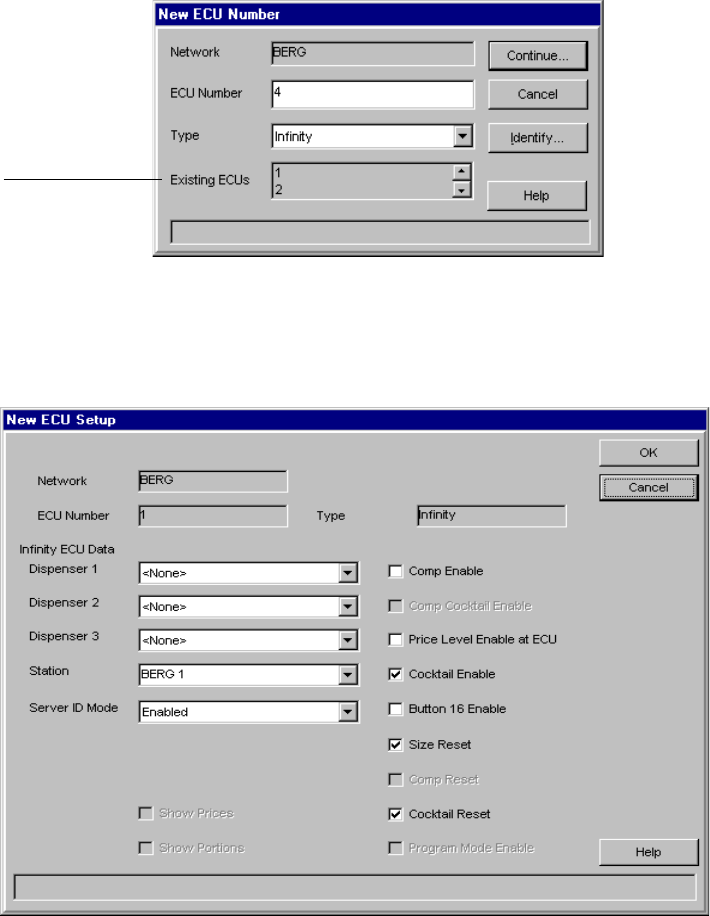
4. Click Identify... to communicate with the network and
determine the next available ECU.
OR
Type in the ECU Number and select the ECU Type.
View Hardware Configuration
If you want to see a list of all
the networks and ECUs you've
set up and the stations to
which the ECUs are assigned,
see View Hardware
Configuration in this section.
Identify...
lYou must be able to
communicate with the ECUs
on the network to use this
feature.
lWhen you click Identify..., the
next numbered ECU that has
not been set up will be
identified and displayed on
the New ECU Setup screen.
Network and ECU Setup 7-13
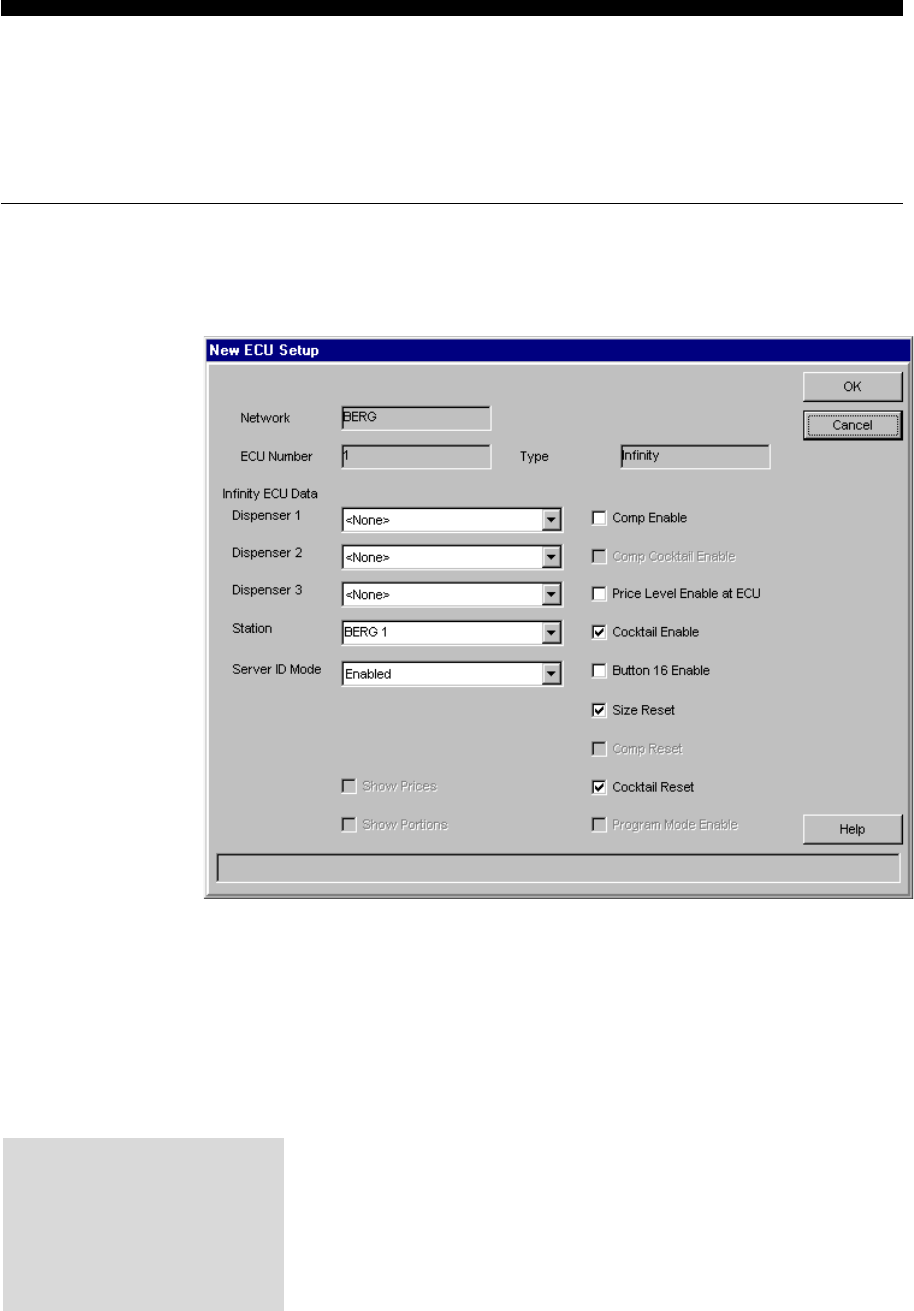
Click the up or
down arrow
(hidden by the
drop down list)
to view existing
ECU numbers. The numbers of any ECUs you've set up appear in the
Existing ECUs field.
Click Continue... .
5. The New ECU Setup screen appears with specific setup
options for the ECU type. See Enter Infinity ECU Options
or Enter TAP 1 ECU Options or Enter 1544 Infinity ECU
Options in this section for help with entering the options.
7-14 Infinity Installation/Service and User Manual
Enter Infinity ECU Options
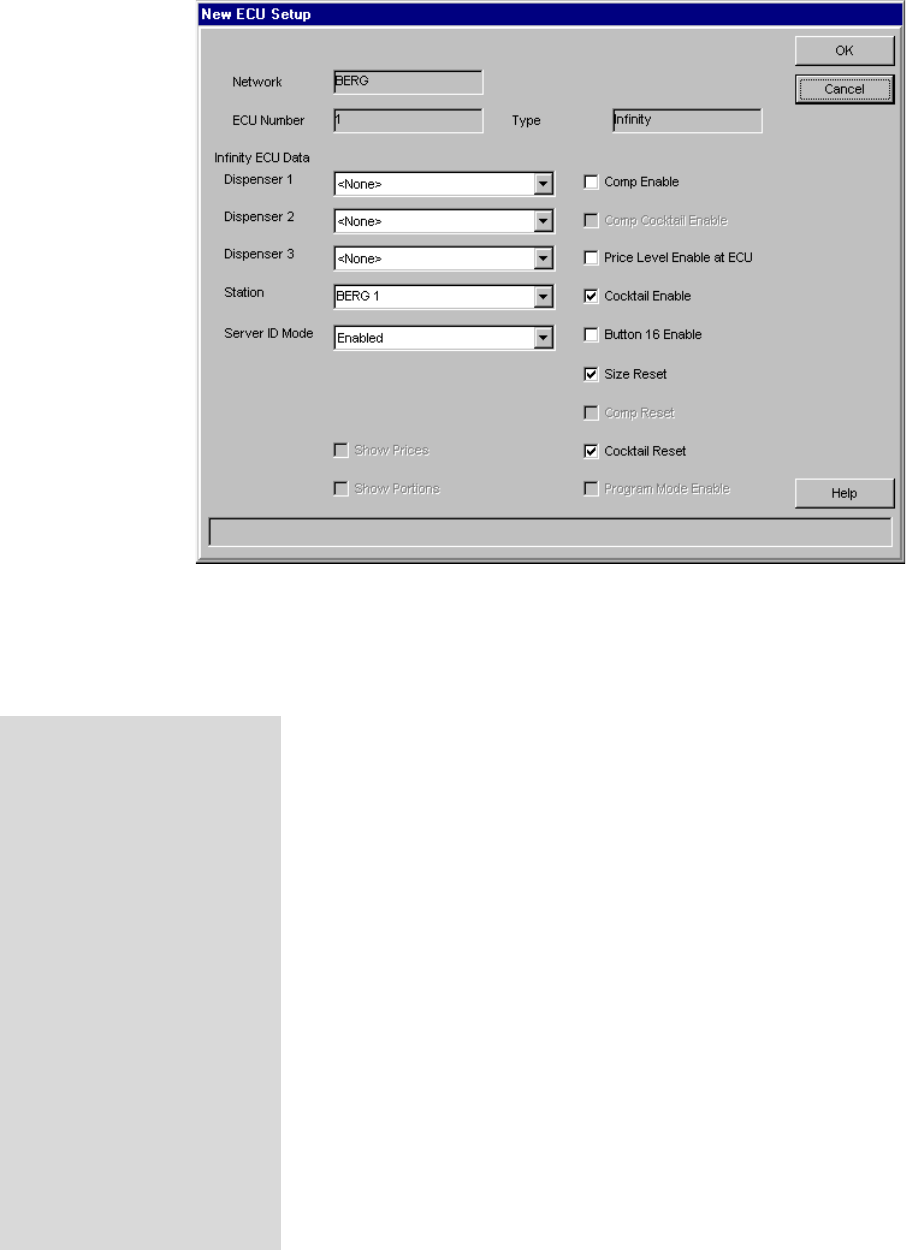
To set up an Infinity ECU, you must know the type of dispenser(s) connected to the ECU and
which features you want to enable at the ECU. Use the Getting Ready for Infinity Worksheet if
you haven't already determined how you want to set up the ECU.
nTo enter Infinity ECU options:
1. Access the New ECU Setup screen. See New ECU Setup in
this section.
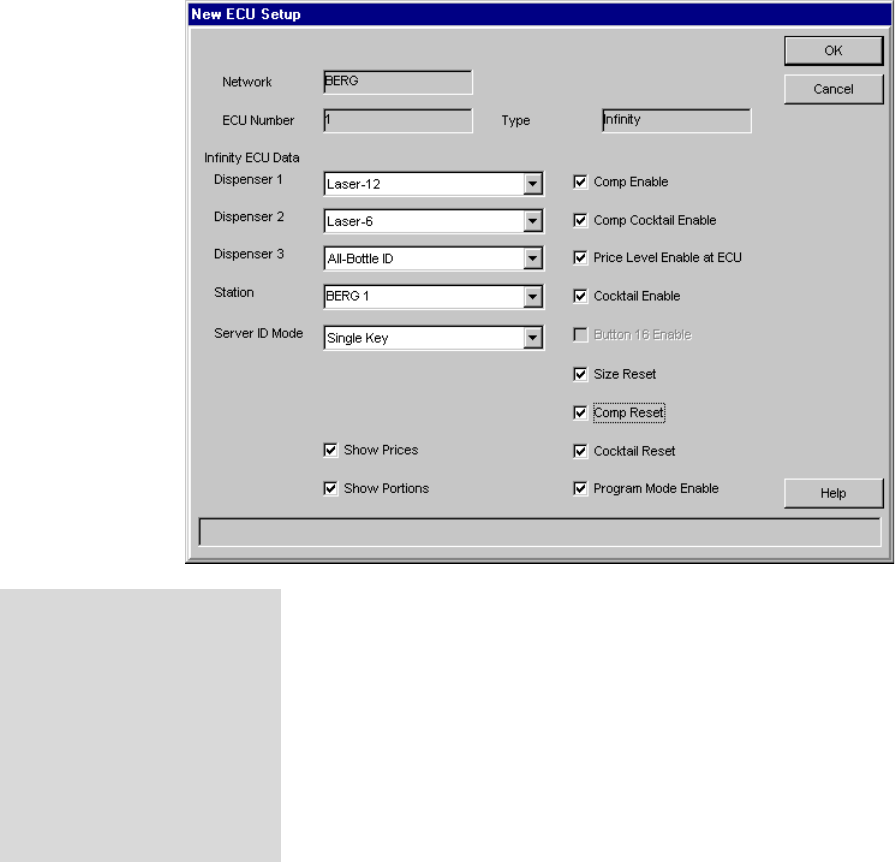
2. Select a Laser dispenser for the Dispenser 1 and 2 fields. If
you only have one Laser dispenser, assign it to Dispenser 1.
3. Select an All-Bottle-7 or All-Bottle-ID dispenser for the
Dispenser 3 field.
4. Select a Station name. (See Default Station Names sidebar.)
5. If you want to use the server ID option with your Infinity
ECU, select a Server ID Mode. (EPROM version 3.08 or
above is required for Server ID.)
Enabled means sales are tracked by server at the ECU and a
key is required for dispensers to pour.
Disabled means server ID mode is disabled at the ECU and a
key is not required for dispensers to pour.
Server ID
If the Server ID Mode list is
not enabled, see Enable Server
ID in the Configuration Options
section.
Network and ECU Setup 7-15
6. Select Comp Enable to enable complimentary pouring.
7. Select Comp Cocktail to enable complimentary cocktail
pouring. (You have to select both Comp Enable and
Cocktail Enable first.)
8. Select Price Level Enable at ECU to enable price level
changes at the ECU. If you uncheck this option, price level
changes can only be made at the computer.
9. Select Cocktail Enable to enable cocktail pouring at any
Laser dispensers at the ECU.
10. Select Button 16 Enable to enable button 16 switching to
cocktail mode. This option is only available for 16 brand
Laser guns and reduces the number of button presses to pour
a cocktail. It also reduces by one the number of brands that
can be individually poured at the dispenser.
11. Select Size Reset to automatically reset the portion size to
regular after every pour.
12. Select Comp Reset to automatically reset to full price
pouring after a complimentary pour.
13. Select Cocktail Reset to automatically reset to regular
brand pouring after a cocktail pour.
(continued on next page)
Default Station Names
Infinity automatically creates a
station for each ECU you set
up. The name of the station is
the network name plus the ECU
number (e.g., 'Eagle 5').
You can:
lAccept the default name, or
lType a new name in the
Station field (up to 19
characters), or
lSelect another existing
station to which to add this
ECU.
You can always rename a
station or change station
setup later on (see the Station
and Group Setup section).
7-16 Infinity Installation/Service and User Manual
14. If you selected an All-Bottle-ID dispenser, select Show
Prices and/or Show Portions to see price and portion
information displayed on the All-Bottle-ID dispenser when
you insert a pourer.
15. If you selected an All-Bottle-ID dispenser, select Program
Mode to enable pourer programming at the All-Bottle-ID
dispenser at this ECU.
16. Click OK to save your entries and exit the screen. Or click
Cancel to exit the screen without saving.
Wait while the software communicates the setup information
to the ECU.
17. Click Close to exit the ECU Setup screen.
Note
qWhen you set up a new Infinity ECU with an All-Bottle-7 or
All-Bottle-ID dispenser, the default Delay and Cal values
sent to the ECU for the coded pourers are for high flow
pourers. If you're using standard flow pourers, you can speed
up the calibration process by setting the correct calibration
values for standard flow pourers. See Initialize Calibration
Values in the Calibration section.
Enable Features
Selecting a feature such as
Comp Enable, Cocktail Enable or
Comp Cocktail Enable does not
put dispensers at the ECU in
Comp or Cocktail mode. It
simply makes it possible for
bartenders to switch to these
pouring modes.
Network and ECU Setup 7-17
Enter TAP 1 ECU Options
To set up a TAP 1 ECU, you must know the number of partitions (if any) to set up for the ECU
and which features you want to enable at the ECU. Use the Getting Ready for Infinity Worksheet
if you haven't already determined how you want to set up the ECU.
nTo enter TAP 1 ECU options:
1. Access the New ECU Setup screen. See New ECU Setup in
this section.
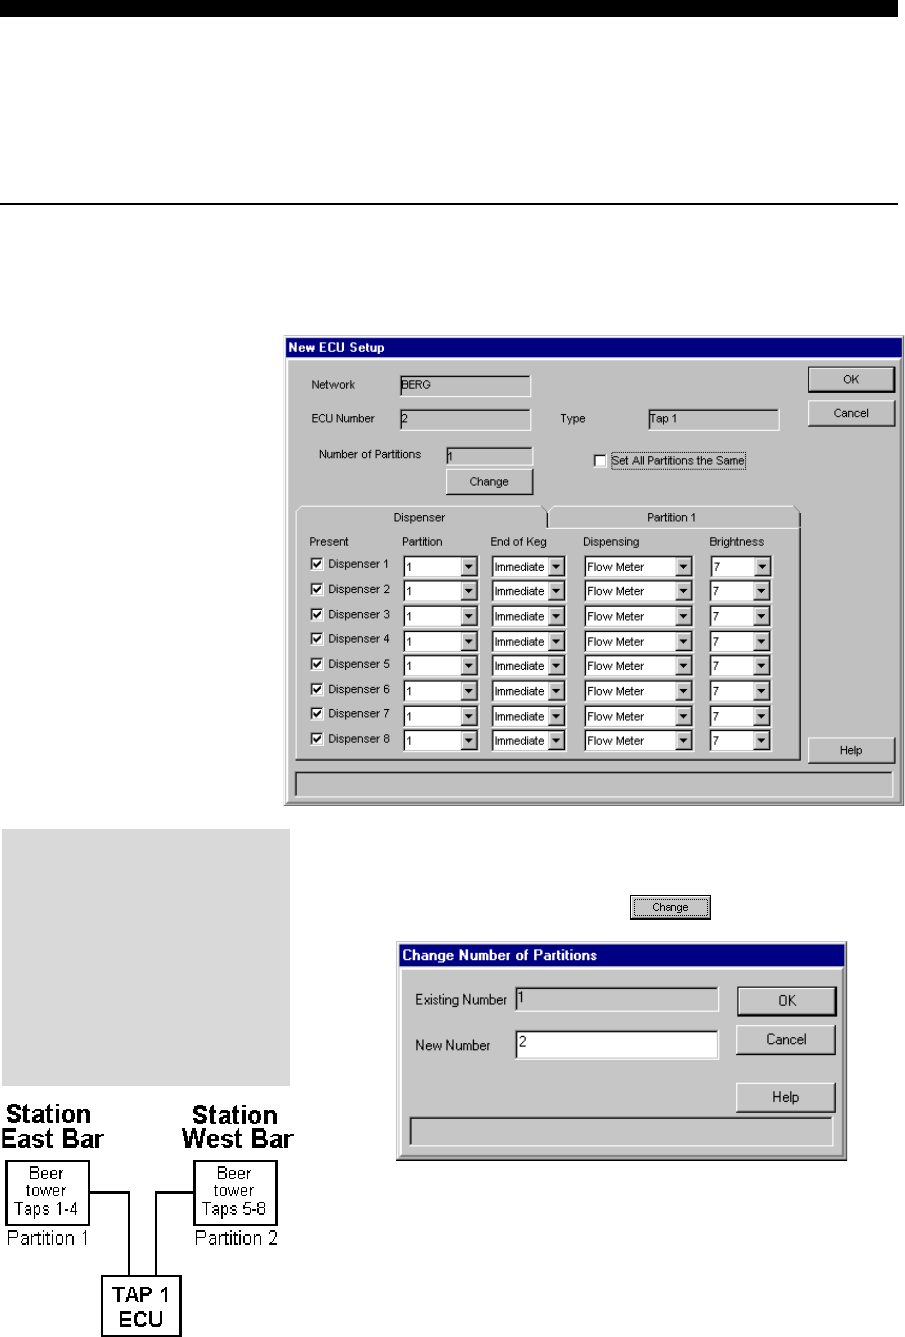
2. By default the Number of Partitions for every TAP 1 ECU
is 1. (The entire ECU is considered a single partition.) If you
want multiple partitions, click .
Type in the New Number of partitions (2-8) and click OK.
3. To set up all partitions with identical options, select Set All
Partitions the Same. This option copies your entries on the
Partition 1 tab to every other partition tab. (The station
names for the partitions remain unique.)
(continued on next page)
Partitions
A partition is a set of tap
controllers defined by you to
provide flexibility in assigning
tap controllers to stations. A
partition can be as small as
one tap controller, so a TAP 1
ECU can have up to eight
partitions.
7-18 Infinity Installation/Service and User Manual
To select different options for each partition (or if you have
not set up any further partitions) leave Set All Partitions
the Same unchecked.
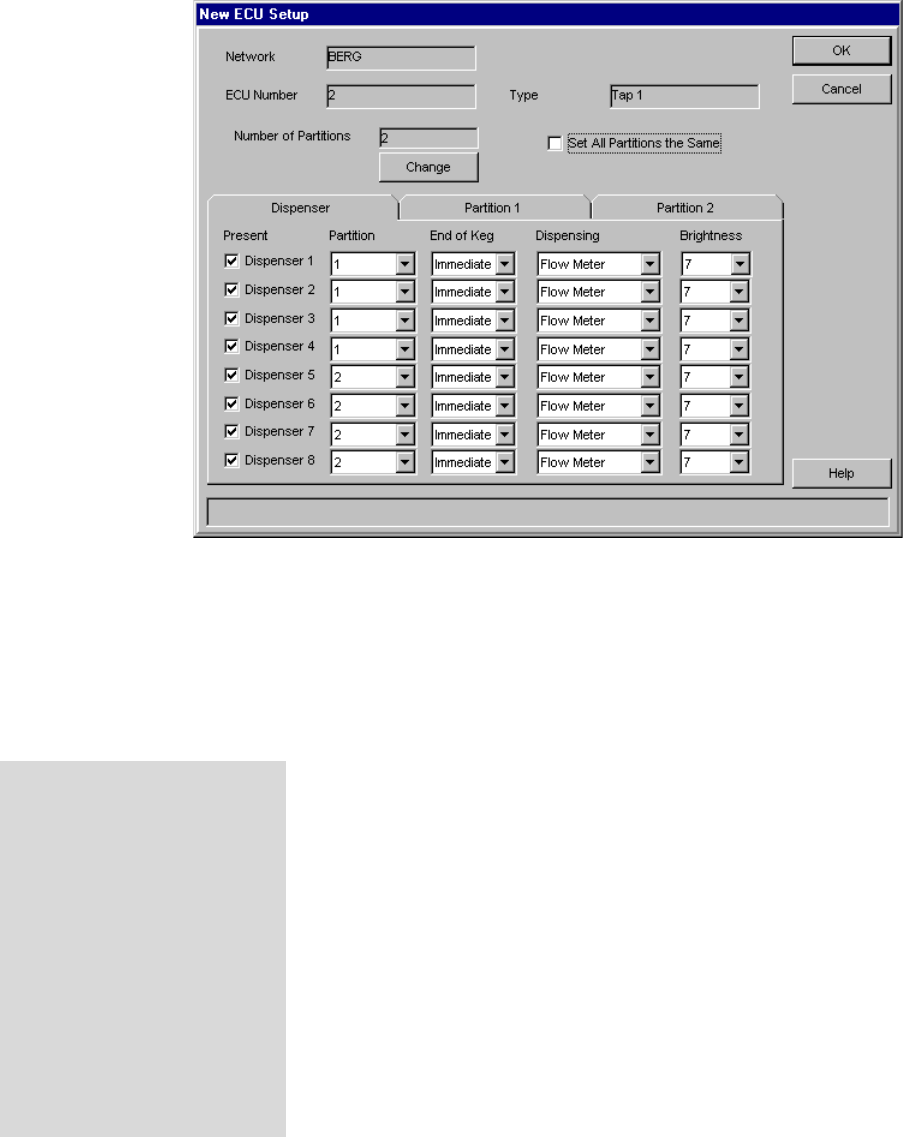
4. On the Dispenser tab, select options for each Tap.
Present indicates whether or not there is a tap dispenser at
this position. Uncheck if the position is vacant.
Partition is the partition number. If you haven't set up
multiple partitions, each tap controller should be in partition
1. At least one tap must be assigned to each partition.
End of Keg indicates the preferred notification when the
flow meter detects an empty keg. (Skip these options if the
pouring control method is not Flow Metersee below.)
Immediate Immediately pause the pour
After Pour Pause after pour is complete
No Notify No notification at the tap
Dispensing is the pouring control method used for the tap.
Flow Meter Portion control by flow meter, TAP 1 tap
controller present
Monitor No portion control, monitors volume by
flow meter, no TAP 1 tap controller present
Timer Mode Portion control by timer, no flow meter,
TAP 1 tap controller present
Brightness is the brightness level (0-7) of the tap's keypad.
7 is the brightest.
Server ID with Partitions
lThe server limit (the number
of servers the ECU tracks
sales for at any given time)
goes from 20 per partition to
10 per partition if there are
more than 4 partitions.
lThis is only a limit to the
number of servers the ECU
maintains records for at a
given time. There may be
many more servers
authorized for the station(s).
Network and ECU Setup 7-19
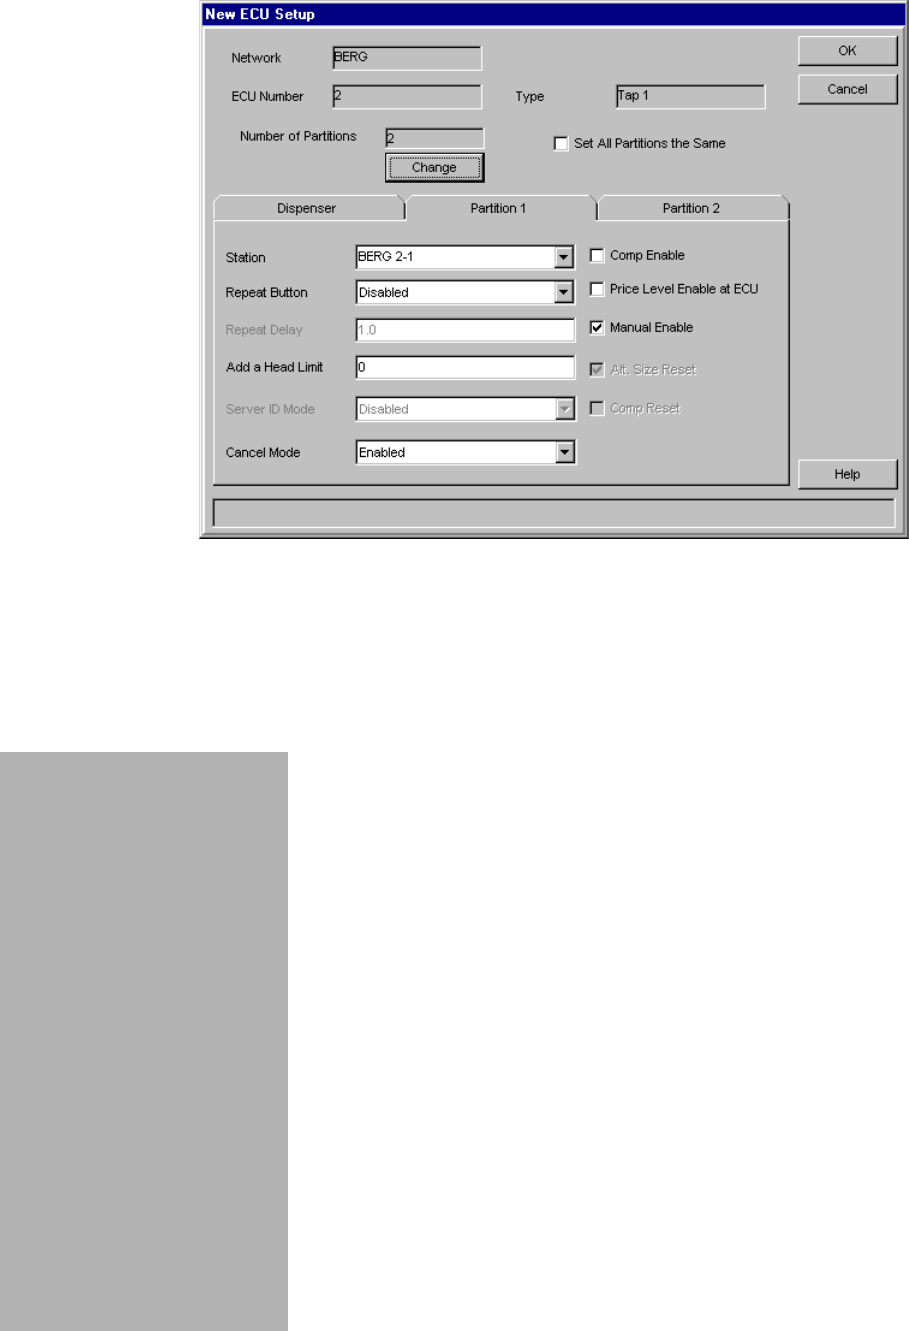
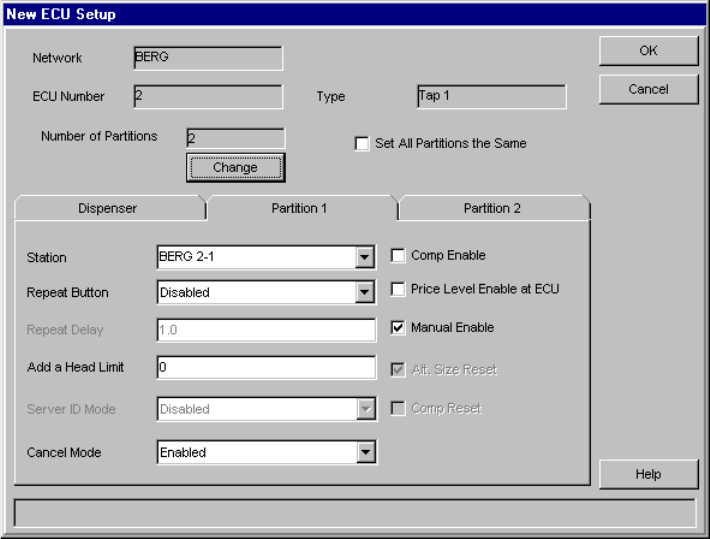
5. Click the Partition 1 tab.
6. Select a Station name. (See Default Station Names
sidebar.)
7. Select a Repeat Button option.
Repeat Enabled enables the repeat button on the taps for
repeat pours.
Alternate Size Enabled enables the repeat button to pour
alternate portion sizes (sizes 5-8).
Disabled disables the repeat button.
8. Type the Repeat Delay if you enabled repeat pours.
Repeat Delay is the number of seconds (0.8-9.9) the tap
pauses between identical pours.
9. Type the Add a Head Limit (only available with EPROMS
3.00 or later).
Add a Head Limit is the maximum number (0-10) of
consecutive 'add a head' pours allowed. (Add a head is
any zero-priced size, typically set at a small portion on
size 4.) Entering 0 permits unlimited add a head pours.
10. If you want to use the server ID option with your TAP 1
ECU, select a Server ID Mode. (EPROM version 5.04 or
above is required for Server ID.)
Enabled means sales are tracked by server at the ECU and
a key is required for dispensers to pour.
(continued on next page)
On the Partition
tabs you select
options that affect
all tap controllers
in the partition. If
you have not set up
multiple partitions,
all tap controllers
are in Partition 1. If
you have set up
multiple partitions
and checked Set All
Partitions the
Same, all tabs
except Partition 1
are disabled.
Default Station Names
Infinity automatically creates a
station for each ECU or
partition you set up. The name
of the station is the network
name plus the ECU number plus
the partition number (e.g., 'Berg
2-1').
You can:
lAccept the default name, or
lType a new name in the
Station field (up to 19
characters), or
lSelect another station for
this ECU or partition.
You can always rename a
station or change station
setup later on (see the Station
and Group Setup section).
7-20 Infinity Installation/Service and User Manual
Disabled means server ID mode is disabled at the ECU and
a key is not required for dispensers to pour.
If the Server ID Mode list is not enabled, see Enable Server
ID in the Configuration Options section.
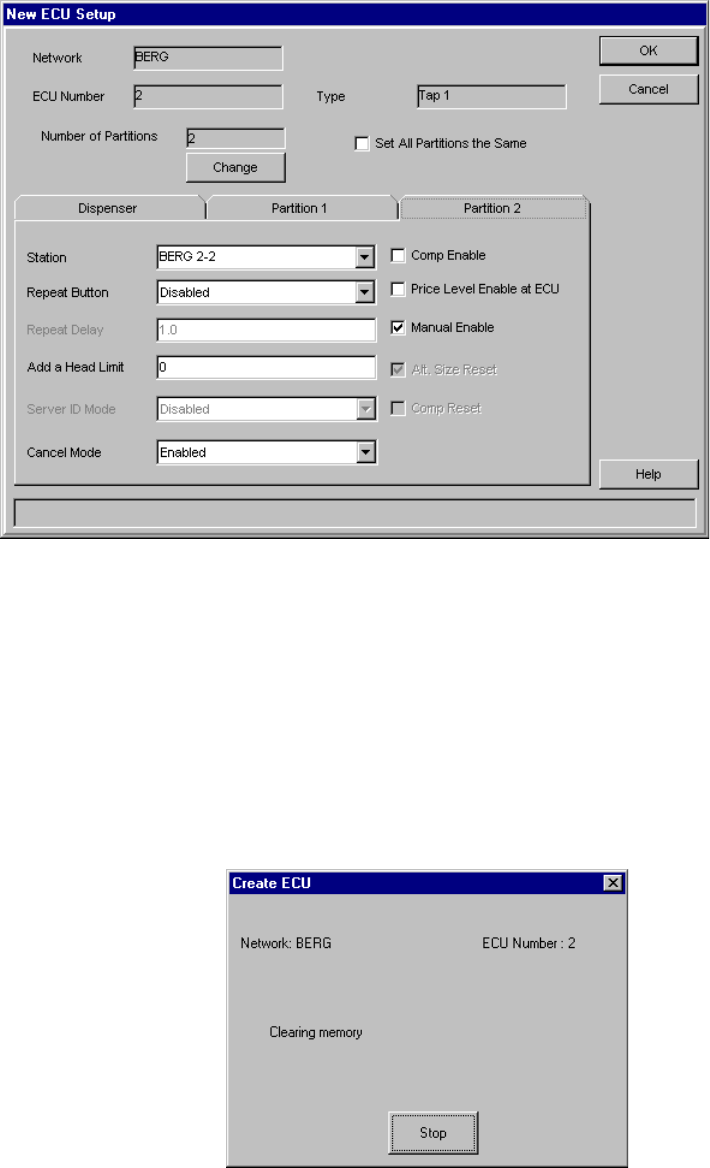
11. Select a Cancel Mode.
Enabled means canceled pours are recorded as cancels on
reports.
Charge Cancels means any canceled pours are recorded as
full-volume, full-price pours (only available with EPROMS
3.00 or later).
12. Select Comp Enable to enable complimentary pouring.
Enabling this feature does not put dispensers in comp mode;
it simply makes comp mode an option at the dispensers.
13. Select Price Level Enable at ECU to enable price level
changes at the taps. If you uncheck this option, price level
changes can only be made at the computer.
14. Select Manual Enable to enable manual pouring at the taps.
Enabling this feature does not automatically suspend portion
control pouring; it simply makes it possible to pour
manually.
15. Select Alt. Size Reset to reset the portion sizes at the tap to
standard mode after every alternate size pour (if you enabled
alternate size pouring).
Network and ECU Setup 7-21
16. Select Comp Reset to automatically reset to full price
pouring after a complimentary pour (if you enabled comp
pouring).
17. Click the next Partition tab (if any) and repeat steps 6-16
for every partition if you did not select Set All Partitions
the Same.
18. Click OK to save all your entries and exit the screen. Or
click Cancel to exit the screen without saving.
Wait while the software communicates the setup
information to the ECU.
19. Click Close to exit the ECU Setup screen.
7-22 Infinity Installation/Service and User Manual
Default Station Names
Infinity automatically creates a
station for each ECU you set
up. The name of the station is
the network name plus the ECU
number (e.g., 'Eagle 5').
You can:
lAccept the default name, or
lType a new name in the
Station field (up to 19
characters), or
lSelect another existing
station to which to add this
ECU.
You can always rename a
station or change station
setup later on (see the Station
and Group Setup section).
Enter 1544 Infinity ECU Options
A 1544 Infinity ECU must be set up with a network name and a unique ECU number. You must
also know which features to enable before you can set up the ECU. Use the Getting Ready for
Infinity Worksheet if you haven't already determined how you want to set up the ECU.
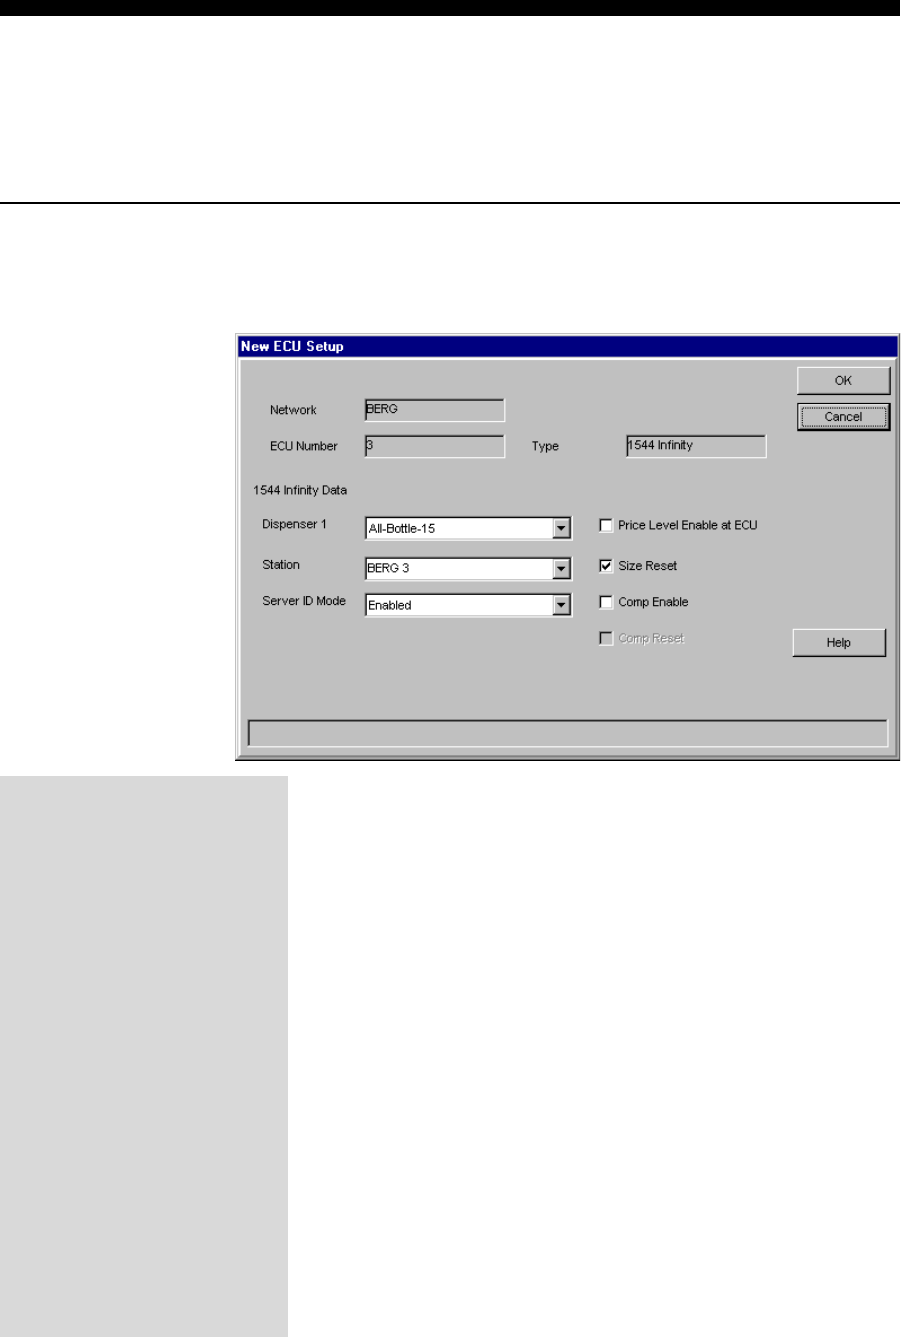
nTo enter 1544 Infinity ECU options:
1. Access the New ECU Setup screen. See New ECU Setup in
this section.
2. Select All-Bottle 15 for the Dispenser 1 field.
3. Select a Station name. (See Default Station Names
sidebar.)
4. If you want to use the server ID option with your 1544
Infinity ECU, select a Server ID Mode. (EPROM version
3.08 or above is required for Server ID.)
Enabled means sales are tracked by server at the ECU and a
key is required for dispensers to pour. (1544 Infinity ECUs
can use two server key receptacles in this mode, but only one
at time. If a key is inserted in both receptacles at the same
time, no pour is allowed.)
Disabled means server ID mode is disabled at the ECU and
a key is not required for dispensers to pour.
(If the Server ID Mode list is not enabled, see Enable
Server ID in the Configuration Options section.)
Network and ECU Setup 7-23
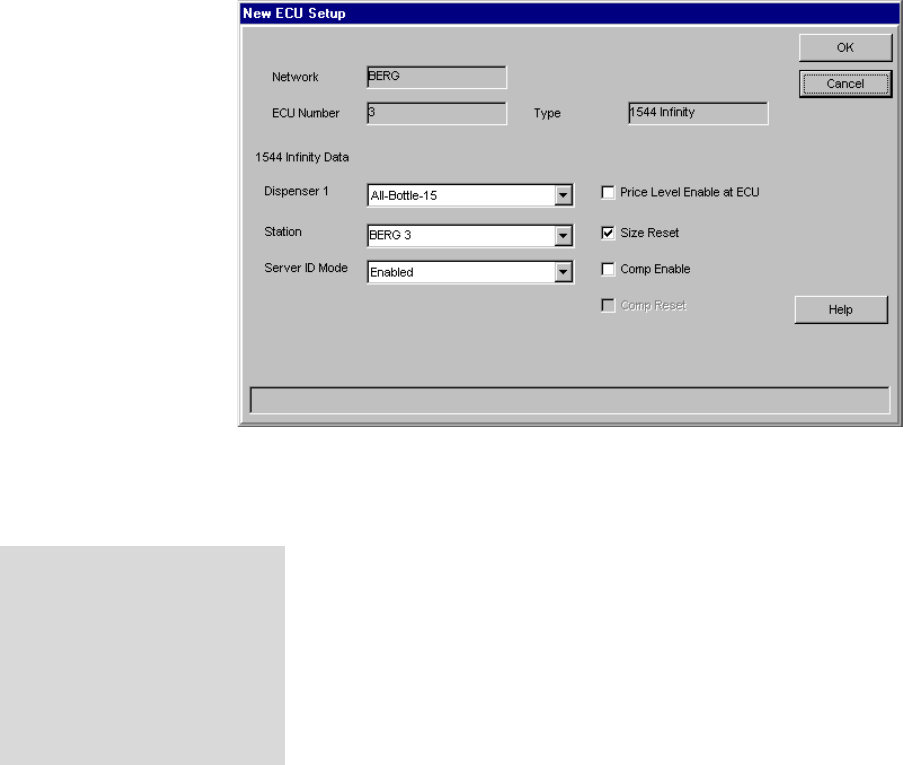
5. Select Price Level Enable to enable price level changes at
the ECU. If you uncheck this option, price level changes can
only be made at the computer.
7. Select Size Reset to automatically reset the portion size to
regular after every pour.
5. Select Comp Enable to enable complimentary pouring.
8. Select Comp Reset to automatically reset to full price
pouring after a complimentary pour (if you enabled comp
pouring).
9. Click OK to save your entries and exit the screen. Or click
Cancel to exit the screen without saving.
Wait while the software communicates the setup information
to the ECU.
10. Click Close to exit the ECU Setup screen.
Enable Features
Selecting a feature such as
Comp Enable does not put
dispensers at the ECU in Comp
mode. It simply makes it
possible for bartenders to
switch to this pouring mode.
7-24 Infinity Installation/Service and User Manual
Modify an ECU (Infinity, TAP 1 or 1544 Infinity)
You can make changes to existing ECU settings (Infinity, TAP 1 or 1544 Infinity) if necessary.
All ECU settings can be modified and the changes are communicated to the ECU as soon as you
click OK to enter them. If you have accumulated sales data, run a Clear Sales (Z) report before
making major changes such as modifying the number of partitions in a TAP 1 ECU.
nTo modify an ECU:
1. Run Manager.
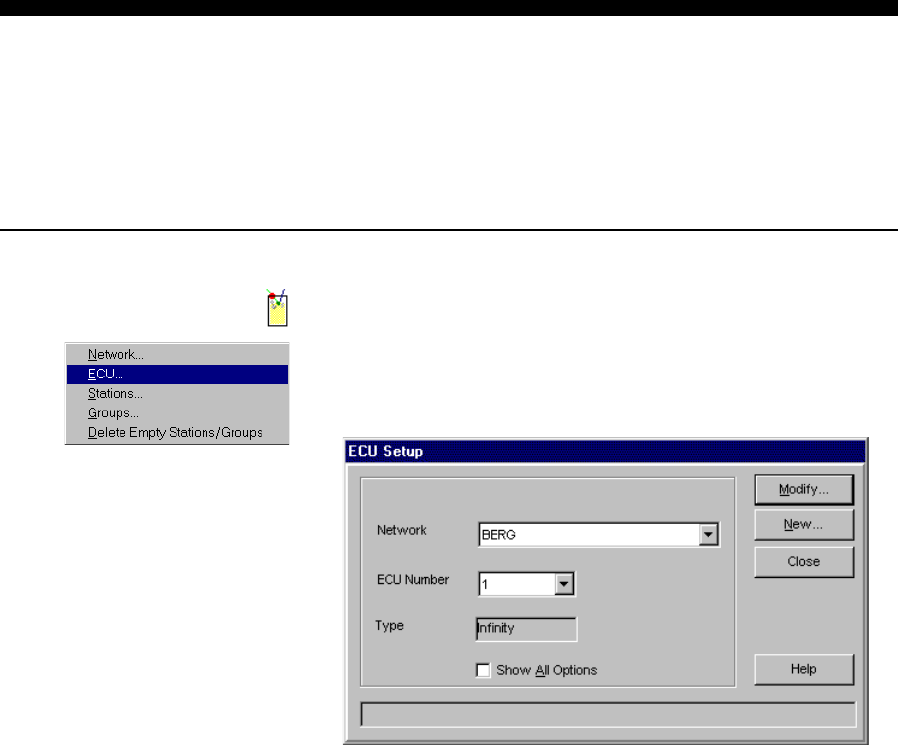
2. Pull down the Equipment menu and point to Setup. Click
ECU....
3. Select the name of the Network.
4. Select the ECU number.
5. Click Modify....
6. Select new entries for the ECU options you want to modify.
If you need help with the options, see the New ECU Setup
tasks in this section.
7. Click OK to save all your entries and exit the screen. Or
click Cancel to exit the screen without saving.
Network and ECU Setup 7-25
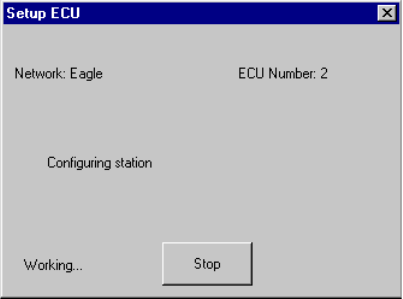
Wait while the software communicates the modifications to
the ECU.
8. Click Close to exit the ECU Setup screen.
7-26 Infinity Installation/Service and User Manual
Delete an ECU (Infinity, TAP 1 or 1544 Infinity)
You can delete an ECU if you need to, rather than simply modifying it. When you delete an ECU,
the ECU and its dispensers are disabled. If you have accumulated sales data, run a Clear Sales (Z)
report before deleting the ECU.
nTo delete an Infinity or TAP 1 ECU:
1. Run Manager.
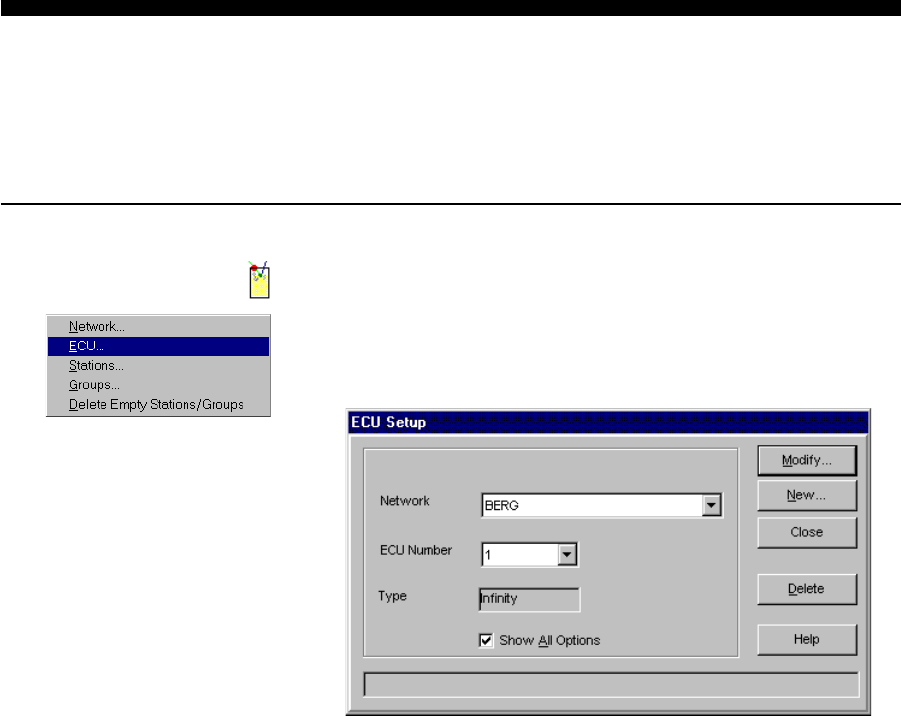
2. Pull down the Equipment menu and point to Setup. Click
ECU....
3. Pull down a list and select the name of the Network.
4. Pull down a list and select the ECU number.
5. Check Show All Options if necessary.
6. Click Delete.
Network and ECU Setup 7-27
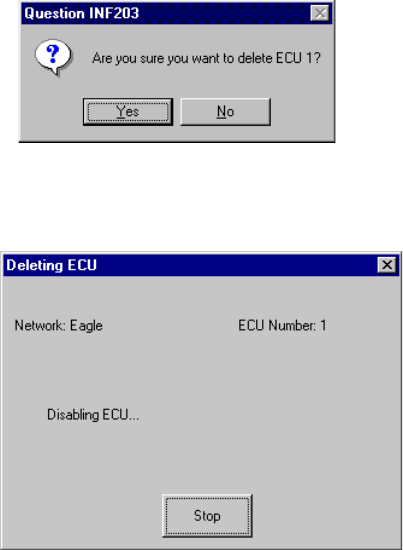
7. Click Yes to confirm the deletion.
Wait for the software to complete the deletion. After
communication with the ECU, the ECU and its dispensers
are disabled.
8. Click Close to exit the ECU Setup screen.
7-28 Infinity Installation/Service and User Manual
View Hardware Configuration
This feature lets you view a list of the networks and ECUs you have set up. It also includes the
station name of each ECU. This list is helpful if you want to get an overview of the system's
organization or you need to see what's out there before making changes. It's easily moved and
resized and you can view it from any screen. This list reflects only your database configuration at
the computerit does not check to see what hardware is attached at the present time.
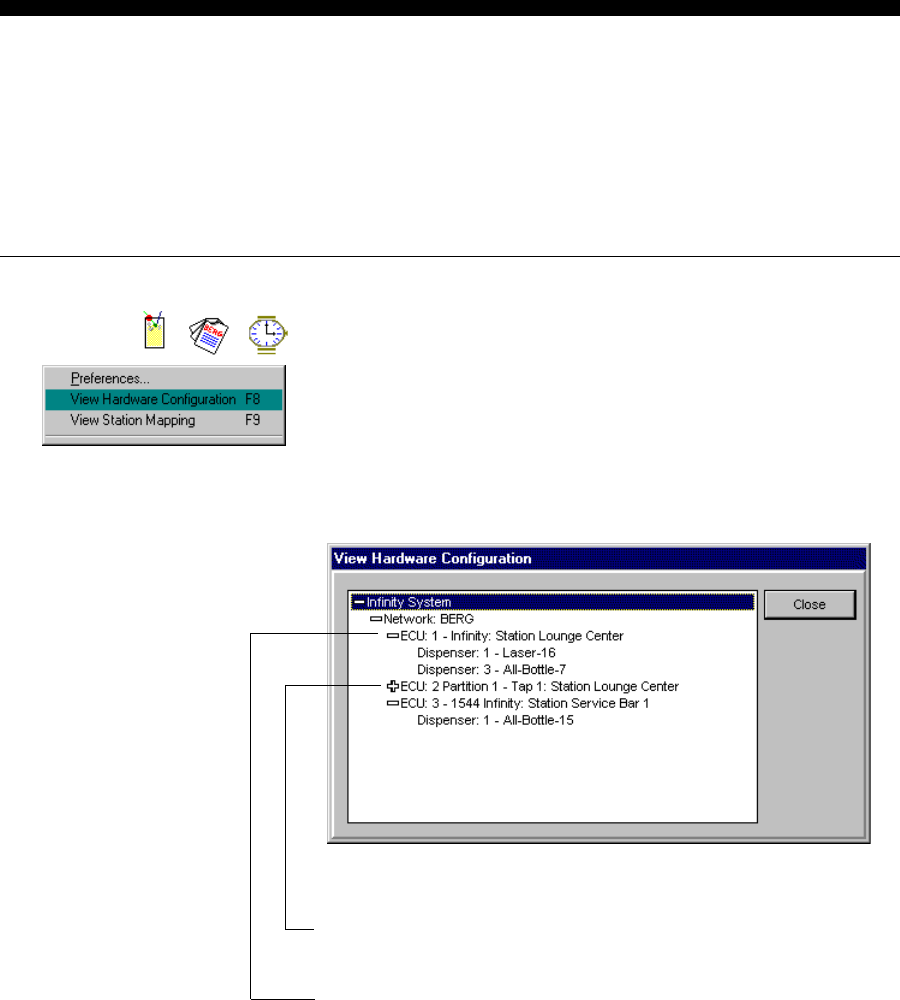
nTo view hardware configuration:
1. Run Manager, Report or Schedule.
2. Pull down the Options menu and click View Hardware
Configuration.
OR
From any screen press the F8 key.
3. View the directory-type list using the scroll bar if necessary.
4. Click the plus (+) sign on networks or ECUs to view their
components.
5. Click the minus (-) sign on networks or ECUs to collapse
their components.
6. Click Close to exit the screen.

SECTION
8
After you've set up networks and ECUs, you can organize the ECUs into stations
and groups for convenient management of pouring operations and reporting. A
station is the smallest component of the system used for performing software
tasks such as changing price levels or running reports. By default, a station is set
up in the software for each ECU or partition you set up. Therefore, you don't
need to set up any more stations unless you want to combine ECUs or partitions
into one station for convenience. Setting up groups provides further flexibility
because you can combine stations and other groups into one group. An ECU or
partition can only be in one station, but in multiple groups. As you set up your
system, you can view a list of stations and groups using the View Station
Mapping feature. This section provides help with the following tasks:
New Station Setup........................................................................... 8-2
Modify a Station .............................................................................8-4
Rename a Station ............................................................................8-6
Delete a Station ............................................................................... 8-7
New Group Setup ............................................................................ 8-8
Modify a Group............................................................................. 8-10
Rename a Group............................................................................8-12
Delete a Group ..............................................................................8-13
View Station Mapping ..................................................................8-14
Delete Empty Stations and Groups ...............................................8-15
Station and Group
Setup
8-2 Infinity Installation/Service and User Manual
New Station Setup
You don't have to set up any stations if you plan to treat each ECU as its own station. If you want
to keep each ECU in its own station but give it a new station name, see Rename a Station in this
section. You should set up a new station if you want to combine two or more ECUs or partitions
into a single station for the purposes of pouring operations and reports. A station is the smallest
component the software uses to perform most functions, so be sure the stations you set up provide
the most convenient combinations of ECUs and partitions. For maximum flexibility, set up each
ECU or partition as its own station, and then set up groups for all operations involving multiple
ECUs or partitions.
nTo set up a new station:
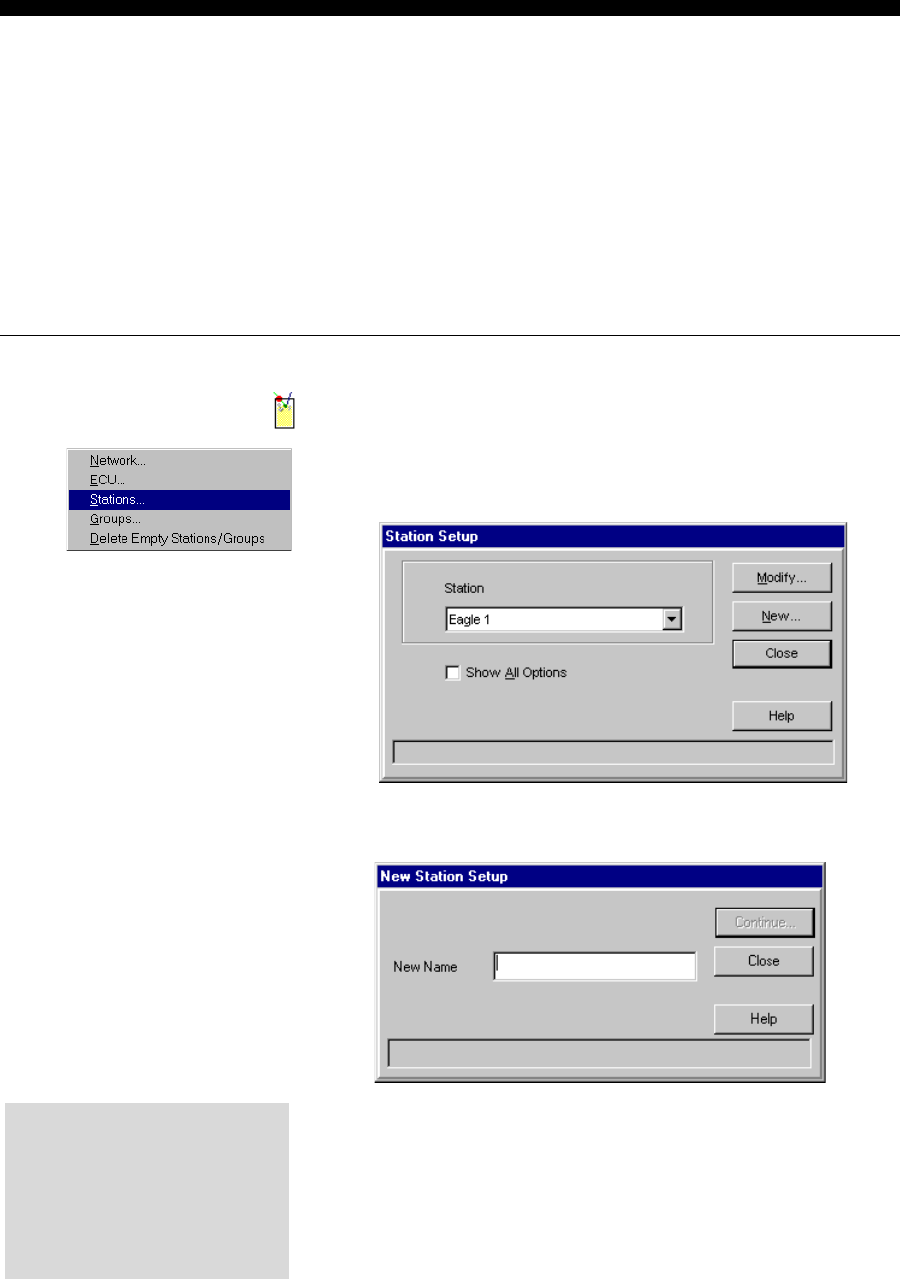
1. Run Manager.
2. Pull down the Equipment menu and point to Setup. Click
Stations....
3. Click New....
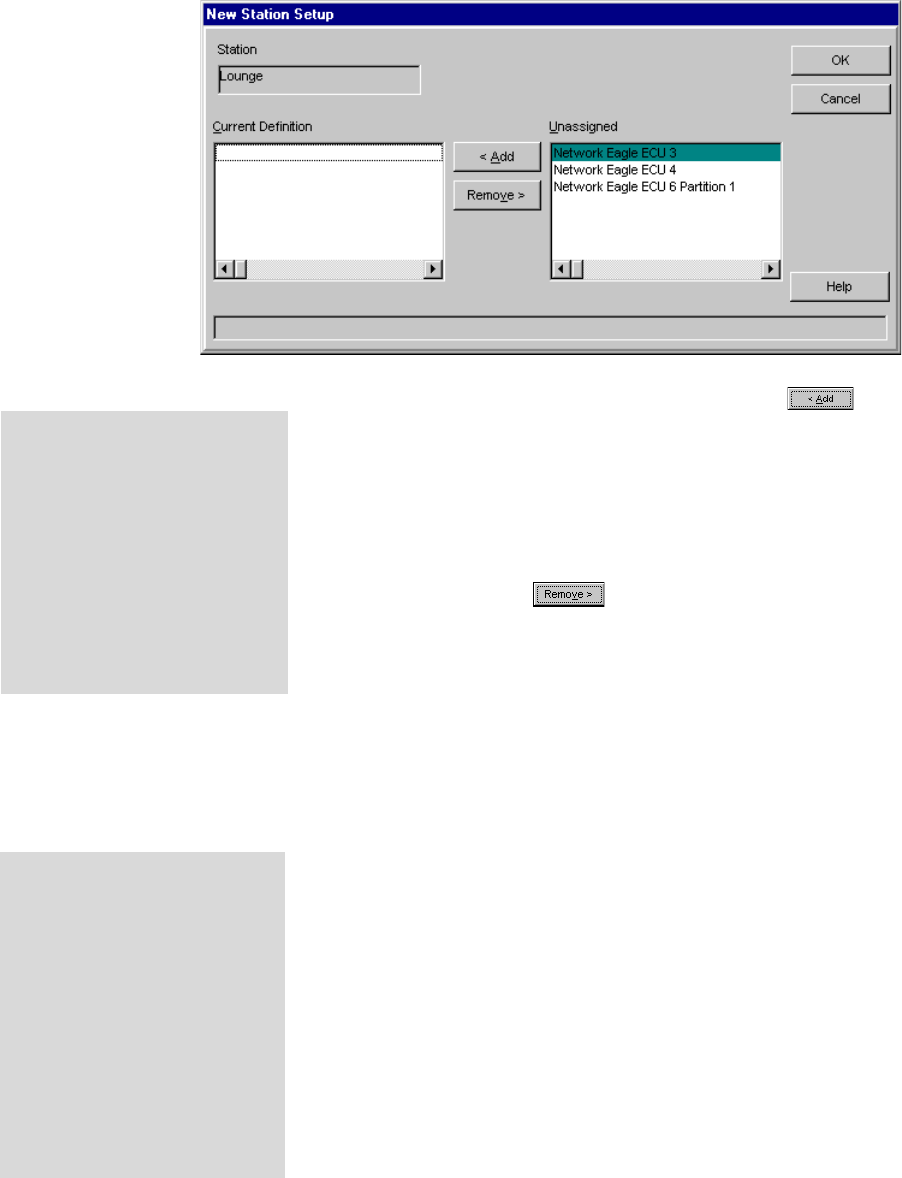
4. Type in the station's unique name in the New Name field. It
can be up to 19 characters long.
5. Click Continue... to proceed with setting up the station or
click Close to exit the screen without saving.
View Station Mapping
If you want to see a list of all
the stations and groups you've
set up, see View Station
Mapping in this section.
Station and Group Setup 8-3
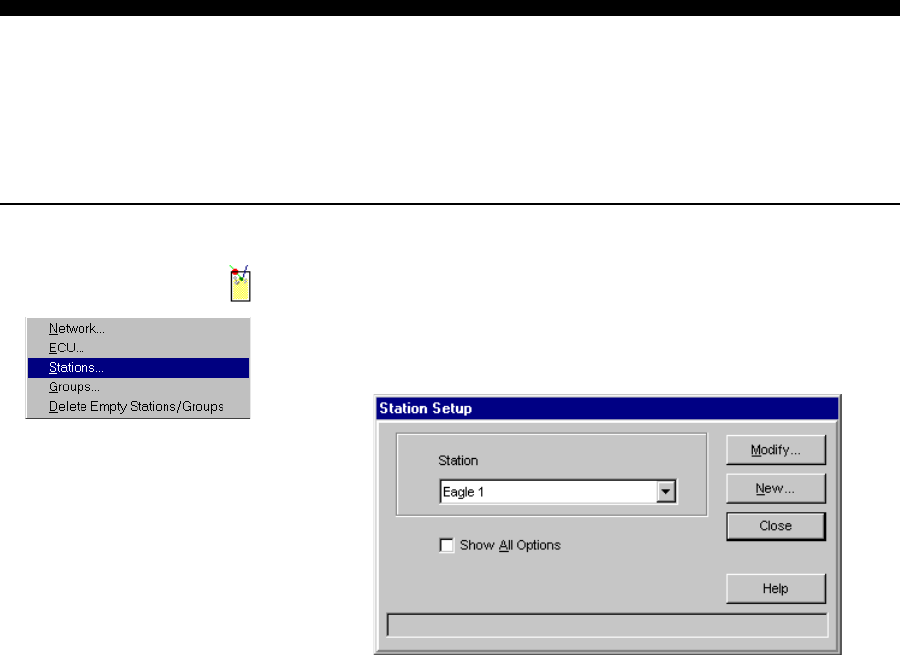
6. Select an entry in the Unassigned list and click to
move the entry into the Current Definition list or drag and
drop the selected entry to the Current Definition list.
The Unassigned list is a list of all the ECUs and partitions
that are currently unassigned to a station.
7. To remove an entry from the Current Definition list, select
the entry and click or drag and drop the entry from
Current Definition list to the Unassigned list.
8. Click OK to save all your entries in the Current Definition
list and exit the screen. Or, click Cancel to exit the screen
without saving.
9. Repeat steps 3-8 for each new station you are setting up.
10. Click Close to exit the Station Setup screen.
If the ECU or partition you want
to add is not in the Unassigned
list, see Modify a Station in this
section to remove it from its
current station.
Or you can delete the current
station names which puts all
ECUs and partitions on the
Unassigned list. See Delete a
Station in this section.
Empty Stations
lYou can create an empty
station if you want to make
the ECU/partition
assignments later.
lEmpty stations do not
appear in station selection
lists when you perform
Infinity operations (such as
enabling/disabling stations,
running reports, etc.).
8-4 Infinity Installation/Service and User Manual
Modify a Station
You can make changes to the current definition of a station if necessary. If you remove ECUs or
partitions from the station they are put on the Unassigned list. Be sure to reassign them to a
different station.
nTo modify a station:
1. Run Manager.
2. Pull down the Equipment menu and point to Setup. Click
Stations....
3. Select the name of the Station you want to modify.
4. Click Modify....
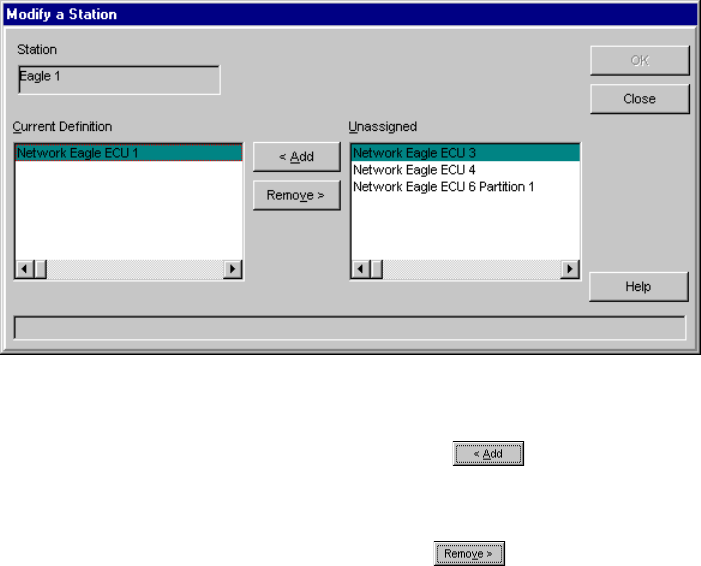
5. View the Current Definition list for the station using the
scroll bar.
Station and Group Setup 8-5
6. To add entries to the Current Definition list, click entries
in the Unassigned list and click or drag and drop
the entry to the list.
To remove entries from the Current Definition list,
highlight the entries and click or drag and drop the
entry from the Current Definition list to the Unassigned
list.
7. Click OK to save the displayed Current Definition list and
exit the screen. Or click Cancel to exit the screen without
saving.
8. Repeat steps 3-7 for each station you want to modify.
9. Click Close to exit the Station Setup screen.
8-6 Infinity Installation/Service and User Manual
Rename a Station
If you only want to change a station's name, use this station setup feature. If you want to modify
the station's definition list, see Modify a Station in this section.
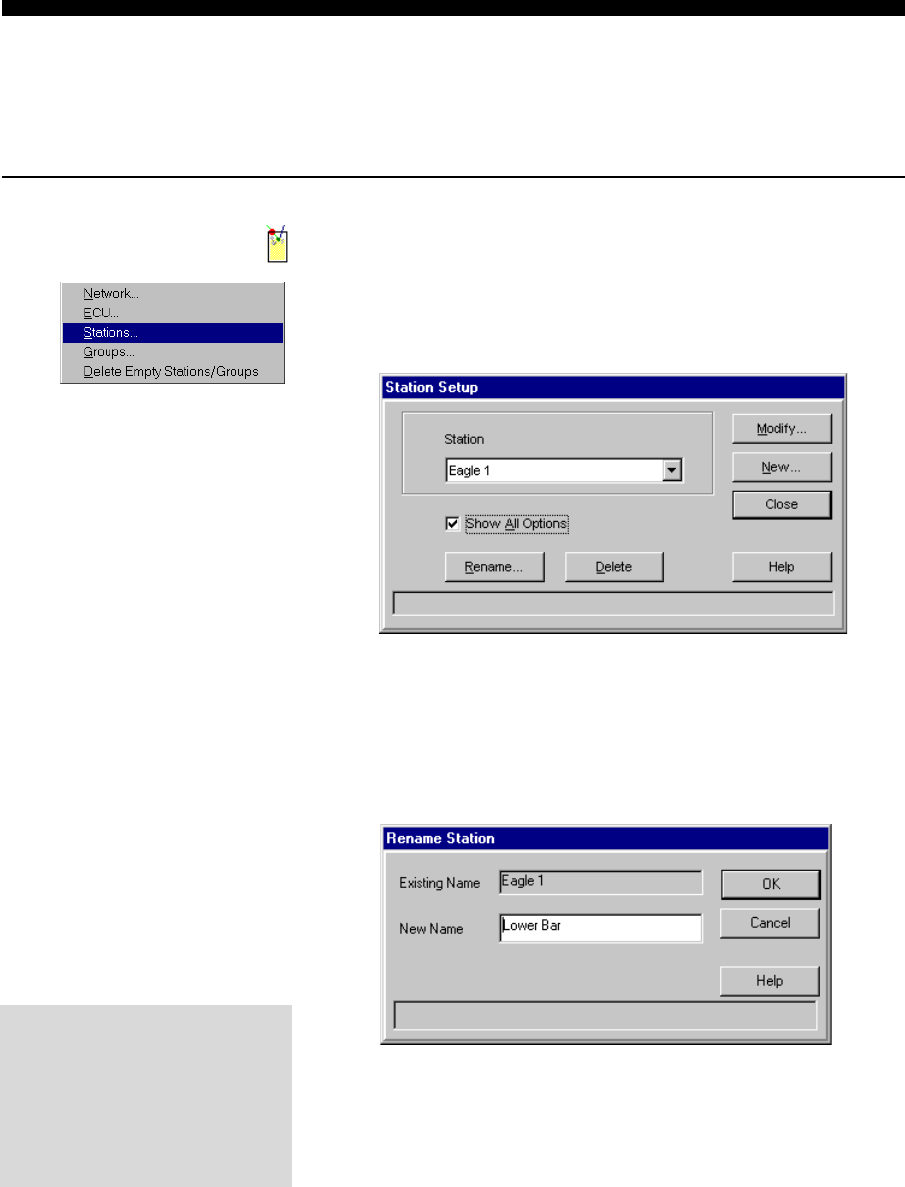
nTo rename a station:
1. Run Manager.
2. Pull down the Equipment menu and point to Setup. Click
Stations....
3. Select the name of the Station you want to rename.
4. Select Show All Options.
5. Click Rename....
6. Type in a unique name for the station in the New Name
field.
7. Click OK to save your entry and exit the screen. Click
Cancel to exit the screen without saving.
8. Click Close to exit the Station Setup screen.
lThe old station name will be
automatically replaced with
the new station name in any
custom reports, exports or in
any schedules saved in the
Infinity directory..
Station and Group Setup 8-7
Delete a Station
You can delete a station if you need to. When you delete a station, the ECUs and partitions in the
station are not deleted. They are put on the Unassigned list. Be sure to reassign them to a
different station.
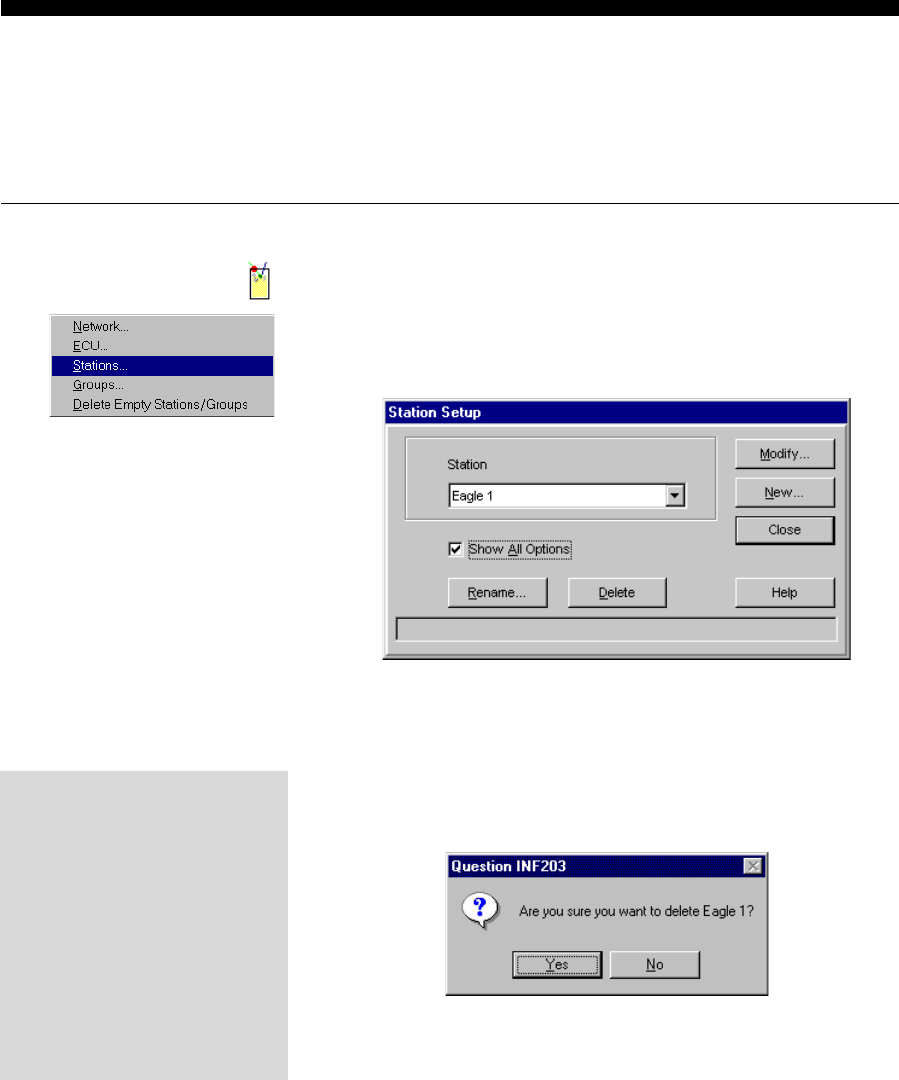
nTo delete a station:
1. Run Manager.
2. Pull down the Equipment menu and point to Setup. Click
Stations....
3. Select the name of the Station you want to delete.
4. Select Show All Options.
5. Click Delete.
6. Click Yes to confirm the deletion.
7. Click Close to exit the Station Setup screen.
Note
qSee also Delete Empty Stations and Groups if you want to
quickly delete all station or group names that have no
assigned ECUs or partitions.
lYou'll see a warning if the
station is included in any
schedules, exports or custom
reports. Click Continue... and
then respond to the Yes or
No confirmation message.
lIf you proceed with the
deletion, the indicated
schedules, exports, or
custom reports will not run
correctly.
8-8 Infinity Installation/Service and User Manual
New Group Setup
Groups are the most flexible equipment setup item in the software. You can set up as many or as
few groups as you like, with each group being part of another group or forming a series of levels
if your system is large. Groups are composed of stations and/or other groups. Organize your
groups to provide the most convenient access for management, scheduling and reporting activites.
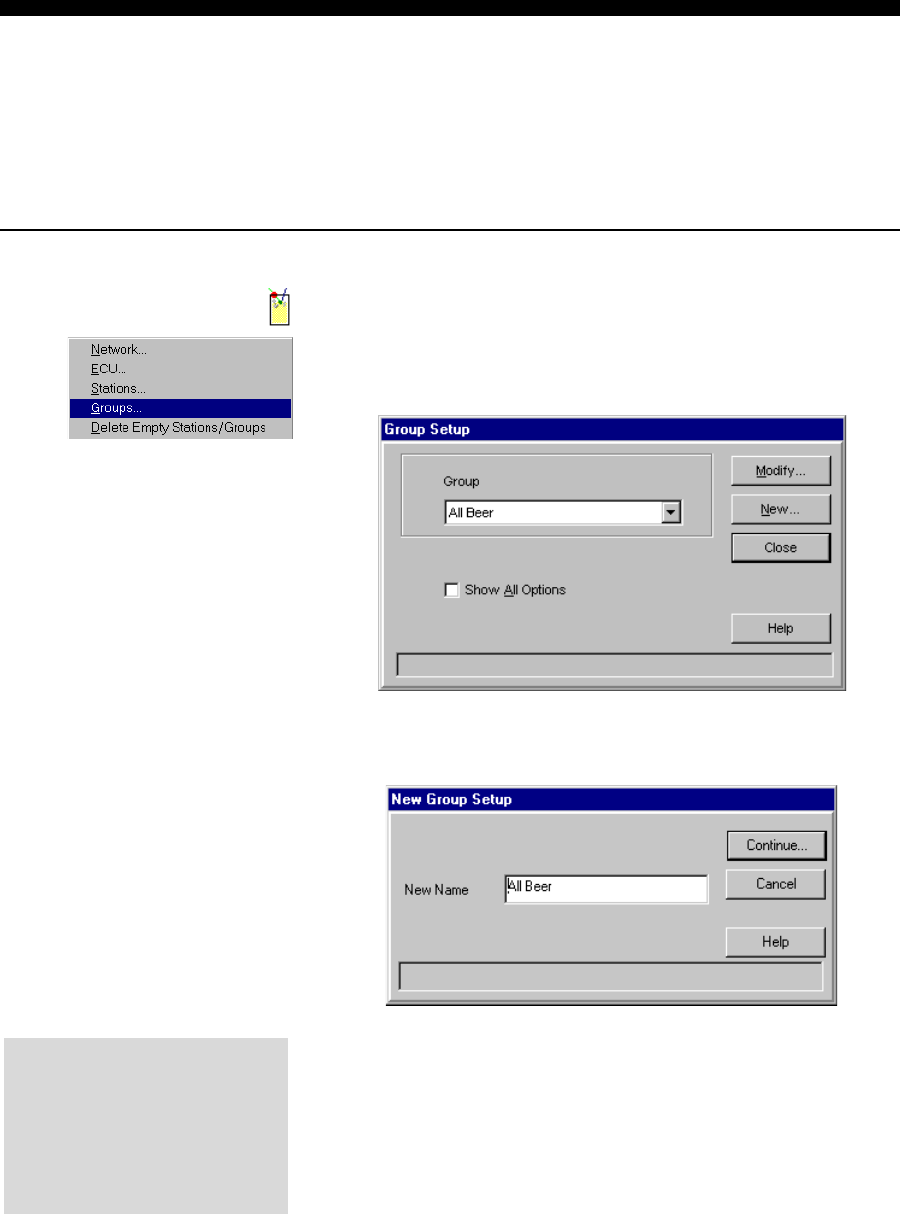
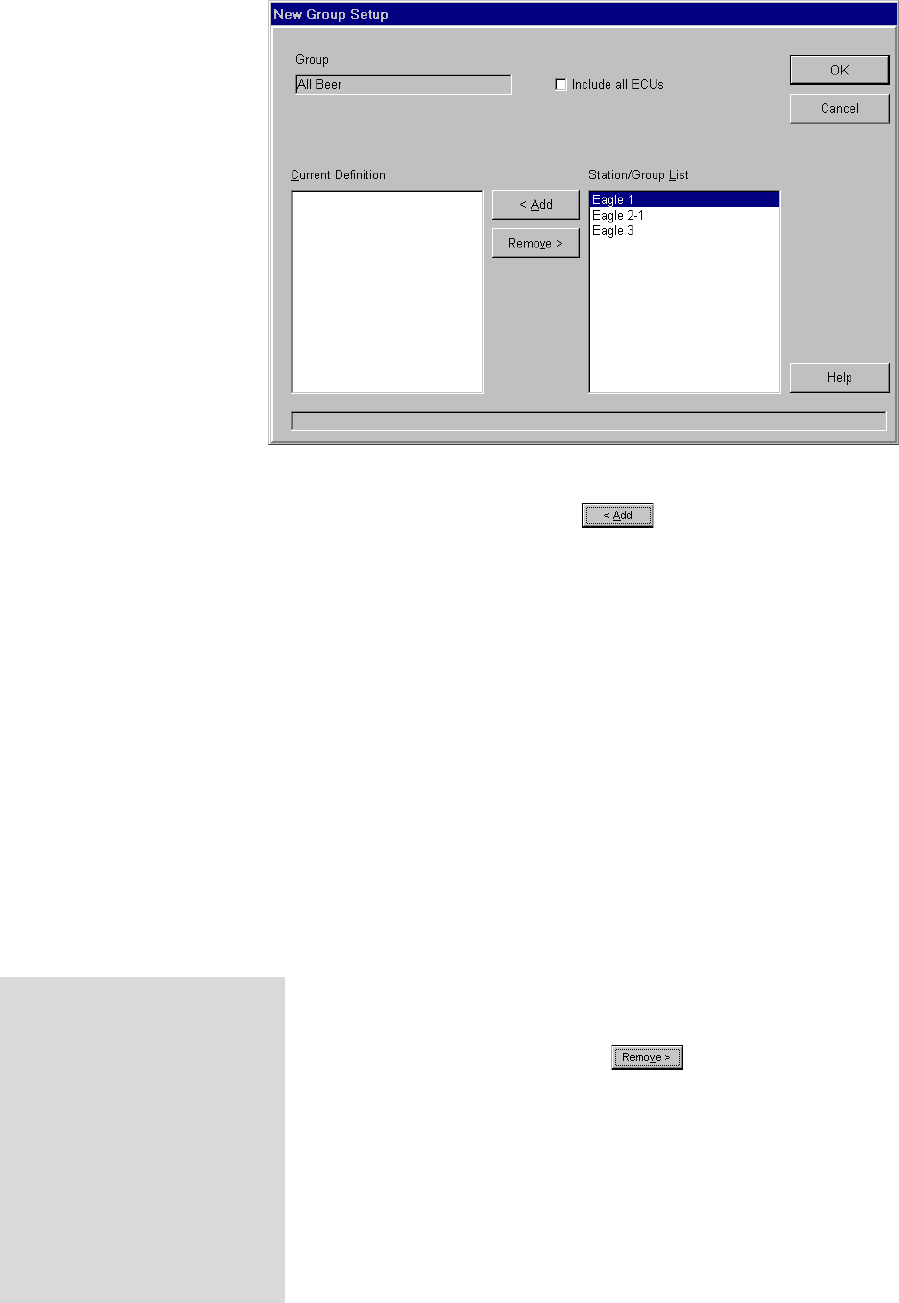
nTo set up a new group:
1. Run Manager.
2. Pull down the Equipment menu and point to Setup. Click
Groups....
3. Click New....
4. Type in the group's unique name in the New Name field. It
can be up to 19 characters long.
5. Click Continue... to proceed with setting up the group or
click Close to exit the screen without saving.
View Station Mapping
If you want to see a list of all
the stations and groups you've
set up, see View Station
Mapping in this section.
Station and Group Setup 8-9
6. View the Station/Group List using the scroll bar. Select an
entry in the list and click to add the entry to the
Current Definition list or drag and drop the entry from the
Station/Group List to the Current Definition list.
Note that the entry is not removed from the Station/Group
List because one entry can be in several different groups.
7. To set up a master group that includes all ECUs (even those
not assigned to a particular station), select Include all
ECUs.
Selecting this option does not prevent you from setting up
other groups. Once you've selected this option and exited
the screen, it no longer appears on the New Group Setup
screen because you can only have one master group.
When you install Infinity with a new database a master
group is automatically created for you. Once you have a
master group, any new ECUs that you set up are
automatically added to the master group.
8. To remove an entry from the Current Definition list,
highlight the entry and click or drag and drop the
entry from the Current Definition list to the Station/
Group List.
9. Click OK to save all your entries in the Current Definition
list and exit the screen. Or click Cancel to exit the screen
without saving.
10. Repeat steps 3-9 for each new group you are setting up.
11. Click Close to exit the Group Setup screen.
Empty Groups
lYou can create an empty
group if you want to make
the station/group
assignments later.
lEmpty groups do not appear
in group selection lists when
you perform Infinity
operations (such as enabling/
disabling groups, running
reports, etc.).
8-10 Infinity Installation/Service and User Manual
Modify a Group
You can make changes to an existing group if necessary. The only group you can't modify is a
master group (if you've defined one by checking the Include all ECUs option).
nTo modify a group:
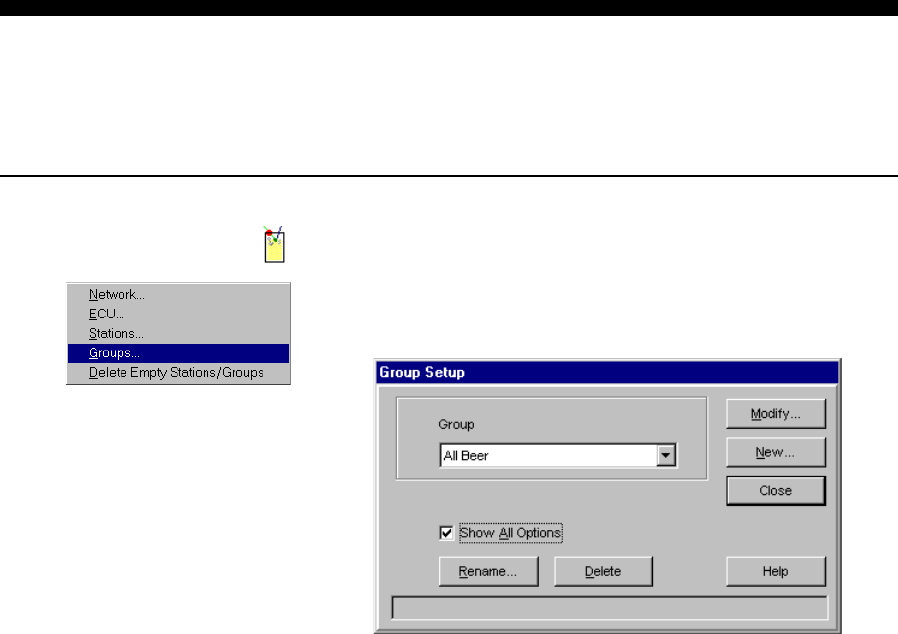
1. Run Manager.
2. Pull down the Equipment menu and point to Setup. Click
Groups....
3. Select the name of the Group you want to modify.
4. Click Modify....
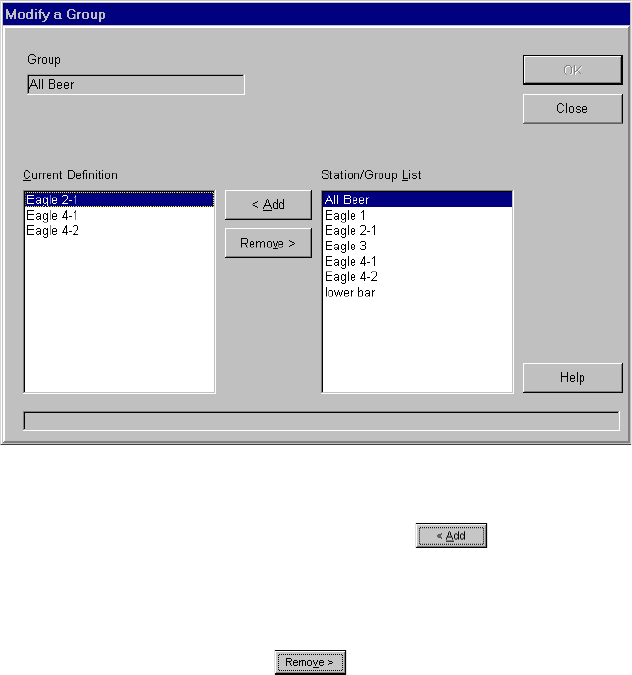
5. View the Current Definition list for the group using the
scroll bar.
Station and Group Setup 8-11
6. To add entries to the Current Definition list, select entries
in the Station/Group List and click or drag and
drop entries from the Station/Group List to the Current
Definition list.
To remove entries from the Current Definition list, select
the entries and click or drag and drop entries from
the Current Definition list to the Station/Group List.
7. Click OK to save the displayed Current Definition list and
exit the screen. Or click Cancel to exit the screen without
saving.
8. Repeat steps 3-7 for each group you want to modify.
9. Click Close to exit the Setup Groups screen.
Note
qThe Include all ECUs option does not appear on the
Modify a Group screen.
8-12 Infinity Installation/Service and User Manual
Rename a Group
If you only want to change a group's name, use this group setup feature. If you want to modify the
group's definition list, see Modify a Group in this section.
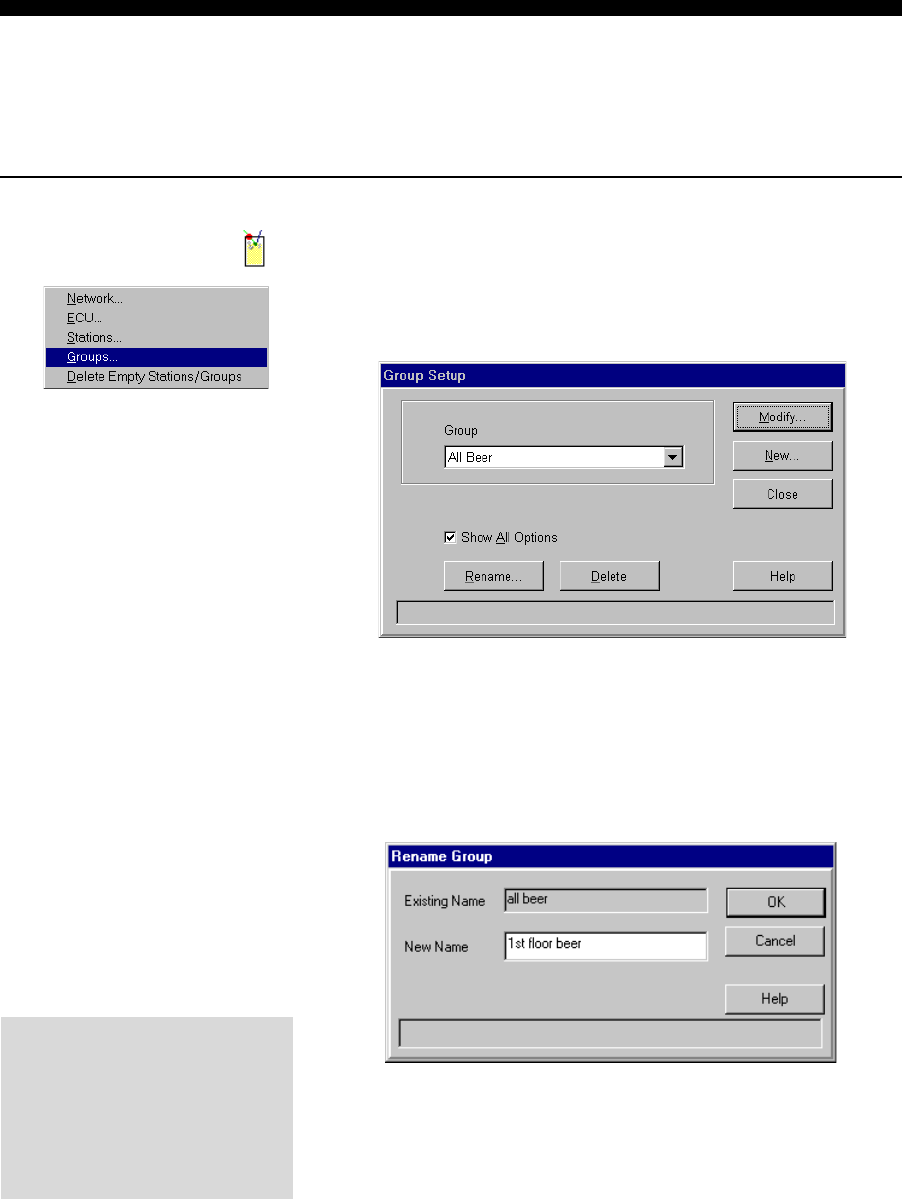
nTo rename a group:
1. Run Manager.
2. Pull down the Equipment menu and point to Setup. Click
Groups....
3. Select the name of the Group you want to rename.
4. Select Show All Options.
5. Click Rename....
6. Type in a unique name for the group in the New Name field.
It can be 19 characters.
7. Click OK to save your entry and exit the screen. Click
Cancel to exit the screen without saving.
8. Click Close to exit the Group Setup screen.
lThe old group name will be
automatically replaced with
the new group name in any
custom reports, exports or in
any schedules saved in the
Infinity directory..
Station and Group Setup 8-13
Delete a Group
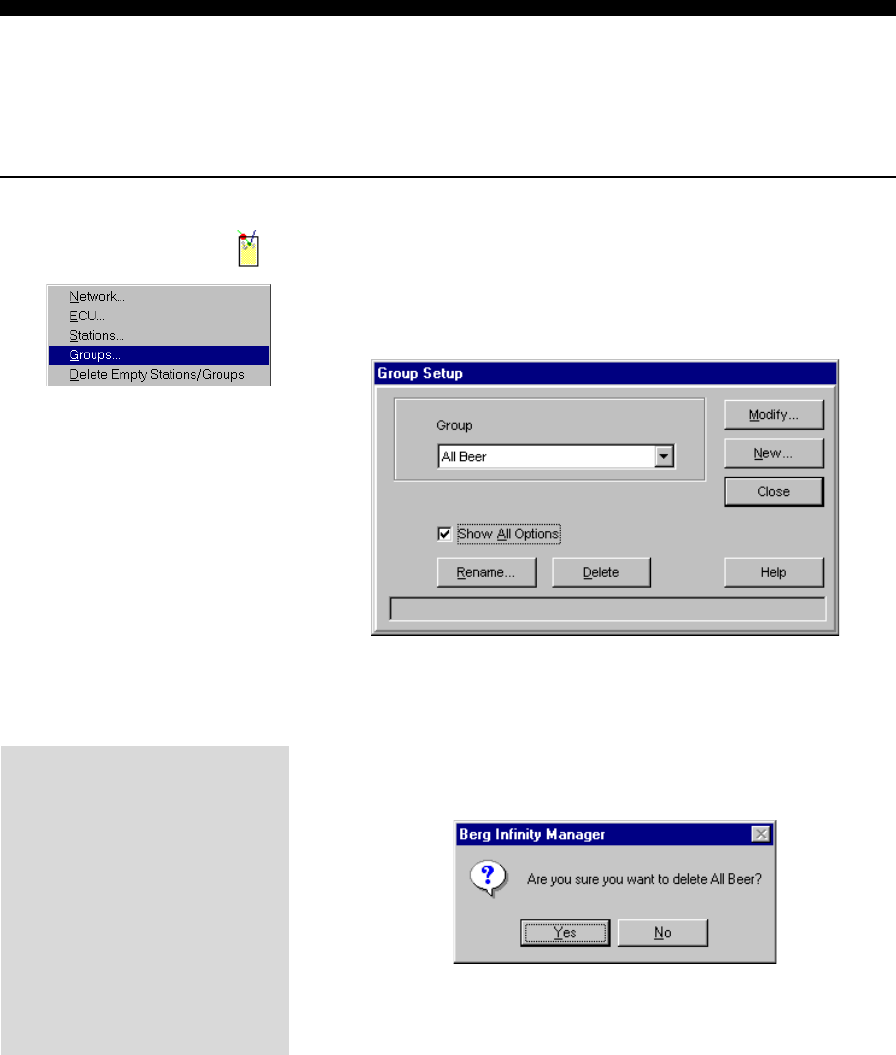
You can delete a group if you need to, rather than simply modifying or renaming it. When you
delete a group, the stations and groups in the group are not deleted.
nTo delete a group:
1. Run Manager.
2. Pull down the Equipment menu and point to Setup. Click
Groups....
3. Select the name of the group you want to delete.
4. Select Show All Options.
5. Click Delete.
6. Click Yes to confirm the deletion.
7. Click Close to exit the Group Setup screen.
Note
qSee also Delete Empty Stations and Groups if you want to
quickly delete all station or group names that have no
assigned ECUs or partitions.
lYou'll see a warning if the
group is included in any
schedules, exports or custom
reports. Click Continue... and
then respond to the Yes or
No confirmation message.
lIf you proceed with the
deletion, the indicated
schedules, exports, or
custom reports will not run
correctly.
8-14 Infinity Installation/Service and User Manual
View Station Mapping
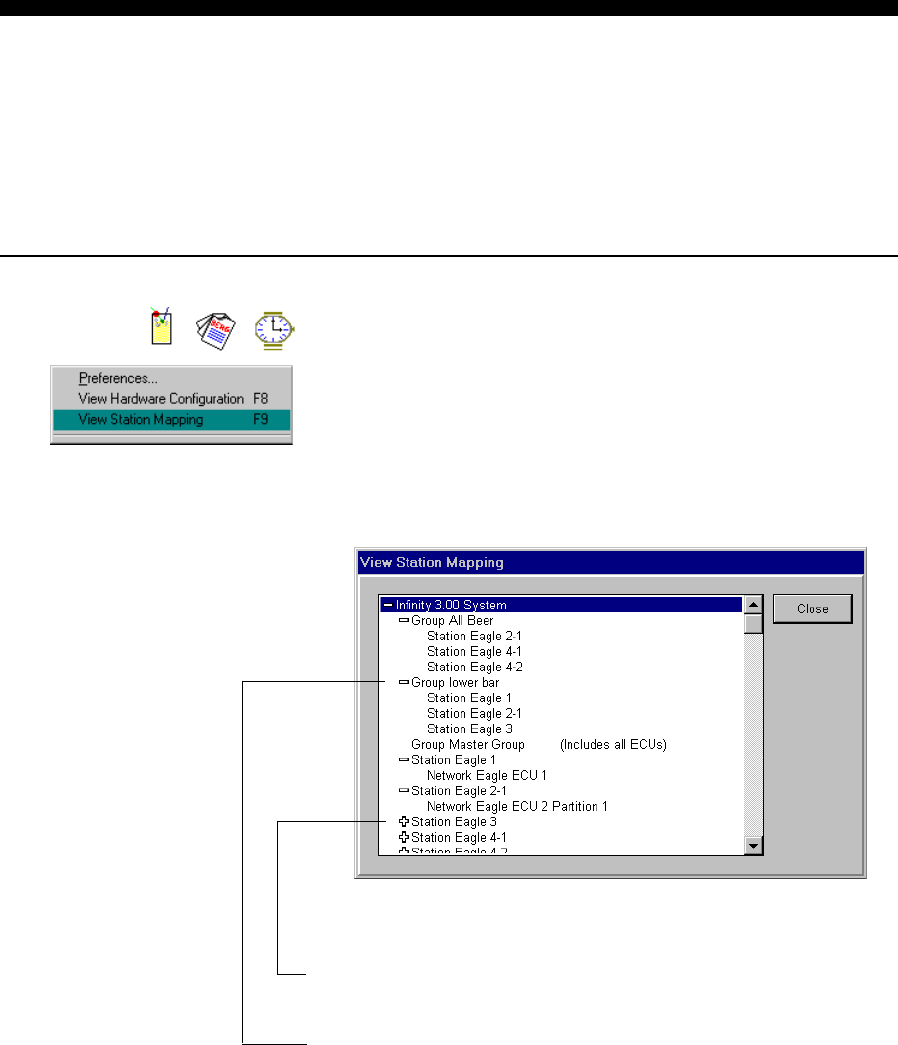
You can view a list of the stations and groups you have set up. This list is helpful if you want to
get an overview of the system's organization or you need to see what's out there before making
changes. It's easily moved and resized and you can view it from any screen. This list reflects only
your database configuration at the computerit does not check to see what hardware is attached
at the present time.
nTo view station mapping:
1. Run Manager, Report or Schedule.
2. Pull down the Options menu and click View Station
Mapping.
OR
From any screen press the F9 key.
3. View the directory-type list using the scroll bar if necessary.
4. Click the plus (+) sign on stations or groups to view their
components.
5. Click the minus (-) sign on stations or groups to collapse
their components.
6. Click Close to exit the screen.
Station and Group Setup 8-15
Delete Empty Stations and Groups
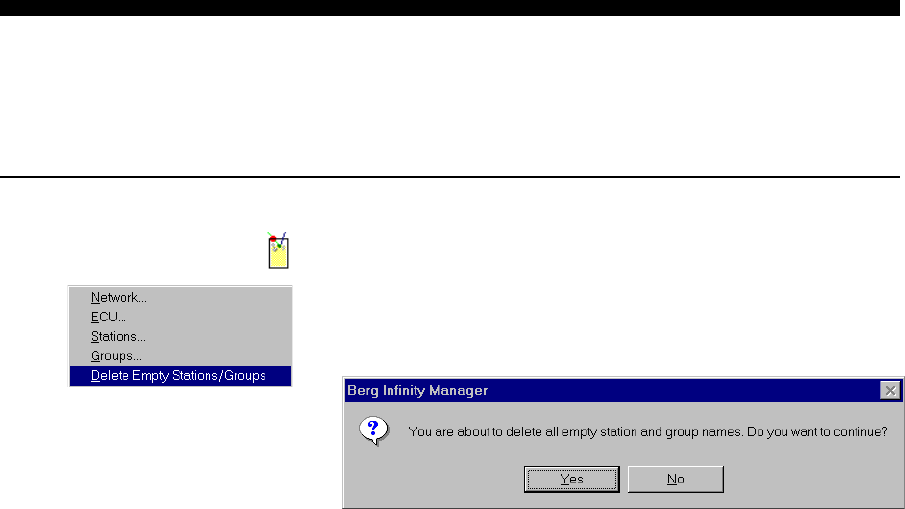
Perform this task to quickly remove the names of all stations or groups that have no assigned
ECUs or partitions.
nTo delete empty stations and groups:
1. Run Manager.
2. Pull down the Equipment menu and point to Setup. Click
Delete Empty Stations/Groups.
3. Click Yes to proceed with the deletion.
Even though you don't see a list of the station and group
names deleted, you can safely perform this operation
knowing that any station or group that contains an ECU or
partition won't be deleted.

SECTION
9
Diagnostic features are included in Infinity software to test communication
between the ECUs and the computer. Use these features to verify communication
at the time of installation and any time you may need to troubleshoot
communication with a particular ECU. This section provides help with the
following tasks:
Communication Wizard ..................................................................9-2
Loopback Test .................................................................................9-6
Communication Test ....................................................................... 9-8
Memory Test .................................................................................9-10
Clear and Restore Memory ...........................................................9-12
ECU Diagnostics
9-2 Infinity Installation/Service and User Manual
Communication Wizard
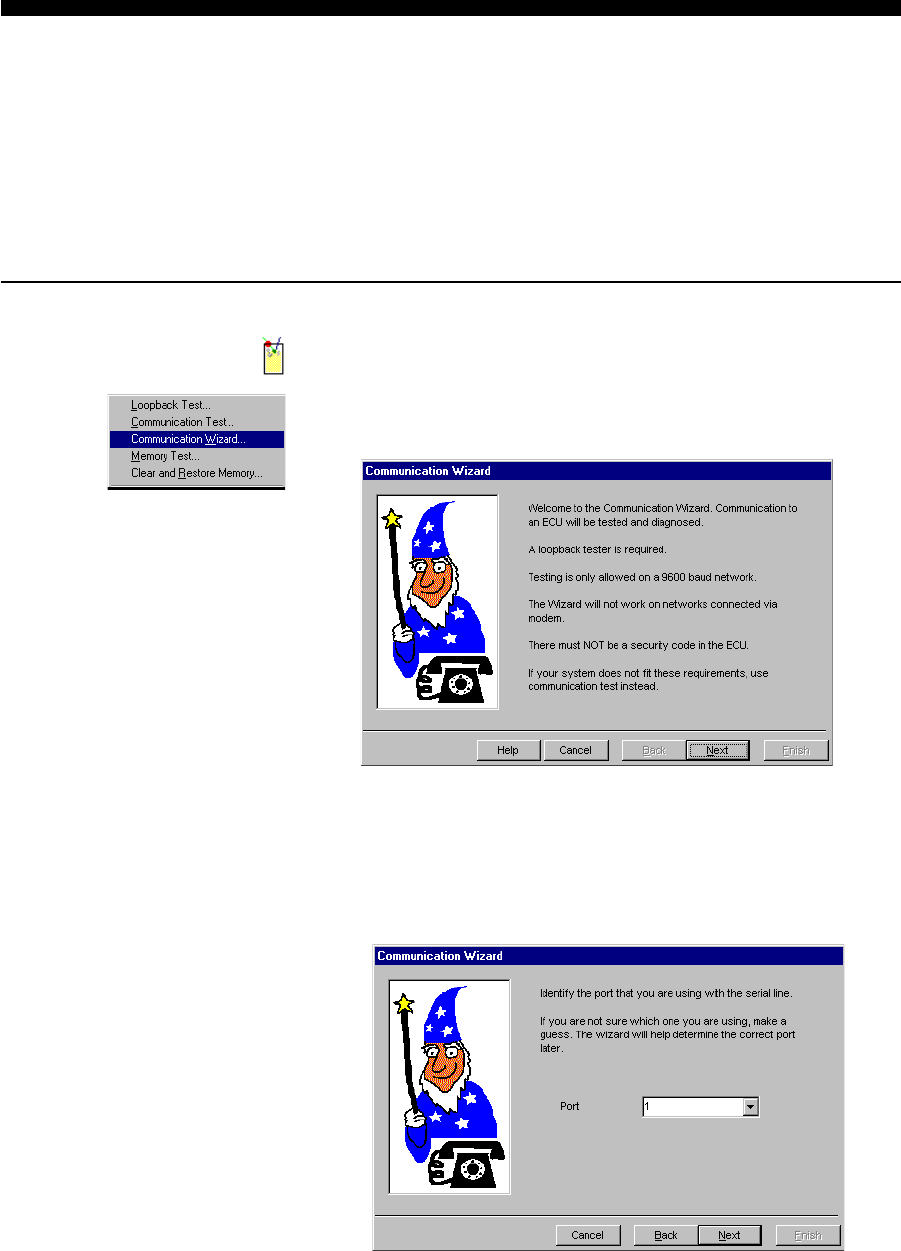
This Wizard helps you troubleshoot communication problems between your computer and any
ECUs in a hard-wired network. Since it takes you through the process step by step, the Wizard is
especially helpful if you're not sure you're running a loopback or communication test properly. To
use the Wizard you must have a loopback tester, your network communication must be at 9600
baud and the ECUs must be free of security codes. The Wizard can't help you test communication
on a modem-connected network.
nTo use the Communication Wizard:
1. Run Manager.
2. Pull down the Diagnostics menu. Click Communication
Wizard....
The first screen lists the prerequisites for running the
Wizard.
2. Click Next to proceed to the next screen or click Cancel to
exit the Wizard.
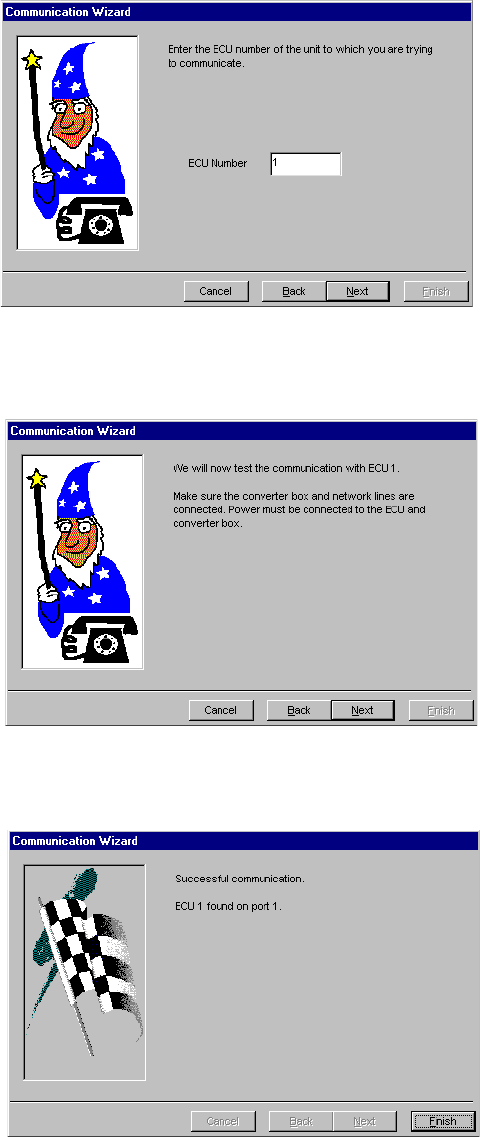
3. Select the Port number at the computer where your Infinity
network is connected and click Next.
ECU Diagnostics 9-3
4. Enter the ECU Number of the first ECU you want to test
and click Next.
5. Check all connections (including power) and click Next. The
communication test proceeds. Wait while the test runs.
6. If communication with the ECU succeeded, you'll see this
message. Click Finish to close the Wizard. To check
communication with a different ECU, start the Wizard again.
(continued on next page)
9-4 Infinity Installation/Service and User Manual
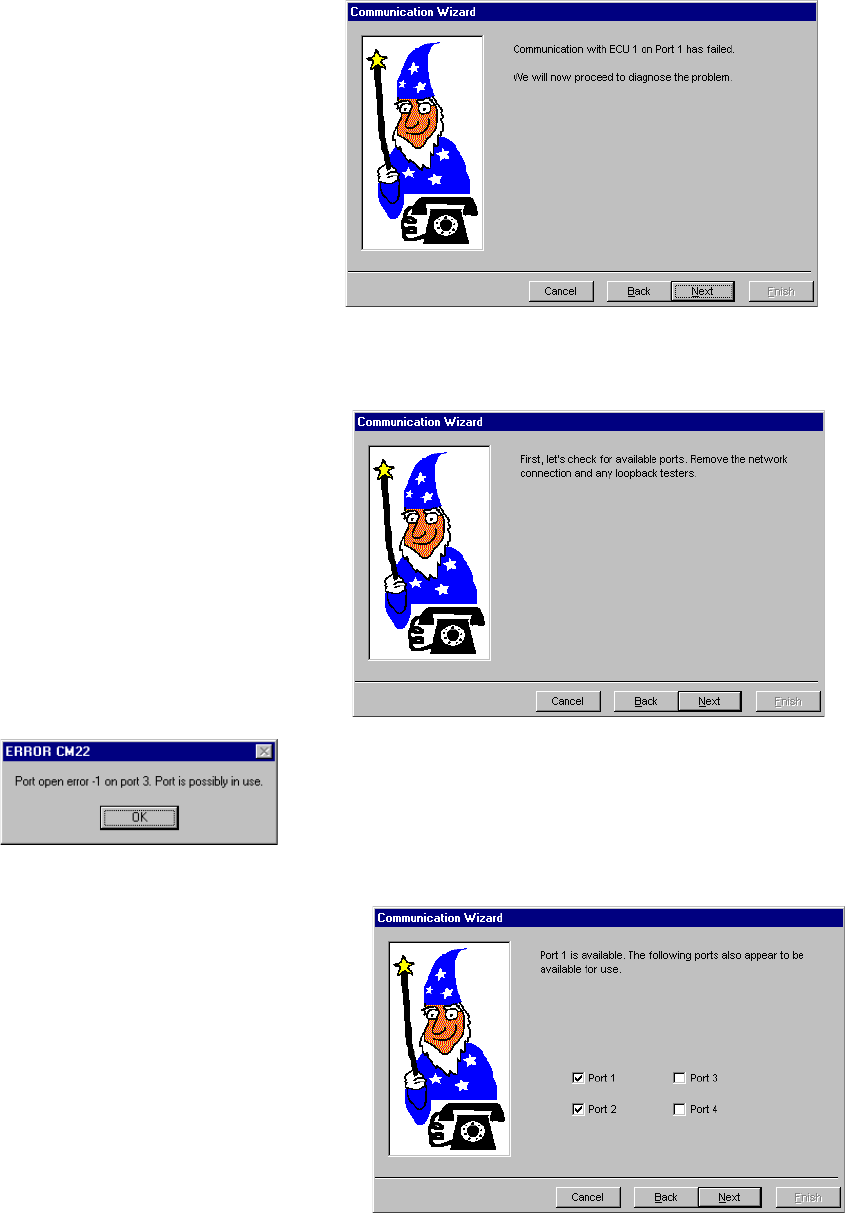
7. If communication with the ECU failed, the Wizard will help
you determine why. Click Next.
8. The first thing to test is the communication port at the
computer. Disconnect the Infinity network and any loopback
tester from the computer and click Next. The software then
checks the computer's comm ports. The next message you
see is determined by your particular setup.
9. The software determines which comm ports are available for
you to make an Infinity network connection. Click Next.
You may see this error
message which means the.
port could not be opened,
usually for one of the following
reasons. The port is being
used by another program or
device (such as a modem or a
mouse). Note that some
programs will not release the
port until they are exited. If a
program crashed while using
the port, the port may still
think it is being used. When
running a program in a DOS
window, the DOS window will
hold on to the port (even
after the program completes)
until the DOS window is
closed.
ECU Diagnostics 9-5
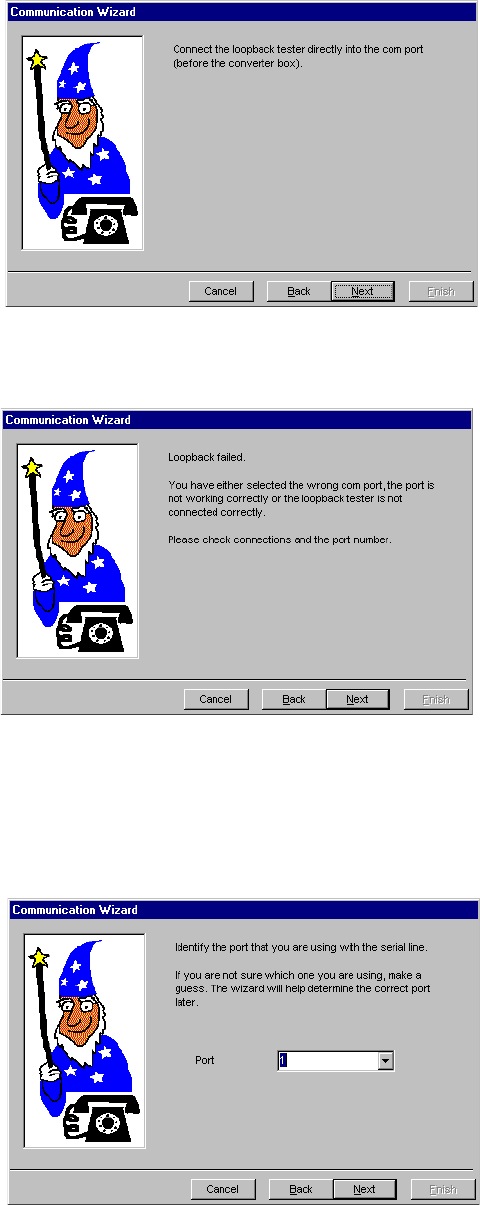
10. Reconnect the loopback tester directly into the port you
think is the port number you selected. Click Next.
11. In this example, the Wizard runs the test and suggests trying
a different port number (or the possibility that the port or
loopback tester is defective). When you click Next, the
Wizard puts you back to the first step of the test--entering a
Port number.
12. Proceed with the prompts the Wizard displays for your
particular setup. You'll be disconnecting and re-connecting
the loopback tester at various points in the communication
line between the ECU and computer.

9-6 Infinity Installation/Service and User Manual
Loopback Test
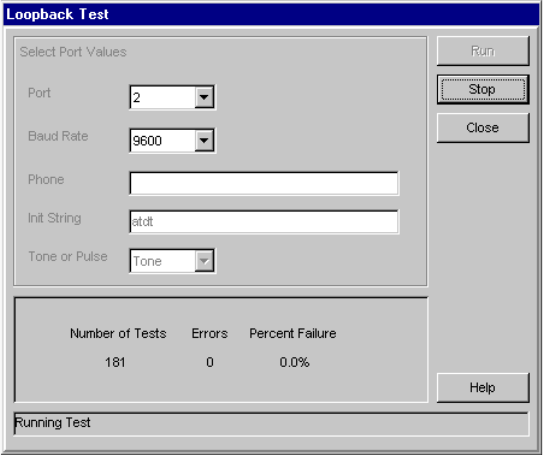
The loopback test verifies you have a working, accessible COM port on your computer. You must
have a loopback tester (Berg PN 8009196) to connect to the port to perform this test.
nTo perform a loopback test:
1. Run Manager.
2. Pull down the Diagnostics menu. Click Loopback Test....
3. Select the number of the Port.
4. Select the Baud Rate.
5. Type the Phone number of the remote modem if you are
testing a modem connection.
6. Type the initialization string for the computer modem in the
Init String field. The default (AT &D2 &C1 S0=0|) sets
Data Terminal Relay and Carrier Detect to normal and turns
off Auto Answer.
7. Select Tone or Pulse for the type of dialing used on the
computer modem's telephone line.
ECU Diagnostics 9-7
8. Click Run to begin the test (without the loopback tester in
place).
The loopback test commences. You should see exactly 100%
failure.
9. If you don't see 100% failure, click Stop to end the test. (The
port you've chosen is already in use by a device that is
echoing the loopback signal. That port is not available for
Infinity.) Select a new Port number and click Run.
10. When you see 100% failure, plug the loopback tester into the
computer port. (You don't need to stop the test.)
If the failure rate decreases to near 0%, you know the port is
OK.
11. Click Stop to end the test.
12. Click Close to exit the Loopback Test screen.
Note
qSee Local Network Communication Problems in the
Troubleshooting section for a series of loopback tests you
can perform to test each component of the computer-to-
network connection.
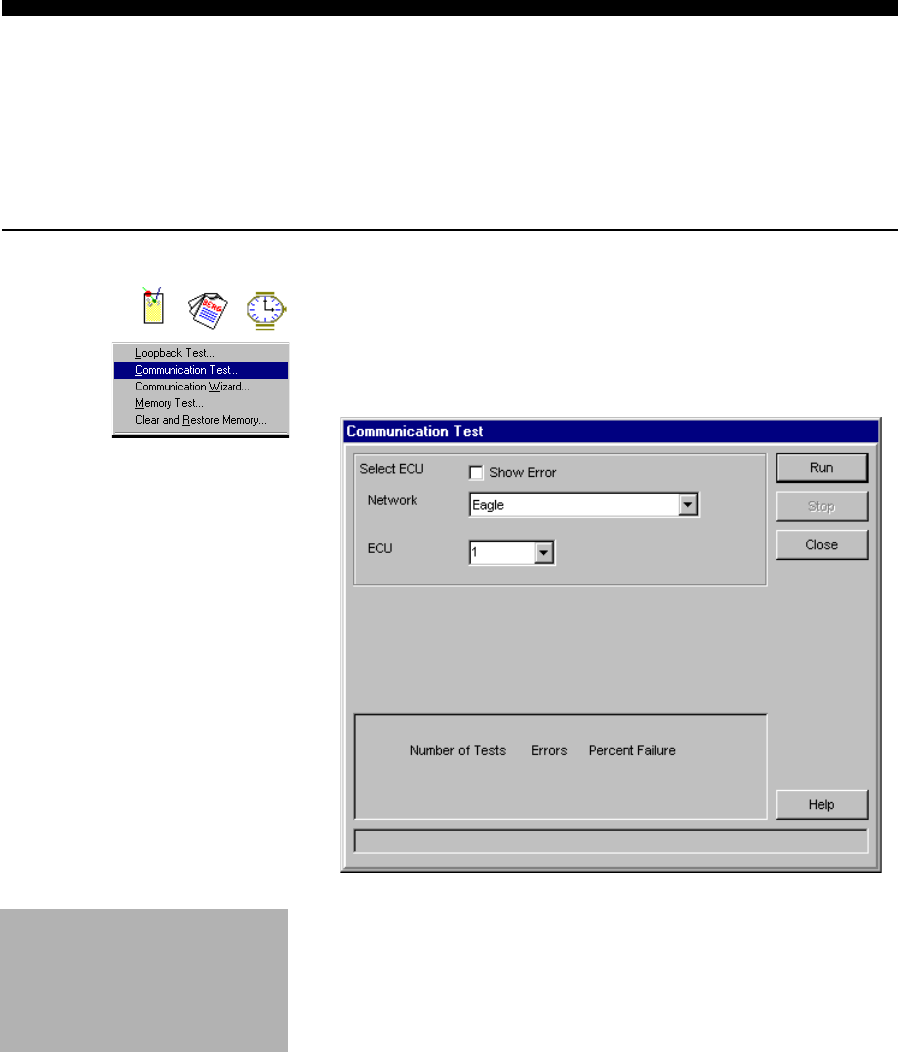
9-8 Infinity Installation/Service and User Manual
Communication Test
The communication test verifies the communication on a network line to an ECU. The network
must be set up in the software and the ECU number must be set at the ECU before you perform
this test. It's a good idea to perform this test on every ECU in a network after you've set up the
network and before you set up the ECU in the software.
nTo perform a communication test:
1. Run Manager, Report or Schedule.
2. Pull down the Diagnostics menu and click Communication
Test....
3. Select the name of the Network.
4. Select the number of the ECU.
5. Click Run to begin the test.
You can type in the number of
an ECU that hasn't been
defined in the software, as long
as the ECU is connected to the
computer.
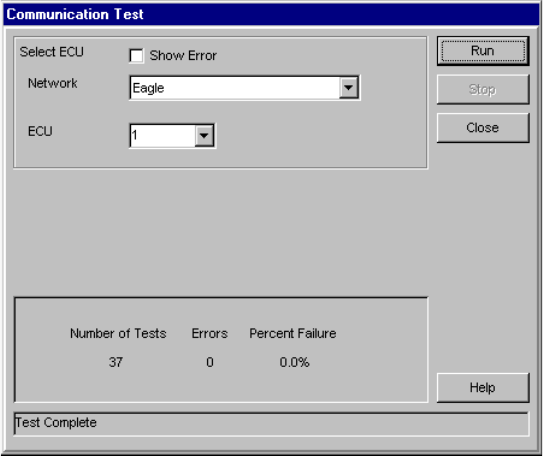
ECU Diagnostics 9-9
The communication test commences. You'll most likely see
near 0% failure or exactly 100% failure. If you see failures,
check the ECU number and baud rate set at the ECU.
Perform a loopback test to make sure the COM port is
working. You can also tighten cable connections while the
communication test is running and observe any changes in
the failure rate.
6. Click Stop to end the communication test.
7. Click Close to exit the Communication Test screen.
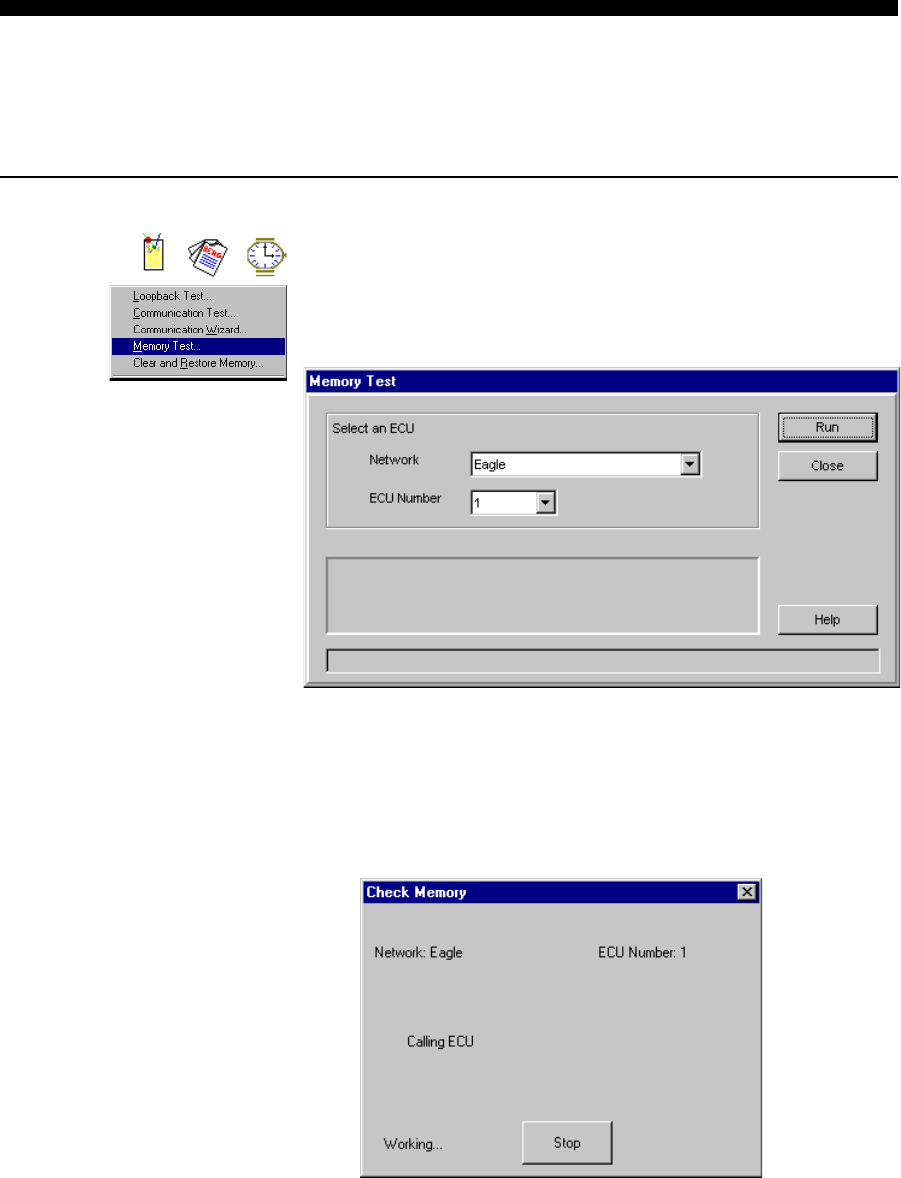
9-10 Infinity Installation/Service and User Manual
Memory Test
The memory test directs an ECU to perform a self-diagnostic memory test. Use this test if you
suspect memory errors at the ECU are causing problems.
nTo perform a memory test:
1. Run Manager, Report or Schedule.
2. Pull down the Diagnostics menu and click Memory Test....
3. Select the name of the Network.
4. Select the number of the ECU.
5. Click Run to begin the test.
6. Wait while the memory test is performed.
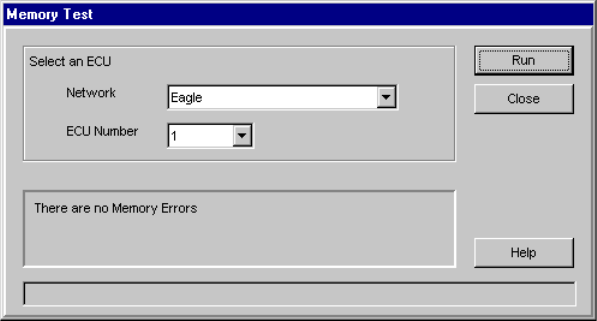
ECU Diagnostics 9-11
When the test ends, a message indicates if any memory
errors were found. If there are memory errors, the ECU
should be reinitialized. See Clear and Restore Memory in
this section.
7. Click Close to exit the Memory Test screen.
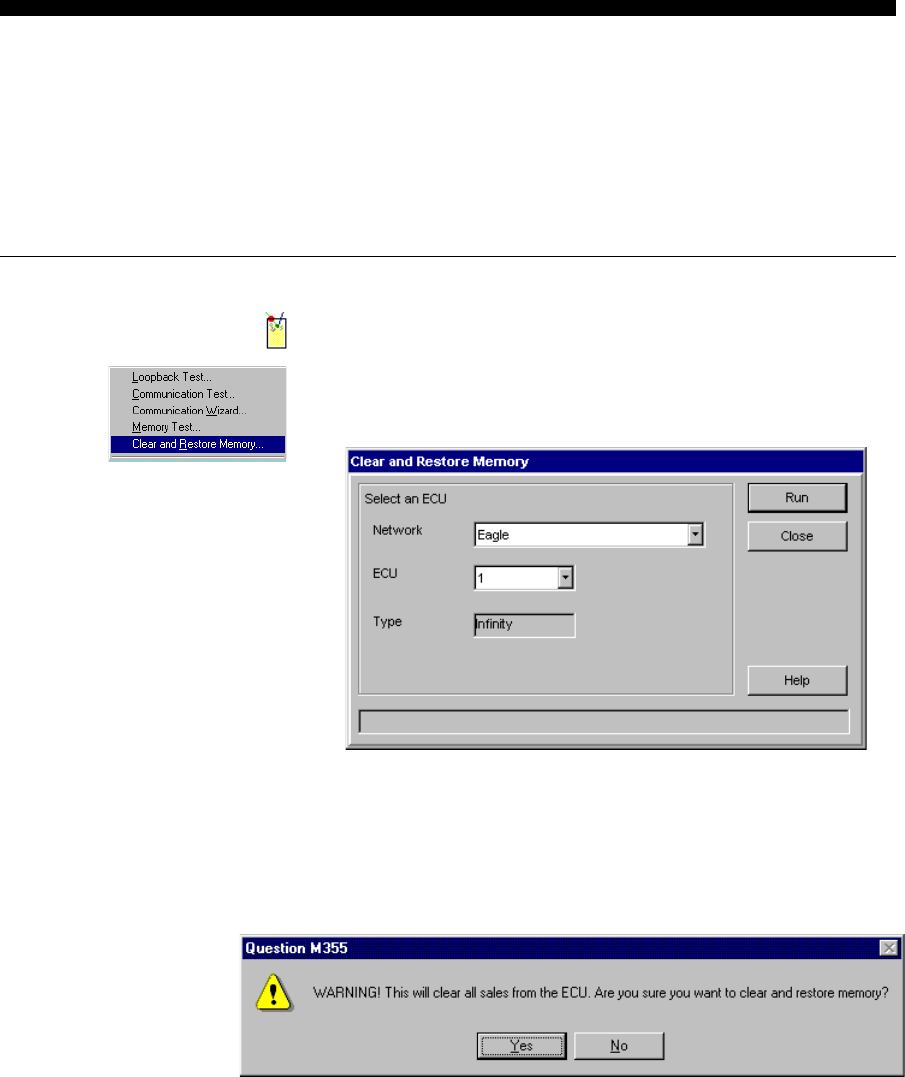
9-12 Infinity Installation/Service and User Manual
Clear and Restore Memory
Perform this operation when you want to clear all the information and reset the setup data at the
ECU to match the data in the software. You should perform this operation if you encounter
memory problems in an ECU, or you change the EPROM in an ECU or you replace an ECU.
This operation clears all sales so you may want to run a Clear Sales Report to preserve existing
sales data before you perform this operation.
nTo clear and restore memory:
1. Run Manager.
2. Pull down the Diagnostics menu. Click Clear and Restore
Memory....
3. Select the name of the Network.
4. Select the number of the ECU.
5. Click Run to clear and restore the ECU's memory.
A warning message reminds you this operation clears all
sales data from the ECU.
6. Click Yes to proceed or No to cancel.
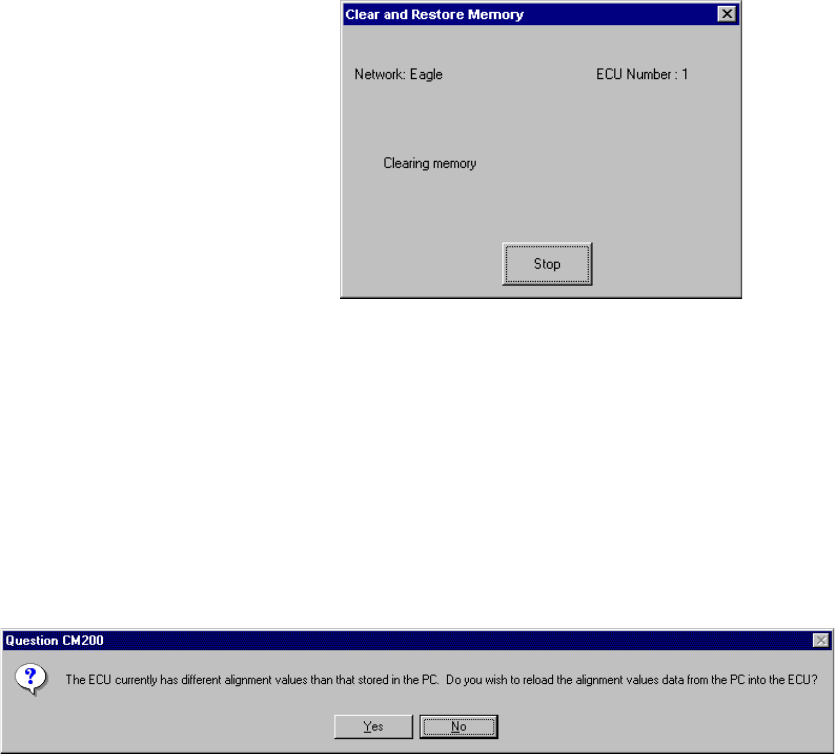
ECU Diagnostics 9-13
7. Wait while the ECU's memory is cleared and restored.
8. Click Close to exit the Clear and Restore Memory screen.
Notes
qYou may see a message informing you of differences
between the ECU's data and the database at the computer. If
your ECU's been having problems, it's usually best to reload
data from the computer to the ECU.
Click Yes to continue or No to cancel the process.
qIf you have Interface software installed, performing this
operation also prompts you to load the driver to the ECU.

SECTION
10
With the hardware and software of an Infinity system installed and
communicating, you can assign specific brands to pour at each dispenser. First
include all your brands in the brand list. Then enter the prices and portions for
each brand and cocktail. Proceed by assigning specific brands to pour from each
dispenser. After making dispenser assignments you should calibrate each
dispenser to make sure all portion sizes pour accurately. (See the Calibration
section.) Finally, assign any cocktails to Laser dispensers. This section provides
help with the following tasks:
Add a New Brand.......................................................................... 10-2
Add a New Cocktail ...................................................................... 10-4
Modify Existing Brand(s) ............................................................. 10-6
Container Setup.............................................................................10-8
Brand Prices and Portions ........................................................... 10-10
TAP 1 Portions with Learn Mode ............................................... 10-13
Cocktail Prices and Portions .......................................................10-16
Assign Brands to Dispensers ...................................................... 10-18
Assign Cocktails to Laser Dispensers ......................................... 10-20
Copy ECU ................................................................................... 10-22
Copy Dispenser ........................................................................... 10-24
Copy Partition .............................................................................10-26
Delete Unused Brands and Cocktails.......................................... 10-28
What is Test Pour? ...................................................................... 10-30
Brands, Cocktails,
Prices and Portions
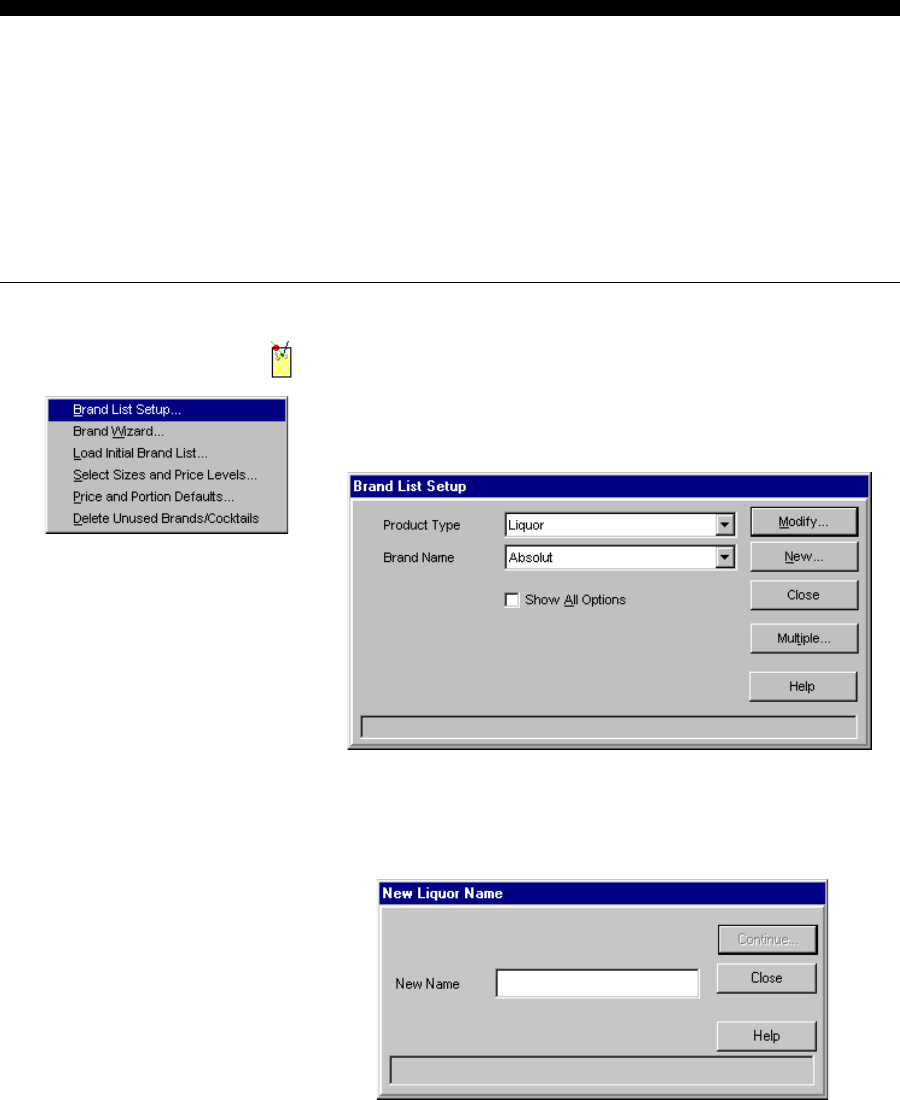
10-2 Infinity Installation/Service and User Manual
Add a New Brand
Berg includes a list of typical brands you can load on your system using Brand Wizard or Load
Initial Brand List. You can also add any brand to the list at any time. To add a brand, you need to
know the brand name, the typical container size of the brand, the container's cost and the brand's
retail price per volume unit. If you want to enter (or modify) container information or price per
unit for brands already in the list see Modify Existing Brand(s) in this section. If you want to
delete any brand from the list see Delete a Brand or Cocktail in this section.
nTo add a new brand:
1. Run Manager.
2. Pull down the Pouring menu and point to Brand
Operations. Click Brand List Setup....
3. Select the Product Type.
4. Click New....
5. Type the brand's name. It can be up to 19 characters.
6. Click Continue... to proceed or click Cancel to exit.
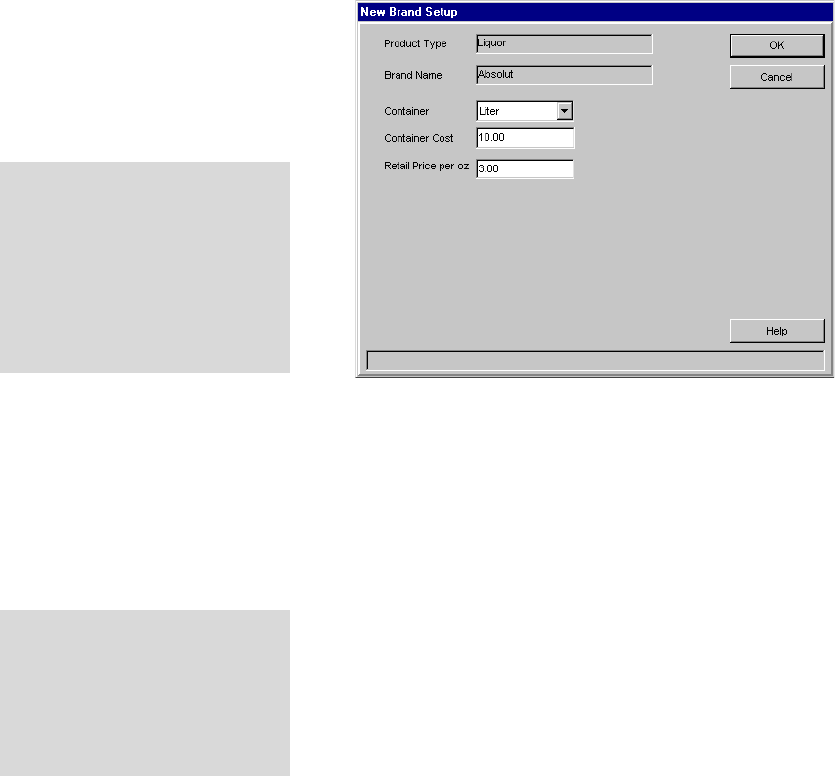
Brands, Cocktails, Prices and Portions 10-3
7. Select the Container.
Container is the name of the typical container the brand
comes in. The number of containers poured appears on a
Usage report.
8. Type the Container Cost.
Container Cost is the cost (to you) of each container of the
brand. It's used to calculate the potential pouring cost for the
brand shown on a Usage report.
9. Type the Retail Price per unit.
Retail Price per unit is the retail price the customer pays
for each unit of measure of the brand. It's used to calculate
retail value on the Retail Usage report and the
Reconciliation report.
10. Select the Viscosity. (This may not appear on your system.)
This field sets All-Bottle ID default cal values for the brand.
11. Click OK to save the brand. (Click OK even if you didn't
make any entries to confirm you want the brand set up that
way.) Click Cancel to exit the screen without saving.
12. Repeat steps 3-10 for each new brand you want to set up.
13. Click Close to exit the Brand List Setup screen.
Notes
qWhen you add a brand to the list, a category of prices and
portions called "Standard" is automatically created for it
using default prices and portion sizes.
qYou can also add a new brand to the brand list when you are
setting up prices and portions. See Brand Price and Portion
Setup in this section.
Container Setup
To specify the size of your
containers or add new
containers, see Container Setup
in this section.
Inventory
If you're using the Inventory
feature, additional fields appear
on this screen. See Brand List
Setup in the Inventory section
for a description of these
entries.
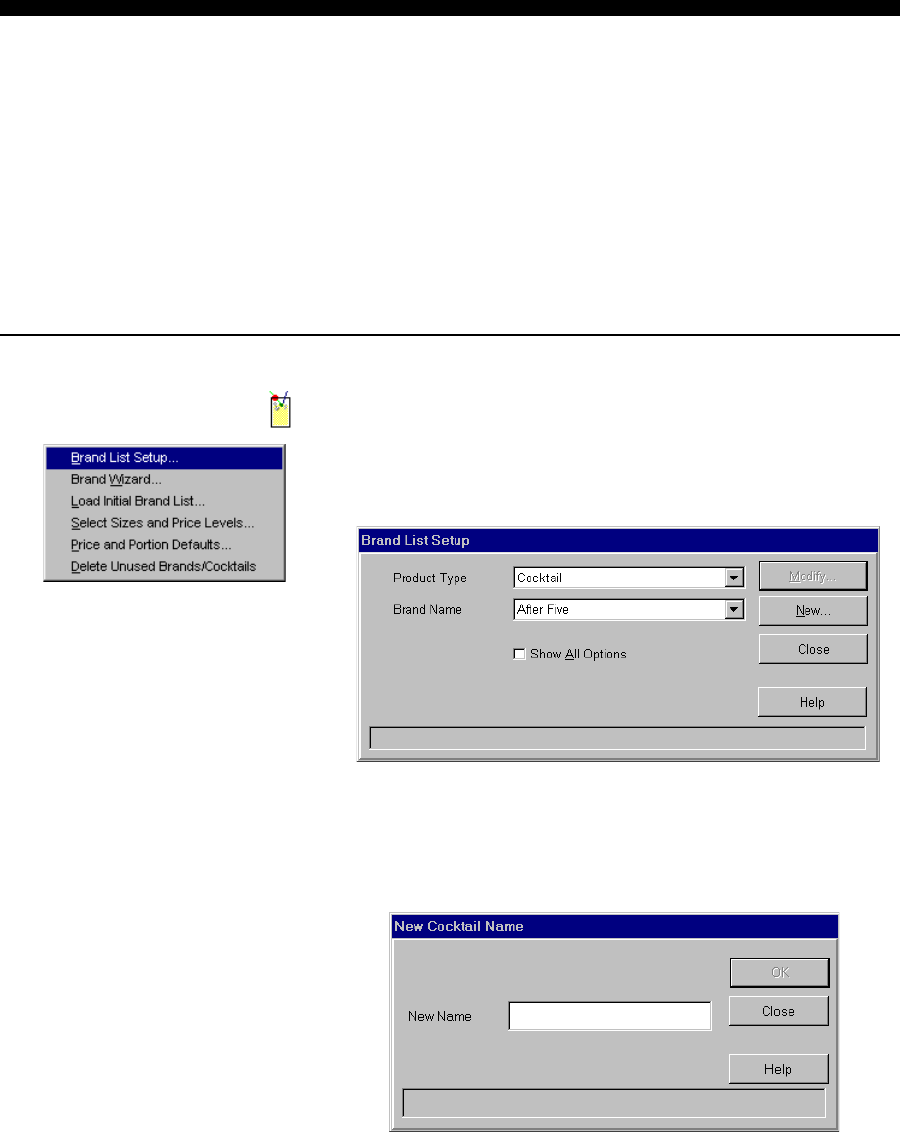
10-4 Infinity Installation/Service and User Manual
Add a New Cocktail
Berg includes a list of typical cocktails you can load on your system using Brand Wizard or Load
Initial Brand List. If every cocktail you want to pour is already included on the list you don't need
to perform this task. If you want to add a cocktail to the list all you need to know is the cocktail
name. You define the cocktail's ingredients when you enter prices and portions. (See Cocktail
Prices and Portions in this section.) If you want to delete a cocktail from the list see Delete a
Brand or Cocktail in this section. Once your cocktail list is established, you need to tell the
software which cocktails are poured at each Laser dispenser. See Assign Cocktails to Dispensers
in this section.
nTo add a new cocktail:
1. Run Manager.
2. Pull down the Pouring menu and point to Brand
Operations. Click Brand List Setup....
3. Select Cocktail for the Product Type.
4. Click New....
5. Type the cocktail's name. It can be up to 19 characters.
6. Click OK to save the name or click Cancel to exit without
saving.
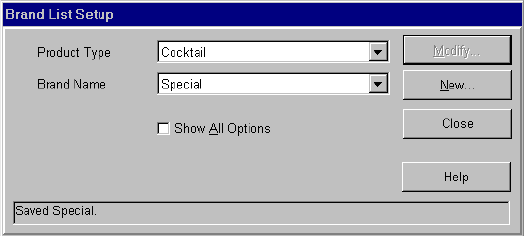
Brands, Cocktails, Prices and Portions 10-5
7. Repeat steps 4-6 for each new cocktail you want to set up.
8. Click Close to exit the Brand List Setup screen.
Notes
qWhen you add a cocktail to the list, a category of prices and
portions called "Standard" is automatically created for it.
qYou can also add a new cocktail to the brand list when you
are setting up prices and portions. See Cocktail Price and
Portion Setup in this section.
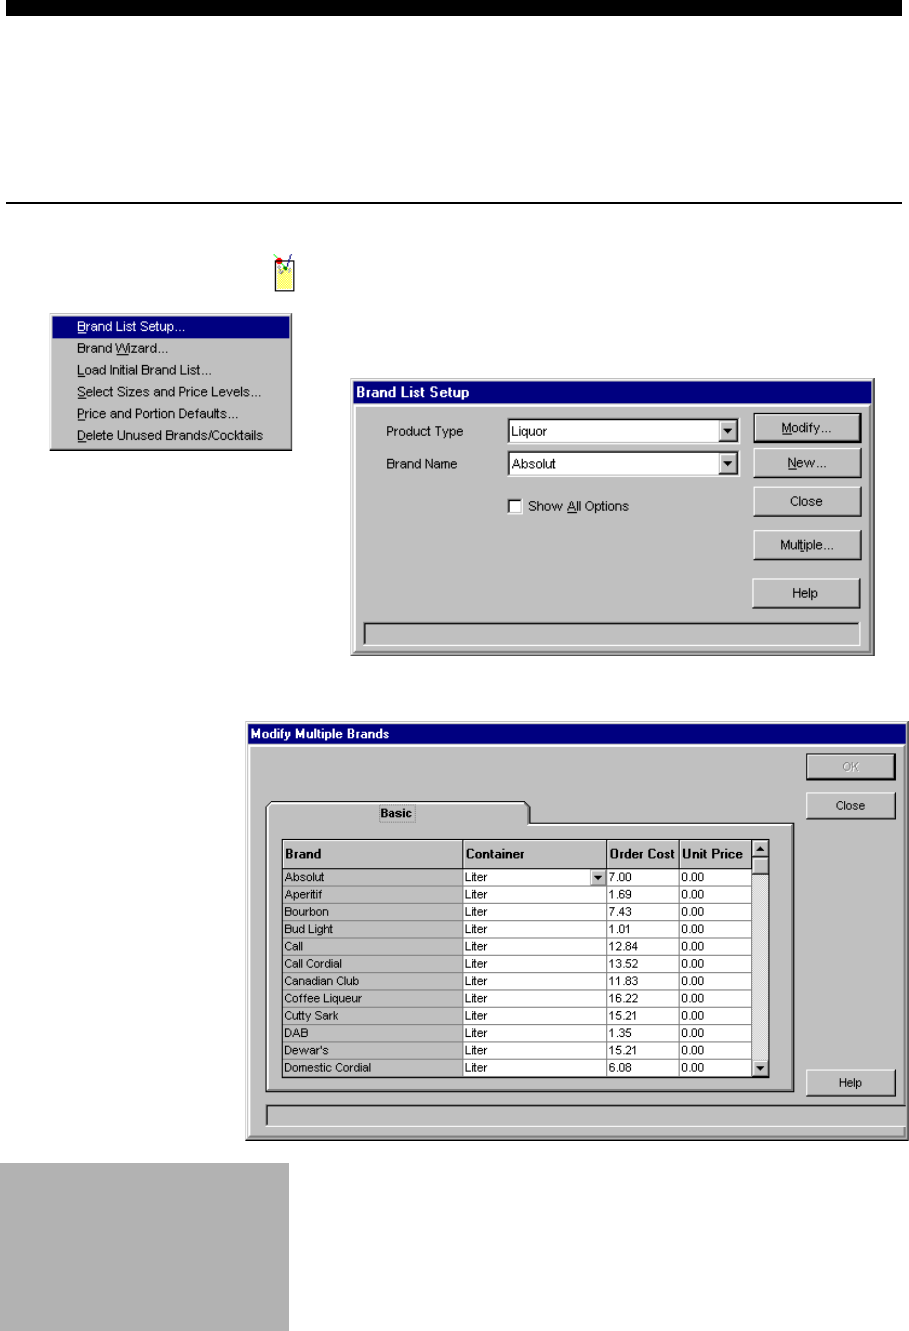
10-6 Infinity Installation/Service and User Manual
Modify Existing Brand(s)
The only entries of a brand's setup you can modify are the container name, container cost and
retail price per unit. (If you want to change a brand's name see Rename a Brand or Cocktail in
this section.)
nTo modify a brand's setup:
1. Run Manager.
2. Pull down the Pouring menu and point to Brand
Operations. Click Brand List Setup....
3. Click Multiple....
OR
3. Select the Product Type and the Brand Name.
Click Modify....
Inventory
If you're using the Inventory
feature, see Brand List Setup
in the Inventory section for help
modifying a brand's setup.
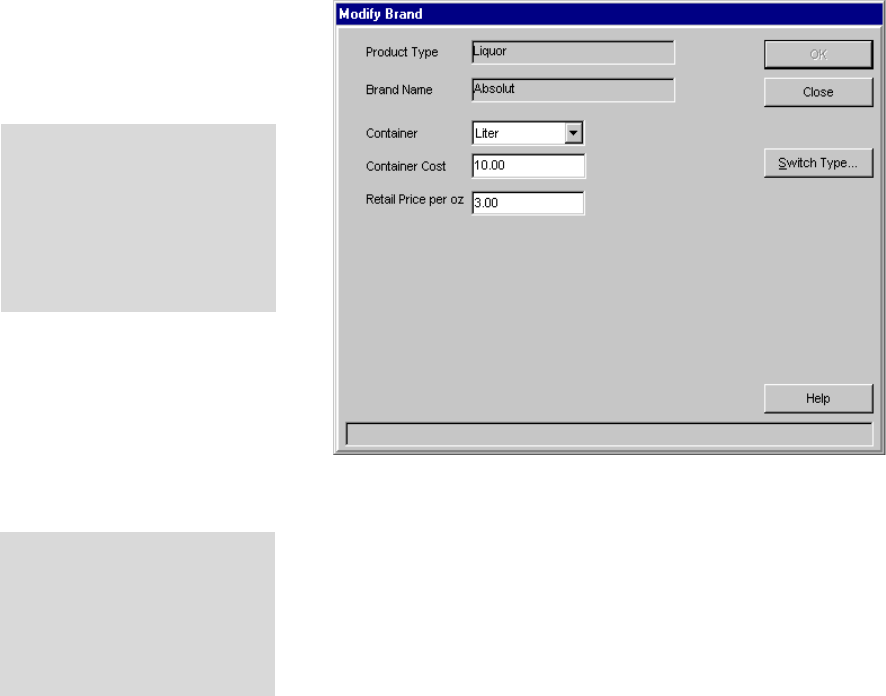
Brands, Cocktails, Prices and Portions 10-7
4. Select the Container.
Container is the name of the typical container the brand
comes in. The number of containers poured appears on a
Usage report.
5. Type the Container Cost.
Container Cost is the cost (to you) of each container of the
brand. It's used to calculate the potential pouring cost for
the brand shown on a Usage report. If you use the Inventory
feature, container cost is also used in the Container Stock
report and the Brand Information report.
6. Type the Retail Price per unit.
Retail Price per unit is the retail price the customer pays
for each unit of measure of the brand. It's used to calculate
retail value on the Retail Usage report and the
Reconciliation report.
7. Click OK to save your entries and exit the screen. Click
Cancel to exit the screen without saving any changes.
8. Click Close to exit the Brand List Setup screen.
Switch Type...
Click this button to change
the product type designation
for the brand. See Switch
Product Type in the Advanced
Brand Operations section.
Container Setup
To specify the size of your
containers or add new
containers, see Container
Setup in this section.
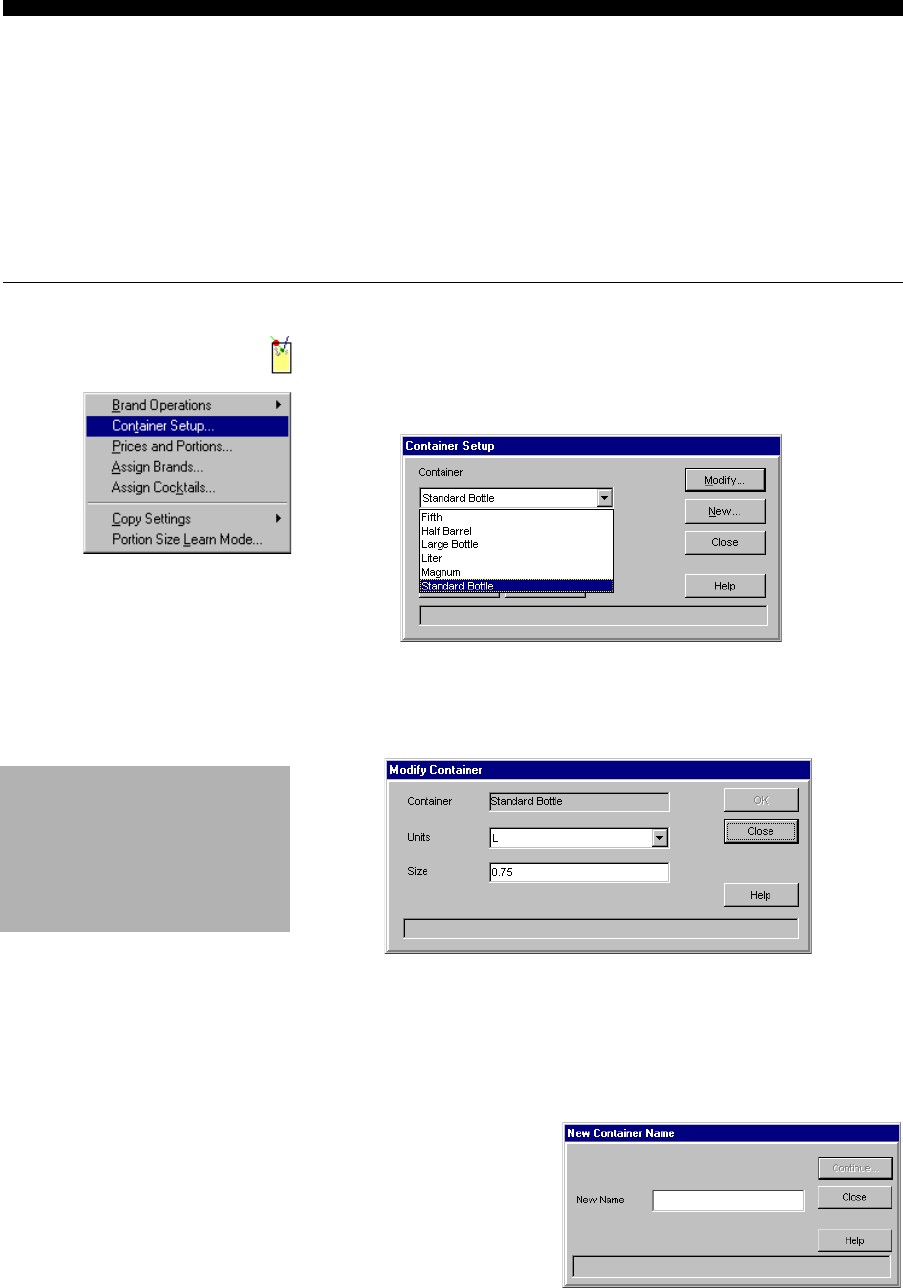
10-8 Infinity Installation/Service and User Manual
Container Setup
Use this form to specify the size of each of your containers. You can also create custom names for
your containers. The container names you define in Container Setup can then be assigned to each
brand. See Modify Existing Brand(s) in this section for help assigning container names to each
brand. Container names appear on a Usage report and are useful for tracking inventory. (Any
bottle sizes you defined in releases 3.xx will be converted to containers. Please check all
container sizes if you're upgrading from a 3.xx Infinity release.)
nTo modify a container's setup:
1. Run Manager.
2. Pull down the Pouring menu and click Container Setup....
3. Select a Container to modify.
4. Click Modify....
5. Select the Units of measure for the container.
6. Type in the Size of the container. (The size is the number of
units.)
7. Click OK.
nTo add a new
container:
1. Click New....
2. Type in the New
Name of the
container and click Continue.... See steps 5-7 above.
Inventory
If you're using the Inventory
feature, see Container Setup in
the Inventory section for help
setting up containers.
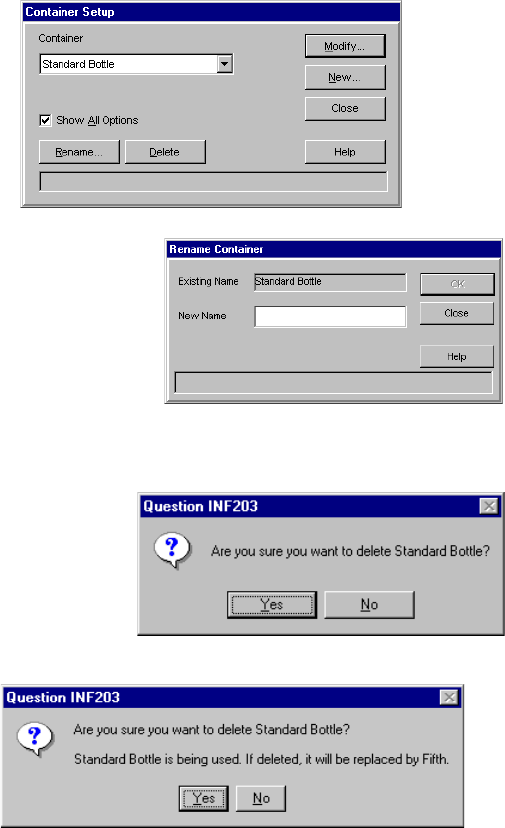
Brands, Cocktails, Prices and Portions 10-9
nTo rename or delete a container:
1. Select Show All Options.
2. Click Rename....
3. Type in the New
Name of the
container and click
OK.
OR
2. Click Delete.
3. Click Yes.
4. If you delete a container already assigned to a brand a
prompt reminds you. Click Yes to delete the container or No
to keep it. If you proceed with the deletion, any brands with
the container assignment receive another container
assignment as shown in the message.
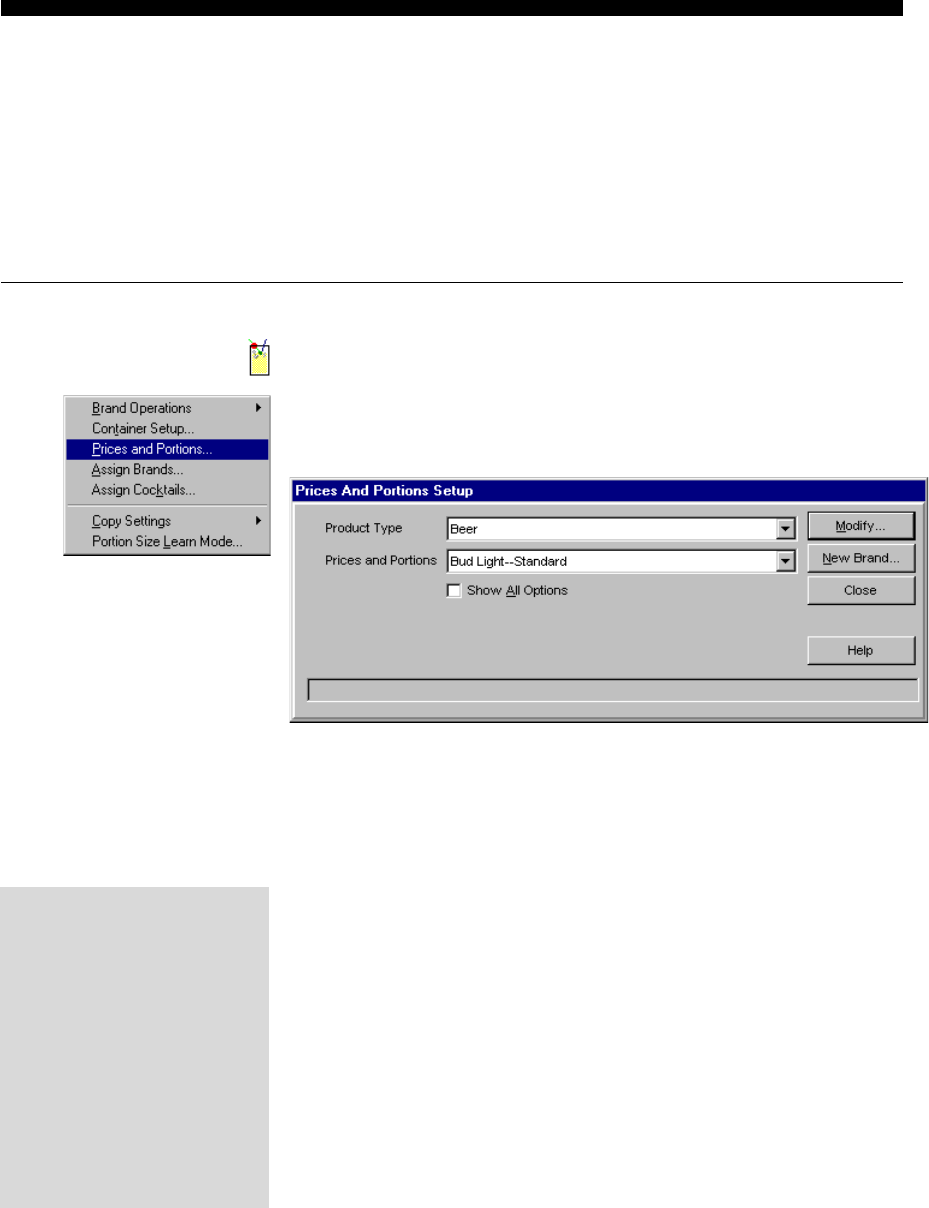
10-10 Infinity Installation/Service and User Manual
Brand Prices and Portions
Prices and portions are always associated with a brand in Infinity; they are never defined
independently. Each brands initial prices and portions are called its Standard category of prices
and portions, e.g., BudweiserStandard refers to the standard price/portion category of the
Budweiser brand. Default prices and portions (for the product type) are assigned to all price levels
of a brand when it is added to the brand list and these defaults are given the name Standard.
You click Modify... to make changes to the currently defined prices and portions for the brand.
nTo modify a brand's prices and portions:
1. Run Manager.
2. Pull down the Pouring menu and click Prices and
Portions....
3. Select the Product Type.
4. Select the brand's Prices and Portions you want to change.
(If you haven't defined any other prices and portions,
Standard is the only choice.)
OR
If you want to add a new brand to the brand list and set up its
prices and portions click New... and follow the steps outlined
in Add a Brand or Cocktail in this section.
5. Click Modify....
Price Levels
Price levels are optional tiers
of prices and portions that
can be defined to
accommodate various needs.
Some owners don't use price
levels; others use them for
switching between happy hour,
regular and entertainment
pricing; still others use them
to track shift sales.
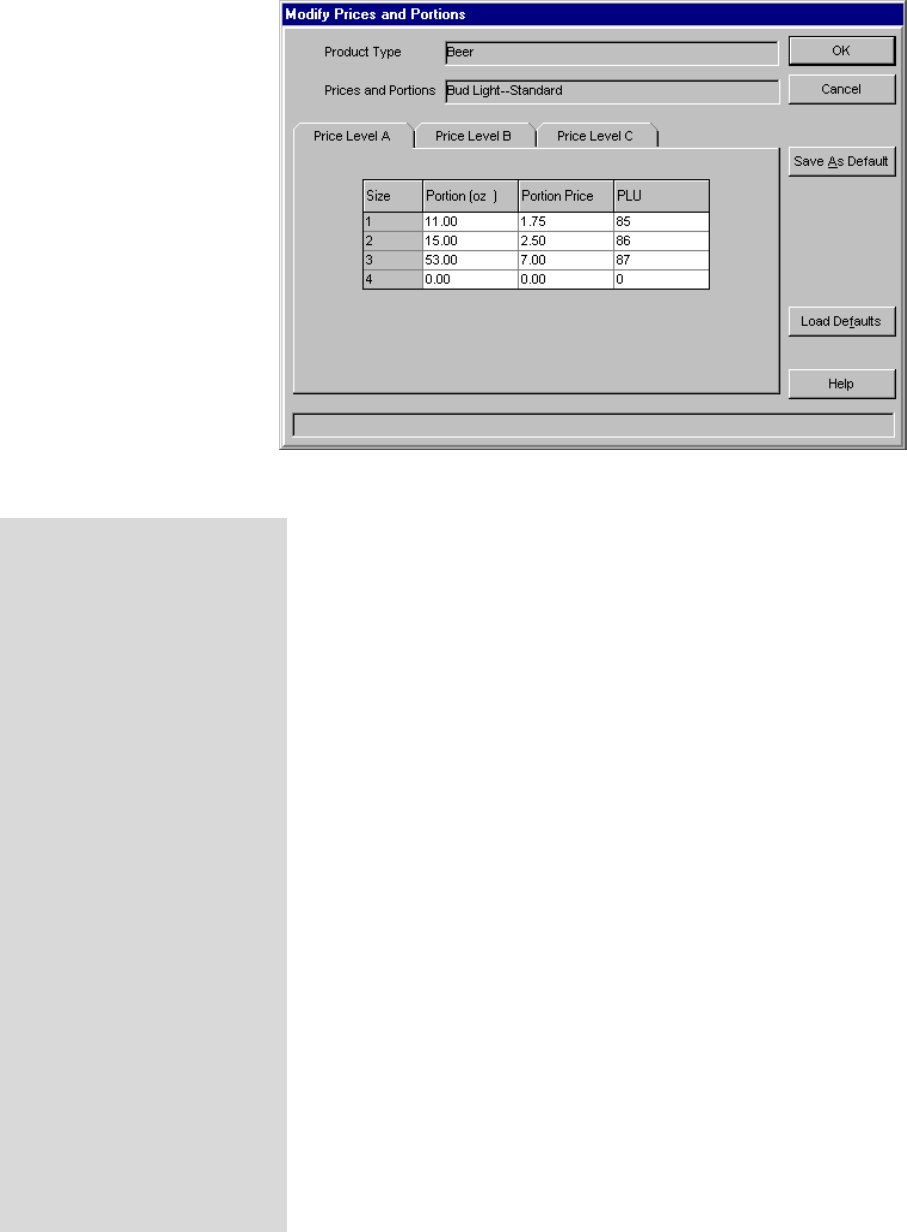
Brands, Cocktails, Prices and Portions 10-11
TAP 1
prices
and
portions
Default Prices and Portions
lDefaults are base prices and
portions which are entered for
each brand when the brand is
added to the brand list.
lIf you click Load Defaults the
prices and portions displayed
are whatever defaults are
currently defined for the
product type.
lBergs default prices and
portions are used if you dont
set your own defaults.
lYou can set your own default
prices and portions for each
product type using any of the
following methods:
1. Load the initial brand list
using the Brand Wizard.
2. Use the Price and Portion
Defaults menu item.
3. Use the Save As Default
button on the Modify Prices
and Portions screen.
6. Click a Price Level tab that has prices and/or portions you
want to change.
OR
Click Load Defaults to load your default prices and portions
(for this product type) on the Price Level tabs. Then proceed
with step 10 (if you don't want to make any other changes).
7. Type the correct Portion and Price for each Size listed on
the tab. The number of sizes and price levels varies according
to dispenser type. You don't need to type a decimal if you're
entering a whole number, e.g., type 6 for 6.00 oz, or 2 for
$2.00.
If you are installing an interface between Infinity and a sales
terminal or POS system see the Infinity/Sales Terminal
Interface Manual for help with entering PLUs in Infinity.
8. Repeat steps 6 and 7 for any Price Level tab that has prices
and/or portions you want to change.
9. Click Save As Default if you want to save the prices and
portions you just entered (on all tabs) as the default prices
and portions for this product type.
This feature lets you copy prices and portions from one brand
to another brand of the same product type. You copy to the
other brand using Load Defaults.
(continued on next page)
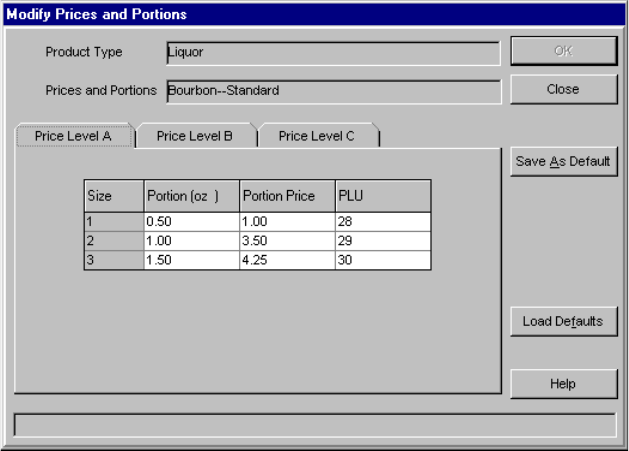
10-12 Infinity Installation/Service and User Manual
This does not change the prices and portions of brands that
currently have default prices and portions. However, it does
mean any new brand you add to the brand list of this product
type is assigned the prices and portions you save as default
prices and portions.
10. Click OK to save your entries on all tabs. Click Cancel to
exit the screen without saving.
11. Click Close to exit the Prices and Portions Setup screen.
Notes
qTo create a different set of prices and portions for a brand
see Create a New Price Portion Category in the Advanced
Brand Operations section.
qBrand Assignments popup screen: If you've already
assigned the brand to dispensers, a list of dispenser
assignments appears when you save any changes to the
brand's prices and portions. Click Continue... to confirm the
changes and send the prices and portions to all the ECUs
with dispensers where the brand is assigned.
qIn order to ensure accurate portions, Berg recommends
calibrating each brand. See the Calibration section.
All-Bottle and
Laser prices
and portions
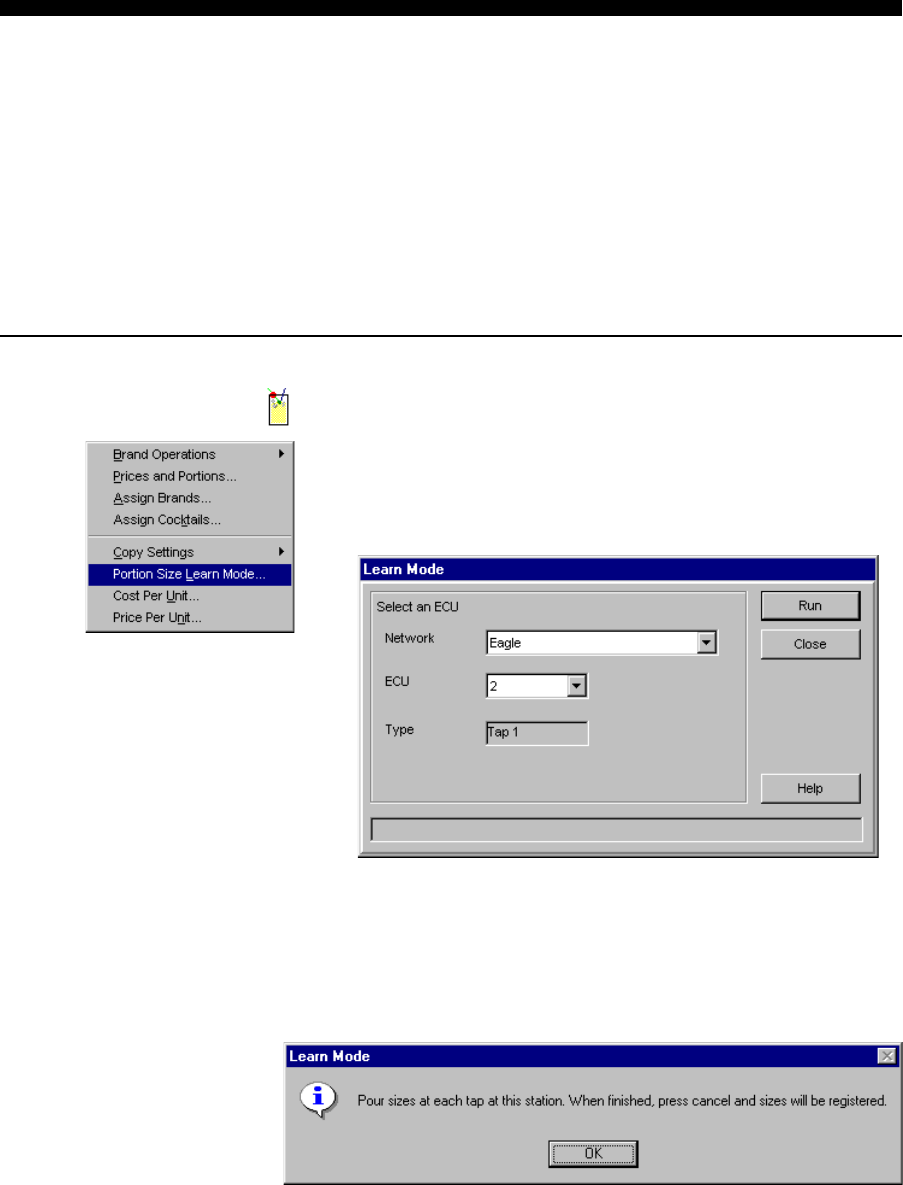
Brands, Cocktails, Prices and Portions 10-13
Set Up TAP 1 Portions with Learn Mode
Learn mode is a feature of TAP 1 ECUs that can help you set up initial portion sizes for tap
controllers. It is especially helpful when the owner knows the glass or mug he wants to use for a
particular button but is not sure of the exact portion size. In learn mode, you can pour a glass as
full as you want and Infinity calculates the volume of the pour and automatically sets up the
portion size. If you use learn mode to set up portion sizes you should assign brands to taps first.
You still have to set up prices for the brands poured at TAP 1 ECUs. Be sure to calibrate your
system before using learn mode since the accuracy of your portion sizes is based on your
systems calibration. Learn mode does not calibrate your system.
nTo set up TAP 1 portion sizes using learn mode:
1. Run Manager.
2. Pull down the Pouring menu and click Portion Size Learn
Mode....
3. Select the Network.
4. Select the number of the ECU.
5. Click Run.
6. Click OK when you've read the message confirming learn
mode.
(continued on next page)
10-14 Infinity Installation/Service and User Manual
2
BERG
3
4
1
The ECU you have selected is now in learn mode. The lights
behind the cancel and repeat buttons at the taps go out.
7. Go to any tap connected to the ECU in learn mode. Select
the appropriate glass for a portion size button and press the
button to begin the pour.
The light behind the button goes out and beer continues to
pour until you stop the pour.
8. Press the same button again to stop the pour.
9. If youre not satisfied with the amount poured in the glass,
discard the contents of the glass and pour again. Each time
the pour is repeated it erases the data from the previous
attempt (for that button).
10. Repeat steps 7-9 for the other portion size buttons at the tap
(using the appropriate glass size for each button).
11. Repeat steps 7-10 for any other taps you want to define
portions for.
You only need to pour at other taps if you expect to use
different glassware at those taps. Otherwise you can just
define the portions at one tap with learn mode and save them
as defaults and load them to taps that pour other brands but
use the same portion sizes. See Copy Dispenser, Copy
Partition and Brand Prices and Portions in this section.
12. Press the cancel button at any tap connected to the ECU
when you are satisfied with the amounts poured for all the
buttons at the tap(s). The lights behind the cancel and repeat
buttons come back on.
Price Levels
The portion sizes entered with
learn mode will be used for all
3 price levels.
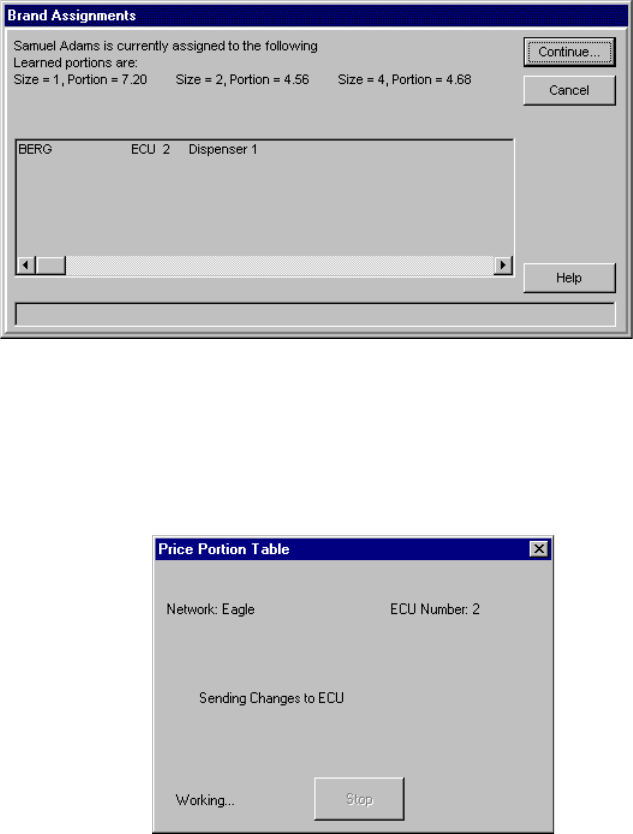
Brands, Cocktails, Prices and Portions 10-15
13. Click Continue... to confirm sending learn mode portion
size changes to each tap listed. Click Cancel to exit and lose
any learn mode portion sizes for that brand only.
Wait while the changes are communicated to the ECU(s).
14. Click Close to exit the Learn Mode screen.
Notes
qYou can refine portion sizes set with learn mode using the
Modify Prices and Portions screen. For example, if 10.02
ounces is poured in learn mode, you can modify the portion
size to 10 ounces to make accounting easier. See Brand
Price and Portion Setup in this section.
qPortions poured in learn mode aren't recorded as sales in the
ECU.
A separate Brand
Assignments screen
appears for each brand
you've changed.
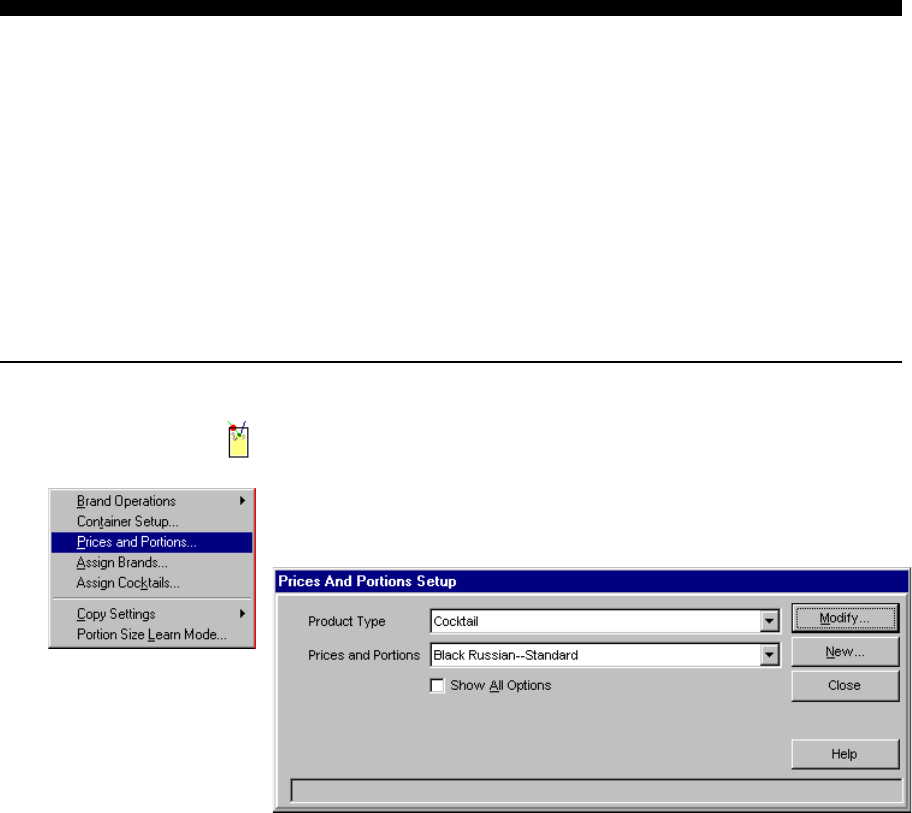
10-16 Infinity Installation/Service and User Manual
Cocktail Prices and Portions
Cocktail prices and portions are always associated with a cocktail name in Infinity; they are
never defined or used independent of a cocktail. Each cocktail is assigned a category of prices and
portions called "Standard", e.g. Black Russian--Standard refers to the standard prices and portions
set up for the Black Russian cocktail. These standard prices and portions include three price
levels. You can define default prices and ingredient portions for cocktails. See the Brand Wizard
section or Price and Portion Defaults in this section. You can add a cocktail to the brand list at
the time you enter prices and portions. You can enter a cocktail's prices and portions before or
after you assign the cocktail to a dispenser, but either way you must be sure the brands used in the
cocktail are included on the Laser gun.
nTo enter or change a cocktail's prices and portions:
1. Run Manager.
2. Pull down the Pouring menu and click Prices and
Portions....
3. Select Cocktail as the Product Type.
4. Select the cocktail's Prices and Portions. (If you haven't
defined any other prices and portions, Standard is the only
choice.)
OR
If you want to add a new cocktail to the list and set up its
prices and portions click New... and follow the steps outlined
in Add a Brand or Cocktail in this section.
5. Click Modify....
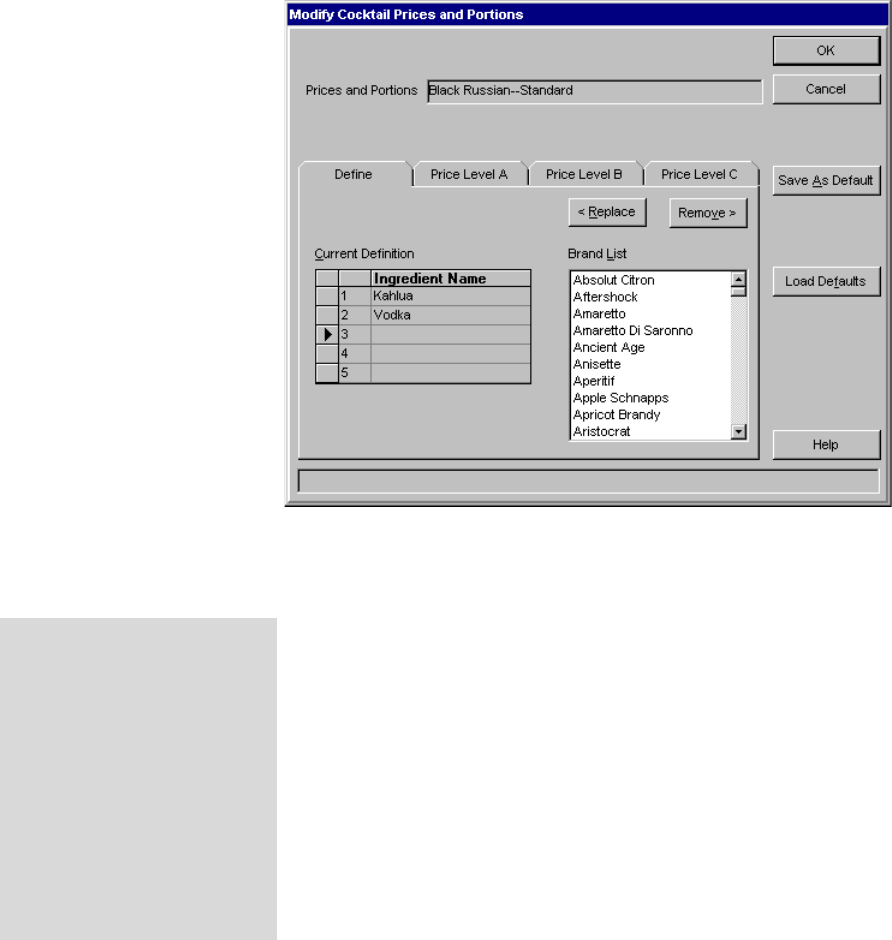
Brands, Cocktails, Prices and Portions 10-17
6. On the Define tab, select a brand in the Brand List that is
an ingredient in the cocktail.
7. Click <Replace to add the selected brand to the Current
Definition list of the cocktail or drag and drop the brand
from the Brand List to the Current Definition.
8. Click >Remove to remove a selected brand from the
Current Definition or drag and drop the brand from the
Current Definition to the Brand List.
9. Repeat steps 6-8 for the remaining brands in the cocktail.
10. Click a Price Level tab that has prices and/or portions you
want to change.
(continued on next page)
Price Levels
Price levels are optional tiers
of prices and portions that
can be defined to
accommodate various needs.
Some owners don't use price
levels; others use them for
switching between happy hour,
regular and entertainment
pricing; still others use them
to track shift sales.
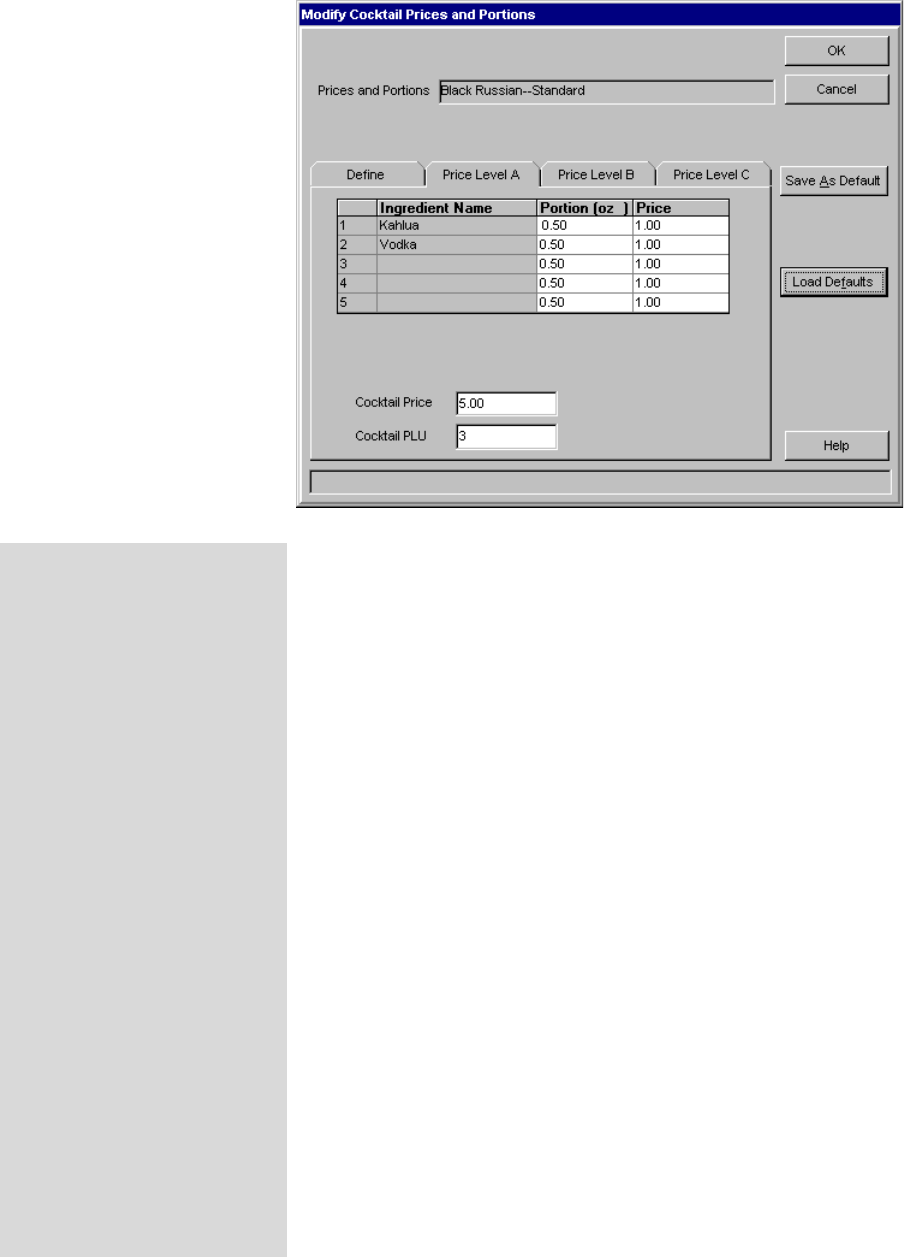
10-18 Infinity Installation/Service and User Manual
11. Type the correct Portion and Price for each Ingredient
Name listed on the tab. (You don't need to type a decimal if
you're entering a whole number, e.g. type 6 for 6.00 oz, or 2
for $2.00.)
You must enter a Portion size for each ingredient to tell the
dispenser how to pour the cocktail.
Ingredient Prices are an optional entry and should be the
retail value of the amount of the brand used in the cocktail.
Ingredient prices are only used in a Usage report. In the
report the ingredient price is multiplied by the number of
cocktails poured and added to the sales total for the brand.
The total of the ingredient prices may or may not equal the
price of the cocktail.
12. Type the correct Cocktail Price for the displayed price
level.
If you are installing an interface between Infinity and a sales
terminal or POS system see the Infinity/Sales Terminal
Interface Manual for help with entering PLUs in Infinity.
13. Repeat steps 10-12 for any Price Level tab that has prices
and/or portions you want to change.
14. Click OK to save your entries on all tabs. Click Cancel to
exit without saving.
Default Prices and Portions
lDefaults are base prices and
portions which are entered for
each brand when the brand is
added to the brand list.
lIf you click Load Defaults the
prices and portions displayed
are whatever defaults are
currently defined for the
product type.
lBergs default prices and
portions are used if you dont
set your own defaults.
lYou can set your own default
prices and portions for each
product type using any of the
following methods:
1. Enter price and portion
defaults using the Brand
Wizard.
2. Use the Price and Portion
Defaults menu item.
3. Use the Save As Default
button on the Modify Prices
and Portions screen.
Brands, Cocktails, Prices and Portions 10-19
15. Click Close to exit the Prices and Portions Setup screen.
Notes
qYou can build your cocktail prices based on the ingredients
used. The more expensive the liquor, the higher the price
that is charged.
Example: The following brand prices are established:
Bar Vodka Regular portion $2.00
Call Vodka (Smirnoff) Regular portion 2.25
Premium Vodka (Absolut) Regular portion 2.50
Kahlua (premium cordial) Small portion 1.25
If a customer orders a Black Russian, the price could be built as
follows:
Bar Vodka Black Russian 2.00 + 1.25 = 3.25
Call Vodka Black Russian 2.25 + 1.25 = 3.50
Premium Vodka Black Russian 2.50 + 1.25 = 3.75
qIf you need more prices and portions for a cocktail than the
three price levels of its standard prices and portions see
Create a New Price Portion Category in this section.
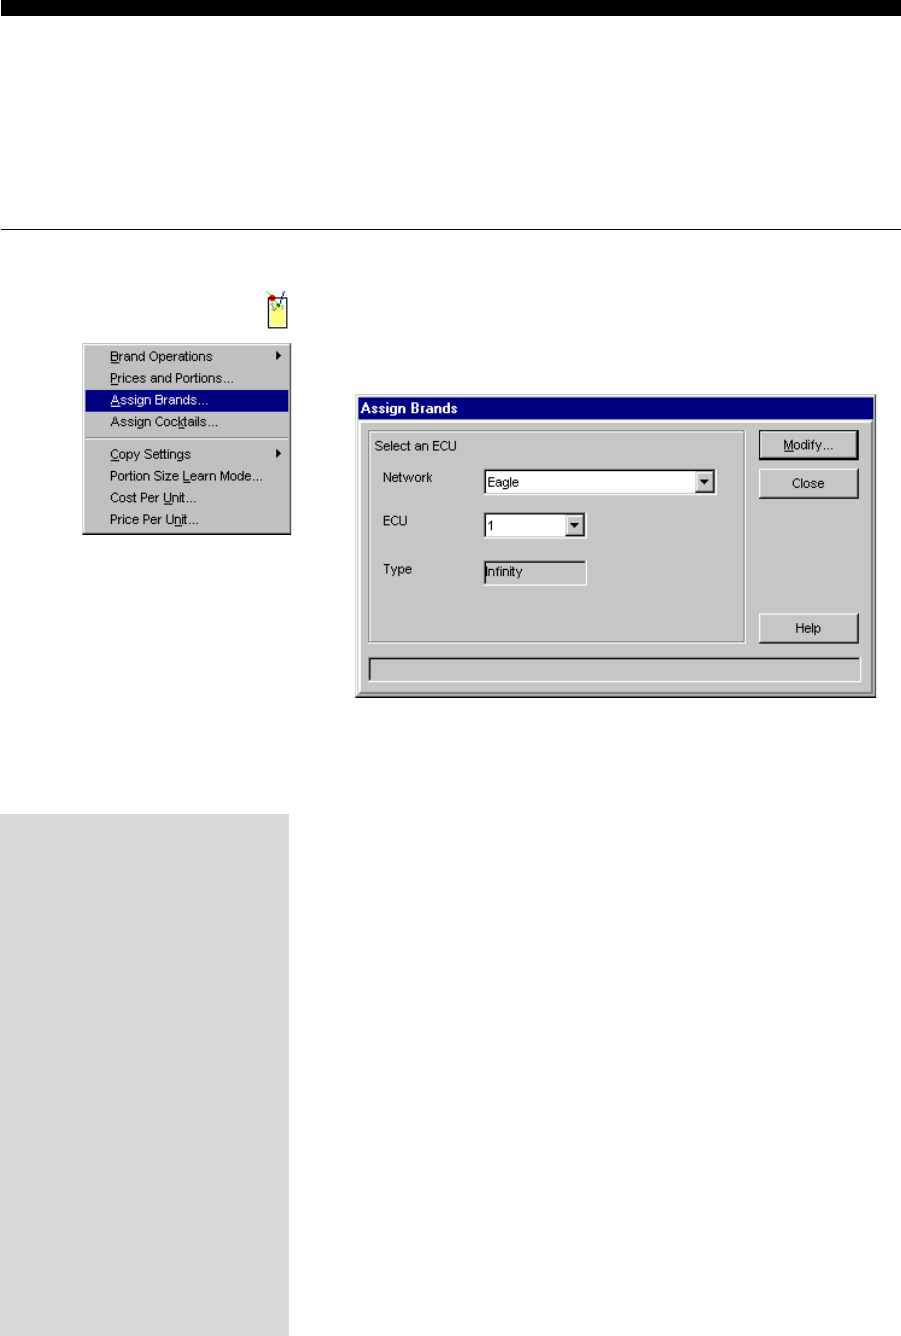
10-20 Infinity Installation/Service and User Manual
Assign Brands to Dispensers
Assign brands to specific dispensers after you've added any new brands to your brand list. Test
Pour is automatically assigned to all dispensers when you set up new ECUs so you can test the
equipment. You replace Test Pour when you assign your brands. See What is Test Pour? in this
section.
nTo assign brands to dispensers:
1. Run Manager.
2. Pull down the Pouring menu and click Assign Brands....
3. Select the Network.
4. Select the number of the ECU.
5. Click Modify.... (You are modifying the current
assignments.)
6. To assign brands to an Infinity ECU, click the correct Laser
or All-Bottle dispenser tab.
7. Select the brand you want to assign to Button 1 (Laser
guns), OR pourer Code 1 (All-Bottle) OR Disp. 1 (tap
controllers).
8. Click <Assign to assign the selected brand to the number 1
position on the dispenser. (Or drag and drop the selected
brand to the dispenser/button/code.)
9. Repeat steps 7-8 for the remaining Button, Code or Disp.
numbers.
10. To remove a brand from a dispenser, select the brand and
click >Remove. (Or drag and drop the selected brand to the
brand list.) This sets <None> as the brand assignment. If you
don't assign another brand in that position, the gun button,
pourer code or tap will not pour.
Product Types
Product types are categories
Infinity uses to organize the
brand list.
lBeer can only be assigned to
TAP 1 dispensers.
lCocktails can only be assigned
to Laser dispensers.
lLiquor can be assigned to
Laser or All-Bottle
dispensers.
lMixers can be assigned to
any dispenser.
lOther can be assigned to any
dispenser.
lWine can be assigned to any
dispenser.
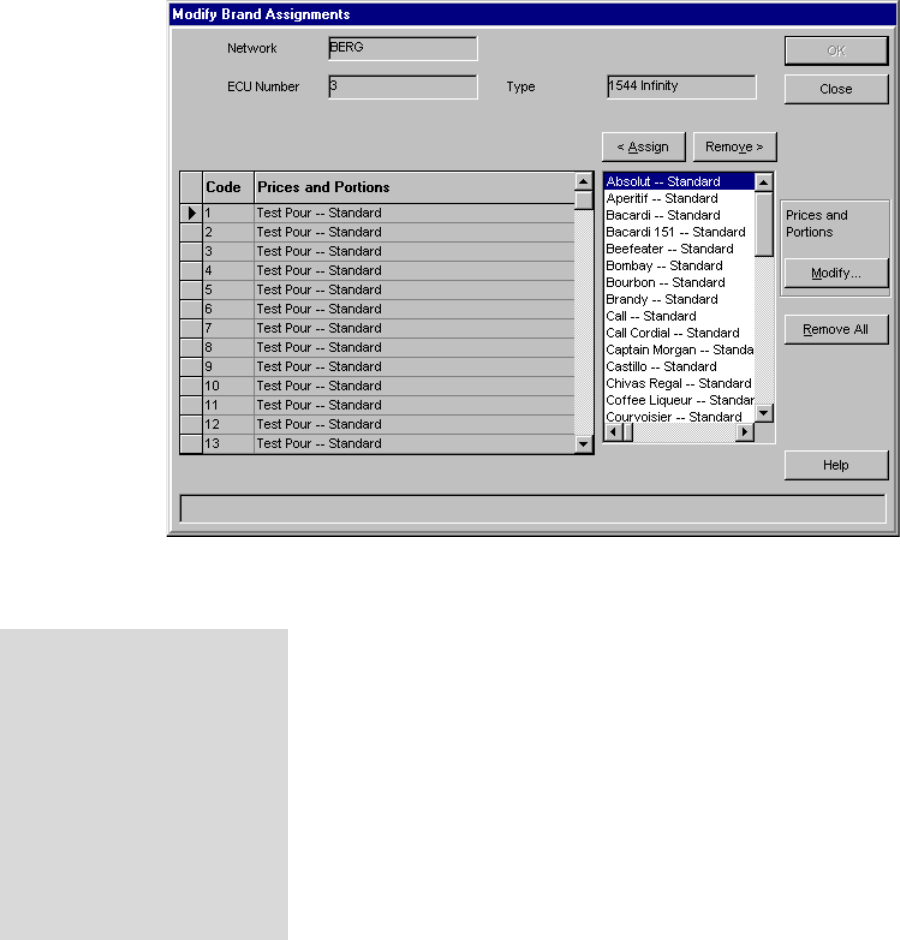
Brands, Cocktails, Prices and Portions 10-21
11. Repeat steps 6-10 for each dispenser tab of an Infinity ECU.
12. Click OK to save the brand assignments for all dispensers
connected to the ECU. Click Cancel to exit the screen
without saving any changes.
13. Repeat steps 3-12 for each ECU. Or, to copy identical
dispenser assignments to another ECU see Copy ECU, Copy
Dispenser or Copy Partition in this section.
Notes
qIf you don't use a Laser gun button, All-Bottle pourer code
or TAP 1 tap, remove any brand assignments (including Test
Pour) to disable the button, pourer code or tap.
qIf you change brand assignments later, be sure to clear sales
at the ECU first. If you don't clear sales first, all sales for the
first brand will show up on reports under the new brand's
name.
qEvery All-Bottle ID dispenser shares the same set of
assigned brands.
qSales Present popup screen: If you remove an assignment
for a brand that has sales, a message informs you of the
sales. You can remove the brand or cancel out of the process.
qRequired Brands popup screen: You can't remove a brand
from a Laser gun if it's used in a cocktail recipe assigned to
the gun. A message appears reminding you of the cocktail
assignment(s) if you attempt to remove the brand.
Shortcut Button
Click Modify... to modify prices
or portions for a specific brand.
This is a shortcut button that
gives you access to the Modify
Prices and Portions screen
without exiting the Modify
Brand Assignments screen.
Follow the steps outlined in
Brand Prices and Portions in
this section.
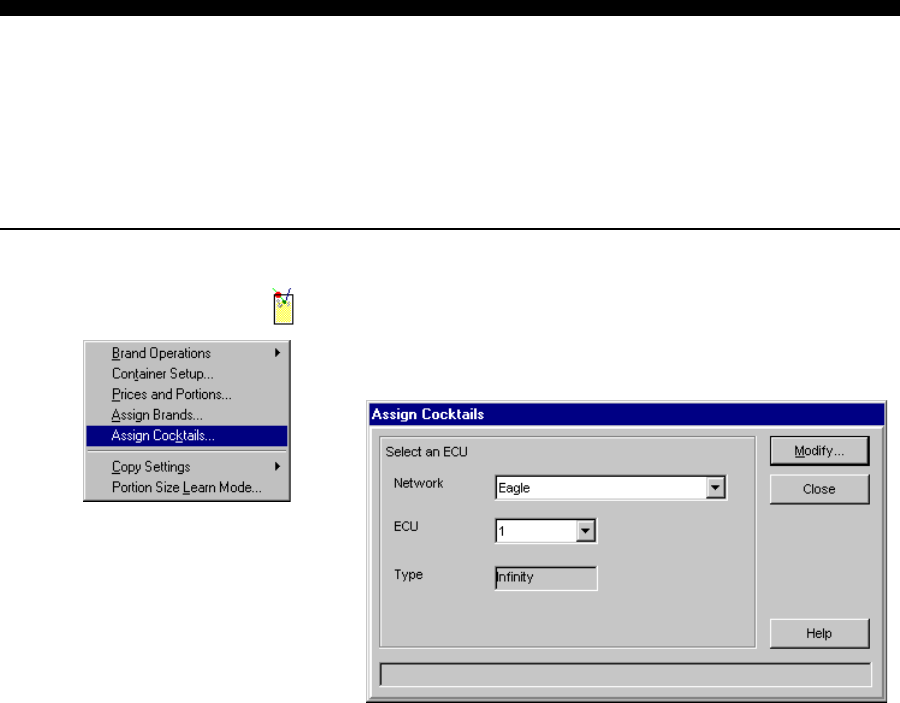
10-22 Infinity Installation/Service and User Manual
Assign Cocktails to Laser Dispensers
Assign cocktails to Laser dispensers after you've added any new cocktails to the brand list and
after you've assigned brands to dispensers. A cocktail is a combination of brands so you must be
sure those brands are assigned to the Laser dispenser and will be available for the cocktail. Berg
recommends defining cocktail prices and portions before assigning cocktails to Laser dispensers.
nTo assign cocktails to Laser dispensers:
1. Run Manager.
2. Pull down the Pouring menu and click Assign Cocktails....
3. Select the Network.
4. Select the number of the ECU.
5. Click Modify....
6. Click the tab for a selected Bank of cocktails on the correct
Laser dispenser.
The three cocktail banks represent the three levels of
cocktails available at the Laser gun using the up and down
arrow buttons. The cocktail banks can correspond to the size
of the cocktails if you choose.
Use the Regular bank of cocktails for those poured most
often. This bank does not require an extra button press on
the Laser gun. The Lower bank is accessed with the down
arrow button and the Upper bank with the up arrow button.
The number of cocktails you can assign to each bank is the
number of buttons on the Laser gun6,12 or 16. (If you use
button 16 switching on a Laser 16 gun you can assign 15
cocktails to each bank.)
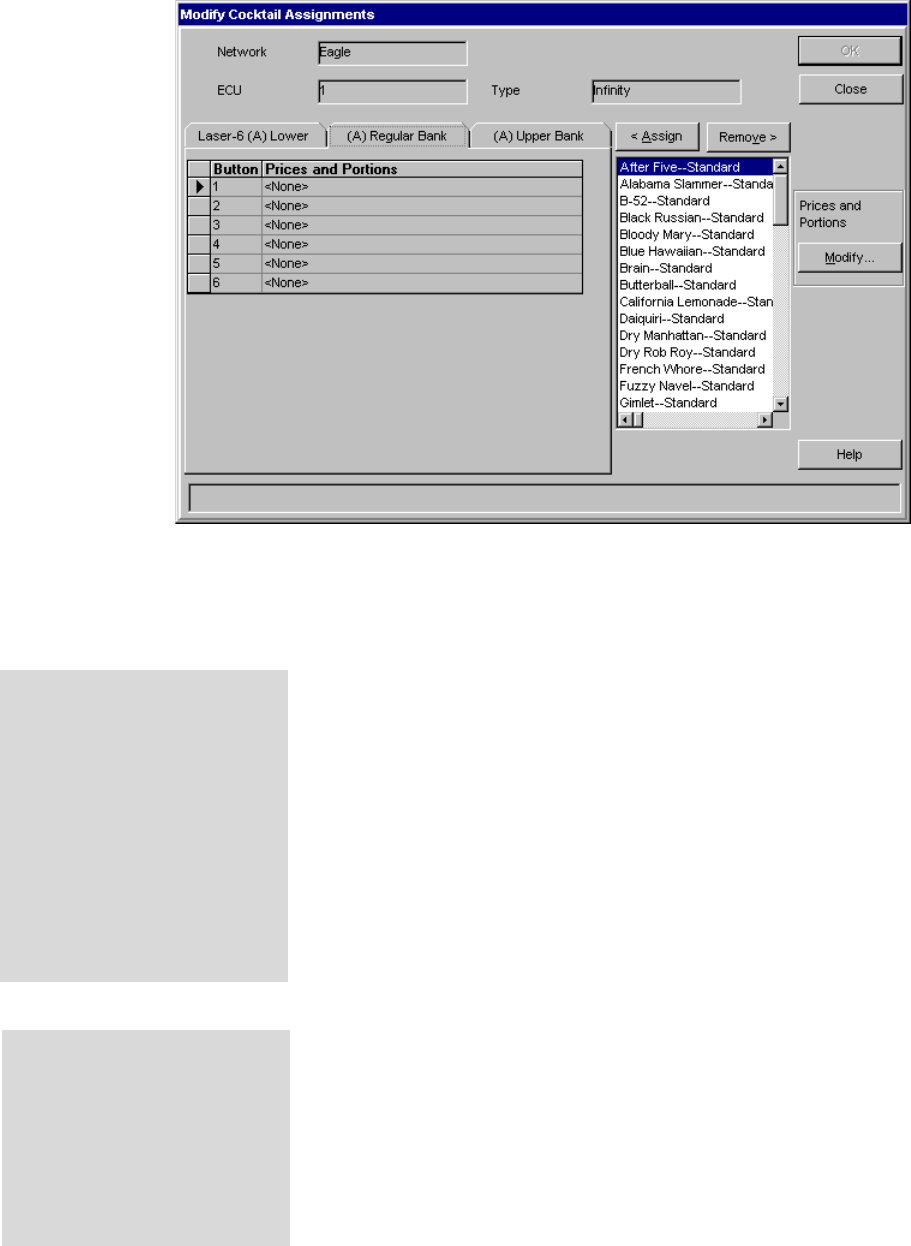
Brands, Cocktails, Prices and Portions 10-23
7. Select the cocktail you want to assign to Button 1.
8. Click <Assign to assign the selected cocktail to Button
1.(Or drag and drop the selected cocktail in place.)
9. Repeat steps 7-8 for the remaining Button numbers.
10. To remove a cocktail from a button, select the cocktail and
click >Remove.(Or drag and drop it back to the cocktail
list.)
11. Repeat steps 6-10 for each bank of each Laser dispenser
connected to the ECU.
12. Click OK to save the cocktail assignments for all dispensers
connected to the ECU. Click Cancel to exit the screen
without saving any changes.
If any brands needed to pour an assigned cocktail are
missing from the Laser gun, a popup message (Missing
Ingredient Assignments) reminds you. You can click
Continue... to assign the missing brands to the gun or click
Cancel to exit the cocktail assignment process.
13. Repeat steps 3-12 for each Infinity ECU with Laser
dispensers. Or, to assign identical cocktails to a different
Laser dispenser see Copy ECU or Copy Dispenser in this
section.
Shortcut Button
Click Modify... to modify prices
or portions for a specific brand.
This is a shortcut button that
gives you access to the Modify
Prices and Portions screen
without exiting the Modify
Brand Assignments screen.
Follow the steps outlined in
Brand Prices and Portions in
this section.
PLU Recipe
If you've enabled the
Reconciliation report feature, all
ECUs display a tab for PLU
Recipes. See About PLU
Recipes in the Reconciliation
and Variance Reports section.
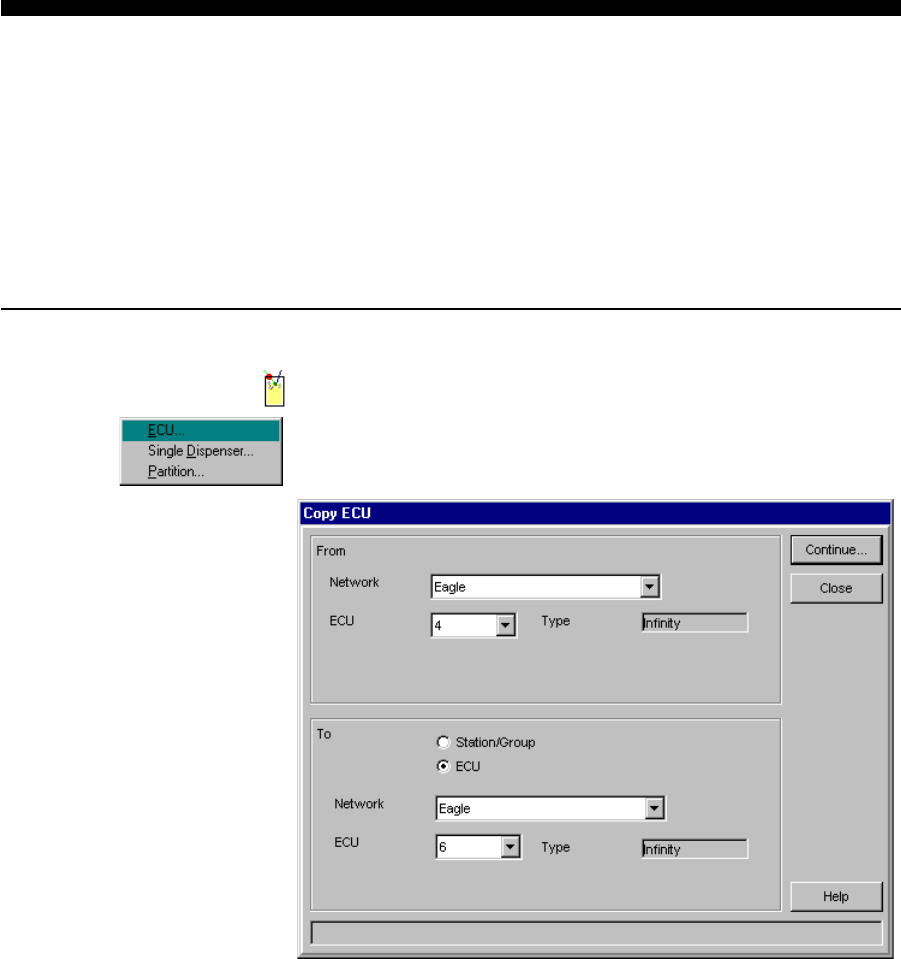
10-24 Infinity Installation/Service and User Manual
Copy ECU
Use this feature to copy dispenser brand assignments from one Infinity or 1544 Infinity ECU to
another. You can copy the brand assignments of one ECU to several identical ECUs by selecting a
station or group. This feature copies the names of the brands and cocktails (along with prices and
portions) and the buttons or pourer codes they are assigned to. It also copies the calibration
values for All-Bottle dispensers. To copy the brand assignments of a TAP 1 ECU see Copy
Partition in this section. To copy the brand assignments of a single dispenser see Copy Dispenser
in this section.
nTo copy ECU dispenser brand assignments:
1. Run Manager.
2. Pull down the Pouring menu and point to Copy Settings.
Click ECU....
3. Select the "from" Network.
Select the "from" ECU.
4. Select whether you're copying "to" a Station/Group or an
ECU.
If you copy to a station or group, all ECUs in the station or
group that are identical to the "from" ECU will receive the
copy. Any non-identical ECUs will be left alone.
Select the name of the Station/Group.
OR
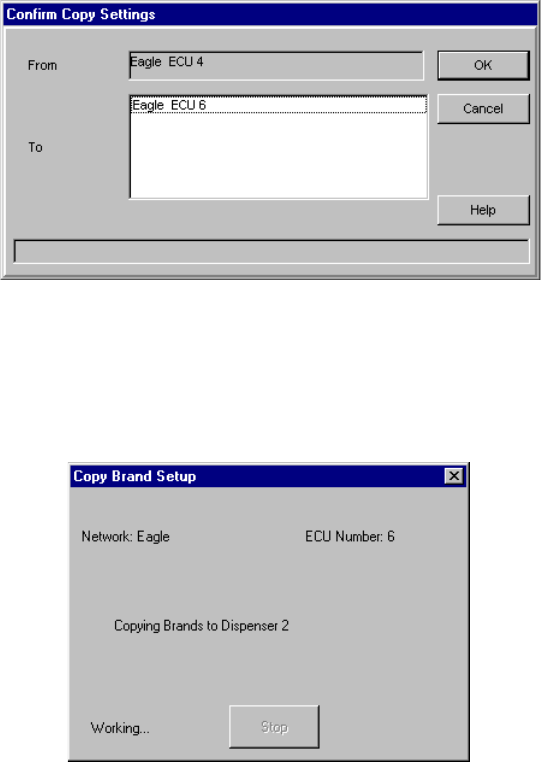
Brands, Cocktails, Prices and Portions 10-25
Select the "to" Network.
Select the number of the "to" ECU.
5. Click Continue....
You'll see a list of all the ECUs to which the assignments
will be copied.
6. Click OK to confirm the copy operation or click Cancel to
cancel the copy operation.
Wait while the copy is communicated to the ECU(s).
7. Click Close to exit the Copy ECU screen.
Only ECUs with the same
number and type of
dispensers as the "from"
ECU will receive the copied
settings.
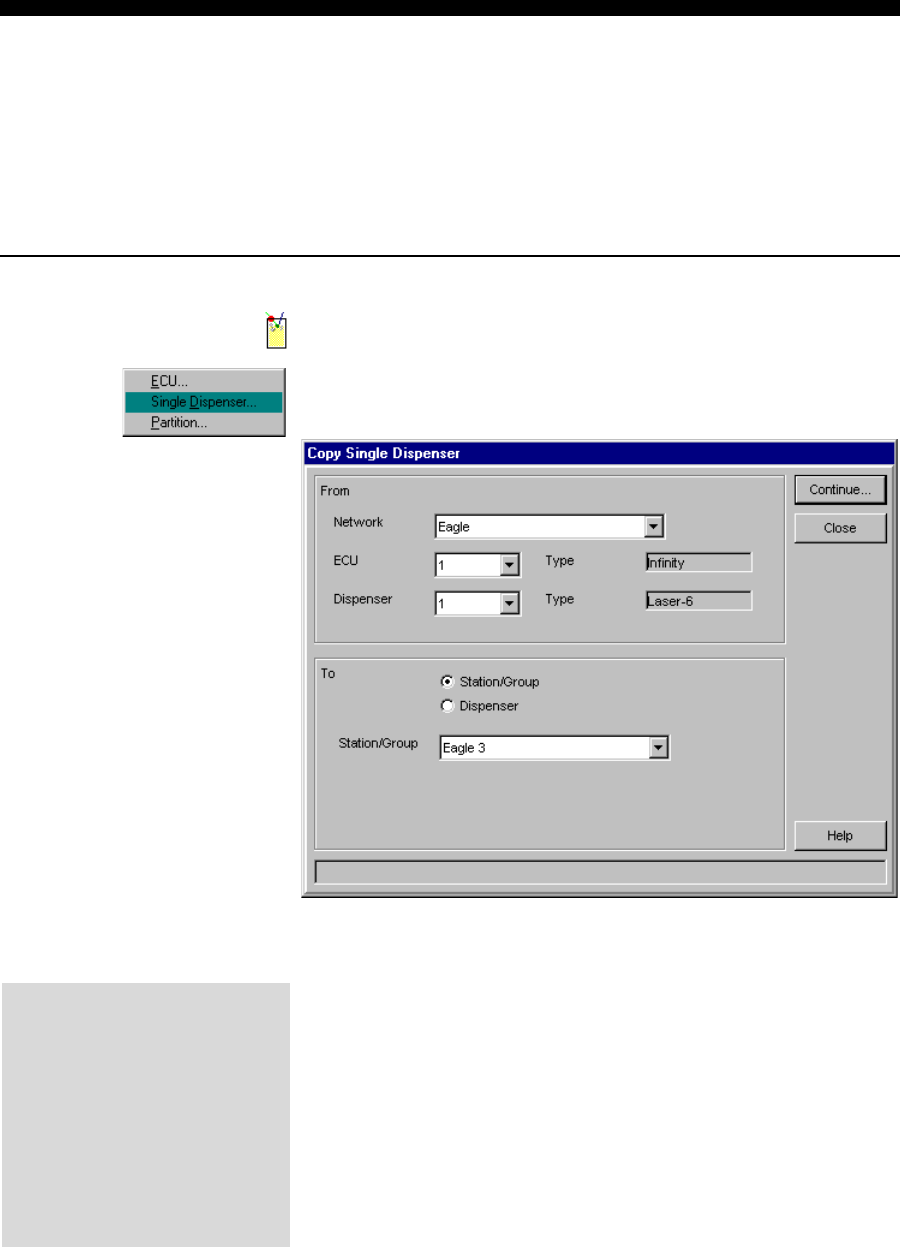
10-26 Infinity Installation/Service and User Manual
Copy Dispenser
You can copy the brand assignments of Laser, All-Bottle or TAP 1 dispensers to other identical
dispensers. This feature copies the names of the brands and cocktails (along with prices and
portions) and the buttons or pourer codes they are assigned to. It also copies the calibration
values for All-Bottle dispensers. You can copy from one dispenser to multiple dispensers by
selecting a station or group.
nTo copy dispenser assignments:
1. Run Manager.
2. Pull down the Pouring menu and point to Copy Settings.
Click Single Dispenser....
3. Select the "from" Network.
Select the "from" ECU.
Select the number of the "from" Dispenser.
4. Select whether you're copying "to" a Dispenser or Station/
Group.
If you copy to a station or group, all dispensers in the station
or group that are the same type as the "from" dispenser will
receive the copy. Any dispensers of a different type will be
left alone.
Select the name of the Station/Group.
OR
All-Bottle ID
The brand assignments of an
All-Bottle ID dispenser are
automatically copied to all
other All-Bottle ID dispensers
whenever changes are made.
(You don't need to use Copy
Dispenser for All-Bottle ID
dispensers.)
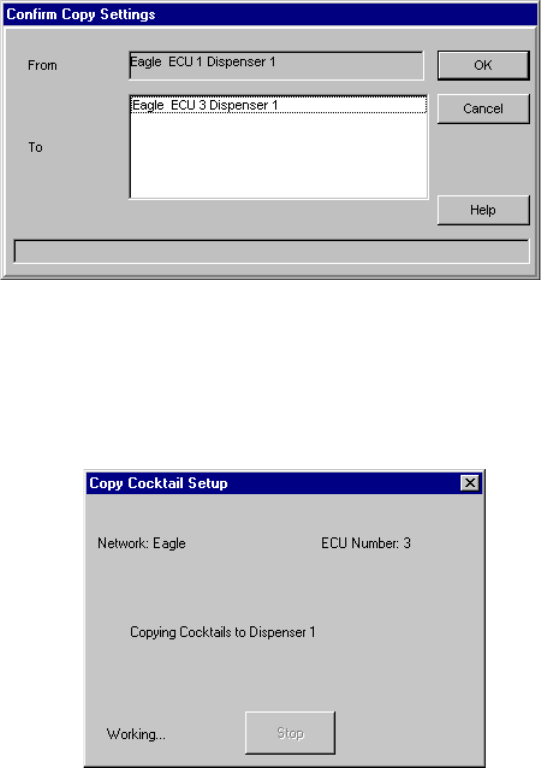
Brands, Cocktails, Prices and Portions 10-27
Select the "to" Network.
Select the number of the "to" ECU.
Select the number of the "to" Dispenser.
5. Click Continue....
You'll see a list of all matching dispensers to which the
assignment will be copied.
6. Click OK to confirm the copy operation or click Cancel to
cancel the copy operation.
Wait while the copy is communicated to the ECU(s).
7. Click Close to exit the Copy Dispenser screen.
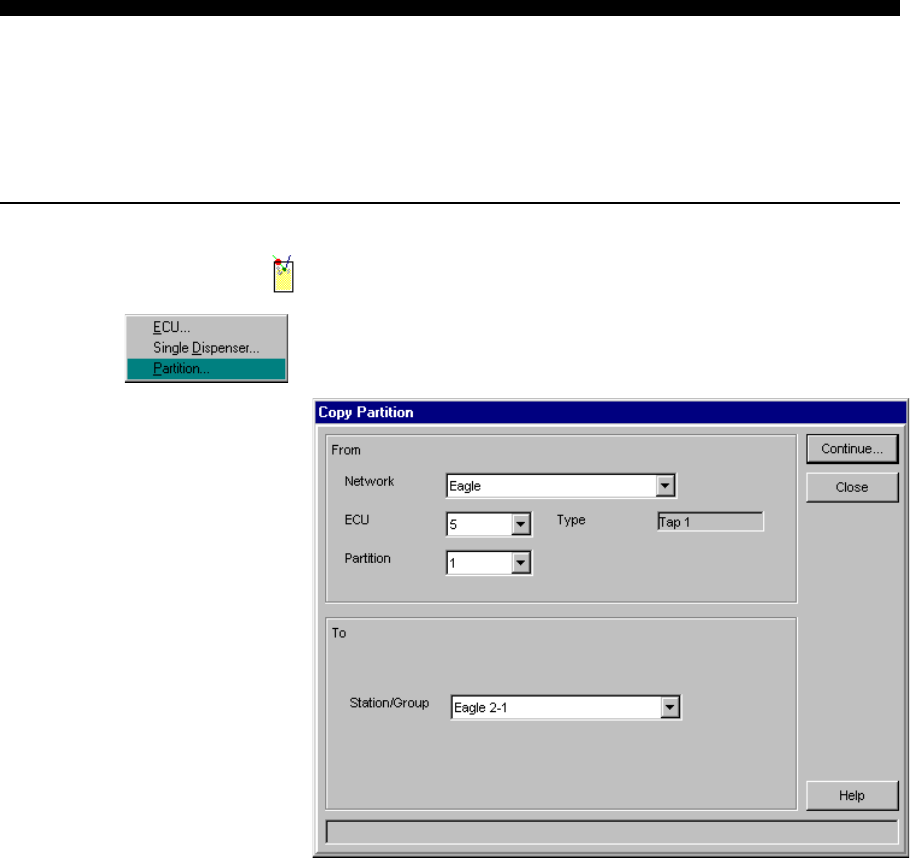
10-28 Infinity Installation/Service and User Manual
Copy Partition
Use this feature to copy identical dispenser brand assignments from one TAP 1 partition to other
identical TAP 1 partitions in a station or group. This feature copies the names of the brands
(along with prices and portions) and the buttons they are assigned to.
nTo copy partition brand dispenser assignments:
1. Run Manager.
2. Pull down the Pouring menu and point to Copy Settings.
Click Partition....
3. Select the "from" Network.
Select the "from" ECU.
Select the "from" Partition.
4. Select the name of the "to" Station/Group.
When you copy to a station or group, all TAP 1 partitions in
the station or group that are identical to the "from" partition
will receive the copy. Any non-identical partitions will be
left alone.
5. Click Continue....
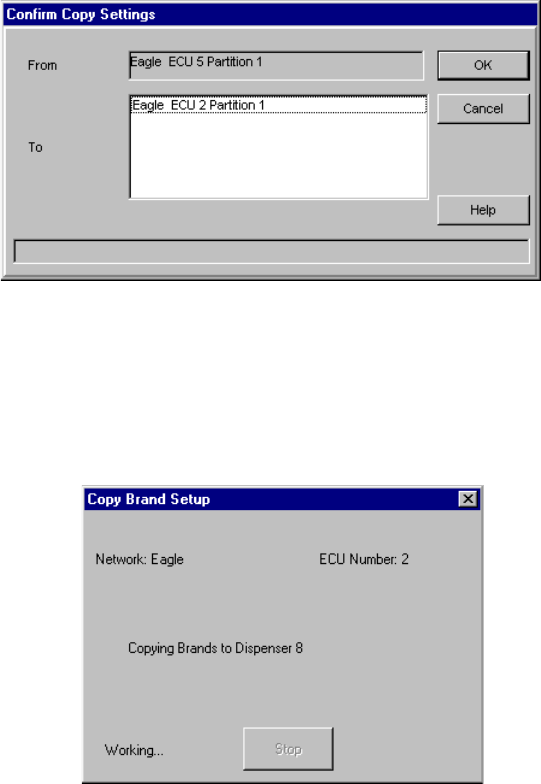
Brands, Cocktails, Prices and Portions 10-29
You'll see a list of all partitions to which the assignment will
be copied.
6. Click OK to confirm the copy operation or click Cancel to
cancel the copy operation.
Wait while the copy is communicated to the ECU(s).
7. Click Close to exit the Copy Partition screen.
Only partitions with the
same number of taps as the
"from" partition will receive
the copied settings.
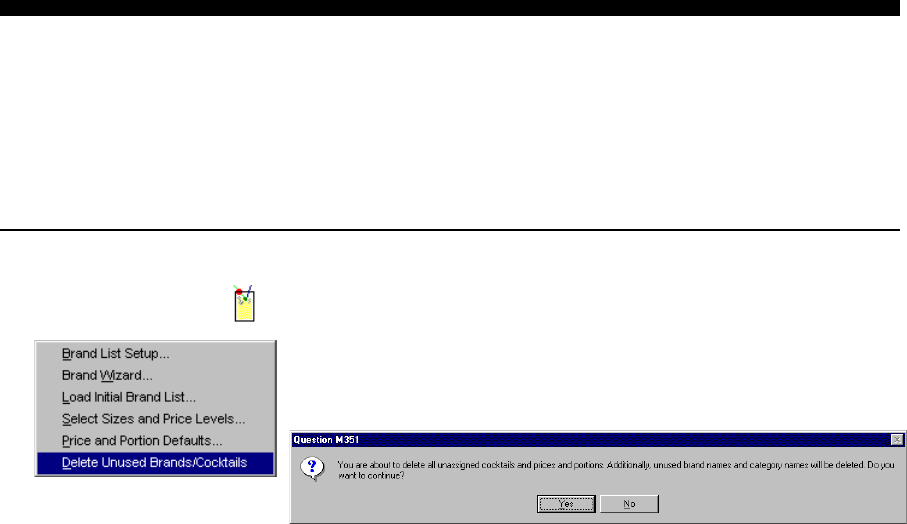
10-30 Infinity Installation/Service and User Manual
Delete Unused Brands and Cocktails
Perform this task to quickly remove the names of all unused brands and cocktails from your brand
list. Unused brands and cocktails are those that aren't assigned to any dispensers. When you
delete unused brands and cocktails, their prices and portions are also deleted. Be sure you've
made all your brand and cocktail assignments before performing this task.
nTo delete unused brands and cocktails:
1. Run Manager.
2. Pull down the Pouring menu and point to Brand
Operations. Click Delete Unused Brands/Cocktails.
3. Click Yes to proceed with the deletion.

Brands, Cocktails, Prices and Portions 10-31
What is Test Pour?
You may have noticed Test Pour in your brand list. This entry is included in the brand list for
your convenience during installation and also to assist Berg in troubleshooting your system.
Test Pour Test Pour isn't a specific brand of liquor. It's a default brand
name initially assigned to each dispenser. It makes it possible to
pour at each dispenser before you've set up any brands with the
software. Test Pour uses the factory default portion sizes for S,
R and L. A different Test Pour is used for Tap 1 dispensers (Tap
1 Test Pour).
Removing Test Pour
from a dispenser
When you assign specific brands to each dispenser, you replace
Test Pour with the chosen brand.
Removing Test Pour
from the Brand List
Test Pour can't be deleted from the brand list so it's always
available for diagnostic purposes.