Bang and Olufsen a s BEOCOM1 Cordless Telephone User Manual 3507344 til INTERPEN
Bang & Olufsen a/s Cordless Telephone 3507344 til INTERPEN
Contents
- 1. User Manual 2
- 2. User Manual Final version
- 3. User Manual insert declaration
- 4. User Manual insert
User Manual Final version

BeoCom 1
Guide

3
Before you start…
This Guide contains instructions in how to use the BeoCom 1
handset with a BeoLine base on the Public Switched Telephone
Network (PSTN).
How to use this Guide
The following examples show what a key or status display looks like in an
instruction sequence.
Examples of keys on the handset
The wheel
The key in the middle of the wheel
The phone key, which starts and ends a call
The digit keys
The handset display
The phone number is prefaced by 1: or 2:, which
indicates the line currently in use.
A black arrow indicates that more options are
available if you turn the wheel in the direction
shown – clockwise for right, and counter-
clockwise for left. A grey arrow indicates that no
more options are available in the direction
shown.
OK
0 –9
1:5551234567
s
Enter name?
t

Contents
Get started, 7
This chapter leads you through connection and setting-up of
BeoCom 1, and instructs you in how to use the handset keys and
the display. It also contains information about proper maintenance
and about accessories available from your Bang & Olufsen retailer.
Daily use, 19
Find out how to use the most basic, day-to-day functions, such as
making and answering calls, adjusting the handset volume, and
using the Phonebook, Caller ID list and Redial list.
2-line use, 31
Find out how to handle simultaneous calls on the same line, handle
simultaneous calls on both lines, make a 2-line conference call and
make a three-party call on one line.
Advanced operations, 37
This chapter describes functions you may use less often, but which
make the phone more useful or enjoyable, such as entering names
and numbers in the Phonebook, storing numbers from the Redial
and Caller ID lists, and adjusting the volume level of Bang &
Olufsen audio or video products.
System use with several handsets, 47
Find out how to make a handset personal or common, call another
handset, forward external calls and make an internal conference
call between two handsets in the system and one external call.
4

5
Preference settings, 53
Find out how to register a handset to a base manually, choose a
base, change the pincode for the base, and cancel the registration
of a handset to a base. The chapter also includes an overview of
the ‘Settings’ and ‘Advanced settings’ menus.
Important information about BeoCom 1, 58
This chapter contains technical data and other special information
about your BeoCom 1.
Index, 60

6

7
Charge the handset battery, 8
First-time registration of a handset, 8
• Open the base and register the handset
• Name the handset
• Set BeoCom 1 for use with one or two lines
• Set the time and date
Phone feedback – indicator lights, 12
Connect and use a headset, 12
Placement, surroundings, and cleaning, 13
Attach the clip, 13
The handset, 14
• The display
• The keypad
Battery status, 17
Replace the battery, 17
When getting started, follow this
procedure:
1 Connect the charger to the
power outlet as described in the
charger’s Guide;
2 Charge the handset battery;
3 Connect the BeoLine base as
described in the BeoLine Guide;
4 Register the handset to the base.
Do not extend or alter the base or
charger’s power cord in any way, as
this will cause the product in
question to malfunction!
This chapter describes the first-time
setup procedure in detail.
In addition, it describes how to
interpret the indicator light on the
handset, use the handset keys and
navigate using the menu system
and the handset display.
Finally, the chapter contains
information about maintenance of
BeoCom 1 and accessories
available from your Bang & Olufsen
retailer.
Get started

8>> Get started
Charge the handset battery
If the handset requires charging, this occurs automatically when
the handset is placed in the charger. For safety reasons, the battery
is not charged prior to shipping. We recommend that you charge
the handset for at least one hour before proceeding further.
About charging…
– The charger must be connected to the power outlet.
– It takes four hours to fully charge the battery.
– The maximum talk-time per charge is approximately 10 hours.
– Standby time per charge is approximately 150 hours.
First-time registration of a handset to a base
In order for the BeoLine base and the handset to communicate, the
handset must be registered to the base. Up to 8 handsets can be
registered to one base. To register a handset, follow the procedure
described on these pages.
Open the BeoLine base for registration of a handset…
> If you have not connected your base to the power outlet, do so. If the
base is connected, but the indicator light is not flashing red, disconnect
the base, wait two seconds, and reconnect it. The indicator light flashes
red, and the base is open for registration
The handset controls battery
charging, so you can always place
the handset in the charger after
use, even if the battery does not
need recharging. Leaving the
handset in the charger does not
reduce the lifetime of the battery.
The handset display and a beep
signal will inform you when the
batteries require charging. Please
refer to the chapter The handset
display on pages 14–15 for more
information. For more information
about how to handle, place and
connect a BeoLine base, refer to
the Guide enclosed with the base.
Indicator light

9
To register a handset…
Press to switch on the handset. The display
prompts you to register the handset
Press to continue. The handset searches for an
open base
When a base is located, the PARK number –
which identifies the base – is shown. Check the
number in the display against the number on the
back of the base
If the numbers do not match, turn the wheel to
view the available bases
When the desired base is shown, press to
register the handset to the base. The display
prompts you to wait until registration is complete
If the base prompts you for a pincode, enter the
pincode and press OK
When registration is complete, Enter handset
name? appears in the display. You can then
move on to naming the handset, as described on
page 10. If you do not wish to name the
handset, press C
You can also open a base and
register a handset via the Advanced
settings menu. Refer to the chapter
Preference settings on page 53 for
more information.
OK
Register
handset to base?
OK
Searching base
Wait...
Base 01/01
36-000077000111
OK
Wait...
0 –9
OK
Enter handset
name?
C

10 >> Get started
Name the handset
When registration is complete, the display prompts you to name
the handset. You can enter this setting at a later date, if you wish.
The display prompts you to enter a name
Turn the wheel to select characters, and press OK
to store each character
When the name is complete, turn the wheel to
move the cursor under the symbol. Store
entry? appears in the display
Press to store the name. You can then set
BeoCom 1 for use with one or two lines
Set BeoCom 1 for use with one or two lines
After you have named the handset, BeoCom 1 prompts you to
select the number of telephone lines to which you have access.
When naming is complete, Phone lines appears
in the display
Turn the wheel to select the number of lines
Press to store. You can then set the clock
You can name the handset, for
example, after the room in which it
is placed, or after the person who
uses it most frequently. Handsets
not named are automatically given
a number from 1 to 8, depending
on how many handsets you have in
your system.
The functions described on these
pages are accessible via the
Advanced Settings menu. Please
refer to the chapter Preference
settings on page 53 for more
information.
If you register a previously named
handset to the base, this name
appears in the display when
registration is complete. To use the
same name, move the cursor under
the symbol and press OK.
It is only necessary to set the
number of phone lines when
registering the first handset to the
base. This step in the registration
procedure is skipped for all
subsequent handsets.
_
ABCDEFGHIJKLM…
OK
Living room
s
Store entry?
t
OK
Living room
Stored
Phone lines
s
2?
t
OK
Stored
2

11
Set the time and date
After you have registered the handset, named it and set it up for
use with the telephone lines to which you have access, the display
prompts you to set the time and date. The time is shown when the
phone is not in use and when there is no new information in the
display. Time and date are also shown with Caller ID and Redial
information.
Set clock? is shown
Press to be able to set the clock, or press C if you
wish to skip this step
Turn the wheel to set the hour
Press to store and move to the minutes setting
Complete the setting of the clock
Press to store the time and date
Turn the wheel to set the year and press OK to
store the year
When you have set the time and date…
The display prompts you to register another
handset
If you have additional handsets to register, press
OK. The base is then open for a new five-minute
period, and you can repeat the registration
procedure on the next handset
If you do not have additional handsets, press C
to leave the menu
It is only necessary to set the time
when registering the first handset
to the base. This step in the
registration procedure is skipped
for all subsequent handsets.
Set clock?
OK
Set time
11:20 AM
OK
OK
OK
Register more
handsets?
OK
C
12 >> Get started
Phone feedback – indicator lights
Indicator light on the handset
The indicator light flashes red when…
– The phone is off the hook
– The phone rings
– Unanswered Caller IDs are registered. If you set a primary line for
outgoing calls, as described on page 36, the indicator light flashes for
unanswered calls on the primary line only. Otherwise, the indicator light
flashes for all unanswered calls
– Conditions exist which affect or impede the optimal use of your phone.
Refer to page 15 for more information.
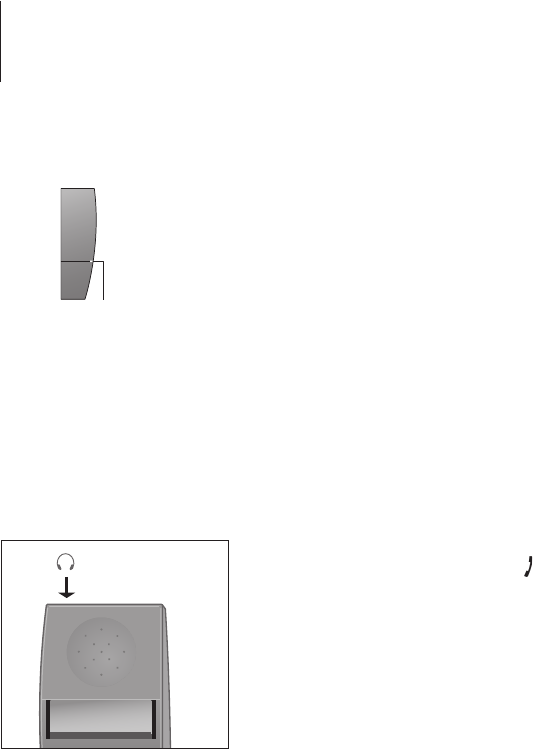
Connect and use a headset
Connect a headset to the socket on the handset as shown. You can
then answer incoming calls by pressing or any digit key on the
handset keypad. Place a call as described on page 20.
An optional headset can be purchased from your Bang & Olufsen retailer.
You can turn off the handset
indication of unanswered Caller
IDs. Refer to the chapter Preference
settings on page 53 for more
information.
Indicator
light
When you connect a headset,
‘Headset connected’ appears briefly
in the display.
13
Placement and surroundings
The phone must not be placed in damp, dusty or polluted
surroundings and should not be exposed to direct sunlight or
liquids. Avoid the handset charging contacts touching metal or
greasy parts.
Clean BeoCom 1
Clean your BeoCom 1 with a soft, damp cloth with a few drops of
mild detergent added. To clean the charging contacts of charger
and handset – and only these parts – use a cotton swab and
isopropyl alcohol. Do not use isopropyl alcohol to clean any other
part of the charger or handset!
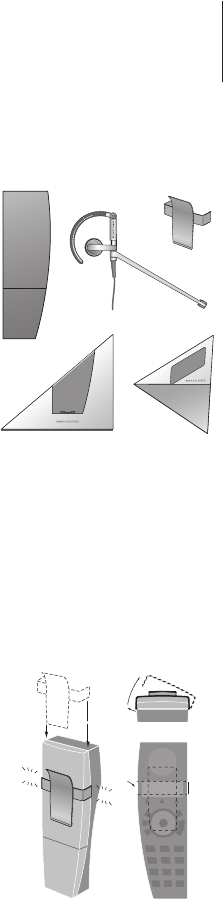
Attach the clip
With the clip you can attach the handset to your pocket. Attach the
clip on the back of the handset:
To attach the clip…
> Slide the two flaps down along the two grooves on the sides of the
handset.
> When the clip is positioned correctly, approximately 1.75 inches
(4.5 cm) from the top of the handset, it will click into place. Make sure
the clip is firmly attached on both sides of the handset.
To remove the clip:
> Pull the left flap (B) out to the left with a flat object.
> When the left flap is clear of the groove, pull the clip back – be careful
not to scratch the handset with the clip.
BeoCom 1 can only be used with
the Bang & Olufsen accessories
shown: Extra handset, EarSet 1
Home, Clip, Table charger, Wall
charger. Do not use BeoCom 1 with
BeoCom 6000 bases or chargers.
CLICK CLICK
1
2
B

14 >> Get started
The handset display
Open the display…
Press while the handset is in standby
Turn the wheel to view options in the display
Press to select an option
Options in the main menu
–Redial list… See the list of outgoing calls – refer to page 26.
–Caller ID list… See the list of calls you have received – refer to page 28.
–Delete lists… Delete the Caller ID and Redial lists – refer to page 30.
–Lock keypad?… Lock the handset keypad – refer to page 21.
–Silence?… Mute the handset ringer and battery alarm – refer to page 22.
–Battery status… See the charge level of the battery – refer to page 17.
–Settings… Activate, adjust, or deactivate functions – refer to page 53.
Display of new, unanswered calls
While the handset is in standby, the display informs you of any
unanswered calls you have received. The menu disappears when you have
seen the calls, and the call information is moved to the Caller ID list. If you
have set a primary line (see page 36), only new calls on this line are
shown. If you have not set a primary line, calls on both lines are shown.
‘3 new calls’ appears in the display…
Press to see the number, the time and the date
of the newest call. If the name is stored in the
Phonebook, this is shown instead of the number
Turn the wheel to see the other calls
When you have seen the new calls, press C to
leave the menu
s
Redial list
t
s
Caller ID list
t
s
Delete lists
t
s
Lock keypad?
t
s
Silence?
t
s
Battery status
t
s
Settings
t
s
3 new calls
t
View?
If you wish to bring up the main
menu without viewing new call
information, simply turn the wheel.
OK
OK
OK
2:5551212
Sep 12 10:00 AM
C

15
s
Alert
t
View?
s
No contact
t
with base
s
No dial tone
t
Line 1
s
Battery needs
t
recharging
s
The clock has
t
not been set
If you wish to bring up the main
menu without viewing the alert,
simply turn the wheel.
Troubleshooting via the display – the Alert menu
If conditions exist which impede or otherwise affect the optimal use of
your phone, Alert appears in the display while the handset is in standby
and remains as long as the conditions apply.
‘Alert’ appears in the display…
Press to be able to view the cause of the alert
Turn the wheel to see if other conditions apply
Press to be able to adjust relevant settings, if
available
Turn the wheel to adjust settings, and press OK
to store them
Messages that can appear in standby – a summary
The handset is in standby and line 1 is selected –
normal display
The handset is not registered to a base. Press OK
to start the first-time setup procedure
Refer to the description above
2 unanswered calls received. Refer to the
opposite page for more information
The handset is silenced
Line 1 is busy. Press , then OK to ‘break in’ on
the call
Another handset has a call on hold on line 1.
Press to transfer the call to your handset
OK
s
The clock has
t
not been set
OK
Set time
11:20 AM
OK
1:Living room
Oct 24 8:50 AM
Register
handset to base?
s
Alert
t
View?
s
2 new calls
t
View?
1:Living room
Silenced
1:Line is busy
Oct 24 8:50 AM
1:Line on hold
Oct 24 8:50 AM
16
A
•
V
A..Z
INT
C
LINE 1 LINE 2 HOLD
1
0
2
ABC 3
DEF
4
GHI 5
JKL 6
MNO
7
PQRS 8
TUV 9
WXYZ
Clock
Jun 3 11:17 AM
The display is illuminated when the
handset is in use.
>> Get started
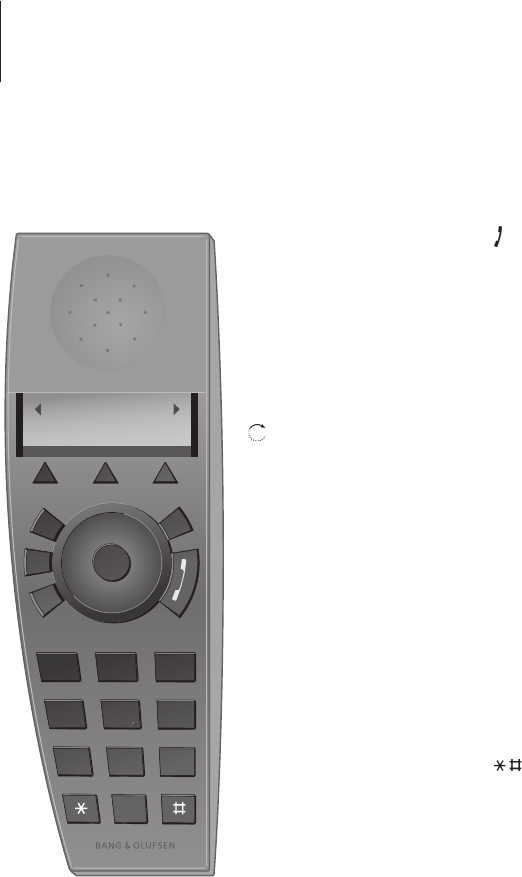
Handset keys
LINE 1
LINE 2
– Select a line to use for a new call
– Switch to a call on another line
– Resume a call on hold
HOLD
Place a call on hold
– Turn the wheel to search in the
Phonebook, Redial list, Caller ID
list and the handset menu system
– During a call, turn the wheel to
adjust the volume
OK (wheel middle)
– Accept and store entries or
choices in the display
– Depending on the state of the
phone, pressing OK gives you
access to additional functions or
options, which you can view by
turning the wheel
– Press and hold to switch the
handset off, and press once to
switch it on again
C
– Deletes the most recent key entry
– Press and hold to exit a function
Starts and ends a call
A.V
Adjusts the volume of Bang &
Olufsen audio or video systems
INT
Press to be able to call an internal
handset. You can then look
through the list of handsets with
the wheel, or select a handset by
pressing that handset’s number
(1–8)
A..Z
Access the Phonebook. Also used
for storing names and numbers in
the Phonebook
0 –9
Digit keys for entering telephone
numbers
Used in telephone numbers, for
Call Forwarding and other
automated services
17
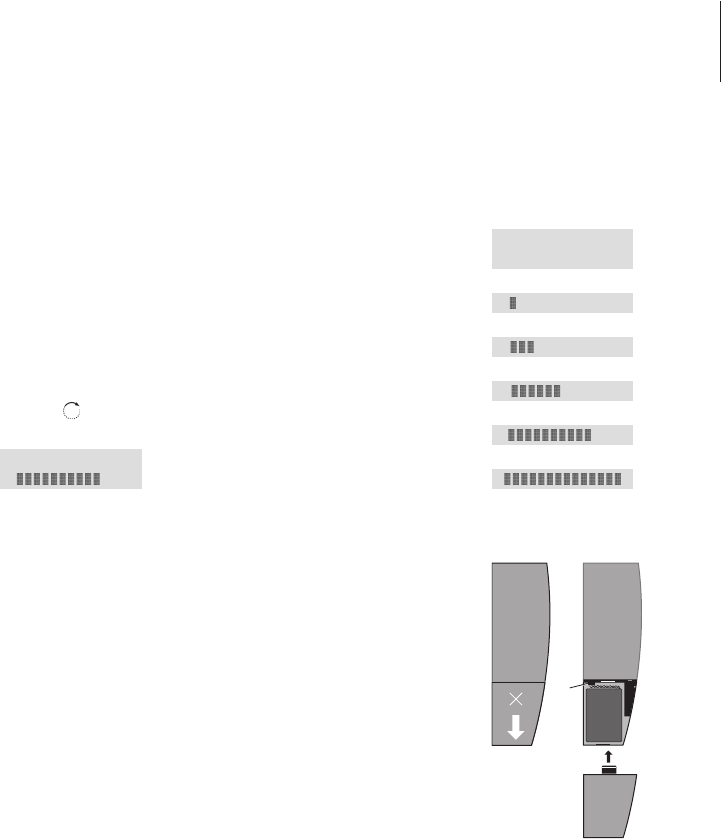
Battery status
The battery indicator in the display shows the charge level of the
handset battery. If the batteries require charging, this appears
automatically in the display and the handset warns you with an
audible signal.
To display the battery status…
Press while the handset is in standby
Turn the wheel until Battery status is shown and
press OK. The current charge level appears in the
display
Replace the battery
To remove the battery…
> Remove the battery cover; press the cover lightly and slide it off.
> Remove the battery and pull out the battery plug.
To insert a new battery…
> Insert the battery plug (A) and place the battery and the cords as
shown.
> Replace the battery cover, make sure that the tabs and the slots snap
into place correctly at the top and bottom of the cover.
If the battery in the handset is replaced with a new battery, please follow
the instructions accompanying the new battery.
Battery status
============
===========
=========
======
===
OK
OK
Battery status
===
A
0%
10%
25%
50%
75%
100%

18

19
Make and answer calls, 20
•Make a call
•Answer a call
•Mute the ringing of a single incoming call
Lock the handset keypad, 21
Silence the handset ringer and battery alert, 22
Volume and the microphone, 23
Store a number after a call, 24
Search the Phonebook and make a call, 25
The Redial and Caller ID lists, 26
•Use Redial
•Use Caller ID
•Delete the content of the Caller ID and Redial lists
This chapter instructs you in the
use of the basic, day-to-day
functions in BeoCom 1, such as
making and answering calls,
storing a number in the Phonebook
after a call, and using the Caller ID
and Redial lists.
Daily use

20 >> Daily use
Make and answer calls
The key on the BeoCom 1 is used to start and end a call. During
the call, the phone displays the active line, the duration of the call
and the number or name of the person called. If you do not wish to
answer a call, you can mute the ringing signal.
To make a call…
The current line for outgoing calls appears in the
display. If you wish to use another line, press the
appropriate line key
Enter the telephone number
To correct a digit, turn the wheel to move the
cursor to the digit in question and press C to
delete it
Press to make the call. The call time is shown,
and if the name is stored in the Phonebook, this
is shown as well
Press to end the call. Alternatively, place the
handset in the charger
To answer a call…
Press to answer the call
Press to end a call. Alternatively, place the
handset in the charger
To mute a handset’s ringing…
Press to mute the ringing signal for the incoming
call. The indicator light on the handset flashes
until the caller hangs up the phone
1:Living room
LINE 2
2:Living room
0 –9
2:5551234567_
2:5551234567
C
2:David Jones
Time: 0:19
2:David Jones
5551234567
C
If you select a primary line for
outgoing calls, as described on
page 36, this line is accessed when
you press . If you have not
selected a primary line, the line last
used for an outgoing call is
accessed.
If you connect a headset, note that
placing the handset in the charger
does not end an active call. This
allows you to charge the handset
during an active call.
If you end a call to or from a
number not previously stored in the
Phonebook, the display prompts
you to do so. Refer to Store a
number after a call on page 24 for
more information.
To get a dial tone before entering
the number, press .

21
OK
s
Redial list
t
s
Lock keypad?
t
OK
Keypad locked
OK
Unlock
s
No?
t
Unlock
s
Yes?
t
OK
Lock the handset keypad
You can lock the handset keypad to avoid inadvertent key
activation when, for example, you carry the handset in a pocket. If
you lock the handset keypad, you can still answer calls, but you
have to unlock the keypad to make a call.
To lock the handset keypad…
Press while the handset is in standby
Turn the wheel until Lock keypad? is shown and
press OK. Keypad locked appears briefly in the
display
To unlock the handset keypad…
Press to be able to unlock the keypad. Unlock –
No? appears in the display
Turn the wheel until Unlock – Yes? is shown and
press OK
You can also activate (and
deactivate) an autolock function
from the Settings menu. Refer to
page 55 for more information.

22 >> Daily use
Silence the handset ringer and battery alert
You can silence the handset ringer for situations in which you do
not want to be disturbed - if you’re in a meeting, for example, or
taking a nap. While the handset is silenced, the ringer is
deactivated, but incoming calls are still registered in the New calls
menu, as described on page 14.
To silence the handset ringer…
Press to bring up the main menu
Turn the wheel until Silence? is shown and press
OK. Silence selected appears briefly in the
display, and this changes to Silenced when the
handset returns to standby
To reactivate the handset ringer…
Press to be able to reactivate the ringer. Silence
off? appears in the display
Press OK. The ringer is reactivated. Silence off –
selected appears briefly in the display, and the
handset then returns to standby
OK
s
Redial list
t
s
Silence?
t
OK
Silence
selected
1:Living room
Silenced
OK
s
Silence off?
t
OK
Silence off
selected
1:Living room
Oct 24 12:15 PM

23
Volume
s
=== ====
t
OK
s
Mic. off?
t
OK
Microphone off
OK
OK
Volume and the microphone
During a call, you can adjust the volume level using the wheel. You
can also switch off the microphone if you do not wish the person
on the phone to overhear a conversation you are having with a
person in the room.
To turn the handset volume up or down…
Turn the wheel to adjust the handset volume
To turn the microphone on or off during a call…
Press to see your options
Turn the wheel until Mic. off? appears in the
display
Press OK. Microphone off appears in the display
and the handset beeps at short intervals until the
microphone is switched back on
To switch on the microphone, press OK twice
A selected volume setting – with
the exception of the two highest
settings – applies to all subsequent
calls until the next time you adjust
the volume.
If a headset is connected to your
handset and you switch the
microphone off, the phone does
not beep.

24 >> Daily use
Store a number after a call
After a call, you will be asked whether you want to store the
number in the Phonebook, if it is not already there. You can also
enter a name with the number.
After a call…
The display shows the number and prompts you
to store it in the Phonebook. If a name was
received with Caller ID information, this name is
shown
Press OK to store the number. If the name was
provided, it will also be stored. Otherwise…
…turn the wheel to select the letters for the
name. Both upper and lower case letters are
available
Press OK to store the selected letter. If you store
an upper case letter, the cursor automatically
moves to the lower-case letters
Finish ‘typing’ the name
To include digits, press the number keys
Turn the wheel to move the cursor under the
symbol. Store entry? appears in the display
Press OK to store the name and number
1:5551234567
Enter name?
OK
_
ABCDEFGHIJKLM…
OK
D_
...&’ ,-./ abcde…
David Jones_
…fghijklmnopqrs…
0 –9
David Jones_
s
Store entry?
t
OK
David Jones
Stored
Here are some tips that can help
you make Phonebook entries easier
to find:
– When entering couples’ names,
put first names in alphabetical
order;
– When entering names of
colleagues, put the company
name first;
– When entering the names of
childrens’ friends, start with the
child’s first initial.
A quick way to store a name and
number is to press the A..Z key
when you are finished ‘typing’ the
name.
Mary & Robert
B&O Michael
L Jane

25
David Jones
5551212
A..Z
First letter:
ABDEFHIK
First letter:
ABDEFHIK
OK
Dan Smith
5551234
David Jones
5551212
Search the Phonebook and make a call
When the phone is not in use, you can turn the wheel to search
directly from the entire list of names in the Phonebook.
When the phone is not in use…
Turn the wheel to search through the Phonebook
and press to make a call. This method is
quickest if there are very few entries in the
Phonebook
If the Phonebook contains many entries, press
A..Z to access it. The letters in the display
correspond to the first letters of Phonebook
entries
Turn the wheel to select the first letter
Press to be able to search through names
beginning with the letter you selected
Turn the wheel to search through the names
Press to make a call

26 >> Daily use
Use Redial
The Redial function stores the last 24 telephone numbers you
called. In addition to the number called, you can also view the
time, date, and duration of the call. If you have entered a name in
the Phonebook, this is displayed instead of the number. Internal
calls are not registered in the Redial list.
To call from the Redial list…
Press while the handset is in standby
Press OK to access the list
Turn the wheel to select the name or number
Press to call
To see call information for a selected outgoing call…
Press to view your options
Turn the wheel until Details? appears in the
display
Press OK. The phone number and the call
duration are shown
OK
s
Redial list
t
OK
1:David Jones
Dec 12 9:00 AM
1:John Smith
Dec 10 11:51 AM
OK
1:David Jones
s
Call?
t
David Jones
s
Details?
t
OK
1:5554321
Time: 1:02:14
You can store telephone numbers
from the Redial list directly in the
Phonebook. Refer to Store Redial
and Caller ID numbers on page 42
for more information.
The Redial list is common only to
handsets set up to be ‘common’.
Refer to Make a handset ‘personal’
or ‘common’ on page 49 for more
information.

27
OK
s
Redial list
t
OK
1:David Jones
Dec 12 9:00 AM
1:John Smith
Dec 10 11:51 AM
OK
1:John Smith
s
Call?
t
1:John Smith
s
Delete?
t
OK
1:John Smith
Deleted
To delete a specific Redial number from the list…
Press while the handset is in standby
Press to access the list
Turn the wheel to select the name or number
Press to view your options
Turn the wheel until Delete? appears in the
display
Press OK to delete the selected entry
If you have selected a primary line,
as described on page 36, the Redial
list shows only those calls made on
the primary line. Press the
appropriate line key to view calls
made on the other line. If you have
not selected a primary line, the
Redial list contains calls made on
both lines.

28 >> Daily use
Use Caller ID
The last 24 numbers you have received calls from are stored in the
Caller ID list. If a name is stored with the number in the
Phonebook, this name is shown, even if your phone company has
provided Caller ID information. Identical numbers are only stored
once in the list for that line – the most recent call. The Caller ID list
shows information on who called, the number of calls and the time
the calls were received.
To call from the Caller ID list…
Press while the handset is in standby
Turn the wheel until Caller ID list appears in the
display
Press to access the list
Turn the wheel to select a name or number
Press to call
To see call information for a selected incoming call…
Press to view your options
Turn the wheel until Details? appears in the
display
Press OK. If the call was unanswered, the phone
number and the number of attempts made are
shown. If the call was completed successfully, the
phone number and the call duration are shown
OK
s
Redial list
t
s
Caller ID list
t
OK
1:David Jones
Dec 12 9:00 AM
1:John Smith
Dec 10 11:51 AM
OK
1:David Jones
s
Call?
t
1:David Jones
s
Details?
t
OK
1:5554321
Calls: 10
This function requires a Caller ID
subscription with your telephone
company.
You can store telephone numbers
from the Caller ID list directly in the
Phonebook. Refer to Store Redial
and Caller ID numbers on page 42
for more information.
If you subscribe to Caller ID, but
caller information is unavailable, it
is because your phone company
has not provided the information
for one of several reasons. The
following appears in the display
during an incoming call:
– ‘Private caller’… Calls from
unlisted numbers;
– ‘Unavailable’… Caller ID not
supported by the service
provider;
– ‘Incoming call’… Information
unavailable for other reasons.

29
OK
s
Redial list
t
s
Caller ID list
t
OK
1:David Jones
Dec 12 9:00 AM
1:John Smith
Dec 10 11:51 AM
OK
1:John Smith
s
Call?
t
1:John Smith
s
Delete?
t
OK
1:John Smith
Deleted
To delete a specific Caller ID number from the list…
Press to bring up the main menu
Turn the wheel until Caller ID list appears in the
display
Press to access the list
Turn the wheel to select the name or number
Press to view your options
Turn the wheel until Delete? appears in the
display
Press OK to delete the selected entry
If you have selected a primary line,
as described on page 36, the Caller
ID list shows only those calls
received on the primary line. Press
the appropriate line key to view
calls received on the other line. If
you have not selected a primary
line, the Caller ID list contains calls
received on both lines.

30 >> Daily use
Delete the content of the Caller ID and Redial lists
If, for example, you use the phone often during the course of a
day, and you prefer to keep call information only for calls made or
received that day, you may find it useful to delete the entire
content of the Caller ID list, the Redial list, or both.
Delete the content of a list…
Press to bring up the main menu
Turn the wheel until Delete lists appears in the
display and press OK
If you have set a primary line, as described on
page 36, turn the wheel to select Line 1 or Line 2
and press OK. Otherwise…
…turn the wheel to select Caller ID list or Redial
list and press OK to delete the content of the
selected list
OK
s
Redial list
t
s
Delete lists
t
OK
s
Line 1
t
OK
s
Caller ID list
t
OK
If you delete the content of the
Caller ID or Redial list on a handset
set to be ‘personal’, these lists are
only deleted in the particular
handset. If you delete the content
of the lists on a handset set to be
‘common’, the lists are deleted for
all common handsets in the
system! Please refer to Make a
handset personal or common on
page 49 for more information.

31
Switch between two calls, 32
•Calls on separate lines
•Calls on the same line – Call Waiting
Conference calls, 34
•A two-line conference call
•Conference call on one line – Three-Party call
Choose a primary line, 36
BeoCom 1 is a two-line phone,
made to handle up to four calls –
two on each line – at the same
time.
Another advantage of the two-line
system is the freedom to dedicate
each line to a specific purpose, for
example, if you wish to keep
private calls and work-related calls
separate. This is done by choosing
a primary line. Choosing a primary
line also allows you to keep
separate Caller ID and Redial lists.
This chapter tells you how to
switch between calls, place them
on hold, combine them in
conference calls or Three-Party
Calls, and choose a primary line for
BeoCom 1.
2-line use

32 >> 2-line use
Switch between calls on separate lines
BeoCom 1 makes it possible for you to handle simultaneous calls on
separate lines. The display shows which line is active and whether
or not a call on the other line is placed on hold.
To handle two simultaneous calls on separate lines…
You have an active call on line 1
The display and a dampened ringing signal from
the handset loudspeaker inform you of an
incoming call on line 2
Press to put the active call on hold. In this
example, the display indicates that there is a call
on hold on line 1 and an incoming call on line 2.
If you want to end the active call before
answering the incoming call, skip this step
Answer the incoming call on line 2
Press to end the active call
You can then press the appropriate line key to
resume the call on hold
1:John Smith
Time: 0:35
2:David Jones
5551212
HOLD
2:David Jones
555121
LINE 2
LINE 1
Note that if you have an active call
and switch to the non-active line
without placing the active call on
hold first, the active call is ended!
If you have incoming calls on both
lines at the same time, press a line
key to select a line before
answering a call.
If you have kept a call on hold for
over three minutes, the handset
then beeps once every thirty
seconds to remind you of the call
on hold. A call kept on hold for ten
minutes is automatically ended.
Placing the handset in the charger
does not end calls placed on hold.

33
Switch between calls on the same line – Call Waiting
Use the OK key to place a call on hold while you answer an
incoming call, or to switch between two calls.
To handle two simultaneous calls on the same line…
You have an active call on line 1
The display and a beep from the handset inform
you of an incoming call on the same line
Press if you do not wish to answer the incoming
call. Otherwise…
…press to put the first call on hold and answer
the incoming call. The call established first
always appears at the top of the display
Press to be able to switch between calls
Press to switch between calls
Press to end a call
1:John Smith
Time: 0:35
1:David Jones
Answer?
C
OK
1:John Smith
1:David Jones
OK
1:John Smith
s
Flash?
t
OK
Placing a call on hold in this
manner requires that you have a
subscription to the basic Call
Waiting service with your phone
company.

34 >> 2-line use
A two-line conference call
When you have simultaneous calls on both line 1 and line 2, you
can connect the calls and establish a conference call.
You have simultaneous calls on both lines…
The display shows the active call on line 1 and a
call or calls on hold on line 2
Press to be able to make a conference call
Press to confirm
To end a single call in a conference…
Press the line key for the line you wish to
continue the call on
To end a conference call…
Press to end a conference call
1:John Smith
Time: 0:35
OK
1:John Smith
s
Conference?
t
OK
1:John Smith
2:David Jones
LINE 1
LINE 2
Note that external parties in a
conference call will hear each other
only faintly if they are located far
from the telephone exchange. This
public network problem can be
reduced by subscribing to the
Three-Party Call service with your
phone company.

35
Conference call on one line – Three-Party Call
When you establish a Three-Party Call, the first call made can be an
incoming or outgoing call, but you must initiate the second call
yourself. Please contact your phone company for more information
about the Three-Party Call service.
You have a call on line 1…
Press OK. Flash? appears in the display
Press to confirm. The active call is put on hold
Place a call to the third party in your Three-Party
Call by dialling the number
When the third party answers the call, press OK.
Flash? appears in the display
Press to confirm
To end the conference call, press OK once more
to reveal Flash?
Press to confirm. The third party is disconnected
and you can continue the original call
Press to end the call completely
OK
1:John Smith
s
Flash?
t
OK
0 –9
OK
1:David Jones
s
Flash?
t
OK
OK
s
Flash?
t
OK
To combine calls on the same line,
you must have a subscription to
your phone company’s Three-Party
Call service for that line.
If you choose to make a Three-
Party Call part of a larger
conference call, please note that
you must initiate all the calls in the
Three-Party call.

36 >> 2-line use
Choose a primary line
Choosing a primary line for outgoing calls gives you several
advantages. You can dedicate each line to a specific purpose,
making one line a private line and the other a line for work-related
calls. You can also keep separate Caller ID and Redial lists.
To choose a primary line…
Press to bring up the main menu
Turn the wheel until Settings appears in the
display and press OK
Turn the wheel until Primary line appears in the
display and press OK
Turn the wheel to select Line 1?, Line 2? or
None?
Press to store the setting
OK
s
Redial list
t
s
Settings
t
OK
s
Primary line
t
OK
s
Line 2?
t
OK
If you do not choose a primary line,
but select None instead, the Caller
ID list and the Redial list will
contain calls made and received on
both lines.

37
Enter a new name and number in the Phonebook, 38
Delete a name and number in the Phonebook, 39
Edit a name or number in the Phonebook, 40
Store Redial and Caller ID numbers, 42
Adjust volume level on audio/video products, 43
Call and store extension numbers in the Phonebook, 44
This chapter tells you how to use
the more advanced functions of
BeoCom 1, functions which,
though you may not need them as
often, make the phone most useful
and enjoyable.
Find out, for example, how to edit
entries in the Phonebook, store
numbers from the Redial and Caller
ID lists, and adjust the volume level
of Bang & Olufsen audio or video
products.
Advanced operations

38 >> Advanced operations
Enter a new name and number in the Phonebook
At any time, you can store a name and number in the Phonebook.
A number can contain up to 30 digits, and a name up to 16
characters. You can store up to 200 entries.
To enter a number…
Enter the telephone number
Press to be able to store the number. Enter
name? appears in the display
Press OK. You can then enter a name
To enter a name…
Turn the wheel to select the characters for the
name
Press to store the selected character
Finish ‘typing’ the name
Turn the wheel to move the cursor under the
symbol. Store entry? appears in the display
Press to store the name
0 –9
OK
1:2125551234
s
Enter name?
t
OK
_
ABCDEFGHIJKLM…
OK
s
Store entry?
t
OK
Names and numbers are common
only to all handsets set up to be
‘common’. Refer to Make a
handset ‘personal’ or ‘common’ on
page 49 for more information.
A quick way to store a name and
number is to press the A..Z key
when you are finished ‘typing’ the
name.

39
Delete a name and number in the Phonebook
You can delete names and numbers stored in the Phonebook.
Press A..Z
Turn the wheel to select a first letter and press
OK
Turn the wheel to select an entry and press OK
Turn the wheel until Delete? appears in the
display and press OK to delete the entry
A..Z
OK
OK
s
Delete?
t
OK

40 >> Advanced operations
Edit a name or number in the Phonebook
You can edit a Phonebook entry – which typically contains a
number and a name – at any time. Delete characters and digits in
reverse order, and replace them using the wheel and the digit keys.
Edit a number in the Phonebook…
Press A..Z
Turn the wheel to select a first letter and press
OK
Turn the wheel to select an entry and press OK
Turn the wheel until Edit? is shown
Press to be able to edit the number
If editing a name only, press OK and skip to the
next page. Otherwise…
…turn the wheel to select a digit you wish to
edit
Press to delete the digit
Enter a digit to replace the one you deleted
Repeat the above three steps for each digit you
wish to edit
Press when you are done editing the number.
You can then edit the name, as described on the
following page
A..Z
OK
OK
s
Call?
t
s
Edit?
t
OK
5551234
OK
5551234
C
555134
0 –9
5551434
OK
When you have displayed a
number from the Phonebook, you
can edit it by pressing OK. Press OK
again to enter a new name for the
edited number. This entry then
replaces the previous entry in the
Phonebook.
A quick way to store an edited
name and number is to press the
A..Z key when you are finished
editing the name.

41
To edit a name…
The display prompts you to confirm that the
number is correct
Press to confirm. The display prompts you to
confirm that the name is correct
If the name is correct, press OK. Otherwise…
…turn the wheel to select the letters for the
name
Press to store the selected letter, or…
…press to delete letters
Finish editing the name
Turn the wheel to move the cursor under the
symbol and press OK to store the name
5551234_
s
Number OK?
t
OK
David Jones_
s
Store entry?
t
OK
David Jones_
ABCDEFGHIJKLM…
OK
C
David Jones_
s
Store entry?
t
OK

42 >> Advanced operations
Store Redial and Caller ID numbers
Telephone numbers from the Redial and Caller ID lists can be stored
and named in the Phonebook.
Press to bring up the main menu
Turn the wheel until Caller ID list or Redial list
appears in the display and press OK
Turn the wheel to select the desired number
Press OK to view your options
Turn the wheel until Enter name? appears in the
display and press OK
Turn the wheel to select characters for the name
and press OK to store the selected character
Finish ‘typing’ the name
Turn the wheel to move the cursor under the
symbol and press OK to store the name
OK
s
Redial list
t
s
Caller ID list
t
OK
2:5551212
OK
2:5551212
s
Call?
t
s
Enter name?
t
OK
_
ABCDEFGHIJKLM…
OK
s
Store entry?
t
OK
A quick way to store a name and
number is to press the A..Z key
when you are finished ‘typing’ the
name.

43
Adjust volume level on audio/video products
You can adjust the volume of your Bang & Olufsen audio and video
products directly from your handset. First select which sound
source, audio or video, you wish to adjust.
To adjust the volume of an Audio or Video system…
Press A.V repeatedly until the desired system
type appears in the display. The first system type
in the list is the type on which you last adjusted
the volume with the handset
Turn the wheel to turn the volume up or down
A.V
Volume
audio
A.V
video
A.V
link audio
A.V
link video
Volume up
link video
If the phone is ringing and you
wish to adjust the volume of a
Bang & Olufsen product before you
answer the call, simply turn the
wheel. This assumes that the
particular product is the one on
which you last adjusted the volume
with the handset.

44 >> Advanced operations
Call and store extension numbers in the Phonebook
If you need to make a call to an extension number, such as those
used by banks and other large businesses with switchboards, a
pause must be inserted before the extension number. Store the
main number, the pause and the extension number in the
Phonebook. You can then call the number from the Phonebook.
To call an extension number directly…
Enter the main telephone number
Press to make the call. Wait for a connection
Enter the extension number
Press to end the call
To store an extension number in the Phonebook…
Enter the main telephone number
Press to be able to insert a pause
Turn the wheel until Insert pause? appears in the
display and press OK
Turn the wheel to select a pause length and
press OK. You can select a pause length of one
to nine seconds, or select Wait?. Refer to the
following page for further information
0 –9
0 –9
0 –9
1:5551212
OK
1:5551212
s
Enter name?
t
1:5551212
s
Insert pause?
t
OK
1:5551212
s
3 seconds?
t
OK

45
Enter the extension number
Press twice to store the entry. You can then give
the number a name, as described on page 38
To call an extension number from the Phonebook…
Turn the wheel to search through the entire
Phonebook
Press to make a call. The main number is dialled
If you have selected a pause length between one
and nine seconds, the extension number is
dialled automatically after the selected number
of seconds
If you have selected Wait? as the pause length,
the display prompts you to continue. Press OK to
call the extension number
0 –9
1:5551212-123
OK
OK
Continue?
OK

46
47
Call another handset, 48
Make a handset ‘personal’ or ‘common’, 49
Forward external calls, 50
Make an internal conference call, 51
With several handsets registered to
one base, you can make your own
phone system. All the handsets can
receive external calls, also during
internal calls between handsets.
Handsets in the system are
numbered 1–8 and can be named
as well.
Each handset is initially set up as
‘common’. This means that the
Phonebook, Caller ID list and Redial
list are all updated by the base and
shared with other handsets in the
system. If you want an
independent Phonebook, Caller ID
list and Redial list in an individual
handset, make the handset
‘personal’ instead.
You may wish to keep private calls
and work-related calls separate in a
system. This is done by choosing a
primary line. Choosing a primary
line also allows you to keep
separate Caller ID and Redial lists.
Refer to page 36 for more
information.
System use with several handsets

48 >> System use with several handsets
Call another handset
You can call one handset or call all handsets simultaneously. If you
call all handsets, the handset that responds first receives the call. If
you call one handset, the display shows which handset has been
called.
To call a handset…
Press to make an internal call
Press the number of the handset and the call is
made automatically. Alternatively…
…turn the wheel to search through the internal
listing of handsets and press to make the call.
If the internal call can not be made, you will hear
a busy signal
To call all handsets…
Press to make an internal call
Press to call all handsets
To end a call…
Press to end a call
INT
1 –8
Living room
3
INT
The phone system allows up to one
internal call and two external calls
to take place at the same time.
You can use three different ringing
signals to identify calls on line 1,
calls on line 2, and internal calls.
For further information, refer to the
chapter Preference settings on
page 53.
If you misplace a handset, you may
be able to locate it by making a call
to that handset.
If you have an active call and
another handset elsewhere in the
system is taken off the hook, your
handset emits a single, short beep
to notify you that a third party has
joined the call. This, however, only
happens if the system handsets are
using the same line at the time.

49
OK
s
Redial list
t
s
Settings
t
OK
s
Advanced
t
settings
OK
s
Handset
t
OK
s
Handset type
t
OK
s
Common?
t
OK
Make a handset ‘personal’ or ‘common’
You can set your handset to be ‘personal’ instead of ‘common’. The
Phonebook, Redial list and Caller ID list of a personal handset are
located in the handset and not the base.
Press to bring up the main menu
Turn the wheel to select the Settings menu and
press OK to bring up the menu
Turn the wheel to select the Advanced settings
menu and press OK to bring up the menu
Turn the wheel to select the Handset menu and
press OK to bring up the menu
Turn the wheel to select Handset type and press
OK
Turn the wheel to select Personal or Common
and press OK to store the setting
If you change your handset from
personal back to common, the
personal Phonebook, Caller ID list
and Redial list are deleted. If you
have other handsets which have
common lists, these lists replace
the personal lists that have been
deleted. Updating the common
Phonebook, Caller ID and Redial
lists may take a few minutes.

50 >> System use with several handsets
Forward external calls
You can forward an external call to one handset or to all handsets.
You can speak with the person answering the internal handset
before forwarding the call. When you forward an external call to
all handsets, the call goes to the handset which answers first.
Forward an external call…
Press to make an internal call
Press the number of the handset and the call is
made automatically. Alternatively…
…turn the wheel to search through the internal
listing of handsets and press to make the call.
If the internal call can not be made, you will hear
a busy signal
If the internal call is answered…
You can transfer the call, start a conference call,
or retrieve the external call
Turn the wheel to display either Forward?,
Conference?, or Retrieve?
Press OK to enter your choice
Retrieve the external call if the internal call is not answered…
Press to retrieve the external call on hold. You
can also press
INT
1 –8
Living room
3
OK
s
Forward?
t
OK
If you have an active call and
another handset elsewhere in the
system is taken off the hook, your
handset emits a single, short beep
to notify you that a third party has
joined the call. This, however, only
happens if the system handsets are
using the same line at the time.

51
INT
1 –8
Living room
3
s
Conference?
t
OK
OK
Make an internal conference call
During an external call, you can call another party on an internal
handset to establish a conference call. If one party hangs up, the
call continues with the remaining parties.
Start a conference call with one internal and one external party…
Press to make an internal call during an external
call. The external call is now on hold
Press the number of the handset and the call is
made automatically. Alternatively…
…turn the wheel to search through the internal
listing of handsets and press to make the call.
If the internal call can not be made, you will hear
a busy signal
If the internal call is answered…
Turn the wheel to select Conference? and press
OK to start the conference call
Press to end the conference call
Retrieve the external call if the internal call is not answered…
Press to retrieve the external call on hold. You
can also press
If, for example, there is an active
call on line 1 on another handset in
your system, and you select line 1
on your handset for an outgoing
call, Line is busy appears in the
display. You can still break in – that
is, connect to the active call – by
pressing , followed by OK.
If you have an active call and
another handset elsewhere in the
system is taken off the hook, your
handset emits a single, short beep
to notify you that a third party has
joined the call. This, however, only
happens if the system handsets are
using the same line at the time.

52

53
The Settings menu, 54
The Advanced settings menu, 56
Many BeoCom 1 functions can be
activated, adjusted, and
deactivated to help you tailor the
phone to the way you want to use
it. This is mainly done via the
Settings and Advanced settings
menus. This chapter provides an
overview of these two menus.
Preference settings

54 >> Preference settings
The Settings menu
The Settings menu contains several options which allow you to
connect, disconnect or adjust BeoCom 1 functions.
To choose settings in the menu…
Press to bring up the main menu
Turn the wheel to display Settings and press OK
to bring up the menu
Turn the wheel until the desired option is
displayed, such as Clock
Press to bring up the menu
Turn the wheel to select a setting and press OK
to store it
The Settings menu options
Ringer…This menu contains three separate ringer settings: an on/off
switch, the ringer level (or volume), and the ringer melody. Upon
selecting the Ringer menu, you are prompted to select Line 1, Line 2 or
Intercom. The settings you then choose for the ringer apply only to the
selected line (or to the intercom) for the handset on which you select
the settings.
– ‘Ringer on/off’ lets you switch the ringer on or off, and set a time
period in which the phone will not ring. If you switch off the ringer, the
phone does not ring, but it does register incoming calls in the Caller ID
list. The ringer is disconnected until you change the setting.
– ‘Ringer level’ lets you set the ringer volume. Options are Extra low, Low,
Medium or High. The ringing signal selected is played after a moment.
– ‘Ringer melody’ lets you choose from 8 melodies. If you give the two
lines different melodies, you can hear which line an incoming call is
using.
OK
s
Redial list
t
s
Settings
t
OK
s
Clock
t
OK
Set time
05:20 AM
OK
Options or settings you adjust less
often – perhaps only once – are
available via the Advanced settings
menu, described on pages 56–57.
When you browse through the
Settings menu, the current settings
for each option are shown in the
display. For example, when you
browse to the Clock option, the
current time and date appear on
the second line of the display.

55
Primary line…Choose a default line – Line 1, Line 2 or None – for
outgoing calls. Choosing a primary line lets you dedicate each line to a
specific purpose, for example, if you wish to keep private calls and
work-related calls separate. It also allows you to keep separate Caller ID
and Redial lists for each line. For more information, refer to page 36.
Clock…Use the wheel and the OK key to enter the time and date.
Auto lock…Options are On and Off. Locking the handset keypad
prevents inadvertent operation of the keys. You can still receive calls,
but the handset keypad locks again automatically after you end a call.
To unlock the handset temporarily, press OK, turn the wheel to display
Unlock – Yes? and press OK. In this situation, the handset locks itself
again automatically after a timed delay if you do not press keys or use
the wheel. Unlock the handset permanently via the Settings menu.
News indicator…The news indication – the flashing red light on the
handset and the display message indicating new, unanswered calls – is
set to On from the factory, so you can see how many new calls you
have received. Options are On and Off.
Area codes…Select options to match the requirements of your
telephone company. ‘Area codes’ contains two sub-menus: ‘Dial’ and
‘Area code’.
– ‘Dial’ indicates whether or not area codes must be dialled for local calls.
Options are Yes and No.
– ‘Area code’ allows you to enter up to ten area codes.
Battery alert…Alerts you audibly when the handset battery requires
charging. Options are On, Off and Timed off. If you select Timed off,
you can then use the wheel to set a daily time period during which the
battery alert will not occur – for example, between 10 pm and 7 am.
Note that if you select a primary
line, the display of new,
unanswered calls will only inform
you about calls received on that
line.
Regarding area codes:
Telephone companies have
different requirements regarding
how to make local calls. The
settings you choose in the Area
Codes menu are determined by the
requirements of your particular
company. If your telephone
company requires you to dial:
–1+area code+number for all
calls…set ‘Dial’ to Yes and do
not enter an area code for the
option ‘Area code’;
–area code+number for local
calls…set ‘Dial’ to Yes. For ‘Area
code’, you can enter up to ten
area codes that fall within your
local calling area;
–neither 1 nor area code for
local calls…set ‘Dial’ to No and
enter your own area code for
‘Area code’.

56 >> Preference settings
The Advanced settings menu
The Advanced settings menu contains several options which allow
you to connect, disconnect or adjust BeoCom 1 functions. These
options are typically selected or set rarely or only once.
To choose settings in the menu…
Press to bring up the main menu
Turn the wheel to display Settings and press OK
to bring up the menu
Turn the wheel to display Advanced settings and
press OK to bring up the menu
Turn the wheel to display an option, such as
Auto off-hook and press OK to bring up the
menu
Turn the wheel to display a setting and press OK
to store it
OK
s
Redial list
t
s
Settings
t
OK
s
Advanced
t
settings
OK
s
Auto off-hook
t
OK
s
On?
t
OK
Other settings are available via the
Settings menu, described on page
54.
Please note that if you at any time
change a personal handset from
personal to common, the contents
of the handset’s Phonebook are
deleted! In this case, the display
prompts you to confirm that you
wish to delete the Personal
Phonebook. Press OK to confirm
this.

57
The Advanced settings menu options
Handset…The Handset menu contains three sub-menus:
–Change name allows you to give the handset a new name using the
wheel and OK keys. Note that this menu is called Enter name until you
have entered a name for the handset.
–Register allows you to register the handset to the BeoLine base.
Provided the base has been opened for registration as described below,
registration occurs automatically when you select Register.
–Handset type allows you to set the handset to be Personal or Common,
as described on page 49.
Base…The Base menu contains three sub-menus:
–Remove handset cancels registration of the handset to the base.
–Open base for registration opens the BeoLine base for registration of
handsets. You can also open the base manually, as described on page
8. You can then register the handset to the base, as described above.
–Change pincode allows you to enter a new pincode for your base and
change the pincode. Use the number keys to enter the pincode and the
OK key to store it. The default pincode is 0000.
Flash time…The correct flash time depends on how you have connected
your phone. Choose Long (450 milliseconds), Short (270 milliseconds)
or a custom value with the wheel.
Auto off-hook…Switch Auto off-hook to On if you want your phone to
answer a call as soon as you lift the handset from the charger. Auto
off-hook is set to Off when you purchase the phone. Auto off-hook can
only be used if the handset is placed in the charger. If the handset is
not placed in the charger, you must always press to answer a call.
Language…You can select the language of the display texts.
Phone lines…BeoCom 1 is a two-line telephone, but can be set for use
with one line only. Options are 1and 2.

58 Important information about BeoCom 1
Technical data
Number of handsets per base:
8
Talk time per charging:
10 hours
Standby time per charging:
150 hours
Charging time:
4 hours
Range:
The phone has an indoor range of up to 165 feet (50 metres), and an
outdoor range of up to 1000 feet (300 metres). However, both figures
are dependent on conditions
System:
2.4 GHz (CAT)
Power supply, Base:
120V AC / 6.0V DC power outlet adaptor
Power supply, Charger:
120V AC / 5.6V DC power outlet adaptor
Power supply, Handset:
NiMH batteries, 720 mAh
Power output:
(EIRP) 250 mW/10 mW
Temperature and humidity:
The phone should be placed in surroundings with an ambient
temperature of 32–113° F (0–45° C) and a relative humidity of 15 –
95%
Display:
Alpha numeric display with 2 lines of 16 characters each
Indicator light, handset:
Red
Indicator light, BeoLine base:
Red/Green
BeoCom 1 is intended for use on
the public analogue network. The
phone supports Caller ID, provided
you have the proper subscription
with your telephone company. Not
all supplementary services offered
by the different service providers
are available in all countries.
The phone can only be expected to
function in the country for which it
was manufactured, as transmission
systems, legal requirements and
automated services may vary from
country to country. The packaging
will state for which country your
BeoCom 1 is manufactured. The
national identity letters can be
found above the lowest bar code
on the label.
If you are in any doubt about the
use of your BeoCom 1, please
contact your retailer for further
information.

59

60
Accessories
Accessories, 13
Attach the clip, 13
Base
Cancel registration of a handset, 56
Change the base pincode, 56
First-time registration of the handset to a base, 8
Manual registration of a handset, 56
Open a base for registration, 56
PARK numbers, 8
Battery
Battery status, 17
Charge the handset battery, 8
Replace the battery, 17
BeoLine
Cancel registration of a handset, 56
Change the base pincode, 56
First-time registration of the handset to a base, 8
Manual registration of a handset, 56
Open a base for registration, 56
PARK numbers, 8
BeoLink
Adjust volume level on audio/video products, 43
Caller ID
Store Redial and Caller ID numbers, 42
Use Caller ID, 28
Calls
Call another handset, 48
Call and store extension numbers in the
Phonebook, 44
Call from the Caller ID list, 28
Call from the Redial list, 26
Conference call on one line – Three-Party call, 35
Forward external calls, 50
Make and answer calls, 20
Make an internal conference call, 51
Search the Phonebook and make a call, 25
Store a number after a call, 24
Switch between calls on separate lines, 32
Switch between calls on the same line – Call
Waiting, 33
Two-line conference call, 34
Call Waiting
Switch between calls on the same line – Call
Waiting, 33
Charge
Battery status, 17
Charge the handset battery, 8
Conference calls
Conference call on one line – Three-Party Call, 35
System use with several handsets – make a
conference call, 51
Two-line conference call, 34
Contact
Contact Bang & Olufsen, 66
Index

61
Delete
Caller ID call, 29
Delete the content of the Caller ID and Redial
lists, 30
Name or number in the Phonebook, 39
Redial number, 27
Displays and menus
Display of new, unanswered calls, 14
Options in the main menu, 14
Settings and Advanced settings menus, 53
The handset display, 14
Edit
Edit the Phonebook, 40
Extension numbers
Call and store extension numbers in the
Phonebook, 44
Forward calls
Forward external calls, 50
Handset
Call another handset, 48
Handset keys, 16
Indicator light, 12
Lock the keypad, 21
Make a handset ‘personal’ or ‘common’, 49
Mute the ringing signal for one call, 20
Name the handset, 56
Silence the handset ringer, 22
Switch on or off, 16
Volume and the microphone, 23
Indicator light
Phone feedback – indicator light, 12
Intercom
Call another handset, 48
Forward external calls, 50
Make an internal conference call, 51
Keypad
Handset keys, 16
Lock the handset keypad, 21
Maintenance
Clean BeoCom 1, 13
Replace the battery, 17
Technical data, 58
Microphone
Volume and the microphone, 23
Phonebook
Call and store extension numbers, 44
Delete a name or number, 39
Edit a name or number, 40
Enter a new name and number, 38

62
Search the Phonebook and make a call, 25
Store a number after a call, 24
Store Redial and Caller ID numbers, 42
Pincode
Change the base pincode, 56
Placement
Placement and surroundings, 13
Redial
Store Redial and Caller ID numbers, 42
Use Redial, 26
Registration
Cancel registration of a handset, 56
First-time registration of the handset, 8
Manual registration, 56
PARK numbers, 8
Ringing signal
Mute the ringing signal for one call, 20
Ringer menu options, 54
Silence the handset ringer and battery alert, 22
Settings
Adjust volume on audio/video products, 43
Area codes, 54
Auto lock, 54
Auto off-hook, 56
Battery alert, 54
Cancel registration of a handset, 56
Change the base pincode, 56
Flash time, 56
Handset type – personal or common, 56
Language, 56
Name the handset, 56
News indicator, 54
Open base for registration, 56
Primary line, 54
Register a handset, 56
Ringer settings, 54
Set BeoCom 1 for use with one or two lines, 56
Settings and Advanced settings menus, 53
Time and date, 54
Volume and the microphone, 23
Switchboard
Call and store extension numbers in the
Phonebook, 44
Set the flash time, 56
Technical data
BeoCom 1 specifications, 58
Volume
Adjust volume level on audio/video products, 43
Volume and the microphone, 23
>> Index

63
NOTICE: The Industry Canada label
identifies certified equipment. This
certification means that the equip-
ment meets telecommunications
network protective, operational
and safety requirements as pre-
scribed in the appropriate Terminal
Equipment Technical Requirements
document(s). The Department does
not guarantee the equipment will
operate to the user’s satisfaction.
Before installing this equipment,
users should ensure that it is
permissible to be connected to the
facilities of the local
telecommunications company. The
equipment must also be installed
using an acceptable method of
connection. The customer should
be aware that compliance with the
above conditions may not prevent
degradation of service in some
situations. Repairs to certified
equipment should be coordinated
by a representative designated by
the supplier. Any repairs or
alterations made by the user to this
equipment, or equipment
malfunctions, may give the
telecommunications company
cause to request the user to
disconnect the equipment.
Users should ensure for their own
protection that the electrical
ground connections of the power
utility, telephone lines and internal
metallic water pipe system, if
present, are connected together.
This precaution may be particularly
important in rural areas.
CAUTION: Users should not
attempt to make such connections
themselves, but should contact the
appropriate electric inspection
authority, or electrician, as
appropriate.
NOTICE: The Ringer Equivalence
Number (REN) assigned to each
terminal device provides an
indication of the maximum number
of terminals allowed to be
connected to a telephone interface.
The termination on an interface
may consist of any combination of
devices subject only to the
requirement that the sum of the
Ringer Equivalence Numbers of all
the devices does not exceed 5.
To prevent radio interference to the
licensed service, this device is
intended to be operated indoors
and away from windows to provide
shielding. Equipment (or it’s
transmit antenna) that is installed
outdoors is subject to licensing.
For the Canadian market only…

64
For the American market only…
This equipment complies with Part
68 of the Federal Communications
Commission (FCC) rules for the
United States.
A label is located on the underside
of the base unit containing either
the FCC registration number and
Ringer Equivalence Number (REN).
You must upon request, provide
the following information to your
local telephone company:
USOC Jack Type: RJ11
REN: 0.1B
Should you experience trouble with
this telephone equipment, please
contact:
Bang & Olufsen America, Inc.
780 West Dundee Road
Arlington Heights
IL 60004 U.S.A.
Phone: (847) 590-4900
Main Fax: (847) 255-7805
The REN is used to determine the
quantity of devices which may be
connected to the telephone line.
Excessive RENs on the telephone
line may result in the devices not
ringing in response to an incoming
call. In most, but not all areas, the
sum of RENs should not exceed five
(5.0). To be certain of the number
of devices that may be connected
to a line, as determined by the total
RENs, contact the local telephone
company.
If trouble is experienced with
BeoCom 1, for repair or warranty
information, please contact:
Bang & Olufsen America, Inc.
780 West Dundee Road
Arlington Heights
IL 60004 U.S.A.
Phone: (847) 590-4900
Main Fax: (847) 255-7805
If the equipment is causing harm to
the telephone network, the
telephone company may request
that you disconnect the equipment
until the problem is resolved.
This equipment cannot be used on
public coin phone service provided
by the telephone company.
Connection to party line service is
subject to state tariffs.
Your telephone company may
discontinue your service if your
equipment causes harm to the
telephone network. They will notify
you in advance of disconnection, if
possible. During notification, you
will be informed of your right to
file a complaint to the FCC.
Occasionally, your telephone
company may make changes in its
facilities, equipment, operation, or
procedures that could affect the
operation of your equipment. If so,
you will be given advance notice of
the change to give you an
opportunity to maintain
uninterrupted service.

65
Changes or modifications not
expressly approved by the party
responsible for compliance could
void the user's authority to operate
the equipment.
This equipment complies with FCC
radiation exposure limits set forth
for an uncontrolled environment.
This device complies with FCC SAR
limit of 1.6 mW/g.
The maximum SAR value measured
was 0.082mW/g. This device must
not be co-located or operating in
conjunction with any other
antenna or transmitter.
NOTE: This equipment has been
tested and found to comply with
the limits for a Class B digital
device, pursuant to Part 15 of the
FCC Rules. These limits are
designed to provide reasonable
protection against harmful
interference in a residential
installation. This equipment
generates, uses and can radiate
radio frequency energy and, if not
installed and used in accordance
with the instructions, may cause
harmful interference to radio
communications.
However, there is no guarantee
that interference will not occur in a
particular installation.
If this equipment does cause
harmful interference to radio or
television reception, which can be
determined by turning the
equipment off and on, the user is
encouraged to try to correct the
interference by one or more of the
following measures:
– Reorient or relocate the receiving
antenna.
– Increase the separation between
the equipment and receiver.
– Connect the equipment into an
outlet on a circuit different from
that to which the receiver is
connected.
– Consult the dealer or an
experienced radio/TV technician
for help.

66
For your information…
Your needs as a user are given careful consideration during the
design and development process of a Bang & Olufsen product and
we strive to make our products easy and comfortable to operate.
Therefore, we hope that you will take the time to tell us about
your experiences with your Bang & Olufsen product. Anything
which you consider important – positive or negative – may help us
in our efforts to refine our products.
Thank you!
Write to: Bang & Olufsen a/s
Customer Service
Peter Bangs Vej 15
DK–7600 Struer
or fax: Bang & Olufsen
Customer Service
+45 97 85 39 11 (fax)
or e-mail: beoinfo1@bang-olufsen.dk
Visit our Web-site on…
www.bang-olufsen.com
Technical specifications, features and the use thereof are subject to
change without notice.
3507344 0309 Printed in Denmark by Bogtrykkergården a-s, Struer

www.bang-olufsen.com