Beyerdynamic QUINTATB Microphone Unit User Manual Layout 1
Beyerdynamic Microphone Unit Layout 1
UserManual.wiki
>
Beyerdynamic
>
QUINTATB User Manual
>
user manual part 1
Contents
1.
user manual part 2
2.
user manual part 1
user manual part 1
Navigation menu
Upload a User Manual
Namespaces
Wiki Guide
HTML
PDF
Info
Views
User Manual
Discussion / Help
Navigation

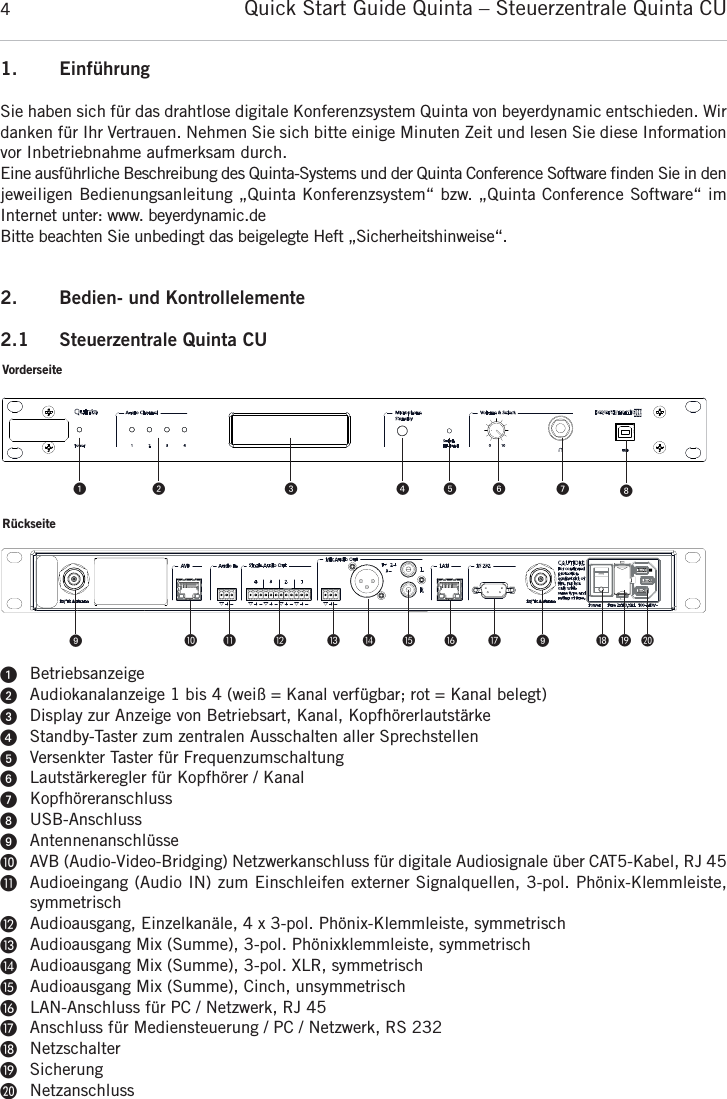
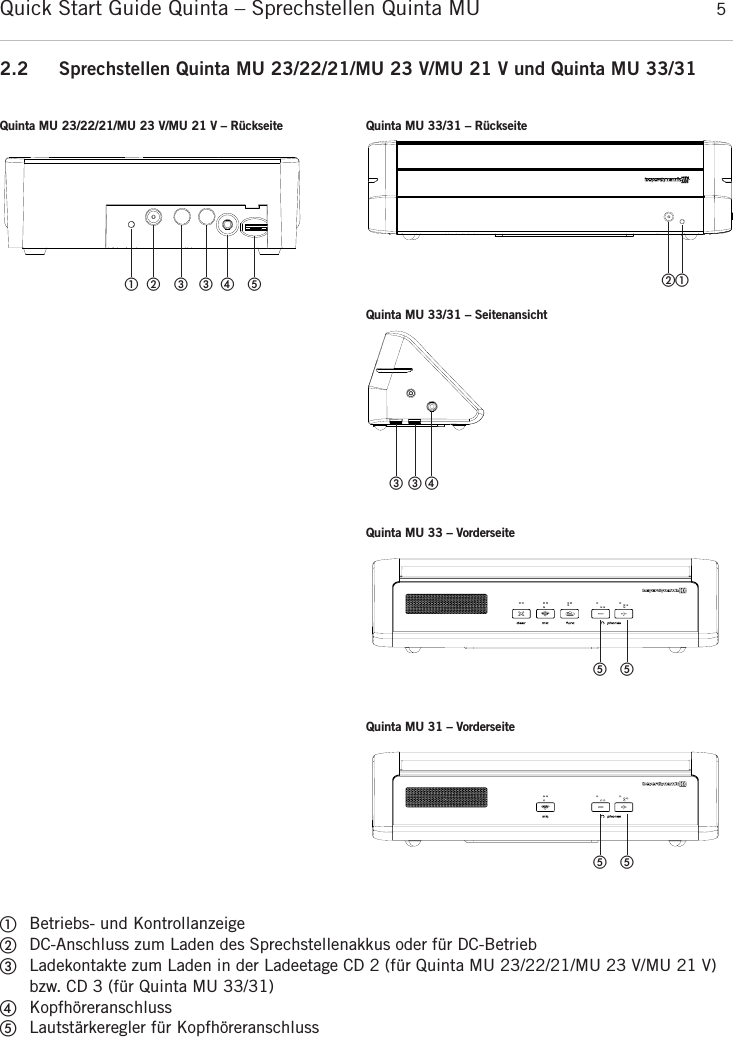


![Quick Start Guide Quinta – How to Operate the System 19english3. How to Operate the System3.1 Quinta CU Control UnitWhere to place the control unit• If you do not use remote antennae, place the Quinta CU control unit in the room where the meeting takes place. If you use remote antennae, place the antennae in the conference room.• Avoid shadowing effect of the antennae, especially by metallic surfaces.• A free line of sight between the Quinta MU microphone units and the antennae of the Quinta CU control unit is essential for the operation of the microphone units. How to connect the antennae• Connect the antennae to the antenna connections ᕩ. Please note that for diversity operation bothantennae have to be connected! A weighting circuit is used to make sure that the better antenna signal is received. • For stand-alone operation we recommend using the supplied CA Q 11 angled rod antennae.• The Quinta CU control unit can also be operated with remote antennae. We recommed extremelylow attenuation connecting cables which are 10 m [32.8 ft] or 20 m [65.6 ft] long. Please notethat the antennae have to be installed remotely. Connections• If required, connect the Audio Mix Ƹ, XLR ƹor Cinch ƺmaster output of the Quinta CU controlunit to the input of a mixing console or amplifier.• Connect the Quinta CU control unit to the mains ƿ. The internal power supply unit of the controlunit can automatically adjust between 100 and 240 V at 50 - 60 Hz. Verify that the voltage ratingof the unit matches that of the AC mains outlet you are to use. If you connect the unit to the wrongvoltage, you may seriously damage it. Always route cables running to the unit where they will notbe pinched or cut by heavy or sharp objects. • For using the AVB network connection, please refer to the extensive “Quinta Conference System” manual.How to operate the control unit• Turn on the Quinta CU control unit with the On/Off switch ƽ. The Power on LED ᕡwill illuminate.• The channel LED 1 to 4 will illuminate white to indicate the availability. As soon as a microphoneis activated, the channel LED ᕢwill illuminate red to indicate that the channel is occupied.• At the factory the RF bands 2.4; 5.2 or 5.8 GHz* will be activated (Automatic Mode). This meansthat the Quinta CU control unit will select a free frequency and if necessary it will select a differentfree frequency without any interferences. This operating mode is recommended for normal use.The free frequencies for the Quinta CU control unit can be deactivated via the Quinta Conferencesoftware. The microphone unit will automatically be adjusted and without any interruption to thefrequency of the Quinta CU control unit. Please refer also to the “Quinta Conference System” manual.*Note:The availability of the RF bands 2.4; 5.2 or 5.8 GHz depends on the selected region.](https://usermanual.wiki/Beyerdynamic/QUINTATB.user-manual-part-1/User-Guide-3132311-Page-19.png)