Billion Electric BIL-8200NX (3G) 802.11n VDSL (VPN) Firewall Router User Manual Users manual 02
Billion Electric Co., Ltd. (3G) 802.11n VDSL (VPN) Firewall Router Users manual 02
Contents
- 1. Users manual
- 2. Users manual-02
- 3. Users manual-03
Users manual-02
69
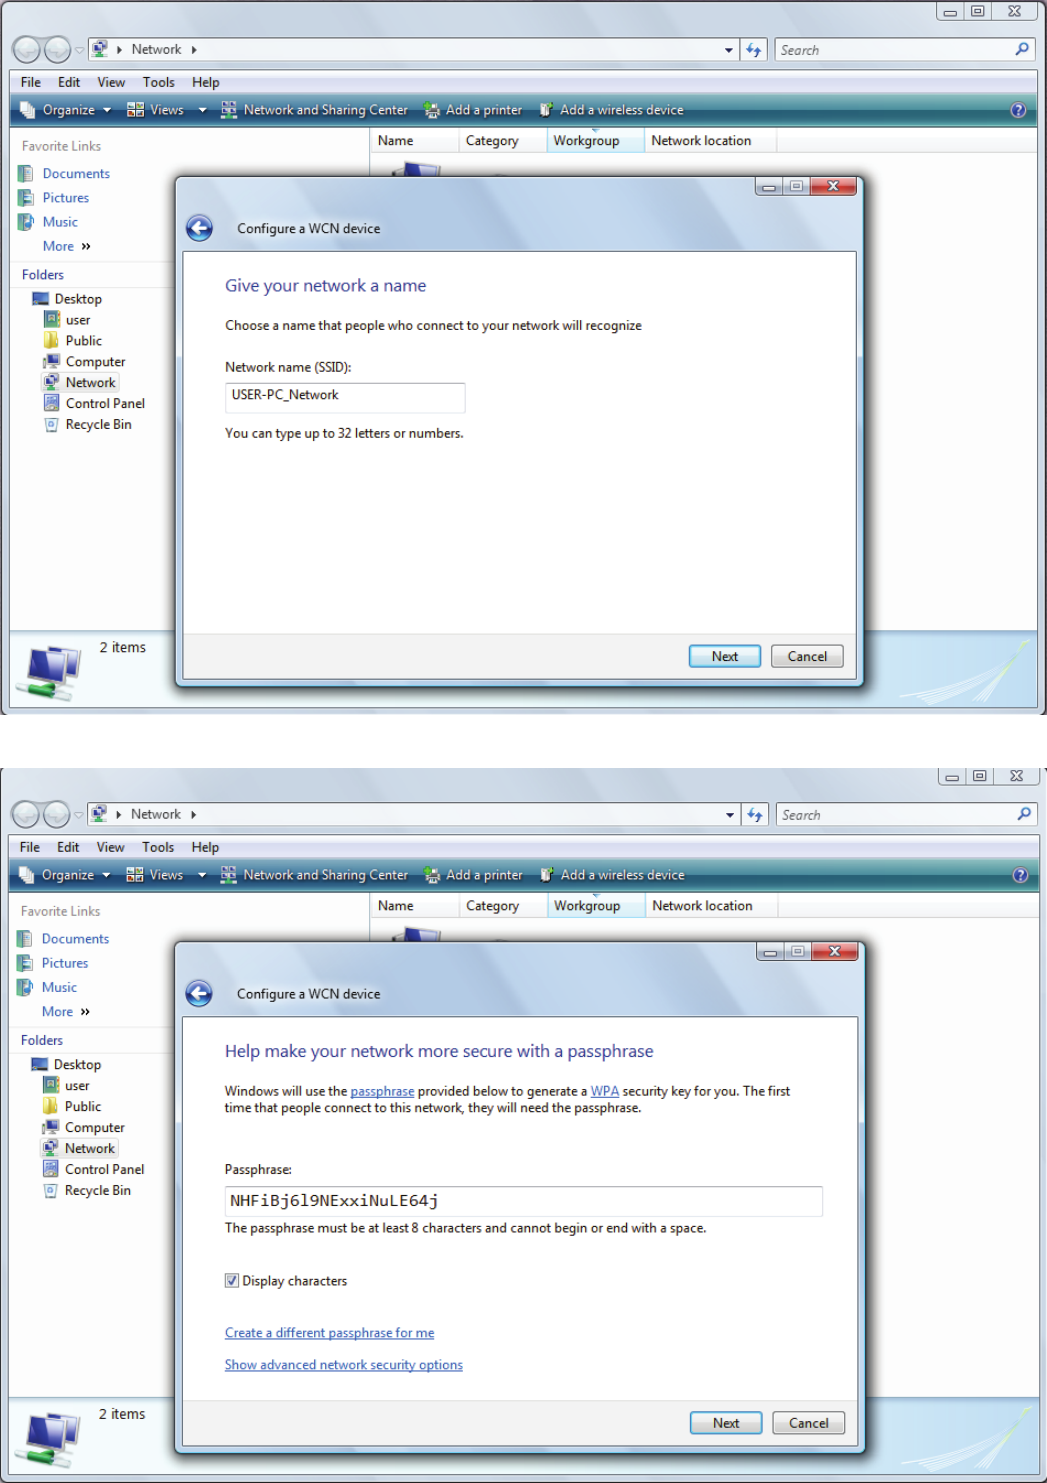
4. Enter the AP SSID then click Next.
5. Enter the passphrase then click Next.
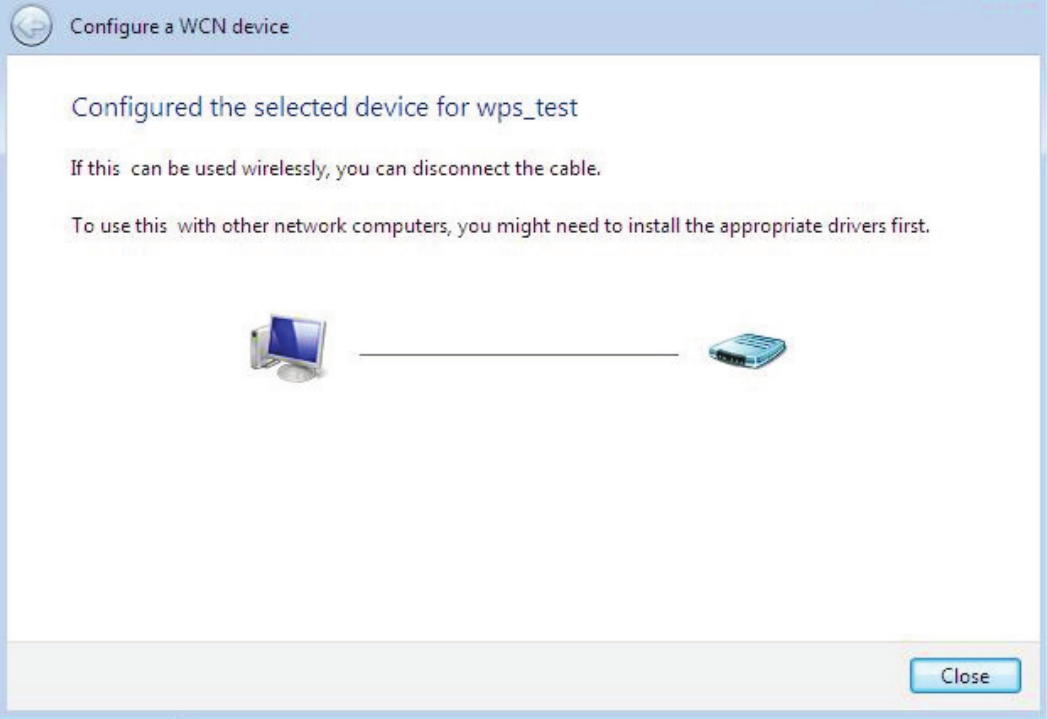
6. When you have come to this step, you will have comleted the Wi-Fi network setup using the
built-in WCN feature in Windows Vista.
70
71
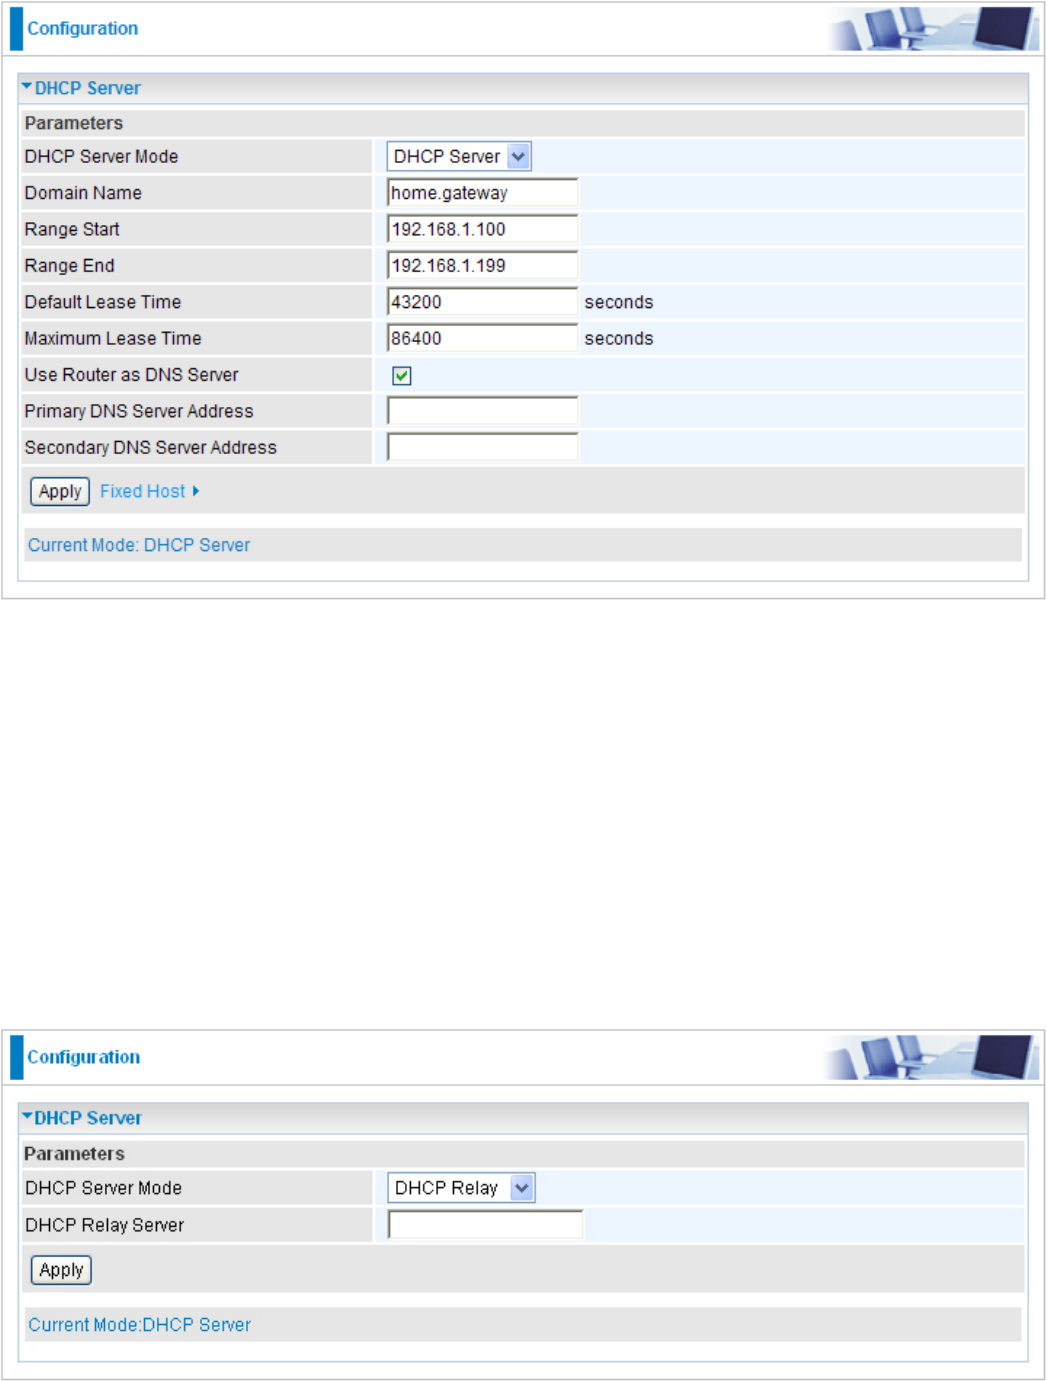
DHCP Server
DHCP allows networked devices to obtain information on the parameter of IP, Netmask, Gateway
as well as DNS through the Ethernet Address of the device.
To congure the router’s DHCP Server, select DHCP Server from the DHCP Server Mode drop-
down menu. You can then congure parameters of the DHCP Server including the domain, IP pool
(starting IP address and ending IP address to be allocated to PCs on your network), lease time for
each assigned IP address (the period of time the IP address assigned will be valid), DNS IP address
and the gateway IP address. These details are sent to the DHCP client (i.e. your PC) when it requests
an IP address from the DHCP server. If you check “Use Router as a DNS Server”, the Router will
perform the domain name lookup, nd the IP address from the outside network automatically and
forward it back to the requesting PC in the LAN (your Local Area Network). Click Apply to enable
this function.
If you select DHCP Relay from the DHCP Server Mode drop-down menu, you must enter the IP
address of the DHCP server that assigns an IP address to the DHCP client in the LAN. Use this
function only if advised to do so by your network administrator or ISP. Click Apply to enable this
function.
72
WAN - Wide Area Network
A WAN (Wide Area Network) is a computer network that covers a broad geographical area (eg.
Internet) that is used to connect LAN and other types of network systems.
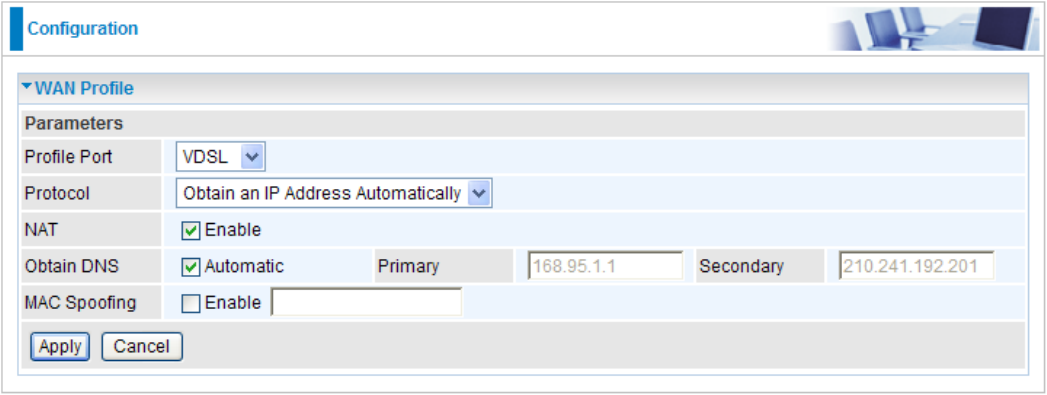
WAN Prole - Main Port: VDSL
Obtain an IP Address Automatically (VDSL)
When connecting to the ISP, your router also functions as a DHCP client. By conguring DHCP
settings, the device is able to obtain IP settings automatically from the ISP.
Protocol: Select the protocol you will use in the device.
NAT: The NAT (Network Address Translation) feature allows multiple users to access the Internet
through a single IP account by sharing the single IP address. If users on your LAN have their own
public IP addresses to access the Internet, NAT function can be disabled.
Obtain DNS: Select this check box to activate DNS.
Primary DNS/ Secondary DNS: Enter the IP addresses of the DNS servers. The DNS servers are
passed to the DHCP clients along with the IP address and the netmask.
MAC Spoong: This option is required by some service providers. You must ll the MAC address
specied by your service provider when this information is required. It will temporarily change
your router’s MAC address to the one you have specied in this eld. The default setting is set to
disable.
Click Apply to conrm the settings.
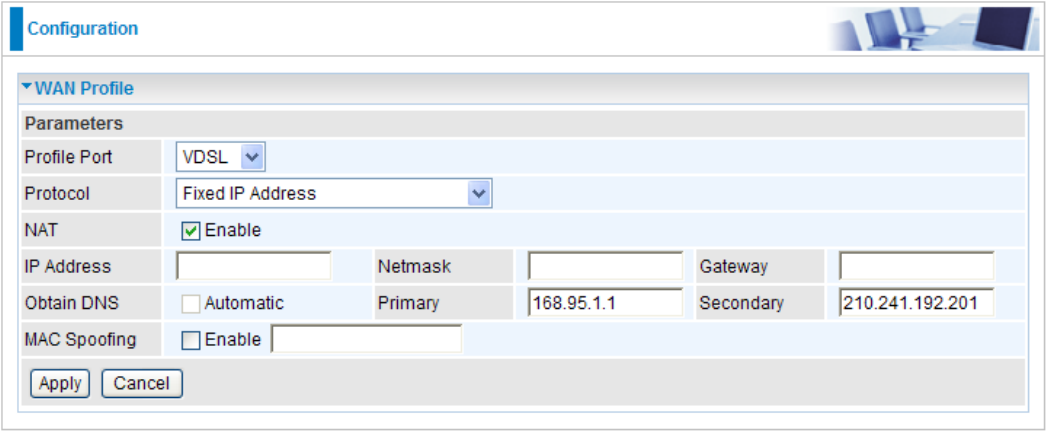
Fixed IP Address (VDSL)
A Static WAN connection will be congured according to the IP properties dened by your ISP.
Protocol: Select the protocol you will use in the device.
NAT: The NAT (Network Address Translation) feature allows multiple users to access the Internet
through a single IP account by sharing the single IP address. If users on your LAN have their own
public IP addresses to access the Internet, NAT function can be disabled.
IP Address: Enter your xed IP address. Each IP address entered in the eld must be in the
appropriate IP form, which is four IP octets separated by a dot (x.x.x.x). The Router will not accept
the IP address if it is not in this format.
Netmask: User can change it to others such as 255.255.255.128. Type the netmask assigned to
you by your ISP (if given)
Gateway: Enter the IP address of the default gateway (if given).
Obtain DNS: Select this check box to activate DNS.
Primary DNS/ Secondary DNS: Enter the IP addresses of the DNS servers. The DNS servers are
passed to the DHCP clients along with the IP address and the netmask.
MAC Spoong: This option is required by some service providers. You must ll the MAC address
specied by your service provider when this information is required. It will temporarily change
your router’s MAC address to the one you have specied in this eld. The default setting is set to
disable.
Click Apply to conrm the settings.
73
74
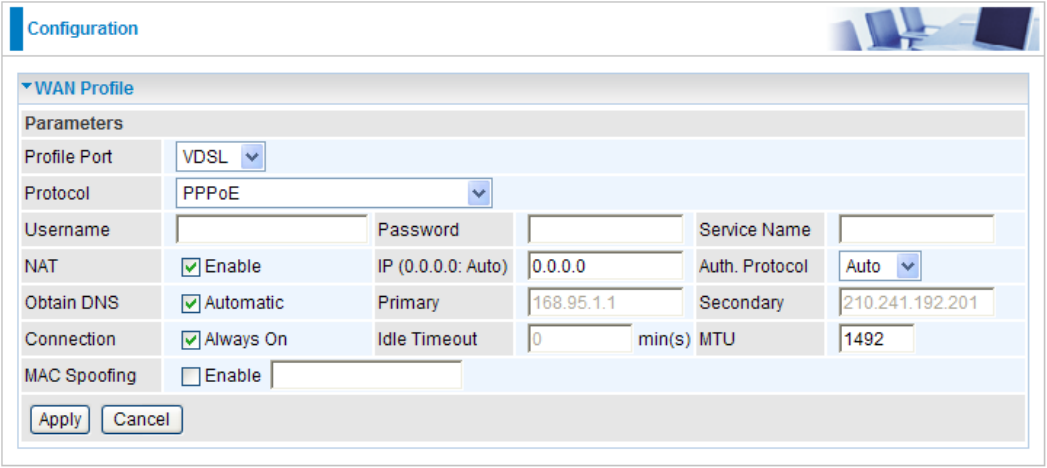
PPPoE (VDSL)
PPPoE (PPP over Ethernet) provides access control in a manner which is similar to dial-up services
using PPP.
Protocol: Select the protocol you will use in the device.
Username: Enter the username provided by your ISP. You can input up to 256 alphanumeric
characters (case sensitive). This is in the format of “username@ispname” instead of simply
“username”.
Password: Enter the password provided by your ISP. You can input up to 32 alphanumeric
characters (case sensitive).
Service Name: This item is for identication purposes. If it is required, your ISP will provide you
the necessary information. Maximum input is 32 alphanumeric characters.
NAT: The NAT (Network Address Translation) feature allows multiple users to access the Internet
through a single IP account by sharing the single IP address. If users on your LAN have their own
public IP addresses to access the Internet, NAT function can be disabled.
IP (0.0.0.0.Auto): Enter your xed IP address. Leave this at 0.0.0.0 to automatically obtain an IP
address from your ISP.
Auth. Protocol: Default is Auto. Please consult your ISP on whether to use Pap or Chap.
Obtain DNS: Select this check box to activate DNS.
Primary DNS/ Secondary DNS: Enter the IP addresses of the DNS servers. The DNS servers are
passed to the DHCP clients along with the IP address and the netmask.
Connection: Click on Always On to establish a PPPoE session during start up and to
automatically re-establish the PPPoE session when disconnected by the ISP. You may uncheck
the item to disable this function.
Idle Timeout: Auto-disconnect the broadband rewall gateway when there is no activity on the line
for a predetermined period of time.
MTU: Maximum Transmission Unit. The size of the largest datagram (excluding media-specic
headers) that IP will attempt to send through the interface.
MAC Spoong: This option is required by some service Providers. You must ll the MAC address
specied by your service provider when this information is required. It will temporarily change
your router’s MAC address to the one you have specied in this eld. The default setting is set to
disable.
Click Apply to conrm the settings.
75
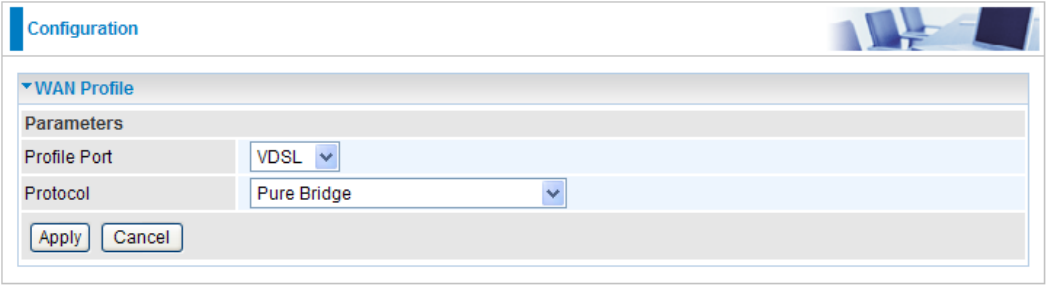
Pure Bridge (VDSL)
Protocol: Select the protocol you will use in the device.
Click Apply to conrm the change.
76
77
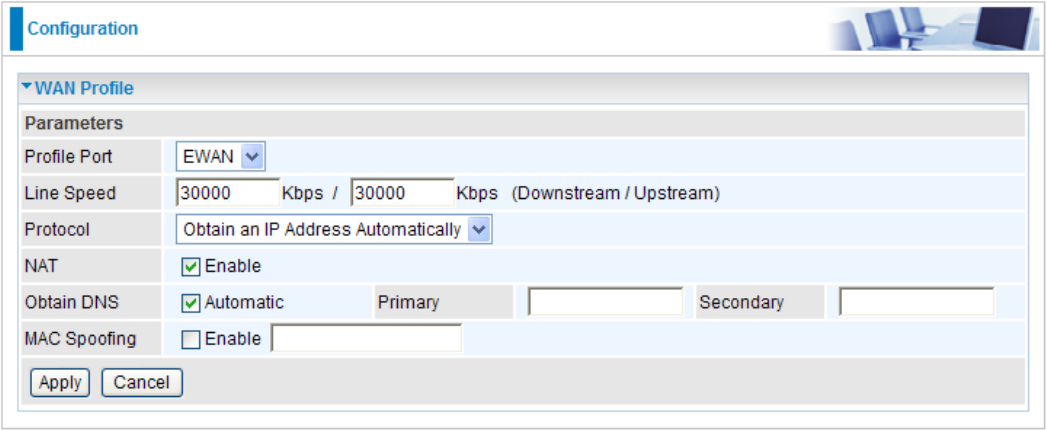
WAN Prole - Main Port: EWAN
Besides using VDSL to get connected to the Internet, the VDSL router offers its Ethernet port 4
as a WAN port to be used to connect to Cable Modems and bre optic lines. This alternative, yet
faster method to connect to the internet will provide users with more exibility to get online.
Obtain an IP Address Automatically (EWAN)
When connecting to the ISP, your router also functions as a DHCP client. By conguring DHCP
settings, the device is able to obtain IP settings automatically from the ISP.
Protocol: Select the protocol you will use in the device.
Line Speed: Set the downstream and upstream of your connection in kilobytes per second. The
connection speed is used by QoS settings.
Protocol: Select the protocol you will use in the device.
NAT: The NAT (Network Address Translation) feature allows multiple users to access the Internet
through a single IP account by sharing the single IP address. If users on your LAN have their own
public IP addresses to access the Internet, NAT function can be disabled.
Obtain DNS: Select this check box to activate DNS.
Primary DNS/ Secondary DNS: Enter the IP addresses of the DNS servers. The DNS servers are
passed to the DHCP clients along with the IP address and the netmask.
MAC Spoong: This option is required by some service providers. You must ll the MAC address
specied by your service provider when this information is required. It will temporarily change
your router’s MAC address to the one you have specied in this eld. The default setting is set to
disable.
Click Apply to conrm the settings.
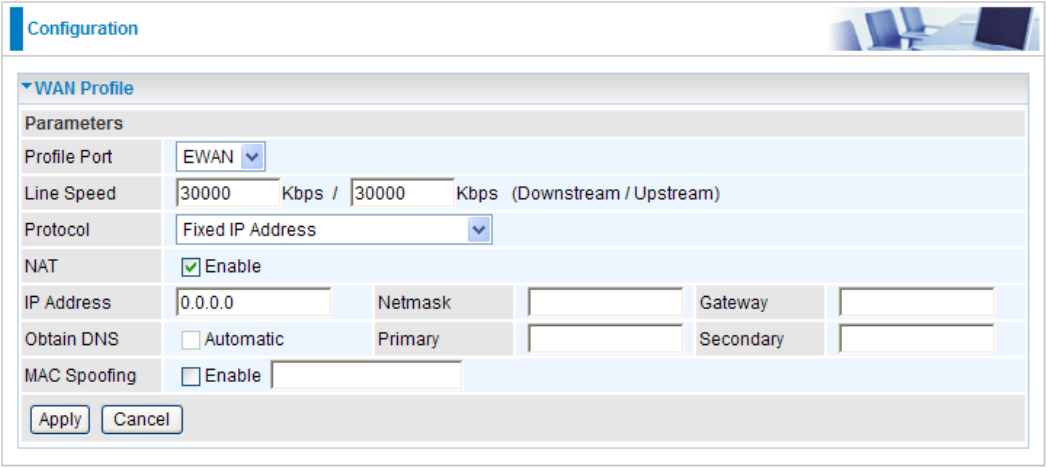
Fixed IP Address (EWAN)
A Static WAN connection will be congured according to the IP properties dened by your ISP.
Line Speed: Set the downstream and upstream of your connection in kilobytes per second. The
connection speed is used by QoS settings.
Protocol: Select the protocol you will use in the device.
NAT: The NAT (Network Address Translation) feature allows multiple users to access the Internet
through a single IP account by sharing the single IP address. If users on your LAN have their own
public IP addresses to access the Internet, NAT function can be disabled.
IP Address: Enter your xed IP address. Each IP address entered in the eld must be in the
appropriate IP form, which is four IP octets separated by a dot (x.x.x.x). The Router will not accept
the IP address if it is not in this format.
Netmask: User can change it to others such as 255.255.255.128. Type the netmask assigned to
you by your ISP (if given)
Gateway: Enter the IP address of the default gateway (if given).
Obtain DNS: Select this check box to activate DNS.
Primary DNS/ Secondary DNS: Enter the IP addresses of the DNS servers. The DNS servers are
passed to the DHCP clients along with the IP address and the netmask.
MAC Spoong: This option is required by some service providers. You must ll the MAC address
specied by your service provider when this information is required. It will temporarily change
your router’s MAC address to the one you have specied in this eld. The default setting is set to
disable.
Click Apply to conrm the settings.
78
79
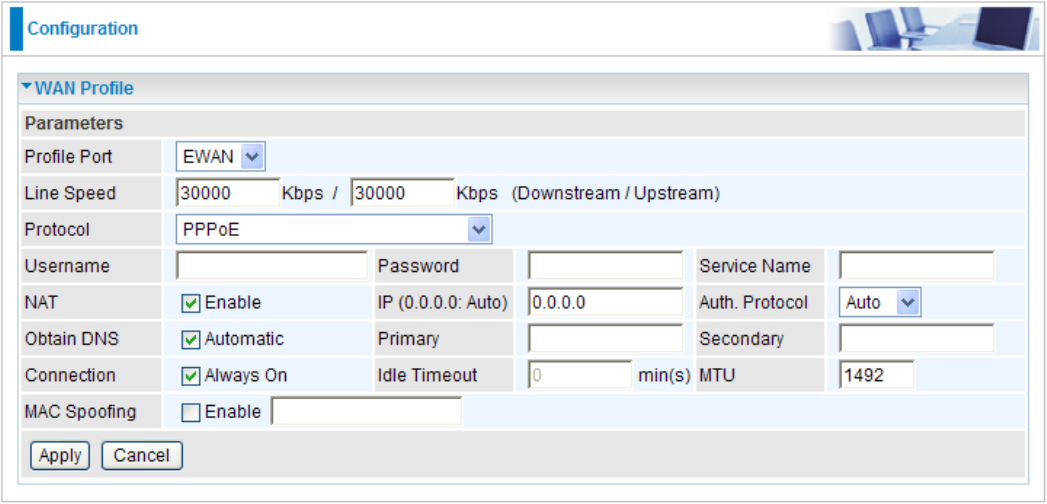
PPPoE (EWAN)
PPPoE (PPP over Ethernet) provides access control in a manner which is similar to dial-up services
using PPP.
Line Speed: Set the downstream and upstream of your connection in kilobytes per second. The
connection speed is used by QoS settings.
Protocol: Select the protocol you will use in the device.
Username: Enter the username provided by your ISP. You can input up to 256 alphanumeric
characters (case sensitive). This is in the format of “username@ispname” instead of simply
“username”.
Password: Enter the password provided by your ISP. You can input up to 32 alphanumeric
characters (case sensitive).
Service Name: This item is for identication purposes. If it is required, your ISP will provide you
the necessary information. Maximum input is 32 alphanumeric characters.
NAT: The NAT (Network Address Translation) feature allows multiple users to access the Internet
through a single IP account by sharing the single IP address. If users on your LAN have their own
public IP addresses to access the Internet, NAT function can be disabled.
IP (0.0.0.0.Auto): Enter your xed IP address. Leave this at 0.0.0.0 to automatically obtain an IP
address from your ISP.
Auth. Protocol: Default is Auto. Please consult your ISP on whether to use Pap or Chap.
Obtain DNS: Select this check box to activate DNS.
Primary DNS/ Secondary DNS: Enter the IP addresses of the DNS servers. The DNS servers are
passed to the DHCP clients along with the IP address and the netmask.
Connection: Click on Always On to establish a PPPoE session during start up and to
automatically re-establish the PPPoE session when disconnected by the ISP. You may uncheck
the item to disable this function.
Idle Timeout: Auto-disconnect the broadband rewall gateway when there is no activity on the line
for a predetermined period of time.
MTU: Maximum Transmission Unit. The size of the largest datagram (excluding media-specic
headers) that IP will attempt to send through the interface.
MAC Spoong: This option is required by some service Providers. You must ll the MAC address
specied by your service provider when this information is required. It will temporarily change
your router’s MAC address to the one you have specied in this eld. The default setting is set to
disable.
Click Apply to conrm the settings.
80
81
System
There are the items within the System section: Time Zone, Firmware Upgrade, Backup/Restore,
Restart, User Management and Mail alert.
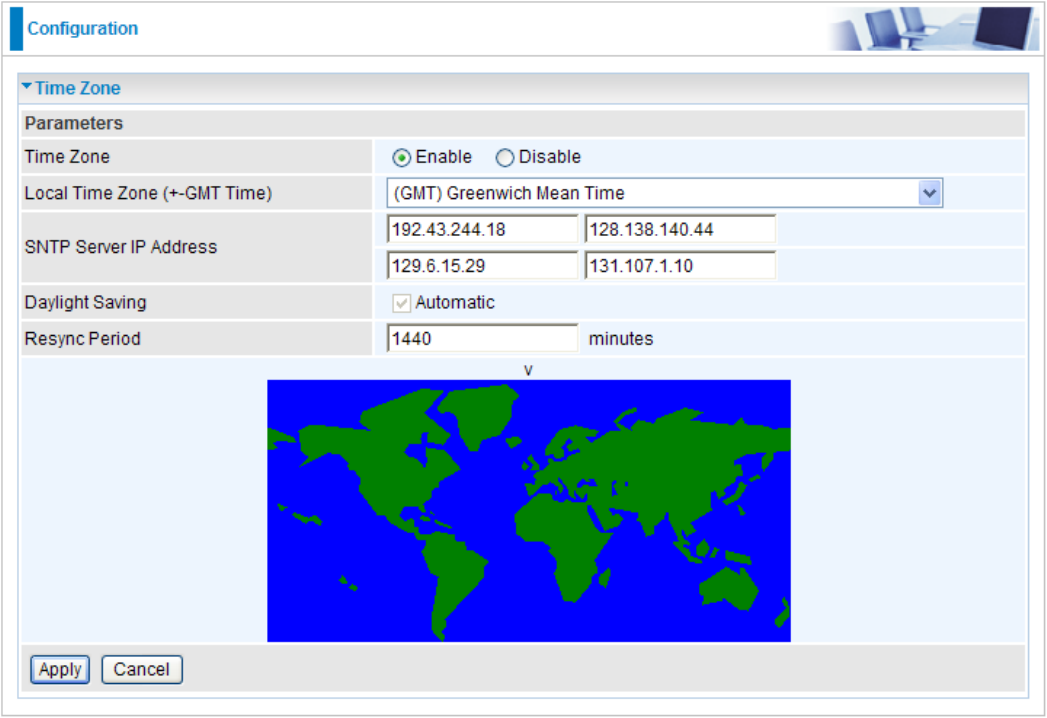
Time Zone
The router does not have a real time clock on board; instead, it uses the Simple Network Time
Protocol (SNTP) to get the most current time from an SNTP server outside your network. Choose
your local time zone from the drop down menu. To apply the selected local time zone, click Enable
and click the Apply button. After a successful connection to the Internet, the router will retrieve
the correct local time from the SNTP server you have specied. If you prefer to specify an SNTP
server other than those in the drop-down list, simply enter its IP address in their appropriate blanks
provided as shown above. Your ISP may also provide an SNTP server for you to use.
Resync Period (in minutes) is the periodic interval the router will wait before it re-synchronizes the
router’s time with that of the specied SNTP server. In order to avoid unnecessarily increasing the
load on your specied SNTP server you should keep the poll interval as high as possible – at the
absolute minimum every few hours or even days.
Click Apply to conrm the settings.
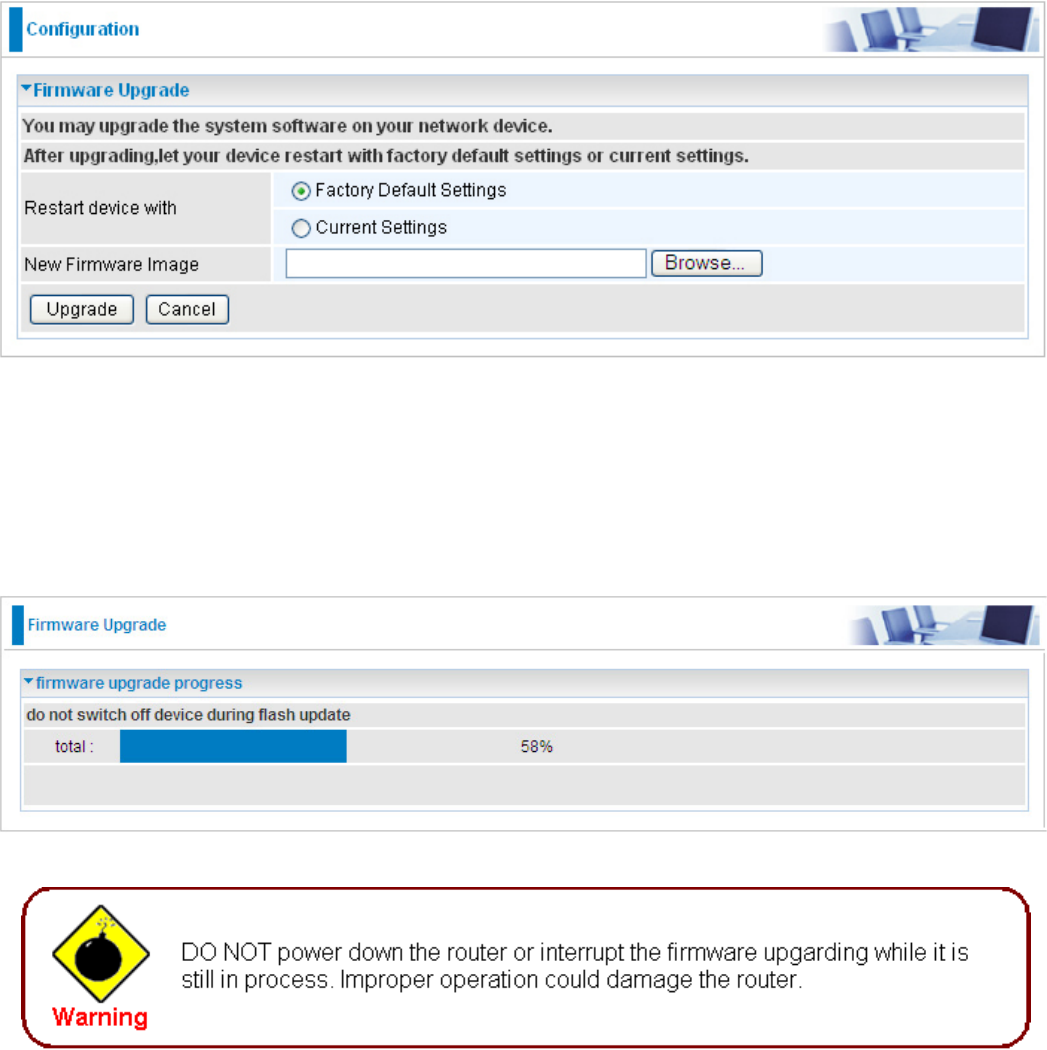
Firmware Upgrade
Your router’s rmware is the software that enables it to operate and provides all its functionality.
Think of your router as a dedicated computer, and the rmware as the software that runs in your
router. Thus, by upgrading the newly improved version of the rmware allows you the advantage to
use newly integrated features.
Factory Default Settings: If select this setting, the device will reboot to restore the parameters of
all its applications to its default values.
Current Settings: If select this setting, the device will reboot and retain the customized settings of
all applications.
Click on Browse to select the new rmware image le you have downloaded to your PC. Once the
correct le is selected, click Upgrade to update the rmware to your router.
82
83
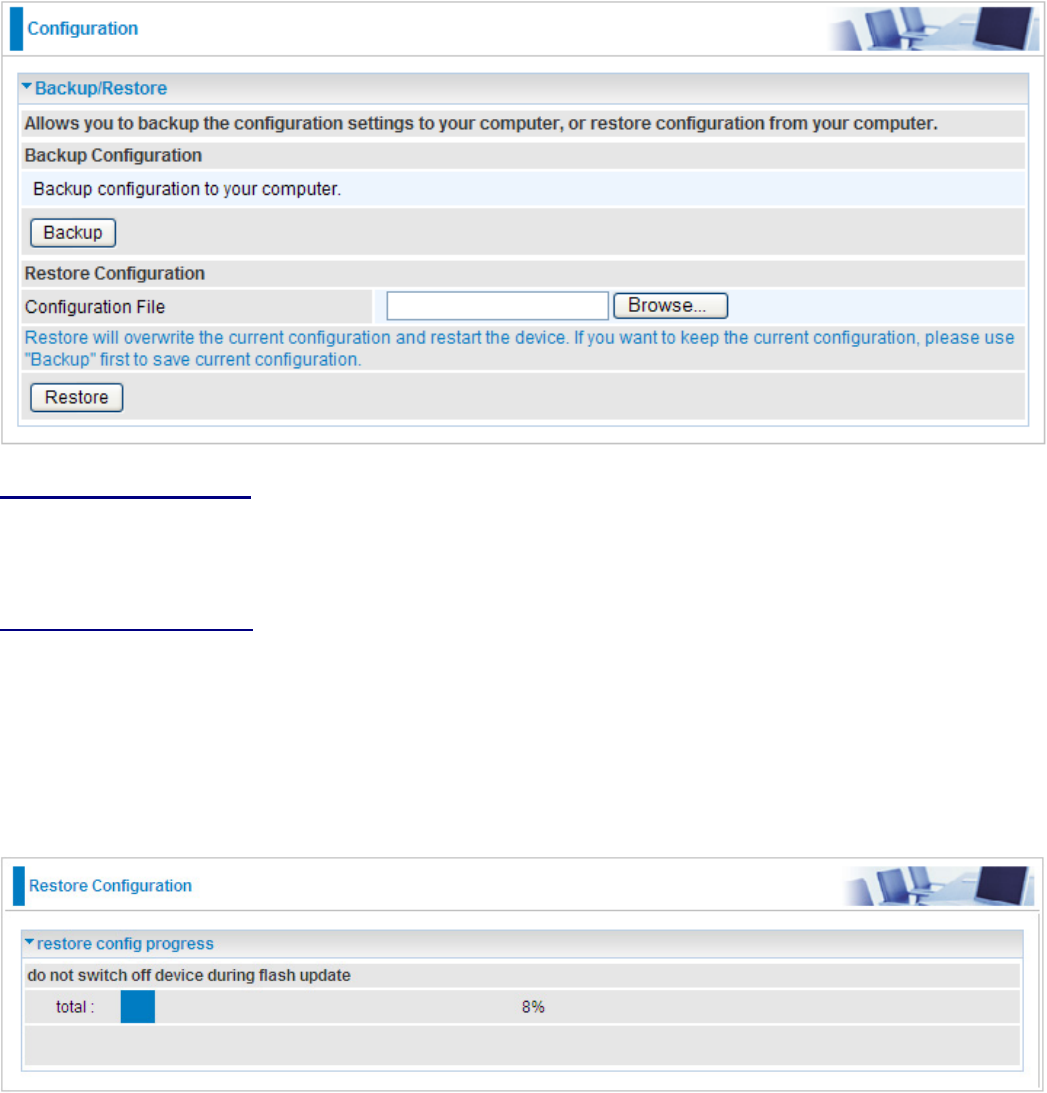
Backup / Restore
These functions allow you to save a backup of the current conguration of your router to a dened
location on your PC, or to restore a previously saved conguration. This is useful if you wish to
experiment with different settings, knowing that you have a backup in hand in case any mistakes
occur. It is advisable that you backup your router conguration before making any changes to your
router conguration.
Backup Conguration
Press Backup to select where on your local PC you want to store your setting le. You may also
want to change the name of the le when saving if you wish to keep multiple backups.
Restore Conguration
Press Browse to select a le from your PC to restore. You should only restore your router setting
that has been generated by the Backup function which is created with the current version of the
router rmware. Settings les saved to your PC should not be manually edited in any way.
Select the settings les you wish to use, and press Restore to load the setting into the router. Click
Restore to begin restoring the conguration and wait for the router to restart before performing any
actions.
84
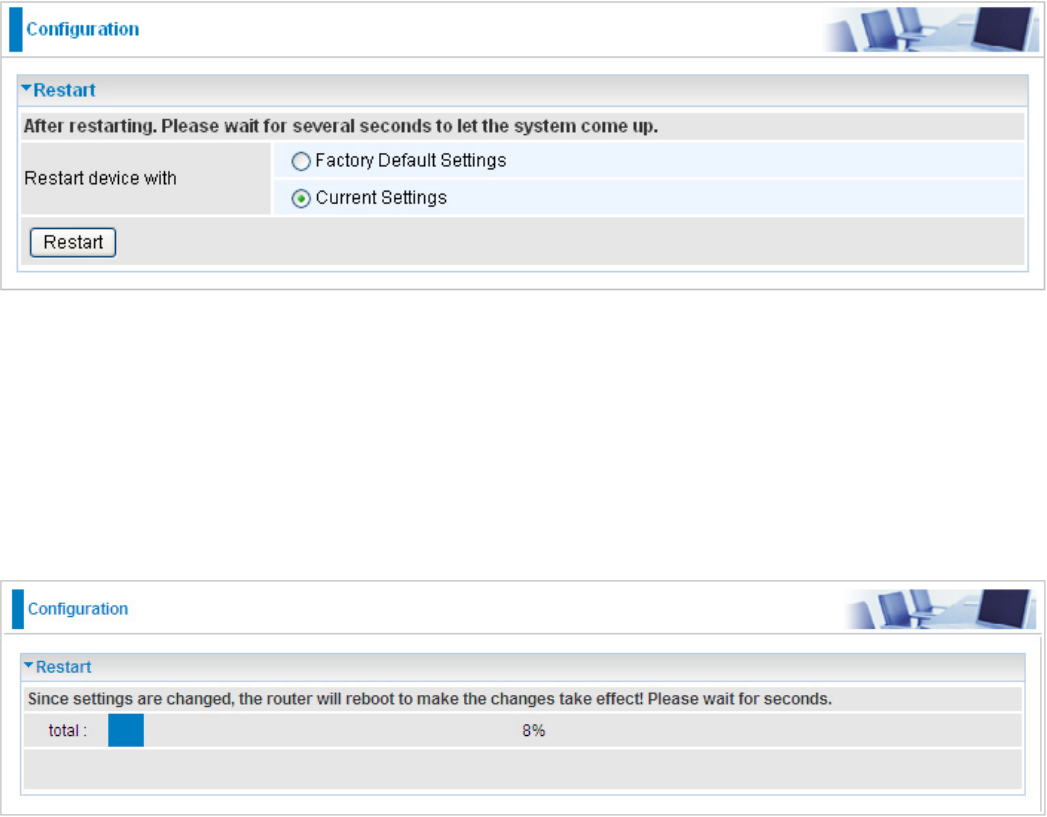
Restart
There are 2 options for you to choose from before restarting the your 8200N device. You can
either choose to restart your device to restore it to the Factory Default Settings or to restart the
device with your current settings applied. Restarting your device to Factory Default Setting will be
useful especially after you have accidentally changed your settings that may result in undesirable
outcome.
If you wish to restart the router using the factory default settings (for example, after a rmware
upgrade or if you have saved an incorrect conguration), select Factory Default Settings to reset to
factory default settings.
Click Restart with option Current Settings to reboot your router (and restore your last saved
conguration).
After selecting the type of setting you want the device to restart with, click the Restart button to
initiate the process. After restarting, please wait several minutes to let the selected setting applied
to the system.
You may also reset your router to factory settings by holding the small Reset pinhole button more
than 1 second on the back of your router.
85
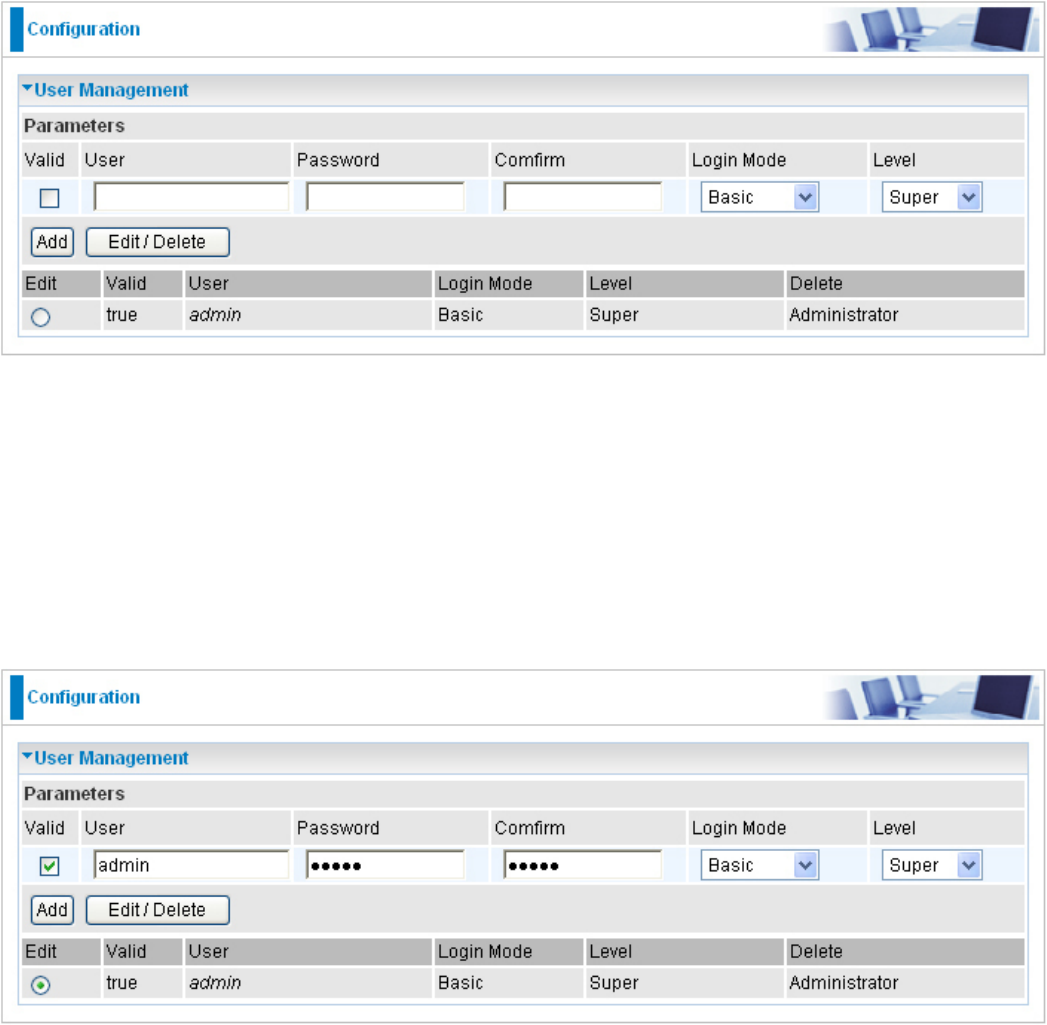
User Management
In order to prevent unauthorized access to your router conguration interface, it requires all users
to login with a username and password. Therefore only system administrator can access the
system.
This feature allows you to set up multiple user accounts which contains a unique password of its
own. In addition, you can also edit any existing user accounts or add new users to allow access to
the device conguration interface.
Edit Account Information
You can change the informations of any account whether the account is active or valid.
1. To edit an account, click on the Edit radio button of the account you want to edit. Once selected,
all information of that account will be displayed.
2. Delete the information to be edited and replace it with the new one.
3. When it is done, simply click on the Edit/Delete button to save your changes.
Note: It is highly recommended that you change the password immediately to prevent
security breach to your GUI.
Add an account
1. Check the Valid checkbox, ll in all the information: User name, Comment (optional), Password,
Conrm Password.
2. When it is done, click the Add button.
Delete a User Account
1. Check the Delete checkbox of the account you want to delete.
2. Then click the Edit/Delete to conrm the deletion.
Note: You can delete any user account except for the default admin account. Thus there is
no delete radio button available for this account.
86
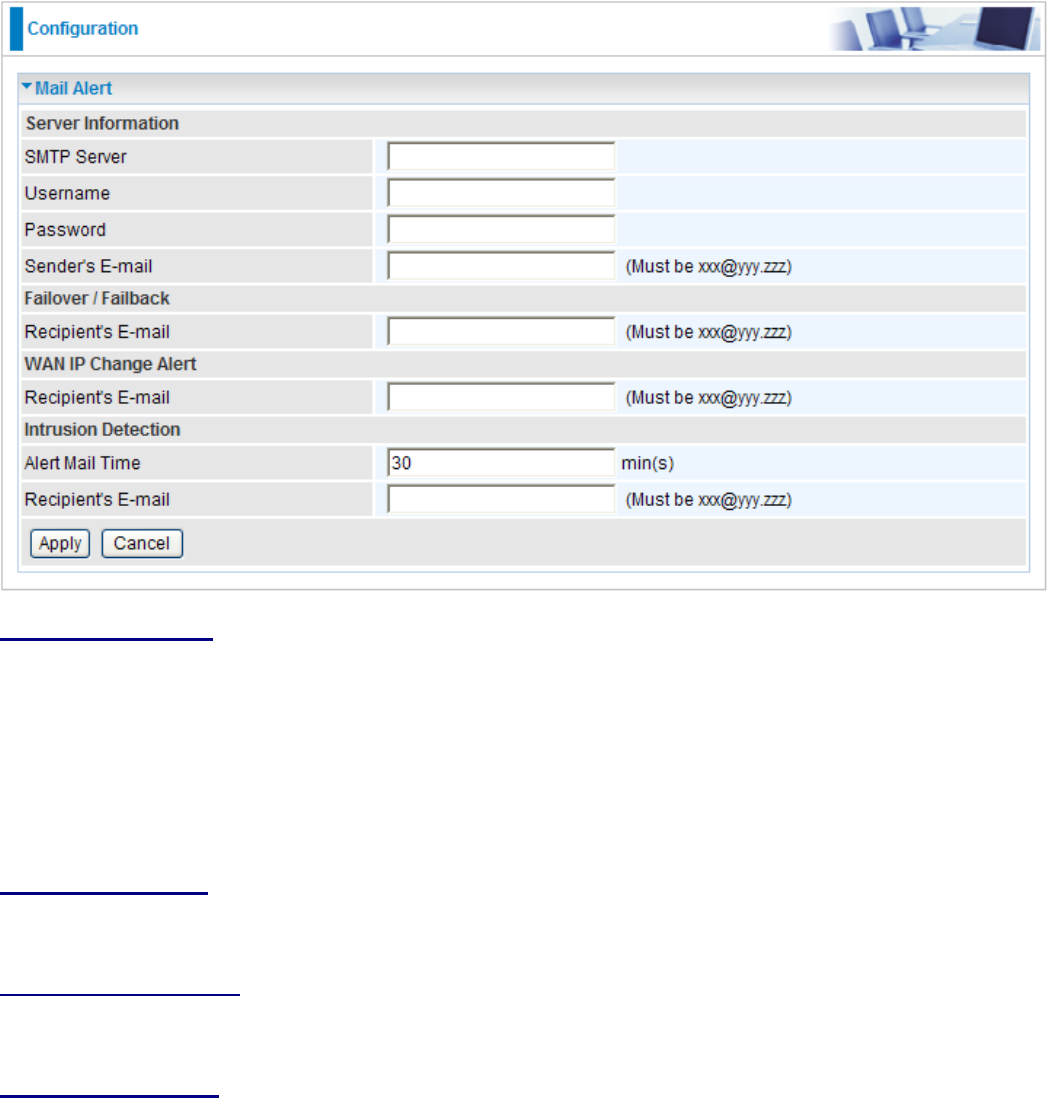
Mail Alert
Mail Alert allows administrator to receive notications from the router through email about
important events that is occurring in real time. This allows administrator to be able to take
immediate actions to counteract any possible hacking or to restore the router to its original status
should any failover / failback ever occurs.
Server Information
SMTP Server: Enter the SMTP (mail) server address.
Username: Enter the username of your SMTP server.
Password: Enter the password associated with the username.
Sender’s E-mail: Enter the email address you wish to send the mail alert email to.
Failover / Failback
Recipient’s E-mail: Enter the email address you wish to send the Failover / Failback email to.
WAN IP Change Alert
Recipient’s E-mail: Enter the email address you wish to send the WAN IP Change email to.
Intrusion Detection
Alert Mail Time: Set the time for sending the Alert mail.
Recipient’s E-mail: Enter the email address you wish to send the Intrusion Detection email to.
Click Apply to conrm the settings.
87
88
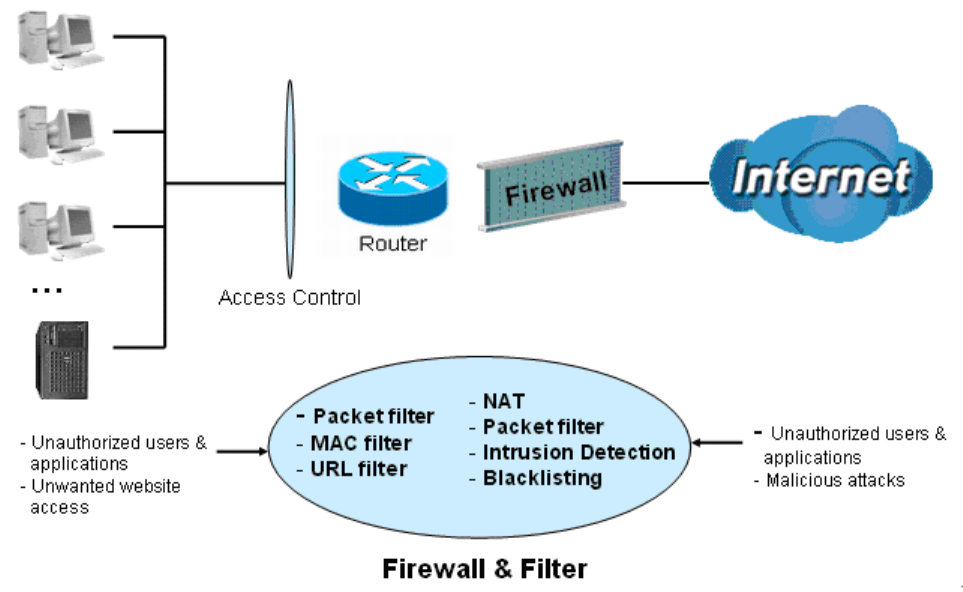
Firewall
Firewall and Access Control
Your router includes a full SPI (Stateful Packet Inspection) rewall for controlling Internet access
from your LAN, as well as helping to prevent attacks from hackers. In addition to this, when using
NAT (Network Address Translation) the router acts as a “natural” Internet rewall, since all PCs
on your LAN use private IP addresses that cannot be directly accessed from the Internet. See the
WAN conguration section for more details on NAT.
Firewall: Prevents access from outside your network.
NAT natural rewall: This masks LAN users’ IP addresses, which are invisible to outside users on
the Internet, making it much more difcult for a hacker to target a machine on your network. This
natural rewall is on when the NAT function is enabled.
Firewall Security and Policy (General Settings): Inbound direction of Packet Filter rules prevent
unauthorized computers or applications accessing your local network from the Internet.
Intrusion Detection: Enable Intrusion Detection to detect, prevent, and log malicious attacks.
MAC Filter rules: Prevents unauthorized computers accessing the Internet.
URL Filter: Blocks PCs on your local network from unwanted websites.
A detailed explanation of each of the following items appears in the Firewall section below: Packet
Filter, MAC Filter, Intrusion Detection, Block WAN PING and URL Filter.
89
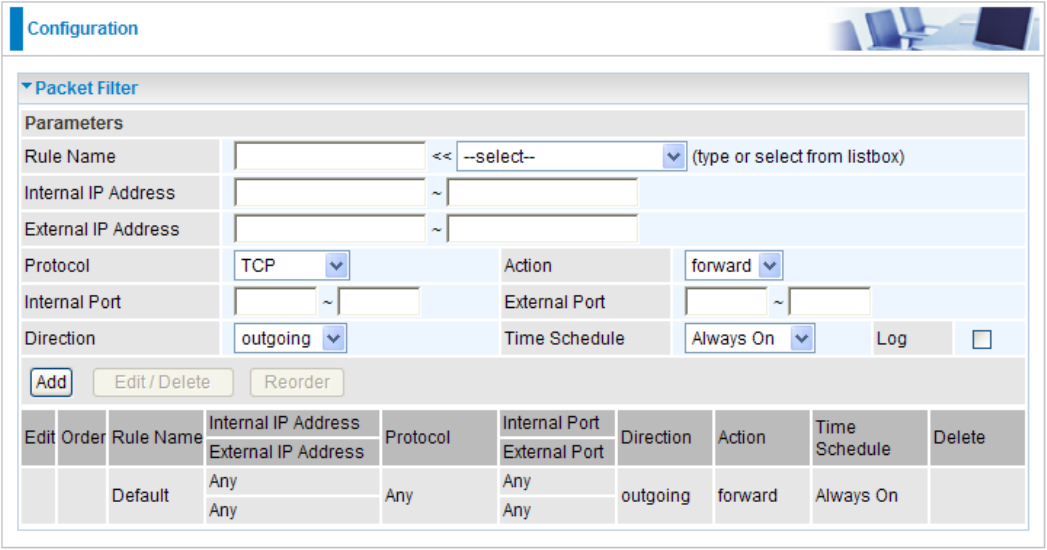
Packet Filter
Packet ltering enables you to congure your router to block specic internal / external users (IP
address) from Internet access, or disable specic service requests (Port number) to / from the
Internet. This conguration program allows you to set up different lter rules for different users
based on their IP addresses or their network Port number. The relationship among all lters is “or”
operation, which means that the router checks these different lter rules one by one, starting from
the rst rule. As long as one of the rules is satised, the specied action will be taken.
Rule Name: User dened description for entry identication. The maximum name length is 32
characters, and then can choose an application that they want from the listbox.
Internal IP Address / External IP Address: This is the Address-Filter used to allow or block trafc
to/rom particular IP address(es). Input the range you want to lter out. If you leave these four elds
empty or enter 0.0.0.0, it means any IP address.
Protocol: Specify the packet type (TCP, UDP, TCP/UDP) that the rule applies to. Select TCP if
you wish to search for the connection-based application service on the remote server using the
port number. Or select UDP if you want to search for the connectionless application service on the
remote server using the port number.
Action: If a packet matches this lter rule, forward (allows the packets to pass) or drop (disallow
the packets to pass) this packet.
Internal Port: This Port or Port Range denes the ports allowed to be used by the Remote/WAN
to connect to the application. Default is set the range from 1 to 65535. It is recommended that this
option be congured by an advanced user.
External Port: This is the Port or Port Range that denes the application.
Direction: Determine whether the rule is for outgoing packets or for incoming packets.
Time Schedule: It is self-dened time period. You may specify a time schedule for your
prioritization policy. For setup and detail, refer to Time Schedule section.
Log: Check the checking box if you wish to generate logs when the ler rule is applied to a packet.
90
Add: Click this button to add a new packet lter rule and the added rule will appear at the bottom
table.
Edit: Check Edit next to the item you wish to edit, and then change parameters as desired.
Complete it by press “Edit/Delete”.
Delete: Check Edit next to the item you wish to delete, and press “Edit/Delete” to remove this rule.
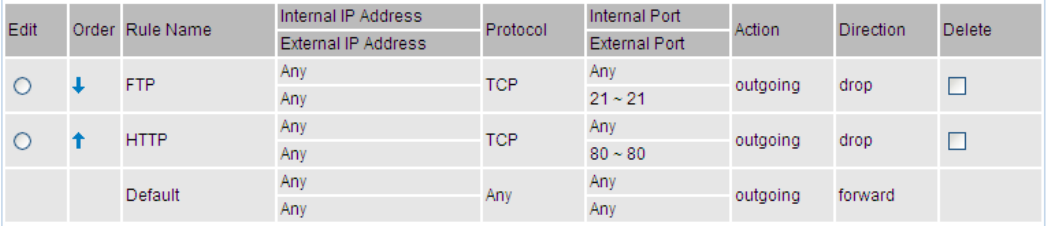
Order: Be aware that packet ltering parameters appear in priority order i.e. the rst one takes
precedence over all other rules. There is a sort function next to the Rule Name column, you can
move the rule to higher or lower priority by clicking the Order arrow, and press “Reorder” to save
the new priority.
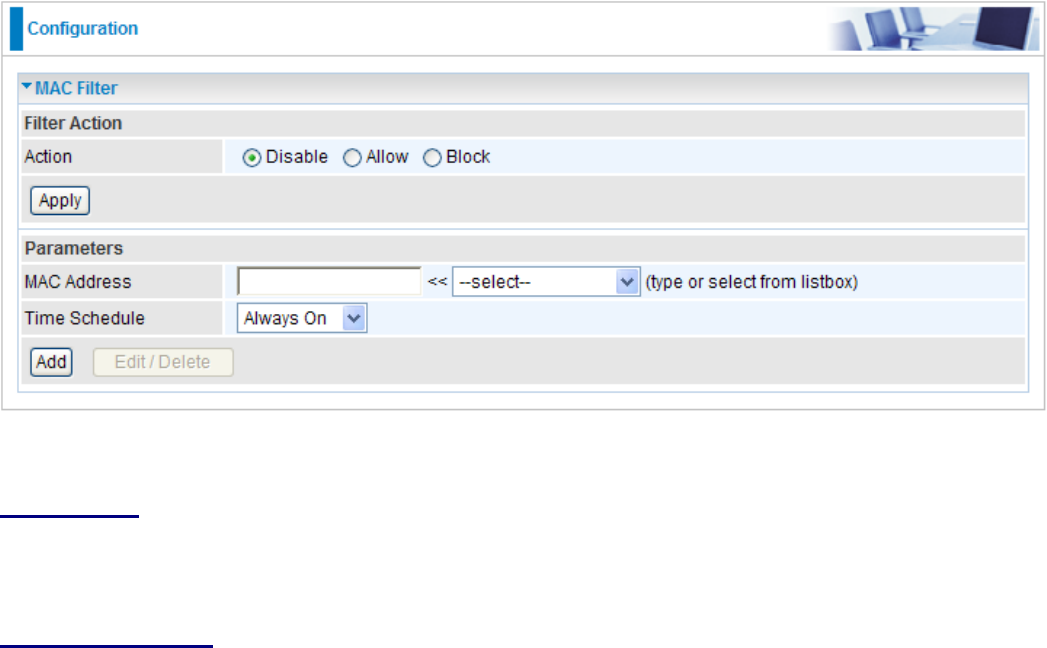
MAC Filter
A MAC (Media Access Control) address is the unique network hardware identier for each PC on
your network’s interface (i.e. its Network Interface Card or Ethernet card). Using your router’s MAC
Address Filter function, you can congure the network to block specic machines from accessing
your LAN.
There are no pre-dened MAC address lter rules, you can add the lter rules to meet your
requirements.
The format of MAC address could be: xx:xx:xx:xx:xx:xx or xx-xx-xx-xx-xx-xx.
Filter Action
Action: Select an action for MAC Filter. This feature is disabled by default. Check Allow or Block
to activate the lter.
Server Information
MAC Address: Enter the MAC addresses you wish to have the lter rule applies.
91
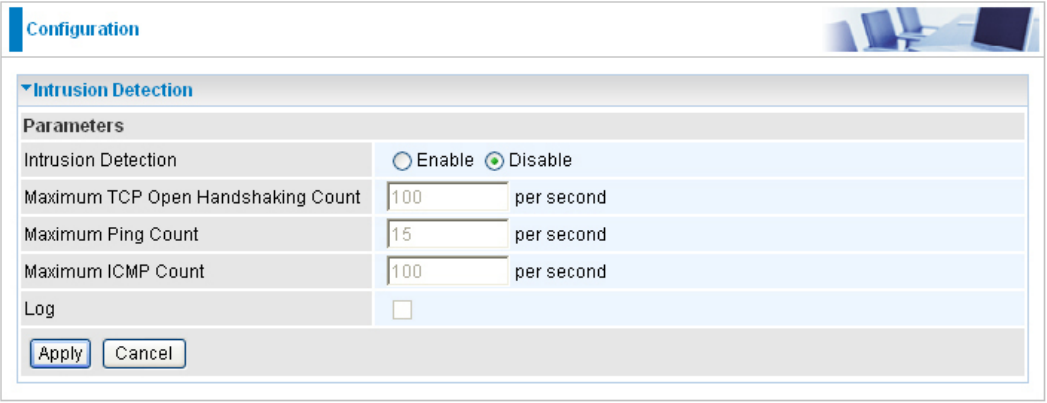
Intrusion Detection
The router Intrusion Detection System (IDS) is used to detect hacker’s attack and intrusion
attempts from the Internet. If the IDS function of the rewall is enabled, inbound packets are
ltered and blocked depending on whether they are detected as possible hacker attacks, intrusion
attempts or other connections that the router determines to be suspicious.
Intrusion Detection: Check Enable if you wish to detect intruders accessing your computer
without permission.
Maximum TCP Open Handshaking Count: This is a threshold value to decide whether a SYN
Flood attempt is occurring or not. Default value is 100 TCP SYN per seconds.
Maximum Ping Count: This is a threshold value to decide whether an ICMP Echo Storm is
occurring or not. Default value is 15 ICMP Echo Requests (PING) per second.
Maximum ICMP Count: This is a threshold to decide whether an ICMP ood is occurring or not.
Default value is 100 ICMP packets per seconds except ICMP Echo Requests (PING).
Log: Check Log if you wish to generate logs when the ler rule is applied to the Intrusion
Detection.
Click Apply to conrm the settings.
92

Table: Hacker attack types recognized by the IDS
Intrusion Name Detect Parameter Blacklist Type of Block
Duration Drop Packet Show Log
Ascend Kill Ascend Kill data Src IP DoS Yes Yes
WinNuke
TCP
Port 135, 137~139,
Flag: URG
Src IP DoS Yes Yes
Smurf ICMP type 8
Des IP is broadcast Dst IP Victim
Protection Yes Yes
Land attack SrcIP = DstIP Yes Yes
Echo/CharGen
Scan
UDP Echo Port and
CharGen Port Yes Yes
Echo Scan UDP Dst Port =
Echo(7) Src IP Scan Yes Yes
CharGen Scan UDP Dst Port =
CharGen(19) Src IP Scan Yes Yes
X’mas Tree Scan TCP Flag: X’mas Src IP Scan Yes Yes
IMAP
SYN/FIN Scan
TCP Flag: SYN/FIN
DstPort: IMAP(143)
SrcPort: 0 or 65535
Src IP Scan Yes Yes
SYN/FIN/RST/ACK
Scan
TCP
No Existing session
And Scan Hosts more
than ve.
Src IP Scan Yes Yes
Net Bus Scan
TCP
No Existing session
DstPort = Net Bus
12345,12346, 3456
SrcIP Scan Yes Yes
Back Orice Scan UDP, DstPort = Orice
Port (31337) SrcIP Scan Yes Yes
SYN Flood
Max TCP Open
Handshaking Count
(Default 100 c/sec)
Yes
ICMP Flood Max ICMP Count
(Default 100 c/sec) Yes
ICMP Echo Max PING Count
(Default 15 c/sec) Yes
93
Src IP: Source IP
Src Port: Source Port
Dst Port: Destination Port
Dst IP: Destination IP
94
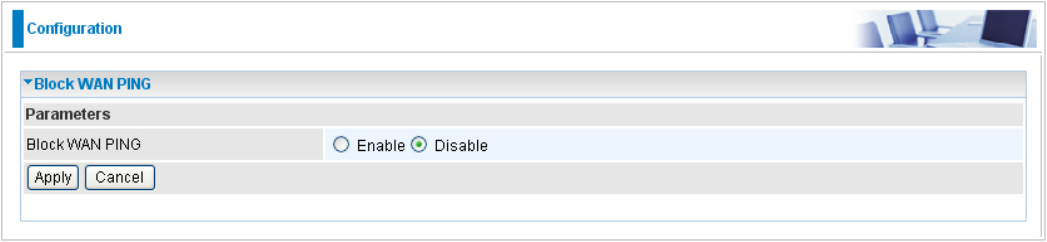
Block WAN Ping
This feature is to be enabled when you want the public WAN IP address on your router not to
respond to any ping command.
This feature is disabled by default. To activate the Block WAN PING feature, check the Enable box
then click the Apply button.
95
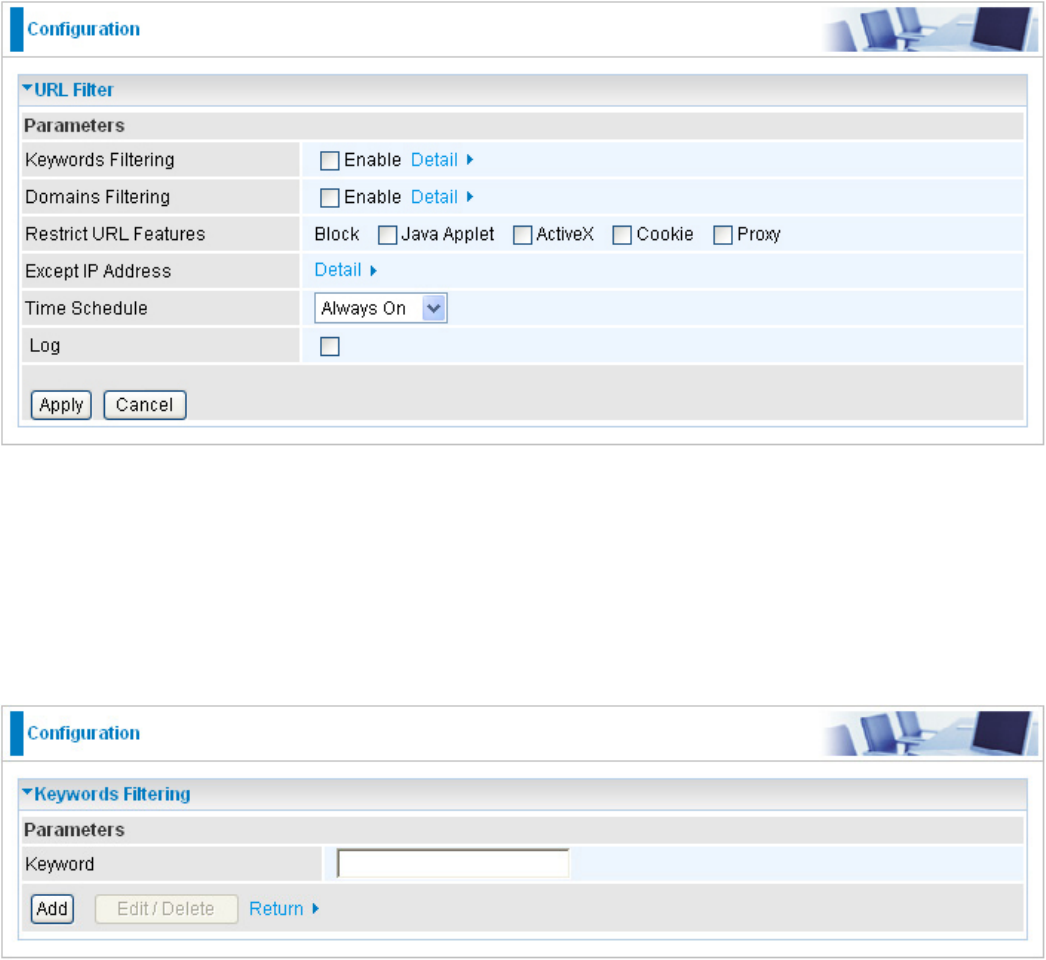
URL Filter
URL (Uniform Resource Locator) (e.g. an address in the form of http://www.abcde.com or http://
www.example.com) lter rule allows you to prevent users on your network from accessing specic
websites dened by their URL. There are no predened URL lter rules, therefore you can add
lter rules to meet your requirements.
Keywords Filtering: Allow blocking against specic keywords within a particular URL rather
than having to specify a complete URL (e.g. to block any image called “advertisement.gif”). When
enabled, your specied keywords list will be checked to see if any keywords are present in URLs
accessed to determine if the connection attempt should be blocked. Please note that the URL lter
blocks web browser (HTTP) connection attempts using port 80 only.
For example, if the URL is http://www.abc.com/abcde.html, it will be dropped as the keyword
“abcde” occurs in the URL.
Domains Filtering: This function checks the whole URL not the IP address, in URLs accessed
against your list of domains to block or allow. If it is matched, the URL request will be sent (Trusted)
or dropped (Forbidden). For this function to be activated, both check-boxes must be checked. Here
is the checking procedure:
1. Check the domain in the URL to determine if it is in the trusted list. If yes, the connection attempt
is sent to the remote web server.
2. If not, check if it is listed in the forbidden list. If yes, then the connection attempt will be
dropped.
3. If the packet does not match either of the above two items, it is sent to the remote web server.
96
4. Please be note that the completed URL, “www” + domain name shall be specied. For example
to block trafc to www.google.com.au, enter “www.google” or “www.google.com”.
Restrict URL Features: This function enhances the restriction to your URL rules.
Block Java Applet: Blocks Web content which includes the Java Applet to prevent someone
who wants to damage your system via the standard HTTP protocol.
Block ActiveX: Blocks ActiveX.
Block Cookies: Blocks Cookies.
Block Proxy: Blocks Proxy.
Except IP Address: The except IP address list.
Time Schedule: It is self-dened time period. You may specify a time schedule for your
prioritization policy. For setup and detail, refer to Time Schedule section.
Log: Check this checking box if you wish to generate logs when the ler rule is applied to the URL
Filter.
Click Apply to conrm the settings.
97