Broadcom BRCM1017 Broadcom 802.11ag WLAN mini PCI card User Manual file C temp hhE8F0

Broadcom Corporation Broadcom 802.11ag WLAN mini PCI card file C temp hhE8F0

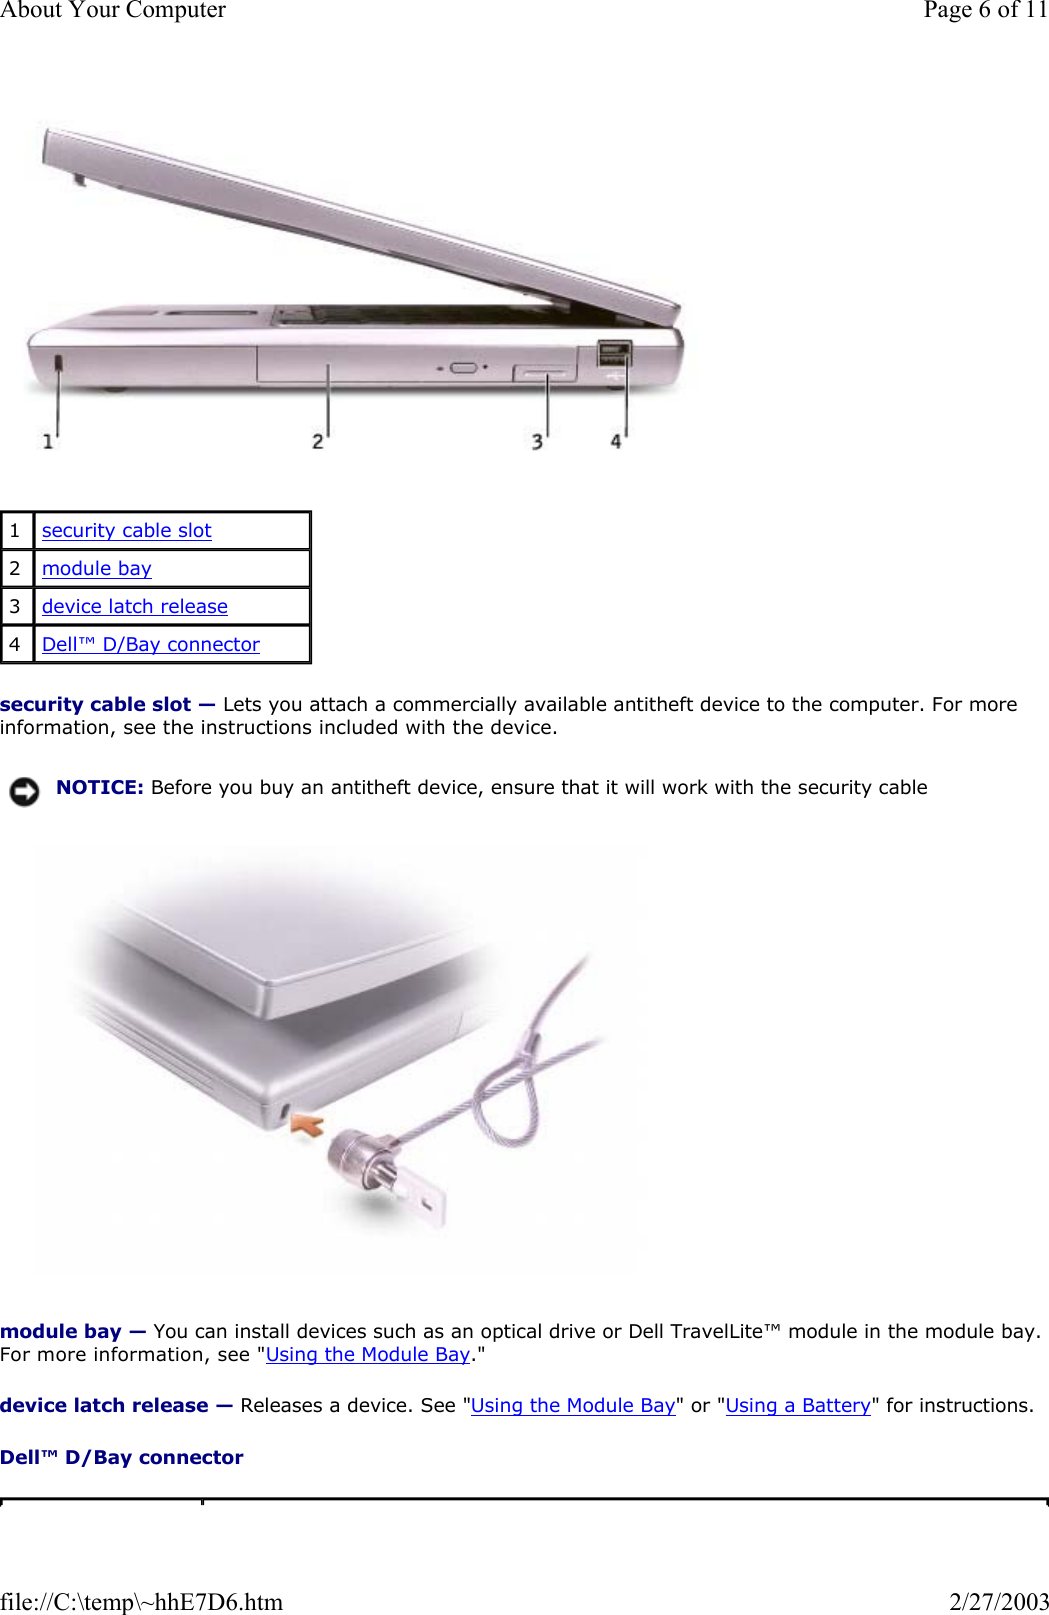
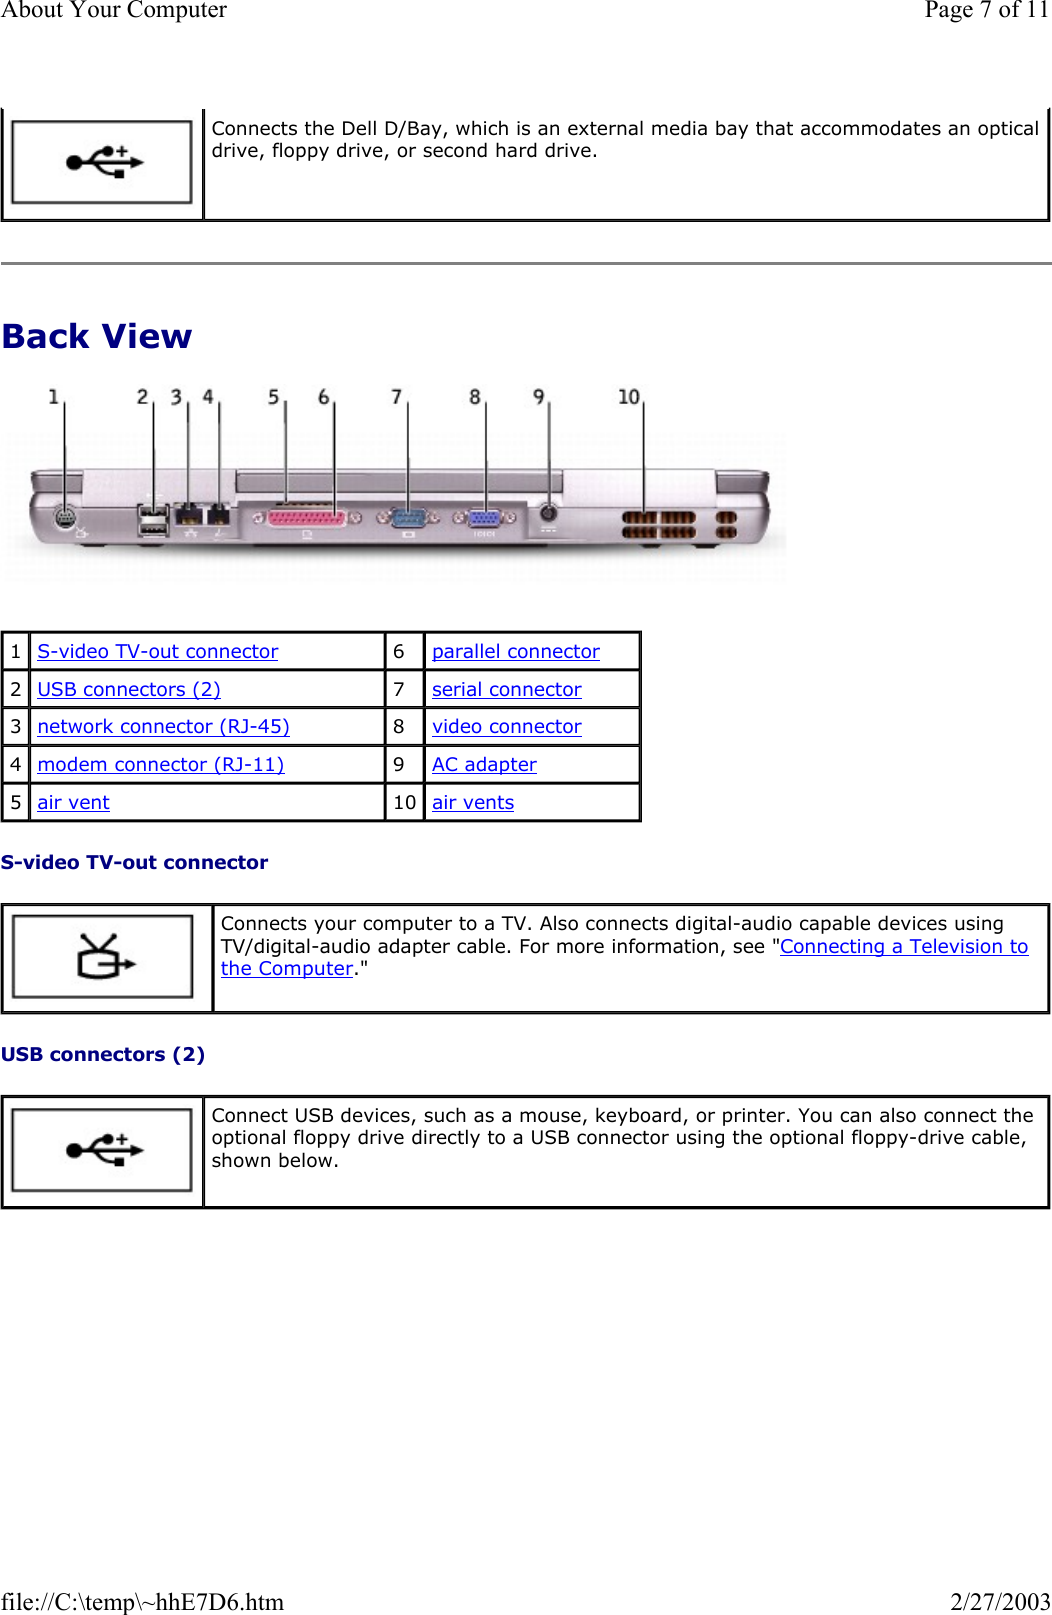
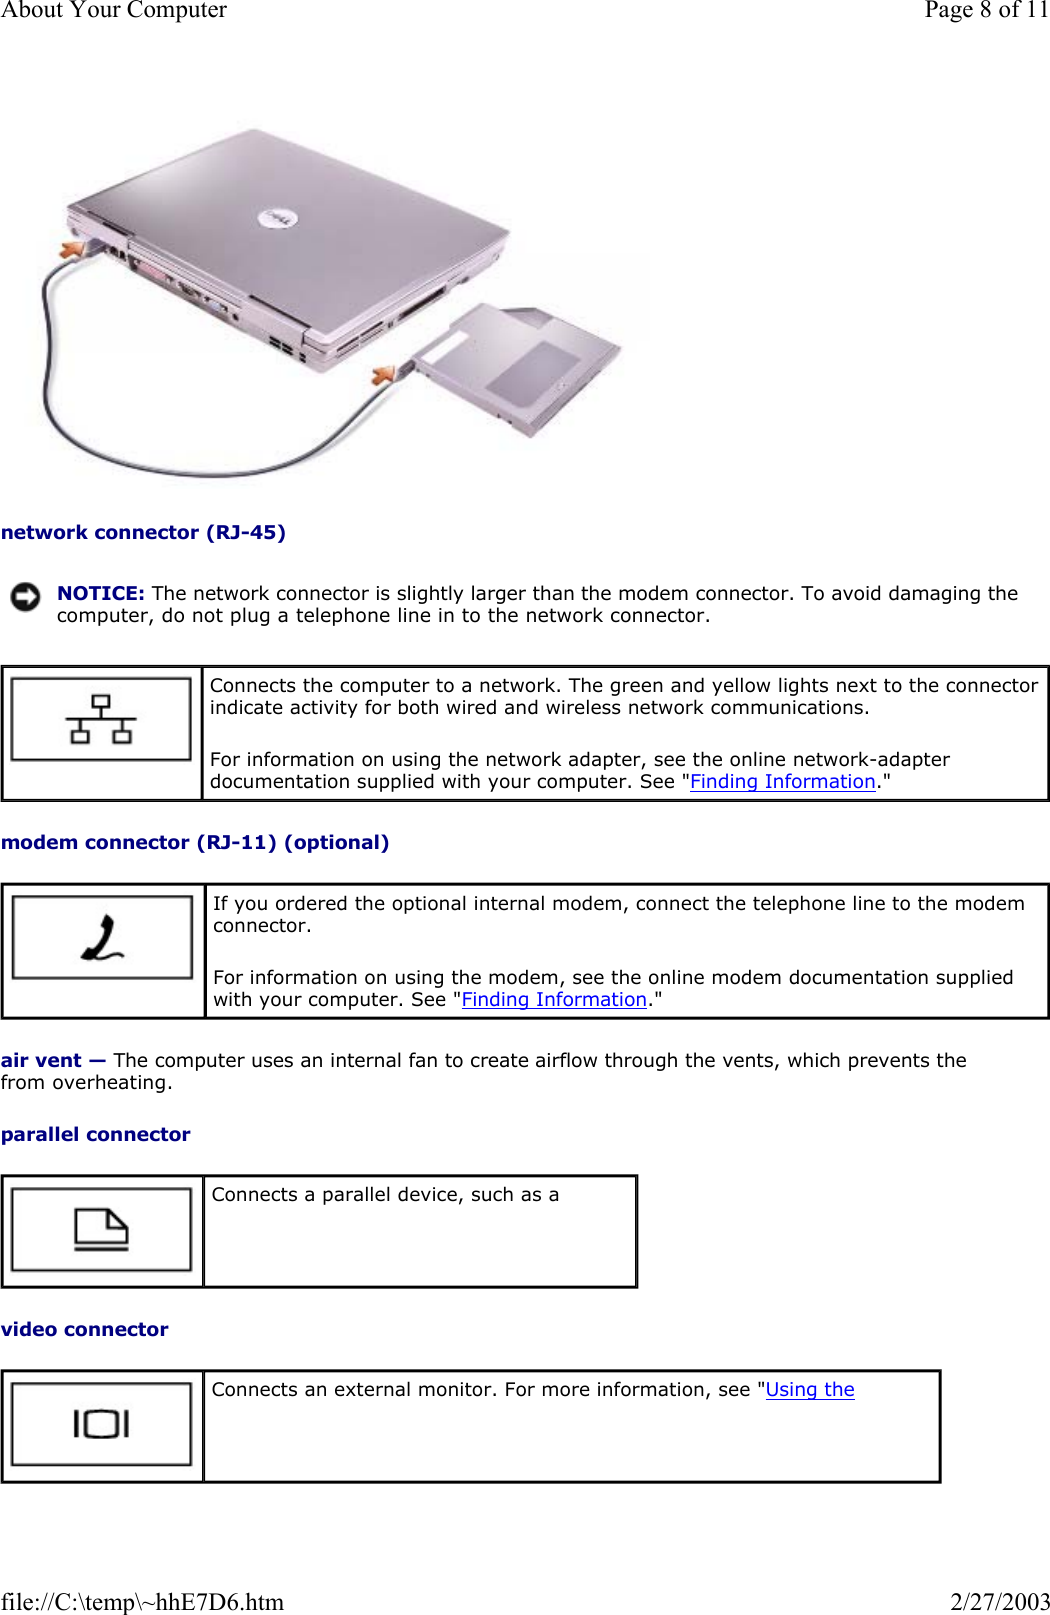
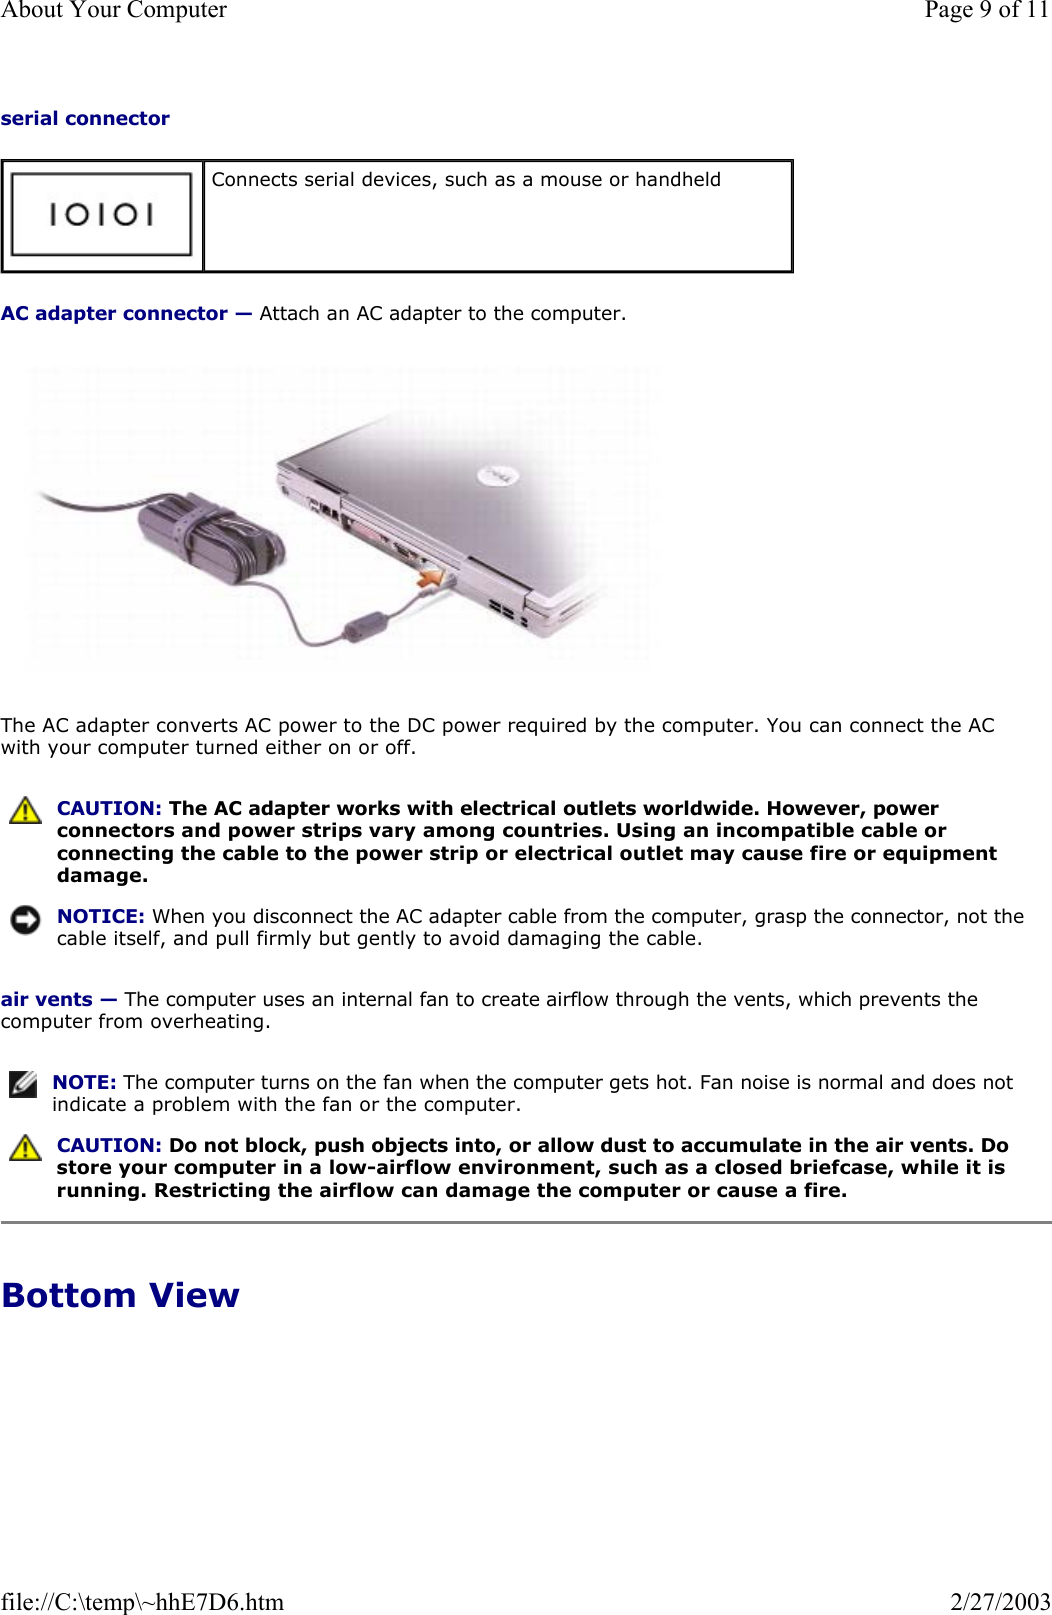
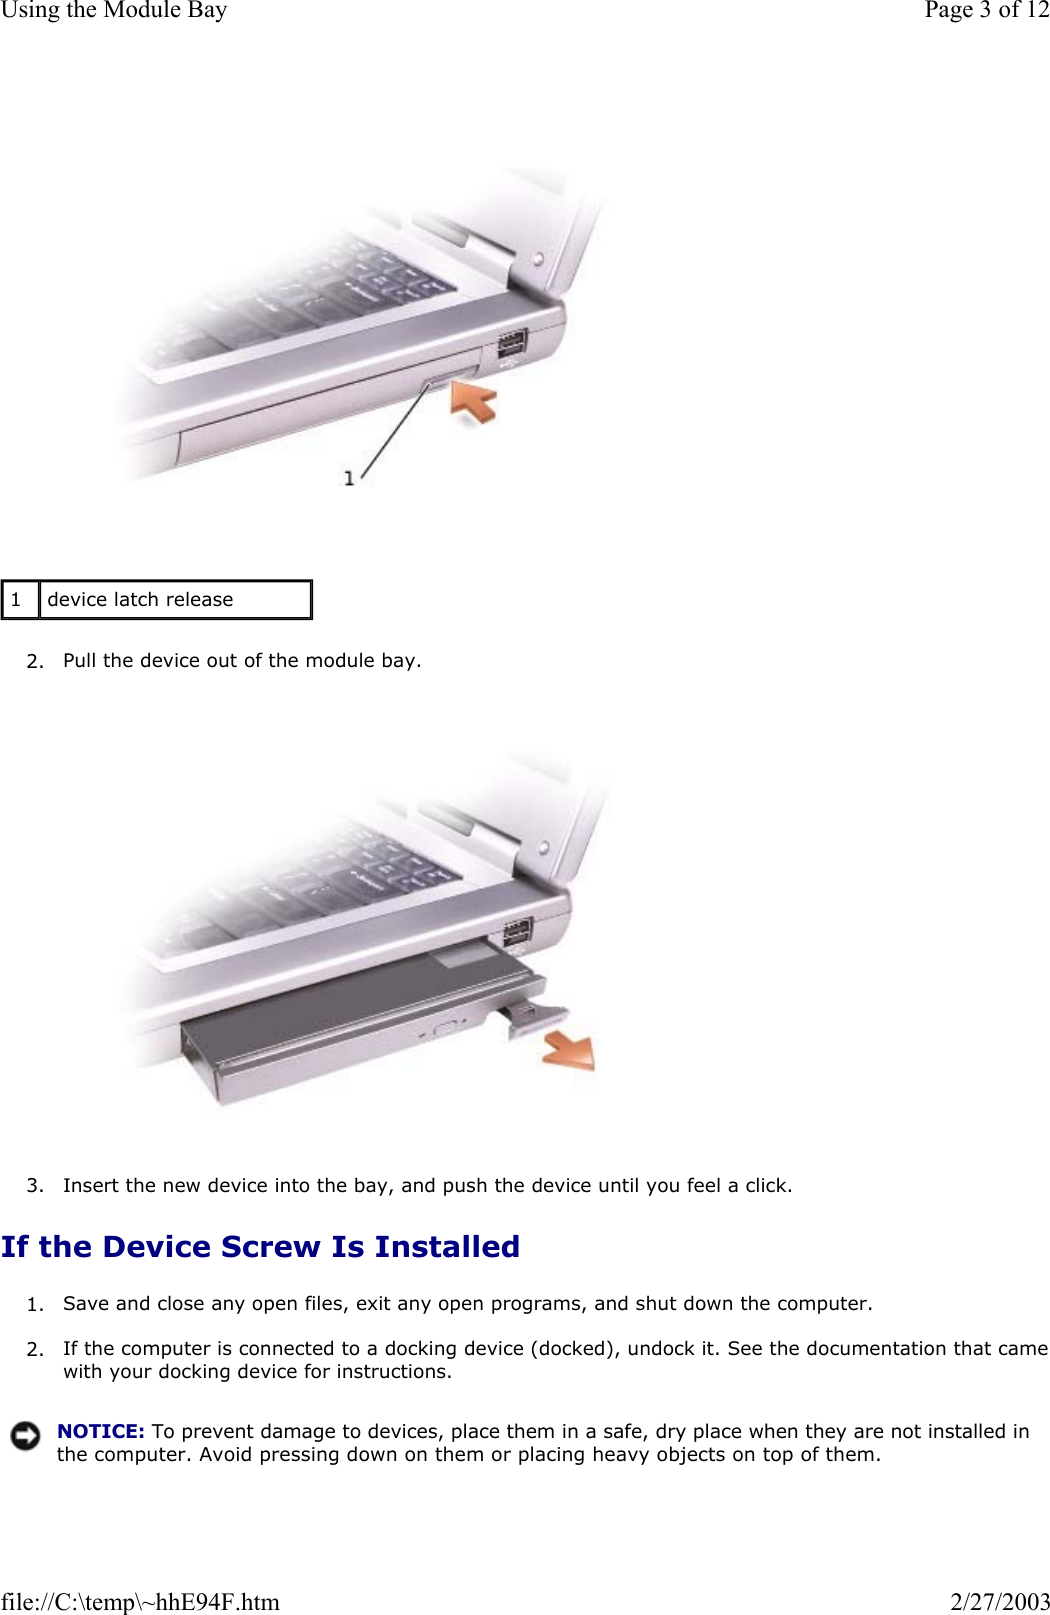
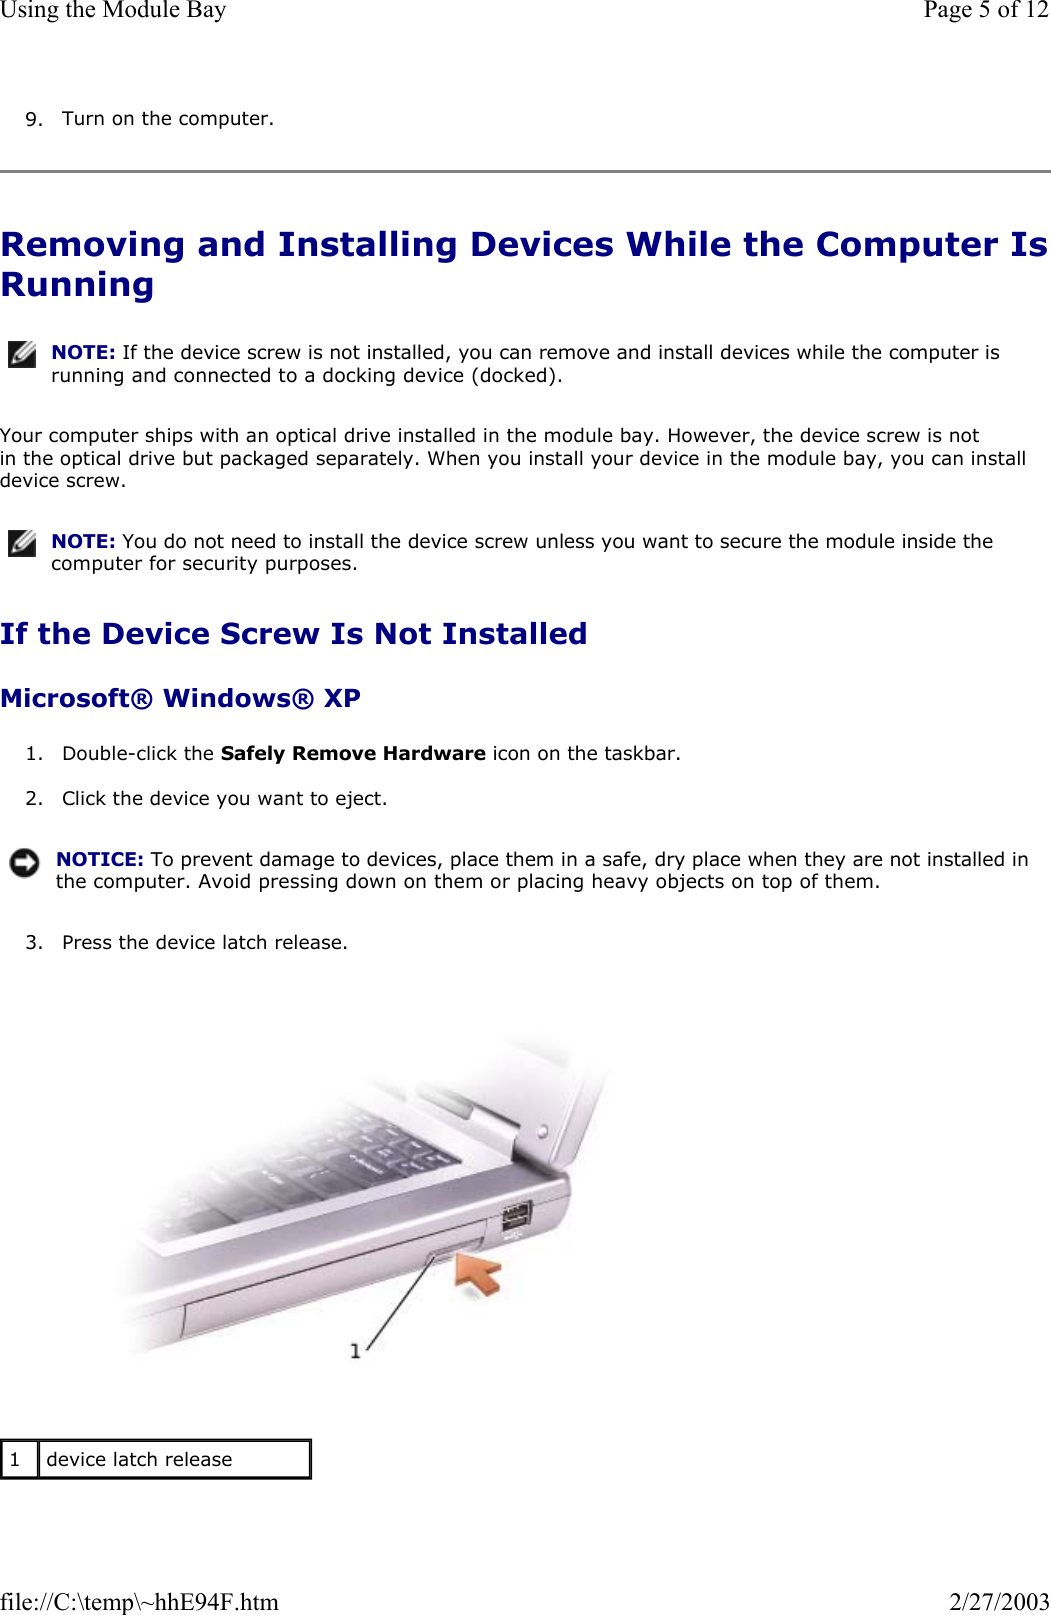
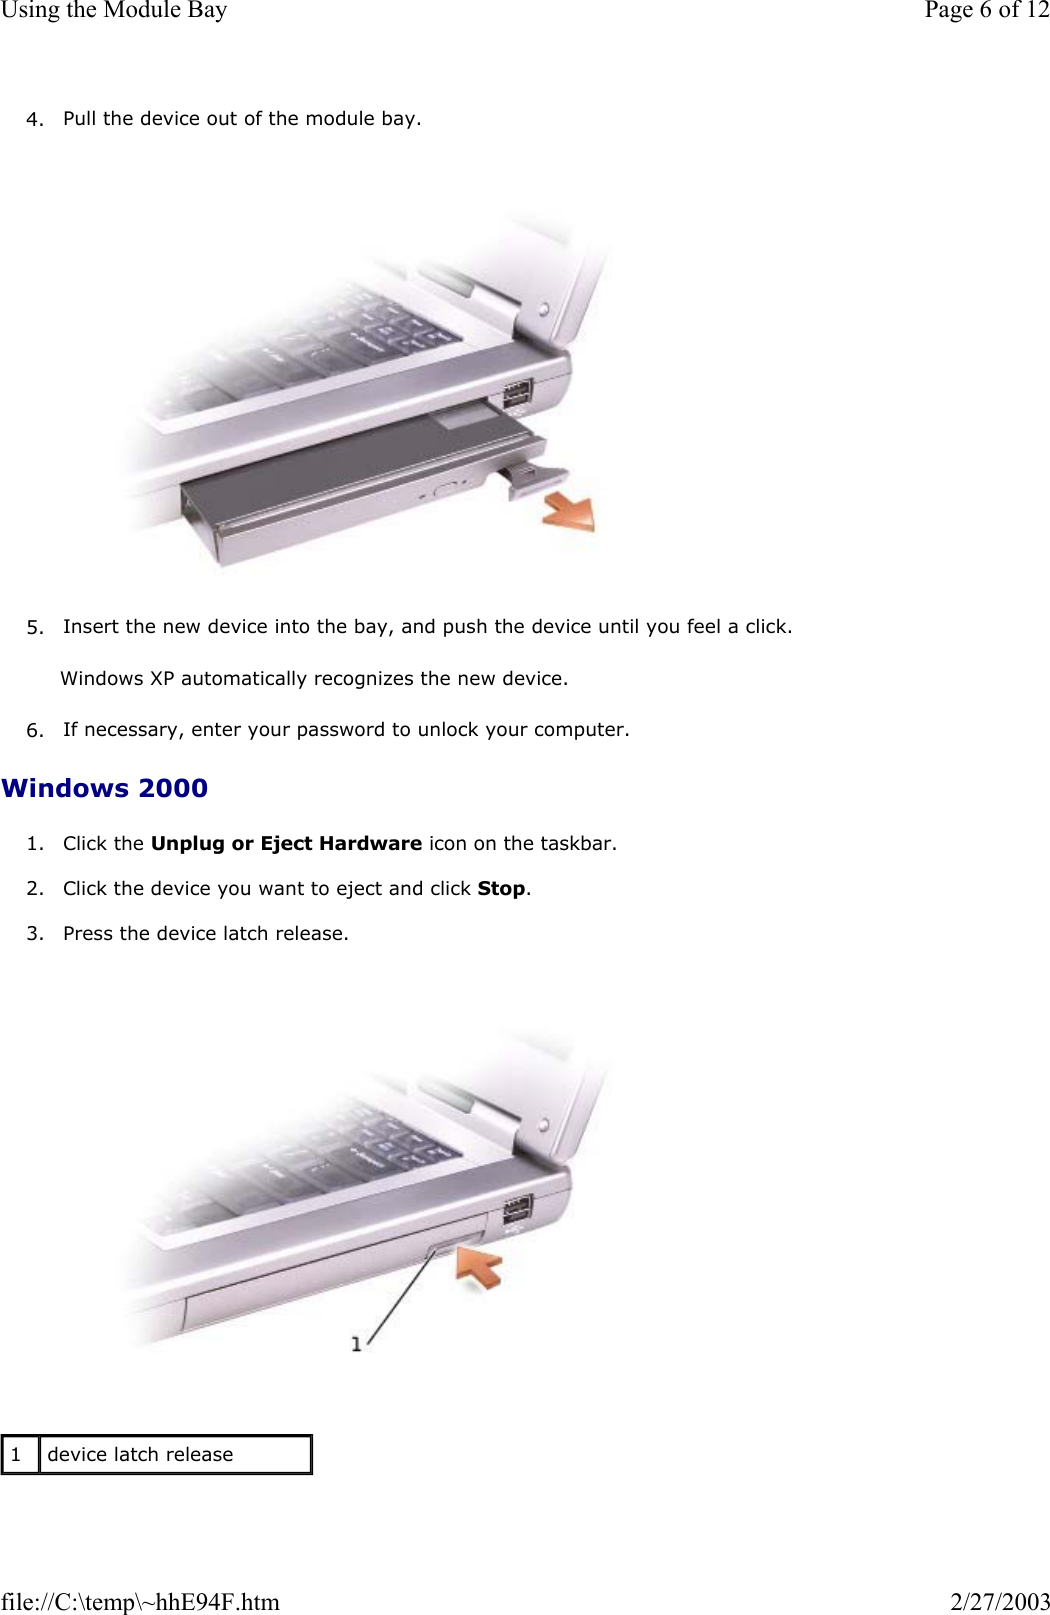
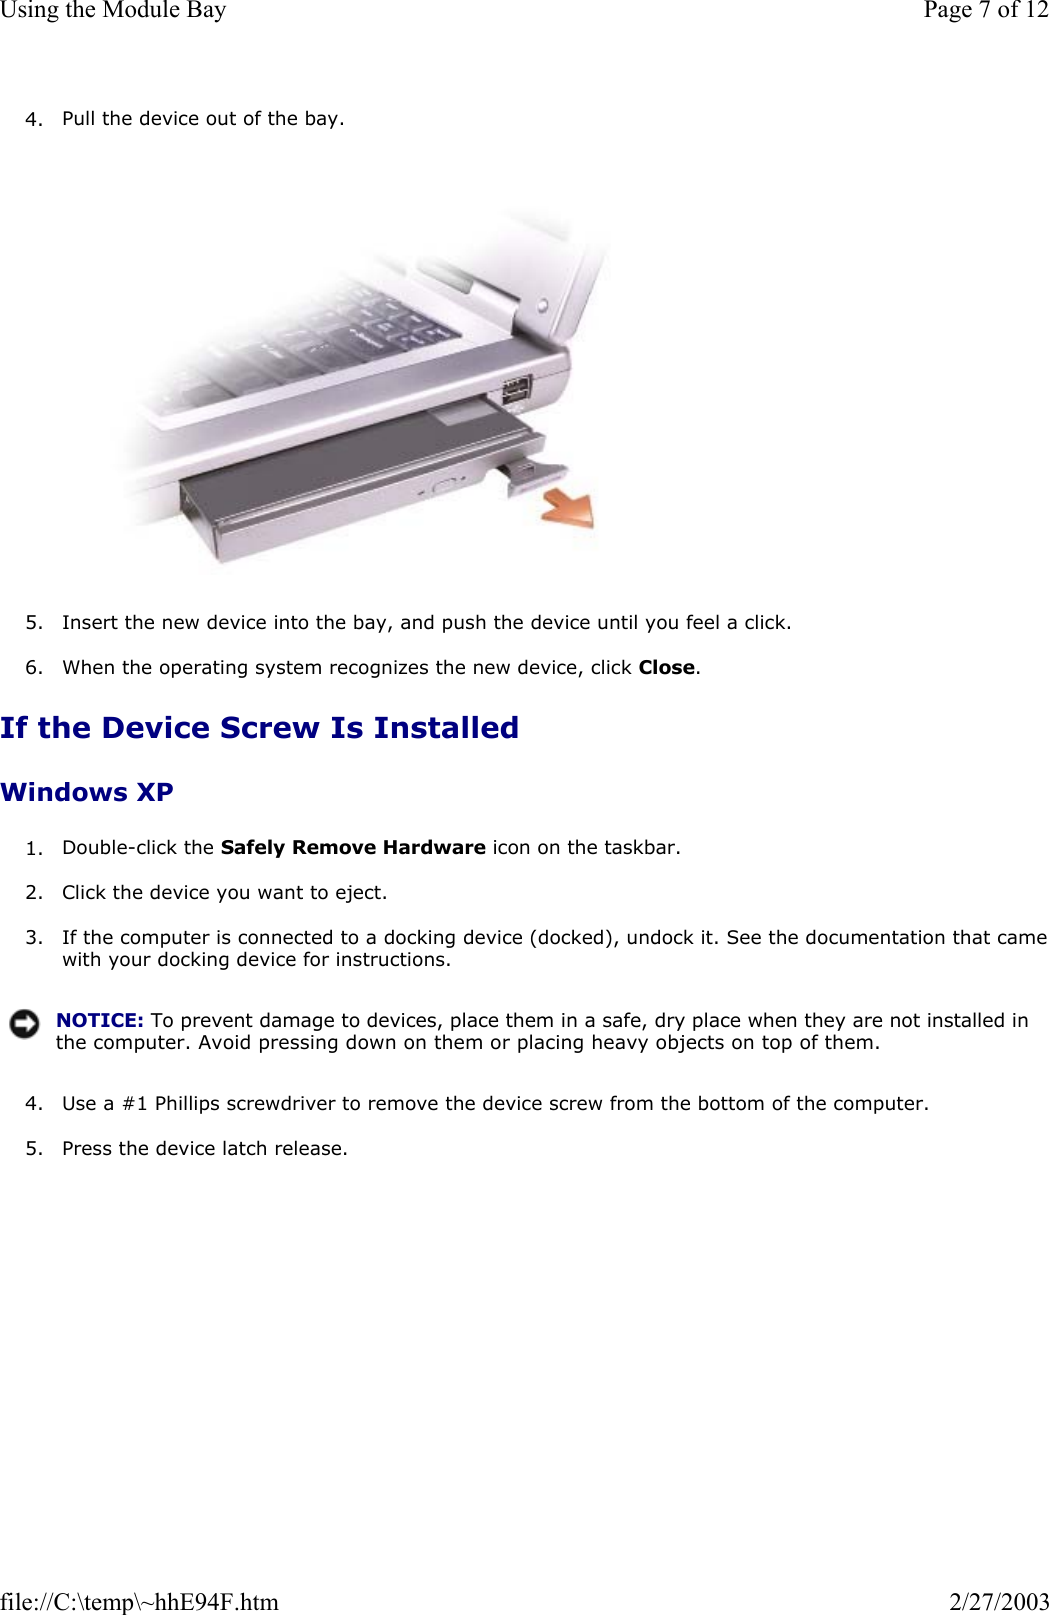
User guide PP02X part 1
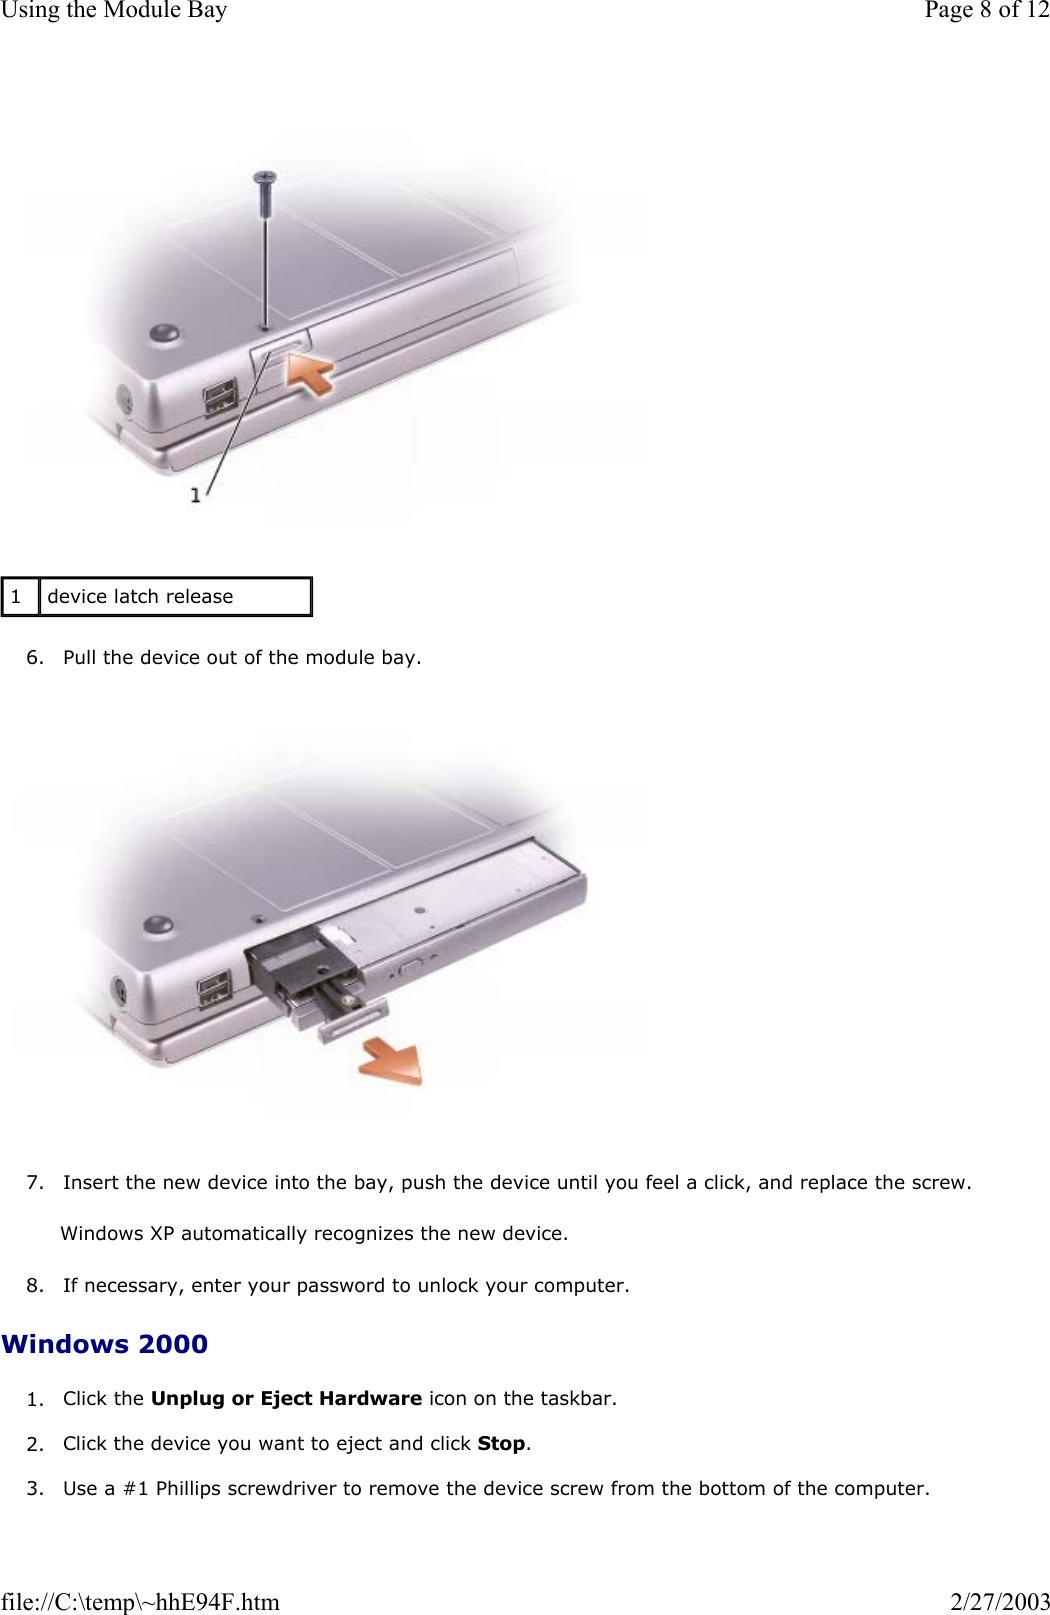
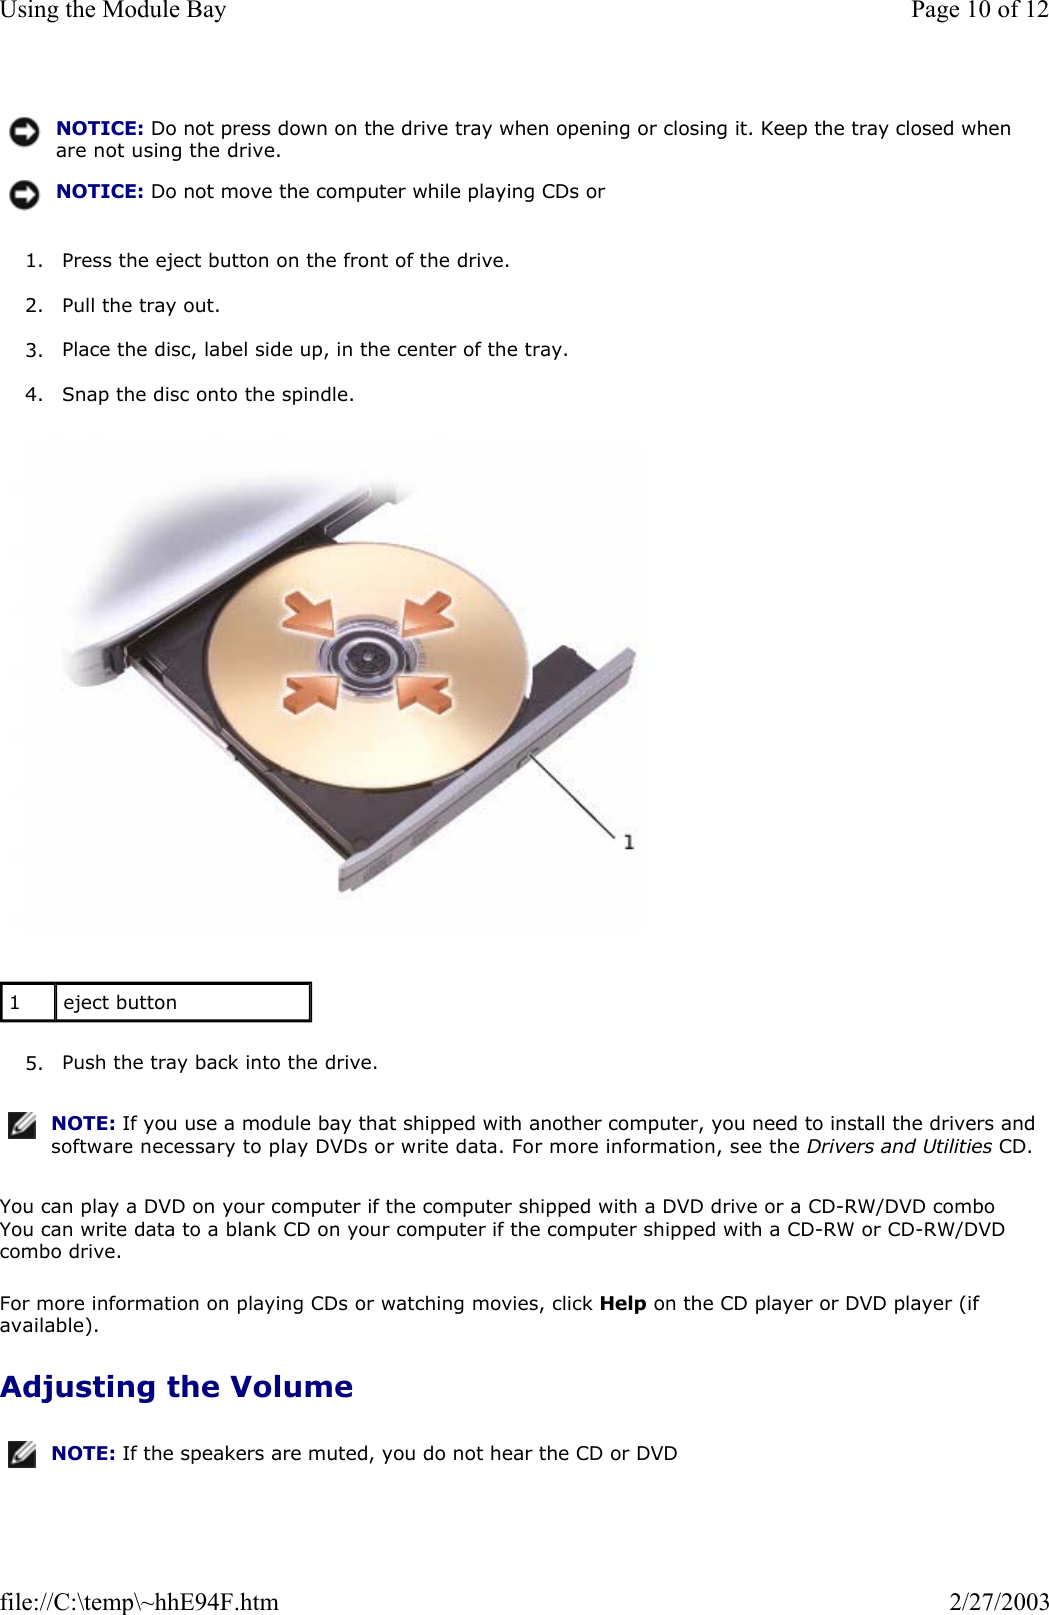
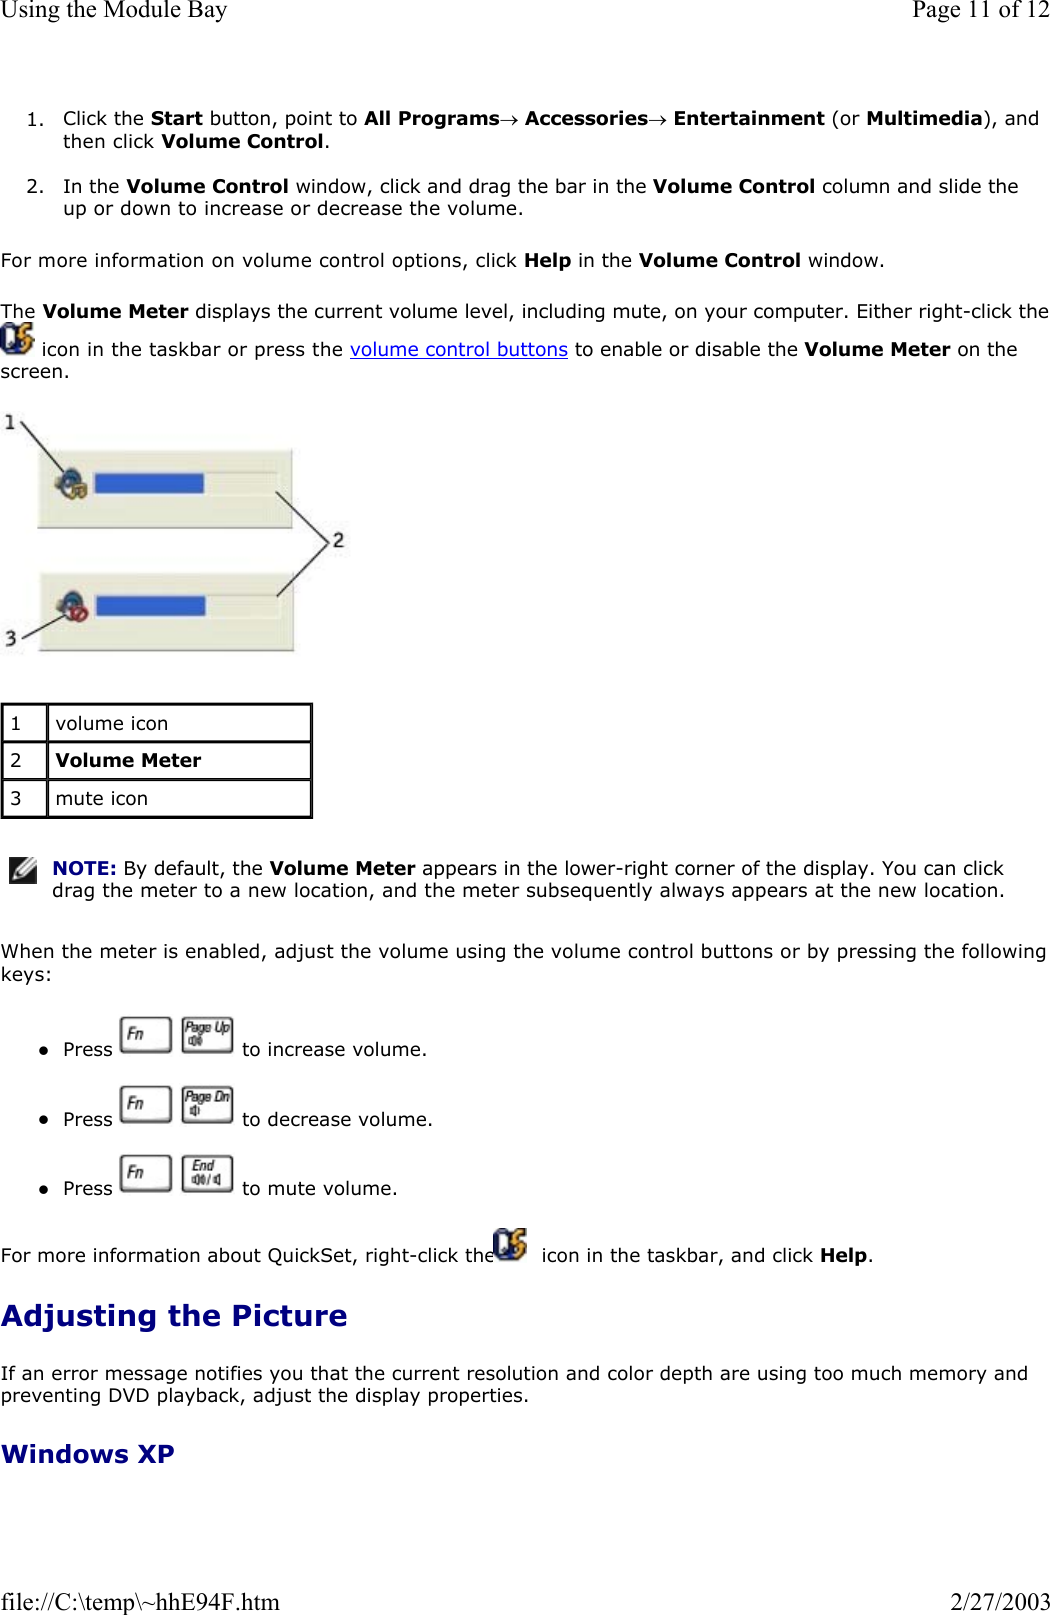
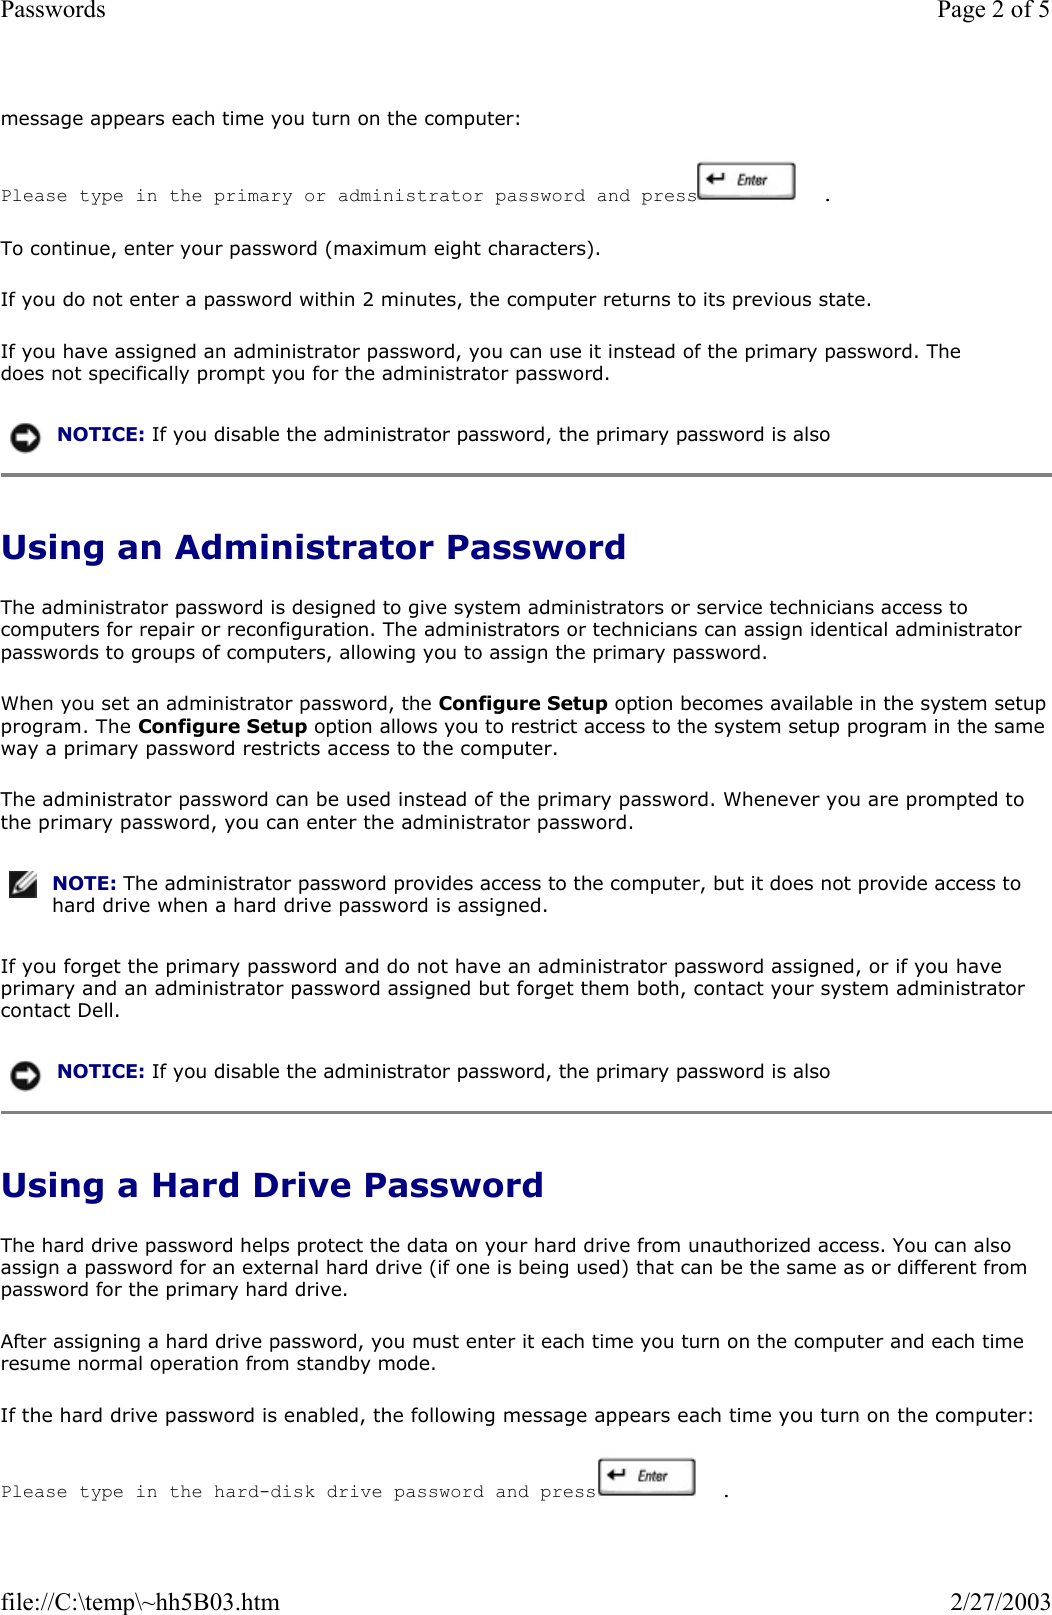
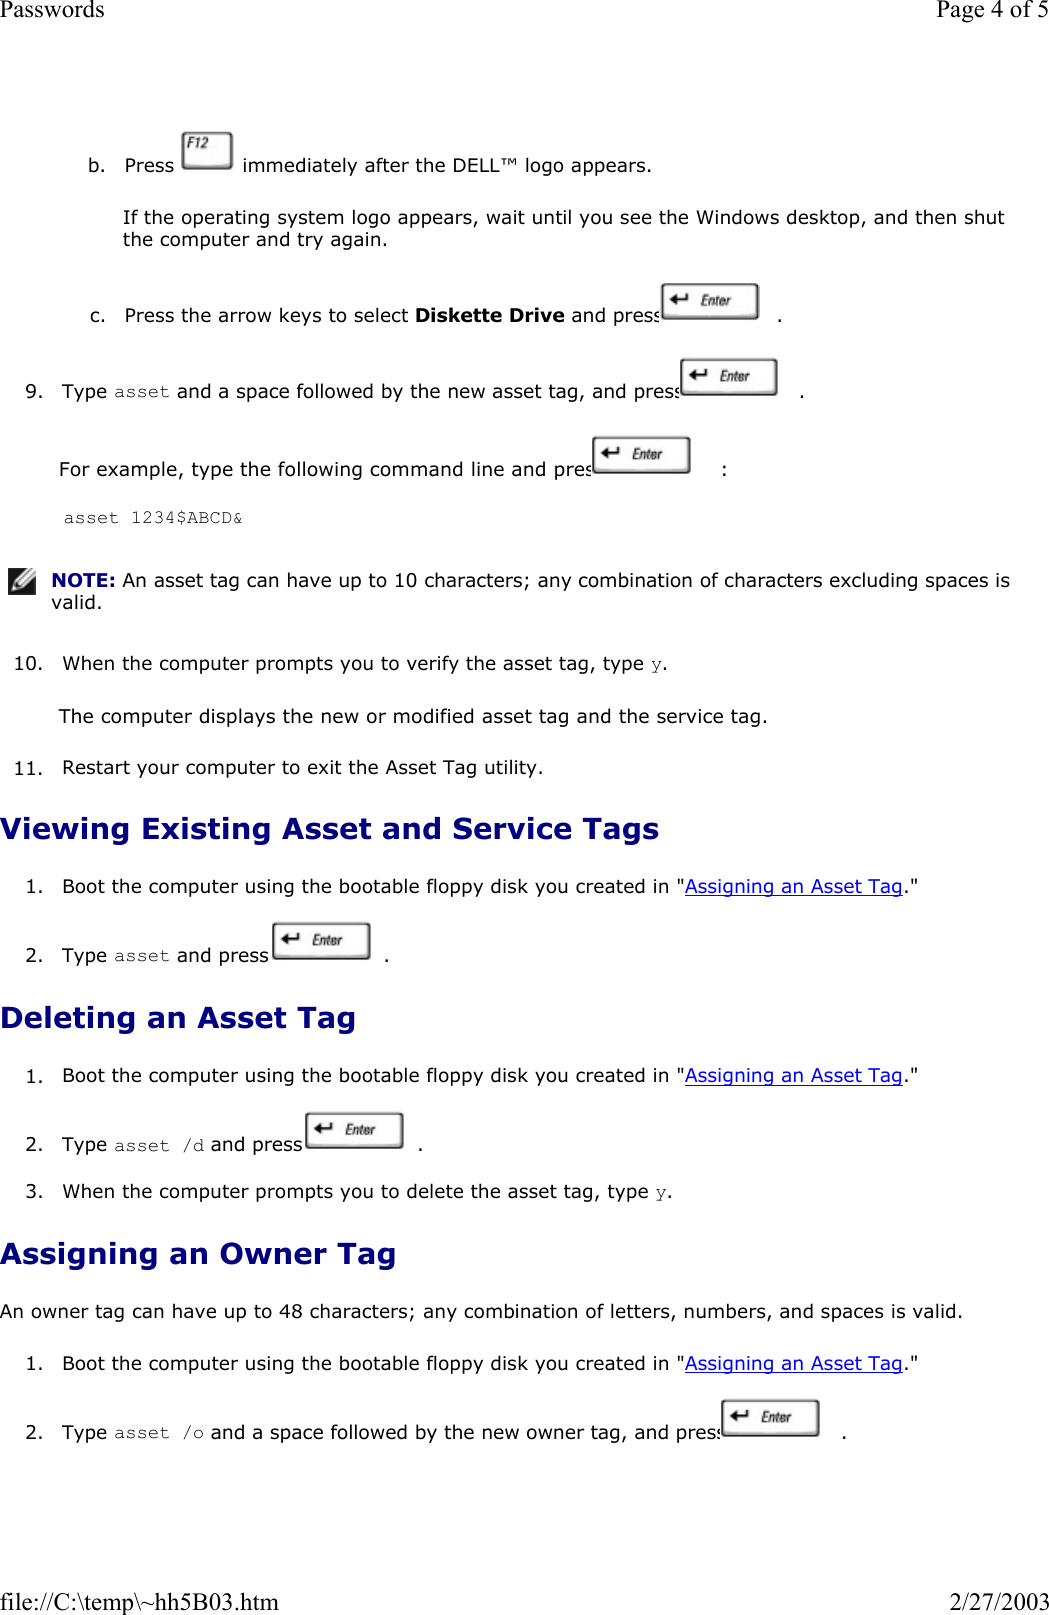
  Dell™ Latitude™ D800 User's Guide  Click the links to the left for information on the features and operation of your computer. For information on other documentation included with your computer, see "Finding Information." Notes, Notices, and Cautions Abbreviations and Acronyms For a complete list of abbreviations and acronyms, see the Glossary. If you purchased a Dell™ n Series computer, any references in this document to Microsoft® Windows® operating systems are not applicable. Information in this document is subject to change without notice. © 2003 Dell Computer Corporation. All rights reserved. Reproduction in any manner whatsoever without the written permission of Dell Computer Corporation is strictly forbidden. Trademarks used in this text: Dell, the DELL logo, Inspiron, Dell Precision, Dell TravelLite, Dimension, OptiPlex, Latitude, and are trademarks of Dell Computer Corporation; Intel and Pentium are registered trademarks and Intel SpeedStep and Centrino are trademarks of Intel Corporation; Microsoft, Windows, Windows NT, and MS-DOS are registered trademarks of Microsoft Bluetooth is a trademark owned by Bluetooth SIG, Inc. and is used by Dell Computer Corporation under license; ENERGY STAR is a registered trademark of the U.S. Environmental Protection Agency. As an ENERGY STAR Partner, Dell Computer Corporation has determined that this product meets the ENERGY STAR guidelines for energy efficiency. Other trademarks and trade names may be used in this document to refer to either the entities claiming the marks and names or products. Dell Computer Corporation disclaims any proprietary interest in trademarks and trade names other than its own. Model PP02X February 2003    P/N 4Y332     Rev. A00  CAUTION: Follow the safety instructions in the System Information Guide to help protect computer from damage and ensure your own personal safety.NOTE: A NOTE indicates important information that helps you make better use of your NOTICE: A NOTICE indicates either potential damage to hardware or loss of data and tells you how to avoid the problem. CAUTION: A CAUTION indicates a potential for property damage, personal injury, or Page 1 of 1Dell™ Latitude™ D800 User's Guide2/27/2003file://C:\temp\~hhE8F0.htm
Finding Information      Safety Instructions   Documentation Updates   Using Microsoft® Windows®   Using Devices   Using the Dell™ Drivers and Utilities CD   Fixing Problems   Installing Parts Safety Instructions Documentation Updates Documentation updates are sometimes included with your computer to describe changes to your computer or software. Always read these updates before consulting any other documentation because the updates contain the latest information. Readme files, which may be installed on your hard drive or located on CDs such as the Drivers and Utilities CD, provide last-minute updates about technical changes to your computer or advanced technical reference material intended for experienced users or technicians. Using Microsoft® Windows® Windows Help Your operating system provides complete online instructions for using it: zIn Windows XP, click the Start button and click Help and Support. For more information, see "Using Microsoft® Windows® XP."  zIn Windows 2000, click the Start button and click Help.  Microsoft Windows Guide For more information on using the Windows operating system, see the Windows documentation that came with your computer.  CAUTION: For precautions on safely handling and using your computer and preventing electrostatic discharge, see the safety instructions in the System Information Guide.Page 1 of 2Finding Information2/27/2003file://C:\temp\~hh7DC9.htm
Using Devices Device User's Guides For help with using your computer devices (such as a modem) and options you purchase separately from your computer, see the device user's guide. zIn Windows XP, click the Start button and click Help and Support. In the Help and Support window, click User and system guides.  zIn Windows 2000, click the Start button, point to Programs, and then click User's Guides.  Using the Dell™ Drivers and Utilities CD The Drivers and Utilities CD contains drivers and utilities, the Dell Diagnostics, and user's guides for your computer and optional devices. Dell ships your computer to you with required drivers and utilities already installed—no further installation or configuration is needed. If you ever need to reinstall a driver or utility, diagnostics tests on your computer, or access the user's guides, use the Drivers and Utilities CD. See "Reinstalling Software" and "Using the Dell Diagnostics." Fixing Problems For help with fixing computer problems, see "Solving Problems" and "Using the Dell Diagnostics." Microsoft Windows Guide For more information on troubleshooting problems, see the Windows documentation that came with your computer. Dell Support For personalized online support, driver updates, and instant answers to your questions, access Dell Support at support.dell.com. Installing Parts For help with adding parts to your computer, see "Adding and Replacing Parts"  For detailed information on the computer's parts and assemblies and how to remove and replace them, see computer Service Manual on support.dell.com. Page 2 of 2Finding Information2/27/2003file://C:\temp\~hh7DC9.htm
About Your Computer      Front View   Left View   Right View   Back View   Bottom View Front View   display latch — Keeps the display closed. 1  display latch 8  speakers 2  display 9  track stick/touch pad buttons 3  power button 10  track stick 4  device status lights 11  volume control buttons 5  keyboard 12  mute button 6  touch pad 13  keyboard status lights 7  display latch button      Page 1 of 11About Your Computer2/27/2003file://C:\temp\~hhE7D6.htm
display — For more information about your display, see "Using the Display." power button — Press the power button to turn on the computer or to enter or exit a power management mode. If the computer stops responding, press and hold the power button until the computer turns off completely (which may take several seconds). device status lights   If the computer is connected to an electrical outlet, the   light operates as follows: NOTICE: To avoid losing data, turn off your computer by performing a Microsoft® Windows® rather than by pressing the power button. Turns on when you turn on the computer and blinks when the computer is in a power management mode.  Turns on when the computer reads or writes data. NOTICE: To avoid loss of data, never turn off the computer while the   light is  Turns on steadily or blinks to indicate battery charge status.  Turns on when Bluetooth™ is enabled. To enable or disable Bluetooth, press   . NOTE: Bluetooth is an optional feature, so the   icon turns on only if you ordered Bluetooth with computer. For more information, see the documentation that came with your Bluetooth wireless technology.  Page 2 of 11About Your Computer2/27/2003file://C:\temp\~hhE7D6.htm
{Solid green: The battery is charging.  {Flashing green: The battery is almost fully charged.  If the computer is running on a battery, the   light operates as follows: {Off: The battery is adequately charged, the computer is turned off, or the battery is not installed the computer.  {Flashing orange: The battery charge is low.  {Solid orange: The battery charge is critically low.  keyboard — The keyboard includes a numeric keypad as well as the Microsoft® Windows® logo key   . For information on supported keyboard shortcuts, see "Using the Keyboard and Touch Pad." touch pad — Touch pad and touch pad buttons provide the functionality of a mouse. See "Using the Keyboardand Touch Pad" for more information. display latch button — Press this button to release the display latch and open the display. speakers — To adjust the volume of the integrated speakers, press the volume control buttons or volume-control keyboard shortcuts. For more information, see "Using the Keyboard and Touch Pad." track stick/touch pad buttons — Track stick and touch pad buttons provide the functionality of a mouse. "Using the Keyboard and Touch Pad" for more information. track stick — Track stick and track stick buttons provide the functionality of a mouse. See "Using the and Touch Pad" for more information. volume control buttons — Press these buttons to adjust the volume. mute button — Press this button to turn off the volume. keyboard status lights   The green lights located above the keyboard indicate the following: Page 3 of 11About Your Computer2/27/2003file://C:\temp\~hhE7D6.htm
Left View   air vents — The computer uses an internal fan to create airflow through the vents, which prevents the computer from overheating. IEEE 1394 connector (4-pin) — Use to attach devices supporting IEEE 1394 high-speed transfer rates, suchas some digital video cameras. PC Card slot — Supports one PC Card, such as a modem or network adapter. The computer ships with a blank installed in the slot. For more information, see "Using PC Cards." smart card slot — Supports one smart card. For more information, see "Using Smart Cards." infrared sensor — Lets you transfer files from your computer to another infrared-compatible device without using cable connections.   Turns on when the numeric keypad is enabled.   Turns on when the uppercase letter function is enabled.   Turns on when the scroll lock function is enabled. 1  air vents 5  infrared sensor 2  IEEE 1394 connector (4-pin) 6  audio connectors 3  PC Card slot 7  hard drive 4  smart card slot 8  security cable slot NOTE: The computer turns on the fan when the computer gets hot. Fan noise is normal and does not indicate a problem with the fan or the computer. CAUTION: Do not block, push objects into, or allow dust to accumulate in the air vents. Do store your computer in a low-airflow environment, such as a closed briefcase, while it is running. Restricting the airflow can damage the computer or cause a fire.Page 4 of 11About Your Computer2/27/2003file://C:\temp\~hhE7D6.htm
When you receive your computer, the sensor is disabled. You can use the system setup program to enable the sensor. For information on transferring data, see Windows Help (Windows 2000), the Windows Help and Center (Windows XP), or the documentation that came with your infrared-compatible device. audio connectors   hard drive — Stores software and data. security cable slot — Lets you attach a commercially available antitheft device to the computer. For more information, see the instructions included with the device.   Right View Attach a microphone to the   connector. Attach headphones or speakers to the   NOTICE: Before you buy an antitheft device, ensure that it will work with the security cable Page 5 of 11About Your Computer2/27/2003file://C:\temp\~hhE7D6.htm
  security cable slot — Lets you attach a commercially available antitheft device to the computer. For more information, see the instructions included with the device.   module bay — You can install devices such as an optical drive or Dell TravelLite™ module in the module bay. For more information, see "Using the Module Bay." device latch release — Releases a device. See "Using the Module Bay" or "Using a Battery" for instructions. Dell™ D/Bay connector 1  security cable slot 2  module bay 3  device latch release 4  Dell™ D/Bay connector NOTICE: Before you buy an antitheft device, ensure that it will work with the security cable Page 6 of 11About Your Computer2/27/2003file://C:\temp\~hhE7D6.htm
Back View   S-video TV-out connector USB connectors (2)  Connects the Dell D/Bay, which is an external media bay that accommodates an optical drive, floppy drive, or second hard drive. 1  S-video TV-out connector 6  parallel connector 2  USB connectors (2) 7  serial connector 3  network connector (RJ-45) 8  video connector 4  modem connector (RJ-11)  9  AC adapter 5  air vent 10  air vents  Connects your computer to a TV. Also connects digital-audio capable devices using TV/digital-audio adapter cable. For more information, see "Connecting a Television to the Computer."  Connect USB devices, such as a mouse, keyboard, or printer. You can also connect the optional floppy drive directly to a USB connector using the optional floppy-drive cable, shown below. Page 7 of 11About Your Computer2/27/2003file://C:\temp\~hhE7D6.htm
  network connector (RJ-45) modem connector (RJ-11) (optional) air vent — The computer uses an internal fan to create airflow through the vents, which prevents the from overheating. parallel connector video connector NOTICE: The network connector is slightly larger than the modem connector. To avoid damaging the computer, do not plug a telephone line in to the network connector. Connects the computer to a network. The green and yellow lights next to the connector indicate activity for both wired and wireless network communications. For information on using the network adapter, see the online network-adapter documentation supplied with your computer. See "Finding Information."  If you ordered the optional internal modem, connect the telephone line to the modem connector. For information on using the modem, see the online modem documentation supplied with your computer. See "Finding Information."  Connects a parallel device, such as a  Connects an external monitor. For more information, see "Using the Page 8 of 11About Your Computer2/27/2003file://C:\temp\~hhE7D6.htm
serial connector AC adapter connector — Attach an AC adapter to the computer.   The AC adapter converts AC power to the DC power required by the computer. You can connect the AC with your computer turned either on or off. air vents — The computer uses an internal fan to create airflow through the vents, which prevents the computer from overheating. Bottom View  Connects serial devices, such as a mouse or handheld  CAUTION: The AC adapter works with electrical outlets worldwide. However, power connectors and power strips vary among countries. Using an incompatible cable or connecting the cable to the power strip or electrical outlet may cause fire or equipment damage.NOTICE: When you disconnect the AC adapter cable from the computer, grasp the connector, not the cable itself, and pull firmly but gently to avoid damaging the cable.NOTE: The computer turns on the fan when the computer gets hot. Fan noise is normal and does not indicate a problem with the fan or the computer. CAUTION: Do not block, push objects into, or allow dust to accumulate in the air vents. Do store your computer in a low-airflow environment, such as a closed briefcase, while it is running. Restricting the airflow can damage the computer or cause a fire.Page 9 of 11About Your Computer2/27/2003file://C:\temp\~hhE7D6.htm
  hard drive — Stores software and data. Mini PCI card/modem cover — Covers the compartment that contains the optional modem and optional PCI card. See "Adding and Replacing Parts." battery-bay latch release — Releases the battery. See "Using a Battery." battery — When a battery is installed, you can use the computer without connecting the computer to an electrical outlet. See "Using a Battery." battery charge gauge — Provides information on the battery charge. See "Using a Battery." docking device slot — Lets you attach your computer to a docking device. See the documentation that came with your docking device for additional information. memory module cover — Covers the compartment that contains the memory modules. See "Adding and Replacing Parts." fan — The computer uses an internal fan to create airflow through the vents, which prevents the computer overheating. 1  hard drive 5  battery charge gauge 2  Mini PCI card/modem  6  docking device slot 3  battery-bay latch release 7  memory module 4  battery 8  fan NOTE: The computer turns on the fan when the computer gets hot. Fan noise is normal and does not indicate a problem with the fans or the computer. CAUTION: Do not block, push objects into, or allow dust to accumulate in the air vents. Do Page 10 of 11About Your Computer2/27/2003file://C:\temp\~hhE7D6.htm
store your computer in a low-airflow environment, such as a closed briefcase, while it is running. Restricting the airflow can damage the computer or cause a fire.Page 11 of 11About Your Computer2/27/2003file://C:\temp\~hhE7D6.htm
Using Microsoft® Windows® XP      Help and Support Center   Switching to Classic View   Desktop Cleanup Wizard   User Accounts and Fast User Switching   Files and Settings Transfer Wizard   Program Compatibility Wizard   Home and Small Office Networking   Internet Connection Firewall Help and Support Center The Help and Support Center provides help with the Windows XP operating system and other support and educational tools. To access the Help and Support Center, click the Start button and click Help and Support. Switching to Classic View You may change the appearance of the Control Panel, the Start menu, and the Windows desktop to the classic view of previous Windows operating systems. Control Panel The Control Panel presents information as task-oriented categories. If you are accustomed to performing a particular task with the icon-oriented classic Control Panel, you can switch to the classic icon view. 1. Click the Start button and click Control Panel.   2. Click Switch to Classic View or Switch to Category View in the upper-left area of the Control Panel window.   Start Menu 1. Right-click the empty area on the taskbar.  2. Click Properties.  3. Click the Start Menu tab.  4. Select Classic Start Menu and click OK.  Window and Button Appearance 1. Right-click anywhere on the main desktop screen and click Properties.  Page 1 of 4Using Microsoft® Windows® XP2/27/2003file://C:\temp\~hh8110.htm
 2. Click the Appearance tab.   3. From the Windows and buttons drop-down menu, select Windows Classic style.  4. To customize color, font, and other classic desktop options, click Advanced.  5. When you have completed your appearance selections, click OK.  Desktop Cleanup Wizard By default, the Desktop Cleanup Wizard moves program icons that you don't frequently use from your desktopto a designated folder 7 days after you first start your computer and every 60 days after that. The appearance of the Start menu changes as program icons are moved.  To turn off the Desktop Cleanup Wizard: 1. Right-click an empty spot on the desktop and click Properties.  2. Click the Desktop tab and click Customize Desktop.  3. Click Run Desktop Cleanup Wizard every 60 days to remove the check mark.  4. Click OK.  To run the Desktop Cleanup Wizard at any time: 1. Right-click an empty spot on the desktop and click Properties.  2. Click the Desktop tab and click Customize Desktop.  3. Click Clean Desktop Now.  4. When the Desktop Cleanup Wizard appears, click Next.  5. In the list of shortcuts, deselect any shortcuts you want to leave on the desktop and then click Next.  6. Click Finish to remove the shortcuts and close the wizard.  User Accounts and Fast User Switching After Windows XP is installed, the administrator or a user with administrator rights can create additional user accounts. 1. Click the Start button and click Control Panel.  2. In the Control Panel window, click User Accounts. NOTE: Account options for Windows XP Home Edition differ from those available for Windows XP Professional. Also, options available in Windows XP Professional vary depending on whether the is connected to a domain.Page 2 of 4Using Microsoft® Windows® XP2/27/2003file://C:\temp\~hh8110.htm
 3. Under Pick a task, click Create a new account.  4. Under Name the new account, type the name of the new user and click Next.  5. Under Pick an account type, click one of the following options:  zComputer administrator — You can change all computer settings.   zLimited — You can change only your own personal settings, such as your password. You cannot install programs or use the Internet.   6. Click Create Account.  Fast User Switching Fast User Switching allows multiple users to access one computer without requiring the previous user to log 1. Click the Start button and click Log Off.  2. In the Log Off Windows window, click Switch User.  When you use Fast User Switching, programs that previous users were using remain running in the so you might experience slower computer activity. Also, multimedia programs, such as games and DVD software, might not work with Fast User Switching. For more information, see the Windows Help and Center. Files and Settings Transfer Wizard The Files and Settings Transfer Wizard allows you to transfer files and settings from one computer to another (for instance, when upgrading to a new computer), even if the old computer is running an earlier operating system. The time required to collect and transfer data depends on the amount of data collected. Times can from just a few minutes to several hours. You can transfer the data to the new computer over a network or direct serial connection, or you can store it a removable medium such as a floppy disk or writable CD. If a CD drive is not available, the wizard allows you to create a wizard disk to run on your old computer.  For more information, see the Windows Help and Support Center. Program Compatibility Wizard If you encounter problems running a program designed for an earlier Windows operating system, you can use the Program Compatibility Wizard to help resolve the problem. The Program Compatibility Wizard allows you configure a program to run in an environment closer to that of Windows 95, Windows 98, Windows Millennium Edition (Me), Windows NT® 4.0 with Service Pack 5, or Windows 2000. NOTE: Fast User Switching is unavailable if the computer is running Windows XP Professional and is a member of a computer domain, or if the computer has less than 128 MB of memory.Page 3 of 4Using Microsoft® Windows® XP2/27/2003file://C:\temp\~hh8110.htm
If you experience problems with your operating system or other programs after performing an installation, can use the system restore feature to return your computer to a previous stable condition. For more information, see the Windows Help and Support Center. Home and Small Office Networking The Network Setup Wizard provides online documentation and support for setting up a home or small office network. The new wizard automatically enables the personal firewall (see "Internet Connection Firewall").  The Network Setup Wizard includes a checklist and steps to guide you through the process of sharing such as files, printers, or an Internet connection, between computers in a home or small office. For more information, see the Windows Help and Support Center. Internet Connection Firewall The Internet Connection Firewall provides basic protection from unauthorized access to the computer while computer is connected to the Internet. The firewall is automatically enabled when you run the Network Setup Wizard. When the firewall is enabled for a network connection, the firewall icon appears with a red backgroundin the Network Connections portion of the Control Panel.  Note that enabling the Internet Connection Firewall does not reduce the need for virus-checking software. For more information, see the Windows Help and Support Center. Page 4 of 4Using Microsoft® Windows® XP2/27/2003file://C:\temp\~hh8110.htm
Dell™ QuickSet Features      Clicking the QuickSet Icon   Double-Clicking the QuickSet Icon   Right-Clicking the QuickSet Icon Dell™ QuickSet runs from the   icon located in the taskbar and functions differently when you click, click, or right-click the icon. Clicking the QuickSet Icon Click the   icon to perform the following tasks: zAdjust power management settings using the Power Management Wizard.  zAdjust the size of icons and toolbars.  zSelect a power scheme that you set in the Power Management Wizard.  zTurn presentation mode on or off.  Double-Clicking the QuickSet Icon Double-click the   icon to adjust power management settings using the Power Management Wizard. Right-Clicking the QuickSet Icon Right-click the   icon to perform the following tasks: zEnable or disable the Brightness Meter on the screen.  zEnable or disable the Volume Meter on the screen.  zTurn wireless activity on or off.  zView Dell QuickSet Help.  zView the version and copyright date of the QuickSet program installed on your computer.  For more information about QuickSet, right-click the   icon in the taskbar and click Help. Page 1 of 1Dell™ QuickSet Features2/27/2003file://C:\temp\~hhEE20.htm
Using the Keyboard and Touch Pad      Numeric Keypad   Keyboard Shortcuts   Touch Pad   Customizing the Touch Pad and Track Stick Numeric Keypad   The keypad numbers and symbols are marked in blue on the right of the keypad keys. To type a number or symbol, ensure that the keypad is enabled and press   and the desired key. The   light indicates that keypad is active. Keyboard Shortcuts System Functions  Opens the Task Manager window   Enables and disables the numeric   Enables and disables the scroll lock Page 1 of 5Using the Keyboard and Touch Pad2/27/2003file://C:\temp\~hh41A5.htm
Battery CD or DVD Tray Display Functions Radios (Including Wireless Networking and Bluetooth™) Power Management Speaker Functions If no sound comes from the speakers, press     and adjust the volume.  Displays the Dell™ QuickSet Battery  Requires Dell QuickSet to function. Ejects the tray out of the   Switches the video image to the next display in the following sequence: the integrated display only, the integrated display and an external CRT monitor simultaneously, an external CRT monitor only, the integrated display and an external DVI monitor simultaneously, external DVI monitor only, and external CRT monitor and external DVI monitor simultaneously.  Increases brightness on the integrated display only (not on an external monitor).   Decreases brightness on the integrated display only (not on an external monitor).  Enables and disables radios, including wireless networking and  Activates the power management mode of your choice. You can program this keyboard on the Advanced tab in the Power Options Properties window.  Increases the volume of the integrated speakers and external speakers, if   Decreases the volume of the integrated speakers and external speakers, if  Enables and disables the integrated speakers and external speakers, if attached Page 2 of 5Using the Keyboard and Touch Pad2/27/2003file://C:\temp\~hh41A5.htm
Microsoft® Windows® Logo Key Functions To adjust keyboard operation, such as the character repeat rate, open the Control Panel, and click Printers Other Hardware (Windows XP) or double-click the Keyboard icon (Windows 2000). Touch Pad The touch pad detects the pressure and movement of your finger to allow you to move the cursor on the display. Use the touch pad and touch pad buttons as you would use a mouse.   Minimizes all open windows  Maximizes all windows   Runs Windows Explorer   Opens the Run dialog box   Opens the Search Results dialog box   Opens the Search Results-Computer dialog box (if the computer is connected to a network)   Opens the System Properties dialog box Page 3 of 5Using the Keyboard and Touch Pad2/27/2003file://C:\temp\~hh41A5.htm
  zTo move the cursor, lightly slide your finger over the touch pad.  zTo select an object, lightly tap once on the surface of the touch pad or use your thumb to press the left touch-pad button.  zTo select and move (or drag) an object, position the cursor on the object and tap down-up-down on the touch pad. On the second down motion, leave your finger on the touch pad and move the selected by sliding your finger over the surface.   zTo double-click an object, position the cursor on the object and tap twice on the touch pad or use your thumb to press the left touch-pad button twice.  You can also use the track stick to move the cursor. Press the track stick left, right, up, or down to change the direction of the cursor on the display. Use the track stick and track stick buttons as you would use a mouse. Customizing the Touch Pad and Track Stick You can disable the touch pad and track stick or adjust their settings by using the Mouse Properties window.1  touch pad 2  track stick 3  track stick buttons 4  touch pad buttons Page 4 of 5Using the Keyboard and Touch Pad2/27/2003file://C:\temp\~hh41A5.htm
1. Open the Control Panel and double-click the Mouse icon.  2. On the Mouse Properties window:  zClick the Device Select tab to disable the touch pad and track stick.   zClick the Pointer tab to adjust touch pad and track stick settings.   3. Select the desired settings and click Apply.  4. Click OK to save the settings and close the window.  Changing the Track Stick Cap Your computer came with an additional track stick cap. You can purchase additional caps by visiting the Dell website at www.dell.com. You may need to change the track stick cap if it wears down from prolonged use.   1. Pull the cap off the track stick.  2. Align the new cap over the square track-stick post and gently press the cap down onto the post.  3. Test the track stick to ensure that the cap is seated properly.  Page 5 of 5Using the Keyboard and Touch Pad2/27/2003file://C:\temp\~hh41A5.htm
Using the Display      Adjusting Brightness   Switching the Video Image   Setting Display Resolution Adjusting Brightness When the Dell™ computer is running on battery power, you can conserve power by setting the brightness to lowest comfortable setting using the appropriate keyboard shortcuts for the display. The Dell QuickSet Brightness Meter shows the current brightness setting for the display. Right-click the   icon in the taskbar to enable or disable the Brightness Meter on the screen.   You can enable or disable the Brightness Meter from the QuickSet taskbar menu. When the meter is press the following keys to adjust brightness: zPress     to increase brightness on the integrated display only (not on an external monitor).  zPress     to decrease brightness on the integrated display only (not on an external monitor).  For more information about QuickSet, right-click the   icon in the taskbar and click Help. Switching the Video Image When you start the computer with an external device (such as an external monitor or projector) attached and turned on, the image may appear on either the display or the external device. 1  Brightness Meter NOTE: By default, the Brightness Meter appears in the lower-right corner of the display. You can click and drag the meter to a new location, and the meter subsequently always appears at the new NOTE: Brightness keyboard shortcuts only affect the display on your portable computer, not monitors that you attach to your portable computer or docking device. If your computer is in CRT only mode you try to change the brightness level, the Brightness Meter appears, but the brightness level on the monitor does not change.Page 1 of 2Using the Display2/27/2003file://C:\temp\~hh94EE.htm
Press     to switch the video image to the integrated display only, the integrated display and an external CRT monitor simultaneously, an external CRT monitor only, the integrated display and external DVI monitor simultaneously, external DVI monitor only, and external CRT monitor and external DVI monitor simultaneously. Setting Display Resolution To display a program at a specific resolution, both the video controller and the display must support the program, and the necessary video drivers must be installed. Before you change any of the default display settings, make a note of the default settings for future If you choose a resolution or color palette that is higher than the display supports, the settings adjust automatically to the closest possible setting. Microsoft® Windows® XP 1. Click the Start button and click Control Panel.  2. Under Pick a category, click Appearance and Themes.  3. Under Pick a task..., click the area you want to change, or under or pick a Control Panel icon, click Display.  4. Try different settings for Color quality and Screen resolution.   Windows 2000 1. Click the Start button, point to Settings, and then click Control Panel.  2. Double-click the Display icon and click the Settings tab.   3. Try different settings for Colors and Screen area.  If the video resolution setting is higher than that supported by the display, the computer enters pan mode. pan mode, the screen cannot be completely displayed. For example, the taskbar that usually appears at the bottom of the desktop may no longer be visible. To view the rest of the screen, use the touch pad or track to move the cursor past the top, bottom, left, and right borders of the screen. NOTE: Use only the Dell-installed video drivers, which are designed to offer the best performance with your Dell-installed operating system.NOTE: As the resolution increases, icons and text appear smaller on the NOTICE: You can damage an external monitor by using an unsupported refresh rate. Before adjusting the refresh rate on an external monitor, see the monitor user's guide.Page 2 of 2Using the Display2/27/2003file://C:\temp\~hh94EE.htm
Using the Module Bay      About the Module Bay   Checking the Charge on the Second Battery   Removing and Installing Devices While the Computer Is Turned Off   Removing and Installing Devices While the Computer Is Running   Using the CD or DVD Tray About the Module Bay You can install devices such as a floppy drive, CD drive, CD-RW drive, DVD drive, CD-RW/DVD drive, Dell TravelLite™ module, second battery, or second hard drive in the module bay. Your Dell™ computer ships with an optical drive installed in the module bay. However, the device screw is not installed in the optical drive but packaged separately. When you install your device in the module bay, you caninstall the device screw. Checking the Charge on the Second Battery Before you install a second battery, press the status button on the battery charge gauge to illuminate the charge-level lights. Each light represents approximately 20 percent of the total battery charge. For example, if the battery has 80 percent of its charge remaining, four of the lights are on. If no lights appear, the battery no charge. NOTE: All devices that you install in the module bay, except a second battery, can also be installed in Dell D/Bay.NOTE: You do not need to install the device screw unless you want to secure the module inside the computer for security purposes.Page 1 of 12Using the Module Bay2/27/2003file://C:\temp\~hhE94F.htm
  Removing and Installing Devices While the Computer IsTurned Off Your computer ships with an optical drive installed in the module bay. However, the device screw is not in the optical drive but packaged separately. When you install your device in the module bay, you can install device screw. If the Device Screw Is Not Installed 1. Press the device latch release.  1  status button on the charge gauge 2  second battery (top) NOTE: If the device screw is not installed, you can remove and install devices while the computer is running and connected to a docking device (docked).NOTE: You do not need to install the device screw unless you want to secure the module inside the computer for security purposes.NOTICE: To prevent damage to devices, place them in a safe, dry place when they are not installed in the computer. Avoid pressing down on them or placing heavy objects on top of them.Page 2 of 12Using the Module Bay2/27/2003file://C:\temp\~hhE94F.htm
  2. Pull the device out of the module bay.    3. Insert the new device into the bay, and push the device until you feel a click.  If the Device Screw Is Installed 1. Save and close any open files, exit any open programs, and shut down the computer.  2. If the computer is connected to a docking device (docked), undock it. See the documentation that camewith your docking device for instructions.  1  device latch release NOTICE: To prevent damage to devices, place them in a safe, dry place when they are not installed in the computer. Avoid pressing down on them or placing heavy objects on top of them.Page 3 of 12Using the Module Bay2/27/2003file://C:\temp\~hhE94F.htm
3. Close the display and turn the computer over.  4. Use a #1 Phillips screwdriver to remove the device screw from the bottom of the computer.  5. Press the device latch release.    6. Pull the device out of the module bay.    7. Insert the new device into the bay, and push the device until you feel a click.  8. Replace the device screw.  1  device latch release NOTICE: Insert devices into the module bay before you dock and turn on the Page 4 of 12Using the Module Bay2/27/2003file://C:\temp\~hhE94F.htm
9. Turn on the computer.  Removing and Installing Devices While the Computer IsRunning Your computer ships with an optical drive installed in the module bay. However, the device screw is not in the optical drive but packaged separately. When you install your device in the module bay, you can install device screw. If the Device Screw Is Not Installed Microsoft® Windows® XP 1. Double-click the Safely Remove Hardware icon on the taskbar.  2. Click the device you want to eject.  3. Press the device latch release.    NOTE: If the device screw is not installed, you can remove and install devices while the computer is running and connected to a docking device (docked).NOTE: You do not need to install the device screw unless you want to secure the module inside the computer for security purposes.NOTICE: To prevent damage to devices, place them in a safe, dry place when they are not installed in the computer. Avoid pressing down on them or placing heavy objects on top of them.1  device latch release Page 5 of 12Using the Module Bay2/27/2003file://C:\temp\~hhE94F.htm
4. Pull the device out of the module bay.    5. Insert the new device into the bay, and push the device until you feel a click.  Windows XP automatically recognizes the new device. 6. If necessary, enter your password to unlock your computer.  Windows 2000 1. Click the Unplug or Eject Hardware icon on the taskbar.  2. Click the device you want to eject and click Stop.  3. Press the device latch release.    1  device latch release Page 6 of 12Using the Module Bay2/27/2003file://C:\temp\~hhE94F.htm
4. Pull the device out of the bay.    5. Insert the new device into the bay, and push the device until you feel a click.  6. When the operating system recognizes the new device, click Close.  If the Device Screw Is Installed Windows XP 1. Double-click the Safely Remove Hardware icon on the taskbar.  2. Click the device you want to eject.  3. If the computer is connected to a docking device (docked), undock it. See the documentation that camewith your docking device for instructions.  4. Use a #1 Phillips screwdriver to remove the device screw from the bottom of the computer.  5. Press the device latch release.  NOTICE: To prevent damage to devices, place them in a safe, dry place when they are not installed in the computer. Avoid pressing down on them or placing heavy objects on top of them.Page 7 of 12Using the Module Bay2/27/2003file://C:\temp\~hhE94F.htm
  6. Pull the device out of the module bay.    7. Insert the new device into the bay, push the device until you feel a click, and replace the screw.  Windows XP automatically recognizes the new device. 8. If necessary, enter your password to unlock your computer.  Windows 2000 1. Click the Unplug or Eject Hardware icon on the taskbar.  2. Click the device you want to eject and click Stop.  3. Use a #1 Phillips screwdriver to remove the device screw from the bottom of the computer. 1  device latch release Page 8 of 12Using the Module Bay2/27/2003file://C:\temp\~hhE94F.htm
 4. Press the device latch release.      5. Pull the device out of the module bay.  6. Insert the new device into the bay, push the device until you feel a click, and then replace the screw.  7. When the operating system recognizes the new device, click Close.  Using the CD or DVD Tray 1  device latch release Page 9 of 12Using the Module Bay2/27/2003file://C:\temp\~hhE94F.htm
1. Press the eject button on the front of the drive.  2. Pull the tray out.  3. Place the disc, label side up, in the center of the tray.  4. Snap the disc onto the spindle.    5. Push the tray back into the drive.  You can play a DVD on your computer if the computer shipped with a DVD drive or a CD-RW/DVD combo You can write data to a blank CD on your computer if the computer shipped with a CD-RW or CD-RW/DVD combo drive. For more information on playing CDs or watching movies, click Help on the CD player or DVD player (if available). Adjusting the Volume NOTICE: Do not press down on the drive tray when opening or closing it. Keep the tray closed when are not using the drive.NOTICE: Do not move the computer while playing CDs or 1  eject button NOTE: If you use a module bay that shipped with another computer, you need to install the drivers and software necessary to play DVDs or write data. For more information, see the Drivers and Utilities CD.NOTE: If the speakers are muted, you do not hear the CD or DVD Page 10 of 12Using the Module Bay2/27/2003file://C:\temp\~hhE94F.htm
1. Click the Start button, point to All Programs→ Accessories→ Entertainment (or Multimedia), and then click Volume Control.  2. In the Volume Control window, click and drag the bar in the Volume Control column and slide the up or down to increase or decrease the volume.  For more information on volume control options, click Help in the Volume Control window. The Volume Meter displays the current volume level, including mute, on your computer. Either right-click the icon in the taskbar or press the volume control buttons to enable or disable the Volume Meter on the screen.   When the meter is enabled, adjust the volume using the volume control buttons or by pressing the following keys: zPress   to increase volume.  zPress   to decrease volume.  zPress   to mute volume.  For more information about QuickSet, right-click the   icon in the taskbar, and click Help. Adjusting the Picture If an error message notifies you that the current resolution and color depth are using too much memory and preventing DVD playback, adjust the display properties. Windows XP 1  volume icon 2  Volume Meter 3  mute icon NOTE: By default, the Volume Meter appears in the lower-right corner of the display. You can click drag the meter to a new location, and the meter subsequently always appears at the new location.Page 11 of 12Using the Module Bay2/27/2003file://C:\temp\~hhE94F.htm
1. Click the Start button and click Control Panel.  2. Under Pick a category, click Appearance and Themes.  3. Under Pick a task..., click Change the screen resolution.  4. In the Display Properties window, click and drag the bar in Screen resolution to change the setting 1280 by 800 pixels.  5. Under Color quality, click the drop-down menu and click Medium (16 bit).  6. Click OK.  Windows 2000 1. Click the Start button, point to Settings, and then click Control Panel.  2. Double-click the Display icon and click the Settings tab.   3. Click and drag the bar in Screen area to change the setting to 1280 by 800 pixels.  4. Under Color quality, click the drop-down menu and click High Color (16 bit).  5. Click Apply.  6. Click OK to save the settings and close the window.  Page 12 of 12Using the Module Bay2/27/2003file://C:\temp\~hhE94F.htm
Using a Battery      Battery Performance   Checking the Battery Charge   Charging the Battery   Removing a Battery   Installing a Battery   Storing a Battery Battery Performance Use a battery to power the computer when it is not connected to an electrical outlet. One battery is supplied standard equipment in the battery bay. Battery operating time varies depending on operating conditions. With average usage, you may expect from 3 4 hours from a single fully charged battery. You can install an optional second battery in the module bay to significantly increase operating time. For more information about the second battery, see "Using the Module Bay." Operating time is significantly reduced when you perform operations including, but not limited to, the zUsing optical drives, especially DVD and CD-RW drives  zUsing wireless communications devices, PC Cards, or USB devices  zUsing high-brightness display settings, 3D screen savers, or other power-intensive programs such as games  zRunning the computer in maximum performance mode  You can check the battery charge before you insert the battery into the computer. You can also set power management options to alert you when the battery charge is low. NOTE: Batteries for portable computers are covered only during the initial one-year period of the warranty for your computer. For more information about the Dell warranty for your computer, see the System Information Guide.NOTE: The module bay in your computer supports a second battery. The Dell D/Bay does not support a second battery.NOTE: It is recommended that you connect your computer to an electrical outlet when writing to a NOTE: You can conserve battery life by setting the Maximum Power Savings option for your graphics card. For more information, see the documentation that came with your graphics card. CAUTION: Using an incompatible battery may increase the risk of fire or explosion. Replace the battery only with a compatible battery purchased from Dell. The lithium-ion battery is designed to work with your Dell™ computer. Do not use a battery from other computers your computer. Page 1 of 4Using a Battery2/27/2003file://C:\temp\~hh9849.htm
Checking the Battery Charge The Dell QuickSet battery meter, the Microsoft® Windows® power meter window and   icon, the battery charge gauge and health gauge, and the low-battery warning provide information on the battery charge.  For more information about checking the charge on the second battery, see "Using the Module Bay." Dell QuickSet Battery Meter Press     to display the QuickSet Battery Meter. The Battery Meter screen displays status, charge level, and charge completion time for the primary and batteries in your computer. In addition, when your computer is connected to a docking device (docked), the Battery Meter screen a Dock Battery tab, which displays the charge level and current status of the docking device battery. The following icons appear in the Battery Meter screen: For more information about QuickSet, right-click the   icon in the taskbar, and click Help. Microsoft Windows Power Meter The Windows power meter indicates the remaining battery charge. To check the power meter, double-click the icon on the taskbar. For more information on the Power Meter tab, see "Power Management." If the computer is connected to an electrical outlet, a   icon appears.  CAUTION: Do not dispose of batteries with household waste. When your battery no longer holds a charge, call your local waste disposal or environmental agency for advice on of a lithium-ion battery. See "Battery Disposal" in your System Information Guide. CAUTION: Misuse of the battery may increase the risk of fire or chemical burn. Do not puncture, incinerate, disassemble, or expose the battery to temperatures above 65°C Keep the battery away from children. Handle damaged or leaking batteries with extreme Damaged batteries may leak and cause personal injury or equipment damage. NOTE: You can use your docking device to charge a computer battery. However, a battery in a docking device does not power the docking device or computer. zThe computer or docking device is running on battery power.  zThe battery is discharging or idle.   zThe computer or docking device is connected to an electrical outlet and running on AC zThe battery is charging.   zThe computer or docking device is connected to an electrical outlet and running on AC zThe battery is discharging, idle, or charging.  Page 2 of 4Using a Battery2/27/2003file://C:\temp\~hh9849.htm
Charge Gauge Before you insert a battery, press the status button on the battery charge gauge to illuminate the charge-levellights. Each light represents approximately 20 percent of the total battery charge. For example, if the has 80 percent of its charge remaining, four of the lights are on. If no lights appear, the battery has no Health Gauge The battery operating time is largely determined by the number of times it is charged. After hundreds of and discharge cycles, batteries lose some charge capacity, or battery health. To check the battery health, and hold the status button on the battery charge gauge for at least 3 seconds. If no lights appear, the battery in good condition, and more than 80 percent of its original charge capacity remains. Each light represents incremental degradation. If five lights appear, less than 60 percent of the charge capacity remains, and you should consider replacing the battery. See "Specifications" for more information about the battery operating time. Low-Battery Warning A low-battery warning occurs when the battery charge is approximately 90 percent depleted. The computer beeps once, indicating that minimal battery operating time remains. During that time, the speaker beeps periodically. If two batteries are installed, the low-battery warning means that the combined charge of both batteries is approximately 90 percent depleted. The computer enters hibernate mode when the battery charge at a critically low level. For more information on low-battery alarms, see "Power Management." Charging the Battery When you connect the computer to an electrical outlet or install a battery while the computer is connected to electrical outlet, the computer checks the battery charge and temperature. If necessary, the AC adapter then charges the battery and maintains the battery charge. If the battery is hot from being used in your computer or being in a hot environment, the battery may not charge when you connect the computer to an electrical outlet. The battery is too hot to start charging if the   light flashes alternately green and orange. Shut down the computer, disconnect the computer from the electrical outlet, and allow the computer and the battery to cool room temperature. Then connect the computer to an electrical outlet to continue charging the battery. For more information on resolving problems with a battery, see "Power Problems." NOTICE: To avoid losing or corrupting data, save your work immediately after a low-battery warning. Then connect the computer to an electrical outlet, or install a second battery in the module bay. If battery runs completely out of power, hibernate mode begins automatically.NOTE: The AC adapter charges a completely discharged battery in approximately 1 hour with the computer turned off. Charge time is longer with the computer turned on. You can leave the battery in computer as long as you like. The battery internal circuitry prevents the battery from overcharging.Page 3 of 4Using a Battery2/27/2003file://C:\temp\~hh9849.htm
Removing a Battery For more information about removing the second battery, see "Using the Module Bay." 1. Ensure that the computer is turned off, suspended in a power management mode, or connected to an electrical outlet.  2. If the computer is connected to a docking device (docked), undock it. See the documentation that camewith your docking device for instructions.  3. Slide and hold the battery-bay latch release on the bottom of the computer, and then remove the from the bay.    Installing a Battery Slide the battery into the bay and lower the battery until the latch release clicks. For information about installing the second battery, see "Using the Module Bay." Storing a Battery Remove the battery when you store your computer for an extended period of time. A battery discharges prolonged storage. After a long storage period, recharge the battery fully before you use it.  CAUTION: Before performing these procedures, turn off the computer, disconnect it from the electrical outlet, and disconnect the modem from the telephone wall jack.NOTICE: If you choose to replace the battery with the computer in standby mode, you have up to 90 seconds to complete the battery replacement before the computer shuts down and loses any unsaved data.Page 4 of 4Using a Battery2/27/2003file://C:\temp\~hh9849.htm
Power Management      Power Management Tips   Power Management Wizard   Power Management Modes   Power Options Properties Power Management Tips zConnect the computer to an electrical outlet when possible because battery life is largely determined by the number of times the battery is charged.  zPlace the computer in standby mode or hibernate mode when you leave the computer unattended for long periods of time.  zTo enter a power management mode, close the display or press     .  zTo exit a power management mode, open the display or press the power button.  Power Management Wizard Click or double-click the   icon to open the Power Management Wizard. The first two screens of the wizard—Welcome and What is Power Management?—describe and define various power management options. Use the following screens of the Power Management Wizard to set various power management options, including sleep modes, power schemes, and low battery charge alarms. Setting Sleep Modes The screen defines standby and hibernate modes. From the screen you can: zSet standby-mode password options.  zEnable or disable hibernate mode.  NOTE: See "Using a Battery" for more information on conserving battery NOTE: The Power Management Wizard is not available if you have restricted access NOTE: On the What is Power Management? screen, you can select Do not show this page again. When you select this option, the Welcome screen also does not appear again.Page 1 of 6Power Management2/27/2003file://C:\temp\~hh1F99.htm
zSelect how the computer will respond when you close the display:  {Choose no action.  {Enter standby mode.  {Enter hibernate mode.  zSelect how the computer will respond when you press the power button:  {Choose no action.  {Enter standby mode.  {Enter hibernate mode.  {Shut down the Microsoft® Windows® operating system and turn off the computer.  {Prompt a user for an action (Ask me what to do).  zSelect how the computer will respond when you press     :  {Choose no action.  {Enter standby mode.  {Enter hibernate mode.  {Shut down Microsoft Windows and turn off the computer.  {Prompt a user for an action (Ask me what to do).  Selecting a Power Scheme The screen allows you to select, create, and edit power scheme settings. In addition, you can delete power schemes that you create, but you cannot delete Dell™ QuickSet predefined power schemes (Maximum Battery, Maximum Performance, Presentation, and Network Disabled). All QuickSet power schemes are displayed in a drop-down menu near the center of the screen. The power settings for each scheme in the menu are listed below the menu. The power settings are listed separately when the computer is running on battery or connected to an electrical outlet. The Power Management Wizard also allows you to associate the display brightness level with a power scheme. You must enable brightness-level power schemes through QuickSet in order to set the brightness The display brightness, internal network card activity, and wireless activity features are not available the Microsoft® Windows® Control Panel power schemes. In order to make use of these value-added you must set them through QuickSet power schemes. NOTE: When your computer is running on battery power, the Network Disabled power scheme your internal network and wireless activity. When your computer is connected to an electrical outlet docking device, the Network Disabled power scheme disables only your wireless activity. You must the power scheme through QuickSet (not Microsoft® Windows®) for Network Disabled to work.NOTE: QuickSet automatically adds the word (QuickSet) after the names of power schemes created using QuickSet.Page 2 of 6Power Management2/27/2003file://C:\temp\~hh1F99.htm
Setting Battery Alarms and Actions The screen allows you to enable the low-battery and critical-battery alarms and to change settings for the alarms. For example, you can set the low-battery alarm to 20% to remind you to save work and switch to AC power, and you can set the critical-battery alarm to 10% to enter hibernate mode. From the screen, you can: zSelect whether the alarm will notify you by sound or text.  zAdjust the power level at which you want the alarm to notify you.  zSelect how the computer will respond when the alarm notifies you:  {Choose no action.  {Enter standby mode.  {Enter hibernate mode.  {Shut down Windows and turn off the computer.  Completing the Power Management Wizard The screen summarizes the QuickSet power scheme, sleep mode, and battery alarm settings for your Review the settings you have selected and click Finish. For more information about QuickSet, right-click the   icon in the taskbar and click Help. Power Management Modes Standby Mode Standby mode conserves power by turning off the display and the hard drive after a predetermined period of inactivity (a time-out). When the computer exits standby mode, it returns to the same operating state it was before entering standby mode. To enter standby mode: zIn the Microsoft® Windows® XP operating system, click the Start button, click Turn off computer, then click Stand by.  In Windows 2000, click the Start button, click Shutdown, click Standby, and then click OK. NOTE: Brightness shortcut keys only affect the display on your portable computer, not monitors that attach to your portable computer or docking device. If your computer is in CRT only mode and you change the brightness level, the Brightness Meter appears, but the brightness level on the monitor not change.NOTICE: If your computer loses AC and battery power while in standby mode, it may lose Page 3 of 6Power Management2/27/2003file://C:\temp\~hh1F99.htm
or zDepending on how you set the power management options on the Advanced tab in the Power Properties window, use one of the following methods:  {Close the display.  {Press   .  To exit standby mode, press the power button or open the display depending on how you set the options on Advanced tab. You cannot make the computer exit standby mode by pressing a key or touching the touch or track stick. Hibernate Mode Hibernate mode conserves power by copying system data to a reserved area on the hard drive and then completely turning off the computer. When the computer exits hibernate mode, it returns to the same state it was in before entering hibernate mode. Your computer enters hibernate mode if the battery charge level becomes critically low. To manually enter hibernate mode: zIn Windows XP, click the Start button, click Turn off computer, press and hold   , and then click Hibernate.  In Windows 2000, if hibernate support is enabled, click the Start button, click Shutdown, click Hibernate, and then click OK. or zDepending on how you set the power management options on the Advanced tab in the Power Properties window, use one of the following methods to enter hibernate mode:  {Close the display.  {Press   .  To exit hibernate mode, press the power button. The computer may take a short time to exit hibernate mode. You cannot make the computer exit hibernate mode by pressing a key or touching the touch pad or track For more information on hibernate mode, see the documentation that came with your operating system. Power Options Properties NOTICE: You cannot remove devices or disconnect your computer from a docking device while your computer is in hibernate mode.NOTE: Some PC Cards may not operate correctly after the computer exits hibernate mode. Remove reinsert the card, or simply restart (reboot) your computer.Page 4 of 6Power Management2/27/2003file://C:\temp\~hh1F99.htm
The Power Options Properties window helps you to manage power consumption and monitor battery status. To access the Microsoft Windows Power Options Properties window: zIn Windows XP, click the Start button, click Control Panel, click Performance and Maintenance, then click Power Options.  zIn Windows 2000, open the Control Panel and double-click the Power Options icon.  Power Schemes Tab Windows XP controls the performance level of the processor depending on the power scheme you select. You not need to make any further adjustments to set the performance level. For information on setting processor performance for other operating systems, see "Intel SpeedStep™ Technology Tab." Each preset power scheme has different time-out settings for entering standby mode, turning off the and turning off the hard drive. For more information on power management options, see the Help and Center (Windows Help in Windows 2000). Alarms Tab The Low battery alarm and Critical battery alarm settings alert you with a message when the battery charge falls below a certain percentage. When you receive your computer, the Low battery alarm and battery alarm check boxes are selected. It is recommended that you continue to use these settings. See "Using a Battery" for more information on low-battery warnings. Power Meter Tab The Power Meter tab displays the current power source and amount of battery charge remaining. Advanced Tab The Advanced tab allows you to: zSet power icon and standby mode password options.  zProgram the following functions (depending on your operating system):  {Prompt a user for an action (Ask me what to do).  {Enter standby mode.  {Enter hibernate mode.  {Shut down Windows and turn off the computer.  {Choose no action (None or Do nothing).  To program these functions, click an option from the corresponding drop-down menu and then click OK. Hibernate Tab NOTE: To enable audible alarms, click each Alarm Action button and select Sound Page 5 of 6Power Management2/27/2003file://C:\temp\~hh1F99.htm
The Hibernate tab lets you enable hibernate mode by clicking the Enable hibernate support check box. Intel SpeedStep™ Technology Tab Depending on your operating system and microprocessor, the Power Options Properties window includes Intel SpeedStep™ technology tab. Intel SpeedStep technology allows you to set the performance level of processor according to whether the computer is running on battery or AC power. Depending on your system, typical options are: zAutomatic — The processor runs at its highest possible speed (Maximum Performance mode) when thecomputer is running on AC power. When the computer is running on battery power, the processor Battery Optimized mode.  zMaximum Performance — The processor runs at its highest possible speed even if the computer is running on battery power.  zBattery Optimized Performance — Processor speed is optimized for battery power even if the computer is connected to an electrical outlet.  zMaximum Battery — The processor runs at a slower speed to extend battery life.  To change additional Intel SpeedStep options: 1. Click Advanced and click one of the following options:  zDisable Intel SpeedStep technology control   zRemove flag icon (from the notification area)   zDisable audio notification when performance changes   2. Click OK to accept any changes and click OK to close the Intel SpeedStep™ technology window.  You can also change the Intel SpeedStep settings by right-clicking the flag icon in the notification area. NOTE: Windows XP controls the performance level of the processor depending on the power scheme you select. See "Power Schemes Tab."NOTE: To use Intel SpeedStep technology, a Windows operating system must be Page 6 of 6Power Management2/27/2003file://C:\temp\~hh1F99.htm
Using PC Cards      PC Card Types   PC Card Blanks   Extended PC Cards   Installing a PC Card   Removing a PC Card or Blank PC Card Types See "Specifications" for information on supported PC Cards. The PC Card slot has one connector that supports a single Type I or Type II card. The PC Card slot supports CardBus technology and extended PC Cards. "Type" of card refers to its thickness, not its functionality. PC Card Blanks Your computer shipped with a plastic blank installed in the PC Card slot. Blanks protect unused slots from dust and other particles. Save the blank for use when no PC Card is installed in the slot; blanks from other computers may not fit your computer. To remove the blank, see "Removing a PC Card or Blank." Extended PC Cards An extended PC Card (for example, a wireless network adapter) is longer than a standard PC Card and extends outside the computer. Follow these precautions when using extended PC Cards: zProtect the exposed end of an installed card. Striking the end of the card can damage the system board.  zAlways remove an extended PC Card before you pack the computer in its carrying case.  Installing a PC Card You can install a PC Card in the computer while the computer is running. The computer automatically detects NOTE: A PC Card is not a bootable device.Page 1 of 3Using PC Cards2/27/2003file://C:\temp\~hh736E.htm
the card. PC Cards are generally marked with a symbol (such as a triangle or an arrow) to indicate which end to insert into the slot. The cards are keyed to prevent incorrect insertion. If card orientation is not clear, see the documentation that came with the card.  To install a PC Card: 1. Hold the card with its orientation symbol pointing into the slot and the top side of the card facing up. latch may need to be in the "in" position before you insert the card.  2. Slide the card into the slot until the card is completely seated in its connector.   If you encounter too much resistance, do not force the card. Check the card orientation and try again.    The computer recognizes most PC Cards and automatically loads the appropriate device driver. If the configuration program tells you to load the manufacturer's drivers, use the floppy disk or CD that came with PC Card. Removing a PC Card or Blank Press the latch and gently remove the card or blank. For some latches, you must press the latch twice: once pop the latch out, and then a second time to pop the card out. 3. Gently remove the card or blank.  Save a blank to use when no PC Card is installed in a slot. Blanks protect unused slots from dust and other particles. NOTICE: Use the PC Card configuration utility   on the taskbar to select a card and stop it from functioning before you remove it from the computer. If you do not stop the card in the configuration utility, you could lose data. Do not attempt to eject a card by pulling its cable, if one is attached.Page 2 of 3Using PC Cards2/27/2003file://C:\temp\~hh736E.htm
  Page 3 of 3Using PC Cards2/27/2003file://C:\temp\~hh736E.htm
Using Smart Cards      About Smart Cards   Installing a Smart Card About Smart Cards Smart cards are small portable credit-card shaped devices with internal integrated circuits. Smart cards come in two varieties: memory and microprocessor. Memory smart cards store data but cannot process information. Microprocessor smart cards can add, delete, and manipulate information in the card memory. The top surface of the microprocessor smart card contains an embedded microprocessor located under the gold contact pad. Microprocessor smart cards can be used for programs such as: zSecure log-on and authentication of users to PCs and networks  zSecure business-to-business (B2B) and business-to-consumer (B2C)  e-commerce  zStorage of digital certificates, credentials, and passwords  zEncryption of sensitive data  The combination of the small size and integrated circuits make smart cards valuable tools for security, data storage, and special programs. Using smart cards can improve system security by combining something a user has (the smart card) with something only the user should know (a PIN) to provide more secure user-authentication than passwords alone. Installing a Smart Card You can install a smart card in the computer while the computer is running. The computer automatically detects the card. To install a smart card: 1. Remove the smart card blank from the smart card slot.  2. Hold the card face up with the gold contact pad on the top surface and pointing toward the smart card slot.  NOTE: To use a smart card for secure PC log-on and authentication, B2B and B2C e-commerce, local file encryption, and storage of digital certificates, additional software is required. To use a smart card for secure network log-on and authentication, file and e-mail encryption, and Virtual Private Network (VPN) log-on, you need to enable Microsoft® Windows® PKI support.Page 1 of 2Using Smart Cards2/27/2003file://C:\temp\~hhBE43.htm
  3. Slide the smart card into the smart card slot until the card is completely seated in its connector. The smart card will protrude approximately 1.27 cm (0.5 inch) from the slot. The smart card slot is located below the PC Card slot.  If you encounter too much resistance, do not force the card. Check the card orientation and try again.   1  gold contact pad 2  smart card (top) 1  PC Card slot (top) 2  smart card slot (bottom) 3  smart card Page 2 of 2Using Smart Cards2/27/2003file://C:\temp\~hhBE43.htm
Traveling With Your Computer      Identifying Your Computer   Packing the Computer   Travel Tips Identifying Your Computer zAttach a name tag or business card to the computer, or use a permanent marker or stencil to write a unique identifying mark (such as your driver's license number) on the computer.  zWrite down your service tag and store it in a safe place away from the computer or carrying case. Use the service tag if you need to report a loss or theft to law enforcement officials and to Dell.  zCreate a file on the Microsoft® Windows® desktop called if_found. Place information such as your name, address, and telephone number in this file.  zContact your credit card company and ask if it offers coded identification tags.  Packing the Computer zRemove any external devices attached to the computer and store them in a safe place. Remove any cables attached to installed PC Cards, and remove any extended PC Cards.  zTo make the computer as light as possible, replace any devices installed in the module bay with the DellTravelLite™ module.  zFully charge the main battery and any spare batteries you plan to carry with you.  zShut down the computer.  zDisconnect the AC adapter.  zRemove any extraneous items, such as paper clips, pens, and paper, from the keyboard and palm rest and close the display.  zUse the optional Dell™ carrying case to pack the computer and its accessories together safely.  zAvoid packing the computer with items such as shaving cream, colognes, perfumes, or food.  zProtect the computer, the batteries, and the hard drive from hazards such as extreme temperatures and overexposure to sunlight, dirt, dust, or liquids.  NOTICE: When the display is closed, extraneous items on the keyboard or palm rest could damage the display.NOTICE: If the computer has been exposed to extreme temperatures, allow it to acclimate to room Page 1 of 3Traveling With Your Computer2/27/2003file://C:\temp\~hhE61.htm
zPack the computer so that it does not slide around in the trunk of your car or in an overhead storage compartment.  Travel Tips zConsider disabling wireless activity on your computer to maximize battery operating time. To disable wireless activity, press   .  zConsider changing your power management options to maximize battery operating time.  zIf you are traveling internationally, carry proof of ownership—or of your right to use the computer if it iscompany-owned—to speed your passage through customs. Investigate the customs regulations of the countries you plan to visit, and consider acquiring an international carnet (also known as a merchandise passport) from your government.  zEnsure that you know which electrical outlets are used in the countries you will visit, and have appropriate power adapters.  zCheck with your credit card company for information about the kinds of emergency travel assistance it offers to users of portable computers.  Traveling by Air zEnsure that you have a charged battery available in case you are asked to turn on the computer.  zBefore you use the computer on an airplane, verify that such usage is permitted. Some airlines forbid use of electronic devices during the flight. All airlines forbid the use of electronic devices during takeoff and landing.  If Your Computer Is Lost or Stolen zCall a law enforcement agency to report the lost or stolen computer. Include the service tag in your description of the computer. Ask that a case number be assigned and write down the number, along the name, address, and telephone number of the law enforcement agency. If possible, obtain the name the investigating officer.  temperature for 1 hour before turning it on.NOTICE: Do not check the computer as NOTICE: Do not move the computer while using the optical drive. Doing so can result in loss of NOTICE: Do not walk the computer through a metal detector. Send the computer through an X-ray machine or have it hand inspected.NOTE: If you know where the computer was lost or stolen, call a law enforcement agency in that area. you do not know, call a law enforcement agency where you live.Page 2 of 3Traveling With Your Computer2/27/2003file://C:\temp\~hhE61.htm
zIf the computer belongs to a company, notify the security office of the company.  zContact Dell customer service to report the missing computer. Provide the computer service tag, the number, and the name, address, and telephone number of the law enforcement agency to which you reported the missing computer. If possible, give the name of the investigating officer.  The Dell customer service representative will log your report under the computer service tag and flag the computer as missing or stolen. If someone calls Dell for technical assistance and gives your service tag, the computer is identified automatically as missing or stolen. The representative will attempt to get the phone number and address of the caller. Dell will then contact the law enforcement agency to which you made the report of the missing computer. Page 3 of 3Traveling With Your Computer2/27/2003file://C:\temp\~hhE61.htm
Passwords      About Passwords   Using a Primary Password   Using an Administrator Password   Using a Hard Drive Password   Assigning an Asset Tag About Passwords A primary password prevents unauthorized access to the computer at start-up. You can use an administrator password instead of the primary password. A hard drive password helps prevent unauthorized access to data the drive, even when the drive is installed in another computer. If you forget any of your passwords, contact your system administrator or call Dell. For your protection, Dell technical support staff will ask you for proof of your identity to ensure that only an authorized person can use the computer. The following table identifies types and features of passwords available on your computer. Using a Primary Password The primary password allows you to protect the computer from unauthorized access. After assigning a primary password, you must enter it each time you turn on your computer. The following NOTE: Passwords are disabled when you receive your NOTE: Only hard drives purchased from Dell for use with the Dell™ Latitude™ D-Family computers support hard drive passwords.NOTICE: Passwords provide a high level of security for data in your computer or hard drive. However, they are not foolproof. If you require more security, obtain and use additional forms of protection, as smart cards, data encryption programs, or PC Cards with encryption features. Type of Password Features Primary  zProtects the computer from unauthorized access  Administrator  zGives system administrators or service technicians access to computers for repair reconfiguration  zAllows you to restrict access to the system setup program in the same way a password restricts access to the computer  zCan be used instead of the primary password  Hard drive  zHelps protect the data on your hard drive or external hard drive (if one is being used) from unauthorized access.  Page 1 of 5Passwords2/27/2003file://C:\temp\~hh5B03.htm
message appears each time you turn on the computer: Please type in the primary or administrator password and press   .  To continue, enter your password (maximum eight characters). If you do not enter a password within 2 minutes, the computer returns to its previous state. If you have assigned an administrator password, you can use it instead of the primary password. The does not specifically prompt you for the administrator password. Using an Administrator Password The administrator password is designed to give system administrators or service technicians access to computers for repair or reconfiguration. The administrators or technicians can assign identical administrator passwords to groups of computers, allowing you to assign the primary password. When you set an administrator password, the Configure Setup option becomes available in the system setup program. The Configure Setup option allows you to restrict access to the system setup program in the same way a primary password restricts access to the computer. The administrator password can be used instead of the primary password. Whenever you are prompted to the primary password, you can enter the administrator password. If you forget the primary password and do not have an administrator password assigned, or if you have primary and an administrator password assigned but forget them both, contact your system administrator contact Dell. Using a Hard Drive Password The hard drive password helps protect the data on your hard drive from unauthorized access. You can also assign a password for an external hard drive (if one is being used) that can be the same as or different from password for the primary hard drive. After assigning a hard drive password, you must enter it each time you turn on the computer and each time resume normal operation from standby mode. If the hard drive password is enabled, the following message appears each time you turn on the computer: Please type in the hard-disk drive password and press   .  NOTICE: If you disable the administrator password, the primary password is also NOTE: The administrator password provides access to the computer, but it does not provide access to hard drive when a hard drive password is assigned. NOTICE: If you disable the administrator password, the primary password is also Page 2 of 5Passwords2/27/2003file://C:\temp\~hh5B03.htm
To continue, enter your password (maximum eight characters). Press   to return the computer to its previous state. If you do not enter a password within 2 minutes, the computer returns to its previous state. If you enter the wrong password, the following message appears: Invalid password [Press Enter to retry]  If the correct password is not entered in three attempts, the computer tries to boot from another bootable device if the Boot First Device option in the system setup program is set to allow it. If the Boot First option is not set to allow booting from another device, the computer returns to the state it was in when you turned it on. If the hard drive password, the external hard drive password, and the primary password are the same, you prompted only for the primary password. If the hard drive password is different from the primary password, are prompted for both. Two different passwords provide greater security. Assigning an Asset Tag The Asset Tag utility allows you to enter an asset tag that you or your company assigns to the computer. Afteryou enter an asset tag, the tag appears in the system setup screens. You can also use the Asset Tag utility to enter an owner tag that appears in the system log-on screen and withthe primary password prompt. Use your Drivers and Utilities CD to create a bootable floppy disk, and then use the bootable floppy disk to assign an asset tag: 1. Save and close any open files and exit any open programs.  2. Connect the Dell™ D/Bay with a floppy drive to the Dell D/Bay connector on the right side of the computer, or connect a USB floppy drive to one of the two USB connectors on the back of the  3. Insert the Drivers and Utilities CD.  4. When the Welcome Dell System Owner window appears, click Next.  5. Select MS-DOS from the Operating System drop-down menu.  6. Click Dell Portables Asset Tag, click Extract, and then click Setup.  7. Insert a blank floppy disk and press   .  Follow the instructions on the screen to create a bootable floppy disk. 8. Boot the computer using the bootable floppy disk:  a. Restart the computer.  NOTE: The administrator password provides access to the computer, but it does not provide access to a hard drive that is protected by a hard drive password.Page 3 of 5Passwords2/27/2003file://C:\temp\~hh5B03.htm
 b. Press   immediately after the DELL™ logo appears.  If the operating system logo appears, wait until you see the Windows desktop, and then shut the computer and try again. c. Press the arrow keys to select Diskette Drive and press   .  9. Type asset and a space followed by the new asset tag, and press   .   For example, type the following command line and press   : asset 1234$ABCD&  10. When the computer prompts you to verify the asset tag, type y.  The computer displays the new or modified asset tag and the service tag. 11. Restart your computer to exit the Asset Tag utility.  Viewing Existing Asset and Service Tags 1. Boot the computer using the bootable floppy disk you created in "Assigning an Asset Tag."  2. Type asset and press   .  Deleting an Asset Tag  1. Boot the computer using the bootable floppy disk you created in "Assigning an Asset Tag."   2. Type asset /d and press   .  3. When the computer prompts you to delete the asset tag, type y.   Assigning an Owner Tag An owner tag can have up to 48 characters; any combination of letters, numbers, and spaces is valid. 1. Boot the computer using the bootable floppy disk you created in "Assigning an Asset Tag."  2. Type asset /o and a space followed by the new owner tag, and press   .   NOTE: An asset tag can have up to 10 characters; any combination of characters excluding spaces is valid.Page 4 of 5Passwords2/27/2003file://C:\temp\~hh5B03.htm

Navigation menu