COSMED Srl K4B2R-USA TELEMETRY UNIT User Manual User man K4B2 en

COSMED Srl TELEMETRY UNIT User man K4B2 en
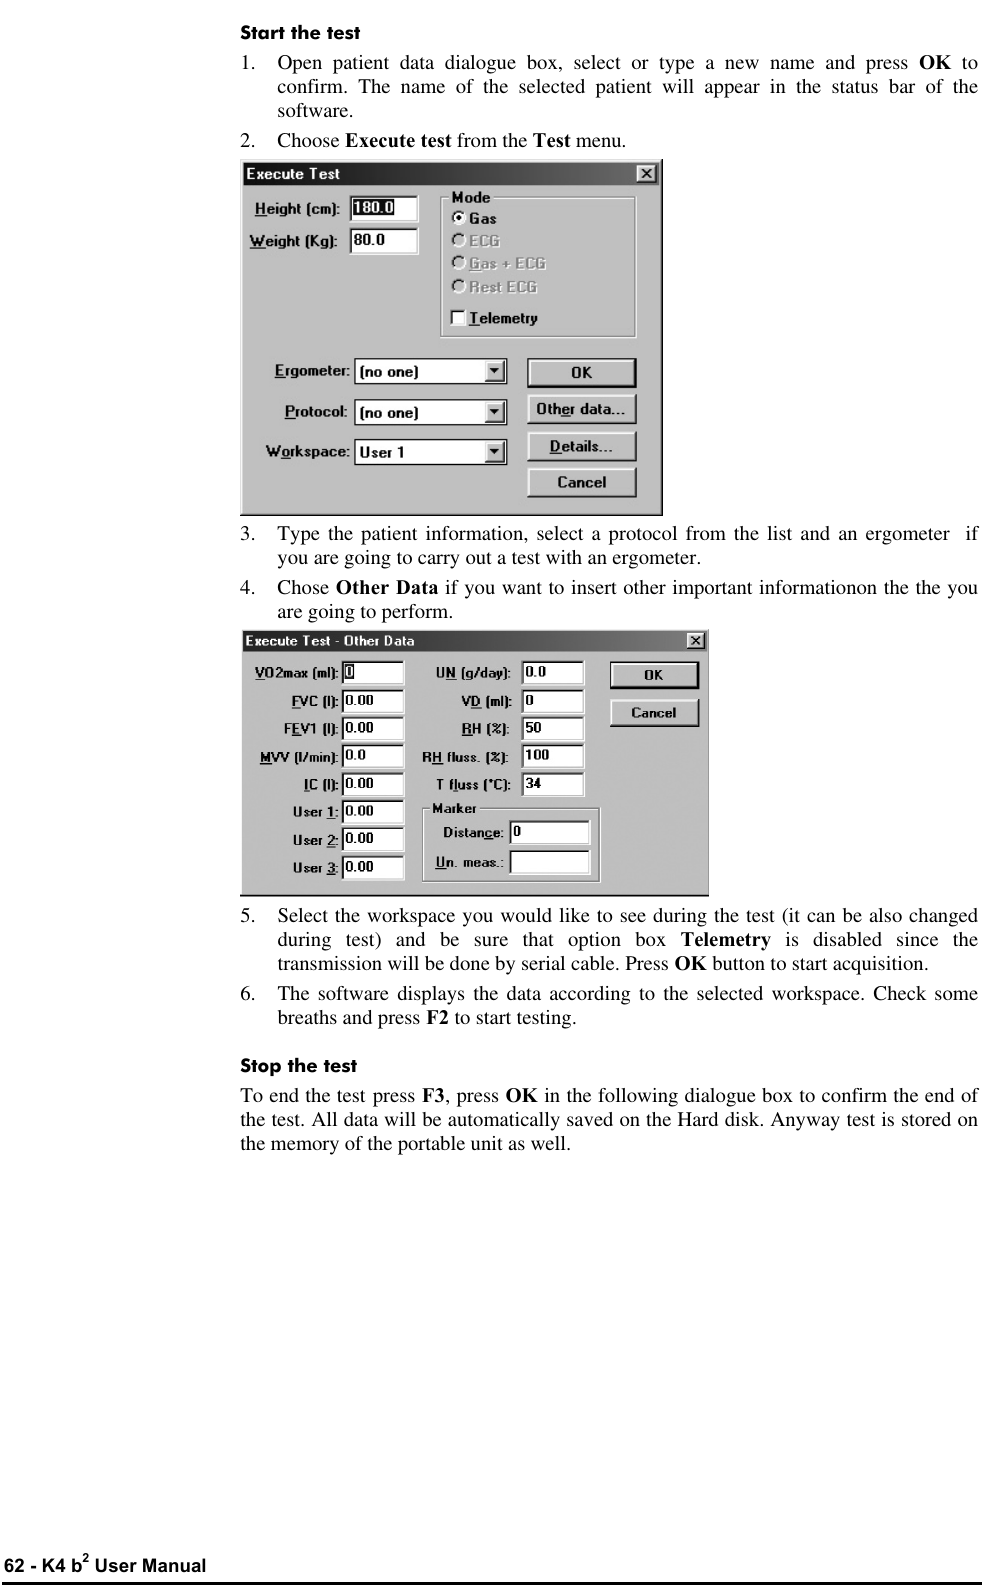
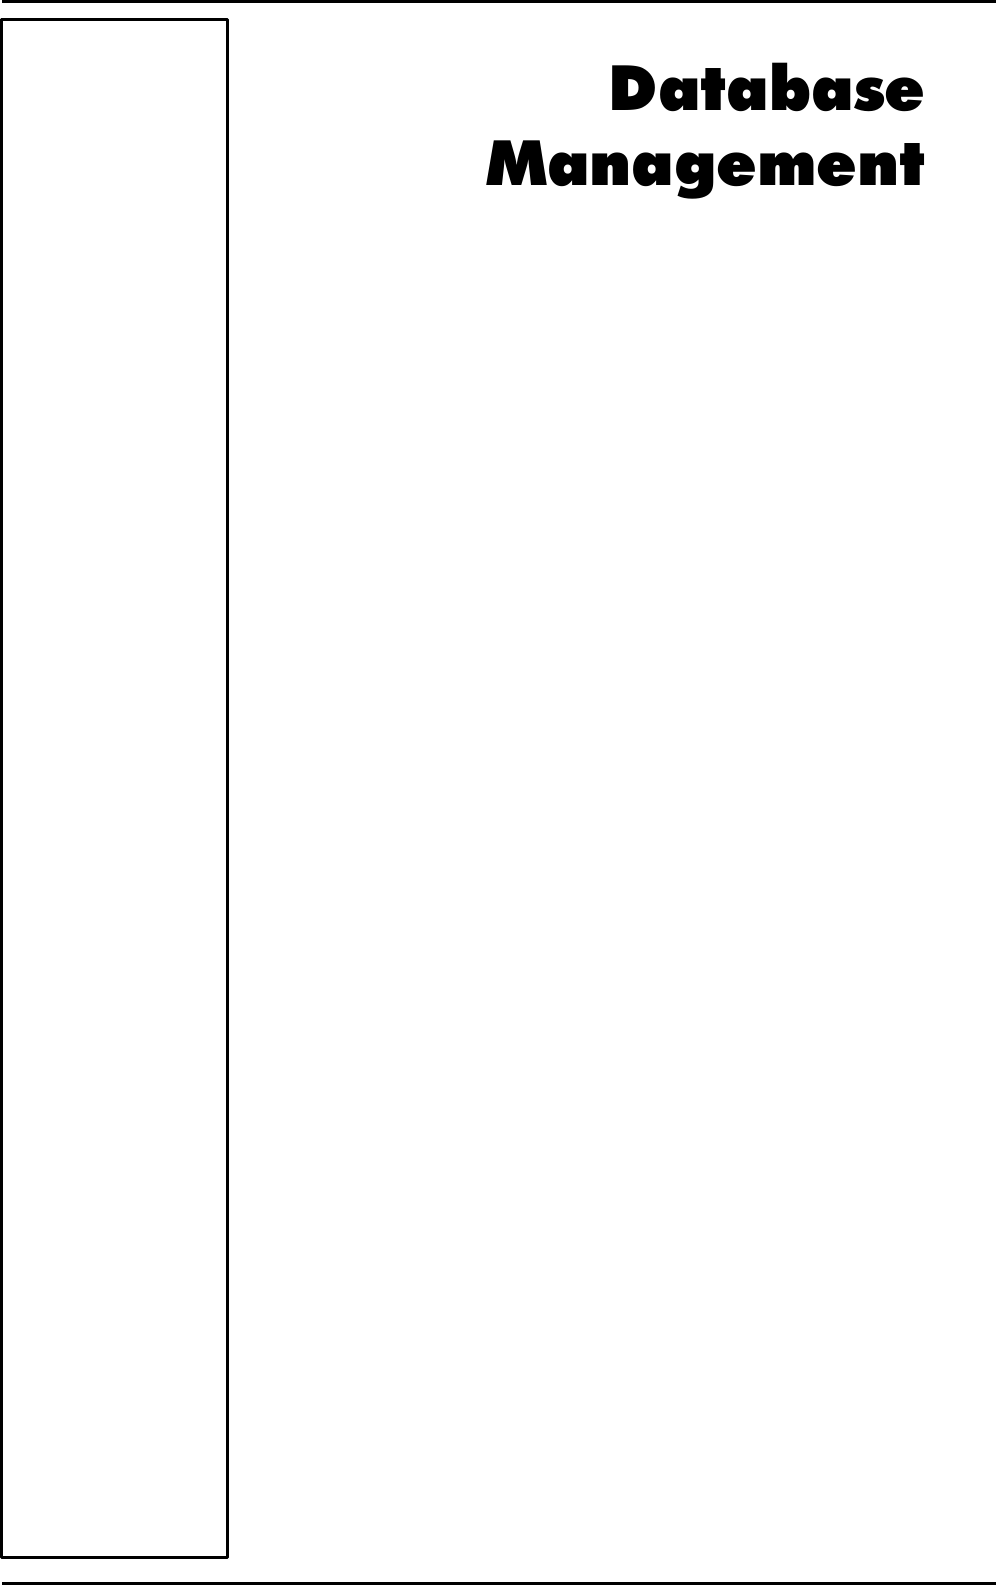
Users Manual III

  Calibration
 44 - K4 b2 User Manual Gas calibration procedures The system can be calibrated according to the following procedures: 1. Room air calibration 2. Reference gas calibration 3. Delay calibration 4. Turbine calibration The Room air calibration, forced by the system before every test, consists of a sampling room air. It updates the baseline of the CO2 analyzer and the gain of the O2 analyzer, in order to match the readings with the predicted athmospheric values (20.93% for O2 and 0.03% for CO2). The Reference gas calibration, recommended to be carried out daily, consists of sampling a gas with a known composition (i.e. 16.00% for O2 and 5.00% for CO2) from a calibration cylinder, and updating the baseline and the gain (span) of the analyzers in order to match the readings with the predicted values (i.e. 16.00% for O2 and 5.00% for CO2). The Delay calibration, recommended to be carried out ones a week or whenever the sampling line is replaced, is necessary to measure accurately the time necessary for the gas sample to pass through the sampling line before being analyzed. The Turbine calibration, recommended to be carried out quarterly, consists in measuring the volume of a 3 litres calibration syringe and in updating the gain of the flowmeter in order to match the predicted value. Running the Calibration program Start the program and choose Calibration from the Test Menu. The software runs the Calibration software and the main menu changes accordingly. Log file The program creates and updates as default the calibration log file, containing the conditions and the results of all the calibrations performed by the user. To access the file select File/Report File... from the calibration program. Setting reference values Before starting calibrating  make sure that the system has been configured correctly by setting the right values of gas concentration of: room air (i.e. 20.95% O2 and 0.03% CO2), of gas mixture contained in the cylinders and the volume of the calibration syringe (i.e. 3 litres). Set the reference values using the PC software This operation must be performed only the first time. The next times, the system keeps stored the reference values entered in this step. 1. Select Reference Values from the Calibration menu. 2. Type the correct values for the O2 and CO2 room air concentration (i.e. 2093 for 20.93%), and do the same for the gas concentration of the calibration cylinder.  3. Type the volume of the calibration syringe (i.e. 3000 for a 3 litres calibration syringe). 4. Press OK button to confirm changes.
  Chapter 4 - Calibration - 45 Set the reference values using the Portable Unit To set reference values from the K4 b2 Portable Unit go to the main menu, choose Calibration and scroll tasks up to choose Set Cal. Predicted Values, type the values using the arrow keys and press Enter to confirm changes. Room air calibration Room Air calibration is forced to be performed before each test. With this procedure the system calibrates both gas analyzers according to the Room Air Concentrations (20.95% O2 and 0.03% for CO2). You can run this procedure either with the software or directly with the Portable Unit. Room air calibration using the PC software 1. Connect the Portable Unit to the PC by the serial port. Remove the sampling plug from the flowmeter. 2. Run the calibration program and choose Room air from the Calibration menu. 3. The message "Room air calibration in progress..." will appear and a graph will show in real time the O2 and CO2 calibration. At the end of the manoeuvre the message "Calibration done" will be visualized. 4. The following dialogue box will appear showing the calibration results, press OK to confirm the calibration.  Room air calibration using the Portable Unit 1. Remove the sampling plug from the flowmeter. 2. In the main menu choose Calibration menu, choose Room Air Calibration and confirm by pressing Enter.  3. The procedure is automatically performed until the message "Calibration done" appears, the O2 and CO2 values will be visualized on the display.  Reference gas calibration The software allows to automatically calibrate zero, gain and alignments  of the gases sensors. Even if the program doesn't force you to carry out the calibration, the system should be calibrated before each test. To perform the sensor calibration is necessary to sss Note: After turning on the unit, wait 45 minutes warm up time before starting the calibration procedure. sss Important: During calibration always remove the sampling tube from the optoelectronic reader. Do not remove the sampling tube from the Portable Unit otherwise calibration could be affected. sss Caution: During Room Air calibration be sure to put the sampling line far from the expired gas otherwise calibration could be affected.sss Caution: Room Air calibration performed in small ambients (high concentration of CO2) affects the calibration results and the accuracy of the following test. sss Notice: Do not use mixtures with a O2 concentration above 24% since it is out of the oxygen sensor range
 46 - K4 b2 User Manual have available a cylinder filled of a concentration known of mixed gas. It is suggested to use CO2 5,00% , O2 16% concentrations and N2 for balance. The calibration unit The gas regulator has an adjustable second stage that must be open every time the cylinder is used for the calibration. This is necessary to avoid a small leakage in the connections can discharge the bottle in few time. 1. Make sure you wait for warm-up time before starting calibrating. Be sure the high-pressure tube supplied together with the system is connected to the "Cylinder" plug. 2. Open the cylinder valve by turning the valve counter-clockwise, the pressure value must be set within a range of 300-500 Kpa (3-5 bars or 44-73 Psi).  After these operation, please operate as follows. Reference gas calibration using the PC software 1. Connect the K4 b2 unit to the PC by the serial port. Remove the sampling plug from the optoelectronic reader. 2. Run the calibration program and choose Gas from the Calibration menu. 3. The message "Gas calibration in progress..." will appear and a graph will show in real time the O2 and CO2 calibration. The software runs first the Room Air calibration, so do not connect the sample plug to cylinder output until the message "Sample reference gas..." will be displayed. At the end of the procedure the message "Calibration done" will be visualized. 4. The dialogue box showing the calibration results will appear, press OK to confirm the calibration. Reference gas calibration using the Portable Unit 1. Remove the sampling plug from the flowmeter. 2. In the main menu choose Calibration menu, choose Refernce gas calibration and confirm by pressing Enter.  3. The K4 b2 runs first the Room Air calibration, so do not connect the sample plug to cylinder output until the message " Sample reference gas..." will be displayed. At the end of the procedure the message "Calibration done" will be visualized. sss Notice: Before calibrating be sure the "Reference values" of room air and reference gas are properly entered. sss Caution:  Be sure that the cylinder pressure out is regulated to 3 and 5 bar. sss Notice: If the pressure regulator is set at a different pressure  from what specified, room air could be mixed together with reference gas and the calibration could be affected.sss Notice: Before calibrating be sure the "Reference values" of room air and reference gas are properly entered.
  Chapter 4 - Calibration - 47  Gas delay calibration The delay calibration procedure is a calibration included in the software due the time alignment between flow and gas concentration measurements is one of the potential problems to consider to assure accurate readings during test. The gas delay calibration is the measurement of time required by the gas to reach the gas analyzer. For "breath by breath" analysis it is essential that the instantaneous flow rate must be multiplied by the proper time-matched expired gas concentration. Although flow can be instantaneously measured, gas concentration measurements can be calculated with a delay related both to the time necessary for the gas to be transported to the sensor and to intrinsic characteristics of the analyzer principle. Two factors contribute to the time alignments delay. K4 b2 uses a capillary sampling tube with a pump to draw a continuous gas sample into the analyzers. The gas transport time depends on the dimensions of the tube and on the pump flow rate. Additionally the gas sensors have a response time that must be added to the above delay for calculating the total delay. The software of the K4 b2 by carrying out the Gas Delay procedure calculates this delay and introduces a correction to realign both flow and gas measurements. This procedure must be carried out each time some changes occur in the sampling system, i.e. when the sampling tube is changed. However it is recommended to carry out this calibration each week in order to prevent wrongs measurements. Delay calibration using the PC software 1. Connect the K4 b2 unit to the PC by the serial port. Remove the sampling plug from the optoelectronic reader. 2. Run the calibration program and choose Delay from the Calibration menu. 3. The message "Gas calibration in progress..." will appear and a graph will show in real time the O2 and CO2 calibration. The software first runs the Room Air calibration. At the end of the Room Air calibration the following message appears.  4. Connect the sampling tube to the optoelectronic reader and press OK button to start breathing at a constant rate. 5. The software helps to maintain a constant rate by means of a beep sound. It is not important to maintain the same rate suggested by the system but it is very important to breath constantly. 6. Continue breathing some cycles until the message "Calibration done" appears. The software open a dialogue box with the new calibration factors and the new delay value. Press OK to confirm the calibration. Delay calibration using the Portable Unit 1. On the main menu scroll the commands, choose Calibration and press Enter to confirm the choice. 2.  Choose O2/CO2 delay calibration and press Enter to confirm. 3. The following message appears, and the software automatically run the Room air Calibration.
 48 - K4 b2 User Manual 4. When the message “Connect the sampling line and press Enter” appears press Enter and start breathing at a constant rate. The software helps to maintain a constant rate by means of a beep sound. It is not important to maintain the same rate suggested by the system but it is most important to breath constantly. 5. After some cycles a message will appear confirming the delay calibration and the new values will be shown on the display. Press Cancel to return to the previous menu. Print the calibration report In the Calibration program choose Print from the File menu. Edit the calibration factors The last sensors calibration factors can be either edited or viewed. To do this choose Gas Results… from the File menu. To view or edit the last Turbine calibration factor choose Turbine results… from the File menu. Note: To restore factory setting press Default button in the dialog box. Once you press the default button you must run a new calibration before testing.
  Chapter 4 - Calibration - 49 Turbine calibration The system uses a turbine flowmeter. It opposes a very low resistance to flow. The air passing through the helical conveyors, takes a spiral motion which causes the rotation of the turbine rotor. The rolling blade interrupts the infrared light beamed by the three diodes of the optoelectronic reader. Every interruption represents 1/6 turn of the rotor, this allows to measure the number of turn in the time. There is a constant ratio between air passing through the turbine and number of turns. This allows an accurate measure of flows and volume. The turbine flowmeter doesn't need daily calibrations as it is not affected by pressure, humidity and temperature. To work properly, the turbine only requires the rotor to rotate freely without any friction that might be caused by dust that can be easily avoided with an ordinary cleaning procedure (see Maintenance). However in order to ensure accuracy it's recommended to run periodically the calibration procedure. Calibration has to be carried out with a calibration syringe of 3 litres volume, the calibration procedure is totally managed by software. A measurement system should be calibrated daily in order to ensure maximum accuracy and reliable test results. If a correct maintenance is provided it’s possible to check the calibration of the turbine flowmeter even at relatively long intervals (i.e. 1 month). The calibration procedure assures valid and verifiable results within a ±3% accuracy. Assembling  the flowmeter for calibration 1. Connect the Opto-reader to the calibration syringe through the adapter. 2. Connect the flowmeter to the syringe with the rubber cylinder supplied in the standard packaging.  Note: If a bacterial filter is used for the tests, do use it also during the turbine calibration. Calibrating the turbine Turbine calibration using the PC software After having run the calibration program: 1. Select Reference Values from the File menu. If your syringe has a different value from the default one (3 litres), please enter the correct value. 2. Select Calibration/Turbine…. 3. When the Calibration Turbine dialog box appears with the syringe piston initially pushed all the way in, move the piston in and out for 5 inspiratory strokes and 5 sss Note: If you are using a slow PC, we recommend to set an higher refresh time.
 50 - K4 b2 User Manual expiratory strokes in order to get the first values appearing on the display. Then move the syringe piston for other 10 strokes (IN and EX).  4. At each of the 10 steps the software displays the results of the manoeuvre and the percentage error in the reading. 5. At the end of this operation, the software displays the new calibration factors. Press OK to store the new value.  Turbine calibration using the Portable Unit 1. Screw up the adapter for the calibration syringe to the optoelectronic reader. 2. Connect the optoelectronic reader to the calibration syringe. Before starting the calibration be sure to have inserted the right reference value for the syringe. To check it, select Volume Syringe from the Set predicted value menu.  3. Then choose Calibration from the main menu and press Enter. 4. Scroll the menu, choose Turbine Calibration and press Enter. 5. Start moving the syringe till the message "Operate syringe" will disappear on the display. The display will show expired (E) and inspired (I) readings for each stroke.  6. When the display visualizes the message "Calibration done" the Turbine has been calibrated, press Cancel to return to the main menu, the new calibration factor will be automatically stored.
  Chapter 4 - Calibration - 51 Checking the system signals The control panel The  Control Panel, which can be activated from the Calibration/Control panel… menu item, is a useful tool to check the main hardware functions of K4 b2. By using the controls on Control Panel you are able to do the following: 1. Reading the signals acquired by the system both as voltages and processed data; 2. Activating/Disactivating the valves, the sampling pump and other installed components (for example, oxymeter).  Using the control panel         mV / real values display Select all channels Deselect all channels Signal refresh time Sampling pump on/off edit parameters (name, unit,…) Flowmeter on/off Buzzer on/off Transmitter on/off Digital CO2 trimmer
 52 - K4 b2 User Manual
  Operating modes
 54 - K4 b2 User Manual K4 b2 Operating modes K4 b2 is a versatile system. You can use it in the field or in the lab without any kind of limitation. Test can be carried out in the following three different configuration: • Holter Data Recorder • Telemetry Data Transmission • Laboratory Station Holter Data Recorder Using the system in the field without the Receiver unit you can store data "breath by breath" in high capacity memory (1 MB). The memory allows to store up to 16 thousands breaths, when the test is completed, the results can be downloaded to the PC via the RS 232 port provided with the equipment. Telemetry Data Transmission (option) In case the telemetry Data Transmission module is available, the K4 b2 portable unit provided with a small transmitter that allows to send data by telemetry up to a distance of 800 meters. All data are transmitted "breath by breath" to the receiver unit. The Receiver Unit  must be connected to a PC by serial port, it allows the resercher to monitor data on line both in table and graphic format. Anyway tests are stored in the memory of the portable unit, thus in case of transmission interferences no data are lost. By using the system with a PC the software K4 b2 can also control and synchronise ergometers by using user defined exercise protocol. Serial (Laboratory) Station Although K4 b2 has been designed for tests in the field, it can also be used as a conventional laboratory station as it offers the same features of the best stand alone devices. Under this operating mode the K4 b2 Portable Unit is simply connected to the PC through the RS232 serial port and all tasks, exactly like any conventional laboratory device. Anyway tests are stored on the memory of the portable unit as well.
  Chapter 5 - Operating modes - 55 Portable Unit User Interface diagram
 56 - K4 b2 User Manual Holter Data Recorder Mode It is ideal operating modes if you need to test a patient difficult to monitor by Telemetry (i.e. climbing, long distances races, etc). The memory capacity of the K4 b2 is able to store data up to 16 thousands breaths. The system saves data for each breath, hence time storing capacity depends on the respiratory frequency.    1. Mask + flowmeter 2. Heart rate belt 3. Rechargeable battery 4. Harness 5. K4 b2 Unit 6. HR probe 7. Power cable       Operating sequence Warming-up the system Warm-up the K4 b2 for 45 minutes before testing or calibrating. Enter new patient 1. Connect K4 b2 to the subject. 2. Go to the K4 b2 control panel and choose Patient's data from Test menu.  3. Move the cursor among fields with the Enter key and use the Up and Down keys to modify values.   The fields are shown in the following order:  #: patient ID  A: age in years  H: height (cm or inch)  W: weight (kg or Lbs)  S: sex (M or F)  HR: HR max 4. The HR Max is automatically calculated by the formula 220-age, however it can be also changed according to physician experience and patient medical history. By confirming the HR rate value all the patient data are automatically saved. Calibrate and start the test 1. Remove the sampling plug from the mask and put the tube far from expired gas concentrations. 2. On the Patient's Data menu scroll down the menu and select Start Test from the main menu and press Enter to confirm. sss Note: USA and Japan versions have the items 3 and 5 slightly different because of the antenna placement.
  Chapter 5 - Operating modes - 57 3. The message "Insert relative humidity" will be visualized, type the correct value and press Enter.  4. The K4 b2 runs automatically the Room Air calibration. The message "Do not breath near the sampling line" appears. Wait for few seconds until the message "Calibration done" will appear together with a double beep sound.  5. Connect the sampling plug to the optoelectronic reader. Some values (Heart Rate, R, VO2, VCO2,...) will be shown and updated each breath on the control panel display. The message "Press Enter to start the test" will be displayed each 10 secs. You can switch to different values by moving the Up and Down key. 6.  After having pressed the Enter key the test starts but the K4b2 is not storing data. In this phase the PU is checking the main parameters and you can visualize it on the PU display by the time is blinking.  7. To start storing data press another time the Enter key. You can check the storing phase because the time parameter don't blink anymore.  Stop the test To stop the test press Cancel. The message "Press enter to stop test" will appear, press Enter to stop the test. Transferring test to PC Once the test is concluded you may download all data stored in the K4 b2 to the management software. 1. Turn the K4 b2 on. 2. Connect the K4 b2 to the PC by the serial cable enclosed in the equipment. 3. Run the K4 b2 software and choose Receive Test from the Test menu.  4. To download a test you must link it to an existing patient file. Choose Find and then List to select an existing patient. If the patient is new than select Find and then New, fill in the fields and press OK to confirm. 5. Select the test to link by using First, Previous, Next and Last buttons and press Download to confirm your choice and to store the test on the Hard Disk. You can use the Preview button to see some data and graph of the test in order to find out the proper one.
 58 - K4 b2 User Manual Telemetry Data Transmission Mode In case you need to monitor in real time the test you can use the Telemetry Data Transmission module that is provided by COSMED as an option. The transmission range can reach 800 m allowing to monitor exercise testing in the field. To use this option you need a personal computer to connect the receiver unit.    1. Mask + flowmeter 2. Heart rate belt 3. Rechargeable battery + antenna 4. Harness 5. K4 b2 Unit 6. HR probe 7. Power cable + antenna 8. Receiver unit 9. RS232 cable 10. Personal computer    Operating sequence Warming-up the system Warm-up the K4 b2 for 45 minutes before testing or calibrating. Connect the receiver unit to the PC Connect the receiver unit to PC with the serial cable provided in the standard packaging. Enable transmission 1. Go to the K4 b2 control panel, verify that transmission is enabled by choosing Settings /On/Off Transmitter and press Enter. 2. Enable the transmission by moving the "*" sign on Transmit. On and press Enter to confirm settings. Enter new patient 1. Connect K4 b2 to the subject. 2. Go to the K4 b2 control panel and choose Patient's data from Test menu.  3. Move the cursor among fields with the Enter key and use the Up and Down keys to modify values.   The fields are shown in the following order:  #: patient ID  A: age in years  H: height (cm or inch)  W: weight (kg or Lbs)  S: sex (M or F)  HR: HR max sss Note: USA and Japan versions have the items 3 and 5 slightly different because of the antenna placement.
  Chapter 5 - Operating modes - 59 4. The HR Max is automatically calculated by the formula 220-age, however it can be also changed according to physician experience and patient medical history. By confirming the HR rate value all the patient data are automatically saved. Enable reception on PC 1. Run K4 b2 software. 2. Open patient data dialog box, select or type a new name and press OK to confirm. The name of the selected patient will appear in the status bar of the software. 3.  Choose Execute test from the Test menu.  4. Type the patient information, select a protocol from the list and an ergometer  if you are going to carry out a test with an ergometer. 5. Chose Other  Data if you want to insert other important informationon the the you are going to perform.  6. Select the workspace you would like to see during the test (it can be also changed during test), check the option box Telemetry to enable software receiving of data and press OK to confirm. The software will show blank windows waiting for the first breath. Calibrate and start the test 1. Remove the sampling plug from the mask and put the tube far from expired gas concentrations. 2. On the Patient's Data menu scroll down the menu and select Start Test from the main menu and press Enter to confirm.. 3. The message "Insert relative humidity" will be visualized, type the correct value and press Enter.  4. The K4 b2 runs automatically the Room Air calibration. The message "Do not breath near the sampling line" appears. Wait for few seconds until the message "Calibration done" will appear together with a double beep sound.
 60 - K4 b2 User Manual 5. Connect the sampling plug to the optoelectronic reader. Some values (Heart Rate, R, VO2, VCO2,...) will be shown and updated each breath on the control panel display. The message "Press Enter to start the test" will be displayed each 10 secs. You can switch to different values by moving the Up and Down key. 6.  After having pressed the Enter key the test starts but the K4b2 is not storing data. In this phase the PU is checking the main parameters and you can visualize it on the PU display by the time is blinking.  7. To start storing data press another time the Enter key. You can check the storing phase because the time parameter don't blink anymore.  Stop the test To stop the test press Cancel. The message "Press enter to stop test" will appear, press Enter to stop the test. Transferring test to PC If some interferences should occur during test execution by telemetry, some breaths could be lost. The software shows a message on the status bar warning that some steps missed . Since K4 b2 stores every time the complete test in the memory, it is possible to download the test later to the management software to recover all lost data. 1. Turn the K4 b2 on. 2. Connect the K4 b2 to the PC by the serial cable enclosed in the equipment. 3. Run the K4 b2 software and choose Receive Test from the Test menu.  4. To download a test you must link it to an existing patient file. Choose Find and then List to select an existing patient. If the patient is new than select Find and then New, fill in the fields and press OK to confirm. 5. Select the test to link by using First, Previous, Next and Last buttons and press Download to confirm your choice and to store the test on the Hard Disk. You can use the Preview button to see some data and graph of the test in order to find out the proper one.
  Chapter 5 - Operating modes - 61 Serial Mode When the K4 b2 is used in the serial mode the system works exactly as any other conventional laboratory station. In this mode the software controls completely the K4 b2 portable unit so that any command such as calibration can be run by the software. You can also drive an ergometer if a second serial port is available in the PC.   1. Mask + flowmeter 2. Heart rate belt 3. Rechargeable battery 4. Harness 5. K4 b2 Unit 6. HR probe 7. Power cable 8. Receiver unit 9. RS232 cable 10. Personal computer    Operating sequence Warming-up the system Warm-up the K4 b2 for 45 minutes before testing or calibrating. Connect the Portable unit to the PC 1. Connect K4 b2 to the PC by the serial cable 2. Check that the Serial Port is properly selected by choosing RS 232 from the Option menu. 3. Check the Ergometer connected to PC option box if you intend to use an ergometer for testing. Calibrate the system 1. Run the K4 b2 software and choose Calibration from the Test menu. 2. In the Calibration software select Analyzers -> Room Air from the Calibration menu. Enter patient data 1. In the K4 b2 software and choose Patient from the File menu.  2. Select a patient from the list or press New to enter a new name and press OK to confirm. sss Note: USA and Japan versions have the items 3 and 5 slightly different because of the antenna placement.
 62 - K4 b2 User Manual Start the test 1. Open patient data dialogue box, select or type a new name and press OK  to confirm. The name of the selected patient will appear in the status bar of the software. 2.  Choose Execute test from the Test menu.  3. Type the patient information, select a protocol from the list and an ergometer  if you are going to carry out a test with an ergometer. 4. Chose Other Data if you want to insert other important informationon the the you are going to perform.  5. Select the workspace you would like to see during the test (it can be also changed during test) and be sure that option box Telemetry  is disabled since the transmission will be done by serial cable. Press OK button to start acquisition. 6. The software displays the data according to the selected workspace. Check some breaths and press F2 to start testing. Stop the test To end the test press F3, press OK in the following dialogue box to confirm the end of the test. All data will be automatically saved on the Hard disk. Anyway test is stored on the memory of the portable unit as well.
  Database Management
 64 - K4 b2 User Manual Exercise testing patient's database The exercise testing software uses a different interface for presenting patient information. The patient database allows to: • Enter a new patient • Find patient data • Edit patient data • Delete patient data. Select Patients from the File menu. Enter a new patient 1. Press New to show the Patient dialog box. 2. Enter data of a new patient and press OK button to confirm.  Find a patient Enter a search string into the Find field and press Find to view the data concerning a subject already in the database. You can search for “Last name”, “ID code” or “Progressive”. Or: Press List to view the list of patients in the database. Press Next or Previous to view the data corresponding to the next or to the last patient. Press OK to confirm. The Next and Previous buttons allow to move to the next or the previous patient in the database. Edit patient data 1. Select the patient. 2. Press Modify… in order to edit the patient’s data. 3. Edit the desired values and press OK to confirm. Delete a patient 1. Select the patient to be deleted. 2. Press Delete.
  Chapter 6 - Database Management - 65 Uploading tests from the Portable Unit In telemetry and holter function you could need to upload data from the portable unit via serial port. 1. Link up the PU to the PC with the RS232 cable supplied. 2. Turn on the Portable Unit. 3.  Choose Receive Test from Test menu or press Alt F2.  4. To be downloaded the test must be linked to a patient. If the current patient has already been inserted in the database, choose Find and then List select the patient and confirm. If the current patient doesn't belong to the archive he must be inserted, select  Find  and then New, fill in the fields and confirm. Now the download function is available and the test will be filed on the PC. 5. Choose the test to link with the First, Previous, Next and Last buttons and press Download. 6. A status bar will show the data acquisition in progress. At the end a message will indicate the end of data reception.
 66 - K4 b2 User Manual Archive maintenance The software allows to manage files selecting Archive from the File menu. It is advisable to perform the archive reorganisation every month, in order to free space on the hard disk and/or to correct possible errors present within the database. It is possible also that your have no more hard disk space. So, you have to delete all the data. In this case, it is useful to perform the initialising. Reorganise the archive 1. Select Reorganize archive from the File menu. 2. Wait for the end of the operation before performing any other function. Delete the archive 1. Select Initialize Archive from the File menu. 2. Wait for the end of the operation before performing any other function. Delete a test To delete an ergometry test, select Test/Delete test. To delete a spirometry test, press the proper button in the Test Card. Backup and restore It is strongly recommended to backup files, a warning message will be displayed monthly. This function allows the user to restore the data if the PC or the HD will not work anymore. Backup 1. Select Backup archive from the File menu. 2. Selecting the destination path with the Browse key or press New to create a new directory. Press OK to confirm. 3. In the dialog box it will appear an estimate of the number of floppy disks you need in order to back up the archives. Press OK.    Restore 1. Select Restore archive from the File menu. 2. On the Restore dialog box specify the drive source and press OK, a dialog box  will appear indicating all data of the backup processed.
  Chapter 6 - Database Management - 67 Spirometry patient's database The Patients database consists of a Patient Card, a Visit Card and a Test Card in which are listed all tests performed by the patient. Select Archive Navigator from the File menu  or press the button by side.  Patient Card It collects all the information of a patient (first name, last name, date of birth) which remain the same for each visit. For each patient there is only one Patient Card, which is created the first time the Patient performs a test.  To move within the database use the following buttons:  Move to the first patient in the archive  Move to the previous patient in the archive  Move to the next patient in the archive  Move to the last patient in the archive  Find a patient in the archive  Enter a new patient in the archive  Delete current patient from the archive  Edit the current patient card Visit Card It collects all information relative to the visit (diagnosis, visit description...) and to the patient information subject to change between one visit and another (height, weight, smoke). Each patient can be related to several Visit Cards provided they have been created in different days. Before carrying out any spirometric test it is necessary to create a new Visit Card or to open the today’s Visit Card.  To move within the database use the following buttons:  Move to the first visit in the archive  Move to the previous visit in the archive  Move to the next visit in the archive  Move to the last visit in the archive  Find a visit in the archive sss Note: after having deleted a record (patient, visit or test), it is recommended to reorganize the archive in order to free disk space.

Navigation menu