Cisco Systems 2400-MDM08-R1 CPE Transceiver-Model 2.4 GHz LCD Modem Release 1 User Manual Ripwave Modem User Guide
Cisco Systems, Inc CPE Transceiver-Model 2.4 GHz LCD Modem Release 1 Ripwave Modem User Guide
Contents
- 1. User guide
- 2. Installation guide
User guide
R
Ri
ip
pw
wa
av
ve
e™
™
M
Mo
od
de
em
m
U
Us
se
er
r
G
Gu
ui
id
de
e
For use with all Ripwave Modem models
Part Number 40-00097-00
Revision F, Version 1.0
May 21, 2004
Proprietary
All information disclosed by this document is the proprietary property of Navini Networks, Inc. and is protected
by copyright, trademark, and/or trade secret laws. All rights therein are expressly reserved.

Ripwave Modem User Guide Navini Networks, Inc.
TABLE OF CONTENTS
INTRODUCTION.......................................................................................................................................7
PACKAGE INVENTORY.........................................................................................................................7
RIPWAVE MODELS.................................................................................................................................7
OPERATING FREQUENCIES .........................................................................................................................8
COMPUTER CONNECTIONS .........................................................................................................................8
MINIMUM COMPUTING REQUIREMENTS......................................................................................9
PHYSICAL CHARACTERISTICS........................................................................................................10
INSTALLING AN ETHERNET MODEM ............................................................................................12
INSTALLING A USB MODEM..............................................................................................................15
ACCESSING THE INTERNET..............................................................................................................19
TROUBLESHOOTING...........................................................................................................................20
INDICATOR LIGHTS OR LCD DISPLAY .....................................................................................................20
INSTALLING NAVINI MONITOR.......................................................................................................21
USING NAVINI MONITOR ...................................................................................................................25
UNINSTALLING NAVINI MONITOR.................................................................................................28
INSTALLING NAVINI DIAGNOSTICS...............................................................................................29
USING NAVINI DIAGNOSTICS ...........................................................................................................32
UNINSTALLING NAVINI DIAGNOSTICS.........................................................................................35
INSTALLING & CHARGING THE BATTERY..................................................................................36
2.4 GHZ BATTERY...................................................................................................................................36
2.3 GHZ, 2.5 GHZ, 2.6 & 3.5 GHZ BATTERY .........................................................................................37
CARE & MAINTENANCE .....................................................................................................................38
UPGRADING THE MODEM .................................................................................................................38
ADDENDUM 1: RIPWAVE MODEM - PC TROUBLESHOOTING
™............................................39
ADDENDUM 2: END USER SOFTWARE LICENSE AGREEMENT.............................................44
2 Part #40-00097-00 Rev F v1.0
May 21, 2004

Navini Networks, Inc. Ripwave Modem User Guide
Permissions, Trademarks & Distribution
Copyright© 2001 - 2004, Navini Networks, Inc. All information contained herein and disclosed by this
document is confidential and the proprietary property of Navini Networks, Inc. and all rights therein are
expressly reserved. Acceptance of this material signifies agreement by the recipient that the information
contained in this document is confidential and that it will be used solely for the purposes set forth herein.
Acceptance of this material signifies agreement by the recipient that it will not be used, reproduced in
whole or in part, disclosed, distributed, or conveyed to others in any manner or by any means – graphic,
electronic, or mechanical, including photocopying, recording, taping, or information storage and retrieval
systems – without the express written permission of Navini Networks, Inc.
Navini Networks, the Navini Networks logo, Internet at the Speed of Thought, Zero-Install, Ripwave,
and Unwired by Navini are trademarks of Navini Networks, Inc. Other product and company names
mentioned herein may be trademarks and/or service marks of their respective owners.
Except for the hardware warranty, nothing herein constitutes any representation, warranty,
assurance, or guaranty of any kind.
Because of continuing developments and improvements in design, manufacturing, and deployment,
material in this document is subject to change without notification and does not represent any
commitment or obligation on the part of Navini Networks, Inc.
Navini Networks, Inc. shall have no liability for any error or damages resulting from the use of this
document.
All Navini Networks logos and trademarks are the property of Navini Networks, Inc. Unauthorized usage
is strictly prohibited without the express written permission of Navini Networks, Inc.
© 2001 - 2004 Navini Networks, Inc. All rights reserved.
Part #40-00097-00 Rev F v1.0 3
May 21, 2004

Ripwave Modem User Guide Navini Networks, Inc.
Safety
When using Navini Ripwave electronic equipment, always follow basic safety precautions to reduce the
risk of electrical shock, fire, and injury to people and/or property. Follow all warnings and instructions
that come with the equipment.
1. Do not use the equipment while you are in a bathtub, shower, pool, or spa. Exposure of the
equipment to water could cause severe electrical shock or serious damage to the equipment.
2. Do not immerse the equipment in any type of liquid. Use a damp clothe and if needed, water and a
mild detergent to clean the plastic shell. Unplug the equipment from the power source before
cleaning.
3. Follow all airport and FAA regulations when using the equipment on or near aircraft.
4. Only operate the equipment from the type of power source(s) indicated in this manual (110/220
VAC, 60/50 Hz adapter or Navini supplied battery). Any other type of input power source may cause
damage to the equipment.
5. Power the equipment using only the battery or the AC adapter cable provided, and in accordance with
the instructions specified in the user manual.
6. Do not use a frayed or damaged power cord. Do not place the power cord where it can be stepped on
or tripped over.
7. Do not touch wires where the insulation is frayed or worn unless the equipment has been
disconnected from its power source.
8. Do not overload wall outlets, power strips, or extension cords. This can cause serious electrical shock
or fire.
9. Do not place the equipment on an unstable surface. It can fall and cause injury or damage to the
equipment.
10. Do not disassemble the equipment. Removing covers exposes dangerous voltages or other risks and
also voids the warranty. Incorrect reassembly can cause equipment damage or electrical shock. Only
an authorized repair technician should service this product.
11. Do not expose the equipment to extreme hot or cold temperatures.
12. Do not use the equipment under the following conditions:
• When the equipment has been exposed to water or moisture.
• When the equipment has been damaged.
• When the power cord is damaged or frayed.
• When the equipment does not operate properly or shows a distinct change in performance.
4 Part #40-00097-00 Rev F v1.0
May 21, 2004

Navini Networks, Inc. Ripwave Modem User Guide
Regulatory Information
FCC Notice
CAUTION: This device is a Radio Frequency transmitter. It is required to comply with FCC RF
exposure requirements for transmitting devices. A minimum separation distance of 8 inches (20
cm) or more must be maintained between the antenna and all persons during device operations to
ensure compliance with the FCC’s rules for Radio Frequency Exposure. If this minimum distance
cannot be maintained, exposure to RF levels that exceed the FCC’s limits may result.
FCC Compliance and Advisory Statement
This equipment has been tested and found to comply with the limits for a class B digital device,
Pursuant to Part 15 of the FCC rules. The operation is subject to the following two conditions:
Tested To Comply
With FCC Standards
FOR HOME OR OFFICE US
E
(1) This device may not cause harmful interference, and
(2) This device must accept any interference received, including interference that may cause
undesired operation.
These limits are designed to provide reasonable protection against harmful interference in a
residential installation. This equipment generates, uses, and can radiate radio frequency energy
and, if not installed or used in accordance with the instructions, may cause harmful interference to
radio communications. However, there is no guarantee that interference will not occur in a
particular installation. If this equipment does cause harmful interference to radio or television
reception, which can be determined by turning the equipment off and on, the user is encouraged
to try to correct the interference by one or more of the following measures:
1) Reorient or relocate the receiving antenna,
2) Increase the separation between the equipment and the receiver,
3) Connect the equipment to an outlet on a circuit that is different from the one to which the
receiver is connected,
4) Consult the dealer or an experienced radio/TV technician for additional suggestions.
INFORMATION TO USER
This device has been authorized as a radio frequency transmitter under the appropriate rules of the
Federal Communications Commission. Any changes or modifications not expressly approved by
Navini Networks could void the user’s authority to operate the equipment.
Part #40-00097-00 Rev F v1.0 5
May 21, 2004

Ripwave Modem User Guide Navini Networks, Inc.
Battery Precautions
CAUTION! To reduce risk of injury or fire, follow these instructions when handling the battery.
1. Risk of explosion is possible if the battery is replaced with one not supplied by Navini Networks.
2. Do not dispose of the battery in a fire. They may explode. Check with the local codes for battery
disposal guidelines.
3. Do not open or mutilate the battery. The battery contains substances that are toxic, corrosive, or
harmful to humans. If battery substances come in contact with the skin, seek medical help
immediately.
4. Do not attempt to recharge the battery by any means except per the instructions in this manual.
5. Remove the battery from the equipment if the equipment is not going to be used for a long period of
time. The battery could leak and cause damage to the equipment.
6. Exercise care when handling the battery to prevent shorting the battery with conducting materials
such as bracelets, rings, and keys.
7. Store the battery pack in a dry place, 0 to +40 degrees Celsius.
8. Dispose of used batteries according to environmental guidelines.
6 Part #40-00097-00 Rev F v1.0
May 21, 2004
Navini Networks, Inc. Ripwave Modem User Guide
Introduction
Package
Inventory
Ripwave Models
Congratulations! The Ripwave™ Modem is a user-friendly, easy-to-
install device that helps you connect wirelessly to the Internet. It
provides complete broadband Internet access to residential and
small office/home office (SOHO) customers without the necessity
of professional hardware installation. The Ripwave Modem also
provides nomadic service availability as a computer with this
device is moved from room to room, location to location, or even
city to city as long as there is coverage in the area.
Please verify the contents of your Ripwave Modem package. If you
do not find all of these items in your package, notify the supplier
from whom you obtained it.
• Ripwave Modem
• Ripwave Modem AC power adapter
• PC-to-Ripwave Modem cable (USB or Ethernet straight cable)
• Ripwave Modem User Guide (on CD)
• Ripwave Modem Quick Installation Guide
• Ripwave Monitor Installation CD
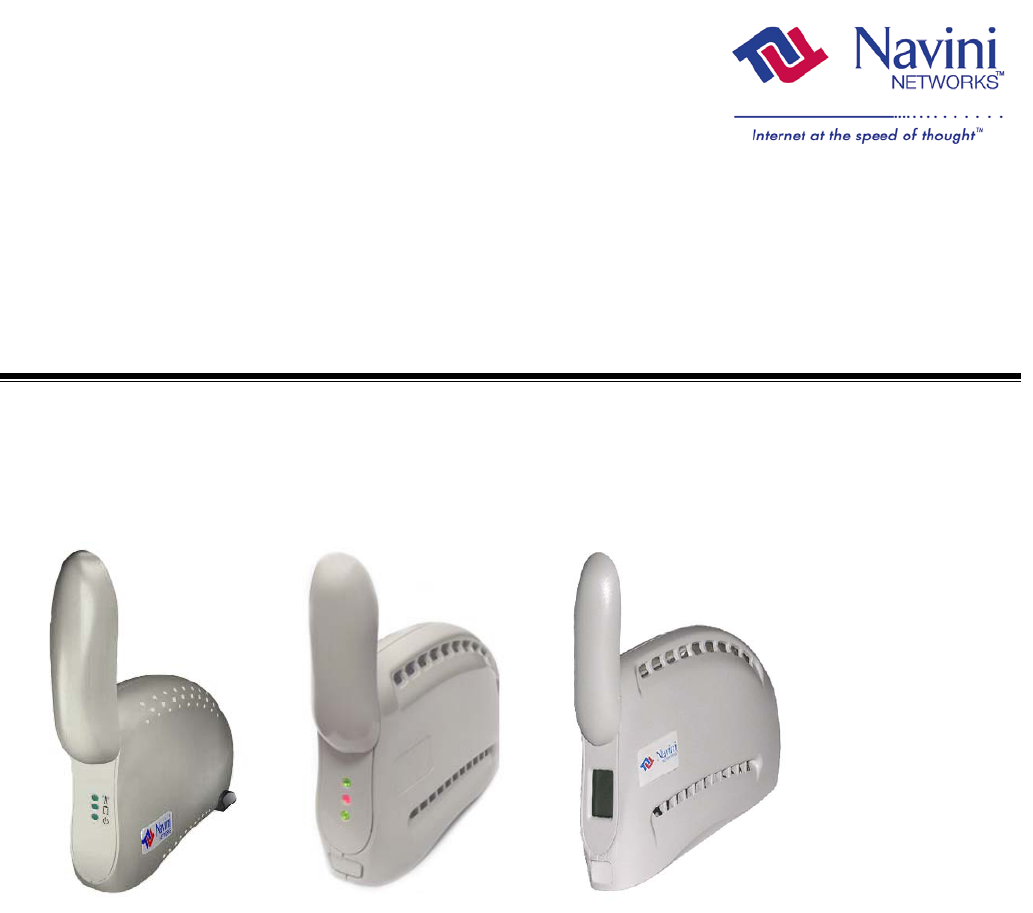
Your Ripwave Modem will operate in either the 2.3 GHz, 2.4 GHz,
2.5 GHz, 2.6 GHz, 3.4 GHz, or 3.5 GHz range. Within each
frequency range there are several model types, described on the
next page. The 2.4 GHz Modem varies slightly in appearance.
Also, in Release 4.0, the 2.4 GHz Modem is available in both an
LED and LCD version. In the future, an LCD version of the
Modem will be available for the 2.5, 2.6 and 3.5 GHz Modems.
2.4 GHz LED
Modem
2.3, 2.5, 2.6, 3.4 & 3.5
GHz Modem
2.4 & 3.5 GHz
LCD Modem
Part #40-00097-00 Rev F v1.0 7
May 21, 2004

Ripwave Modem User Guide Navini Networks, Inc.
Operating
Frequencies
Computer
Connections
Modem Model Frequency Range Operating
Band
2.3 GHz 2300E/U 2.305 GHz to 2.385 GHz WCS+
2.4 GHz 2400 E/U 2.400 GHz - 2.480 GHz ISM
2.5 GHz 2500 E/U 2.500 GHz - 2.596 GHz MMDS/ITFS
2.6 GHz 2600 E/U 2.596 GHz – 2.686 GHz MMDS/ITFS
3.4 GHz 3400 E/U 3.410 GHz – 3.525 GHz BWA/FWA
3.5 GHz 3500 E/U 3.500 GHz – 3.600 GHz BWA/FWA
The “E” in the model name stands for Ethernet, and the “U” in the
model name stands for Universal Serial Bus (USB). Your computer
will have one of these two types of ports for connecting the
Modem.
• An Ethernet connection will function with any Win32
Operating System (Windows® 95 or later).
• A USB connection will function only with Windows 98,
Windows 98SE, Windows 2000, Windows ME, or Windows
XP. It will not work with Windows 95 or Windows NT.
You must have the Ripwave Modem model with the appropriate
connection for your computer port.
8 Part #40-00097-00 Rev F v1.0
May 21, 2004

Navini Networks, Inc. Ripwave Modem User Guide
Minimum
Computing
Requirements
(See, also, Addendum 1)
Operating
System1: Ethernet Modems: Any Win32® Operating System
(OS) - Windows® 95, Windows 982, Windows
98SE2, Windows 2000, Windows ME2, Windows
XP, or later version. Windows XP must be Service
Pack Level 1 or higher. Internet Explorer 3.0 or
higher is required for installation on Windows 95
Operating Systems.3
USB Modems: Windows® 982, Windows 98SE2,
Windows 2000, Windows ME2, Windows XP,
or later version. USB will not work with Windows
95 or Windows NT. Windows XP must be Service
Pack Level 1 or higher. 3
General Information:
Ensure that the pc network port is enabled.
MacIntosh systems and Lynx/Unix systems are
not supported.
CPU: Pentium level or higher
RAM: 32 MB or the Operating System minimum,
whichever is greater
Hard Drive: 10 MB free disk space for Navini Monitor software
Monitor: 256 colors, 800 x 600 resolution
1NOTE: If you are going to upgrade your Operating System after loading the
Navini Monitor or Navini Diagnostics software, you must first uninstall Navini
Monitor or Navini Diagnostics prior to upgrading the OS. Otherwise, the Navini
Monitor or Navini Diagnostics will not work. See Uninstall instructions in this
Guide.
2NOTE: The Ripwave Modem must be left powered ON whenever you shut
down or restart any Windows 98 or ME platforms. If the Modem is off, a blue
screen appears on the monitor. In the event that happens you will most likely
have to power cycle the PC.
3NOTE: Navini Diagnostics Tool software is supported on Win98, Win98SE,
Win2000, WinME, WinXP or higher, Mac X or higher,or Red Hat Linux 8.0 or
higher.
The Ripwave Modem installation sections include instructions for
both Ethernet and USB connections. Be sure to use the instructions
that apply to your Ripwave model. The Navini Monitor software
installation procedure is the same for any of the Ripwave models.
This manual will guide you through the simple process of installing
the Ripwave Modem and software, which has been developed to
optimize the ease and convenience for you, our valued customer.
The 2.6 GHz model is used in most of the illustrations in this
manual where there are no differences in the 2.3, 2.4, 2.5, 2.6, 3.4
& 3.5 GHz models.
Part #40-00097-00 Rev F v1.0 9
May 21, 2004
Ripwave Modem User Guide Navini Networks, Inc.
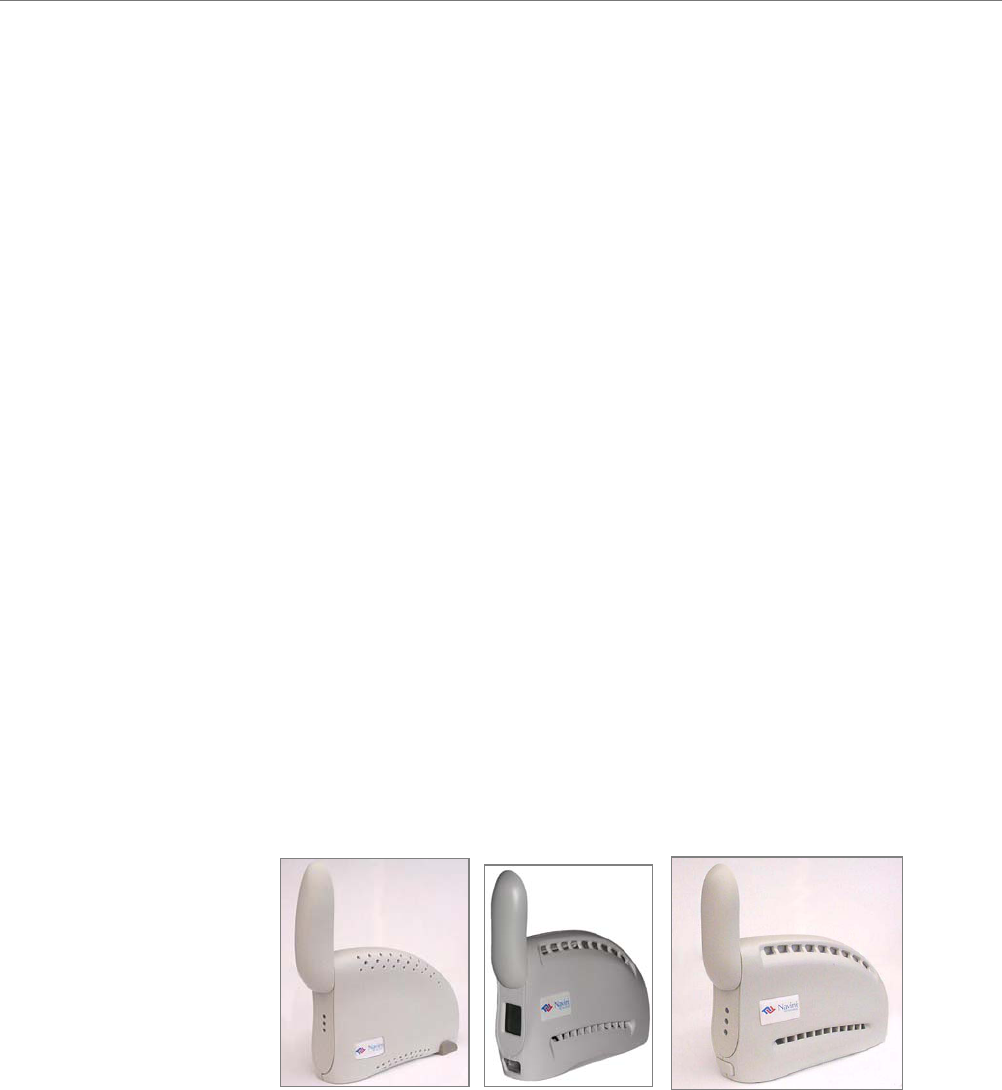
Physical
Characteristics
If you experience any difficulties with your unit, please contact
your Service Provider or the vendor from whom you obtained your
Ripwave Modem.
The 2.4 GHz Ripwave Modem varies in some aspects from the 2.3,
2.5, 2.6, 3.4 and 3.5 Modems. As well, the Ethernet connection on
any model varies from a USB connection. Notice the differences
highlighted in the photos below and on the following page.
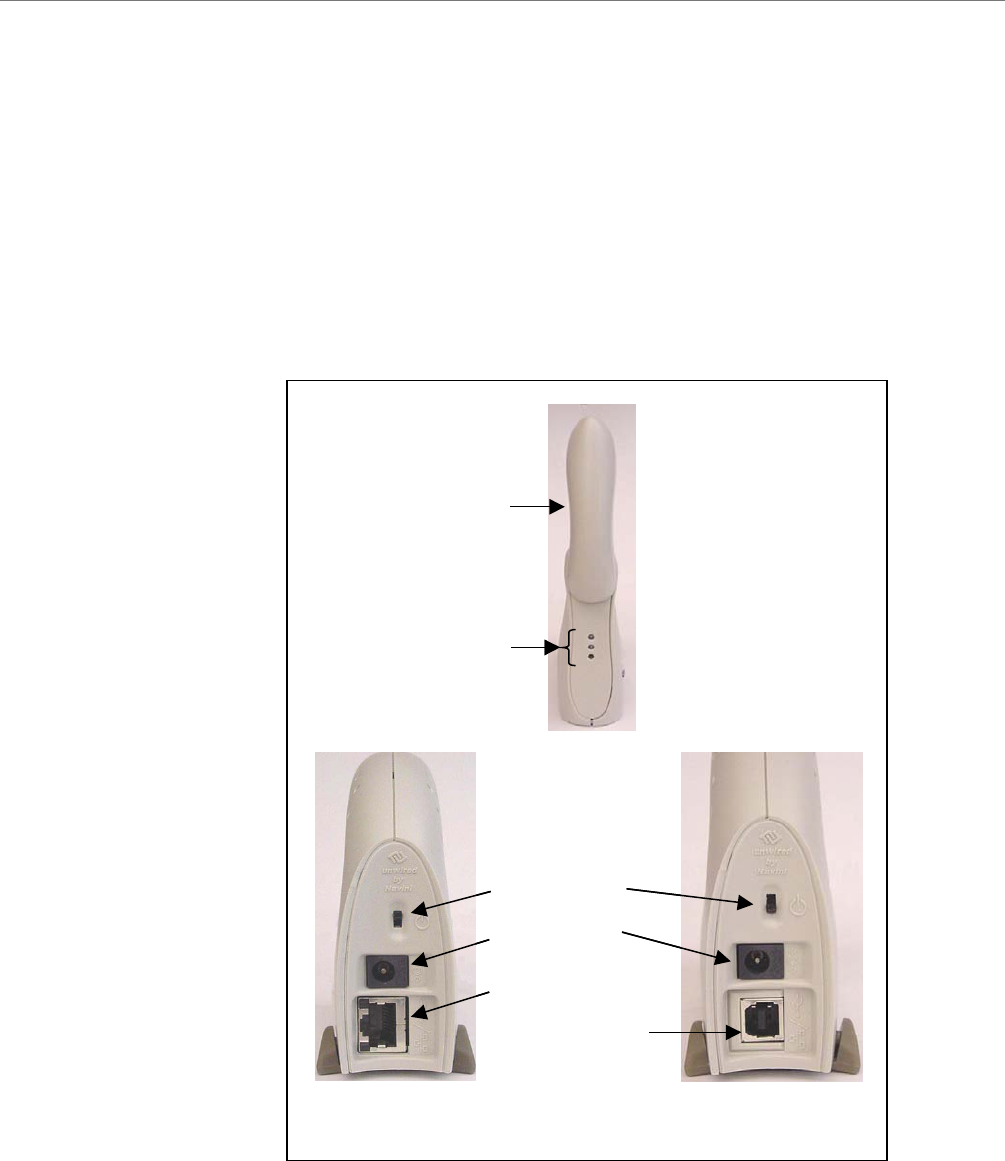
2.4 GHz LED Ripwave Modem
Antenna
Indicator Lights
On/Off Switch
Power Adapter
Connection
Ethernet Cable
Connection
Back of 2.4 E Back of 2.4 U
USB Cable
Connection
Antenna
Indicator Lights
On/Off Switch
Power Adapter
Connection
Ethernet Cable
Connection
Back of 2.4 E Back of 2.4 U
USB Cable
Connection
10 Part #40-00097-00 Rev F v1.0
May 21, 2004
Navini Networks, Inc. Ripwave Modem User Guide
#40-00097-00 Rev F v1.0 11
May 21, 2004
hysical
istics,
P
Character
Continued
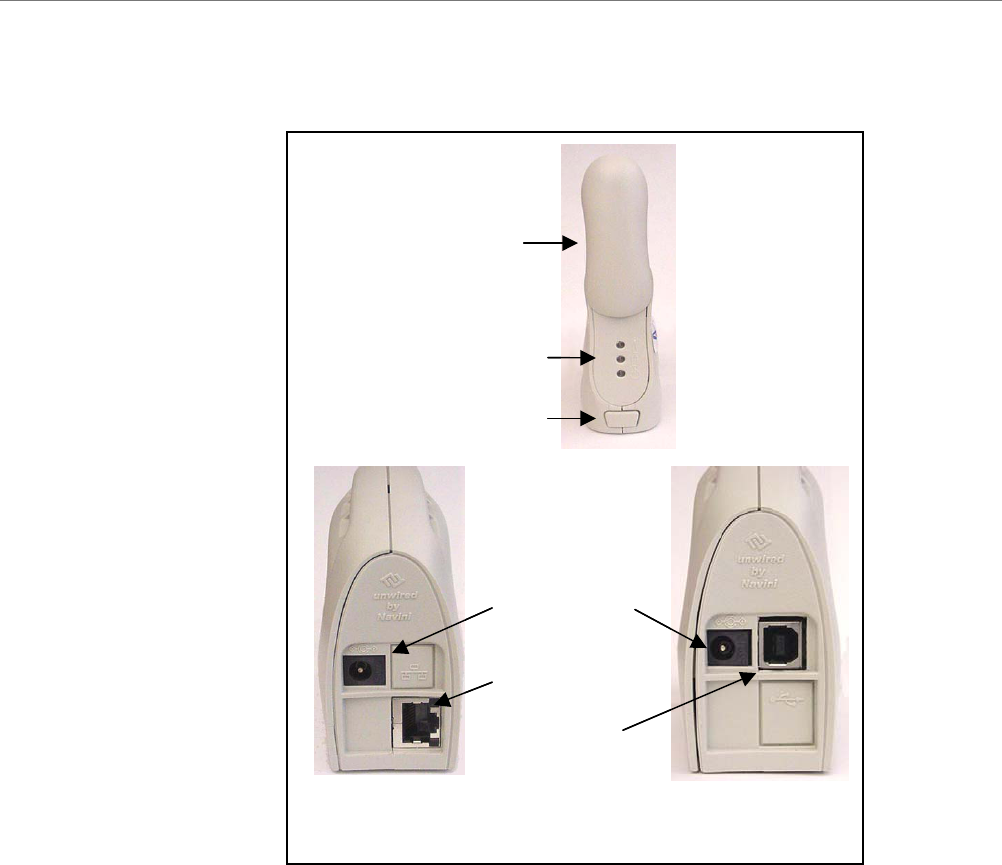
2.3, 2.5, 2.6, & 3.5 GHz LED Ripwave Modems
Antenna
Indicator Lights
On/Off Switch
Power Adapter
Connection
Ethernet Cable
Connection
USB Cable
Connection
Back of 2.3,
2.5, 2.6 & 3.5 E
Back of 2.3,
2.5, 2.6 & 3.5 U
Part
Ripwave Modem User Guide Navini Networks, Inc.
Installing an
Ethernet Modem
(See, also, Addendum 1)
The following instructions are for the installation of a Ripwave
Modem that has a USB connection. Please read all instructions
before attempting the installation. It is advisable to turn off the
computer and the Ripwave Modem before performing the
installation.
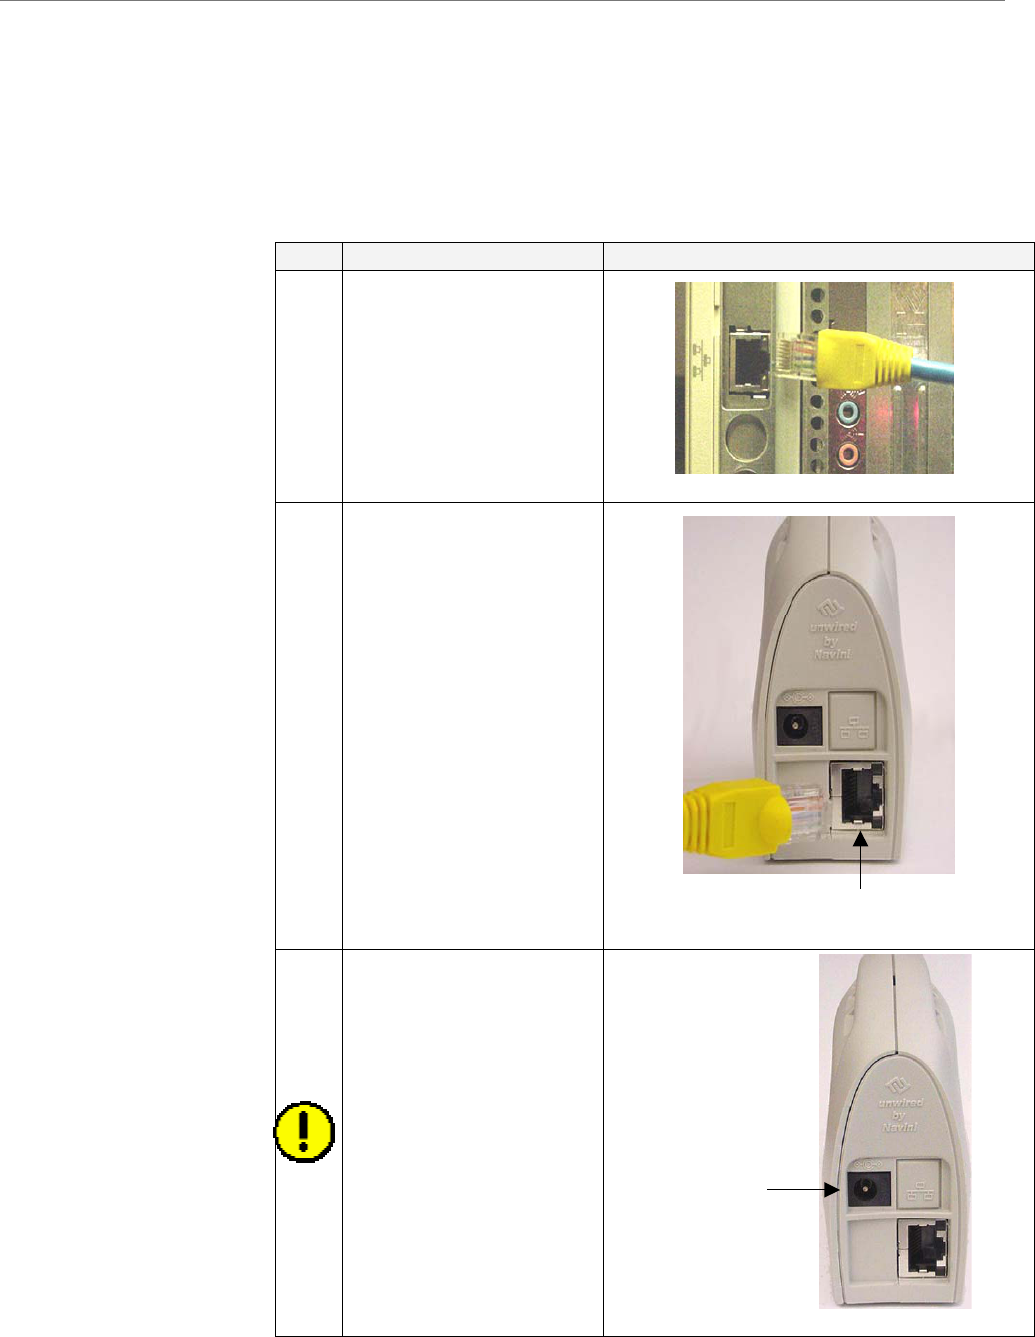
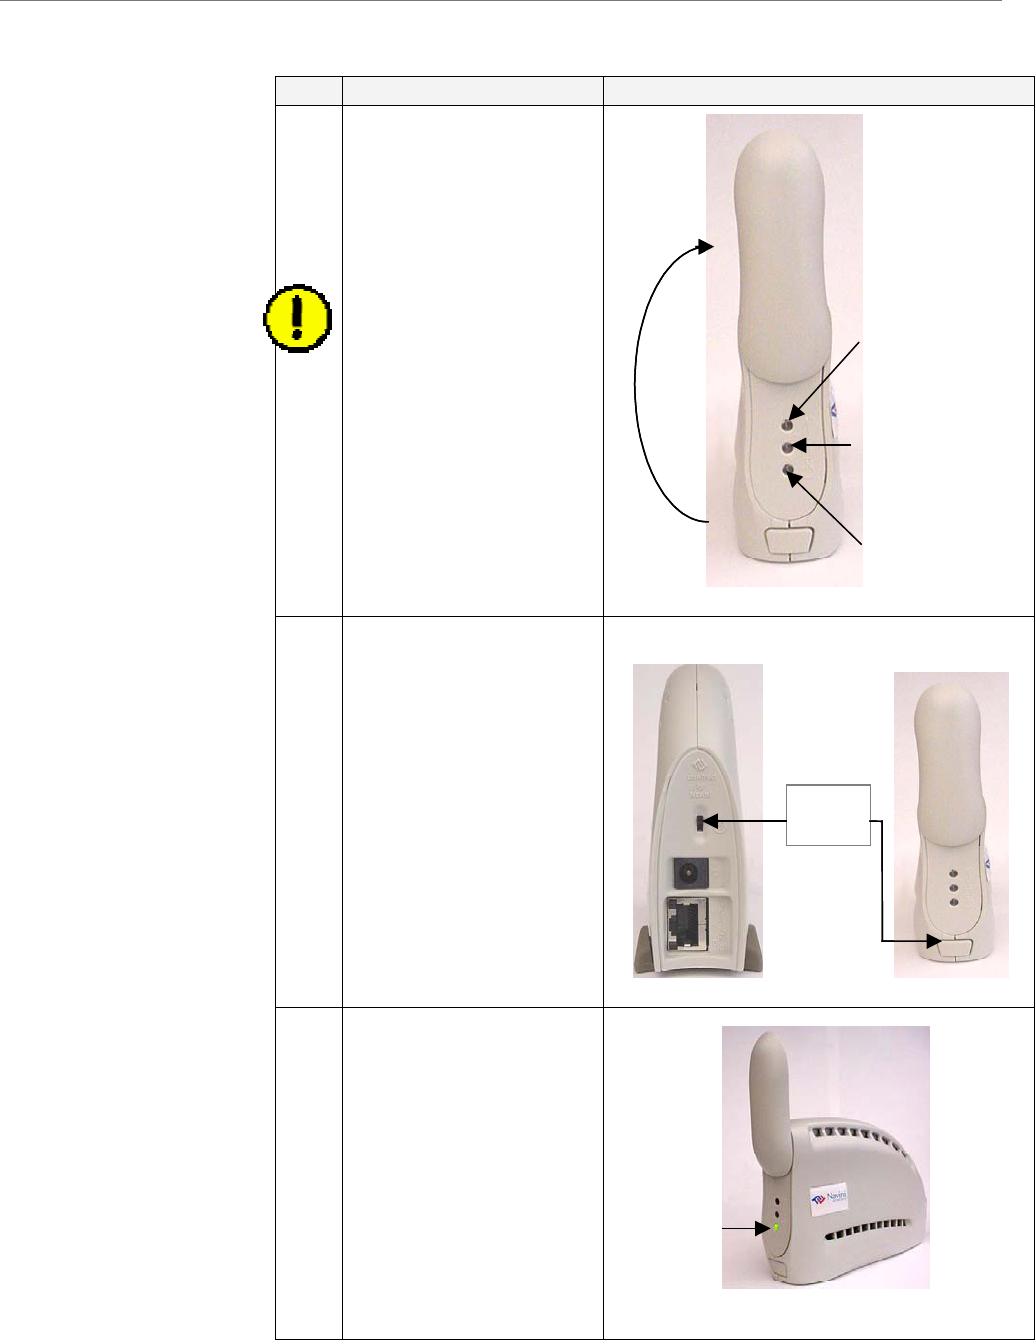
Step Action Illustration (using LED Modem)
1. Connect the Ethernet
cable to the Ethernet
port on the computer.
2. Connect the other end of
the Ethernet cable to the
Ripwave Modem.
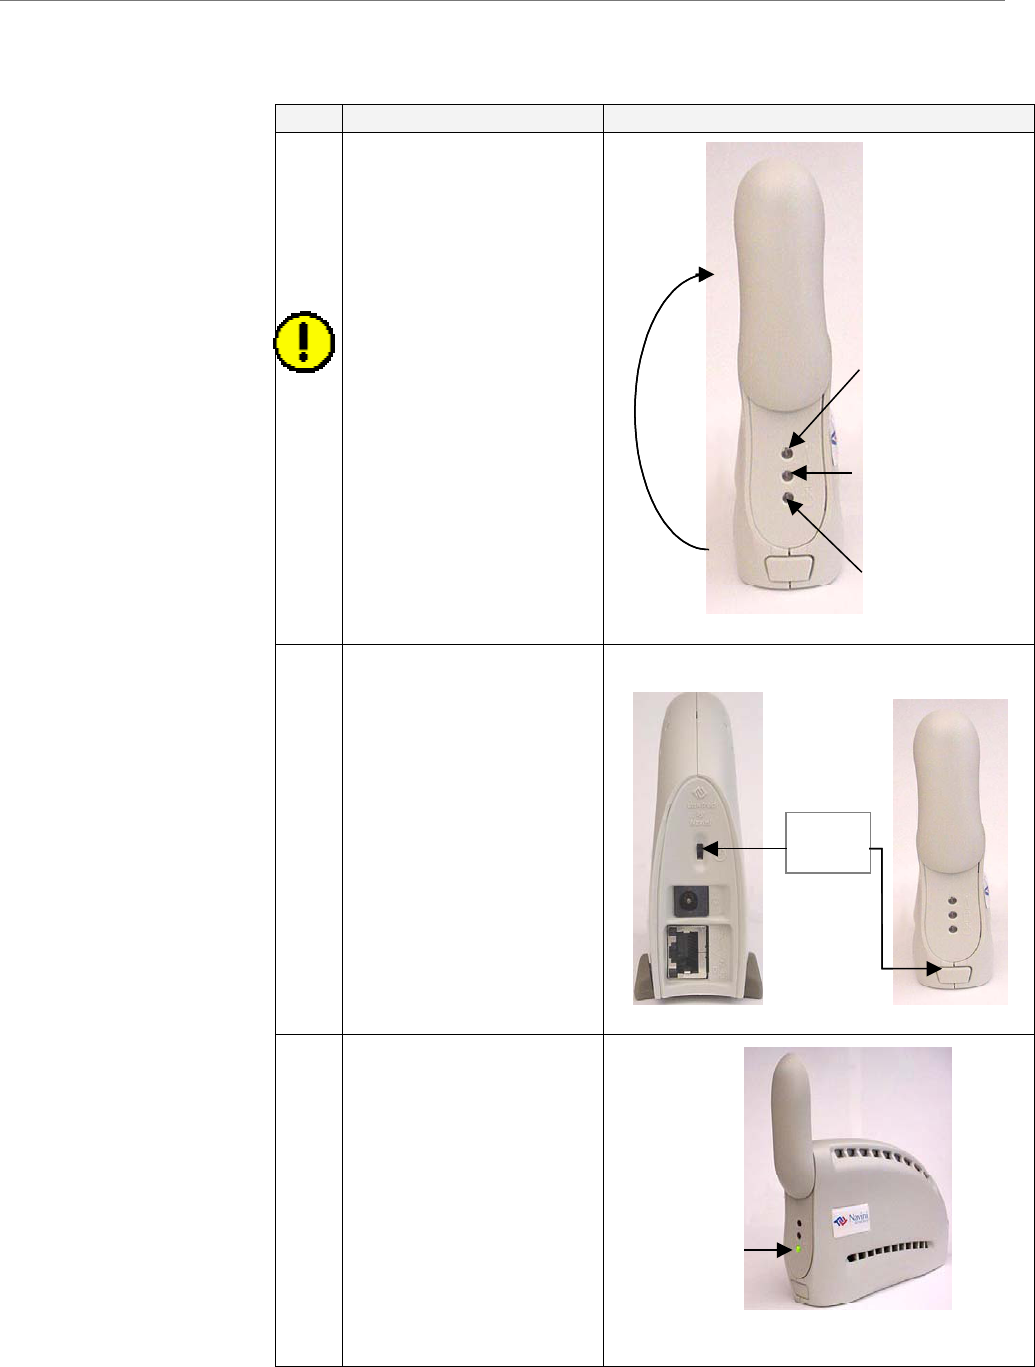
3. Connect the AC power
adapter to the Ripwave
Modem. Plug the other
end into a 110/220 VAC
60/50 Hz outlet.
CAUTION! Only use
the AC power adapter
specifically supplied
with the Ripwave
Modem. Using any other
adapter may cause
damage to the Modem.
Ethernet
AC Power
adapter cable
j
ack
12 Part #40-00097-00 Rev F v1.0
May 21, 2004
Navini Networks, Inc. Ripwave Modem User Guide
Installing an Ethernet
Modem, continued
Step Action Illustration (using LED Modem)
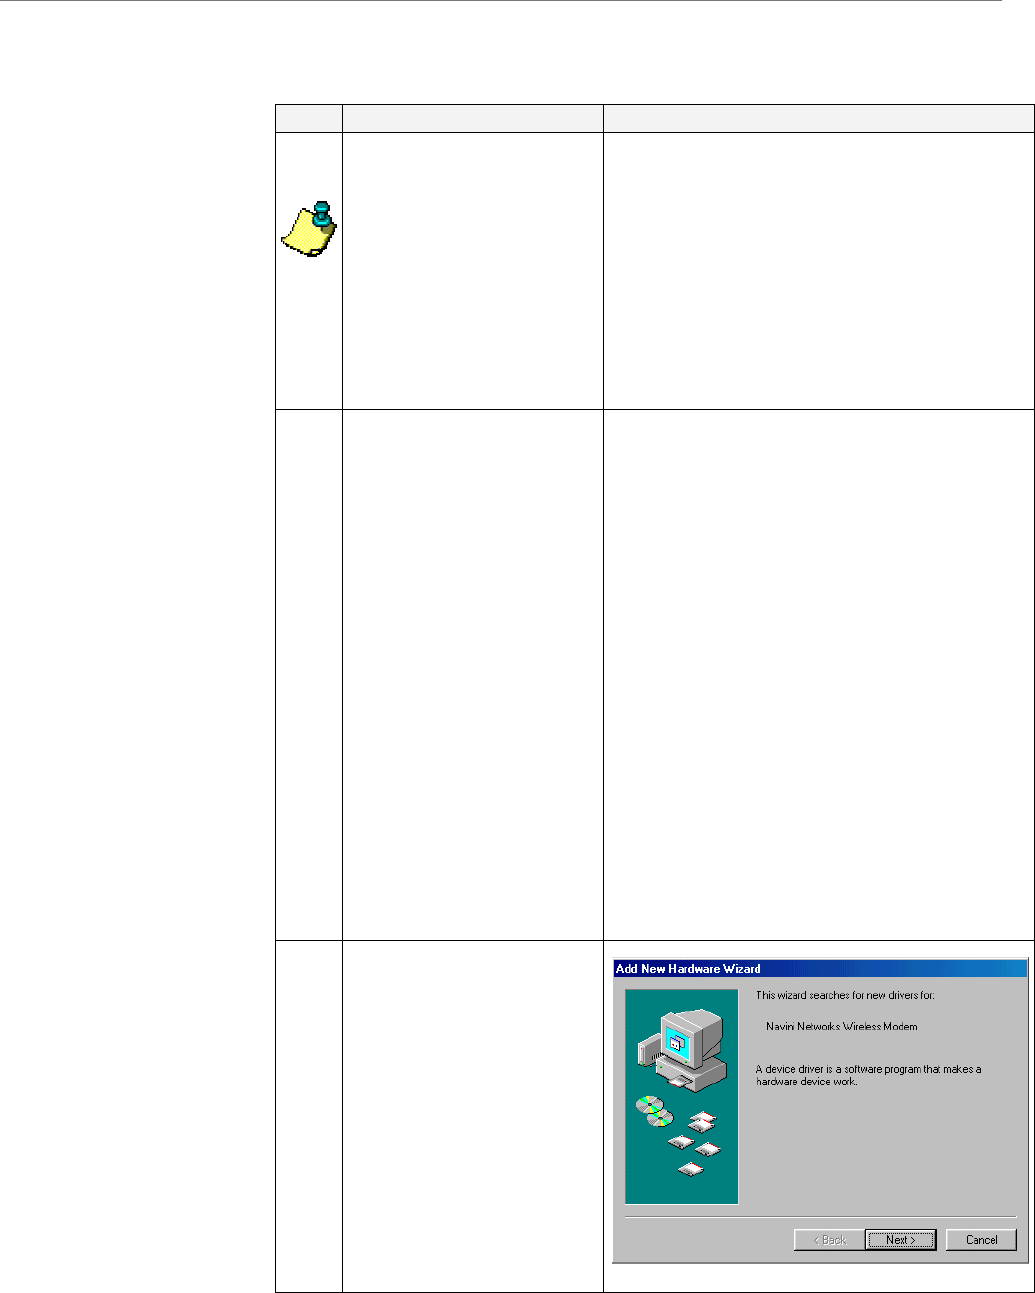
4. Rotate the antenna on
the Ripwave Modem
clockwise 180 degrees
to the UP position. This
reveals the Ripwave
Modem indicator lights.
CAUTION! Rotation or
movement of the
antenna in any other
direction may cause
damage to the Ripwave
Modem.
5. Turn the Modem ON.
On the 2.4 GHz modem,
do this by flipping the
On/Off switch to the up
position. On all other
models, push the On/Off
button in.
6. If the green Power LED
lights, proceed to Step 7.
(On an LCD Modem,
the display turns on.) If
not, there is a problem
with the Modem or the
AC power adapter.
Check all cables for
proper connection. If
there is still a problem,
contact the supplier who
gave you the package.
Signal Strength
Indicator (SSI)
Power
Indicator
Battery
Indicator
Antenna
Signal Strength
Indicator (SSI)
Power
Indicator
Battery
Indicator
Antenna
On/Off
Switch
2.4 GHz
2.3, 2.5, 2.6,
& 3.5 GHz
Power
Indicator
Power
Indicator
Part #40-00097-00 Rev F v1.0 13
May 21, 2004

Ripwave Modem User Guide Navini Networks, Inc.
Installing an Ethernet
Modem, continued
Step Action Illustration
7.
Turn your computer on
and log in.
8. he
g /
f this
Proceed to t
“Troubleshootin
Installing Navini
Monitor” section o
manual.
14 Part #40-00097-00 Rev F v1.0
May 21, 2004

Navini Networks, Inc. Ripwave Modem User Guide
Installing a USB
Modem
(See, also, Addendum 1)
The following instructions are for the installation of a Ripwave
Modem that has a USB connection. Please read all instructions
before attempting the installation. It is advisable to turn off the
computer and the Ripwave Modem before performing the
installation.
Step Action Illustration (using LED Modem)
1. Connect the USB cable
to the USB port on the
computer.
2. Connect the other end of
the USB cable to the
back of the Ripwave
Modem.
3. Connect the AC power
adapter cable to the back
of the Ripwave Modem.
Plug the other end of the
cable into a 110/220
VAC, 60/50 Hz outlet.
CAUTION! Only use
the AC power adapter
specifically supplied
with the Ripwave
Modem. Using any other
adapter may cause
damage to the Modem.
US
B P
o
r
t
AC Power
adapter cable
j
ack
Part #40-00097-00 Rev F v1.0 15
May 21, 2004
Ripwave Modem User Guide Navini Networks, Inc.
Installing a USB Modem,
continued
Step Action Illustration (using LED Modem)
4. Rotate the antenna on
the Ripwave Modem
180 degrees to the UP
position. This reveals
the Modem’s indicator
lights.
CAUTION! Rotation of
the antenna in any other
direction may cause
damage to the Modem.
5. Turn the Modem ON.
On the 2.4 GHz modem,
do this by flipping the
On/Off switch to the up
position. On all other
models, push the On/Off
button in.
6. If the green Power LED
lights, proceed to Step 7.
(On an LCD Modem,
the display turns on.) If
not, there is a problem
with the Modem or the
AC Power Adapter.
Check all cables for
proper connection. If
there is still a problem,
contact the supplier who
gave you the package.
Signal Strength
Indicator (SSI)
Power
Indicator
Battery
Indicator
Antenna
Signal Strength
Indicator (SSI)
Power
Indicator
Battery
Indicator
Antenna
On/Off
Switch
2.4 GHz 2.3, 2.5, 2.6
& 3.5 GHz
Power
Indicator
Power
Indicator
16 Part #40-00097-00 Rev F v1.0
May 21, 2004
Navini Networks, Inc. Ripwave Modem User Guide
Installing a USB Modem,
Continued
Step Action Illustration
7.
Turn your computer ON
and log in.
NOTE: For Windows
2000, you must be
logged into an account
having Administrative
privileges to install the
Ripwave Modem and its
software.
8. Plug-and-Play will
detect the Ripwave
device now attached to
the computer, and it will
launch the Plug-and-
Play application.
If this does not happen,
the problem may be due
to one of the following:
• Windows NT and
Windows 95 do not
support a USB
device.
• The Modem is not
turned on.
• The Modem is not
connected properly
to the computer.
9. The Add New Hardware
Wizard dialog box
appears. Click Next to
continue.
Part #40-00097-00 Rev F v1.0 17
May 21, 2004
Ripwave Modem User Guide Navini Networks, Inc.
Installing a USB Modem,
Continued
Step Action Illustration
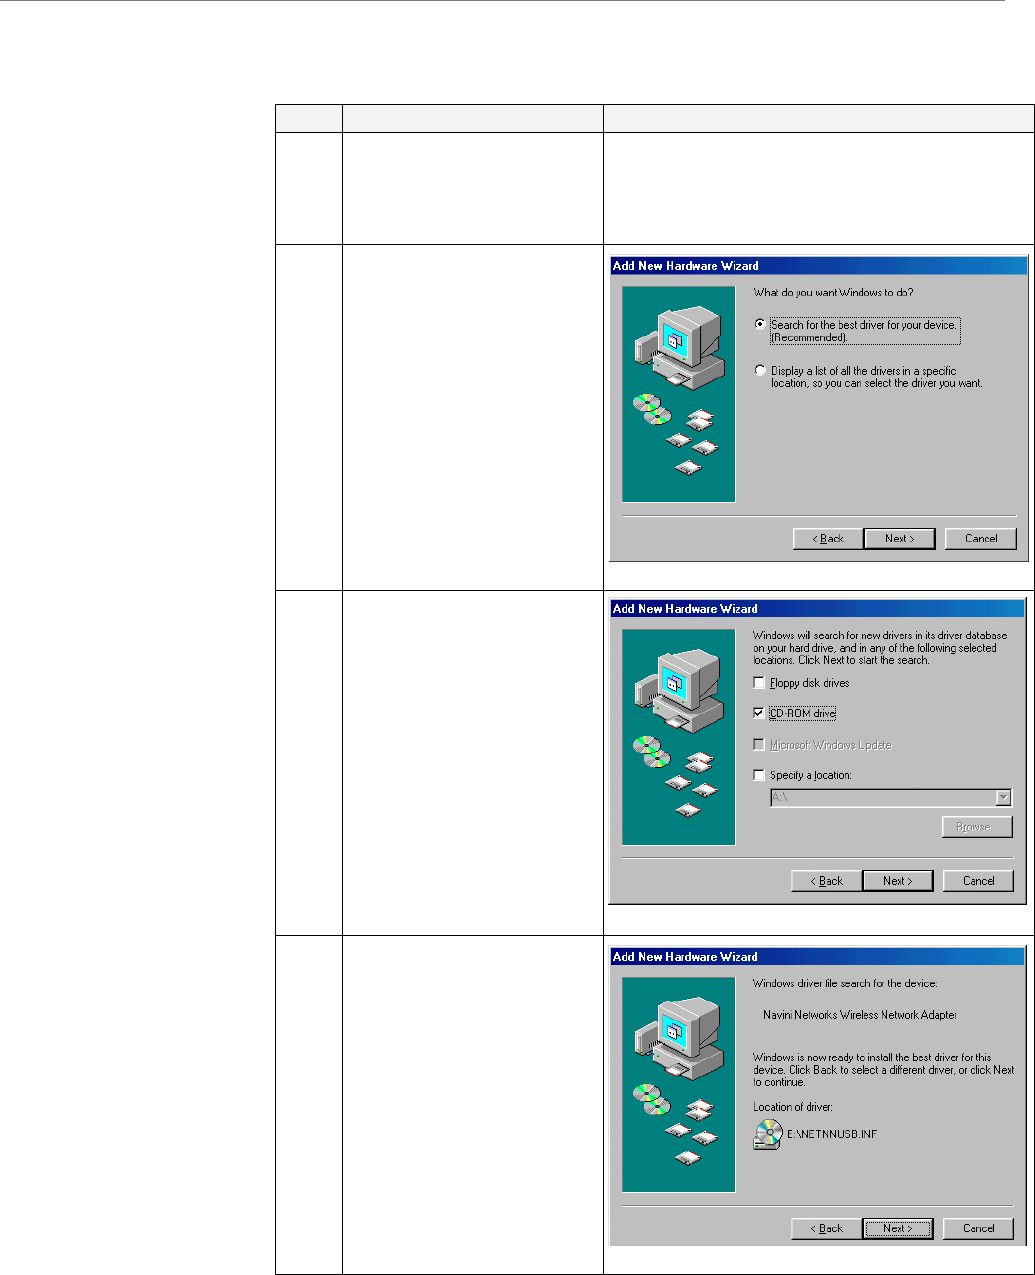
10. Insert the Ripwave
Installation CD into the
computer’s CD-ROM
drive.
11. Select the ‘Search for
the best driver for your
device’ option. Click
Next to continue.
12. Select the ‘CD-ROM
drive’ checkbox. Click
Next to continue.
13. Confirm that the drive
location is correct (it
may be different than
the one shown in the
illustration). The file to
be installed should say
‘NETNNUSB.INF”.
Click Next to continue.
18 Part #40-00097-00 Rev F v1.0
May 21, 2004
Navini Networks, Inc. Ripwave Modem User Guide
Installing a USB Modem,
Continued
Accessing the
Internet
Step Action Illustration
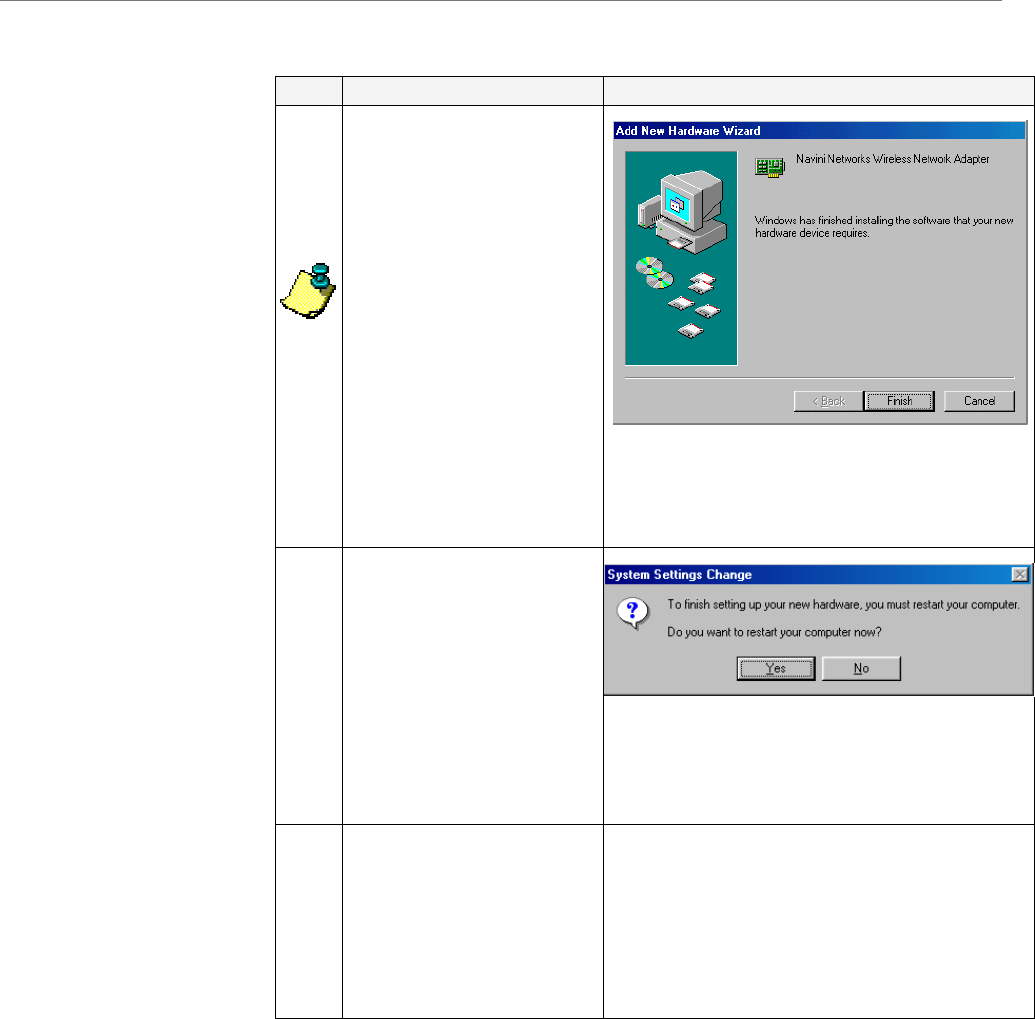
14. Windows will finish
installing the software
files required for the
Ripwave Modem
operation. Click Finish.
NOTE: For Window 98,
a window may appear
asking for drivers to be
installed from the
Windows 98 setup disk.
If so, insert the
Windows 98 setup disk
into the CD-ROM drive
at this time and accept
the defaults.
15. After clicking Finish,
the System Settings
Change window appears
asking if you want to
restart your computer
now. Click Yes.
You must restart your
computer at this point
before proceeding.
16. After the computer
restart is complete,
proceed to the
“Troubleshooting /
Installing Navini
Monitor” section of this
manual.
With your Modem now installed, and both the Modem and
computer powered on, you should be able to surf the Internet! To
access the Internet, open the web browser that is installed on your
computer.
Part #40-00097-00 Rev F v1.0 19
May 21, 2004
Ripwave Modem User Guide Navini Networks, Inc.
Troubleshooting
Indicator Lights or
LCD Display
After installation, if you are experiencing difficulties with your
Internet connection, please review the Minimum Computing
Requirements and Addendum 1 to ensure your computer meets
those requirements. Next, go back over the installation procedures
and ensure those steps were completed properly.
Assuming the computer requirements are met and the installation
steps were completed as required, you will need to observe the
light indicators on the front of the Modem. You also may need to
install the monitoring software. This software is provided on a CD
that came in your Modem package. Navini offers two types of
monitoring software. The first type, called the Navini Ripwave
Monitor, is available with Ripwave Modems that have a software
release prior to release 4.0. The second type, called the Navini
Diagnostics Tool, is available with Ripwave Modems that have a
software release of 4.0 or greater.
The Navini Monitor and Navini Diagnostics software assists in
solving connection problems as well as providing information
about the battery power in cases where batteries are used. Batteries
are optional with some Ripwave LED Modems.
The indicator lights on the front of the LED Modem provide
valuable information about its operation. They change appearance
to designate the state of the items that they represent. Used in
conjunction with the monitoring software, you can troubleshoot
signal issues, network connections, and power problems.
The LCD Display performs the same function as the indicator
lights. However, instead of using colored lights, it provides a
written message and symbols within the display.
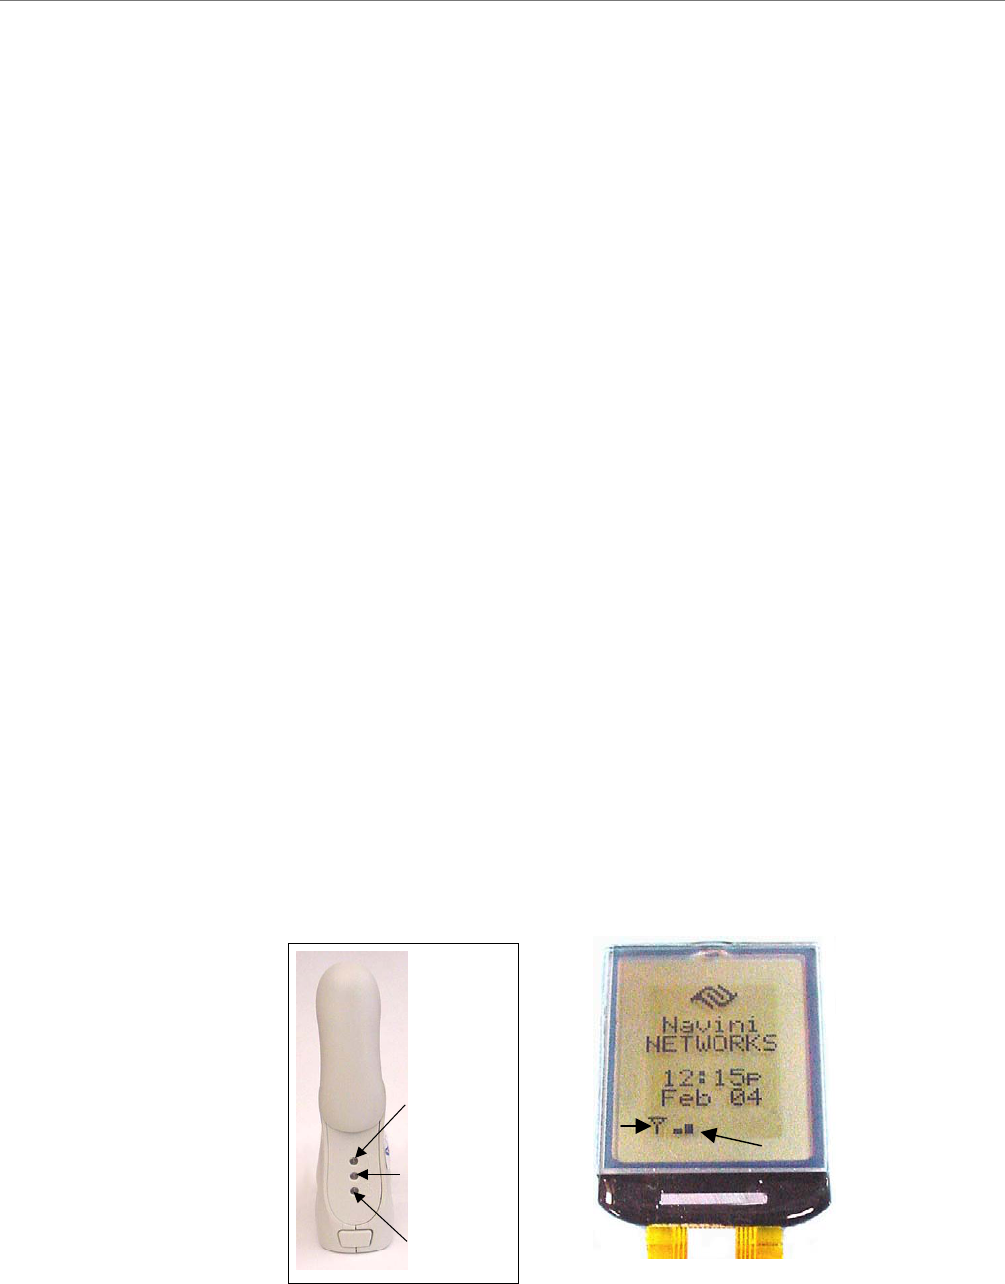
Signal Strength
Indicator (SSI)
Power
Indicator
Battery
Indicator
Signal Strength
Indicator (SSI)
Power
Indicator
Battery
Indicator
Power
Indicator
Battery
Indicator
Sync Indicator
Signal Strength Bars
20 Part #40-00097-00 Rev F v1.0
May 21, 2004

Navini Networks, Inc. Ripwave Modem User Guide
Indicator Lights or LCD
Display, Continued
Installing
Ripwave
Monitor
LED Indicator Lights:
Signal Strength Indicator (SSI) Light
Constant Green: Strong signal
Constant Yellow: Medium signal
Constant Red: Weak signal
Flashing Red: No signal
Battery Indicator Light
Constant Yellow: Battery is charging
Constant Red: Battery is less than 20% charged
Flashing Red: Battery is less than 10% charged
Off: Battery is fully charged or not installed
Power Indicator Light
Constant Green: The Modem is ON (AC or DC power)
LCD Display Symbols
Sync Indicator Antenna symbol appears when the Modem is in sync and
s
y
nc stren
g
th = −110 dBm.
Signal Strength
Bars
1 bar means signal strength > −110 dBm and ≤ −90 dBm
2 bars mean signal strength > −90 dBm and ≤ −80 dBm
3 bars mean signal strength > −80 dBm and ≤ −70 dBm
4 bars mean signal strength > −70 dBm
Navini’s monitoring software (Ripwave Monitor or Navini
Diagnostics) provides two types of information: signal strength and
quality of the incoming signal. It also can provide information
about the connectivity to the Service Provider’s network. These
displays may be required when troubleshooting Modem problems.
The next few sections will discuss how to install, troubleshoot
with, and uninstall your Ripwave Monitor software. If your
Ripwave Modem has a software release of 4.0 or greater, you do
not have the Ripwave Monitor. You have the Navini Diagnostics
software. You should refer to the sections that discuss how to
install, troubleshoot with, and uninstall your Navini Diagnostics
software.
Before you install your Ripwave Monitor software, please note:
For Windows NT and Windows 2000 you must log into an
account having Administrative privileges in order to install the
Navini Monitor software.
For Windows 95, 98, and 98SE Operating Systems (OS), the
OS CD may be required to complete this installation. If
prompted, insert the OS CD into the CD-ROM drive and accept
the defaults.
Part #40-00097-00 Rev F v1.0 21
May 21, 2004
Ripwave Modem User Guide Navini Networks, Inc.
Installing Ripwave
Monitor, Continued
After the Ripwave Monitor software is loaded, if you must
upgrade your PC OS, first uninstall Ripwave Monitor prior to
upgrading the OS. Otherwise, Ripwave Monitor will not work.
See Uninstall instructions in this Guide.
•
Step Action Illustration
1. Shut down all programs,
including anti-virus
software programs,
before installing the
Ripwave Monitor
software.
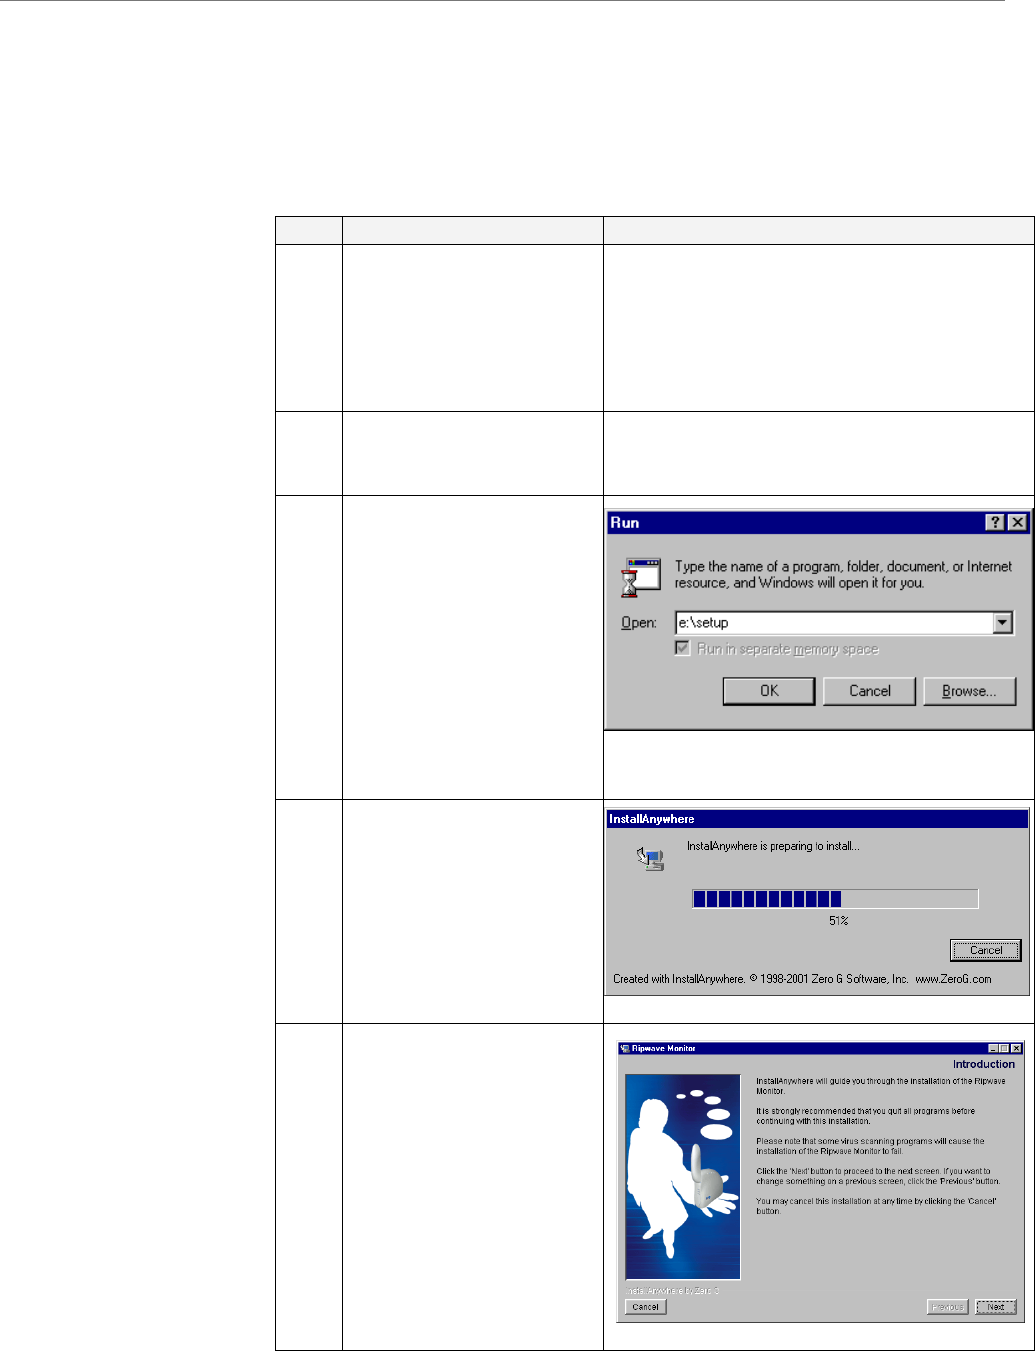
2. Insert the Ripwave
Monitor Installation CD
into the CD-ROM drive.
3. At the bottom left-hand
corner of your screen,
click Start > Run. In
the Run window, enter
e:\setup in the Open
field (where “e”
represents the CD
drive). Use whatever
letter represents your
CD drive. Click OK to
continue.
4. The InstallAnywhere
window appears. The
progress bar indicates
that InstallAnywhere has
initialized.
5. The Ripwave Monitor
Introduction screen
appears. Click Next to
continue.
22 Part #40-00097-00 Rev F v1.0
May 21, 2004
Navini Networks, Inc. Ripwave Modem User Guide
Installing Ripwave
Monitor, continued
Step Action Illustration
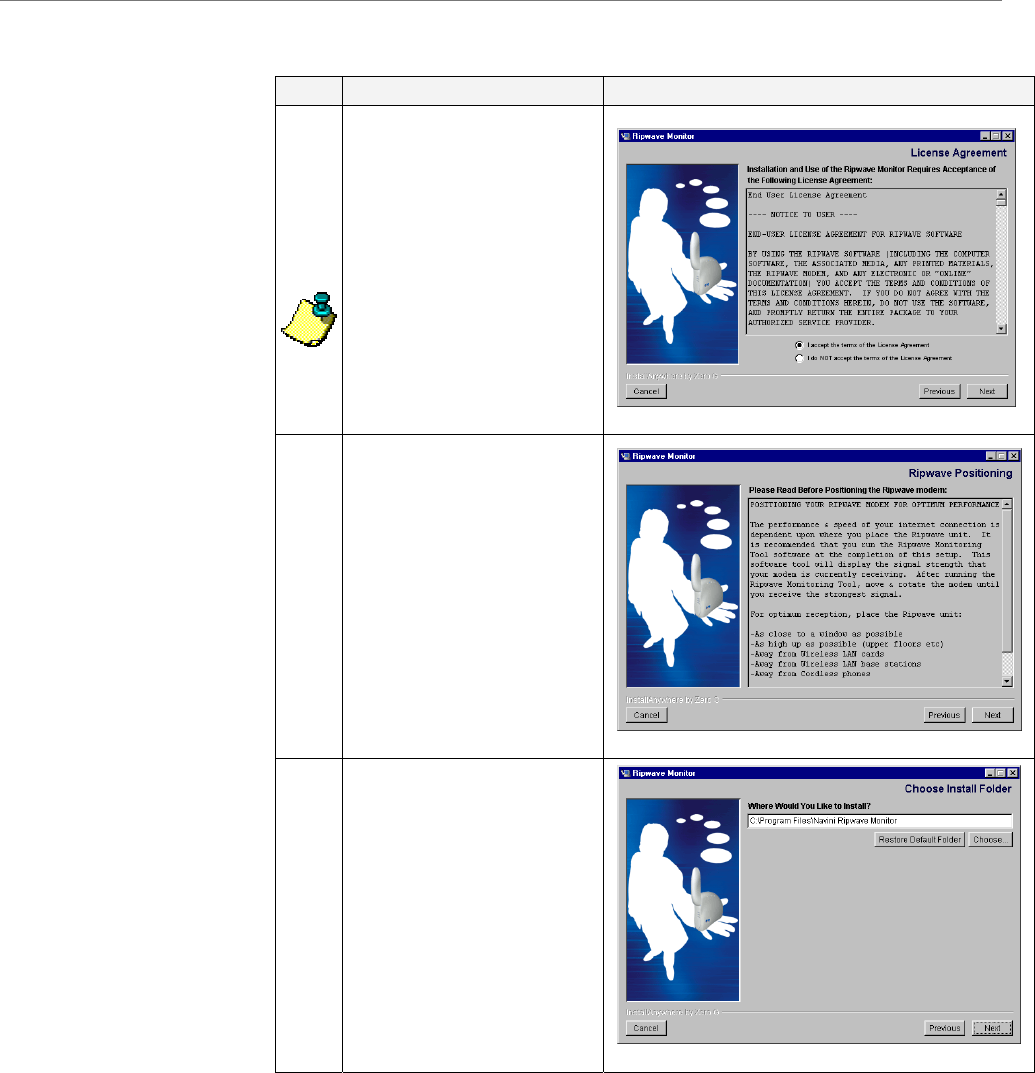
6. The License Agreement
screen appears. Read the
Licensing Agreement.
Select the I Accept
option, and click Next to
continue.
NOTE: If the License
Agreement is not
accepted, you cannot
install the software.
7. The Ripwave
Positioning screen
appears. Read the screen
for positioning the
Ripwave Modem for
optimum performance.
Click Next to continue.
8. The Choose Install
Folder screen appears.
Enter the name of the
folder where you wish to
install the software.
Click Next to continue.
The default installation
folder provided by the
software is shown in the
illustration.
Part #40-00097-00 Rev F v1.0 23
May 21, 2004
Ripwave Modem User Guide Navini Networks, Inc.
Installing Ripwave
Monitor, continued
Step Action Illustration
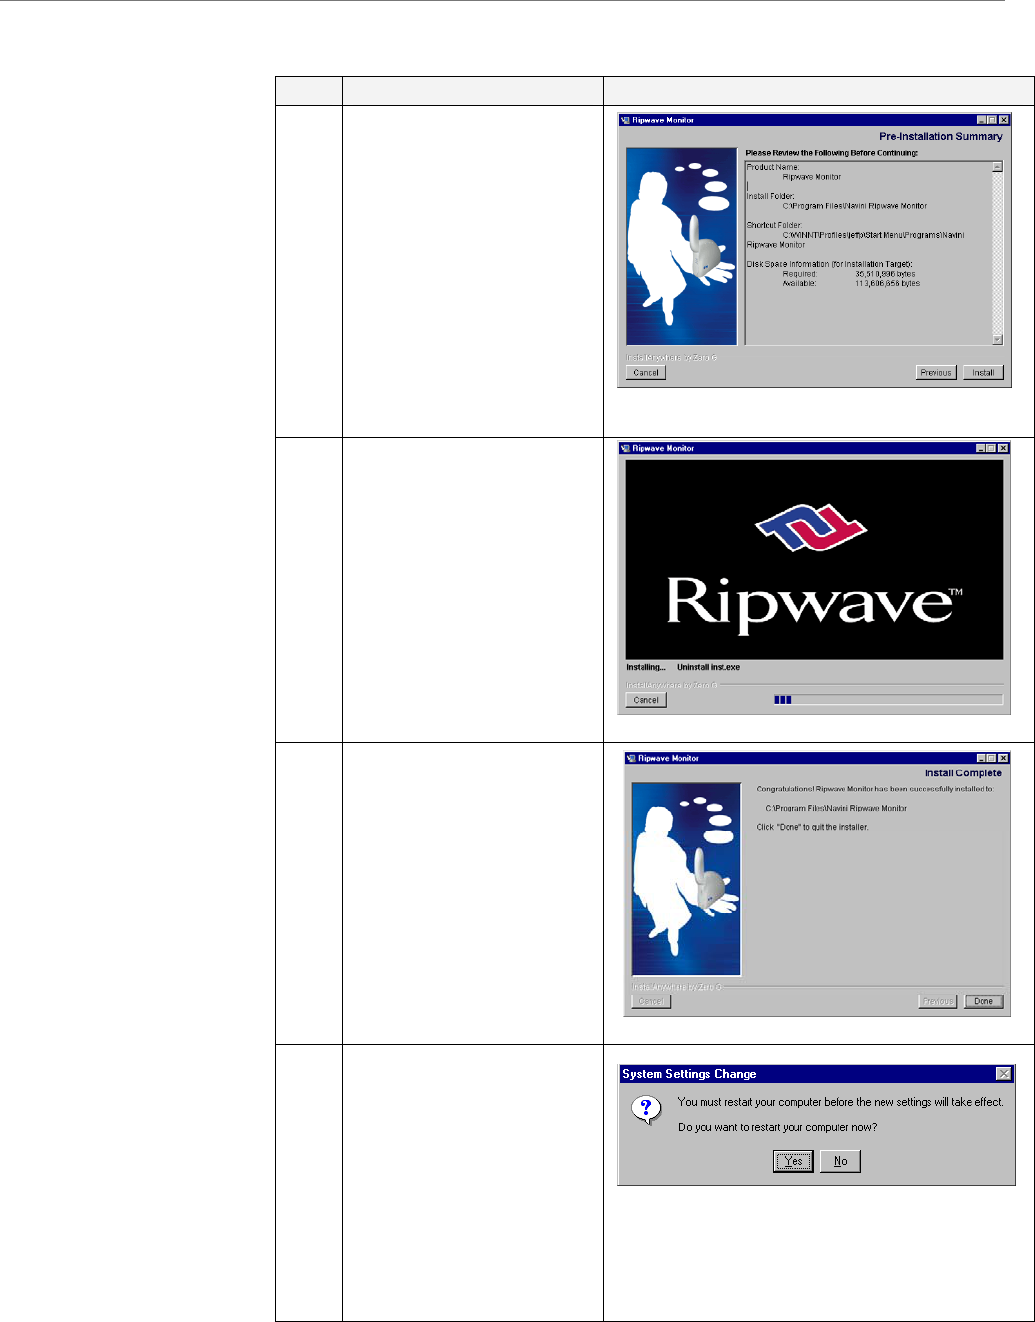
9. The Pre-Installation
Summary screen
appears. Review the
contents for accuracy.
Click Install to
continue.
For your installation and
computer, this screen
may have different
information than what is
shown in the illustration.
10. The Installing screen
will display as the
application files are
loaded.
11 At the Install Complete
screen, click Done to
close the window.
12. After clicking Done the
System Settings Change
window appears, asking
if you want to restart
your computer now.
Click Yes.
NOTE: You must restart
your computer at this
point before proceeding.
24 Part #40-00097-00 Rev F v1.0
May 21, 2004
Navini Networks, Inc. Ripwave Modem User Guide
Troubleshooting
Using Ripwave
Monitor
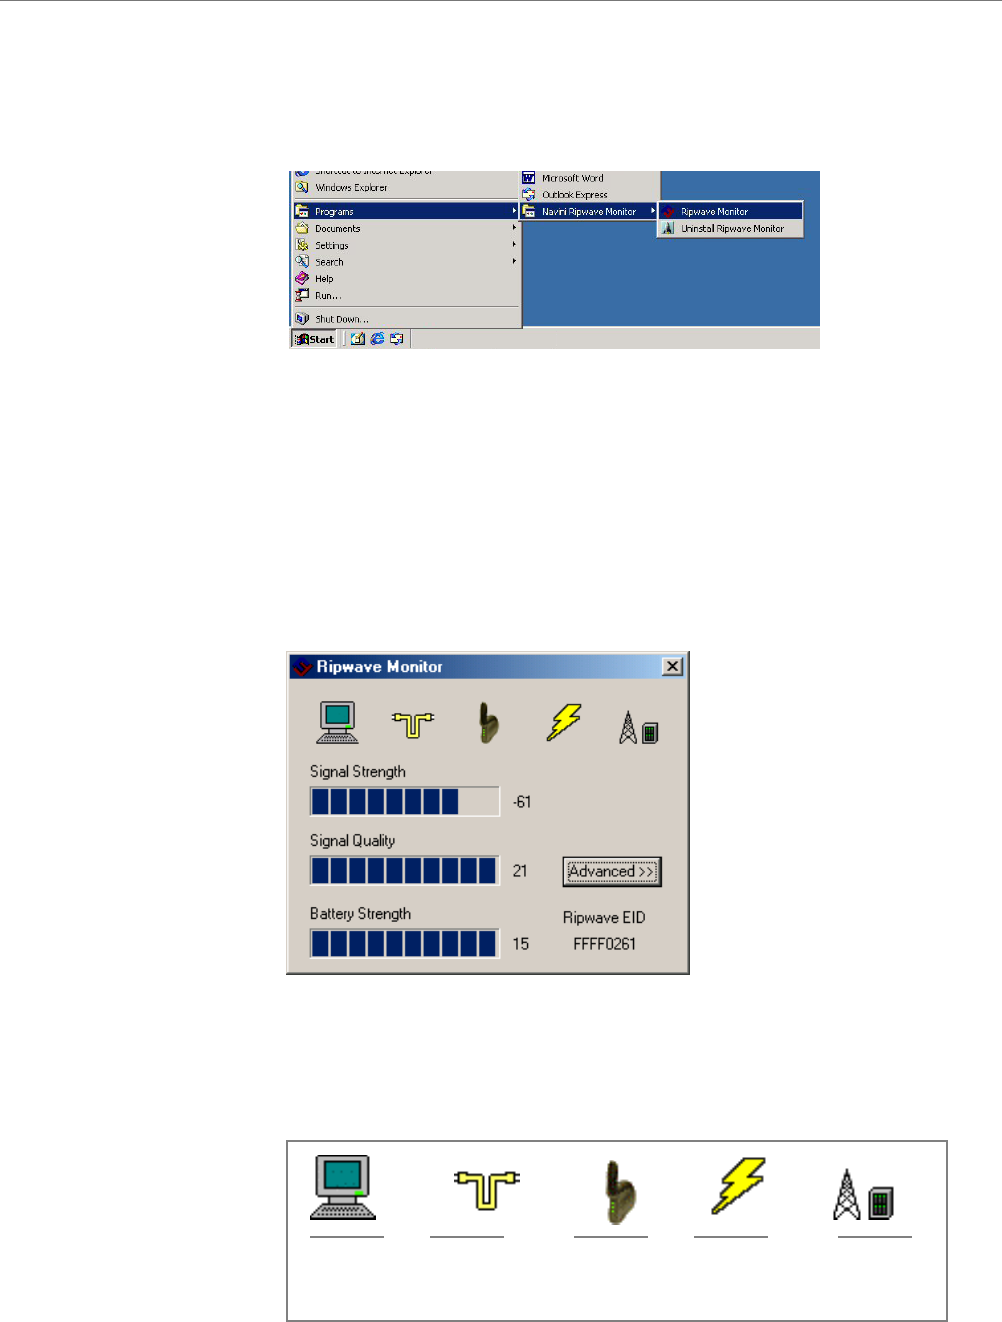
o open the Ripwave Monitor software application, click on the
Start” button and select Programs→Navini Ripwave
onitor→Ripwave Monitor.
appear in the toolbox tray of your
omputer. Double-click on this icon.
rner of the window shows
e Equipment Identification (EID) for your specific Ripwave
e PC and the
dem and the
ase Station, and the Base Station with which the Modem is
ommunicating.
T
“
M
The Ripwave Monitor icon will
c
A window with icons and, provided your Modem is on, bar graphs,
will pop up. Notice the bottom right co
th
Modem. If you talk with a Service Technician while
troubleshooting, you may be asked for this number.
The icons represent the PC, the connection between th
Modem, the Modem, the connection between the Mo
B
c
Computer Computer to Ripwave Ripwave to Base Station
Ripwave Modem Base Station
connection wireless connection
Computer Computer to Ripwave Ripwave to Base Station
Ripwave Modem Base Station
connection wireless connection
Part #40-00097-00 Rev F v1.0 25
May 21, 2004
Ripwave Modem User Guide Navini Networks, Inc.
Troubleshooting Using
Ripwave Monitor,
continued
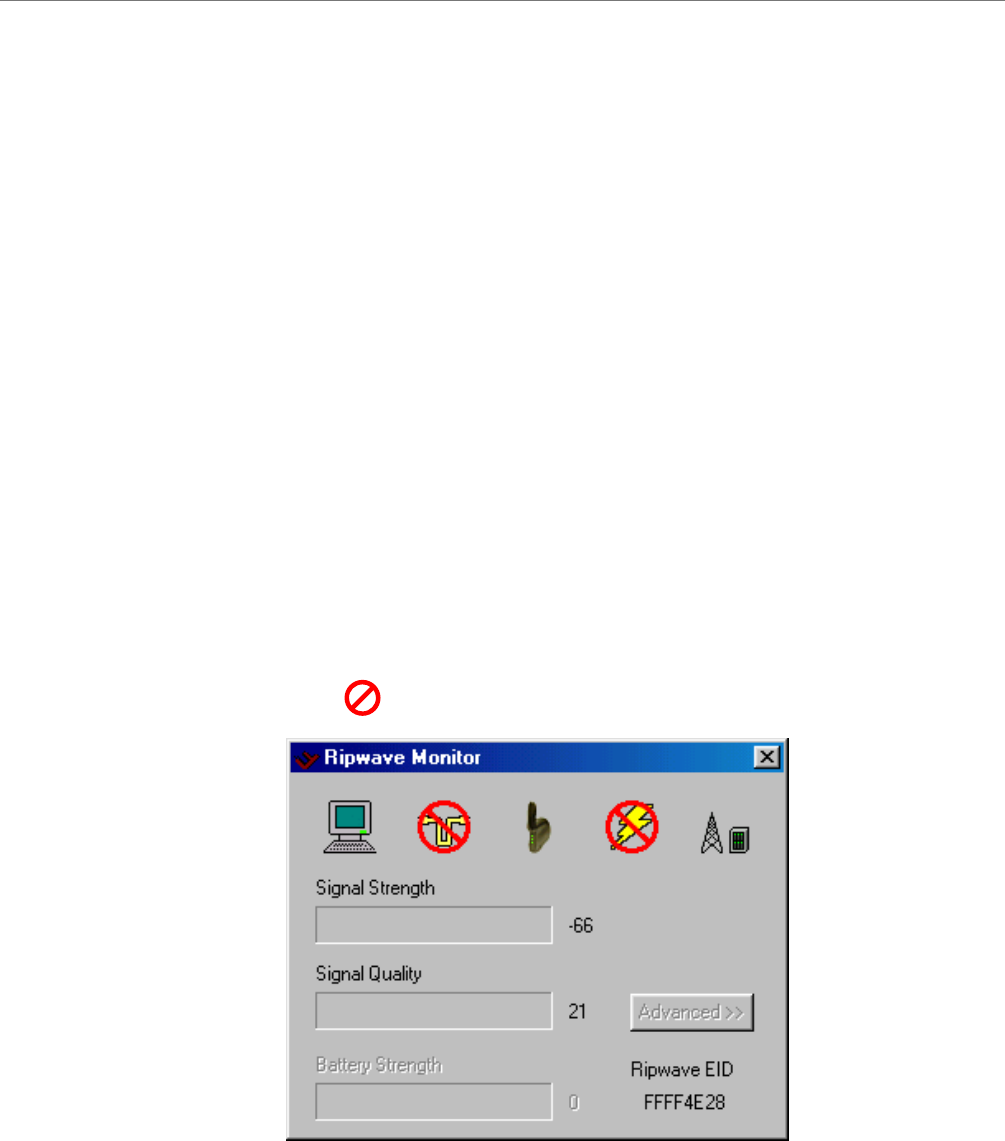
The Signal Strength and Signal Quality are dynamic bar graphs
that indicate how well your Modem is receiving signals from the
Base Station. To increase the strength and quality of the signal,
change the location of the Ripwave Modem. Try moving it closer
to a window, to a higher location, away from other wireless devices
(microwave ovens, cordless phones), and away from metal objects
is repositioned,
bserve the Signal Strength and Signal Quality bar graphs. Position
e Modem for maximum signal strength and quality.
you make a service call to your Service Provider, the Technician
ay ask you to read the numbers to the right of the signal bar
raphs. These will help the Technician to evaluate the best position
r your Ripwave Modem. The Battery Strength bar graph and the
umber to the right of it indicate how much charge is left in the
attery. Not all Modems have the battery option. Only some LED
odems have a battery option. Without a battery in the Modem,
dem is
ot o ional; the wireless signal between Modem and Base
Station is down; and there is no battery being used.
(shelves, file cabinets). As the Ripwave Modem
o
th
If
m
g
fo
n
b
M
the Battery Strength bar graph and number will be disabled (grayed
out).
If the connection between the PC and the Modem or between the
Modem and the Base Station is interrupted, a, red circle with a
slash will be positioned over the corresponding icon.
In this example, the cable connecting the computer and Mo
n perat
26 Part #40-00097-00 Rev F v1.0
May 21, 2004
Navini Networks, Inc. Ripwave Modem User Guide
Troubleshooting Using
Ripwave Monitor,
continued
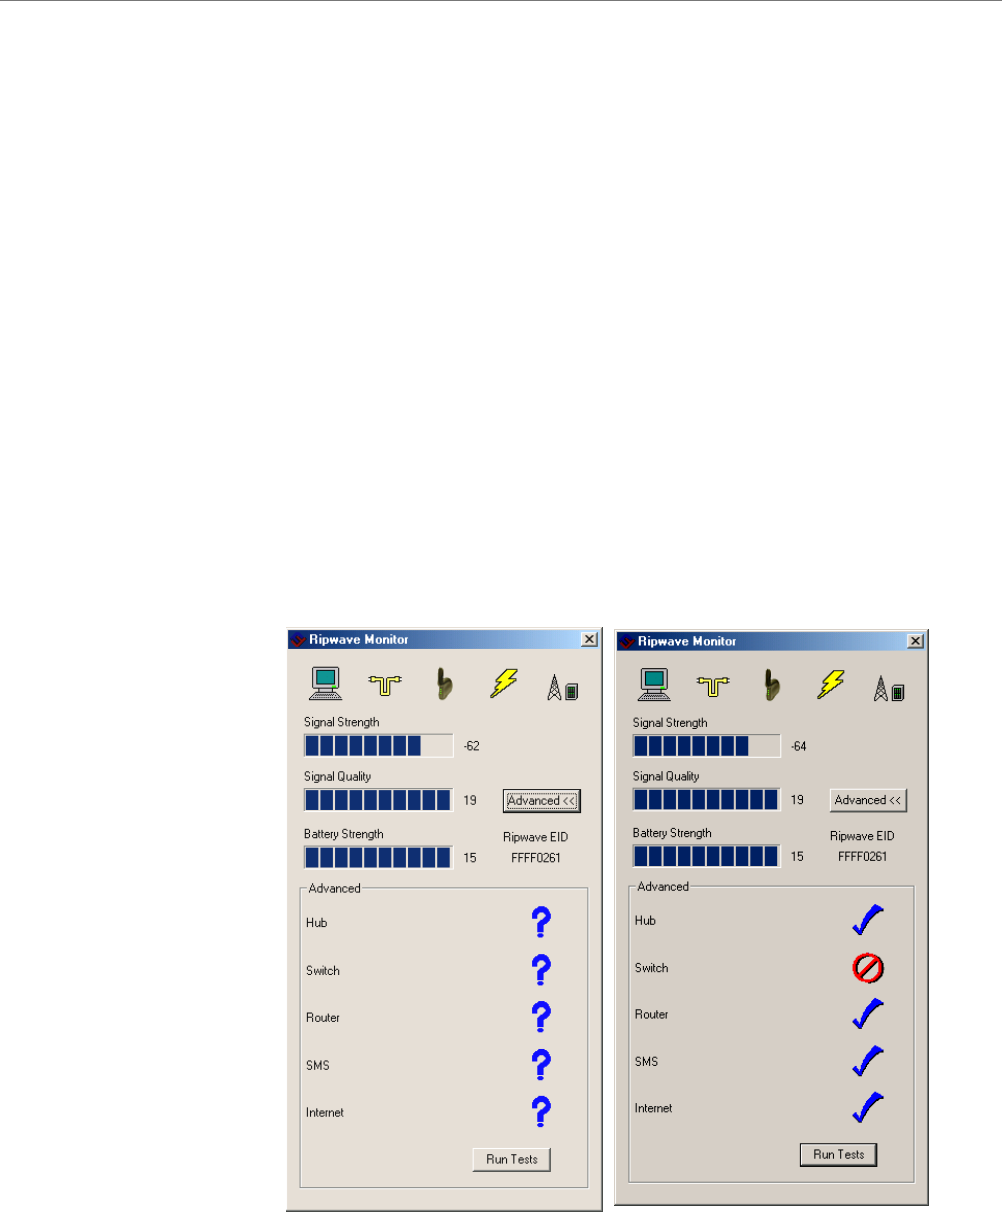
To check connectivity to the Service Provider’s network, click the
Advanced button on the Ripwave Monitor window. The Advanced
section of the window appears and displays several strings of
characters representing selected IP-addressable nodes in the
network. These strings of characters (displayed) and the associated
IP addresses (not displayed) are configurable by the Service
Provider on a BTS-per-BTS basis. Note that if the connection
between the Ripwave Modem and the Base Station is down, the
Advanced button will be disabled (grayed out).
The blue question marks on the right side of the Advanced section
indicate that all connections are untested. Now click on the Run
Tests button at the bottom of the window. The PC will attempt to
ping the IP address associated with each one of the character
rings. Each blue question mark will change to either a blue
heckmark or a red circle with a slash mark. A blue checkmark
dicates that the connection to the IP is good. A red circle with a
ash mark indicates there is a problem with that connection to that
.
ve
st
c
in
sl
IP
The features of the Advanced and Run Tests buttons are to be used
in conjunction with your Service Provider Technician to resol
problems. There is no need to use these features unless you are
experiencing problems with the Modem.
Part #40-00097-00 Rev F v1.0 27
May 21, 2004
Ripwave Modem User Guide Navini Networks, Inc.
28 Part #40-00097-00 Rev F v1.0
May 21, 2004
for some reason you need to uninstall the Ripwave Monitor
ftware, e.g., to upgrade your Operating System software, follow
Uninstalling
Ripwave
Monitor
If
so
the procedure below.
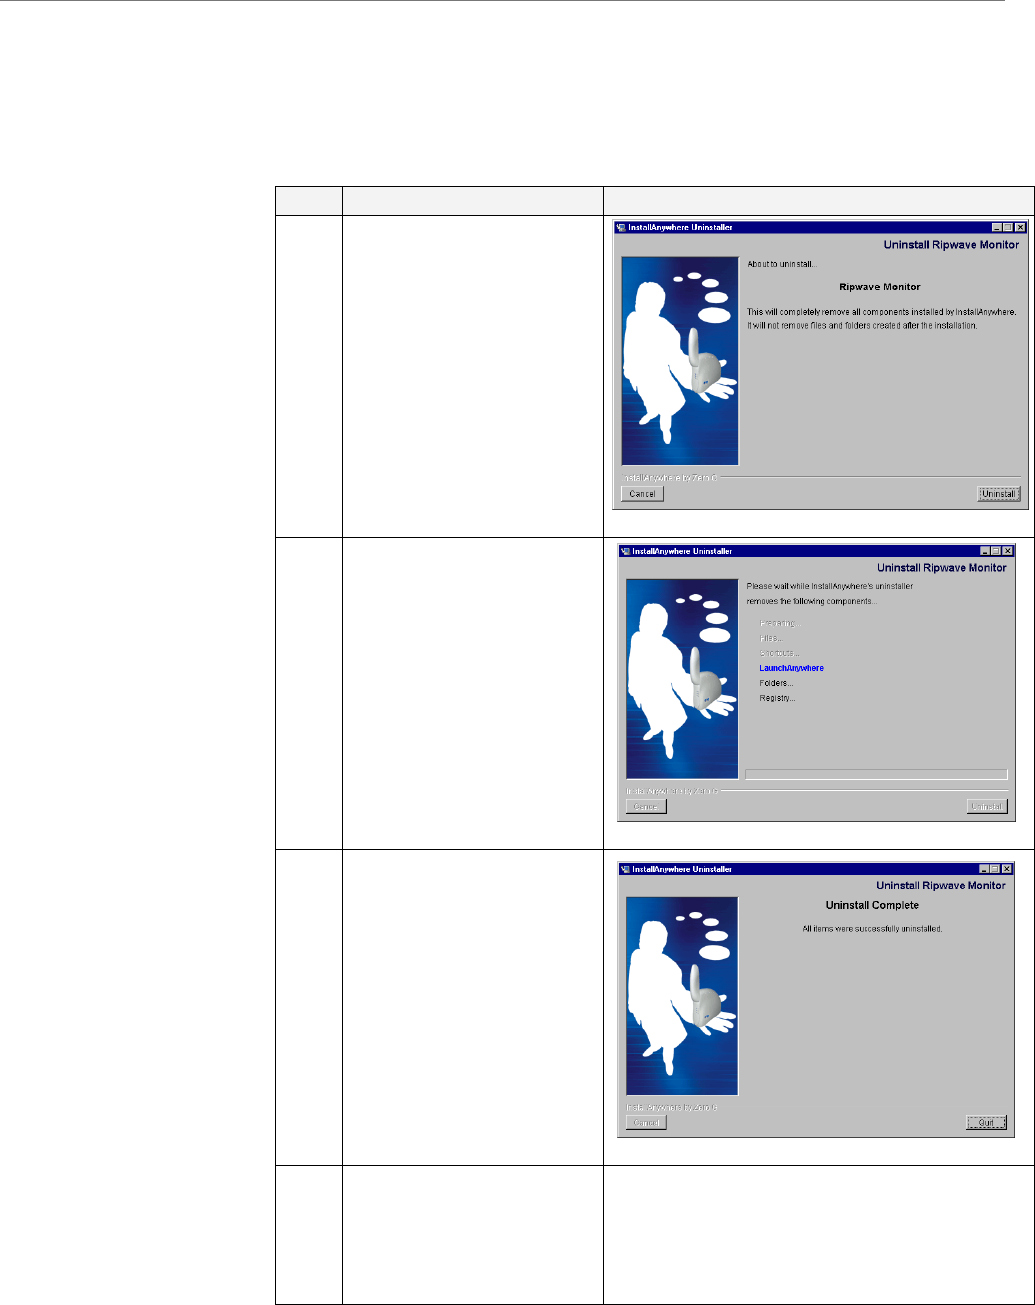
Step Action Illustration
1. On your computer
screen lower left corner,
click on Start >
Programs > Navini
Navini Monitor >
Uninstall Navini
Monitor. The Install-
Anywhere Uninstaller
screen appears. Click
Uninstall.
2. The screen will cycle
through as the
application files are
uninstalled.
3. The Uninstall Complete
screen appears when
finished. Click on Quit
to close the Uninstall
screen.
4. Restart the PC to
complete the uninstall
process. This will ensure
it functions properly
after uninstalling.
Navini Networks, Inc. Ripwave Modem User Guide
Installing Navini
iagnostics
NavDiag)
our a software release prior to 4.0, you
have the Navini Monitor software and not the Navini Diagnostics.
D
(
If y Ripwave Modem has
Step Action Illustration
1. Shut down all programs,
including anti-virus
software programs,
before installing the
Navini Diagnostics
software.
2. Insert the Navini
Diagnositcs Installation
CD into the CD-ROM
drive.
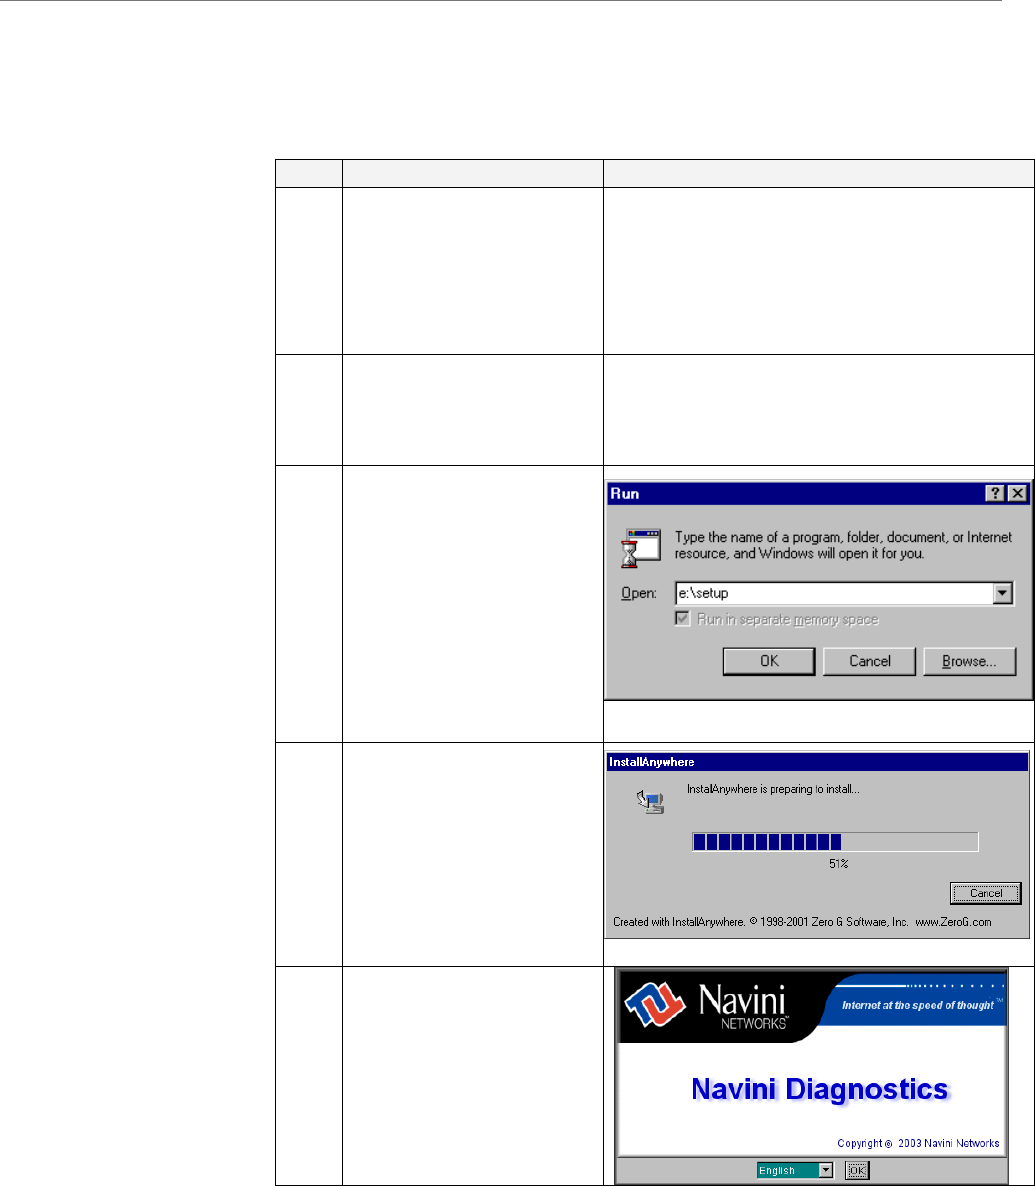
3. d
. In
the Run window, enter
e:\setup in the Open
field (where “e”
represents the CD drive
wher you inserted the
At the bottom left-han
corner of your screen,
click Start > Run
installation CD). Click
OK to continue.
4.
re has
The InstallAnywhere
window appears. The
progress bar indicates
that InstallAnywhe
initialized.
5. The Navini Diagnostics
Language screen
appears. Select a
language and click OK
to continue.
Part #40-00097-00 Rev F v1.0 29
May 21, 2004
Ripwave Modem User Guide Navini Networks, Inc.
Part #40-00097-00 Rev F v1.0
May 21, 2004
stalling Navini
iagnostics, Continued
In
D
Step Action Illustration
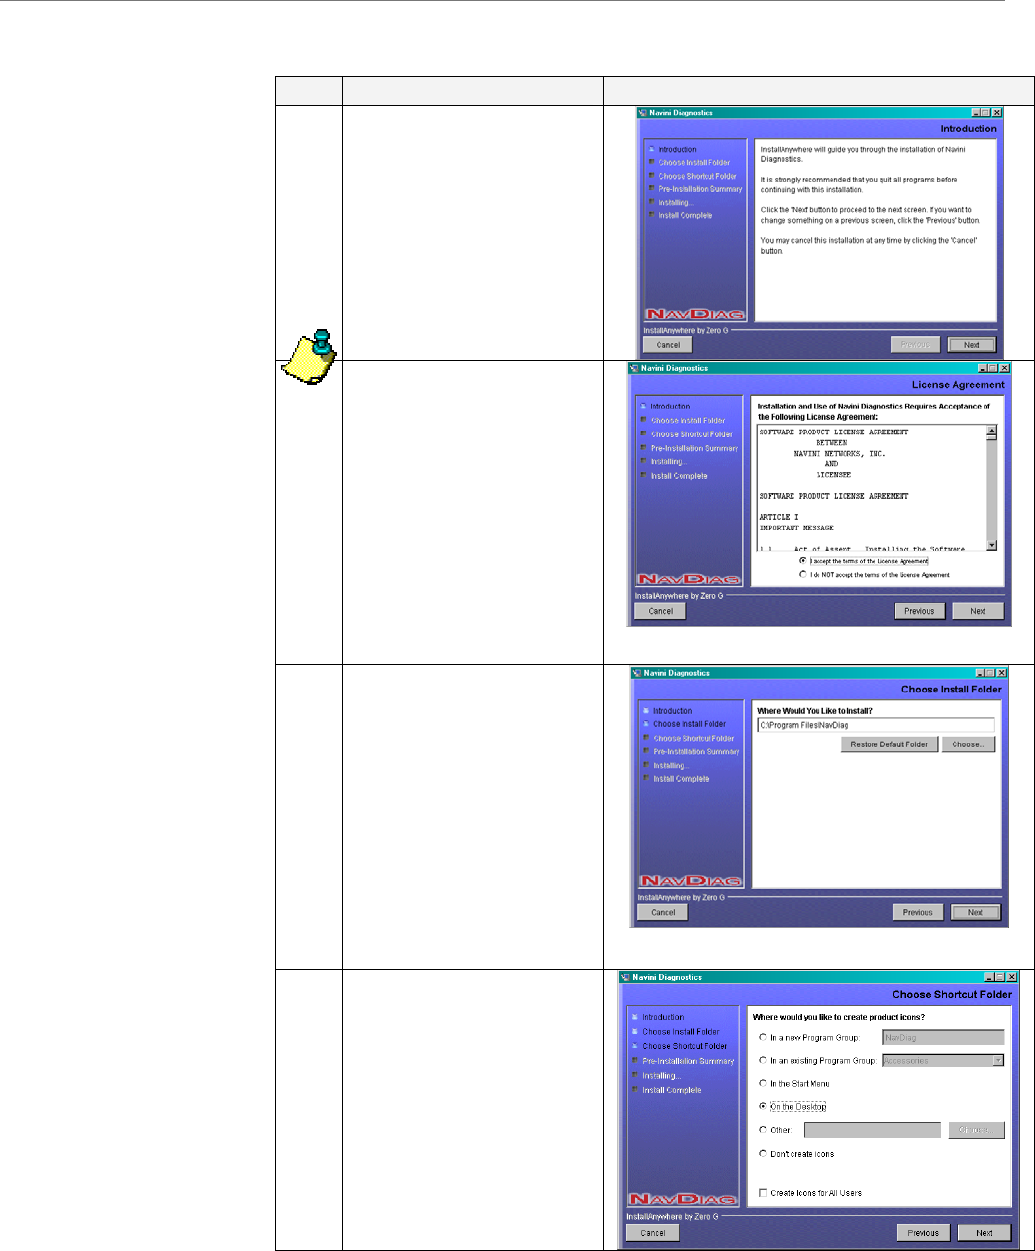
6. The Navini Diagnostics
Introduction screen
appears. Click Next to
continue.
7. The License Agreemen
screen appears. Read th
Licensing Agreement.
Select the I Accept
option, and
t
e
click Next to
continue.
NOTE: If the License
not
e.
Agreement is not
accepted, you can
install the softwar
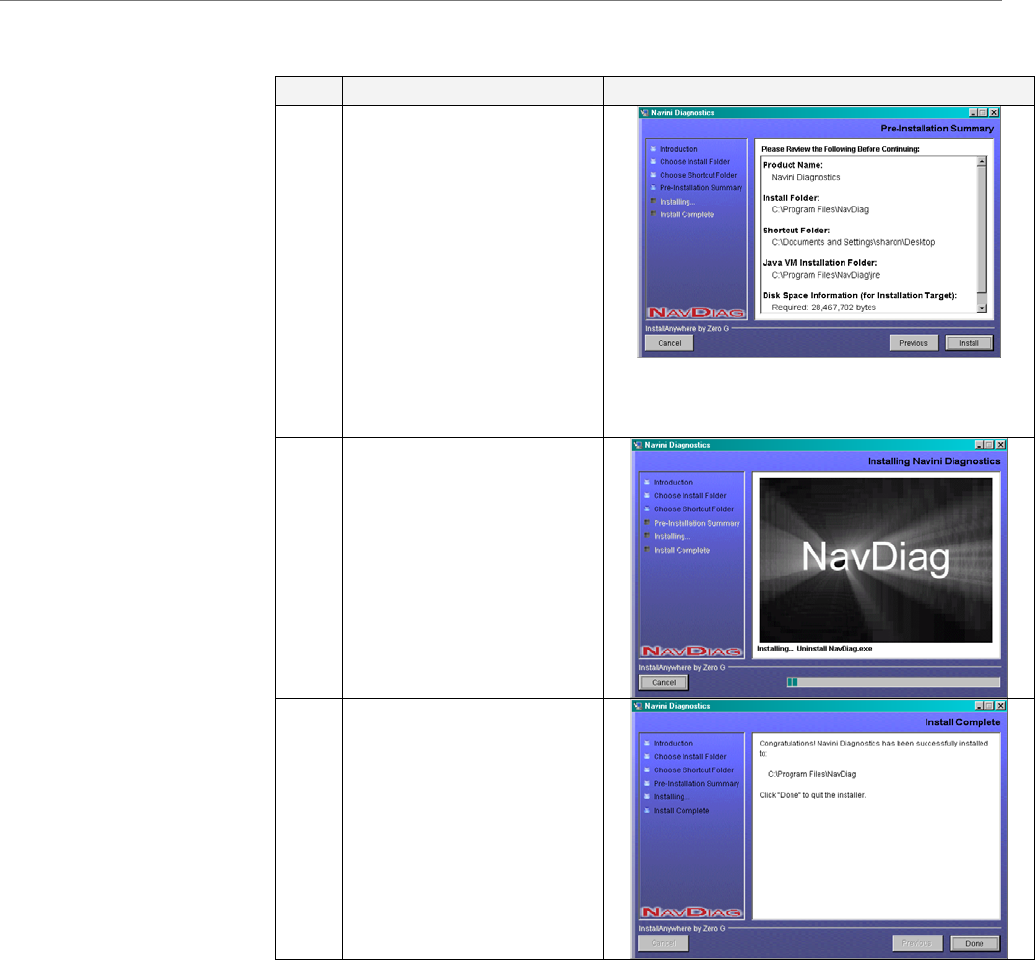
8.
appears.
Enter the name of the
folder where you wish to
install the software.
Click Next to continue.
The default installation
folder provided by the
software is shown in the
The Choose Install
Folder screen
illustration.
9. eThe Choos Shortc t
e rs.
Select On the Desktop
and click Next to
continue.
u
aFolder screen app
30
Navini Networks, Inc. Ripwave Modem User Guide
Installing Navini
iagnostics, Continued
D
Step Action Illustration
10.
all to
ontinue.
n and
at is
.
The Pre-Installation
Summary screen
appears. Review the
contents for accuracy.
Click Inst
c
For your installatio
computer, this screen
may have different
information than wh
shown in the illustration
11. The Installing screen
will display as the
application files are
loaded.
12. At the Install Complete
screen, click Done to
close the window.
Part #40-00097-00 Rev F v1.0 31
May 21, 2004
Ripwave Modem User Guide Navini Networks, Inc.
Troubleshooting
sing Navini
iagnostics
NavDiag)
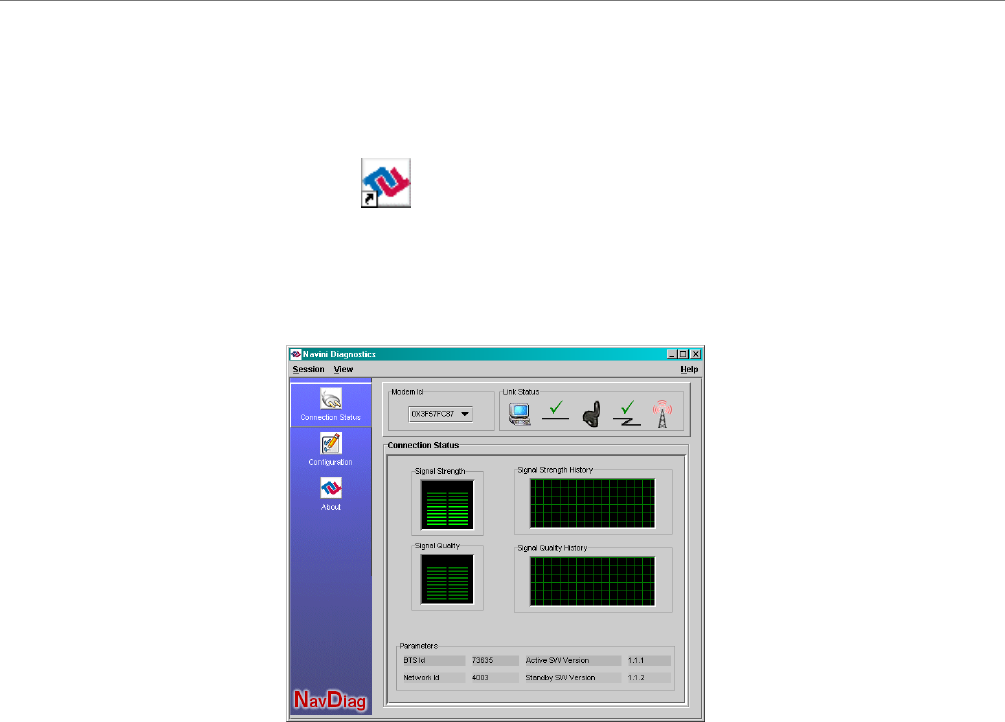
To open the Navini Diagnostics software application, double-click
on the Navini Diagnostics icon on your desktop.
U
D
(
Navini Diagnostics.lnk
The Connection Status screen will open and display data if the
Modem is in session. The screen refreshes live data every second.
The icons represent the PC, the connection between the PC and the
odem, the Modem, the connection between the Modem and the
ase Station, and the Base Station to which the Modem is
ommunicating. Check marks over the connections indicate
orking connections.
he Signal Strength and Signal Quality are dynamic bar areas that
dicate how well your Modem is receiving signals from the Base
tation. Green lines indicate a strong signal. Orange lines indicate
moderately strong signal while red lines indicate a weak signal.
n, away from other wireless devices (microwave
ones), and away from metal objects (shelves, file
abinets). As the Ripwave Modem is repositioned, observe the
ignal Strength and Signal Quality bars. Position the Modem for
aximum signal strength and quality.
M
B
c
w
T
in
S
a
To increase the strength and quality of the signal, change the
location of the Ripwave Modem. Try moving it closer to a window,
to a higher locatio
vens, cordless pho
c
S
m
32 Part #40-00097-00 Rev F v1.0
May 21, 2004

Navini Networks, Inc. Ripwave Modem User Guide
Troubleshooting Using
avini Diagnostics,
ontinued
he History graphs plot the signal every 10 seconds. Read the
graphs from right to left.
If the connection between the PC and the Modem or between the
Modem and the Base Station is interrupted, a red circle with a slash
question mark is positioned over the corresponding icon.
On the left-hand side of the screen, there are three screen options:
Connection Status, Configuration, and About. The following
screen will appear when you press the Configuration button.
N
c
T
The Configuration screen enables you to update your Modem’s
software if you are so directed by your Service Provider. If you
must update your Modem’s software, your Service Provider will
provide you with instructions regarding what to do.
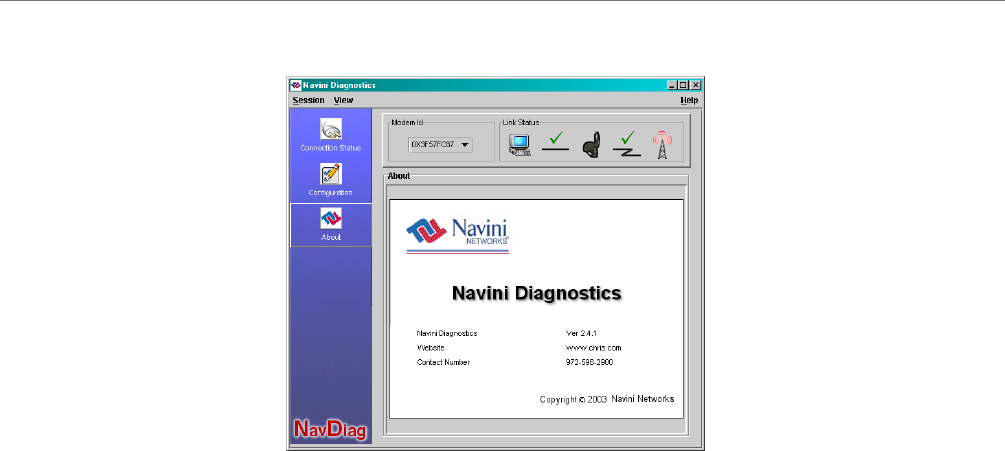
If you click on About, the following screen will appear.
Part #40-00097-00 Rev F v1.0 33
May 21, 2004
Ripwave Modem User Guide Navini Networks, Inc.
Troubleshooting Using
avini Diganostics,
ontinued
N
c
This screen provides the version of the Navini Diagnostics
software currently installed in your computer. It also provides a
web site and telephone number where you can contact your Service
Provider.
34 Part #40-00097-00 Rev F v1.0
May 21, 2004
Navini Networks, Inc. Ripwave Modem User Guide
Uninstalling
avini
iagnostics
ftware, e.g., to upgrade your Operating System software, follow
e procedure below.
N
D
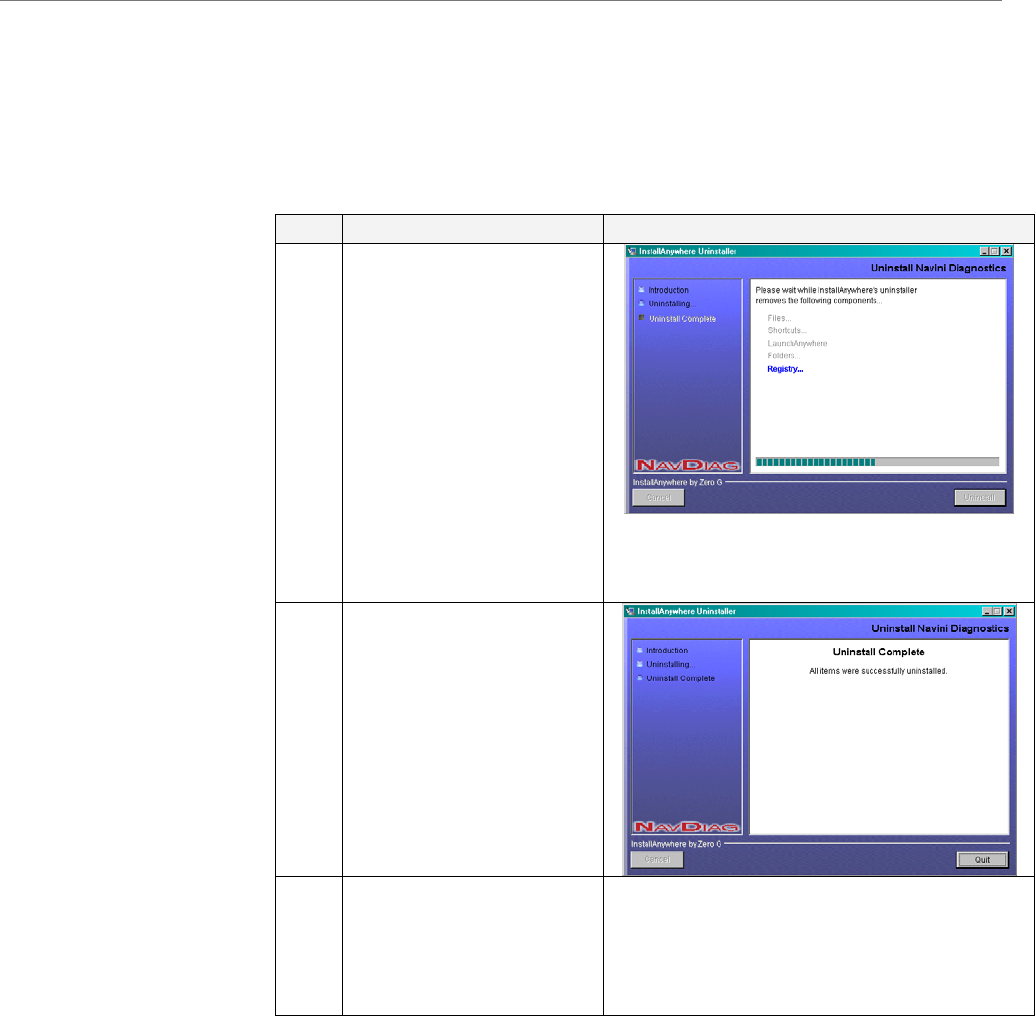
If for some reason you need to uninstall the Navini Diagnostics
so
th
Step Action Illustration
1. On your computer
screen lower left corner,
click on Start >
Programs > Navini
Diagnostics > Uninstall
Navini Diagnostics.
The Install-Anywhere
Uninstaller screen
appears. Click
Uninstall. The screen
will cycle through as the
application files are
uninstalled.
2. The Uninstall Complete
screen appears when
finished. Click on Quit
to close the Uninstall
screen.
3. Restart the PC to
it functions properly
after uninstalling.
complete the uninstall
process. This will ensure
Part #40-00097-00 Rev F v1.0 35
May 21, 2004
Ripwave Modem User Guide Navini Networks, Inc.
Installing &
harging the
attery
.4 GHz Battery
The battery pack was an option on former models of Ripwave
Modem hased optionally.
If you have a battery, the battery pack is installed in the bottom of
Rip y compartment of the 2.4 GHz
Ripwa the 2.3, 2.5, 2.6, and 3.5 GHz
models. To install and charge or remove the battery pack, follow
the ste l.
C
B
2
s. Batteries could be purc
the wave Modem. The batter
ve Modem varies from
ps based on your mode
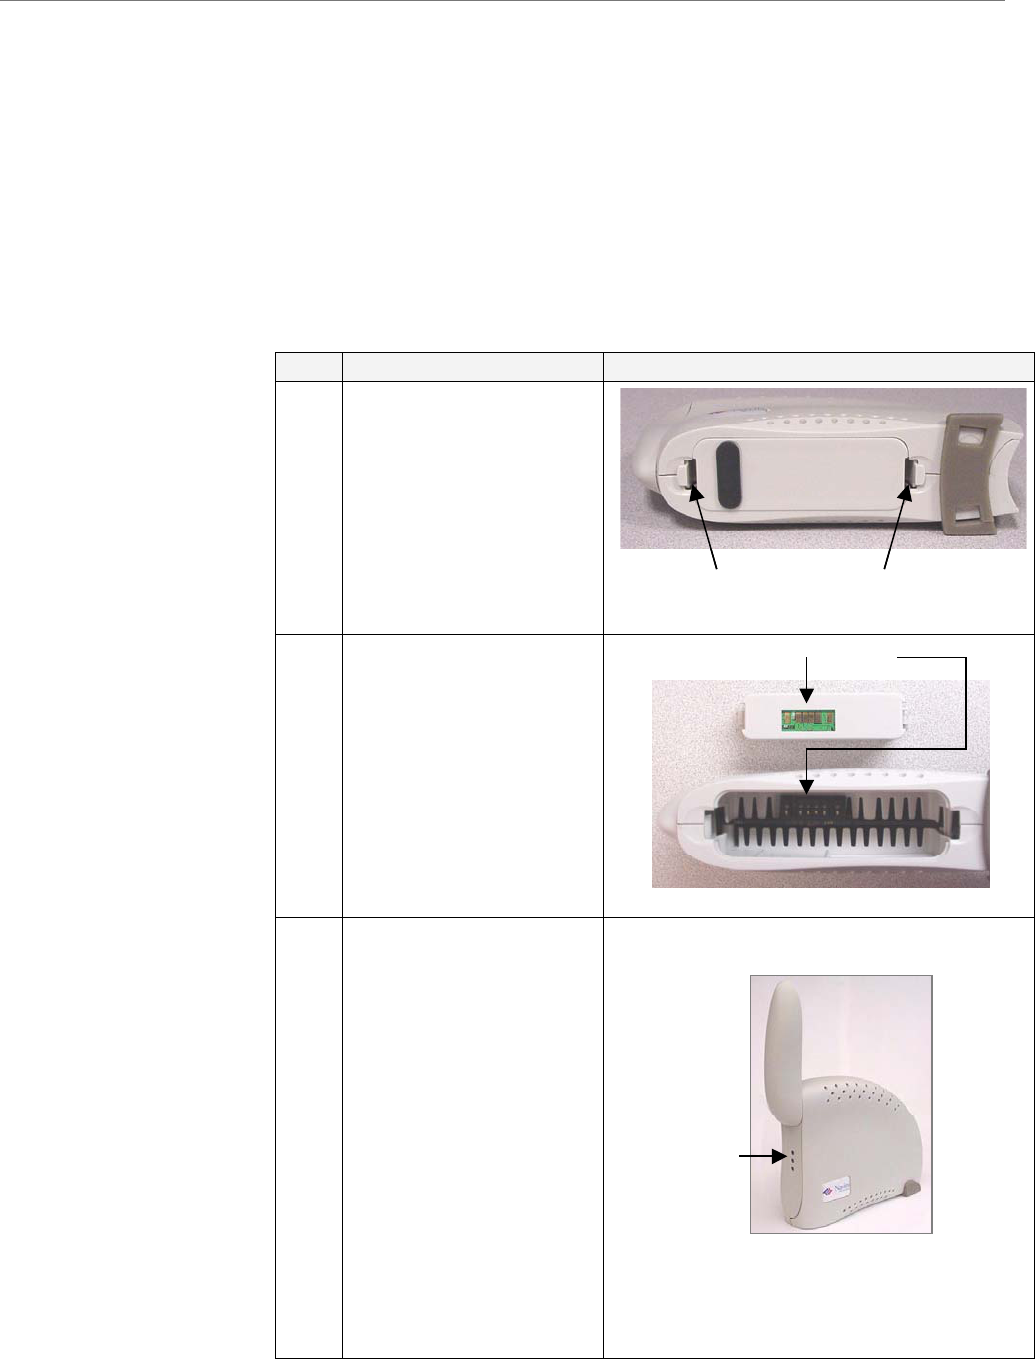
Step Action Illustration
1. Squeeze both tabs to
remove or install the
battery pack cover.
Note that the cover is
not used when the
battery pack is installed
in the Modem.
2. Install the battery pack
into the Ripwave
Modem, ensuring that
the contacts on the
battery pack mate with
the contacts in the
Modem and that both
slides snap down
securely.
3. To charge the battery,
connect the AC adapter
to the Modem and to an
AC power source
(110/220 VAC, 60/50
Hz). The battery
immediately will begin
gardless of
switch is on. However,
rge
ff
switch is in the OFF
position.
If the on/off switch is
ON, the light indicator
will be constant yellow.
When fully charged, the
light will go off.
charging re
whether the On/Off
the pack will cha
faster if the on/o
Battery contactsBattery contacts
Battery Pack Cover tabsBattery Pack Cover tabs
.
.
.
Battery
Indicator .
.
.
Battery
Indicator
36 Part #40-00097-00 Rev F v1.0
May 21, 2004
Navini Networks, Inc. Ripwave Modem User Guide
Part #40-00097-00 Rev F v1.0
y 21, 2004
37
Ma
.3 GHz, 2.5 GHz,
2.6 GHz Battery
2
&
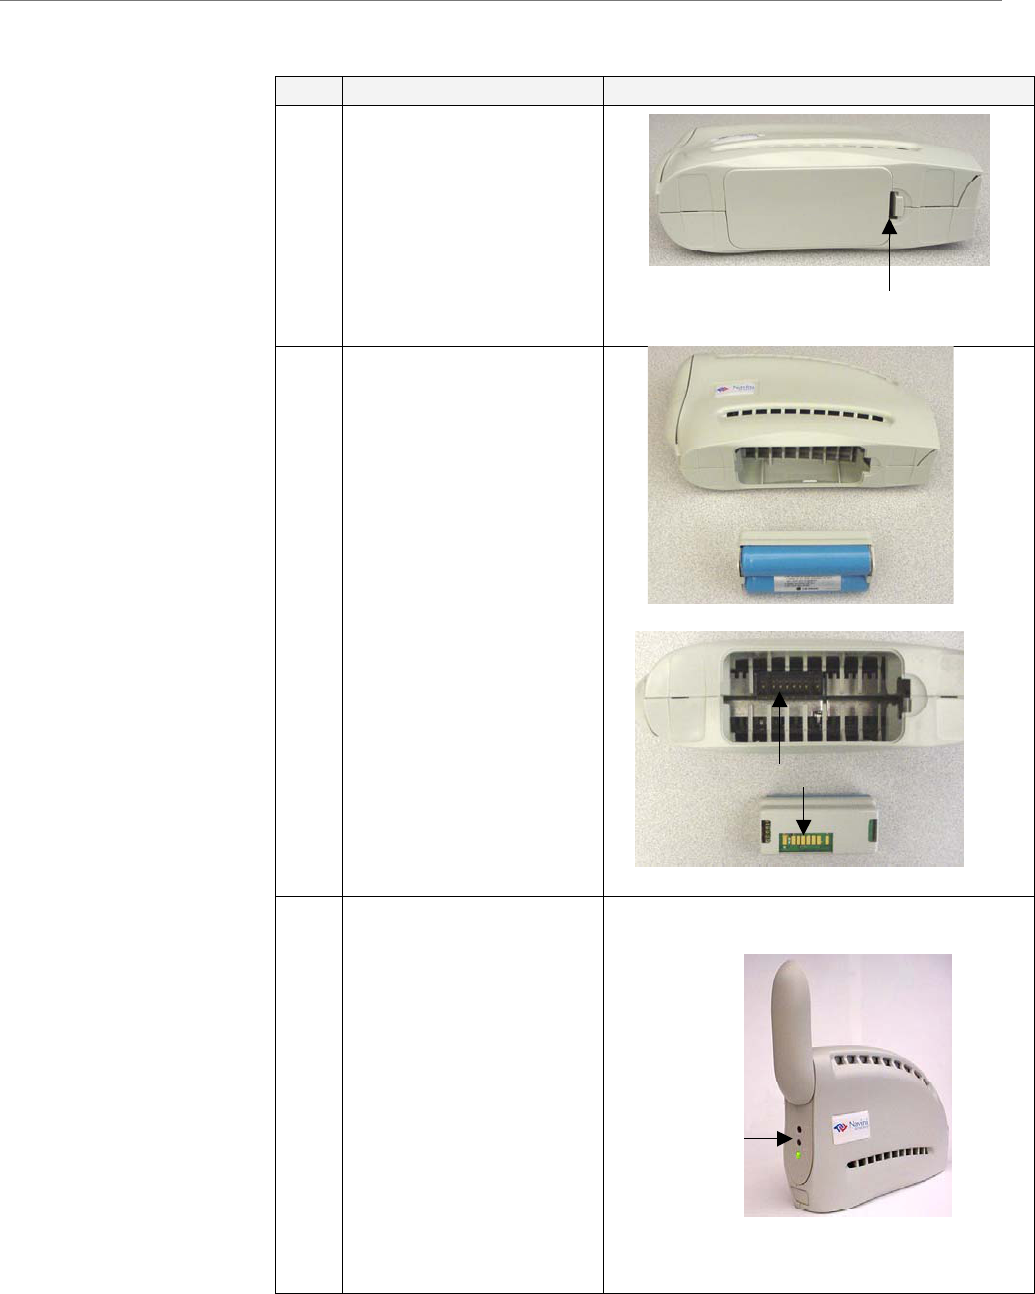
Step Action Illustration
1. Applying light pressure,
tab on the
.
push the
battery pack cover to
remove it from the
bottom of the Modem
2. Install the battery pack
into the Modem,
ensuring that the
contacts mate and that
both sides snap down
securely.
Reinstall the battery
pack cover on the
Modem.
3.
an
e
immediately
the on/off switch is
ON, the light indicator
will be constant yellow.
en fully charged, the
light will go off.
To charge the battery,
connect the AC adapter
to the Modem and to
AC power source. Th
battery will begin
harging c
regardless of whether
the On/Off switch is on.
However, the pack will
charge faster if the
on/off switch is in the
OFF position.
If
Wh
Battery
Indicator .
Battery
Indicator .
Battery Pack Cover tabBattery Pack Cover tab
Battery contactsBattery contacts

Ripwave Modem User Guide Navini Networks, Inc.
Care &
aintenance
pgrading the
odem
Ri d to give years of trouble-free
service. To ensure operation, read the following care and
mainte
Keep the Modem free of dust and moisture. If the Modem gets
wet, use a towel to dry it immediately.
Handle the Modem gently. Dropping it or mishandling it can
cause dam
Ke ay from high temperatures. Heat can cause
dam or the electronic circuitry.
Us ild detergent and a soft, damp cloth to clean the
Mo chemicals or abrasives to clean the
pla
If there is a problem with the Modem, do not attempt to repair
it yourself. Report the problem to your Service Provider.
If you are going to upgrade your Operating System after
loading the Navini monitoring software (Ripwave Monitor or
Navini Diagnostics), you must first uninstall the monitoring
software prior to upgrading the OS. Otherwise, the monitoring
software will not work. See Uninstall instructions in this Guide.
The Ripwave Modem must be left powered ON whenever you
shut down or restart any Windows 98 or ME platforms. If the
Modem is off, a blue screen appears on the monitor. In the
event this happens you will mostly likely have to power cycle
the
There are two different ways to upgrade the software that makes
the Mo e Provider may perform an over-the-
air (OTA) upgrade, where the up-to-date software files are
transfe ase Station to your Modem; or
provide a downloadable web file or CD-ROM with software to be
insta to upgrade the Modem.
The la if the Modem was not powered on
during the OTA upgrade process. The OTA upgrade is normally
transparent to the user; in other words, there should be no
noticeable service interruption. The web or CD upgrade comes
ith in es a minimal amount of time to complete.
M
U
M
The pwave Modem is designe
nance instructions.
age to the plastic shell or the electronic circuitry.
ep the Modem aw
age to the plastic shell
only a m
e
dem. Do not use any
stic shell.
PC.
dem work. Your Servic
rred wirelessly from the B
d on your PC and usedlle
tter method is used only
structions and takw
38 Part #40-00097-00 Rev F v1.0
May 21, 2004

Navini Networks, Inc. Ripwave Modem User Guide
ADDENDUM ooting
- For Use With All Ripwave ware -
C Operating Systems
rior to installing the Ripwav hat the
C Operating System meets t
npredictable problems may o cu ave the
test Windowsc updates insta
ftware.
1: Ripwave™ Modem - PC Troublesh
Modems, Ripwave Monitor Software, and Navini Diagnostics Soft
P
P e Monitor or Navini Diagnostics software, please check to insure t
he criteria given in the table below. If these criteria are not met,
r as a result of installation. It is recommended that the user h
P
u c
ll
la ed prior to installing the Ripwave Monitor or Navini Diagnostics
so
Operating System Ethernet interface USB interface Notes
Win95 Supported Not Supported 1, 2
Win98 Supported Supported 2
Win98, 2nd ed. Supported Supported 2
WinME Supported Supported 2
Win 2000 Supported Supported 2, 4
Win NT 3.0/4.0 Supported Not Supported 2, 4
Win XP Supported Supported 3, 4
Note 1: USB was not supported in t
ote 2: Internet Explorer 3.0 or hig
ote 3: Requires Service Pack 1
ote 4: To load the Ripwave M e
privileges.
SB Interface
he USB Modem allows for a single PC to be connected to the Ripwave Modem via a USB interface, or
ultiple PC’s connected via a USB hub. The Modem conforms to USB 1.1 standards. The Ethernet
PC a e encapsulated within the USB protocol and transferred to the Modem.
t ove ows 98,
, Windows 2000
o install the Modem using a insert the
D that comes with the mode g the
SB Miniport driver, the PC e type of Operating
ystem and the particular installation. The system will prompt if a reboot is necessary.
ow install the Ripwave Mon the PC
fter installing or uninstalling n.
his software release
her is required N
N
N onitor or Navini Diagnostics software, the user MUST have Administrativ
U
T
m
packets generated by the
The packets are then sen
Windows ME
r
r-the-air. The USB Modem is fully supported for PC’s using Wind
, and Windows NT 5.0.
USB interface, you must connect the Modem to the PC first and
m in the package to load the USB “Miniport” driver. After installin
may or may not need to be restarted, depending upon th
T
C
U
S
N itor or Navini Diagnostics software. You must ALWAYS reboot
this software. Failure to do may gravely affect PC operatioa
Part #40-00097-00 Rev F v1.0
May 21, 2004
39
Ripwave Modem User Guide Navini Networks, Inc.
Ethernet Interface
The E
onnec
ave a mix of devices, such as Unix machines, Apple Computers, etc. IP
SB or
ubs. Doing so may cause Riwpave Monitor software not to operate.
Ba
Older Ripwave Modems gave the user the option of buying an 1800 mA Li-Ion battery. With the optional
b he user could be conn Internet an here ther F coverage without
t er outlet. Th ttery was ra e 30 minutes to 90 minutes of use
without recharging (depending on activity).
Configuration Options
thernet Modem may be connected to a PC via an Ethernet connection. Also, it is possible to
t multiple PC devices to a single Modem. The multi-PC configuration is transparent to the PCc
users and is analogous to a multi-PC configuration on a normal Ethernet LAN. The distinct advantage of
e Ethernet Modem is that it connects to any device that has an Ethernet interface. This makes it ideal th
for small businesses that h
addresses can be assigned to the devices dynamically via a DHCP server, or as Fixed IP assignments, or
Point-to-Point Protocol Over Ethernet (PPPoE).
Routers & Hubs
The Ripwave Monitor software will not work if going through a router or if going through some U
thernet hE
ttery
attery, t ected to the ytime and anyw e is R
he need for a pow e Modem ba ted to provid
Host Computer used
as router to a network
(USB or Ethernet)
Modem shown as Modem connected to one of many devices
on a USB hub
a single computer
(USB or Ethernet)
Modem providing
the Internet
hernet HUB
access to
a an Etvi
Host Computer used
as router to a network
(USB or Ethernet)
Modem shown as Modem connected to Modem providing
the Internet
hernet HUB
a single computer
(USB or Ethernet) one of many devices
on a USB hub access to
a an Etvi
Part #40-00097-00 Rev F v1.0
May 21, 2004
40

Navini Networks, Inc. Ripwave Modem User Guide
Results of Correct Navini Monitor Installation
stall Begin: Wed Feb 26 13:30:09 EST 2003
26 13:30:29 EST 2003
FATAL ERRORS
ction Notes:
one.
stall Log Detail:
ustom Action: com.navini.iatool.KillMon
Status: SUCCESSFUL
heck Disk Space: D:\Program Files\Navini Ripwave Monitor
Status: SUCCESSFUL
Additional Notes: NOTE - Required Disk Space: 23,243,991; Free Disk Space: 3,977,043,968
stall Directory: D:\Program Files\Navini Ripwave Monitor\jre
Status: SUCCESSFUL
Additional Notes: NOTE - Directory already existed
stall Directory: D:\Program Files\Navini Ripwave Monitor\
Status: SUCCESSFUL
Additional Notes: NOTE - Directory already existed
stall Directory: D:\Program Files\Navini Ripwave Monitor\UninstallerData\
Status: SUCCESSFUL
Additional Notes: NOTE - Directory already existed
ustom Action: com.navini.iatool.KillMon
Status: SUCCESSFUL
stall Uninstaller: Ripwave Monitor (Install All Uninstaller Components)
Status: SUCCESSFUL
stall File: D:\Program Files\Navini Ripwave Monitor\UninstallerData\Uninstall inst.exe
Status: SUCCESSFUL
stall File: D:\Program Files\Navini Ripwave Monitor\UninstallerData\Uninstall inst.lax
Status: SUCCESSFUL
Experienced PC users can check the results of the Navini Ripwave Monitor installation by
looking at the log file that is created during the installation process. The log file is named
“Ripwave_Monitor_InstallLog.log.” It is located under c:\Program Files\Navini Ripwave
Monitor.
-------
In
Install End: Wed Feb
Created with Zero G's InstallAnywhere 4.5.3 Enterprise Build 1394
Summary
-------
Installation: Successful.
34 SUCCESSES
0 WARNINGS
0 NONFATAL ERRORS
0
A
N
In
C
C
In
In
In
C
In
In
In
Part #40-00097-00 Rev F v1.0
May 21, 2004
41

Ripwave Modem User Guide Navini Networks, Inc.
Install Directory: D:\Program Files\Navini Ripwave Monitor\UninstallerData\resource\
Status: SUCCESSFUL
Additional Notes: NOTE - Directory already existed
Install File:
D:\Program Files\Navini Ripwave Monitor\UninstallerData\resource\iawin32.dll
Status: SUCCESSFUL
ile: D:\Program Files\Navini Ripwave Monitor\UninstallerData\resource\remove.exe
Status: SUCCESSFUL
KEY_LOCAL_MACHINE\SOFTWARE\Microsoft\Windows\CurrentVersion\Uninstall\Ripwave Monitor, Value Name:
Status: SUCCESSFUL
stry Entry: Key:
LOCAL_MACHINE\SOFTWARE\Microsoft\Windows\CurrentVersion\Uninstall\Ripwave Monitor, Value Name:
ta: "D:\Program Files\Navini Ripwave Monitor\UninstallerData\Uninstall inst.exe"
atus: SUCCESSFUL
ave Monitor (Install All Uninstaller Components)
s: SUCCESSFUL
D:\Program Files\Navini Ripwave Monitor\instpro5.exe
Status: SUCCESSFUL
ve Monitor\NAVMON.exe
o5.inf
stall File: D:\Program Files\Navini Ripwave Monitor\NAVPRO5.sys
Status: SUCCESSFUL
rogram Files\Navini Ripwave Monitor
stall Directory: D:\Documents and Settings\All Users\Start Menu\Programs\
- Directory already existed
ms\Navini Ripwave Monitor\
Additional Notes: NOTE - Directory already existed
Settings\All Users\Start Menu\Programs\Navini Ripwave Monitor\Ripwave
Install F
Make Registry Entry: Key:
H
DisplayName, Value Data: Ripwave Monitor
Make Regi
HKEY_
UninstallString, Value Da
St
Install Uninstaller: Ripw
Statu
Install File:
Install File: D:\Program Files\Navini Ripwa
Status: SUCCESSFUL
Install File: D:\Program Files\Navini Ripwave Monitor\navpr
Status: SUCCESSFUL
In
Status: SUCCESSFUL
Registry Entries: Create the InstallDir Key
Set Environment Variable: PATH = D:\P
Status: SUCCESSFUL
Install File: D:\Program Files\Navini Ripwave Monitor\reboot.exe
Status: SUCCESSFUL
In
Status: SUCCESSFUL
Additional Notes: NOTE
Install Directory: D:\Documents and Settings\All Users\Start Menu\Progra
Status: SUCCESSFUL
Create Shortcut: D:\Documents and
Monitor.lnk
Status: SUCCESSFUL
Part #40-00097-00 Rev F v1.0
May 21, 2004
42

Navini Networks, Inc. Ripwave Modem User Guide
Create Shortcut: D:\Documents and Settings\All Users\Start Menu\Programs\Navini Ripwave Monitor\Uninstall
Additional Notes: NOTE - Directory already existed
Settings\All Users\Start Menu\Programs\Startup\
Status: SUCCESSFUL
es: NOTE - Directory already existed
ngs\All Users\Start Menu\Programs\Startup\Ripwave Monitor.lnk
OWS\
on.exe
Status: SUCCESSFUL
Status: SUCCESSFUL
Ripwave Monitor.lnk
Status: SUCCESSFUL
Install Directory: D:\WINDOWS\System32\DRIVERS\
Status: SUCCESSFUL
Install Directory: D:\Documents and
Additional Not
Create Shortcut: D:\Documents and Setti
Status: SUCCESSFUL
Install Directory: D:\WIND
Status: SUCCESSFUL
Additional Notes: NOTE - Directory already existed
Install File: D:\WINDOWS\killm
Execute Target File: reboot.exe
Part #40-00097-00 Rev F v1.0
May 21, 2004
43

Ripwave Modem User Guide Navini Networks, Inc.
ADDENDUM 2: End User Software License Agreement
TO USER ----
ND-USER LICENSE AGREEMENT FOR RIPWAVE SOFTWARE
ARE, THE
HE RIPWAVE MODEM, AND ANY
E AGREEMENT. IF YOU DO NOT AGREE WITH THE TERMS
ND CONDITIONS HEREIN, DO NOT USE THE SOFTWARE, AND PROMPTLY RETURN THE
AUTHORIZED SERVICE PROVIDER.
SE TO USE THE SOFTWARE, YOU
TERMS AND CONDITIONS:
LLY: This End-User License Agreement ("Agreement") is a legal
individual or an entity) and Navini Networks, Inc. for the Ripwave
oftware ("SOFTWARE"). The SOFTWARE includes computer software, the associated media, any
printed materials, and any electronic or "online" documentation. Any software provided along with the
SOFTWARE that is associated with a separate end-user license agreement is licensed to you under the
terms of that license agreement. By installing, copying, downloading, accessing, or otherwise using the
SOFTWARE, you agree to be bound by the terms of this AGREEMENT. If you do not agree to the terms
of this AGREEMENT, Navini is unwilling to license the SOFTWARE to you. In such event, you shall
not use or copy the SOFTWARE, and you should promptly contact your Authorized Service Provider
("ASP") for instructions on return of the SOFTWARE and Ripwave Modem. EXCEPT FOR NON-
DISCLOSURE AGREEMENTS BETWEEN THE PARTIES, THIS IS THE ENTIRE AGREEMENT
BETWEEN THE PARTIES RELATING TO THIS SOFTWARE ANDSUPERSEDES ANY
PURCHASE ORDER, COMMUNICATION, ADVERTISING, OR REPRESENTATION
CONCERNING THE SOFTWARE OR THE RIPWAVE SERVICE. NO CHANGE OR
MODIFICATION OF THIS AGREEMENT WILL BE VALID UNLESS IT IS IN WRITING AND
SIGNED BY NAVINI.
SOFTWARE LICENSE
The SOFTWARE is protected by copyright laws and international copyright treaties, as well as other
intellectual property laws and treaties. The SOFTWARE is licensed, not sold. This Agreement does not
authorize a sale or lease of the SOFTWARE. The term "COMPUTER" shall mean a single computer
system.
---- NOTICE
E
BY USING THE RIPWAVE SOFTWARE (INCLUDING THE COMPUTER SOFTW
SSOCIATED MEDIA, ANY PRINTED MATERIALS, TA
ELECTRONIC OR “ONLINE” DOCUMENTATION) YOU ACCEPT THE TERMS AND
CONDITIONS OF THIS LICENS
A
ENTIRE PACKAGE TO YOUR
YOU A LICENIN RETURN FOR OUR GRANTING TO
AGREE TO THE FOLLOWING
IMPORTANT - READ CAREFU
greement between you (either ana
S
Part #40-00097-00 Rev F v1.0
May 21, 2004
44

Navini Networks, Inc. Ripwave Modem User Guide
1. GRANT OF LICENSE. This AGREEMENT grants to you a personal,
non-exc
1.1 Storage, Installation and Use. rovided in this AGREEMENT, you
ill be allowed to install, use, access, the SOFTWARE on multiple
l Modem ("MODEM").
ides
e
IVE WORKS, OR REVERSE
r
uch event,
ware and all
AGREEMENT does not grant you any rights in connection with any
lusive, non-transferable license as follows:
Except as otherwise expressly p
run, or otherwise interact with w
COMPUTERS. This SOFTWARE may only be used with a Ripwave Digita
2. DESCRIPTION OF OTHER RIGHTS AND LIMITATIONS.
2.1 Multiple Processor Version Selection. The CD or diskette(s) on which the SOFTWARE res
may contain several copies of the SOFTWARE, each of which is compatible with different
microprocessor architectures, such as the x86 architecture or various RISC architectures ("Processor
Version(s)"). You may install and use only one copy of one Processor Version of the SOFTWARE on th
OMPUTER. C
2.2 Limitations on Reverse Engineering, Decompiling, and Disassembly. YOU MAY NOT
ODIFY, TRANSLATE, DISASSEMBLE, CREATE DERIVATM
ENGINEER THE SOFTWARE OR ANY COPY, IN WHOLE OR IN PART.
2.3 Rental. You may not rent, lease, assign, or lend the SOFTWARE or distribute copies of the
SOFTWARE to others.
2.4 Software Transfer. You may not sell the SOFTWARE. You may not post, distribute or transfer
the SOFTWARE to anyone. You are authorized to use the SOFTWARE on your machine, which means
a machine, all of which is under your complete, direct legal and physical control.
2.5 Termination. This license is effective until terminated. You may terminate this license by
returning the SOFTWARE, the Ripwave Modem and associated hardware and all documentation to you
service provider. Without prejudice to any other rights, NAVINI may terminate your rights under this
AGREEMENT if you fail to comply with the terms and conditions of this AGREEMENT. In s
you must return the SOFTWARE and any copies, the Ripwave Modem and associated hard
documentation to your service provider.
.6 Trademarks. This2
trademarks or service marks of NAVINI.
Part #40-00097-00 Rev F v1.0
May 21, 2004
45

Ripwave Modem User Guide Navini Networks, Inc.
2.7 Third Party Intellectual Property. Licensee acknowledges, understands
licensed Software covered by this License Agreemen
P
and agrees that the
t may contain Intellectual Property owned by Third
arties and duly licensed to NAVINI NETWORKS, INC. Copyright, Patent and other laws protect Third
efit
roperty, and agrees to stop using, destroy and/or return such Third Party owned Intellectual Property
th in this License Agreement. The
hird Party is a third party beneficiary under this License Agreement and may independently enforce its
. UPGRADES. If the SOFTWARE is labeled as an upgrade, you must be properly licensed to use a
y in accordance with the
rms of this AGREEMENT.
he SOFTWARE is provided with restrictive rights. All title and intellectual
roperty rights in and to the SOFTWARE (including but not limited to any images, photographs,
ati
FTWARE but may be
ccessed through use of the SOFTWARE and the MODEM is the product of the respective content
s. This
his AGREEMENT are reserved by NAVINI.
I. For
ort number provided in their documentation.
6. U.S. GOVERNMENT RESTRICTED RIGHTS. ALL SOFTWARE provided to the U.S.
Government pursuant to solicitations issued on or after December 1, 1995 is provided with the
commercial license rights and restrictions described elsewhere herein. ALL SOFTWARE provided to
the U.S. Government pursuant to solicitations issued prior to December 1, 1995 is provided with
“Restricted Rights” as provided for in FAR, 48 CFR 52.227-14 (June 1987) or DFAR, 48 CFR 252.227-
7013 (Oct 1988), as applicable.
7. EXPORT RESTRICTIONS. You agree that you will not directly or indirectly export or re-export
the SOFTWARE (or portions thereof) to any proscribed country. You specifically agree not to export or
Party Intellectual Property manufactured with, marketed with, or otherwise bundled with the licensed
Software. Licensee promises to keep such Third Party Intellectual Property in confidence to the ben
of the Third Party, agrees not to reverse engineer or otherwise decompile Third Party Intellectual
P
under the same terms and conditions as the licensed Software as set for
T
Intellectual Property rights.
2.8 Remote Digital Access. Licensor reserves the right, but is not obligated to digitally access the
Modem and/or the Ripwave Software for the purposes of upgrading and maintaining the software.
3
product identified by NAVINI as being eligible for the upgrade in order to use the SOFTWARE
("Eligible Software"). SOFTWARE labeled as an upgrade replaces and/or supplements (and may
disable) the Eligible Software. You may use the resulting upgraded product onl
te
4. COPYRIGHT. T
p
anim ons, video, audio, music, text, and "applets" incorporated into the SOFTWARE), the
accompanying printed materials, and any copies of the SOFTWARE, are owned by NAVINI. All title
and intellectual property rights in and to the content that is not contained in the SO
a
owner and may be protected by applicable copyright or other intellectual property laws and treatie
AGREEMENT grants you no rights to use such content. Use of any online services that may be accessed
through the SOFTWARE may be governed by the respective terms of use for such services. If this
SOFTWARE contains documentation that is provided only in electronic form, you may print one copy of
such electronic documentation. You may not copy the printed materials accompanying the SOFTWARE.
All rights not specifically granted under t
5. PRODUCT SUPPORT. Product support for the SOFTWARE is not provided by NAVIN
product support, please refer to ASP's supp
Part #40-00097-00 Rev F v1.0
May 21, 2004
46

Navini Networks, Inc. Ripwave Modem User Guide
re-export the SOFTWARE (i) to any country to which the U.S. has embargoed or restricted the export of
a,
ERCHANTABILITY, FITNESS FOR A PARTICULAR PURPOSE,
ITLE, NON-INFRINGEMENT, AND ANY WARRANTY AGAINST LATENT DEFECTS. NAVINI
ING
HICH SOFTWARE BEST SUITS YOUR NEEDS, FOR INSTALLING THE SOFTWARE, AND
R
UANT TO YOUR USE OF THE SOFTWARE AND NAVINI SHALL
OT BE LIABLE FOR ANY COSTS OR DAMAGES ARISING OUT OF, EITHER DIRECTLY OR
IR L
U OR ANY
,
RES
NDEMNITY IN
ESPECT OF ANY CLAIM RELATED TO THE SOFTWARE. IN ANY EVENT, NAVINI'S
BIL
goods or services, which currently include, but are not necessarily limited to, Cuba, Iran, Iraq, Liby
North Korea, Sudan, and Syria, or to any national of any such country, wherever located, who intends to
transmit or transport the SOFTWARE back to such country; (ii) to any person or entity whom you know
or have reason to know will utilize the SOFTWARE in the design, development, or production of
nuclear, chemical, or biological weapons; or (iii) to any person or entity who has been prohibited from
participating in U.S. export transactions by any federal agency of the U.S. government.
8. WARRANTY. THE SOFTWARE IS PROVIDED ON AN "AS IS" BASIS WITHOUT
WARRANTIES OF ANY KIND, EXPRESS OR IMPLIED, INCLUDING WITHOUT LIMITATION
ANY WARRANTIES OF M
T
DOES NOT WARRANT THAT THE OPERATION OF THE SOFTWARE WILL BE
UNINTERRUPTED OR ERROR FREE. YOU ARE SOLELY RESPONSIBLE FOR DETERMIN
W
FOR RESULTS OBTAINED. YOU HAVE THE SOLE RESPONSIBILITY FOR INSPECTING AND
TESTING THE SOFTWARE TO YOUR SATISFACTION BEFORE USING THEM WITH
IMPORTANT DATA OR WITH YOUR COMPUTER. NAVINI MAKES NO WARRANTIES O
REPRESENTATIONS WHATSOEVER REGARDING ANY GOODS OR SERVICES PROVIDED BY
ANY THIRD PARTIES PURS
N
IND ECTLY, THE ACTIONS OR INACTIONS OF SUCH THIRD PARTY. IN NO EVENT SHAL
NAVINI NETWORKS, INC. OR ANY THIRD PARTY INVOLVED IN THE CREATION,
PRODUCTION, DELIVERY, OR LICENSING OF THE SOFTWARE BE LIABLE TO YO
THIRD PARTY FOR ANY DIRECT, INDIRECT, SPECIAL, GENERAL, PUNITIVE, EXEMPLARY
AGGRAVATED, INCIDENTAL, OR CONSEQUENTIAL DAMAGES, EVEN IF ADVISED OF THE
POSSIBILITY THEREOF, WHETHER FORESEEABLE OR UNFORESEEABLE, OF ANY KIND
WHATSOEVER, INCLUDING BUT NOT LIMITED TO LOSS OF PROFITS; UNANTICIPATED
BENEFITS OR REVENUE; ANTICIPATED PROFITS; DAMAGES OR COSTS INCURRED AS A
RESULT OF: (i) LOST TIME, DATA, OR USE OF THE SOFTWARE; (ii) HARDWARE FAILU
FOR ANY REASON; (iii) INCOMPATIBILITY WITH HARDWARE OR OTHER SOFTWARE; (iv)
LOSS OR CLAIMS FROM THIRD PARTIES; OR (v) FROM ANY OTHER CAUSE ARISING OUT
OF USE OF OR INABILITY TO USE THE SOFTWARE, OR CONTRIBUTION OR I
R
LIA ITY SHALL NOT EXCEED THE ACTUAL PRICE PAID FOR THE LICENSE TO USE THE
SOFTWARE.
Part #40-00097-00 Rev F v1.0
May 21, 2004
47

Ripwave Modem User Guide Navini Networks, Inc.
SOME JURISDICTIONS DO NOT ALLOW THE EXCLUSION OR LIMITATION OF INCIDENTA
OR CONSEQUENTIAL DAMAGES, OR ALLOW LIMITATIONS ON HOW LONG A WARRANTY
LASTS, SO THE ABOVE LIMITATIONS OR EXCLUSIONS MAY NOT APPLY TO YOU. THIS
WARRANTY GIVES YOU SPECIFIC LEGAL RIGHTS, AND YOU MAY ALSO HAVE OTHE
RIGHTS, WHICH VARY FROM JURISDICTION TO JURISDICTION.
L
R
. LAW. This Agreement and each Order shall be construed in accordance with the laws (including
licts of
ser
e SOFTWARE
wave, and
9
the Uniform Commercial Code) of the State of Texas, without giving effect to principles of conf
laws. Any legal action arising here from will be brought within the state or federal courts located in
Dallas county, Texas, which is agreed by the parties to be a convenient forum. The SOFTWARE U
acknowledges, understands and agrees that this Agreement is written in the English Language and
versions of this Agreement written in any other language is for convenience only, and th
User expressly waives all “native language” requirements, whether based in local statutory, regulatory or
other law.
END OF AGREEMENT
Copyright © 2001, 2002, 2003, 2004 Navini Networks, Inc.
All rights reserved. Printed in the USA.
Navini Networks is a registered trademark. Internet at the Speed of Thought, Zero-Install, Rip
Unwired by Navini are trademarks of Navini Networks, Inc. Other product and company names
mentioned herein may be trademarks and/or service marks of their respective owners. Rev. 052302
Part #40-00097-00 Rev F v1.0
May 21, 2004
48