Cisco Systems RTBIZ0352 Cisco Unified IP Endpoint 9951 with BT Module User Manual 9951 User Manual 20 43

Cisco Systems Inc Cisco Unified IP Endpoint 9951 with BT Module 9951 User Manual 20 43

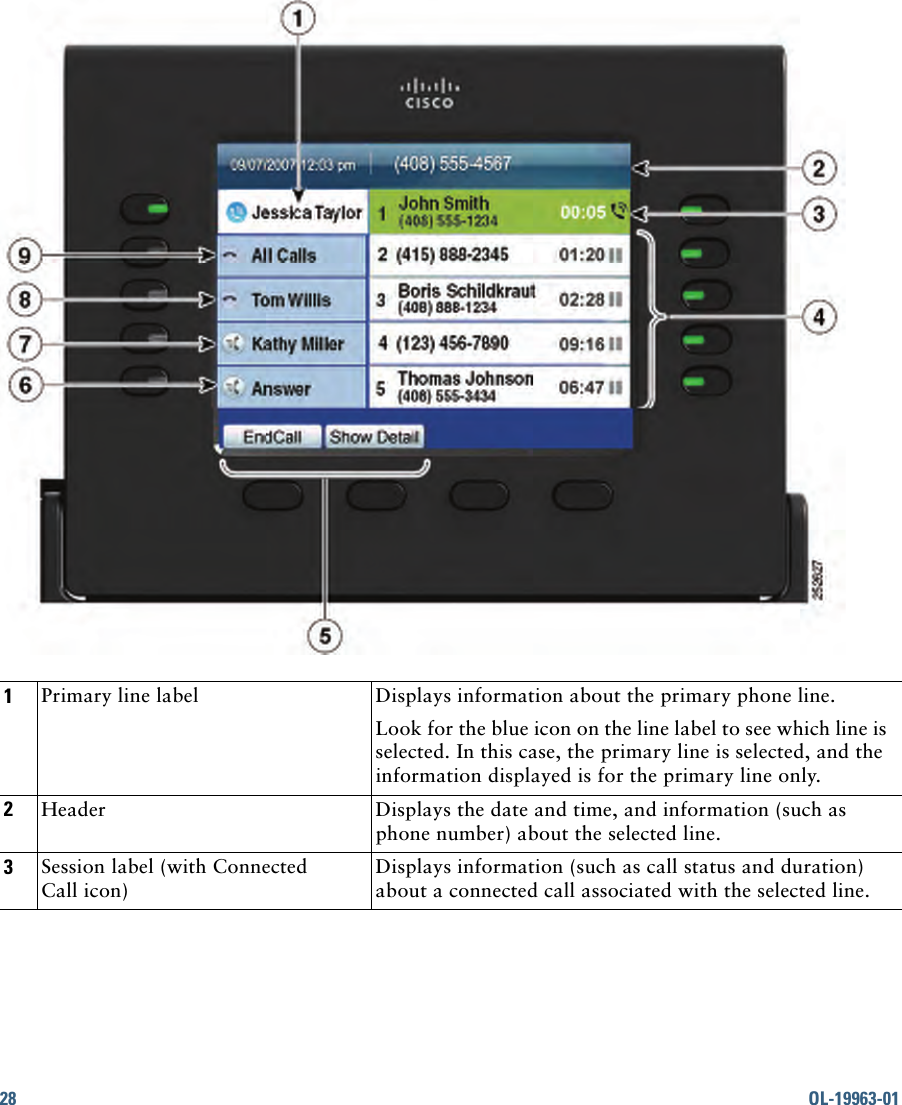
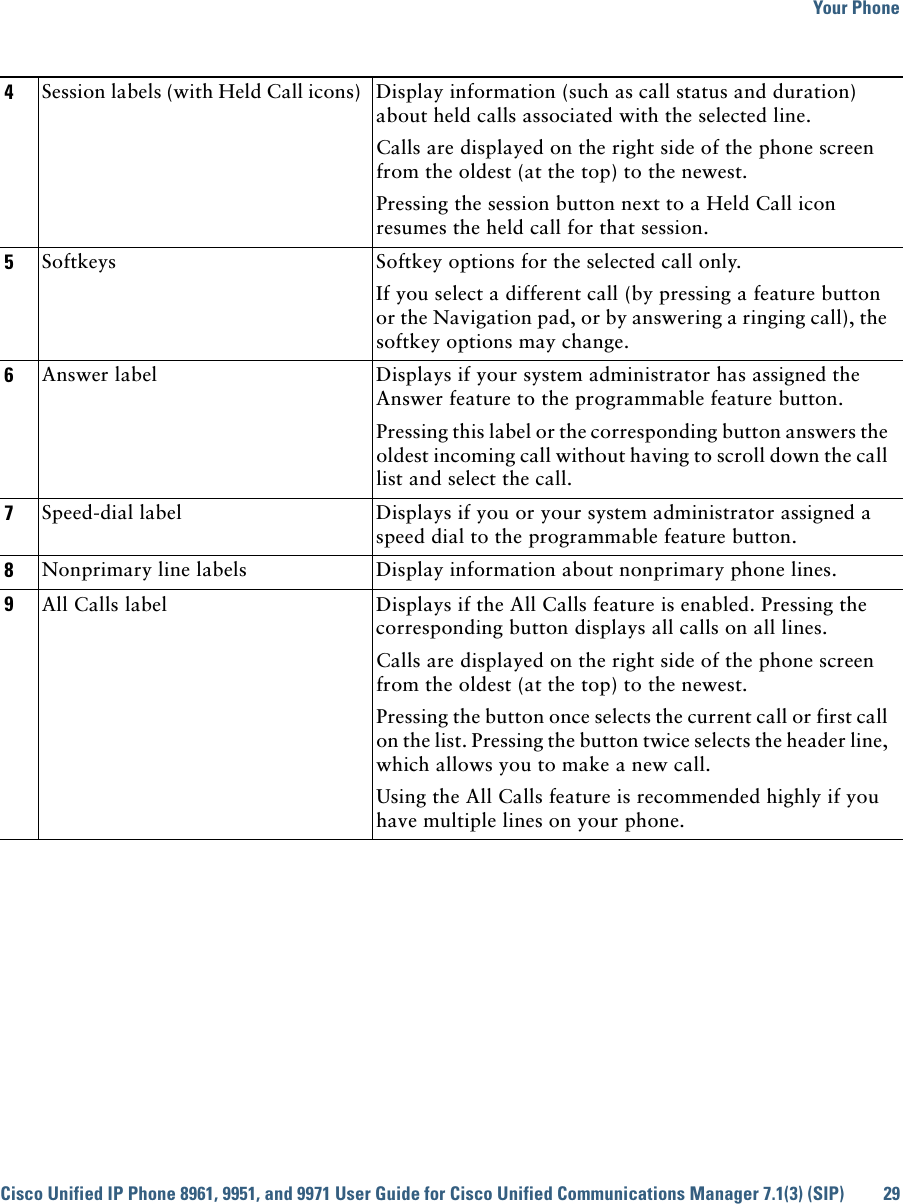
9951-User-Manual-20-43

8OL-19963-01 6Navigation pad and Select buttonThe four-way Navigation pad allows you to scroll through menus, highlight items, and move within a text input field.The Select button (center of the Navigation pad) allows you to select a highlighted item.The Select button is lit (white) when the phone is in power-save mode.7Conference button Creates a conference call.8Hold button Places a connected call on hold.9Transfer button Transfers a call.10 Keypad Allows you to dial phone numbers, enter letters, and choose menu items (by entering the item number).11 Speakerphone button Selects the speakerphone as the default audio path and initiates a new call, picks up an incoming call, or ends a call. During a call, the button is lit green. The speakerphone audio path does not change until a new default audio path is selected (for example, by picking up the handset).If external speakers are connected, the Speakerphone button selects them as the default audio path.12 Mute button Toggles the microphone on or off during a call. When the microphone is muted, the button is lit red.13 Headset button Selects the headset as the default audio path and initiates a new call, picks up an incoming call, or ends a call. During a call, the button is lit green. A headset icon   in the phone screen header line indicates the headset is the default audio path. This audio path does not change until a new default audio path is selected (for example, by picking up the handset).14 Volume button Controls the handset, headset, and speakerphone volume (off-hook) and the ringer volume (on-hook).Silences the ringer on the phone if an incoming call is ringing.15 Messages button Auto-dials your voicemail system (varies by system).
Your PhoneCisco Unified IP Phone 8961, 9951, and 9971 User Guide for Cisco Unified Communications Manager 7.1(3) (SIP) 9 16 Applications button Opens/closes the Applications menu. Depending on how your system administrator sets up the phone, use it to access applications such as call history, preferences, and phone information.17 Contacts button Opens/closes the Contacts menu. Depending on how your system administrator sets up the phone, use it to access personal directory, corporate directory, or call history.18 Phone display Can be positioned to your preferred viewing angle.19 Programmable feature buttonsEach corresponds to a phone line, speed dial, and calling feature.Pressing a button for a phone line displays the active calls for that line.If you have multiple lines, you may have an All Calls button that displays a consolidated list of all calls from all lines (oldest at the top). Then, it is recommended that you keep your phone in the All Calls view.Color LEDs indicate the line state:  • Amber  —Ringing call on this line  • Green  —Active or held call on this line  • Red  —Shared line in-use remotely(The position of the programmable feature buttons can be reversed with the position of the session buttons on phones that use a locale with a right-to-left reading orientation, such as Hebrew and Arabic.)20 Handset with light strip The handset light strip lights up to indicate a ringing call (flashing red) or a new voice message (steady red).
10 OL-19963-01 Phone ScreenThe way that your system administrator set up your phone determines what is displayed on your phone screen.Phone with Single Line1Line label Displays the line phone information.2Header Displays the date and time, and information (such as phone number) about the selected line.(If you are on a call and highlight the header instead of a call, the softkeys that display are the same as those that display when the phone is idle. This is useful, for example, if you want to access the Forward All or New Call softkeys while you are on a call.)
Your PhoneCisco Unified IP Phone 8961, 9951, and 9971 User Guide for Cisco Unified Communications Manager 7.1(3) (SIP) 11 Phone with Multiple LinesIf you have multiple lines, it is recommended that you use the All Calls button to view all calls on all lines. If you handle many calls at one time, it is recommended that you use the Answer button to answer the oldest incoming call without having to scroll down the call list and select the call. For more information, see your system administrator.3Session button label (for connected call)Displays information (such as phone number and duration) about a connected call on the line.4Session button label (for held call)Displays information (such as phone number and duration) about a held call on the line.Pressing the corresponding session button resumes the held call.5New Call icon Indicates you can press the corresponding session button to make a new call.6Softkeys Softkey options for the selected (highlighted) call only.If you select a different call (by pressing a feature button or the Navigation pad, or by answering a ringing call), the softkey options may change.
12 OL-19963-01 1Primary line label Displays information about the primary phone line.Look for the blue icon on the line label to see which line is selected. In this case, the primary line is selected, and the information displayed is for the primary line only. 2Header Displays the date and time, and information (such as phone number) about the selected line.(If you are on a call and highlight the header instead of a call, the softkeys that display are the same as those that display when the phone is idle. This is useful, for example, if you want to access the Forward All or New Call softkeys while you are on a call.)3Session label (with Connected Call icon)Displays information (such as call status and duration) about a connected call associated with the selected line.
Your PhoneCisco Unified IP Phone 8961, 9951, and 9971 User Guide for Cisco Unified Communications Manager 7.1(3) (SIP) 13 4Session labels (with Held Call icons)Display information (such as call status and duration) about held calls associated with the selected line. Calls are displayed on the right side of the phone screen from the oldest (at the top) to the newest.Pressing the session button next to a Held Call icon resumes the held call for that session.5Softkeys Softkey options for the selected call only.If you select a different call (by pressing a feature button or the Navigation pad, or by answering a ringing call), the softkey options may change.6Answer label Displays if your system administrator has assigned the Answer feature to the programmable feature button.Pressing this label or the corresponding button answers the oldest incoming call without having to scroll down the call list and select the call.7Speed-dial label Displays if you or your system administrator assigned a speed dial to the programmable feature button. This is useful if you tend to have more than five active calls on your phone. 8Nonprimary line labels Display calls and information about nonprimary phone lines.9All Calls label Displays if the All Calls feature is enabled. Pressing the corresponding button displays all calls on all lines.Calls are displayed on the right side of the phone screen from the oldest (at the top) to the newest.When you are on a call, pressing All Calls once selects the current call or the first call on the list; pressing All Calls twice selects the header. With the header selected, the softkeys that display are the same as those that display when the phone is idle. This is useful, for example, if you have multiple calls on your phone and want to access the New Call softkey.Using the All Calls feature is recommended highly if you have multiple lines on your phone.
14 OL-19963-01 Phone Screen Navigation and Item SelectionTask Action ExampleScroll to highlight an item. Press the Navigation pad. Highlight a call from the missed call list.Select an item by number. Press the corresponding number on the keypad.Press 2 to select the second item in the Applications menu.Select an item using the Select button.Press the Select button (at the center of the Navigation pad).Highlight the Preferences application and press the Select button.Navigate to a submenu.(A right arrow (>) next to the menu item indicates that a submenu exists.)Highlight the menu item and press the item number on the keypad.Or press the down arrow on the Navigation pad and then press the Select button.Highlight the Network Setup menu, then press 1 to open the submenu.Select a line to use a calling feature (when the line is idle).Press the line button.Indicators of your line selection include:   • The selected line is displayed on the phone screen header.  • Color of the icon (on the line label) changes to blue.Press the line button and then press the Forward All softkey to forward calls on that line.Select a line to use a calling feature (when the line has one or more active calls).Press the line button twice.Indicators of your line selection include:   • The selected line is displayed on the phone screen header.  • Color of the icon (on the line label) changes to blue.Press the line button twice and then press the Forward All softkey to forward calls on that line.
Your PhoneCisco Unified IP Phone 8961, 9951, and 9971 User Guide for Cisco Unified Communications Manager 7.1(3) (SIP) 15 Power-Save ModeDepending on how your system administrator set up your phone, the phone display may go into a power-save mode (the phone screen appears blank and the Select button is lit white). To turn on the phone display, press any button or pick up the handset.Handset RestYour system administrator may have mounted your phone on a wall. With a wall-mounted phone, you may need to adjust the handset rest to ensure that the receiver does not slip out of the cradle.1Remove the handset from the cradle and pull the plastic tab from the handset rest.2Rotate the tab 180 degrees.3Hold the tab between two fingers, with the corner notches facing you. 4Line up the tab with the slot in the cradle and press the tab evenly into the slot. An extension protrudes from the top of the rotated tab. Return the handset to the handset rest.21 32759434
16 OL-19963-01 Cisco Unified IP Phone 9951The Cisco Unified IP Phone 9951 provides these features:  • Phone connections  • Bluetooth  • Footstand  • Phone-display viewing angle  • Buttons and hardware  • Phone screen  • Power-save mode  • Handset restPhone ConnectionsYour system administrator can help you connect your phone to the corporate IP telephony network.
Your PhoneCisco Unified IP Phone 8961, 9951, and 9971 User Guide for Cisco Unified Communications Manager 7.1(3) (SIP) 17 1DC adapter port (DC48V) 6Handset port2AC-to-DC power supply (optional for the network port connection but required for a wifi connection)7Analog headset port (headset optional)3AC power wall plug (optional) 8USB port4Network port (10/100/1000 SW) with IEEE 802.3af and 802.3at power enabled9Anti-theft security connector (lock optional)5Computer port (10/100/1000 PC)193117892345671ComputerNetworkComputerNetwork
18 OL-19963-01 Note Each USB port supports a maximum of five supported and nonsupported devices that are connected to the phone. Each device connected to the phone is included in the maximum device count. For example, your phone can support five USB devices (such as three Cisco Unified IP Color Key Expansion modules, one hub, and one other standard USB device) on the side port and five additional standard USB devices on the back port. (Many third-party USB products count as several USB devices.) For more information, see your system administrator.1USB port 3Speaker port for output to optional external speakers2Cisco Unified IP Phone Expansion Module 7917 connector4Microphone port for input from optional external microphone
Your PhoneCisco Unified IP Phone 8961, 9951, and 9971 User Guide for Cisco Unified Communications Manager 7.1(3) (SIP) 19 BluetoothYour phone supports Bluetooth Class 2 technology when the headsets support Bluetooth. You can add and connect up to five Bluetooth headsets to your phone, but the last Bluetooth headset connected becomes the default for use with the phone.Related TopicsBluetooth Headsets, page 111
20 OL-19963-01 FootstandIf your phone is placed on a table or desk, connect the footstand to the back of the phone. 1Insert the curved connectors into the lower slots.2Lift the footstand until the connectors snap into the upper slots.11222211193118
Your PhoneCisco Unified IP Phone 8961, 9951, and 9971 User Guide for Cisco Unified Communications Manager 7.1(3) (SIP) 21 Phone Display Viewing AngleThe viewing angle of the phone display can be adjusted according to your preference.Change Display Viewing AngleHold the handset and cradle with your left hand, hold the right side of the bezel (to the right of the display) with your right hand, and then move your hands back and forth in opposite directions to adjust the angle. (The Cisco Unified IP Phone 9971 is shown for illustrative purposes.)Buttons and HardwareYour phone provides quick access to your phone lines, features, and call sessions:  • Use the feature buttons (on the left) to view calls on a line or access features such as speed dial or All Calls.   • Use the call session buttons (on the right) to perform tasks such as making a call, answering a call, or resuming a held call. Each call on your phone is associated with a session button.193119
22 OL-19963-01 1812 1113 10 914182019151617567234194674
Your PhoneCisco Unified IP Phone 8961, 9951, and 9971 User Guide for Cisco Unified Communications Manager 7.1(3) (SIP) 23 1Phone screen Shows information about your phone, including directory number, call information (for example caller ID, icons for an active call or call on hold) and available softkeys. 2Session buttons Each represents a call session and takes the default action for that session. For example, pressing the session button for a ringing call answers the call, while pressing the session button for a held call resumes the call.Color LEDs reflect the call state. LEDs can flash (blink on and off rapidly), pulse (alternately dim and brighten), or appear solid (glow without interruption).  • Flashing amber  —Ringing call. Pressing this button answers the call.  • Solid green  —May be a connected call or an outgoing call that is not yet connected. If the call is connected, pressing this button displays the call details or the participants of a conference call. If the call is not yet connected, pressing this button ends the call.  • Pulsing green  —Held call. Pressing this button resumes the held call.  • Solid red  —Shared line in-use remotely. Pressing this button allows you to barge in on the call (if Barge is enabled).  • Pulsing red  —Shared line call put on hold remotely. Pressing this button resumes the held call.Icons next to the session buttons indicate an action for that session. For example, pressing the session button with a Missed Calls icon displays your missed calls, and pressing the session button with a Voicemail icon accesses your voice-messaging system.(The position of the session buttons can be reversed with the position of the programmable feature buttons on phones that use a locale with a right-to-left reading orientation, such as Hebrew and Arabic.) 3Softkey buttons Allow you to access the softkey options (for the selected call or menu item) displayed on your phone screen.4Back button Returns to the previous screen or menu.5Release button Ends a connected call or session.
24 OL-19963-01 6Navigation pad and Select buttonThe four-way Navigation pad allows you to scroll through menus, highlight items, and move within a text input field.The Select button (center of the Navigation pad) allows you to select a highlighted item.The Select button is lit (white) when the phone is in power-save mode.7Conference button Creates a conference call.8Hold button Places a connected call on hold.9Transfer button Transfers a call.10 Keypad Allows you to dial phone numbers, enter letters, and choose menu items (by entering the item number).11 Speakerphone button Selects the speakerphone as the default audio path and initiates a new call, picks up an incoming call, or ends a call. During a call, the button is lit green. The speakerphone audio path does not change until a new default audio path is selected (for example, by picking up the handset).If external speakers are connected, the Speakerphone button selects them as the default audio path.12 Mute button Toggles the microphone on or off during a call. When the microphone is muted, the button is lit red.13 Headset button Selects the headset as the default audio path and initiates a new call, picks up an incoming call, or ends a call. During a call, the button is lit green. A headset icon   in the phone screen header line indicates the headset is the default audio path. This audio path does not change until a new default audio path is selected (for example, by picking up the handset).14 Volume button Controls the handset, headset, and speakerphone volume (off-hook) and the ringer volume (on-hook).Silences the ringer on the phone if an incoming call is ringing.15 Messages button Auto-dials your voicemail system (varies by system).
Your PhoneCisco Unified IP Phone 8961, 9951, and 9971 User Guide for Cisco Unified Communications Manager 7.1(3) (SIP) 25 16 Applications button Opens/closes the Applications menu. Depending on how your system administrator sets up the phone, use it to access applications such as call history, preferences, and phone information.17 Contacts button Opens/closes the Contacts menu. Depending on how your system administrator sets up the phone, use it to access personal directory, corporate directory, or call history.18 Phone display Can be positioned to your preferred viewing angle.19 Programmable feature buttonsEach corresponds to a phone line, speed dial, and calling feature.Pressing a button for a phone line displays the active calls for that line.If you have multiple lines, you may have an All Calls button that displays a consolidated list of all calls from all lines (oldest at the top). Then, it is recommended that you keep your phone in the All Calls view.Color LEDs indicate the line state:  • Amber  —Ringing call on this line  • Green  —Active or held call on this line  • Red  —Shared line in-use remotely(The position of the programmable feature buttons can be reversed with the position of the session buttons on phones that use a locale with a right-to-left reading orientation, such as Hebrew and Arabic.)20 Handset with light strip The handset light strip lights up to indicate a ringing call (flashing red) or a new voice message (steady red).
26 OL-19963-01 Phone ScreenThe way that your system administrator set up your phone determines what is displayed on your phone screen.Phone with Single Line1Line label Displays the line phone information.2Header Displays the date and time, and information (such as phone number) about the selected line.3Session button label (for connected call)Displays information (such as phone number and duration) about a connected call on the line.
Your PhoneCisco Unified IP Phone 8961, 9951, and 9971 User Guide for Cisco Unified Communications Manager 7.1(3) (SIP) 27 Phone with Multiple LinesIf you have multiple lines, it is recommended that you use the All Calls button to view all calls on all lines. If you handle many calls at one time, it is recommended that you use the Answer button to answer the oldest incoming call without having to scroll down the call list and select the call. For more information, see your system administrator.4Session button label (for held call)Displays information (such as phone number and duration) about a held call on the line.Pressing the corresponding session button resumes the held call.5New Call icon Indicates you can press the corresponding session button to make a new call.6Softkeys Softkey options for the selected (highlighted) call only.If you select a different call (by pressing a feature button or the Navigation pad, or by answering a ringing call), the softkey options may change.
28 OL-19963-01 1Primary line label Displays information about the primary phone line.Look for the blue icon on the line label to see which line is selected. In this case, the primary line is selected, and the information displayed is for the primary line only. 2Header Displays the date and time, and information (such as phone number) about the selected line.3Session label (with Connected Call icon)Displays information (such as call status and duration) about a connected call associated with the selected line.
Your PhoneCisco Unified IP Phone 8961, 9951, and 9971 User Guide for Cisco Unified Communications Manager 7.1(3) (SIP) 29 4Session labels (with Held Call icons) Display information (such as call status and duration) about held calls associated with the selected line. Calls are displayed on the right side of the phone screen from the oldest (at the top) to the newest.Pressing the session button next to a Held Call icon resumes the held call for that session.5Softkeys Softkey options for the selected call only.If you select a different call (by pressing a feature button or the Navigation pad, or by answering a ringing call), the softkey options may change.6Answer label Displays if your system administrator has assigned the Answer feature to the programmable feature button.Pressing this label or the corresponding button answers the oldest incoming call without having to scroll down the call list and select the call.7Speed-dial label Displays if you or your system administrator assigned a speed dial to the programmable feature button.8Nonprimary line labels Display information about nonprimary phone lines.9All Calls label Displays if the All Calls feature is enabled. Pressing the corresponding button displays all calls on all lines.Calls are displayed on the right side of the phone screen from the oldest (at the top) to the newest.Pressing the button once selects the current call or first call on the list. Pressing the button twice selects the header line, which allows you to make a new call.Using the All Calls feature is recommended highly if you have multiple lines on your phone.
30 OL-19963-01 Phone Screen Navigation and Item SelectionTask Action ExampleScroll to highlight an item. Press the Navigation pad. Highlight a call from the missed call list.Select an item by number. Press the corresponding number on the keypad.Press 2 to select the second item in the Applications menu.Select an item using the Select button.Press the Select button (at the center of the Navigation pad).Highlight the Preferences application and press the Select button.Navigate to a submenu.(A right arrow (>) next to the menu item indicates that a submenu exists.)Highlight the menu item and press the item number on the keypad.Or press the down arrow on the Navigation pad and then press the Select button.Highlight the Network Setup menu, then press 1 to open the submenu.Select a line to use a calling feature (when the line is idle).Press the line button.Indicators of your line selection include:   • The selected line is displayed on the phone screen header.  • Color of the icon (on the line label) changes to blue.Press the line button and then press the Forward All softkey to forward calls on that line.Select a line to use a calling feature (when the line has one or more active calls).Press the line button twice.Indicators of your line selection include:   • The selected line is displayed on the phone screen header.  • Color of the icon (on the line label) changes to blue.Press the line button twice and then press the Forward All softkey to forward calls on that line.
Your PhoneCisco Unified IP Phone 8961, 9951, and 9971 User Guide for Cisco Unified Communications Manager 7.1(3) (SIP) 31 Power-Save ModeDepending on how your system administrator set up your phone, the phone display may go into a power-save mode (the phone screen appears blank and the Select button is lit white). To turn on the phone display, press any button or pick up the handset.Handset RestYour system administrator may have mounted your phone on a wall. With a wall-mounted phone, you may need to adjust the handset rest to ensure that the receiver does not slip out of the cradle.1Remove the handset from the cradle and pull the plastic tab from the handset rest.2Rotate the tab 180 degrees.3Hold the tab between two fingers, with the corner notches facing you. 4Line up the tab with the slot in the cradle and press the tab evenly into the slot. An extension protrudes from the top of the rotated tab. Return the handset to the handset rest.21 32759434

Navigation menu