Cisco Systems RTPRO0350 Wireless IP Phone User Manual 9971 rt901
Cisco Systems Inc Wireless IP Phone 9971 rt901
Contents
- 1. User Manual 1
- 2. User Manual 2
- 3. User Manual 3
- 4. User Manual 4
- 5. User Manual 5
User Manual 3
44 OL-19963-01
EFT DRAFT - CISCO CONFIDENTIAL
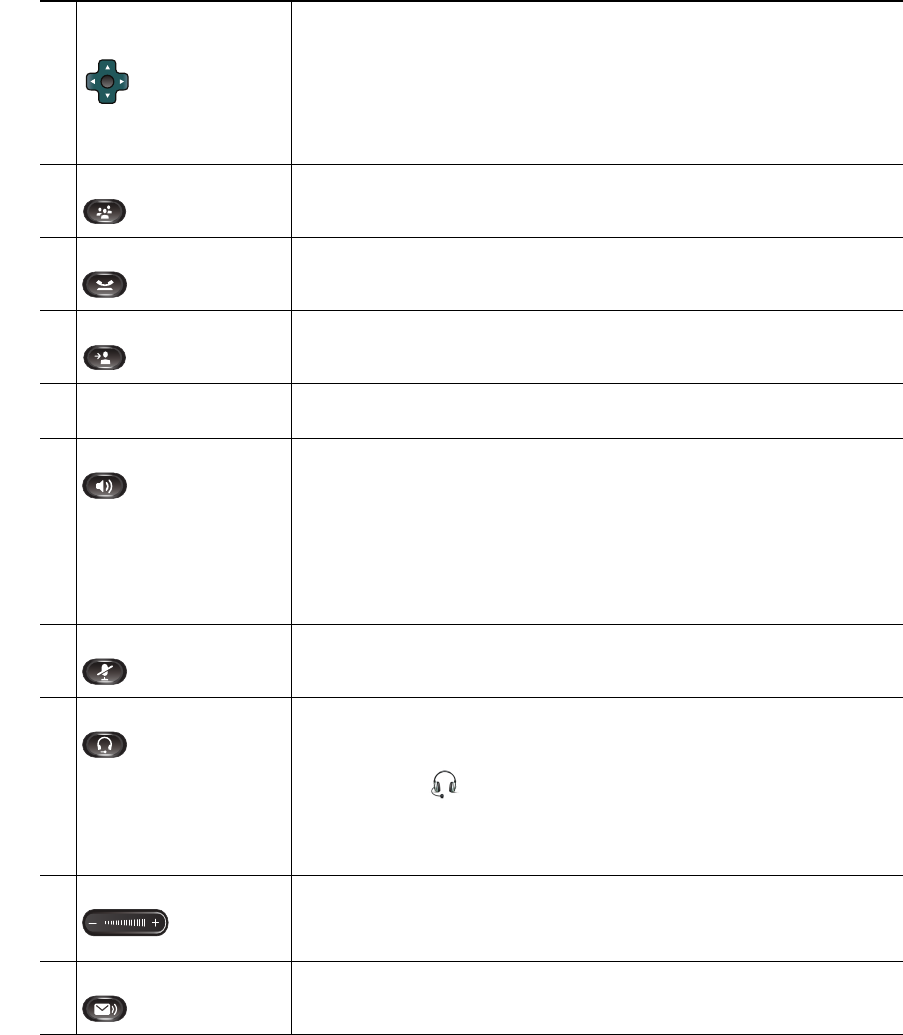
5Navigation pad and
Select button
The four-way Navigation pad allows you to scroll through menus,
highlight items, and move within a text input field.
The Select button (center of the Navigation pad) allows you to select a
highlighted item, disable the phone screen for cleaning, or enable the
phone screen if it is in power-save mode.
The Select button is lit (white) when the phone is in power-save mode.
6Conference button Creates a conference call.
7Hold button Places a connected call on hold.
8Transfer button Transfers a call.
9Keypad Allows you to dial phone numbers, enter letters, and choose menu
items (by entering the item number).
10 Speakerphone button Selects the speakerphone as the default audio path and initiates a new
call, picks up an incoming call, or ends a call. During a call, the button
is lit green.
The speakerphone audio path does not change until a new default
audio path is selected (for example, by picking up the handset).
If external speakers are connected, the Speakerphone button selects
them as the default audio path.
11 Mute button Toggles the microphone on or off during a call. When the microphone
is muted, the button is lit red.
12 Headset button Selects the wired headset as the default audio path and initiates a new
call, picks up an incoming call, or ends a call. During a call, the button
is lit green.
A headset icon in the phone screen header line indicates the
headset is the default audio path. This audio path does not change until
a new default audio path is selected (for example, by picking up the
handset).
13 Volume button Controls the handset, headset, and speakerphone volume (off-hook)
and the ringer volume (on-hook).
Silences the ringer on the phone if an incoming call is ringing.
14 Messages button Auto-dials your voicemail system (varies by system).
Your Phone
Cisco Unified IP Phone 8961, 9951, and 9971 User Guide for Cisco Unified Communications Manager 7.1(3) (SIP) 45
EFT DRAFT - CISCO CONFIDENTIAL
Phone Screen
How your system administrator sets up the phone determines what is displayed on your phone screen.
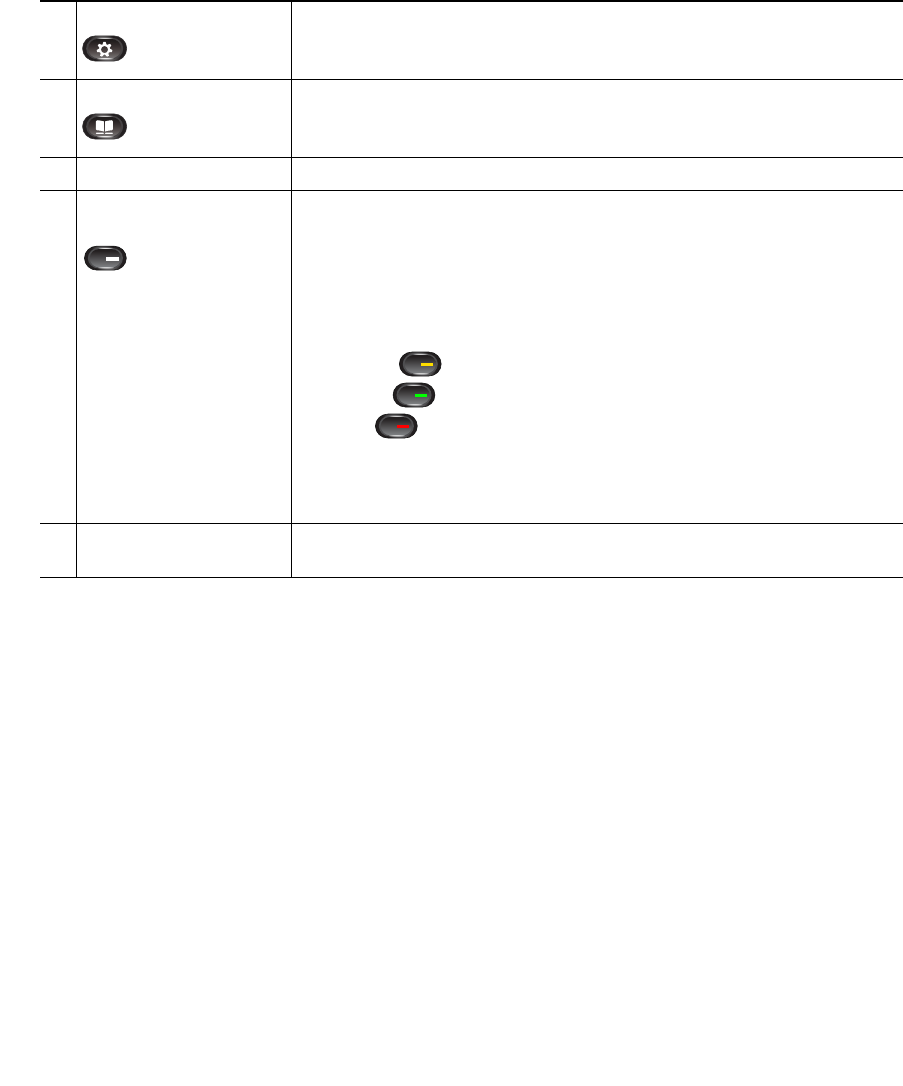
15 Applications button Opens/closes the Applications menu. Depending on how your system
administrator sets up the phone, use it to access applications such as
call history, preferences, and phone information.
16 Contacts button Opens/closes the Contacts menu. Depending on how your system
administrator sets up the phone, use it to access personal directory,
corporate directory, or call history.
17 Phone display Phone display that can be positioned to your preferred viewing angle.
18 Programmable feature
buttons
Programmable feature buttons that correspond to phone lines, speed
dials, and calling features.
Pressing a button for a phone line displays the active calls for that line.
If you have multiple lines, you might have an All Calls feature button
that displays a consolidated list of calls from all lines.
Color LEDs indicate the line state:
• Amber —Ringing call on this line
• Green —Active or held call on this line
• Red —Shared line in-use remotely
(The position of programmable feature buttons may be reversed with
that of session buttons on phones using a locale with a right-to-left
reading orientation, such as Hebrew and Arabic.)
19 Handset with light strip The handset light strip lights up to indicate a ringing call (flashing red)
or a new voice message (steady red).
46 OL-19963-01
EFT DRAFT - CISCO CONFIDENTIAL
Phone with Single Line
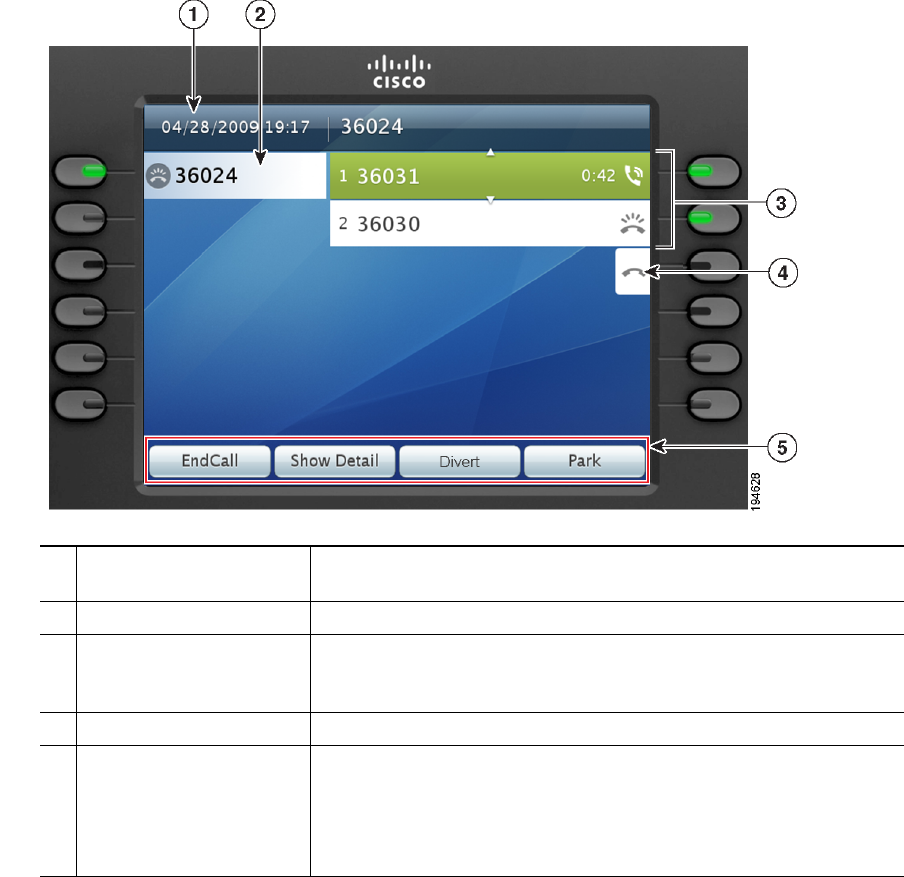
1Header Displays the date and time, and information (such as phone number)
about the selected line.
2Primary line label Displays the primary line phone information.
3Session labels Display information (such as call status and duration) about active
calls associated with the selected line. Calls are displayed in order of
the oldest (at the top) to the newest.
4New Call icon A touch-sensitive icon you can press to make a new call.
5Softkeys Touch-sensitive softkey options for the selected (highlighted) call
only.
If you select a different call (by pressing a feature button or the
Navigation pad, or by answering a ringing call), the softkey options
may change.
Your Phone
Cisco Unified IP Phone 8961, 9951, and 9971 User Guide for Cisco Unified Communications Manager 7.1(3) (SIP) 47
EFT DRAFT - CISCO CONFIDENTIAL
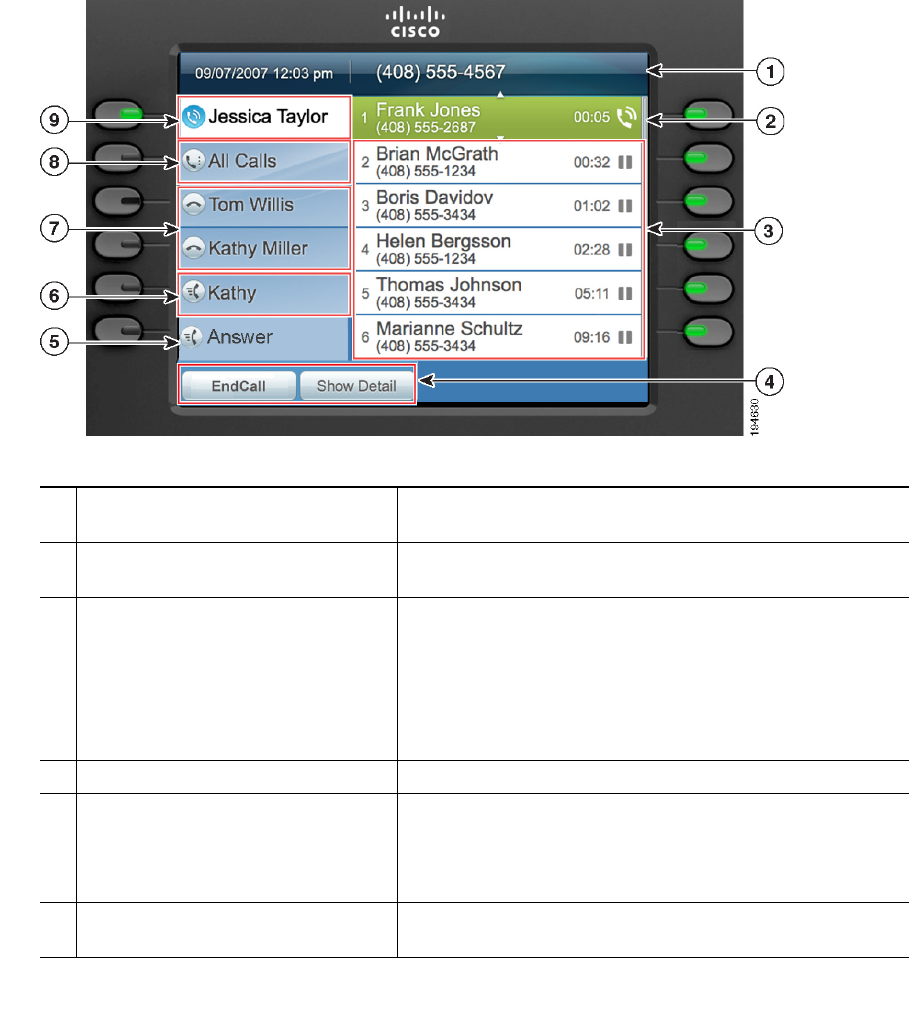
Phone with Multiple Lines
If you have multiple lines, it is highly recommended that the All Calls feature is enabled on your phone.
All Calls allows you to view all the calls on all lines at the same time. For more information, see your
system administrator.
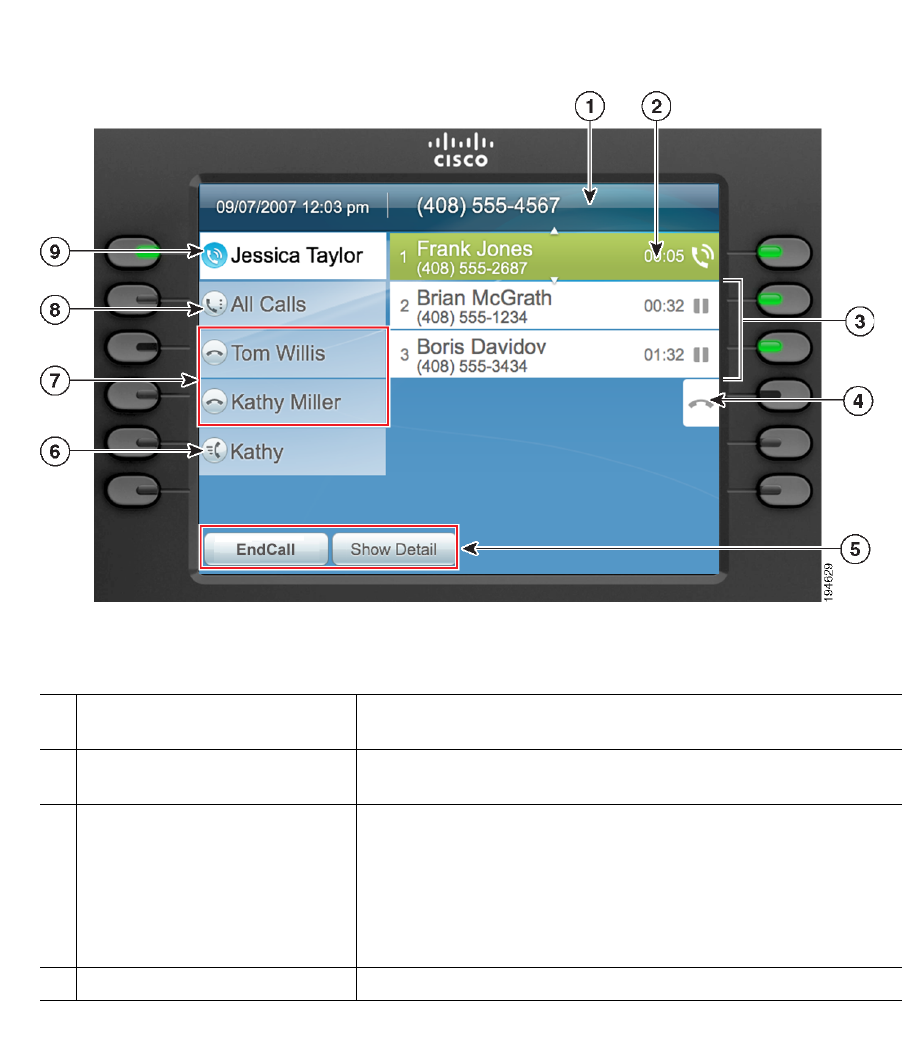
1Header Displays the date and time, and information (such as phone
number) about the selected line.
2Session button label (for a
connected call)
Displays information (such as call status and duration) about a
connected call on the selected line.
3Session button labels (for held
calls)
Display information (such as call status and duration) about
held calls associated with the selected line.
Calls are displayed on the right side of the phone screen from
the oldest (at the top) to the newest.
Pressing the session button next to a Held Call icon resumes the
held call for that session.
4New Call icon A touch-sensitive icon you can press to make a new call.

48 OL-19963-01
EFT DRAFT - CISCO CONFIDENTIAL
5Softkeys Touch-sensitive softkey options for the selected (highlighted)
call only.
If you select a different call (by pressing a feature button or the
Navigation pad, or by answering a ringing call), the softkey
options may change.
6Speed-dial button label Displays if you assigned a speed dial to the programmable
feature button.
7Nonprimary line labels Display nonprimary line phone information.
8All Calls button label Displays if the All Calls feature is enabled. Pressing this label
or corresponding button displays all calls on all lines.
Calls are displayed on the right side of the phone screen from
the oldest (at the top) to the newest.
Pressing the button once highlights (selects) the current call or
first call on the list. Pressing the button twice highlights the
header line, allowing you to make a new call.
Using the All Calls feature is highly recommended if you have
multiple lines on your phone.
9Primary line label Displays the primary line phone information.
In this example, the blue icon (for Connected Call) indicates
this is the selected line.
Your Phone
Cisco Unified IP Phone 8961, 9951, and 9971 User Guide for Cisco Unified Communications Manager 7.1(3) (SIP) 49
EFT DRAFT - CISCO CONFIDENTIAL
Phone with Answer Button
1Header Displays the date and time, and information (such as phone
number) about the selected line.
2Session button label (for connected
call)
Displays information (such as call status and duration)
about a connected call on the selected line.
3Session button labels (for held calls) Display information (such as call status and duration)
about held calls associated with the selected line.
Calls are displayed on the right side of the phone screen
from the oldest (at the top) to the newest.
Pressing the session button next to a Held Call icon
resumes the held call for that session.
4Softkeys Touch-sensitive softkey options.
5Answer button label Displays if your system administrator has assigned the
Answer feature to the programmable feature button.
Pressing this label or the corresponding button answers the
oldest incoming call.
6Speed-dial button label Displays if you assigned a speed dial to the programmable
feature button.

50 OL-19963-01
EFT DRAFT - CISCO CONFIDENTIAL
Phone Screen Navigation and Item Selection
7Nonprimary line labels Displays the nonprimary line phone information.
8All Calls button label Displays if the All Calls feature is enabled. Pressing this
label or corresponding button displays all calls on all lines.
Calls are displayed on the right side of the phone screen
from the oldest (at the top) to the newest.
Pressing the button once highlights (selects) the current call
or first call on the list. Pressing the button twice highlights
the header line, allowing you to make a new call.
Using the All Calls feature is highly recommended if you
have multiple lines on your phone.
9Primary line label Displays the primary line phone information.
In this example, the blue icon (for Connected Call)
indicates this is the selected line.
Task Action Example
Scroll to highlight an item. Press the Navigation pad. Highlight a call from the missed
call list.
Scroll to a different page (of a
listing) by touch.
Quickly press and drag your
finger on the list in the direction
you wish the page to move (flick
scroll).
Flick scroll to display the next
page of the placed calls list.
Select a touch-sensitive item
(press once).
Press the item on the phone
screen.
Press the Preferences
application to open it.
Select a touch-sensitive item to
perform the default action
(double-tap).
Double-tap an item in a listing. Double-tap a call history item to
dial the number.
Select an item by number. Press the corresponding number
on the keypad.
Press 2 to select the second item
in the Applications menu.
Select an item using the Select
button.
Press the Select button (at the
center of the Navigation pad).
Highlight the Preferences
application and press the Select
button.

Your Phone
Cisco Unified IP Phone 8961, 9951, and 9971 User Guide for Cisco Unified Communications Manager 7.1(3) (SIP) 51
EFT DRAFT - CISCO CONFIDENTIAL
Navigate to a submenu.
(A right arrow (>) next to the
menu item indicates there is a
submenu.)
Highlight the menu item and
press the item number on the
keypad.
Or press the down arrow on the
Navigation pad and then press
the Select button.
Highlight the Network Setup
menu, then press 1 to open the
submenu.
Select a line to use a calling
feature (when line is idle).
Press the line label.
Indicators of your line selection
include:
• The selected line is
displayed on the phone
screen header.
• The selected line is
highlighted.
• Color of the icon (on the
line label) changes to blue.
Press the line label, then press
the Forward All softkey to
forward calls on that line.
Select a line to use a calling
feature (when line has one or
more active calls).
Double-tap the line label.
Indicators of your line selection
include:
• The selected line is
displayed on the phone
screen header.
• The selected line is
highlighted.
• Color of the icon (on the
line label) changes to blue.
Double-tap the line label, then
press the Forward All softkey to
forward calls on that line.
Change the line view (while on a
call).
Select a different line by
double-tapping the label for the
other line.
If you are on a call, changing the
line view does not end the call,
but it may disappear from view.
To see your current call session
again, select the line the call is
on.
While on a call, double-tap the
label for the line.
Call session information for the
newly selected line is displayed.
Call session information
previously displayed may
disappear from view.
Go back to the previous screen
or menu.
Press the Back button or
the softkey.
From the Preferences menu,
press or the
softkey.
Task Action Example

52 OL-19963-01
EFT DRAFT - CISCO CONFIDENTIAL
Power-Save Mode
Depending on how your system administrator sets up the phone, your phone display might go into
power-save mode (the phone screen appears blank and the Select button is lit white). To turn on the
phone display, press any button, touch the blank phone screen, or pick up the handset.
Phone Display Cleaning
Before cleaning the phone display, disable the phone screen by pressing the Select button until you see
the message “Touchscreen Disabled.”
To enable the phone screen again after cleaning, press the Select button until you see the message
“Touchscreen Enabled.”
Caution Use only a soft, dry cloth to wipe the phone display. Do not use any liquids or powders
on the phone, as they can contaminate phone components and cause failures.
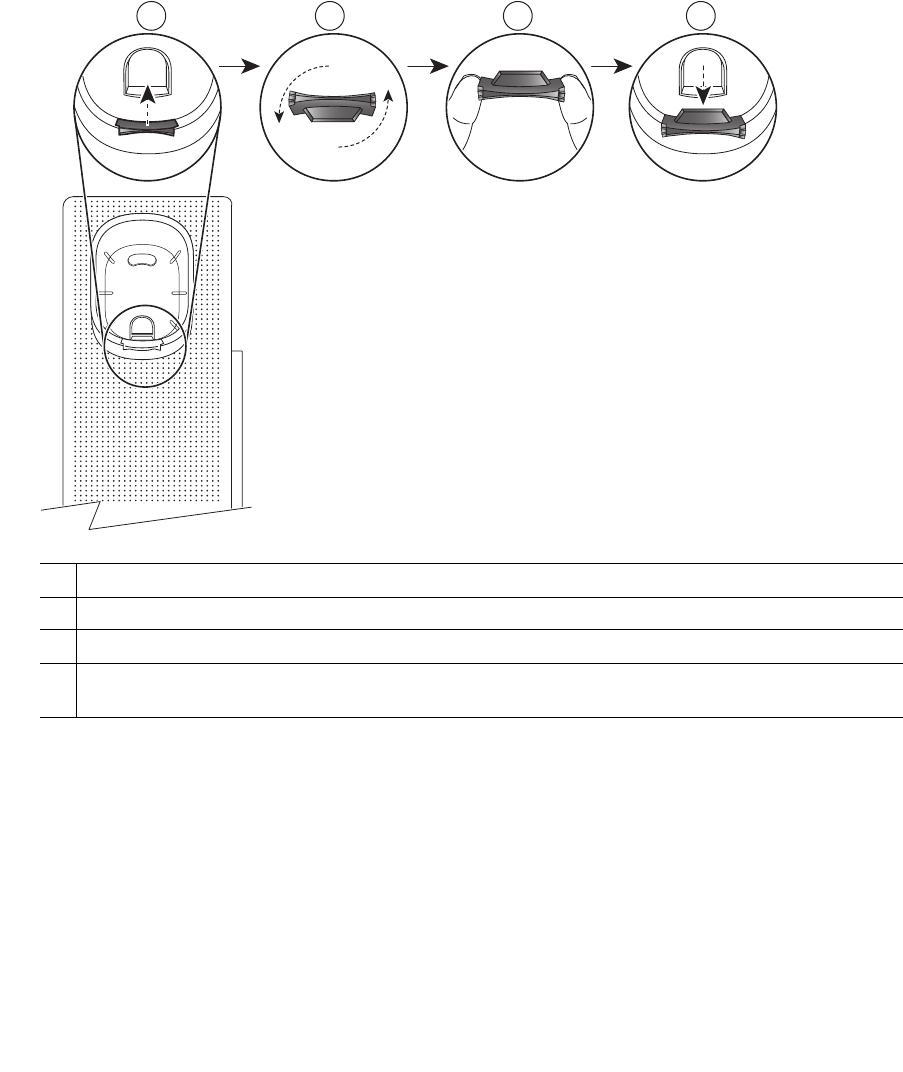
Handset Rest
Your system administrator may have mounted your phone on a wall. With a wall-mounted phone, you
might need to adjust the handset rest to ensure that the receiver will not slip out of the cradle.
Your Phone
Cisco Unified IP Phone 8961, 9951, and 9971 User Guide for Cisco Unified Communications Manager 7.1(3) (SIP) 53
EFT DRAFT - CISCO CONFIDENTIAL
1Remove handset from the cradle and pull the plastic tab from the handset rest.
2Rotate the tab 180 degrees.
3Hold the tab between two fingers, with the corner notches facing you.
4Line up the tab with the slot in the cradle, and press the tab evenly into the slot. An extension
protrudes from the top of the rotated tab. Return the handset to the handset rest.
21 3
275943
4
54 OL-19963-01
EFT DRAFT - CISCO CONFIDENTIAL

Cisco Unified IP Phone 8961, 9951, and 9971 User Guide for Cisco Unified Communications Manager 7.1(3) (SIP) 55
EFT DRAFT - CISCO CONFIDENTIAL
Applications
August 21, 2009
Phone Applications
Phone applications allow you to access the following:
• Call History
• Preferences
• Accessories
• Running Applications
• Phone Information
• Administrator Settings (For system administrators only.)
Call History
Call History allows you to view information on the last 150 calls on your phone. An icon displays
indicating the type of call:
• Received—
• Placed—
• Missed—
The caller ID is displayed with the call icon. If the caller ID is unavailable, then the phone number is
displayed. If the phone number is unavailable, then “Unknown” is displayed. All Call History items
are integrated into one list and are ordered by time (latest to oldest). There is a 150 call limit per phone
and not per line. For example, if a phone has multiple lines, the 150 call limit applies to all lines
combined.
You can sort the Call History list by all lines, each line, or by missed calls. You can sort the call history
for each line by selecting the individual line for which you want to see the call history for, or select the
AllCalls softkey button to see the merged history for all lines. You can also dial a number directly from
the Call History list.
A + symbol on entries in call history, redial, or call directory indicates that your phone is set up to list
international calls. For more information, see your system administrator.

56 OL-19963-01
EFT DRAFT - CISCO CONFIDENTIAL
View Call History
1. Press the Applications button .
2. Select Call History. (Use the Navigation pad and Select button to scroll and select.)
The phone screen displays the call history with an icon associated for each type of call.
3. Press the Exit softkey to return to the Applications screen.
View Call Record Details
1. Press the Applications button .
2. Select Call History. (Use the Navigation pad and Select button to scroll and select.)
The phone screen displays the call history with an icon associated for each type of call.
3. Select a call record and press the Details softkey (you may need to press More softkey first).
The phone screen displays the time stamp, duration of the call, caller’s name, caller’s directory
number and his alternate number.
4. Press the softkey to return to the Call History screen.
5. Press the Exit softkey to return to the Applications screen.
Filter Call History
1. Press the Applications button .
2. Select Call History. (Use the Navigation pad and Select button to scroll and select.)
3. Press the Missed Calls softkey.
The Call History screen displays only the missed calls on the selected line.
4. To view all calls in the Call History screen, press the All Calls softkey.
5. Press the Exit softkey to return to the Applications screen.
Dial From Call History
1. Press the Applications button .
2. Select Call History. (Use the Navigation pad and Select button to scroll and select.)
3. From the Call History screen, highlight the call you want to dial and do one of the following:
–
Press the Call softkey.
–
Pick up the handset.
–
Double-tap on the number on the phone screen.
–
Press the Select button.
–
Press the Speakerphone button or Headset button .

Applications
Cisco Unified IP Phone 8961, 9951, and 9971 User Guide for Cisco Unified Communications Manager 7.1(3) (SIP) 57
EFT DRAFT - CISCO CONFIDENTIAL
Edit Number From Call History
1. Press the Applications button .
2. Select Call History. (Use the Navigation pad and Select button to scroll and select.)
3. Highlight the call you want to edit.
4. Press the EditDial softkey. (You may need to press More softkey first.)
5. Press the right or left arrow on the Navigation bar to move the cursor to the desired location.
6. Press the softkey to delete numbers on the left of the cursor.
7. Press the Call softkey to dial the new edited number.
8. Press the softkey to return to the Call History screen.
Clear Call History
1. Press the Applications button .
2. Select Call History. (Use the Navigation pad and Select button to scroll and select.)
3. Press the Clear List softkey to clear the entire call history on the phone.
4. Press the Delete softkey to delete the call history on the phone, or press the Cancel softkey to go
back to the Call History screen.
5. Press the Exit softkey to return to Applications screen.
Delete Call Record From Call History
1. Press the Applications button .
2. Select Call History. (Use the Navigation pad and Select button to scroll and select.)
3. Highlight the call record you want to delete.
4. Press the Delete softkey to delete the number from Call History. (You may need to press More
softkey first.)
5. Press the Delete softkey to delete the number, or press the Cancel softkey to go back to the Call
History screen.
6. Press the Exit softkey to return to Applications screen.
Preferences
Preferences allows you to set user preferences for the following items:
• Ringtone
• Wallpaper
• Brightness

58 OL-19963-01
EFT DRAFT - CISCO CONFIDENTIAL
• Bluetooth
Ringtones
You can customize how your phone indicates an incoming call. You can also adjust the ringer volume
for your phone.
Change Ringtone for a Line
1. Press the Applications button .
2. Select Preferences. (Use the Navigation pad and Select button to scroll and select.)
3. Select Ringtone.
4. Highlight a ringtone.
5. Press the Play softkey to play the sample ringtone.
6. Press the Set softkey to apply the ringtone.
7. Press the softkey to return to the Preferences screen.
Wallpaper
You can change the default image that appears on your phone screen with wallpapers that are provided
with the phone, or with your own custom wallpaper. For more information about adding your own
custom wallpaper to the phone, see your system administrator.
Change Wallpaper
1. Press the Applications button .
2. Select Preferences. (Use the Navigation pad and Select button to scroll and select.)
3. Select Wallpaper and select a wallpaper option.
4. Press the Preview softkey to see the wallpaper on your phone screen.
5. Press the Set softkey to apply the wallpaper to the phone.
Brightness
You can adjust your phone screen brightness level.
Adjust the Brightness
1. Press the Applications button .
2. Select Preferences. (Use the Navigation pad and Select button to scroll and select.)

Applications
Cisco Unified IP Phone 8961, 9951, and 9971 User Guide for Cisco Unified Communications Manager 7.1(3) (SIP) 59
EFT DRAFT - CISCO CONFIDENTIAL
3. Select Brightness.
–
To increase brightness, press the right arrow on the Navigation pad.
–
To decrease brightness, press the left arrow on the Navigation pad.
4. Press the Save softkey to set the brightness, or press the Cancel softkey to exit.
Bluetooth
If your system administrator has set up the Bluetooth feature for your phone, you can turn it on and
off from your phone.
Turn On Bluetooth
(For the Cisco Unified IP Phone 9951 and 9971 only.)
1. Press the Applications button .
2. Select Preferences. (Use the Navigation pad and Select button to scroll and select.)
3. Select Bluetooth.
4. Press the On softkey. The Bluetooth icon appears on the phone screen header.
To add a Bluetooth accessory from this screen, select Bluetooth again and press the Add Accessory
softkey.
Turn Off Bluetooth
(For the Cisco Unified IP Phone 9951 and 9971 only.)
1. Press the Applications button .
2. Select Preferences. (Use the Navigation pad and Select button to scroll and select.)
3. Select Bluetooth.
4. Press the Off softkey.
The Bluetooth icon disappears from the phone screen header.
Accessories
You can connect a external hardware to your phone using either the headjack, Bluetooth, or USB. The
accessory list, by default, contains analog headset which can be set up to enable wideband on it.
View Accessories List
1. Press the Applications button .
2. Select Accessories. (Use the Navigation pad and Select button to scroll and select.)
A list of phone accessories is displayed.

60 OL-19963-01
EFT DRAFT - CISCO CONFIDENTIAL
3. Press the Exit to return to the Applications screen.
View Accessory Details
1. Press the Applications button .
2. Select Accessories. (Use the Navigation pad and Select button to scroll and select.)
A list of phone accessories is displayed.
3. Select an accessory from list and press the Details softkey.
The phone screen displays the details of selected accessory. The information displayed on the
phone screen depends on the accessory selected. Most of the accessories provide these details:
–
Device Name
–
Hostname
–
Device Type
–
Device Service
–
Firmware Version
–
Paired Status (for Bluetooth devices)
–
Connected Status
–
Configured Status
4. Press the Setup softkey to configure the selected accessory for your phone.
5. Press the Exit softkey to return to the Applications screen.
Set Up Wideband for Analog Headset
1. Press the Applications button .
2. Select Accessories. (Use the Navigation pad and Select button to scroll and select.)
A list of phone accessories is displayed.
3. Select Analog Headset and press Setup softkey.
The phone screen displays the wideband status for the analog headset.
4. Press the Turn On softkey to enable wideband for the analog headset.
5. Press Turn Off softkey to disable wideband for the analog headset.
6. Press the softkey to return to the Accessories screen.
Add Bluetooth Accessory
(For the Cisco Unified IP Phone 9951 and 9971 only.)

Applications
Cisco Unified IP Phone 8961, 9951, and 9971 User Guide for Cisco Unified Communications Manager 7.1(3) (SIP) 61
EFT DRAFT - CISCO CONFIDENTIAL
Before You Begin
Before you add a Bluetooth accessory, it must be discoverable by the phone. Look for a flashing LED
on a Bluetooth accessory as an indication that it is discoverable. For more information, see the
documentation from the Bluetooth accessory manufacturer.
1. Press the Applications button .
2. Select Accessories. (Use the Navigation pad and Select button to scroll and select.)
3. Select Add Bluetooth Accessory.
The phone searches for discoverable accessories that are supported. When an accessory is found,
it is added to the list in the Adding Bluetooth Accessory screen.
4. Select the accessory and press the Connect softkey.
5. The phone automatically attempts to connect the accessory using a Bluetooth device PIN of
“0000.” If your accessory requires a different PIN and the Adding PIN screen appears, enter the
PIN for your accessory.
6. When the connection is completed, the Bluetooth active icon appears on the phone screen
header and a checkmark appears next to the connected accessory.
Delete Bluetooth Accessory
(For the Cisco Unified IP Phone 9951 and 9971 only.)
1. Press the Applications button .
2. Select Accessories. (Use the Navigation pad and Select button to scroll and select.)
3. Select a Bluetooth accessory and press the Delete softkey.
The Bluetooth accessory will be disconnected (if it was connected) and removed from the
Accessories list.
Connect Bluetooth Accessory
(For the Cisco Unified IP Phone 9951 and 9971 only.)
Before You Begin
Before you can connect a Bluetooth accessory, it must be already added as an accessory to the phone.
1. Press the Applications button .
2. Select Accessories. (Use the Navigation pad and Select button to scroll and select.)
3. Select a Bluetooth accessory and press the Connect softkey.
When the connection is completed, the Bluetooth active icon appears on the phone screen
header and a checkmark appears next to the connected accessory.

62 OL-19963-01
EFT DRAFT - CISCO CONFIDENTIAL
Disconnect Bluetooth Accessory
(For the Cisco Unified IP Phone 9951 and 9971 only.)
1. Press the Applications button .
2. Select Accessories. (Use the Navigation pad and Select button to scroll and select.)
3. Select a Bluetooth accessory and then press the Disconnect softkey.
Running Applications
You can view the applications that are running on your phone, including those that are not under
Applications menu: for example, Directories.
View Running Applications
1. Press the Applications button .
2. Select Running Applications. (Use the Navigation pad and Select button to scroll and select.)
The phone displays a list of applications running on the phone including those that are not under
Application menu.
3. Press Exit softkey to return to the Applications screen.
Switch to a Running Application
1. Press the Applications button .
2. Select Running Applications. (Use the Navigation pad and Select button to scroll and select.)
3. Choose a running application and press the Switch To softkey to open and use the selected
application.
4. Press the Exit softkey to close the application.
Close Running Application
1. Press the Applications button .
2. Select Running Applications. (Use the Navigation pad and Select button to scroll and select.)
3. Select a running application and press the Close App softkey to close the application.
–
Press Close softkey to close the application without saving the changes.
–
Press Cancel softkey to cancel the close application operations.
4. Press the Exit softkey to return back to the Applications screen.

Applications
Cisco Unified IP Phone 8961, 9951, and 9971 User Guide for Cisco Unified Communications Manager 7.1(3) (SIP) 63
EFT DRAFT - CISCO CONFIDENTIAL
Phone Information
Phone Information allows you to view this model information for your phone:
• Model Number
• IP Address
• Host Name
• Active Load
• Last Upgrade
• Active Server
• Stand-by-Server
View Phone Information
1. Press the Applications button .
2. Select Phone Information. (Use the Navigation pad and Select button to scroll and select.)
3. Press the Exit softkey to return back to the Applications screen.
Administrator Settings
For information on accessing and changing the Administrator Settings, see your system administrator.
64 OL-19963-01
EFT DRAFT - CISCO CONFIDENTIAL

Cisco Unified IP Phone 8961, 9951, and 9971 User Guide for Cisco Unified Communications Manager 7.1(3) (SIP) 65
EFT DRAFT - CISCO CONFIDENTIAL
Contacts
Revised: August 21, 2009
Phone Contacts
The Cisco Unified IP Phone 8961, 9951, and 9971 provide you with access to corporate and personal
contacts using these directories:
• Corporate Directory
• Personal Directory
You may see other directories listed in Contacts. For more information, see your system administrator.
Corporate Directory
The corporate directory contains corporate contacts that you can access on your phone. Your system
administrator sets up and maintains the directory.
You can dial calls from your corporate directory:
• When you are not on another call.
• When you are on another call.
Search for and Dial a Contact
1. Press the Contacts button .
2. Select Corporate Directory. (Use the Navigation pad and Select button to scroll and select.)
3. Select one or all of these search criteria to search for a co-worker:
–
First Name
–
Last Name
4. Enter the search criteria information, press the Submit softkey, and select a contact.
5. To dial, perform any of these actions:
–
Press the Dial softkey.
–
Press the Select button.

66 OL-19963-01
EFT DRAFT - CISCO CONFIDENTIAL
–
From the keypad, press the number that is displayed in the upper right-hand corner of the
contact label.
–
Press the Speakerphone button .
–
Press the Headset button .
–
Pick up the handset.
Search for and Dial a Contact While on a Call
1. Press the Contacts button .
2. Select Corporate Directory. (Use the Navigation pad and Select button to scroll and select.)
3. Select one or both of these search criteria to search for a co-worker:
–
First Name
–
Last Name
4. Enter the search criteria information and press the Search softkey.
5. Press the Dial softkey. The first call gets automatically put on hold while the second call gets
dialed.
Personal Directory
The personal directory contains a list of your personal contacts. You can assign fast-dial codes to your
personal directory entries for fast-dialing.
There are two ways you can set up and maintain your personal directory:
• Phone—Using your phone, you can:
–
Set up and use Personal Directory
–
Assign and use fast-dial codes
• User Options Web Pages—Using User Options web pages, you can also set up and use your
personal directory.
Related Topics
User Options, page 99
Personal Directory Options
From your phone, you can use personal directory options to:
• Sign in and out
• Add an entry
• Search for an entry

Contacts
Cisco Unified IP Phone 8961, 9951, and 9971 User Guide for Cisco Unified Communications Manager 7.1(3) (SIP) 67
EFT DRAFT - CISCO CONFIDENTIAL
• Dial a number
• Delete an entry
• Edit an entry
Sign In and Out of Personal Directory
1. Press the Contacts button .
2. Select Personal Directory. (Use the Navigation pad and Select button to scroll and select.)
3. Enter your user ID and PIN (provided by your system administrator), then press the Submit
softkey.
4. Select Log Out.
5. Press the Select softkey.
6. Press the OK softkey to sign out.
You are automatically logged out after a certain amount of time. This time limit can vary. For more
information, see your system administrator.
Add a Personal Directory Entry
1. Press the Contacts button .
2. Sign in to Personal Directory.
3. Select Personal Address Book; the Search for an entry screen displays.
4. Press the Submit softkey.
5. Press the New softkey (you may need to press the More softkey first).
6. Enter the nickname information (you can also enter a name).
7. Press the Phones softkey and enter the phone numbers.
Include any required access codes such as a 9 or 1.
8. Press the Submit softkey to add the entry to your personal directory.
Search for an Entry in Personal Directory
1. Press the Contacts button .
2. Sign in to Personal Directory.
3. Select Personal Address Book.
4. Select one, all, or none of these criteria to search for an entry:
–
Last Name
–
First Name
–
Nickname

68 OL-19963-01
EFT DRAFT - CISCO CONFIDENTIAL
5. Enter the search criteria information, then press the Submit softkey. The name displays.
Dial a Number from Personal Directory
1. Press the Contacts button .
2. Sign in to Personal Directory.
3. Select Personal Address Book and search for an entry.
4. Select the personal address book entry that you want to dial.
5. Press the Dial softkey.
Delete a Personal Directory Entry
1. Press the Contacts button .
2. Sign in to Personal Directory.
3. Select Personal Address Book and search for an entry.
4. Press the Select softkey.
5. Press the Edit softkey.
6. Press the Delete softkey (you may need to press the More softkey first).
7. Press the OK softkey to confirm the deletion.
Edit a Personal Directory Entry
1. Press the Contacts button .
2. Sign in to Personal Directory.
3. Select Personal Address Book and search for an entry.
4. Press the Select softkey.
5. Press the Edit softkey.
6. Modify the entry information.
7. Press the Phones softkey to modify a phone number.
8. Press the Update softkey.
Fast-Dial Codes with Personal Directory
Using the phone, you can:
• Assign a fast-dial code to a Personal Directory entry
• Place a call using a fast-dial code
• Delete a fast-dial code