Cochlear CP81000 Wireless Hearing Aid User Manual 195992 Iss3 CP810 user guide 01 nu
Cochlear Limited Wireless Hearing Aid 195992 Iss3 CP810 user guide 01 nu
Cochlear >
Contents
- 1. User Manual 1
- 2. User Manual 2
- 3. User Manual 3
User Manual 2
Identifying your processors
If you are a bilateral recipient, you may want to use Cochlear™ Nucleus®
CP800 Series Bilateral Identifi cation Adhesive Labels to reduce the
risk of mixing up processors. The labels are available in two colours to
help identify your left (blue) and right (red) ear processors. For more
information, contact your clinician.
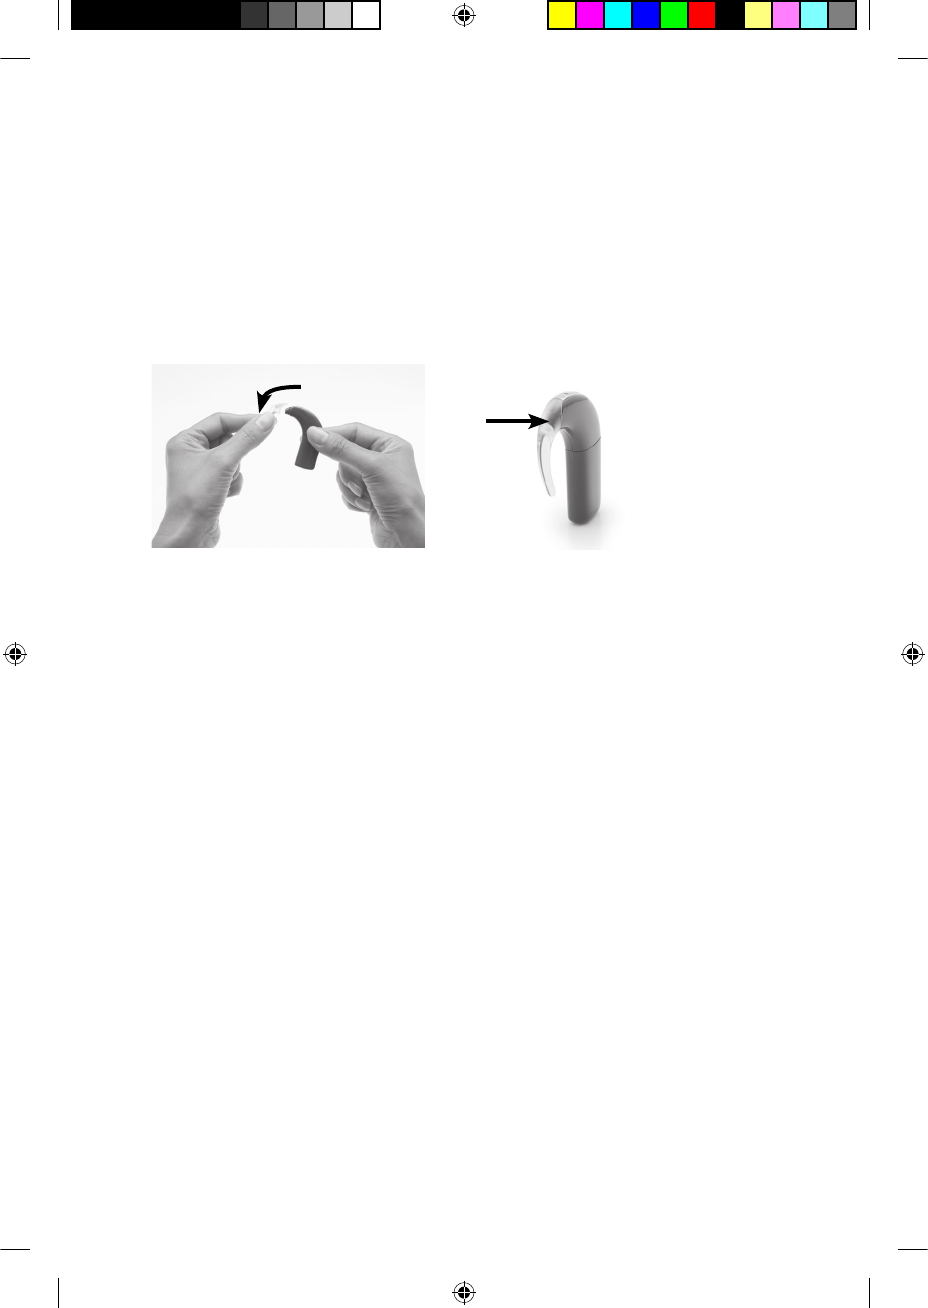
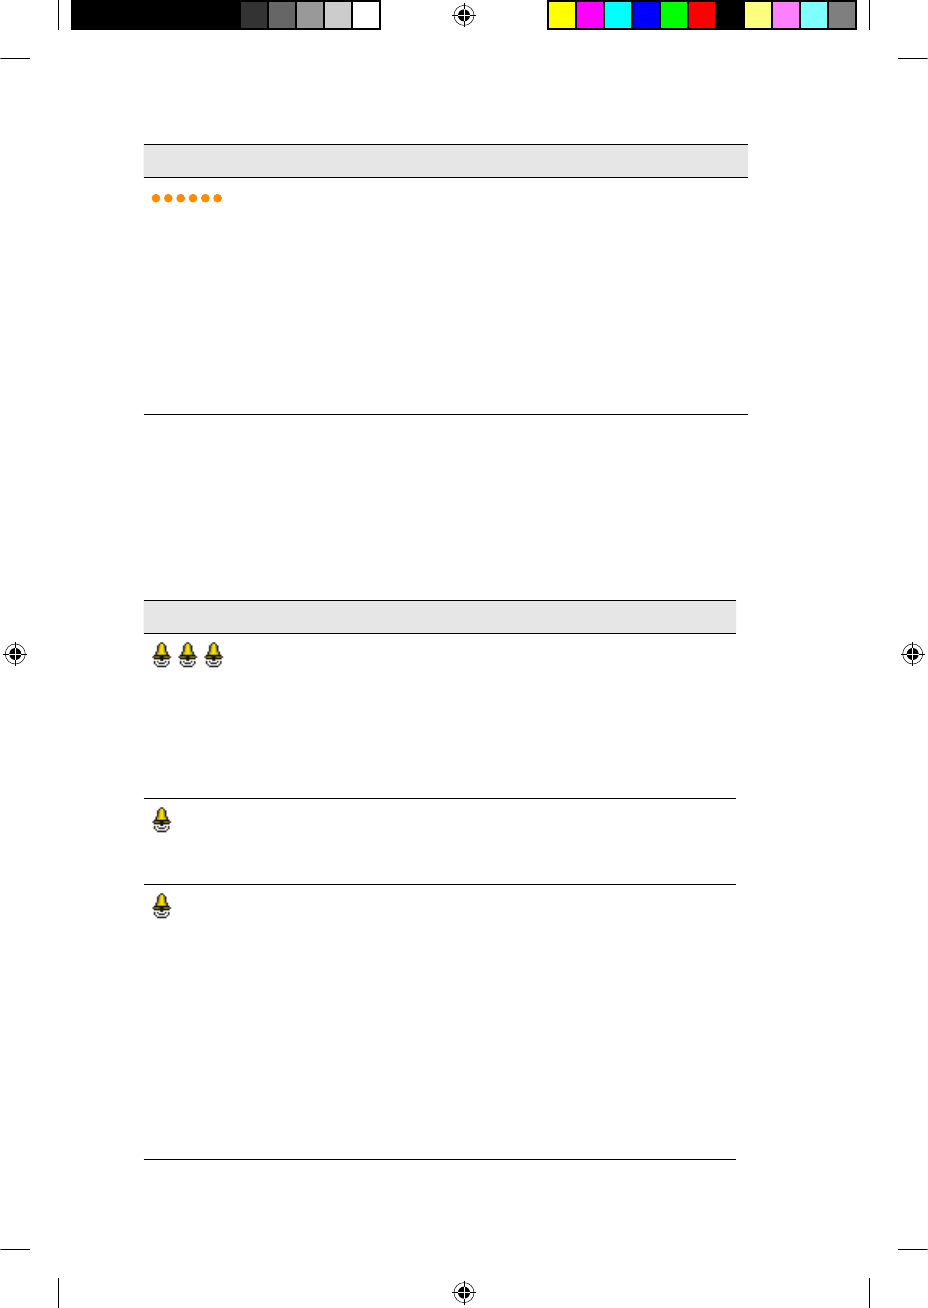
To place the label on your processor:
.
Remove the earhook from 1.
the processing unit by
rotating it.
Place the label on the 2.
earhook end (tip) of the
processing unit. It should
stick easily.
Attach the earhook by 3.
pushing the lower end of
the earhook back onto the
processing unit.
If you want to remove the label from the processing unit, you can easily
peel it off with your fi ngers.
26 - CP810 Sound Processor User Guide © Cochlear Limited 2009
Wearing your processor
195992 Iss3 CP810 user guide 01.indd 26 13/05/2009 4:24:24 PM
Detaching and attaching the
battery module
You need to detach the battery module from the processing unit
when:
Changing the battery module to a different one (e.g. changing •
from a standard battery module to a rechargeable battery
module).
Changing the wearing option (e.g. using the LiteWear cable to •
attach the battery module to the processing unit).
Charging the rechargeable battery module.•
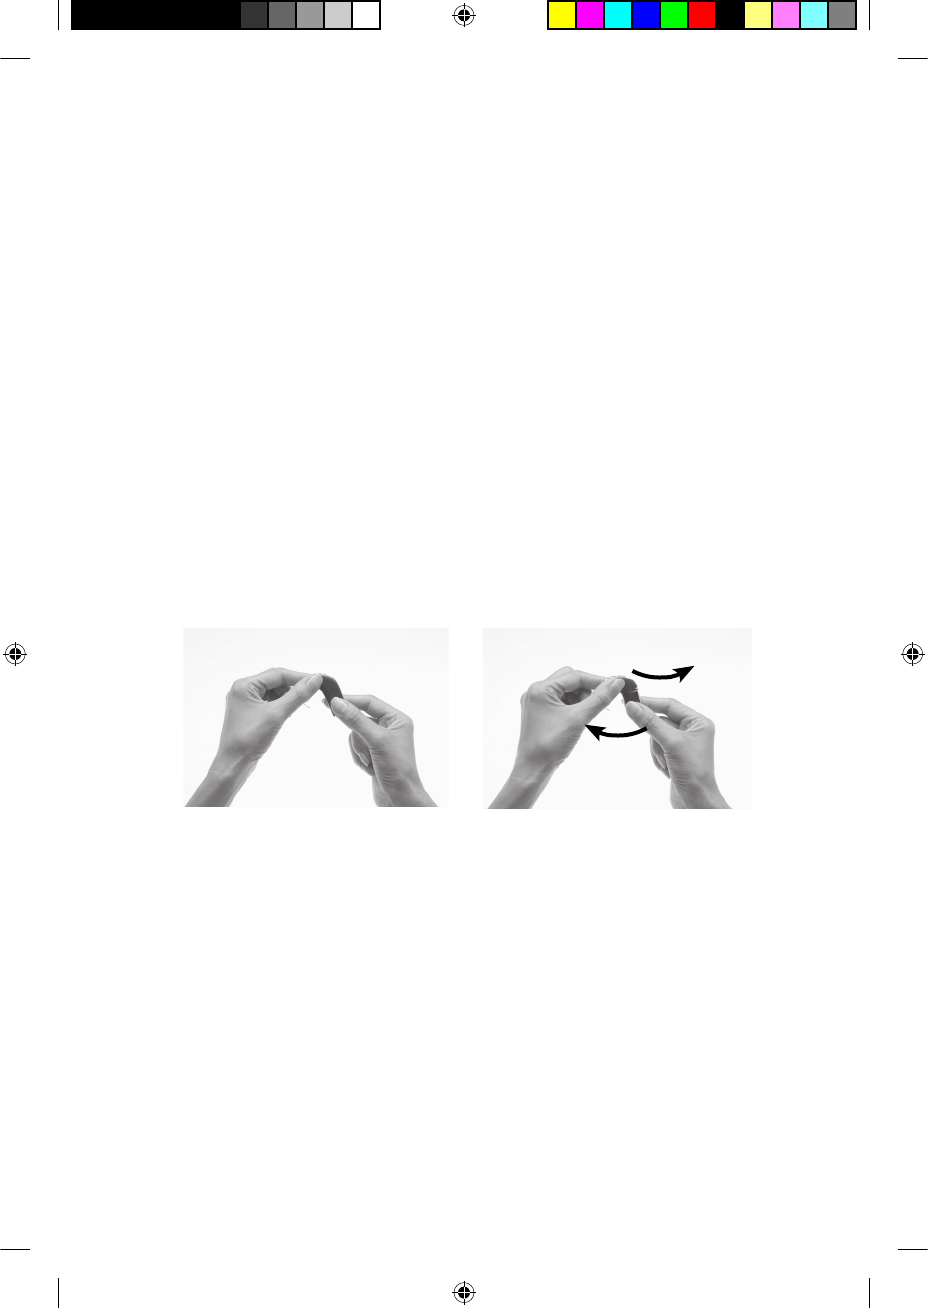
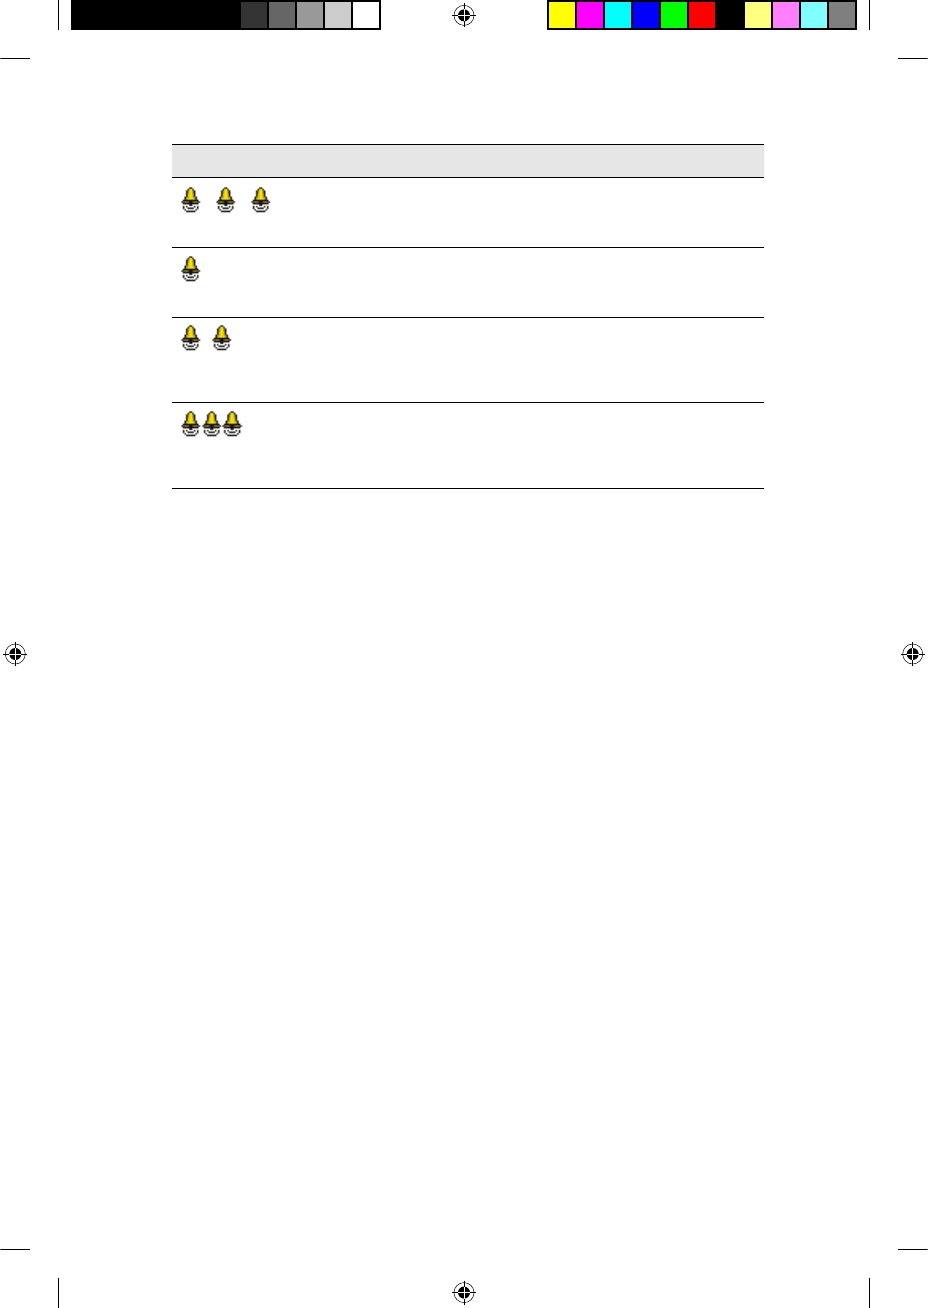
Detaching the battery module from the
processing unit
To detach the battery module from the processing unit:
Hold the battery module 1.
and the processing unit
as shown. If the battery
module is locked, you need
to unlock it as described
in the section Locking
and unlocking the battery
module.
Gently twist the battery 2.
module to your left and
the processing unit to your
right until the two parts
separate.
© Cochlear Limited 2009 CP810 Sound Processor User Guide - 27
195992 Iss3 CP810 user guide 01.indd 27 13/05/2009 4:24:27 PM

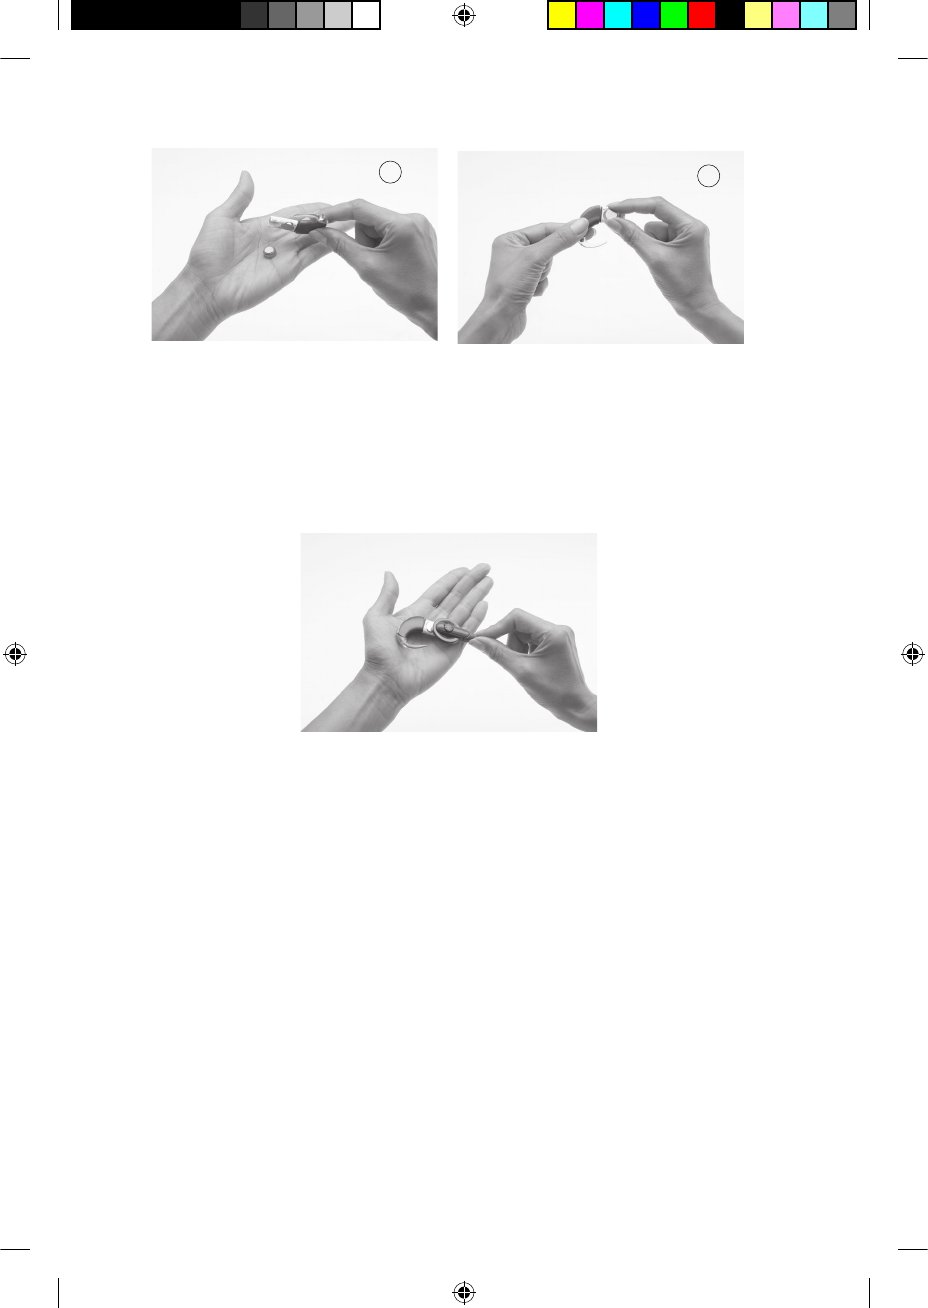
Attaching the battery module to the processing
unit
To attach the battery module to the processing unit:
Hold the battery module 1.
and the processing unit so
they touch. The battery
module should face to the
left and the processing unit
to the right of the fi nal
position.
Twist the battery module 2.
and the processing unit
until the two parts fi t into
place.
Make sure the battery 3.
module is correctly aligned.
Check for broken or bent
contacts between the
battery module and the
processing unit, which can
cause misalignment. If
any contacts are broken,
return the processor to your
clinician.
28 - CP810 Sound Processor User Guide © Cochlear Limited 2009
Detaching and attaching the battery module
195992 Iss3 CP810 user guide 01.indd 28 13/05/2009 4:24:31 PM

Using your processor
This section describes how to use the buttons on your processor. The
sequence of button presses that are described in each of the sections
below are part of the Simple user interface. If your processor has the
Advanced user interface enabled, see Advanced user interface for
information on the processor functions you can control and the button
press sequences.
Turning your processor on and off
To be able to hear sound from your processor, the processor needs to be
turned on and the coil needs to be connected to the implant. To turn on
your processor, press and hold the lower button for at least one second
until you either hear sounds (if your processor is in place on your head),
or until you see short fl ashes of green. The number of fl ashes you see
corresponds to the number of the current program (e.g. if your current
program is program 2, you see two fl ashes). For more information on
programs, see the following section.
To turn off, press and hold the lower button for at least one second,
until the sound stops, or you see a steady orange light. Do not remove
batteries, or detach the battery module to turn off your processor.
Changing programs
Programs help you hear better in different listening situations. Up to
four programs can be enabled by your clinician, depending on your
listening needs. The four programs are:
Everyday: Ideal for the typical listening situations of everyday life. It •
can adjust the sounds you hear for maximum clarity and comfort.
Noise: Suitable for environments with signifi cant background •
noise, improving the audibility of wanted sound from all sides.
Focus: Useful where there is signifi cant background noise, but the •
focus is on hearing what one person or a small group of people are
saying.
Music: Used to listen to all types of music from any audio source.•
You can change programs to suit your listening situation (e.g. use the
Music program when listening to music).
© Cochlear Limited 2009 CP810 Sound Processor User Guide - 29
195992 Iss3 CP810 user guide 01.indd 29 13/05/2009 4:24:37 PM
To change the current program:
If the processor is turned off, turn it on.1.
Press the lower button until the program changes to the one you 2.
want.
Each successive button press changes the program to the next one (e.g.
to change from program 1 to program 2, press once). The number of
green light fl ashes you see corresponds to the number of the selected
program (e.g. after you change from program 1 to program 2, you see
two short fl ashes of green). If private tones are enabled, you hear two
private tones.
The program you select operates until you change it. When you turn
your processor off and on again, it will return to the program and
settings you were using before you switched it off.
Understanding indicator lights
You see an indicator light when you perform a function (e.g. change the
program), or when there is a problem (e.g. processor battery is empty).
Indicator light What it means
Short fl ashes of green
with a pause between fl ashes.
You are turning on the processor.
The number of fl ashes you see
corresponds to the number of the
selected program.
Short fl ashes of green with a
pause between fl ashes.
You are changing the program.
The number of fl ashes you see
corresponds to the number of the
selected program.
Steady orange while
the lower button is pressed.
You are turning off your processor.
Short fl ash of green. You are changing volume or
sensitivity level. This is available only
with the Advanced user interface.
30 - CP810 Sound Processor User Guide © Cochlear Limited 2009
Using your processor
195992 Iss3 CP810 user guide 01.indd 30 13/05/2009 4:24:37 PM
Indicator light What it means
Long fl ash of green. You are changing from using:
The microphones to using the •
telecoil.
The telecoil to using the •
microphones.
The microphones to using an •
audio accessory.
An audio accessory to using the •
microphones.
Flash of green followed
by a fl ash of orange.
You are locking your processor
buttons.
Flash of orange followed
by a fl ash of green.
You are unlocking your processor
buttons.
Flashes of green. Indicates that the microphones are
capturing sound.
Flash of orange
every second.
The coil may be off, or your processor
is not connected to the correct
implant.
Steady orange.
If a general fault and coil off
error occur at the same time,
you only see the general fault
indicator light (steady orange
light).
Indicates a general fault.
This could mean:
There is a fault with your •
processor.
There is a corrupt program in •
your processor.
The Troubleshooting Guide provided
with your processor documentation
helps you troubleshoot basic
processor problems.
Flash of orange when you
press a button.
Your processor buttons are locked.
© Cochlear Limited 2009 CP810 Sound Processor User Guide - 31
Using your processor
195992 Iss3 CP810 user guide 01.indd 31 13/05/2009 4:24:37 PM
Indicator light What it means
Continuous fl ashes
of orange with a short pause
between fl ashes.
If a battery empty warning
and general fault occur at
the same time, you only see
the battery empty indicator
light (continuous fl ashes of
orange).
Your processor battery is empty.
You need to replace the disposable
batteries, or recharge the
rechargeable battery module.
Understanding private tones
When private tones are enabled, you hear a tone when you perform
a function (e.g. change the program), or when there is a problem (e.g.
processor battery is empty). Private tones can be heard only by you.
Tone What it means
You hear short high
tones.
You are changing the program.
The number of tones you hear
corresponds to the number of the
selected program (e.g. when you
change from program 1 to program
2, you hear two high tones).
You hear a single high
tone.
You are changing microphone
volume or sensitivity level
(Advanced user interface only)
.. You hear a single long
high tone.
You are changing from using:
The microphones to using the •
telecoil.
The telecoil to using the •
microphones.
The microphones to using an •
audio accessory.
An audio accessory to using •
the microphones.
32 - CP810 Sound Processor User Guide © Cochlear Limited 2009
Using your processor
195992 Iss3 CP810 user guide 01.indd 32 13/05/2009 4:24:38 PM
Tone What it means
.. .. You hear a
sequence of long low tones.
General fault.
You hear a short low tone
when you press a button.
Your processor buttons are locked.
You hear two short
low tones.
Your processor battery is low. You
need to replace the batteries, or
recharge the battery module.
You hear a sequence
of short low tones.
Your processor battery is empty.
You need to replace the batteries,
or recharge the battery module.
Using the telecoil
The telecoil is used to receive sound signals from a telephone,
roomloop, neckloop, etc. The telecoil can also receive sound signals
from an amplifi er, TV or Hi-Fi through an induction loop.
To turn on the telecoil, press the upper button. A single long fl ash of
green confi rms that the telecoil is activated.
To turn off the telecoil, press the upper button again. A single long fl ash
of green confi rms that the telecoil is deactivated.
When an audio accessory is connected to your processor, you will not
receive any sound from the telecoil. To move back to using the telecoil,
remove the audio accessory from the processor.
Turn off the telecoil when not in use, as it reduces the microphone
volume.
Using Auto Telecoil
Your clinician can program your processor so that it automatically
turns on the telecoil when you use the telephone, or when you are in a
roomloop environment. The telecoil automatically turns off when:
You move the telephone away from your processor (e.g. when the •
telephone call ends).
You exit the roomloop environment.•
© Cochlear Limited 2009 CP810 Sound Processor User Guide - 33
Using your processor
195992 Iss3 CP810 user guide 01.indd 33 13/05/2009 4:24:38 PM

When Auto Telecoil is turned on, you see the Auto Telecoil icon on the
remote assistant Home screen.
Noise
Music
Focus
Everyday
AUTO
Figure 9: Auto Telecoil icon displayed on the remote assistant Home screen
You can manually turn off Auto Telecoil by pressing the upper button
on the processing unit. You can also manually turn this feature on or
off using the remote assistant. For more information, see the Remote
Assistant User Guide.
Certain electronic devices or machinery may automatically turn
on Auto Telecoil. If this occurs, either wait for about 10 or 20
seconds for Auto Telecoil to turn itself off, or manually turn it off
using the processor buttons or the remote assistant.
Using the telephone with your processor
You may use your telephone and your processor with the:
Microphones.•
Telecoil.•
Telecoil and microphones on at the same time.•
When using the telephone, position the telephone so that its earpiece is
aligned with your processor.
Changing loudness of sounds
Microphone sensitivity and volume control the loudness levels of the
sounds you hear.
34 - CP810 Sound Processor User Guide © Cochlear Limited 2009
Using your processor
195992 Iss3 CP810 user guide 01.indd 34 13/05/2009 4:24:38 PM

Depending on how your clinician has set up your programs, you can use
the processor buttons (Advanced user interface only) to:
Change microphone sensitivity only.•
Change volume only.•
The new microphone sensitivity or volume levels you choose will be
saved for each program.
Controlling microphone sensitivity
Microphone sensitivity controls the softest level of sound picked up by
the microphones.
If your clinician has enabled you to change the sensitivity, you can:
Reduce the sensitivity of the sound to reduce background noise in •
noisy situations.
Increase the sensitivity of the sound to hear very soft sounds in •
quiet situations.
If your clinician has enabled the Advanced user interface, you can press
the upper button to increase sensitivity. To decrease sensitivity, press
the lower button. When you change sensitivity level, you see a fl ash of
green.
If your processor has the Simple user interface, you can use the remote
assistant to change sensitivity.
Controlling microphone volume
Microphone volume controls your perception of loudness. If your
clinician has enabled you to change the volume, you can:
Reduce the volume if sounds are uncomfortably loud.•
Increase the volume if speech, including your own voice, is too •
soft.
If your clinician has enabled the Advanced user interface, you can press
the upper button to increase volume. To decrease volume, press the
lower button. When you change volume level, you see a fl ash of green.
If your processor has the Simple user interface, you can use the remote
assistant to change the volume.
© Cochlear Limited 2009 CP810 Sound Processor User Guide - 35
Using your processor
195992 Iss3 CP810 user guide 01.indd 35 13/05/2009 4:24:38 PM

If you are adjusting the volume setting often, or if adjusting the volume
causes you discomfort, consult your clinician.
Locking and unlocking processor buttons
You can lock the buttons on your processor to prevent children from
changing the controls, or to avoid accidental button presses changing
your processor settings.
To lock the buttons, briefl y press both the upper button and the lower
button at the same time.
A fl ash of green followed by a fl ash of orange confi rms that your
processor buttons are locked. If you press any button on the processing
unit when it is locked, you see an orange fl ash.
You cannot turn off your processor while the buttons are locked.
To unlock the buttons, briefl y press both the upper button and the lower
button at the same time. A fl ash of orange followed by a fl ash of green
confi rms that the buttons are unlocked.
Advanced user interface
If your clinician has enabled the Advanced user interface, you can use
your processor buttons to perform the following functions:
Function Button press sequence
Turn your processor on and
off.
Press and hold the upper button
and the lower button at the same
time. Pressing and holding the lower
button only will also turn on the
processor.
Change your program. Press and hold the lower button.
Turn the telecoil/audio
accessory (when connected)
on and off.
Press and hold the upper button.
Lock and unlock processor
buttons.
Press the upper button and the
lower button at the same time.
36 - CP810 Sound Processor User Guide © Cochlear Limited 2009
Using your processor
195992 Iss3 CP810 user guide 01.indd 36 13/05/2009 4:24:38 PM

Function Button press sequence
Adjust microphone volume or
sensitivity level.
Press the upper button to increase
volume or sensitivity level.
Press the lower button to decrease
volume or sensitivity level.
Discuss with your clinician which user interface would be more suitable
for you.
Checking the coil
The remote assistant has an in-built coil sensor that allows you to check
if the coil connected to your processor is receiving sound signals from
your processor.
To use the coil sensor:
Remove the coil from the head.1.
Place the coil on the coil sensor guides on the back of the remote 2.
assistant.
Figure 10: Placing the coil on the back of the remote assistant
If the coil is receiving sound signals, an animation will display on the
remote assistant display. This, however, only provides an indication and
does not confi rm that the coil is functioning properly.
If the coil is not receiving sound signals, no response is displayed on the
display.
For more information, refer to the Remote Assistant User Guide.
© Cochlear Limited 2009 CP810 Sound Processor User Guide - 37
Using your processor
195992 Iss3 CP810 user guide 01.indd 37 13/05/2009 4:24:38 PM

38 - CP810 Sound Processor User Guide © Cochlear Limited 2009
195992 Iss3 CP810 user guide 01.indd 38 13/05/2009 4:24:41 PM

Replacing and recharging batteries
Replacing disposable batteries
The Standard Battery Module uses two disposable batteries. It is
recommended that you use two p675 zinc air batteries for maximum
battery life.
Replace disposable batteries when any of the following occur:
You see continuous fl ashes of orange on your processor.•
You hear two short low tones (battery is low) or a sequence of •
short low tones (battery is empty).
The processor battery low or battery empty icon displays on the •
remote assistant screen.
You stop hearing sound.•
The sound you hear becomes intermittent.•
An empty battery may not be the only cause for not hearing
sound, or for sound becoming intermittent. For information on
identifying and troubleshooting processor problems, refer to the
processor Troubleshooting Guide you received with your processor
documentation.
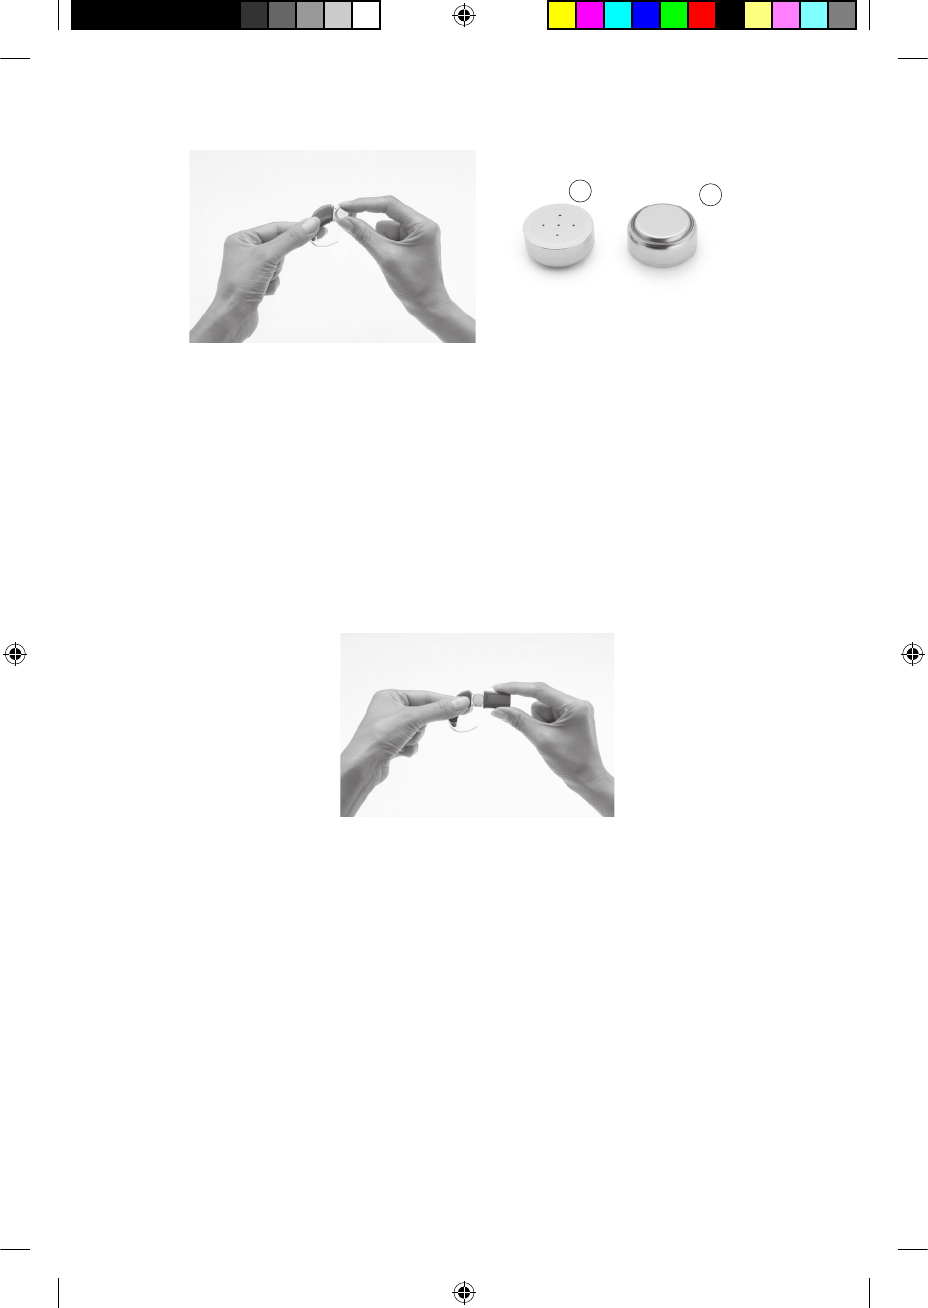
To remove disposable batteries:
Turn off your processor. 1.
If the battery module or
battery cover is locked,
unlock it.
Pull the battery cover away 2.
from the battery holder as
shown.
© Cochlear Limited 2009 CP810 Sound Processor User Guide - 39
195992 Iss3 CP810 user guide 01.indd 39 13/05/2009 4:24:41 PM
To remove the batteries, tip the battery holder to one side (1), or 3.
lift each battery out with your fi ngers (2) as shown.
You can also use the coil magnet to remove batteries from the battery
holder.
To remove batteries using the coil magnet:
Place the coil magnet over the batteries so that the coil magnet 1.
touches both batteries. The coil magnet will lift both batteries
out of the battery holder.
Pull the batteries away from the coil.2.
To replace batteries:
Remove the new set of batteries from their pack. New batteries 1.
are sealed, usually with a seal or tab.
To allow the air to activate the batteries, remove their seals and 2.
let the batteries stand briefl y.
2
1
40 - CP810 Sound Processor User Guide © Cochlear Limited 2009
Replacing and recharging batteries
195992 Iss3 CP810 user guide 01.indd 40 13/05/2009 4:24:43 PM
Insert batteries with the 3.
positive terminal facing up
and the negative terminal
facing down. The batteries
should fi t into the curved
recess in the battery holder.
Do not force the batteries
into place. When inserted
correctly, they should fi t
easily.
Positive terminal (1) and negative
terminal (2) of zinc air batteries.
Replace the battery cover by sliding it up from the bottom of 4.
the battery holder towards the processing unit. Do not force the
cover upwards as it should fi t easily.
Recharging the rechargeable battery module
Cochlear supplies a Cochlear™ Nucleus® CP800 Series Battery Charger
to recharge the rechargeable battery module. A Cochlear™ Nucleus®
CP800 Series Global Power Adaptor is also supplied to connect the
battery charger to mains power. The battery charger also allows you to
recharge the remote assistant at the same time.
To get the longest battery life, always fully recharge the rechargeable
battery module before using it. A completely empty battery will take
2
1
© Cochlear Limited 2009 CP810 Sound Processor User Guide - 41
Replacing and recharging batteries
195992 Iss3 CP810 user guide 01.indd 41 13/05/2009 4:24:50 PM
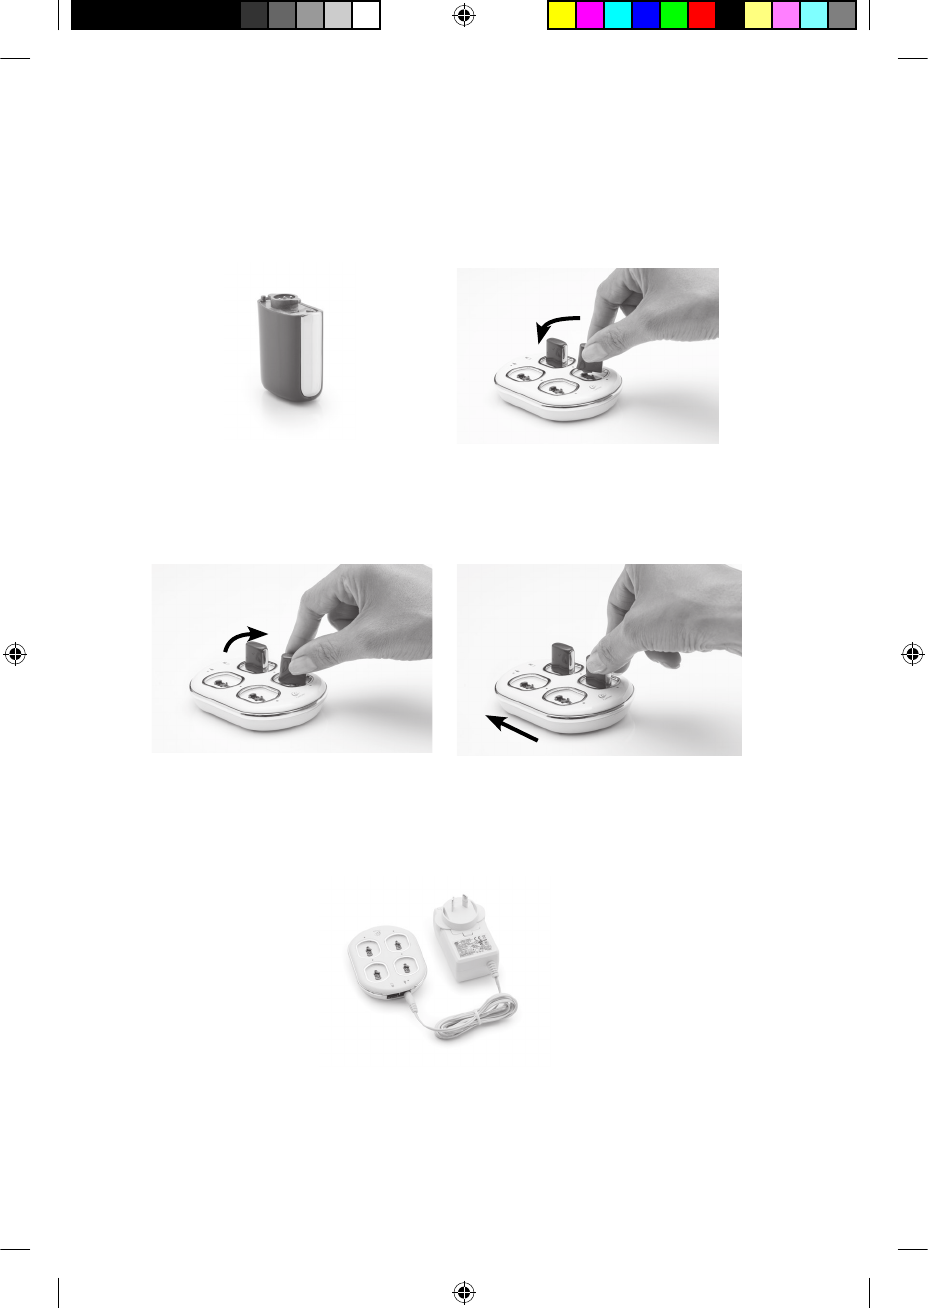
approximately four hours to recharge. As the battery ages, it may take
longer to fully recharge it. The battery charger has four sockets allowing
you to recharge four rechargeable battery modules at the same time.
To recharge the rechargeable battery module:
Remove the rechargeable 1.
battery module from the
processing unit.
Insert the rechargeable 2.
battery module into the
battery charger socket at a
slight angle as shown.
Rotate the rechargeable battery module in a clockwise direction 3.
until it is fully aligned with the alignment indicator marking on
the charger.
Connect the Global Power 4.
Adaptor to the battery
charger.
Plug the other end of the 5.
Global Power Adaptor into a
mains power outlet.
42 - CP810 Sound Processor User Guide © Cochlear Limited 2009
Replacing and recharging batteries
195992 Iss3 CP810 user guide 01.indd 42 13/05/2009 4:24:54 PM