D Link CS932LA1 Wireless N Day/Night Home Network Camera User Manual DCS 930 A2 UserMan 1
D Link Corporation Wireless N Day/Night Home Network Camera DCS 930 A2 UserMan 1
D Link >
Contents
(DCS-930_A2)UserMan-1
USER MANUAL
DCS-930
VERSION 1.0
DCS-930_A2
Wireless N Day/Night Home Network Camera

2D-Link DCS-930 User Manual
Table of Contents
Product Overview ........................................................ 4
Package Contents ...................................................4
System Requirements .............................................4
Introduction ..............................................................5
Features .................................................................. 6
Hardware Overview .................................................7
Front View ..........................................................7
Rear View ..........................................................8
Installation ....................................................................9
Hardware Installation ...............................................9
Wireless Installation Considerations ...................... 10
Starting the Camera Installation Wizard ................11
WPS - Hardware Push Button Setup ............... 12
Conguration ............................................................. 13
Using the Conguration Menu ...............................13
Live Video ........................................................15
Setup > Wizard ................................................ 15
Internet Connection Setup Wizard .............. 16
Network Setup ............................................18
Setup > Wireless .............................................. 19
Wireless Interface ....................................... 19
Setup > DDNS ................................................ 20
Setup > Image Setup ....................................... 21
Image Settings ............................................ 21
Setup > Video .................................................. 22
Video Conguration .................................... 22
Setup > Audio .................................................. 23
Setup > Motion Detect ..................................... 24
Setup > Mail ..................................................... 25
Email Account ............................................. 25
Time Schedule ............................................ 26
Setup > FTP ..................................................... 27
FTP Server .................................................27
Time Schedule ............................................ 28
Setup > Time and Date .................................... 29
Maintenance > Admin ...................................... 30
Maintenance > System .................................... 31
Maintenance > Firmware Upgrade .................. 32
Status > Device Info ......................................... 33
Status > Active User ........................................ 34
Using & Conguring the DCS-930 ......................... 35
Wireless Security.......................................................38
What is WEP? .......................................................38
What is WPA? .......................................................39
Using & Conguring the DCS-930 with a NAT
Router ..............................................................40
Troubleshooting ........................................................ 47
Table of Contents
DCS-930_A2
DCS-930L_A2
DCS-930L_A2
DCS-930_A2
DCS-930_A2
DCS-930_A2

3D-Link DCS-930 User Manual
Table of Contents
Wireless Basics ......................................................... 49
Networking Basics .................................................... 54
Check your IP address ..........................................54
Statically Assign an IP address .............................55
Technical Specications........................................... 56

4D-Link DCS-930 User Manual
Section 1 - Product Overview
• DCS-930 Network Camera
• CAT5 Ethernet Cable
• Power Adapter
• Manual and Software on CD
• Quick Install Guide
• Camera Stand
Note: Using a power supply with a different voltage than the one included with your
product will cause damage and void the warranty for this product.
If any of the above items are missing, please contact your reseller.
System Requirements
• Computer with Microsoft Windows® 7, XP®, or Vista®
• PC with 1.3GHz or above; at least 128MB RAM
• Internet Explorer 6 or above , Firefox 3.5 or above, Safari 4
• Existing 10/100 Ethernet-based network or 802.11n wireless network
Product Overview
Package Contents
DCS-930L_A2
DCS-930_A2

5D-Link DCS-930 User Manual
Section 1 - Product Overview
Introduction
Congratulations on your purchase of the DCS-930 Network Camera. The DCS-930 is a versatile and unique solution for your small
ofce or home. Unlike a webcam, the DCS-930 is a stand-alone system with a built-in CPU that transmits high quality video images
for monitoring. The DCS-930 can be remotely accessed, and controlled using a Web browser over the Intranet or Internet. The simple
installation procedure and intuitive Web-based interface offer easy integration with your Ethernet/Fast Ethernet or 802.11n wireless
network. The DCS-930 also comes with remote monitoring capability for a complete and cost-effective home security solution.
DCS-930L_A2
DCS-930L_A2
DCS-930L_A2
DCS-930L_A2
DCS-930L_A2
DCS-930_A2
DCS-930_A2
DCS-930_A2
DCS-930_A2
DCS-930_A2

6D-Link DCS-930 User Manual
Section 1 - Product Overview
Simple to Use
The DCS-930 is a stand-alone system with a built-in CPU, requiring no special hardware or software such as PC frame grabber cards.
The DCS-930 supports both ActiveX mode for Internet Explorer and Java mode for other browsers such as Firefox® and Safari®.
Supports a Variety of Platforms
Supporting TCP/IP networking, HTTP, and other Internet related protocols. The DCS-930 can also be integrated easily into other
Internet/Intranet applications because of its standards-based features.
802.11n Wireless or Ethernet/Fast Ethernet Support
The DCS-930 offers wireless 802.11n and Ethernet/Fast Ethernet connectivity, making the DCS-930 easy to integrate into your existing
network environment. The DCS-930 works with a 10 Mbps Ethernet based network or 100 Mbps Fast Ethernet based network for
traditional wired environments, and works with 802.11n routers or access points for added exibility. The Site Survey feature also allows
you to view and connect to any available wireless networks.
Web Conguration
Using a standard Web browser, administrators can congure and manage the Network Camera directly from its own Web page via
Intranet or Internet. This means you can access your DCS-930 anytime, anywhere in the world.
Broad Range of Applications
With today’s high-speed Internet services, the Network Camera can provide the ideal solution for delivering live video images over the
Intranet and Internet for remote monitoring. The Network Camera allows remote access using a Web browser for live image viewing,
and allows the administrator to manage and control the Network Camera anytime, anywhere in the world. Many applications exist,
including industrial and public monitoring of homes, ofces, banks, hospitals, child-care centers, and amusement parks.
Features
DCS-930L_A2
DCS-930L_A2
DCS-930L_A2
DCS-930L_A2
DCS-930L_A2
DCS-930L_A2
DCS-930L_A2
DCS-930_A2
DCS-930_A2
DCS-930_A2
DCS-930_A2
DCS-930_A2
DCS-930_A2
DCS-930_A2
DCS-930_A2
DCS-930_A2
7D-Link DCS-930 User Manual
Section 1 - Product Overview
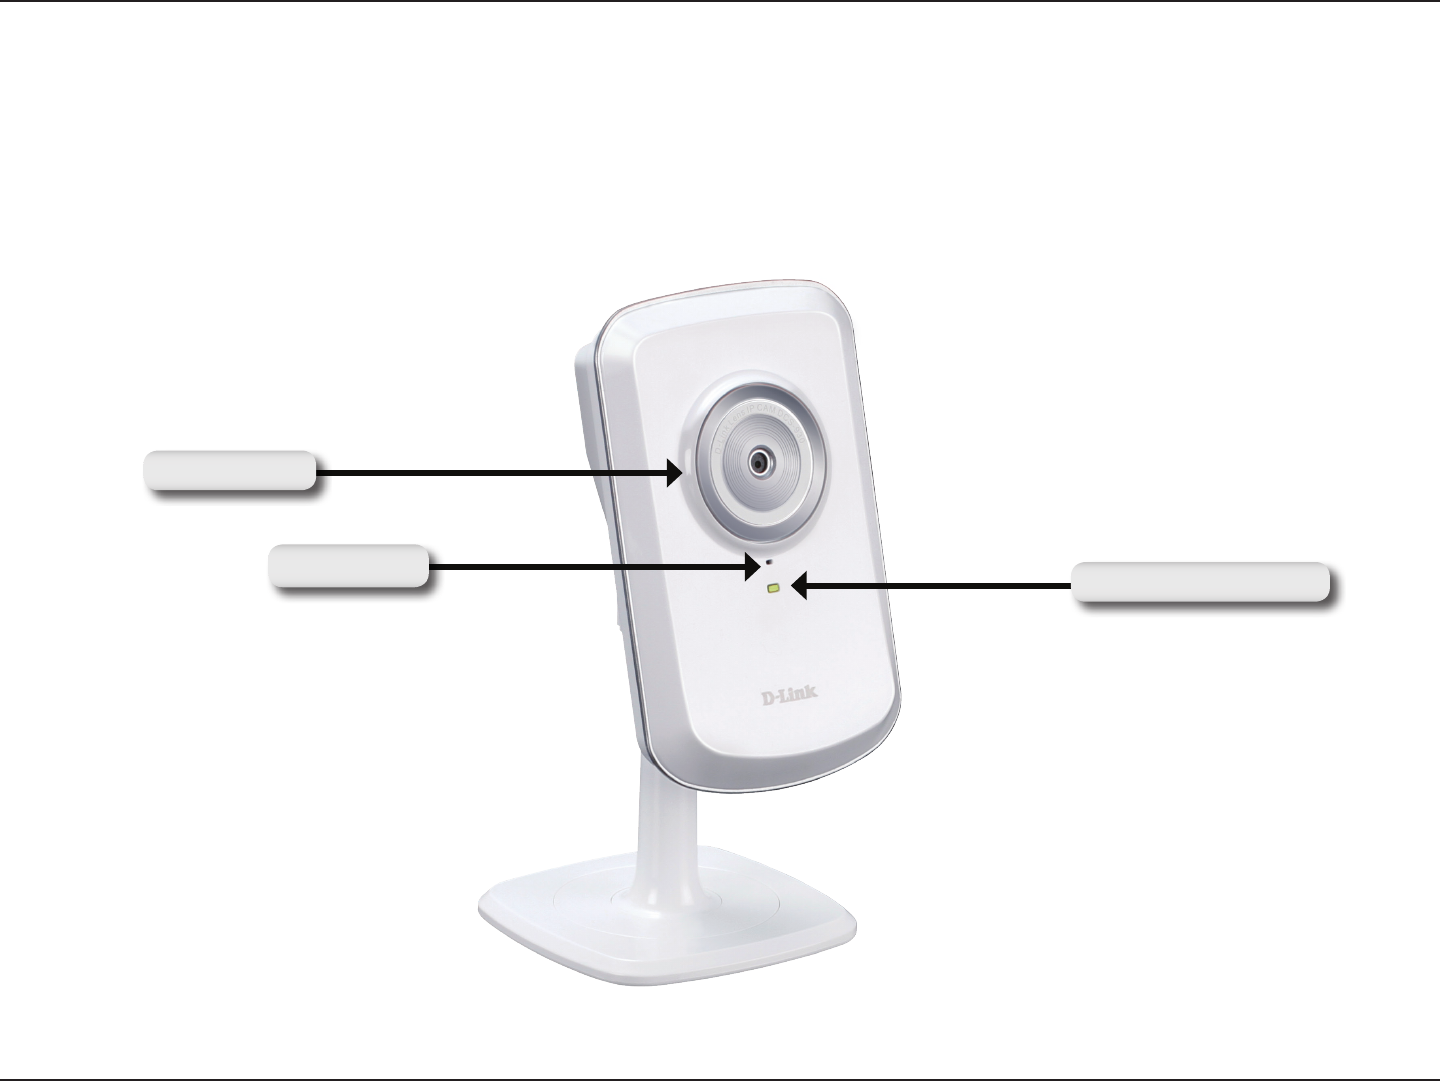
Hardware Overview
Front View
Power and Link LED
Camera Lens
Microphone

8D-Link DCS-930 User Manual
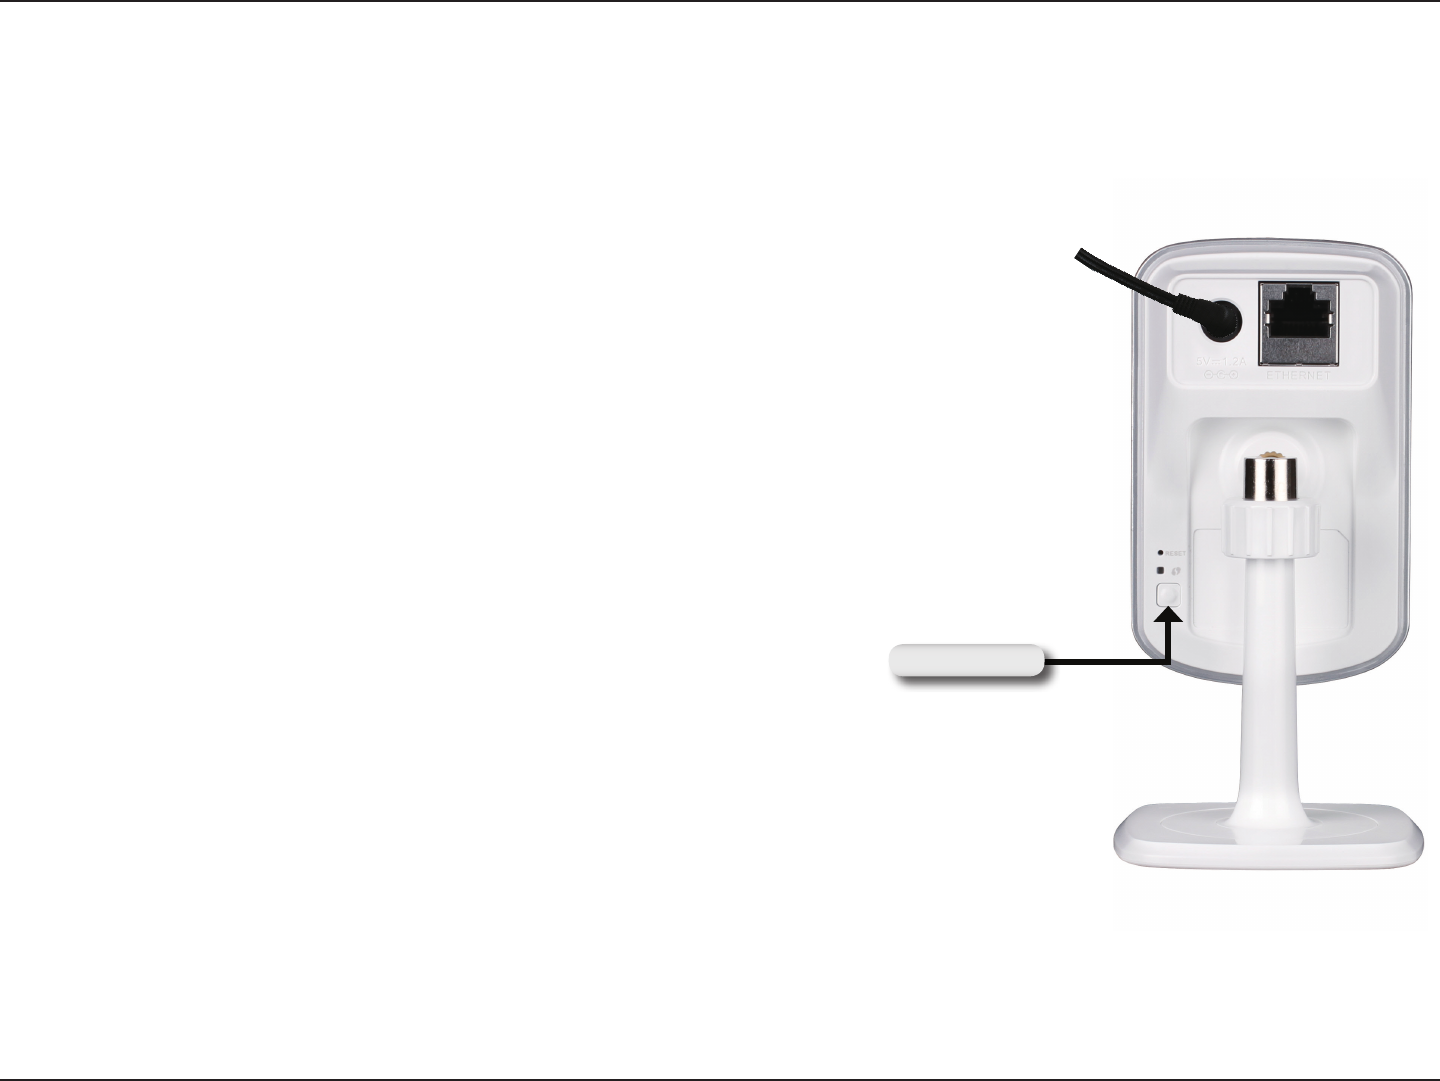
Section 1 - Product Overview
Rear View
Camera Stand
Ethernet Connector
Power Connector
WPS Button
WPS LED
Reset
9D-Link DCS-930 User Manual
Section 2 - Installation
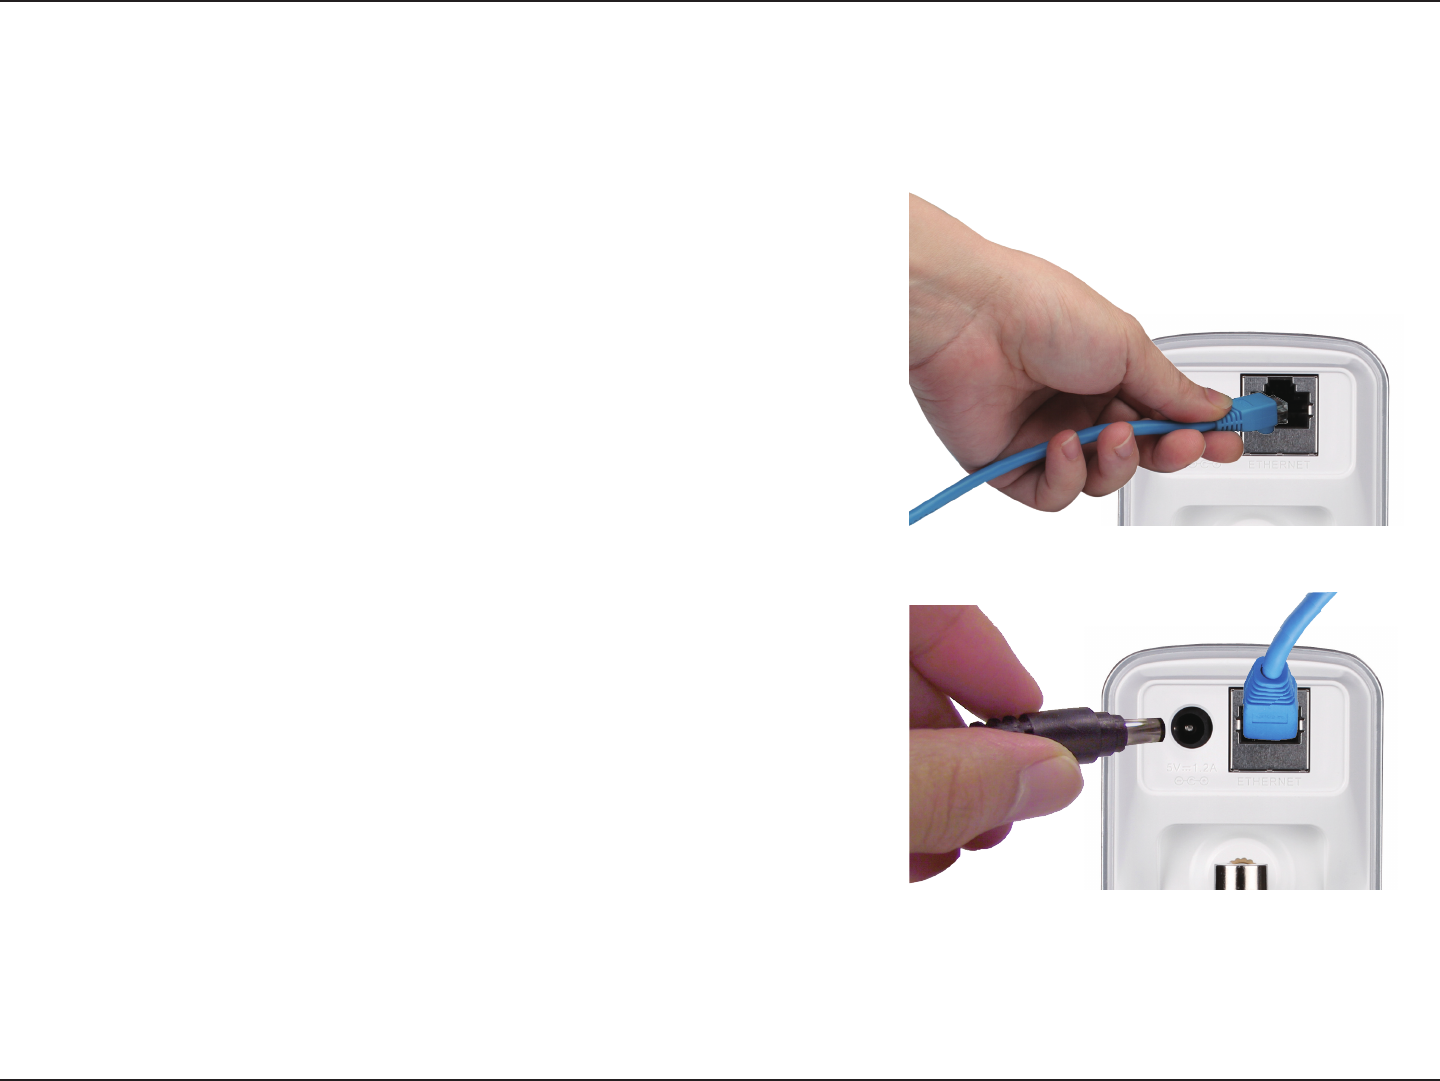
Hardware Installation
Connect the Ethernet Cable
Connect the included Ethernet cable to the network cable connector
located on the bottom panel of the DCS-930 and attach it to the
network.
Attach the External Power Supply
Attach the external power supply to the DC power input connector
located on the bottom panel of the DCS-930 and connect it to
your wall outlet or power strip. Power is conrmed when the green
LED Power Indicator located below the lens on the DCS-930 is
illuminated.
Installation
DCS-930L_A2
DCS-930L_A2
DCS-930L_A2
DCS-930_A2
DCS-930_A2
DCS-930_A2

10D-Link DCS-930 User Manual
Section 2 - Installation
Wireless Installation Considerations
The D-Link Wireless Network Camera lets you access your network using a wireless connection from anywhere within the operating range
of your wireless network. However, the number, thickness and location of walls, ceilings, or other objects that the wireless signals must
pass through, may limit the range. Typical ranges vary depending on the types of materials and background RF (radio frequency) noise
in your home or business. The key to maximizing wireless range is to follow these basic guidelines:
1. Minimize the number of walls and ceilings between your adapter and other network devices (such as your Network Camera) - each
wall or ceiling can reduce your adapter’s range from 3-90 feet (1-30 meters).
2. Be aware of the direct line between network devices. A wall that is 1.5 feet thick (.5 meters), at a 45-degree angle appears to be almost
3 feet (1 meter) thick. At a 2-degree angle, it looks over 42 feet (14 meters) thick. Position your devices so that the signal will travel
straight through a wall or ceiling (instead of at an angle) for better reception.
3. Building Materials make a difference. A solid metal door or aluminum studs may weaken the wireless signal. Try to position your
access points, wireless routers, and other networking devices where the signal passes through drywall or open doorways. Materials
and objects such as glass, steel, metal, walls with insulation, water (sh tanks), mirrors, le cabinets, brick, and concrete will degrade
your wireless signal.
4. Keep your product at least 3-6 feet or 1-2 meters away from electrical devices or appliances that generate RF noise.
5. If you are using 2.4GHz cordless phones or other radio frequency sources (such as microwave ovens), your wireless connection may
degrade dramatically or drop completely. Make sure your 2.4GHz phone base is as far away from your wireless devices as possible.
The base transmits a signal even if the phone in not in use.
11D-Link DCS-930 User Manual
Section 2 - Installation
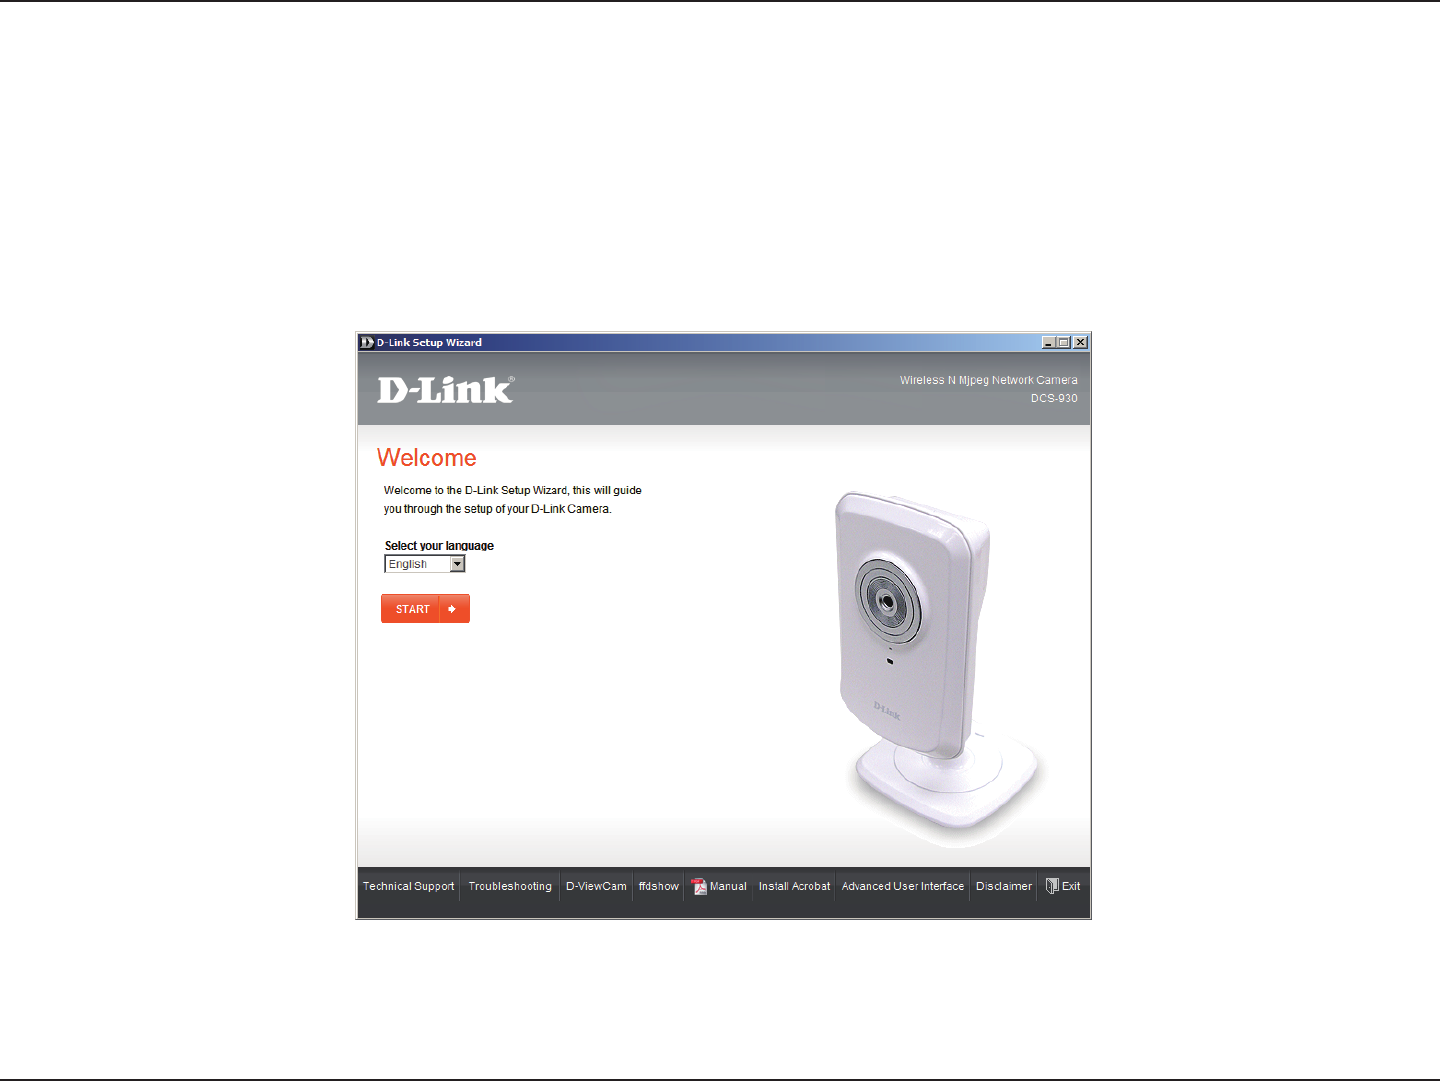
Insert the Installation CD-ROM into your computer’s optical drive to start the autorun program.
The CD-ROM will open the Camera Installation Wizard. Simply click Start to go through the Installation Wizard, which will guide you
through the installation process from connecting your hardware to conguring your camera.
Starting the Camera Installation Wizard
12D-Link DCS-930 User Manual
Section 2 - Installation
Alternatively, you may create a WPS connect using the WPS Button on the back
of the camera.
To create a WPS connection:
Step 1
Press and hold the WPS button on the side of the camera for three seconds.
The blue WPS status LED above the button will blink.
Step 2
Press the WPS button on your router within 60 seconds. The WPS button is
usually on the front or side of your router. On some routers, you may need to log
in to the web interface and then click on an onscreen button to activate the WPS
feature. If you are not sure where the WPS button is on your router, please refer
to your router’s User Manual.
The DCS-930 will automatically create a wireless connection to your router.
While connecting, the green LED will ash and your camera will reboot.
WPS Button
WPS - Hardware Push Button Setup
DCS-930L_A2
DCS-930_A2
13D-Link DCS-930 User Manual
Section 3 - Configuration
Conguration
Using the Conguration Menu
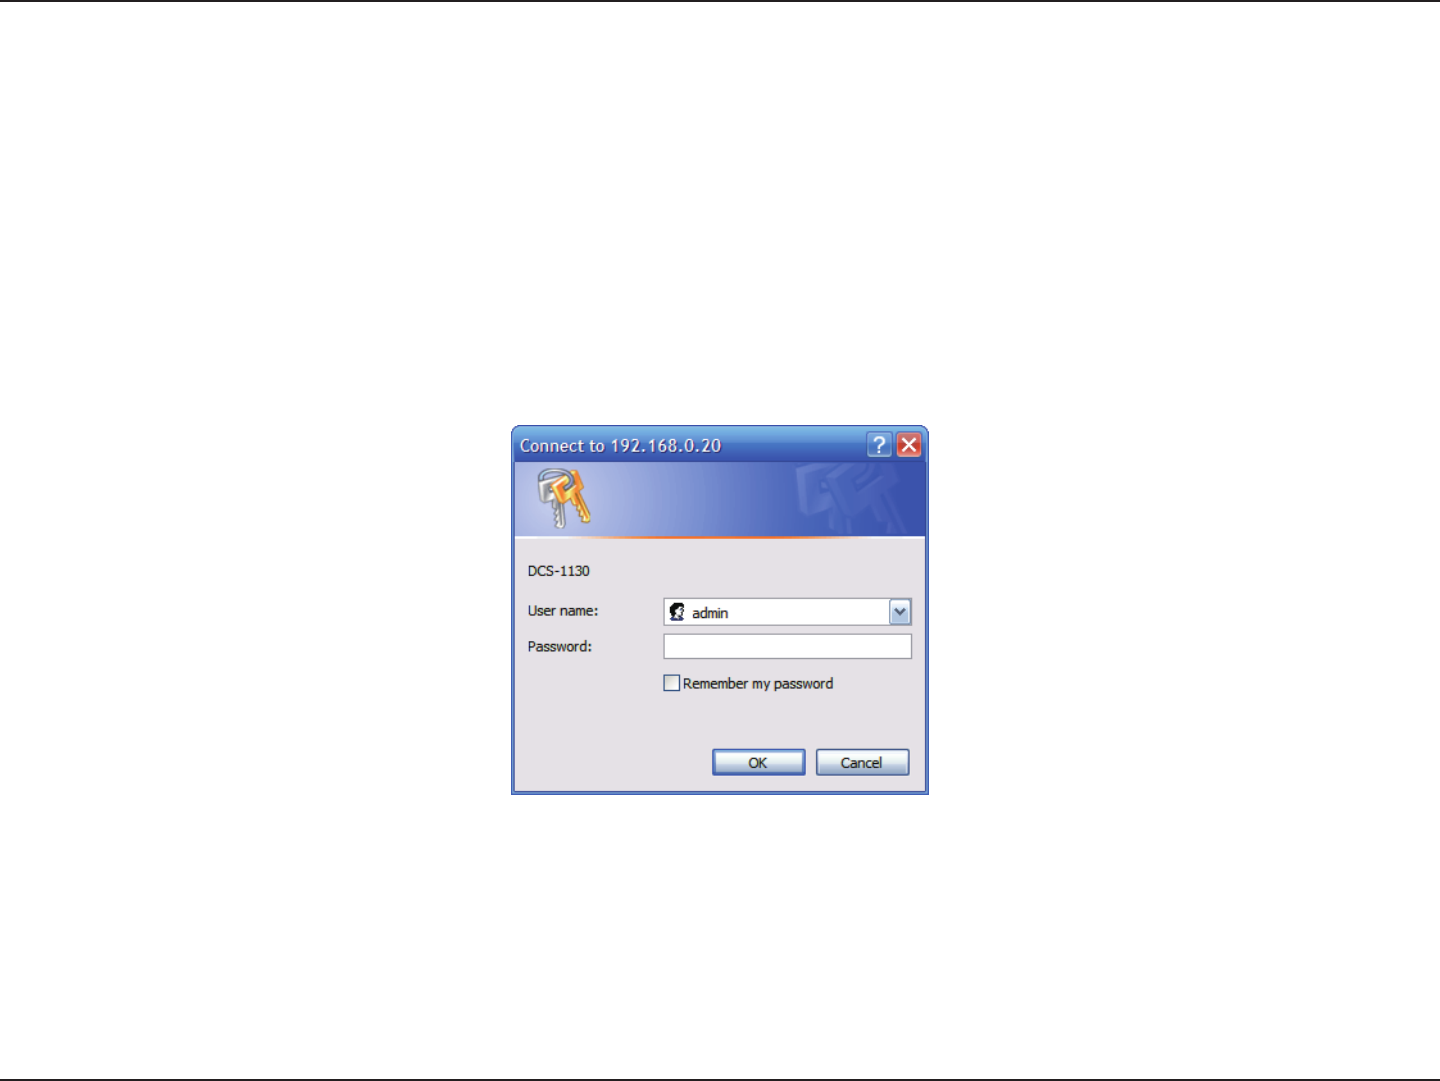
After completing the Camera Installation Wizard, you are ready to use your camera. The camera’s built-in Web conguration utility is
designed to allow you to easily access and congure your DCS-930. At the end of the wizard, click Go To Camera, or enter the IP address
of your camera into a web browser, such as Internet Explorer®. To log in, use the User name admin and the password you created in the
Installation Wizard. If you did not create a password, the default password is blank. After entering your password, click OK.
Note: If you are directly connecting your PC to the camera, or if you are using the camera on a closed network, the default IP is 192.168.0.20.
DCS-930L_A2
DCS-930_A2
14D-Link DCS-930 User Manual
Section 3 - Configuration
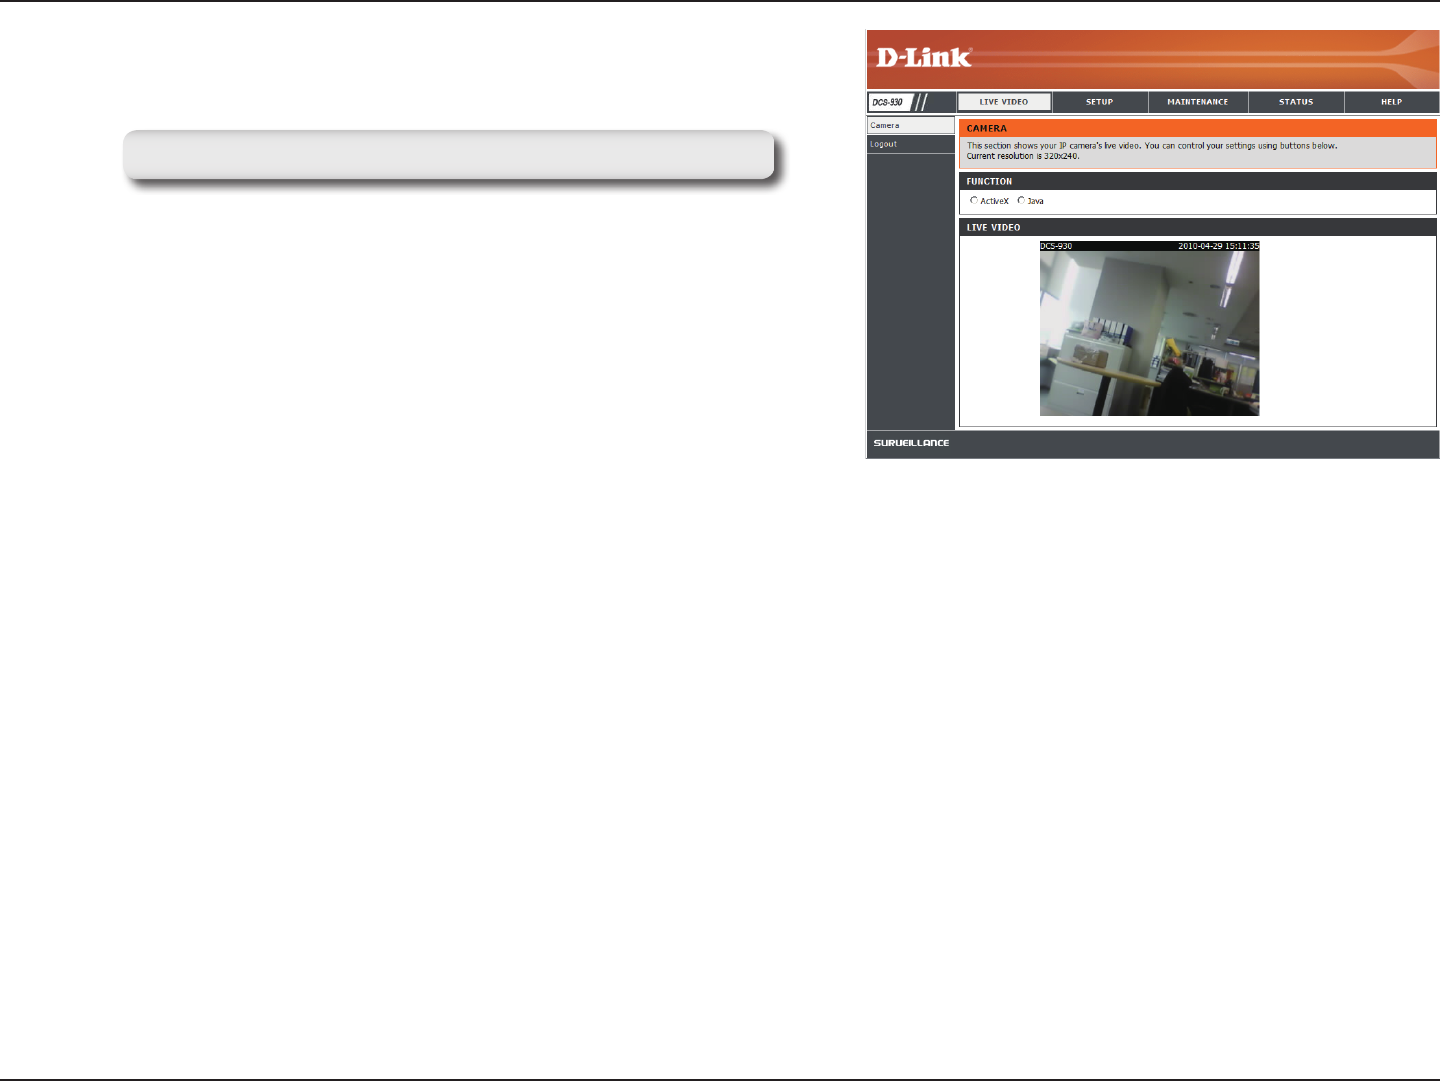
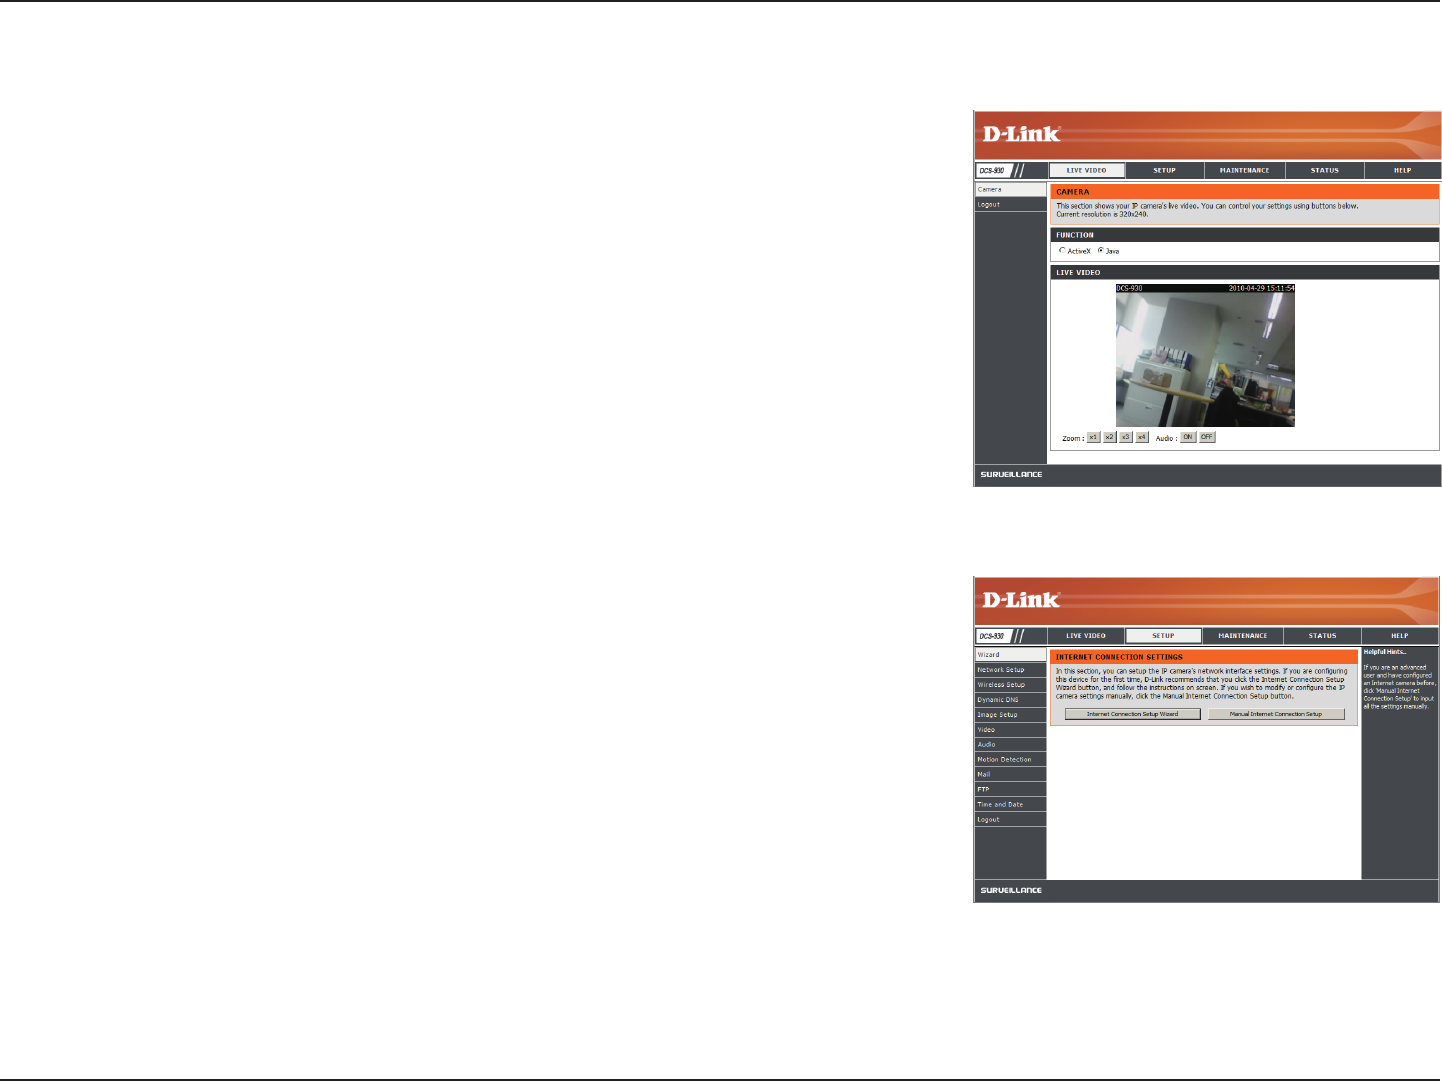
Click the ActiveX or Java radio button to view live video.
Please make sure that you have the latest version of Java application installed on your computer to ensure proper
operation when viewing the video in Java mode. The Java application can be downloaded at no cost from Sun’s web site.
(http://www.java.com)
When you connect to the home page of your camera, you will be prompted to download ActiveX. If you want to use ActiveX to view your
video images instead of Java, then you must download ActiveX.
15D-Link DCS-930 User Manual
Section 3 - Configuration
Live Video
ActiveX:
Java:
For Windows® Users that do not have Java installed, please choose this option
to view video streaming on the Home page.
For Windows® users that have Java installed, you can also use this for viewing
video. Mac users must choose this mode to view video.
Setup > Wizard
You may choose to congure your network by using the Internet Connection Setup
Wizard that includes step-by-step instructions. Otherwise, you may manually congure
your connection using the Manual Internet Connection Setup.