Contents
- 1. user manual I
- 2. user manual II
user manual II
61
8. Resetting the DI-524 to Factory Default Settings
After you have tried other methods for troubleshooting your network, you may
choose to Reset the DI-524 to the factory default settings. Remember that
D-Link AirPro products network together
, out of the box, at the factory default
settings.
To hard-reset the DI-524 to Factory Default Settings, please do the following:
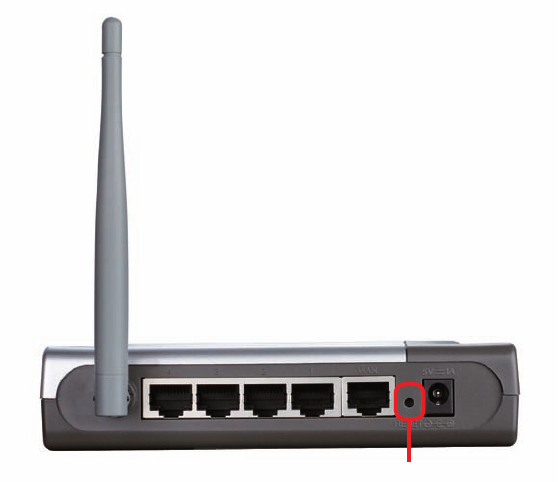
Troubleshooting
After the DI-524 reboots (this may take a few minutes)
it will be reset to the factory Default settings
Use a paper clip to press the Reset button
Hold for about 10 seconds and then release
Locate the Reset button on the back of the DI-524
Reset
62
IP Filtering
URL Filtering
Domain Blocking
Scheduling
Based on IEEE 802.11n (draft 2.0) Technology
IEEE 802.11g
IEEE 802.11b
IEEE 802.3
IEEE 802.3u
Technical Specications
L2TP
Standards
VPN Pass Through/ Multi-Sessions
PPTP
Device Management
Web-Based- Internet Explorer v6 or later; Netscape Navigator v7
or later; or other Java-enabled browsers
Advanced Firewall Features
NAT with VPN Passthrough (Network Address Translation)
95% maximum (non-condensing)
Wireless Operating Range
Operating Temperature
32ºF to 104ºF (0ºC to 40ºC)
Humidity:
Indoors – up to 328 feet (100 meters)
IPSec
DHCP Server and Client
MAC Filtering
Outdoors – up to 984 feet (300 meters)
Safety and Emissions:
FCC, CE
2.4GHz to 2.462GHz
Wireless Frequency Range:
63
LEDs:
Power
WAN
Physical Dimensions:
Technical Specications
L = 5.6 inches (142mm)
W = 4.3 inches (109mm)
H = 1.2 inches (31mm)
Wireless Transmit Power:
15dBm± 5dB
Security:
802.1x
WEP
WPA
WPA-PSK
External Antenna Type:
Single Fixed Antenna
Orthogonal Frequency Division Multiplexing (OFDM)
Modulation Technology:
Power Input:
Ext. Power Supply DC 5V, 1A
Weight:
0.44 lbs. (200g)
LAN (10/100)
WLAN (Wireless Connection)
Warranty:
1 year
64
Max physical rate up to 150 Mbps in 802.11n mode
54 Mbps
48 Mbps
36 Mbps
24 Mbps
18 Mbps
12 Mbps
11 Mbps
9 Mbps
6 Mbps
5.5 Mbps
2 Mbps
1 Mbps
Wireless Data Rates with Automatic Fallback:
54Mbps OFDM, 10% PER, -68dBm
48Mbps OFDM, 10% PER, -70dBm
36Mbps OFDM, 10% PER, -75dBm
Receiver Sensitivity:
24Mbps OFDM, 10% PER, -79dBm
18Mbps OFDM, 10% PER, -82dBm
12Mbps OFDM, 10% PER, -84dBm
11Mbps CCK, 8% PER, -82dBm
9Mbps OFDM, 10% PER, -86dBm
6Mbps OFDM, 10% PER, -88dBm
5.5Mbps CCK, 8% PER, -85dBm
2Mbps QPSK, 8% PER, -86dBm
1Mbps BPSK, 8% PER, -89dBm
Technical Specications
65
Frequently Asked Questions
When entering the IP Address of the DI-524 (192.168.0.1), you are not connecting to
the Internet or have to be connected to the Internet. The device has the utility built-in
to a ROM chip in the device itself. Your computer must be on the same IP subnet to
connect to the web-based utility.
To resolve difculties accessing a web utility, please follow the steps below.
Step1Verify physical connectivity by checking for solid link lights on the device.
If you do not get a solid link light, try using a different cable or connect to a different
port on the device if possible. If the computer is turned off, the link light may not be
on.
The following connections require a Crossover Cable:
Computer to Computer
Computer to Uplink Port
Computer to Access Point
Computer to Print Server
Computer/XBOX/PS2 to DWL-810
Computer/XBOX/PS2 to DWL-900AP+
Uplink Port to Uplink Port (hub/switch)
Normal Port to Normal Port (hub/switch)
The following connections require a Straight-through Cable:
Computer to Residential Gateway/Router
Computer to Normal Port (hub/switch)
Access Point to Normal Port (hub/switch)
Print Server to Normal Port (hub/switch)
Uplink Port to Normal Port (hub/switch)
Rule of Thumb:
”If there is a link light, the cable is right.”
What type of cable should I be using?
Why can´t I access the web based conguration?
66
Frequently Asked Questions (continued)
What type of cable should I be using? (continued)
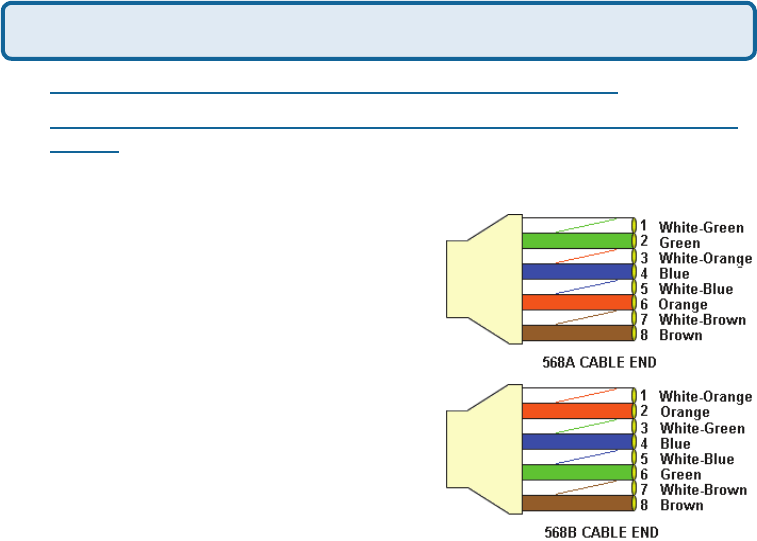
What´s the difference between a crossover cable and a straight-through
cable?
The wiring in crossover and straight-through cables are different. The two
types of cable have different purposes
for different LAN congurations. EIA/TIA
568A/568B dene the wiring standards
and allow for two different wiring color
codes as illustrated in the following
diagram.
*The wires with colored backgrounds may
have white stripes and may be denoted
that way in diagrams found elsewhere.
How to tell straight-through cable from
a crossover cable:
The main way to tell the difference
between the two cable types is to
compare the wiring order on the ends
of the cable. If the wiring is the same on
both sides, it is straight-through cable. If one side has opposite wiring, it is a
crossover cable.
All you need to remember to properly congure the cables is the pinout order of
the two cable ends and the following rules:
A straight-through cable has identical ends
A crossover cable has different ends
It makes no functional difference which standard you follow for straight-through
cable ends, as long as both ends are the same. You can start a crossover cable
with either standard as long as the other end is the other standard. It makes no
functional difference which end is which. The order in which you pin the cable
is important. Using a pattern other than what is specied in the above diagram
could cause connection problems.
When to use a crossover cable and when to use a straight-through cable:
Computer to Computer – Crossover
Computer to an normal port on a Hub/Switch – Straight-through
Computer to an uplink port on a Hub/Switch - Crossover
Hub/Switch uplink port to another Hub/Switch uplink port – Crossover
Hub/Switch uplink port to another Hub/Switch normal port - Straight-through
Why can´t I access the web based conguration? (continued)
67
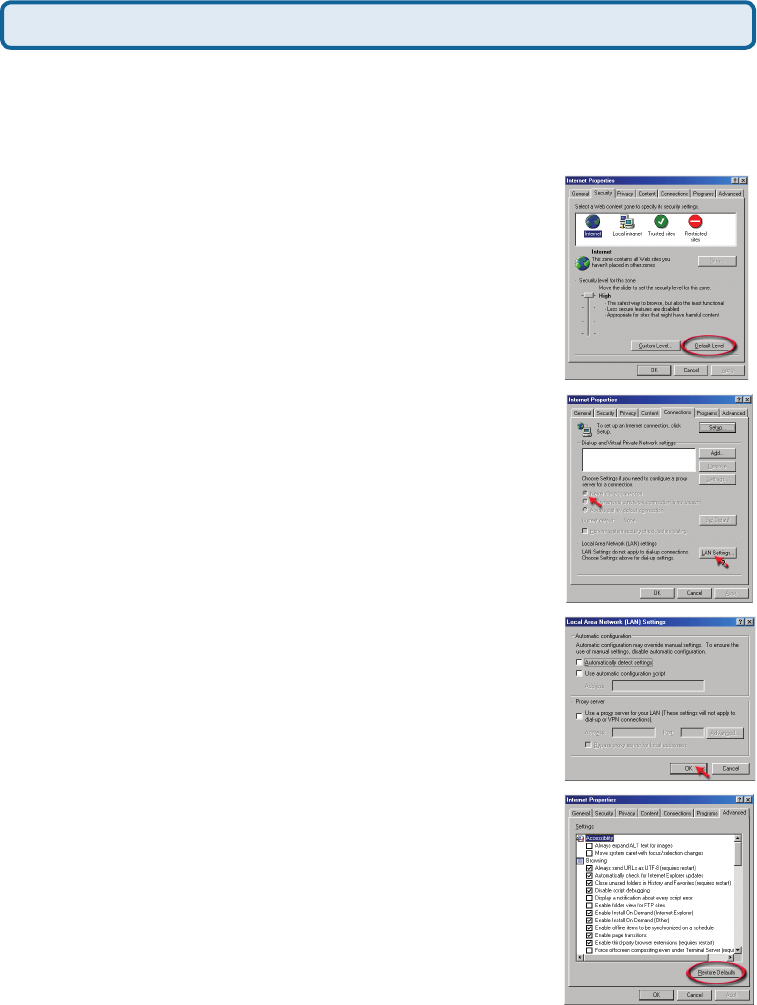
Step3 Congure your Internet settings.
Step2 Disable any Internet security software running on the computer. Software
rewalls like Zone Alarm, Black Ice, Sygate, Norton Personal Firewall, etc. might
block access to the conguration pages. Check the help les included with your
rewall software for more information on disabling or conguring it.
Frequently Asked Questions (continued)
Click to the Connection tab and set the dial-
up option to Never Dial a Connection. Click
the LAN Settings button
Nothing should be checked. Click OK
Go to the Advanced tab and click the
button to restore these settings to their
defaults
Click OK. Go to the desktop and close any open
windows
Go to Start>Settings>Control Panel. Double
click the Internet Options Icon. From the Security
tab, click the button to restore the settings to their
defaults.
Why can´t I access the web based conguration? (continued)
68
Frequently Asked Questions (continued)
Step4 Check your IP Address. Your computer must have an IP Address in the
same range of the device you are attempting to congure. Most D-Link devices use
the 192.168.0.X range.
How can I nd my IP Address in Windows 95, 98, or
ME?
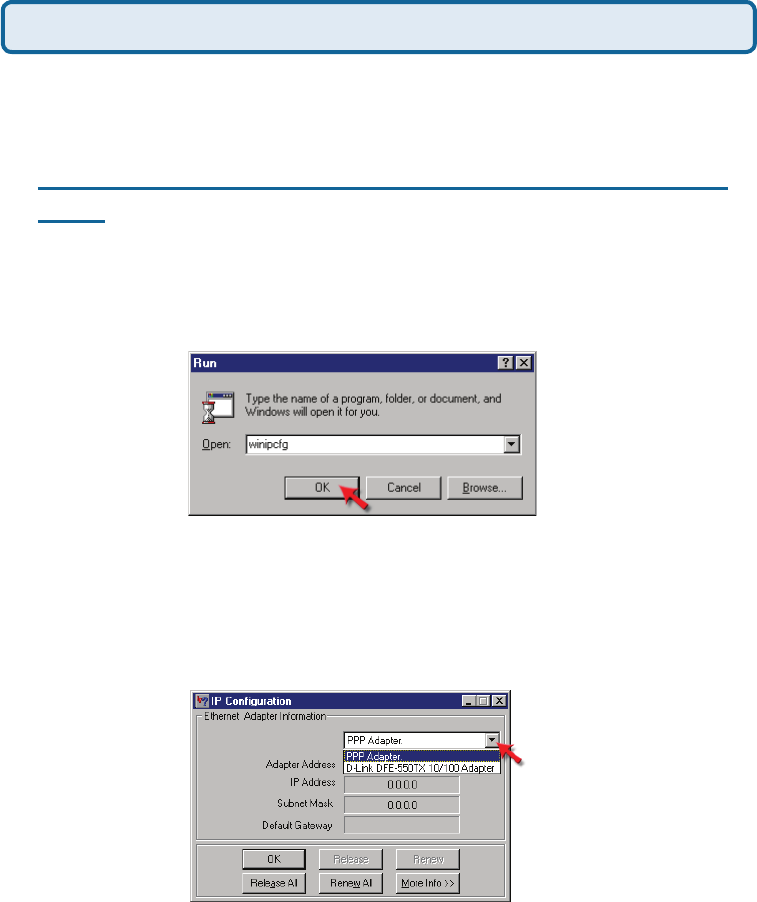
Step 1 Click on Start, then click on Run.
Step 2 The Run Dialogue Box will appear. Type winipcfg in the window as
shown then click OK.
Step 3 The IP Conguration window will appear, displaying your Ethernet
Adapter Information.
Select your adapter from the drop down menu.
If you do not see your adapter in the drop down menu, your adapter is
not properly installed.
Step 4 After selecting your adapter, it will display your IP Address, subnet
mask, and default gateway.
Step 5 Click OK to close the IP Conguration window
Why can´t I access the web based conguration? (continued)
69
Frequently Asked Questions (continued)
Step4 (continued) Check your IP Address. Your computer must have an IP Address
in the same range of the device you are attempting to congure. Most D-Link devices
use the 192.168.0.X range.
How can I nd my IP Address in Windows 2000/XP?
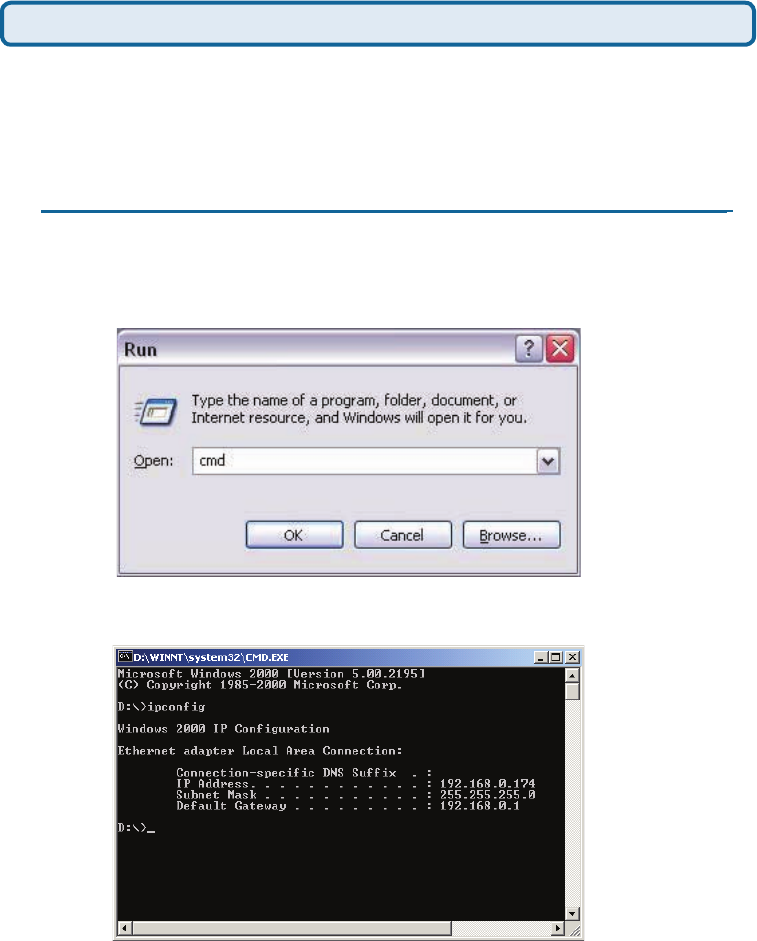
Step 1 Click on Start and select Run.
Step 2 Type cmd then click OK.
Step 3 From the Command Prompt, enter ipcong. It will return your IP
Address, subnet mask, and default gateway
Step 4 Type exit to close the command prompt.
Why can´t I access the web based conguration? (continued)
70
Frequently Asked Questions (continued)
Step4 (continued) Check your IP Address. Your computer must have an IP
Address in the same range of the device you are attempting to congure. Most D-
Link devices use the 192.168.0.X range.
Make sure you take note of your computer´s Default Gateway IP Address. The
Default Gateway is the IP Address of the D-Link router. By default, it should be
192.168.0.1.
How can I assign a Static IP Address in Windows XP?
Step 1
Click on Start > Control Panel > Network and Internet Connections >
Network connections.
Step 2 See Step 2 for Windows 2000 and continue from there.
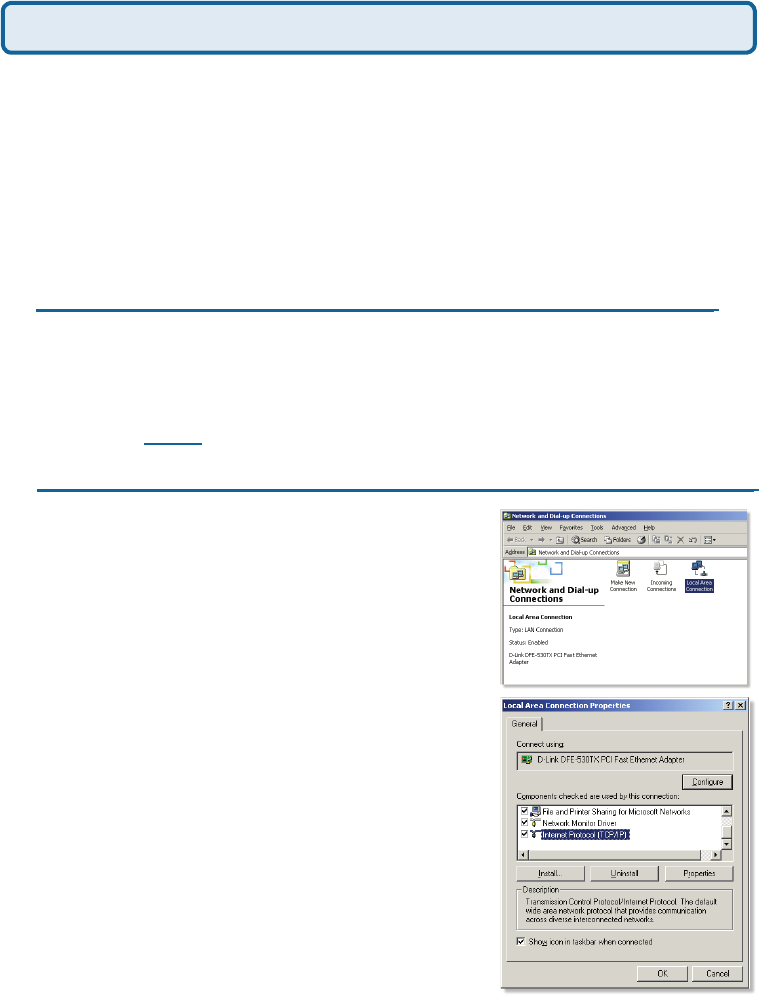
How can I assign a Static IP Address in Windows 2000?
Step 1 Right-click on My Network
Places and select Properties.
Step 2 Right-click on the Local
Area Connection which represents
your network card and select
Properties.
Highlight Internet Protocol (TCP/
IP) and click Properties.
Why can´t I access the web based conguration? (continued)
71
Frequently Asked Questions (continued)
How can I assign a Static IP Address in Windows
2000? (continued)
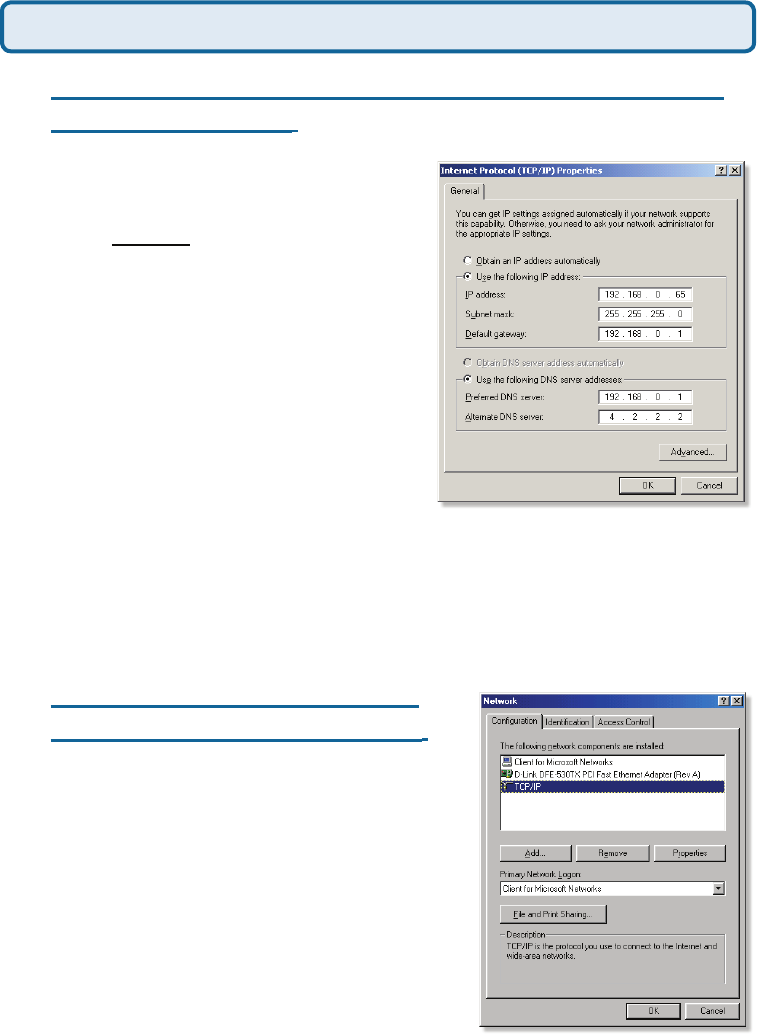
Click Use the following IP Address and
enter an IP Address that is on the same
subnet as the LAN IP Address on your
router. Example: If the router´s LAN IP
Address is 192.168.0.1, make your IP
Address 192.168.0.X where X = 2-99.
Make sure that the number you choose
is not in use on the network.
Set the Default Gateway to be the
same as the LAN IP Address of your
router (192.168.0.1).
Set the Primary DNS to be the same
as the LAN IP address of your router
(192.168.0.1).
The Secondary DNS is not needed or enter a DNS server from your ISP.
Click OK twice. You may be asked if you want to reboot your computer. Click
Yes.
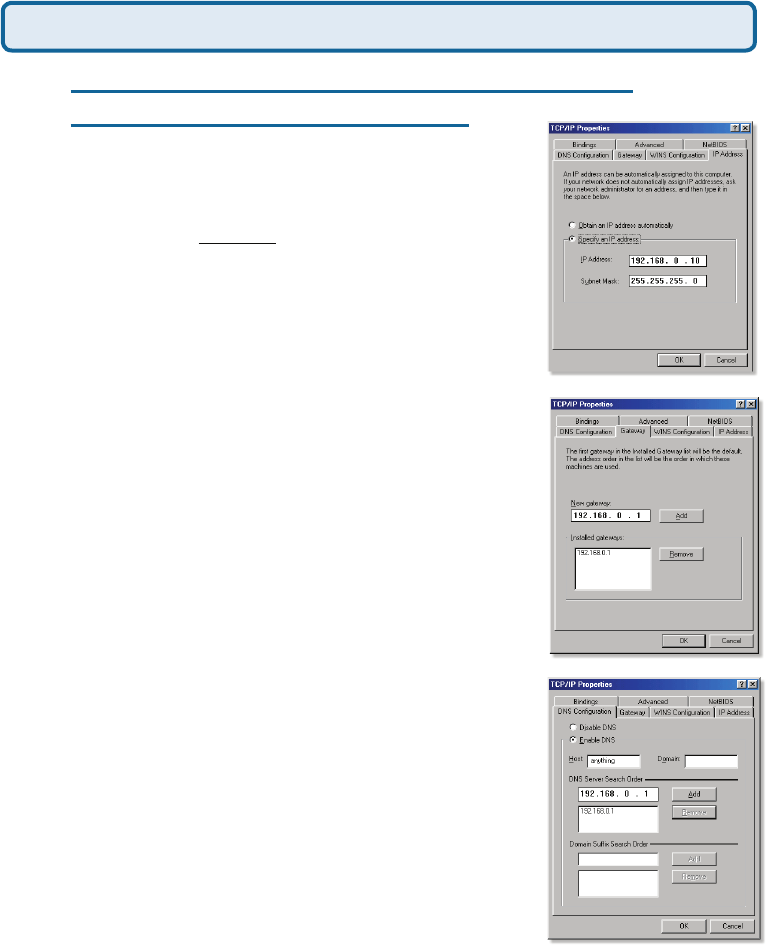
How can I assign a Static IP
Address in Windows 98/Me?
Step 1 From the desktop, right-click on the
Network Neigborhood icon (Win ME - My
Network Places) and select Properties
Highlight TCP/IP and click the Properties
button. If you have more than 1 adapter,
then there will be a TCP/IP “Binding”
for each adapter. Highlight TCP/IP >
(your network adapter) and then click
Properties.
Why can´t I access the web based conguration? (continued)
72
Frequently Asked Questions (continued)
How can I assign a Static IP Address in
Windows 98/Me? (continued)
Step 2 Click Specify an IP Address.
Step 3 Click on the Gateway tab.
Enter the LAN IP Address of your router
here (192.168.0.1).
Click Add when nished.
Step 4 Click on the DNS Conguration tab.
Enter in an IP Address that is on the same
subnet as the LAN IP Address on your
router. Example: If the router´s LAN IP
Address is 192.168.0.1, make your IP
Address 192.168.0.X where X is between
2-99. Make sure that the number you choose
is not in use on the network.
Step 5 Click OK twice.
Click Enable DNS. Type in a Host (can
be any word). Under DNS server search
order, enter the LAN IP Address of your
router (192.168.0.1). Click Add.
When prompted to reboot your computer,
click Yes.
After you reboot, the computer will now
have a static, private IP Address.
Why can´t I access the web based conguration? (continued)
Step5Access the web management. Open your web
browser and enter the IP Address of your D-Link device in
the address bar. This should open the login page for the
web management. Follow instructions to login and complete the conguration.
73
Frequently Asked Questions (continued)
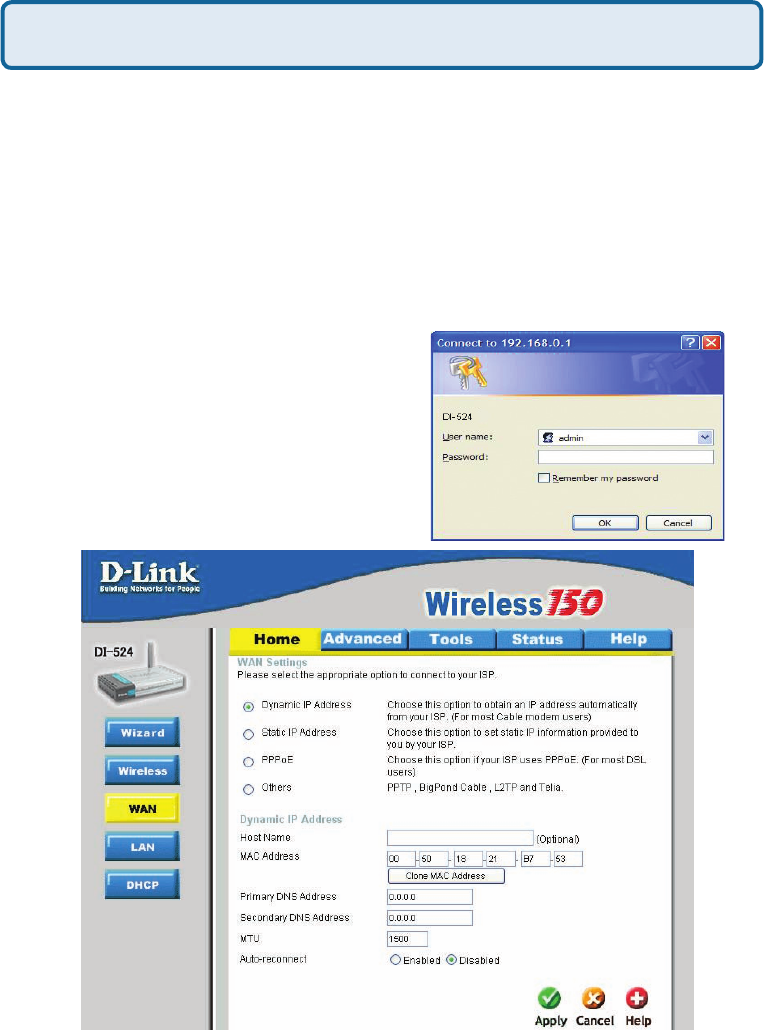
How can I setup my router to work with a Cable modem connection?
Dynamic Cable connection
(IE AT&T-BI, Cox, Adelphia, Rogers, Roadrunner, Charter, and Comcast).
Note: Please congure the router with the computer that was last connected directly
to the cable modem.
Step1 Log into the web based conguration by typing in the IP Address of the
router (default:192.168.0.1) in your web browser. The username is admin (all
lowercase) and the password is blank (nothing).
Step2Click the Home tab and click the
WAN button. Dynamic IP Address is the
default value, however, if Dynamic IP Address
is not selected as the WAN type, select
Dynamic IP Address by clicking on the radio
button. Click Clone Mac Address. Click
on Apply and then Continue to save the
changes.
74
Frequently Asked Questions (continued)
How can I setup my router to work with a Cable modem connection?
(continued)
Step3Power cycle the cable modem and router:
Turn the cable modem off (rst) . Turn the router off Leave them off for 2 minutes.**
Turn the cable modem on (rst). Wait until you get a solid cable light on the cable
modem. Turn the router on. Wait 30 seconds.
** If you have a Motorola (Surf Board) modem, leave off for at least 5 minutes.
Step4Follow step 1 again and log back into the web conguration. Click the
Status tab and click the Device Info button. If you do not already have a public IP
Address under the WAN heading, click on the DHCP Renew and Continue buttons.
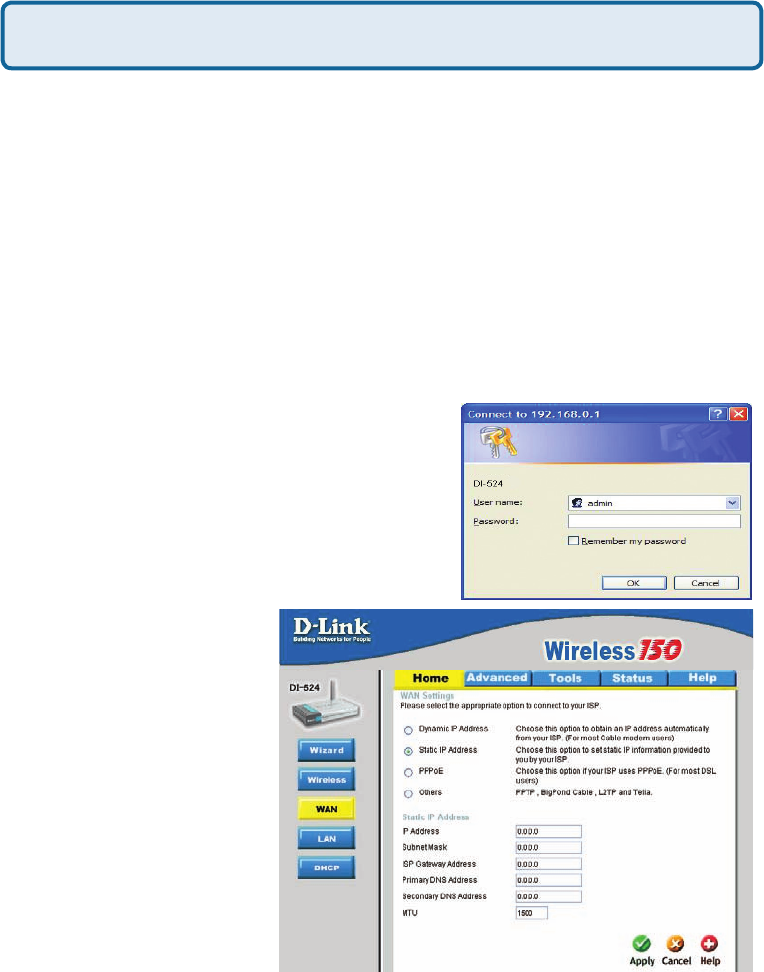
Static Cable Connection
Step1Log into the web based conguration
by typing in the IP Address of the router
(default:192.168.0.1) in your web browser. The
username is admin (all lowercase) and the
password is blank (nothing).
Step2Click the Home tab and click the WAN
button. Select Static IP Address and enter your
static settings obtained from the ISP in the elds
provided.
If you do not know your
settings, you must contact
your ISP.
Step3 Click on Apply and
then click Continue to save
the changes.
Step4 Click the Status
tab and click the Device
Info button. Your IP Address
information will be displayed
under the WAN heading.

75
Frequently Asked Questions (continued)
How can I setup my router to work with Earthlink DSL or any PPPoE
connection?
Make sure you disable or uninstall any PPPoE software such as WinPoet or Enternet
300 from your computer or you will not be able to connect to the Internet.
Step1Upgrade Firmware if needed.
(Please visit the D-Link tech support website at: http://support.dlink.com for the latest
rmware upgrade information.)
Step2 Take a paperclip and perform a hard reset. With the unit on, use a paperclip
and hold down the reset button on the back of the unit for 10 seconds. Release it and
the router will recycle, the lights will blink, and then stabilize.
Step3 After the router stabilizes, open your browser and enter 192.168.0.1 into
the address window and hit the Enter key. When the password dialog box appears,
enter the username admin and leave the password blank. Click OK.
If the password dialog box does not come up repeat Step 2.
Note: Do not run Wizard.
Step4 Click on the WAN tab on left-hand side of the screen. Select PPPoE.
Step5Select Dynamic PPPoE (unless your ISP supplied you with a static IP
Address).
Step6In the username eld enter ELN/username@earthlink.net and your
password, where username is your own username.
For SBC Global users, enter username@sbcglobal.net.
For Ameritech users, enter username@ameritech.net.
For BellSouth users, enter username@bellsouth.net.
For Mindspring users, enter username@mindspring.com.
For most other ISPs, enter username.
Step7 Maximum Idle Time should be set to zero. Set MTU to 1492, unless
specied by your ISP, and set Autoreconnect to Enabled.
Note: If you experience problems accessing certain websites and/or email issues,
please set the MTU to a lower number such as 1472, 1452, etc. Contact your ISP for
more information and the proper MTU setting for your connection.
76
Step8 Click Apply. When prompted, click Continue. Once the screen refreshes,
unplug the power to the D-Link router.
Step9Turn off your DSL modem for 2-3 minutes. Turn back on. Once the modem
has established a link to your ISP, plug the power back into the D-Link router. Wait
about 30 seconds and log back into the router.
Step10Click on the Status tab in the web conguration where you can view the
device info. Under WAN, click Connect. Click Continue when prompted. You should
now see that the device info will show an IP Address, verifying that the device has
connected to a server and has been assigned an IP Address.
How can I setup my router to work with Earthlink DSL or any PPPoE
connection? (continued)
Frequently Asked Questions (continued)
Can I use my D-Link Broadband Router to share my Internet
connection provided by AOL DSL Plus?
In most cases yes. AOL DSL+ may use PPPoE for authentication bypassing the
client software. If this is the case, then our routers will work with this service. Please
contact AOL if you are not sure.
To set up your router:
Step1Log into the web-based conguration (192.168.0.1) and congure the WAN
side to use PPPoE.
Step2 Enter your screen name followed by @aol.com for the user name. Enter
your AOL password in the password box.
Step3You will have to set the MTU to 1400. AOL DSL does not allow for anything
higher than 1400.
Step4 Apply settings.
Step5 Recycle the power to the modem for 1 minute and then recycle power to the
router. Allow 1 to 2 minutes to connect.
If you connect to the Internet with a different internet service provider and want
to use the AOL software, you can do that without conguring the router’s rewall
settings. You need to congure the AOL software to connect using TCP/IP.
Go to http://www.aol.com for more specic conguration information of their software.
77
Frequently Asked Questions (continued)
How do I open ports on my router?
To allow trafc from the internet to enter your local network, you will need to open up
ports or the router will block the request.
Step1 Open your web
browser and enter the IP
Address of your D-Link router
(192.168.0.1). Enter username
(admin) and your password
(blank by default).
Step2Click on Advanced
on top and then click Virtual
Server on the left side.
Step3Check Enabled to
activate entry.
Step4 Enter a name for your virtual server entry.
Step5 Next to Private IP, enter the IP Address of the computer on your local
network that you want to allow the incoming service to.
Step6 Choose Protocol Type - either TCP, UDP, or both. If you are not sure, select
both.
Step7Enter the port information next to Private Port and Public Port. The private
and public ports are usually the same. The public port is the port seen from the WAN
side, and the private port is the port being used by the application on the computer
within your local network.
Step8Enter the Schedule information.
Step9Click Apply and then click Continue.
Note: Make sure DMZ host is disabled. If DMZ is enabled, it will disable all Virtual
Server entries.
Because our routers use NAT (Network Address Translation), you can only open a
specic port to one computer at a time. For example: If you have 2 web servers on
your network, you cannot open port 80 to both computers. You will need to congure
1 of the web servers to use port 81. Now you can open port 80 to the rst computer
and then open port 81 to the other computer.
78
Frequently Asked Questions (continued)
What is DMZ?
Demilitarized Zone:
In computer networks, a DMZ (demilitarized zone) is a computer host or small
network inserted as a neutral zone between a company´s private network and the
outside public network. It prevents outside users from getting direct access to a
server that has company data. (The term comes from the geographic buffer zone
that was set up between North Korea and South Korea following the UN police action
in the early 1950s.) A DMZ is an optional and more secure approach to a rewall and
effectively acts as a proxy server as well.
In a typical DMZ conguration for a small company, a separate computer (or host in
network terms) receives requests from users within the private network for access
to Web sites or other companies accessible on the public network. The DMZ host
then initiates sessions for these requests on the public network. However, the DMZ
host is not able to initiate a session back into the private network. It can only forward
packets that have already been requested.
Users of the public network outside the company can access only the DMZ host. The
DMZ may typically also have the company´s Web pages so these could be served
to the outside world. However, the DMZ provides access to no other company data.
In the event that an outside user penetrated the DMZ hosts security, the Web pages
might be corrupted but no other company information would be exposed. D-Link, a
leading maker of routers, is one company that sells products designed for setting up
a DMZ
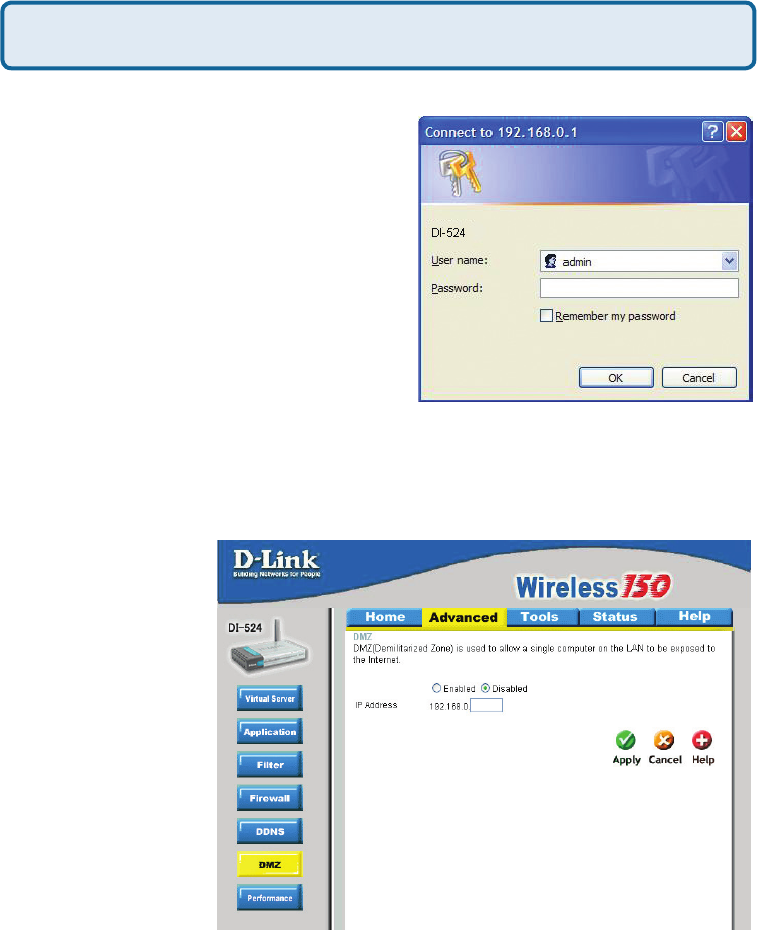
How do I congure the DMZ Host?
The DMZ feature allows you to forward all incoming ports to one computer on the
local network. The DMZ, or Demilitarized Zone, will allow the specied computer
to be exposed to the Internet. DMZ is useful when a certain application or game
does not work through the rewall. The computer that is congured for DMZ will be
completely vulnerable on the Internet, so it is suggested that you try opening ports
from the Virtual Server or Firewall settings before using DMZ.
Step1 Find the IP address of the computer you want to use as the DMZ host.
To nd out how to locate the IP Address of the computer in Windows XP/2000/ME/9x
or Macintosh operating systems please refer to Step 4 of the rst question in this
section (Frequently Asked Questions).
79
Frequently Asked Questions (continued)
Step2Log into the web based conguration
of the router by typing in the IP Address
of the router (default:192.168.0.1) in your
web browser. The username is admin (all
lowercase) and the password is blank
(nothing)
How do I congure the DMZ Host? (continued)
Step3Click the Advanced tab and then click on the DMZ button. Select Enable
and type in the IP Address you found in step 1.
Step4Click Apply
and then Continue to
save the changes.
Note: When DMZ is
enabled, Virtual Server
settings will still be
effective. Remember,
you cannot forward the
same port to multiple
IP Addresses, so the
Virtual Server settings
will take priority over
DMZ settings.
80
Frequently Asked Questions (continued)
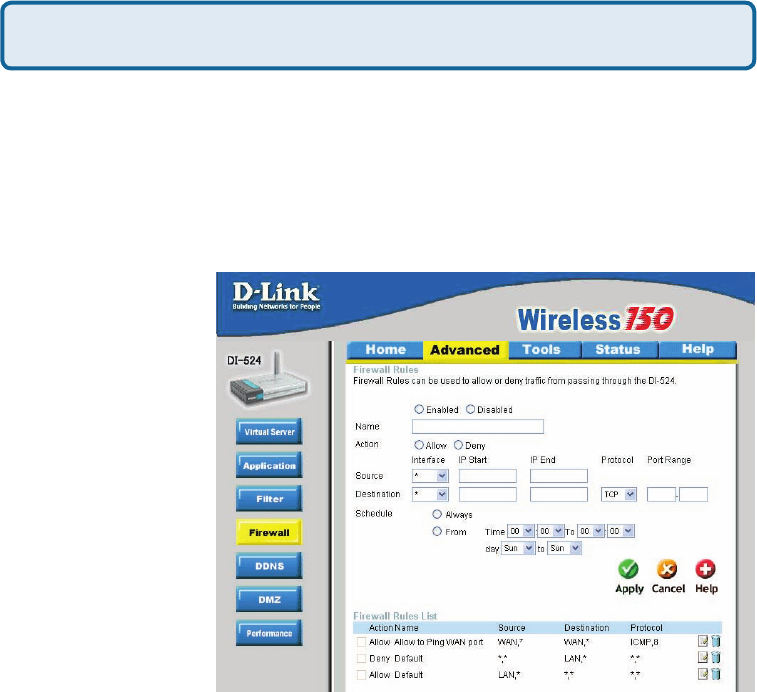
How do I open a range of ports on my DI-524 using Firewall rules?
Step1Access the router’s web conguration by entering the router’s IP Address in
your web browser. The default IP Address is 192.168.0.1. Login using your password.
The default username is “admin” and the password is blank.
If you are having difculty accessing web management, please see the rst question
in this section.
Step2From the web management Home page, click the Advanced tab then click
the Firewall button.
Step3Click on
Enabled and type in a
name for the new rule.
Step4Choose WAN
as the Source and
enter a range of IP
Addresses out on the
internet that you would
like this rule applied
to. If you would like
this rule to allow all
internet users to be
able to access these
ports, then put an
Asterisk in the rst
box and leave the
second box empty.
Step5Select LAN as the Destination and enter the IP Address of the computer on
your local network that you want to allow the incoming service to. This will not work
with a range of IP Addresses.
Step6Enter the port or range of ports that are required to be open for the incoming service.
Step7Click Apply and then click Continue.
Because our routers use NAT (Network Address Translation), you can only open a
specic port to one computer at a time. For example: If you have 2 web servers on
your network, you cannot open port 80 to both computers. You will need to congure
1 of the web servers to use port 81. Now you can open port 80 to the rst computer
and then open port 81 to the other computer.
Note: Make sure DMZ host is disabled.
81
Frequently Asked Questions (continued)
What are virtual servers?
A Virtual Server is dened as a service port, and all requests to this port will be
redirected to the computer specied by the server IP. For example, if you have an
FTP Server (port 21) at 192.168.0.5, a Web server (port 80) at 192.168.0.6, and
a VPN server at 192.168.0.7, then you need to specify the following virtual server
mapping table:
Server Port Server IP Enable
21 192.168.0.5 X
80 192.168.0.6 X
1723 192.168.0.7 X
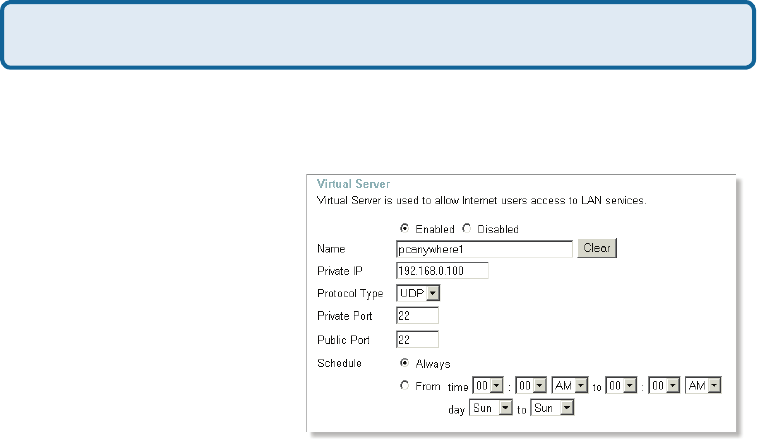
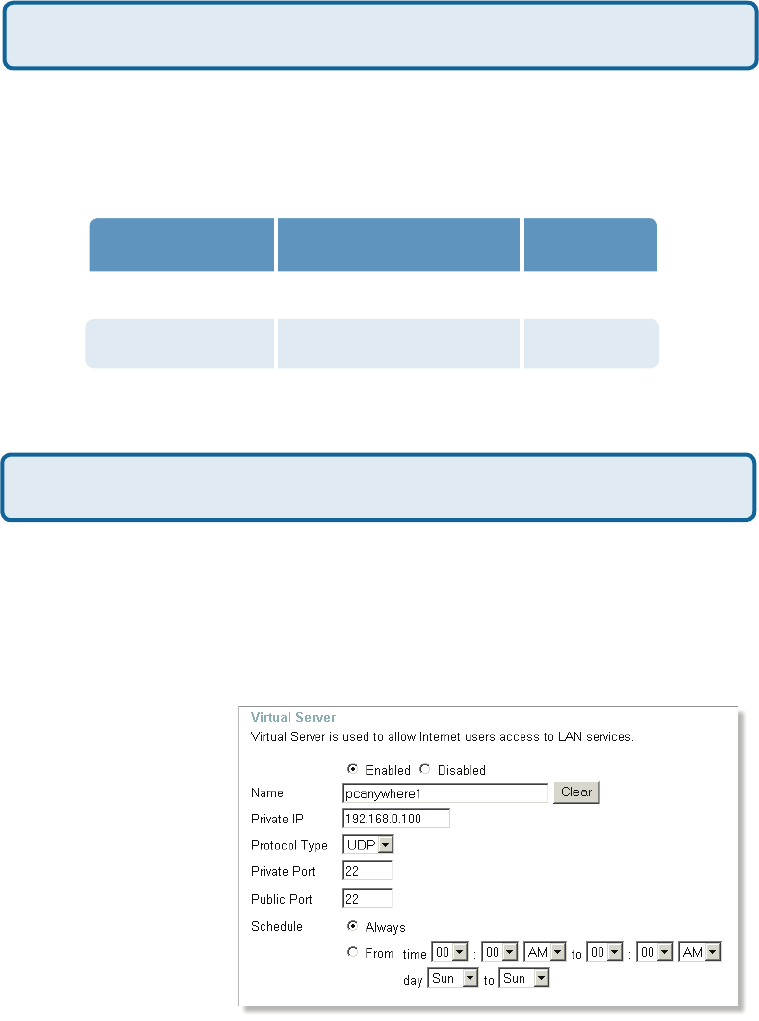
How do I use PC Anywhere with my DI-524 router?
You will need to open 3 ports in the Virtual Server section of your D-Link router.
Step1 Open your web browser and enter the IP Address of the router
(192.168.0.1).
Step2 Click on Advanced at the top and then click Virtual Server on the left side.
Step3 Enter the
information as seen
below. The Private IP
is the IP Address of the
computer on your local
network that you want
to connect to.
Step4The rst entry
will read as shown here:
Step5 Click Apply
and then click Continue.
82
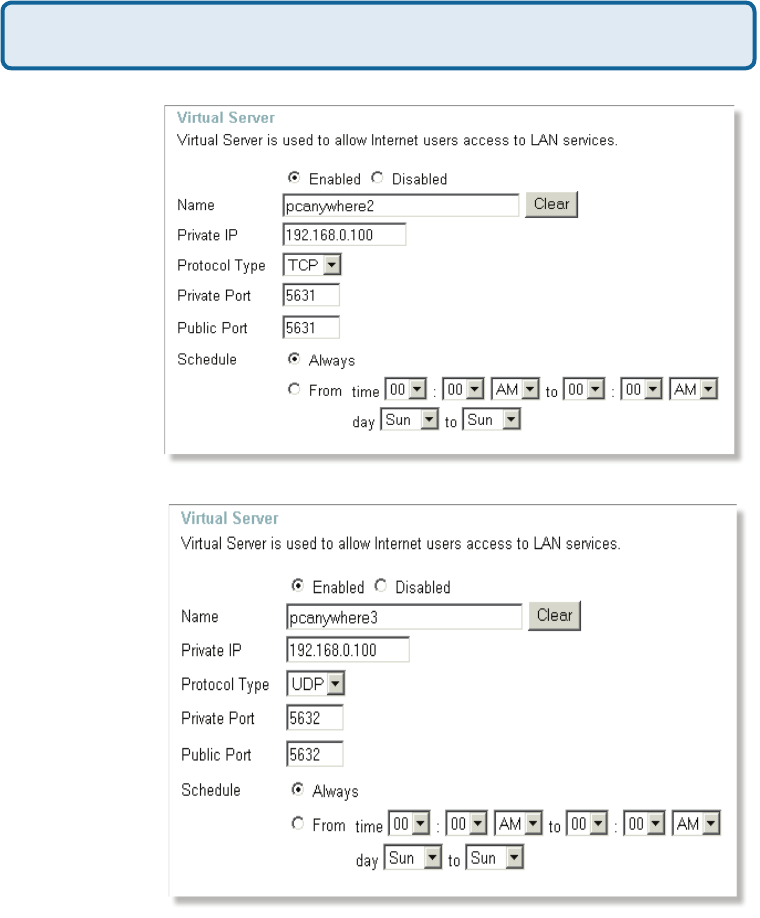
How do I use PC Anywhere with my DI-524 router? (continued)
Frequently Asked Questions (continued)
Step6 Create
a second entry
as shown here:
Step7 Click
Apply and then
click Continue.
Step8 Create
a third and nal
entry as shown
here:
Step9 Click Apply and then click Continue.
Step10Run PCAnywhere from the remote site and use the WAN IP Address of the
router, not your computer´s IP Address.
83
How can I use eDonkey behind my D-Link Router?
Frequently Asked Questions (continued)
You must open ports on your router to allow incoming trafc while using eDonkey.
eDonkey uses three ports (4 if using CLI):
4661 (TCP) To connect with a server
4662 (TCP) To connect with other clients
4665 (UDP) To communicate with servers other than the one you are connected to.
4663 (TCP) *Used with the command line (CLI) client when it is congured to allow
remote connections. This is the case when using a Graphical Interface (such as the
Java Interface) with the client.
Step1 Open your web browser and enter the IP Address of your router
(192.168.0.1). Enter username (admin) and your password (leave blank).
Step2 Click on Advanced and then click Firewall.
Step3 Create a
new rewall rule:
Click Enabled.
Enter a name
(edonkey).
Click Allow.
Next to Source,
select WAN under
interface. In the
rst box, enter an *.
Leave the second
box empty.
Next to Destination,
select LAN under
interface. Enter the
IP Address of the
computer you are
running eDonkey
from. Leave the
second box empty.
Under Protocol,
select *. In the port range boxes, enter 4661 in the rst box and then 4665 in the
second box. Click Always or set a schedule.
Step4 Click Apply and then Continue.
84
Frequently Asked Questions (continued)
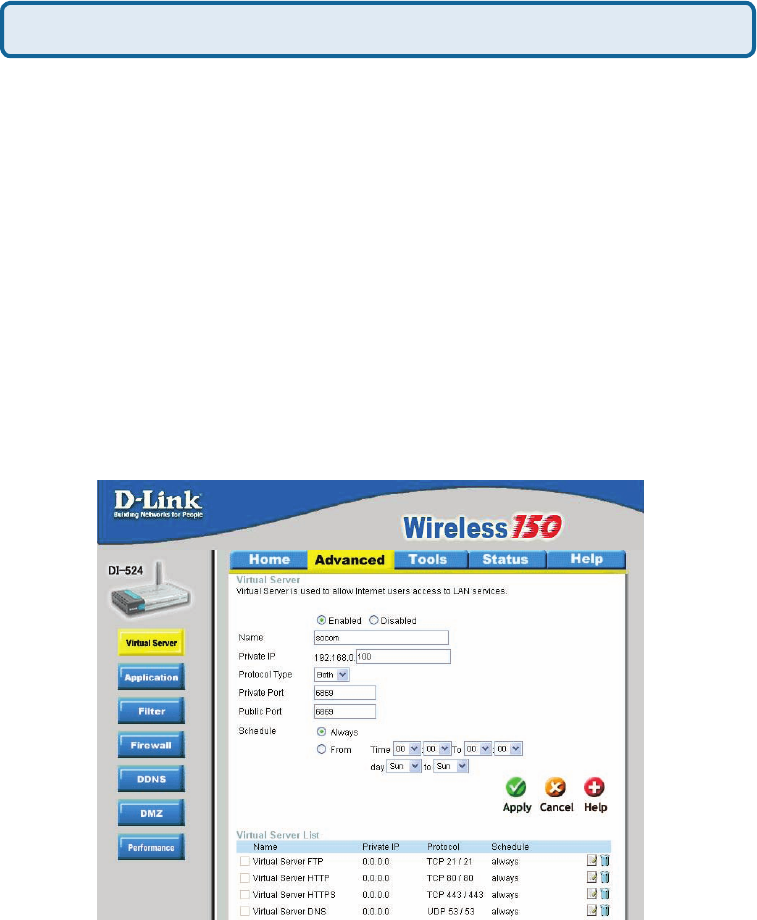
To allow you to play SOCOM and hear audio, you must download the latest rmware
for the router (if needed), enable Game Mode, and open port 6869 to the IP Address
of your Playstation.
Step1 Upgrade rmware (follow link above).
Step2Open your web browser and enter the IP Address of the router
(192.168.0.1). Enter username (admin) and your password (blank by default).
Step3 Click on the Advanced tab and then click on Virtual Server on the left side.
Step4 You will now create a new Virtual Server entry. Click Enabled and enter a
name (socom). Enter the IP Address of your Playstation for Private IP.
Step5 For Protocol Type select Both. Enter 6869 for both the Private Port and
Public Port. Click Always. Click Apply to save changes and then Continue
Step6 Click on the Tools tab and then Misc on the left side.
Step7 Make sure Gaming Mode is Enabled. If not, click Enabled. Click Apply and
then Continue.
How do I set up my router for SOCOM on my Playstation 2?
85
Frequently Asked Questions (continued)
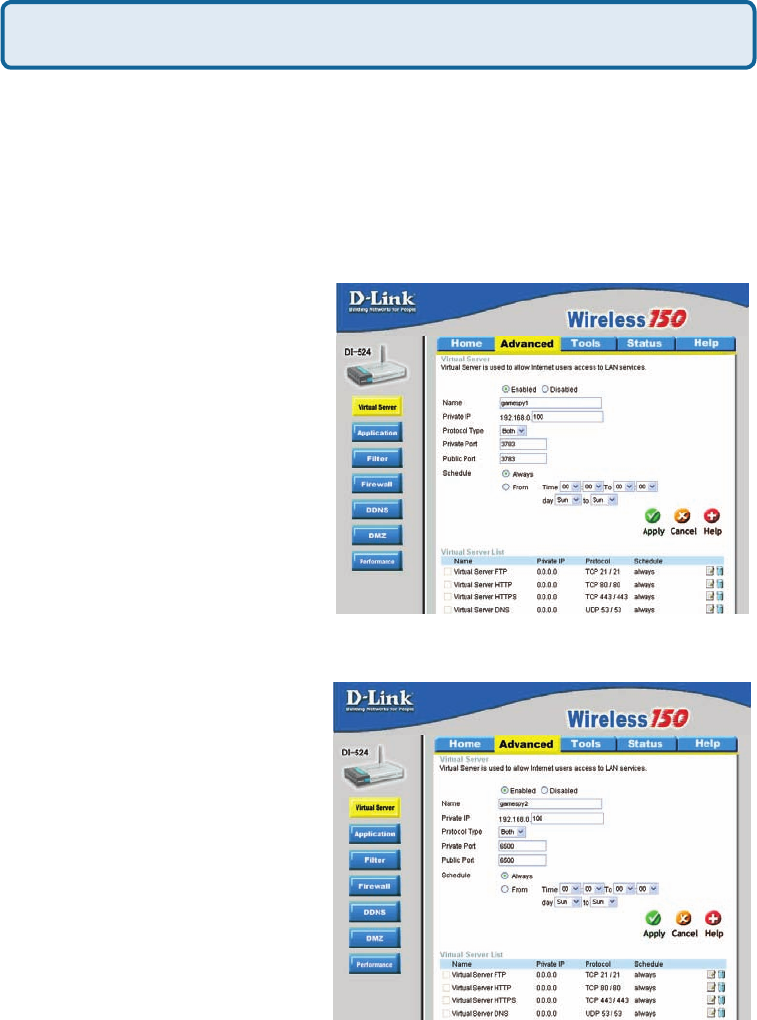
How can I use Gamespy behind my D-Link router?
Step1 Open your web browser and enter the IP Address of the router
(192.168.0.1). Enter admin for the username and your password (blank by default).
Step2 Click on the Advanced tab and then click Virtual Server on the left side.
Step3 You will create 2 entries.
Step4 Click Enabled and enter Settings:
Click Apply and then continue
Step5 Enter 2nd entry:
Click Enabled
Click Apply and then continue.
NAME - Gamespy1
PRIVATE IP - The IP Address
of your computer that you are
running Gamespy from.
PROTOCOL TYPE - Both
PRIVATE PORT - 3783
PUBLIC PORT - 3783
SCHEDULE - Always.
NAME - Gamespy2
PRIVATE IP - The IP Address
of your computer that you
are running Gamespy from.
PROTOCOL TYPE - Both
PRIVATE PORT - 6500
PUBLIC PORT - 6500
SCHEDULE - Always.
86
Frequently Asked Questions (continued)
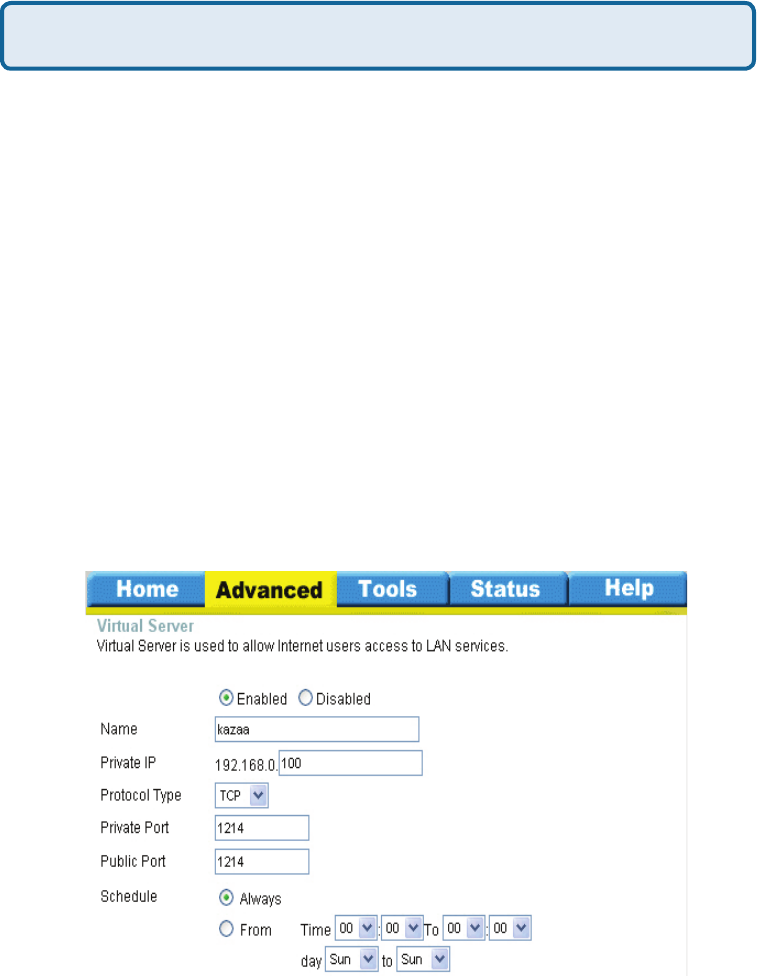
How do I congure my router for KaZaA and Grokster?
The following is for KaZaA, Grokster, and others using the FastTrack P2P le sharing
system.
In most cases, you do not have to congure anything on the router or on the Kazaa
software. If you are having problems, please follow steps below:
Step1 Enter the IP Address of your router in a web browser (192.168.0.1).
Step2 Enter your username (admin) and your password (blank by default).
Step3 Click on Advanced and then click Virtual Server.
Step4 Click Enabled and then enter a Name (kazaa for example).
Step5 Enter the IP Address of the computer you are running KaZaA from in the
Private IP box. Select TCP for the Protocol Type.
Step6 Enter 1214 in the Private and Public Port boxes. Click Always under
schedule or set a time range. Click Apply.
Make sure that you did not enable proxy/rewall in the KaZaA software.
87
Frequently Asked Questions (continued)
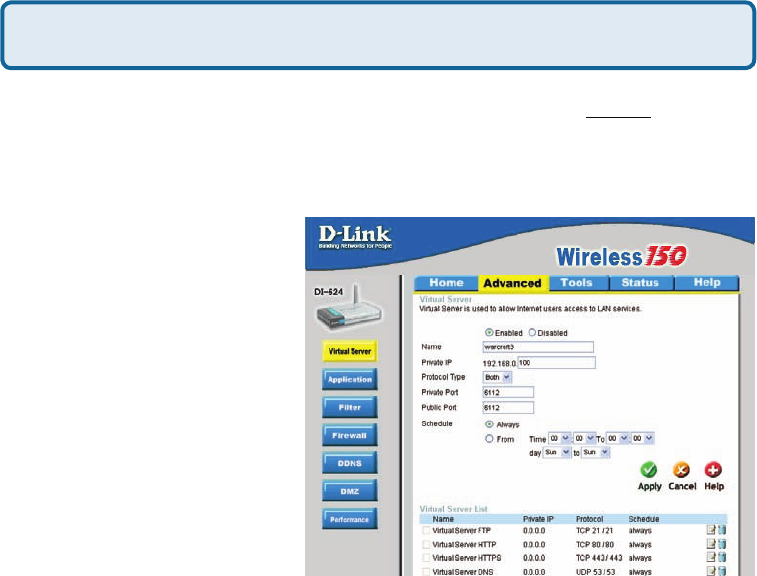
How do I congure my router to play Warcraft 3?
You must open ports on your router to allow incoming trafc while hosting a game in
Warcraft 3. To play a game, you do not have to congure your router.
Warcraft 3 (Battlenet) uses port 6112.
For the DI-604, DI-614+. DI-524,
DI-754, DI-764, or DI-774:
Step1 Open your web browser
and enter the IP Address of
your router (192.168.0.1). Enter
username (admin) and your
password (leave blank).
Step2 Click on Advanced and
then click Virtual Server.
Step3 Create a new entry:
Click Enabled. Enter a name
(warcraft3). Private IP - Enter the
IP Address of the computer you
want to host the game. Select
Both for Protocol Type Enter 6112 for both Private Port and Public Port Click Always
or set a schedule.
Step4 Click Apply and then Continue.
Note: If you want multiple computers from you LAN to play in the same game that
you are hosting, then repeat the steps above and enter the IP Addresses of the other
computers. You will need to change ports. Computer #2 can use port 6113, computer
#3 can use 6114, and so on.
You will need to change the port information within the Warcraft 3 software for
computers #2 and up.
Congure the Game Port information on each computer:
Start Warcraft 3 on each computer, click Options > Gameplay. Scroll down and you
should see Game Port. Enter the port number as you entered in the above steps.
88
Frequently Asked Questions (continued)
How do I use NetMeeting with my D-Link Router?
Unlike most TCP/IP applications, NetMeeting uses DYNAMIC PORTS instead of
STATIC PORTS. That means that each NetMeeting connection is somewhat different
than the last. For instance, the HTTP web site application uses port 80. NetMeeting
can use any of over 60,000 different ports.
All broadband routers using (only) standard NAT and all internet sharing programs
like Microsoft ICS that use (only) standard NAT will NOT work with NetMeeting or
other h.323 software packages.
The solution is to put the router in DMZ.
Note: A few hardware manufacturers have taken it on themselves to actually provide
H.323 compatibility. This is not an easy task since the router must search each
incoming packet for signs that it might be a netmeeting packet. This is a whole lot
more work than a router normally does and may actually be a weak point in the
rewall. D-Link is not one of the manufacturers.
To read more on this visit http://www.HomenetHelp.com
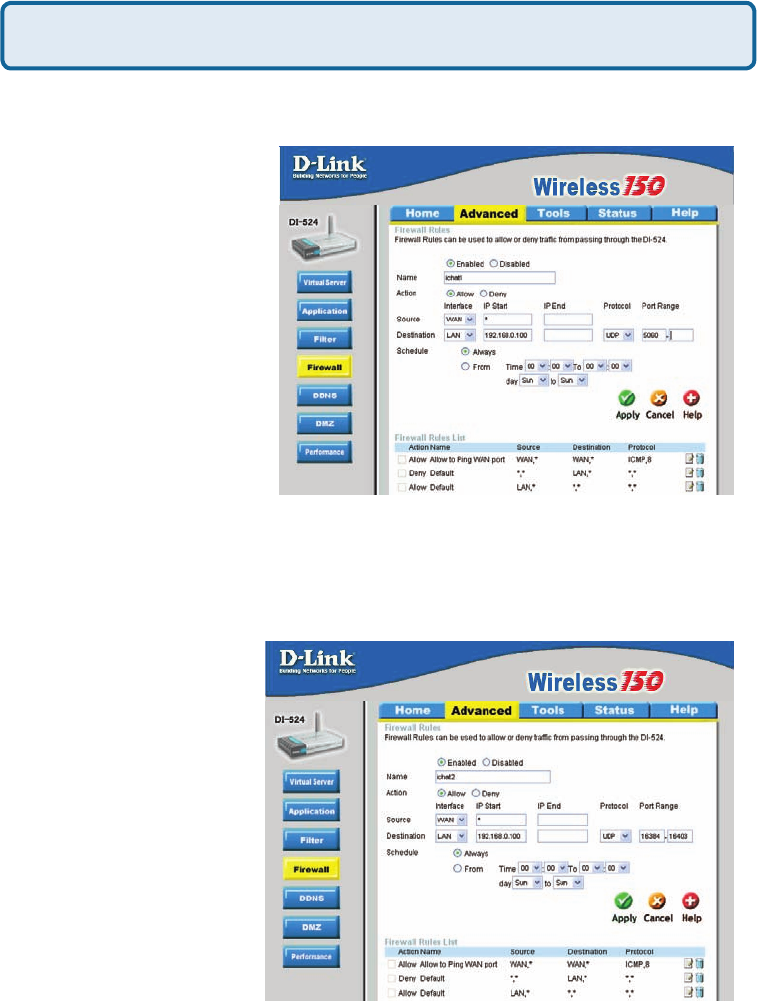
How do I set up my router to use iChat? -for Macintosh users-
You must open ports on your router to allow incoming trafc while using iChat.
iChat uses the following ports: 5060 (UDP) 5190 (TCP) File Sharing 16384-16403
(UDP) To video conference with other clients
Step1 Open your web browser and enter the IP Address of your router
(192.168.0.1). Enter username (admin) and your password (leave blank).
Step2 Click on Advanced and then click Firewall.
89
Frequently Asked Questions (continued)
Step3Create a new rewall rule:
Leave the second box empty. Under Protocol, select UDP. In the port range boxes,
enter 5060 in the rst box and leave the second box empty.
Click Always or set a schedule.
Step4 Click Apply and
then Continue.
Step5
Repeat steps 3 and 4
enter ichat2 and open
ports 16384-16403 (UDP).
How do I set up my router to use iChat? -for Macintosh users-
(continued)
Click Enabled.
Enter a name (ichat1).
Click Allow.
Next to Source, select
WAN under interface.
In the rst box, enter an *.
Leave the second box
empty.
Next to Destination, select
LAN under interface.
Enter the IP Address of the
computer you are running
iChat from.

90
Frequently Asked Questions (continued)
If using Mac OS X Firewall, you may need to temporarily turn off the rewall in
the Sharing preference pane on both computers.
To use the Mac OS X Firewall, you must open the same ports as in the router:
Step1 Choose Apple menu > System Preferences.
Step2 Choose View > Sharing.
Step3 Click the Firewall tab.
Step4 Click New.
Step5Choose Other from the Port Name pop-up menu.
Step6 In the Port Number, Range or Series eld, type in: 5060, 16384-16403.
Step7 In the Description eld type in: iChat AV
Step8 Click OK.
For File Sharing:
Step1 Click on
Advanced and then
Virtual Server.
Step2 Check Enabled
to activate entry.
Step3 Enter a name for
your virtual server entry
(ichat3).
Step4Next to Private
IP, enter the IP Address
of the computer on
your local network that
you want to allow the
incoming service to.
Step5 Select TCP for
Protocol Type.
Step6 Enter 5190 next to Private Port and Public Port.
Stsp7 Click Always or congure a schedule.
Step8 Click Apply and then Continue.
How do I set up my router to use iChat? -for Macintosh users-
(continued)

91
Frequently Asked Questions (continued)
How do I send or receive a le via iChat when the Mac OSX rewall is
active? -for Macintosh users- Mac OS X 10.2 and later
“iChat cannot send or receive a le when the Mac OS X rewall is active in its default
state. If you have opened the AIM port, you may be able to receive a le but not send
them.
In its default state, the Mac OS X rewall blocks le transfers using iChat or America
Online AIM software. If either the sender or receiver has turned on the Mac OS X re-
wall, the transfer may be blocked.
The simplest workaround is to temporarily turn off the rewall in the Sharing preference
pane on both computers. This is required for the sender. However, the receiver may
keep the rewall on if the AIM port is open. To open the AIM port:
If you do not want to turn off the rewall at the sending computer, a different le sharing
service may be used instead of iChat. The types of le sharing available in Mac OS X
are outlined in technical document 106461, “Mac OS X: File Sharing” in the AppleCare
Knowledge base online.
Note: If you use a le sharing service when the rewall is turned on, be sure to click
the Firewall tab and select the service you have chosen in the “Allow” list. If you do not
do this, the rewall will also block the le sharing service. “
The following information is from the online Macintosh AppleCare knowledge base:
Step1Choose Apple menu > System Preferences.
Step2 Choose View > Sharing.
Step3 Click the Firewall tab.
Step4 Click New.
Step5 Choose AOL IM from the Port Name pop-up menu. The number
5190 should already be lled in for you.
Step6 Click OK.
92
What is NAT?
NAT stands for Network Address Translator. It is proposed and described in
RFC-1631 and is used for solving the IP Address depletion problem. Basically, each
NAT box has a table consisting of pairs of local IP Addresses and globally unique
addresses, by which the box can “translate” the local IP Addresses to global address
and vice versa. Simply put, it is a method of connecting multiple computers to the
Internet (or any other IP network) using one IP Address.
D-Link´s broadband routers (ie: DI-604) support NAT. With proper conguration,
multiple users can access the Internet using a single account via the NAT device.
For more information on RFC-1631: The IP Network Address Translator (NAT), visit
http://www.faqs.org/rfcs/rfc1631.html
Frequently Asked Questions (continued)
FCC Statement:
Federal Communication Commission Interference Statement
This equipment has been tested and found to comply with the limits for a Class B digital device,
pursuant to Part 15 of the FCC Rules. These limits are designed to provide reasonable protection
against harmful interference in a residential installation. This equipment generates, uses and can
radiate radio frequency energy and, if not installed and used in accordance with the instructions, may
cause harmful interference to radio communications. However, there is no guarantee that interference
will not occur in a particular installation. If this equipment does cause harmful interference to radio or
television reception, which can be determined by turning the equipment off and on, the user is
encouraged to try to correct the interference by one of the following measures:
● Reorient or relocate the receiving antenna.
● Increase the separation between the equipment and receiver.
● Connect the equipment into an outlet on a circuit different from that to which the receiver is
connected.
● Consult the dealer or an experienced radio/TV technician for help.
FCC Caution: Any changes or modifications not expressly approved by the party
responsible for compliance could void the user’s authority to operate this equipment.
This device complies with Part 15 of the FCC Rules. Operation is subject to the following two
conditions: (1) This device may not cause harmful interference, and (2) this device must accept any
interference received, including interference that may cause undesired operation.
For product available in the USA/Canada market, only channel 1~11 can be operated. Selection of
other channels is not possible.
This device and its antenna(s) must not be co-located or operation in conjunction with any other
antenna or transmitter.
IMPORTANT NOTE:
FCC Radiation Exposure Statement:
This equipment complies with FCC radiation exposure limits set forth for an uncontrolled environment.
This equipment should be installed and operated with minimum distance 20cm between the radiator &
your body.