Elhrom EL-SKYPORT Wireless flash triggering system User Manual Universal Receiver
Elinchrom SA Wireless flash triggering system Universal Receiver
Elhrom >
Contents
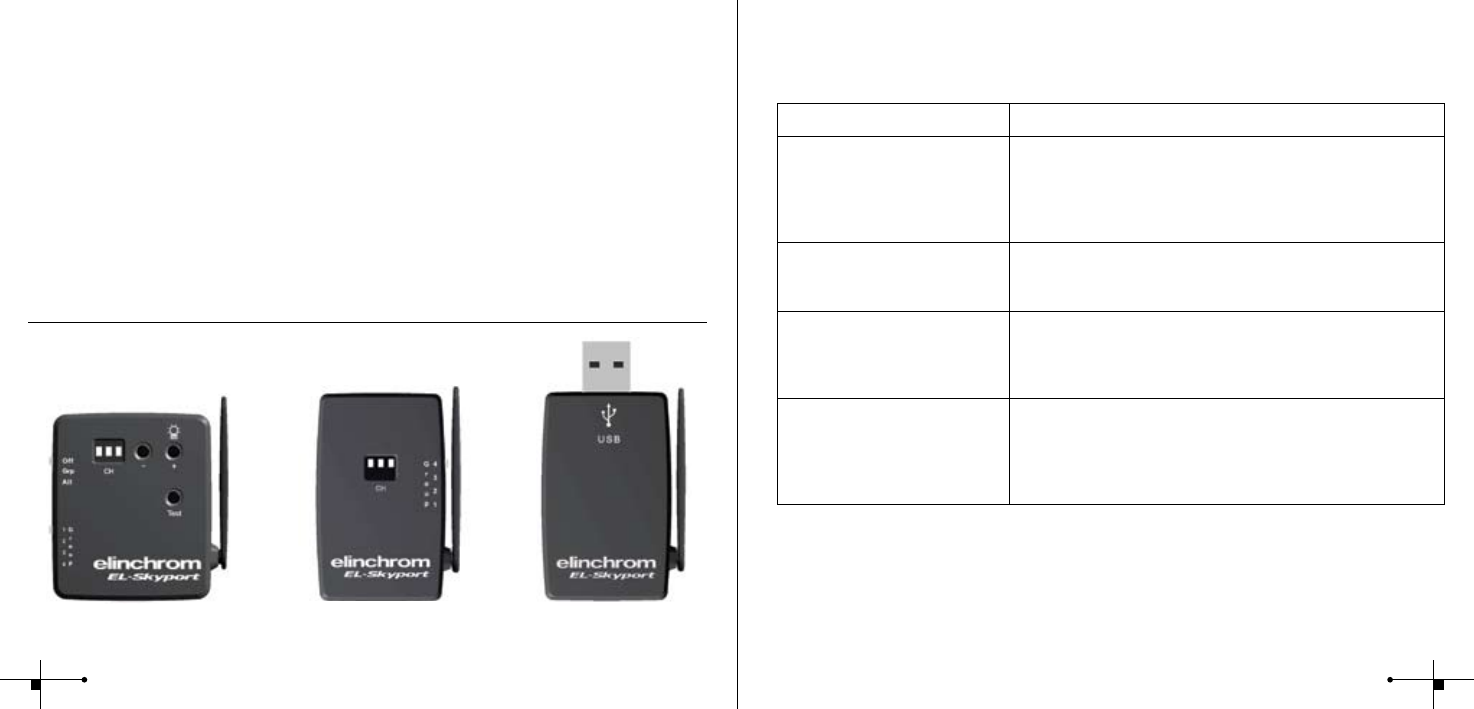
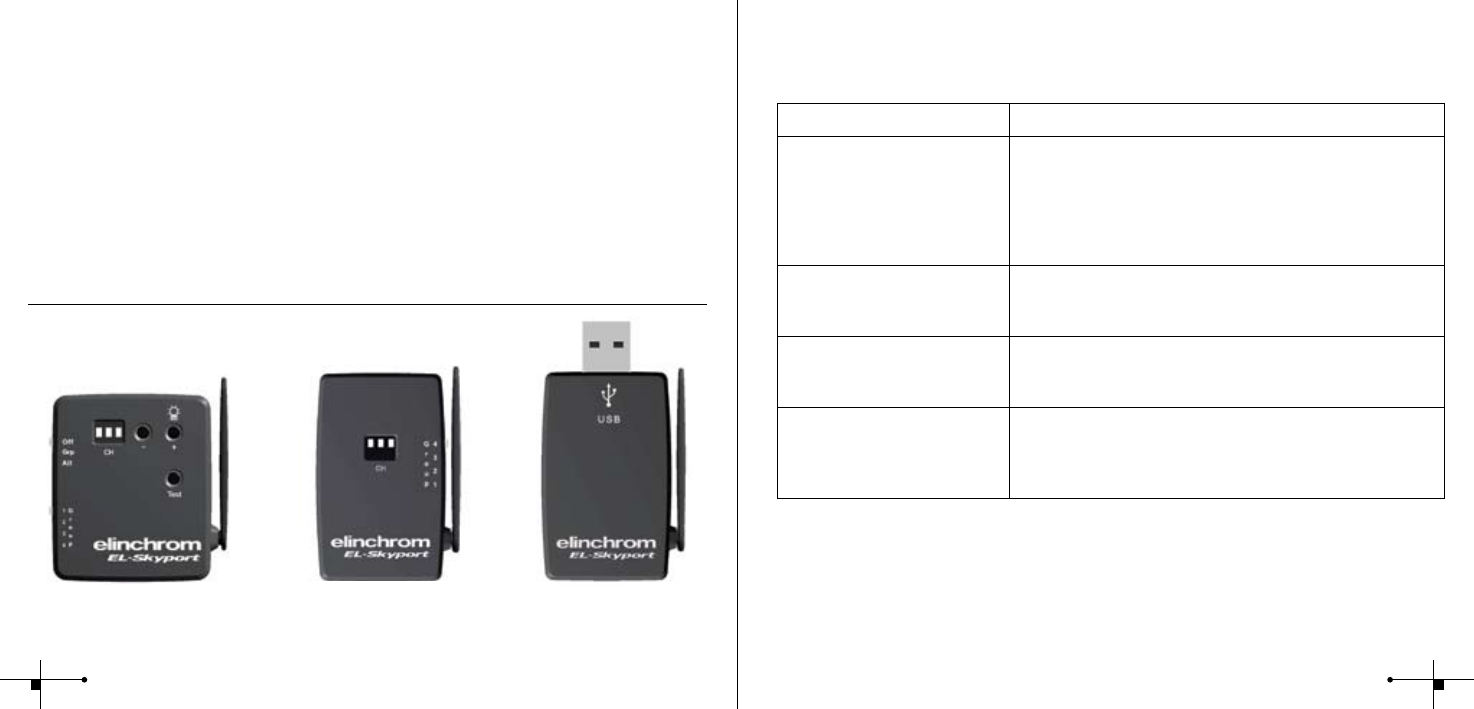
- 1. Universal Receiver
- 2. Transmitter
- 3. Transceiver Rx
- 4. USB Rx
Universal Receiver
Instructions for use
Istruzioni per l’uso
Инструкция по эксплуатации
Instrucciones para el uso
Universal Receiver

EL-Skyport
Universal Receiver
19352
Contents :
Features 2
Battery Charging 3
Operating Instructions 4
Operating Modes 4
Frequency Channel 5
Trigger Group Settings 5
Integrated SYNC Socket 6
Elinchrom RX Features 6
EL-Skyport Modules 7
Troubleshooting 8
CE Statements 8
FCC Compliance and
Advisory Statement 9
Disposal and recycling 9
English
English 1 - 9
Français 10 - 18
Deutsch 19 - 27
Italiano 28 - 36
Русский 37 - 45
Español 46 - 54
Gurantee 55 - 56

Battery Charging
The internal Li-Ion battery is rechargeable. Use only the EL-Skyport Wall-Adapter Charger.
1. Switch OFF the unit for fastest charging time.
2. Connect the EL-Skyport charger to the Universal charge socket and connect to
mains supply
3. When the Status LED is ON, charging is in progress
4. When the Status LED is OFF, the Battery is fully recharged
! CAUTION:
• Use only the original Elinchrom EL-Skyport Wall-Adapter Charger (19355 EU)
to charge the battery
• Do not open the housing to replace the battery
• Switch OFF when the Universal Receiver is not in use to save Battery power. Note:
Stand-By mode does not completely switch off the unit.
Status LED
OFF Universal Receiver
• is switched OFF or
• when Charger is plugged-in, the Battery is fully recharged or
• if switched ON, the unit is in Stand-By mode. (Switch off and on to reawaken)
ON Universal Receiver charges.
Flashing Universal Receiver is in operating mode
EL-Skyport
Universal Receiver
19352
Operating instructions :
2.4 GHz digital wireless
Universal Receiver for ash triggering
Features
EL-Skyport ash trigger is designed with the latest 2.4 GHz Digital Wireless Technology.
• Triggers all ash brands with SYNC socket
• Up to 1/1000s shutter speed
• 4 selectable trigger groups
• 8 frequency channels
• 40 Bit security encryption
• Up to 50 m range indoors
• Up to 120 m range outdoors
• Internal rechargeable Battery lasts up to 30 hours
• Integrated Quick Charger circuit
• 3.5mm SYNC-socket for all common ash units
• Auto-Standby function after 4 hours
You will appreciate the convenience of this professional, and powerful wireless device.
Note:
Shutter speed and distance range is inuenced by reections (from ceilings, walls, oor, furniture and
other equipment) and interference from other 2.4 GHz electronic equipment. For best performance the
Transmitter and Receiver antenna should have direct sight, without any walls or objects in-between.
23

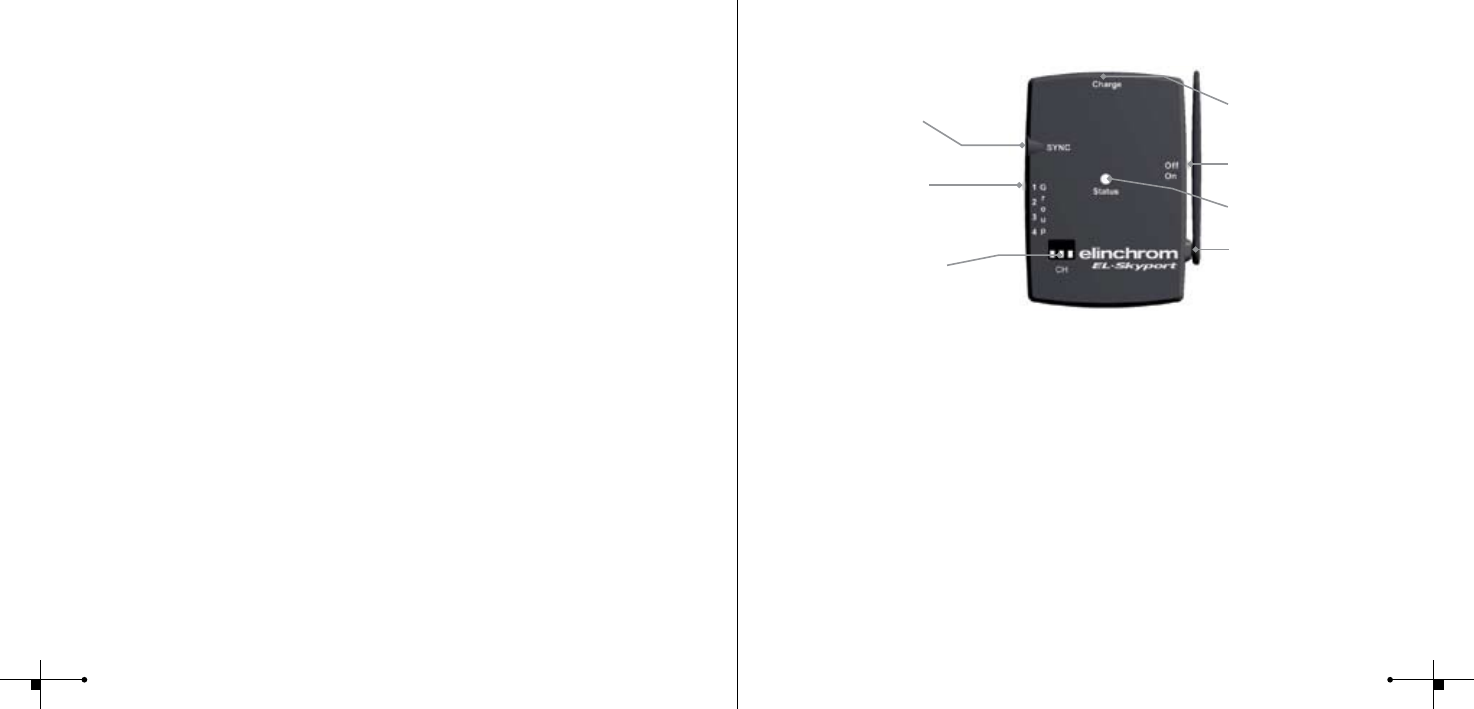
Fig. 1
3.5mm SYNC
socket
Operating Instructions
1. Connect the SYNC cable to the EL-Skyport SYNC socket and the ash unit SYNC socket.
Use included SYNC cable.
2. Check the correct Group and Channel setting for the Transmitter and
Universal Receiver.
3. Switch ON the EL-Skyport Universal Receiver and Transmitter
4. Switch ash unit ON and press “TEST” push button on EL-Skyport Transmitter for a Test
ash.
Operating Modes
1. Battery mode: Charge LED ashes when switched ON. If not used for 4 hours, the unit
will switch to Stand-By Mode (switch Receiver OFF and ON to return to normal mode)
2. Supply mode: With Wall-Adapter Charger plugged in for long term xed operation
Note:
If the EL-Skyport Receiver is used whilst charging (in Supply Mode), the Universal Receiver
will not change to Stand-By mode.
Frequency
channel selector
Flexible swivel
Antenna 360 ̊
Charge socket for
EL-Skyport Wall Charger only
GROUP switch
ON/OFF switch
Status LED (green)
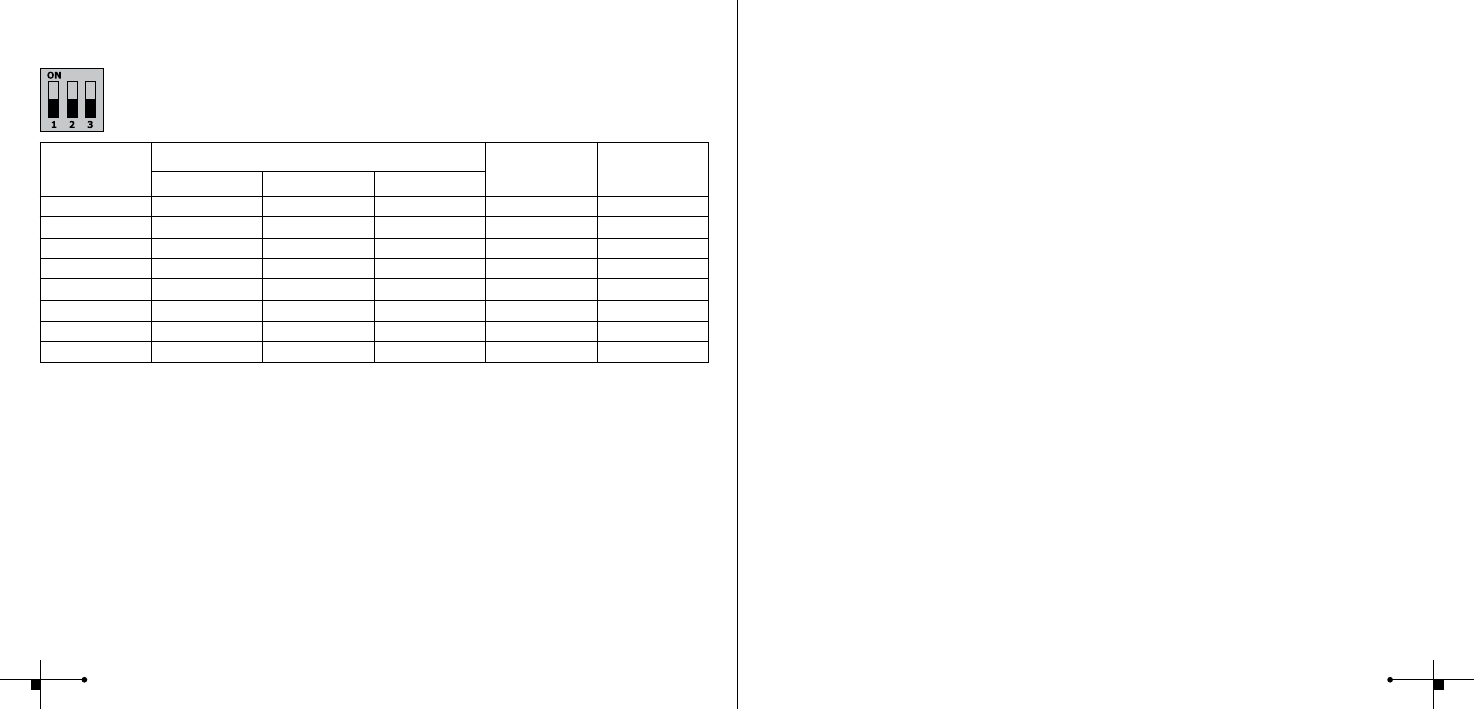
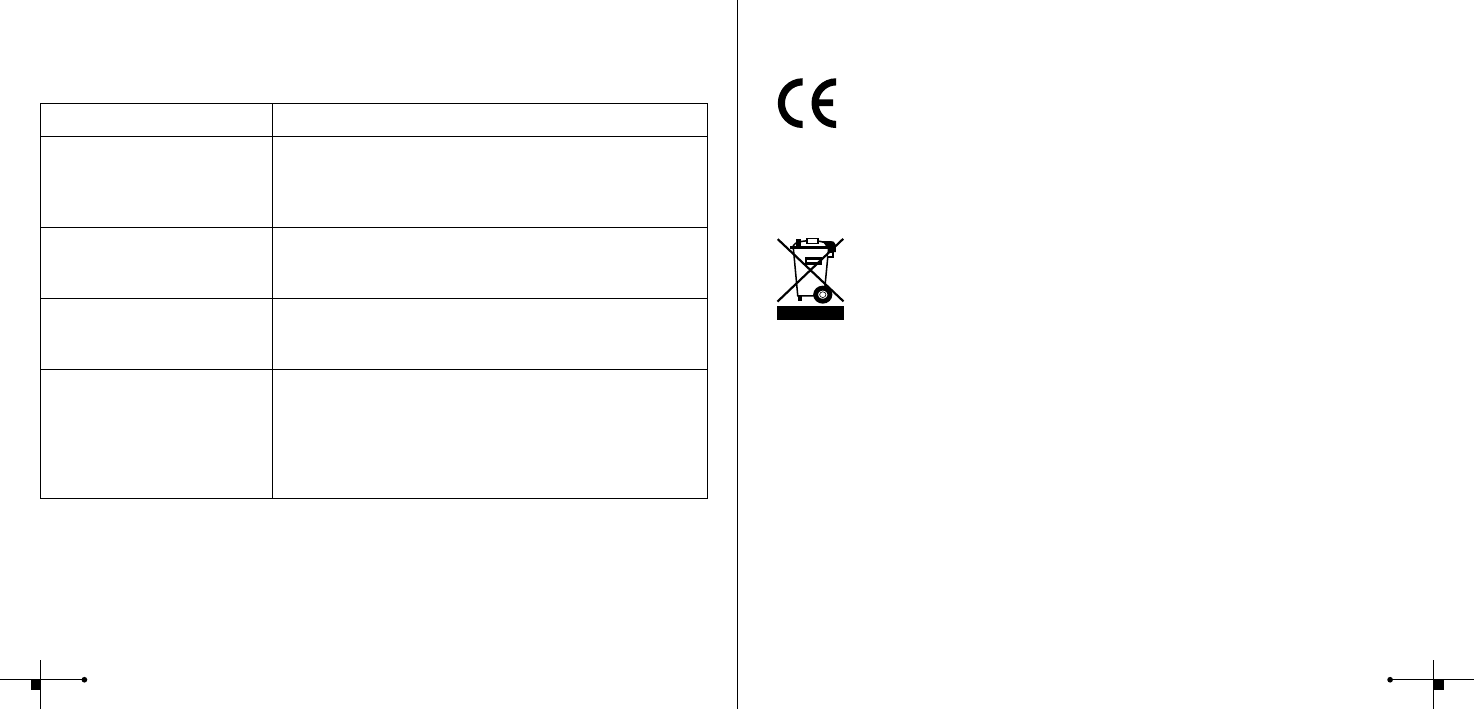
Frequency Channel
Note:
Transmitter and the corresponding RX Transceivers or Universal Receivers must have
the same frequency channel setting !
Frequency
Channel
Slide Button conguration Trigger
Frequency
/ Mhz
Remote
Frequency
/ Mhz
123
1 (default) Off Off Off 2456 2448
2On Off Off 2458 2450
3Off On Off 2460 2452
4On On Off 2462 2454
5Off Off On 2469 2461
6On Off On 2471 2463
7Off On On 2473 2465
8On On On 2475 2467
Note:
After changing the frequency, switch Receiver OFF and ON again to activate the new settings.
Trigger Group Settings
The EL-Skyport Transmitter triggers the Universal Receiver in following modes:
1. Groups(1 to 4) sets and triggers ash units in different “Groups”
è only Flash Units with the selected Group are triggerd by the Transmitter
(Group setting must correspond between Transmitter and Receiver)
2. ALL
Transmitter is set to ALL
è The Transmitter triggers all EL-Skyport Receivers
45
Integrated SYNC Socket
The integrated 3.5mm Mono Jack socket is for direct connection to all ash brands with
max. 50 V SYNC voltage and a max. peak current of 0.5 Amps.
EL-Skyport Features
All EL-RX ash units accept computer operation. Use 19354, 19353 and the EL-Skyport
PC/MAC Software to access EXTRA features:
1. Automatic PnP (Plug and Play) detection. The software automatically adds
connected RX units to the unit list.
2. Flash Stand-By Mode: Activates and deactivates the ash trigger via EL-Skyport
Software
3. Adjustable independent Flash Delay triggering for ash sequencing, between 5
milliseconds and 16 seconds
4. The EL-Skyport software offers many additional features. For further information
please check www.elinchrom.com
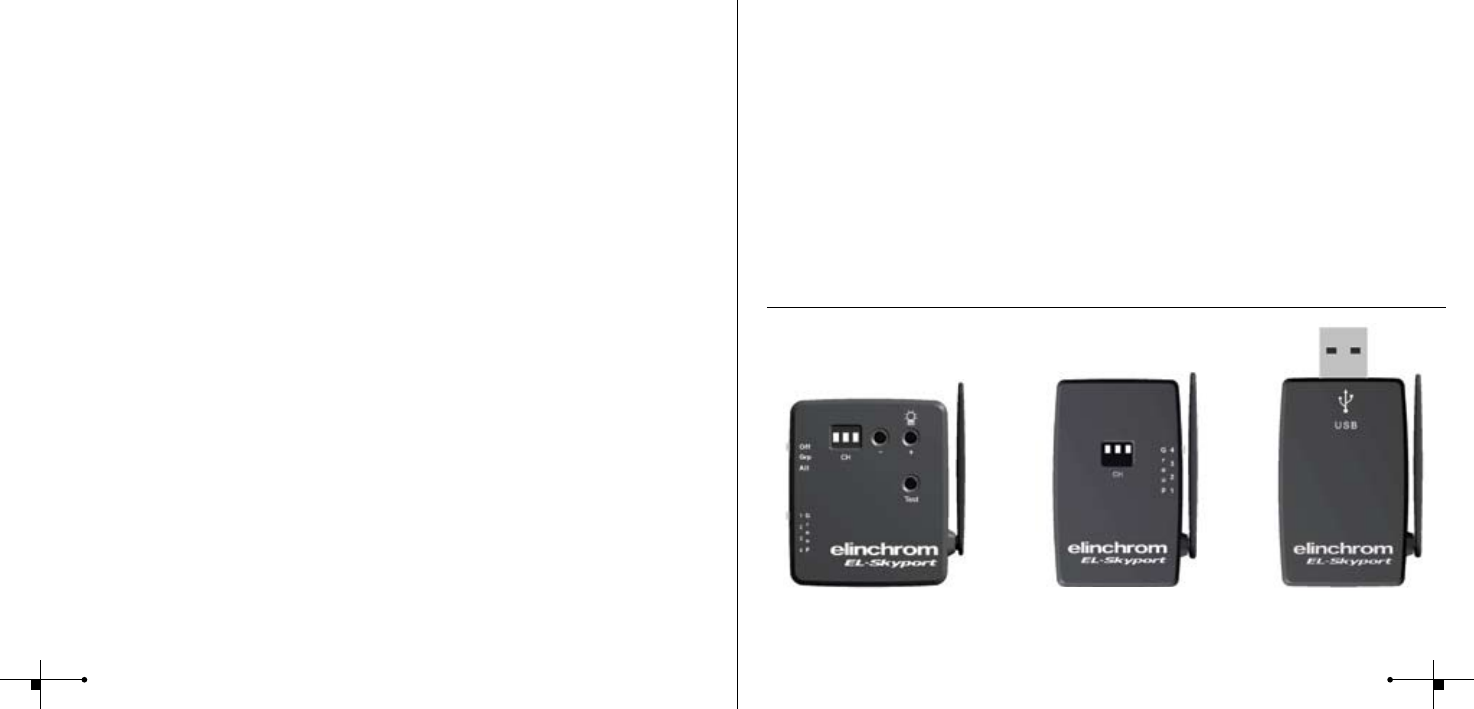
EL-Skyport Modules
EL-Skyport Transmitter 19351
• Universal Transmitter triggers all EL-Skyport Receivers via the Camera Hot-shoe or
SYNC cable!
EL-Skyport Transceiver RX 19353
• The Transceiver is only for Elinchrom RX units. This module operates all RX features
with the EL-Skyport / ERS- software and triggers the ash
EL-Skyport USB RX 19354
• To operate RX ash units via the computer, the USB module, the Transceiver RX and
the EL-Skyport ERS- software is required.
USB RX
19354
Transmitter
19351
Transceiver RX
19353
67
Troubleshooting
Should an error occur, rst check the following points:
Having this problem? Check the following points:
Universal Receiver is not trig-
gered by the Transmitter.
Mode “All” is selected
ØCheck if the Transmitter is switched ON
ØCheck battery polarity
ØCheck if the Receiver module is connected correctly to the unit
ØCheck if the frequency selector switch is set to the same
channel
Some Flash units are not
triggered by the Transmitter
Mode “Grp” is selected
Ø Check if the Channel selector switch is set to the same Group
Ø Reduce distance to any “not working” units
TEST ash works, but the camera
will not trigger Flash unit
ØCheck hot-shoe tting
ØChoose SYNC cable instead of hot-shoe connection
Distance range is too small ØReposition the unit
ØIncrease the distance to walls and ceilings
ØPosition the antenna of Transmitter and Receiver
ØUse an RX extension cable to reduce the distance between
modules
CE Statements
This device has been tested and found to comply with the requirements set
up in the council directive on the approximation of the law of member states
relating to EMC Directive 89/336/EEC, Low Voltage Directive 73/23/EEC and
R&TTE Directive 99/5/EC
FCC Compliance and Advisory Statement
This device complies with Part 15 of the FCC rules. Operation is subject of the following two
conditions: 1. this device may not cause harmful interference, and 2. this device must accept
any interference received, including interferences that may cause undesired operation.
The equipment has been certied to comply with the limits for a Class B computing device
pursuant to Part 15 of the FCC Rules. These limits are designed to provide reasonable pro-
tection against harmful interference in a residential installation. This equipment generates,
uses, and can radiate radio frequency energy and, if not installed or used in accordance with
the instructions, may cause harmful interference to radio communications. However, there
is no guarantee that interference will not occur in a particular installation. If this equipment
does cause harmful interference to radio or television reception, which can be determined
by switching the equipment off and on. The user can try to correct the interference by the
following measures:
1. Reorient or relocate the receiving antenna
2. Increase the separation between the equipment and receiver
3. Connect the equipment to an outlet on a circuit different from that to which the
receiver is connected.
4. Consult the dealer or an experience radio/TV technician for help Changes or modication
not expressly approved by the party responsible for compliance could avoid the user’s
authority to operate the equipment.
Disposal and recycling
This device has been manufactured to the highest possible degree from materials
which can be recycled or disposed of in a manner that is not environmentally
damaging. The device may be taken back after use to be recycled, provided that
it is returned in a condition that is the result of normal use. Any components not
reclaimed will be disposed of in an environmentally acceptable manner.
If you have any question on disposal, please contact your local ofce or your local
ELINCHROM agent (check our website for a list of all ELINCRHOM agents world wide).
89

EL-Skyport
Universal Receiver
19352
Contents :
Caractéristiques 11
Charge de la batterie 12
Mode d’emploi 13
Modes d’utilisation 13
Fréquence du canal radio 14
Modes d’utilisation du
groupe de déclenchement 14
EL-Skyport fonctions
complémentaires 15
EL-Skyport Caractéristiques 15
Modules EL-Skyport 16
Dépannage 17
Déclaration de
conformité CE 18
Mise au rebut et recyclage 18
EL-Skyport
Universal Receiver
19352
Guide de l’utilisateur :
Récepteur de déclenchement pour ash sans l,
basé sur l’utilisation des ondes radio HF, de la bande 2,4GHz.
Caractéristiques
Ce récepteur de déclenchement de ash, utilise la plus récente technologie en matière de
communication radio numérique sans l.
• Déclenche toutes les marques de ashes ayant une prise synchro
• Vitesse d’obturation supérieure au 1/1000s
• 4 groupes de déclenchement sélectionnables
• 8 canaux de fréquence à choix
• Codage de sécurité sur 40 bits
• Portée supérieure à 50m à l’intérieur
• Portée supérieure à 120m à l’extérieur
• Autonomie de la batterie rechargeable, plus de 30 heures
• Circuit de charge rapide intégré
• Prise jack de 3,5mm, pour une liaison avec tous les ashes du commerce
• Mode auto. d’économie après 4 heures d’inactivité
Vous apprécierez la simplicité et la facilité d’utilisation de ce système de communication
professionnel sans l.
Remarque :
La portée de transmission et la vitesse de l’obturateur dépendront de la conguration et de la géographie
des lieux. Les réexions sur le plafond, sur les murs, sur des obstacles comme des meubles, des étagères,
ou des interférences avec d’autres système radio utilisant la même fréquence de communication, peut en
limiter les performances. Vous obtiendrez de ce matériel, un fonctionnement optimal en dirigeant et en
orientant les antennes en regard l’une de l’autre.
11

Charge de la batterie
La batterie interne (Li-Ion) est rechargeable. Utilisez exclusivement l’adaptateur mural de
charge “EL-Skyport”.
1. Éteindre le récepteur pour raccourcir le temps de recharge.
2. Connectez le chargeur “EL-Skyport” à la prise de charge du récepteur et ensuite, branchez
le chargeur sur une prise secteur.
3. Quand la LED d’état (status) et allumée, la batterie se charge.
4. Quand la LED d’état (status) et éteinte, la batterie est entièrement chargée.
ATTENTION:
• Utilisez exclusivement l’adaptateur mural de charge Elinchrom EL-Skyport
(19355 EU)
• N’ouvrez pas le boîtier pour changer la batterie
• Lorsque le récepteur n’est pas utilisé, mettez le sur Off, pour économiser la batterie.
Note: le mode (Stand-By) attente, n’éteint pas complètement le récepteur.
État de la LED du récepteur
Éteinte (OFF) quand:
• le récepteur est sur Off
• le chargeur est branché et que la batterie est complètement chargée, ou si le
récepteur est au repos (stand-by), (éteignez le, et rallumez le pour le réveiller).
Allumée (ON) quand : le récepteur se charge.
Clignote, quand le récepteur est en activité.
Fig. 1
Prise synchro
de 3.5mm
Mode d’emploi
1. Connectez le câble synchro inclus au système, entre ce récepteur et le ash.
Utilisez exclusivement le câble EL.
2. Vériez que les fréquences, du canal de l’émetteur et celle du récepteur universel
19352 soient identiques.
3. Mettre sur ON le récepteur universel 19352 et l’émetteur 19351
4. Allumez le ash et pressez la touche “TEST” de l’émetteur 19351, pour vérier le
bon fonctionnement du système de déclenchement “EL-Skyport”
Modes d’utilisation
1. Mode batterie: la LED clignote lorsque l’interrupteur est sur ON. Après 4 heures
d’inutilisation, le module passe en mode repos (stand-by), éteignez le et rallumez le pour
le réveiller.
2. Mode alimentation: pour une utilisation de longue durée, laissez le chargeur
mural alimenté et branché sur le récepteur universel.
Remarque :
Si le récepteur EL-Skyport est utilisé, alors qu’il est en charge, il ne passera pas en mode
(Stand-By) attente.
Sélecteur d’une des
8 fréquences radio
(choix d’un canal)
Antenne exible
rotative sur 360°
Prise, seulement pour
chargeur mural “EL-Skyport”
Sélecteur de
groupe
Interrupteur de marche/arrêt
“LED” verte, indicatrice de
fonctions
12 13
Fréquence du canal radio
Remarque :
Pour communiquer entre eux, l’émetteur et l’émetteur/récepteur (transceiver) RX ou le
récepteur universel RX, doivent avoir la même fréquence de communication.
Fréquence du
canal
Conguration des intérrupteurs Fréquence
du trigger
(MHz)
Fréquence
Des données
(MHz)
1 2 3
1 (par défaut) Off Off Off 2456 2448
2On Off Off 2458 2450
3Off On Off 2460 2452
4On On Off 2462 2454
5Off Off On 2469 2461
6On Off On 2471 2463
7Off On On 2473 2465
8On On On 2475 2467
Remarque :
Après une modication de numéro de canal, il faut éteindre et réallumer l’émetteur RX (transmitter RX)
pour activer le dernier choix.
Modes d’utilisation du groupe de déclenchement
L’émetteur-récepteur “EL-SKYPORT RX”, peut être déclenché par l’émetteur “EL-SKYPORT”
dans les modes suivants:
1. Les ashes peuvent êtres répartis en 4 groupes (1 à 4)
è Seuls les ashes appartenant au groupe sélectionné seront déclenchés.
2. Position ALL (tous les ashes)
Dans ce mode l’émetteur déclenche tous les groupes.
è Tous les groupes munis d’un récepteur “EL-SKYPORT” seront déclenchés
simultanément par l’émetteur.
Prise de synchronisation
La prise de synchronisation Jack 3.5 mm permet de brancher les marques de ash et sup-
porte une tension maximale de 50 V et un courant de pointe de 0.5 A.
EL-Skyport fonctions complémentaires
Pour accéder à ces fonctions, Il faut: l’émetteur/récepteur USB 19354, un récepteur/émetteur
19353 par ash et le Logiciel “EL-SKYPORT” pour PC et MAC.
1. Automatic PnP (plug and play) detection: le logiciel détecte tous les ashes
actifs, il les identies et active la communication.
2. Mode Stand-By: cette fonction du logiciel autorise l’activation ou la désactivation du
déclenchement des ashes.
3. Flash Delay : retardement réglable du déclenchement (entre 5 millisecondes et
16 secondes), individuel ou séquentiel des ashes.
4. Le logiciel “EL-Skyport” offre aussi d’autres fonctions et informations supplémentaires,
pour les découvrir. Visitez notre site Web : www.elinchrom.com
14 15
Modules EL-Skyport
EL-Skyport émetteur 19351
• Émetteur universel pour le déclenchement depuis le socle ash de l’appareil photo ou
avec un cordon de synchronisation de tous les récepteurs “EL-Skyport”.
EL-Skyport émetteur/récepteur RX (19353)
• Module de déclenchement et de communication, il est destiné uniquement aux ashes
RX. Ce module, supporte toutes les fonctionnalités avancées du système de
communication EL-Skyport avec un ordinateur PC ou Mac.
EL-Skyport USB RX 19354
• Ce module est indispensable pour communiquer et piloter les ashes RX depuis un
ordinateur, il est à utiliser conjointement avec le logiciel “ERS-Software” et
l’émetteur/récepteur (transceiver) 19353.
Dépannage
En cas de problèmes, vériez les points suivants:
Problème? Vériez les points suivants:
Le récepteur universel n’est pas
déclenché par l’émetteur.
Le mode “ALL” (tous)
est sélectionné.
ØVériez que l’émetteur est sur ON (actif).
ØQue de la pile de l’émetteur est mise dans le bon sens,
le – en haut.
ØQue le récepteur est correctement branché.
ØQue les fréquences utilisées sont identiques.
Certains ashes ne sont pas
déclenchés par le émetteur.
Le mode “Grp” est sélectionné.
Ø Qu’ils aient le même N° de groupe (1-4).
Ø Rapprochez les ashes qui ne déclenchent pas.
Le ash fonctionne avec
(Test), mais l’appareil photo ne
déclenche pas le ash.
ØVériez que l’émetteur est correctement xé sur la glissière
ash de l’appareil photo.
ØQue le cordon synchro est correctement enché sur le socle
pour ash.
La distance est insufsante.
Le système ne fonctionne pas
correctement.
ØÉloignez le ou les ashes de l’émetteur.
ØEloignez-vous des murs.
ØRéorientez les antennes de l’émetteur et du récepteur.
ØEmployez un câble prolongateur RX pour réduire la
distance entre des modules.
USB RX
19354
Transmitter
19351
Transceiver RX
19353
16 17
Déclaration de conformité CE
Cet équipement a été testé et déclaré conforme aux directives européennes
ci-après : EMC Directive 89/336/EEC, basse tension Directive 73/23/EEC et
R&TTE Directive 99/5/EC.
Mise au rebut et recyclage
Ce symbole, apposé sur ce produit ou sur son emballage, indique que si un
jour ce produit devait être éliminé, il ne devrait pas être traité avec les déchets
ménagers. Il devrait être remis à un point de collecte approprié pour le recy-
clage des équipements électroniques. En respectant ces conseils vous aiderez à
prévenir les conséquences potentiellement négatives pour l’environnement et la santé humaine.
Le recyclage des matériaux aidera à préserver les ressources naturelles. Pour toute information
supplémentaire vous pouvez contacter la déchetterie ou l’agent Elinchrom du pays. La liste des
agents, est disponible sur notre site: www.elinchrom.com
EL-Skyport
Universal Receiver
19352
Inhaltsverzeichnis :
Funktionen 20
Batterieladung 21
Betriebsanleitung 22
Betriebsarten 22
Frequenzkanäle 23
Auslösegruppen 23
Integrierter Synchronanschluss 24
EL-Skyport Funktionen 24
EL-Skyport Module 25
Fehlerbehandlung 26
CE-Kennzeichnung 27
Entsorgung und Recycling 27
Deutsch
18

EL-Skyport
Universal Receiver
19352
Betriebsanleitung :
2.4 GHz Digital Wireless
Universal Receiver zur Blitzauslösung
Funktionen
EL-Skyport Flash Trigger ist mit der neuesten 2.4 GHz
DigitalWireless Technologie ausgestattet.
• Für alle Blitzgeräte mit Synchronanschluss
• Verschlusszeit bis zu to 1/1000 s.
• 4 selektierbare Auslösegruppen
• 8 Frequenzkanäle
• 40 Bit Sicherheitsverschlüsselung
• Bis zu 50 m Reichweite im geschl. Raum
• Bis zu 120 m Reichweite im Freien
• Bis 30 Stunden Betriebszeit für integrierten Akku
• Mit integrierter Schnellladung
• 3,5mm Synchronanschluss
• Stand-By Funktion nach 4 Stunden
Testen Sie die professionellen und leistungsstarken Funktionen von EL-Skyport System.
Anmerkung:
Auslösezeit und Reichweite werden durch Reektionen (Decken, Wände, Einrichtung und Equipment) und
Interferenzen durch andere 2.4GHz Systeme beeinusst. Für optimale Funktion, sollten sich zwischen
Sender und Empfänger keine Objekte benden und eine direkte Sicht zwischen den Modulen erhöht die
Reichweite und Zuverlässigkeit.
Batterieladung
Der integrierte Li-Ionen Akkus ist wiederauadbar. Verwenden Sie nur das Original
Elinchrom Ladegerät.
1. Schalten Sie das Gerät AUS (OFF).
2. Schliessen Sie das EL-Skyport Ladegrät am Universal Receiver an bevor Sie es in die
Steckdose stecken.
3. Wenn die Status LED leuchtet, ist die Ladung aktiv.
4. Wenn die Status LED aus ist, ist die Ladung beendet.
! ACHTUNG:
• Benutzen Sie immer nur das original Elinchrom EL-Skyport Wall-Adapter
Ladegerät (19355 EU) für die Batterieladung
• Wechseln Sie niemals die Batterie
• Schalten Sie das Gerät immer AUS (OFF) wenn es nicht benötigt wird. Dies erhöht
die Batterielebensdauer l Achtung: Die Stand-By Funktion schaltet das Gerät nicht
vollständig aus!
Status LED
AUS Universal Receiver
• ist ausgeschaltet (OFF)
• wenn das Ladegerät angeschlossen ist, ist die Batterie voll aufgeladen oder
• wenn das Gerät Eingeschaltet ist, bendet sich das Gerät im
Stand-By Betrieb. (Sie müssen das Gerät Aus- und wieder Einschalten, um in
den Normalen Betrieb zu wechseln).
AN Batterie wird geladen.
BLINKT Universal Receiver ist betriebsbereit.
20 21

Bild. 1
3.5mm SYNC
Anschluss
Betriebsanleitung
1. Verbinden Sie das Synchronkabel mit dem Synchronanschluss des Blitzgerätes. Benutzen
Sie dafür das beigelegte Synchronadapterkabel.
2. Prüfen Sie die korrekte Gruppen- und Frequenzkanaleinstellung am Transmitter und am
Universal Receiver.
3. Schalten Sie den EL-Skyport Universal Receiver und Transmitter EIN
4. Schalten Sie nun das Blitzgerät EIN und drücken den “TEST”- Knopf am EL-Skyport
Transmitter um einen Testblitz auszulösen.
Betriebsarten
1. Batteriebetrieb: Die Status LED blinkt im Normalbetrieb. Nach ca. 4 Stunden un
benutzten Betrieb schaltet das Gerät in Stand-By (schalten Sie den Receiver AUS
und wieder AN um in den Normalbetrieb zu wechseln)
2. Netzbetrieb: Für Netzbetrieb sollte das Ladegerät verwendet werden, um die
Laufzeit zu erhöhen.
Achtung:
Wird der Receiver bei gleichzeitiger Batterieladung betrieben (Netzbetrieb), schaltet der
Receiver nicht in Stand-By.
Frequenzkanal-
schalter
Flexible
Antenne 360°
Ladebuchse (nur für
EL- Skyport Ladegerät)
Gruppen-
schalter
ON/OFF switch
Status LED (grün)
Frequenzkanäle
Anmerkung:
Transmitter und die korrespondierenden RX Transceiver oder Universal Empfänger
müssen die gleichen Frequenzeinstellungen haben!
Frequenz-
kanalchannel
Schiebeschalter-konguration Trigger
Frequency
/ Mhz
Remote
Frequency
/ Mhz
123
1 (default) Off Off Off 2456 2448
2On Off Off 2458 2450
3Off On Off 2460 2452
4On On Off 2462 2454
5Off Off On 2469 2461
6On Off On 2471 2463
7Off On On 2473 2465
8On On On 2475 2467
Anmerkung:
Die Frequenzeinstellung wird erst nach erneutem Einschalten aktiviert.
Auslösegruppen
Der EL-Skyport Transceiver kann in folgende Auslöse Betriebsarten konguriert werden
1. Gruppen (1 to 4) ermöglicht eine gruppenorientierte Auslösung von RX Geräten
è Nur Geräte der gleichen Gruppe werden getriggert
2. ALL
Transmitter in Stellung ALL
è Alle EL-Skyport Receiver Gruppen werden getriggert
22 23
Integrierter Synchronanschluss
Die integrierte 3.5 mm Synchronbuchse kann mit allen Handelsüblichen Blitzgeräten mit einer
Synchronspannung von max. 50 V Spannung und einen Spitzenstrom von max. 0.5 Ampere.
EL-Skyport Funktionen
Alle EL-RX Geräte können per Computer fernbedient werden. Benutzen Sie 19354 mit 19353
und die EL-Skyport PC/MAC Software um folgende EXTRA Funktionen zu erhalten:
1. PnP (Plug and Play) Geräteerkennung ermöglicht die automatische Erkennung
von RX Geräten ohne manuelle Adressierung
2. Blitz Stand-By Funktion: Aktivierung bzw. Deaktivierung der Blitzauslösung
durch EL-Skyport Software
3. Unabhängige Blitzverzögerung für Sequenzielle Blitzauslösung (zwischen 5
Millisekunden und 16 Sekunden)
4. Speichern und Öffnen aller RX Geräte und Universal Receiver Einstellungen.
5. Blitzzähler
6. Die EL-Skyport Software ermöglicht zusätzliche Funktionen und Geräteinformationen. Mehr
unter www.elinchrom.com
EL-Skyport Modules
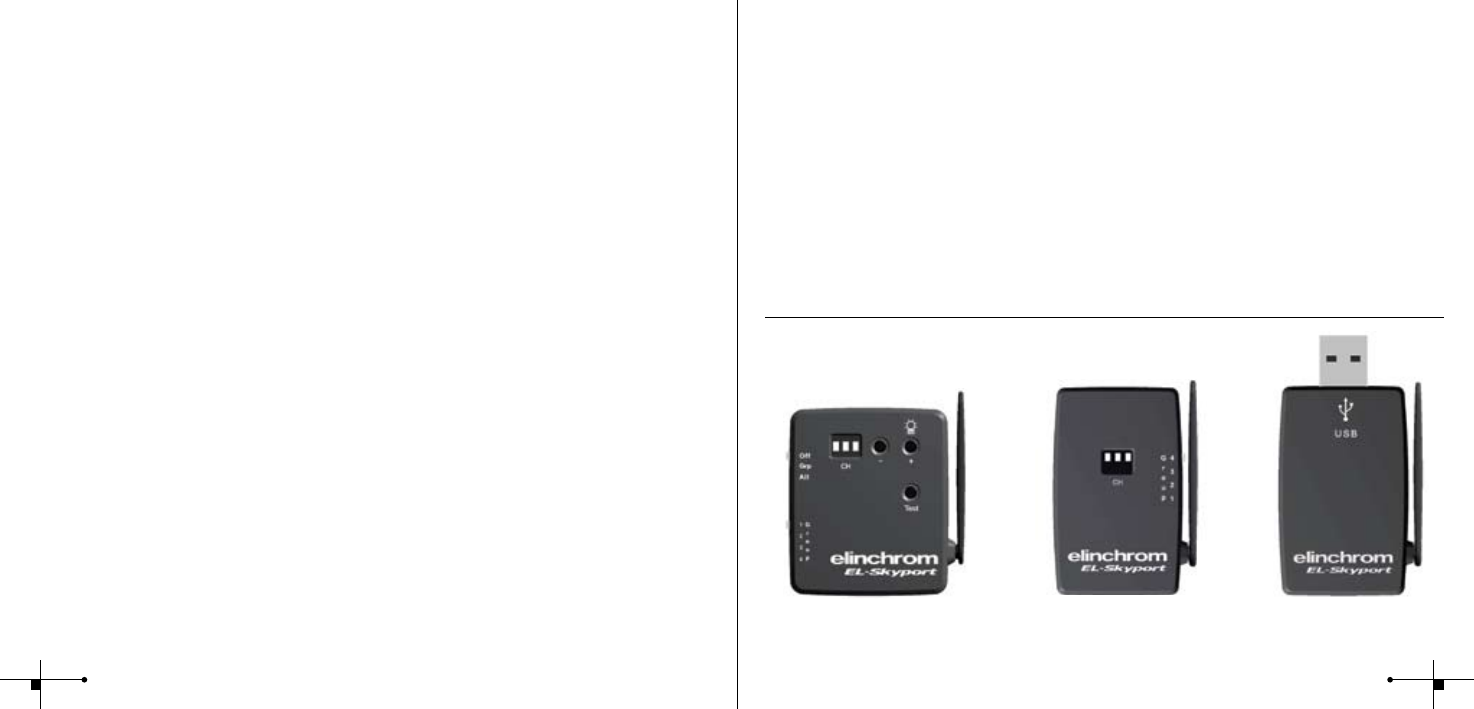
EL-Skyport Transmitter 19351
• Transmitter zur drahtlosen Blitzauslösung aller EL-Skyport Receivers und Transceivers
durch die Kamera via Hot-shoe oder Sychronkabel!
EL-Skyport Transceiver RX 19353
• Dieser Transceiver ist nur für Elinchrom RX Geräte. Alle Einstellungen können mit
der EL-Skyport/ ERS- Software fernbedient werden. Zusätzlich kann mit dem
Transmitter (Sender) der Blitz ausgelöst werden
EL-Skyport USB RX 19354
• Erlaubt die Fernbedienung aller Elinchrom RX Geräte per Computer in Verbindung mit
Transceiver RX Module.
USB RX
19354
Transmitter
19351
Transceiver RX
19353
24 25
Fehlerbehandlung
Prüfen Sie beim Auftreten von Problem folgende Punkte:
Haben Sie dieses Problem? Bitte prüfen Sie genannte Punkte:
Keine Blitzauslösung aller Geräte
durch den Transmitter
Mode “All” ist selektiert
ØIst der Transmitter eingeschaltet
ØPolarität der Batterie prüfen
ØKorrekten Anschluss des Empfängers prüfen
ØKorrekte Frequenzkanaleinstellung prüfen
ØKorrekte Gruppenkanaleinstellung prüfen
Einige Blitzgeräte werden nicht
ausgelöst
Mode “Grp” ist selektiert
Ø Abstand verringern
Ø Hot-shoe Verbindung prüfen
TEST Auslösung geht, aber keine
Auslösung durch die Kamera
ØVerwenden Sie ein SYNC Kabel anstelle der Hot-shoe
Verbindung
Reichweite zu gering ØBlitzlichtgerät anders positionieren
ØGrößerer Abstand zu Wänden und Decke
ØAusrichtung der Antenne von Transmitter und
Receiver/Transceiver ändern
ØBenutzen Sie ein RX Verlängerungskabel um die Distanz
zu verringern
CE-Kennzeichnung
Dieses Gerät erfüllt in der ausgelieferten Ausführung die Anforderungen der EG
Richtlinie 89/336/EWG „Elektromagnetische Verträglichkeit“ und 73/23/EWG
“Niederspannungsrichtlinie” und die Richtlinie nach R&TTE 99/5/EC
Entsorgung und Recycling
Dieses Gerät wurde weitestgehend aus Materialien hergestellt, die umweltscho-
nend entsorgt und einem fachgerechten Recycling zugeführt werden können.
Nach seinem Gebrauch wird das Gerät zurückgenommen, um es einer Wiederver-
wertung bzw. wertstofichen Verwertung zuzuführen, soweit es in bestimmungs-
gemäßen Gebrauch entspricht. Nicht verwertbare Geräteteile werden sachgemäß
entsorgt. Bei Fragen zur Entsorgung wenden Sie sich bitte and Ihre Verkaufsstelle. Eine Liste
aller Verkaufsstellen in Ihrer Nähe nden Sie auf unserer Homepage www.elinchrom.com.
26 27

EL-Skyport
Universal Receiver
19352
Indice :
Caratteristiche 29
Carica della batteria 30
Istruzioni di funzionamento 31
Modalità di funzionamento 31
Canale di frequenza 32
Impostazioni gruppo di innesco 32
Presa integrata sincro 33
Caratteristiche EL-Skyport 33
Moduli EL-Skyport 34
Soluzione guasti 35
Dichiarazioni CE 36
Smaltimento e riciclo 36
Italiano
EL-Skyport
Universal Receiver
19352
Istruzioni di funzionamento :
Ricevitore universale per innesco ash con
tecnologia digitale senza li a 2.4 GHz
Caratteristiche
Il dispositivo di innesco ash EL-Skyport è progettato con la più recente tecnologia
digitale senza li a 2.4 GHz.
• Fa scattare tutte le marche di ash con presa sincro
• Tempo di otturazione no a 1/1000s
• 4 selectable trigger groups
• 8 canali di frequenza
• Criptaggio di sicurezza da 40 Bit
• Campo di applicazione no a 50 m in interno
• Campo di applicazione no a 120 m in esterno
• Batteria interna ricaricabile con durata no a 30 ore
• Circuito integrato caricabatteria rapido
• Presa sincro da 3,5mm per tutti i tipi di ash comuni
• Funzione di pausa automatica dopo 4 ore
Apprezzerete la praticità di questo apparecchio senza li professionale ed efcace.
Nota:
La gamma di tempi di otturazione e di distanze è inuenzata dal riesso (da softti, pareti, pavimento,
mobili e altre apparecchiature) e dall’interferenza di altre apparecchiature elettroniche da 2.4 GHz. Per
ottenere le prestazioni migliori le antenne di trasmettitore e ricevitore dovrebbero avere percezione diretta
senza pareti od oggetti frapposti fra loro.
29

Carica della batteria
La batteria interna litio-ione è ricaricabile. Utilizzare soltanto il carica-batteria con adattatore
per prese a muro EL-Skyport
1. SPEGNERE l’unità per un tempo di carica più veloce.
2. Collegare il caricatore EL-Skyport alla presa di carica universale e connettere alla rete
elettrica
3. Quando il LED di stato è acceso l’apparecchio si sta caricando
4. Quando il LED di stato è spento la batteria si è ricaricata completamente
! ATTENZIONE:
• Usare solo il carica batteria originale Elinchrom EL-Skyport
• con adattatore per prese a muro (19355 EU) per caricare la batteria
• Non aprire la custodia per sostituire la batteria quando il ricevitore universale non è
in uso:
per risparmiare la carica della batteria. Nota: la modalità di attesa non spegne
completamente l’unità.
LED di stato
SPENTO il ricevitore universale
• è SPENTO o
• quando il carica-batteria è inserito, la batteria è ricaricata completamente o
• se è acceso l’unità è in modalità di attesa. (Spegnere e riaccendere per rimet
terla in funzionamento)
ACCESO il ricevitore universale è in carica.
ON Universal Receiver charges.
Flashing Universal Receiver is in operating mode
Fig. 1
Presa sincro
da 3.5mm
Istruzioni di funzionamento
1. Collegare il cavo sincro con la presa sincro EL-Skyport e con la presa sincro sul ash.
Usare il cavo sincro incluso.
2. Controllare il gruppo corretto e le impostazioni di canale per il trasmettitore e il
ricevitore universale.
3. ACCENDERE il ricevitore universale e il trasmettitore EL-Skyport
4. Accendere il ash e premere il pulsante “PROVA” sul trasmettitore EL-Skyport per fare
una prova di scatto ash.
Modalità di funzionamento
1. a batteria: il LED di carica lampeggia quando è ACCESO. Se non viene usato per 4 ore
l’apparecchio passerà in modalità di attesa (spegnere e riaccendere il ricevitore per tornare
alla modalità normale)
2. a corrente: con il caricatore con adattatore per prese a muro inserito per un lungo tempo
di funzionamento sso
Nota:
Se il ricevitore EL-Skyport viene usato mentre è sotto carica (nella modalità “a corrente”), il
ricevitore universale non entrerà in modalità di attesa.
Selettore canale
di frequenza
Antenna essibile
ruotabile di 360°
Presa di caricamento unicamente
per caricatore da muro
EL Skyport
Interruttore
di gruppo
InterruttoreON/OFF
LED di stato (green)
30 31

Canale di frequenza
Nota:
Il trasmettitore e i corrispondenti Transceiver o i Ricevitori Universali RX devono avere
le stesse impostazioni per il canale di frequenza!
Canale di fre-
quenza
Congurazione pulsante scorrimento Frequenza
innesco
/ Mhz
Frequenza
remota
/ Mhz
1 2 3
1 (predenito) Off Off Off 2456 2448
2On Off Off 2458 2450
3Off On Off 2460 2452
4On On Off 2462 2454
5Off Off On 2469 2461
6On Off On 2471 2463
7Off On On 2473 2465
8On On On 2475 2467
Nota:
Dopo aver variato la frequenza, spegnere e riaccendere il ricevitore per attivare le nuove impostazioni.
Impostazioni gruppo di innesco
Il trasmettitore EL-Skyport aziona il ricevitore universale nei seguenti modi:
1. Gruppi (da 1 a 4) imposta ed innesca i ash in “Gruppi” diversi
è soltanto dei ash con gruppo selezionato sono innescati dal trasmettitore (le impostazio
ni di “Gruppo” devono corrispondere per Trasmettitore e Ricevitore)
2. TUTTI
Il trasmettitore è impostato su TUTTI
è The Transmitter triggers all EL-Skyport i ricevitori
Presa integrata sincro
La spina a jack mono da 3,5 mm integrata è per il collegamento diretto a tutte le marche di
ash, con un voltaggio sincro massimo di 50 V e una corrente di picco massima di 0.5 Ampère.
Caratteristiche EL-Skyport
Tutti i ash EL-RX possono essere fatti funzionare tramite computer. Usare gli apparecchi
19354, 19353 e il software EL-Skyport PC/MAC per aver accesso alle caratteristiche EXTRA:
1. Rilevamento automatico PnP (Plug and Play): Il software aggiunge automaticamente
all’elenco unità le unità RX connesse.
2. Modalità ash in attesa: attiva e disattiva l’innesco ash attraverso il software EL-Skyport
3. Innesco in ritardo del ash regolabile indipendente per creare delle sequenze
(tra 5 millesimi di secondo e 16 secondi)
4. Il software EL-Skyport offre molte caratteristiche ulteriori. Per maggiori informazioni si
prega di consultare il sito www.elinchrom.com
32 33
Moduli EL-Skyport
Trasmettitore EL-Skyport 19351
• Trasmettitore universale, aziona tutti i ricevitori EL-Skyport attraverso il contatto caldo o
il cavo sincro dell’apparecchio fotograco!
Transceiver EL-Skyport RX 19353
• Il transceiver funziona solo con unità Elinchrom RX. Questo modulo rende operative
tutte le caratteristiche RX ed innesca il ash con il software EL-Skyport/ ERS
EL-Skyport USB RX 19354
• Per far funzionare i ash RX mediante computer, sono necessari il modulo USB,
il transceiver RX e il software EL-Skyport /ERS
Soluzione guasti
Se si dovesse vericare un errore, dapprima controllare i punti seguenti:
C’è questo problema? Controllare i punti seguenti:
Il ricevitore universale non viene
innescato dal trasmettitore. C’è
selezionata la modalità “Tutti”.
ØControllare se il trasmettitore è acceso
ØControllare la polarità della batteria
ØControllare se il modulo del ricevitore è collegato
correttamente con l’unità
ØControllare se il selettore di frequenza è impostato sullo
stesso canale
Taluni ash non sono innescati
dal trasmettitore C’è selezionata
la modalità “Gruppi”
Ø Controllare se il selettore di canale è impostato sullo
stesso gruppo
Ø Ridurre la distanza con le unità “non in funzionamento”
Il ash di prova funziona ma la
macchina fotograca non lo fa
scattare
ØControllare il caricamento del contatto caldo
ØScegliere il cavo sincro invece del contatto caldo
La distanza è troppo ridotta ØRiposizionare il ash
ØAumentare la distanza da pareti e softti
ØRiposizionare le antenne di trasmettitore e ricevitore
ØUsare una prolunga RX per ridurre la distanza tra i moduli
USB RX
19354
Transmitter
19351
Transceiver RX
19353
34 35
Dichiarazioni CE
Questa apparecchiatura è stata testata e rinvenuta conforme alle richieste
espresse nella direttiva conciliare sulla assimilazione nel diritto degli stati membri
della direttiva CEE n. 89/336 sulla compatibilità elettromagnetica,
della direttiva CEE n. 73/23 sul basso voltaggio e della direttiva CEE n. 99/5 sulle
apparecchiature per terminali radio televisivi.
Smaltimento e riciclo
Questo apparecchio è stato prodotto in massimo grado con materiali che possono
essere riciclati o di cui si possa disporre in modo non dannoso per l’ambiente.
L’apparecchio può essere ritirato dopo l’uso per essere riciclato se viene restituito
in una condizione che sia il risultato del normale utilizzo.
Di tutti i componenti non recuperati si farà un uso accettabile per l’ambiente.
Per qualsiasi domanda sullo smaltimento si prega di contattare la sede locale o l’agente
ELINCHROM della propria località di residenza (controllare il nostro sito web per l’elenco di tutti
gli agenti ELINCRHOM nel mondo).
EL-Skyport
Универсальный приемник
19352
Возможности 38
Зарядка аккумулятора 39
Инструкция по эксплуатации 40
Режимы работы 40
Частотный канал 41
Настройки групп срабатывания 41
Встроенный разъем SYNC 42
Возможности EL-Skyport 42
Модули EL-Skyport 43
Возможные неисправности 44
Заявление CE 45
Утилизация и переработка 45
Русский
:
36

EL-Skyport
Универсальный приемник
19352
Инструкция по эксплуатации :
Цифровой беспроводной универсальный приемник
светосинхронизатора с рабочей частотой 2,4 ГГц
Возможности
Светосинхронизатор EL-Skyport разработан по новейшей цифровой беспроводной
технологии 2,4 ГГц.
• Приводит в действие все модели вспышек с разъемом SYNC
• Выдержка до 1/1000 с
• 4 выбираемых группы срабатывания
• 8 частотных каналов
• 40-битное кодирование
• Радиус действия в помещении до 50 м
• Радиус действия на открытом пространстве до 120 м
• Внутренний аккумулятор работает до 30 часов
• Встроенная быстродействующая зарядная цепь
• 3,5-миллиметровый разъем SYNC для всех распространенных вспышек
• Автоматическое срабатывание функции ожидания через 4 часа
Вы обязательно оцените все удобства использования этого профессионального и
мощного беспроводного устройства.
Примечания:
На выдержку и радиус действия оказывают влияние отражения (от потолков, стен, пола, мебели и
др.) и воздействия других устройств, работающих на частоте 2,4 ГГц.
Для лучшего результата антенны передатчика и приемника должны находиться в прямой
видимости без препятствий в виде стен или каких-либо объектов.
Зарядка аккумулятора
Встроенный литий-ионный аккумулятор перезаряжается. Используйте только зарядное
устройство EL-Skyport.
1. Для быстрейшей зарядки выключите прибор.
2. Подключите зарядное устройство EL-Skyport к универсальному разъему и сети
питания
3. При включенном индикаторе состояния происходит зарядка
4. Выключенный индикатор состояния означает полную зарядку аккумулятора
! ВНИМАНИЕ :
• Используйте только оригинальное зарядное устройство (19355 EU)
для зарядки аккумулятора
• Не вскрывайте корпус для замены аккумулятора
• Если универсальный приемник не используется, выключайте его для экономии
энергии аккумулятора. Примечание: Режим ожидания не отключает прибор
полностью.
Индикатор состояния
ВЫКЛ Универсальный приемник
• выключен, или
• если зарядное устройство включено, аккумулятор полностью заряжен
• если включен, прибор находится в режиме ожидания.
(Включите и выключите его)
ВКЛ Универсальный приемник заряжается.
Мигает Универсальный приемник в рабочем режиме
38 39
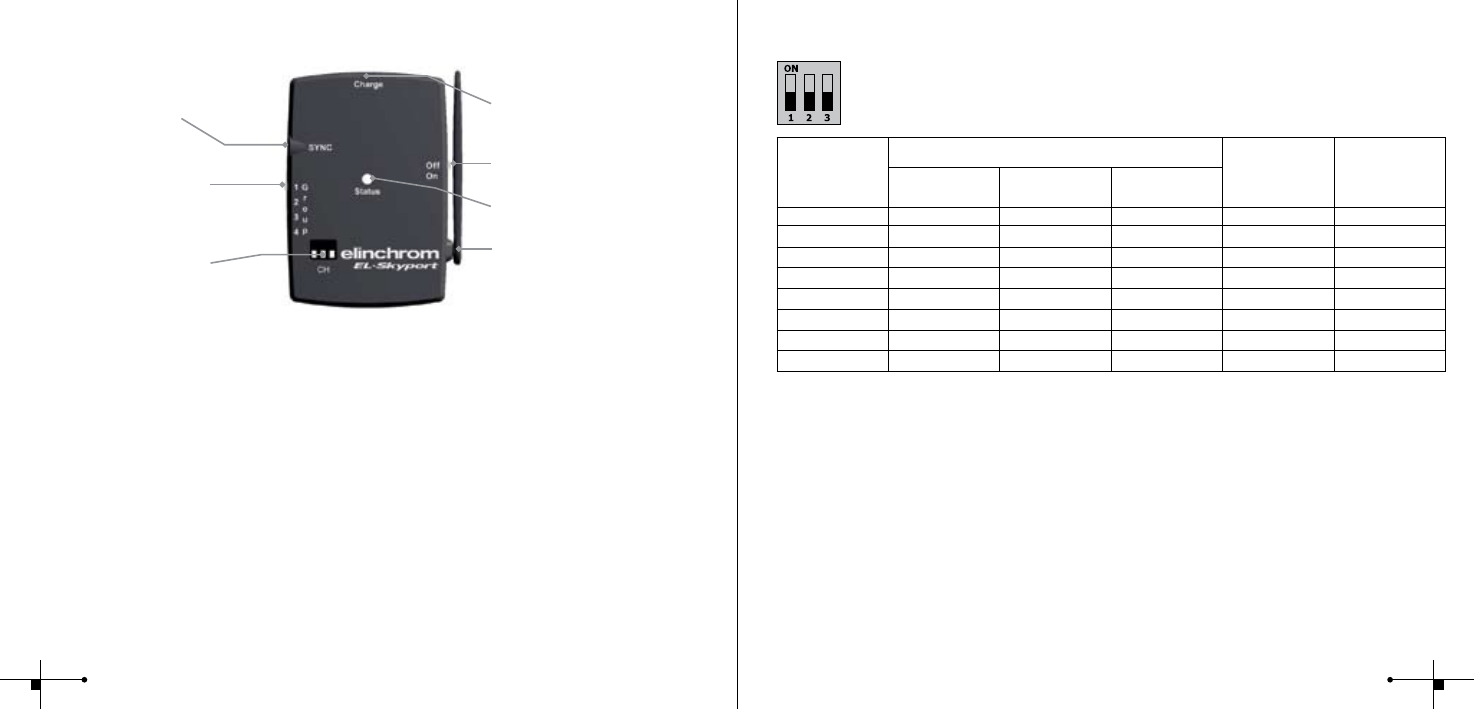
Рис. 1
Разъем SYNC,
3,5-мм
Инструкция по эксплуатации
1. Подключите кабель SYNC к разъему SYNC EL-Skyport и такому же разъему
вспышки. Используйте прилагающийся кабель SYNC.
2. Проверьте правильность настройки группы и каналов для передатчика и
универсального приемника.
3. Включите универсальный приемник и передатчик EL-Skyport
4. Включите вспышку и нажмите кнопку “TEST” на передатчике EL-Skyport для
тестовой вспышки.
Режимы работы
1. Режим аккумулятора: Во включенном состоянии индикатор мигает. После 4 часов
без эксплуатации прибор переключается в режим ожидания (выключите и включите
приемник, чтобы вернуть его в рабочее состояние)
2. Режим питания: С подключенным зарядным устройством для длительной
стационарной работы
Примечание:
Если приемник EL-Skyport используется во время зарядки (в режиме питания), то он не
переключается в режим ожидания.
Селектор
частотных
каналов
Гибкая
шарнирная
антенна с
возможностью
вращения на 360°
Разъем для зарядки. Только
для зарядного устройства
EL- Skyport
Переключатель
групп
Переключатель ВКЛ./ВЫКЛ.
(ON/OFF соответственно)
Индикатор
Частотный канал
Примечание:
Передатчик и соответствующие RX-трансиверы или универсальные приемники
должны иметь одинаковые настройки частотного канала! ON—ВКЛ., OFF – ВЫКЛ.
Частотный
канал
Положение кнопок Частота
абатывания/
МГц
Частота
удаленного
управления/
МГц
123
1 (умолч.) Выкл. Выкл. Выкл. 2456 2448
2Вкл. Выкл. Выкл. 2458 2450
3Выкл. Вкл. Выкл. 2460 2452
4Вкл. Вкл. Выкл. 2462 2454
5Выкл. Выкл. Вкл. 2469 2461
6Вкл. Выкл. Вкл. 2471 2463
7Выкл. Вкл. Вкл. 2473 2465
8Вкл. Вкл. Вкл. 2475 2467
Примечание:
После настройки выключите и включите трансивер RX снова для активизации нового изменения
частоты/канала.
Настройки групп срабатывания
Передатчик EL-Skyport приводит универсальный приемник в действие в
следующих режимах:
1. Group (группа – от 1 до 4) задает и приводит в действие вспышки в
различных “группах”
è Передатчиком приводятся в действие только вспышки с выбранной группой
(настройка группы должна совпадать у передатчика и приемника)
2. ALL (ВСЕ)
Передатчик настроен на ALL (ВСЕ)
è Передатчик приводит в действие все приемники EL-Skyport
40 41

Встроенный разъем SYNC
Встроенный 3,5 миллиметровый разъем Mono-Jack для прямого соединения со всеми
моделями вспышек с максимальным напряжением SYNC в 50 В и максимальным током
пика в 0,5 Ампер.
Возможности EL-Skyport
Возможно компьютерное управление всеми вспышками EL-RX. Используйте 19354, 19353
и ПО EL-Skyport PC/MAC для получения ДОПОЛНИТЕЛЬНЫХ возможностей:
1. Автоматическое обнаружение (Plug and Play): Программа автоматически
вносит подключенный блок RX в список устройств.
2. Режим ожидания вспышки: Включает и выключает светосинхронизатор через
программы EL-Skyport
3. Настраиваемый независимый запуск вспышки с задержкой для задания
последовательности срабатывания, между 5 миллисекундами и 16 секундами
4. Программами EL-Skyport предлагается множество дополнительных возможностей.
Информацию смотрите на сайте www.elinchrom.com
Модули EL-Skyport
Передатчик EL-Skyport 19351
• Универсальный передатчик приводит в действие все приемники EL-Skyport
через разъем hot-shoe («горячий башмак») камеры или кабель SYNC.
Трансивер EL-Skyport RX 19353
• Трансивер работает только со вспышками Elinchrom RX. Данный модуль
поддерживает все возможности RX с программным обеспечением EL-Skyport
/ ERS- software and triggers the ash
EL-Skyport USB RX 19354
• Для работы со вспышками RX с компьютера, необходимо ПО для USB модуля,
трансивера RX и EL-Skyport ERS.
Трансивер RX
19352 USB RX
19354
Передатчик
19351
42 43
Возможные неисправности
При возникновении ошибки проверьте:
Проблема Проверьте:
Универсальный приемник
не приводится в действие
передатчиком. Выбран режим
“All”
ØВключен ли передатчик
ØПолярность батареи
ØПравильность подключения модуля приемника к вспышке
ØНастроен ли селектор частоты на тот же канал
Некоторые вспышки не
запускаются передатчиком.
Режим “Grp”
Ø Переключен ли селектор каналов на ту же группу
Ø Переместите неработающие блоки ближе
TEST работает, камера не
приводит вспышку в действие
ØПравильно ли подключен hot-shoe
ØПопробуйте соединение при помощи кабеля SYNC вместо
hot-shoe
Радиус действия мал ØИзмените положение блока
ØУвеличьте расстояние до стен и потолков
ØРасположите антенну передатчика и приемника другим
образом
ØИспользуйте удлинительный кабель RX для снижения
расстояния между
Заявление CE
Тестирование данного устройства показало его соответствие требованиям
директивы совета по унификации законодательства стран-членов
относительно директивы EMC 89/336/EEC, директивы по низкому
напряжению 73/23/EEC и директивы R&TTE 99/5/EC
Утилизация и переработка
Насколько это возможно, данное устройство было произведено из
материалов, подвергающихся утилизации и дальнейшей переработке
наименее вредным для окружающей среды способом. После использования
данное устройство можно вернуть для утилизации при условии его
нормальной эксплуатации. Все невосстанавливаемые компоненты будут
утилизированы с причинением наименьшего вреда окружающей среде.
При возникновении вопросов по утилизации свяжитесь с местным представительством или
агентом ELINCHROM (на нашем Интернет-сайте дан список всех агентов ELINCRHOM по
всему миру).
44 45

EL-Skyport
Universal Receiver
19352
Características 47
Carga de la batería 48
Instrucciones de funcionamiento 49
Modos de funcionamiento 49
Canal de frecuencia 50
Modos de los grupos de disparadores 50
Enchufe SYNC integrado 51
Características del EL-Skyport 51
Módulos del EL-Skyport 52
Solución de problemas 53
Declaración de la CE 54
Eliminación y reciclado 54
Español
:
EL-Skyport
Universal Receiver
19352
Instrucciones de funcionamiento :
Sistema inalámbrico digital a 2,4GHz
Receptor universal para el disparado de unidades de ash
Características
El disparador de ash EL-Skyport ha sido diseñado con la última tecnología wireless
digital a 2,4GHz.
• Dispara todas las marcas de ash que tengan ranura SYNC
• Velocidad de obturador de hasta 1/1000s
• Cuatro grupos de disparadores seleccionables
• 8 canales de frecuencia
• Encriptación de seguridad de 40 bits
• Con un rango de alcance de hasta 50m en interiores
• Rango de alcance de hasta 120m en exteriores
• La batería interna recargable dura hasta 30 horas
• Circuito de carga rápida integrado
• Enchufe SYNC de 3,5 mm para todas las unidades de ash comunes
• Función de paso automático a modo en espera tras cuatro horas
Apreciará la comodidad de este dispositivo inalámbrico potente y profesional.
Nota:
Tanto la velocidad real del obturador como la distancia de alcance de la unidad de ash se ven inuencia-
das por las reexiones (techos, muros, suelos, muebles y otros equipamientos) y por la posible interfer-
encia de otro equipamiento electrónico inalámbrico cuya frecuencia de funcionamiento se encuentre en la
banda de los 2,4GHz.
Para un mejor rendimiento, las antenas del receptor y del transmisor deberían tener línea de visión
directa, sin ningún muro u objeto entre ellos.
47
Carga de la batería
La batería interna de iones de litio (Li-Ion) es recargable. Use únicamente el cargador
EL-Skyport adaptable a la pared.
1. Apague la unidad para aumentar la rapidez del proceso de carga.
2. Conecte el cargador EL-Skyport al enchufe de carga del Receptor universal y entonces
conecte el cargador a una toma de red eléctrica
3. Cuando el LED de estado esté encendido, la recarga de la batería estará en proceso
4. Cuando el LED de estado se apague, se habrá terminado el proceso de carga
Precaución!
• Use únicamente el Cargador EL-Skyport adaptable a la pared original de
Elinchrom (19355 EU) para cargar la batería
• No abra el alojamiento de la batería para reemplazarla
• Apague el Receptor universal cuando no lo esté usando para ahorrar carga de la
batería. Nota: el modo en espera no apaga la unidad por completo.
LED de estado
APAGADO Receptor universal
• Está apagado o
• Cuando el cargador está enchufado indica que la batería se ha
cargado por completo o
• Si está encendido, la unidad está en modo en espera. (apague y
encienda la unidad para “despertarla”)
ENCENDIDO El receptor universal se está cargando
Parpadeando El receptor universal está en funcionamiento
Figura 1
Ranura SYNC
de 3,5 mm
Instrucciones de funcionamiento
1. Conecte el cable SYNC a la ranura SYNC del EL-Skyport y al enchufe SYNC de la unidad
de ash. Use el cable SYNC incluido.
2. Compruebe que el grupo y el canal de frecuencias están correctamente congurados
tanto en el transmisor como en el receptor universal.
3. Encienda el transmisor y el receptor universal EL-Skyport
4. Encienda la unidad de ash y pulse en el botón de “TEST” del transmisor EL-Skyport para
un disparo de ash de prueba.
Modos de funcionamiento
1. Modo de batería: El LED de carga parpadea cuando se enciende. Si no se usa durante
4 horas, la unidad pasará a modo en espera (apague y encienda el receptor para volver al
modo de funcionamiento normal)
2. Modo de suministro: Con el cargador adaptable a la pared enchufado para un funciona
miento continuo durante un largo periodo de tiempo
Nota:
Si el receptor EL-Skyport está siendo usado mientras se carga (en modo de suministro),
el receptor universal no cambiará a modo en espera.
Selector del canal
de frecuencia
Antena exible
con 360º de giro
Enchufe de carga, únicamente
para el Cargador de pared
EL-Skyport
Interruptor
de grupo
Interruptor de
encendido / apagado
LED de estado (verde)
48 49

Canal de frecuencia
Nota:
El transmisor y los Transceptores RX o Receptores universales correspondientes deben tener
la misma conguración del canal de frecuencias!
Canal de Fre-
cuencia
Conguración de los botones deslizantes Frecuencia del
disparador /
MHz
Frecuencia
del Remoto /
MHz
123
1 (por defecto) Apagado Apagado Apagado 2456 2448
2Encendido Apagado Apagado 2458 2450
3Apagado Encendido Apagado 2460 2452
4Encendido Encendido Apagado 2462 2454
5Apagado Apagado Encendido 2469 2461
6Encendido Apagado Encendido 2471 2463
7Apagado Encendido Encendido 2473 2465
8Encendido Encendido Encendido 2475 2467
Nota:
Después de congurar el canal de frecuencia, apague el Transceptor RX y vuelva a encenderlo para acti-
var la nueva frecuencia / cambio de canal.
Modos de los grupos de disparadores
El Transmisor EL-Skyport dispara el Receptor Universal en los modos descritos a continuación:
1. Grupo (1 a 4) establece y dispara las unidades de ash en diferentes “agrupaciones”
è Únicamente las unidades de ash que se encuentren en el grupo seleccionado son dis
paradas por el transmisor (la conguración de Grupo debe ser la misma tanto en el
transmisor como en el receptor)
2. TODOS
El modo del transmisor es establecido como TODOS
è The Transmitter triggers all EL-Skyport Receivers
Enchufe SYNC integrado
El enchufe integrado Mono Jack de 3,5 mm se usa para su conexión directa con todas las
marcas de ash con un voltaje máximo de SYNC de 50V y una corriente pico máxima de 0,5 A.
Características del EL-Skyport
Todas las unidades EL-RX aceptan el manejo remoto a través de un ordenador. Use un 19354
con el 19353 y el software EL-Skyport para PC y Mac para acceder a las siguientes
características EXTRA:
1. Detección PnP (Plug and Play) automática: Este software añade automáticamente las
unidades RX conectadas a la lista de unidades
2. Modo de ash en espera: Activa y desactiva el disparador del ash mediante el software
EL-Skyport
3. Retardo del disparo del ash ajustable e independiente para disparo en secuencia
(entre 5 milisegundos y 16 segundos)
4. El software EL-Skyport ofrece muchas características e información adicionales.
Para saber más, visite la página Web www.elinchrom.com
50 51

Módulos del EL-Skyport
Transmisor EL-Skyport 19351
• Transmisor universal para el disparo de todos los receptores EL-Skyport desde la
cámara a través de la zapata de contacto del ash o mediante el cable SYNC!
Transceptor EL-Skyport 19353
• Este transceptor es únicamente adecuado para las unidades RX de Elinchrom.
El módulo puede manejar todas las características RX con el software EL-Skyport /
ERS y además dispara el ash
EL-Skyport USB RX 19354
• Para el manejo de las unidades de ash RX a través del ordenador es necesario un
módulo USB, este módulo se usa junto con los transceptores RX EL-Skyport
y con el software ERS
Solución de problemas
Si ocurriese un error, compruebe los siguientes puntos en primer lugar:
Está teniendo este problema? Compruebe los siguientes puntos:
El receptor universal no es dis-
parado por el transmisor.
El modo “TODOS” está selec-
cionado
ØCompruebe si el transmisor está encendido
ØCompruebe la polaridad de la batería
ØCompruebe si el módulo receptor está correctamente co
nectado a la unidad
ØCompruebe si el interruptor selector de frecuencia está con
gurado en el mismo canal
Algunas unidades de ash no son
disparadas por el transmisor.
El modo “GRUPO” está selec-
cionado
Ø Compruebe si el selector de canal está congurado con el
mismo grupo
Ø Reduzca la distancia de las unidades que no estén
funcionando
El TEST del ash funciona, pero
la cámara no puede disparar la
unidad de ash
ØCompruebe el ajuste de la zapata del ash
ØIntente realizar el disparo a través de la conexión del cable
SYNC en lugar de usar la zapata del ash
El rango de distancias es
demasiado pequeño
ØReposicione la unidad de ash
ØIncremente la distancia respecto a muros y techos
ØReposicione la antena del receptor y la del transmisor
ØUse un cable de extensión RX para reducir la distancia entre
los módulos
USB RX
19354
Transmitter
19351
Transceiver RX
19353
52 53
Declaración de la CE
Este dispositivo ha sido testeado y se ha encontrado que cumple con los req-
uisitos establecidos en la directiva 89/336/EEC de “compatibilidad electromag-
nética”, la 73/23/EEC “directiva para bajo voltaje” y la directiva 99/5/EC de la
R&TTE según establecen las directivas del consejo en aproximación a las leyes de los estados
miembros de la UE.
Eliminación y reciclado
Este dispositivo ha sido creado, hasta el límite de lo posible, usando materiales
que puedan ser reciclados o eliminados de modo que no sean dañinos para el
medio ambiente. El dispositivo puede ser devuelto después de su uso para ser
reciclado, suponiendo que se devuelva en una condición que sea resultado de
un uso normal. Cualquier componente que no sea reclamado será eliminado de
un modo medioambientalmente aceptable. Si tiene cualquier duda sobre la eliminación del
dispositivo, por favor, póngase en contacto con su ocina o agente locales de ELINCHROM
(compruebe en nuestro Sitio Web la lista de todos los agentes de ELINCHROM a nivel mundial).
GUARANTEE
This ELINCHROM product will be repaired free of charge by the vending agent if during a period
of 24 months from date of purchase its working order is impaired through a manufacturing or
material defect. The faulty product should be immediately sent to the authorized dealer or ELINCA
agent. This guarantee is not valid for equipment which has been misued, dismantled, modied
or repaired by persons not belonging to the ELINCA distribution network. It does not cover ash
tubes, lamps and the normal ageing of capacitors. No responsibilities can be accepted for damage
resulting from unsatisfactoıy operation of the equipment, such as wasted lm or other expenses.
GARANTIE
Dieses ELINCHROM Produkt wird durch den Verkäufer des Gerätes kostenlos repariert, falls sich
innerhalb von 24 Monaten ab Verkaufsdatum durch Fabrikations oder Materialfehler verursachte
Mängel auftreten. Senden Sie das Gerät sofort an den zuständigen Händler oder ELINCA Vertreter.
Der Garantieanspruch entfällt, wenn das Gerät unsachgemäss behandelt oder durch unberechtigte
Personen demontiert, umgebaut oder repariert wurde. Ausgeschlossen von dieser Garantie sind
Blitzröhren, Lampen, das normale Altern von Kondensatoren sowie Schäden die durch ein defektes
Gerät entstehen könnten, z.B. Filmverlust, Reise-und andere Kosten
GARANTIE
Questo prodotto ELINCHROM sarà riparato gratuitamente da un agente della casa produttrice se
durante un periodo di 24 mesi dalla data dell’acquisto il suo funzionamento è danneggiato da un
difetto di fabbricazione o di materiale. Il prodotto difettoso dovrà essere inviato immediatamente a
un centro autorizzato o ad un rappresentante ELINCA. Questa garanzia non si applica ad apparec-
chiature usate in modo non conforme, che sono state smontate, su cui hanno operato o che sono
state riparate da personale non appartenente alla rete di distribuzione ELINCA. Parimenti essa
non copre lampadine per ash, lampade e il normale ammortamento dei condensatori. Non ci si
assume la responsabilità di danni derivanti da un funzionamento insoddisfacente dell’apparecchio
come pellicole rovinate o spese similari.
54

GARANTIE
Cet appareil ELINCHROM sera gratuitement remis en état par son vendeur en cas de mauvais
fonctionnement, imputable à un défaut de fabrication ou de composants, apparu dans un délai
de 24 mois à partir de la date d’achat. L’appareil doit être envoyé dès que possible à l’adresse du
vendeur ou de l’agent ELINCA autorisé. Cette garantie n’est plus valable pour les appareils soumis
à un traitement anormal, démontés, modiés ou réparés par des personnes n’appartenant pas au
réseau de distribution ELINCA. Sont exclus de cette garantie les tubes-éclairs, les lampes pilotes, le
vieillissement des con- densateurs ainsi que tout dommage pouvant résulter d’un fonctioımement
défectueux de l’appareil (perte de lm, man- que à gagner ou autres frais).
ГАРАНТИЯ
Торговый агент обязуется произвести ремонт данного изделия ELINCHROM в случае,
если в течение 24 месяцев с даты покупки причиной неисправности изделия явилось
наличие производственного или материального дефекта. Дефектное изделие должно быть
незамедлительно направлено официальному дилеру или агенту ELINCA. Настоящая гарантия
недействительна для оборудования, которое было использовано недолжным образом,
разобрано, модифицировано или ремонт которого был произведен лицами, не являющимися
представителями дистрибьюторской сети ELINCA. Гарантия не распространяется на
лампы-вспышки, лампы и случаи обычного износа конденсаторов. Компания не несет
ответственности за повреждения, вызванные ненадлежащей эксплуатацией оборудования,
такие как испорченная пленка или другие издержки.
GARANTIE
Este aparato ELINCHROM será reparado gratuitamente por el vendedor en caso de mal fun-
cionamento, imputable a un defecto de fabricación o de material, surgido durante 24 meses
siguiente a la fecha de compra. El aparato detectuoso deberá ser enviado rápidamente al
comerciante o al agente ELINCA. Esta garantía no es válida para los aparatos sometidos a un uso
anormal, desmontados, modicados a reparados por personas que no pertenecen a la red de
distribución ELINCA. Esta garantía no incluye los tubos de destello, los capacitores y el envejeci-
miento normal de las bombillas de luz de modelado, asi como también cualquier daño que pueda
resultar del funcionamiento defectuoso del aparato (pérdida de lm, gastos de desplazamiento,
perdida de ganancias, etc.). Av. de Longemalle 11, P. O. Box -458, CH-1020 Renens, Switzerland, Tel. : + 41 21 637 26 77
Fax: +41 21 637 26 81 E-mail: elinca@elinca.ch Website: www.elinchrom.com

P.O. Box 458
Avenue de Longemalle 11
CH-1020 Renens
Switzerland
Please return this registration card directly to :
Diese Registrierkarte bitte direkt zurücksenden an :
Veuillez retourner cette carte d’enregistrement directement à :
Vi preghiamo di far pervenire questa cartolina di iscrizione direttamente a :
Пожалуйста, верните данную регистрационную карточку непосредственно :
Por favor envie esta carta de registro directamente a :
Elinchrom model :
Elinchrom modèle :
Elinchrom Modell :
Modello di Elinchrom :
Elinchrom модель :
Modelo de Elinchrom : N ̊
Date of purchase :
Datum des Kaufs :
La date d’achat :
La data di acquisto :
Дата закупки :
La fecha de la compra :
Dealer :
Händler :
Négociant :
Il distributore :
Дилер :
El comerciante :
Your full name and address :
Ihr voller Name und redet an :
Votre nom plein et adresse :
Il suo nome pieno ed indirizza :
Ваше полное наименование и адрес :
Su nombre y apellidos y dirige :
Please „register“ your Elinchrom product online under
Bitte registrieren Sie ihr Elinchrom Produkt unter
Veuillez enregistrer votre produit Elinchrom on line sousz
Per favore registrare il suo prodotto Elinchrom in linea sul sito
Пожалуйста “регистрируйте” ваше Elinchrom изделие онлайн под
Por favor registra su producto Elinchrom por internet
www.elinchrom.com > Downloads > Product Registration
P.O. Box 458
Avenue de Longemalle 11
CH-1020 Renens
Switzerland
Stamp
IMPORTANT
Registration card
Carte d’enregistrement
Registrierkarte
Scheda di registrazione
Регистрационная карта
Tarjeta de registro