Flir BelgiumBA VHFGEN1 Fixed Mount VHF marine radio User Manual Ray218 55 Handbook
Raymarine UK Ltd. Fixed Mount VHF marine radio Ray218 55 Handbook
Contents
- 1. Part user handbook
- 2. Part2 user handbook
- 3. Part3 user handbook
Part2 user handbook
44 Ray218 and Ray55 VHF Radios
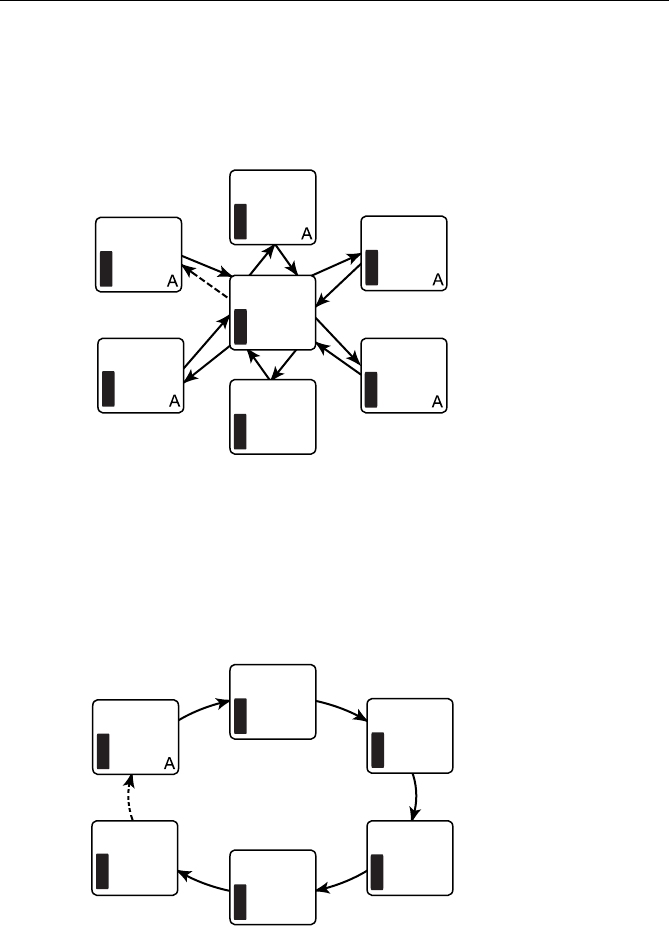
Priority All Scan
Priority All Scan searches for activity on all channels but alternates scanning the
Priority Channel 16 after each channel.
When active, SCAN ALL + 16 appears on the display.
Saved (Memory) Scan
In Saved Scan mode, only the channels that have been saved in memory are
scanned in sequence. After the last saved channel number has been scanned, the
cycle repeats.
When active, SCAN SAVE appears on the display. If no channels have been saved
into memory when you select this feature, an error tone sounds.
SCAN +16
U
S
A
01
SCAN +16
U
S
A
88
SCAN +16
U
S
A
03
SCAN +16
U
S
A
07
SCAN +16
U
S
A
05
SCAN +16
U
S
A
06
SCAN +16
U
S
A
16
D9173-1
SCAN SAVE
U
S
A
06
U
S
A
78
U
S
A
68
U
S
A
72
U
S
A
69
U
S
A
71
SCAN SAVE
SCAN SAVE
SCAN SAVE
SCAN SAVE
SCAN SAVE
D9174-1
Chapter 4: Menu Settings 45
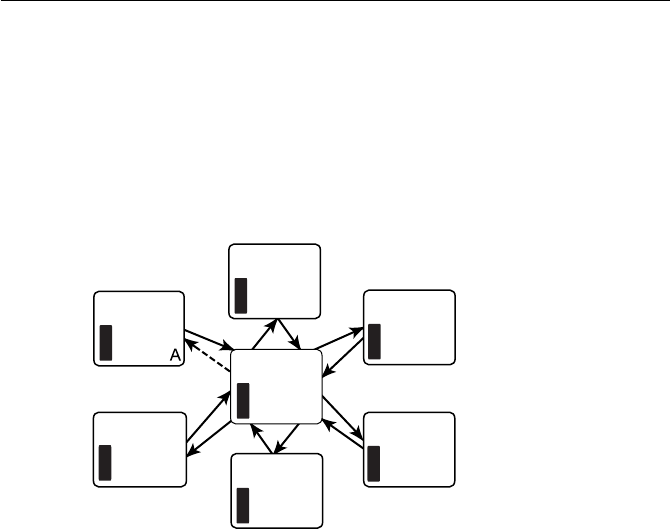
Priority Saved Scan
Priority Saved Scan is much like Priority Scan except that the radio alternates
searching for activity on the Priority Channel 16 and the channels stored in
memory.
When active, SCAN SAVE + 16 appears on the display.
Note:
If no channels have been saved into memory when you select this feature, an error
tone sounds.
Display Mode
The Ray218/Ray55 has two methods for displaying the channel number:
1 UP and 2 UP.
1 UP mode is the normal mode; the channel is displayed on the left side of the
display and text information on the right.
In 2 UP mode, you are presented with two channels: the currently-active channel
on the left and the standby channel on the right. Pressing the double arrow soft
key determines which of the two displayed channels is the active one.
While in 2 UP mode, pressing the channel up/down keys CHANGES THE STANDBY
CHANNEL, NOT THE ACTIVE ONE.
The radio exits 2 UP mode when you enter the menu or DSC call screens.
SCAN SAVE+16
U
S
A
06
SCAN SAVE+16
U
S
A
78
SCAN SAVE+16
U
S
A
68
SCAN SAVE+16
U
S
A
72
U
S
A
69
U
S
A
71
U
S
A
16
D9175-1
SCAN SAVE+16
SCAN SAVE+16
SCAN SAVE+16

46 Ray218 and Ray55 VHF Radios
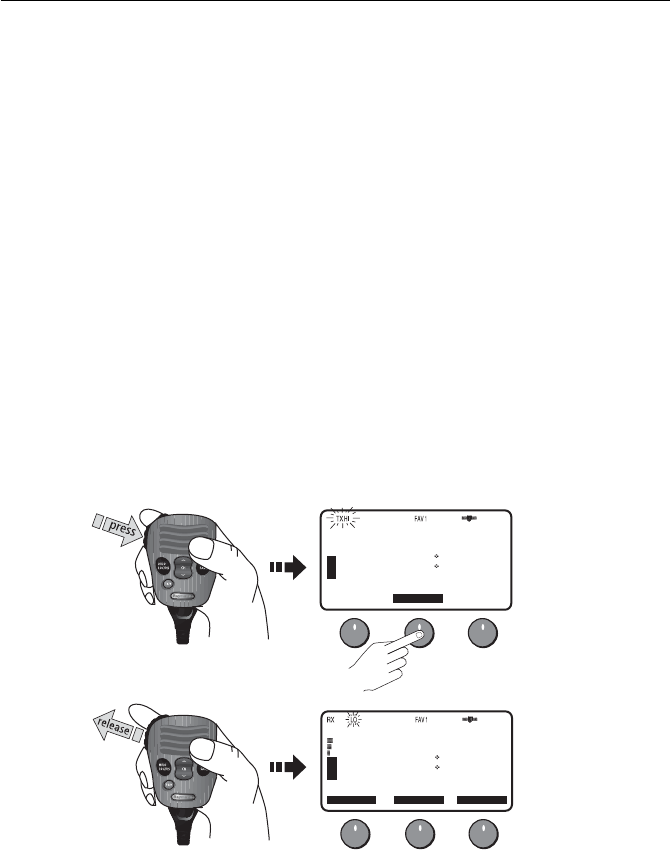
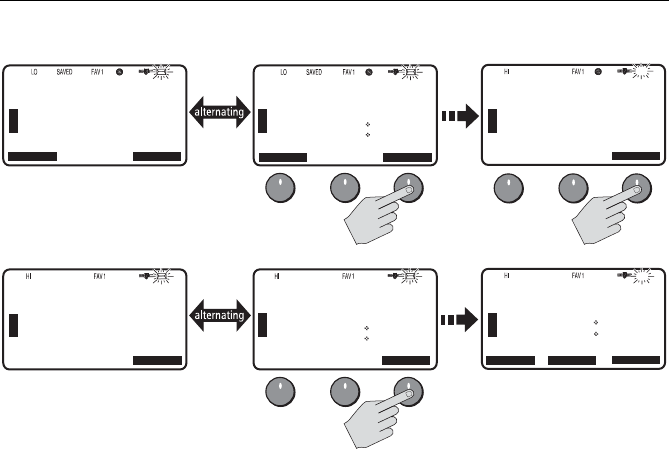
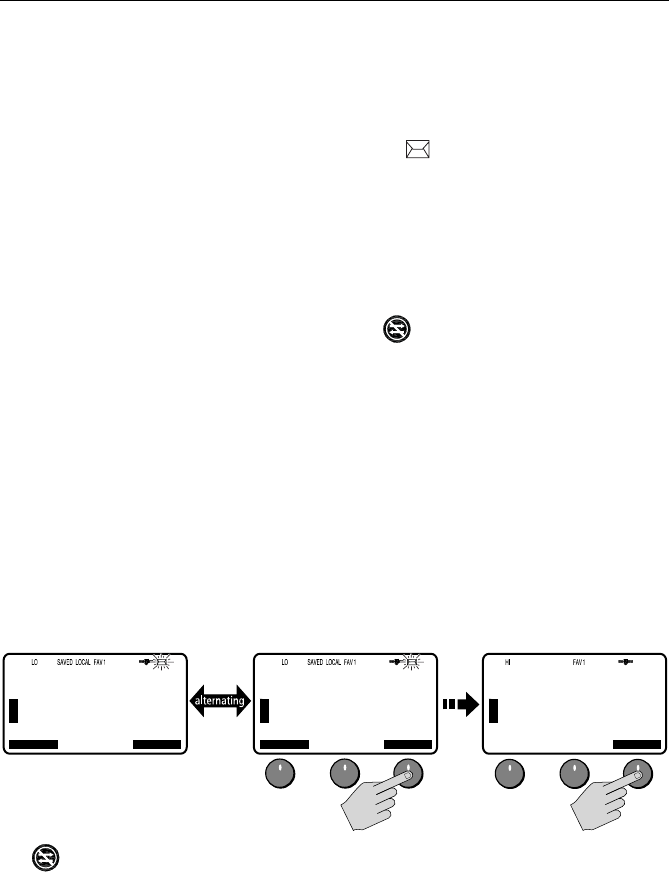
Setting the Power Output (HI/LO)
The choice of power output is dependent upon the distance of transmission and
transmitting conditions. As a part of FCC procedures and marine communications
courtesy, initial contact should always be attempted using low power. You should
switch to high power only when contact can not be made on low power or in
emergency situations. Press the HI/LO soft key to toggle the TX power from LOW
(1 watt) to HIGH (25 watts). The corresponding LO or HI indicator appears.
You can also press and release the HI/LO–LOC/DIS key on the microphone to
toggle the TX power.
71
PLEASURE
B
B
DISPLAY MODE
SELECT
1UP CHANNEL
2UP CHANNEL
[BACK]
U
S
A
71
PLEASURE
B
B
SELECT
U
S
A
27 07.3838N
080 04.8499W
AM10:33LOC
68
B
S
T
A
N
D
B
Y
72
SHIP/SHIP
B
B
U
S
A
68
PLEASURE
B
B
DISPLAY MODE
SELECT
1UP CHANNEL
2UP CHANNEL
[BACK]
U
S
A
72
B
S
T
A
N
D
B
Y
68
PLEASURE
B
B
U
S
A
71
SHIP/SHIP
B
A
SELECT
U
S
A
VHF OPS
SCAN MODE
DISPLAY MODE
HI/LO POWER
SAVE CHANNEL
WATCH MODE
D9176-1
69
PLEASURE
B
B
SELECT
U
S
A
VHF OPS
SCAN MODE
DISPLAY MODE
HI/LO POWER
SAVE CHANNEL
WATCH MODE
69
PLEASURE
B
B
BACK
U
S
A
HI/LO POWER
CHANGE PWR
SETTING
HI/LO POWER
WATCH MODE
HI/LO
69
PLEASURE
B
B
BACK
U
S
A
HI/LO POWER
CHANGE PWR
SETTING
HI/LO POWER
WATCH MODE
HI/LO
D9177-1
Chapter 4: Menu Settings 47
Some channels are limited by regulation to be low power only. If the HILO
operation request is denied, an error tone beeps.
Channels restricted to low transmit power are as follows:
• Canadian channel set: 13, 15, 17, 77
• International channel set: 15, 17
• US channel set: 13, 15, 17, 67, 77
Overriding the Low Output Power Restriction
In the US, channels 13 and 67 are restricted to transmit at low power. However,
you can temporarily override this low power restriction. When you press PTT, a
new soft key appears in the middle position, labelled OVRIDE.
To override the LO power restriction on channels 13 or 67 and transmit at high
power:
1. Press and hold PTT. The OVRIDE soft key appears.
2. Press and release OVRIDE. The TX power is set to HI power for as long as you
hold down PTT.
When you release PTT, power returns to LO.
13
BRIDGE
A
CH68 CH79A CH71
U
S
A
OVRIDE
26 06.0098N
080 04.8589W
AM10:33LOC
D9250-1
13
BRIDGE
A
CH68 CH79A CH71
U
S
A
CH69
26 06.0098N
080 04.8589W
AM10:34LOC
48 Ray218 and Ray55 VHF Radios
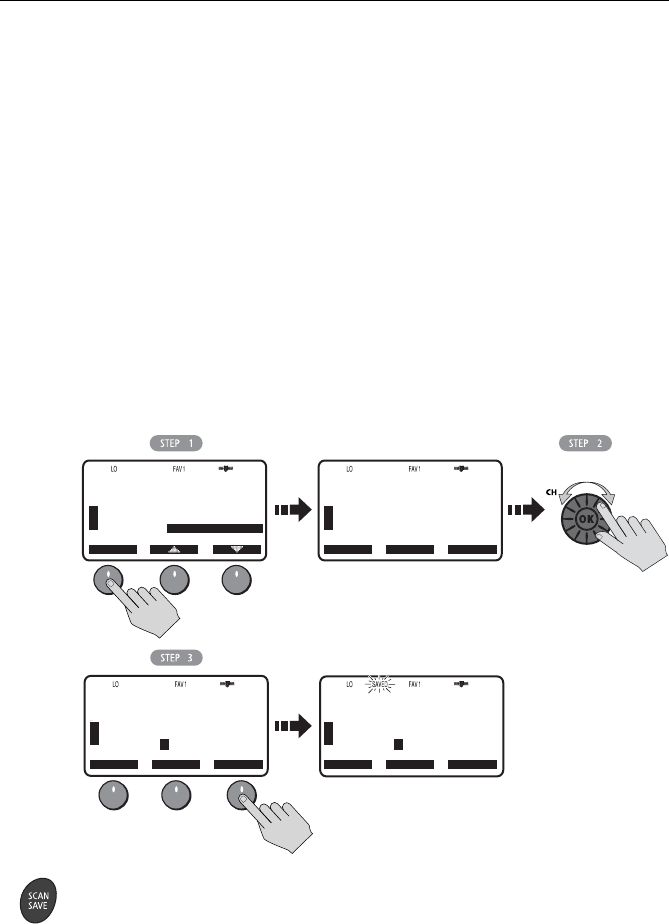
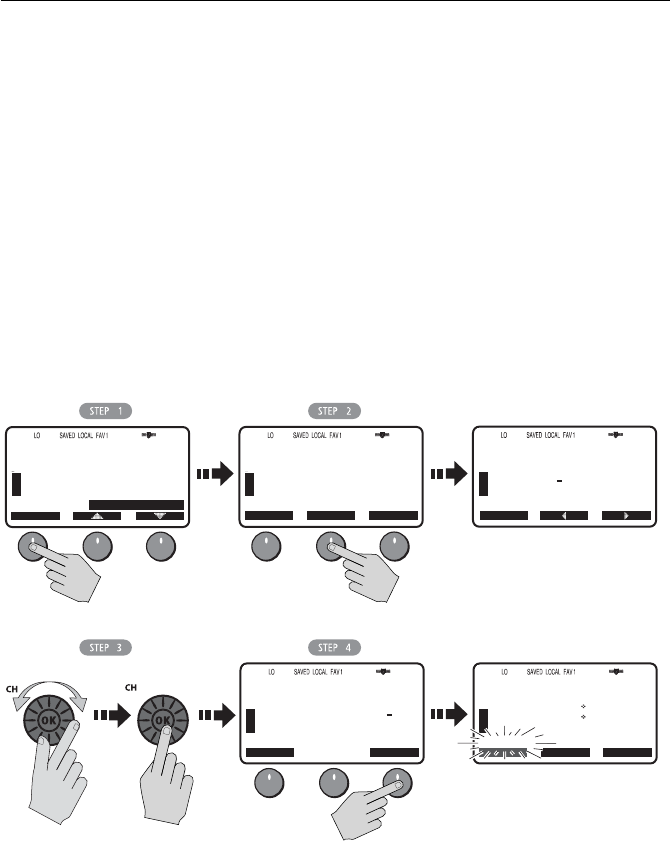
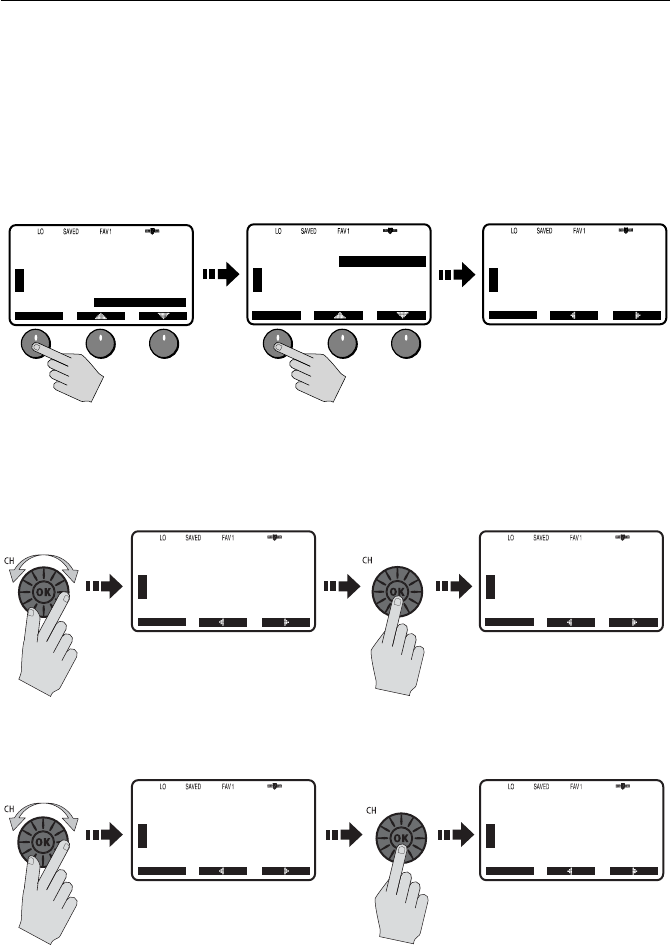
Saving Channels to Memory
The Ray218/Ray55 can store any channel (except WX channels) into memory. The
stored channels are the ones scanned in the Saved (Memory) Scan mode (see
page 44). Any number of channels can be saved as memory channels.
Separate memory channel groups exist for USA, International, and Canadian
frequency sets.
To add or remove a channel to/from memory:
1. Select SAVE CHANNEL from the VHF OPS menu.
2. Rotate the CH knob to select the channel to be added/removed from memory.
3. To add the selected channel from memory, press SAVE. The SAVED icon
appears to indicate the current channel has been saved in memory.
To remove the channel from memory, press CLEAR. The SAVED icon disap-
pears.
You can also add the current channel to memory by pressing and holding the
SCAN/SAVE key on the microphone. If the channel is already saved, pressing and
holding the key removes the channel from memory.
68
PLEASURE
SELECT
U
S
A
A
VHF OPS
SCAN MODE
DISPLAY MODE
HI/LO POWER
SAVE CHANNEL
WATCH MODE
68
PLEASURE
BACK
U
S
A
A
SAVE CHANNEL
SELECT CH
PRESS SAVE
OR CLEAR
WATCH MODE
SAVE
CLEAR
78
PLEASURE
B
A
BACK
U
S
A
SAVE CHANNEL
SELECT CH
PRESS SAVE
OR CLEAR
WATCH MODE
SAVE
CLEAR
D9179-1
78
PLEASURE
B
A
BACK
U
S
A
SAVE CHANNEL
SELECT CH
PRESS SAVE
OR CLEAR
WATCH MODE
SAVE
CLEAR
Select Channel
Chapter 4: Menu Settings 49
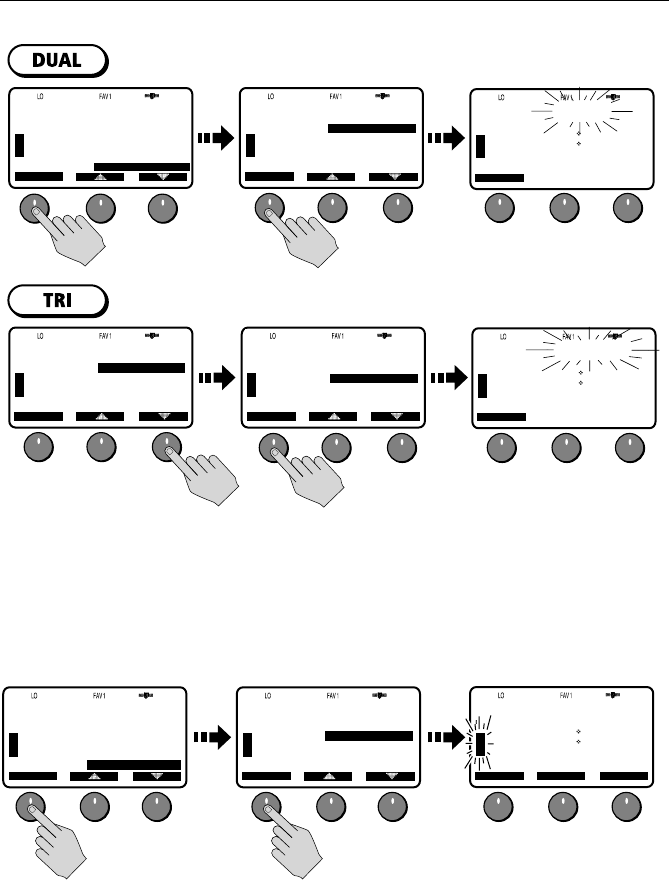
Using the Watch Modes
The Watch Modes monitor the programmed Priority Channel and other user-
selected channel(s). The watch is halted when activity is detected on a monitored
channel. The Ray218/Ray55 is equipped with 2 types of monitor operations: Dual
Watch and Tri Watch.
Note:
Whenever Weather Alert is activated, the WX Alert channel is also monitored dur-
ing Dual Watch and Tri Watch.
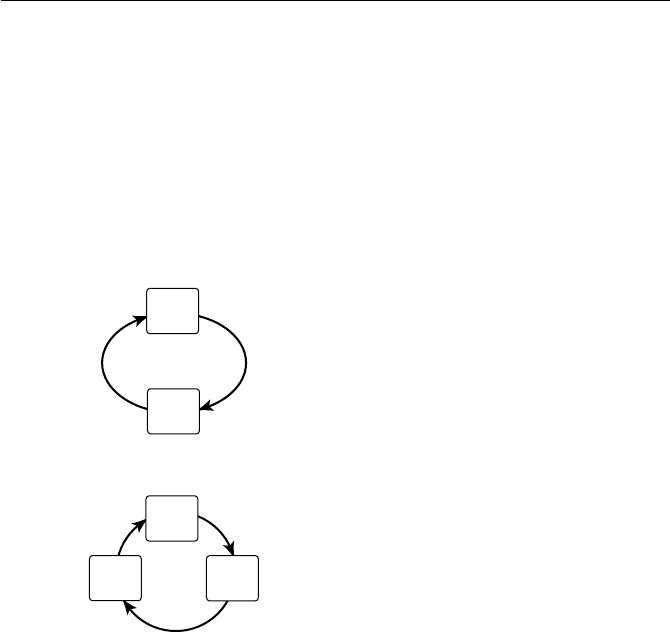
Dual Watch
Dual Watch monitors the current working channel and
Channel 16 in cycle.
DUAL 16 appears on the top line of the display.
Dual Watch is demonstrated in the figure to the left; the
sample working channel is CH 72.
Tri Watch
Tri Watch monitors in cycle channel 16, the current
working channel and the channel you have set as the
Secondary Priority Channel.
TRI 16+09 appears on the top line of the display.
Tri Watch is demonstrated in the figure to the left; the
sample working channel is channel 72.
Press the END soft key to terminate Watch mode and return to the previous
working channel.
Press and release the 16/9 key to terminate Watch mode and switch to the Priority
Channel.
Press and release the CLEAR/WX key to terminate Watch mode and return to the
last-used channel.
Note:
During Tri Watch Mode, the WX and CH keys are inactive and an error beep sounds
if pressed.
D9181-1
16
72
D9182-1
16
09
72
50 Ray218 and Ray55 VHF Radios
Frequency Band
The Ray218/Ray55 can transmit and receive all USA, International and Canadian
frequencies. This setting determines which channel set is being used. The
appropriate indicator is illuminated in the LCD: USA, INT for International, or CAN
for Canadian channel sets.
D9180-1
72
SHIP/SHIP
B
SELECT
U
S
A
VHF OPS
SCAN MODE
DISPLAY MODE
HI/LO POWER
SAVE CHANNEL
WATCH MODE
72
SHIP/SHIP
B
U
S
A
WATCH MODE
SELECT
DUAL WATCH
TRI WATCH
[BACK]
WATCH MODE
72
SHIP/SHIP
B
U
S
A
26 06.0098N
080 04.8589W
AM10:33LOC
END SAVE
CLEAR
DUAL 16
72
SHIP/SHIP
B
U
S
A
WATCH MODE
SELECT
DUAL WATCH
TRI WATCH
[BACK]
WATCH MODE
72
SHIP/SHIP
B
U
S
A
WATCH MODE
SELECT
DUAL WATCH
TRI WATCH
[BACK]
WATCH MODE
72
SHIP/SHIP
B
U
S
A
26 06.0098N
080 04.8589W
AM10:33LOC
END SAVE
CLEAR
TRI 16+09
69
PLEASURE
B
A
SELECT
U
S
A
VHF OPS
69
PLEASURE
B
A
U
S
A
FREQ BAND
SELECT
USA
INTERNATNL
CANADA
[BACK]
D9183-1
69
SHIP/SHIP
B
A
I
N
T
50 46.1718N
001 17.7189W
AM08:53LOC
CH06 CH72
CH69
DISPLAY MODE
HI/LO POWER
SAVE CHANNEL
WATCH MODE
FREQ BAND
Chapter 4: Menu Settings 51
Channel Name
By default, the Ray218/Ray55 scrolls a descriptive name of up to 16 characters in
the line directly below the channel number and then stops to display a fixed
length of up to 9 characters. This option modifies the name for the currently-
selected channel from its default.
To change the Channel Name from the default:
1. From the VHF OPS menu, select CHANNEL NAME.
2. Press EDIT. The name for the currently-selected channel appears.
3. Use the CH knob to modify the NAME field using the same technique
described in “Adding a new Entry“ on page 75.
4. Press DONE when completed.
To completely remove the Channel Name, press CLEAR in step 2 above. If the
name is deleted, the space below the channel number is blank for that channel.
68
PLEASURE
B
B
VHF OPS
SELECT
U
S
A
68
PLEASURE
B
B
CHANNEL NAME
BACK
SELECT CH
PRESS
EDIT OR
CLEAR
U
S
A
D9313-1
68
PLEASURE
B
B
BACK
U
S
A
Select Characters Press OK
EDIT CLEAR
68
PLEASURE
B
B
EDIT NAME
CHANNEL NAME
PLEASURE
U
S
A
EDIT NAME
CHANNEL NAME
FISHING
BACK
DONE
26 06.0098N
080 04.8589W
AM10:33LOC
68
FISHING
B
B
U
S
A
CH06 CH67
CH17
HI/LO POWER
SAVE CHANNEL
WATCH MODE
FREQ BAND
CHANNEL NAME
52 Ray218 and Ray55 VHF Radios
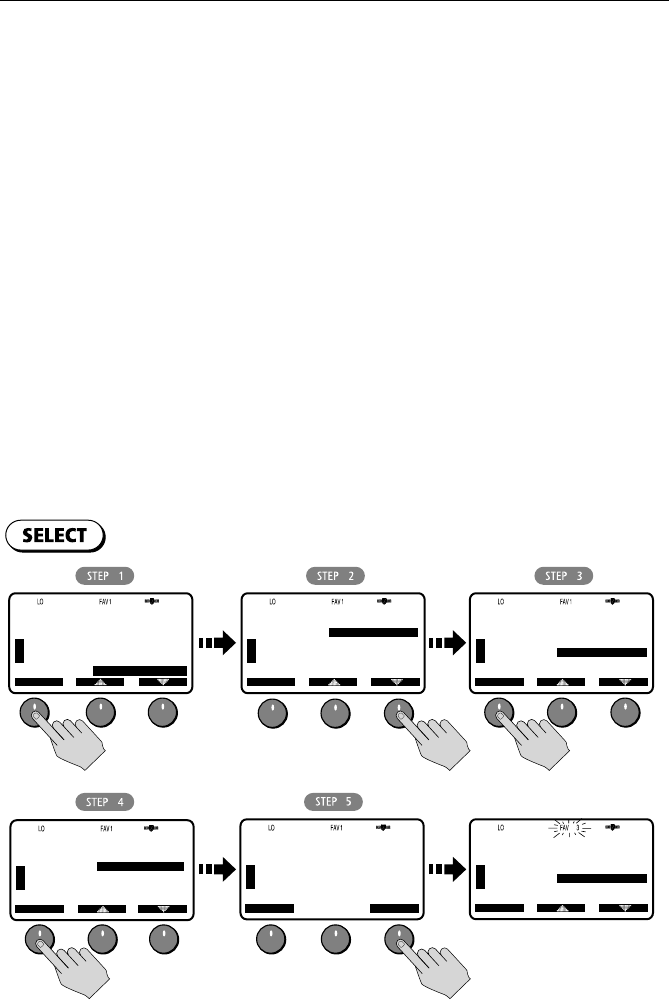
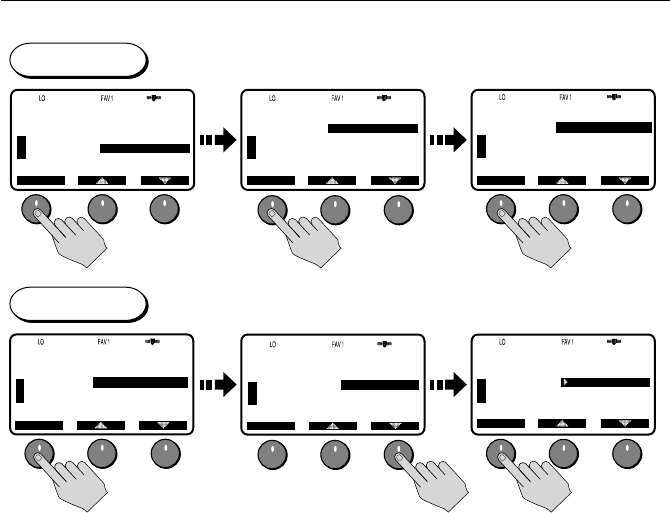
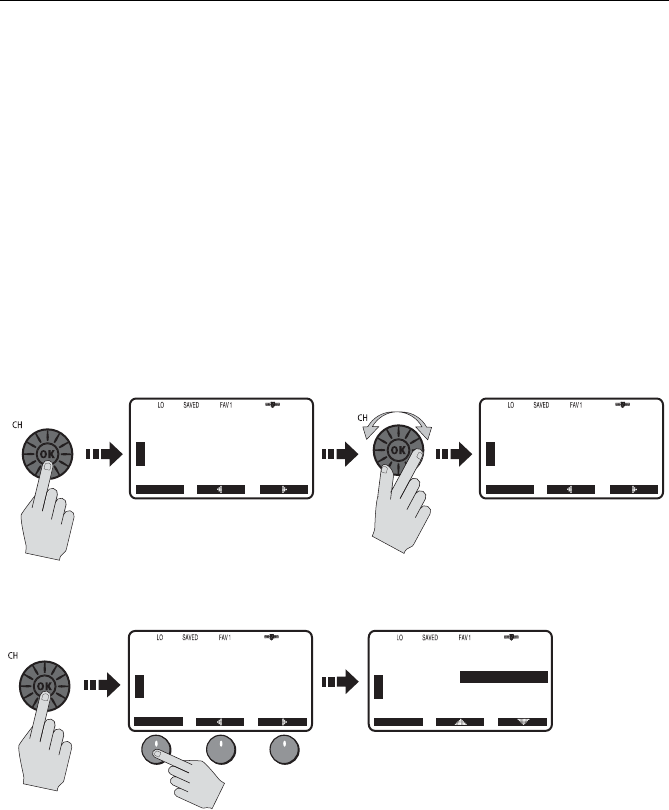
Favorite Channel
When in standby mode, the Ray218/Ray55 displays a channel number in each of
the three soft key locations. By pressing the corresponding soft key, the radio
instantly switches to that channel number. You can select from three separate
Favorite Channel groups for a total of 9 channel options for each frequency set.
You select which channel group is displayed and edit what channel numbers are
assigned.
Default channels are as follows:
• FAV1: CH67 CH68 CH72
• FAV2: CH71 CH73 CH77
• FAV3: CH06 CH08 CH09
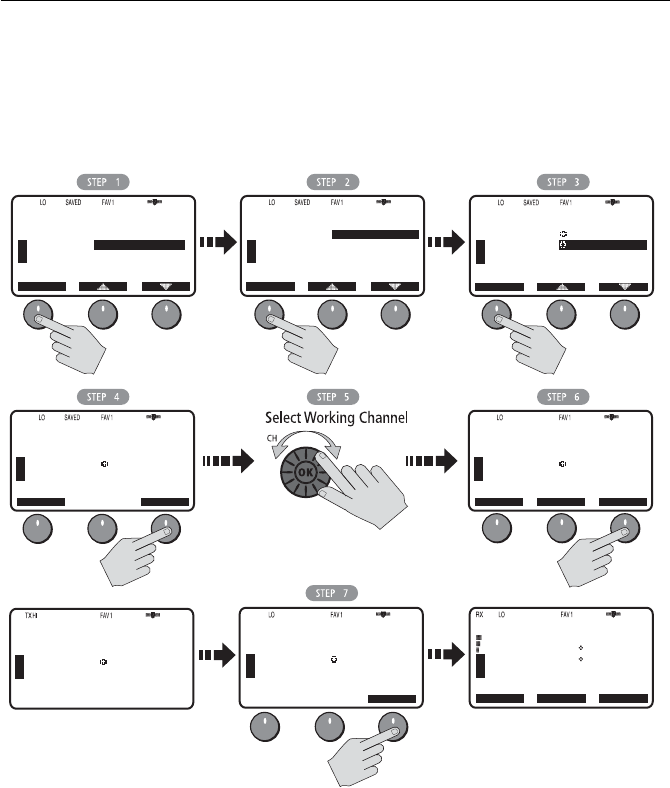
To SELECT which bank of Favorite Channels is displayed:
1. From the VHF OPS menu, select FAVORITE CH.
2. Highlight the Favorite Channel Bank you wish to be displayed.
3. Press the SELECT soft key. Two options appear: SELECT and EDIT.
4. Choose the SELECT option.
5. Press OK to confirm. Selected favorite channels appear in the soft key bank.
71
PLEASURE
B
A
SELECT
U
S
A
VHF OPS
71
PLEASURE
B
A
U
S
A
FAVORITE CH
SELECT
FAV-BANK1
FAV-BANK2
FAV-BANK3
[BACK]
71
PLEASURE
B
A
U
S
A
FAVORITE CH
SELECT
FAV-BANK1
FAV-BANK2
FAV-BANK3
[BACK]
71
PLEASURE
B
A
U
S
A
FAVORITE CH
SELECT
FAV-BANK1
FAV-BANK2
FAV-BANK3
[BACK]
71
PLEASURE
B
A
U
S
A
FAV BANK-3
68 69 71
SELECT
EDIT
[BACK]
SELECT
71
PLEASURE
B
A
U
S
A
FAVORITE CH
BACK
FAV BANK-3
IS SELECTED
PRESS [OK]
TO ACCEPT
OK
D9185-1
SAVE CHANNEL
WATCH MODE
FREQ BAND
CHANNEL NAME
FAVORITE CH

Chapter 4: Menu Settings 53
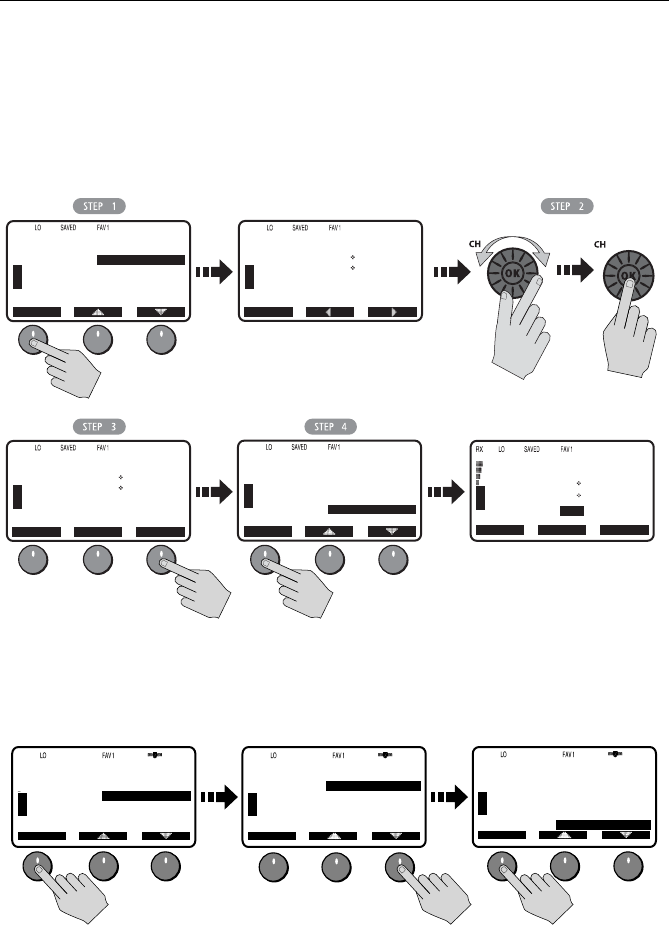
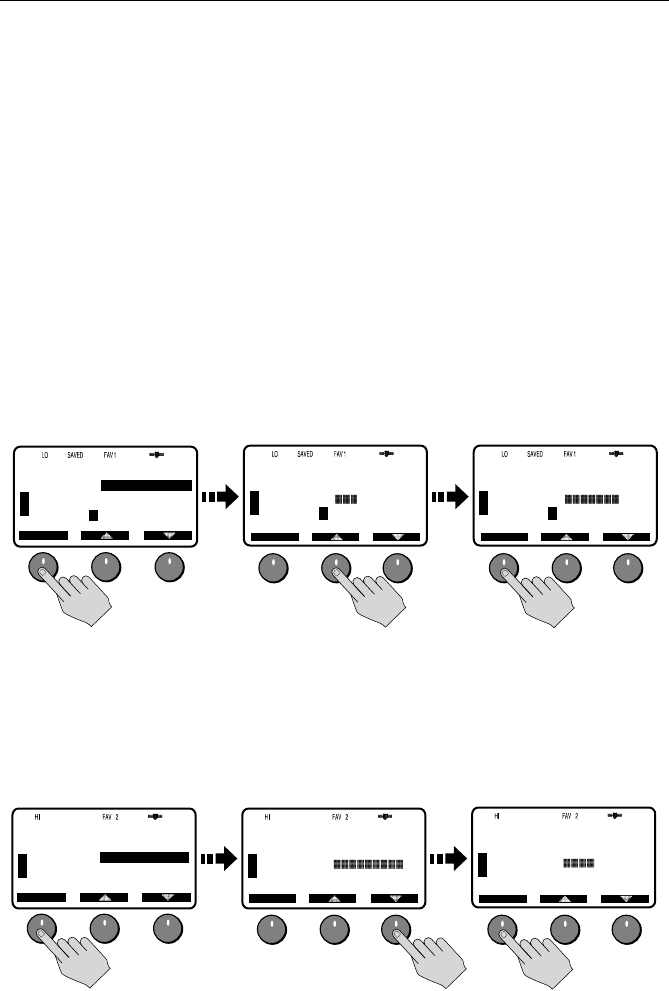
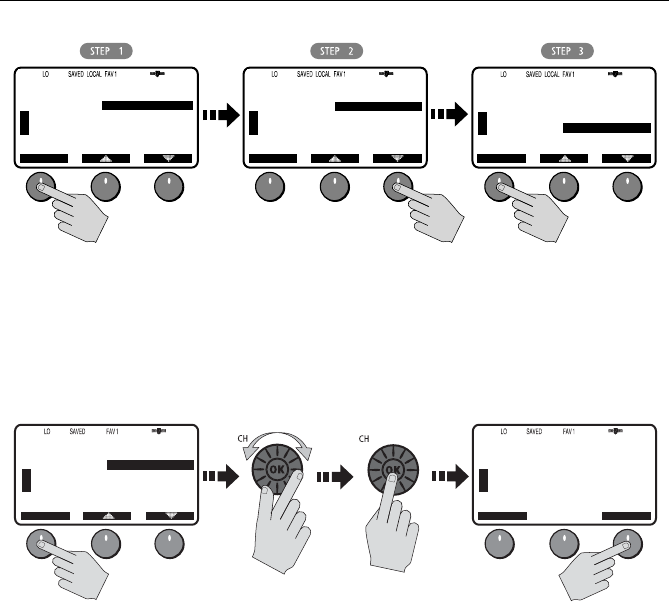
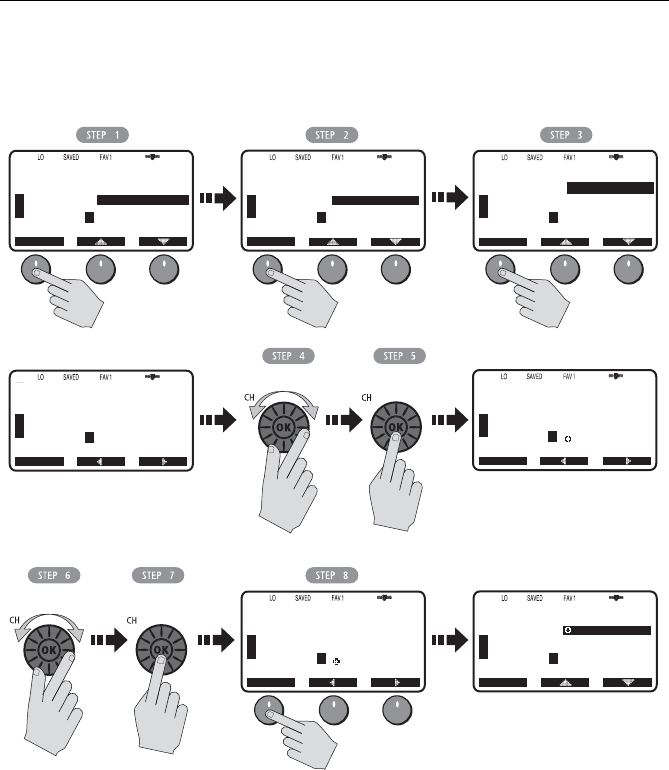
To EDIT Favorite Channels contained within a bank:
1. Repeat steps 1–3 above for the SELECT process and highlight the bank you
wish to edit.
2. Select the EDIT option.
3. Use the up/down arrows to highlight which soft key label you wish to edit:
LEFT, CENTER or RIGHT.
4. Rotate the CH knob to change the channel to the desired value.
5. Push in the CH knob to confirm. The new channel selection appears in the
edited soft key position for that bank.
Shortcut
You can quickly access the Favorite Channel menu item by pressing and holding
any of the three channel soft keys in standby mode.
EDIT
72
SHIP/SHIP
B
A
U
S
A
EDIT FAV-3
68 69 78A
BACK
72
SHIP/SHIP
B
A
U
S
A
A
CH68 CH78A
CH69
72
SHIP/SHIP
B
A
U
S
A
FAV BANK-3
68 69 71
SELECT
SELECT
EDIT
[BACK]
D9186-1
Select Channel
72
SHIP/SHIP
B
A
U
S
A
EDIT FAV-3
68 69 71
BACK
Press OK
72
SHIP/SHIP
B
A
U
S
A
FAVORITE CH
SELECT
FAV-BANK1
FAV-BANK2
FAV-BANK3
[BACK]
27 07.3838N
080 04.8499W
AM10:33LOC
LEFT: 68
CENTER: 69
RIGHT: 71
PRESS [OK]
TO ACCEPT
LEFT: 68
CENTER: 69
RIGHT: 78A
PRESS [OK]
TO ACCEPT
71
PLEASURE
B
A
U
S
A
FAVORITE CH
SELECT
FAV-BANK1
FAV-BANK2
FAV-BANK3
[BACK]
71
PLEASURE
B
A
U
S
A
A
CH68 CH71
CH69
D9187-1
PRESS and HOLD
any soft key 3 secs
10
15
20
25
30
35
40
45
50
55 60 5
27 07.3838N
080 04.8499W
AM10:33LOC
54 Ray218 and Ray55 VHF Radios
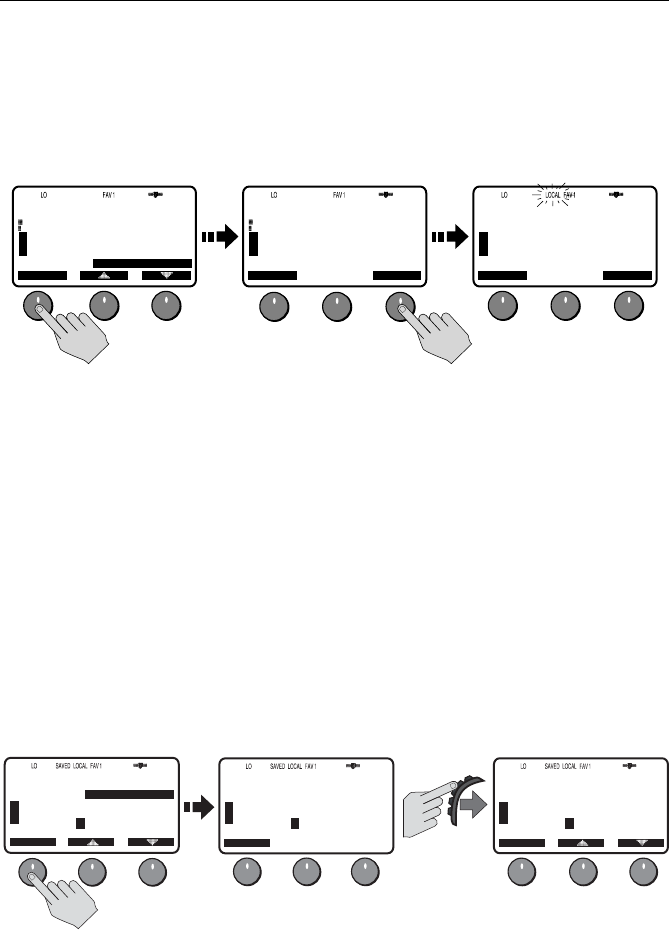
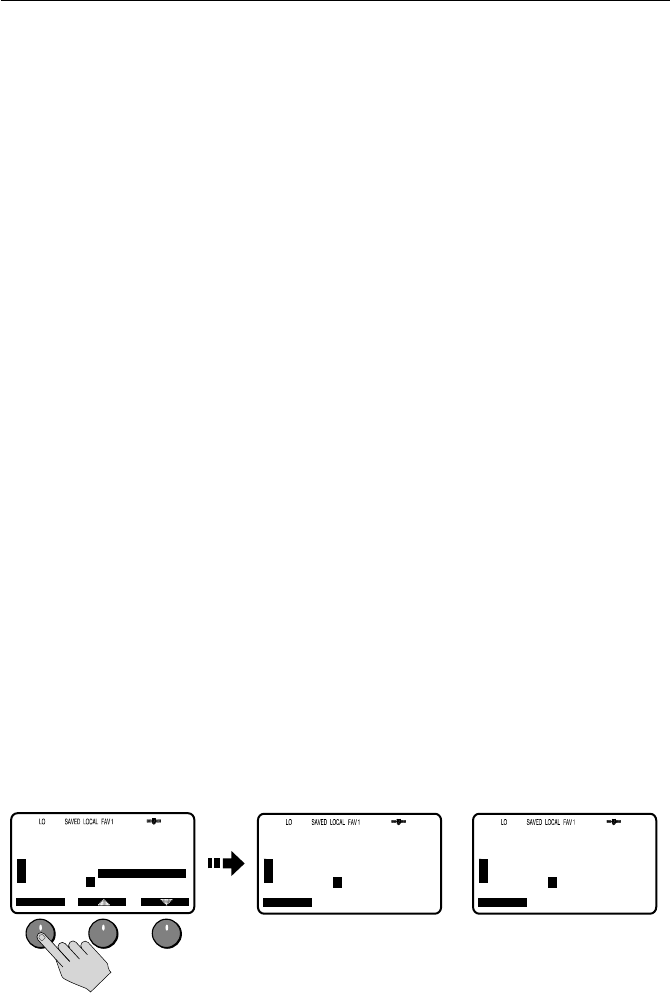
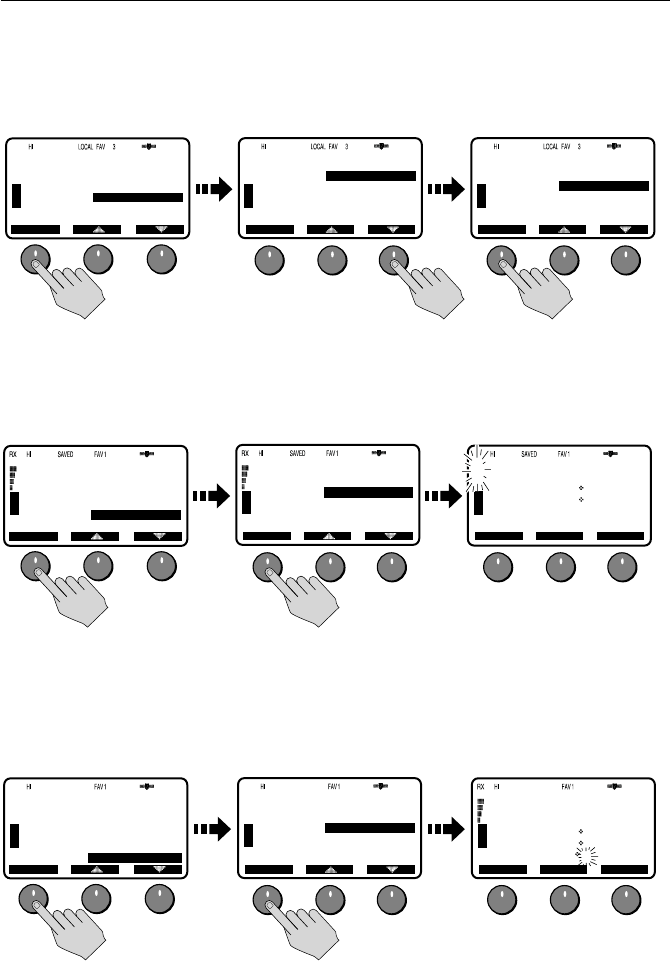
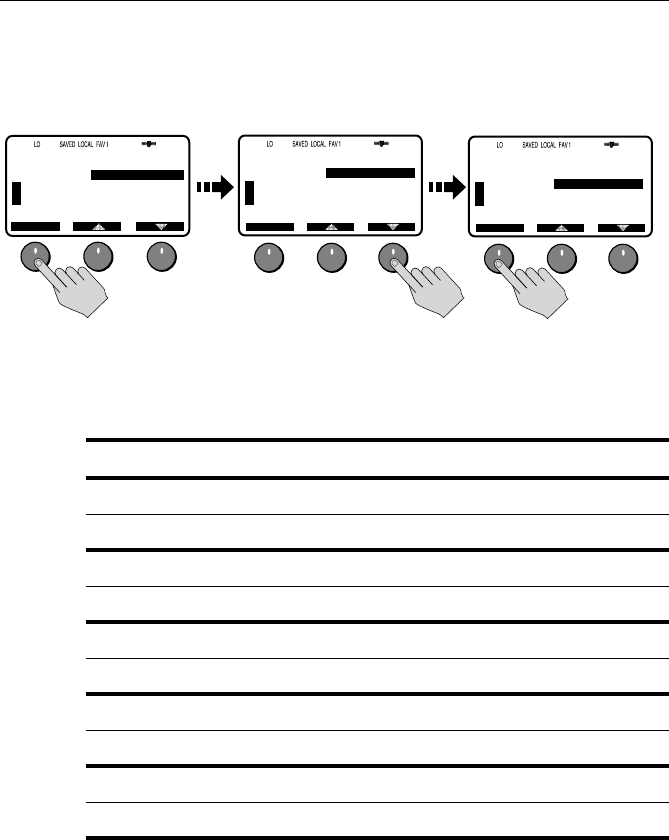
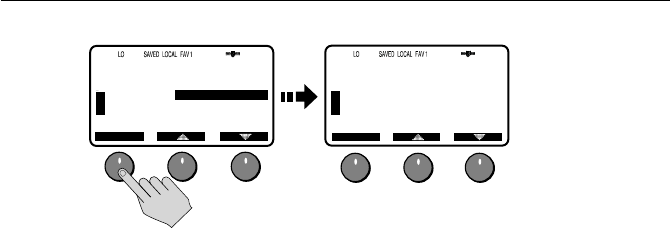
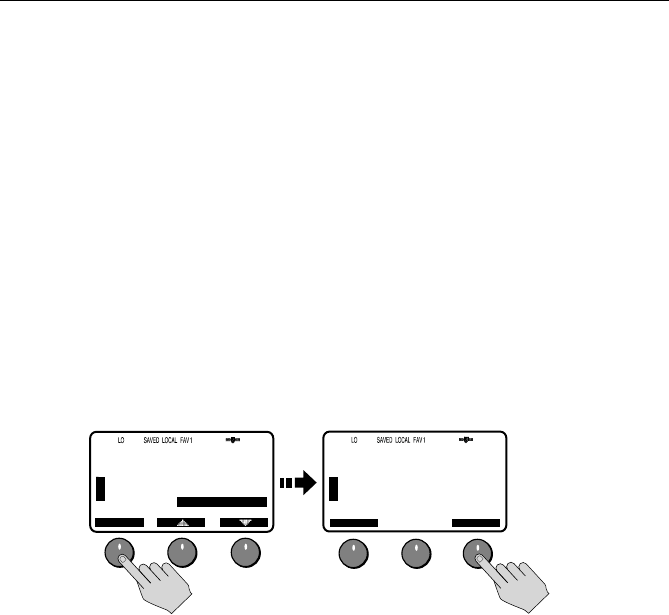
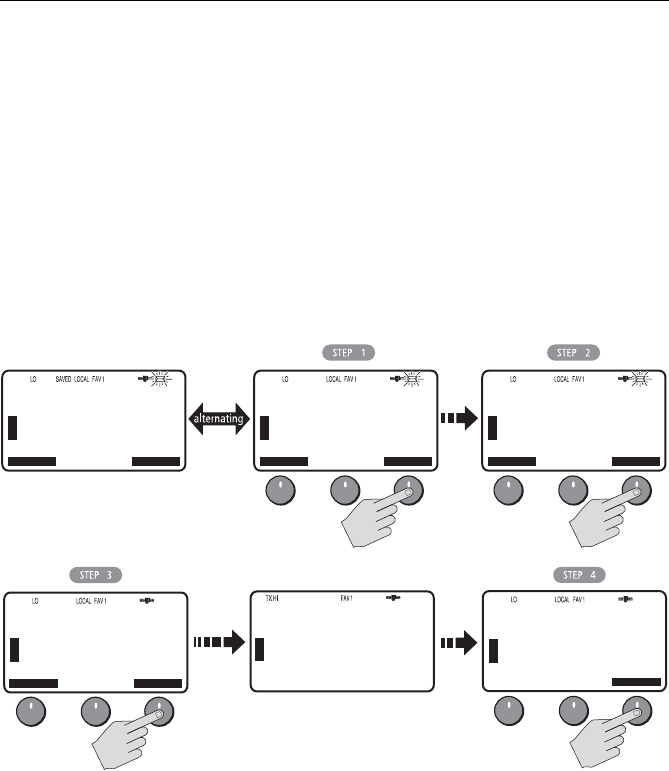
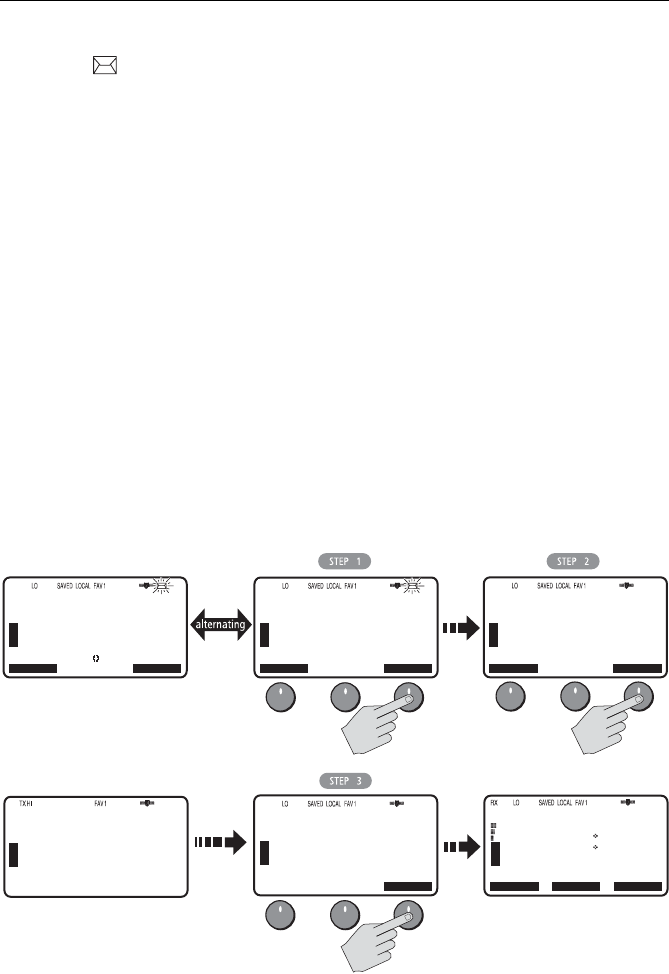
Sensitivity
Use this setting to switch the transmit power from high to low. Press the L/D soft
key t o toggle between full receiver sensitivity (Distant mode) and attenuated
receiver sensitivity (Local mode). The LOCAL icon appears while in Local mode
and then is removed in Distant mode.
4.3 Hailer/Fog Horn/Intercom
This menu item provides access to three auxiliary functions. These operations
require that you have purchased and installed an optional hailer horn.
HAIL/FOG/IC is an auxiliary mode. While Hailer, Fog Horn or Intercom
operations are active, you cannot send or receive radio calls. The
exception is in AUTO FOG mode, between soundings.
Hailer
The Hailer operation enables the unit to use a Hailer Horn as a loudspeaker. Press
and hold PTT to place the unit in Hailer mode. Anything spoken into the handset
is amplified and broadcast from the Hailer Horn (but not transmitted over the
radio). To adjust the Hailer Horn broadcast volume, use the up/down arrow soft
keys while pressing and holding PTT.
Release PTT to switch to Listen mode. The Hailer Horn then acts as a directional
microphone. Sounds picked up by the Hailer Horn are heard on the radio speaker.
To adjust the Hailer Horn broadcast volume, use the up/down arrow soft keys.
71
PLEASURE
B
A
SELECT
U
S
A
VHF OPS
WATCH MODE
FREQ BAND
CHANNEL NAME
FAVORITE CH
SENSITIVITY
71
PLEASURE
B
A
U
S
A
SENSITIVITY
BACK
SET
LOCAL
OR
DISTANT
71
PLEASURE
B
A
U
S
A
D9248-1
L/D BACK L/D
SENSITIVITY
SET
LOCAL
OR
DISTANT
78
PLEASURE
U
S
A
HAIL/FOG/IC
SELECT
HAILER
FOG
INTERCOM
[BACK]
A
78
PLEASURE
U
S
A
HAILER
END
TALKING
VOL: 10
HORN VOLUME
A
D9188-1
PTT
78
PLEASURE
U
S
A
HAILER
LISTENING
PRESS PTT
TO TALK
END
A
Chapter 4: Menu Settings 55
Fog Horn
This operation enables the radio to emit various fog horn tones over a hailer horn
speaker. Select one of the following modes, and then press SELECT to enable the
selection:
MANUAL FOG
Pressing the PTT switch sounds a continuous 400 Hz tone for as long as you hold
the PTT.
AUTO FOG
Sounds a predetermined pattern. Press END soft key or any hard key (CLEAR/WX,
HAILER/INTCM, etc.) to quit.
Note:
Between AUTO Fog Horn soundings, you can make and receive calls.
Select one of the following modes, and then press SELECT to enable the selection:
• PWR MAKE WY—Power vessel underway
• NOT MAKE WY—Power vessel not underway
• SAIL/FISHNG—Sailing vessel or any vessel fishing but not trolling
• RSTRICT/TOW—Restricted in ability to maneuver or towing another vessel
• UNDER TOW—This vessel being towed
• AGROUND—Vessel is aground
• AT ANCHOR—Vessel is at anchor
Volume is controlled by the up/down soft keys.
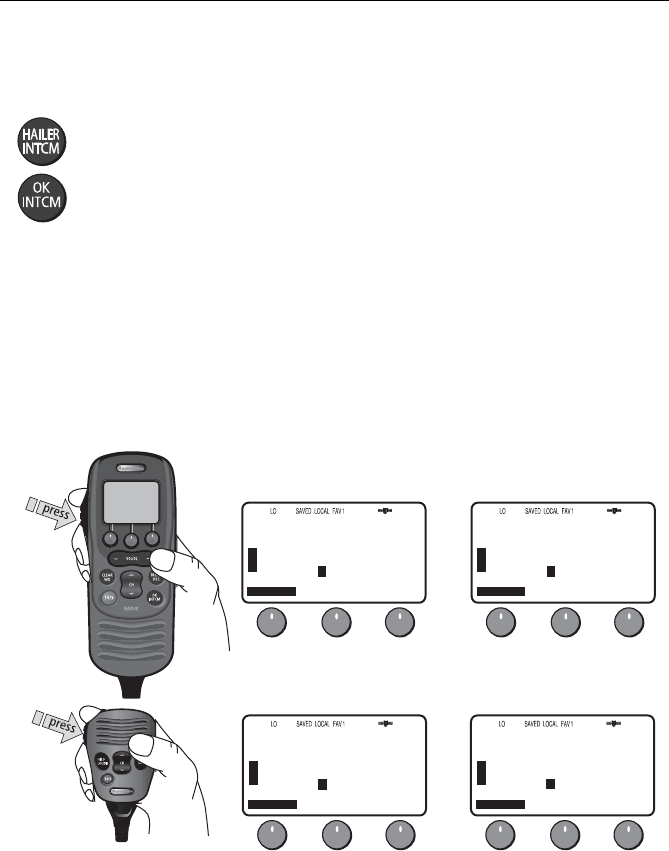
Intercom
When a RayMic secondary handset is installed on the Ray218/Ray55, Intercom
operation enables voice communications between the RayMic and the
transceiver. You can initiate the call from either the transceiver or second station.
The following illustrates what is displayed when the transceiver initiates the call.
D9433-1
78
PLEASURE
B
U
S
A
HAIL/FOG/IC
SELECT
A
78
PLEASURE
B
U
S
A
INTERCOM
CALLING
RAYMIC
CANCEL
A
78
PLEASURE
B
U
S
A
INTERCOM
INCOMING
FROM
BASE
PRESS PTT
TO ACCEPT
CANCEL
A
on Transceiver on RayMic
AAA
HAILER
FOG
INTERCOM
[BACK]
56 Ray218 and Ray55 VHF Radios
To initiate an Intercom call:
1. From the sending station (transceiver or RayMic) select INTERCOM from the
IC/HAIL/FOG menu.
—or—
Press and hold the HAILER / INTCM key on the Ray218.
—or—
Press and hold the OK / INTCM key on the RayMic.
The receiving station sounds an alert tone and displays a message that an
intercom call is incoming.
2. On the receiving station, press PTT to accept the call and respond.
While PTT is depressed, that station displays TALKING and the other station
displays LISTENING. When neither station is pressing PTT, both LCD’s display
PRESS PTT TO TALK.
3. On the sending station, when the LCD no longer reads TALKING, press PTT to
talk.
4. To terminate the call, press END from either station.
D9434-1
78
PLEASURE
B
U
S
A
INTERCOM
END
LISTENING
A
78
PLEASURE
B
U
S
A
INTERCOM
END
TALKING
A
on Transceiver on RayMic
78
PLEASURE
B
U
S
A
INTERCOM
END
TALKING
A
78
PLEASURE
B
U
S
A
INTERCOM
END
LISTENING
A
on Transceiver on RayMic
AA
A
A

Chapter 4: Menu Settings 57
4.4 GPS/Time Setup
By default, the Ray218/Ray55 auto-detects NMEA 0183 strings and decodes
appropriate latitude/longitude position and time or COG/SOG. When position
data is available, the GPS satellite icon appears on the top line of the LCD. If the
GPS navigation receiver is not connected or is not functional, a manual latitude/
longitude position and UTC time can be entered and used in the DSC distress
transmitted message.
Manual Position
If no GPS data is available and the MMSI number has been programmed, the GPS
icon does not appear, and POS DATA REQ is displayed on the dot matrix display,
followed by NO POS DATA. An alarm sounds for 5 seconds or until you
acknowledge by pressing any key.
The alert repeats every four hours as long as no position information has been
entered manually. If position data is entered manually but has not been updated
during the previous 23.5 hours, all the position (lat/lon) fields are set to all 9’s,
time field is set to all 8’s, and the display reverts to NO POS DATA.
Note:
The Manual Lat/Lon function is valid only when your radio is not connected to a
GPS receiver.
To manually set the GPS position and time settings:
1. Under the GPS SETUP menu, select MANUAL POS. The Manual Position
screen appears.
2. Using the CH knob, fill in the Lat/Lon and time information, one character at a
time. The first character space is highlighted with a flashing underline.
A more-detailed description of manual character entry can be found in “Add-
ing a new Entry“ on page 75.
• Rotate the CH knob to scroll through the selections.
• When the desired character appears, push in the CH knob to accept it. The
next character to be filled in sequence is underlined (_).
• Use the < and > soft keys to edit selected characters, if necessary.
• Continue this process until all latitude data been selected.
• When the direction character is underlined, rotate the CH knob to toggle
between N and S, if necessary.
• Press the CH knob when the desired direction character is displayed. The
first character in the longitude field is now underlined.
• Use the same process to complete longitude information.
58 Ray218 and Ray55 VHF Radios
• Use the same process to complete time information.
When time data is entered manually, the MAN indicator appears in front
of the time, which is displayed in UTC.
3. Press DONE soft key when complete. The radio returns to the GPS Setup
menu.
4. Select BACK to exit the menu.
Settings
You can also set how some time and position information is displayed on the
screen. Make your selection from the options on the list.
B
72
SHIP/SHIP
B
GPS SETUP
SELECT
MANUAL POS
SETTING
NMEA OUTPUT
[BACK]
U
S
A
B
72
SHIP/SHIP
B
MANUAL POS
BACK
U
S
A
_- --:----N
--- --:----W
--:--UTC
Select Characters Press OK
>
<
B
72
SHIP/SHIP
B
MANUAL POS
BACK
U
S
A
27 07:3800N
080 04:8500W
21:30UTC
PRESS DONE
TO ACCEPT
DONE
72
SHIP/SHIP
B
A
U
S
A
A
27 07.3800N
080 04.8500W
MAN21:30UTC
CH69 CH72
CH72
D9189-1
B
72
SHIP/SHIP
B
GPS SETUP
SELECT
MANUAL POS
SETTING
NMEA OUTPUT
[BACK]
U
S
A
69
PLEASURE
B
A
SELECT SELECT
U
S
A
GPS SETUP
MANUAL POS
SETTING
NMEA OUTPUT
[BACK]
69
PLEASURE
B
A
U
S
A
SETTING
LAT/LON DISP
TIME DISPLAY
TIME OFFSET
TIME FORMAT
COG/SOG
D9425-1
SELECT
69
PLEASURE
B
A
U
S
A
SETTING
LAT/LON DISP
TIME DISPLAY
TIME OFFSET
TIME FORMAT
COG/SOG

Chapter 4: Menu Settings 59
Latitude/Longitude Display
The LAT/LON DISP setting indicates whether Latitude and Longitude position data
are displayed on the screen in standby mode.
Time Display
The TIME DISPLAY setting indicates whether time information is displayed on the
screen in standby mode. When manual time is used, it is always displayed as UTC
time, even if you have entered an offset.
Note:
If TIME DISPLAY is set ON, COG/SOG is automatically set to OFF. Because they oc-
cupy the same line on the LCD, only one of these two settings can be displayed at a time.
Time Offset
The TIME OFFSET setting indicates the amount of time to add or subtract from
UTC time to equal your local time. Rotate the CH knob to select a value from
between +13 to –13 hours of UTC and then press ACCEPT to confirm. After
setting up Time Offset, “LOC” is displayed to the right of the Time field to indicate
local time.
Note:
The Time Offset setting is valid only when GPS data is available. When manual time
is used, it is always displayed as UTC time, even though you have entered an offset.
Time Format
The TIME FORMAT setting indicates whether the time is displayed in 12 hour or 24
hour format.
COG/SOG Display
This setting determines whether Course Over Ground and Speed Over Ground
(COG/SOG) data from the GPS is displayed on the bottom line of the dot matrix
display instead of the time of day. The menu setting “Bearing Mode“ on page 63
determines whether the True or Magnetic heading is displayed for COG. The
setting “Speed Unit“ on page 64 determines whether knots, MPH or KPH is used
for SOG.
Note:
If COG/SOG is set ON, TIME DISPLAY is automatically set to OFF. Because they oc-
cupy the same line on the LCD, only one of these two settings can be displayed at a time.
69
TW 16+09+W01
12 34.5678N
123 45.6789W
356 T 12.6KS
PLEASURE
B
CH69 CH71 CH72
U
S
A
D9190-1

60 Ray218 and Ray55 VHF Radios
NMEA Output
When Distress Call and Position (lat/lon) information is received from other
stations, your Ray218/Ray55 has the capability of forwarding this data to your
display unit (C Series, E Series, etc.) over the NMEA port so that it can be displayed
on the screen. You can specify which stations will have their position data and
Distress Call information sent to the display unit.
SEL OUTPUT
Use this option to select the stations for which you want incoming position data
and Distress Call information to be displayed.
1. From the GPS SETUP menu, select NMEA OUTPUT.
2. From the NMEA OUTPUT menu, select SEL OUTPUT.
3. Select which vessel’s position data will be forwarded to the display:
• ALL STATION. Forward all received position data to the display.
• LIST STATION. Send position data from stations that you have selected
from a list. If you choose this option, specify the permitted vessels using
the SEL STATION option described below.
• NONE. Do not forward position data from any station.
SEL STATION
If you enabled LIST STATION in the SEL OUTPUT menu, this option presents a list
from which you can select the stations whose data will be forwarded.
1. As outlined above in step 3, ensure you have selected LIST STATION from the
SEL OUTPUT menu.
2. From the NMEA OUTPUT menu, select SEL STATION. The list of stations in your
Phone book is displayed.
3. Using the up/down arrow soft keys, highlight the first station whose data you
want to have forwarded to the display unit.
4. Press SELECT. An arrow appears to the left of the station name, indicating that
it has been selected.
5. Continue until all stations for which you want to allow data to be forwarded
have been selected (have an arrow next to the station name).
6. Select [BACK] to exit.
Chapter 4: Menu Settings 61
68
PLEASURE
B
A
SELECT SELECT SELECT
U
S
A
GPS SETUP
MANUAL POS
SETTING
NMEA OUTPUT
[BACK]
68
PLEASURE
B
A
U
S
A
NMEA OUTPUT
SEL OUTPUT
SEL STATION
[BACK]
68
PLEASURE
B
A
U
S
A
SEL OUTPUT
ALL STATION
LIST STATION
NONE
[BACK]
SELECT
D9426-1
68
PLEASURE
B
A
U
S
A
SEL STATION
$AQUAHOLIC
$DESTINY
$GOOD RX
$PURA VIDA
[BACK]
SELECT
68
PLEASURE
B
A
U
S
A
NMEA OUTPUT
SEL OUTPUT
SEL STATION
[BACK]
SELECT
68
PLEASURE
B
A
U
S
A
SEL STATION
$AQUAHOLIC
$DESTINY
$GOOD RX
$PURA VIDA
[BACK]
SEL OUTPUT
SEL STATION
62 Ray218 and Ray55 VHF Radios
4.5 System Configuration
Use these menu items for selecting general system-wide settings.
Backlight Adjustment
This setting adjusts the backlight brightness for the LCD, microphone keypad and
transceiver keypad. Choose from 10 brightness settings or OFF.
Rotate the CH knob or use the up/down arrow soft keys to select the desired
backlight level. The number of blocks illuminated in the bar indicates the level,
one through ten. For HI all 10 are illuminated; for OFF none are illuminated.
Press SELECT or push the CH knob to accept.
Separate backlight settings are maintained for the transceiver and the RayMic
handset. When the backlight level is being adjusted in the transceiver, a message
appears on the RayMic indicating that the base is busy. A similar message
appears on the base LCD when adjusting the backlight on the RayMic.
Contrast Adjustment
This setting adjusts the levels of LCD contrast. Choose from 10 settings.
Rotate the CH knob to select the desired contrast level. The number of blocks
illuminated in the bar indicate the level. A larger number of blocks indicate a
darker LCD. For HI, all 10 blocks are illuminated; for LO none are illuminated.
78
PLEASURE
B
U
S
A
SYSTM CONFIG
SELECT
BACKLIGHT
CONTRAST
KEY BEEP
SIGNAL BAR
BEARING MODE
A
78
BACKLIGHT
OFF HI
PLEASURE
A
U
S
A
SELECT
78
BACKLIGHT
OFF HI
PLEASURE
A
U
S
A
SELECT
D9191-1
SELECT
09
CALLING
B
U
S
A
SYSTM CONFIG
SELECT
BACKLIGHT
CONTRAST
KEY BEEP
SIGNAL BAR
BEARING MODE
A
09
CONTRAST
LO HI
CALLING
A
U
S
A
09
CONTRAST
LO HI
CALLING
A
U
S
A
SELECT
D9192-1
Chapter 4: Menu Settings 63
Key Beep
This setting is used to set the volume of the beep that sounds when a key is
pressed. Select LOUD, QUIET or OFF.
Signal Bar
Use this setting to determine whether the signal strength bar is displayed to the
left of the channel number. Select from ON or OFF.
Bearing Mode
This setting is used to determine how heading data are displayed when COG/SOG
is displayed (see page 59). Select MAGNETIC or TRUE. If you select MAGNETIC, an
“M” appears. If TRUE is selected, a “T” appears.
68
PLEASURE
B
U
S
A
SYSTM CONFIG
SELECT
BACKLIGHT
CONTRAST
KEY BEEP
SIGNAL BAR
BEARING MODE
A
68
KEY BEEP
LOUD
QUIET
OFF
[BACK]
PLEASURE
A
U
S
A
SELECT
68
KEY BEEP
LOUD
QUIET
OFF
[BACK]
PLEASURE
A
U
S
A
SELECT
D9193-1
71
PLEASURE
B
U
S
A
SYSTM CONFIG
SELECT
BACKLIGHT
CONTRAST
KEY BEEP
SIGNAL BAR
BEARING MODE
A
71
PLEASURE
A
U
S
A
SELECT
SIGNAL BAR
ON
OFF
[BACK]
71
PLEASURE
A
U
S
A
CH71
TW 16+09+W01
26 06.0098N
080 04.8589W
AM11:45LOC
D9194-1
CH72 CH78A
D9195-1
09
CALLING
A
U
S
A
TW 16+09+W01
26 06.0098N
080 04.8589W
356 M 12.6KS
CH69 CH71 CH72
09
CALLING
A
U
S
A
SELECT
BEARING MODE
TRUE
MAGNETIC
[BACK]
09
CALLING
B
U
S
A
SYSTM CONFIG
SELECT
BACKLIGHT
CONTRAST
KEY BEEP
SIGNAL BAR
BEARING MODE
A
64 Ray218 and Ray55 VHF Radios
Speed Unit
This parameter sets the unit for Speed that is used to display all data, including
information received from other instruments on the system.
System Test
This menu item displays status of four separate conditions:
Item Status Meaning
GPS OK Valid NMEA signal received
NO NMEA signal not received
RAYMIC OK RayMic second station is connected
NO RayMic is not connected
HAILER OK Hailer horn speaker is connected
NO Hailer is not connected
BATTERY OK Battery voltage within nominal limits (10.5–15.8 VDC)
NO Battery is below 10.5 VDC or above 15.8VDC
DSC OK DSC processor is operating properly.
NO DSC processor is not operating properly.
69
PLEASURE
A
U
S
A
SELECT
SPEED UNIT
KNOTS
MPH
KPH
[BACK]
69
PLEASURE
B
U
S
A
SYSTM CONFIG
SELECT
A
SPEED UNIT
SYSTEM TEST
VERSION
RESET
[BACK]
69
PLEASURE
A
U
S
A
SELECT
SPEED UNIT
KNOTS
MPH
KPH
[BACK]
D9196-1
Chapter 4: Menu Settings 65
Version Number
This menu item displays the hardware and software versions of your radio.
Reset
Use this menu item to return your radio to the default factory settings. The
following items are reset. All other settings are unaffected.
VHF OPS
•DISPLAY MODE
Set to 1 UP CHANNEL.
•HI/LO POWER
Set to HI.
•SAVE CHANNEL
The Saved Channel list is cleared.
•CHANNEL NAME
The Long Channel Name list is displayed.
•SENSITIVITY
Set to DISTANT.
GPS SETUP
•SETTING
LAT/LON DISP is set ON.
TIME DISPLAY is set ON.
TIME OFFSET is set to 0.
TIME FORMAT is set to 24 HR.
COG/SOG is set OFF.
• NMEA OUTPUT
SEL OUTPUT is set to ALL STATION.
71
PLEASURE
B
U
S
A
SYSTM CONFIG
SELECT
A
SPEED UNIT
SYSTEM TEST
VERSION
RESET
[BACK]
D9196-1
71
PLEASURE
A
U
S
A
SELECT
SYSTEM TEST
GPS:
RAYMIC:
HAILER:
BATTERY:
OK
NO
NO
OK
DSC: OK
66 Ray218 and Ray55 VHF Radios
SYSTEM CONFIG
•KEY BEEP
Set to QUIET.
•SIGNAL BAR
Set to ON.
•BEARING MODE
Set to TRUE.
•SPEED UNIT
Set to KNOTS.
DSC MENU
•RECV’D CALLS
All logs are cleared.
•DSC SETUP
AUTO CH CHANGE is set ON.
71
PLEASURE
B
U
S
A
SYSTM CONFIG
SELECT
A
SPEED UNIT
SYSTEM TEST
VERSION
RESET
[BACK]
D9207-1
71
PLEASURE
A
U
S
A
BACK
RESET
SYSTEM
RESET
PRESS RESET
TO ACCEPT
RESET
Chapter 5: Digital Selective Calling (DSC)
The Ray218/Ray55 includes equipment for Class “D” Digital Selective Calling
(DSC). DSC protocol is a globally applied system used to send and receive digital
calls. DSC uses a unique Maritime Mobile Service Identity (MMSI) number to
direct DSC calls directly to your radio, much like a telephone number.
Note:
An MMSI number is required to operate the DSC equipment in this radio. You can
obtain an MMSI from BoatUS (www.boatus.com). Once obtained, you can program the
MMSI number yourself one time only using the operation described in “My MMSI ID“ on
page 92. Otherwise, your Raymarine dealer can program or change the number for you.
The Ray218/Ray55 includes a separate dedicated receiver just for DSC
communications on channel 70. When a DSC call is received, the radio
automatically responds based on the type of call. When receiving a DSC call from
another vessel or a coast station, an alert sounds and DSC data appears in the
LCD–such as time of a call, the caller and the type and priority of a call.
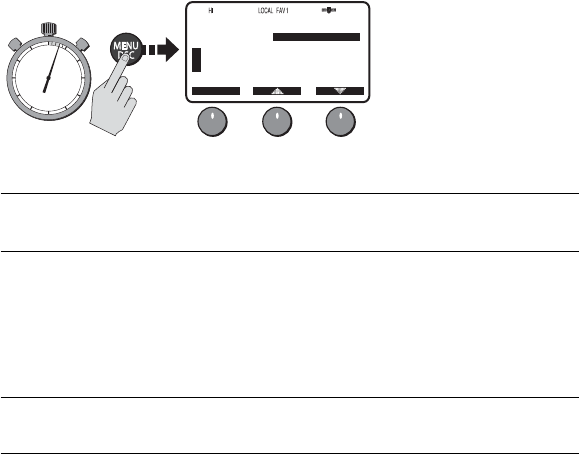
5.1 DSC Call Menu
You access DSC functions via the DSC menu. Press and hold the MENU/DSC key
for 3 seconds to enter DSC call mode.
Note:
Distress calls are made using the DISTRESS key.
The Ray218/Ray55 can make the following type of DSC calls:
DSC Call
Type Description
DISTRESS Sends out your MMSI number and nature of your Distress along with
the position and time information from the input NMEA data. This dig-
ital information lets other ships and shore stations equipped with
appropriate DSC equipment know where you are and that you are in a
Distress situation. Distress Calls are made using the DISTRESS key.
To make Distress calls, the radio must be connected to
a GPS.
INDIVIDUAL Makes a ROUTINE DSC call to a specific station identified by its MMSI
number.
09
CALLING
B
B
DSC MENU
SELECT
INDIVIDUAL
GROUP
ALL SHIPS
POS REQUEST
RECV’D CALLS
U
S
A
D9208-1
PRESS and HOLD for 3 secs
68 Ray218 and Ray55 VHF Radios
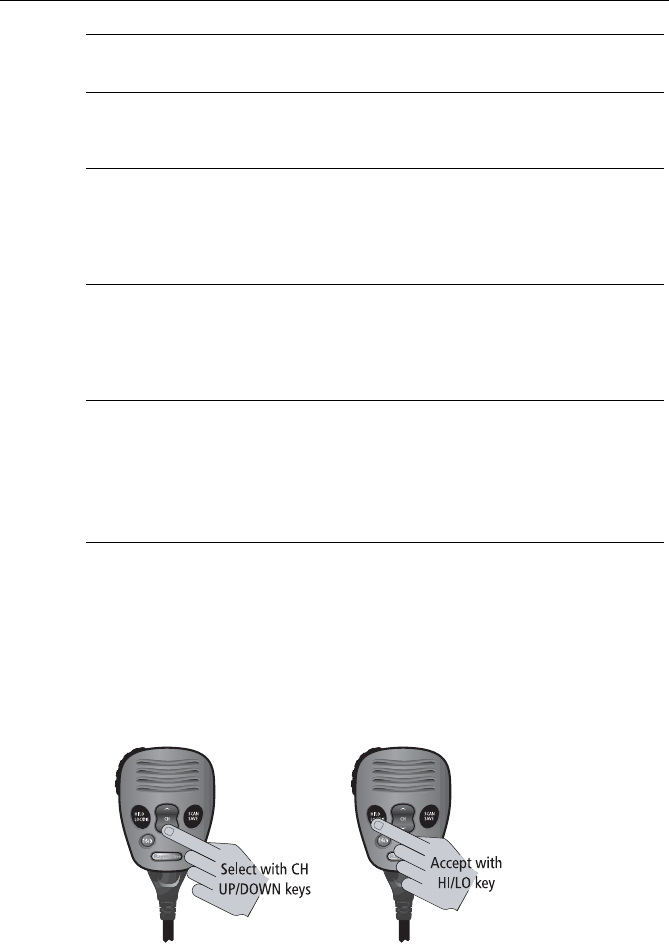
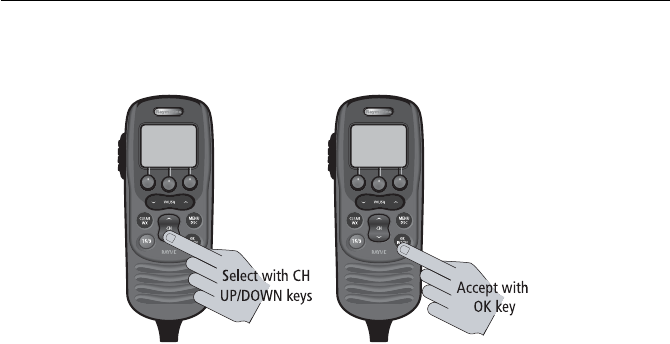
Making DSC Menu and Programming Selections
There are three ways to make DSC menu and character selections in your radio:
1. Most examples in this chapter describe making selections using the CH knob
and soft keys on the transceiver.
2. However, you can also press the microphone up/down keys to make your
selections and then press the microphone HI/LO key to accept.
GROUP Sends transmissions that are only received by radios sharing a com-
mon Group MMSI number. Up to 5 Group MMSI numbers can be
stored and called.
ALL SHIPS Sends out a message to all vessels within range that you need assis-
tance but the situation is not serious enough for a Distress Call. All
Ships calls should only be used if hailing for assistance on channel 16
fails. There are two types of All Ships Calls: SAFETY for advisory alerts
and URGENCY for assistance when life is not in immediate danger.
POSITION
REQUEST
This option enables you to request GPS position information from any
vessel for which an MMSI number is known. You can specify the target
vessel either by selecting it from your MMSI phonebook or by manu-
ally entering its MMSI number. You can also be requested to send out
your position to someone else.
RECEIVED
CALLS
Three separate logs listing all received DSC Call types by number and
time of call. Entries are separated into the following: Distress Log, Call
Log for all other types of DSC Calls, and Position Log.
NOTE: You can place a call directly from a log to the station that is cur-
rently displayed. You can also add the displayed station to the DSC
Phonebook.
DSC Call
Type Description
D10023-1
Chapter 5: Digital Selective Calling (DSC) 69
3. Alternatively, if you have an optional RayMic, you can use its CH up/down
keys to select and OK key to accept.
D10022-1
70 Ray218 and Ray55 VHF Radios
5.2 Distress Calls
For a Distress Call transmission, the Ray218/Ray55 takes the position and time
information from the input NMEA data along with your MMSI and converts it into
a digital “packet”. When transmitted, this digital information lets other ships and
shore stations equipped with appropriate DSC equipment know where you are
and that you are in a Distress situation.
Your call can specify the nature of the Distress (designated call) or not
(undesignated call).
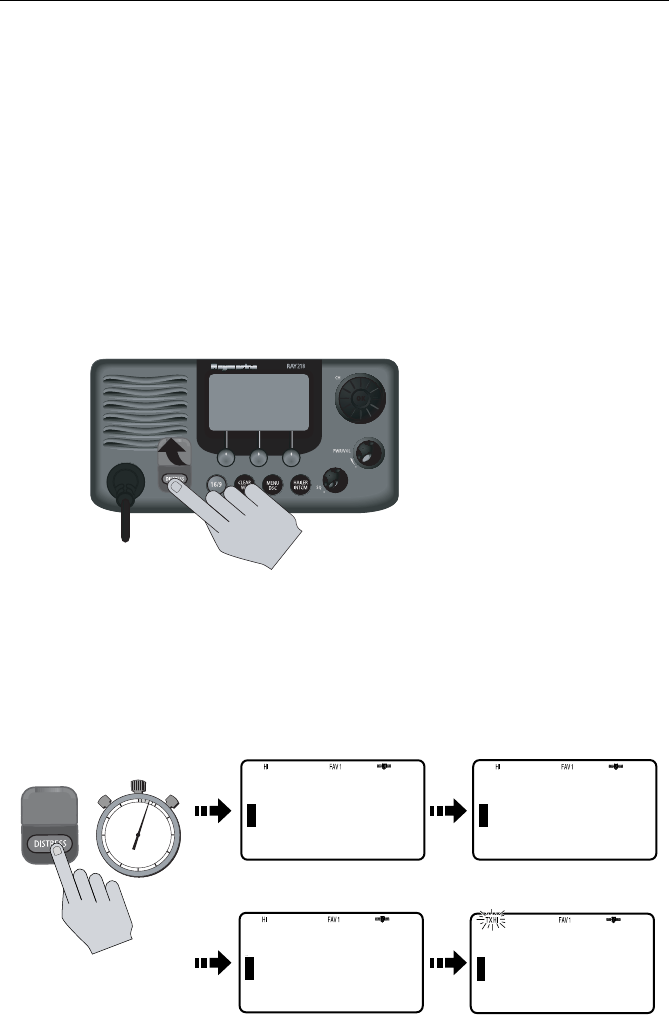
Sending a Distress Call
Lift the spring-loaded door on the front panel of the transceiver.
Undesignated (Quick) Distress Call
To send a distress call without specifying its nature:
• Press and hold the red DISTRESS key for 3 seconds to initiate the call. During
this time, the radio beeps, the display flashes and a timer counts down
03...02...01.
D9254-1
03
B
B
DISTRES CALL
COUNTING
DOWN...
U
S
A
70
DSC
B
B
U
S
A
DISTRES CALL
TRANSMITING
DISTRESS
UNDESIG
02
B
B
U
S
A
01
B
B
U
S
A
BACK SEND
DISTRES CALL
COUNTING
DOWN...
DISTRES CALL
COUNTING
DOWN...
D9256-1
PRESS and HOLD for 3 SECS
10
15
20
25
30
35
40
45
50
55 60 5
Chapter 5: Digital Selective Calling (DSC) 71
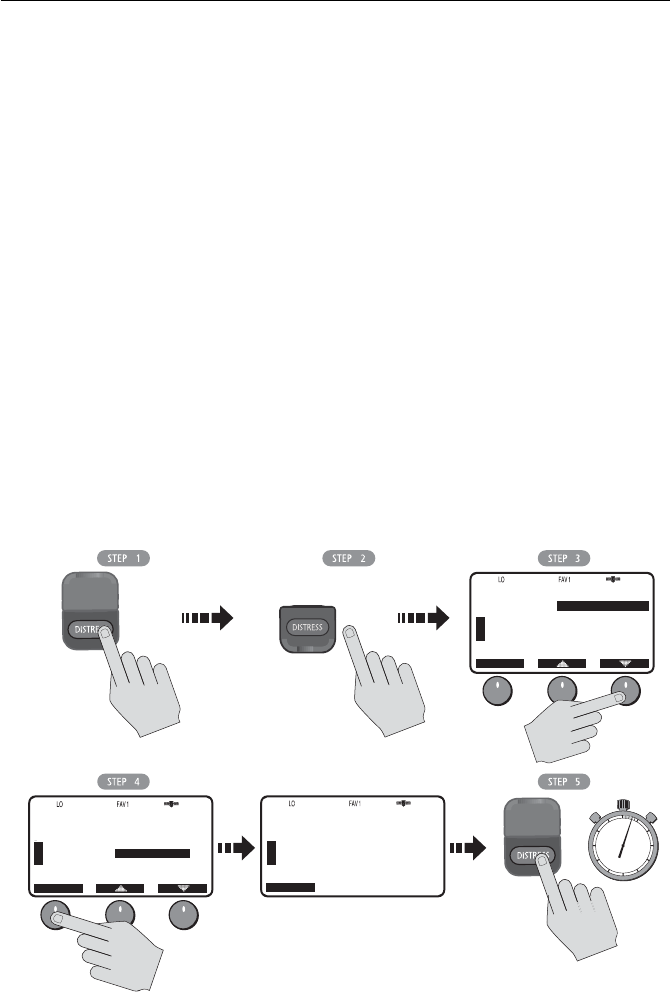
Designated Distress Call
To send a distress call and specify its nature:
1. Press the red DISTRESS key.
2. Release the DISTRESS key.
The Distress Call screen appears.
3. Rotate the CH knob or press the up/down arrow soft keys until the type of
Distress you wish to designate is highlighted:
4. Press SELECT to choose that type of Distress.
5. Press and hold the DISTRESS key for 3 seconds to initiate the call. During this
time, the radio beeps, the display flashes and a timer counts down
03...02...01... , just as with the undesignated call illustrated above.
• UNDESIGNATED • SINKING
• FIRE • ADRIFT
• FLOODING • ABANDONING
• COLLISION • PIRACY
• GROUNDING • MANOVERBOARD
• CAPSIZING • EXIT
71
B
B
U
S
A
DISTRES CALL
SELECT
UNDESIGNATED
FIRE
FLOODING
COLLISION
GROUNDING
PLEASURE
71
B
B
U
S
A
DISTRES CALL
SELECT
UNDESIGNATED
FIRE
FLOODING
COLLISION
GROUNDING
PLEASURE
71
B
B
U
S
A
DISTRES CALL
EXIT
FLOODING
HOLD DOWN
DISTRESS
3 SECONDS
PLEASURE
D9255-1
Release
Press
HOLD for 3 SECS
PRESS and
72 Ray218 and Ray55 VHF Radios
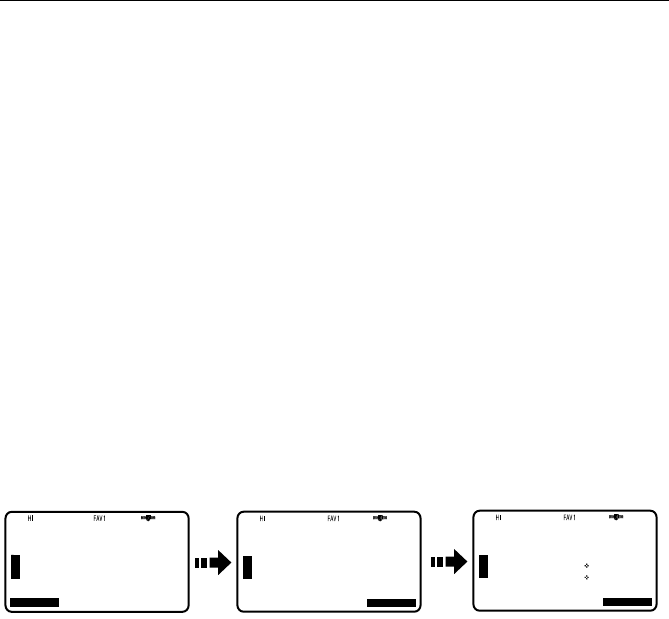
Transmitting
After the Distress transmission, the radio is automatically set to channel 16 at
high power to listen for and respond to voice replies from Coast Guard or other
vessels that may have received your Distress Call.
The Distress Call is resent randomly every 3.5 – 4.5 minutes until an
acknowledgement is received or the call is manually cancelled.
To mute the alarm:
Press CLEAR/WX.
To manually cancel the automatic Distress resend:
Press CLEAR/WX a second time.
The Distress Call is resent randomly every 3.5 – 4.5 minutes until an
acknowledgement is received or the call is manually cancelled.
Receiving Acknowledgement
After the call is sent, the radio waits for acknowledgement. The display stops
flashing and the alarm sounds continuously until muted or an ACK is received.
Cancelling a Distress Call Made in Error
If the countdown has not been completed, release the DISTRESS key before the
countdown has completed.
If the countdown has completed and the distress call has been sent in error, you
should make an announcement as soon as possible that the distress situation
does not exist.
1. Immediately press CLEAR/WX two times to cancel the Distress Call. The
radio returns to the state before the Distress Call.
2. Press the 16/9 key. The radio switches to the Priority Channel.
3. Make a broadcast to all stations giving your ship’s name, call sign and MMSI
number and cancel the false distress alert. For example:
“All Stations, All Stations, All Stations. This is NAME, CALL SIGN, MMSI ID,
POSITION. Cancel my distress alert of DATE, TIME, NAME, CALL SIGN.”
D9257-1
16
DISTRESS
B
B
U
S
A
16
DISTRESS
B
B
U
S
A
END
DISTRES CALL
AWAIT ACK
AUTO
TRANSMIT
OK
16
DISTRESS
B
B
U
S
A
DISTRES ACK
26 06.0098N
080 04.8589W
12:45UTC
OK
UNDESIG
DISTRESS ACK
FROM:
001234567
ORIGINATOR:
366123456

Chapter 5: Digital Selective Calling (DSC) 73
Receiving a Distress Call
The Ray218/Ray55 receives distress messages sent by another vessel and/or
acknowledgments (ACK) sent by a coast station to another vessel in distress. The
radio also receives distress relays.
Note:
Class “D” DSC radios such as the Ray218/Ray55 are forbidden by law from auto-
matically acknowledging or relaying DSC distress calls. Upon receiving a distress call, you
may hail the vessel in distress on channel 16 and standby to lend assistance if requested.
When a Distress Call is received, the Ray218/Ray55 automatically tunes to
channel 16 and sounds the Distress Alarm Tone. (If you have disabled automatic
channel changing, as described on page 95, you are first prompted whether to
accept the call.)
Two alternating screens appear in the display. When position data and time is
included within the signal, it is displayed on the first screen in the text area of the
LCD. The second screen shows the nature of the distress and time it was sent.
The 2 alternating pages of data are recorded in the Distress Log. The envelope
icon ( )blinks until you accept the call, reject the call, or open the resulting
unread message stored in the Log. See page “Received Calls (Logs)“ on page 90.
Your radio has the capability of forwarding position data from a Distress Call to
your display unit (C Series, E Series, etc.) over the NMEA port so that it can be
displayed on the screen. You can specify which stations will have their position
data information sent to the display unit using the option NMEA Output, which is
described on page 60.
To mute the alert tone:
Press CLEAR/WX.
To ignore the Distress Call:
Press CLEAR/WX a second time or press the CANCEL soft key. The envelope icon
disappears, the call is interrupted and the normal screen appears on the LCD.
To accept a Distress Call when Auto Channel Change is OFF
1. Press the OK soft key or the CH knob. The alert tone is muted, the envelope
icon disappears and the radio switches to channel 16.
2. Press OK again to confirm the channel change. The radio returns to standby
mode. Press PTT to communicate on channel 16.
To accept a Distress Call when Auto Channel Change is ON
Press the OK soft key or the CH knob. The alert tone is muted, the envelope icon
disappears and the radio automatically switches to channel 16. Press PTT to
communicate.
74 Ray218 and Ray55 VHF Radios
Note:
The AUTO CH CHG option determines whether you want your radio automatically
switched to channel 16 to receive the call or instead to be prompted to manually receive or
decline the channel change. See page 95.
Receiving a Distress Relay Sent by Another Station
When a Distress Relay is received, an alarm sounds, the envelope icon blinks and
the LCD displays two alternating screens. The first page displays the Name/MMSI
ID of the station sending the message. Page 2 displays the Name/MMSI ID of the
vessel in distress and its lat/lon position. Your radio does not re-send a distress
relay message.
5.3 DSC Phonebook
The Phonebook stores up to 50 preprogrammed MMSI numbers that you can
select for making an Individual Call. The numbers are stored by name and contain
the station’s MMSI number. You can add, edit and delete entries from the
Phonebook, much as you would on a cellular telephone. Rotate the CH knob to
make an item appear on the dot matrix display and then press in the CH knob to
select that item.
D9268-1
16
DISTRESS
B
B
U
S
A
DISTRESS
26 06.0098N
080 04.8589W
PM12:45LOC
CH78A
16
DISTRESS
B
B
U
S
A
OK
...with Auto Channel Change ON
72
SHIP/SHIP
B
B
U
S
A
CANCEL
DISTRESS
FROM:
$36612345
CH CHANGE
REQ TO CH16
16
DISTRESS
B
B
U
S
A
OK
72
SHIP/SHIP
B
B
U
S
A
...with Auto Channel Change OFF
END OK
CH71 CH72
CANCEL END OK
DISTRESS
FIRE
26 07.3838N
080 04.8499W
12:45UTC
DISTRESS
FROM:
$36612345
CH HAS BEEN
CHANGED
16
DISTRESS
B
B
U
S
A
OK
DISTRESS
FROM:
$36612345
CH HAS BEEN
CHANGED
DISTRESS
FIRE
26 07.3838N
080 04.8499W
12:45UTC
Chapter 5: Digital Selective Calling (DSC) 75
Adding a new Entry
1. Select PHONEBOOK from the DSC menu. The list of Phonebook entries
appears. Highlight <NEW>. If no entries have yet been entered, this is your
only choice.
Press SELECT. You are prompted to enter the MMSI number for the new entry.
The first character space to be modified is highlighted with a flashing under-
line.
2. Rotate the CH knob. The flashing underline is replaced with a numeric charac-
ter. Continue rotating the knob to scroll through the selections.
When the appropriate number appears, press the CH knob to accept. The
next character to be filled in sequence is then underlined.
3. Continue this process until all MMSI digits have been entered. Use the < and
> soft keys to edit selected characters, if necessary.
B
72
SHIP/SHIP
B
DSC MENU
SELECT
GROUP
ALL SHIPS
POS REQUEST
RECV’D CALLS
PHONEBOOK
.
.
.
B
72
SHIP/SHIP
B
PHONEBOOK
.
.
.
SELECT
<NEW>
[BACK]
B
72
PLEASURE
B
PHONEBOOK
BACK
NEW ENTRY
ENTER MMSI:
_--------
ENTER NAME
-----------
.
.
.
D9162-1
.
.
.
B
72
SHIP/SHIP
B
PHONEBOOK
NEW ENTRY
ENTER MMSI:
3--------
ENTER NAME:
----------
.
.
.
BACK
B
72
SHIP/SHIP
B
PHONEBOOK
BACK
NEW ENTRY
ENTER MMSI:
3_-------
ENTER NAME
-----------
Select Characters Press OK
D9209-1
.
.
.
.
.
.
Select Characters
B
72
SHIP/SHIP
B
PHONEBOOK
NEW ENTRY
ENTER MMSI:
36-------
ENTER NAME:
----------
BACK
B
72
SHIP/SHIP
B
PHONEBOOK
BACK
NEW ENTRY
ENTER MMSI:
366123456
ENTER NAME
-----------
Press OK
D9210-1
76 Ray218 and Ray55 VHF Radios
4. When you press the CH knob to accept the final MSSI ID digit, the cursor
moves on to the NAME field. The first character in this line is a symbol
assigned by the radio, based on the MMSI number you entered.
Coast Stations are identified by “00” at the beginning of the station name. If
you enter 00 as the leading digits of the MMSI ID, the radio recognizes this as
a coast station and automatically enters a tower symbol (&). If you enter a
number other than 0 in the initial position of the MMSI ID, an anchor symbol
($) is entered as a prefix to the name, identifying this as a Ship Station.
The first character space to be modified is highlighted with a flashing under-
line. Using the same procedure as above, rotate the CH knob to select the
NAME characters. All alpha and numeric characters are available, as well as
13 symbols: ! # % ’ ( ) : ? / . , + -
Press the CH knob to accept. Continue this process until all NAME characters
have been entered.
5. When complete, press the DONE soft key to accept.
The new entry appears in the list.
Editing an Existing Entry
1. From the Phonebook, rotate the CH knob or press the [ and ] soft keys until
the entry you wish to edit is highlighted.
2. Press SELECT. The list of options appear.
3. Highlight EDIT and press SELECT.
4. Make your changes to the NAME and MMSI ID, using the CH knob.
5. When finished, DONE to save your changes. The revised name or MMSI
number appears in the list.
.
..
.
.
..
.
Press OK
B
72
SHIP/SHIP
B
PHONEBOOK
NEW ENTRY
ENTER MMSI:
36123456
ENTER NAME:
$_--------
BACK
B
72
SHIP/SHIP
B
PHONEBOOK
NEW ENTRY
ENTER MMSI:
36123456
ENTER NAME:
$TROPIC-AL
BACK
Select Characters
D9252-1
.
.
.
.
.
.
D9400-1
B
72
SHIP/SHIP
B
PHONEBOOK
ENTER MMSI:
366123456
ENTER NAME:
$TROPIC-AL
PRESS DONE
DONE
B
72
SHIP/SHIP
B
SELECT
PHONEBOOK
<NEW>
[BACK]
$TROPIC-AL
Press OK

Chapter 5: Digital Selective Calling (DSC) 77
Deleting an Existing Entry
1. From the Phonebook, rotate the CH knob or press the [ and ] soft keys until
the entry you wish to delete is highlighted.
2. Press SELECT. The list of options appear.
3. Highlight DELETE and press SELECT again. You are prompted to confirm your
selection.
4. Press DELETE. The entry is removed from the list.
5.4 Individual Calls
The Ray218/Ray55 can make Individual Routine calls.
Making DSC Calls to Coast Stations
The examples in this handbook illustrate making DSC calls to Ship Stations.
However, the procedures for making Individual Calls to a Coast Station are
different. Calls to a Ship Station require that you enter a subsequent working
channel chosen from a pre-programmed list offered to you by the Ray218/Ray55.
Calls to a Coast Station remove this step from the operating procedures. The
Coast Station controls and indicates the subsequent working channel within its
acknowledgement.
The Ray218/Ray55 automatically detects the correct procedures for you based on
the type of MMSI number you enter manually or with or the phonebook. If “00” is
detected as the first two characters of the MMSI, Coast Station procedures are
implemented automatically.
Note:
When making a call to a coast station, you will not be asked to select a working
channel because that will be provided by the coast station.
Transmitting an Individual Call
To make an Individual Call to a ship or coast station, you must select the specific
MMSI number to contact and the working channel to be used for the call. The
MMSI ID can be entered manually or selected from a Phonebook list of
preprogrammed numbers specified using the MENU function, as follows:
1. From the DSC menu, rotate the CH knob or press the [ and ] soft keys until
INDIVIDUAL is highlighted, and push the CH knob or press SELECT.
The Individual Routine menu appears, which displays any Phonebook entries
you have saved and <MANUAL> for manual number entry.
2. Rotate the CH knob or press the arrow soft keys until the desired individual
name is highlighted.
3. When the desired name is highlighted, press SELECT.
78 Ray218 and Ray55 VHF Radios
If using MANUAL MMSI ID entry:
Enter the MMSI number using the CH knob. Rotate the CH knob to select
each character and then push in the CH knob to accept. The next position to
be modified is indicated by a blinking underline. A more-detailed description
of manual character entry can be found in “Adding a new Entry“ on page 75.
4. Press OK to initiate the call.
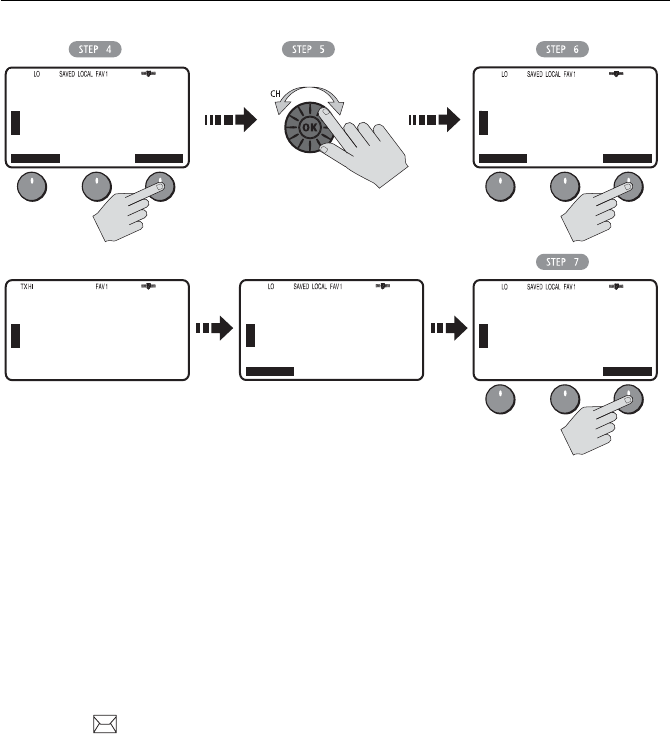
5. Rotate the CH knob to select the working channel to be used for the Individual
Call and press OK. Select from 06, 08, 09, 10, 13, 16, 17, 67, 68, 69, 71, 72, 73
or 77.
Note:
Individual Calls to a Coast Station remove this step from the operating proce-
dures. The Coast Station controls and indicates the working channel within its ACK.
6. Press SEND to transmit the call. The Individual Call is transmitted on channel
70, the radio tunes to the original channel and waits for acknowledgement.
During this period you are still able to receive calls.
7. When the acknowledgement is received, the radio automatically switches to
the selected working channel and sounds a DSC Call alert ring. Press OK to
confirm.
69
PLEASURE
B
B
DSC MENU
SELECT
INDIVIDUAL
GROUP
ALL SHIPS
POS REQUEST
RECV’D CALLS
U
S
A
69
PLEASURE
B
B
INDIVIDUAL
ROUTINE
SELECT
<MANUAL>
$AQUAHOLIC
$CASTAWAY
$CHILLIN
[BACK]
U
S
A
D9211-1
69
PLEASURE
B
B
INDIVIDUAL
ROUTINE
U
S
A
<MANUAL>
$AQUAHOLIC
$CASTAWAY
$CHILLIN
[BACK]
SELECT
D9212-1
69
PLEASURE
B
B
INDIVIDUAL
ROUTINE
U
S
A
ENTER MMSI:
366123456
BACK
69
PLEASURE
B
B
INDIVIDUAL
ROUTINE
U
S
A
<MANUAL>
$AQUAHOLIC
$CASTAWAY
$CHILLIN
[BACK]
SELECT OK
Select Characters Press OK
Chapter 5: Digital Selective Calling (DSC) 79
Press PTT to communicate on the specified channel. Pressing PTT at any time
before an ACK is received cancels the Individual Call
Receiving Individual Calls
When an Individual Call is received, the envelope icon blinks and the LCD
alternates between a screen displaying the name (or MMSI ID) of the station
initiating the call and one indicating that a request for a change of working
channels is being made. The channel does not change until you accept.
The 2 alternating pages of data are recorded in the Call Log. The envelope icon
()blinks until you accept the call, reject the call, or open the resulting unread
message stored in the Log. See page “Received Calls (Logs)“ on page 90.
To mute the alert tone:
Press CLEAR/WX.Automatic cancellation takes place after 2 minutes.
To ignore the Individual Call:
Press CLEAR/WX a second time or press the CANCEL soft key. The envelope icon
disappears, the call is interrupted and the normal screen appears on the LCD.
69
PLEASURE
B
B
INDIVIDUAL
ROUTINE
SHIP-SHIP
BACK
TO:
$CASTAWAY
SELECT CH
U
S
A
72
SHIP/SHIP
B
B
U
S
A
BACK
SELECT OK
Select Working Channel
INDIVIDUAL
ROUTINE
SHIP-SHIP
TO:
$CASTAWAY
PRESS SEND
70
DSC
B
B
INDIVIDUAL
ROUTINE
SHIP-SHIP
BACK
TO:
$CASTAWAY
CALLING...
U
S
A
D9213-1
72
SHIP/SHIP
B
B
U
S
A
OK
SELECT OK
ACK RECEIVED
FROM:
$CASTAWAY
CH HAS BEEN
CHANGED
69
PLEASURE
B
B
INDIVIDUAL
ROUTINE
SHIP-SHIP
CANCEL
TO:
$CASTAWAY
AWAIT ACK...
U
S
A
SELECT OK
SEND
80 Ray218 and Ray55 VHF Radios
To accept an Individual Call:
1. Press the OK soft key to change channels to the one designated by the caller.
The alert tone is muted and the envelope icon disappears.
2. If the caller requests an acknowledgement, press OK to accept.
3. Press SEND to comply with the ACK.
4. When the caller responds to the ACK, press OK to return to standby mode.
Establish voice communications on the designated channel by pressing PTT.
If the caller requests that you change to an unsupported working channel the
message INVALID CHANNEL appears on the LCD. If an acknowledgement is sent,
the originating station is sent the message UNABLE TO COMPLY, indicating that
your radio could not make the requested channel change.
68
PLEASURE
B
B
INDIVIDUAL
ROUTINE
CANCEL
FROM:
$GOOD RX
U
S
A
OK
68
PLEASURE
B
B
INDIVIDUAL
ROUTINE
CANCEL
CH CHANGE
REQUESTED
TO CH 72
U
S
A
OK
72
SHIP/SHIP
B
B
INDIVIDUAL
ROUTINE
CANCEL
FROM:
$GOOD RX
CH HAS BEEN
CHANGED
U
S
A
OK
68
PLEASURE
B
B
CANCEL
U
S
A
SEND
SEND ACK
ABLE TO
COMPLY
PRESS SEND
U
S
A
70
DSC
B
B
BACK < >
SENDING...
SEND ACK
68
PLEASURE
B
B
INDIVIDUAL
ROUTINE
CANCEL
FROM:
$GOOD RX
PRESS OK
TO ACK
U
S
A
OK
D9214-1

Chapter 5: Digital Selective Calling (DSC) 81
5.5 Group Calls
The Group Call feature sends transmissions that are only received by radios
sharing a common Group MMSI number, such as a flotilla or racing fleet. The
Ray218/Ray55 sends Group Routine calls.
Group MMSI Setup
You can program up to five Group MMSI ID numbers and associated Group
names, which can be up to 11 characters long. Group MMSI ID numbers always
begin with a zero (0). You only enter the last 8 digits of the Group ID number; the
initial “0” is automatically entered for you.
Adding a New Group
1. Select GROUP from the DSC Menu.
2. Select MY GROUP ID. If an existing Group name and MMSI ID number are
already stored, those values appear. If blank, <EMPTY 1>, <EMPTY 2>, etc.
are shown to indicate that the Group IDs have not yet been programmed.
Select the first available empty group location. The first field for you to enter
data is the GROUP MMSI number.
3. Fill in the GROUP MMSI field one number at a time. The first character space
to be modified is highlighted with a flashing underline. A more-detailed
description of manual character entry can be found in “Adding a new Entry“
on page 75.
4. Rotate the CH knob. The flashing underline is replaced with a numeric charac-
ter. Continue rotating the knob to scroll through the selections. Use the < and
> soft keys to edit selected characters, if necessary.
5. When the appropriate number appears, press the CH knob to accept. The next
character to be filled in sequence is then underlined. Continue this process
until all GROUP MMSI characters have been entered.
When you press the CH knob to accept the final MSSI ID digit, the cursor
moves on to the GROUP NAME. Because the MMSI ID begins with a zero, the
Name field is prefixed with a plus symbol ( ), which identifies this as a
Group entry. The first character space to be modified is highlighted with a
flashing underline.
6. Using the same procedure as above, rotate the CH knob to select the GROUP
NAME characters. All alpha and numeric characters are available, as well as
13 symbols: ! # % ’ ( ) : ? / . , + -
7. Press the CH knob to accept. Continue this process until all GROUP NAME
characters have been entered.
82 Ray218 and Ray55 VHF Radios
8. When complete, press the DONE soft key to accept. The new entry appears in
the list.
Use the same procedure to edit an existing entry in the list.
Transmitting a Group Call
To call another vessel in the group, select the Group Name to contact from the list
of numbers described in the preceding section and the working channel to be
used for the Group Call.
1. Select GROUP from the DSC menu.
2. Select CALL. The Group entries you have saved appear.
3. Highlight the group name you wish to call and press SELECT.
4. Press OK to initiate the call.
78
PLEASURE
B
A
DSC MENU
SELECT
U
S
A
78
PLEASURE
B
A
GROUP
SELECT
U
S
A
CALL
MY GROUP ID
78
PLEASURE
B
A
MY GROUP ID
U
S
A
SELECT
[EMPTY 1]
[EMPTY 2]
[EMPTY 3]
[EMPTY 4]
[EMPTY 5]
D9215-1
78
PLEASURE
B
A
U
S
A
GROUP
RAYMARINE
[EMPTY 2]
[EMPTY 3]
[EMPTY 4]
[EMPTY 5]
SELECT
Select Characters Press OK
Select Characters Press OK
78
PLEASURE
B
A
MY GROUP ID
BACK
NEW ENTRY
GROUP MMSI:
_--------
GROUP NAME
-----------
U
S
A
78
PLEASURE
B
A
MY GROUP ID
U
S
A
ENTER MMSI:
036612345
ENTER NAME
RAYMARINE
PRESS DONE
DONE
78
PLEASURE
B
A
MY GROUP ID
NEW ENTRY
GROUP MMSI:
036612345
GROUP NAME
_---------
U
S
A
BACK
INDIVIDUAL
GROUP
ALL SHIPS
POS REQUEST
RECV’D CALLS
Chapter 5: Digital Selective Calling (DSC) 83
5. Rotate the CH knob to select the working channel to be used for the call.
6. Press SEND to transmit the Group Call.
The Group Call is transmitted on channel 70, and the radio tunes to the desig-
nated working channel to be used for the Group Call.
7. Press OK to confirm that the working channel has been changed.
.
Receiving Group Calls
The Ray218/Ray55 can receive Group Routine Calls from anyone in your
prearranged group.
When a Group Call is received, the LCD alternates between a screen displaying
the name (or MMSI ID) of the station in the group initiating the call and one
indicating that a request for a change of working channels is being made.
69
PLEASURE
B
B
DSC MENU
SELECT
U
S
A
69
PLEASURE
B
B
GROUP
SELECT
CALL
MY GROUP ID
U
S
A
D9216-1
69
PLEASURE
B
B
GROUP
ROUTINE
U
S
A
RAYMARINE
SEAWATCH
[EMPTY 3]
[EMPTY 4]
[EMPTY 5]
SELECT
69
PLEASURE
B
TO:
SEAWATCH
SELECT CH
GROUP
ROUTINE
U
S
A
70
DSC
B
TO:
SEAWATCH
CALLING...
GROUP
ROUTINE
72
SHIP/SHIP
B
U
S
A
TO:
SEAWATCH
TX COMPLETE
CH HAS BEEN
CHANGED
GROUP
ROUTINE
U
S
A
BACK OK
72
SHIP/SHIP
B
TO:
SEAWATCH
PRESS SEND
GROUP
ROUTINE
U
S
A
BACK SEND
OK
72
SHIP/SHIP
B
U
S
A
CH68
27 07.3838N
080 04.8499W
PM12:45LOC
CH69 CH78A
INDIVIDUAL
GROUP
ALL SHIPS
POS REQUEST
RECV’D CALLS
84 Ray218 and Ray55 VHF Radios
The 2 alternating pages of data are recorded in the Call Log. The envelope icon
()blinks until you accept the call, reject the call, or open the resulting unread
message stored in the Log. See page “Received Calls (Logs)“ on page 90.
To mute the alert tone:
Press CLEAR/WX.Automatic cancellation takes place after 2 minutes.
To ignore the Group Call:
Press CLEAR/WX a second time or press the CANCEL soft key. The envelope icon
disappears, the call is interrupted and the normal screen appears on the LCD.
To accept the Group Call:
1. Press the OK soft key to change channels to the one designated by the caller.
The alert tone is muted and the envelope icon disappears.
2. If the caller requests an acknowledgement, press SEND to comply.
3. When the caller responds to the ACK, press OK to return to the standby mode.
Establish voice communications on the designated channel by pressing PTT.
If the caller requests that you change to an unsupported working channel the
message INVALID CHANNEL appears on the LCD. If an acknowledgement is sent,
the originating station is sent the message UNABLE TO COMPLY, indicating that
your radio could not make the requested channel change.
68
PLEASURE
B
B
GROUP
ROUTINE
CANCEL
FROM:
$GO FISH
GROUP:
RAYMARINE
U
S
A
OK
68
PLEASURE
B
B
GROUP
ROUTINE
CANCEL
CH CHANGE
REQUESTED
TO CH 72
U
S
A
OK
D9217-1
70
DSC
B
B
BACK < >
SENDING...
SEND ACK
72
SHIP/SHIP
B
B
GROUP
ROUTINE
CANCEL
U
S
A
OK
68
PLEASURE
B
B
CANCEL
U
S
A
OK
GROUP
ROUTINE
FROM:
$GO FISH
PRESS OK
TO ACK
72
SHIP/SHIP
B
B
U
S
A
CH71
26 06.0098N
080 04.8498W
AM12:45LOC
CH72 CH78A
FROM:
$GO FISH
CH HAS BEEN
CHANGED
U
S
A

Chapter 5: Digital Selective Calling (DSC) 85
5.6 All Ships Calls
An All Ships Call sends out a message to all stations within range. The Ray218/
Ray55 can make All Ships Safety Calls for advisory alerts and Urgency Calls when
assistance is required but life is not in danger. For example, you might send a
Safety Call to warn others there is a large floating object that may be a hazard to
navigation. A sample Urgency Call might be that you have an illness or an
accident on board. The All Ships Call is made on channel 70, and then the radio
automatically switches to channel 16 at high power for voice communications.
Transmitting an All Ships Call
1. Select ALL SHIPS from the DSC menu.
2. Select the type of call you wish to make: URGENCY or SAFETY.
3. Press SEND to transmit the call. The call is transmitted on channel 70, and
then the radio tunes to channel 16 at high power.
4. Press OK to reconfirm the All Ships Call. The radio returns to standby mode.
Press PTT to communicate on channel 16.
D9218-1
09
CALLING
B
B
DSC MENU
SELECT
U
S
A
09
CALLING
B
B
ALL SHIPS
SELECT
U
S
A
URGENCY
SAFETY
[EMPTY]
70
DSC
B
B
ALL SHIPS
URGENCY
CALLING...
U
S
A
16
DISTRESS
B
B
ALL SHIPS
URGENCY
U
S
A
TX COMPLETE
CH HAS BEEN
CHANGED
OK
16
DISTRESS
B
B
ALL SHIPS
URGENCY
U
S
A
CANCEL
PRESS SEND
SEND
16
DISTRESS
B
B
U
S
A
26 06.0098N
080 04.8498W
AM10:33LOC
CH68 CH72
CH71
INDIVIDUAL
GROUP
ALL SHIPS
POS REQUEST
RECV’D CALLS
86 Ray218 and Ray55 VHF Radios
Receiving an All Ships Call
When an All Ships Safety or Routine Call is received, the LCD alternates between
a screen displaying the name (or MMSI ID) of the station initiating the call and one
requesting a change of working channels. The 2 alternating pages of data are
recorded in the Call Log. The envelope icon ( )blinks until you accept the call,
reject the call, or open the resulting unread message stored in the log. See page
“Received Calls (Logs)“ on page 90.
For an Urgency or Distress Call, the Automatic Channel Change option (see page
95) determines how the call is handled. If set ON, the radio automatically switches
to Priority Channel 16 for voice communications. If OFF, you are prompted to
manually accept or decline the call and channel change by pressing OK or
CANCEL, respectively. When set OFF, the icon appears.
To mute the alert tone:
Press CLEAR/WX.Automatic cancellation takes place after 2 minutes.
To ignore the All Ships Call:
Press CLEAR/WX a second time or press the CANCEL soft key. The envelope icon
disappears, the call is interrupted and the normal screen appears on the LCD.
To accept an All Ships Safety or Routine Call:
1. Press the OK soft key or the CH knob. The alert tone is muted, the envelope
icon disappears and the radio switches to the requested channel.
2. Press OK again to confirm the channel change. The radio returns to standby
mode. Press PTT to communicate on channel 16.
To accept an All Ships Urgency or Distress Call when Auto Channel
Change is OFF
1. Press the OK soft key or the CH knob. The alert tone is muted, the envelope
icon disappears and the radio switches to channel 16.
2. Press OK again to confirm the channel change. The radio returns to standby
mode. Press PTT to communicate on channel 16.
71
PLEASURE
B
B
ALL SHIPS
SAFETY
CANCEL
FROM:
$RESPITE
U
S
A
OK
71
PLEASURE
B
B
ALL SHIPS
SAFETY
CANCEL
CH CHANGE
REQUESTED
TO CH 72
U
S
A
OK
D9266-1
72
SHIP/SHIP
B
B
U
S
A
OK
ALL SHIPS
SAFETY
FROM:
$RESPITE
CH HAS BEEN
CHANGED