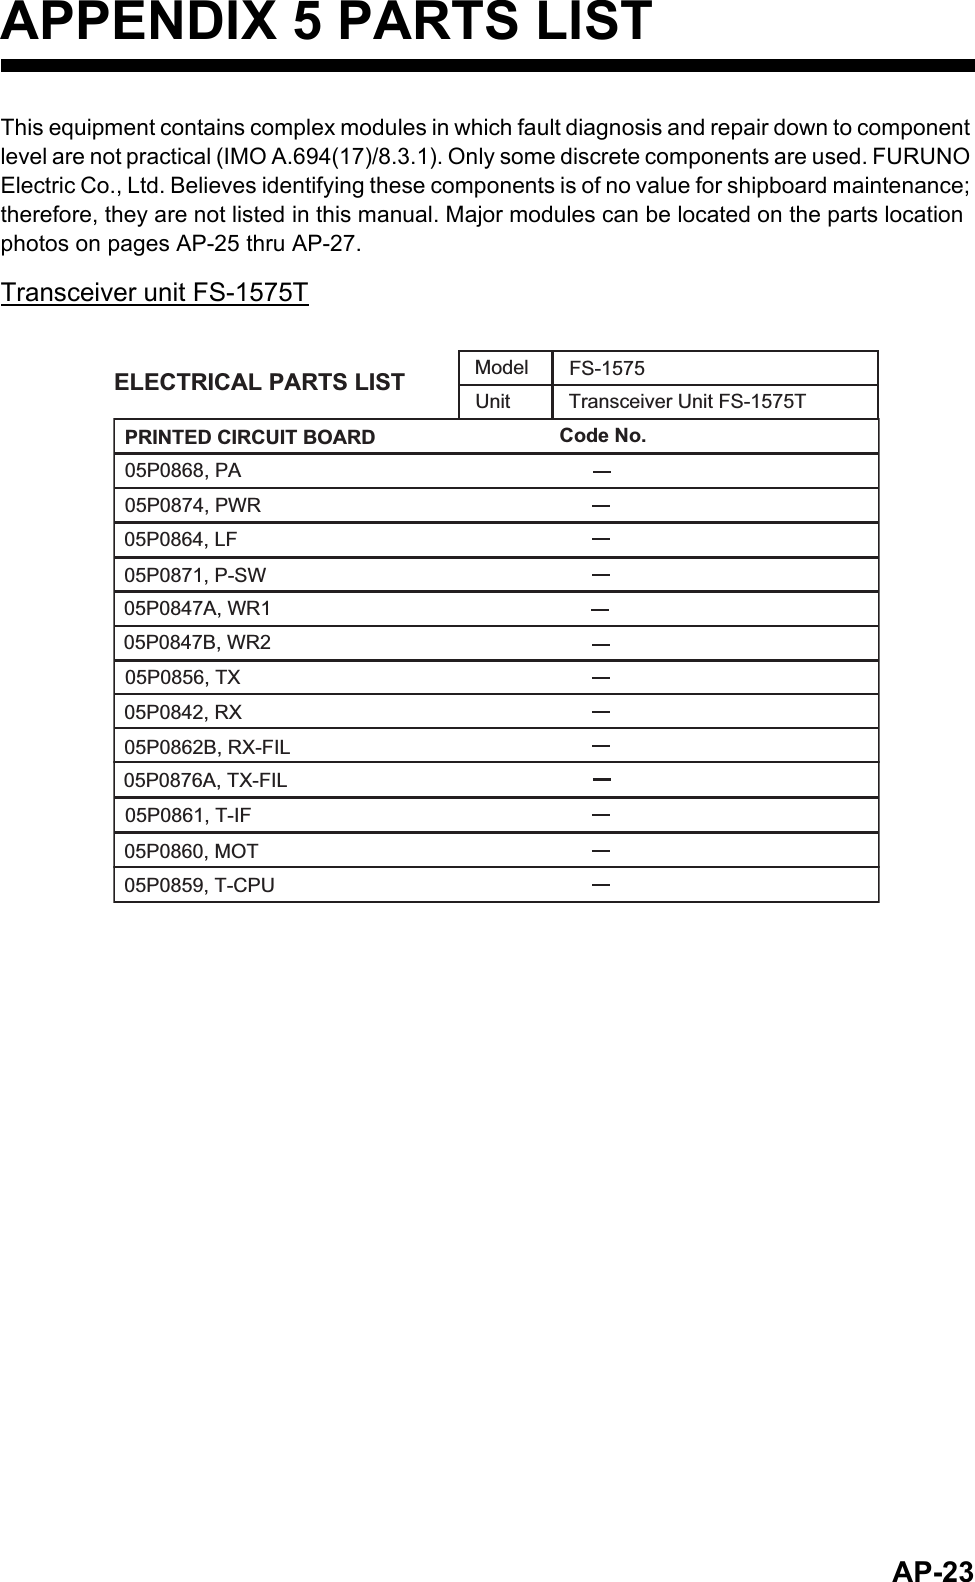
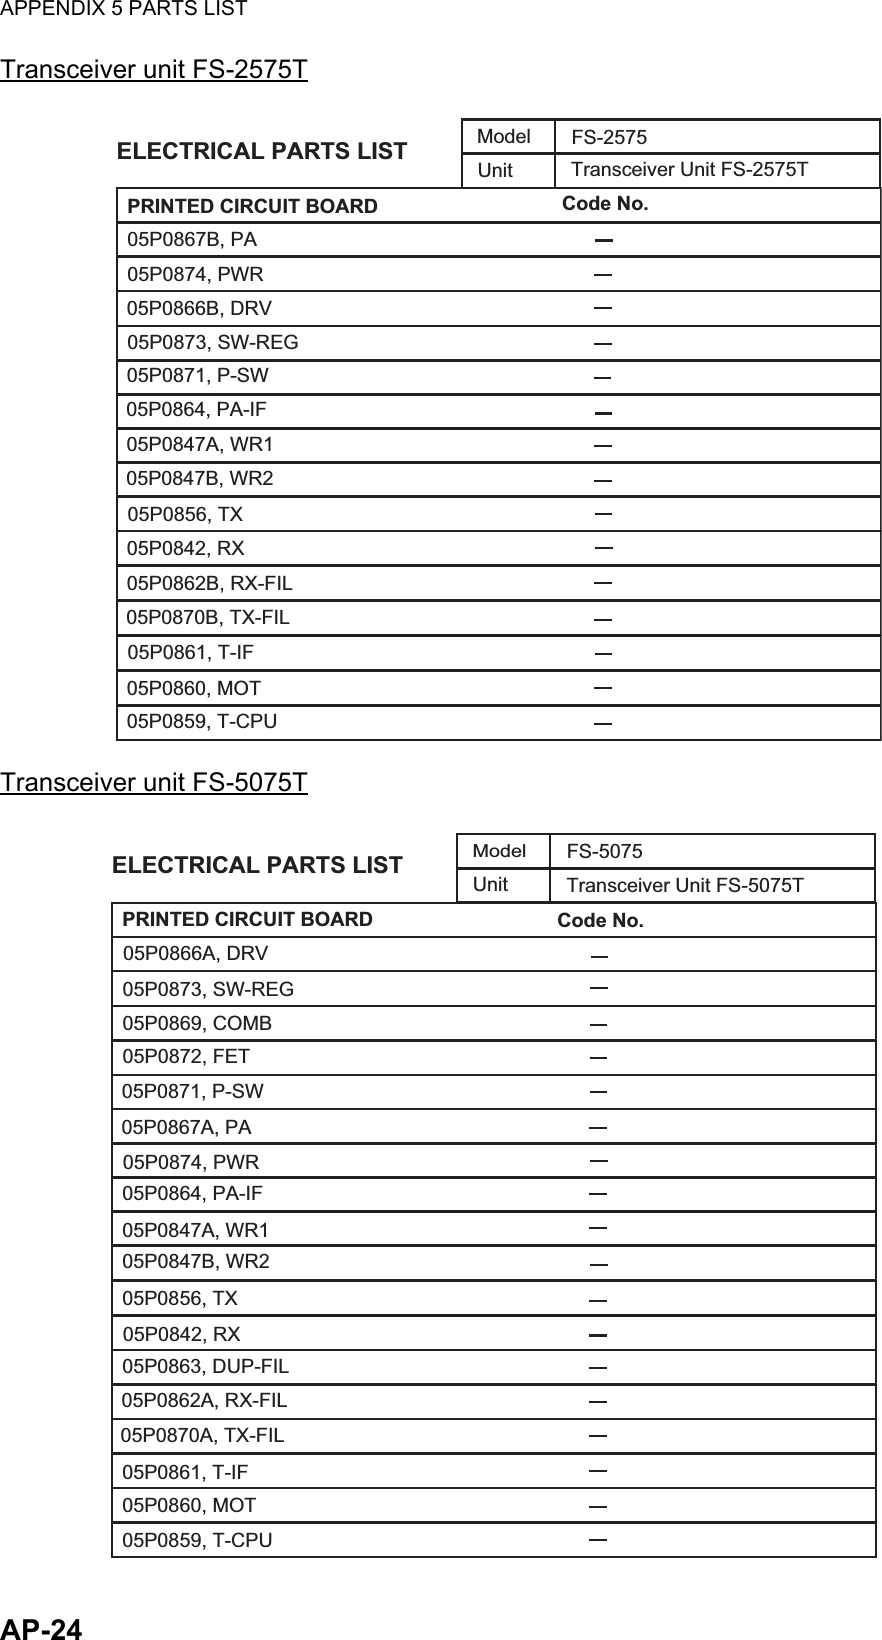
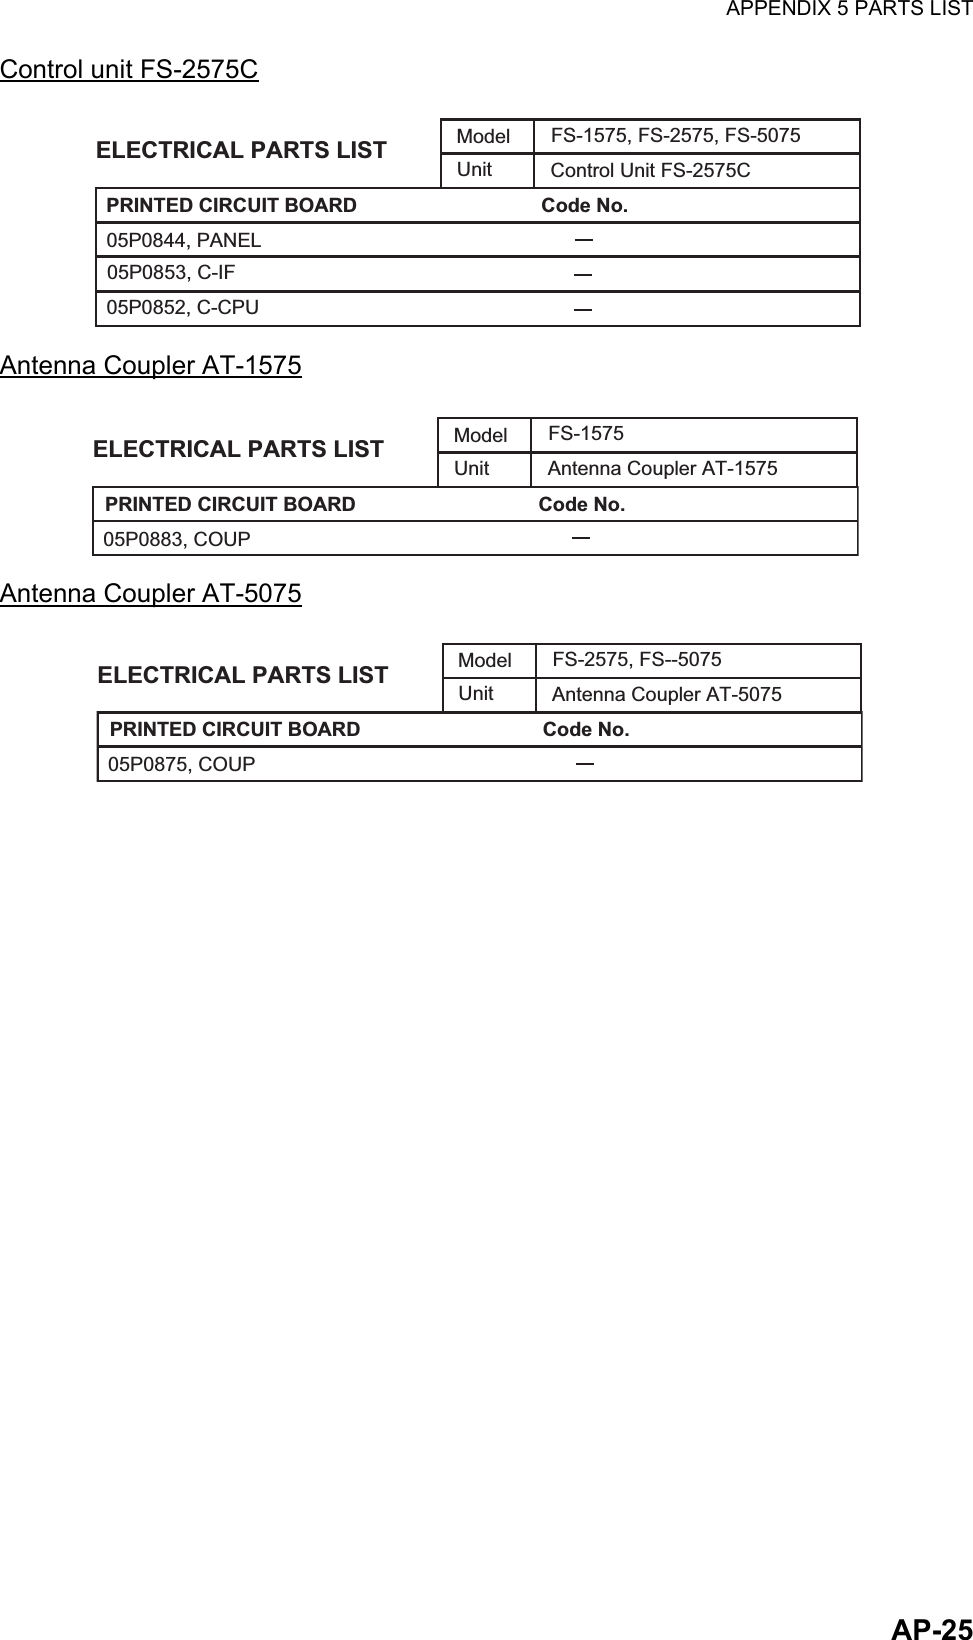
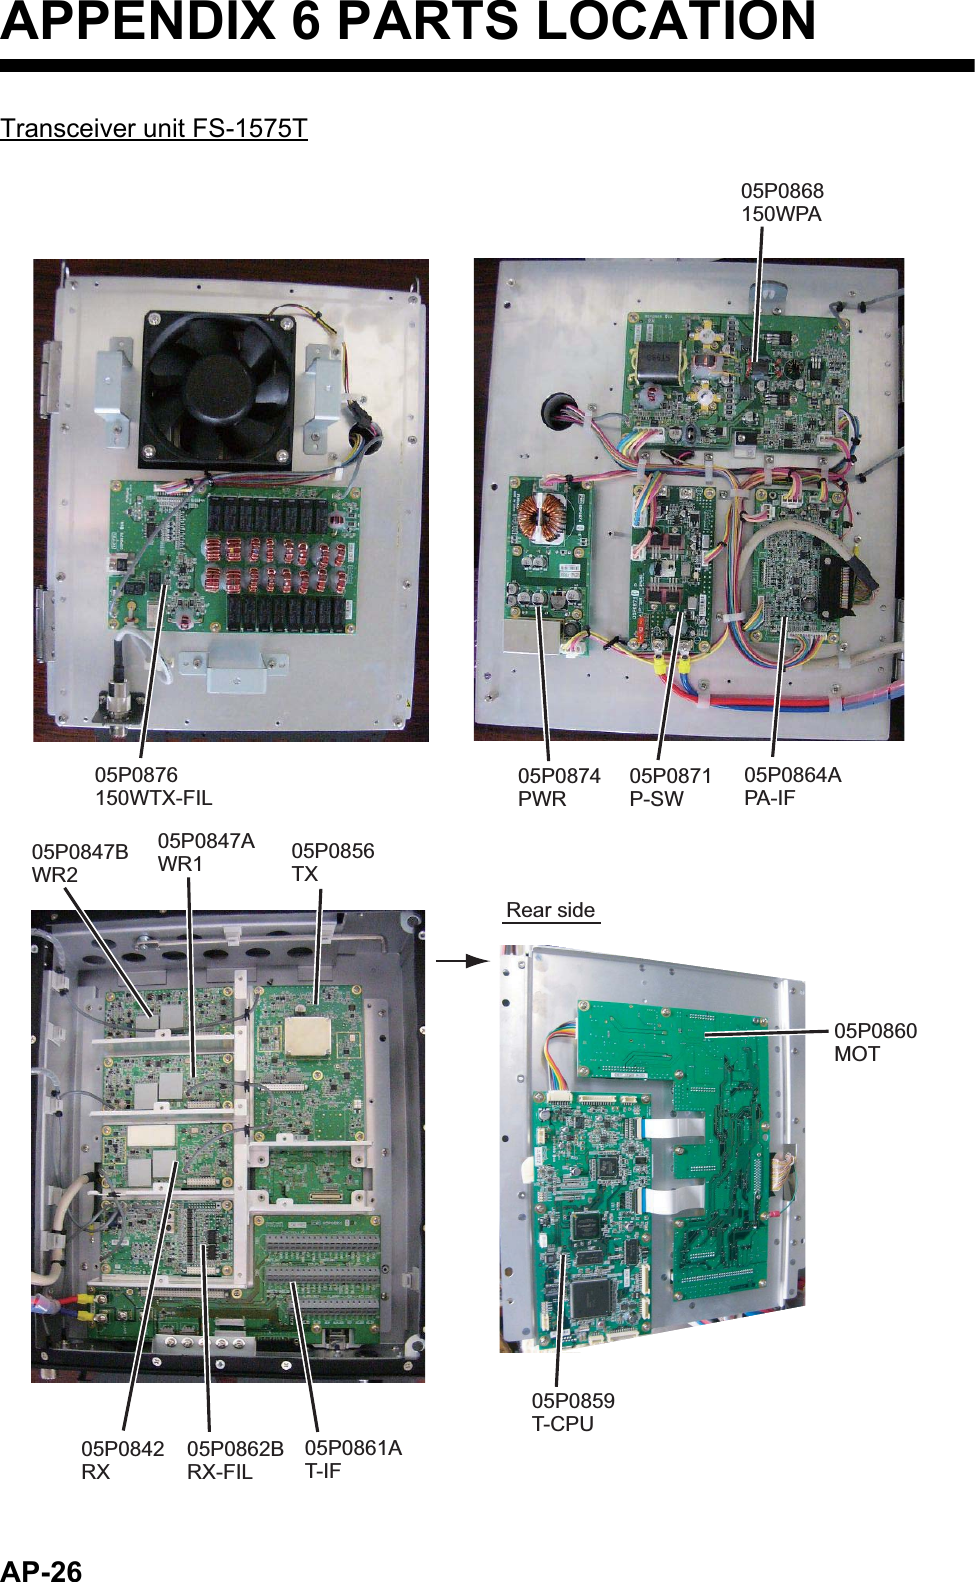
Furuno USA 9ZWFS1575 GMDSS SSB User Manual FS1575 2575 5075 OME Frontcover
Furuno USA Inc GMDSS SSB FS1575 2575 5075 OME Frontcover
Contents
- 1. users manual part 1A
- 2. users manaul part 1B
- 3. users manual part 2
- 4. users manual part 3
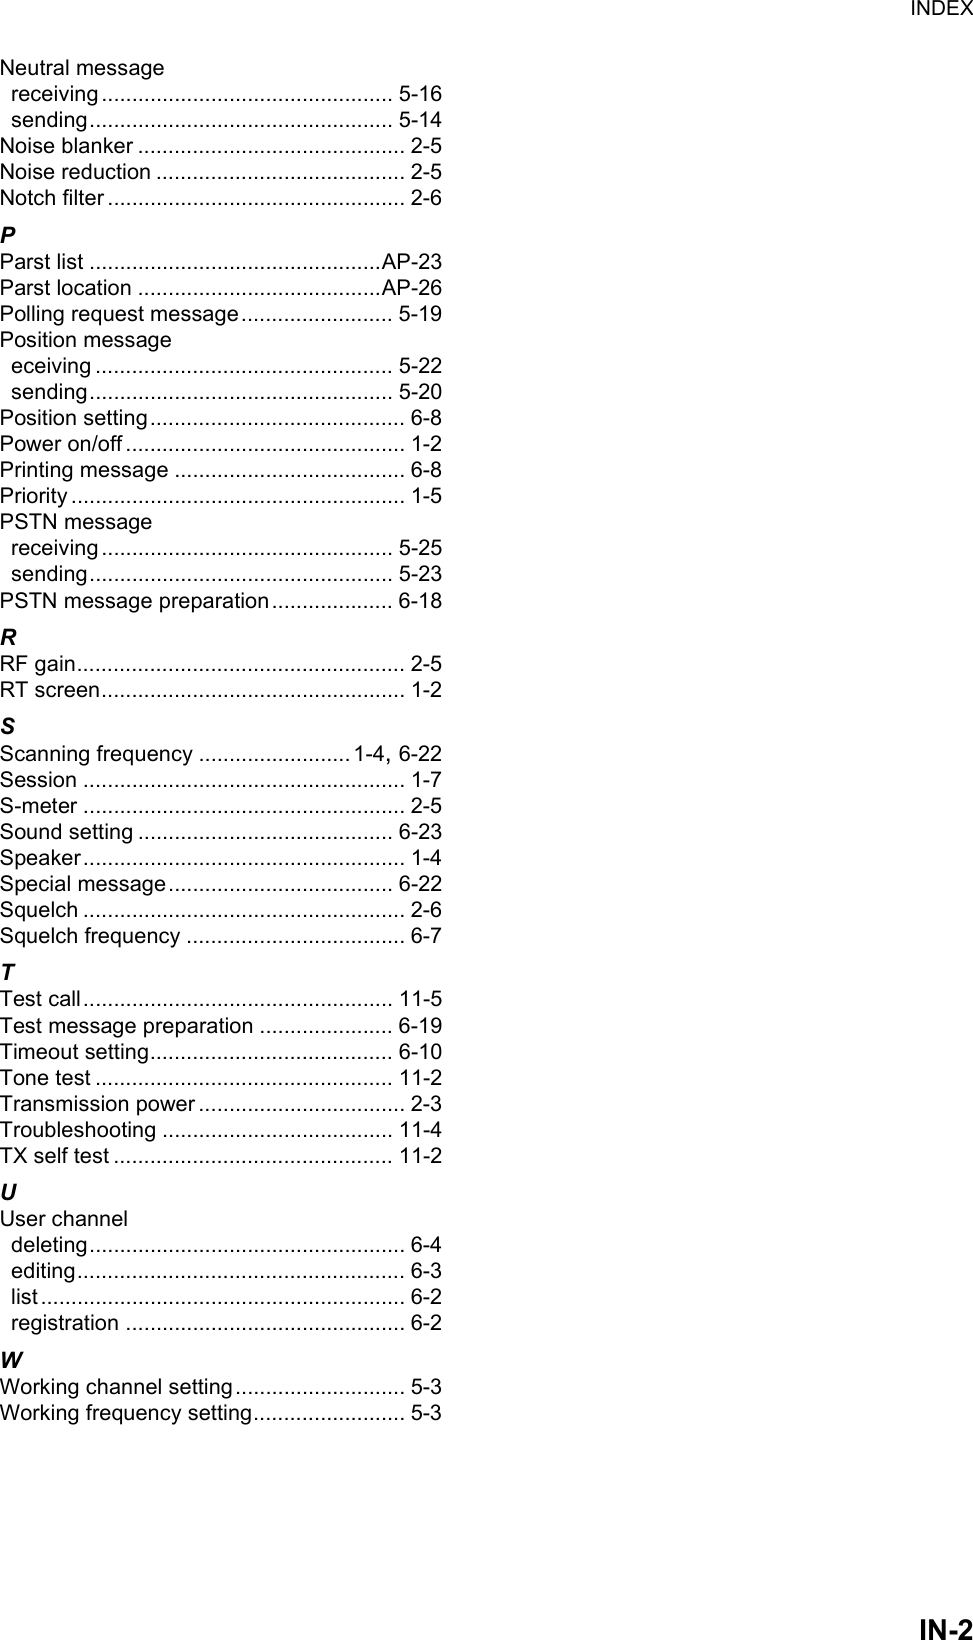
users manual part 3
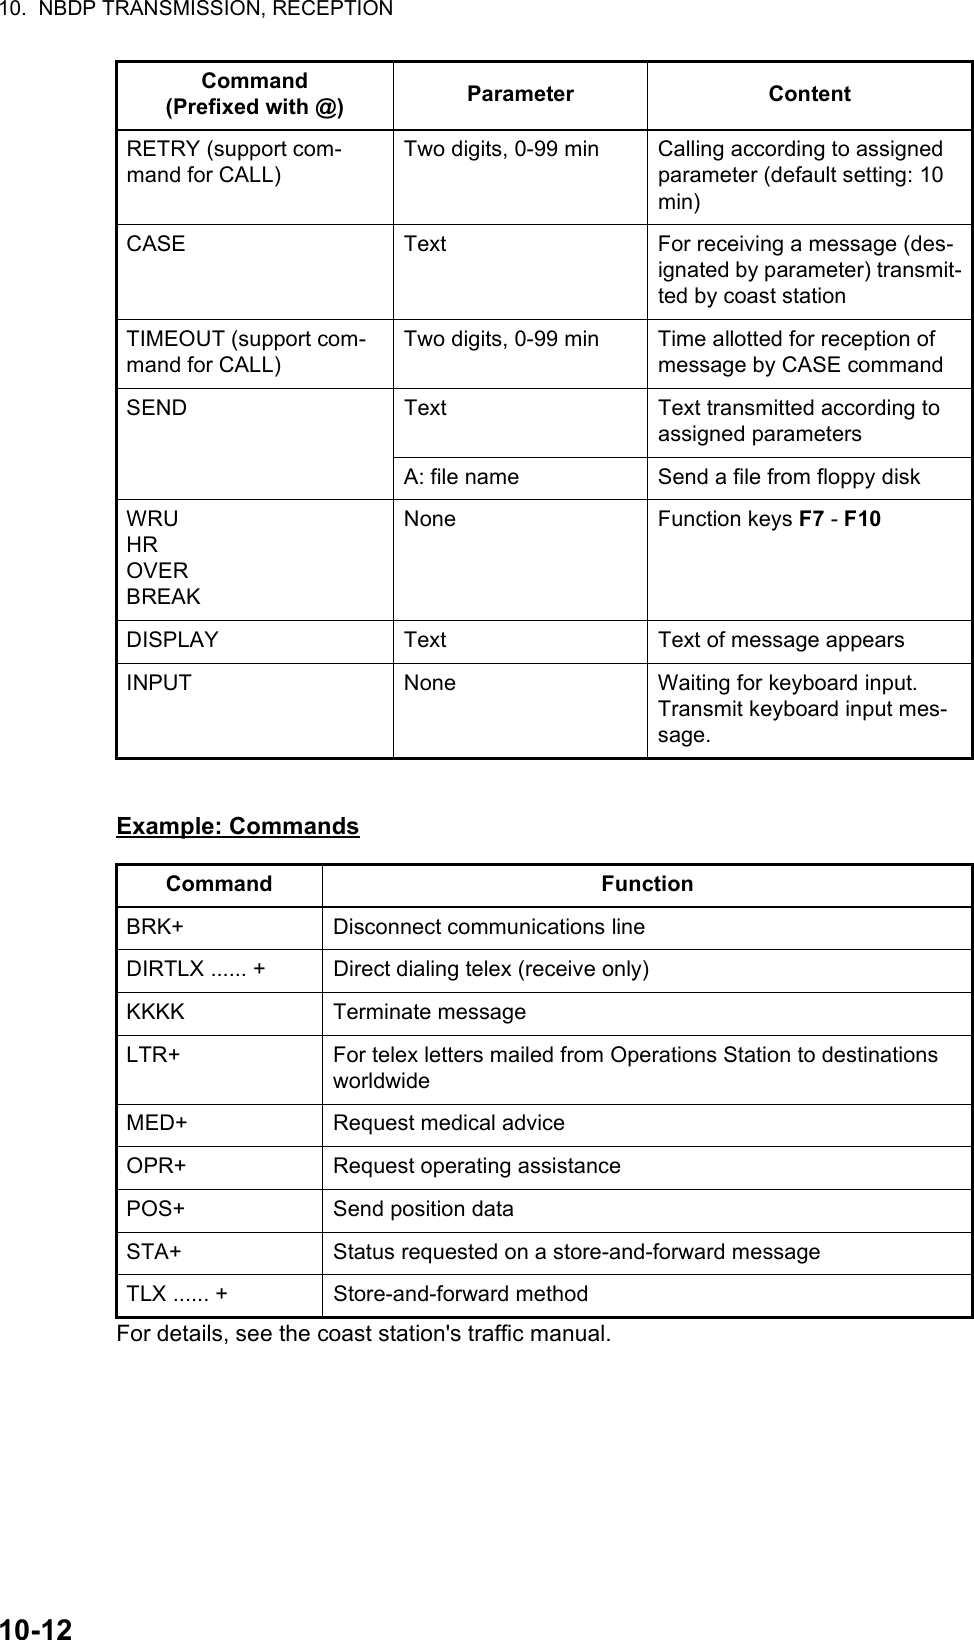
![10. NBDP TRANSMISSION, RECEPTION10-2For IB-585:• To enter the frequency, press the 9 key to select [Set Frequency]. Go to step 3.• To enter the ITU or user channel, press the 0 key to select [Set Channel]. Go to step 4.3. Input a pair of TX and RX frequencies. Go to step 5.4. Input the user channel. To select the user channel from the list, press the → key to display [User Channel List]. Press the ↑ or ↓ key to select the desired user channel.5. Press the Enter key.Note: You can not set frequency or user channel in the following cases;• When opening the menu from the control panel (FS-2575C).• When communicating by radiotelephone.• When the DSC scan screen is displayed.• When sending DSC calls.6. Press the function key F3 then the 8 key to select [Manual Calling].7. Press the ← or → key to select a communication mode.8. Press the ↓ key then input party's ID number.9. Press the Enter key to connect the communication line. "Channel Busy Check" appears. If the line is free, "Connect", "Send" and "Lock" appear in highlight as be-low.](https://usermanual.wiki/Furuno-USA/9ZWFS1575.users-manual-part-3/User-Guide-1777366-Page-1.png)
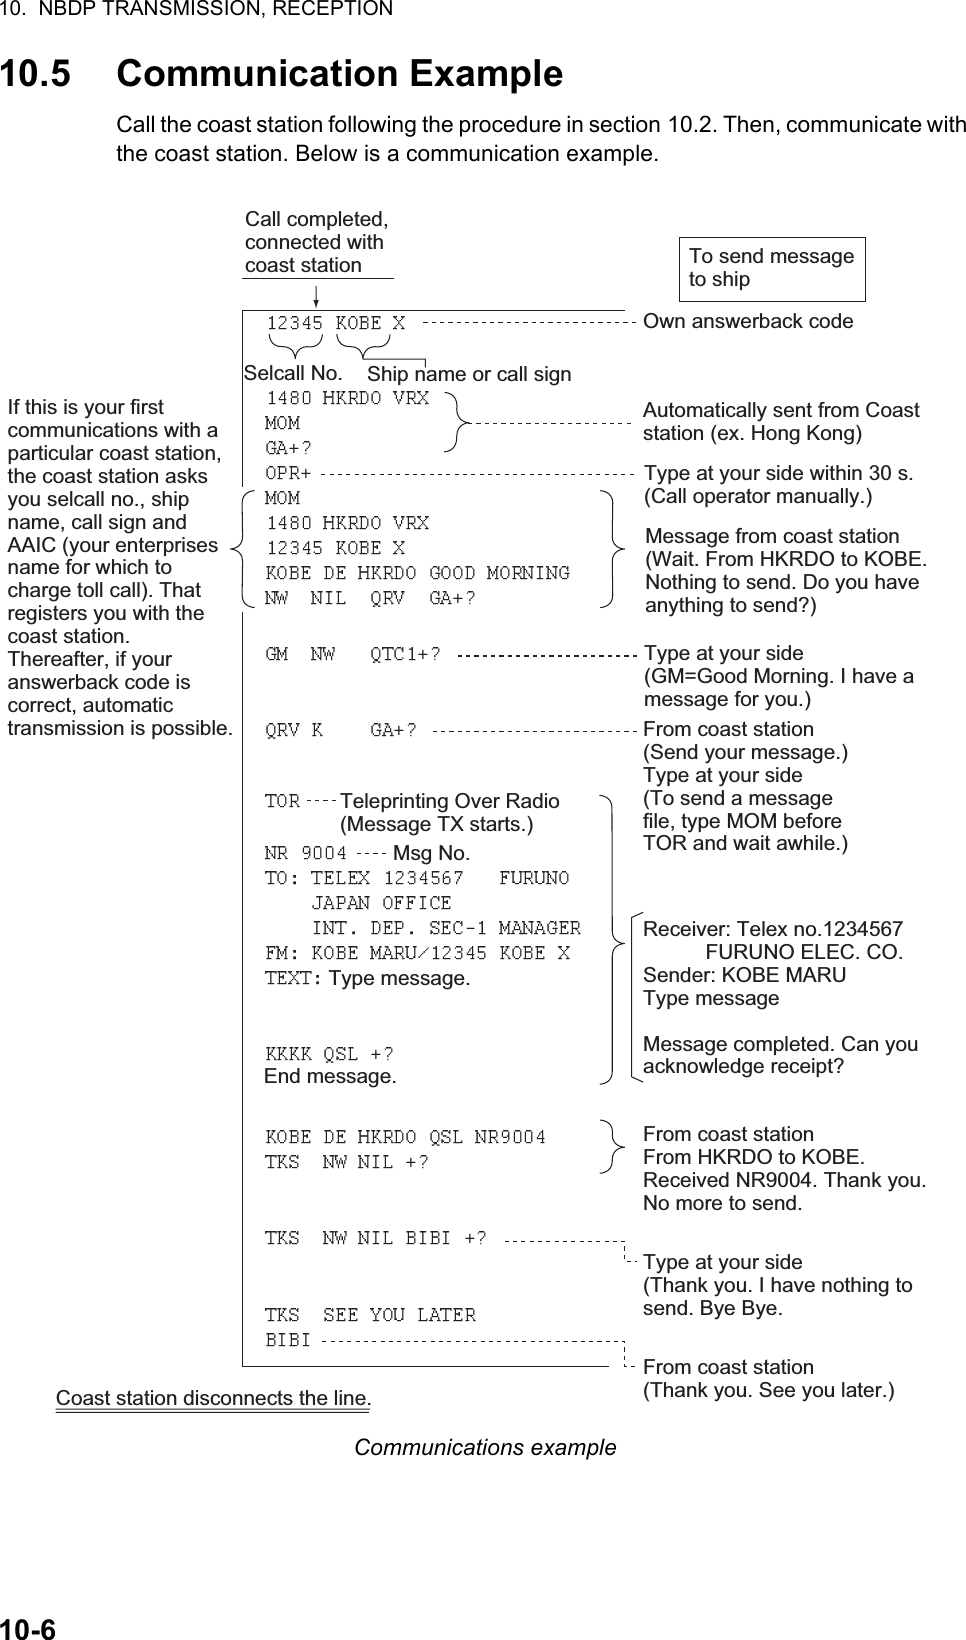
![10. NBDP TRANSMISSION, RECEPTION10-3For the ARQ mode, go to step 10. For the FEC mode, type your message then go to step 13.10. Press the function key F7. The party's answerback code appears on the screen.Note: Step 10 and 11 are needed for ship-to-ship calling only.11. Press the function key F8. Your ship's answerback code is sent to the party.12. Press the Enter key and type your message.13. If you want to receive other party's response, press the function key F9.14. Press the function key F10 to disconnect the line.10.2 ARQ Mode OperationIn ARQ operation, one station (information sending station) sends data to another block by block, then listens for the acknowledge signal between blocks from the infor-mation receiving station which requests either the next block or retransmission of the last block if there is an error. The request can be repeated up to 32 times until the com-plete block is received free of error.How to establish connection1. Press the function key F3 to open the [Operate] menu.2. Press the 1 key to select [Call Station].3. Select a station. (Station must be registered for use in the ARQ mode).4. Press the Enter key. The message "Calling Station" appears. If the message shown below appears, check both the power of the radiotelephone and the con-nections between the radiotelephone and the NBDP terminal unit.Message: "Station calling suspended. Check interconnections between the termi-nal and main units. Press any key to escape."When an acknowledge signal is detected, "Connect" appears in reverse video on the [Comm Status] line.Note: If the signal conditions are poor, connection can take a while. If the line could not be connected in one minute, the calling stops. The message "Station calling suspended" appears. Try step 3 again, one minute later. Should the signal conditions worsen during message transmission, "Error" appears in reverse video on the [Comm Status] line and the line is disconnected.5. Transmit message by one of the following methods:Connect Send Lock](https://usermanual.wiki/Furuno-USA/9ZWFS1575.users-manual-part-3/User-Guide-1777366-Page-2.png)
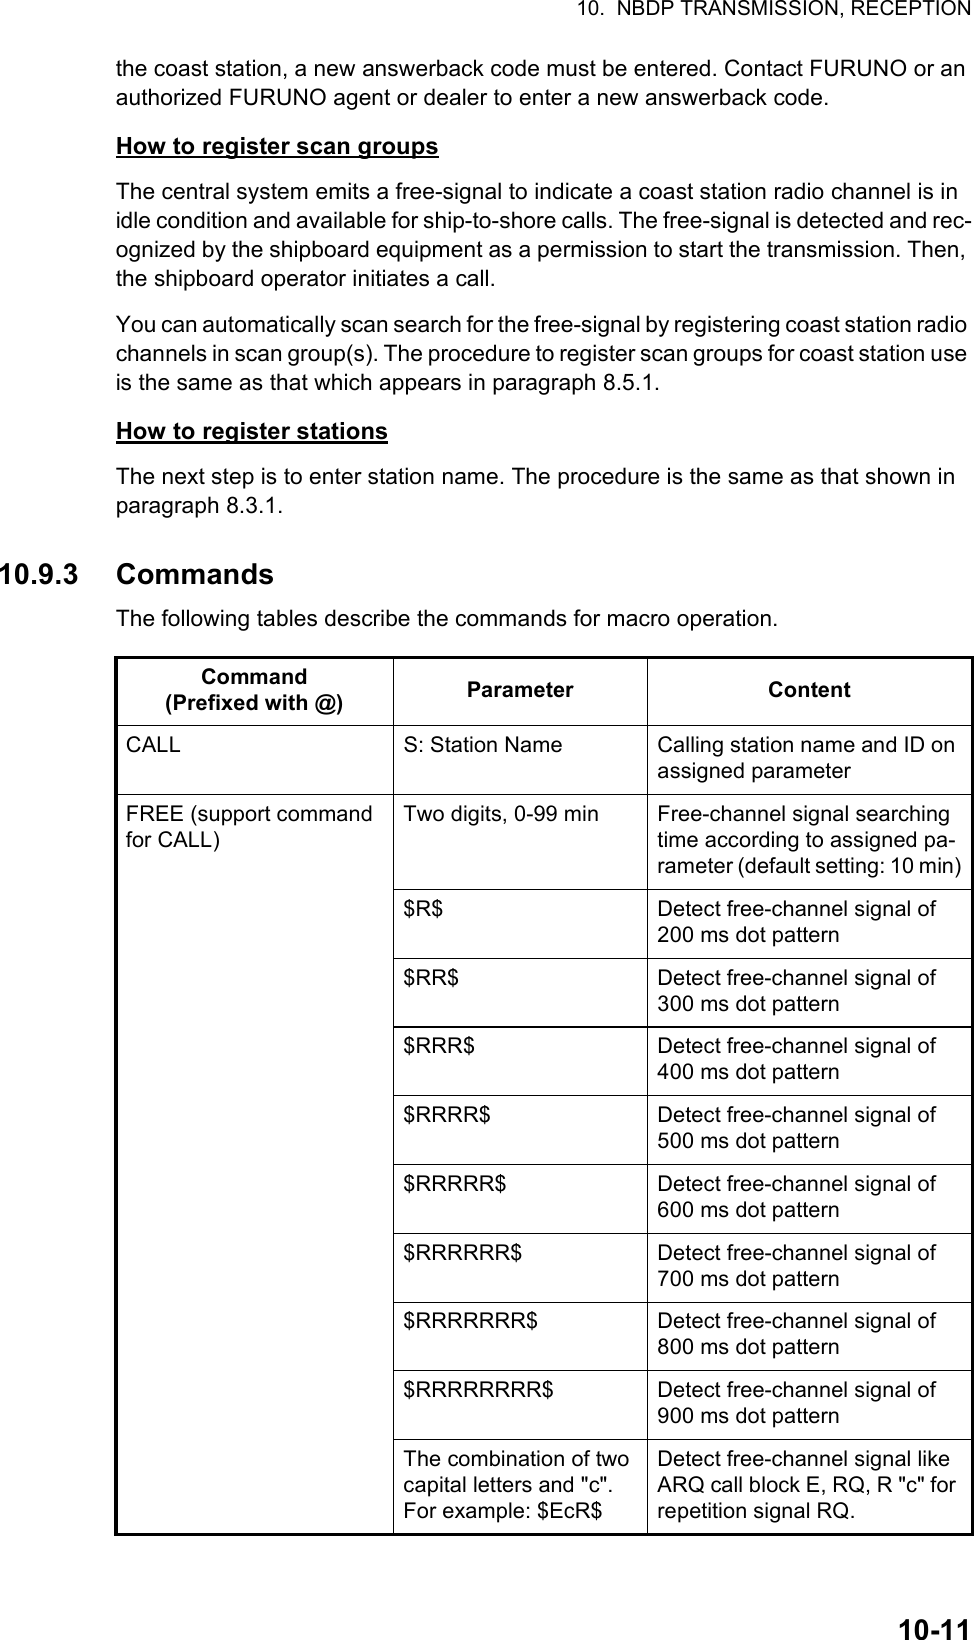
![10. NBDP TRANSMISSION, RECEPTION10-4How to send a file stored on a floppy disk or an SD card1. Press the function key F7 to request the answerback code of the other station. Verify that the code from the station called is correct.2. Press the function key F8 to transmit your own identity (answerback code).3. Press the function key F3 then the 3 key to open the [Send File] window.4. Press the ↑ or ↓ key to select the file to send and press the Enter key.5. Press the Enter key again.Sending volume (percentage of message transmitted, counts upward as the mes-sage is being transmitted), ARQ error count and ARQ transmission time appear on the screen. "Lock" appears in reverse video when the mark and space signals in the received signal are normal. [ARQ Error] shows the number of errors found during transmission. [ARQ Time] is the time in seconds the communication con-nected.6. After the message is transmitted, press the function key F10 to disconnect the line.How to type a message from the keyboard1. After exchanging answerback code by the function keys F7 and F8, type your message directly from the keyboard.2. To change the direction of traffic, press the function key F9, or + and ? in order. The other station becomes the information sending station, your station becomes the information receiving station. Receive a message from the sending station.3. After you have completed communications, press the function key F7 to request the answerback code of the other station.4. Press the function key F8 to transmit your own answerback code.5. Press the function key F10 to disconnect the line.Note: When you are requested to change the direction of traffic while transmitting a message, or communication is interrupted because of an error, some of the final char-acters on the screen may not be sent to the receiving station.](https://usermanual.wiki/Furuno-USA/9ZWFS1575.users-manual-part-3/User-Guide-1777366-Page-3.png)
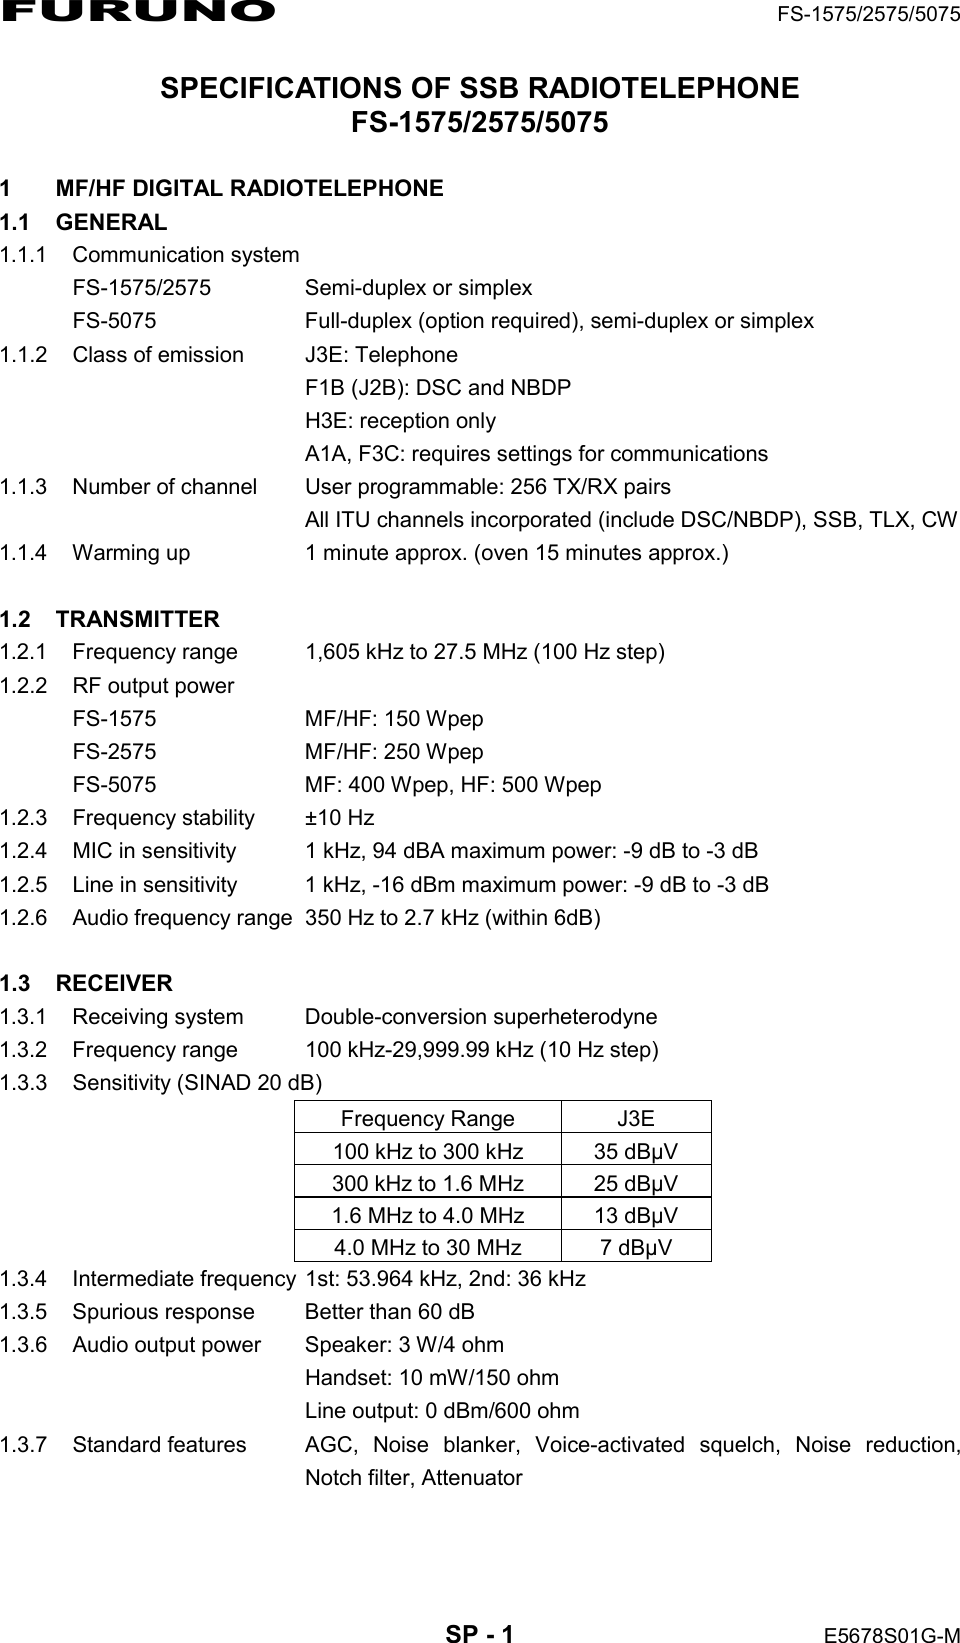
![10. NBDP TRANSMISSION, RECEPTION10-5How to stop transmission1. Press the function key F3 then the 4 key. The message "Send Canceled" appears on the screen. Transmission is stopped but the line is still connected.2. Press the function key F10 to disconnect the line.10.3 FEC Mode OperationThe FEC mode transmits the same data twice for less errors. Compared with the ARQ mode, the FEC mode is better for communication when the signal is weak.1. Press the function key F3.2. Press the 1 key to open the [Call Station] menu.3. Press the ↑ or ↓ key to select a station which is registered for the FEC mode.4. Press the Enter key. "Connect" appears in reverse video.5. Transmit a message directly input from the keyboard, or do the following to trans-mit a message stored on a floppy disk or an SD card:1) Press the function key F3 then the 3 key to select [File to Send].2) Press the ↑ or ↓ key to select the file to send then press the Enter key.6. After the message is transmitted, press the function key F10 to disconnect the line.Note 1: When communication is force-quitted by control display, some of the final characters may not be sent to the receiving station.Note 2: When the continuous transmission by FEC mode exceeds one minutes, the output power reduces to low automatically to prevent overheating.10.4 How to Select Reception Mode1. Press the function key F3 then the 6 key to open the [Manual Reception] menu.2. Press the ← or → key to select the reception mode:[AUTO]: Automatic reception in ARQ or FEC mode[ARQ]: International radiotelex ARQ mode[FEC]: International radiotelex FEC mode3. Press the Enter key. The reception mode appears on the screen.All received (and transmitted) mes-sages are saved to a floppy disk or an SD card when [TX/RX MSG Save] is [ON] in the [System] menu. The file is automatically named (see the figure).Note 1: Press the function key F10 to cancel NBDP reception (quit waiting for connec-tion).Note 2: For NBDP procedure controlled by DSC function, the function key F10 is not available to cancel NBDP reception. Select [QUIT] option on the control panel to can-cel NBDP reception.Note 3: During reception in FEC mode, the characters which are not detected be-cause of reception error are displayed as "*".12 04 10 0 0. X X XYear month date Serial number from 000](https://usermanual.wiki/Furuno-USA/9ZWFS1575.users-manual-part-3/User-Guide-1777366-Page-4.png)
![10. NBDP TRANSMISSION, RECEPTION10-7Table of abbreviationsCommand and abbreviationAbbreviation Question Answer or AdviceQRA What is the name of your station? My station name is ...QRC By what private enterprise are the ac-counts for charges for your station set-tled?The accounts for my station are settled by the private enterprise ...QRU Have you any thing for me? I have nothing for you.QRV Are you ready? I am ready.QRX When will you call me again? I will call you again at ... hours [on ... kHz].QSJ What is the charge to be collected to ... including your internal charge?The charge to be collected to ... includ-ing my internal charge is ...QSL Can you acknowledge receipt? I can acknowledge receipt.QSX Will you listen to ... [call sign] on ... kHz? I am listening to ... [call sign] on ... kHz.QTA Shall I cancel message number ...? Cancel message number ...QTC How many messages have you to send? I have ... message for you.QTU What are the hours your station is open? My station is open from ... to ... hours.Abbreviation DefinitionBK Signal used to interrupt a transmission progress.CFM ConfirmDE From ...K Invitation to transmit.NIL I have noting to send to you.NW NowPSE PleaseR ReceivedREF Reference to ...SVC Prefix indicating a service telegram.Command FunctionTGM+ To indicate that the following message is a radiotelegram.MSG+ To indicate that the ship station needs to be connected immediately any message held.OPR+ Call operator.URG+ Safety, urgency and distress message.MED+ Request medical advice.TEST+ Request coast station to send a test message for checking the ship station.BRK+ To clear the connection with the coast station.Abbreviation FunctionGA+ I am ready. Transmit your command.MOM Wait a moment.MSG+ Request pending messages from the shore.KKKK or NNNN Terminate a message.XXXXX Typo](https://usermanual.wiki/Furuno-USA/9ZWFS1575.users-manual-part-3/User-Guide-1777366-Page-6.png)
![10. NBDP TRANSMISSION, RECEPTION10-810.6 Timer OperationA built-in timer permits automatic transmission and reception of telex messages.10.6.1 How to enable timer operation1. Press the function key F3 to open the [Operate] menu.2. Press the 7 key to open the [Timer Operation List].3. Press the ↑ or ↓ key to select the operation (name) to execute.4. Press the Enter key. An asterisk appears beside the operation selected and "T. Op" appears in reverse video on the communication status screen. If a file stored on a floppy disk or an SD card is to be sent, be sure the floppy disk or the SD card containing the file is inserted in the drive.5. If desired, select another operation (name) then press the Enter key.6. Press the Esc key.When the predetermined time passed, the NBDP terminal unit automatically sends or receives the message. The results of timer operation are displayed as either [OK] or [NG] (No Good) on the [Timer Operation List] window.10.6.2 How to stop timer operation1. Press the function key F3.2. Press the 7 key.3. Press the ↑ or ↓ key to select the operation (name) which has an asterisk attached to it then press the Enter key. Remove all asterisks to cancel all timer programs. "T. Op" disappears from the communication status screen.](https://usermanual.wiki/Furuno-USA/9ZWFS1575.users-manual-part-3/User-Guide-1777366-Page-7.png)
![10. NBDP TRANSMISSION, RECEPTION10-910.7 ScanningThe radio equipment scans a group of operator-selected frequencies (channels), and stops scanning when a signal is received. See section 8.5 for registeration of scan group.1. Press the function key F3 then the 5 key to open [Scanning Group List]. You can confirm the scan channel by pressing the ↑ or ↓ key while pressing the Shift key.2. Press the ↑ or ↓ key to select a scan group then press the Enter key. The scan-ning starts and the indication "Scan" appears in reverse video. Further, the name of the scan group appears in the [Station Name] field.Communication status screen3. Press the function key F3 then the 5 key to stop scanning. "Scan" disappears from the communication status screen.10.8 Communication BufferThe communication buffer is a temporary memory which stores the transmitted and received messages. To display the contents of the communication buffer, do the fol-lowing:1. If necessary, close the [Edit] window 1 or 2, pop-up, or menu.2. Press the Pg Up or Page Up, or Pg Dn or Page Down key. The contents of the communication buffer are displayed.Press the P key while pressing the Ctrl key to print them. Press the function key F1 then the 9 key to erase the contents of the buffer. To erase the contents from the screen, do one of the following:• Press the Pg Dn or Page Down key on the last page.• Press the ↓ key at the bottom line.• Press the Esc key.*](https://usermanual.wiki/Furuno-USA/9ZWFS1575.users-manual-part-3/User-Guide-1777366-Page-8.png)
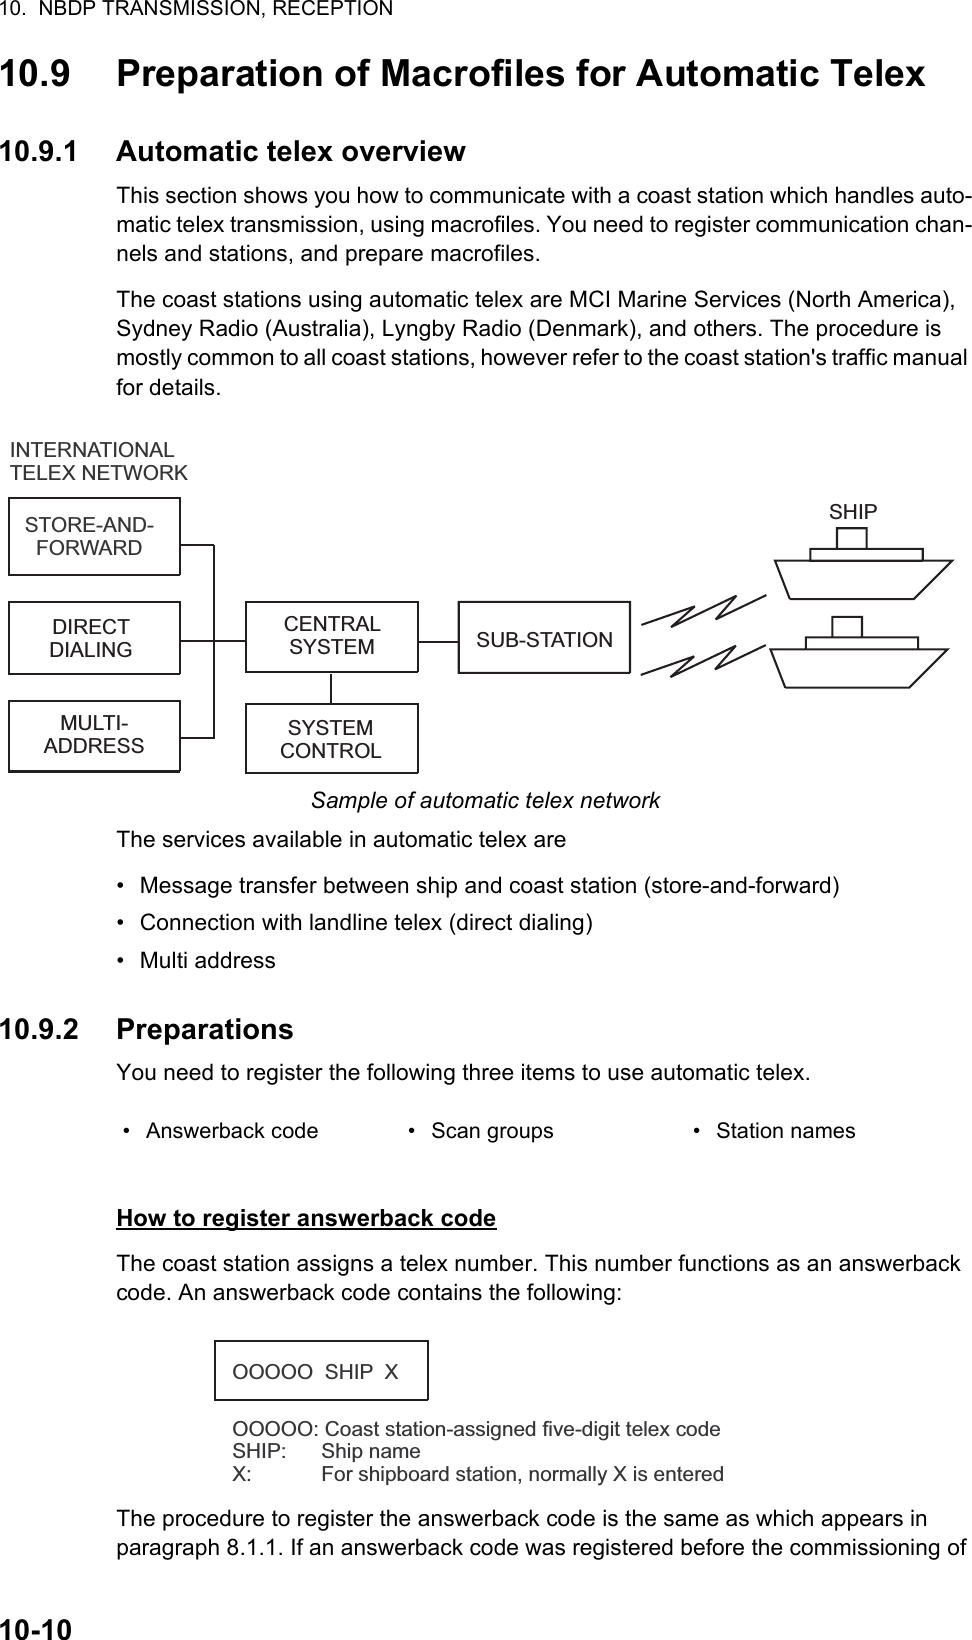
![10. NBDP TRANSMISSION, RECEPTION10-1310.9.4 Store-and-forward methodThe following is the sequence of events for transmission of a file by the store-and-for-ward method.1. Ship station sends message to coast station.2. Coast station stores message in memory buffer.3. Ship station and coast station clear the radio circuit.4. Coast station sends message to subscriber designated.Actual procedure for store-and-forward telexProcedure to prepare a macrofile for store-and-forward methodYou need a macrofile to enable automatic message transmission by store-and-for-ward method. After preparing it, save it to a floppy disk for future use.1. Press the function key F1 to open the [File] menu.2. For IB-585, press the B key. For IB-583, press the 1 key.No. Procedure Display Remarks1 Call a coast station. "Connect" appears in re-verse video and bell sounds.Free-signal found; ra-dio circuit ready.2 Transmit WRU signal. Initial identity ex-change between coast station and ship-board station.3 Key in subscriber's telex number. Example: (Hong Kong) 12345Request to start mes-sage transmission.4 Transmit file. Message transmis-sion.5 When transmission is com-pleted, type KKKK.Transmit your answer-back code. Receive other party's answer-back code.6 Transmit BREAK command to clear radio circuit.00190 TLG DK26XXX SHIP XGA+?TLX80212345+MSG+?26XXX SHIP X00190 TLG DKGA+?](https://usermanual.wiki/Furuno-USA/9ZWFS1575.users-manual-part-3/User-Guide-1777366-Page-12.png)
![10. NBDP TRANSMISSION, RECEPTION10-143. Prepare the macrofile. Below is a simple example.Sample macrofile for store-and-forward method4. Press the function key F1 to open the [File] menu.5. Press the 3 key. The [Close Text] appears.6. Press the Enter key then enter a file name as follows:7. Press the Enter key. < [1] UNTITLED1 > @FREE $RRR$@CALL S:LYNGBY RADIO@WRU@CASE GA+?@SEND TLX80212345+@CASE MSG+?@SEND A: \ABC@SEND KKKK@CASE GA+?@SEND BRK+Search dot pattern free signal until it is found12345Station name (Example: LYNGBY RADIO)Who are you?Station identity exchangeSubscriber's telex number (in example, 802 is country code of Hong Kong) for store-and-forward methodLocation and name of file message A: \ABCRequest for termination of message12345.MCRFile name (max. 14 characters in conjunction with identifier)Extension name](https://usermanual.wiki/Furuno-USA/9ZWFS1575.users-manual-part-3/User-Guide-1777366-Page-13.png)
![10. NBDP TRANSMISSION, RECEPTION10-15DIRTLX macrofileSample DIRTLX macrofileSample DIRLTX macrofile10.10 Automatic Telex Using MacrofileThis section describes how to transmit a telex message using a macrofile.Basic procedure1. Register an answerback code (telex number assigned by the coast station).2. Register the coast station frequency and channel to a scan group.3. Register the station name including the scan group name.4. Retrieve a macrofile. Include the station name and the message file name. Type the message and save the file.5. Open the macro operation menu and select a macrofile. Your message will be transmitted automatically. Below is the sequence of automatic message transmis-sion to a coast station.1) Search for free-signal2) Call coast station on one of its radio channels3) After connection is established, identity exchange4) Transmission of service category and subscriber's address5) Transmission of message < [1] UNTITLED1 > @FREE $RRR$@CALL S:LYNGBY RADIO@WRU@CASE GA+?@SEND DIRTLX725644325+@CASE MSG+?@SEND A: \ABC@SEND KKKK@CASE GA+?@SEND BRK+Search dot pattern free signal until it is found12345Station name (Example: LYNGBY RADIO)Who are you?Station identity exchangeSubscriber's telex number (in example, 72 is country code of Japan) for direct dialing modeLocation and name of file message A: \ABCRequest for termination of message12345](https://usermanual.wiki/Furuno-USA/9ZWFS1575.users-manual-part-3/User-Guide-1777366-Page-14.png)
![10. NBDP TRANSMISSION, RECEPTION10-166) Transmission of termination of message signal7) Identity exchange8) Clearing of radio circuitActual procedure1. Press the function key F3 to open the [Operate] menu.2. Press the 2 key to open the [Call Macro] window.3. Press the ↓ key to select a macrofile.4. Press the Enter key.5. Press the Enter key to confirm the macrofile selected. The message "Wait for Free Signal" appears. Your message is transmitted automatically.](https://usermanual.wiki/Furuno-USA/9ZWFS1575.users-manual-part-3/User-Guide-1777366-Page-15.png)
![11-111. MAINTENANCE &TROUBLESHOOTING11.1 TestDo the following tests to check the radiotelephone for proper operation.Daily test1. Rotate the ENTER knob to select [TEST] on the [MENU] screen then push the knob.2. With [DAILY TEST] selected, push the ENTER knob to start the test. After com-pleting the test, the audio alarm sounds and the screen shown below appears. This screen shows:• Program version numbers.• Test results for RX, DSC, WR1 and WR2, shown as [OK] or [NG] (No Good). For NG, contact your dealer for advice. The DSC test checks, using a DSC sig-nal, the encode and decode functions of the signal processor.To print out the test result manually, press the 4 key. Automatic printing of the daily test is available. See section 6.6.WARNINGWARNINGNOTICEDo not apply paint, anti-corrosive sealant or contact spray to plastic parts or equipment coating.Those items contain products that can damage plastic parts and equipment coating.ELECTRICAL SHOCK HAZARDDo not open the equipment.Only qualified personnel should work inside the equipment.](https://usermanual.wiki/Furuno-USA/9ZWFS1575.users-manual-part-3/User-Guide-1777366-Page-16.png)
![11. MAINTENANCE & TROUBLESHOOTING11-2TX self test1. Rotate the ENTER knob to select [TEST] on the [MENU] screen then push the knob.2. Rotate the ENTER knob to select [TX SELF TEST] then push the knob. [OK] or [NG] (No Good) appears as the test result for each item. For [NG], contact your dealer for advice.[SW REG1], [SW REG2]: For FS-2575/5075[DRV]: For FS-2575/5075[PA2], [COMB] ([DETAILED TEST] for [PA]): For FS-5075Others: For FS-1575/2575/5075Tone test (SSB mode)You can execute tone test with lowering transmission power.1. Rotate the ENTER knob to select [TEST] on the [MENU] screen then push the knob.2. Rotate the ENTER knob to select [TONE TEST] then push the knob.3. With [OFF] selected, push the ENTER knob.4. Rotate the ENTER knob to select the item desired then push the knob. Press the PTT switch of the handset to output the tone signal from the speaker.Unexecuted itemsPress the 1, 2 or 3 key to see the detailed test result for [TX PLL], [PA] or [TX FIL].](https://usermanual.wiki/Furuno-USA/9ZWFS1575.users-manual-part-3/User-Guide-1777366-Page-17.png)
![11. MAINTENANCE & TROUBLESHOOTING11-411.3 Simple TroubleshootingThe table below provides possible problems and the means with which to restore nor-mal operation. If normal operation cannot be restored, do not attempt to check inside the equipment. Any servicing should be referred to a qualified technician.11.4 Error MessagesThe table below shows error messages, their meanings, and remedies. To delete the messages, press the CANCEL key. If other error occurs, contact your dealer.Problem Probable cause RemedyPower cannot be turned on.• Mains switchboard is off.• (DC) voltage is too high.• Battery has discharged, or poor contact at terminals.• Turn on the mains switchboard.• Check supply voltage.• Recharge the battery and tighten the battery terminals.Display indications do not appear.Display brilliance is too low. Press the BRILL key to adjust the display brilliance.Power is on but no sound from the main speaker.Main speaker is off. Press the key to turn on the main speaker.Poor articulation Wrong class of emission. Class of emission should match that of incoming signal.Output power re-duced to LOWPower is automatically reduced to protect against overheating due to continuous transmission.Wait until the unit cools.Antenna coupler can-not tune antenna• Antenna is disconnected or short-ed to ground.• Antenna is out of tunable length.• Poor grounding of antenna cou-pler.• Breaker in coupler has tripped.• Connection cable loosened or dis-connected.• Check the antenna connection.• Recommended length is 10 to 18 meters.• Check coupler ground.• Check mains voltage and polarity. If normal, reset the breaker.• Check the cable.Error message Meaning RemedyERROR:TX PLL UNLOCK[CANCEL]: Stop alarmTX PLL is unlocked. Transmission is stopped.Contact your dealer.ERROR:RX PLL UNLOCK[CANCEL]: Stop alarmRX PLL is unlocked. Reception is stopped.Contact your dealer.ERROR:WR1(2) PLL UNLOCK[CANCEL]: Stop alarmWR1(2) PLL is unlocked. Reception is stopped.Contact your dealer.ERROR:Tx power reduced.Main AMP heated.[CANCEL]: Stop alarmPower amplifier is too hot. Trans-mission power is reduced to one level lower.Allow amplifier to cool.ERROR:Tx power reduced.Ship's main failure.[CANCEL]: Stop alarmAC power is interrupted and re-placed with DC power (only when connecting PR-850A).Can use DC power with low trans-mission power. Check AC power and decrease the transmission power to the minimum. System was rebooted. Unusual event is detected. System restarts automatically.](https://usermanual.wiki/Furuno-USA/9ZWFS1575.users-manual-part-3/User-Guide-1777366-Page-19.png)
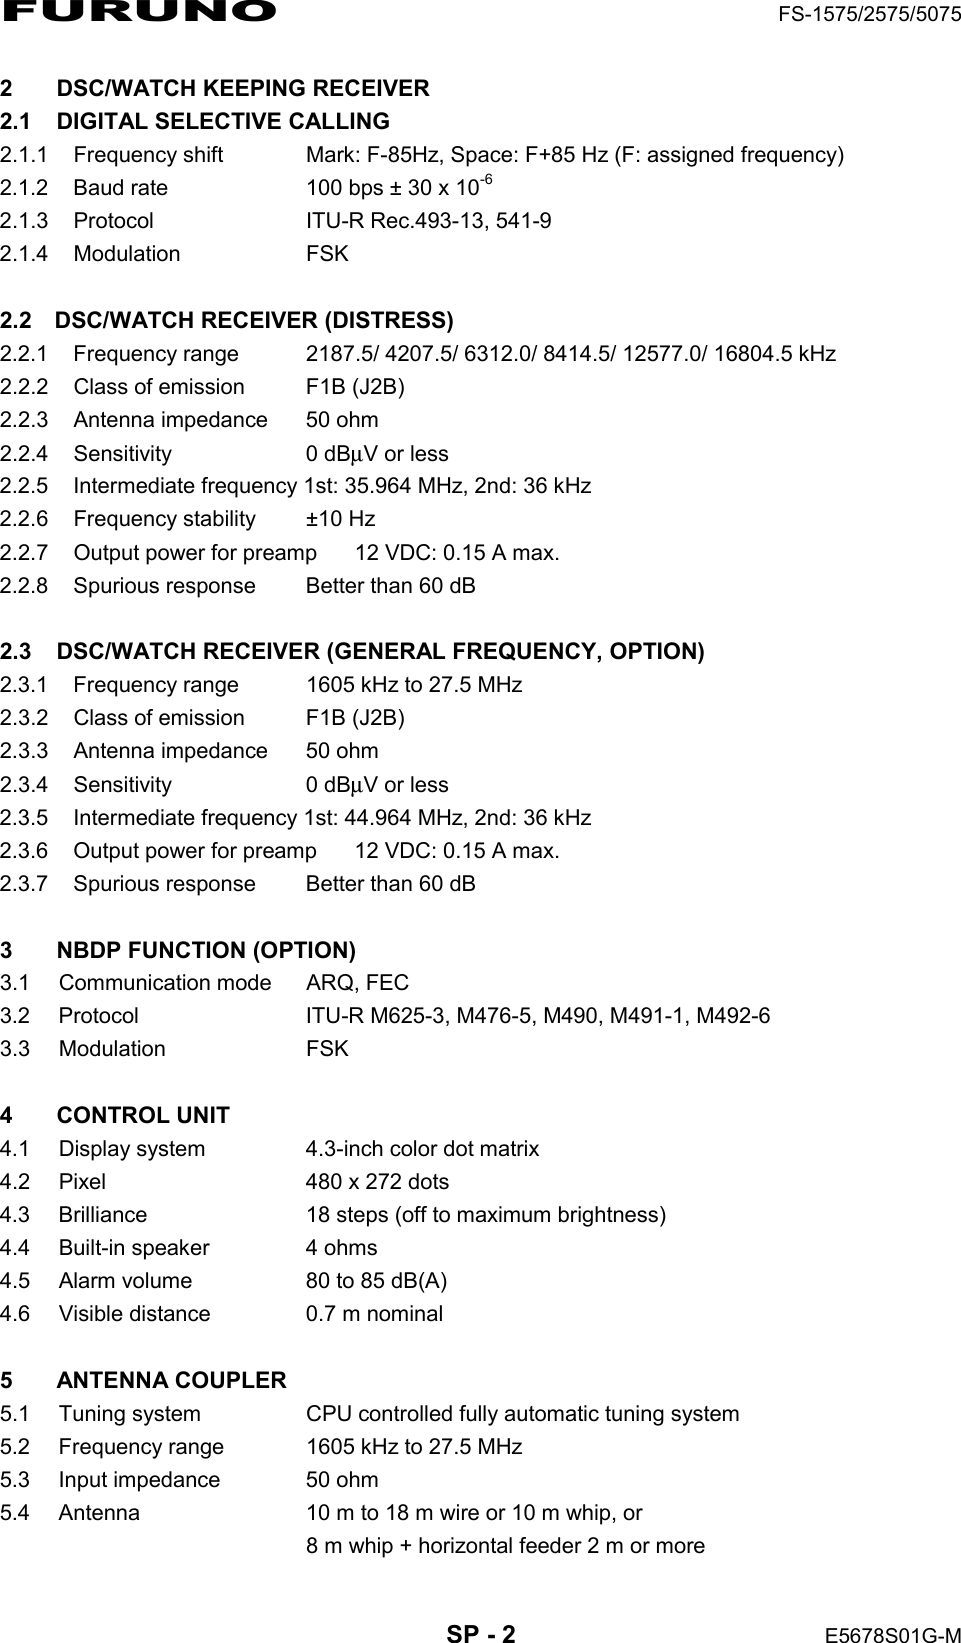
![11. MAINTENANCE & TROUBLESHOOTING11-511.5 Breaker on PR-850AThe AC-DC power supply unit PR-850A has a circuit breaker. If the breaker has tripped, find the reason before resetting the breaker.11.6 Test CallThis function sends a test signal to a coast or ship station, over one of six distress and safety frequencies. For that reason, it should not be executed unnecessarily. You can prepare a test call beforehand (see paragraph 6.16.5).1. Press the OTHER DSC MSG key to open the [COMPOSE MESSAGE].2. Rotate the ENTER knob to select [MSG TYPE] then push the knob.3. Rotate the ENTER knob to select [TEST MSG] then push the knob. [PRIORITY] is automatically set to [SAFETY].4. With [TO] selected, push the ENTER knob.5. Rotate the ENTER knob to select [DIRECT INPUT] or [ADDRESS BOOK DATA] then push the knob.[ADDRESS BOOK DATA]: Select a MMSI from the [ADDRESS BOOK] (see section 6.15) then push the ENTER knob.[DIRECT INPUT]: Enter the MMSI of the station where to send the test message then push the ENTER knob.6. With [DSC FREQ] selected, push the ENTER knob.7. Rotate the ENTER knob to select DSC frequency then push the knob.8. With [GO TO CALL] selected, push the ENTER knob to send the test message. The screen is changed to one for transmission. After the call is sent, the equip-ment waits for acknowledgement of the call. The timer starts counting up the time to wait for acknowledgement.9. Do one of the following.Test acknowledge message receivedThe audio alarm sounds and the message "TEST ACK received! [CANCEL]: Stop alarm" appears. Press the CANCEL key to silence the alarm.ERROR:VC error!Please restartthe power supply.[CANCEL]: Stop alarmVC voltage decreases. Transmis-sion is stopped.Reset the power. If normal opera-tion is not restored, contact your dealer.Error message Meaning RemedyPOWERONONOFFAC INPUT 50/60Hz DC OUTPUTBreaker](https://usermanual.wiki/Furuno-USA/9ZWFS1575.users-manual-part-3/User-Guide-1777366-Page-20.png)
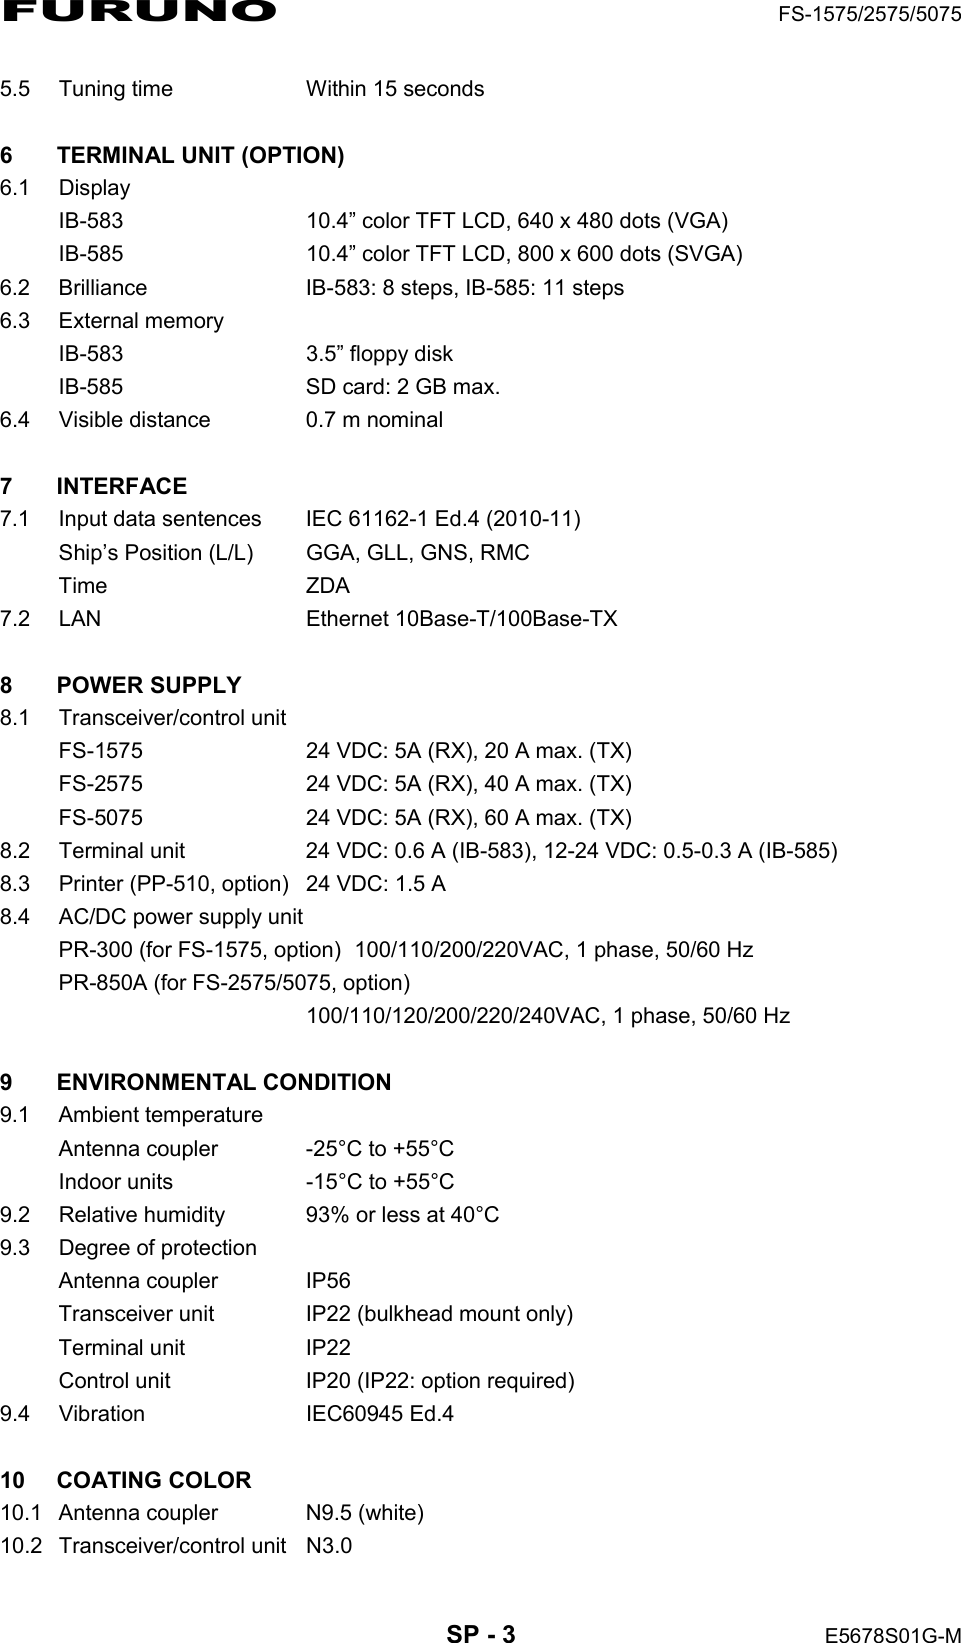
![11. MAINTENANCE & TROUBLESHOOTING11-6No responseRe-send call: Rotate the ENTER knob to select [RESEND] in the user options area then push the knob.Cancel call: Rotate the ENTER knob to select [QUIT] in the user options area then push the knob.11.7 NBDP Terminal Unit MaintenanceRegular maintenance is important for good performance. A regular maintenance pro-gram should be established and should at least include the items mentioned below.11.7.1 Cleaning the equipmentWipe the LCD carefully to prevent scratching, using tissue paper and an LCD cleaner. To remove dirt or salt deposits, use an LCD cleaner, wiping slowly with tissue paper so as to dissolve the dirt or salt. Change paper frequently so the salt or dirt does not scratch the LCD. Do not use solvents such as thinner, acetone or benzene for clean-ing. Also, do not use degreaser or antifog solution, as they can strip the coating from the LCD.11.7.2 Connectors and earth connectionPeriodically check the connectors for proper seating and the earth connection for rust. Remove rust to maintain a good ground system.11.7.3 Floppy disk driveForeign materials on the floppy disk drive head can scratch the magnetic materials on the floppy, resulting in loss of data. Clean the floppy disk drive head regularly with a floppy disk drive cleaning disk to prevent erasure of information stored on disks.11.7.4 DiagnosticsGeneral diagnostics1. Press the function key F6 to open the [System] menu.SetupSlave DelayTX/RX MSG SaveEdit Before sendingTX POWER*Header/Footer*Time SystemTime & DateWindow ColorSelf TestLock Change Defaultxx msec (10 - 50 msec)OFF ONOFF ONHIGH MID LOWOFF ONOFF UTC SMT JST10/Apr/2012 10:00:00SystemFor servicemanNo need to change. Only serviceman can change.*: Only for IB-585](https://usermanual.wiki/Furuno-USA/9ZWFS1575.users-manual-part-3/User-Guide-1777366-Page-21.png)
![11. MAINTENANCE & TROUBLESHOOTING11-72. Select [Change] at [Setup].3. Select [Self Test] at the bottom of the screen.4. Press the Enter key. The results of the self test are displayed a short time later.Selftest results for IB-583Selftest results for IB-585Self test resultsThe test results are shown as [OK] or [NG] (No Good). For any [NG], check the con-nection of the equipments then try the self test again. If it appears again, call for ser-vice. When the test is completed, the message "Selftest Completed. Press any key to escape." appears.X.XX: Version No.*: "NG" and "Printer not ready" when printer is off or abnormal.IB-583Main terminal soft (T-CPU board)NBDP modemXX: Version No.xx: FS-1575, FS-2575 or FS-5075*1: “NG” when the SD card is not inserted.*2: “NG” when FS-xx75 is turned off. *3: "NG" and "Printer not ready" when printer is off or abnormal.*4: The message “Press 3 keys” appears. Press any three keys.](https://usermanual.wiki/Furuno-USA/9ZWFS1575.users-manual-part-3/User-Guide-1777366-Page-22.png)