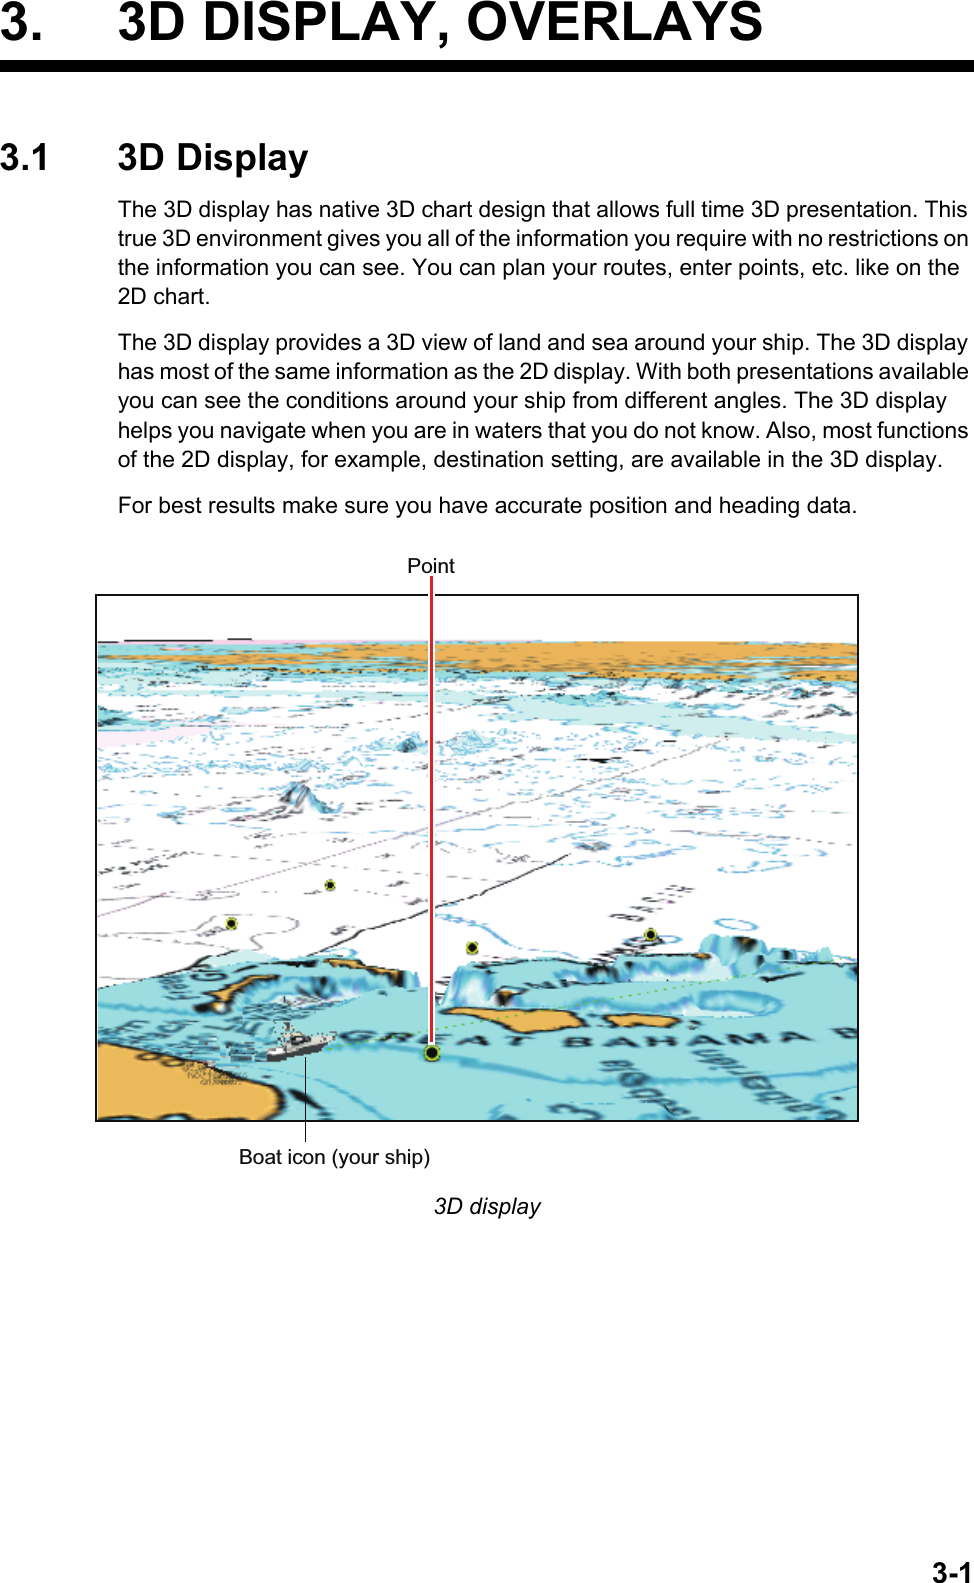
Furuno USA 9ZWRTR104 Transceiver for Radar Sensor DRS4DL User Manual
Furuno USA Inc Transceiver for Radar Sensor DRS4DL
Contents
- 1. User Manual I
- 2. User Manual II Part 1
- 3. User Manual II Part 2
- 4. User Manual II Part 3
- 5. User Manual II Part 4
- 6. User Manual II Part 5
- 7. User Manual II Part 6
- 8. User Manual II Part 7
- 9. User Manual II Part 8
- 10. User Manual II Part 9
- 11. User Manual II Part 10
- 12. User Manual II Part 11
- 13. User Manual II Part 12
User Manual II Part 4
![2. PLOTTER2-132.11.1 XTE alarmThe XTE alarm tells you when your ship goes off course by more than the limit set (XTE alarm boundaries).1. Turn on [XTE Alarm] in the [Alarm] menu.2. Tap [XTE Alarm Value] to display the software keyboard.3. Set the value, then tap .4. Tap the close button at the top of the screen to close the menu.2.11.2 Depth alarmThe depth alarm tells you when the depth to the bottom is shallower than the value you set. Requires depth data.1. Turn on [Depth Alarm] in the [Alarm] menu.2. Tap [Depth Alarm Value] to display the software keyboard.3. Set the value, then tap .4. Tap the close button to finish.2.11.3 SST alarmThe sea surface temperature alarms tells you when the sea surface temperature is over, under, within, or out of range of the temperature you set. Requires a temperature sensor.1. Tap [Sea Surface Temperature Alarm] on the [Alarm] menu.2. Tap [Over], [Under], [Within], [Out of] or [Shear]. Follow the appropriate procedure below.Alarm settingGo to pointIntended course :Alarm areaStarting point](https://usermanual.wiki/Furuno-USA/9ZWRTR104.User-Manual-II-Part-4/User-Guide-2522488-Page-1.png)
![2. PLOTTER2-14[Over] or [Under]The [Over] or [Under] alarm sounds when the temperature is over or under the set value, respectively.1) Tap [Temperature Alarm Value] to display the software keyboard.2) Set the value, then tap . Go to step 3.[Within] or [Out of]The [Within] or [Out of] alarm sounds when the temperature is within or out of the temperature range set, respectively.1) Tap [Temperature Alarm Minimum Value] to display the software keyboard.2) Set the minimum value, then tap .3) Tap [Temperature Alarm Maximum Value] to display the software keyboard.4) Set the minimum value, then tap . Go to step 3.[Shear]The shear alarm sounds when the temperature exceeds the alarm setting for 10 seconds.1) Tap [Temp. Shear Alarm Value] to display the software keyboard.2) Set the value, then tap . Go to step 3.3. Tap the close button to finish.2.11.4 Speed alarmThe speed alarm tells you when the speed of your ship is over or under the limit set. Set the value at [Speed Alarm Value].1. Tap [Speed Alarm] on the [Alarm] menu.2. Tap [Over] or [Under].3. Tap [Speed Alarm Value] to display the software keyboard.4. Set the value for [Over] or [Under] then tap .5. Tap the close button to finish.](https://usermanual.wiki/Furuno-USA/9ZWRTR104.User-Manual-II-Part-4/User-Guide-2522488-Page-2.png)
![2. PLOTTER2-152.11.5 Anchor watch alarmThe anchor watch alarm tells you that your ship has moved a distance greater than the set value when the ship must not be moving.1. Turn on [Anchor Watch Alarm] in the [Alarm] menu.2. Tap [Anchor Watch Alarm Value] to display the software keyboard.3. Set the value, then tap .4. Tap the close button to finish.2.11.6 Other Alarm menu itemsThe followings are the alarm menu items not previously mentioned.[Hardware Alarm]: This alarm alerts you when something is wrong with the hardware.[Notification Sound]: Activate or deactivate the notification sound (for "Waypoint Crossing" (see section 5.8), "End of Route" (section 4.11) or fish finder alarms (section 7.10)).[Alarm Sound]: Disable or enable the buzzer.[Sound Alarm Until Acknowledged]: Turn this item on to sound the aural alarm until an alarm is acknowledged (see paragraph 2.11.7).[Save Log File]: Save alert list to SD card.[Reset Default Settings]: Select this menu item to restore default settings for the [Alarm] menu.Your ship's position where you start the anchor watch alarm.Alarm setting : Alarm area](https://usermanual.wiki/Furuno-USA/9ZWRTR104.User-Manual-II-Part-4/User-Guide-2522488-Page-3.png)
![2. PLOTTER2-162.11.7 How to show the Alarms listWhen an alarm is violated, you can see the name of the offending alarm on the [Alarms] list. The list stores both warning and system messages. Open the home screen, then tap [Lists] followed by [Alarms]. Active alarms are flashing. Tap an active alarm to acknowledge it and stop the f lashing. Acknowledged alarms appear in the [HISTORIC] section. Tap the close button to close the list.2.12 TrackThe track (or movement) of your ship is plotted on the screen with position data. Your track lets you see how your ship has moved.The track is saved to the internal memory if the track is active. A line runs between each track point. The internal memory stores a maximum of 30,000 track points.Your track remains on the screen when the power is turned off. You can delete the track that you do not need from the home screen.The saved track can be shown on the screen, and you can make a route with the saved track.2.12.1 How to start, stop recording the trackStart recordingOpen the slide-out menu or tap the boat icon, then turn [Track] on.Stop recordingMethod 1: Tap the track, then tap [Stop Track].Method 2: Open the slide-out menu or tap the boat icon. Turn [Track] off.2.12.2 How to show or hide the track displayOpen the [Layers] menu and turn [Tracks] on or off.Sea Surface Temperature AlarmDepth AlarmTrack](https://usermanual.wiki/Furuno-USA/9ZWRTR104.User-Manual-II-Part-4/User-Guide-2522488-Page-4.png)
![2. PLOTTER2-172.12.3 Track intervalIn drawing the track, the position of your ship is stored into the memory of this unit at an interval of time. A shorter interval provides better reconstruction of the track, but the storage time of the track is reduced.1. Open the home screen, then tap [Settings] - [Ship & Track].2. Tap [Track Interval].3. Tap a time interval.4. Tap the close button at the top of the screen to close the menu.2.12.4 Track colorTrack can be displayed in a single color or multiple colors. For multiple colors, you can display the track according to the conditions shown below.• SST (Sea Surface Temperature)• Speed• Depth• Bottom sedimentNote: The “bottom sediment” method requires a bottom discrimination capable trans-ducer, bottom discrimination sounder BBDS1, or network sounder DFF1-UHD.From the home screen1. Open the home screen, then tap [Settings] - [Ship & Track].2. Tap [Track Color].3. Tap [Fixed] or [Variable]. Tap “>” to go back one layer. For [Fixed], go to the next step. For [Variable], go to step 5.](https://usermanual.wiki/Furuno-USA/9ZWRTR104.User-Manual-II-Part-4/User-Guide-2522488-Page-5.png)
![2. PLOTTER2-184. Tap [Fixed Color Setup] then tap a color. Go to step 10.5. Tap [Variable Color] then tap an option.[Depth]: Change the color of the track with depth.[SST Range]: Change the color of the track with change in sea surface tempera-ture.[SST Variation]: Change the color of the track according to variation in sea sur-face temperature as follows:[Speed]: Change the color of the track with speed.[Bottom Discrimination]: Change the color of the track with bottom sediment.Temperature range (°C) Color16.60 - 16.80 Red16.81 - 17.00 Yellow17.01 - 17.20 Green17.21 - 17.40 Light-blue17.41 - 17.60 Purple17.61 - 17.80 Orange17.81 - 18.00 Blue18.01 - 18.20 Red18,21 - 18.40 Yellow18.41 - 18.60 Orange](https://usermanual.wiki/Furuno-USA/9ZWRTR104.User-Manual-II-Part-4/User-Guide-2522488-Page-6.png)
![2. PLOTTER2-196. Tap [Variable Color Setup].7. For [Bottom Discrimination], tap [Mud], [Sand], [Rock] or [Gravel]. For others, tap a color (seven choices).8. Tap a color for each menu item.[Depth]: Set the color for each depth range. For example, when the red icon is selected in [Color 1], the track is red for depths from 5 to 10 ft.[SST Range]: Set the color for each range of sea surface temperature. For exam-ple, when the blue icon is selected in [Color 1] (temperature range: 10 to 15°F), the track is blue for temperatures from 10 to 15°F.[SST Variation]: Set the color for each temperature variation. Tap Step 0.2°F, then set each color. Do the same for Step 2.0°F[Speed]: Set the color for each speed range. For example, when the blue icon is selected in [Color 1], the track is blue for speed from 0 to 5 kn.[Bottom Discrimination]: Set the color for each bottom sediment. For example, when the blue icon is selected in [Mud], the track where mud is found is blue.For [Depth], [SST Range], [SST Variation] and [Speed], you can change the threshold amount for each color. Tap a threshold amount to display the software keyboard. Set the value, then tap .9. Tap [Close].10. Tap the close button to finish.On the screen1. Tap a section of track to display the pop-up menu.2. Tap [Color].3. Tap a color.For [Depth] For [SST]For [Speed]For [Bottom Discrimination]Threshold amountColor iconFor [SST Variation]](https://usermanual.wiki/Furuno-USA/9ZWRTR104.User-Manual-II-Part-4/User-Guide-2522488-Page-7.png)
![2. PLOTTER2-202.12.5 Track thicknessYou can set the thickness of the track. If you are following the same track many times, you can show the track in the thinnest width to prevent overlapping of track.1. Open the home screen, then tap [Settings] - [Ship & Track].2. Drag the slider at [Track Thickness] to set the level. (The thickness can also be set with the software keyboard. Tap the keyboard in the [Track Thickness] field then enter desired thickness.)3. Tap the close button to finish.2.12.6 How to delete tracksIf the screen becomes full of track, you can not know which is the newer track. Delete the track you do not need.How to delete a specific part of a trackYou can delete a track partially. Tap the part of a track to delete. Tap [Del From Here] or [Delete Up to Here] as required.How to delete all tracks1. Open the home screen, then tap [Settings] - [Ship & Track].2. Tap [Delete All Tracks] on the [TRACK] window. The message "THIS ACTION WILL PERMANENTLY DELETE ALL TRACK..." appears.3. Tap [OK].4. Tap the close button to finish.Automatic deleting of tracksThe internal memory stores a maximum of 30,000 track points. When the memory for track points becomes full, the equipment can automatically delete the oldest track points to get space for new track points. To get automatic deletion of track do as fol-lows:1. Open the home screen, then tap [Settings] - [Ship & Track].2. Turn [Automatic Track Deleting] on or off as required.3. Tap the close button to finish.](https://usermanual.wiki/Furuno-USA/9ZWRTR104.User-Manual-II-Part-4/User-Guide-2522488-Page-8.png)
![2. PLOTTER2-212.12.7 How to find number of track points usedOn the home screen, tap [Settings] - [General]. Find [Track points] in the [DATA US-AGE] section. In the example below. 735 track points out of 30,000 have been used.2.13 Plotter MenuThis section describes the plotter menu items, which are in the [Settings] - [Plotter] menu.[Grid Interval]: Set the distance between grid lines. The options are [Off] (no lines), [Very Small], [Small], [Medium], [Large], and [Very Large].[Tide/Current Icons Size]: Set the size of the icon for tide and current.Chart Priority in Auto Mode](https://usermanual.wiki/Furuno-USA/9ZWRTR104.User-Manual-II-Part-4/User-Guide-2522488-Page-9.png)
![2. PLOTTER2-22[Transparencies][NavData Transparency]: Set the degree of transparency for the navdata display. [PhotoFusion Transparency]: Set the degree of transparency for the satellite photo overlay.[Tide Range for PhotoFusion]: Set the degree of transparency for the tide range in the satellite photo overlay.[Tidal Currents Transparency]: Set the degree of transparency for the tidal currents display.[Radar Overlay][Radar Transparency]: Set the degree of transparency for the radar echo.[Range Link]: Activate or deactivate matching the overlay with radar ranges.[Echo Color]: Tap the color for the radar echo.Depth Shading Values[Depth Shading Transparency]: Set the degree of transparency for the depth shad-ing overlay.For the menu items shown in the table, see the mentioned section.[Reset Default Settings]: Tap this menu item to restore default settings for the [Plot-ter Display] menu.Menu item Reference[3D Display]• [Auto 3D Alti Exaggeration]• [3D Alti Exaggeration]See paragraph 3.1.2.[Depth Shading Values]• [Auto Depth Shading Color Scale]• [Minimum Value]• [Maximum Value]• [Depth Color Shade]See paragraph 3.2.1.](https://usermanual.wiki/Furuno-USA/9ZWRTR104.User-Manual-II-Part-4/User-Guide-2522488-Page-10.png)
![2. PLOTTER2-232.14 NAVpilot-700 Series Auto PilotThis section shows you to how to enable use of the NAVpilot with your system. For how to use the NAVpilot to steer to a point or route, see paragraph 4.11.4.The FURUNO NAVpilot-700 Series Auto Pilot installs in the NavNet TZtouch2 network to get automatic steering when going to a point or a route. The following navpilot func-tions can be controlled from a NavNet TZtouch2 display:• Control operation of the NAVpilot from this equipment.• Select the NAVpilot steering mode (Auto or Nav).Note: When an alarm message for the NAVpilot appears, check the control unit of the NAVpilot.2.14.1 How to enable use of the navpilotOpen the [Settings] - [Routes] menu, then turn on [Navigate with AutoPilot]. When you set a route or point as destination, the message" Do you want to navigate using the NAVpilot?" appears.2.14.2 How to show the NAVpilot control box in the data area1. Tap [DATA] or [ROUTE] on the data area to select where to show the NAVpilot-control box.2. Tap a data box or an unoccupied area to select where to show the NAVpilot con-trol box. A pop-up menu appears.3. Tap [NavPilot] to show the NAVpilot control box in the area selected.](https://usermanual.wiki/Furuno-USA/9ZWRTR104.User-Manual-II-Part-4/User-Guide-2522488-Page-11.png)
![3. 3D DISPLAY, OVERLAYS3-33.1.2 How to make the 3D view clearerIn the 3D display, some topographical features are easier to see if you use the 3D ex-aggeration feature. This feature expands both objects on the chart and the underwater vertically so that you can easily see the shape of the objects and position. There are two methods for 3D exaggeration: automatic and manual.1. Open the home screen, then tap [Settings] - [Plotter].2. Find the [3D DISPLAY] section.3. Automatic method:Turn on [Auto Alti 3D Exaggeration].Manual method:Turn off [Auto Alti 3D Exaggeration]. Use the slider or software keyboard at [3D Alti Exaggeration] to set the exaggeration level.High gives the highest level of exaggeration. The example below compares the same picture in low and high exaggerations.4. Tap the close button to finish.High exaggerationLow exaggeration](https://usermanual.wiki/Furuno-USA/9ZWRTR104.User-Manual-II-Part-4/User-Guide-2522488-Page-15.png)
![3. 3D DISPLAY, OVERLAYS3-43.2 OverlaysRadar, satellite photo, depth shading, tide icons, tidal currents, etc. overlays are avail-able on the plotter display.3.2.1 Depth shading overlayThe depth shading overlay shows the depths in different color (the default settings are red (shallow), yellow (medium) and blue (deep)). This overlay is available in both 2D and 3D presentations. Use this overlay to find depths. To show the depth shading overlay, open the [Layers] menu then turn [Depth Shading] on or off as required.Depth shadingYou can turn the automatic depth shading color scale adjustment on or off by tapping the “A”.OFF: Depth shading can be adjusted manually, with the range sliders.ON: Depth shading set according to the depth shading values set in the menu.ONOFFMaximumvalueMinimumvalue](https://usermanual.wiki/Furuno-USA/9ZWRTR104.User-Manual-II-Part-4/User-Guide-2522488-Page-16.png)
![3. 3D DISPLAY, OVERLAYS3-5Depth shading settingsThe depth shading settings are in the [Plotter] menu.[Auto Depth Shading Color Scale]: Turn automatic depth shading color scale selec-tion on or off.[Minimum Value]: Set the minimum depth range for which to show depth shading, with the software keyboard. This is available when [Auto Depth Shading Color Scale] is set to [OFF].[Maximum Value]: Set the maximum depth range for which to show depth shading, with the software keyboard. This is available when [Auto Depth Shading Color Scale] is set to [OFF].[Depth Color Shade]: Select how to display the depth colors among [Classic Hue], [Inverted Classic Hue], [Red Hue], [Blue Hue], [Green Hue] and [Yellow Hue].[Depth Shading Transparency]: Adjust the degree of transparency of the depth shading overlay.Colors of the rainbowShades of red](https://usermanual.wiki/Furuno-USA/9ZWRTR104.User-Manual-II-Part-4/User-Guide-2522488-Page-17.png)
![3. 3D DISPLAY, OVERLAYS3-63.2.2 Satellite photo overlayYou can put the satellite photo for your area on the 2D and 3D displays. Open the[Layers] menu then turn [Satellite Photo] on or off as required.High resolution satellite images for the USA coastline are not provided standard, but are available at no cost (except shipping and handling). Users can install multiple sat-ellite photos on the hard drive of the NavNet TZtouch2. The illustration below shows the vector chart with the satellite photo overlay.How to set satellite photo transparency on waterYou can set the degree of transparency for the satellite photo on the water.1. Open the home screen, then tap [Settings] - [Plotter].2. Drag the slider at [PhotoFusion Transparency] to set the level (setting range: 0 to 80%).3. Tap the close button to finish.3.2.3 Radar overlayThe radar overlay display puts the radar picture on the top of the navigation chart. To display the radar overlay, open the [Layers] menu then turn [Radar Overlay] on or off.](https://usermanual.wiki/Furuno-USA/9ZWRTR104.User-Manual-II-Part-4/User-Guide-2522488-Page-18.png)
![3. 3D DISPLAY, OVERLAYS3-7How to switch between stand-by and TX, match overlay and radar rangesTap the [TX] icon at the bottom right corner to set the radar in transmit or standby state. The icon is filled in white when the radar is transmitting; hollow in standby.To match overlay and radar ranges, open the home screen, then tap [Settings] - [Plot-ter]. Turn on [Range Link]. You can sync the ranges with the Sync icon (at the lower right corner) when [Range Link] is turned off.How to set the level of the radar echo transparencyOpen the home screen, then tap [Settings] - [Plotter]. Drag the slider at [Radar Trans-parency] to set the transparency level.How to adjust radar gain, sea, rainThe gain and sea and rain clutters can be adjusted from the navigation data display. See sections 6.2, 6.3, 6.4, respectively.How to select the echo colorOpen the home screen, then tap Settings - [Plotter] - [Echo Color]. Tap [Multicolor], [Green] or [Yellow].How to acquire a target for ARPAA target can be acquired for ARPA. See paragraph 6.23.2.: Standby: TXPush to sync radar and overlay ranges.](https://usermanual.wiki/Furuno-USA/9ZWRTR104.User-Manual-II-Part-4/User-Guide-2522488-Page-19.png)