Futaba L35-N4581 Radio Control Transmitter User Manual
Futaba Corporation Radio Control Transmitter
Futaba >
Contents
- 1. user manual I
- 2. user manual II
- 3. user manual III
user manual II

Pre-Flight Preparation
Day-Ahead Preparation ............................................................... 4-1
Charging and replacing the flight transmitter battery ............................................... 4-1
Charging and replacing the sprayer transmitter battery (sold separately) ............... 4-3
Fuel and refueling .................................................................................................... 4-4
Precautions for Initial Flight Following Periodic Inspection.......... 4-5
Fuel .......................................................................................................................... 4-5
Helicopter battery..................................................................................................... 4-5
Initial flight procedure............................................................................................... 4-5
Handling the Helicopter ............................................................... 4-6
Transporting the helicopter ...................................................................................... 4-6
Checking radio signal interference........................................................................... 4-9
Radio signal distance test ...................................................................................... 4-10
Main rotor installation and removal and tail rotor inspection.................................. 4-11
Side cover installation and removal ....................................................................... 4-13
4
4-1
Pre-Flight Preparation
Charging and replacing the flight transmitter battery
Charging the battery
Be sure to use the dedicated charger for charging
the battery.
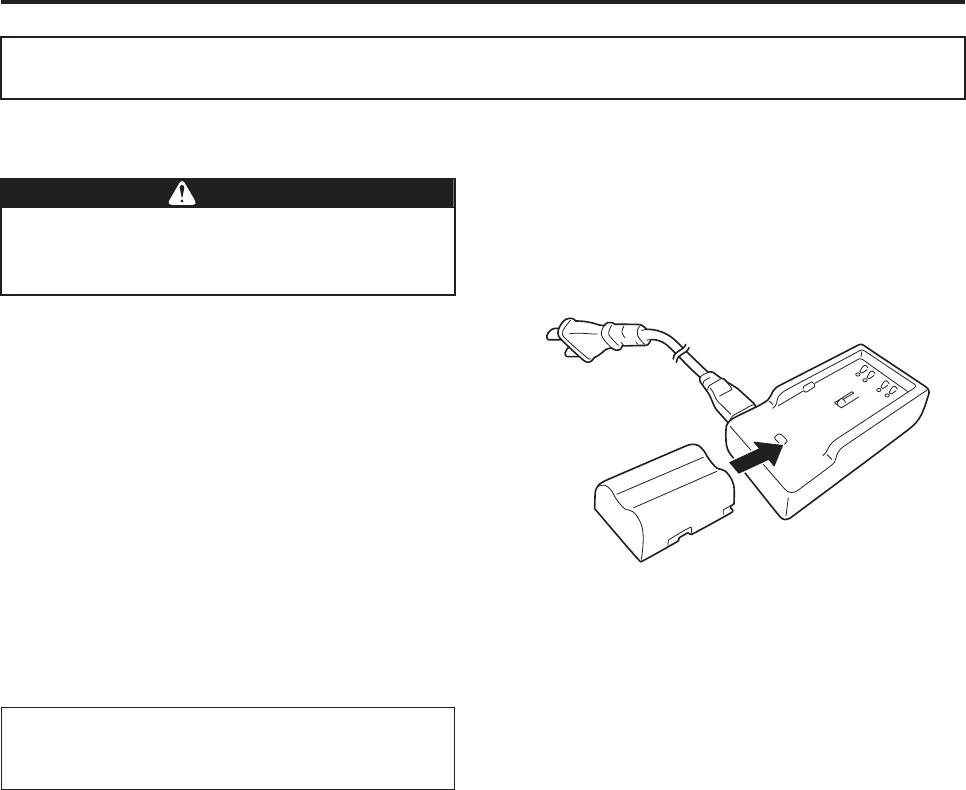
1Place the battery on the charger.
2Insert the power plug into the outlet. The red
lamp will illuminate while charging.
3After charging is complete, remove the battery.
After the battery is fully charged, the red lamp
will turn off.
Refer to the following for the battery’s charging time
and standard operation time.
4A warning lamp will indicate a warning if the bat-
tery must be replaced during flight. (See page 3-
12.)
Day-Ahead Preparation
Make sure to use a fully charged battery for a
flight. An insufficiently charged battery can
lead to an operation failure.
Charging temperature range: 0 to 40 °C
Charging time: 4 hours
Standard operation time: 4 hours minimum
WWARNING
Pre-Flight Preparation
4-2
Battery replacement
Replace the battery as follows.
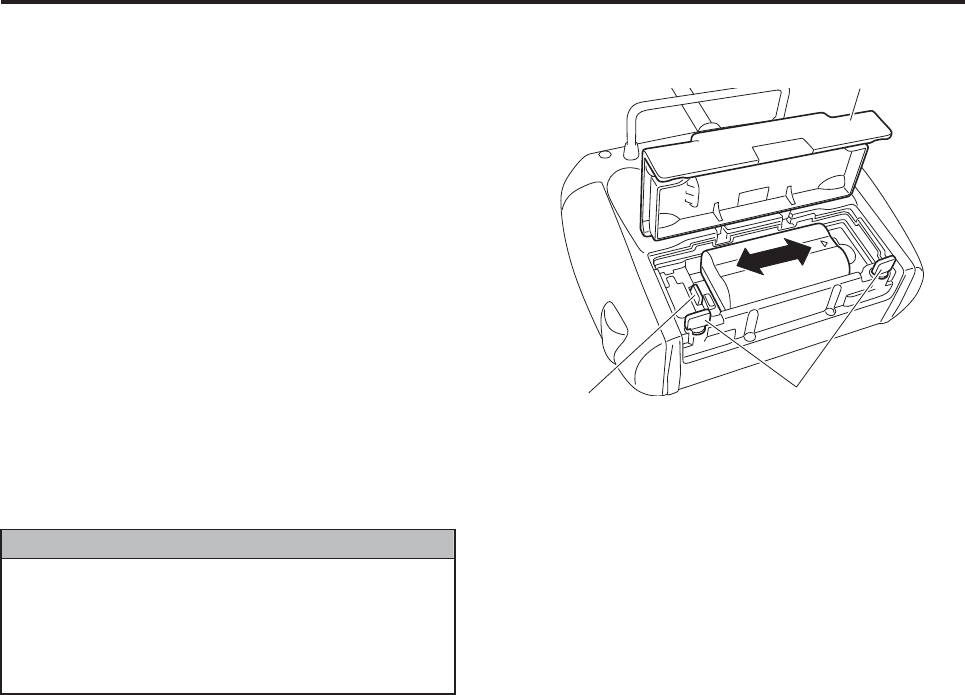
1Loosen the 2 battery cover knobs behind the
transmitter by turning them 90 degrees to the
left.
2Open the battery cover.
3Unlock the battery lock, slide and remove the
battery to the left.
4Insert a charged battery and slide it to the right.
5Close the battery cover, and turn and tighten the
battery cover knobs 90 degrees to the right.
Battery storage
Battery cover knobs
Battery cover
Battery lock
Do not use the battery or leave it in an area
exposed to direct sunlight or in other high-
temperature areas such as inside a sun-
scorched car.
Store it between -20 °C and 50 °C.
NNOTICE
Pre-Flight Preparation
4-3
Charging and replacing the sprayer transmitter battery (sold sepa-
rately)
Charging the battery
Be sure to use a dedicated charger to charge the
battery. Charge it as follows.
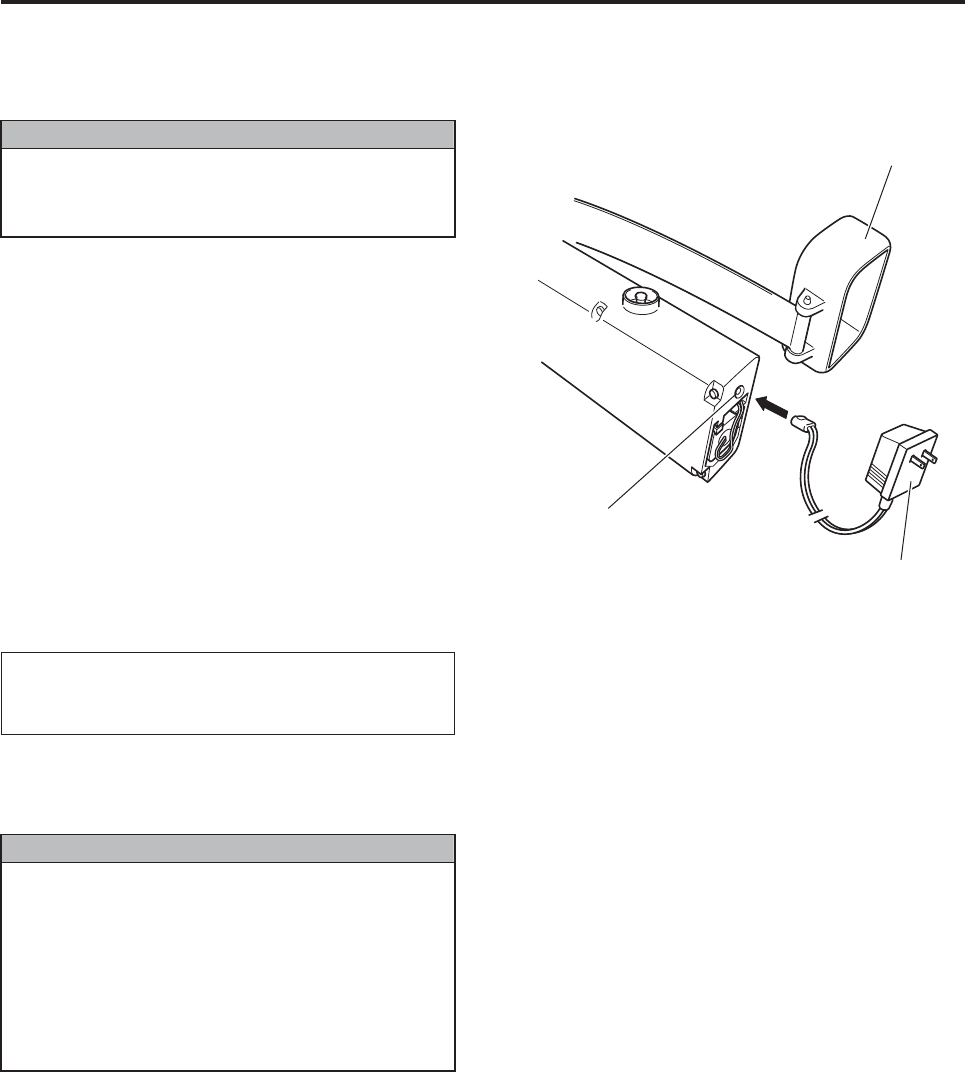
1Make sure the power switch on the transmitter is
OFF.
2Remove the battery cover from the bottom.
3Insert the charger’s plug into the charging jack at
the bottom of the transmitter.
4Insert the power plug into the outlet.
5The pilot lamp of the charger will illuminate, thus
charging the battery.
Refer to the following for the battery’s charging time
and standard operation time.
6After charging is complete, reattach the battery
cover.
Make sure to use a fully charged battery. An
insufficiently charged battery can lead to a
sprayer operation failure.
Charging temperature range: 0 to 40°C
Charging time: 10 hours
Standard operation time: 2.1 to 3.3 hours
If a battery is new or has been in long stor-
age, its operation time after the initial charge
can be shorter than normal. In this case, the
battery’s normal performance with respect to
the operation time will recover after several
times of repeated charging and discharging.
Please remember about this aspect during an
initial use.
NNOTICE
NNOTICE
Charging jack
Dedicated charger
Battery cover
Pre-Flight Preparation
4-4
Fuel and refueling
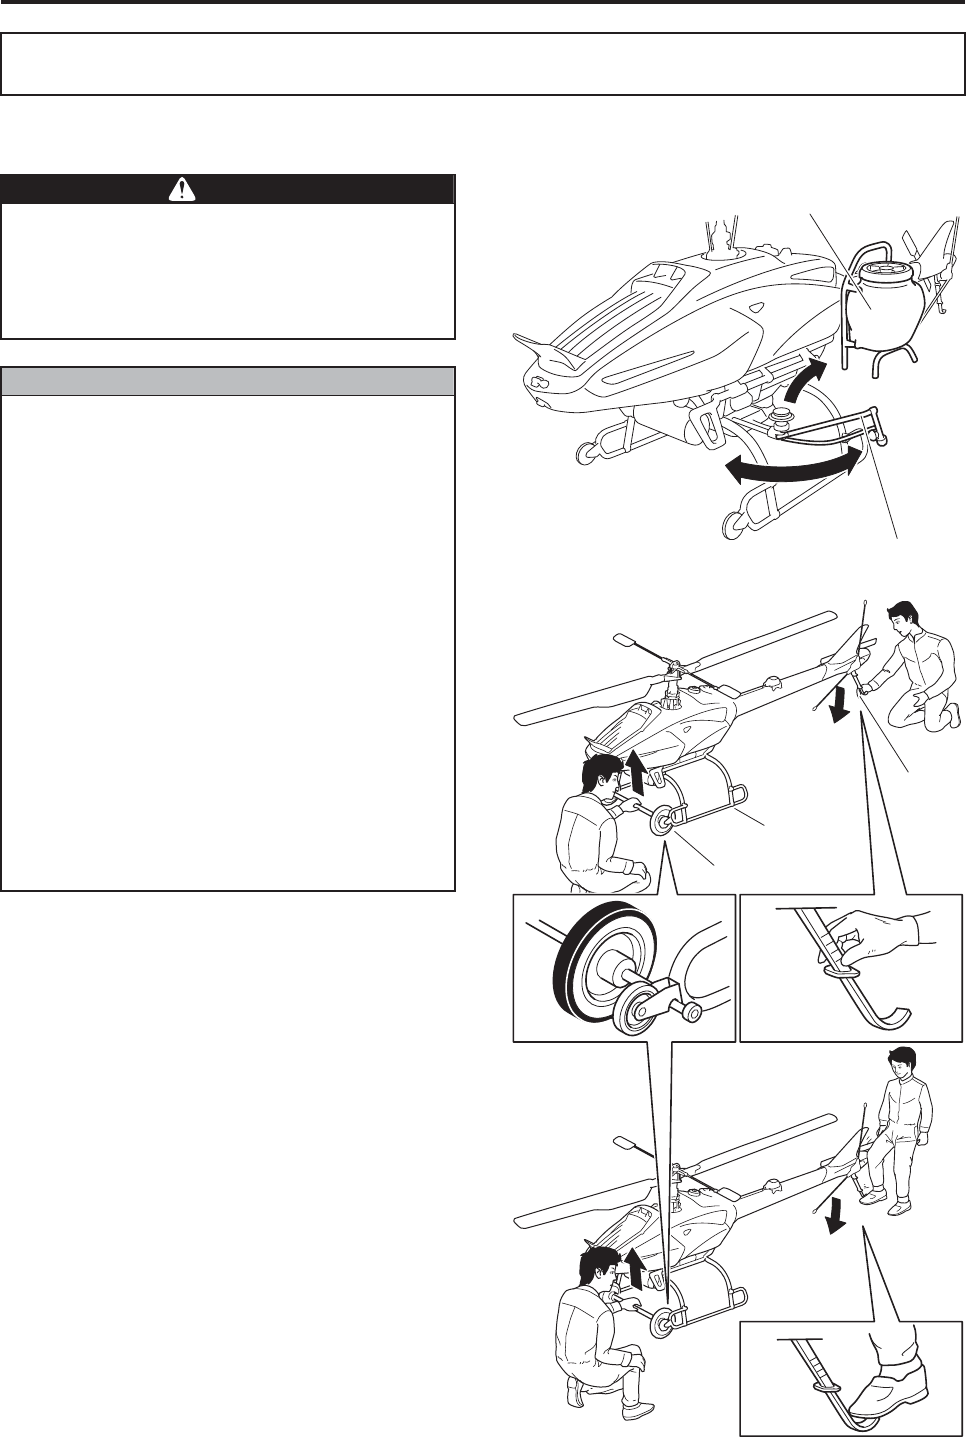
This product uses regular gasoline. Do not mix
engine oil with gasoline.
1Have regular gasoline ready.
Use fresh gasoline purchased recently (within 1
week) from a gasoline station.
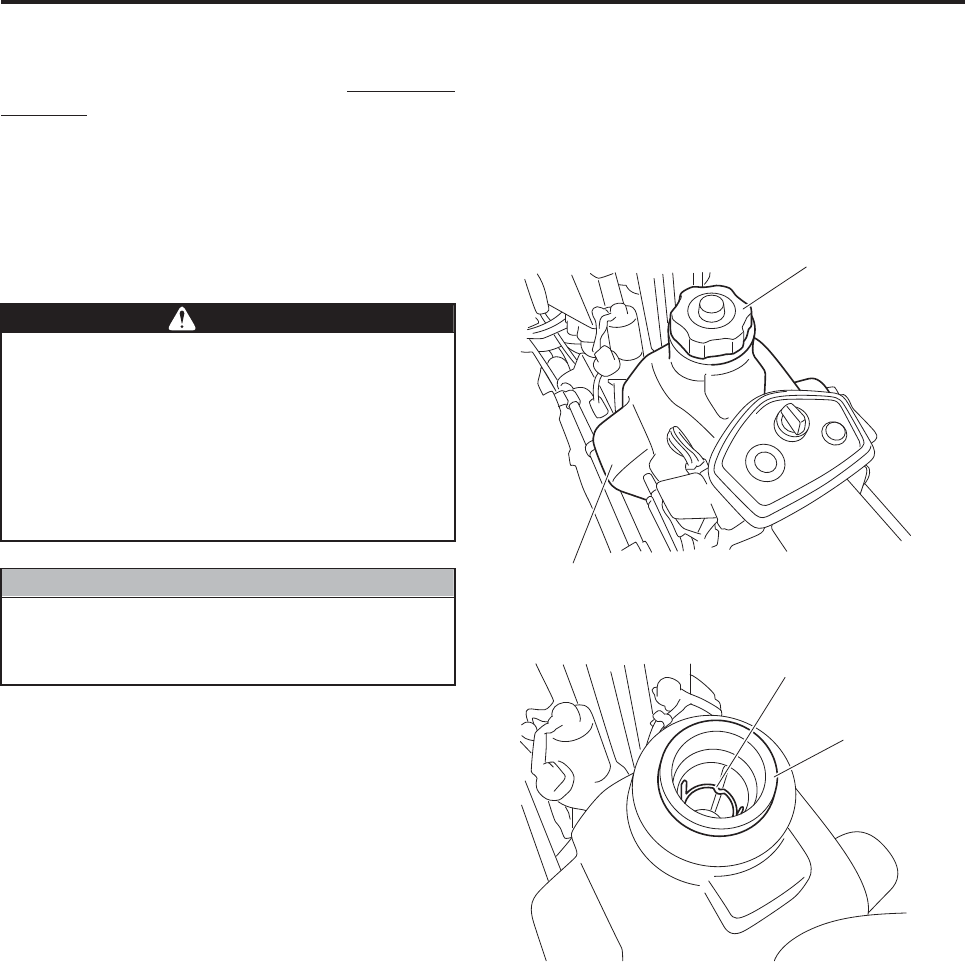
2Remove the fuel tank cap and start refueling.
Make sure the filter net is attached to the filler
inlet.
●Stop the engine before refueling and do
not bring a source of fire in the vicinity.
●Do not pour fuel over the refueling limit
(the red line marked in the filter net).
Excess fuel can ooze out during flight,
which is dangerous.
●After refueling, securely tighten the fuel
tank cap.
The fuel can spray out of the tank during
storage or transport in a vehicle with high
temperature.
WWARNING
NNOTICE
Fuel tank cap
Fuel tank
Refueling limit (red line)
Filter net
Pre-Flight Preparation
4-5
Fuel
After the helicopter undergoes a test flight following the completion of a periodic inspection at the dealer, the
fuel is drained from the fuel tank. This prevents the fuel from getting stale while the helicopter is being stored
by the customer.
Before the customer takes the helicopter on an initial flight, fill the tank with fresh gasoline purchased recently
(within 1 week) from a gasoline stand.
Helicopter battery
Because the tank was drained of its fuel, it will take a while for the fuel to reach the engine.
If the engine does not start within 5 seconds after the starter switch is pressed, allow the starter to rest for
about 10 seconds. This is done to allow the battery voltage to recover and to cool the starter motor. Then,
press the starter switch again.
If the starter motor spins weakly, replace the helicopter battery or recharge it with a dedicated charger.
Initial flight procedure
A periodic inspection consists of inspecting various components of the helicopter as well as performing a
completion test flight. Following a periodic inspection, an initial flight should be performed calmly, in order to
“break in” the various components and to allow the operator to get accustomed to piloting.
1Fill the tank with fresh fuel. Set the chemical and water payload to 50 percent of a normal flight.
2Perform a pre-flight inspection.
3Start the engine, take off, and allow it to hover for a minimum of 2 minutes at a maximum altitude of 1 meter
above ground.
4In the next stage, mainly hover at 2 to 3 meters above ground. Set the maximum flare angle at 10 degrees,
the maximum flight speed to 10 km/h, and steer gently to fly for a minimum of 10 minutes. At this time,
make sure there are no malfunctions in terms of helicopter vibration, noise, and the helicopter movement in
response to the operation of the sticks.
5When landing the helicopter for refueling, be sure to turn off the engine, and observe that the main rotor
has stopped rotating. Then, open the side cover and visually inspect for coolant or oil leaks.
6After a flight, perform a post-flight inspection, cleaning, and service.
Precautions for Initial Flight Following Periodic
Inspection
Never use leftover fuel. Doing so can cause the engine to start poorly or other malfunctions.
NNOTICE
Never attempt to recharge the battery with an automobile charger or to connect it to an automobile
battery through the use of booster cables. Doing so can damage the helicopter’s electronic compo-
nents.
NNOTICE
Pre-Flight Preparation
4-6
Transporting the helicopter
Transport wheel (sold separately)
installation and removal
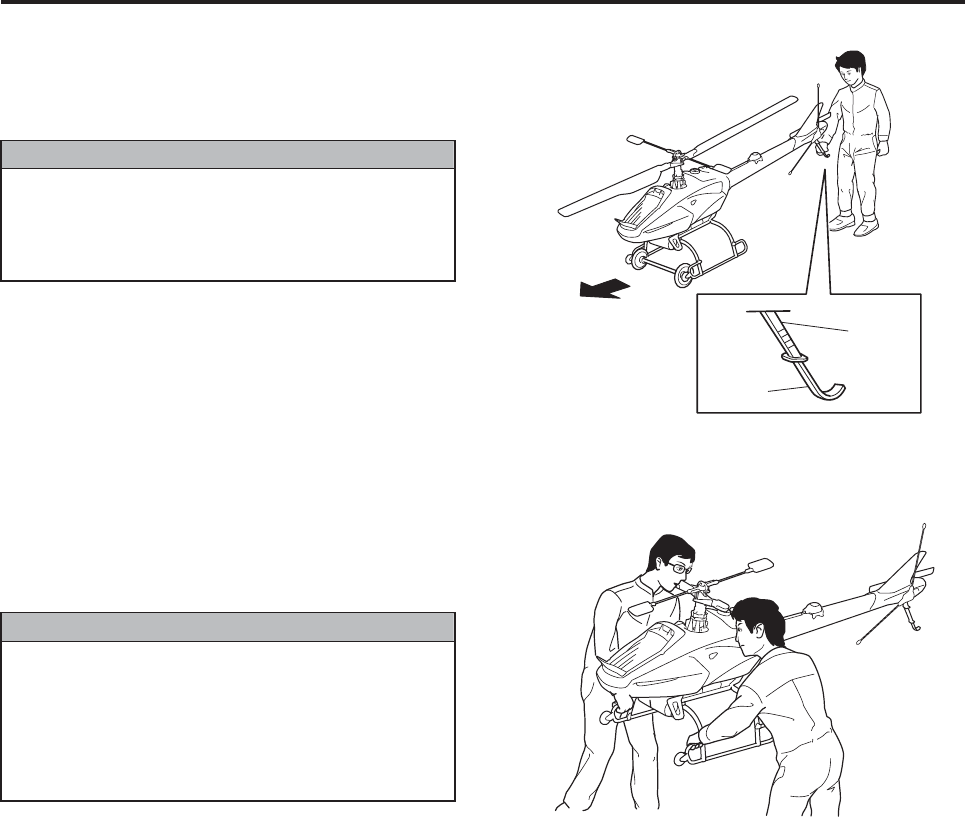
To transport the helicopter by rolling it on the
ground, attach transport wheels to the front of the
runners. Installation (and removal) is performed by
2 persons as follows.
1Use your foot or hand to lower the stone guard,
in order to lift the front end.
2Install (or remove) the transport wheels in the
recess located between the wheel and the pipe
in the front of the runner.
Handling the Helicopter
●The muffler reaches a high temperature
immediately after a flight. To prevent
burns, do not touch it.
●Be careful not to poke your eyes with the
antenna or the like.
●Be sure to remove the chemical tank from
the sprayer. If the helicopter is equipped
with a liquid sprayer, fold the boom before
transporting. Refer to the sprayer owner’s
manual for details.
●Make sure the main rotor blades do not
come in contact with the ground or sur-
rounding objects. Doing so will result in
equipment damage.
●Do not hold the helicopter by the tail body,
tail cover, radiator, or antenna. Doing so
will result in equipment damage.
●Before moving the helicopter, be sure to
turn the main switch OFF. Failure to do so
can transmit shocking impacts to the sen-
sors, causing the helicopter to operate
unintendedly.
●To transport the helicopter by rolling it on
the ground, be sure to attach transport
wheels (sold separately).
WWARNING
NNOTICE
Chemical tank
Boom
Transport wheel
Runner
Stone
guard
Pre-Flight Preparation
4-7
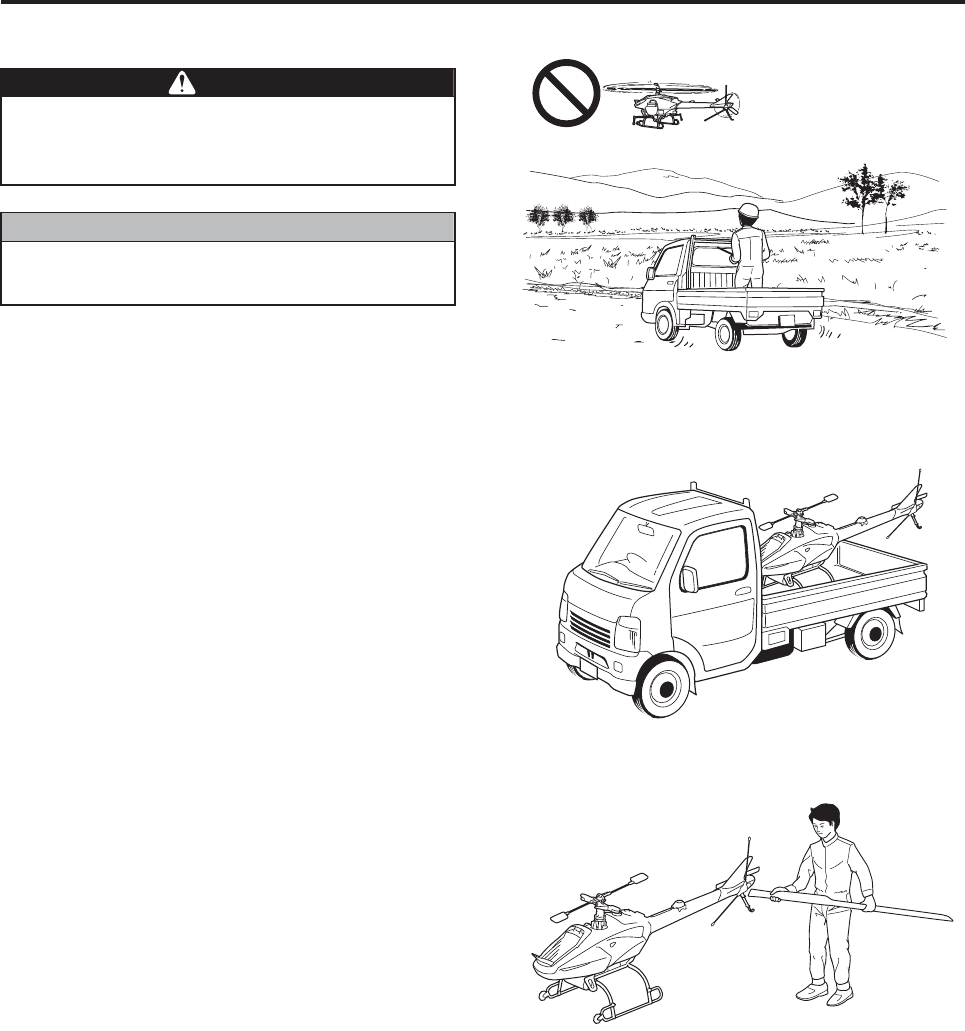
Moving forward/backward
Lift the tail slightly by holding the grip handle of the
stone guard to move the helicopter forward (or
backward).
Lifting and lowering
1Make sure that 2 persons or more lift the helicop-
ter, with each person holding the runner as
shown.
Make sure to hold the grip handle to move
the helicopter forward or backward. Do not
hold the tail cover or antenna, as this could
lead to equipment damage.
NNOTICE
Grip
handle
Stone
guard
●Do not hold the helicopter by the exhaust
pipe of the muffler or the bar for attaching
the sprayer tank, as this could lead to
equipment damage.
●Transport carefully so as not to damage
the tail rotor.
NNOTICE
Pre-Flight Preparation
4-8
Transporting
1Use a truck to transport the helicopter.
2Remove the main rotor blades before loading the
helicopter on a truck bed. (Refer to page 4-12.)
Use a truck to transport the helicopter.
Do not attempt to fly the helicopter to another
site, as this could lead to an accident.
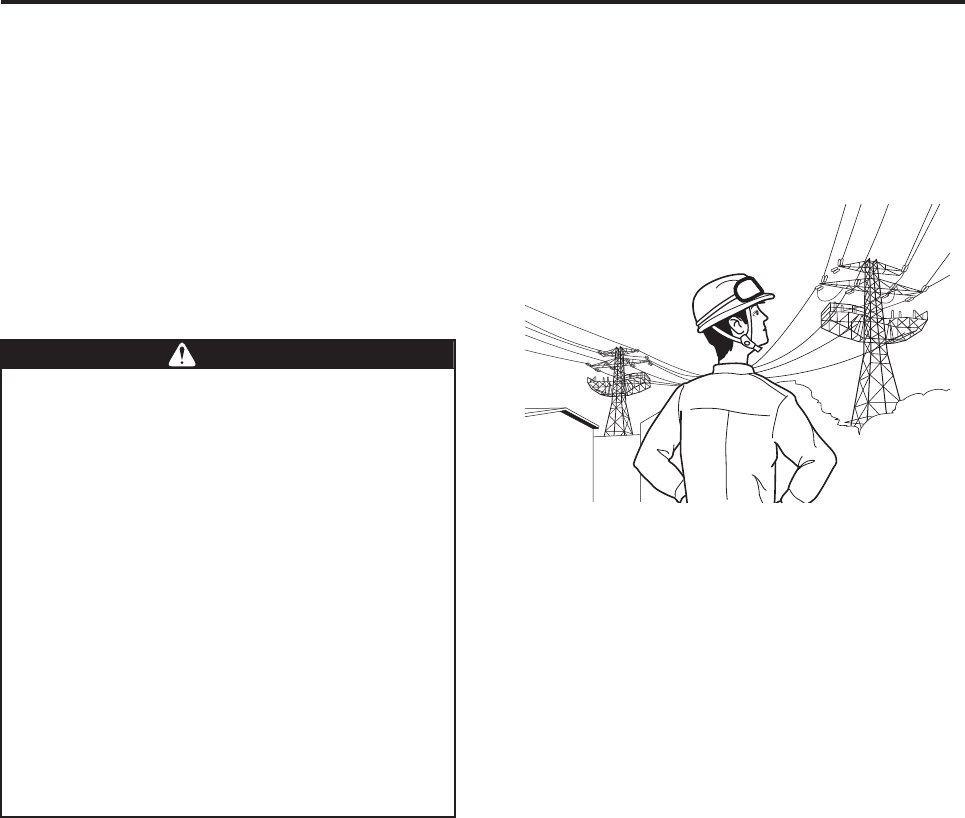
Make sure to remove the main rotor blades
before transporting the helicopter.
WWARNING
NNOTICE
Pre-Flight Preparation
4-9
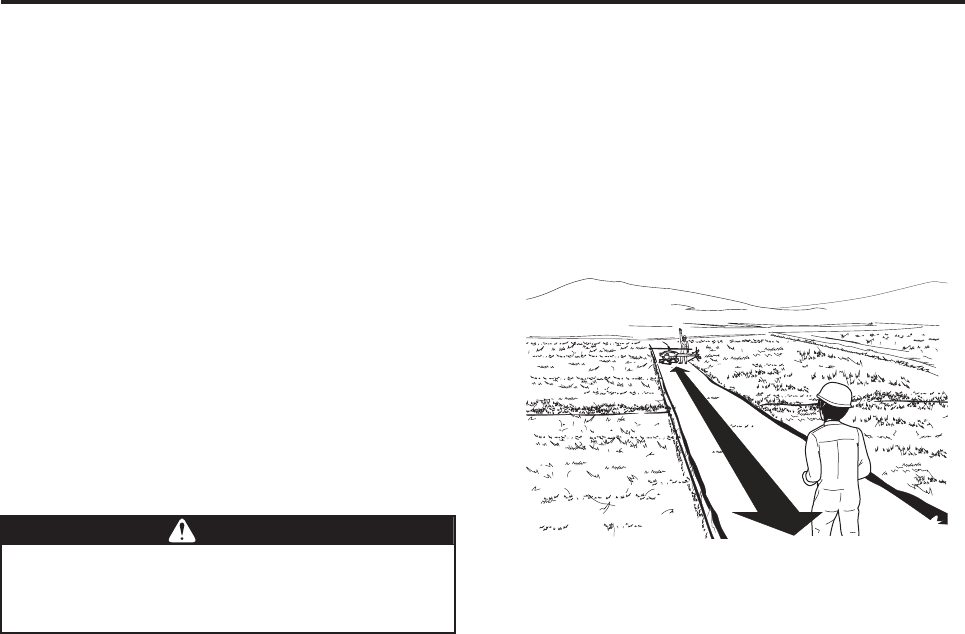
Checking radio signal interference
Because this product is operated by radio signals,
the presence of radio signals with the same fre-
quency in the vicinity will cause the signals to cross,
which will adversely affect the control of the flight.
Before a flight, be sure to use a radio signal moni-
tor, which is sold separately, to check the radio fre-
quencies that are being transmitted in the area.
(See the operation manual of the radio signal moni-
tor for its operation procedure.)
During monitoring, make sure the power switch for
the helicopter transmitter is turned OFF.
The dedicated sprayer transmitter also uses radio
signals to operate the sprayer.
The sprayer could be rendered inoperable due to
unexpected radio signal interference or the effects
of surrounding obstacles.
●The unmanned helicopter for industrial
applications uses radio signals to operate.
Because the helicopter can go out of con-
trol due to unexpected radio signal inter-
ference, pay particular attention to the
presence of radio signal interference
before and during a flight.
●Cancel the flight if you detect the same fre-
quency that you will be using in the vicin-
ity. Otherwise, the radio signal interference
could render the helicopter out of control,
and could lead to serious accidents.
●Check for radio signal interference regu-
larly, including during breaks between
flights.
●Check for radio signal interference each
time you move to an area other than an
adjacent area.
WWARNING
Pre-Flight Preparation
4-10
Radio signal distance test
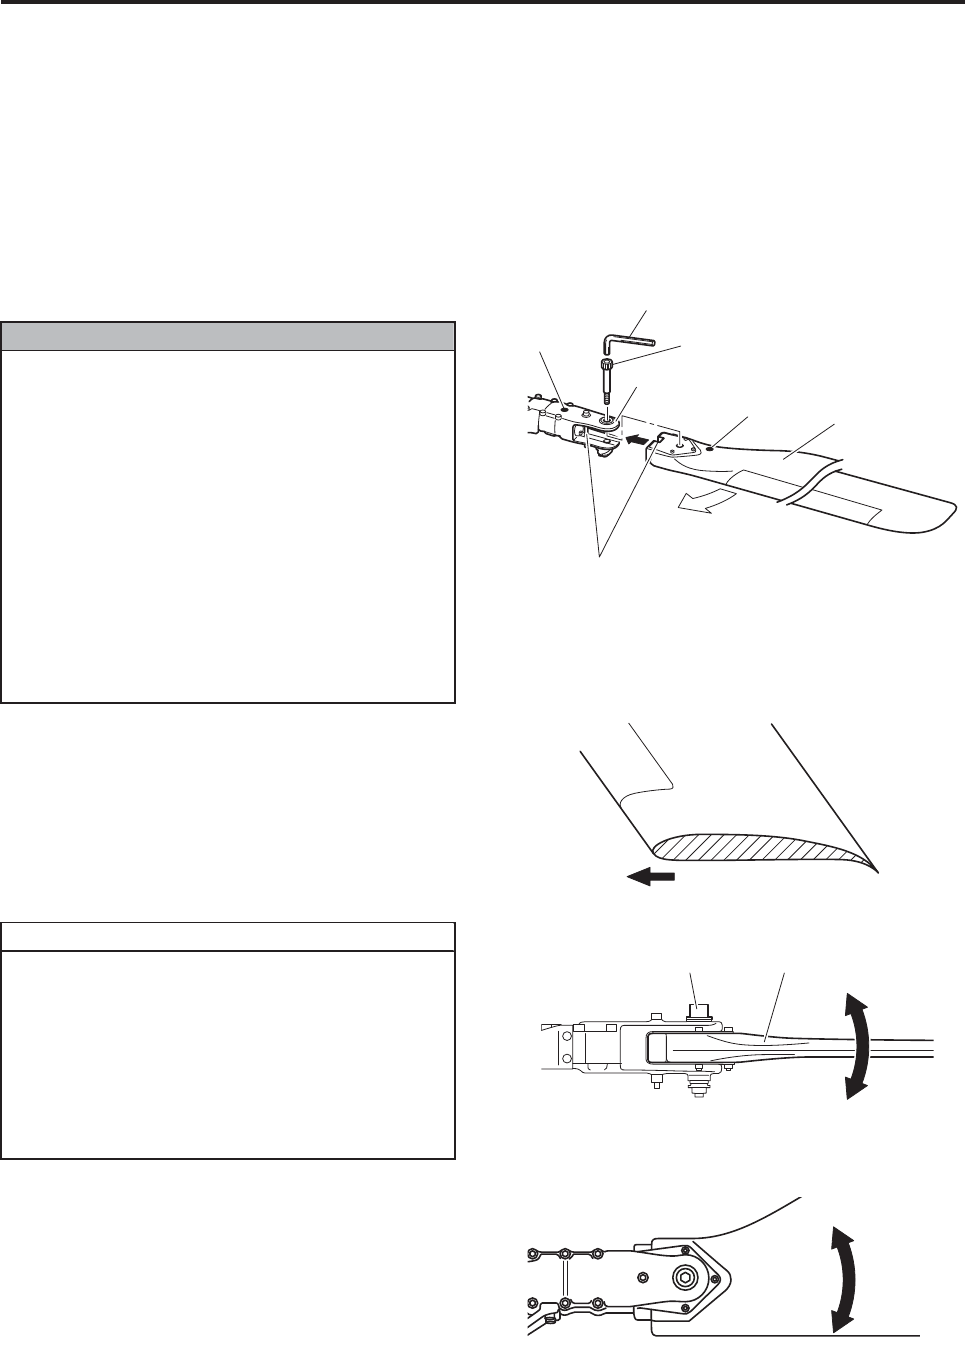
Perform a radio signal distance test to make sure
there are no malfunctions.
Before performing this test, set the transmitter
power ON and the helicopter main switch ON.
1Retract the transmitter’s antenna to its shortest
position.
2The operator to operate the transmitter and the
checker to check the helicopter should stay apart
by maintaining an approximate distance of 50
meters between the helicopter and the transmit-
ter.
3Make sure the servos operate properly in accor-
dance with the operation of the transmitter.
If the radio signal reaching distance is less than 50
meters, cancel the flight and contact the dealer for
a repair.
If the radio signal reaching distance is too
short, the failsafe mode (radio signal interfer-
ence) might kick in during flight.
WWARNING
50 m
Pre-Flight Preparation
4-11
Main rotor installation and removal and tail rotor inspection
Main rotor installation and removal
Inspect the rotor for damage or dirtiness.
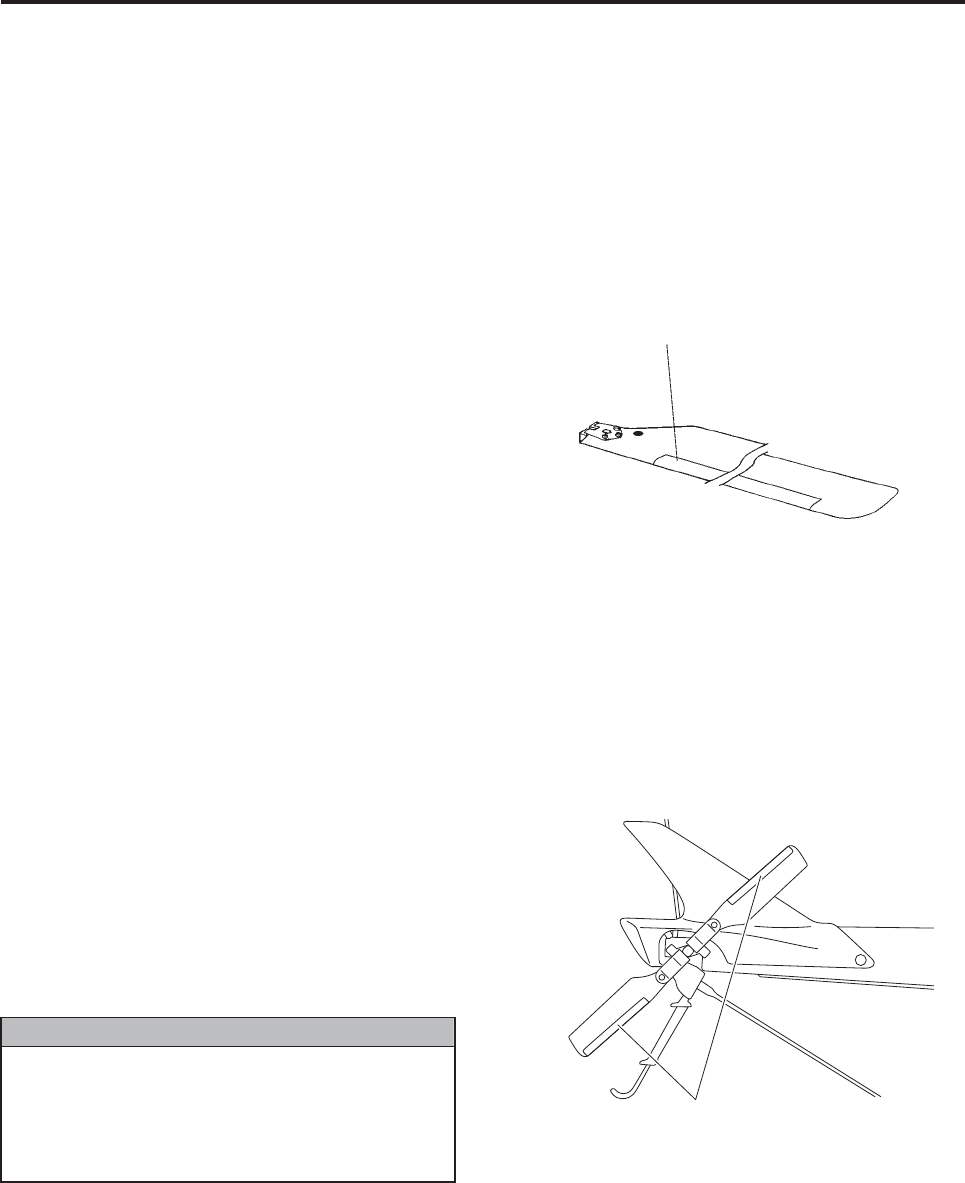
Main rotor installation
1Insert the main rotor blades into the blade
holder.
2Use an 8 mm hex wrench to tighten the retaining
bolts.
Check the tightening of the retaining bolts as fol-
lows.
●Tighten each retaining bolt until it comes to a
stop. Then, back it out between 45° and 90°.
Make sure they are not tightened or loosened
excessively, which could cause vibrations.
●Check that the main rotor blades move
smoothly by moving them slightly in the direc-
tion of rotation. They are designed to stop by
coming in contact with rubber stops if they are
moved extensively.
●There are two main rotor blades: right and
left. Install them by matching the color
marked on the respective main rotor blade
to the blade holder.
●Each main rotor blade has a top and bot-
tom. Install it so that its leading edge is
oriented in the direction of rotation as
shown in the cross section diagram.
●To prevent the top and bottom of the main
rotor from being inadvertently inter-
changed, there is a recess in the rubber
damper on the main rotor side, and a pro-
trusion on the rubber damper on the blade
holder side.
●The main rotor blades are properly
installed if their retaining bolts do not
wobble when the blades are shaken verti-
cally, and if they move smoothly with a
small force applied in the direction of rota-
tion.
●Both rotor blades should be tightened
about equally.
NNOTICE
TIP
Main rotor
Blade holder
Cross section diagram
Rotation direction
Retaining bolt Main rotor
No wobbling in
this direction
Moving
smoothly
in rotation
direction
Mark
Retaining bolt
Hex wrench
Mark
Rotation direction
Align the groove with the bolt
Pre-Flight Preparation
4-12
Main rotor removal
The removal is the reverse (2 → 1) of the installa-
tion.
Main rotor inspection
●Inspect the main rotor surface for dirtiness,
cracks, fissures, or chipping.
●Inspect the cushion tape for peeling or other
damage.
Tail rotor inspection
●Inspect the tail rotor surface for dirtiness,
cracks, fissures, or chipping.
●Inspect the cushion tape for peeling or other
damage.
●Inspect that the tail rotor moves smoothly in
the rotation direction.
If a rotor blade’s surface is dirty, use household
detergent on a soft cloth, wring the cloth, and use it
to wipe the rotor blade’s surface.
If the rotor blade is damaged, cancel the flight and
request a repair by your dealer.
Cushion tape
●If a main or tail rotor blade does not move
smoothly or is damaged, it could generate
noise or vibration.
●The main rotor and the tail rotor are impor-
tant components. Handle them carefully.
NNOTICE
Cushion tape
Pre-Flight Preparation
4-13
Side cover installation and removal
Side cover removal
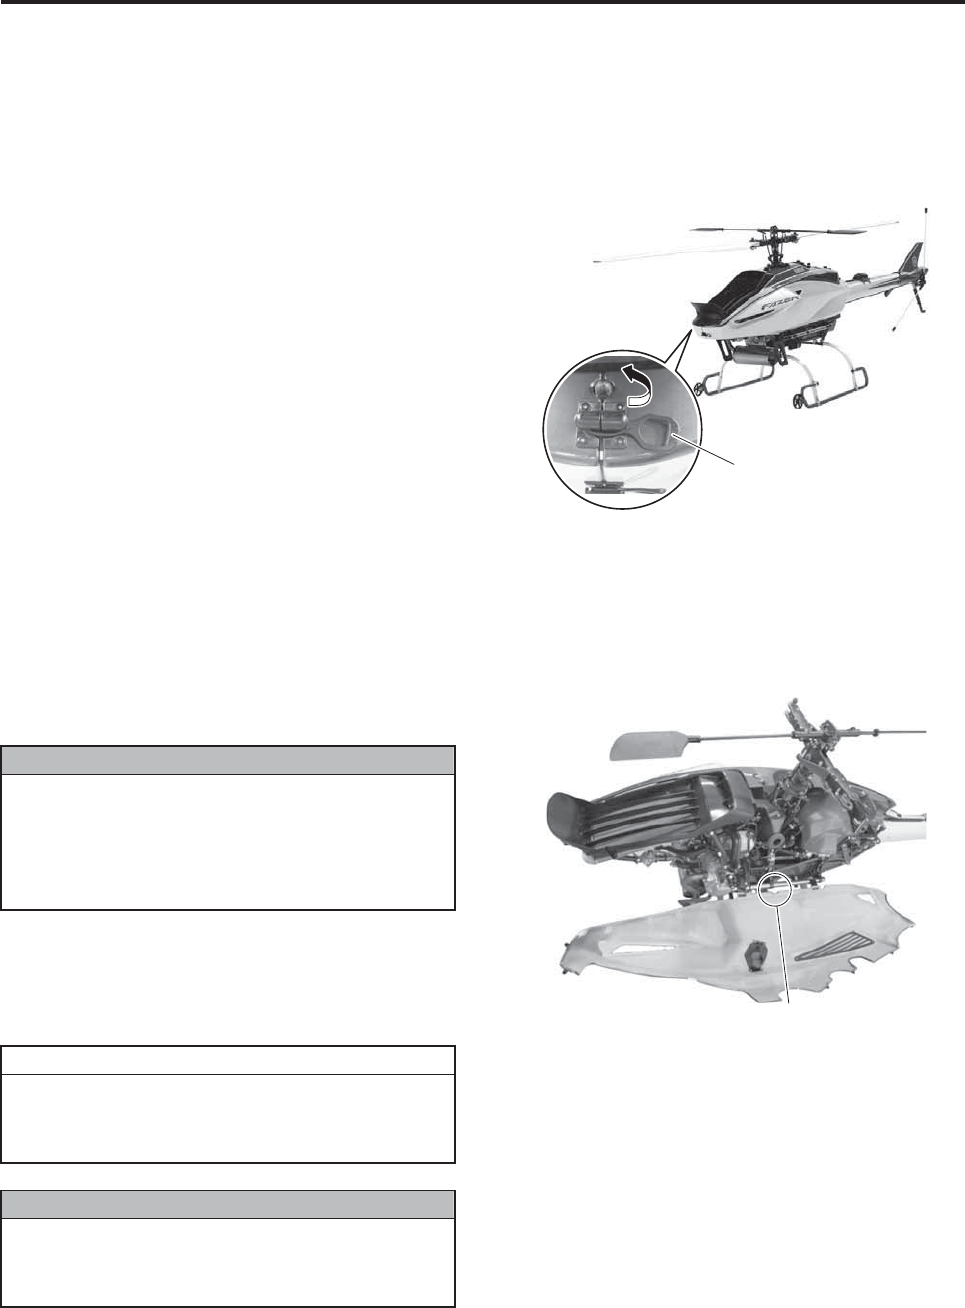
1Undo the 7 rubber hooks that are located along
the top of the helicopter by lifting them as shown
on the right.
2Open the side covers from side to side.
3To completely remove a side cover after it is
open, hold the retaining hooks to pull the side
cover sideways and remove it from the frame.
Side cover installation
Reinstall the side covers in reverse order of
removal.
Rubber hook
Do not hold a side cover during removal, as
this could lead to damage. The side cover
can break if direct force is applied to it. Open
the side cover slowly so as not to scratch the
side cover.
Reinstall the side cover by aligning the cut-
out in the center of the side cover with the
bracket in the center of the payload bar.
Place the right and left side covers and lock
them in place by engaging the 7 rubber
hooks.
NNOTICE
TIP
NNOTICE
Side cover installation position

Flying Procedure
Flying Precautions ....................................................................... 5-1
Engine Starting ............................................................................ 5-3
Pre-start checks ....................................................................................................... 5-3
Engine starting ......................................................................................................... 5-4
Takeoff Precautions and Checks................................................. 5-6
Takeoff procedure.................................................................................................... 5-6
Post-takeoff checks.................................................................................................. 5-7
Flight Modes ................................................................................ 5-8
Landing and Engine Stopping...................................................... 5-9
Landing .................................................................................................................... 5-9
Engine stopping ....................................................................................................... 5-9
General aerial application pattern .......................................................................... 5-11
5
5-1
Flying Procedure
Preparation - Takeoff
Takeoff - Hovering
Hovering - Flying
Flying Precautions
●Do not take off or land on sloping terrain, as this could cause the helicopter to overturn, or
adversely affect its control. As a rule, the helicopter should take off and land on a level surface.
Make sure to select an appropriate location before commencing a flight.
●Select areas that are appropriate for takeoffs and landings, as described below. Failure to select
an appropriate area could lead to an accident.
• Select flat farm roads or vacant lots with minimal foot or vehicle traffic.
• Check that there are no obstacles in the vicinity.
• Check that there are no objects that could get picked up by the wind (such as paper, plastic
tape, empty bags, mowed grass, etc.).
WWARNING
Do not operate the rudder extensively right before a takeoff, as this will cause the helicopter to
move abruptly in the direction of the rudder after the takeoff.
NNOTICE
●Do not operate the sticks abruptly as this could cause the helicopter to lose balance and lead to
an accident.
●For the first flight of the day, allow the helicopter to hover for 1 or 2 minutes while the engine
warms up, and check that the helicopter operates normally. Failure to do so will prevent the
engine from attaining the proper power, which could lead to an accident.
WWARNING
●Adjust the load to leave some margin in the payload. A takeoff with the maximum payload
requires maximum horsepower and careful flying technique. An excess payload at this point
could lead to a serious accident. Therefore, hover the helicopter to check that there is an ample
margin in payload before continuing with the flight.
●Keep the distance between the operator and the helicopter within 150 m, and the flight altitude at
3 - 4 m (from the ground or from the crop). If the distance is any greater, it will prevent the opera-
tor from monitoring the posture of the helicopter and adversely affect the signal reception condi-
tions. For safety, further shorten the distance if there are any obstacles in the area. Failure to fly
the helicopter within the maximum distance limit could lead to an accident.
WWARNING
Do not turn continuously while banking in one direction for more than 10 seconds, as this will
cause the helicopter to drift as if the trim has shifted.
NNOTICE
Flying Procedure
5-2
Flying - Landing
●Do not lower the throttle stick to the slowest position during a flight, as this could disrupt the
engine speed control and cause the helicopter to descend abruptly.
●If the warning light shows an abnormal condition, the helicopter exhibits irregular behavior, or an
unusual symptom occurs (such as vibration, sound, coolant leakage, or foul odor), immediately
land the helicopter in a safe area. Continuing with the flight in this state could lead to an acci-
dent.
●Do not press the engine stop switch during a flight, as this will stop the engine and cause the
helicopter to descend abruptly. However, to force the helicopter to land in case of an emergency,
press the switch after making sure that it is safe to do so.
●Abort the flight or aerial application if poor weather conditions exist as described below. Failure
to do so could pose operation difficulties, which could lead to an accident. In addition, it could
adversely affect the application and the effectiveness of the sprayed chemicals.
• Wind velocity in excess of 3 m per second at a height of 1.5 m above the ground.
• Rain, fog, or lightning in the close vicinity.
●Observe the following until the engine has come to a complete stop after landing:
• Do not turn OFF the power of the flight transmitter.
• Do not remove the battery in the transmitter.
Failure to observe these precautions will trip the failsafe device (automatically turning the speed
control ON), which will cause the engine to accelerate suddenly.
●Never enter the area within 20 meters of the helicopter until the main rotor has stopped com-
pletely and the engine has stopped. Also, do not allow other people to approach this area. Enter-
ing the area within 20 meters can lead to a serious accident.
WWARNING
Flying Procedure
5-3
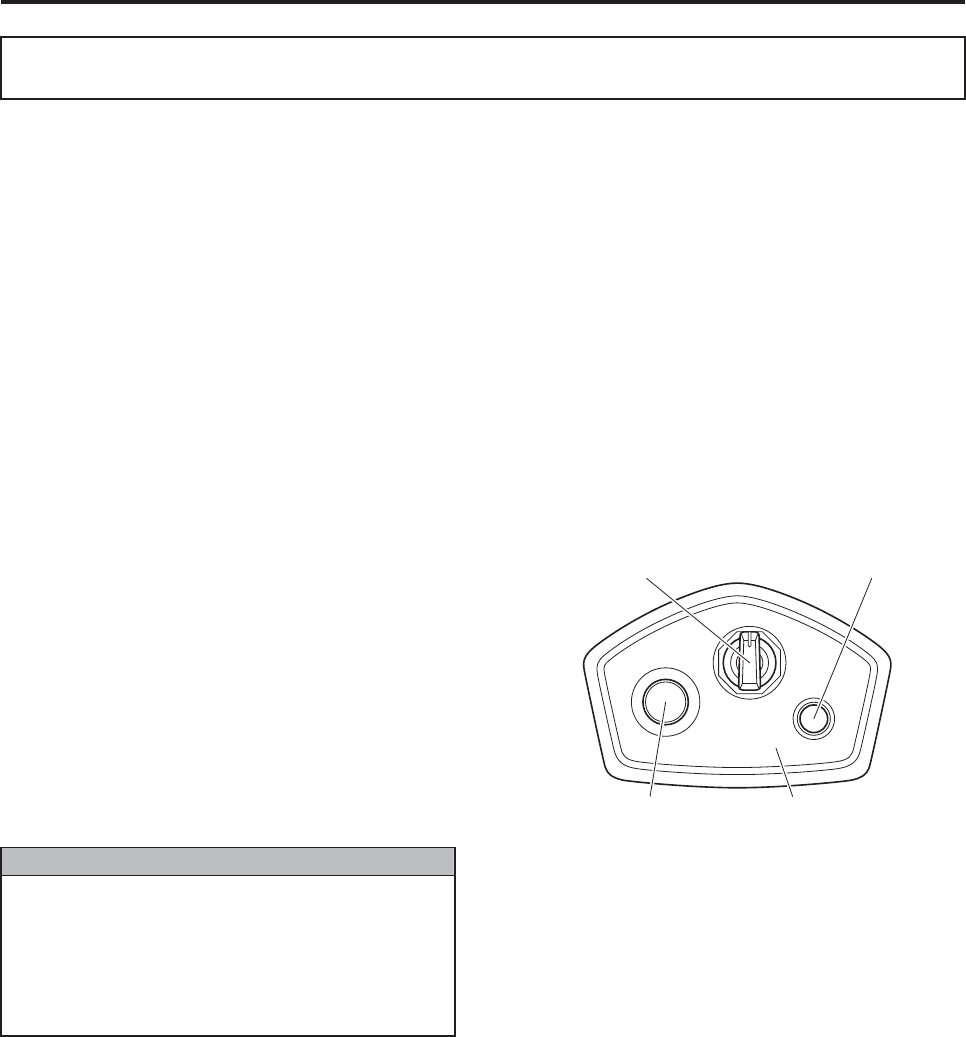
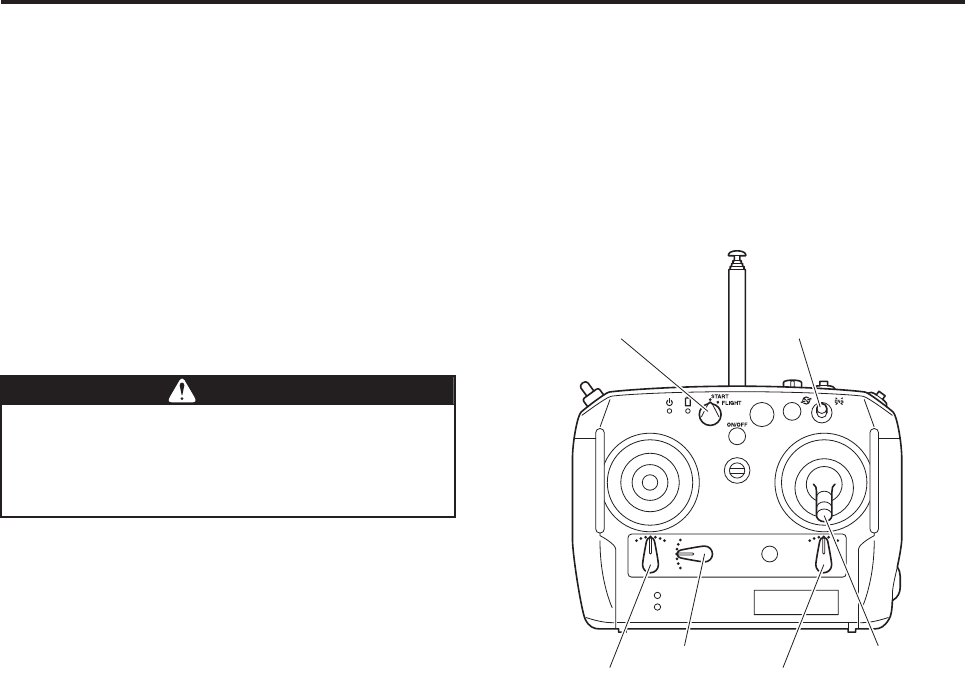
Pre-start checks
1Check that the trim positions on the transmitter
are proper, extend the antenna, and press and
hold the power switch ON.
• If the amount of trim deviates greatly from the
center, the buzzer will sound 3 sets of 4 beeps.
When this happens, return the trim lever to its
normal position.
• Be sure to charge the battery before use. Due
to the nature of the lithium-ion battery, the
buzzer may beep 4 times, even if the battery is
not fully charged. If a low voltage warning is
emitted, promptly replace or recharge the bat-
tery.
2Turn the helicopter’s main switch ON.
The system performs control configurations and
self checks.
Check that the flight lamps on the control panel
flash regularly during configuration. Also, check
that all the warning lamps on the back of the heli-
copter illuminate.
If there are no problems, the flight lamp on the con-
trol panel will turn off, and the warning lamp will illu-
minate blue, indicating that the control configuration
has completed.
Engine Starting
STARTER
OFF
ON
Main switch
Starter switch
Flight lamp
Control panel
●Do not move the helicopter during config-
uration.
●Configuring the control with the helicopter
tilted could cause errors. Therefore, it is
recommended to select a flat area for this
purpose.
NNOTICE
Flying Procedure
5-4
Engine starting
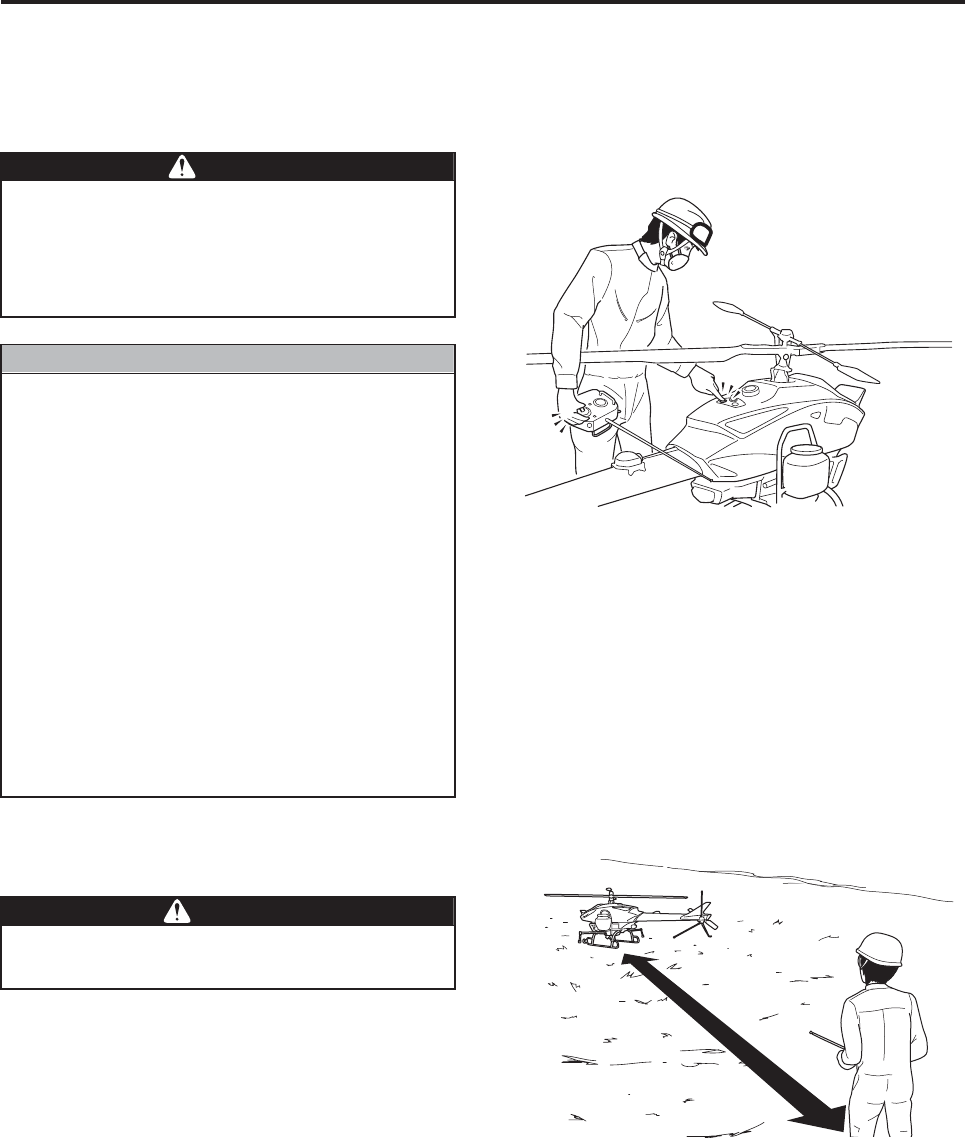
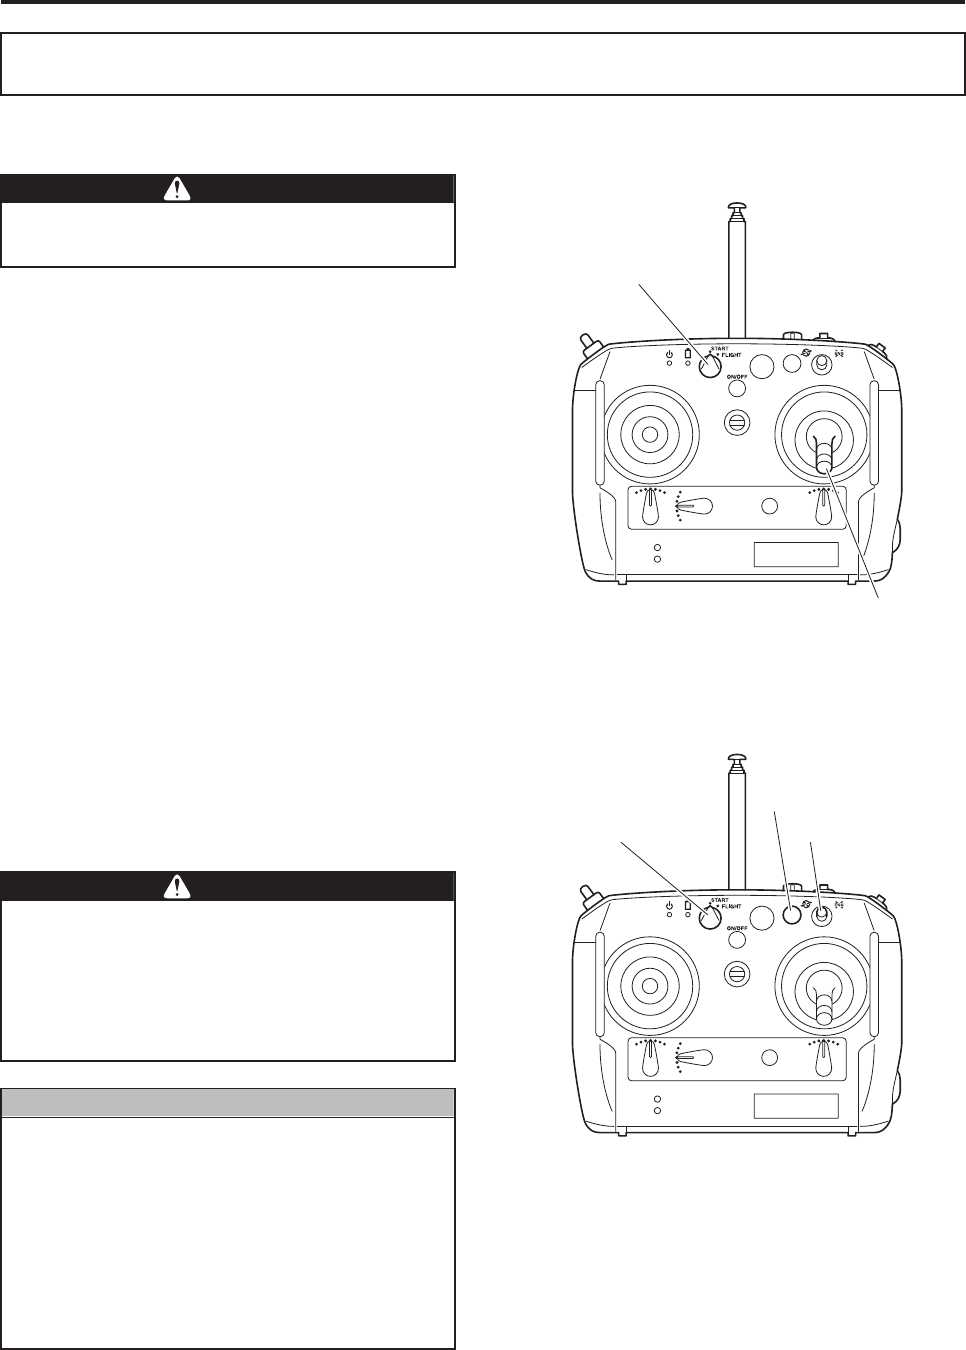
1Check that the transmitter’s flight switch is in the
START position.
2Check that the transmitter’s throttle stick is in the
slowest position.
3Check again that the elevator trim lever, rudder
trim lever, and aileron trim lever are in their neu-
tral position.
4Press once the engine stop switch on the trans-
mitter. The flight lamp on the control panel will
illuminate, enabling the engine to start.
5Fully check (by point and call, etc.) the surround-
ings for safety.
If the elevator trim lever, rudder trim lever, or
aileron trim lever are in a position other than
neutral, the helicopter might not ascend
straight up during takeoff.
WWARNING
Flight
switch
Throttle
stick
Aileron
trim lever
Elevator
trim lever
Rudder
trim lever
Engine
stop switch
Flying Procedure
5-5
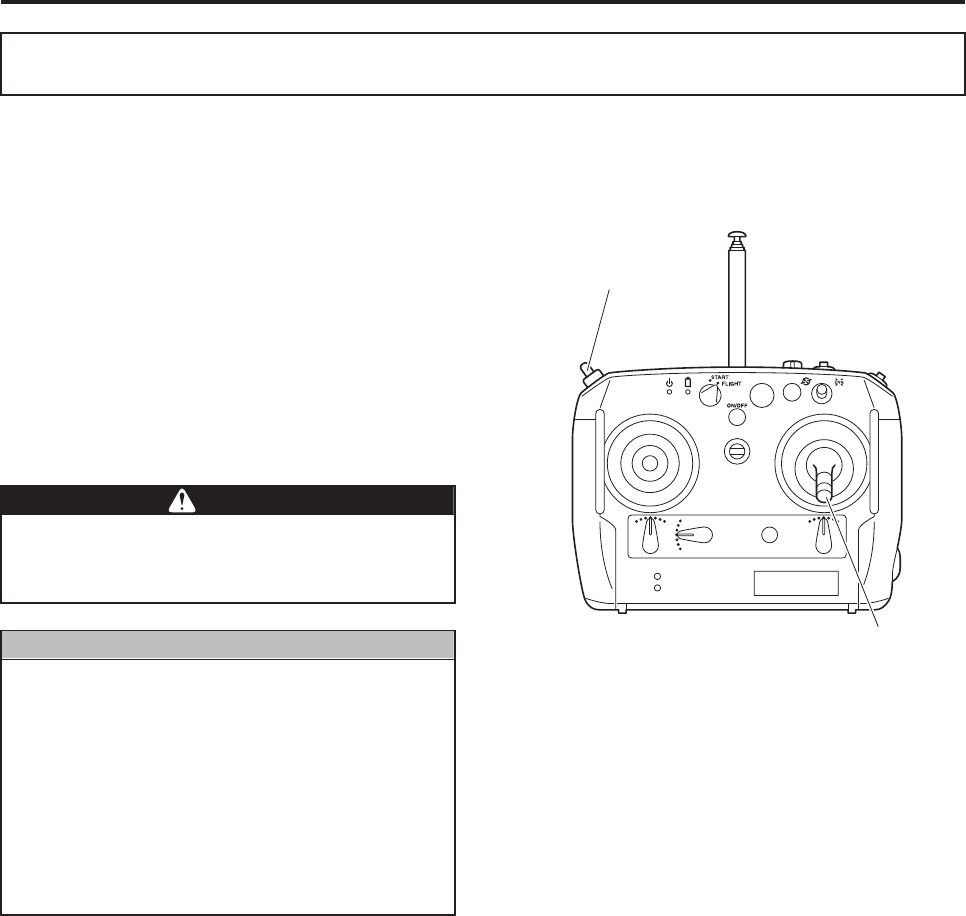
6Stand on the left side of the helicopter, and while
securely supporting the main rotor, keep the
throttle stick at the slowest position with your
right thumb, and press the starter switch with
your left hand.
7While making sure that the throttle stick does not
rise, quickly walk away from the helicopter, to a
minimum distance of 20 m.
Support the main rotor with your body as
shown in the illustration. Otherwise, the rotor
could strike and injure you if the helicopter is
improperly adjusted (such as the idle speed
being too high or the clutch being engaged).
●If the engine does not start within 5 sec-
onds after the starter switch is pressed,
allow the starter to rest for about 10 sec-
onds. This is done to allow the battery
voltage to recover. Then, press the starter
switch again.
●The safety device will trip and prevent the
starter motor from operating if any of the
following conditions have not been met:
• The power switch of the transmitter is
ON.
• The transmitter’s flight switch is in
START position.
• The throttle stick of the transmitter is in
the slowest position.
• The engine stop switch was pressed
down previously.
WWARNING
NNOTICE
Never turn your gaze away from the helicop-
ter when walking away from it.
DDANGER
20 m minimum
Flying Procedure
5-6
Takeoff procedure
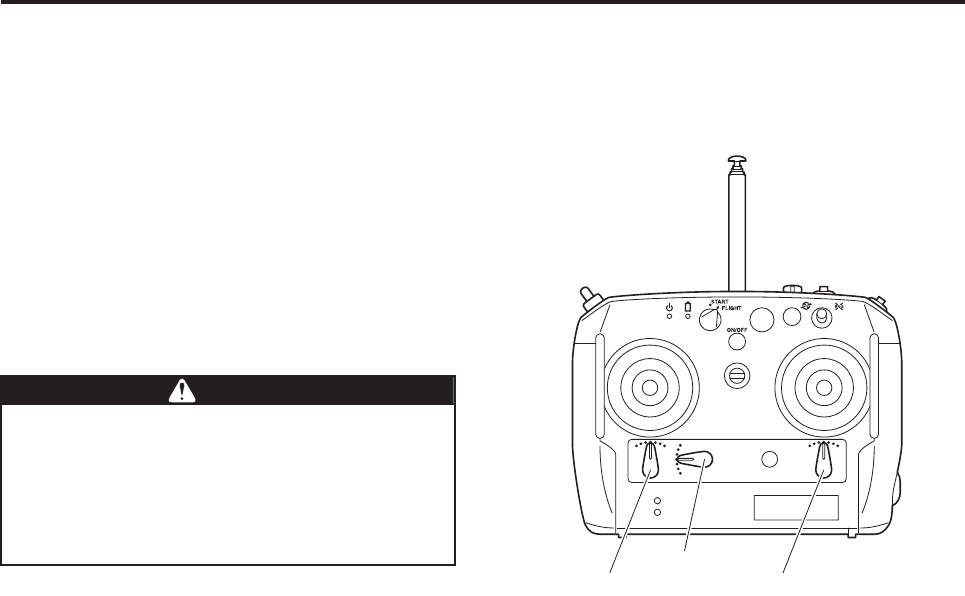
1To fly under speed control, turn the GPS switch
ON. If the GPS switch is OFF, the flight will oper-
ate under postural control.
2Check that the throttle stick on the transmitter is
in the slowest position. Then, set the flight switch
to FLIGHT. The blue warning light will turn off,
and the helicopter is ready to fly.
3Gradually raise the throttle stick to enable the
control to automatically increase the engine
speed.
4Slowly raise the throttle stick to take off.
Takeoff Precautions and Checks
Do not operate the sticks abruptly as this
could cause the helicopter to lose balance
and lead to an accident.
●Do not operate the rudder extensively right
before a takeoff, as this will cause the heli-
copter to move abruptly in the direction of
the rudder after the takeoff.
●If speed control cannot be used due to
GPS signal conditions, turn the GPS
switch ON, which causes the yellow warn-
ing lamp to flash. This will render the flight
to operate automatically under postural
control.
WWARNING
NNOTICE
Throttle stick
GPS switch
Flying Procedure
5-7
Post-takeoff checks
Perform the following checks:
1While the helicopter is hovering, make sure it
behaves normally in response to the operations
of the sticks.
2When the sticks are kept still in their neutral posi-
tion while the helicopter is hovering, the helicop-
ter will drift front-and-back and side-to-side,
depending on wind conditions. If the helicopter
drifts constantly in one direction, land it in a safe
area to make fine adjustments at the trim lever of
the transmitter.
For the first flight of the day, allow the heli-
copter to hover for 1 or 2 minutes while the
engine warms up, and check that the helicop-
ter operates normally. Failure to do so will
prevent the engine from attaining the proper
power, which could lead to an accident.
WWARNING
Elevator
trim lever Aileron
trim lever
Rudder
trim lever
Flying Procedure
5-8
Flight modes (postural control, speed control)
●This unit has 2 types of flight modes: postural control mode (GPS switch OFF) and speed control mode
(GPS switch ON).
●The postural control mode is for stabilizing the posture of the helicopter, and does not stop the helicopter
when the stick is in the neutral position.
●The speed control mode is for stabilizing the helicopter speed, and controls the speed during a forward or
backward flight, as follows.
• It maintains the speed at the point in time when the elevator stick is operated, causing the yellow warning
lamp to illuminate. It maintains this speed even if the stick is set to the neutral position.
• Even if the elevator stick is tilted to the maximum position, the speed will not exceed 20 km/h.
• To stop, operate the elevator stick in the opposite direction (flare) of thrust. After the yellow warning light
turns off, set the elevator stick to its neutral position. This will cause the helicopter to stop and hover.
Flight Modes
In the speed control mode, do not continue tilting the stick to its maximum level because it is dan-
gerous.
WWARNING
Flying Procedure
5-9
Landing
1After hovering the helicopter over the landing
point, gradually lower the throttle stick to land it.
2The blue warning light illuminates 10 seconds
after landing. To take off again without stopping
the engine, set the flight switch momentarily to
the START position, then to the FLIGHT position.
The blue warning lamp will turn off, enabling the
helicopter to fly.
Engine stopping
1After the engine speed has dropped, press down
the engine stop switch on the transmitter until the
engine has come to a complete stop.
2Place the flight switch to START.
3Press the rotor brake switch.
Landing and Engine Stopping
Never allow anyone to approach within 20 m
of the helicopter.
DDANGER
Throttle stick
Flight switch
Never enter the area within 20 m of the heli-
copter until the main rotor has stopped com-
pletely and the engine has stopped. Also, do
not allow other people to approach this area.
Entering the area within 20 m can lead to a
serious accident.
●Do not press the engine stop switch before
the engine speed has dropped.
●The rotor brake will not engage unless the
throttle stick is in the slowest position.
●Use the rotor brake to stop the main rotor
after the engine has stopped. Operating
the stick while the rotor speed is high can
cause the helicopter to tilt, which is dan-
gerous.
DDANGER
NNOTICE
Engine stop switch
Rotor brake switch
Flight switch
Flying Procedure
5-10
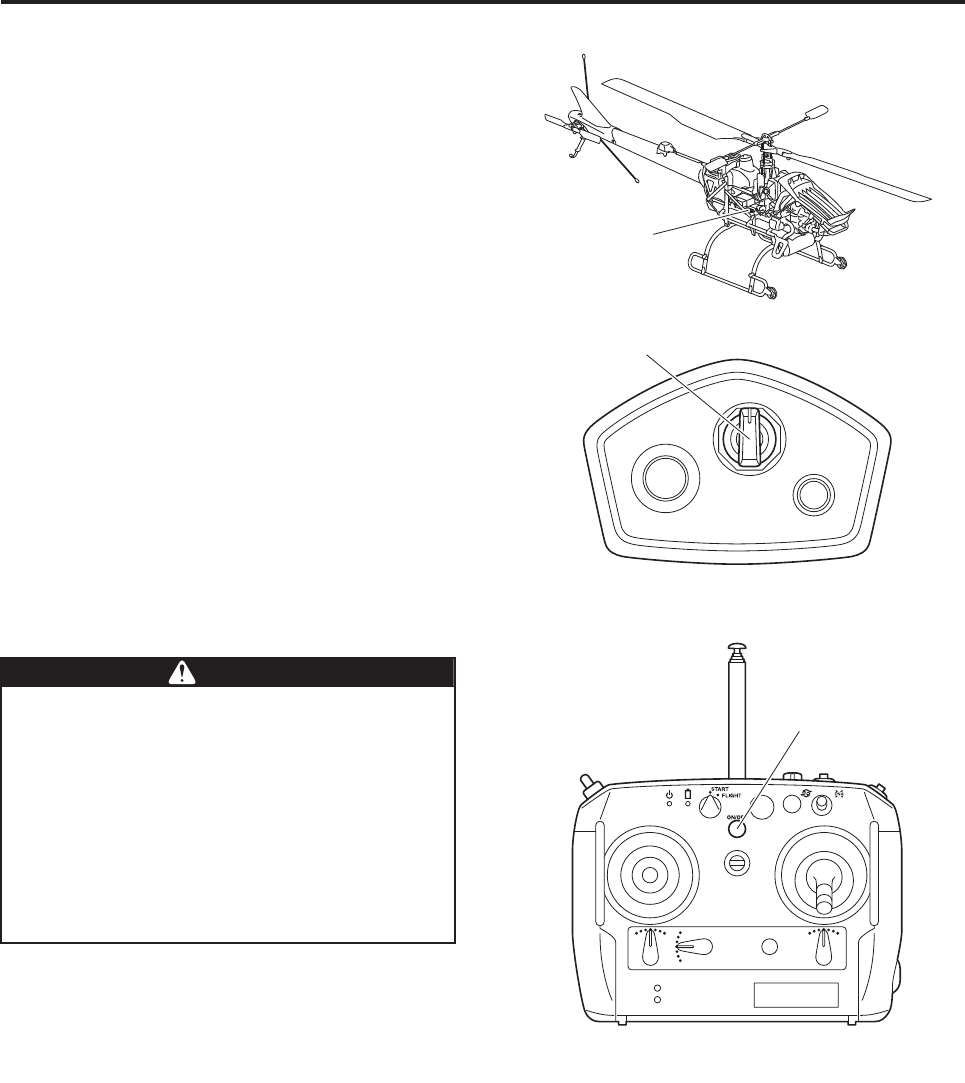
4Before turning the main switch of the helicopter
OFF, check the indications of the self monitor. If
an error code appears, contact your dealer.
5Turn the main switch of the helicopter OFF.
6Press and hold the power switch on the transmit-
ter to turn it OFF.
STARTER
OFF
ON
Main switch
Self monitor
Observe the following until the engine has
come to a complete stop:
• Do not turn OFF the power switch of the
transmitter.
• Do not remove the battery in the transmit-
ter.
Failure to observe these precautions will trip
the failsafe device (speed control turns ON
automatically), which will cause the engine to
accelerate suddenly.
WWARNING
Power switch
Flying Procedure
5-11
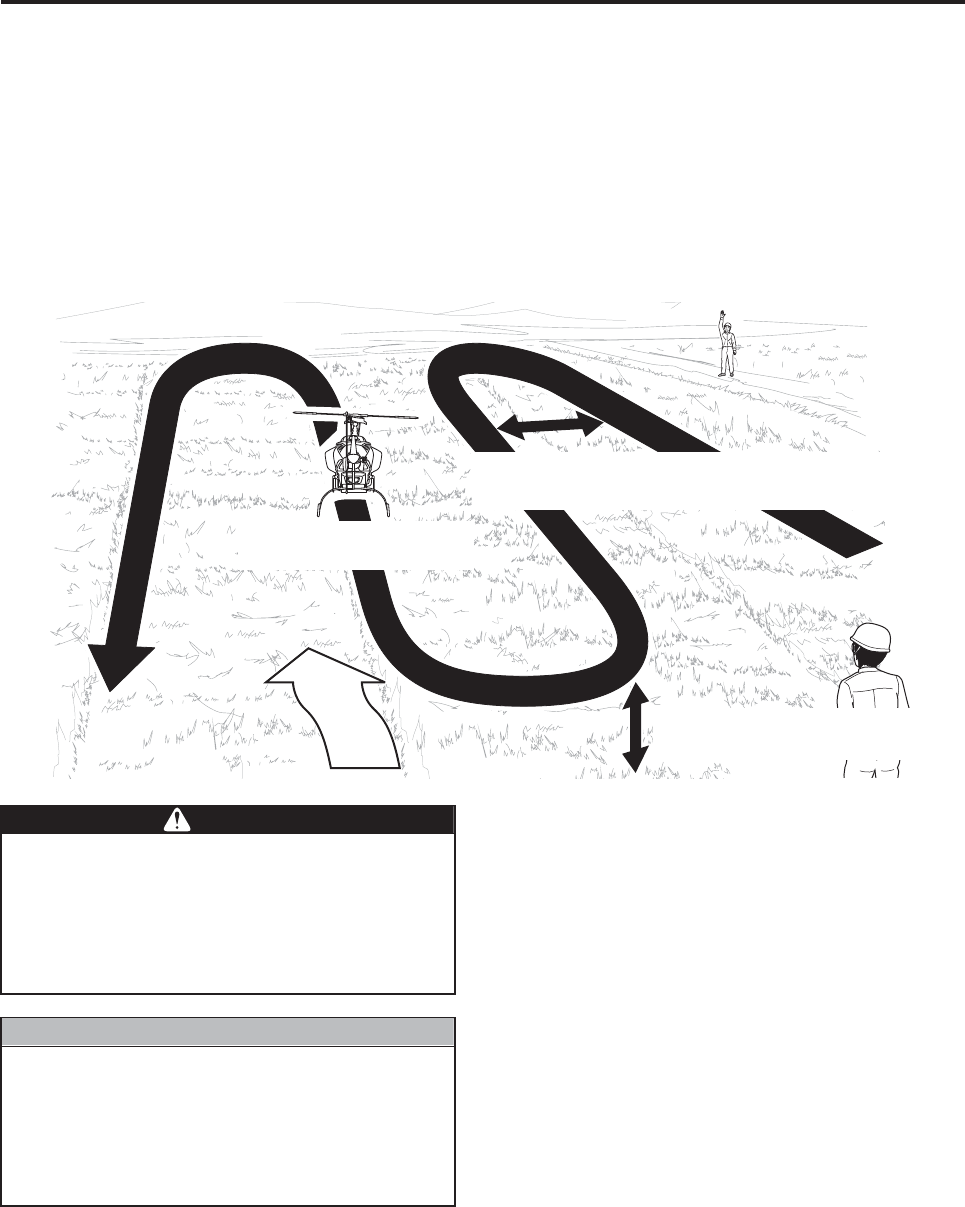
General aerial application pattern
When operating an unmanned helicopter for the purpose of spraying agricultural chemicals, ensure safe oper-
ation, as well as the safety of humans, animals, agricultural products, and the environment during aerial appli-
cation.
Example: Disease and pest control of a rice paddy
• Flight altitude: 3 to 4 m above the field
• Flight speed: 10 to 20 km/h
• Flying interval: 3.75 m (using center nozzle), 5 m (using dropping method), or 7.5 m
•Wind velocity: 3 m/s maximum
Flight speed between
10 and 20 km/h
Flight altitude
3 to 4 m above the field
Flying interval of 3.75 m (using center nozzle),
5 m (using dropping method), or 7.5 m
Wind
When refueling, never enter the area within
20 m of the helicopter until the main rotor has
stopped completely and the engine has
stopped. Also, do not allow other people to
approach this area. Entering the area within
20 m can lead to a serious accident.
When GPS signal reception is favorable, if
the flight speed in the postural control mode
exceeds 20 km/h, the red warning lamp will
illuminate (speed indication function). There-
fore, keep the flight speed low so that this
lamp will not illuminate.
DDANGER
NNOTICE

Post-Flight Cleaning and Servicing
Post-Flight Cleaning and Servicing.............................................. 6-1
Washable areas ....................................................................................................... 6-1
Non-washable areas ................................................................................................ 6-2
Sprayer cleaning ...................................................................................................... 6-2
6
6-1
Post-Flight Cleaning and Servicing
Agricultural chemicals, dust, dead bugs, and pollen could adhere to the helicopter after an aerial application.
If they remain stuck to the helicopter, they will cause a chemical reaction, which will lead to rust, insufficient
lubrication, sealant deterioration, and discoloring.
To prevent these problems, use the methods described below to clean and service the helicopter after a flight,
in preparation for the next flight. While cleaning, check all areas of the helicopter for any damage, abnormal
wear, loose fasteners, etc.
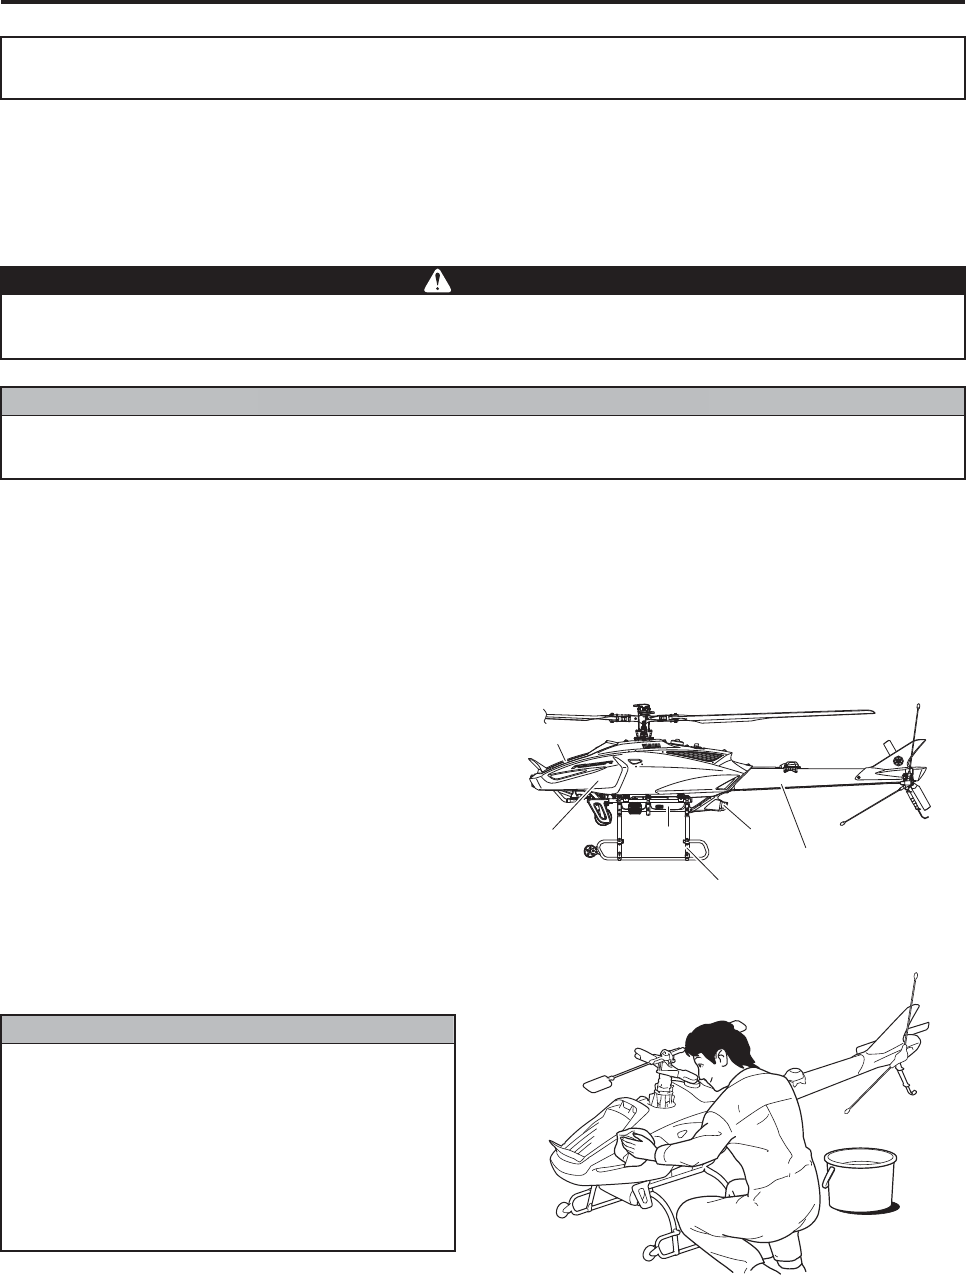
Washable areas
• The helicopter may be washed by directly spray-
ing with a tap water hose.
Do not use a high-pressure cleaner as it could
enter the internal electronic components.
1Side covers
They may be washed only after they have been
removed from the helicopter.
Do not wash them in the installed state because
the water could splash on other parts.
2Tail body, warning lamp, frame, undercover
3Leaves and runners
4Radiator
Clean it by using caution not to damage the fins.
Do not spray high-pressure water from below.
Post-Flight Cleaning and Servicing
The helicopter is very hot immediately after a flight. Therefore, to prevent burns, clean it only after
its temperature has lowered sufficiently.
Washing the helicopter with water will cause a sudden change in temperature, which could create
problems in electrical parts. Therefore, clean it only after its temperature has lowered sufficiently.
WWARNING
NNOTICE
Do not use a high-temperature, high-pres-
sure cleaner to clean areas 1 to 4 above, as it
could damage the film and paint on the sur-
face.
After cleaning the washable areas of the heli-
copter with water, use a soft, moist cloth that
has been wrung to wipe the moisture off the
surface.
NNOTICE
3
2
4
2
2
1
Post-Flight Cleaning and Servicing
6-2
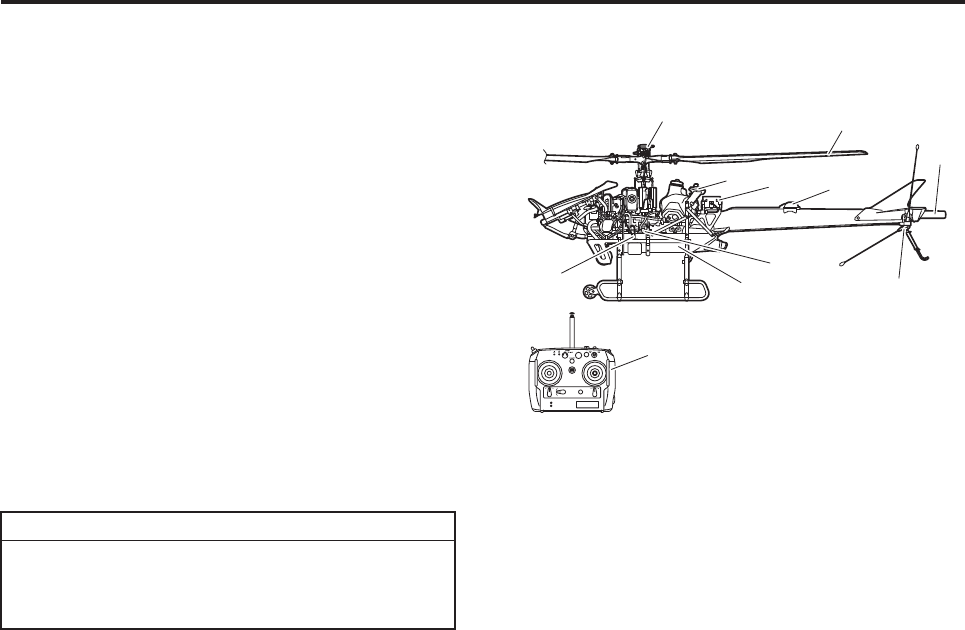
Non-washable areas
• Use a soft, moist cloth that has been wrung to
wipe the dirty areas on the following parts.
1Control panel
2Main and tail rotors
3Main and tail rotor head areas
4Servos and electrical parts
5Frame top
6Transmitters (flight and sprayer)
Sprayer cleaning
32
1
4
4
3
6
4
4
2
5
For details on the cleaning method of the
sprayer, see the operation manual of the
sprayer.
TIP

Post-Flight Cleaning and Servicing
6-3

Simple Maintenance
Battery Recharging Procedure .................................................... 7-1
Pre- and Post-flight Inspection..................................................... 7-3
1. Transmitter inspection (before) ........................................................................ 7-4
2. Fuel inspection (before and after) .................................................................... 7-5
3. Coolant and oil inspection (before and after) ................................................... 7-6
4. Main head area inspection (before and after) .................................................. 7-9
5. Tail body area inspection (before and after) .................................................. 7-11
6. Drive shaft inspection (before and after) ........................................................ 7-13
7. Servo inspection (before and after)................................................................ 7-14
8. Self monitor inspection (before and after) ...................................................... 7-15
9. Radio signal distance test (before)................................................................. 7-15
10. Electrical system inspection (before and after) .............................................. 7-16
11. Helicopter antenna inspection (before and after) ........................................... 7-19
7
7-1
Simple Maintenance
This helicopter uses a sealed battery.
It is not necessary to refill or inspect the battery
fluid.
To inquire about the proper recharging procedure
or any problems with the battery, contact your
dealer.
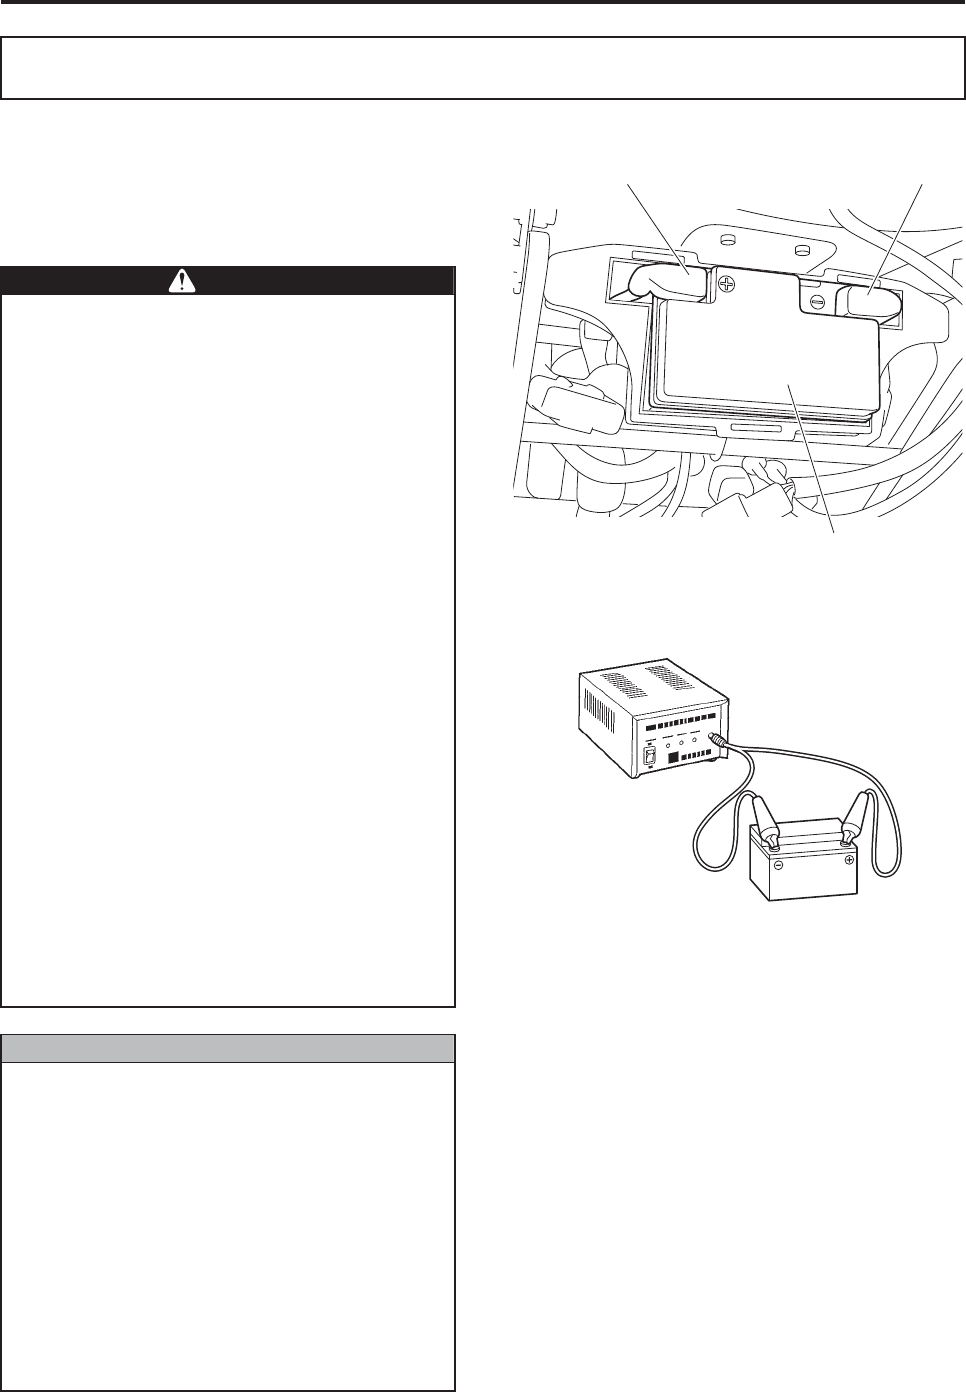
Battery Recharging Procedure
The battery produces flammable gas (hydro-
gen gas). Mishandling it could lead to an
explosion resulting in injuries. Make sure to
observe the following:
●Fire is strictly prohibited. Do not short a
circuit, cause a spark, or let any fire such
as cigarettes come near. This could cause
an explosion.
●Do not connect to the battery terminals in
the wrong order. Doing so could cause a
fire.
●Recharge in a well ventilated place.
●Place the battery upright for recharging.
●Keep gasoline, oil, or organic solvent from
getting on the battery, as this could cause
the battery case to crack.
●Do not drop it or apply any other strong
impact.
●The battery fluid is diluted sulfuric acid.
Contact with the skin, eye, or clothing
could lead to a serious injury.
●Keep out of reach of children.
First Aid
●In the unlikely event that the battery fluid
gets on the skin, clothing, etc., immedi-
ately rinse with copious amounts of water.
●If it enters the eye, immediately rinse it
with copious amounts of water, and seek
medical attention.
●This is a sealed 12 V battery.
●This battery has been filled with fluid and
charged. No fluid level inspection or refill-
ing is necessary.
●For recharging, use the dedicated sealed
battery charger (sold separately). Contact
your dealer for details.
● If the battery is to be left unused for a long
time, remove the battery from the helicop-
ter, and recharge every 3 months.
●When replacing the battery, contact your
dealer, and make sure to use a genuine
battery.
WWARNING
NNOTICE
Positive terminal (red cap)
Negativeterminal
(black cap)
Battery
Simple Maintenance
7-2
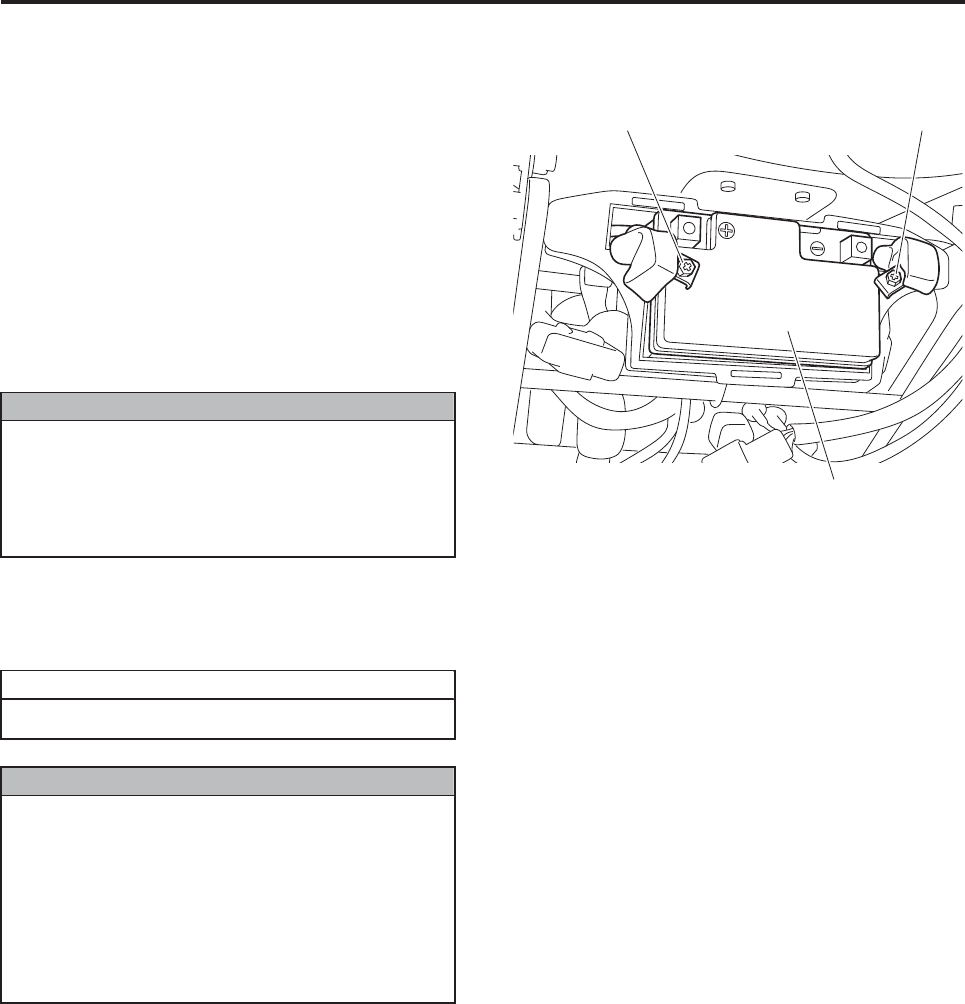
Battery Removal
Remove the battery only after consulting your
dealer.
1Be sure to turn the main switch of the control
panel OFF.
2Remove the undercover (do not disconnect the
warning lamp wiring).
3Remove the battery box cover.
4Disconnect the battery’s negative terminal, and
positive terminal, in that order (as shown on the
right).
5Remove the battery from the helicopter.
Battery Reinstallation
Reinstall the battery in reverse order of removal.
The proper procedure for removing the bat-
tery is to first disconnect the negative termi-
nal, followed by the positive terminal.
Reversing this order can cause a short circuit
in the battery.
NNOTICE
Positive terminal
(red cap)
Negative terminal
(black cap)
Battery
Batteries are consumables.
●Do not interchange the cables to the posi-
tive and negative terminals of the battery.
Doing so can cause a fire or malfunction.
●The proper procedure for reinstalling the
battery is to first connect the positive ter-
minal, followed by the negative terminal.
Reversing this order can cause a short cir-
cuit in the battery.
TIP
NNOTICE
Simple Maintenance
7-3
To ensure safe and efficient operation of the prod-
uct, make sure the operator performs the pre- and
post-flight inspections. In addition, record the
results in the flight inspection log.
In preparation for the next flight, inspect the heli-
copter after a flight and make sure each area is free
of problems.
Pre- and Post-flight Inspection
●To prevent injury, make sure the engine is
stopped before performing an inspection.
●The helicopter is very hot immediately
after a flight. To prevent burns, allow the
temperature of the helicopter to lower suf-
ficiently before performing an inspection.
WWARNING
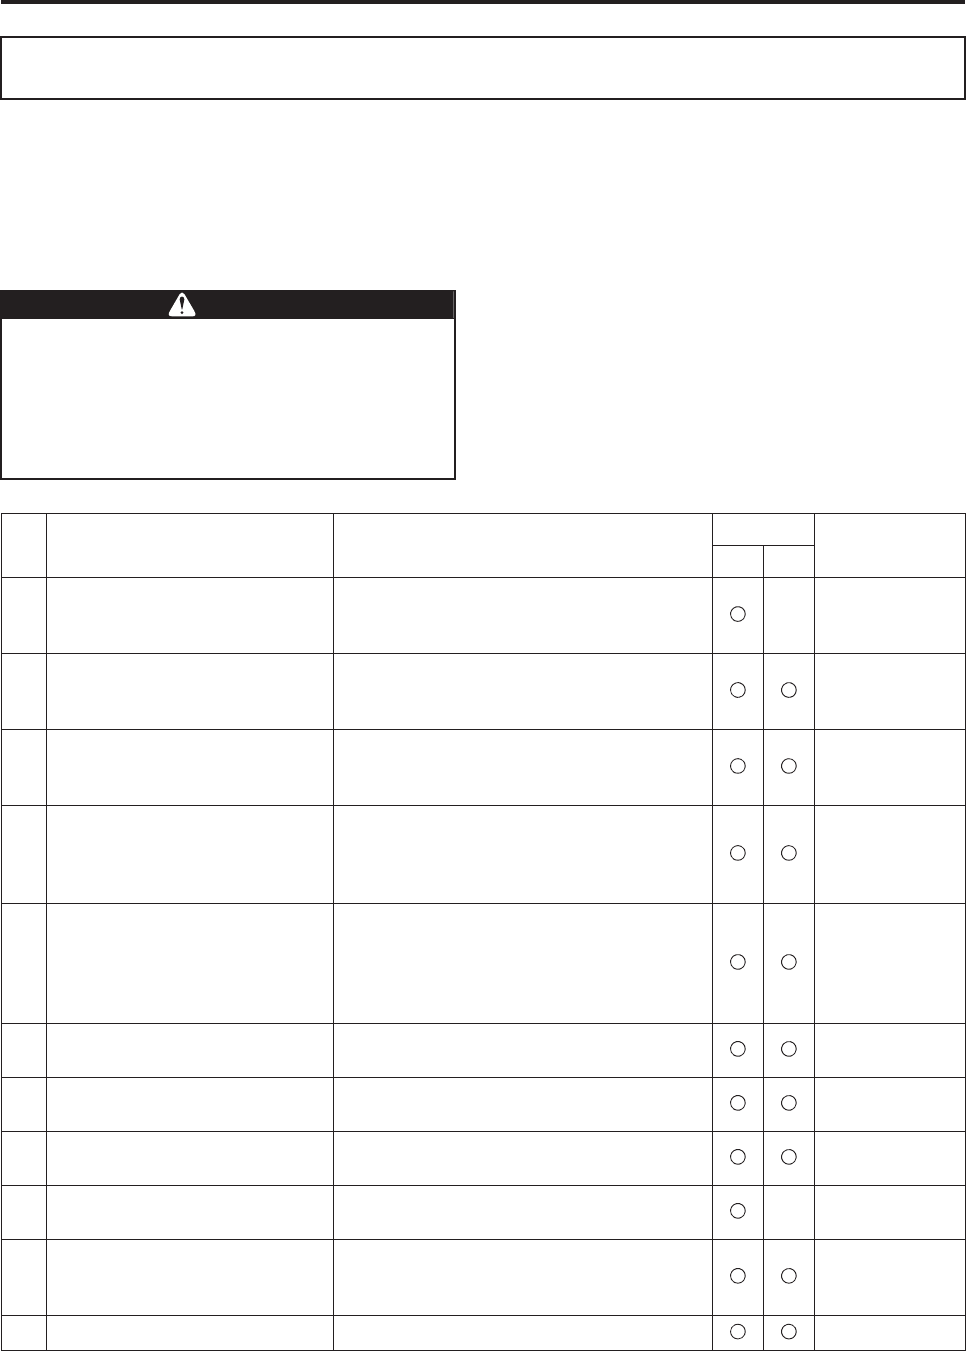
Inspection Areas Inspection Items Flight Remarks
Front Rear
1Transmitter
Battery state-of-charge, operation,
antenna installation condition,
trim position
2Fuel system
Inspect the fuel level and check for any dust in
the tank and filter, any leaks from piping,
cracks, deformation, and installation.
3Coolant and oil
Inspect the coolant level, oil level, and check
for any leaks from piping, cracks, deformation,
and installation.
4Main head area
Inspect the main rotor for cracks, deformation,
and chipping, peeling of cushion tape, rod
installation and movement, drag bolt and nut
conditions.
5Tail area
Inspect the tail rotor for cracks, deformation,
and chipping, peeling of cushion tape, rod
installation and movement, tail rotor movement
in direction of the drag, rubber damper wear,
and damage.
6Drive shaft Inspect for cracks, deformation, installation,
wobble, and operation.
7Servos (throttle and rudder),
slide servo
Installation (servo body, connector), wobble,
operation
8Self monitor Hour meter indications, whether error codes
are displayed
9Radio signal distance test Radio signal reach distance (50 m with
antenna at shortest height)
0Electrical system
Inspect for cracks, deformation, installation,
damage, connector connection, control unit
damper, spark plug cap installation.
AHelicopter antenna Installation condition, and rust
Simple Maintenance
7-4
1. Transmitter inspection (before)
Inspect the flight transmitter battery state-of-
charge, operation, and antenna conditions.
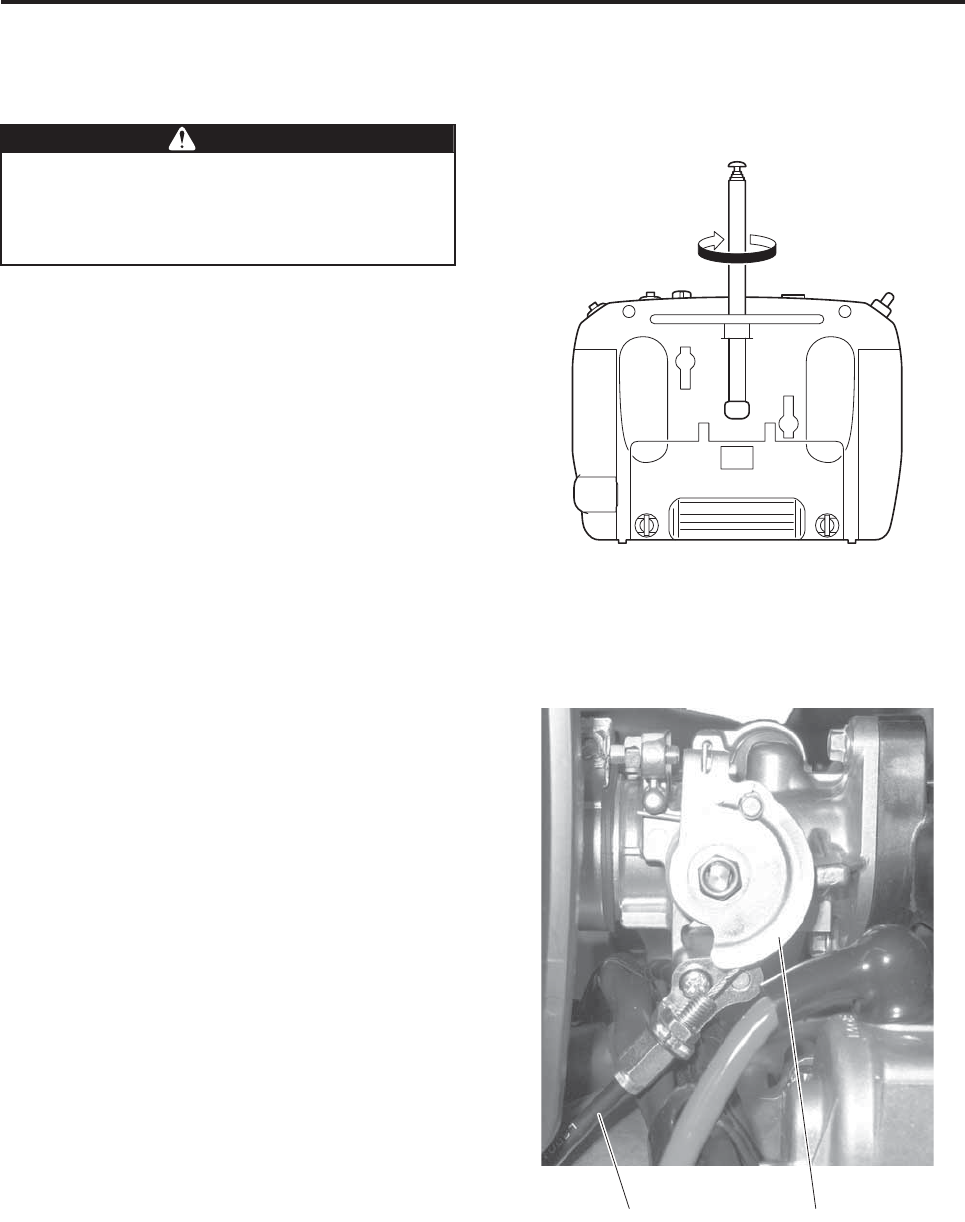
1Perform inspection with the transmitter’s power
turned OFF.
●Check that the sticks move smoothly.
●Check that the trim positions have not deviated
significantly.
●Check that the antenna is securely attached to
the transmitter body.
2Perform inspection with the helicopter’s and
transmitter’s power turned ON.
●Check the state-of-charge of the battery in the
transmitter.
●Check that the self monitor on the electrical box
does not show any errors.
●Move the rudder servo and check that it moves
smoothly.
●Move the slide servo, check that the servo
moves smoothly, and that the linkage moves
without catching.
●Operate the throttle and check that the throttle
body pulley moves smoothly.
●With the antenna retracted to its shortest height,
operate the transmitter from a distance of 50 m,
and check that the servos operate as intended.
* Check the throttle valve movement by way of the
pulley movement.
If the transmitter has a malfunction or the
battery state-of-charge is low, the transmitter
will be unable to send radio signals during a
flight.
WWARNING
Tightening
Throttle cable Throttle body pulley
Simple Maintenance
7-5
2. Fuel inspection (before and after)
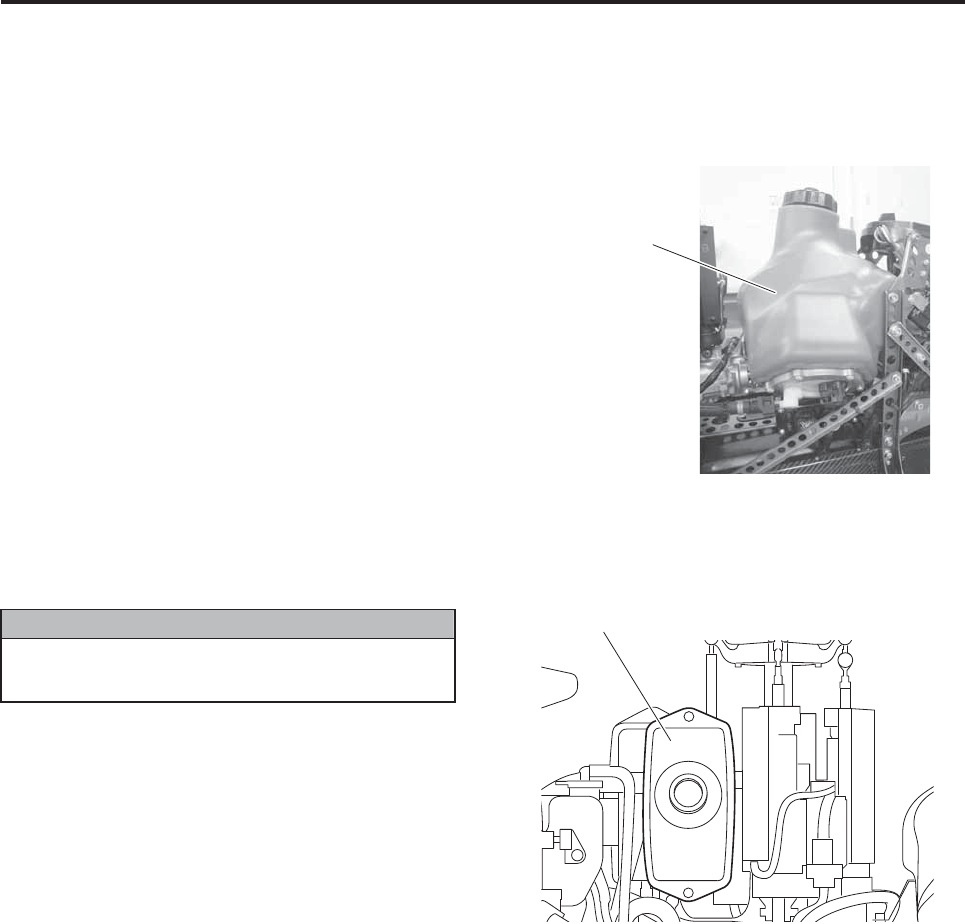
Inspect the fuel level and check for any leaks.
Before performing this inspection, turn OFF both the main switch for the helicopter and the power switch for
the transmitter.
●Check the fuel tank for deformation or fuel leaks.
●Check that there is no dust inside the fuel tank.
●Check the fuel hose for wear, abrasion, or fuel
leaks.
●Inspect the air cleaner element for dirtiness.
Fuel tank
A dirty (or clogged) air cleaner element can
lower engine performance.
NNOTICE
Air cleaner
Simple Maintenance
7-6
3. Coolant and oil inspection (before and after)
Inspect the coolant level, leakage, and oil leakage.
Before performing this inspection, turn OFF both
the main switch for the helicopter and the power
switch for the transmitter.
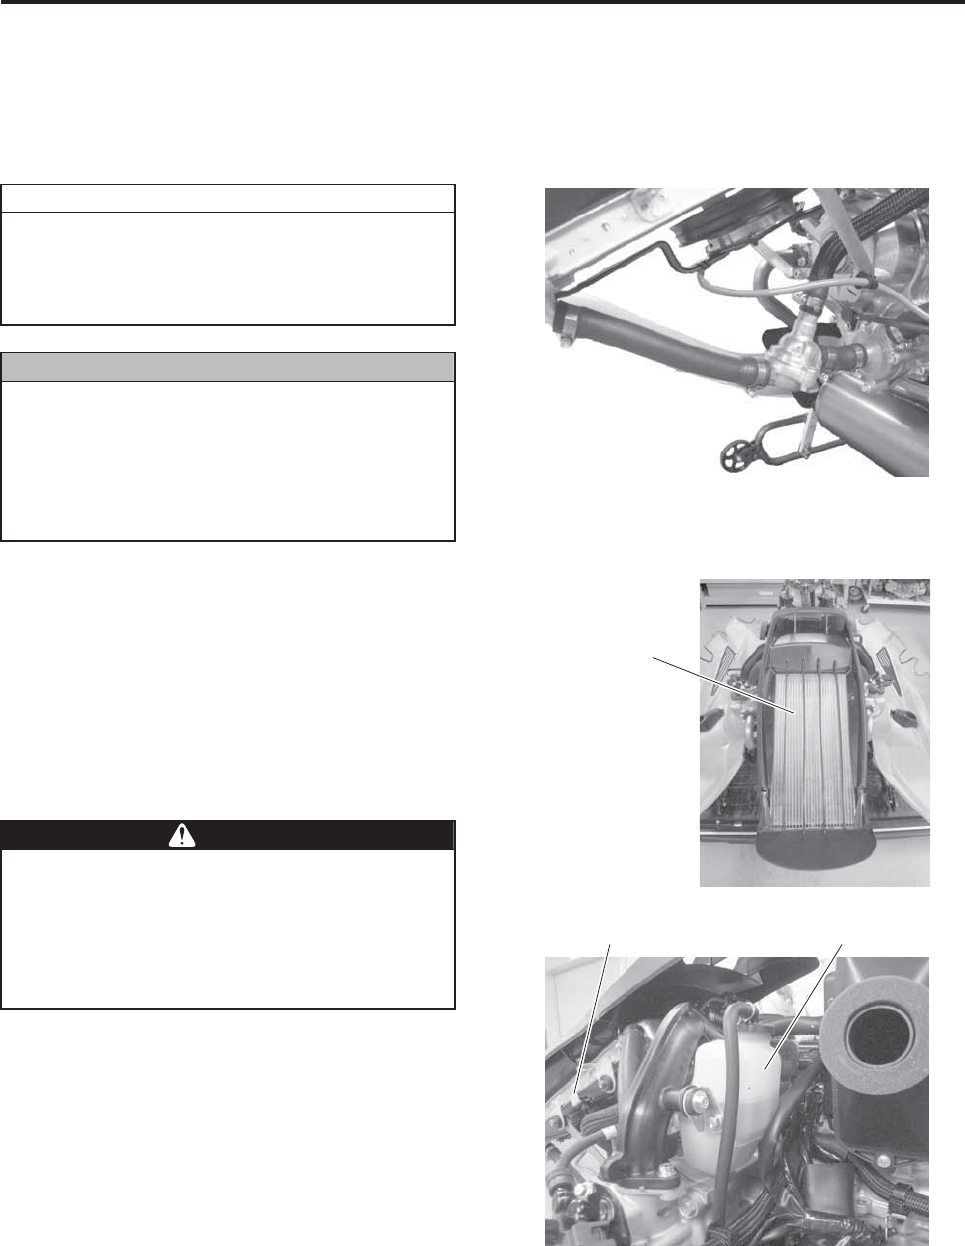
1Coolant piping
●Check the pipes and hoses for wear or abrasion.
●Check the pipe and hose connections for coolant
leaks.
2Radiator
●Check the radiator body and radiator stays for
any deformation.
●Check the radiator cover for cracks or looseness.
●Check that the coolant level in the recovery tank
is appropriate.
●Check the pipe and hose connections for coolant
leaks.
A slight stain of coolant or oil does not indi-
cate an abnormal condition. However, if the
coolant or oil is dripping, cancel the flight
and request a repair by your dealer.
●Coolant leakage will adversely affect the
cooling performance of the helicopter and
cause it to overheat.
●Oil leakage will reduce the internal lubrica-
tion of the transmission and damage the
gears and bearings.
When necessary, remove the radiator cap
only after the engine has cooled down. If the
radiator cap is removed immediately after a
flight, when the coolant is extremely hot, the
scalding liquid could shoot out and cause
burns.
TIP
NNOTICE
WWARNING
Recovery tankRadiator stays
Radiator
Simple Maintenance
7-7
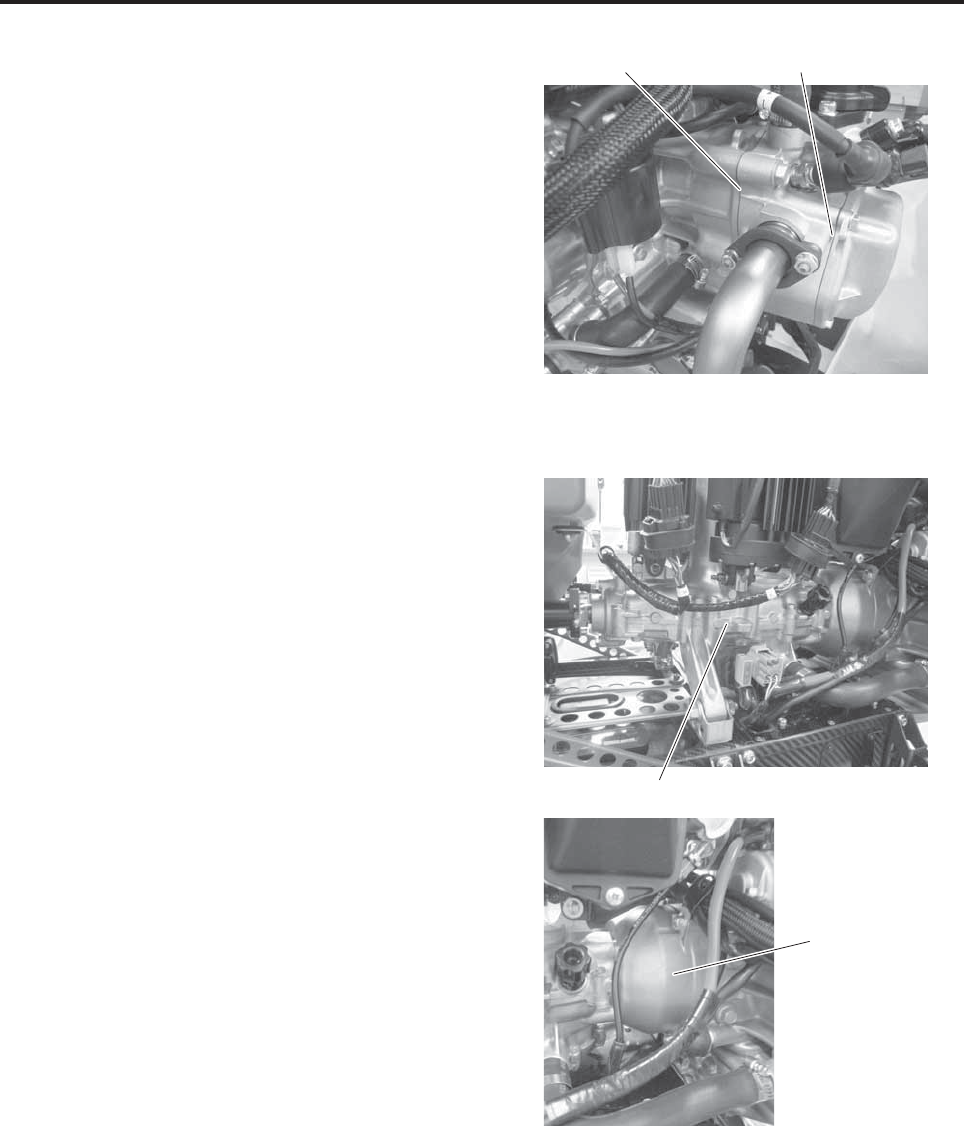
3Cylinder
●Check that there is no oil leakage at the mating
surfaces of the case.
●Check that there is no oil leakage at the cylinder
head mating surface.
4Clutch and transmission case
●Check that there is no oil or coolant leakage.
Cylinder head mating surface
Case mating surface
Transmission case
Clutch