HARRIS TR-0005-A UHF-FM Land Mobile Transceiver User Manual M RK Standard and Enhanced Vehicular Charger

HARRIS CORPORATION UHF-FM Land Mobile Transceiver M RK Standard and Enhanced Vehicular Charger
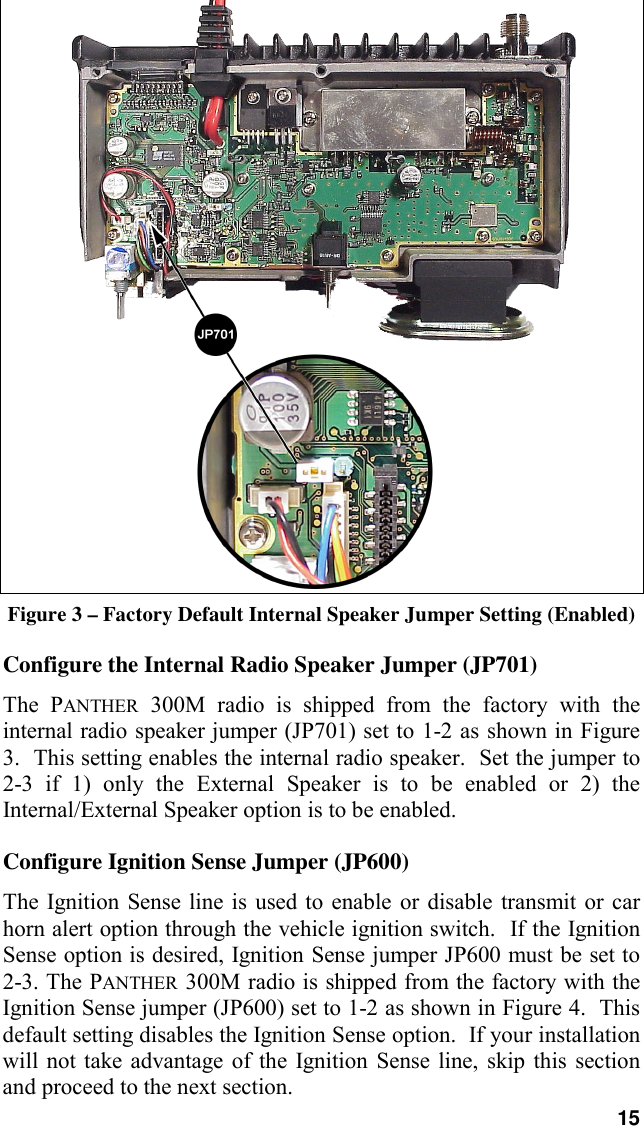
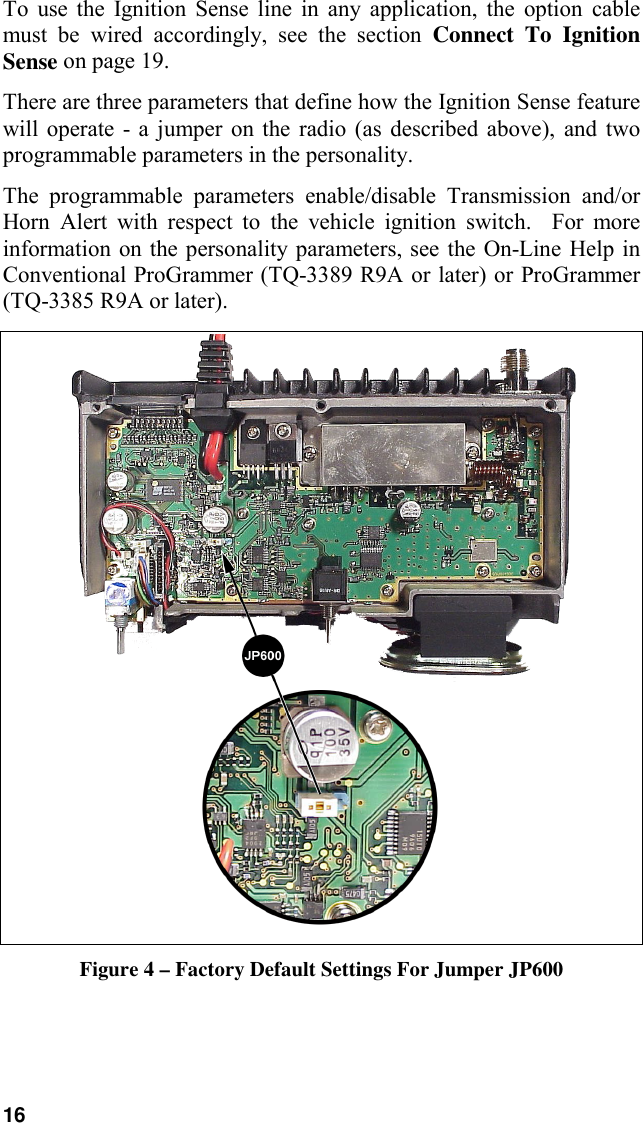
Newest Manual 10252000

MM-101031V1-A1Installation ManualPANTHERTM 300MMobile Radio
2Copyright © 2000, Com-Net Ericsson Critical Radio Systems, Inc.  All rights reserved.This manual is published by Com-Net Ericsson Critical Radio Systems, Inc., without anywarranty. Improvements and changes to this manual necessitated by typographical errors,inaccuracies of current information, or improvements to programs and/or equipment, may bemade by Com-Net Ericsson Critical Radio Systems, Inc., at any time and without notice.Such changes will be incorporated into new editions of this manual. No part of this manualmay be reproduced or transmitted in any form or by any means, electronic or mechanical,including photocopying and recording, for any purpose, without the express written permissionof Com-Net Ericsson Critical Radio Systems, Inc.The software contained in this device is copyrighted by Com-Net EricssonCritical Radio Systems, Inc.  Unpublished rights are reserved under thecopyright laws of the United States.NOTICE!Repairs made to this equipment should be made only by an authorizedservice technician or facility designated by the supplier.  Any repairs,alterations, or substitution of recommended parts made by the user to thisequipment not approved by the manufacturer could void the user’sauthority to operate the equipment in addition to the manufacturer’swarranty.NOTICE!
3SAFETY INFORMATION.........................................................................4MAXIMUM PERMISSIBLE EXPOSURE (MPE) LIMITS...................5Determining MPE Radius ......................................................................5SAFETY TRAINING INFORMATION ...................................................6INTRODUCTION.......................................................................................8UNPACK AND CHECK THE EQUIPMENT..........................................8Options And Accessories .......................................................................9INSTALLATION ......................................................................................10STEP 1 - PLAN THE INSTALLATION .............................................10STEP 2 - LOCATE THE TOOLS REQUIRED...................................10STEP 3 – EQUIPMENT PREPARATION ..........................................13Mounting.......................................................................................13STEP 4 – PROGRAM THE RADIO....................................................17STEP 5 – INSTALL CABLES.............................................................18Power Cable ..................................................................................18Connect To Ignition Sense ............................................................19Radio Mounting Procedures..........................................................21STEP 7 – INSTALL OPTIONS AND ACCESSORIES ......................22Radio Option Cable.......................................................................22External Speaker ...........................................................................25Alarm (Horn) Relay Kit ................................................................28Microphone Hanger/Hook Switch Mounting................................30Antenna .........................................................................................30Noise Suppression Kit...................................................................31FIGURESFigure 1 – Typical Front Mount Connection Diagram ............................... 12Figure 2 – Removing Top Cover................................................................ 14Figure 3 – Factory Default Internal Speaker Jumper Setting (Enabled)..... 15Figure 4 – Factory Default Settings for Jumper JP600............................... 16Figure 5 – Removing Plastic Cover............................................................ 17Figure 6 – Power Cable RPM 113 7674/10................................................ 19Figure 7 – Radio Mounting Hardware........................................................ 21Figure 8 - Mounting the External Speaker ................................................. 25Figure 9 – External Speaker Option ........................................................... 26Figure 10 – Internal/External Speaker Relay.............................................. 27Figure 11 - External Car Alert.................................................................... 29Figure 12 - External Alarm Relay .............................................................. 29Figure 13 – Ignition Sense Option.............................................................. 30TABLESTable 1 - PANTHER 300M Mobile Radio Options and Accessories.............. 9Table 2 – Radio Option Connector P3 Interface Description ..................... 23TABLE OF CONTENTS
4SAFETY INFORMATIONThe operator of any mobile radio should be aware of certain hazardscommon to the operation of vehicular radio transmissions. A list ofseveral possible hazards is given:1. Explosive Atmospheres - Just as it is dangerous to fuel a vehicle withthe motor running, similar hazards exist when operating a mobile radio,be sure to turn the radio off while fueling the vehicle. Do not carrycontainers of fuel in the trunk of the vehicle if the radio is mounted inthe trunk.2. Interference to Vehicular Electronics Systems - Electronic fuelinjection systems, electronic anti-skid braking systems, electroniccruise control systems, etc., are typical electronic systems that maymalfunction due to the lack of protection from radio frequency energypresent when transmitting. If the vehicle contains such equipment,consult the dealer and enlist their aid in determining the expectedperformance of electronic circuits when the radio is transmitting.3. Dynamite Blasting Caps - Dynamite blasting caps may be caused toexplode by operating a radio within 500 feet of the blasting caps.Always obey the "Turn Off Two-Way Radios" signs posted wheredynamite is being used.When transporting blasting caps in your vehicle:a. Carry the blasting caps in a closed metal box with a soft lining.b. Leave the radio OFF whenever the blasting caps are being put intoor removed from the vehicle.4. Radio Frequency Energy - To prevent burns or related physical injuryfrom radio frequency energy, do not operate the transmitter whenanyone outside of the vehicle is within two feet of the antenna.5. Liquefied Petroleum (LP) Gas Powered Vehicles - Mobile radioinstallations in vehicles powered by liquefied petroleum gas with theLP gas container in the trunk or other sealed-off space within theinterior of the vehicle must conform to the National Fire ProtectionAssociation standard (NFPA) 58 requiring:a. The space containing the radio equipment shall be isolated by aseal from the space containing the LP gas container and its fittings.b. Outside filling connections shall be used for the LP gas container.c. The LP gas container shall be vented to the outside of the vehicle.
5MAXIMUM PERMISSIBLE EXPOSURE (MPE)LIMITSDo not transmit with this radio and antenna when persons are within theMPE Radius of the antenna, unless such persons (such as the driver or radiooperator) are shielded from the antenna field by a grounded metallic barrier(such as the user’s vehicle rooftop).  The MPE Radius is the minimumdistance from the antenna axis that persons should maintain in order toavoid RF exposure higher than the allowable MPE level set by the FCC forOccupational/Controlled Exposure, as specified in 47 CFR  1.1310.  See“Determining MPE Radius” for your specific application.WARNINGFAILURE TO OBSERVE THESE LIMITS MAYALLOW THOSE WITHIN THE MPE RADIUS TOEXPERIENCE RF RADIATION ABSORPTIONWHICH EXCEEDS THE FCC MAXIMUMPERMISSIBLE EXPOSURE (MPE) LIMIT FOROCCUPATIONAL/CONTROLLED EXPOSURE.DETERMINING MPE RADIUSThe tables on the following page lists the MPE Radius for ranges of powerwithin which this radio is intended to operate (20, 30, or 40 Watts) and forantennas having gains of 0-3 dBd (1/4 λ, quarter-wave monopole = 0 dBd).Use the following procedure to determine the MPE radius for a specificapplication:1. Refer to the UHF table detailing the FCC limits for Occupational/Controlled RF exposure.2. Choose the row containing the power level going into the antenna.3. Read the MPE Radius in the position intersecting the correspondingpower gain.  (NOTE:  For power gain ratings not appearing in thetables, select the next highest listed number in each case.)If the power level is not known (the level is set in personalityprogramming), assume the maximum of 40 watts.  If the gain rating ofthe antenna is not known, consult the antenna provider.
6MPE Radii for Occupation/Controlled RF Exposure:UHF Band (450-488 MHz1)Power2Power3dBd Antenna Gain4(Watts) (Watts) 0123cm in cm in cm in cm in20 21.9 42 16 47 18 53 21 59 2330 30.0551 20 57 23 64 25 72 2840 43.8 59 23 66 26 74 29 83 33SAFETY TRAINING INFORMATIONWARNINGYour Com-Net Ericsson PANTHER 300M mobileradio generates RF electromagnetic energyduring transmit mode.  This radio is designed forand classified as “Occupational Use Only”meaning it must be used only in the course ofemployment by individuals aware of the hazardsand the ways  to  minimize  such  hazards.  Thisradio is NOT intended for use by the “General Population” in anuncontrolled environment.This radio has been examined and complies with the FCC RFexposure limits for “Occupational Use Only” when persons arebeyond the MPE radius of the antenna.  In addition, your Com-NetEricsson radio complies with the following Standards and Guidelineswith regard to RF energy and electromagnetic energy levels andevaluation of such levels for exposure to humans:• FCC OET Bulletin 65 Edition 97-01 Supplement C, EvaluatingCompliance with FCC Guidelines for Human Exposure to RadioFrequency Electromagnetic Fields.                                                          1Numbers are calculated for 450 MHz, giving the largest (worst-case) MPE radii.2Rated RF Power delivered to antenna: radio output less cable and mismatch losses.3Actual measured RF power delivered to antenna: radio output less cable and mismatchlosses.4Gains are compared to an ideal, ¼-wave monopole (1/2-wave dipole).  Add 2.15 dB forcomparison with an ideal isotropic source (0 dBd = 2.15 dBi).5The 30 Watts Rated Power is set to an actual measured 30.0 Watts to meet the IndustryCanada requirement of 30.0 Watts ±1.0 dB.
7• American National Standards Institute (C95.1 – 1992), IEEEStandard for Safety Levels with Respect to Human Exposure toRadio Frequency Electromagnetic Fields, 3 kHz to 300 GHz.• American National Standards Institute (C95.3 – 1992), IEEERecommended Practice for the Measurement of PotentiallyHazardous Electromagnetic Fields – RF and Microwave.CAUTIONTo ensure that your exposure to RF electromagneticenergy is within the FCC allowable limits forOccupational use, always adhere to the followingguidelines:• DO NOT operate the radio without a proper antenna attached, asthis may damage the radio and may also cause you to exceedFCC RF exposure limits.  A proper antenna for installation on avehicle is a 0 – 3 dBd gain antenna.
8INTRODUCTIONThe PANTHERTM 300M mobile radio is designed for installation as afront mount radio. This manual provides the mobile installationinstructions and includes the instructions to install the external hornor external speaker options.UNPACK AND CHECK THE EQUIPMENTCarefully unpack the equipment and verify the items listed below areincluded in the shipping container.  If damage has occurred to theequipment during shipment, file a claim with the carrierimmediately.  Table 1 on page 9 provides a complete list of theoptions and accessories available for the PANTHER 300M mobileradio.PANTHER 300M Radios Are Shipped With The Following:! PANTHER 300M  Mobile Radio .....................KRD 103 154/(1-7)! Power Cable ................................................RPM 113 7674/10! Mounting Bracket and Hardware Kit..........! Operator's Manual.......................................MM-101030V1! Installation Manual .....................................MM-101031V1
9OPTIONS AND ACCESSORIESThe following table lists the options and accessories available for thePANTHER 300M Mobile Radio.Table 1 - PANTHER 300M Mobile Radio Options and AccessoriesDESCRIPTION PART NUMBER OPTIONNUMBERMicrophone, Standard KRY 101 1654/1 KAMC7JMicrophone, DTMF KRY 101 1654/10 KAMC7KMicrophone Hanger 344A4678P1 KAMN1AExternal Speaker (4 ohm, 10W) 19A149590P11 KALS1HOption Cable RPM 113 7674/1 KACJ7GExternal Relay Kit 19A705499P1 KASU1CNoise Suppression Kit 19A148539G1 KAPD1APower Cable RPM 113 7674/10 KACJ7HAudio Test Cable RPM 113 2472/48Audio Test Box TQ0613Conventional ProGrammer SoftwareorAE/LZY 213 766/5 TQ3389 R9Aor laterProGrammer Software AE/LZY 213 766/1 TQ3385 R9Aor laterRadio Programming Interface Cable RPM 113 2472/47 TQ3393Copy CatTM Cable, 300M-to-300M RPM 113 2472/42 TQ3394Copy CatTM Cable, 300M-to-300P RPM 113 2472/41 TQ3395
10INSTALLATIONSTEP 1 - PLAN THE INSTALLATIONFigure 1 shows an example of a typical connection diagram.  Beforebeginning, plan the radio installation carefully so that it will:" Be safe for the operator and passengers," Be convenient for the operator to use," Be neat in appearance," Be protected from water damage," Be easy to service," Be out of the way of auto mechanics," Be out of the way of passengers, and" Allow for good air flow around the unit’s cooling fins.For passenger safety, mount the radio securely so the unit will notbreak loose in the event of a collision. This is especially important instation wagons, vans and similar type installations where a looseradio could be extremely dangerous to the vehicle occupants.The procedures in this section provide a guideline for installing themobile radio.  In some applications, it may be necessary to deviateslightly from the recommended procedure and the order in which theequipment is installed.To assure the feasibility of the cable routes you plan to use, it issuggested that you run the cables before installing the radio. Be sureto leave some slack in each cable so that the radio may be pulled outfor servicing with the power applied.It is recommended the unit be installed by one of the many Com-NetEricsson Authorized Service Centers located throughout the UnitedStates. Personnel at these centers are experienced in installations ofthis type and can provide a safe, neat, and functional installation.STEP 2 - LOCATE THE TOOLS REQUIREDThe following tools are required to install the PANTHER 300MMobile Radio:! Electric drill for drilling mounting holes
11! Drills and circle cutters as follows:• No. 31 (1/8-inch) drill• 1/2-inch drill or circle cutter• 3/4-inch circle cutter, hole saw or socket punch! Phillips and flat-blade screwdrivers! No. 10 Torx driverTorx is a registered trademark of CAMCAR Division  TEXTRON, Inc.
12Figure 1 – Typical Connection Diagram
13STEP 3 – EQUIPMENT PREPARATIONMountingThis section describes the radio preparation for installation.  In mostapplications, the following procedures should be completed beforethe radio is mounted.  Depending upon the mounting location, theseprocedures could become very difficult after the radio is mounted.The preparation list includes:! Configuring the Internal Speaker Jumper! Configuring the Ignition Sense Line Jumper! Connecting the Option Cable to the RadioRead through the procedures provided in this section.  If you aresatisfied with the default factory jumper settings and your installationdoes not require an option cable, skip this section and go to STEP 4– PROGRAM THE RADIO on page 17.Removing the Top Cover and ShieldThe top cover and shield must be removed to change the InternalSpeaker jumper (JP701) or the ignition sense line jumper (JP600), toconnect the option cable to the radio.1. The top cover is secured with three screws from the bottom ofthe radio.  Using a No. 10 Torx driver, loosen the three screws! on the top of the radio as shown in Figure 2.2. Remove the two control knobs from the front of the radio.3. Pry the cover loose from the two tabs on the bottom of the radio.4. Remove the top cover by lifting the back and sliding it forwardaway from the chassis.
14Figure 2 – Removing Top Cover
15Figure 3 – Factory Default Internal Speaker Jumper Setting (Enabled)Configure the Internal Radio Speaker Jumper (JP701)The PANTHER 300M radio is shipped from the factory with theinternal radio speaker jumper (JP701) set to 1-2 as shown in Figure3.  This setting enables the internal radio speaker.  Set the jumper to2-3 if 1) only the External Speaker is to be enabled or 2) theInternal/External Speaker option is to be enabled.Configure Ignition Sense Jumper (JP600)The Ignition Sense line is used to enable or disable transmit or carhorn alert option through the vehicle ignition switch.  If the IgnitionSense option is desired, Ignition Sense jumper JP600 must be set to2-3. The PANTHER 300M radio is shipped from the factory with theIgnition Sense jumper (JP600) set to 1-2 as shown in Figure 4.  Thisdefault setting disables the Ignition Sense option.  If your installationwill not take advantage of the Ignition Sense line, skip this sectionand proceed to the next section.
16To use the Ignition Sense line in any application, the option cablemust be wired accordingly, see the section Connect To IgnitionSense on page 19.There are three parameters that define how the Ignition Sense featurewill operate - a jumper on the radio (as described above), and twoprogrammable parameters in the personality.The programmable parameters enable/disable Transmission and/orHorn Alert with respect to the vehicle ignition switch.  For moreinformation on the personality parameters, see the On-Line Help inConventional ProGrammer (TQ-3389 R9A or later) or ProGrammer(TQ-3385 R9A or later).Figure 4 – Factory Default Settings For Jumper JP600
17Connect Option CableThis section applies to installations that require an option cable.  Theoption cable (RPM 113 7674/1) is required if you are installing:! External Speaker ! Internal/External Speaker Option! Car Horn Alert ! Ignition Sense! External Modulation ! External DemodulationTo connect the option cable to the radio:1. Remove the two Phillips screws holding the plastic cover inplace, from the back of the radio, see Figure 5.Figure 5 – Removing Plastic Cover2. Insert the option cable through the hole left by removing theplastic cover.  This will allow the connector to fit through thehole in the back of the radio.3. Plug the option cable connector into J3 on the radio circuitboard.4. Finally attach cable with the two Phillips screws.STEP 4 – PROGRAM THE RADIOAll radios must be programmed with a radio personality.  There aremany parameters in the PANTHER 300M mobile radio that need to besetup and defined for the radio to operate appropriately for eachapplication.  Conventional ProGrammer (TQ-3389 R9A or later) orProGrammer (TQ-3385 R9A or later) is the software used to create
18the personality for the PANTHER 300M radio.  The radio personalityis a computer file that defines all the operating parameters for theradio.  For more information on programming the PANTHER 300Mradio, see the On-Line Help provided with ConventionalProGrammer (TQ-3389 R9A or later) or ProGrammer (TQ-3385R9A or later).  Typically, the radio is programmed before it isinstalled in a vehicle.STEP 5 – INSTALL CABLESThe PANTHER 300M Mobile Radio is installed as a front mountradio.  The location of the mount, the application and the options tobe installed should be considered when planning the cable runs.  Thecable diagram in Figure 1 should be referenced throughout theinstallation process.Power CableThe power cable RPM 113 7674/10 consists of a two-wire cable, seeFigure 6.  The red fused lead supplies power to the radio directlyfrom the vehicle battery. Ignition Sense lead, through the separateoption cable, is used by the radio electronics to determine when theignition switch is turned on.  The black lead is the radio groundconnection.To install the power cable:1. Remove the fuse from the power cable.2. When the power cable is wired directly to the vehicle’s battery itis necessary to route the red power lead through the vehicle’sfirewall. If an existing hole is not conveniently located in thefirewall, drill a 1/2-inch hole in the firewall for the cable run andinsert a rubber grommet.  This grommet is required to preventlead chaffing. Additional grommets may be required if the leadsmust pass through shields or guards in the engine compartment.
19Figure 6 – Power Cable RPM 113 7674/10Route the lead away from high heat sources in the enginecompartment that may cause lead damage and introduce a firehazard. In addition, the lead should not be routed near electricalnoise sources such as electronic ignition modules or cruisecontrol modules.3. Secure the cable at several locations within the enginecompartment to prevent possible damage to the cable.4. Connect the BLACK lead to the vehicle chassis.  Connect thelead as close to the radio as possible.  DO NOT connect theBLACK lead to the “NEG” or “-“ battery post.  Connect theRED lead to the positive (“POS” or “+”) battery post.  SeeFigure 6.#The power source must have a minimum current supplycapability of 13 amps.Connect To Ignition SenseThe ignition sense line is used to enable or disable transmit or theCar Horn Alert option through the vehicle ignition switch.  For a
20detailed description on how to configure the Ignition Sense line, seethe section Configure Ignition Sense Jumper on page 15.Regardless of how the ignition sense line is configured, the optioncable must be wired as described below for the feature to work.Connect Pin 13 of the option cable to an ignition “ON” sense point(preferably an “Accessory” point in the vehicle fuse panel) that isswitched on when the vehicle ignition switch is in the ACCESSORYand RUN positions.  This lead should be connected so the vehiclefuse protection is used.  See Figure 6.#The DB-25 male connector that connects to the optioncable is user-supplied.The “Accessory” point should drop to ZERO volts when crankingthe engine and return to +12 volts after the engine is started. If apoint is chosen that drops to a voltage between zero and +12volts, the radio may execute a power-up cycle several timesduring start up.  It is recommended that the terminal bemeasured with a voltmeter to be sure it shuts off (goes to zerovolts) during the cranking of the engine.Certain problems may be encountered when accessoryequipment is connected to the ignition or accessory lines of thevehicle, where these lines may have large filter capacitors and aleakage path present.  If the radio does not turn off within areasonable amount of time after the ignition is turned off, first trya different accessory or ignition A+ pick up point in the vehicle.Many vehicles have more than one circuit that is switched by theignition switch, and one may be available that does not havelarge filter capacitors or a leakage path present.If a different pickup point cannot be found, then add a 470-ohm,1-watt resistor from the ignition A+ pick point to ground. This willdischarge the capacitor(s) or reduce the leakage voltage to a lowvalue.  Current drain through this resistor will be minimal (lessthan 0.03A) when the ignition is switched on.CAUTION
21Figure 7 – Radio Mounting HardwareRadio Mounting ProceduresThe following procedures are used to mount the radio in front mountapplications.1. Using the bracket as a template, mark and drill the mountingholes using a No. 31 (1/8) drill bit.  Be sure to leave enoughroom at the rear of the radio unit for the cable connections andair flow.Be careful to avoid damaging some vital part (fuel tank,transmission housing, etc.) of the vehicle when drilling mountingholes. Always check to see how far the mounting screws willextend below the mounting surface before installing.If pilot holes must be drilled, remove all metal shavings fromdrilling holes before installing screws.2. Mount bracket with four 3/4" sheet metal screws provided (use1-1/2" screws if needed).3. Place radio into mounting bracket and secure with the four M4 x10 mm Phillip’s screws, M4 flat washers and M4 lock washerssupplied.  The radio can be fastened in any of three differentpositions: parallel to the mounting surface or tilted slightly fromthe parallel position.4. Connect antenna coaxial cable to antenna connector (TNC).5. Insert power cable into power connector on rear of radio unit andpush until the connectors snap together.6. Recheck all connections and then reinsert fuses into the fuseassemblies on the power cable.CAUTION
22STEP 7 – INSTALL OPTIONS AND ACCESSORIESRadio Option CableThe radio option cable (RPM 113 7674/1) is required if you areinstalling:! External Speaker ! Internal/External Speaker Option! Car Horn Alert ! Ignition Sense! External Modulation ! External DemodulationThe section STEP 3 – EQUIPMENT PREPARATION, on page13, describes how to connect the option cable to the radio.  The otherend of the option cable consists of a standard female DB-25connector, which is used to connect to the optional accessories listedabove.  Table 2 provides a description for each input and output onthe radio option connector J603.
23Table 2 – Radio Option Connector P3 Interface DescriptionDB-25Pin No(J100)Pin No(P3) I/O Description21---Ground:! Audio Ground52IInternal Speaker Input #1:!  5W across Internal Speaker63OAudio Amp Output #1:! Vo ≈ 6.6 VDC18 4 O Audio Amp Output #2 to Internal or External Speaker! Vo ≈ 6.6 VDC; 10W maximum across ExternalSpeaker19 5 I External Mic Input:! 300-3000 Hz!  Input level @ 1kHz for 60% of RSD: 82 ± 28 mVRMS(if external audio source has Ro=600Ω)!  Input level @ 1kHz for 60% of RSD: 41 ± 14 m VRMS(if external audio source has Ro<1Ω)76IExternal Mod Input:!  5-10,000 Hz (3 db BW)!  Modulation-Sensitivity: 4.2 kHz/Vrms ± 3dB20 7 O Switched DC Output:! Icc=500 mA Max88IPush To Talk:! TX ON: Low! TX OFF: Open21 9 I Mic Hookswitch:!  “Disable” or “Enable” is selected by PC Programmer!  Hookswitch ON: Low! Hookswitch OFF: Open910ORx Discriminator Detect Audio:!  20-4,000 Hz (3 dB Bandwidth)!  75 m VRMS ±3 dB into a 10K ohm load22 11 --- Ground10 12 I Internal Mic Mute:!  Mute ON: Low! Mute OFF: Open23 13 O Radio UnSquelch:!  Squelch Open: Low!  Squelch Close: High!  RL = 4.7 kohms11 14 Spare
24Table 2 - Radio Option Connector P3 Interface Description Con’tDB-25Pin No(J100)Pin No(P3) I/O Description24 15 O (1)  HORN CONTROL At Signaling ModeDisplay In Menu ActionOn EnableOff Disable!  When select “ON”(enable) and a correct T99 IndividualCall is received, the output of pin 15 is “low.”!  Horn Alarm ON : Low!  Horn Alarm OFF: Open(2) SPEAKER SELECT INTERNAL/EXTERNAL!  Enabling or disabling of the Internal/External Speakeroption is done by proper setting of an internal jumper inthe mobile radio.! Internal: Low! External: Open!  For relay control Io_max = 150mA!  **“HORN CONTROL” or “SPEAKER SELECT” isselected by PC ProGrammer.Note:   Internal and external speaker do not operatesimultaneously.12 16 I Data Communication Input (Test Mode)! TTL Level25 17 O Data Communication Output (Test Mode)! TTL Level13 18 I Ignition Sense! 13.6VDC!  Io_max = 100 mAInternal Mic Mute (DB25-10) must be grounded when applyingaudio to external Mic Input (DB25-19).External Mic Input (DB25-19) has the same audio characteristicsas the Front Panel Mic Jack.  External Mod Input (DB25-7) hasno pre-emphasis or modulation limiting.NOTE
25External Speaker – 19A149590P11The external speaker kit includes a 4-ohm, 10 Watt rated speaker anda radio option cable. To connect an external speaker, the radio optioncable (RPM 113 7674/1) must be installed and connected to theradio.1. Mount the speaker so it is directed to the operator but does notinterfere with the operator’s vision. It also should not present ahazard in the event of an accident. The speaker may be mountedon the lower edge of the instrument panel, the firewall, or abovethe windshield in some trucks.2. Use the mounting bracket as a template for locating themounting holes, and mount the speaker as shown in Figure 8.3. Refer to Figure 9 for instructions on connecting the ExternalSpeaker option and Figure 10 for instructions on connecting theInternal/External Speaker option.MOUNTINGBRACKETMACHINESCREWFLAT WASHERLOCK WASHERFigure 8 - Mounting the External Speaker
26PANTHER 300M EXTERNALSPEAKER OPTIONWHEN THE EXTERNAL SPEAKER OPTION IS APPLIED,AUDIO FROM THE SPEAKER AMP LEAVES THE RADIOON OPTION CONNECTOR PINS 3 AND 4 AND GOES TOJ101.  THE EXTERNAL SPEAKER'S CABLE ISCONNECTED TO J101.JUMPER POSITIONS1-2 USED WHEN THERE IS NOEXTERNAL SPEAKER OPTION2-3 USED WHEN THERE IS ANEXTERNAL SPEAKER OPTION-+AUDIO I NRADIO AUDIOAMPINTERNALSPEAKER3 PINJUMPERuP PORTOPEN COLLECTORTRANSISTORHORN/SPKR  15SPKR 1    3INT SPKR 1   2SPKR 2    4INT SPKR 132SPKR 1     1SPKR 2SPKR 2SPKR 18 OHM5 WATTINTEXT300M RADIORPM 113 7674/1OPTION CABLERADIOCONNECTOR DB 25CONNECTOR42315185624P3 J1004 OHM10 WATTJ101SPKR 1SPKR 2Figure 9 – External Speaker Option
27PANTHER 300M INTERNAL/EXTERNALSPEAKER OPTION(THIS SCHEMATIC ALSO APPLIES TO PUBLIC ADDRESS)WHEN THE INTERNAL/EXTERNAL SPEAKER OR PUBLIC ADDRESS OPTIONS ARE APPLIED.  AUDIO FROM THE SPEAKER AMPLEAVES THE RADIO ON OPTION CONNECTOR PIN 3 AND GOES TO THE COMMON SIDE OF AN SPDT RELAY.WHEN INTERNAL SPEAKER IS SELECTED, THE RELAY FLOATS.  THE NORMALLY CLOSED RELAY CONTACT APPLIES AUDIOBACK INTO THE RADIO TO THE INTERNAL SPEAKER ON OPTION CONNECTOR PIN 2.  (IT IS ASSUMED THE INTERNAL 3-PINJUMPER IS ON PINS 2 & 3.)WHEN THE EXTERNAL SPEAKER IS SELECTED, THE RELAY IS ENGAGED.  AUDIO IS APPLIED TO THE NORMALLY OPENCONTACT THAT THEN CONNECTS TO THE EXTERNAL SPEAKER.ONLY THE SPKR_1 SIDE OF THE AUDIO AMP'S OUTPUT IS SWITCHED.  THE SPKR_2 SIDE OF THE AUDIO AMP ISCONNECTED TO BOTH SPEAKERS.OUR SPEAKER RELAY KIT INCLUDES THE 19A149299P1 RELAY, WIRE, AND A FUSE.  THE CUSTOMER IS RESPONSIBLE FORINSTALLING AND PROVIDING POWER TO THE RELAY.JUMPER POSITIONS1-2 USED WHEN THERE IS NO INTERNAL/EXTERNAL SPEAKER OPTION2-3 USED WHEN THERE IS AN INTERNAL/EXTERNAL SPEAKER OPTION-+AUDIO INRADIO AUDIOAMPINTERNALSPEAKER3 PINJUMPERuP PORTOPEN COLLECTORTRANSISTORHORN/SPKR  15SPKR 1    3INT SPKR 1   2SPKR 2    4INT SPKR 132SPKR 1     1SPKR 2SPKR 2SPKR 18 OHM5 WATTINTEXT300M RADIORPM 113 7674/1OPTION CABLERADIOCONNECTOR DB 25CONNECTOR42315185624P3 J100AUDIO OUT (SPKR_2 SIDE OF AUDIO AMP)INTERNAL AUDIO BACK INTO RADIOAUDIO OUT (SPKR_1 SIDE OF AUDIO AMP)RELAY CONTROL LINE COMSPDT RELAY(19A149299P1)SPEAKER RELAYFUSE1ABATTERY A+ORIGNITION A+EXTERNALSPEAKER4 OHM10 WATTEXT SPEAKER AUDIOSPKR 2NONO(LOW FOR EXTERNAL SPEAKER)Figure 10 – Internal/External Speaker Relay
28Alarm (Horn) Relay Kit - 19A705499P1To connect the alarm relay kit, the radio option cable (RPM 1137674/1) must be installed and connected to the radio.  The alarmrelay kit option consists of the following items:! Relay (19A149299P1)! Fuse holder! Fuse, 1 amp, 250 volt! 4 feet red wire, AWG #18 with Ring Tongue Terminal for 3/ 8stud! 6 feet black wire, AWG #18 with Molex #39- 00- 0060 terminal! (5) Insulated 1/ 4 inch spade tab receptacles! Ring Tongue Terminal for 3/ 8 inch stud! #8 x 3/ 4 long Type A sheet metal screw! Nut Plate for #8 screwTo install the Alarm (Horn) Relay Kit1. Fasten the relay in the desired location, close to the voltagesource, using one #8 x 3/ 4 inch self- tapping screw.2. Crimp an insulated 1/ 4 inch spade tab receptacle to one end ofthe #18 red wire.3. Connect the receptacle to relay lug #86. Cut the red lead so thefuse assembly is close to the voltage source. Install the fuseholder. Attach the other end of the fuse lead to the voltage sourcewith appropriate hardware. See Figure 12.4. From the radio option cable, take the green/white wire and crimpan insulated 1/ 4 inch spade tab receptacle. Connect thereceptacle to relay lug #85.5. Connect the horn or light circuit to lugs #30 and #87 (not 87a)using the insulated 1/ 4 inch spade tab receptacles.#The relay contact make/ break current and voltage rating is30 amps at 16 volts.
29OPTION CABLERPM 113 7674/1PIN 15ON18 PIN CONNECTORDB-25 CONNECTOR(FEMALE)P3 J100PIN 24DB-25 CONNECTOR (MALE)TO BE SUPPLIED BY CUSTOMERNOCOM To Horn CircuitTo Horn CircuitRELAY19A149299P1308785FUSE(1A) 86BATTERY A+Figure 11 - External Car Alert868787a3085TO HORN CIRCUITTO RADIO OPTION CABLEGREEN/WHITE WIREFUSE (1A)BATTERY A+Figure 12 - External Alarm Relay
30OPTION CABLERPM 113 7674/1PIN 18IGNITIONSENSE18 PIN CONNECTORDB-25 CONNECTOR(FEMALE)P3 J100PIN 13DB-25 CONNECTOR (MALE)TO BE SUPPLIED BY CUSTOMERFUSE 1A (OPTIONAL)VEHICLE FUSE BLOCKFigure 13 – Ignition Sense OptionMicrophone Hanger/Hook Switch Mounting – 344A4678P1The microphone hanger or Hook Switch should be mounted in alocation convenient to the operator where it will not interfere withthe safe operation of the vehicle or be a hazard to the vehiclepassengers. The hanger or hook switch is designed to mount with theopen end of the mounting button slot pointed upward.1. Use the hanger or Hook Switch as a template to mark and drillthe mounting holes.  Mount the hanger or hook switch with theself-tapping screws provided.2. Connect microphone connector to connector on control unit andsecure with captive screw.#Do not torque microphone connector screw greater than 2 in-lb. Alternatively, finger tight plus 1/4 turn is acceptable.AntennaInstallation instructions for the antenna are packaged with theantenna. The antenna must be installed in accordance with goodengineering practice for optimum results.
31A permanent mount type of antenna should be located in the centerof the roof or center of rear deck. Glass mounted antennas should bekept as high as possible in the top center of the rear window. Somestates have laws restricting vision-obstructing items from thewindows. Be familiar with local laws before installing glass mountantennas.Try to route the cable away from locations where it will be exposedto heat, sharp edges or mechanical damage, and where it will be outof the way of the driver, passengers or vehicles mechanics. Whereverpossible, existing holes in the trunk wall, and the channels above orbeneath doors and window columns should be utilized.Avoid routing the antenna cable near any electronic modules oralong side any vehicle wiring.Connect the antenna cable to the TNC connector on the radio beingcareful not to twist the cable.Noise Suppression Kit - Option KMPD1A (19A148539G1)Refer to the noise suppression kit option installation manual that isincluded with this option.
Com-Net Ericsson Critical Radio Systems, Inc.P.O. Box 2000Lynchburg, Virginia 245011-800-528-7711 (Outside USA, 804-592-7711)  Printed in U.S.A.

Navigation menu