HTC TP GSM/GPRS 1900 MHz Bluetooth Smartphone User Manual Typhoon Manual Book indb
HTC Corporation GSM/GPRS 1900 MHz Bluetooth Smartphone Typhoon Manual Book indb
HTC >
Contents
- 1. User Manual
- 2. Users Manual Part 1
- 3. Users Manual Part 2
- 4. Users Manual Part 3
- 5. Users Manual Part 4
Users Manual Part 1


Smartphone User Manual
Safeguard
Smartphone User Manual
Contents
23
Congratulations on the purchase of your new Windows Mobile™
Smartphone.
Please read before operating your device.
THE DEVICE IS NOT CHARGED WHEN YOU TAKE IT OUT
OF THE BOX.
DO NOT REMOVE THE BATTERY PACK WHEN THE DEVICE
IS CHARGING.
WHEN INSERTING YOUR SIM CARD, MAKE SURE THE
DEVICE IS POWERED OFF, AND THAT THE SIM CARD
SNAPS INTO THE SOCKET.
YOUR WARRANTY IS INVALIDATED IF YOU OPEN OR
TAMPER WITH THE DEVICE’S OUTER CASING. (For more
information, see the enclosed warranty card)
EXPLOSIVE ATMOSPHERES
When in any area with a potentially explosive atmosphere or where
ammable materials exist, the product should be turned off and the user
should obey all signs and instructions. Sparks in such areas could cause
an explosion or re resulting in bodily injury or even death. Users are
advised not to use the equipment at refueling points such as service or
gas stations. Users are reminded of the need to observe restrictions
on the use of radio equipment in fuel depots, chemical plants or where
blasting operations are in progress. Areas with a potentially explosive
atmosphere are often, but not always, clearly marked. These include
fuelling areas, below deck on boats, fuel or chemical transfer or storage
facilities, and areas where the air contains chemicals or particles, such
as grain, dust, or metal powders.

Smartphone User Manual
Safeguard
Smartphone User Manual
Contents
23
Contents
Chapter 1 Getting Started 7
1.1 Knowing your phone 8
1.2 Status indicators 13
1.3 Setting up your phone 14
1.4 Accessories 18
1.5 Navigating 19
1.6 Entering text and numbers 23
1.7 Securing your phone 27
Chapter 2 Using Your Phone 29
2.1 Making a call 30
2.2 Receiving a call 33
2.3 Photo Contacts (Caller ID) 35
2.4 In-call options 44
2.5 Retrieving a voice mail message 45
2.6 Reviewing your calls 45
2.7 Speed Dials and Voice Tags 47
2.8 Advanced dialing information 52

Smartphone User Manual
Contents
Smartphone User Manual
Contents
4
5
Chapter 3 Using Your Camera 55
3.1 Camera mode 56
3.2 Album mode 67
Chapter 4 Personalizing Your Phone 75
4.1 Customizing phone settings 76
Chapter 5 Getting Connected 85
5.1 Connecting to the Internet 86
5.2 Pocket Internet Explorer 89
5.3 Bluetooth 93
5.4 Modem Link 96
Chapter 6 Messaging Features 97
6.1 Setting up accounts 98
6.2 Managing accounts 100
6.3 Creating messages 101
6.4 Receiving E-mail, and SMS messages 104
6.5 Viewing message folders 108
6.6 Managing messaging 110
6.7 Instant messaging 113
6.8 MMS messaging 117

Smartphone User Manual
Contents
Smartphone User Manual
Contents
4
5
Chapter 7 Synchronizing 125
7.1 Using ActiveSync 126
7.2 Installing ActiveSync 127
7.3 Server ActiveSync 129
7.4 Other information 133
Chapter 8 Applications 137
8.1 Using Contacts and Beaming 139
8.2 Using Calendar 147
8.3 Using Tasks 150
8.4 Using Voice Notes 152
8.5 Using Windows Media Player 153
8.6 Using Calculator 158
8.7 Using Java MIDlet Manager 159
8.8 Games 164
Chapter 9 System Management 167
9.1 Adding and removing programs 168
9.2 File Manager 169
9.3 Task Manager 176
9.4 Space Maker 178

Smartphone User Manual
Contents
6
Appendix and Index 183
Regulatory Notices 184
Troubleshooting 193
Specications 199
Index 201

Chapter 1
Getting Started
1.1 Knowing your phone
1.2 Status indicators
1.3 Setting up your phone
1.4 Accessories
1.5 Navigating
1.6 Entering text and numbers
1.7 Securing your phone

8
9
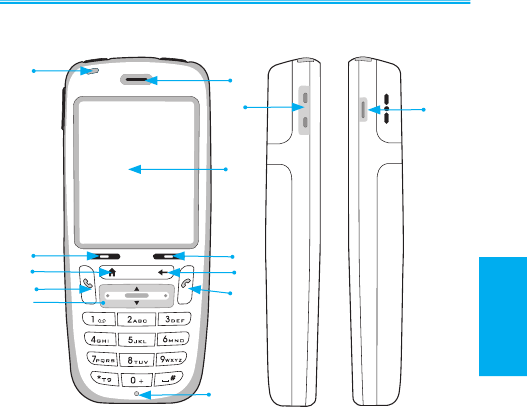
1.1 Knowing your phone
This section will help you to familiarize yourself with your
phone’s hardware, including a basic introduction to the but-
tons and features found on the top, bottom, front, side and
rear of the phone. A brief explanation of the LED indicator
is also provided.
Top View Bottom View
1. Power button
When the phone is turned Off, press and hold the Power
button to turn it On, and vice versa. When the phone is
On, press and quickly release the Power button to display
the Quick List, which allows you to change or lock your
phone’s setting.
2. Infrared port
Allows your phone to receive data from another IR-
compatible device through beaming.
3. Earphones plug
Plug the earphones jack here to use the handsfree mode
or listen to sound or multimedia les.
4. Mini USB connector
Attach the mini-USB cable here to synchronize the phone
with your desktop or notebook PC, or charge its battery.
4
Smartphone User Manual
1. Getting
Started
Smartphone User Manual
1. Getting
Started
123
8
9
Front View Side View
1. LED indicator
The LED Indicator noties you of the battery and network
status of your phone. The indicators are described on the
next page.
12
3
44
56
8
7
9
10
11 12
Smartphone User Manual
1. Getting
Started
Smartphone User Manual
1. Getting
Started
10
11
LED Indicator Status
Solid green Battery is fully charged
Blank Battery case is empty
Solid Amber Battery is charging
Flashing green Network is attached
Flashing red Battery very low (less than 4%)
Flashing blue Bluetooth set to “On” mode or “Discover-
able” mode
Flashing amber Battery temperature is hotter or colder than
the functional limits of 0 to 48 degrees Cel-
sius, and has stopped charging
Amber / green LED off Battery fault. The “Battery Fault” icon is
displayed ( ) In this case, the ashing
green LED can be recovered by unplug-
ging the AC adaptor.
Dim Network is disconnected.
Smartphone User Manual
1. Getting
Started
Smartphone User Manual
1. Getting
Started

10
11
2. Speaker
3. Display screen
The status indicators concerning the current mode,
battery strength, the current activity, or active program
are displayed at the top. In the center of the screen is the
active menu or program. At the bottom of the screen are
the menus or commands related to the active program.
4. Left/Right softkey
Performs the function shown on the screen immediately
above the key.
5. Home key
Press to return to the Home screen.
6. Back key
Press to go back to the previous screen, or to backspace
over one character in a text eld. Press and hold to delete
the entire contents of the eld.
7. Talk key
Press to start a call or answer an incoming call. Press and
hold to turn the speakerphone mode on or off, or switch
between an active call and a call on hold.
8. End key
Press to end a call; press to return to the Home screen;
or press and hold to lock the keypad.
9. Navigation Pad
Use to scroll selection up, down, left, or right. Press
straight down on the center of the Navigation Pad (known
as the “Action” button) to select. In a text eld, use the
navigation pad to move the cursor right or left, character
by character.
10. Microphone
Smartphone User Manual
1. Getting
Started
Smartphone User Manual
1. Getting
Started
12
13
11. Volume Up/Down button
Lets you adjust the volume during the talk mode. During
the standby mode, press and hold the Volume Down
button to launch the Voice Tag feature. Press and hold the
Volume Up button to launch the Voice Notes recorder.
12. Camera button
Launches the camera mode, if not already in camera mode.
If already in camera mode, pressing this button captures
a still image or begins capturing a video clip, depending
on the current capture submode.
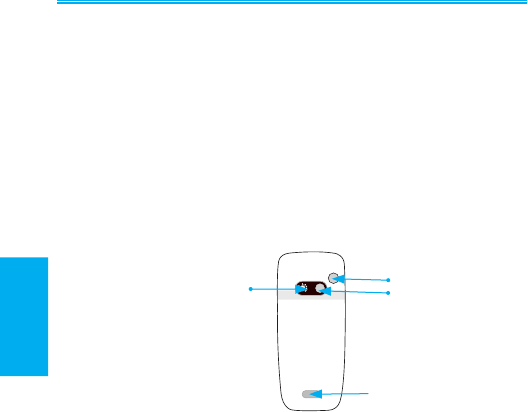
Rear View
1. Car antenna connector
Allows you to attach your phone to the car antenna for
better network signal reception. Simply peel off the rubber
cap and connect the antenna jack. Replug the rubber cap
if unused.
2. Camera lens
Capture still images or video clips.
3. Self-Portrait mirror
Position the phone until the mirror reects the image you
want to capture.
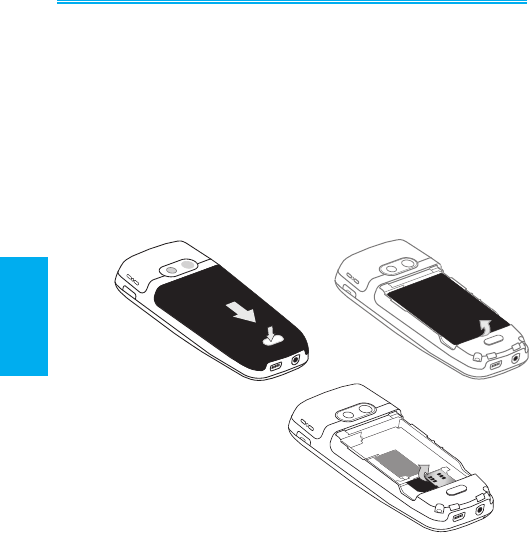
4. Battery release latch
Press to release the latch to access the battery, SIM card,
or Mini-SD card.
1
23
4
Smartphone User Manual
1. Getting
Started
Smartphone User Manual
1. Getting
Started
12
13
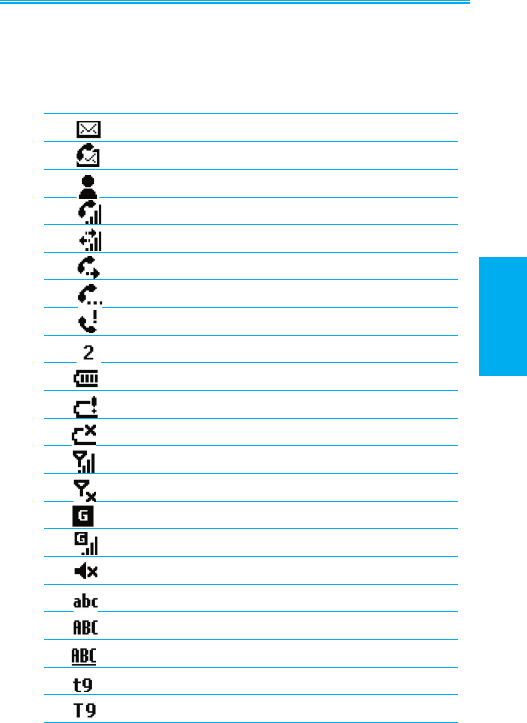
1.2 Status indicators
Status indicators are located in the title bar at the top of the
phone’s display screen. The following table lists common
status indicators and their meanings:
New email
New voice mail
New instant message
Voice call active
Data call active
Call forwarding
Call on hold
Missed call
“1” indicates Line 1; “2” indicates Line 2
Battery full
Battery very low (less than 4%)
Battery fault
Signal strength
Radio off
GPRS available
GPRS in use
Ringer off
Multipress input lower
Multipress text input mode, uppercase
Multipress text input mode, caps lock
T9 text input mode, lowercase
T9 text input mode, uppercase
Smartphone User Manual
1. Getting
Started
Smartphone User Manual
1. Getting
Started
14
15
1.3 Setting up your phone
In this section you will learn how to install a battery, SIM card,
Mini SD card, and how to charge the battery.
Installing the SIM Card
The SIM (Subscriber Identication Module) card contains
a computer chip that stores your personal number, phone
book, and other services provided by your cellular service
provider.
To insert a SIM card:
1. Press on the battery release latch and move the backside
cover downward to open.
2. Remove the battery by lifting it up from the bottom end.
3. Pry the SIM metal socket open.
4. Insert the SIM card with the gold-plated contact area on
the card facing down. Push the metal socket down to lock
into place.
Smartphone User Manual
1. Getting
Started
Smartphone User Manual
1. Getting
Started
14
15
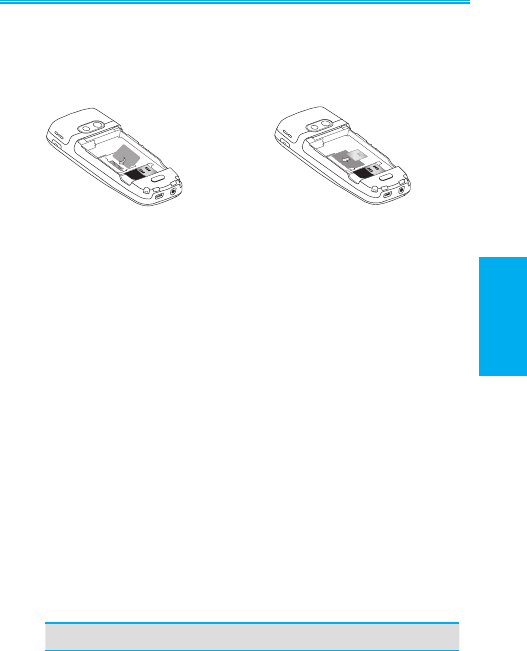
Installing the Mini SD card
Use only the Mini SD (Secure Digital) card for this phone
device. You can install the Mini SD card to store images,
video clips, music and other data on your phone.
To insert a Mini SD card:
1. Remove the back phone cover as shown on the previous
page.
2. Slide the Mini SD card into the holder, with the gold-plated
contact area facing down.
3. Push the card down and pull up the metal latch to secure
it into place.
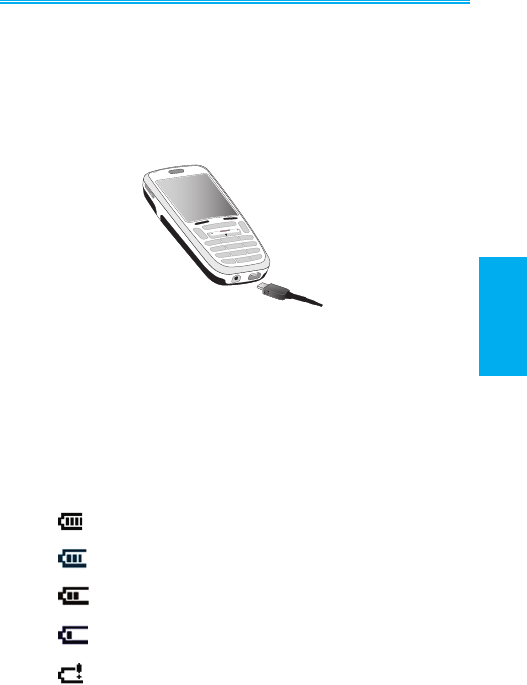
Charging the battery
Your phone is powered by a rechargeable Lithium-Ion bat-
tery. The battery will eventually wear out after a few hun-
dred charges or discharges. Replace the battery through
an authorized vendor when the operating time is noticeably
shorter than usual.
NOTE: Please note that the time it takes for a battery to fully
charge depends on the environment temperature at the time
of charge; a completed charge normally takes about 3.5-4
hours under 0-10 degree temperatures, and below 3 hours
for temperatures ranging from 20-45 degrees.
Mode Estimated battery life
Talk time 3.5 to 4 hours
GPRS 2 hours prox.
Standby 140 hours
Smartphone User Manual
1. Getting
Started
Smartphone User Manual
1. Getting
Started

16
17
Charge the new battery before using your phone for the rst
time. When the low-battery indicator appears, save any
unsaved data you are working on by synchronizing your
phone with your PC or a Microsoft Exchange Server. Do
not restart your phone until you have connected the device
to an external power source.
NOTE: Do not leave your phone connected to a charger
for longer than a week because overcharging can shorten a
battery’s lifespan. Your battery will automatically discharge
when the device is not in use. Leaving the battery in ex-
tremely hot or cold places may also reduce its capacity or
shorten its lifespan.
Smartphone User Manual
1. Getting
Started
Smartphone User Manual
1. Getting
Started
16
17
To charge your battery:
Your phone can be charged while switched on or off. Charge
your battery by plugging the power cable to the mini USB
connector at the base of the device, or by using the AC
adaptor.
If the device is turned off, charging is indicated by an amber
light. If the device is turned on, charging is indicated by the
solid amber light on the LED indicator and the charging icon.
The completed charge is indicated by either a green light or
a charged icon. You can also charge the phone using the
USB Sync cable while connected to the PC’s USB port.
Battery Capacity Indicator
Full
50%-74% capacity
28%-49% capacity
Less than 27% capacity
Very Low alert (less than 4%)
Smartphone User Manual
1. Getting
Started
Smartphone User Manual
1. Getting
Started

18
19
1.4 Accessories
Mini USB cable
A USB cable is provided to allow you to synchronize informa-
tion between your phone and a desktop or notebook PC us-
ing Microsoft ActiveSync. You can also charge the device’s
battery by plugging the cable to a PC USB port.
Stereo earphones with handsfree
function
Use the earphones to listen to sound or multimedia les. The
earphones can also function as a handsfree device.
Using the earphones
Connect the earphones cable to the earphones jack located
at the base of the phone. Press the “Press To Talk” button
to receive an incoming call. Press and hold it to end a call.
Rotate the Volume buttons to adjust the sound level.
Smartphone User Manual
1. Getting
Started
Smartphone User Manual
1. Getting
Started
18
19
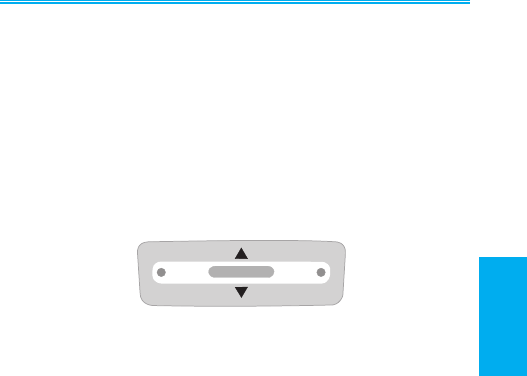
1.5 Navigating
This section shows you how to move through your phone
screens in order to perform tasks quickly and easily.
Navigation Pad
The Navigation Pad provides the easiest and quickest way
to move around the phone’s programs and settings.
Using the Navigation Pad
• Press the left side of the Navigation Pad, or right side, or
the top or the bottom, to move/scroll the selection focus
on the screen left, right, up, or down.
• Select a highlighted item by pressing straight down on
the center of the Navigation Pad, which is also known as
the Action button. In many cases, scrolling to an item
and pressing the Action button executes a command, or
takes you to a program or setting. When you scroll to a
check box, pressing the Action button selects or clears the
box.
Softkeys
There are two softkeys on your phone, located directly be-
low the display screen (“Left Softkey” and “Right Softkey”).
Each softkey performs the command displayed immediately
above it on the screen (called the “Softkey label”), making
it easy to navigate around your phone and to perform com-
mon commands.
Smartphone User Manual
1. Getting
Started
Smartphone User Manual
1. Getting
Started
20
21
Menus
On many screens, the Right softkey is labelled Menu. The
Menu softkey displays a list of menu options that are relevant
to the screen you are viewing. Selecting a menu option will
either perform the command or take you to another part of
the user interface where you can perform the command.
NOTE: You can choose the menu commands quickly by
pressing the number on the keypad that corresponds to the
number shown to the left of the command you want (after
the menu is open).
1. Open the menu by pressing the softkey beneath the Menu
label.
2. Select a command by scrolling to it and pressing the Action
button. Or, on your phone keypad, press the number
shown to the left of the desired command name.
Smartphone User Manual
1. Getting
Started
Smartphone User Manual
1. Getting
Started
20
21
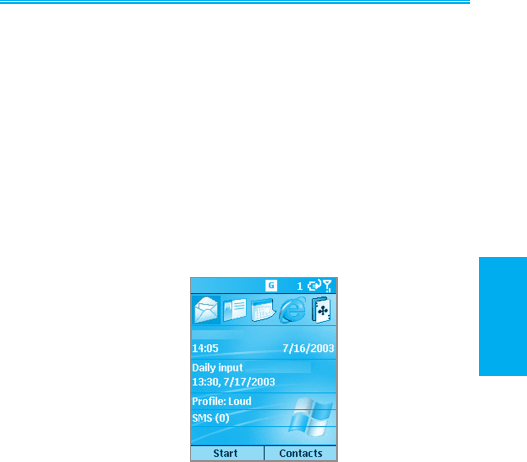
The Home key
Pressing the Home key takes you to the Home screen,
which is your starting place for most tasks. You can gain
access to all of the phone features and programs from the
Home screen.
The top of the Home screen displays icons for the ve ap-
plications that were recently accessed. The center of the
Home screen displays upcoming appointments, the number
of text messages in the inbox, and your current prole. To
open an application, scroll to one of these items and press
the Action button on the Navigation Pad.
The Home screen is the default display when you turn on the
phone. You can also access the screen anytime by pressing
the Home button.
The Back key
Pressing the Back key takes you to the previous screen, in
a similar manner to the Back button on an Internet browser.
In a text eld, pressing the Back key moves the cursor back
to delete one or more characters. This is similar to pressing
the Backspace key on a keyboard.
Smartphone User Manual
1. Getting
Started
Smartphone User Manual
1. Getting
Started
22
23
The Start menu
Your phone comes with many bundled programs that you
can start using immediately. To install additional programs
on your phone, refer to the Companion CD that came with
your phone.
To use the Start menu:
1. On the Home screen, press the softkey beneath Start.
2. Select a program by scrolling to it and pressing the Action
button. You can also select the program by scrolling to it
and pressing the corresponding number on the menu.
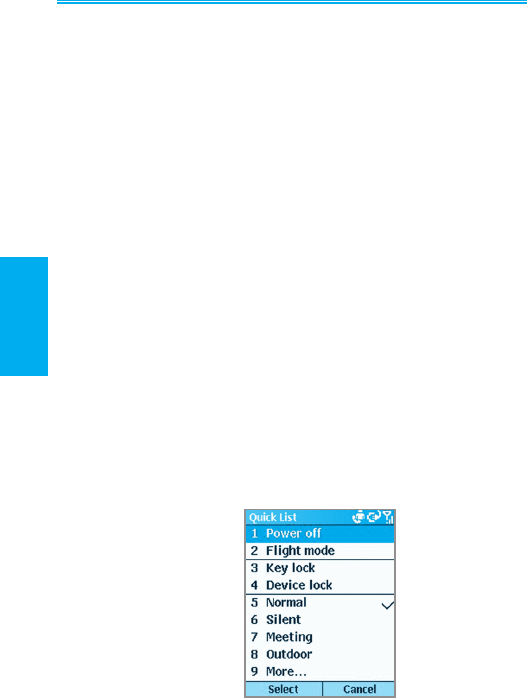
The Quick List
The Quick List displays a list of commands, such as locking
your phone, locking the phone's keypad, and turning on the
Flight mode, as well as the list of available prole types.
To use the Quick List:
1. Press and quickly release the Power button to display the
Quick List.
2. Select the item you want by scrolling to it and pressing the
Action button or the related number.
Smartphone User Manual
1. Getting
Started
Smartphone User Manual
1. Getting
Started

22
23
1.6 Entering text and numbers
Your phone supports three input modes for entering text and
numbers: Multipress, T9, and Numeric. The Multipress
and T9 modes are used for entering text, and the Numeric
mode for entering numbers. When you select a eld that
requires text or numeric entry, the phone will automatically
select the appropriate input mode. You can switch between
the input modes when a text eld is displayed that requires
text or number input by holding down the Asterisk (*) key
on your keypad to choose the input mode until the status
indicator for the input mode you want is displayed in the title
bar. The status indicator on the title bar shows the input
mode you are currently using:
Multipress mode
When you are in Multipress mode, you can enter a letter by
pressing the number key on which the letter appears. To
enter the rst letter on the number key, press the key once,
to enter the second letter, press the key twice quickly, and
so on. The letter entered most recently is underlined until
you have completed the keypresses for the letter and moved
on to the next letter.
For example: To enter the word "hat," press 44, 2, 8.
Indicator Mode
abc
ABC
ABC
t9
T9
T9
123
Multipress text input mode, lowercase
Multipress text input mode, uppercase
Multipress text input mode, caps lock
T9 text input mode, lowercase
T9 text input mode, uppercase
T9 text input mode, caps lock
Numeric input mode
Smartphone User Manual
1. Getting
Started
Smartphone User Manual
1. Getting
Started
24
25
When you enter letters that are on the same number key,
you must pause after entering the rst letter and wait until
the underline disappears before entering the next letter so
your phone can process the rst letter. This pause is called
the Multipress time-out, and you can adjust the length of the
pause between keypresses.
For example: To enter the word "cat," press 222, pause,
press 2, and then press 8. Press the # key to move a
space.
To enter punctuation in Multipress mode, press 1 repeatedly
until you see the punctuation mark that you want.
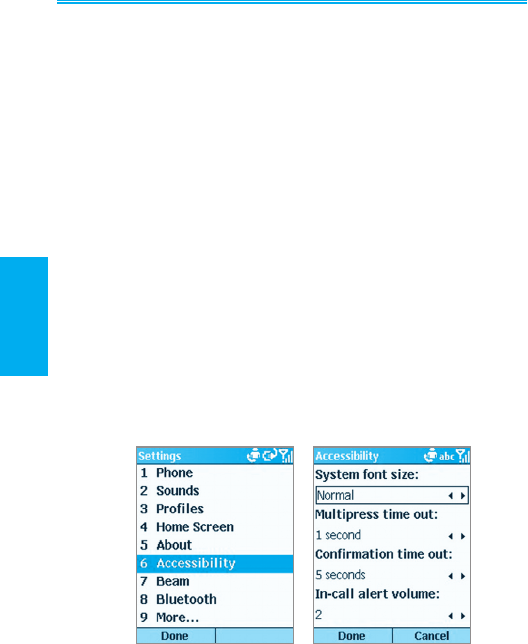
To change the Multipress time-out:
1. In the Home screen, select Start.
2. Select Settings and then Accessibility.
3. In the Multipress time-out eld, select the length of the
pause between keypresses that you prefer.
Smartphone User Manual
1. Getting
Started
Smartphone User Manual
1. Getting
Started

24
25
T9 mode
When you are in the T9 mode, just press the number keys
that contain the letters that you want to form a word. T9
will then analyze your keypresses and attempt to complete
the word.
For example: To enter the word "shoe," press 7, 4, 6, 3.
To enter text in T9 mode:
1. Press and hold the * key until the input menu appears.
Scroll down and choose “English.” The t9 indicator should
appear at the top of the display.
2. Enter letters by pressing the keys on which the letters
appear. Press a key only once for each letter.
3. Press the # key to accept the word and enter a space
after it, or press the Down button on the Navigation Pad
to scroll through the available words; press the Action
button to accept the word choice.
4. Press 1 and then press the Up or Down button on the
Navigation Pad to cycle through common punctuation
symbols.
NOTE: T9 cannot always nd the word you want in the T9
dictionary. In these cases, switch to Multipress mode. After
you have entered the word in Multipress mode, the word will
be added to the T9 dictionary.
Numeric mode
When you are in the Numeric mode, just press the number(s)
you want to enter on the keypad. If a eld permits a numeri-
cal entry only, such as the Work phone eld in Contacts, the
input mode will automatically default to Numeric mode.
Smartphone User Manual
1. Getting
Started
Smartphone User Manual
1. Getting
Started

26
27
Miscellaneous input tasks
• To enter a space: In Multipress or T9 mode, press the *
key.
• To start a new line: Press the Action button.
• To change between uppercase and lowercase in text
mode: Press the * key. To lock caps: Press the * key
twice. Press the * key again to return to lowercase.
• To enter a symbol: Press and hold the # key, select the
symbol you want, and then press the Done softkey.
• To enter a number, an asterisk (*), or a pound sign (#):
Press and hold the * button on the phone keypad to pop
up a selection list, then select “123” for Numeric mode.
You can then press the desired corresponding key on the
keypad.
• To delete characters: Press the Back button to
backspace over a single character. Press and hold the
Back button to backspace and delete all text in a eld.
• To enter the plus (+) sign for international calls: Press
and hold 0.
Smartphone User Manual
1. Getting
Started
Smartphone User Manual
1. Getting
Started

26
27
1.7 Securing your phone
You can customize the level of security you want to have
on your phone by locking the SIM card, the keypad, or the
entire phone.
Locking the keypad
The keypad lock turns off the keypad functionality. This is a
helpful feature if, for example, your phone is turned on and in
your pocket, and you want to prevent accidental keypresses
from dialing a number, etc.
• To lock your keypad: In the Home screen, press and
hold the End button. The Left softkey will display Unlock,
indicating that your phone is locked.
• To unlock your keypad: In the Home screen, press the
Unlock softkey, and press the # key.
Locking the SIM card
Locking your SIM (Subscriber Identity Module) card prevents
you from using the phone, but you can still turn it on and
make emergency calls. When you turn your phone on, you
will be prompted for your PIN1 password, which you must
enter correctly before you can use your phone.
• To lock the SIM: In the Home screen, press the Start
softkey, select Settings, select Security, select Enable
SIM Lock, and then press the Action button. Enter your
PIN1 password, and then press the Done softkey.
• To unlock the SIM: In the Home screen, press the Start
softkey, select Settings, select Security, select Disable
SIM Lock, and then press the Action button. Enter your
PIN1 password, and then press the Done softkey.
Smartphone User Manual
1. Getting
Started
Smartphone User Manual
1. Getting
Started

28
Locking your phone
Locking your phone prevents access to personal data.
When you enable this feature, your phone will automati-
cally lock after a specied time of inactivity. A screen will be
displayed requiring your phone lock password before access
is granted. You can still receive calls and make emergency
calls when the phone is locked.
• To lock your phone:
1. Press the Power button to display the Quick List, select
Device lock, and then press the OK softkey.
2. Under Lock phone after, select the amount of time
you want your phone to be inactive before the phone
automatically locks.
3. Under Password, enter the password you want to use
to access your phone when it is locked.
4. Under Conrm password, enter the password again,
and press the Done soft key.
• To unlock your phone: Press the Unlock softkey,
enter your password, and then press the Unlock softkey
again.
• To turn off phone lock: In the Home screen, press the
Start softkey, select Settings, select Security, select
Disable Phone Lock, and then press the Done softkey.
Smartphone User Manual
1. Getting
Started

Chapter 2
Using your phone
2.1 Making a call
2.2 Receiving a call
2.3 Photo Contacts (Caller ID)
2.4 In-call options
2.5 Retrieving a voice mail message
2.6 Reviewing your calls
2.7 Speed Dials and Voice Tags
2.8 Additional dialing information
Smartphone User Manual
2. Using
your phone
Smartphone User Manual
2. Using
your phone
30
31
2.1 Making a call
There are several ways to make a call.
Making a call from the Home screen
When in the Home screen, press the numbers on the keypad
to enter the phone number, and then press the Talk button
to make the call. Press the Back button if you need to
backspace over a digit.
As you enter a phone number, your phone searches Con-
tacts, Call History, Speed Dial lists, and your SIM card, to
nd a matching number. Matching names and numbers will
be displayed. When you see the name of the person you
want to call (or the entire number) displayed, select it and
press the Talk button.
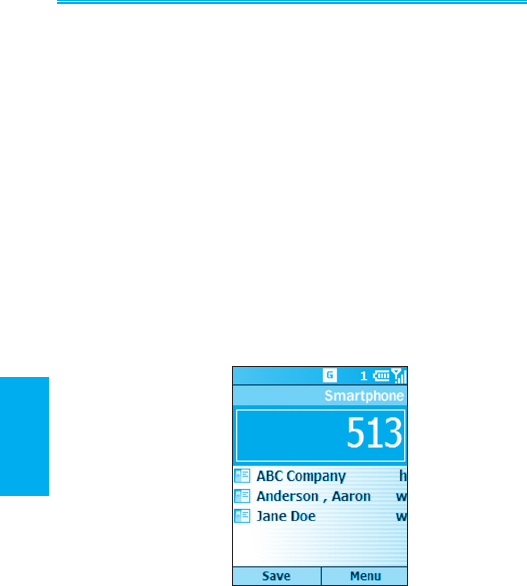
In this example, the rst few digits of a phone number have
been entered. The names listed in this screen have all been
found to have phone numbers that start with these digits. At
this point, you can select the desired name without having
to enter more numbers.

Smartphone User Manual
2. Using
your phone
Smartphone User Manual
2. Using
your phone
30
31
Making a call from Contacts
To make a call by Contact name:
In the Home screen, press the Right Softkey ("Contacts") or
select Contacts from the Start Menu. If there are many con-
tacts listed, you can enter the rst few letters of the desired
contact's name to perform a search. Select the name you
want to call and press the Talk button. The phone number
that has been specied as the default phone number for that
contact entry will be dialed.
To change the default number for a Contact:
In the Home screen, press the Right Softkey ("Contacts")
or select Contacts from the Start Menu. Select the contact
whose default phone number you want to change, then
press the Right or Left navigational button to change the
default number. The abbreviation at the right side of the list
indicates the default number. For example, if you change
“w” to “m,” the default number changes from Work phone
(w) to Mobile phone (m).
To make a call from an open Contact card:
In the Home screen, press the Right Softkey ("Contacts")
or select Contacts from the Start Menu. Select the desired
contact, then press the Action button to display all the infor-
mation for that contact. Select the number you want to call,
then press the Talk button.
NOTE: For more information about Contact list abbrevia-
tions and Contact cards, please see Chapter 8.

Smartphone User Manual
2. Using
your phone
Smartphone User Manual
2. Using
your phone
32
33
Making a call using a recently dialed
number
When in the Home screen, press the Talk button to display
a list of recently-dialed names/numbers. Select the item
you want to dial, then press the Talk button again. Note that
you can also use the menu in this screen to open a Call Info
screen for the selected item.
Making a call from the Call History list
Select Call History from the Start Menu. Select the number
or name you want to call, then press the Talk button.
Making a call from a hyperlink
When you see an underlined phone number presented as
a hyperlink in an E-mail message, just scroll to it, and press
the Action button to make the call.
Making emergency calls
Calls to emergency service numbers can be made under
any circumstances, even if you have locked the SIM card
and/or your phone.
To place an emergency call: Dial the emergency number
appropriate for your location, and press the Talk button.
Smartphone User Manual
2. Using
your phone
Smartphone User Manual
2. Using
your phone
32
33
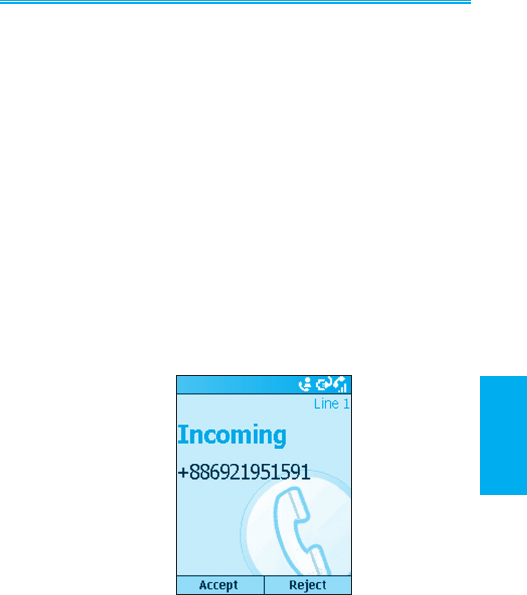
2.2 Receiving a call
NOTE: This section describes the default behavior for in-
coming calls. See the next section if you want a Photo ID
(which you have associated with the caller) to be displayed
on your screen during incoming calls.
When you receive a call, the name and number of the caller
are displayed on the screen. If the name of the caller is not
in your Contacts list, only the caller's phone number is dis-
played. You can answer a call by pressing the Talk button
or the Left softkey (“Accept”).
If don't want to take the call, press the Right softkey (“Re-
ject”). Note that selecting Reject will connect the caller to
your voice mail box, if you subscribe to this service.

Smartphone User Manual
2. Using
your phone
Smartphone User Manual
2. Using
your phone
34
35
Answering a second call using Call
Waiting
If you are already talking on the phone when you receive
another call, the Call Waiting screen will appear. To place the
current call on hold and answer the incoming call, press the
Left Softkey (“Accept”) or the Talk button to simultaneously
place the rst call on hold and answer the second call.
If you want to end the rst call before answering the incoming
call, press the End button, and then press the Accept soft
key or the Talk button to accept the incoming call.
Rejecting a Call Waiting call
If you are already talking on the phone when you receive
another call and you don't want to answer the incoming
call, press the Right Softkey (“Reject”) in the Call Waiting
screen. This will keep your current call in progress, but will
connect the “call waiting” caller to your voice mail box, if you
subscribe to this service.

Smartphone User Manual
2. Using
your phone
Smartphone User Manual
2. Using
your phone
34
35
2.3 Photo Contacts (Caller ID)
Photo Contacts is a “Caller ID” application that adds more
fun to using your phone. It allows you to assign photos or
animated GIF les to the entries in your Contacts. Then
when a person calls you (for whom you have previously
assigned a photo ID in Contacts), that photo ID will appear
on your phone’s incoming call screen.
You can also perform maintenance on the Contacts, even
create new Contacts and Groups and assign members to
the Groups, right from within Caller ID. (See also Chapter
8 for information about maintaining Contacts.)
The Caller ID utility does not run automatically when you
turn on your phone. You must invoke it after the phone is
turned on.
Starting the Caller ID program
Select Photo Contacts from the Start Menu to invoke the
Caller ID program. If you have many Contacts, it may take
a few moments to load them. After they are loaded, the icon
shown below will display in the Title Bar. It indicates that the
“Caller ID monitor” is running, and Photo IDs (if assigned)
will display when incoming calls are received.
NOTE: Even if this icon is not shown, you can still use Caller
ID to assign photos and manage contacts and groups. The
photos will display with your contacts, but incoming calls will
not be able to display the Photo IDs you assigned.
Smartphone User Manual
2. Using
your phone
Smartphone User Manual
2. Using
your phone
36
37
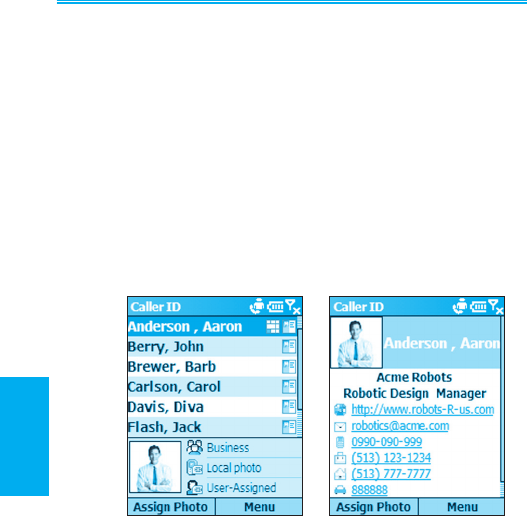
Main List View and Detailed View
When you start the Caller ID application, the main List View
will display as shown in the example below on the left. The
Contacts entries fully mirror those in your Pocket Contacts
(Chapter 8). Any changes you make to your Contacts data
using Caller ID will simultaneously be made in your Pocket
Contacts. In the example below, a Photo ID has already
been assigned to the selected Contact entry. The icon at
the rightmost side of each Contact indicates whether the
Contact resides in your phone’s local memory or on the SIM
card. If a Photo ID has been assigned, an additional icon
will indicate such.
Main (List) View Detailed View
To switch to Detailed View, press the Action button. All data
that has been entered for the selected Contact will be listed.
To switch back to List View, select Cancel from the menu.

Smartphone User Manual
2. Using
your phone
Smartphone User Manual
2. Using
your phone
36
37
Menu Commands
The menu in Detailed View lets you display the Next or
Previous contact entry; Edit or Delete the current contact,
and Assign or Unassign a photo ID to it.
The menu in the main List View contains the following
commands:
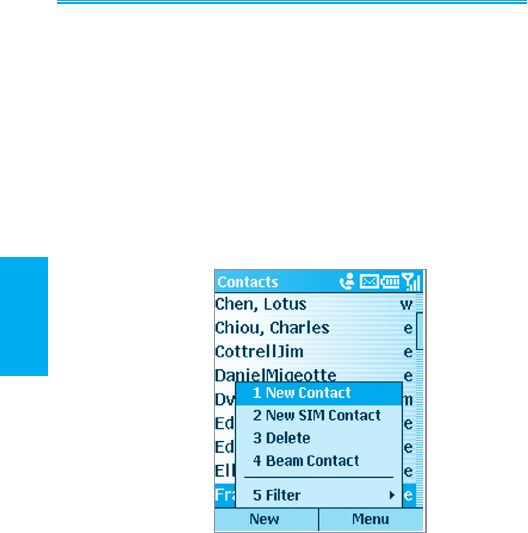
New
Opens a standard screen in which you can enter data and
create a new entry in your Pocket Contacts.
Delete
Select the entry you want to delete, then select Delete. A
message will remind you that if you delete this entry using
Caller ID, it will also be deleted in your phone’s Contacts.
Reset Filter
This command is enabled after you have performed any
manual ltering of entries using your phone’s keypad. For
example, if you have pressed the keys for “j,” “a,” “c,” and
“k” to list only the entries containing the string “jack,” you
can select Reset Filter, or press the * shortcut key, to re-
set the main view so that all entries are once again listed.
(NOTE: This command does not affect any ltering you
may have done using the Filter command explained on
the next page.)
Manage Group
This command provides a convenient interface that lets you
perform complete management of your contacts groups.
Initially, it opens the Manage Group screen, which lists all
currently existing groups and the number of members as-
signed to each group, as well as the Photo ID assigned to
the selected group (if any).

Smartphone User Manual
2. Using
your phone
Smartphone User Manual
2. Using
your phone
38
39
Press the Right Softkey in the Manage Group screen to open
the menu, which lets you create New groups, Rename or
Delete groups, Assign Members to groups, Assign Photo
or Unassign Photo, and Preview the behavior of an already-
assigned photo and/or template.
The Assign Photo, Unassign Photo, and Preview com-
mands in the Manage Group screen operate the same as
those for assigning individual Photo IDs, as explained later
in “Assigning a Photo ID to a Contact.” Note that a Photo
ID assigned to a group will display during an incoming call
only if no individual Photo ID has been assigned to the caller.
The individually-assigned Photo ID has precedence over the
group-assigned Photo ID.
Filter
This command opens a submenu that lets you control which
category of items are listed on the screen: SIM Only, Con-
tacts Only, and Group. By default, No Filter is active.
Assign Photo
Explained later in “Assigning a Photo ID to a Contact.”
Preview
This command is available if a Photo ID is currently assigned
to the selected Contact entry. First, select a Contact entry in
the list that already has a photo assigned to it. Then select
Preview, or press the # button on your phone keypad.

Smartphone User Manual
2. Using
your phone
Smartphone User Manual
2. Using
your phone
38
39
Options
Selecting Options opens a submenu that contains the fol-
lowing three commands:
Set Default Photos — opens a screen that lets you assign,
change, or unassign default Photo IDs for the following three
situations:
Unknown photo This photo will display whenever the
phone number of the incoming call is
not known to Caller ID because no
phone number was “passed in” to
your phone. This would occur if the
person calling you has blocked their
phone number from being displayed
to the receiver, or has not enabled
the broadcast of their Caller ID.
Not-found photo This option in the Set Default Pho-
tos screen lets you assign a generic
Photo ID to any incoming call from
a person whose number is not
found in your Contacts. That is, the
phone number of the incoming call
is known, but has no matching entry
in your Contacts.
Default photo This photo will display when the
incoming call is found to be from
a matching entry in your Contacts
database, but so far there is no
user-assigned Photo ID for either
that individual Contact entry, or for
the Group it belongs to.

Smartphone User Manual
2. Using
your phone
Smartphone User Manual
2. Using
your phone
40
41
Display Settings — Opens the Display Settings screen,
which allows you to specify whether the Photo ID should
consist of only a photo (Use Photo Only), or a photo merged
with a template (Use Template). Options available in this
screen will depend on which of these is active in the Display
Style eld.
General — Opens a screen that contains two options:
Storage Path for Re-sized Photos: Every time you
use Assign Photo to assign a photo, Caller ID will
automatically copy and re-size the original photo le.
You can then delete the original le, if you wish to save
valuable storage space in the phone. The Storage Path
for Resized Photos eld allows you to specify whether
you want these re-sized photos to be saved to your phone
or to your Storage Card.
Display Photo During Incoming or Waiting Call: Active
by default. If you uncheck this checkbox and then select
Done, the phone will recover its original background image
for incoming calls.