HTC TP GSM/GPRS 1900 MHz Bluetooth Smartphone User Manual Typhoon Manual Book indb
HTC Corporation GSM/GPRS 1900 MHz Bluetooth Smartphone Typhoon Manual Book indb
HTC >
Contents
- 1. User Manual
- 2. Users Manual Part 1
- 3. Users Manual Part 2
- 4. Users Manual Part 3
- 5. Users Manual Part 4
Users Manual Part 4

Smartphone User Manual
8.
Applications
Smartphone User Manual
8.
Applications
150
151
8.3 Using Tasks
A task is a personal or work-related project, assignment,
or errand to track through to completion. A task can occur
once, or it can recur. A recurring task can repeat at regular
intervals or repeat based on the date you mark the task
complete. For example, you might want to pay a bill on the
last Friday of every month, or get a haircut when one month
has passed since your last haircut.
The task list
The task list is your "things to do" list. When you create or
edit tasks with Outlook on your PC and then synchronize with
your phone, additional task information may display.
A task that has been marked as high priority is preceded by
an exclamation mark, and one marked as low priority by a
downward-pointing arrow. On color devices, overdue tasks
are displayed bold and red.

Smartphone User Manual
8.
Applications
Smartphone User Manual
8.
Applications
150
151
Note that if you synchronize tasks with your PC, completed
tasks are removed from your phone during synchroniza-
tion. They are then displayed in gray with a strikethrough
on your PC.
To create a new task:
• Select Tasks from the Start Menu. “Enter new task here”
is displayed. Press the Up navigational button to move
the focus to that eld, then enter the task name and press
the Action button.
To mark a task as Complete:
• Select Tasks from the Start Menu. Select the desired task
in the list (one whose checkbox is not checked) and then
press the Left Softkey (“Complete”).
To change a completed task to Incomplete:
• Select Tasks from the Start Menu. Select the desired task
in the list (one that has already been marked as Complete
with a checked checkbox) and then press the Left Softkey
(“Activate”).
To delete a task from the task list:
• Select Tasks from the Start Menu. Select the desired task
in the list and then select Delete from the menu.

Smartphone User Manual
8.
Applications
Smartphone User Manual
8.
Applications
152
153
8.4 Using Voice Notes
You can use Voice Notes to create and play short voice
recordings. Voice Notes are included in the All Notes list
and are named consecutively (Recording1, Recording2,
and so on).
To create a voice note:
1. Select Voice Notes from the Start menu. The All Notes
screen displays.
2. Press the Left Softkey (“Record”), or select Record from
the menu. Right after you do this, the recording process
begins, so be ready to start speaking into the phone
microphone immediately. A counter displays the number
of seconds elapsed during recording.
3. Press the Left Softkey (“Stop”) to stop recording a
voice note. The voice note is saved (to \Storage\My
Documents\Notes), and appears in the All Notes list
of Voice Notes. By default, the rst recording is named
Recording1.
To rename, play, or delete a voice note:
• Select the desired Voice Note le, then select either
Rename, Play, or Delete from the menu.
If you delete a voice note that has a default name, such as
Recording1, this name becomes available for a new voice
note that you create.
NOTES:
• Voice Note les will be shown as thumbnails in the Album
(Camera Wizard) application, and you can play them as
you would any other audio le while in Album mode.
• You can also record a new voice note using the Album
application. While in Thumbnail View mode, select New
> Voice Note from the menu.
Smartphone User Manual
8.
Applications
Smartphone User Manual
8.
Applications
152
153
8.5 Using Windows Media Player
Using Windows Media Player 7.0 or later, you can play Win-
dows Media audio and video les and MP3 audio les on your
phone. You can also copy digital music and video directly
from your PC to your phone by using either Windows Media
Player or Microsoft ActiveSync. For more information about
copying les using Windows Media Player, see Media Player
Help on your PC. For more information about copying les
using ActiveSync, see ActiveSync Help on your PC.
Invoking Media Player and playing a le
When in the Home screen, open the Start menu and select
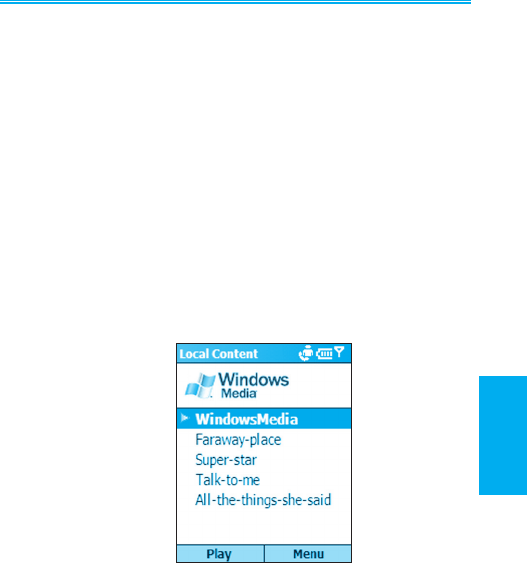
Windows Media. The initial Media Player screen will dis-
play a Playlist. The gure below lists some sample MP3
audio les.
By default, les of the supported letypes residing locally in
the phone are listed. Select the le you want to play, then
press the Action button or the Left Softkey (“Play”). Or, open
the menu to display a “Favorites” list, open a URL, view data
about the selected le, customize settings, or delete the le
(see table on next page).

Smartphone User Manual
8.
Applications
Smartphone User Manual
8.
Applications
154
155
When playback of an audio or video le is in progress, the
menu contains the following options:
Option Function
Play/Pause Play or pause playback of the cur-
rent le.
Next Skip to the next le in the current play
list and start playing it. This command
is not available if the last le is the cur-
rent selection.
Previous Skip to the previous le in the play list.
If a le is currently being played, it will
start re-playing from the beginning.
Full Screen If the le currently being played is a
video le, this option utilizes the en-
tire phone screen to display the video.
This command is not available during
audio le playback.
Open URL Play a streaming media le on a net-
work (for example, content streamed
from an Internet radio station.)
Properties Displays information about the se-
lected le, such as le name, duration,
location, bit rate, and audio codec.
Settings Opens the Settings screen, in which
you can adjust the volume and specify
various playback options.
Add to Favorites Adds the le that is playing to your
Favorites playlist.
Smartphone User Manual
8.
Applications
Smartphone User Manual
8.
Applications
154
155
Selecting Settings on the menu opens a screen that lets
you:
• Adjust the volume. Press the Right navigational button
to increase the volume , up to a maximum of 10. Press
the Left button to decrease volume; 0 is silent.
• Specify whether or not to utilize the full phone screen
during playback of video les using Media Player.
• Select Repeat if you want Media Player to automatically
repeat playback of a le as soon as it nishes playing.
• Select Shufe if you want Media Player to randomly select
the next le to play from the current playlist.
• Select Background Play if you want les to continue
playing while you use another program.
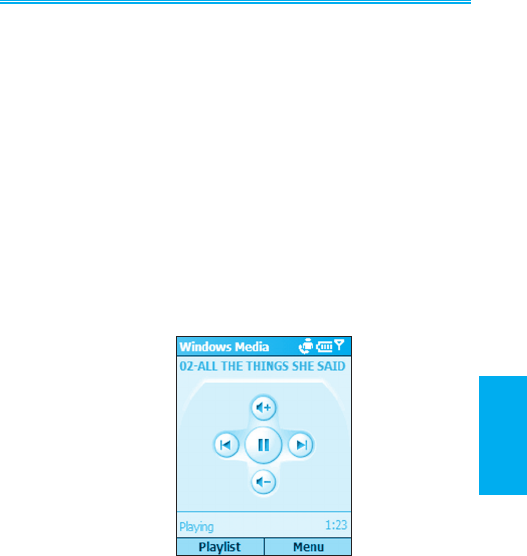
As shown in the gure above, the amount of time elapsed
during playback is displayed. In this screen, you can press
the Up navigational button to increase volume, or press
Down to decrease volume. Press the Right navigational
button to start playing the next sequential le, or press Left
to play the previous le. Press the Action button to Pause
or Play.

Smartphone User Manual
8.
Applications
Smartphone User Manual
8.
Applications
156
157
To play a streaming media le on a network, open the
menu in the Windows Media Player screen, then select Open
URL. In the Open URL screen, enter the desired Web page
address. Press the Left Softkey (“Play”) to play.
To add a streaming media le to Favorites, simply open
the menu while it is playing, and select Add to Favorites.
To access your Favorites list, select Favorites from the menu
in the Media Player window. To delete a le from Favorites,
select the le and then select Delete from the menu. To play
a le, select Play.
Supported le formats
Windows Media Player supports the MP3 (.mp3) le format,
as well as Windows Media les with the following extensions:
.asf, .asx, .wax, .wm, .wma, .wmv, .wmx, .wvx.
Supported audio and video codecs
Media Player can play les that have been compressed by
using any of the following audio and video codecs.
1 Audio codecs:
a. Microsoft Windows Media Audio codec version 2.0,
7.0, 8.0, and 9.0.
b. Fraunhofer IIS-A MPEG-1 Audio Layer-3 codec.
2 Video codecs:
a. Microsoft Windows Media Video codec version 7.0,
8.0, and 9.0.
b. Microsoft MPEG-4 video codec version 3.0.
c. ISO MPEG-4 video codec version 1.0.

Smartphone User Manual
8.
Applications
Smartphone User Manual
8.
Applications
156
157
Understanding licenses
Some digital media content from the Internet, CD tracks,
and videos have associated licenses that protect them from
being unlawfully distributed or shared.
Licenses are managed and created using digital rights
management (DRM), which is the technology for secur-
ing content and managing the rights for its access. Some
licenses prevent you from playing content that is copied to
your phone.
To ensure that the license is copied with the content, use
the Portable Device (or Copy to CD or Device) feature
in Windows Media Player 7.0 or later on your PC to copy
content to your phone. For more information about copying
content to your phone and other portable devices, see the
Windows Media Player Help on your PC.

Smartphone User Manual
8.
Applications
Smartphone User Manual
8.
Applications
158
159
8.6 Using Calculator
Calculator performs basic arithmetic, such as addition,
subtraction, multiplication, and division.
To perform a calculation:
1. When in the Home screen, select Accessories from the
Start menu.
2. Select Calculator.
3. Enter the rst number of the formula using the keypad.
4. Press the Right Softkey (“Options”). From the menu
select the type of calculation to perform: Add, Subtract,
Multiply, Divide, or Decimal Point.
NOTES:
• A decimal point can also be inserted conveniently by
pressing the asterisk (*) key on your keypad.
• In addition, you can scroll through the available
mathematical symbols by pressing the # key until the
symbol you want is displayed (instead of selecting from
the menu).
• Or, you can use the navigation pad to select a
mathematical symbol as follows: Press the Up button
for the plus sign (+); Down for the minus sign (-); Left
for the division sign (/); and Right for the multiplication
sign (X).
5. Enter the second number of the formula using the
keypad.
6. Open the Options menu again and select Equals, or press
the Action button.
To clear a displayed number or calculation, press the
Left softkey (“Clear”).
To clear the last digit entered, press your phone’s Back
button.
Smartphone User Manual
8.
Applications
Smartphone User Manual
8.
Applications
158
159
8.7 Using Java MIDlet Manager
Your phone supports Java 2 Edition, J2ME. The Java MIDlet
Manager (JMM) allows you to download Java applications
such as games and tools specically designed for mobile
phones. You will nd that some Java applications and games
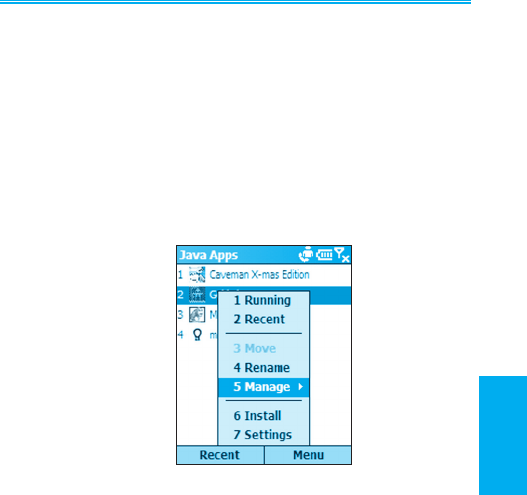
may have already been installed on your phone. When you
select MIDlet Manager from the Start menu in the Home
screen, a screen similar to the example shown below will
appear. This gure also shows the main menu.
The Java MIDlet Manager gives you the exibility of install-
ing and managing additional J2ME applications from the
Internet.

Smartphone User Manual
8.
Applications
Smartphone User Manual
8.
Applications
160
161
Downloading Java games and utilities
To install, run, and manage MIDlet programs (MIDlets) on
your phone, you have to rst download the MIDlet directly
to your device from your desktop or notebook PC.
To download and install MIDlets directly from the In-
ternet:
1. Connect to the Internet and select a MIDlet you wish to
download. (Download both the .jad le and related .jar
le.)
2. Conrm that you wish to download the relevant les before
the download begins. Once the download is complete,
the Java MIDlet Manager automatically starts and prompts
you to install your new MIDlet.
To download MIDlets from the Internet on your PC:
1. Make sure that your phone is synchronized to your PC.
Using your Internet Explorer, go to www.midlet.org or
any site that provides MIDlets for download.
2. Choose the game or utility you want to install, download
it, and save it to your hard drive.
3. Click on the le and move it to your phone, to Mobile
Device\phone\Storage\My Documents.
To install MIDlets on your phone from your PC:
1. Click on Install in the MIDlet Manager menu.
2. Choose a MIDlet available from the Install screen. Select
a MIDlet by moving up/down using the navigation pad, or
by pressing the related number on the keypad.

Smartphone User Manual
8.
Applications
Smartphone User Manual
8.
Applications
160
161
Uninstalling and re-installing MIDlets
To Uninstall
In the Java Apps screen (an example was shown in the pre-
vious gure), use the navigation pad to highlight the MIDlet
you want to uninstall, then select Manage from the menu.
Select Uninstall from the Manage submenu. You will be
asked to conrm your selection.
To Re-install:
In the Java Apps screen, select Install from the menu to ac-
cess the Install screen. Use the navigation pad to highlight
the MIDlet you want to re-install, then select Install from the
menu in the Install screen.
Running MIDlets
To run a MIDlet, go to the Java Apps screen and select
the required MIDlet using the navigation pad or the related
number on the keypad. Consult the content provider on
how to use the game or utility you have installed. Some
MIDlets have an Exit or Stop command within their menu
structure. The content providers determine the location of
this command.

Smartphone User Manual
8.
Applications
Smartphone User Manual
8.
Applications
162
163
Other menus and commands
Some of the other functions available include:
Settings
Select Settings from the menu to access these options:
Display Options — Allows you to adapt the way the MIDlet
manager displays information. Sort Options allows you
to choose whether you view your MIDlets in groups or as
a list. View Options allows you to determine how lists of
MIDlets are ordered.
System Info — Displays information about the total
storage space for MIDlets, the amount currently used
and the amount currently available.
About Java MIDlet Manager — Displays version
information.
Choose Network Type — Opens the Select Service
screen and enables you to choose your connection.
Rename
Select the MIDlet you want to rename, then enter the new
name for that MIDlet in the dialog box.
Running
Lists the MIDlet(s) currently running on your phone.
Recent
Lists the most recently run MIDlets (maximum of nine can
be listed).
Move
Lets you move the selected item into a different group.

Smartphone User Manual
8.
Applications
Smartphone User Manual
8.
Applications
162
163
Manage > Upgrade
You may be able to upgrade certain MIDlets using a network
connection. The availability of this feature is determined by
MIDlet manufacturers/distibutors and their licensing arrange-
ments. You must be connected to an appropriate network for
this feature to be available, for example a corporate intranet
or the Internet.
Manage > Uninstall
Deletes the selected MIDlet from your phone’s memory.
Ensure that the MIDlet you want to select is not running.
Also note that you cannot uninstall a MIDlet individually
from a MIDlet suite. You must uninstall the complete MID-
let suite.
Smartphone User Manual
8.
Applications
Smartphone User Manual
8.
Applications
164
165
8.8 Games
Jawbreaker
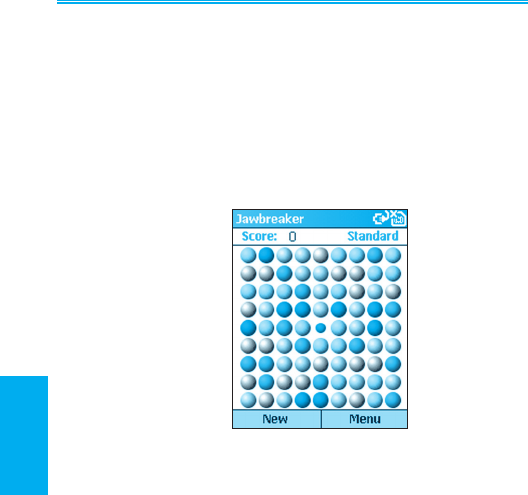
The object of Jawbreaker is to clear out all the balls. The
rule is that you may only clear out adjacent same-colored
balls. The score depends on the number of the balls you
clear out at every move.
To start a game of Jawbreaker, select Games from the
Start menu, then select Jawbreaker. To start a new game,
press the Left Softkey, or select New Game from the menu.
The menu also lets you view Statistics or set Options.
To score, navigate to the ball you want to clear and press
the Action button.
Score equation: S = B * (B-1)
S: Score per move
B: Number of balls you clear out
For example, you score 30 points for clearing out 6 balls
at one move.
Smartphone User Manual
8.
Applications
Smartphone User Manual
8.
Applications
164
165
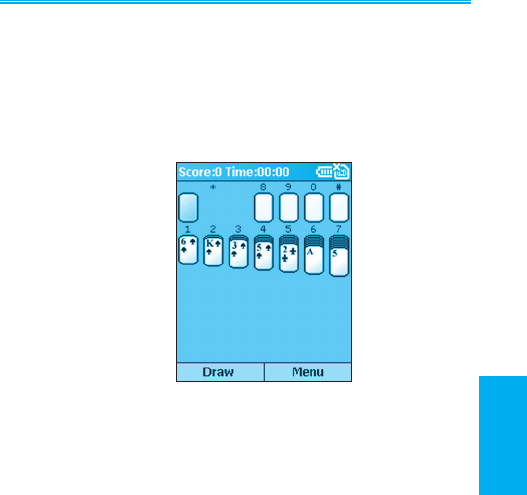
Solitaire
The object of Solitaire is to use all the cards in the deck to
build up the four suit stacks in ascending order, beginning
with the aces. You win the game when all cards are on the
suit stacks.
To start a game of Solitaire, select Games from the Start
menu, then select Solitaire. To start a new game, select
New Game from the menu.
To play Solitaire:
• Move any aces on the seven stacks to the four card spaces
at the top of the screen, and then make any other available
plays.
• When you have made all available plays, press the Draw
soft key to turn over cards.
The card that is face up on the deck is always available
for play.

Smartphone User Manual
8.
Applications
166
To move cards:
A number or character is displayed above each card
stack. On the keypad, press the number or character of
the card to move, and then press the number or character
of the stack to which you want to move the card.
Pressing the Up navigational button moves a card to one
of the four stacks in the upper right corner of the screen if
it belongs there. For example, if an ace appears in one
of the lower stacks, press the number above it, and then
press the Up navigational button.
Chapter 9
Maintaining Your
Phone
9.1 Adding and removing programs
9.2 File Manager
9.3 Task Manager
9.4 Space Maker

Smartphone User Manual
9. System
Maintenance
168
Smartphone User Manual
9. System
Maintenance
169
9.1 Adding and removing
programs
You can use Add/Remove Programs on the Tools Menu of
Microsoft ActiveSync to add and remove programs. If you are
connected via ActiveSync (see Chapter 7), and the program
you want to install has an installer le that can be executed
from the PC, installation will be performed automatically
when you invoke the Installer le on your PC.
If the program installation is done via a CAB le, copy
the CAB le to the \Storage\My Documents folder of your
phone. Then select it in File Manager (explained on the
next page) and press the Action button; it will then install
automatically.
If you do install additional programs into your phone, and then
want to remove one or more of those programs, another way
to do so (besides Add/Remove Programs in ActiveSync) is
to select Settings from the Start Menu, and then Remove
Programs. All of the programs you’ve installed yourself
will be listed in the Remove Programs screen. Select the
program you want to delete, then press the Right Softkey
to open the menu and select Remove.
NOTE: When you use the Clear Storage utility to reset
all of your phone settings back to the manufacturer default
values, this will also erase all of your data.
Smartphone User Manual
9. System
Maintenance
168
Smartphone User Manual
9. System
Maintenance
169
9.2 File Manager
File Manager provides many easy-to-use features for le
and folder management. It operates in either of two major
views, with a separate menu of commands for each view.
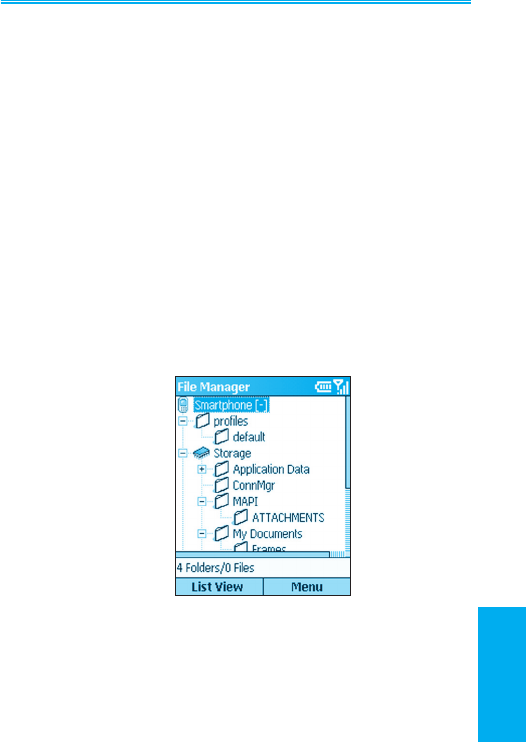
Tree View displays the entire le structure in the phone’s
memory. The functions in Tree View primarily focus on folder
management.
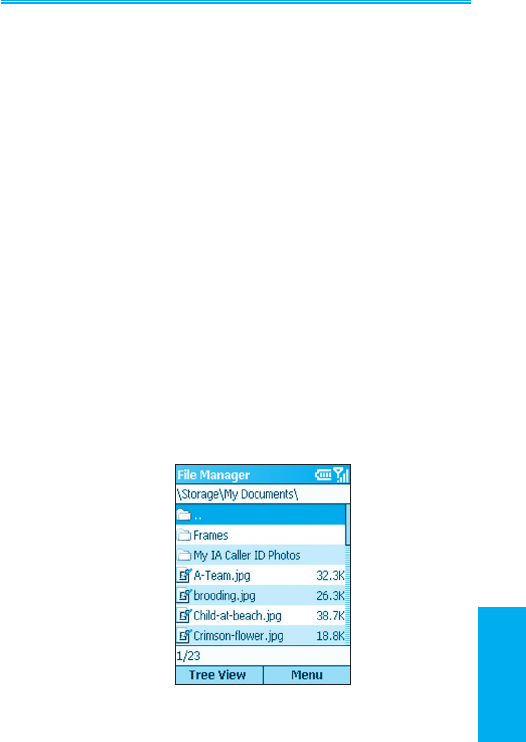
List View displays the details of the selected folder (its sub-
folders and les). The functions in List View are basically
le-oriented.
Tree view
When initially invoked, File Manager is in Tree View by
default. An example is illustrated below.

Smartphone User Manual
9. System
Maintenance
170
Smartphone User Manual
9. System
Maintenance
171
Menu Commands in Tree View
Folder
Selecting Folder opens a submenu that lets you create a
New Folder which will be a subfolder under the current
folder; or Rename, Copy, or Move the currently selected
folder.
Find
This command lets you search for les according to lename
and/or text content. First select the folder where you want the
search to be executed, then select Find. The Find screen
will open. In it, enter part or all of a lename (if you wish
to search by name), and/or enter a text string (if you wish
to search for all les containing that string). You can also
specify the folder to be searched. If any matches are found,
the Find Result screen will open.
Go To
Allows you to switch to other folders conveniently. Shortcut:
press G (the 4 key on the phone keypad) when the menu
is not open.
Delete
Allows you to delete an entire folder and all of its contents.
Shortcut: press D (the 3 key on the phone keypad) when
the menu is not open. To delete individual les, use Delete
on the menu when in List View.
Refresh
Re-paints the Tree View to reect the actual current contents
in memory. You can also press the asterisk (*) shortcut key
to update the screen.
Properties
Displays data related to the selected folder. (If you wish to
view information about an individual le, use the Properties
command in List View.)
Smartphone User Manual
9. System
Maintenance
170
Smartphone User Manual
9. System
Maintenance
171
Options
The Options screen contains several checkboxes that allow
you to customize certain behaviors of File Manager. For
example, you can choose to use a small font, show or hide
le extensions, show or hide les in ROM, etc. Select Reset
Default (on the menu in the Options screen) if you ever want
to reset all options to the default behavior.
System Info
The System Info screen displays useful information about
Battery power, Memory usage, Flash and Device data.
List view
If in Tree View, press the Left Softkey to switch to List View.
If the currently selected folder in Tree View contains no
subfolders, pressing the Action button will also switch to
List View. (If the selected folder in Tree View does have
subfolders, pressing the Action button expands or collapses
the tree for that folder.)

Smartphone User Manual
9. System
Maintenance
172
Smartphone User Manual
9. System
Maintenance
173
Menu Commands in List View
You can perform many additional le management func-
tions using the commands on the menu when in List View,
as follows:
File
Selecting File opens a submenu that lets you create a New
Folder which will be a subfolder under the current folder; or
Rename, Copy, Move, or Duplicate the currently selected
le(s).
Selecting Associate on the File submenu allows you to as-
sociate all les that have the same extension as the selected
le with a specic application program. Then whenever you
select a le of the associated letype, it will open using the
application you specied.
Even if a particular letype is already associated with a
particular application, you can perform a one-time override
of that default association using the Open With command
on the File submenu. It allows you to select a le, and then
individually select the application that you want to open the
le with.
Create Shortcut on the File submenu enables you to create
a shortcut for a le and place it in any folder. First select
the le for which you want to create a shortcut, then select
Create Shortcut and select the folder where you want it
to be placed.
Zip Extraction
This command lets you “unzip” (extract) ZIP les that you
may have received into your phone via ActiveSync, infrared
beaming, E-mail, etc. First, select the desired le (lename
must have an extension of .zip). Then select Zip Extrac-
tion. This opens a submenu containing the Contents and
Extract Here commands.

Smartphone User Manual
9. System
Maintenance
172
Smartphone User Manual
9. System
Maintenance
173
Select Extract Here from the submenu if you just want to
extract all the les immediately and place them in the cur-
rent folder.
Selecting Contents from the submenu will list all the les
contained in the selected ZIP le. In the screen listing the
individual les, you can open a menu containing several
options. Among them are
Extract To — If you don’t want all les in the list to be
extracted, you can rst select only the les you want.
Then select the folder/subfolder where you want to place
the extracted les and press the Left Softkey (“Extract”).
Integrity Test — This command checks to see if the data
contained in all of the individual les (contained in the
current ZIP le) is correct.
View — This command is available when only one individual
le or one folder is selected. If an individual le within the
ZIP le is selected, then the View command invokes the
application associated with that letype and displays the
le. If the ZIP le contains folders, and one of the folders
within the ZIP le is selected, then the View command
will open the folder and display a list of the les within
it. A “plus sign” (+) will be shown in front of encrypted
items in a ZIP le.
Selection
The next command on the main menu in List View (after the
Zip Extraction command) is Selection. It opens a submenu
that lets you Go to Top, Go to End, Select All, Select None,
Invert Select, or enable Select Multiple if you want to select
more than one item in the list. In the Select Multiple screen,
the menu offers additional options to select only the folders
in the list, or only the les in the list.
Sort By
Lets you sort the items in the list by Name, Size, or Date,
in either Ascending or Descending order.

Smartphone User Manual
9. System
Maintenance
174
Smartphone User Manual
9. System
Maintenance
175
Send
This command opens a submenu containing two com-
mands:
Send via E-mail — Only one le can be E-mailed at a
time. (If multiple les are selected, this command will be
disabled.) First, select the le you want to E-mail, then
select this command. The Compose New screen will open
with the selected le already attached.
Send via Infrared — First, select one or more les that you
want to send, or an entire folder, then select this command.
In the Send Data screen that opens, press the Left Softkey
(“Beam”) to start beaming. After the les have nished
being sent, you can beam them again to another device,
if desired, by pressing the Left Softkey again (“Restart”).
Run
If the currently selected le is an executable program le,
selecting Run will invoke that application. Or, if you have
used the Associate command on the File submenu to as-
sociate a particular letype with a particular application,
selecting Run (when a le of that letype is selected) will
start the associated application. The Action button is the
shortcut key for this command.
Delete
Select the le or folder you want to delete, then select Delete
on the menu (or press D on your phone’s keypad when the
menu is not open).
Refresh
When you select Refresh from the menu, or press the
asterisk (*) shortcut key on your keypad when the menu
is closed, the contents of the List View will be re-painted to
reect the actual current contents in memory.

Smartphone User Manual
9. System
Maintenance
174
Smartphone User Manual
9. System
Maintenance
175
Properties
If a le or folder is selected in the list at the time you select
Properties from the main List View menu, the Properties
screen will display related information. Also, in the bottom
portion of the screen, you can change some attributes of the
le or folder, and view others. (This command is disabled if
multiple les/folders are disabled.)
Options
The Options screen is the same one you can access from
the menu in Tree View. It contains several checkboxes that
allow you to customize certain behaviors of File Manager.
For example, you can choose to use a small font, show or
hide le extensions, show or hide les in ROM, etc. Select
Reset Default (on the menu in the Options screen) if you ever
want to reset all options to the default behavior.
Smartphone User Manual
9. System
Maintenance
176
Smartphone User Manual
9. System
Maintenance
177
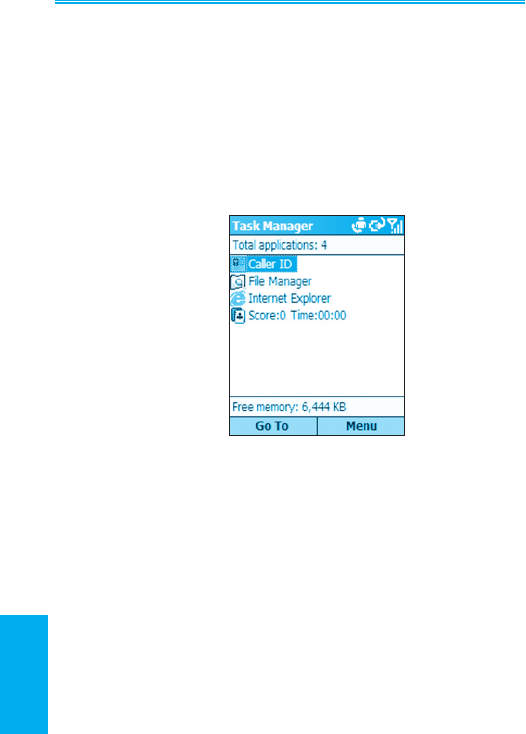
9.3 Task Manager
Task Manager lists all the tasks/applications currently
running on your phone. You can then easily switch to and
activate any currently running task, terminate any tasks, and
view free memory/battery information.
When Task Manager is initially invoked, it lists all tasks/
applications that are currently running in the memory of your
phone. An example is illustrated below.
Menu Commands
Go To
This command activates the selected application/task. First,
select the application in the list that you want to use. Then
select Go To from the menu, or press the Action button, to
switch to that application and make it the active task. (You
can also use the Left Softkey to activate a task if the menu
is not open.)
Refresh
Selecting the Refresh command, or pressing the asterisk
(*) key on the phone keypad, will update and repaint the list
of currently running tasks.
Smartphone User Manual
9. System
Maintenance
176
Smartphone User Manual
9. System
Maintenance
177
Stop
The Stop command (or the 7 key on the phone keypad if
the menu is not open) stops the selected application. If for
any reason the task cannot be terminated, a message will
inform you of such. After you have stopped an application,
the amount of Free Memory (shown near the bottom of the
screen) is updated.
Stop All
Selecting Stop All, (or pressing the 2 key if the menu is not
open), tells Task Manager to try to stop all the listed applica-
tions. A message will ask you to conrm that you want to
terminate all currently running applications. Press the Left
Softkey (“OK”) to conrm.
Stop All But Selected
First select the one task in the list that you do not want to stop.
Then select Stop All But Selected. All other running tasks
will then be terminated, except the one you selected.
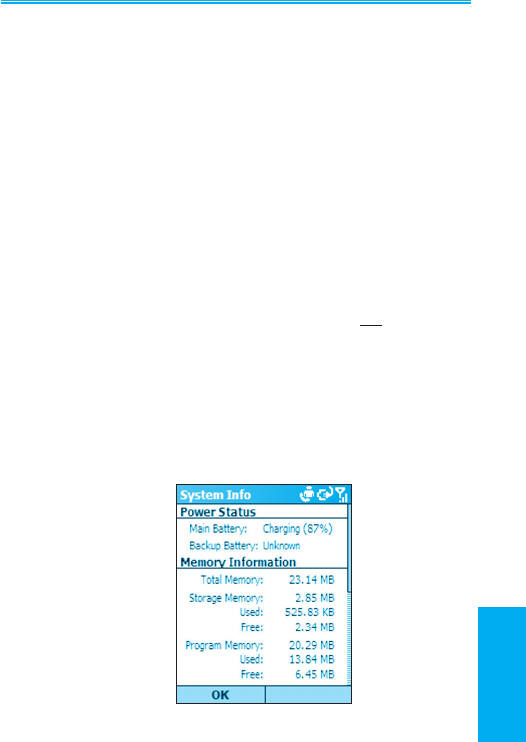
System Info
Select System Info to view details concerning your Power/
Battery, Memory, Flash, and Device information. The il-
lustration below shows the upper half of a sample System
Info screen.
Smartphone User Manual
9. System
Maintenance
178
Smartphone User Manual
9. System
Maintenance
179
9.4 Space Maker
Your phone has a built-in, unremovable default storage card.
The nomenclature of the card is hardware-dependent (in
some phones it is known as “Flash” Storage). The phone
uses this card to store certain data, such as the data in your
Contacts, Tasks, Appointments (Calendar), and E-mail items.
There are times when free storage space might become low,
at which time you might want to delete any less-needed items
in order to free up space.
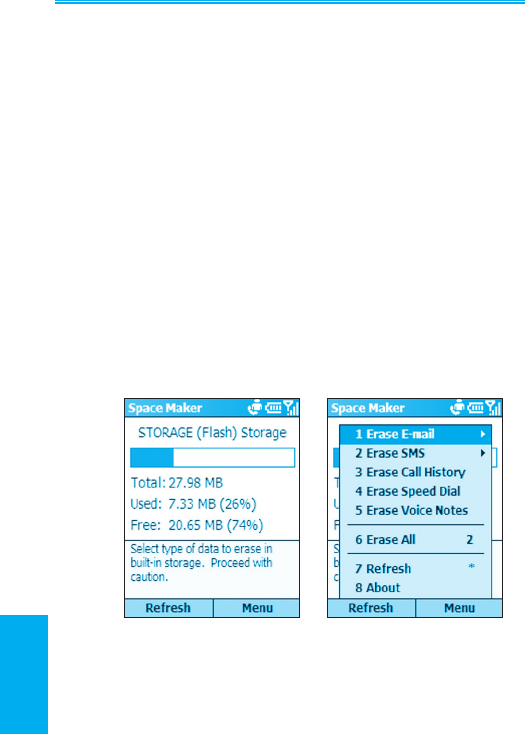
Space Maker makes it easy for you to delete specic cat-
egories of any unwanted data in Flash storage as you see t,
thereby letting you control the amount of space available.
The main Space Maker screen, shown below on the left,
displays the total amount of space available in your particular
built-in storage, the amount of space currently being occupied
by your data on the card (and percentage) and the amount
of space currently not being used (and percentage).
Keypad shortcuts: When the menu is not open, you can
press the 2 key to invoke the Erase All command, or press
the asterisk (*) key to update the storage usage data to reect
the current “Used” and “Free” amounts.

Smartphone User Manual
9. System
Maintenance
178
Smartphone User Manual
9. System
Maintenance
179
Menu Commands
Erase E-mail
Selecting Erase E-mail will open a submenu that gives you
the exibility to delete all E-mail; or only the E-mail marked
as “Read;” or only the E-mail in these individual folders:
Deleted Items, Drafts, Inbox, Outbox, or Sent Items.
Deleting All E-mail — Select All to delete all E-mail in all
folders. All attachments will also be deleted. Note that
SMS and MMS messages will not be deleted. (If you wish
to delete SMS messages in your Inbox, use the Erase SMS
command described on the next page.)
After you select All from the submenu, a conrmation screen
will appear. It displays the number of E-mailings that will
be deleted, and the amount of space currently being used
by those E-mailings which will be “freed up” in your Flash
storage after the command has executed. Press the Left
Softkey to Conrm, or the Right Softkey to Cancel.
After the “Delete All E-mail” operation has nished, all E-mail
will be deleted from the phone. Therefore, the next time you
synchronize after deleting, your E-mail will be out-of-sync,
since it will be gone from the phone but will still exist on your
PC. If you want E-mail to be synchronized on both phone
and PC, rst delete your current partnership and then create
a new partnership.
Deleting Individual Categories of E-mail — Likewise, you
can select one of the following commands from the submenu
to delete only the E-mail in those categories: Read (deletes
all E-mail marked as “Read”); Deleted Items; Drafts; Inbox;
Outbox; and/or Sent Items. In each case, a screen will
open which displays the number of items in that category,
and the total space being used by those items (similar to the
example illustrated on the next page).
Smartphone User Manual
9. System
Maintenance
180
Smartphone User Manual
9. System
Maintenance
181
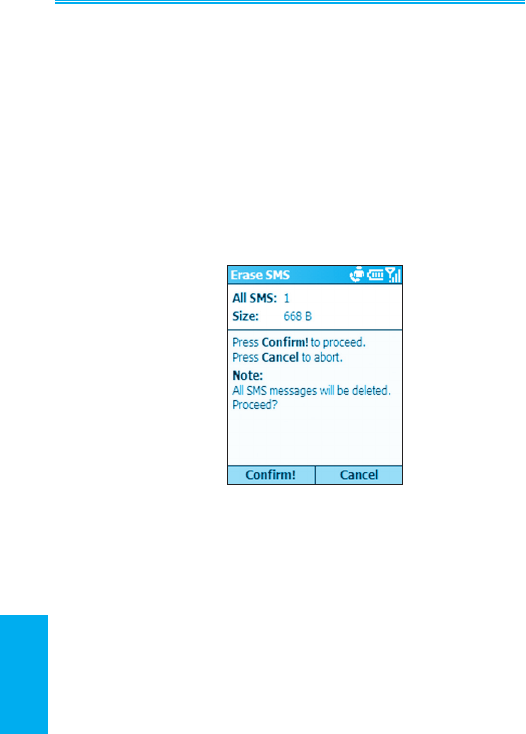
Erase SMS
The Erase SMS command opens a submenu that gives you
a choice of deleting all SMS (Short Message Service) mes-
sages, or only the messages marked as “Read.” Whether
you select All or Read from the submenu, a conrmation
screen will appear and display the number of SMS mes-
sages that will be deleted, as well as the amount of space
being used by those SMS messages. An example is shown
below. Press the Left Softkey (“Conrm”) to delete. You will
then be returned to the main Space Maker screen illustrated
earlier, and the new total “Used” and “Free” storage amounts
will be displayed.
Erase Call History
To delete all Call History data, select Erase Call History on
the menu. A conrmation screen will display the number of
Call History records that will be deleted, and the amount of
space currently being used by those records (similar to the
screen shown above). Press the Left Softkey to Conrm
that you want to delete all Call History records, or the Right
Softkey to Cancel.
Smartphone User Manual
9. System
Maintenance
180
Smartphone User Manual
9. System
Maintenance
181
Erase Speed Dial
To delete all Speed Dial entries, select Erase Speed Dial
on the menu. A conrmation screen will display the number
of Speed Dial records that will be deleted, and the amount
of space currently being used by that data. Press the Left
Softkey to delete, or the Right Softkey to cancel.
Erase Voice Notes
This command deletes all voice recordings you have cre-
ated and stored in Flash storage, using your phone’s Voice
Notes function. In the conrmation screen, press the Left
Softkey to delete.
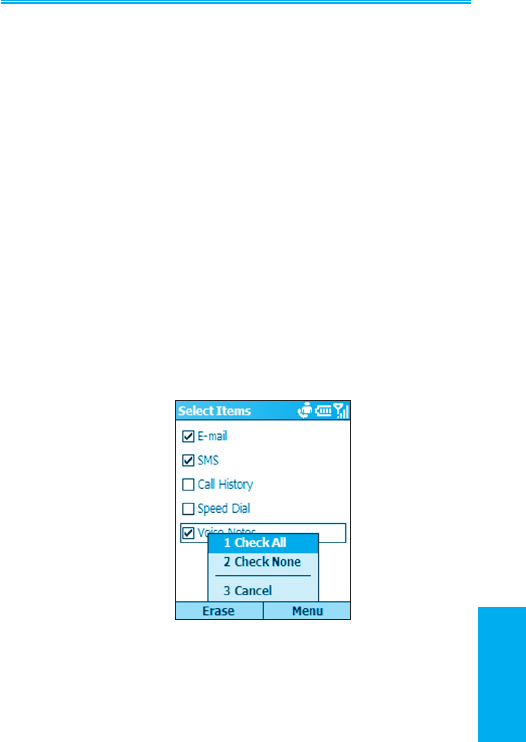
Erase All
When you select the Erase All command from the menu (or
press 2 on your phone’s keypad when the menu is not open),
the screen shown below opens. It allows you to conveniently
select multiple categories of data that you want to delete
(rather than deleting categories of data one-by-one using
the individual commands on the main menu).
After checking the desired checkboxes, press the Left
Softkey to begin the Erase process. You will still be given
an opportunity to conrm the deletion of each category
individually.

Smartphone User Manual
9. System
Maintenance
182
Refresh
Selecting Refresh on the menu, or pressing the asterisk
(*) shortcut key, or the Left Softkey in the main screen,
updates and re-displays the amounts of Used Storage and
Free Storage.
Whenever you use any of the “Erase” commands on the
menu, the Refresh operation will be performed automati-
cally to show you the new storage amounts resulting from
the deletion.
Appendix
Regulatory Notices
Troubleshooting
Specications
Index

Smartphone User Manual
Appendix
Smartphone User Manual
Appendix
184
185
Regulatory Notices
Agency Identication Numbers
For regulatory identication purposes, your product is as-
signed a model number of ST20A. The Battery Pack has
been assigned a model number of ST26A.
To ensure continued reliable and safe operation of your
phone, use only the accessories listed below with your
ST20A.
NOTE: This product is intended to be used with a certied
class 2 limited power source, rated 5 volts DC, minimum
1A power supply unit.
European Union Notice
Products with CE marking comply with the R&TTE Directive
(99/5/EC), the EMC Directive (89/336/EEC) and the Low
Voltage Directive (73/23/EEC) issued by the Commission
of the European Community.
Compliance with these directives implies conformity to the
following European Norms (in brackets are the equivalent
international standards):
§ EN 60950 (IEC 60950) - Safety of Information Technology
Equipment.
§ETSI EN 301 489-7 - Electromagnetic compatibility
and Radio spectrum Matters (ERM); ElectroMagnetic
Compatibility (EMC) for radio equipment and services;
Part 7: Specific conditions for mobile and portable
radio and ancillary equipment of digital cellular radio
telecommunications systems (GSM and DCS).

Smartphone User Manual
Appendix
Smartphone User Manual
Appendix
184
185
§ETSI EN 301 511 – Global System for Mobile
communications (GSM); Harmonized standard for mobile
stations in the GSM 900 and DCS 1800 bands covering
essential requirements under article 3.2 of the R&TTE
directive (1999/5/EC).
§ANSI/IEEE C.95.1-1992- specific absorption rate in
mobile phone emission condition for body health.
§FCC part 15 - Radio Frequency Devices and part 24
– Personal Communications Services.
§EN 50360 - 2001– Product standard to demonstrate the
compliance of mobile phones with the basic restrictions
related to human exposure to electromagnetic elds (300
MHz – 3 GHz).
§SAR: FCC: (1g) 1900MHZ: Body 0.513 mW/g; Head
0.241 mW/g. CE: (10g) 900MHZ: Body 0.503 mW/g;
Head 0.183 mW/g. 1800MHZ: Body 0.619 mW/g; Head
0.297 mW/g.
§ETSI EN 301 489-1 Electromagnetic compatibility
and Radio spectrum Matters (ERM); ElectroMagnetic
Compatibility (EMC) standard for radio equipment and
services; Part 1: Common technical requirements.
§ETSI EN 301 489-17 Electromagnetic compatibility
and Radio spectrum Matters (ERM); ElectroMagnetic
Compatibility (EMC) standard for radio equipment
and services; Part 17: Specific conditions for 2.4
GHz wideband transmission systems and 5 GHz high
performance RLAN equipment.
§ETSI EN 300 328 Electromagnetic compatibility and
Radio spectrum Matters (ERM); Wideband Transmission
systems; data transmission equipment operating in the
2.4 GHz ISM band and using spread spectrum modulation
techniques.

Smartphone User Manual
Appendix
Smartphone User Manual
Appendix
186
187
Federal Communications Commission
Notice
This equipment has been tested and found to comply with
the limits for a Class B digital device, pursuant to Part 15
of the FCC Rules. These limits are designed to provide
reasonable protection against harmful interference in a
residential installation. This equipment generates, uses,
and can radiate radio frequency energy and, if not installed
and used in accordance with the instructions, may cause
harmful interference to radio communications. However,
there is no guarantee that interference will not occur in a
particular installation. If this equipment does cause harm-
ful interference to radio or TV reception, which can be
determined by turning the equipment on and off, the user
is encouraged to try to correct the interference by one or
more of the following measures:
• Reorient or relocate the receiving antenna.
• Increase the separation between the equipment and
receiver.
• Connect the equipment into an outlet on a
circuit different from that to which the receiver is
connected.
• Consult the dealer or an experienced radio or
television technician for help.
Modications
The FCC requires the user to be notied that any changes
or modications made to the device that are not expressly
approved by High Tech Computer Corporation may void
the user’s authority to operate the equipment.

Smartphone User Manual
Appendix
Smartphone User Manual
Appendix
186
187
Important Safety Information
Retain and follow all product safety and operating instruc-
tions. Observe all warnings on the product and in the
operating instructions.
To reduce the risk of bodily injury, electric shock, re, and
damage to the equipment, observe the following precau-
tions.
Safety Precautions for RF Exposure
Tests for SAR are conducted using standard operating
positions specied by the FCC with the phone transmitting
at its highest certied power level in all tested frequency
bands. Although the SAR is determined at the highest
certied power level, the actual SAR level of the phone
while operation can be well below the maximum value. This
is because the phone is designed to operate at multiple
power levels so as to use only the power required to reach
the network. In general, the closer you are to a wireless
base station antenna, the lower the power output. Before
a phone model is available for sale to the public, it must be
tested and certied to the FCC that it does not exceed the
limit established by the government-adopted requirement
for safe exposure. The tests are performed in positions
and locations (for example, at the ear and worn on the
body) as required by the FCC for each model. (Body-worn
measurements may differ among phone models, depending
upon available accessories and FCC requirements). For
body worn operation, to maintain compliance with FCC
RF exposure guidelines, use only original manufacturer
approved accessories. When carrying the phone while
it is on, use the specic original manufacturer supplied
or approved carrying case, holster, or other body-worn
accessory.

Smartphone User Manual
Appendix
Smartphone User Manual
Appendix
188
189
Use only original manufacturer-approved accessories,
or accessories that do not contain any metal: Use of
non-original manufacturer-approved accessories may
violate FCC RF exposure guidelines and should be
avoided.
Heed service markings: Except as explained elsewhere
in the Operating or Service documentation, do not service
any product yourself. Service needed on components in-
side these compartments should be done by an authorized
service technician or provider.
Damage requiring service: Unplug the product from the
electrical outlet and refer servicing to an authorized service
technician or provider under the following conditions:
• Liquid has been spilled or an object has fallen into
the product.
•The product has been exposed to rain or water.
•The product has been dropped or damaged.
•There are noticeable signs of overheating.
•The product does not operate normally when you
follow the operating instructions.
Avoid hot areas: The product should be placed away from
heat sources such as radiators, heat registers, stoves, or
other products (including ampliers) that produce heat.
Avoid wet areas: Never use the product in a wet loca-
tion.
Avoid pushing objects into product: Never push objects
of any kind into cabinet slots or other openings in the prod-
uct. Slots and openings are provided for ventilation. These
openings must not be blocked or covered.

Smartphone User Manual
Appendix
Smartphone User Manual
Appendix
188
189
Mounting Accessories: Do not use the product on an
unstable table, cart, stand, tripod, or bracket. Any mounting
of the product should follow the manufacturer’s instructions,
and should use a mounting accessory recommended by
the manufacturer.
Avoid unstable mounting: Do not place the product with
an unstable base.
Use product with approved equipment: This product
should be used only with personal computers and options
identied as suitable for use with your equipment.
Adjust the volume: Turn down the volume before using
headphones or other audio devices.
Cleaning: Unplug the product from the wall outlet before
cleaning. Do not use liquid cleaners or aerosol cleaners.
Use a slightly damp cloth for cleaning, but NEVER use water
to clean an LCD screen.
Safety Precautions for Power Supply
Unit
Use the correct external power source: A product should
be operated only from the type of power source indicated
on the electrical ratings label. If you are not sure of the
type of power source required, consult your authorized
service provider or local power company. For a product
that operates from battery power or other sources, refer to
the operating instructions that are included with the product.
Handle battery packs carefully: This product contains
a Lithium ion battery. There is a risk of re and burns
if the battery pack is handled improperly. Do not attempt
to open or service the battery pack. Do not disassemble,
crush, puncture, short external contacts or circuits, dispose
of in re or water, or expose a battery pack to temperatures
higher than 60°C (140°F).

Smartphone User Manual
Appendix
Smartphone User Manual
Appendix
190
191
Exposure to Radio Frequency (RF)
Signals
Your wireless phone is a radio transmitter and receiver. It
is designed and manufactured not to exceed the emission
limits for exposure to radio frequency (RF) energy set by the
Federal Communications Commission of the U.S. Govern-
ment. These limits are part of comprehensive guidelines
and establish permitted levels of RF energy for the gen-
eral population. The guidelines are based on the safety
standards previously set by both U.S. and international
standards bodies:
• American National Standards Institute (ANSI) IEEE.
C95.1-1992
• National Council on Radiation Protection and Measure-
ment (NCRP). Report 86. 1986
• International Commission on Non-Ionizing Radiation
Protection (ICNIRP) 1996
• Ministry of Health (Canada), Safety Code 6. The standards
include a substantial safety margin designed to assure the
safety of all persons, regardless of age and health.
Smartphone User Manual
Appendix
Smartphone User Manual
Appendix
190
191
The exposure standard for wireless mobile phones employs
a unit of measurement known as the Specic Absorption
Rate, or SAR. The SAR limit set by the FCC is 1.6W/kg.
In the U.S. and Canada, the SAR limit for mobile phones
used by the public is 1.6 Watts/kg (W/kg) averaged over
one gram of tissue. The standard incorporates a substantial
margin of safety to give additional protection for the public
and to account for any variations in usage. Normal condi-
tions only ensure the radiative performance and safety of the
interference. As with other mobile radio transmitting equip-
ment, users are advised that for satisfactory operation of the
equipment and for the safety of personnel, it is recommended
that no part of the human body be allowed to come too close
to the antenna during operation of the equipment.
Your phone contains a lithium-ion battery pack.
There is a risk of re and burns if the battery pack
is handled improperly. Do not disassemble, crush,
puncture, short external contacts, or dispose of in
re or water. Do not attempt to open or service the
battery pack. Replace only with the battery pack
designated for this product. Recycle or dispose of
batteries properly. Do not discard with your regular
trash.

Smartphone User Manual
Appendix
Smartphone User Manual
Appendix
192
193
Safety Precautions
SAFETY IN AIRCRAFT: This product can cause
interference to an aircraft's navigation system and
network. In most countries it is against the law to
use this product on board an airplane.
ENVIRONMENTAL SAFETY: Do not use this
product in gas stations, fuel stores, chemical plants
and locations containing explosives.
ROAD SAFETY: Vehicle drivers in motion are not
permitted to use handheld telephony services, except
in emergency. In some countries, using hands-free
devices as an alternative is allowed.
MEDICAL EQUIPMENT SAFETY: This product
may cause medical equipment malfunction. In most
hospitals or medical centers use of this product is
forbidden.
Other tips and cautions
• Avoid using the product near metal structures (for
example, the steel frame of a building).
• Avoid using the product near strong electromagnetic
sources, such as microwave ovens, sound speakers,
TV and radio.
• Avoid using this product after a dramatic change in
temperature.

Smartphone User Manual
Appendix
Smartphone User Manual
Appendix
192
193
Troubleshooting
If you encounter a problem with your phone, please review
the list below to try and nd your problem. If still having prob-
lems, please contact Technical Support or your dealer.
Problem
n My phone's screen is
blank.
n My phone does not
make any sound
or vibrate when the
phone rings or alarms
occur.
n My phone operation
has become very
slow.
n A “battery low”
warning message
pops up on the
screen.
Solution
• Your phone is designed by default
to switch to a screen saver. To
turn it on, press any key.
• Your battery may be run down.
Charge the battery immediately.
• Check the Sounds settings by
selecting Settings > Sounds
from the Start menu.
• Select Calendar from the Start
menu and then select Options
from the Calendar menu to see if
Set Reminders is activated.
You may have opened too many
programs. To release the operation
load, you can terminate unneeded
programs using the Task Manager
utility (see Chapter 9).
Plug the AC power into your phone to
charge it.

Smartphone User Manual
Appendix
Smartphone User Manual
Appendix
194
195
Problem
n Viewing my incoming
messages.
n A warning message
about “Running out of
memory” pops up on
the screen.
n I cannot open an
image or video le.
n The image appears
dark when using the
camera.
Solution
Select Messaging from the Start
menu, then select either Media
Messages (for MMS), Text
Messages (for SMS), or Outlook
E-Mail.
Some ways to create space on your
phone are:
• Delete any unnecessary les such
as old e-mail, image les, or large
video les.
• Delete unneeded programs
by selecting Settings from the
Start menu and then Remove
Programs.
• Use Task Manager to terminate
unneeded tasks (see Chapter 9).
• Use Space Maker to delete misc.
unneeded items (see Chapter 9).
The letype of the image or video
may not be supported. See Chapter
3 for a list of all supported image/
video le formats.
When in the Camera screen, you can
adjust for different lighting conditions
by selecting Ambience from the
menu and then selecting an effect,
and/or Adjust View properties.

Smartphone User Manual
Appendix
Smartphone User Manual
Appendix
194
195
ActiveSync Problems
Problem
n ActiveSync operation
cannot be performed
or connected.
Solution
• Make sure the ActiveSync cradle/
cable is connected securely.
• Make sure you have installed the
ActiveSync software found on the
Companion CD that came with
your phone.
• Make sure the settings are correct
in File Menu > Connection
Settings... in the Microsoft
ActiveSync window on your
desktop computer.
• Chapter 7 discusses ActiveSync.
If still not working, try to remove
the ActiveSync software (using
Control Panel on your desktop
computer) and then re-install.

Smartphone User Manual
Appendix
Smartphone User Manual
Appendix
196
197
Problem
n ActiveSync is
connected, but data
or information cannot
be transferred.
n I cannot perform
over-the-air
synchronization.
Solution
Check Tools Menu > Options... in
the Microsoft ActiveSync window on
your desktop computer to see if the
information type you want has been
selected for synchronizing. See
more details about ActiveSync in
Chapter 7.
Ensure that Microsoft Mobile Informa-
tion Server has been installed.

Smartphone User Manual
Appendix
Smartphone User Manual
Appendix
196
197
Problem
n Unable to use
Infrared (IR) to
transfer information.
n Cannot connect to
the Internet.
Solution
Try the following:
• Transfer only one le, or no more
than 25 contact cards, at a time.
• Line up the IR ports so that they
are unobstructed and within close
range.
• Make sure nothing is between the
two IR ports.
• Adjust the room lighting. Some
types of light interfere with IR
connections. Try moving to a
different location or turning off
some lights. Do not try to use
infrared beaming in the sunlight.
Try the following:
• Ensure that you have set up and
connected to an Internet Service
Provider.
• Ensure that the wireless connection
to your mobile Service Provider is
switched on and that the signal is
unobstructed.
• Verify with your Internet Service
Provider that your user name and
password are correct.
Connection Problems

Smartphone User Manual
Appendix
Smartphone User Manual
Appendix
198
199
Problem
n Cannot end a
Bluetooth connection.
n Cannot nd a
particular device.
Solution
If another device leaves its link On when
it is pairing with your phone, the only
way to disconnect is by deactivating
the Bluetooth link. Select Settings >
Bluetooth from the Start menu, then
set the Bluetooth eld to Off.
• Ensure that the other device is
activated.
• Ensure that you are within 10
meters of each other, and that
there are no obstructions.
• Ensure that the other device is not
in “Hidden” mode.

Smartphone User Manual
Appendix
Smartphone User Manual
Appendix
198
199
Specications
System Information
Processor TI OMAP, 200 MHz
Memory — ROM 64 MB (Standard)
— RAM 32 MB (Standard) SDRAM
Operating System Windows Mobile™ Smartphone 2003
Ozone Update, Second Edition
Display
Type Transective 2.2 inch TFT-LCD
Resolution 176 x 220 at 64K colors
GSM/GPRS Tri-Band Module
GSM900 880 ~ 915, 925 ~ 960 MHz
DCS1800 1710 ~ 1785, 1805 ~ 1880 MHz
DCS1900 1850 ~ 1910, 1930 ~ 1990 MHz
Camera Module
Type Color CMOS
Resolution VGA with JPEG encoder
Expansion Slots
SD / MMC Slot Mini-SD memory card
Connection
Infrared IrDA SIR
I/O port Standard 5-pin mini-USB port for
signals (for USB and power)
Audio Stereo headphone jack
Bluetooth Class 2 transmit power

Smartphone User Manual
Appendix
Smartphone User Manual
Appendix
200
201
Controls and Lights
Navigation 5-way navigation pad
Buttons 2 Softkeys
Back
Home
Camera
2 phone function : Call, End
Volume control button (up, down)
Record Audio (hold Vol. Down 3 sec.)
Power on / off
One dialing keypad
Lights Event notication
Charge status
GSM/GPRS signals
Bluetooth connection
Audio
Microphone/Speaker Built-in microphone and 3-in-1
speaker
Headphone MP3 stereo
Power Supply
Battery 1050mAh (typical) Lithium ion
removable, rechargeable battery
AC adapter
- AC input / Frequency 100 ~ 240 VAC / 50 ~ 60Hz
- Rated Output 5V / 1A DC (typical)
* Contents subject to change without notice.

Smartphone User Manual
Appendix
Smartphone User Manual
Appendix
200
201
Index
A
Accept (receiving calls) 33
ActiveSync, installing 126
Add/Remove Programs 168
Album mode, usage 67
Ambience (camera) 64
Assigning Photo ID to Contact 41
Audio, recording with video 65
B
Back button 11,21
Battery, charging 15
Battery, status indicators 17
Battery level (checking) 84
Beaming Contacts 144
Beam (Phone settings) 82
Bluetooth usage 93
Bonds (Bluetooth) 94
Brightness (Camera) 64
BT Settings (Bluetooth) 95
C
Calculator 158
Calendar 147
Caller ID 35
Caller ID enabling 77
Calling from Contacts 31
Calling from Home screen
30
Call Barring 76
Call Forwarding 76
Call History 45
Call History, erasing (Space
Maker) 180
Call Timers 46
Call Waiting 34,77
Camcorder capture mode
58
Camera button 12
Camera mode usage 56
Caps Lock on/off 26
Capture sizes (Camera) 63
Car antenna connector 12

Smartphone User Manual
Appendix
Smartphone User Manual
Appendix
202
203
Certicates (Phone settings) 82
Chat, starting 115
Clear Storage utility 168
Contact Cards 142
Counter, resetting (Camera) 65
Country code 52
D
Data Connections 86
Date/Time settings 83
Default photo (Caller ID) 39
Detailed View (Album) 69
Detailed View (Caller ID) 36
Dial-up connections 86
Dialing pause, inserting 52
Discoverable mode (Bluetooth)
93,94
E
E-mail, composing 101
E-mail, deleting (Space Maker)
179
E-mail account, setting up 98
Earphones 18
Earphones plug 8
Emergency calls 32
Encoder types (Camera) 63
End button 11
F
Favorites (Internet Explorer)
91
FCC/regulatory notices 186
Filetypes supported (Album)
67
File Manager 169
Find (search for les) 170
Flash storage, deleting items
178
Flicker Adjustment (Camera)
65
Forwarding E-mail/SMS 105
Full Screen view (Album) 69

Smartphone User Manual
Appendix
Smartphone User Manual
Appendix
202
203
G
Games, Java, downloading 160
GPRS connections 87
H
Home button 21
Home screen 21
Home screen settings 81
I
Image, capturing 57
In-call options 44
Infrared port 8
Instant messaging 113
Integrity test (for ZIP les) 173
International “+” input 26
Internet Explorer 89
J
Java, installing apps 159
Jawbreaker (game) 164
K
Keypad lock/unlock 27
L
LED Indicator colors 10
Lighting adjustment (camera)
64
List View (File Manager) 171
Locking/unlocking phone 28
Locking keypad/SIM card 27
M
Media Player, using 153
Message draft, saving 102
Message folders, viewing
100,108
Messaging options 110
MIDlet Manager (Java) 159
Mini SD card, inserting 15

Smartphone User Manual
Appendix
Smartphone User Manual
Appendix
204
205
Mirror 12
MMS, creating message 117
MMS Video capture mode 59
Model number (phone/battery)
184
Modem Link 96
Monitor, Caller ID 35
MSN Messenger 113
Multipress mode 23
Multipress Time-out setting 24
N
Navigation Pad 11,19
Networks screen (Phone) 77
New from Camera (Photo ID) 42
Not-found photo (Caller ID) 39
Numeric mode 25
O
Owner Information 83
P
Partnership, creating, Active-
Sync 127
Photo capture mode 57
Photo Contacts, using 35
Photo ID capture mode 59
Picture, taking 57
Picture Theme capture mode
60
Pocket Contacts 139
Pocket Internet Explorer 89
Power Management (battery)
84
Proles 79,80
Proxy connections 87
Q
Quick List 22, 79
R
Receive incoming beams 145
Receiving calls 33
Receiving incoming beams 82

Smartphone User Manual
Appendix
Smartphone User Manual
Appendix
204
205
Regional settings 84
Rejecting calls 33
Resolution (capture size) 63
Review (captured les) 61
S
SD card, mini 15
Server ActiveSync 129
Signatures in messages 103
SIM card, inserting 14
SIM card lock/unlock 27
SIM Contacts, creating 146
Slide Show mode (Album) 70
Softkeys 19
Solitaire (game) 165
Sounds settings 78
Space Maker 178
Specications 199
Speed Dials 47
Speed Dials, erasing (Space
Maker) 181
Status indicators 13
Stopping running apps 177
Synchronizing remotely 133
System Info display 171
T
T9 mode 25
Talk button 11,33
Tasks application, using 150
Task Manager 176
Templates (Caller ID) 41,43
Templates (Picture Theme)
60
Text, misc. input 26
Three-second dialing pause
52
Thumbnail view (Album) 68
Transition Effects (Album)
70,72
Tree View (File Manager) 169
U
Unknown photo (Caller ID) 39
USB cable 8,18

Smartphone User Manual
Appendix
206
V
Video, capturing 58
Voice Mail, retrieving 45
Voice Notes 51,73,152
Voice Notes, erasing (Space
Maker) 181
Voice Tags 49
VPN connections 87
W
Work URL Exceptions 88
Z
ZIP les, extracting 172
Zooming (Camera mode) 63