HTC TP GSM/GPRS 1900 MHz Bluetooth Smartphone User Manual Typhoon Manual Book indb
HTC Corporation GSM/GPRS 1900 MHz Bluetooth Smartphone Typhoon Manual Book indb
HTC >
Contents
- 1. User Manual
- 2. Users Manual Part 1
- 3. Users Manual Part 2
- 4. Users Manual Part 3
- 5. Users Manual Part 4
Users Manual Part 3
6. Messaging
features
Smartphone User Manual
100
6. Messaging
features
Smartphone User Manual 101
6.2 Managing accounts
Use and manage up to eight messaging accounts with your
phone.
Viewing the list of accounts
On the Home screen select Start > Messaging. The list of
accounts that display the number of unread messages in the
Inbox of each account is shown in parentheses.
Moving between accounts
If you have an account open, you can quickly switch to
another account by scrolling right or left, or selecting Menu
> Switch Accounts.
Changing E-mail account options
On the Home screen, select Start > Messaging and then
select an account. Select Menu > Options and then select
the type of option to change. Select Done to conrm.
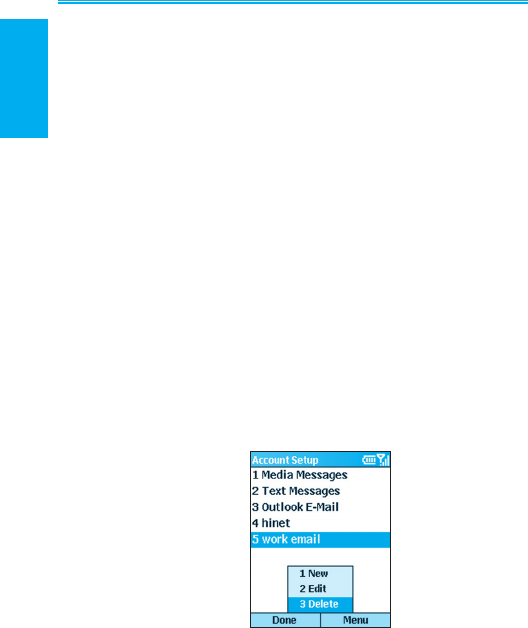
Deleting an account
On the Home screen, select Start > Messaging, and then
select an account. Select Menu >Options > Account Set-
up. Scroll to an account and then select Menu > Delete.
6. Messaging
features
Smartphone User Manual
100
6. Messaging
features
Smartphone User Manual 101
6.3 Creating messages
You can start creating a new E-mail, text message (SMS),
or media message (MMS) from Messaging. You can also
create a new E-mail or text message from Contacts. Only
numbers input are allowed for SMS and MMS messages,
and E-mail addresses for E-mail messages.
To create a message in messaging:
1. On the Home screen, select Start > Messaging.
2. Highlight and select an account, and select New.
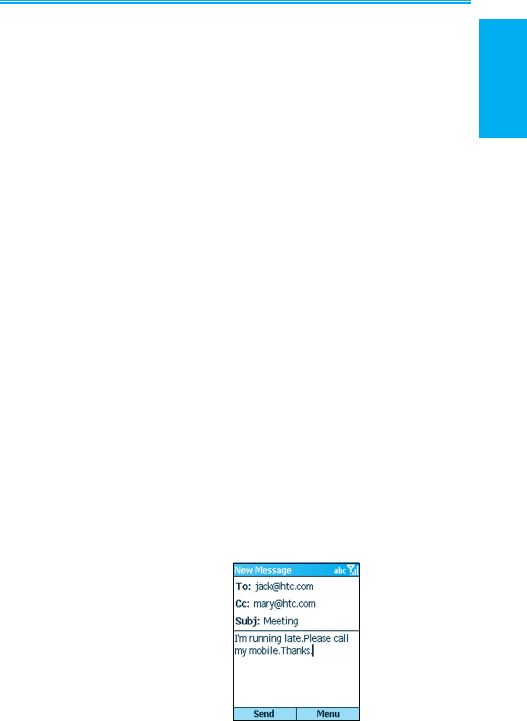
3. In To, enter recipient E-mail address, SMS number. Insert
a semicolon (;) between multiple addresses or numbers.
4. In Cc, enter the E-mail addresses of persons to receive a
copy. This eld does not appear for SMS messages.
5. In Subj, enter a subject. This eld does not appear for
SMS messages.
• To save time you can insert predefined text into
messages. In Subj, select Menu > Insert Text for
E-mail and text messages; scroll to the text and select
Insert.
• You can also insert a voice recording into a message.
Select Menu > Insert Recording, and you will be
prompted to start recording.
• At anytime, you can request a delivery receipt by
selecting Menu > Message Options, and then check
on the "Request message delivery notication" box.

6. Messaging
features
Smartphone User Manual
102
6. Messaging
features
Smartphone User Manual 103
To create a message from a contact card:
1. On the Home screen, select Start > Contacts.
2. Select the contact, select the E-mail address or text
message number to use.
3. Select the account to use; in Subj, enter a subject. This
eld does not appear for text messages.
4. Enter a message. Select Send. E-mail messages are
stored in Outbox and sent to recipients the next time you
synchronize or connect your E-mail server and receive
mail. Text messages are sent immediately.
You can send and receive SMS messages up to 160 char-
acters in size. If a SMS message is longer, it is automati-
cally sent in chunks as several small SMS messages, and
is then unied as one SMS message after all of the small
SMS messages have been received.
To cancel a message, select Menu > Cancel Compose.
Saving a draft of a message
You can save a draft of a message that you are composing
to nish and send later. On the Home screen, select Start
> Messaging. Choose an account and select New. Enter
information in the message. Select Menu > Postpone Mes-
sage. A draft of the message is stored in the Drafts folder
of the account.
Reopening and sending a message draft
On the Home screen, select Start > Messaging. Select
an account and select Menu > Folders. Select Drafts and
then scroll to the draft message to open.
Edit the message and select Send. E-mail messages are
stored in Outbox and sent to recipients the next time you
synchronize or connect to your E-mail server and send and
receive mail. Text messages are sent immediately. For
information about how to send media messages, go to sec-
tion 6.8 of this chapter.

6. Messaging
features
Smartphone User Manual
102
6. Messaging
features
Smartphone User Manual 103
Inserting signatures into messages
For each messaging account, you can specify a signature to
be automatically inserted into messages that you send.
To specify a signature to insert:
1. On the Home screen, select Start > Messaging.
2. Choose the account, select Menu > Option >
Signatures.
3. Scroll right to switch to the account for which to specify a
signature.
4. Select Use signature with this account.
5. To insert a signature in every message you send, select
Include when replying and forwarding. Otherwise, a
signature is inserted only in new messages.
6. Replace the text within the Signature box with a signature
to insert, and select Done. The signature is inserted into
messages that you send from this account.
To stop inserting a signature:
1. On the Home screen, select Start > Messaging.
2. Select the appropriate item (Media Messages, Outlook
E-Mail, etc.).
3. Select Options from the menu, then select Signatures
from the list.
4. In the Signatures screen, select the account for which you
want to stop inserting a signature into messages.
5. Clear the Use signature with this account checkbox,
then select Done. A signature will no longer be inserted
into messages that you send from this account.
6. Messaging
features
Smartphone User Manual
104
6. Messaging
features
Smartphone User Manual 105
6.4 Receiving E-mail, and SMS
messages
You can receive E-mail and SMS messages through Inbox
synchronization or by connecting to your E-mail server. You
can then view all of the messages in your Inbox.
When you connect to the E-mail server or synchronize your
Inbox with your PC, only the rst 0.5 KB of each new mes-
sage are downloaded to Inbox on your phone by default.
Only small attachments are downloaded and the original
messages remain on the E-mail server or your computer.
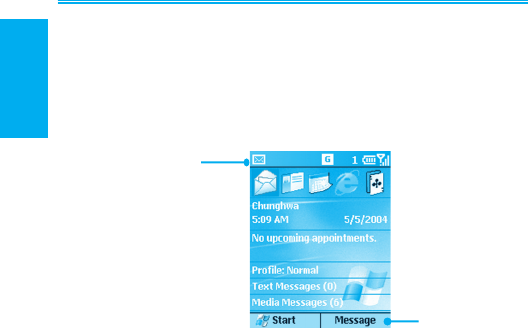
When you receive an E-mail message, the phone plays a
sound and displays an envelope icon at the top of the screen.
By default, the Home screen also displays the number of
unopened E-mail and SMS messages. To quickly view new
messages, scroll down and select the message notication
area on the Home screen, or select the Message soft key.
Working with the message list
Received messages are displayed and stored in the Inbox
folder of the appropriate account. By default, messages are
displayed in the order received, allowing you to change the
display order and date of sent messages.
Icon indicates new
message
Select to go to
Messaging

6. Messaging
features
Smartphone User Manual
104
6. Messaging
features
Smartphone User Manual 105
Viewing the Inbox message list
On the Home screen, select Start > Messaging. Scroll right
or left, or press Menu then select the appropriate account.
The Inbox message list displays your received messages.
Changing message list display options
On the Home screen, select Start > Messaging. High-
light the account, then select Menu > Options > Display.
Change the display options and select Done.
Marking a message as Read or Unread
On the Home screen, select Start > Messaging. Highlight
the account and scroll to the message to mark, then select
Menu > Mark as Read/Unread > Send.
The message is stored in Outbox and sent to recipients the
next time you synchronize or connect to your E-mail server.
SMS messages are sent immediately.
To forward a message:
1. From an open message, select Menu > Forward.
2. In To, enter recipient E-mail addresses or SMS numbers.
Insert a semicolon (;) between multiple addresses or SMS
numbers.
3. Optionally, you can enter an introductory message by
scrolling to the message area, pressing the Action key
to insert a blank line, and entering your text.
4. Select Send. SMS messages are sent immediately. E-
mail messages are stored in Outbox and sent to recipients
the next time you synchronize or connect to your E-mail
server.
Deleting a message:
On the Home screen, select Start > Messaging. Go to the account
in which to delete a message. Scroll to the message to delete.
Select Menu > Delete.

6. Messaging
features
Smartphone User Manual
106
6. Messaging
features
Smartphone User Manual 107
Working with large messages and
attachments
When you receive large E-mail messages and attachments,
the phone downloads only a portion of them. You can view
the partial message or attachment and decide if you want
to download the rest of it.
When you synchronize, the phone downloads the rst 0.5
KB of each new E-mail message by default. When you con-
nect to an Internet E-mail server, it downloads the amount
(in KB) of each new message that you specied when you
set up the account. The message size includes its attach-
ments. The original messages and attachments remain on
the server or your PC.
The attachment size is omitted from messages received
from a POP3 E-mail server.
In the message list, messages with an attachment display
an envelope icon with a paper clip. Within a message, at-
tachments are displayed as a list of hyperlinks at the bot-
tom of the message, and are preceded by an attachment
icon. The hyperlink includes the le name and size of the
attachment.
The following icons indicate the state of each attachment
status:
Not downloaded.
Marked for download.
Downloaded.

6. Messaging
features
Smartphone User Manual
106
6. Messaging
features
Smartphone User Manual 107
Downloading a complete E-mail message
On the Home screen, select Start > Messaging. Select
the account and scroll to the message to download. Select
Menu > Mark for Download. The complete message is
retrieved the next time you synchronize or connect to your
E-mail server and send and receive E-mail.
Downloading an attachment
In an open message with an attachment to download, select
the attachment. The attachment is downloaded the next time
you synchronize or connect to your E-mail server and send
and receive E-mail. If there are multiple attachments in the
message, all attachments are downloaded.
View an attachment
In an open message containing a downloaded attachment,
select the attachment. Note that you can open attachments
only for les that are supported by the phone’s installed
applications.

6. Messaging
features
Smartphone User Manual
108
6. Messaging
features
Smartphone User Manual 109
6.5 Viewing message folders
Each messaging account has a set of folders in which the
phone stores messages for that account.
• Deleted Items: contains messages that you delete until
you empty this folder.
• Drafts: contains messages that you save before send-
ing.
• Inbox: contains received messages.
• Outbox: contains sent E-mail messages awaiting syn-
chronization, or messages that will be sent upon the next
E-mail server connection. SMS messages are sent imme-
diately over the network and appear in your SMS Outbox
folder only for a few seconds.
• Sent Items: contains copies of sent messages.
You can move a message to a different folder within the
same account.
When you synchronize or send and receive E-mail, the phone
synchronizes any additional E-mail folders that you have cre-
ated in Outlook on your desktop computer or on your E-mail
server. It also synchronizes the messages contained in those
folders, if the folders are marked for synchronization.
To view message folder contents:
1. On the Home screen, select Start > Messaging.
2. Choose the account, select Menu > Folders.
3. Scroll to the account for which to view the contents of a
message folder.
4. Select Folders and then the folder to view.

6. Messaging
features
Smartphone User Manual
108
6. Messaging
features
Smartphone User Manual 109
Moving a message to a different folder:
On the Home screen, select Start > Messaging. Choose the
account and scroll to the message to move. Select Menu >
Move. Select the folder into which to move the message.
To empty the deleted items folder:
1. On the Home screen, select Start > Messaging.
2. Select Menu > Folders.
3. If necessary, scroll right or left to switch to the account for
which to empty the Deleted Items folder.
4. Select Folders > Deleted Items.
5. Select Menu > Empty Folder.
6. Messaging
features
Smartphone User Manual
110
6. Messaging
features
Smartphone User Manual 111
6.6 Managing messaging
All E-mail and SMS messages are stored in the respective
Inbox of each account in Messaging. By default, the most
recently received messages are displayed at the top of the
Inbox list. Using the menu options, you can customize your
Inbox settings to control the way you send, receive, and
view messages.
Using Messaging menu options
It is easy to accomplish common messaging tasks from your
Inbox. Press the New soft key to compose a new message,
or press the Menu soft key to forward, delete, and reply to
messages. Access Inbox options allow you to customize
and manage your messages.
To view messaging menu options:
On the Home screen, select Start > Messaging. Choose
the account and then press the Menu softkey.
6. Messaging
features
Smartphone User Manual
110
6. Messaging
features
Smartphone User Manual 111
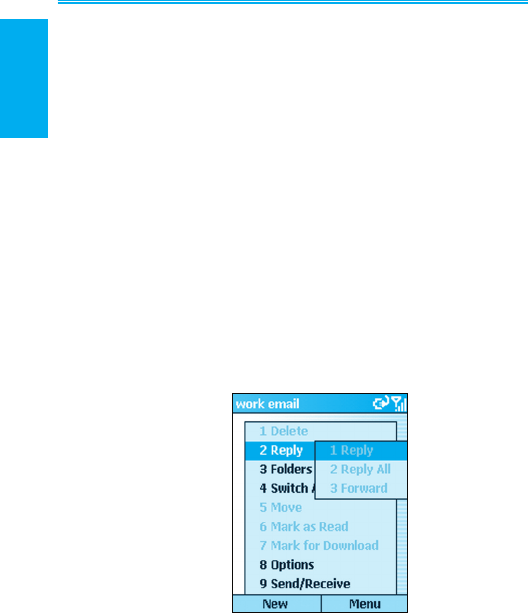
The following table lists the Messaging functions found under
Menu:
Messaging Option Function
Delete Delete the selected message.
Reply Reply to an open or selected mes-
sage.
Reply All Reply to the sender and those who
received a copy of the open or se-
lected message.
Forward Forward the selected message.
Folders View the folders in this account.
Switch
Accounts
Switch between this account and
another.
Move Move the open or selected message
to another folder.
Mark as Read Display the header text of a message
in your Inbox in lightface, indicating
that the message has been read.
Mark for Download Retrieve the entire E-mail message from
the E-mail server the next time you con-
nect.
Options Display a list of Inbox options that you
can customize.
Send/Receive Connect to your E-mail server to send
and receive messages.
6. Messaging
features
Smartphone User Manual
112
6. Messaging
features
Smartphone User Manual 113
Customizing messaging options
You can optimize Messaging according to your work environ-
ment. For example, you can change the way your messages
are displayed, specify how you want your messages to be
sorted, specify the volume and limit the size of messages
you want to automatically download, and change your syn-
chronization schedule.
Accessing Options menu
On the Home screen, select Start > Messaging. Choose
the account, press the Menu > Options. Select the option
to customize. Modify the settings to change, and press
Done.
The following table lists the Options found under Menu Mes-
saging functions:
Options Menu Function
Display Change the message information
displayed in your inbox.
Sending Specify whether you want to include
an original copy of the message in
your reply, save a copy of your sent
message, or use Unicode for SMS
messages.
Edit My Text Edit the predened text so that you
can insert in messages.
Signatures Add a signature in messages.
Account Setup Set up your accounts.
Import SIM
Messages
Import SMS messages from a SIM
card to your inbox. The messages
are not removed from the SIM card
after they are imported.

6. Messaging
features
Smartphone User Manual
112
6. Messaging
features
Smartphone User Manual 113
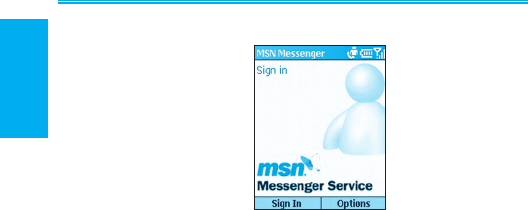
6.7 Instant messaging
You can use MSN Messenger on your phone to send and
receive instant messages. MSN Messenger on your phone
provides the same chat environment as MSN Messenger
on your desktop computer. Features of this environment
include:
• Sending and receiving instant messages.
• Seeing the status of others in your Messenger contacts
list, or changing your own status (e.g., available, busy, out
to lunch).
• Inviting other people to a chat.
• Blocking contacts from seeing your status or sending you
messages.
Setting up MSN Messenger
You need either a Microsoft .NET Passport account
or a Hotmail account to set up MSN Messenger. To
set up a Microsoft .NET Passport account, go to: http://
www.passport.com. Once you have an account, you need
to create a connection on your phone that allows you to
connect to the Internet. For more information about creating
connections, see Chapter 5.
Using MSN Messenger
You can sign in to MSN Messenger using your Hotmail
credentials or your .NET Passport.
6. Messaging
features
Smartphone User Manual
114
6. Messaging
features
Smartphone User Manual 115
To sign in to and sign out of MSN Messenger:
1. On the Home screen, select Start > Messaging > MSN
Messenger > Sign In.
2. In Sign-in Name, enter the sign-in name that you use
for Hotmail or your .NET Passport (Example: name_
123@hotmail.com).
3. In Password, enter your Hotmail or .NET Passport
password.
4. Select Remember my password if you don't want to enter
your password again in the future.
5. Select Sign In.
6. To sign out, select Menu > Sign out.
NOTE: If you do not sign out of MSN Messenger, you will
remain on a data connection. This may result in additional
charges from your service provider.
Adding an MSN Messenger contact:
In the MSN Messenger contacts list, select Menu > Add
Contact. Add the Hotmail or .NET Passport sign-in name
of a person with whom you want to chat. Their sign-in name
is added to the contacts list.

6. Messaging
features
Smartphone User Manual
114
6. Messaging
features
Smartphone User Manual 115
Deleting an MSN Messenger contact:
In the MSN Messenger contacts list, select the contact.
Select Menu > Delete Contact.
Sending an instant message:
Sign in to MSN Messenger. Scroll to the contact with whom
you want to chat. Select Menu > Send Message. Enter
your message and select Send. This starts a chat with the
contact.
To reply to an instant message:
1. Select Menu > Chats.
2. Select the name of the person sending the instant
message. The message displays, along with a box for
your reply.
3. Enter your reply and select Send. If you want to be able
to receive instant messages at any time your phone
is connected to a network, select Menu > Options >
Passport Account > Run this program when connection
is available > Done.
Inviting a contact to an ongoing chat:
From a chat, select Menu > Invite and then choose a
contact. The contact receives an instant message and can
join the chat.

6. Messaging
features
Smartphone User Manual
116
6. Messaging
features
Smartphone User Manual 117
Changing between chats:
Select Menu > Chats. In the list of ongoing chats, select
the name of a contact with whom to chat.
Return to the contacts list:
From a chat, select Menu > My Contacts.
Ending a chat:
Select Menu > End Chat.
Seeing who is already chatting:
Select Menu > Chats.
Blocking or unblocking an MSN Messenger contact:
In the MSN Messenger contacts list, select the contact's
name. Select Menu > Block. The contact will no longer be
able to see your status or send you messages. To unblock
the contact, select Menu > Unblock.
Changing your status:
In the MSN Messenger contacts list, select your name.
Select a status description, such as Away. This status
is displayed next to your name in the contact lists of your
contacts.
Change your display name:
In the MSN Messenger contacts list, select Menu. Select
Options > Passport Account. In My display name, enter
your name as you want it to display in the contacts lists of
your contacts.
6. Messaging
features
Smartphone User Manual
116
6. Messaging
features
Smartphone User Manual 117
6.8 MMS messaging
You can use MMS to create, view, store, send or receive
multimedia messages with text, photos or audio les. Con-
sult with your system administrator or your phone service
provider whether this service is offered. Before using this
service you need to set up a MMS account.
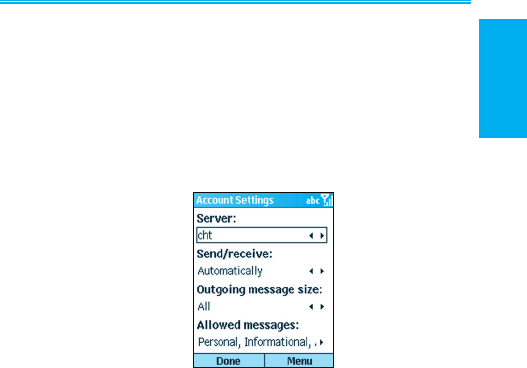
Setting up an MMS account:
1. On the Home screen, select Start > Messaging.
2. Select Media Messages > Options > Account Setup.
3. Select Media Messages.
4. In Server, select your service provider's server name. To
specify your provider's MMS gateway you need to ll out
the Edit Connections sub-menu by selecting Menu > Edit
Connections:
a. From Servers, select an existing server to edit, delete
or add a new one.
b. In Description, specify the name of your cellular or
MMS service provider.
c. In MMSC address, specify the provider's IP address.
d. In Data connection, choose existing Internet or work
environment connection.
6. Messaging
features
Smartphone User Manual
118
6. Messaging
features
Smartphone User Manual 119
e. In Gateway, specify the wireless protocol gateway
offered by your provider.
f. In IP address, specify the address of your service
provider.
g. In Port, specify the port number where MMS services
are routed to.
5. In Send/receive, select whether your MMS messages are
to be sent manually or automatically.
6. In Outgoing message size, specify how large or small
do you want the MMS to be sent.
7. In Password, enter your password.
8. In Allowed messages, choose the types of MMS message
you want to accept or lter out.
9. Select Done.
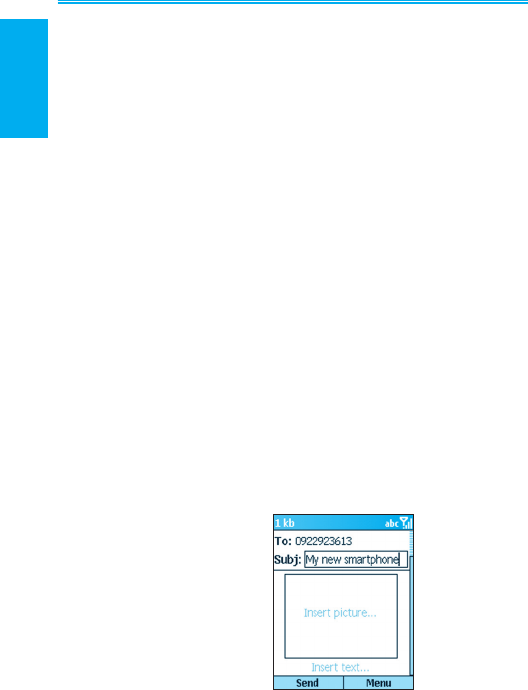
Creating and sending an MMS message
You can create an MMS message with several combined
slides. Each slide can consist of a photo, an audio le, or
inputted text.
1. On the Home screen, select Start > Messaging > Media
Messages > New. In To, enter recipient phone number.
In Subj, enter a subject.

6. Messaging
features
Smartphone User Manual
118
6. Messaging
features
Smartphone User Manual 119
• To add a Photo:
1. In the New Message screen, use the navigation pad
to scroll to the "Insert picture..." box.
2. Press the Action button, a thumbnails menu of all the
photos available will appear.
3. Pick the photo you want to add and press Select.
• To add an audio clip:
1. In the New Message screen, use the navigation pad
to scroll to the "Insert picture..." box.
2. Select Menu > Insert > Sound.
3. Pick up the sound you want to add and press
Select.
• To add canned text:
1. In the New Message screen, use the navigation
pad to scroll to the "Insert text..." portion of the
message.
2. Key in the desired text or Select Menu > Insert >
Text.
3. From "Insert My Text" menu choose the pregured
text message and select Insert.
6. Messaging
features
Smartphone User Manual
120
6. Messaging
features
Smartphone User Manual 121
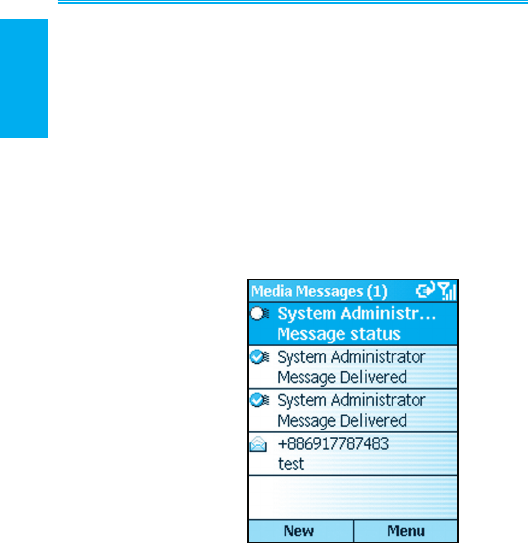
4. Select Send to transmit the MMS message. Select OK
to conrm.
• Your message will be routed to the Outbox for sending
if your account is setup to receive/send messages
"manually". To send the message, go to the Outbox
of the Media Messaging account, select Menu > Send/
Receive.
• You will automatically get an administrator message
in your Media Messages Inbox prompting you to send
the message if your account is setup to receive/send
messages "automatically". To send the message
immediately, scroll to the System Administrator
message, select Menu > Send/Receive.
6. Messaging
features
Smartphone User Manual
120
6. Messaging
features
Smartphone User Manual 121
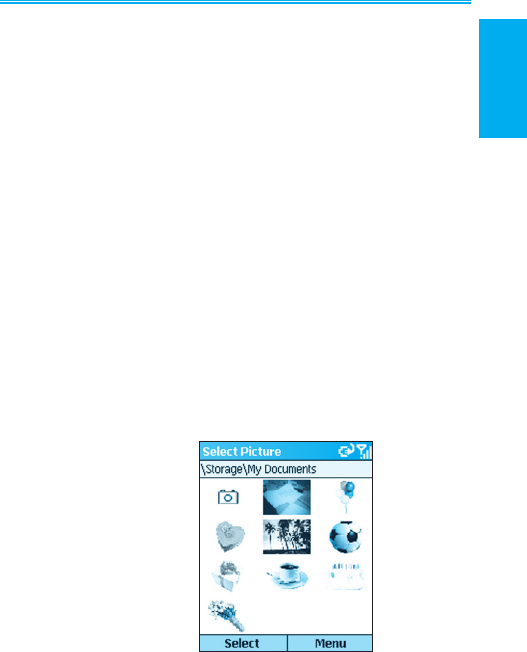
Using your camera to send an MMS
message
Equipped with a camera, your phone allows you to instan-
taneously send pictures to other recipients who also have
access to MMS service. You can also add text and a voice
recording to personalize your message.
1. In the Media Messages New Message screen, enter
the recipient's phone number and the subject of the
message.
2. Use the navigation pad to scroll to the "Insert picture..."
area of the MMS new message composition screen.
3. Press on the Action button and a Select Picture pop-up
menu will appear. Select the camera Icon, which will
launch the camera mode.
4. Take the picture, then press Select to export the picture
into the message. Add text or a voice recording if
necessary.
5. Press Send to send the message.

6. Messaging
features
Smartphone User Manual
122
6. Messaging
features
Smartphone User Manual 123
Other sending options
While composing your MMS message, you can use the
Menu commands to alter, add a recipient, or postpone your
message. The following options are available:
Add Recipient: Add a phone number from your Contacts
list.
Insert: Add additional picture, video, sound, or text.
Remove Object: Scroll to the picture, sound, or text frame
to delete it.
Preview: Have another look at your message before
sending it.
Pages: Add, remove, or move to the next or previous
page.
Background Color: Choose a color to ll in the background
of your message.
Message Options: Set your message's priority, type, and
validity period. You can also set that a delivery report be
sent for conrm.
Postpone Message: Save and send the current message
to Drafts to be composed or sent at a later time.
Send Message: Send your MMS message.
Cancel Compose: Cancel work on the current message
without saving it.

6. Messaging
features
Smartphone User Manual
122
6. Messaging
features
Smartphone User Manual 123
Receiving and replying to MMS messages
When you receive an MMS message, the phone plays a
sound and displays an envelope icon at the top of the screen.
To quickly view new messages, select the Media Message
notication area on the Home screen. Or, access the Media
message from Messaging:
1. On the Home screen, select Start > Messaging > Media
Messages.
2. Use the Action button to access the message. At this point
a telephone number of the sender will appear, along with
the subject of the MMS message.
3. To download the message, select Menu > Send/
Receive.
• Your message will be routed to the Inbox for
downloading if your account is setup to receive/send
messages "manually." To receive the message, go
to the Inbox of the Media Messaging account, select
Menu > Send/Receive.
• Your message will be downloaded automatically in
its entirety if your account is set up to receive/send
messages "automatically." To receive the message
select Menu > Send/Receive.
4. To reply to a received message, select Reply. Insert the
desired pics, text, or recording, and select Send. Select
OK to conrm.

6. Messaging
features
Smartphone User Manual
124
Other receiving options
After receiving your MMS message select Menu to reply,
forward, or save it. The following options are available:
Delete: Delete the current message.
Reply: Reply to the sender of the current message.
Reply All: Reply to the sender and all recipient of the
current message.
Forward: Forward the current message to a third party.
Play: Play an unopened message.
Mark as Unread: Mark message to read at a later time.
Save Media: Save a picture, video, or sound of the current
message to your les.
Pages: Move to the next page or previous page of the
current message.
Send/Receive: Receive a message marked for down-
load.
Save to Contacts: Save the sender's phone number to
your Contacts.
Chapter 7
Synchronizing
7.1 Using ActiveSync
7.2 Installing ActiveSync
7.3 Server ActiveSync
7.4 Other information

Smartphone User Manual
7.
Synchronizing
Smartphone User Manual
7.
Synchronizing
126
127
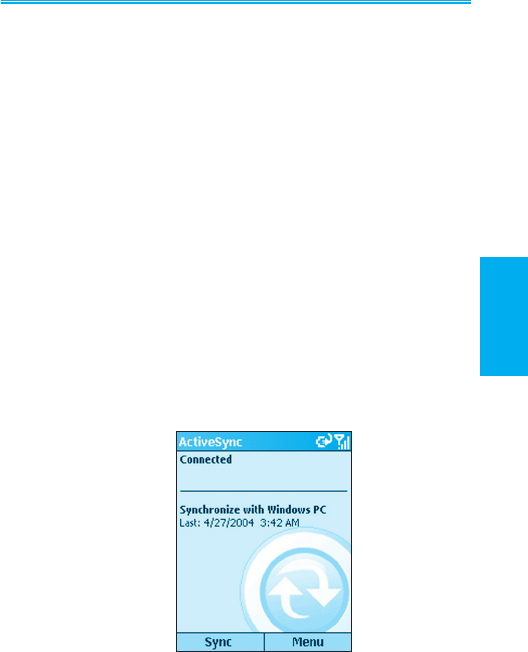
7.1 Using ActiveSync
Maintaining a steady connection between your phone device
and your desktop or notebook PC is essential. This process
of sharing information is called "synchronization." Active-
Sync synchronizes information stored on your phone from
your PC or Microsoft Exchange Server. It also allows you
to share les between your phone and your PC.
When you synchronize, ActiveSync compares the infor-
mation on your device with the information on your PC and/or
Exchange Server and updates all locations with the most
recent information.
With ActiveSync, you can:
• Keep your Outlook information up-to-date by synchroniz-
ing your phone with your PC.
• Maintain connection with your Inbox, Calendar, and Con-
tacts with a server so that you have the latest information,
even when your computer is turned off.
• Copy (rather than synchronize) les between your phone
and your PC. Installation of new phone software applications
utilities are done through ActiveSync.
• Have control over when synchronization occurs by select-
ing a synchronization schedule.
• Select which types of information are synchronized and
specify how much information is synchronized. For example,
you can choose how many weeks of past appointments to
synchronize.
• Using Server ActiveSync, you can synchronize informa-
tion directly with a Microsoft Exchange Server if your com-
pany is running Microsoft Mobile Information Server.
Smartphone User Manual
7.
Synchronizing
Smartphone User Manual
7.
Synchronizing
126
127
7.2 Installing ActiveSync
Before synchronization can begin, you must install Active-
Sync 3.7 or above on your desktop or notebook PC. Use
the Companion CD that came with your device, or install
ActiveSync for free by downloading the software from Micro-
soft's web site at http://www.microsoft.com/windowsmobile.
ActiveSync is already installed on your phone.
Creating a partnership
After the ActiveSync installation is completed, the New Part-
nership wizard will help you set up a partnership between
your phone and your desktop or notebook PC. Your rst
synchronization process will automatically begin when you
nish using the wizard. After the rst synchronization, you
will notice that the information from your PC that you selected
now appears on your phone. Before setting up ActiveSync,
connect the device to your computer using a USB port, or
via infrared connection.

Smartphone User Manual
7.
Synchronizing
Smartphone User Manual
7.
Synchronizing
128
129
NOTE: To prevent synchronization problems, select
Synchronize with Microsoft Mobile Information Server
and/or this PC in the New Partnership wizard only if you
are certain that your company is running Microsoft Mobile
Information Server 2002 or later when you know the server
name. Otherwise, select Synchronize with this PC. For
more information, contact your network administrator or
service provider.
Selective synchronization
The rst synchronization begins automatically after you nish
using the New Partnership wizard.
By default, ActiveSync does not automatically synchronize
all Outlook information. You can use ActiveSync options
to turn synchronization for specic information types on
and off:
1. On your PC, open the Microsoft ActiveSync program.
Click on Options.
2. By default, Calendar, Contacts, Tasks, and Inbox are
synchronized. De-select the check box for the item (s)
you do not want to synchronize.
3. To adjust the settings for a particular type of information,
click on the type and then select Settings. For example,
you may select which folders in Inbox to synchronize.

Smartphone User Manual
7.
Synchronizing
Smartphone User Manual
7.
Synchronizing
128
129
7.3 Server ActiveSync
Before synchronizing information with a server, make sure
all the requested server authentication information such as
username, password, and the name of the Microsoft Mobile
Information Server are correct. In the New Partnership
wizard, select Synchronize with Microsoft Mobile Infor-
mation Server and/or this PC, instead of Synchronize
with this PC.
To set up Server ActiveSync:
1. On the phone Home screen, press the Programs softkey,
select ActiveSync.
2. Select Menu and then Options.
3. Select Server Settings, and then Connection.
4. In User name, enter your Microsoft Exchange user
name.
5. In Password, enter your Microsoft Exchange password.
6. In Domain, enter the name of the domain of your
Exchange server (if required).
7. If you want the device to save your password so that
you need not enter it when connecting, select Save
password.
8. If configuring a Server Name, enter name of your
Exchange server.
9. Select Done; to begin synchronizing with the server, press
the Sync softkey.

Smartphone User Manual
7.
Synchronizing
Smartphone User Manual
7.
Synchronizing
130
131
To change server synchronization
settings:
1. Before you change synchronization settings, disconnect
the device from your PC. On the phone Home screen,
select Start.
2. Select ActiveSync.
3. Select Menu and then Options.
4. Select Server Settings.
5. Select the synchronization settings to edit Calendar,
Contacts, or Inbox:
• To start synchronizing Calendar, Contacts, or Inbox
information, select Sync [Information Type] with a server
on the appropriate synchronization settings page.
• To stop synchronizing Calendar, Contacts, or Inbox
information, clear the Sync [Information Type] with
a server check box on the appropriate synchronization
settings page.
• Change the amount of information to be synchronized.
Scheduling server synchronization
You can create a schedule for automatically synchronizing
information on your phone with your PC or with a Microsoft
Exchange Server. To set up a synchronization schedule
with your PC, you must use ActiveSync on the PC. For
instructions, see Change desktop synchronization schedule
in ActiveSync Help on the PC.

Smartphone User Manual
7.
Synchronizing
Smartphone User Manual
7.
Synchronizing
130
131
To set up a synchronization schedule with an Exchange
server, you must use ActiveSync on your phone. You can
schedule synchronization of your device on two separate
schedules:
Peak times schedule: To synchronize during working hours
or other times you experience higher mail volumes.
Off-peak schedule: To synchronize during times when you
experience lower mail volumes. When you are roaming, you
can synchronize manually to reduce roaming charges, or you
can synchronize using the mobile schedules.
1. To edit schedule settings, your phone must be
disconnected from your PC. On the phone Home screen,
select Start.
2. Select ActiveSync.
3. Select Menu and then Options.
4. Select Mobile Schedule.
a. Select how often to synchronize in the Peak time sync
list.
b. Select how often to synchronize in the Off-peak time
sync list.
c. Select whether or not to synchronize on a schedule in
the Roaming sync list.
d. Select Sync outgoing items as they are sent to
synchronize every time you send E-mail.
5. Select Done.
If you create a schedule for synchronizing while connected
to a PC as well as a schedule for synchronizing remotely
(wirelessly), the phone synchronizes according to both
schedules.

Smartphone User Manual
7.
Synchronizing
Smartphone User Manual
7.
Synchronizing
132
133
Synchronizing Automatically
With ActiveSync you can schedule automatic synchro-
nization between your device and a server every time an
item arrives or is changed at the server. Your device is
informed of that event and synchronizes automatically to
retrieve those items, making your device always up-to-date.
You must synchronize your device at least once (such as after
creating a partnership) before you can see and change the
settings for synchronization as items arrive.
NOTE: You can synchronize as items arrive, only if your
company or service provider is running Microsoft Exchange
Server with Exchange ActiveSync.
Scheduling synchronization
1. On the phone Home screen, select Start.
2. Select ActiveSync.
3. Select Menu and then Options.
4. Select Mobile Schedule.
5. Set Peak time sync and/or Off-peak time sync to As
items arrive.
6. Select Done.

Smartphone User Manual
7.
Synchronizing
Smartphone User Manual
7.
Synchronizing
132
133
7.4 Other information
Remote synchronization
Remote synchronization is when your device is synchronizing
over a wireless connection instead of using a direct local con-
nection to a desktop computer. Synchronizing remotely with
your desktop computer may depend on your network congu-
ration. For example, you may need to set up a virtual private
network (VPN) connection to your network.
To synchronize remotely, you need to set up a connection
rst. Then congure your phone as described in the follow-
ing procedure:
1. On the Home screen, select Start.
2. Select ActiveSync.
3. Select Menu and then Options.
4. Select PC Settings.
5. In Use, scroll to the computer name.
6. Select or clear Use mobile schedule to sync with this
PC.
7. Select or clear Sync with this PC during manual
sync.
8. Select Done.

Smartphone User Manual
7.
Synchronizing
Smartphone User Manual
7.
Synchronizing
134
135
Synchronizing Inbox
When you select Inbox for synchronization in ActiveSync,
E-mail messages are synchronized as part of the general
synchronization process. During synchronization, the fol-
lowing events occur:
• Messages are copied from the Outlook Inbox folder on
your PC, or from Microsoft Exchange Server, to the Inbox
folder on your phone.
• By default, when synchronizing Inbox information with
your PC or Microsoft Exchange Server, you receive only
messages from the last 3 days and the rst 500 bytes of
each new message.
• The messages on your phone and on your PC are linked.
When you delete a message on your phone, it is deleted
from your PC the next time you synchronize, and vice
versa.
• Messages in subfolders of other Outlook E-mail folders
are synchronized only if the folders have been selected
for synchronization in Inbox on your phone.
NOTE: SMS messages are not received in Messaging
through synchronization. Instead, they are sent to your
phone by way of your cellular service provider.

Smartphone User Manual
7.
Synchronizing
Smartphone User Manual
7.
Synchronizing
134
135
Synchronizing Calendar
When you select Calendar for synchronization in Active-
Sync, by default Calendar items from the last two weeks
are synchronized.
Calendar items created on your phone are copied to your
desktop computer and/or server during synchronization, and
vice versa. Similarly, Calendar items that are deleted from
your phone are deleted from your PC and/or server during
synchronization, and vice versa.
Synchronizing Contacts
When you select Contacts for synchronization in ActiveSync,
by default all of your contacts are synchronized.
Contacts created on your phone are copied to your PC and/or
server during synchronization, and vice versa. Similarly,
contacts that are deleted from your phone are deleted from
your desktop computer and/or server during synchroniza-
tion, and vice versa.
Synchronizing Tasks
Task synchronization is automatically selected in ActiveSync.
By default, all of your incomplete tasks are synchronized.
Tasks created on your phone are copied to your desktop
computer during synchronization, and vice versa. Similarly,
tasks that are deleted from your phone are deleted from your
desktop computer during synchronization, and vice versa.
NOTE: Tasks can be synchronized only with your desktop
computer; they cannot be synchronized with a server.

Smartphone User Manual
7.
Synchronizing
136
ActiveSync error messages
If your information cannot be successfully synchronized,
you will see an error message on your phone. To view
more information about the error, scroll to it and press the
Action key.
Some errors interfere with automatic synchronization. If
you suspect that a scheduled synchronization has not oc-
curred, you should attempt to manually synchronize your
information. Successfully completing manual synchroniza-
tion resets automatic synchronization. For more information,
see "Synchronizing Information" in ActiveSync Help on your
desktop computer.
Chapter 8
Applications
8.1 Using Contacts and Beaming
8.2 Using Calendar
8.3 Using Tasks
8.4 Using Voice Notes
8.5 Using Windows Media Player
8.6 Using Calculator
8.7 Using JAVA MIDlet Manager
8.8 Games

Smartphone User Manual
8.
Applications
Smartphone User Manual
8.
Applications
138
139
Microsoft Pocket Outlook includes Contacts, Calendar,
Tasks, Inbox/Messaging, and Voice Notes. You can use
these programs individually or together. For example, E-
mail addresses stored in Contacts can be used to address
E-mail messages in Inbox.
For information about Inbox and messaging, see Chapter
6, Messaging Features. The other applications in Pocket
Outlook mentioned above are explained on the next several
pages.
Using ActiveSync, you can synchronize information in
Microsoft Outlook or Microsoft Exchange on your PC with
your phone. You can also synchronize this information
directly with a Microsoft Exchange server. Each time you
synchronize, ActiveSync compares the changes you made
on your phone, and PC or server, and updates both with the
latest information.
For information on using ActiveSync, see Chapter 7, Syn-
chronizing Information.
Smartphone User Manual
8.
Applications
Smartphone User Manual
8.
Applications
138
139
8.1 Using Contacts and Beaming
You can think of Contacts as an online address book, where
you can store information about people and businesses you
communicate with in contact cards. For example, you can
store multiple phone numbers, E-mail and street addresses,
Web pages, birthday, anniversary date, etc. You can use
Contacts to dial phone numbers and compose E-mail and
SMS messages directly from a contact card.
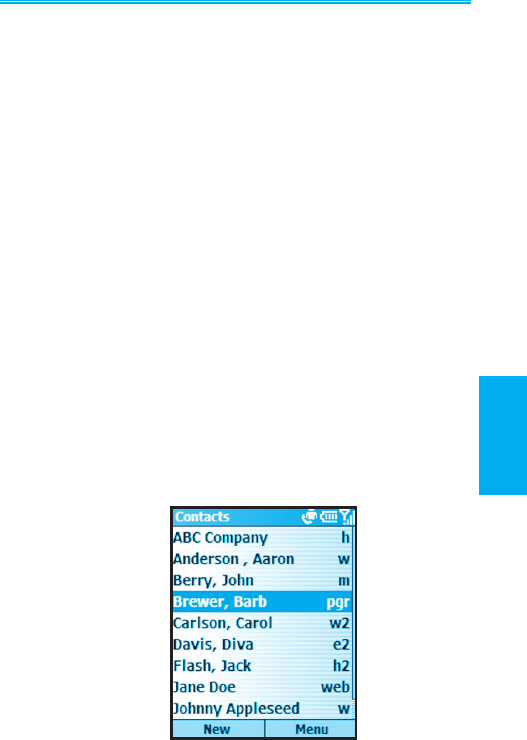
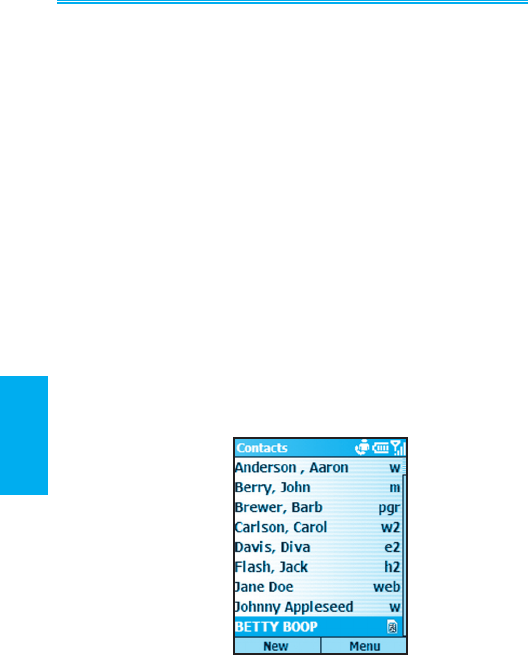
The Contact list
The Contacts list displays the names of your contacts
alphabetically, along with an abbreviation for the default
communication method, such as the person's work phone
number (w) or home phone number (h). This makes it easy
to reach the contact using the method you prefer. Note that if
the contact entry includes a work phone number, your phone
will automatically set it as the default number.
To access Contacts:
Select Contacts from the Start menu, or press the Right
Softkey (“Contacts”) when in the Home screen. The list of
Contacts will appear, as shown in the example below.
Smartphone User Manual
8.
Applications
Smartphone User Manual
8.
Applications
140
141
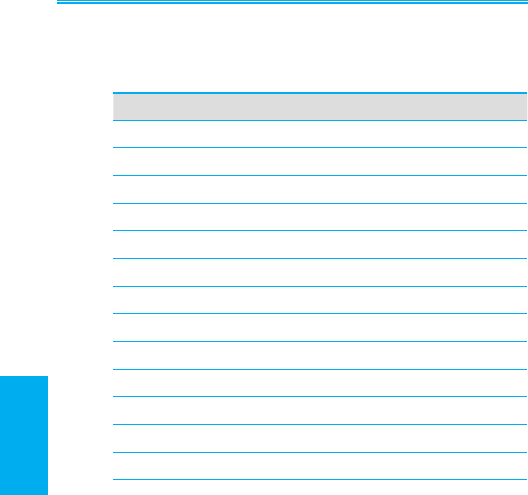
The following table shows some of the abbreviations that might be
displayed in the Contacts list, and their meanings.
Abbreviation Meaning
w Work phone
w2 Second work phone
wfx Work facsimile
h Home phone
h2 Second home phone
m Mobile phone
pgr Pager
car Car phone
txt Text message number
e E-mail address
e2 Second E-mail address
e3 Third E-mail address
web Web page
To call a contact using the default number:
1. Select Contacts from the Start menu, or press the Right
Softkey (“Contacts”) when in the Home screen. The list
of Contacts will appear.
2. Select the contact you want to call.
3. Press the Talk button. The phone dials the contact's
default phone number. The abbreviation for this number
appears to the right of the contact name.

Smartphone User Manual
8.
Applications
Smartphone User Manual
8.
Applications
140
141
NOTE: If you want to change the default number, select the
desired Contact entry and press the Action button. Then
select the number you want to assign as the default, and
select Set as Default from the menu.
To call a contact using a number other than the default
number:
• Select the contact in the list, press the Left or Right
navigational buttons to display the abbreviation for the
number you want to use, then press the Talk button.
To nd a contact by entering a name:
• Begin entering the name of the contact to nd until the
name is displayed. For example, to nd "Sandra," enter
7, 2, 6, 3, 7, 2 because these numbers correspond to the
letters for that name.
To lter contacts:
• Select Filter from the menu, then select the category
whose entries you want to display, such as Business,
Miscellaneous, or Personal. Only the contacts assigned
to the category you select are displayed in the list.
To create a new contact:
• When the Contacts list is displayed, press the Left Softkey
(“New”), or select New Contact from the menu. After
entering the desired data, press Done.
To delete a contact:
• Select the desired entry in the Contacts list, then select
Delete from the menu.
To assign a Photo ID to a contact:
• Use the Photo Contacts (Caller ID) application. This was
explained earlier in Chapter 2.
Smartphone User Manual
8.
Applications
Smartphone User Manual
8.
Applications
142
143
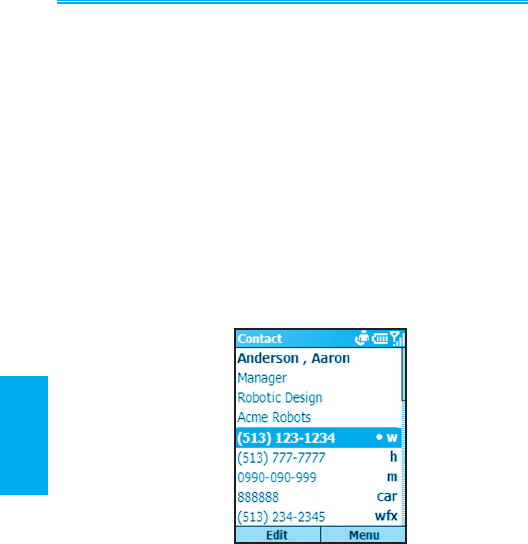
Contact cards
To view a “contact card,” select the desired contact in the
list and press the Action button. A contact card displays all
of the information that you have entered for that contact.
You can use the menu to add it to your Speed Dial, send
a text message, save it to your SIM card, set the selected
number as the default number, beam the Contact, delete
it, or edit it.
To view and edit an existing contact card:
• Select the desired entry from the Contact list. Press the
Action button to view the contact card. If you wish to
modify it, press the Left Softkey (“Edit”) or select Edit from
the menu.
To call a contact from a contact card:
• Select the desired entry from the Contact list. Press the
Action button to access that contact card. Press the Up or
Down navigational button to select the number you want
to call, then press the Action button to dial that number.

Smartphone User Manual
8.
Applications
Smartphone User Manual
8.
Applications
142
143
To send E-mail from a contact card:
1. Select the desired entry from the Contact list.
2. Press the Action button to open the related contact card.
3 Select the E-mail address, and press the Action button.
4. Select an account to use, and press the Action button.
5. Enter a subject, compose your message, and then select
Send.
Using contact card menu options
Select the desired contact in the list, then press the Action
button to access the related contact card (shown in the gure
on the previous page). Using the menu accessed from that
screen, you can perform the functions listed below.
Add Speed Dial
Enables you to create a shortcut to a phone number, E-mail
address, or Web URL by assigning one or two numbers as a
speed dial. (Explained in more detail in Chapter 2.)
Send Text Message
Enables you to send a short message to the contact per-
son.
Add Voice Tag
After recording a Voice Tag, it serves as a shortcut to a phone
number, E-mail address, or Web URL when you speak the
Voice Tag. (Explained in more detail in Chapter 2.)
Save to SIM
Saves the contact to the SIM card.

Smartphone User Manual
8.
Applications
Smartphone User Manual
8.
Applications
144
145
Set as Default
Makes the selected phone number or E-mail address the
default communication method for the contact.
Beam Contact
Sends the contact card to another mobile device or a desktop
PC using infrared.
Delete
Removes the contact card from the Contacts list.
Edit
Enables you to modify information in the contact card.
Beaming information
You can use the Bluetooth or infrared port on your phone to
send and receive (beam) contact information between your
phone and another mobile device or a PC that has Bluetooth
or an infrared port and supports vCards and vCal. However,
you cannot beam SIM contacts. See Chapter 5 for more
information about Bluetooth.
To beam a contact:
1. Select Contacts from the Start menu.
2. Select the Contact entry you want to beam.
3. Select Beam Contact from the menu in the Contacts
screen.
4. Scroll to the device to which you want to beam.

Smartphone User Manual
8.
Applications
Smartphone User Manual
8.
Applications
144
145
5. Do one of the following:
• To beam by infrared, make sure that the infrared
ports are unobstructed and within close range of each
other.
• To beam by using Bluetooth, make sure that both
Bluetooth radios are turned on and that Bluetooth is
discoverable on the receiving device.
6. Press the Left Softkey (“Beam”).
Status information will then be displayed, indicating the
name of the device to which the phone is beaming, and
whether the beaming process is pending, nished, or has
failed.
To receive beamed information:
1. Select Settings from the Start menu.
2. In the Settings screen, select Beam.
3. Select the Receive incoming beams checkbox so that
the checkbox is checked.
4. Do one of the following:
• To receive by infrared, align the infrared ports so that
they are unobstructed and within close range of each
other.
• To receive by using Bluetooth, make sure your
Bluetooth radio is turned on and in discoverable
mode.
5. Select Done. Your phone is now capable of receiving
beams (until you clear the Receive incoming beams
checkbox).
NOTE: Your phone can receive beamed les of any type, but
you may need to copy some les to your PC for viewing.
Smartphone User Manual
8.
Applications
Smartphone User Manual
8.
Applications
146
147
SIM contacts
SIM contacts are stored on your SIM card. When you insert
your SIM card into a different device, you can view and
use the SIM contact information on the new device. Unlike
regular contact cards, you can store only one phone number
for each SIM contact.
To create a new SIM contact:
1. Select Contacts from the Start Menu, or press the Right
Softkey (“Contacts”) in the Home screen.
2. Open the menu and select New SIM Contact.
3. Enter the Name and Number, then select Done.
The new contact appears in your contact list. A SIM icon
appears to the right of the name, indicating that the contact is
stored on your SIM card, as shown in the example below.

Smartphone User Manual
8.
Applications
Smartphone User Manual
8.
Applications
146
147
8.2 Using Calendar
Calendar is the scheduling program on your phone, where
you can create and view appointments and view your cal-
endar by day, week, or month. When you create and edit
appointments in Calendar, your changes are reected in
Outlook on your PC when you synchronize.
To open Calendar:
• On the Home screen, select Calendar from the Start
menu.
To create a new appointment:
1. In the Calendar screen, select New from the menu.
2. Enter information about the appointment.
When inputting a Calendar entry, note that in the Reminder
eld you can specify the amount of time prior to the ap-
pointment that you want to be reminded. If you don't want
to be reminded, select None. The default reminder time is
15 minutes. If you want to change the reminder time later,
open the desired Calendar entry and then press the Left
Softkey (“Edit”), or select Edit from the menu in the Calendar
screen, and scroll to the Reminder eld.
When you create a new appointment on your phone, you can
synchronize Calendar with your PC or Exchange Server to
keep your schedule information up-to-date in all locations.

Smartphone User Manual
8.
Applications
Smartphone User Manual
8.
Applications
148
149
To edit an appointment:
1. Select Calendar from the Start menu.
2. Select the desired appointment, press the Action button,
and then select Edit from the menu or press the Left
Softkey (“Edit”).
3. If the appointment is recurring, select Yes to edit only the
current occurrence, or select No to edit the series.
4. Make your changes and select Done.
To delete an appointment:
1. Select Calendar from the Start menu.
2. Scroll to the appointment to delete.
3. Select Menu and then Delete.
4. If the appointment is recurring, select Yes to delete only the
current occurrence, or select No to delete the series.
Viewing your schedule
You can view your schedule in three different views: Agenda,
Week, and Month.
Agenda View is the default view for calendar information.
This view displays meetings and appointments scheduled
for the current day. Appointments are shown in chronologi-
cal order according to start time. All-day appointments are
shown as a single line at the top of the Agenda view.
When in Agenda View, you can select Week View or Month
View from the menu. Press the Left or Right navigational
buttons to select a desired date/time, then press the Action
button to view the corresponding entries, if any. Or, use the
menu to Go to Today, Go to Date, set Options, or return
to the default Agenda View.

Smartphone User Manual
8.
Applications
Smartphone User Manual
8.
Applications
148
149
Note that in Month View, arrows pointing upward represent
morning appointments, and arrows pointing downward rep-
resent afternoon appointments. If you have both morning
and afternoon appointments on the same day, the arrows
form a colored box. All-day events are indicated by an empty
box. If you have morning and afternoon appointments and
an all-day event on the same day, an empty box surrounds
a colored box.
Customizing the calendar view
You can change viewing options for Calendar, such as
specifying the rst day of the week and the number of days
per week to display, as well as showing and hiding week
numbers.
1. On the Home screen, select Start.
2. Select Calendar.
3. Select Menu and then Options.
4. Scroll to select the options you want and select Done.
Importing calendar information
You can import calendar information from another calendar
program that uses the iCal or vCal format. You can import
calendar information from attachments in E-mail messages,
SMS messages, and links in Microsoft Pocket Internet Ex-
plorer, or by beaming. When you import information and
then synchronize, the information is added to Outlook on
your PC.