HYUNDAI MOBIS AVN-200TFU AVN System User Manual AVN 200TFU IC ATT C E G H I
HYUNDAI MOBIS CO., LTD. AVN System AVN 200TFU IC ATT C E G H I
UserManual.wiki
>
HYUNDAI MOBIS
>
AVN-200TFU User Manual
>
user manual 6 of 7
Contents
1.
user manual 1 of 7
2.
user manual 2 of 7
3.
user manual 3 of 7
4.
user manual 4 of 7
5.
user manual 5 of 7
6.
user manual 6 of 7
7.
user manual 7 of 7
user manual 6 of 7
Navigation menu
Upload a User Manual
Namespaces
Wiki Guide
HTML
PDF
Info
Views
User Manual
Discussion / Help
Navigation


![BLUETOOTH HANDSFREE 5-21BLUETOOTH HANDSFREEPhone MusicBefore playing Phone musicMusic saved in the mobile phone can beplayed in the car through Bluetooth audiostreaming.Phone music can be played only when aBluetooth phone has been connected. Toplay phone music, connect the Bluetoothphone to the car system. For moreinformation on connecting Bluetooth, pleaserefer to the user's manual [Pairing andConnecting a Bluetooth phone]. If the Bluetooth is disconnected while playingphone music, the music will be discontinued. The audio streaming function may not besupported in some mobile phones. Only one function can be used at a timebetween the Bluetooth handsfree or Phonemusic function. For example, if you convert to the Bluetoothhandsfree while playing Phone music, themusic will be discontinued. Playing music from the car is not possiblewhen there are no music files stored in themobile phone. Starting Phone MusicRepeatedly press the key on thefront panel or the key on thesteering wheel to enter Phone musicmode. MDOECD/AUX](https://usermanual.wiki/HYUNDAI-MOBIS/AVN-200TFU.user-manual-6-of-7/User-Guide-1264558-Page-7.png)
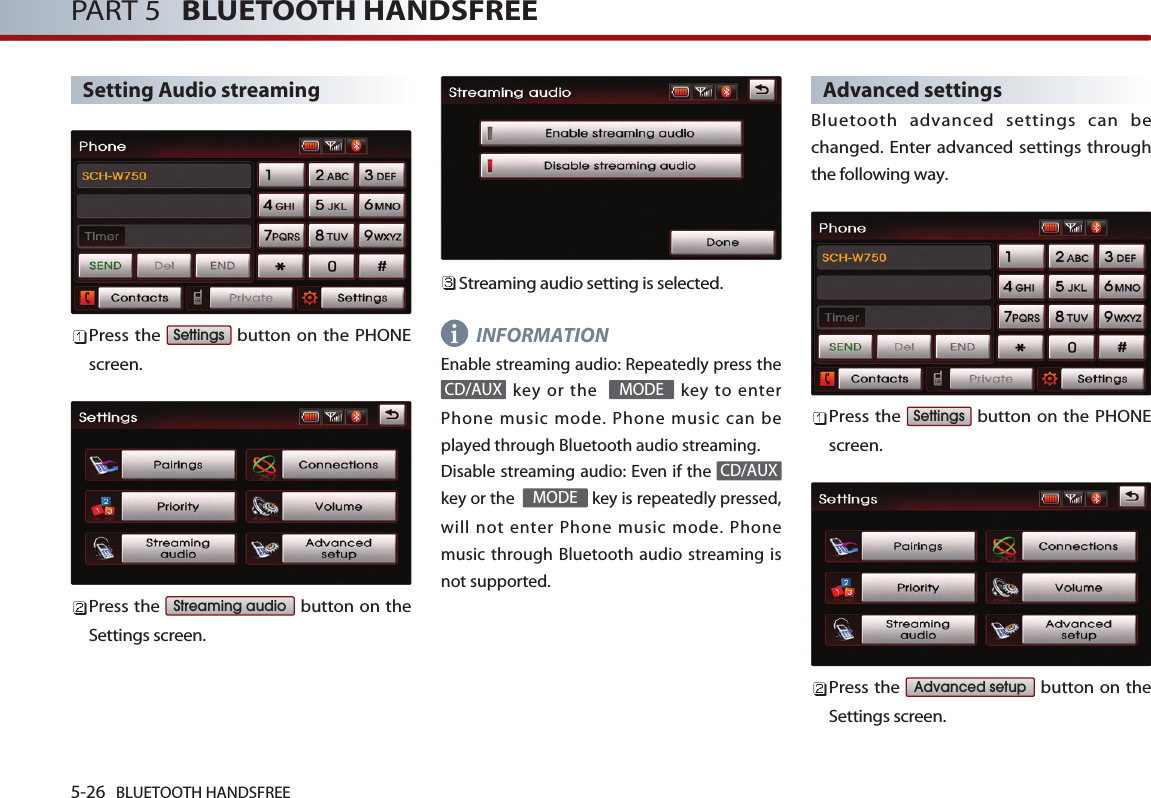
![5-22 BLUETOOTH HANDSFREEPART 5 BLUETOOTH HANDSFREEINFORMATIONEach press of the key on the frontpanel will change the function in the order ofDISC USB or iPod AUX Phone Music DISC . Each press of the key on the steeringwheel will change the audio mode in theorder of FM1 FM2 AM SIRIUS1 SIRIUS2 SIRIUS3 DISC USB or iPod AUX Phone Music FM1.It is not possible to enter Phone music mode ifthe mobile phone is not connected or if theaudio streaming setting within Bluetoothhandsfree settings has been set to [Disablestreaming audio]. For more information on audio streamingsetting, please refer to the user s manual[Bluetooth settings > Setting Audio streaming]. The Phone music screen is displayed. INFORMATIONWhile music saved in the mobile phone willautomatically begin playing after convertingto the Phone music screen, this music playerfunction may not be supported in somemobile phones. If music does not begin playing even afterconverting to the Phone music screen, trystarting the music directly from the mobilephone.Phone music screen layoutInformation Bar : displays information forthe currently playing song.File Down button : plays the previoussong. Play/Pause button : Plays/pauses thesong. File Up button : plays the next song. MODECD/AUXii](https://usermanual.wiki/HYUNDAI-MOBIS/AVN-200TFU.user-manual-6-of-7/User-Guide-1264558-Page-8.png)

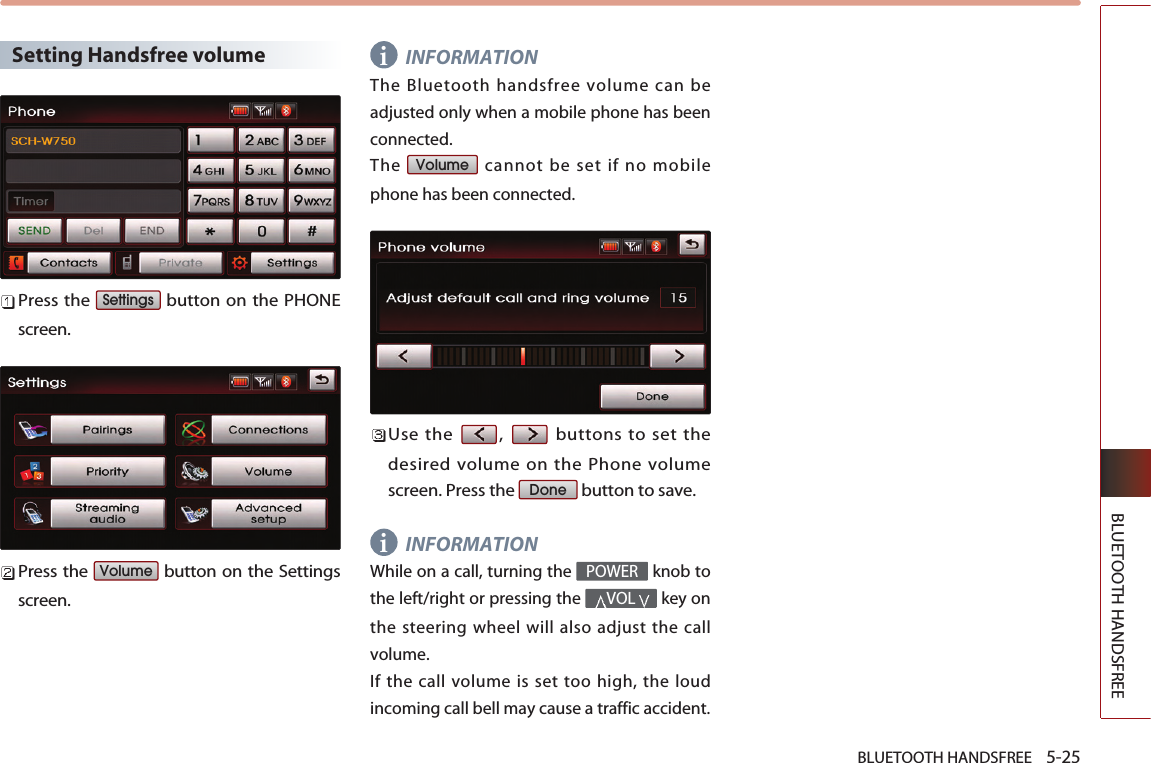
![5-24 BLUETOOTH HANDSFREEPART 5 BLUETOOTH HANDSFREEBluetooth settingsPairing and connecting a mobilephoneFor more information on pairing andconnecting a mobile phone, please refer to[Pairing and Connecting a Bluetooth phone]. Setting mobile phone autoconnect priorityINFORMATION After turning on the car ignition and thesystem is booted up, the Bluetooth connectionbetween the car system and mobile phone isautomatically made. The Bluetooth connection will be conductedin the order of mobile phone priority. The auto connect priority will be supportedonly for previously paired mobile phones. Press the button on the PHONEscreen. Press the button on the Settingsscreen. The paired mobile phone list and themobile phone connection priority will bedisplayed. When wishing to change the priority order,select the mobile phone from the list anduse the , buttons to change itspriority. Press the button to save thechanged mobile phone priority.DonePrioritySettingsi](https://usermanual.wiki/HYUNDAI-MOBIS/AVN-200TFU.user-manual-6-of-7/User-Guide-1264558-Page-10.png)
![5-30 BLUETOOTH HANDSFREEPART 5 BLUETOOTH HANDSFREEImportant information About pairing mobile phones I cannot search for mobile phonesthrough the car system. What is thecause? Check to see whether the mobile phoneyou wish to connect supports Bluetoothfunction. If your mobile phone supportsBluetooth, check to see that whether theBluetooth settings in the mobile phonehave been set to hidden state or if theBluetooth power has been turned off. Ifthe device has been set to hidden,release the hidden state and if theBluetooth power has been turned off,turn the power ON and try searchingagain.What is the difference between pairing amobile phone and connecting a mobilephone?Through a two-way passkey betweenthe car system and mobile phones, up to5 mobile phones can be paired with thecar system. The paired mobile phone willremain paired with the car system untilthe user deletes it manually. In addition, the call history lists andphone number books saved in eachmobile phone will also be maintaineduntil the paired phone is deleted. Formore information on pairing mobilephones, please refer to the manual[Pairing and Connecting a Bluetoothphone > Pairing a mobile phone]. Connect a mobile phone to Bluetoothby selecting the desired mobile phonefrom the paired phones. Within the carsystem, only one Bluetooth phone canbe connected at one time. For moreinformation, please refer to the manual[Pairing and Connecting a Bluetoothphone > Pairing a mobile phone]. What is a Passkey? A passkey is an authentication code usedfor two-way authentication of the carsystem and the mobile phone. Only 4-digit numbers can be used aspasskeys. Passkeys are registered onlyonce when pairing the phone numberfor the first time. The factory-set passkeyis 0000. Q.A.A.A.Q. Q.](https://usermanual.wiki/HYUNDAI-MOBIS/AVN-200TFU.user-manual-6-of-7/User-Guide-1264558-Page-16.png)


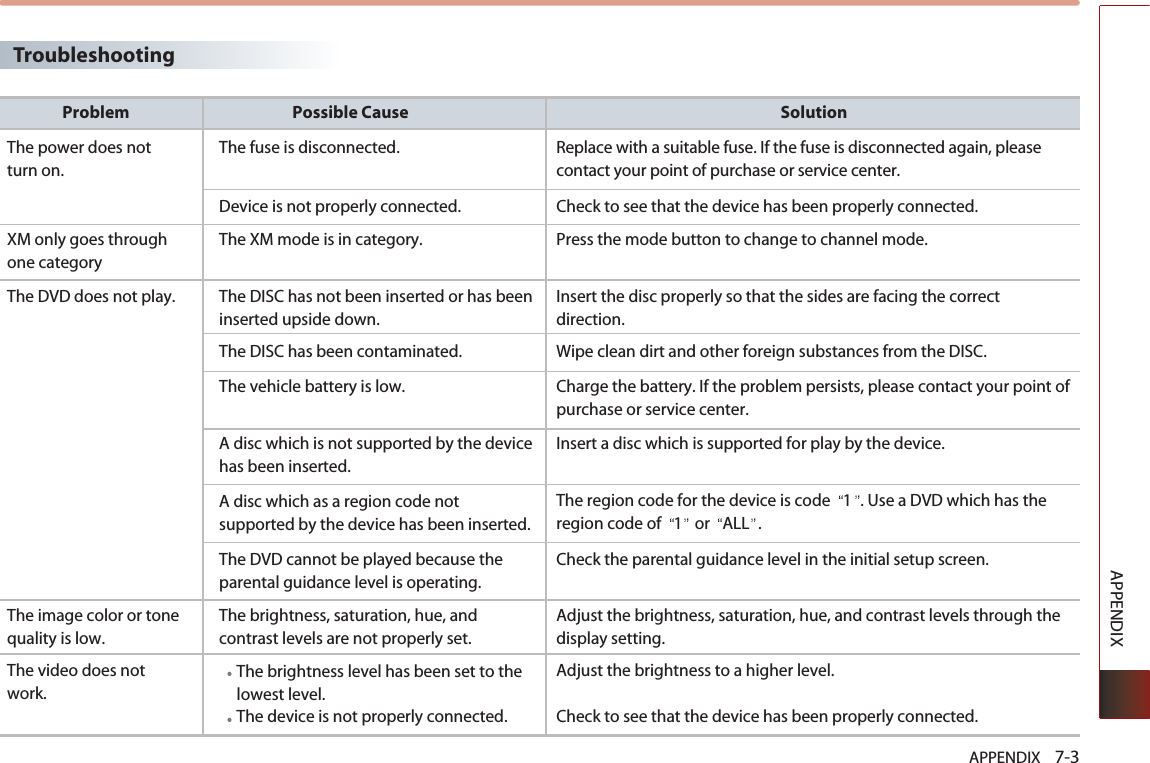
![7-2 APPENDIXPART 7 APPENDIXTroubleshooting guideBefore thinking the product has malfunctioned Errors which occur during the operation or installation of the device may be mistaken as a malfunction of the actual device. If you are having problems with the device, try the suggestions listed below. If the problems persist, contact your point of purchase or the nearest service center. FunctionBecause the LCD is manufactured with technology requiring high point density, a pixel deficiency orlighting may occur within 0.01% of total pixels.Has the Switch for the vehicle been turned to [ACC] or [ON]?Has the SYSTEM been turned OFF? Has the volume been set to a low level?Has the volume been set on mute?The display looking somewhat darker after prolonged periods of use is a normal phenomenon withLCD panels. It is not a malfunction.If the screen is very dark, contact your point of purchase or the nearest service center.Is the position of FAL/BAL sound controls or volume adjusted to only one side?Is the audio and video connector jacks fully inserted into the AUX terminal? Is the external device connected with a standard connector cable? Some map data may be missing or incorrect. The TTS(Text To Speech) engine speaks the street name based off of the phonetic spelling. This will continuously be update with the map database.ProblemThere are small red, blue, or green dotson the screenThe sound or image is not workingThe video is being displayed but sound is not workingWhen the power is turned on, thecorners of the screen are darkSound is working from only onespeakerSound and video does not work in AUXmodeThe external device is not working The road is missing The road name is spoken incorrectly](https://usermanual.wiki/HYUNDAI-MOBIS/AVN-200TFU.user-manual-6-of-7/User-Guide-1264558-Page-42.png)