Hansol LCD B17BF-2 LCD Monitor User Manual ENG 700F
Hansol LCD Inc. LCD Monitor ENG 700F
Contents
- 1. users manual 1
- 2. users manual 2
users manual 1
Hansol Electronics Inc.
VOL
Printed in Korea
Part No. 942217020001-01
www.hansolel.co.kr
17" TFT -LCD Color Monitor
USER'S MANUAL
17"
Printed on the recyclable paper
H700TD(B17BF)

Parts 3
Connection to Signal Source 4
the range of control Angle 5
Installing Monitor Driver 6
Name and Function of Front 8
Power Management Feature 10
Adjusting OSD 11
Standard Signal Table 18
Specification 19
Troubleshooting 20
Warning 22
Table of Contents
INFORMATION TO USER :
This equipment has been tested and found to comply with the limits of a Class
B digital device, pursuant to Part 15 of the FCC Rules.
These limits are designed to provide reasonable protection against harmful
interference in a residential installation.This equipment generates, uses and can
radiate radio frequency energy and,if not installed and used in accordance with
the instructions, may cause harmful interference to radio communications.
However, there is no guarantee that interference will not occur in a particular
installation; if this equipment does cause harmful interference to radio or
television reception, which can be determined by determined by turning the
equipment off and on, the user is encouraged to try to crrent the interference by
one or more of the fllowing measures:
1. Reorient/Relocate the receiving antenna.
2. Increase the separation between the equipment and receiver.
3. Connect the equipment into an outlet on a circuit difference
from that to which the recerver is connected.
4. Consult the dealer or an experienced radio/TV technician for help.
CAUTION
Changes or modifications not expressly approved by the
manufacturer responsible for compliance could void the user's
authority to operate the equipment
ENERGY STAR
As an ENERGY STAR partner, Hansol Electronics Inc.
has determined that this product meets energy Star guidelines
for energy efficiency.
32
Parts
Parts
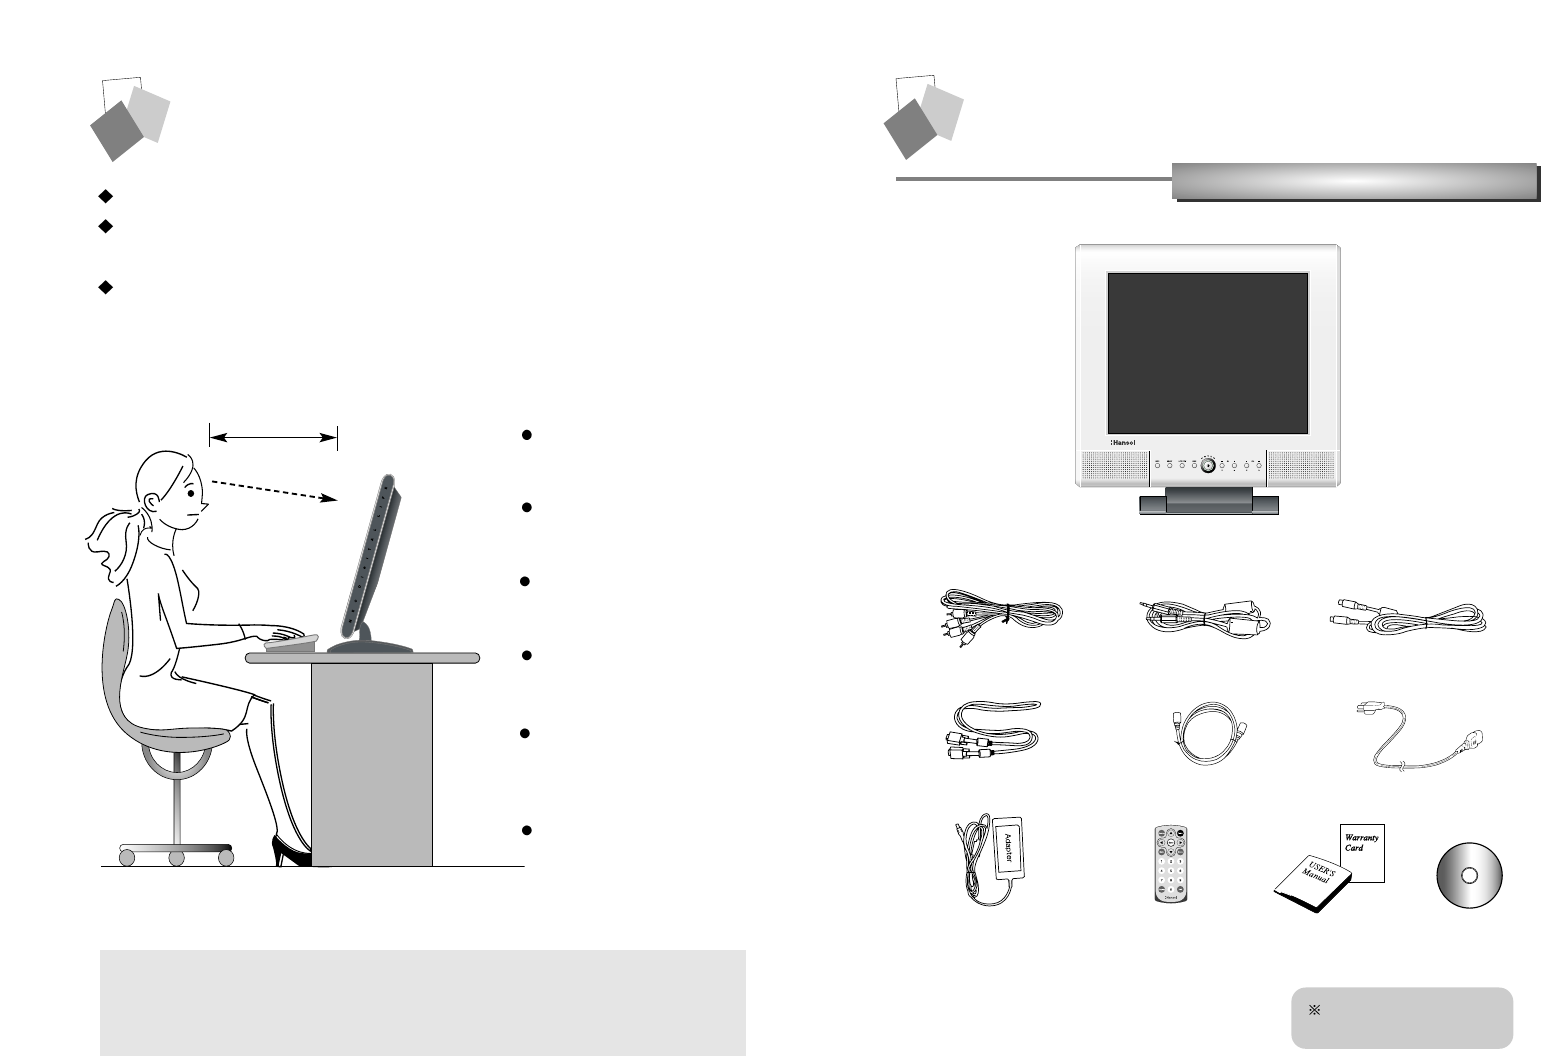
LCD Monitor
Place the monitor to face the user and then adjust the monitor angle.
Take a break (for about 10 minutes) at every hour during the work with
monitor.
Refer to the following figure to take the correct posture.
about 50cm
Class-B Equipment
This unit is registered to Class-B Equipment (allowable electromagnetic wave)
and is suitable for use in all areas including residential area.
Look down the monitor
below the horizon.
Relax shoulders and arms,
and sit back on the chair.
Adjust the monitor to
prevent reflection.
Adjust the monitor stand
to acquire required angle.
Keep feet flat on the ground.
Maintain the arms horizontally
and place hands softly on
the keyboard.
Good Posture Guide
RCA Cable (Pair) Stereo Cable S-VHS Cable
12V-DC Adapter Remote
Controller/Battery User's Manual /
Warranty Card CD
Signal Cable Antenna Cable AC Power Cable
Arm and Option Stand
are optional.
54
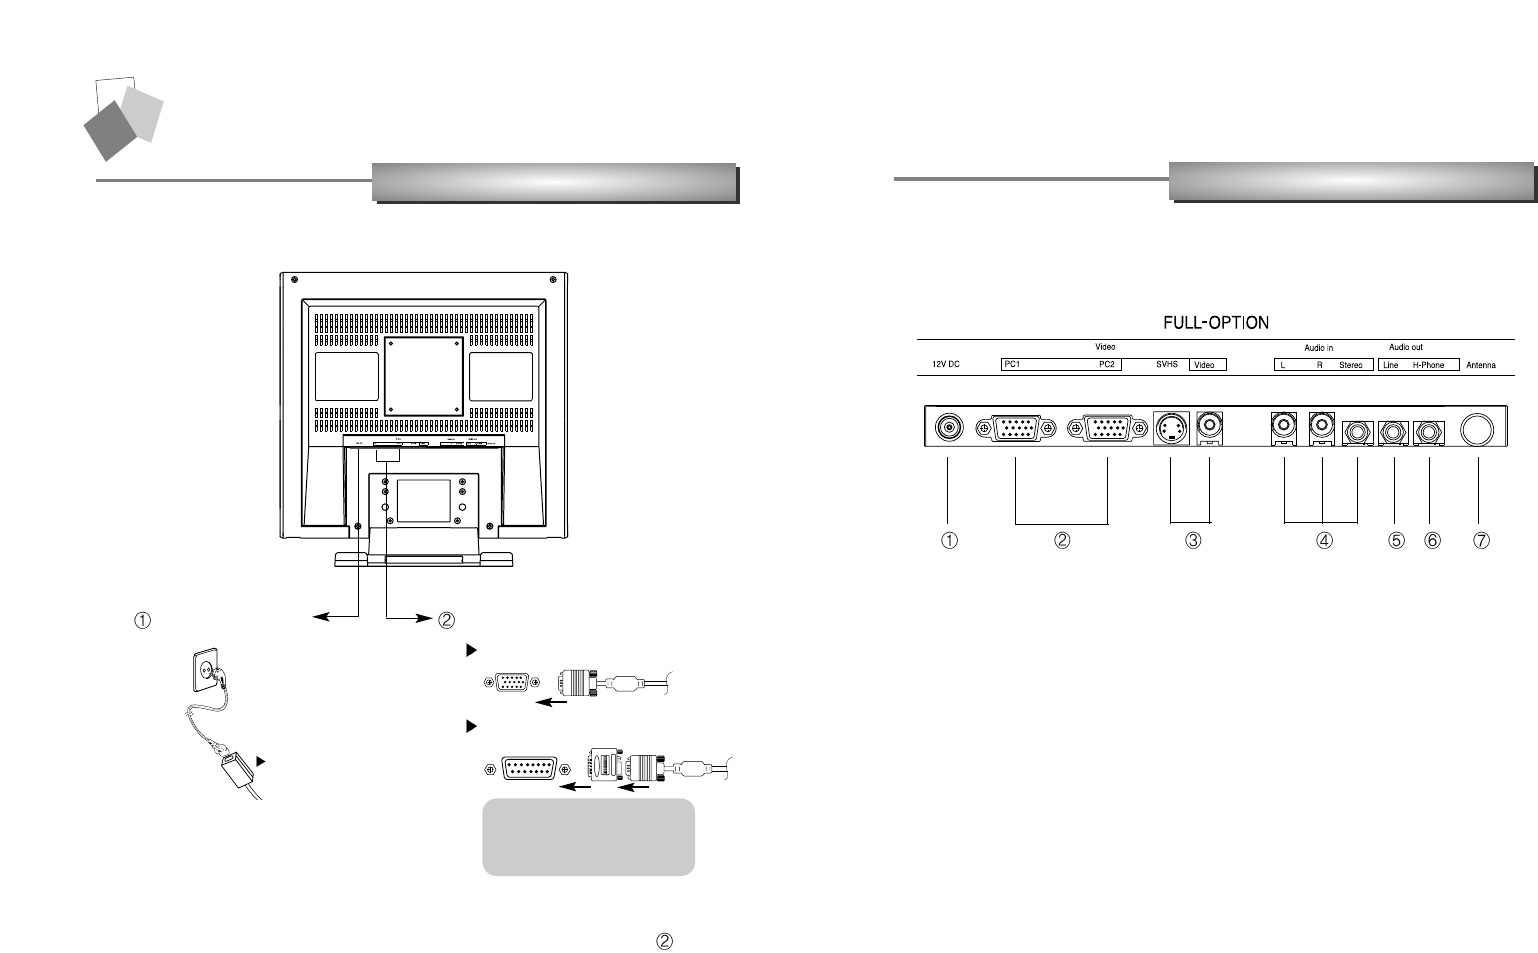
Applied Connection
Connection to Computer
Basic Connection
1. Use 220 V or 110 V. (Free Voltage)
2. Connect monitor and computer via computer cable (See figure )
3. Switch on power to monitor and computer.
4. Installation is finished.
1. Connect the adapter to "12V DC" input terminal.
2. Connect the computer cable to PC1 and DVI
3. Connect video (V1) connection cable or SVHS (V2) connection cable to
DVD, VCR or camcorder.
4. Connect audio output (computer, DVD, VCR or camcorder) to Audio In (L),
Audio In (R) or Audio In (Stereo).
5. Connect external audio system to Audio Out (Line).
6. Connect headphone or earphone to H-Phone terminal.
7. Connect antenna or CATV connection cable to "Antenna" terminal.
12V DC connection
terminal Computer cable
For PC
For Macintosh
Use adapter.
Adapter for Macintosh (Optional)
Refer to the table on the rear side of
the optional Macintosh adapter and
adjust DIP switch by the resolution of
the monitor.
76
Installing Monitor Driver
1. Insert the CD in the CD-ROM driver.
2. "Installation Manager" window appears.
(Or, double-click Install.exe in the CD-ROM driver folder using search function.)
3. Click "Driver Installation" icon.
4. Select the model and click "OK".
5. Select icm file of the model in the icm folder in CD-ROM driver, and then click
"OK" button.
6. Click "Exit" to close the installation.
Automatic Installation
Manual Installation
1. Insert the CD in the CD-ROM driver.
2. Click 'My Computer' and follow the procedure below.
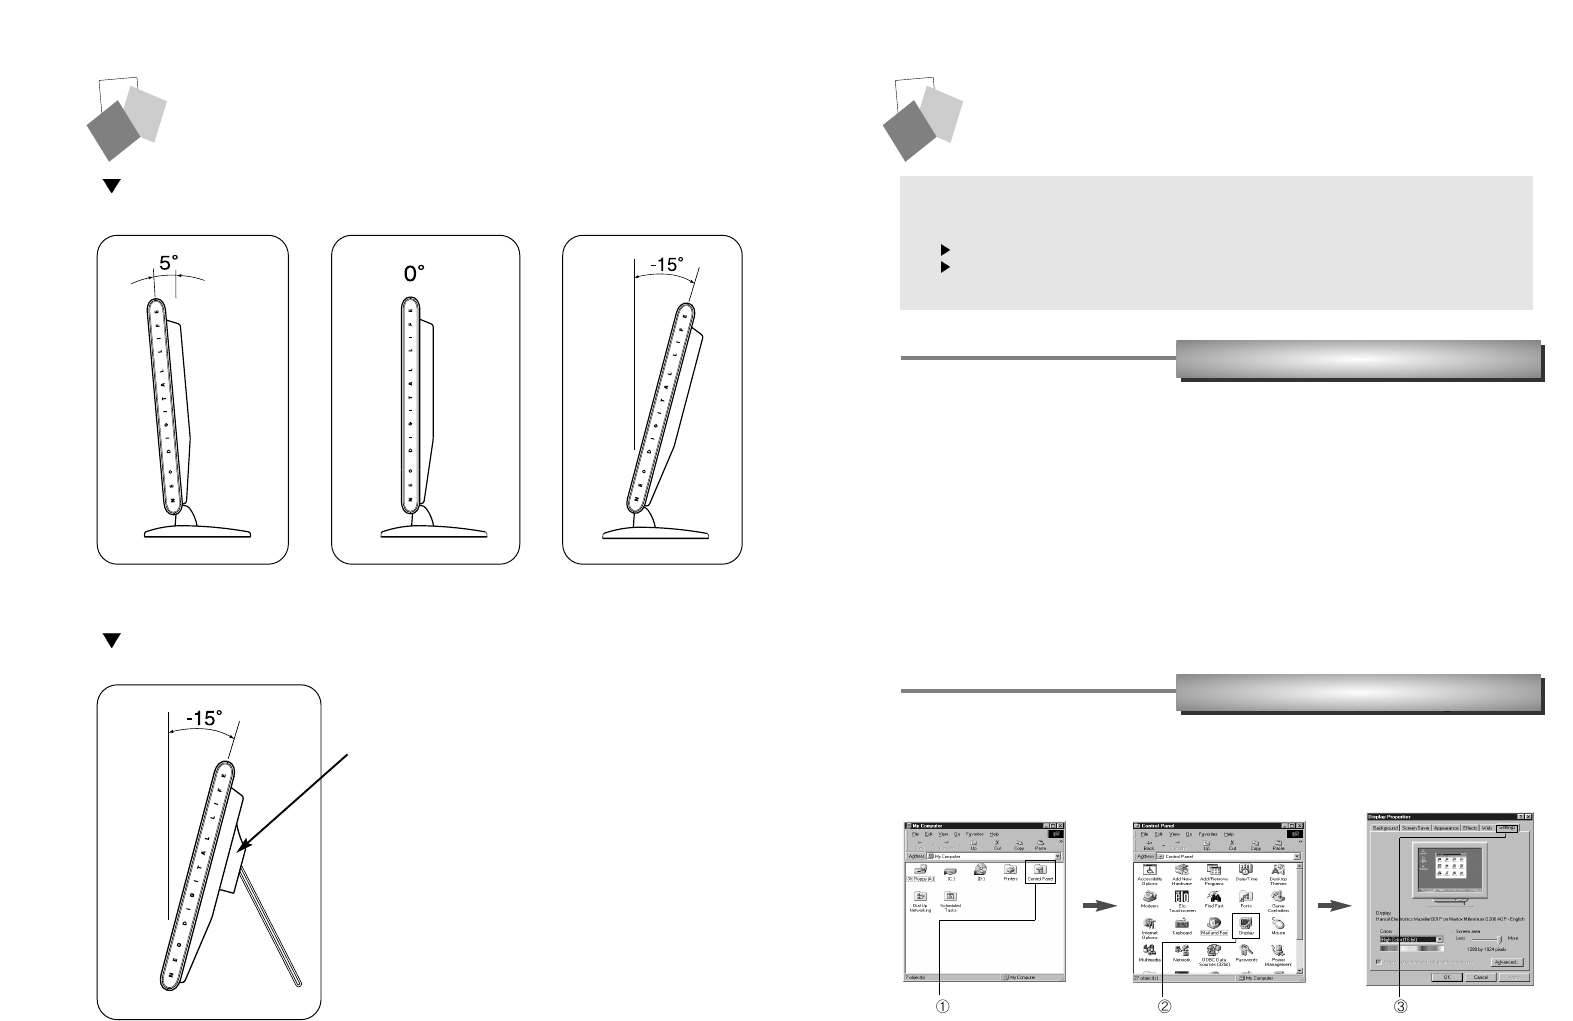
How to Adjust Monitor Angle
How to Default Stand
How to Option Stand
Refer to page 28 for installation of VESA stand.
Click 'Control Panel'. Click 'Display'. Click 'Settings'.
Run (Click) Install at CD-ROM driver and select the product model to set the optimum
display in Window 95 or 98.
Use the Driver CD provided.
Download the latest driver from home page of Hansol Electronics Inc.
(http://www.hansolel.co.kr).
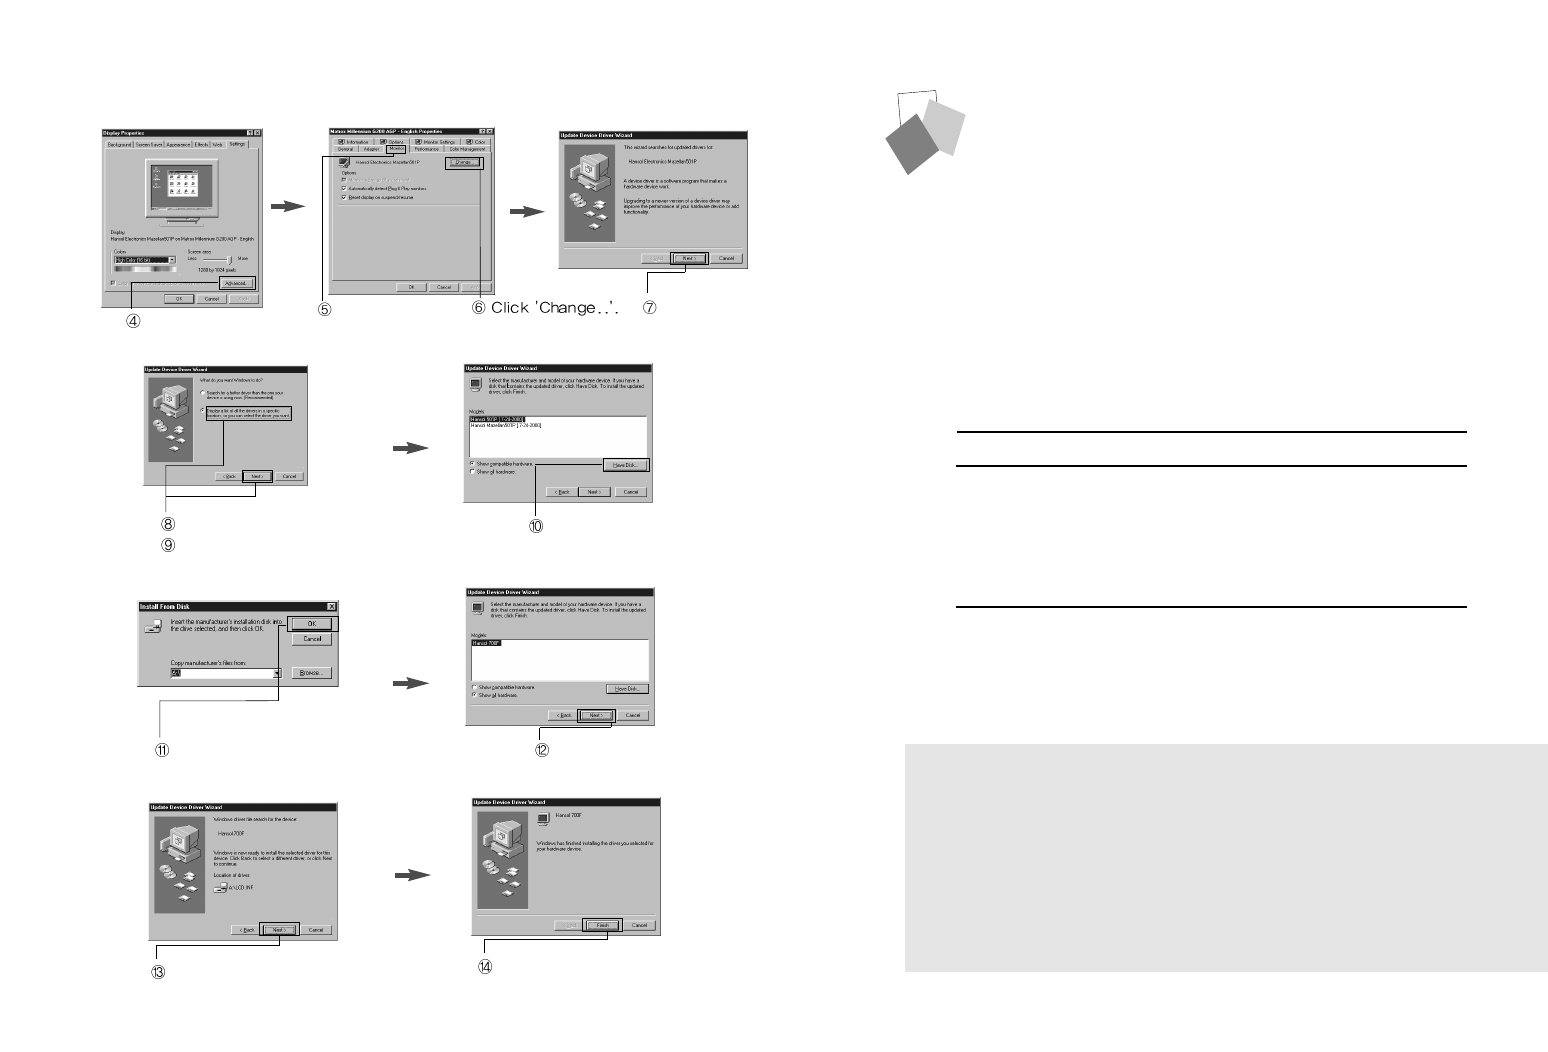
Click 'Finish'.
Click 'Next>'.
98 9
No image is displayed with LED blinking.
Monitor is in power saving mode.
Use mouse or keyboard to release power saving mode.
No image is displayed without LED on.
Power cable plug must be pulled out.
Check the power plugs on monitor and on the wall.
Power Management Feature
When not in use for a long period of time, the monitor
automatically reduces its power consumption, meeting power
saving standards of EPA and NUTEK.
The monitor is equipped with a power saving circuit that
conforms to the world-standard Display Power Manager
Signalling (DPMS) mode of Video Electronics Standard
Association (VESA).
The power management feature requires that the video card
of the computer should support DPMS function.
Status Color of LED Power Consumption
Normal Green Normal Power
Pause Amber/Blinking
( 1 second interval )
Power Cut Off Amber/Blinking
( 2 second interval )
Click 'Advanced..'. Click 'Next>'.
Click 'Monitor'.
Click 'Display a list of all...'.
Click 'Next>'. Click 'Have Disk..'.
Select the driver and click 'OK'. Click 'Next>'.
3. Select Exit if the monitor model is changed, and then reboot Windows.
10 W or Below
5 W or Below