Hanwha Techwin PRO815 Digital Camera User Manual H1 en 002 v03
Samsung Techwin Co Ltd Digital Camera H1 en 002 v03
UserManual.wiki
>
Hanwha Techwin
>
PRO815 User Manual
>
Users Manual 4 of 7
Contents
1.
Users Manual 1 of 7
2.
Users Manual 2 of 7
3.
Users Manual 3 of 7
4.
Users Manual 4 of 7
5.
Users Manual 5 of 7
6.
Users Manual 6 of 7
7.
Users Manual 7 of 7
Users Manual 4 of 7
Navigation menu
Upload a User Manual
Namespaces
Wiki Guide
HTML
PDF
Info
Views
User Manual
Discussion / Help
Navigation
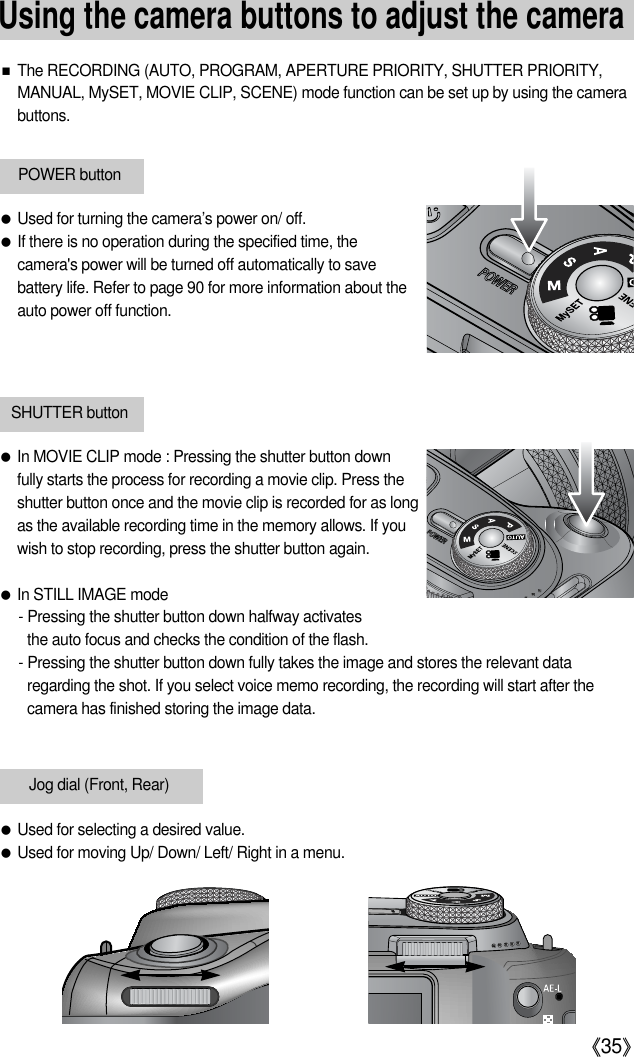
![《32》■How to use the MySET mode ( )This mode allows users to save frequently used shootingsettings for later use.Step 1~2 are the same as those for AUTO mode.3. Select the MySET mode by rotating the mode dial.4. Press the menu button and select the [ ] menu tab.5. Press the Right button and select the [Load Myset]menu by pressing the Up/Down button.6. Press the Right button and select a desired MySETnumber by pressing the Up/Down button.7. Press the OK button and a confirmation window willdisplay. Select the [Yes] menu and press the OK buttonto load the camera configuration saved in the MySETnumber and close the menu screen.8. Point the camera towards the subject and compose theimage by using the LCD.9. Press the shutter button to capture an image.Please see page 57 for details of the MySET shooting mode and menus.2825[ MySET mode ]■How to use the MOVIE CLIP mode ( )A movie clip can be recorded for as long as the availablerecording time of the memory capacity allows.Step 1~2 are the same as those for AUTO mode.3. Select the MOVIE CLIP mode by rotating the mode dial.4. The MOVIE CLIP mode icon and available recordingtime will display on the LCD.5. Point the camera towards the subject and compose theimage by using the LCD. Press the shutter button andmovie clips are recorded for as long as the availablerecording time. Movie clips will still be recorded if theshutter button is released. If you wish to stop recording,press the shutter button again.* Image size and type are listed below.- Image size : 640X480, 320X240, 160X120(Selectable)- File type : *.avi(MJPEG)2800:01:08[ MOVIE CLIP mode ]Recording mode](https://usermanual.wiki/Hanwha-Techwin/PRO815.Users-Manual-4-of-7/User-Guide-572123-Page-1.png)
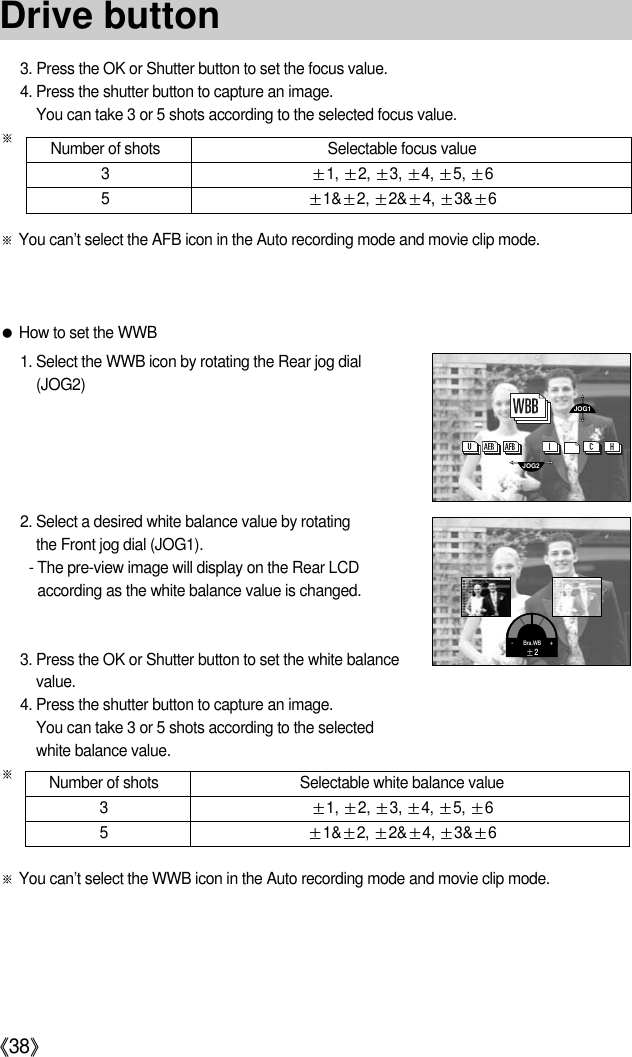
![《33》■How to use the SCENE mode ( )Use the menu to easily configure optimal settings for avariety of shooting situations. These include NIGHT,PORTRAIT, CHILDREN, LANDSCAPE, CLOSE UP,TEXT, SUNSET, DAWN, BACKLIGHT, FIREWORKS andBEACH & SNOW scenes.Step 1~2 are the same as those for AUTO mode.3. Select the SCENE mode by rotating the mode dial.4. Press the SCENE button and scene menu will display asshown alongside.5. Select the desired Scene sub menu by rotating the Rearjog dial (JOG2) and press the OK button. Please seepage 58 for detailed descriptions for each scenes.6. The current scene icon is displayed at the top left of theLCD.7. Point the camera towards the subject and compose theimage by using the LCD.8. Press the shutter button to capture an image.[ Night scene mode ]JOG22825[ SCENE mode ]Recording mode](https://usermanual.wiki/Hanwha-Techwin/PRO815.Users-Manual-4-of-7/User-Guide-572123-Page-2.png)
![《34》■Pressing the shutter button down half way.Lightly press the shutter button to confirm focus and flash battery charge (p.00). - When the green auto focus frame lights up, it means the camera is focused on the subjectand a beep will sound. - When the flash is charged, the flash status lamp (Red) will illuminate. Press the shutterbutton all way down to take the picture.■The available recording time may vary depending on shooting conditions and camera settings.■When the Flash Off or Slow synchro mode is selected in a low lighting condition, the camerashake warning indicator ( ) may appear on the LCD. In this case, use a tripod, supportthe camera on a solid surface or change the flash mode to flash shot mode.■Compensated shooting against the light :Please do not take pictures to the sunlight direction. Taking a picture against the sun maymake the picture dark. To take a picture against the sun, please use the [Backlight] in thescene shooting mode (see page 58), fill-in flash (see page 36), spot metering (see page 51),or exposure compensation (see page 42).■Avoid obstructing the lens or the flash when you capture an image.■Using the Rear LCD extensively will drain the battery.We recommend turning off the Rear LCD and using the Finder LCD and Top LCD as often aspossible in order to extend battery life.■Under certain conditions the auto focus system may not perform as expected.- When photographing a subject that has little contrast.- If the subject is highly reflective or shiny.- If the subject is moving at high speed.- When there is strong reflected light, or when the background is very bright.- When the subject matter has only horizontal lines or the subject is very narrow (such as astick or flagpole).- When the surroundings are very dark.■If the camera doesn’t be turned off by the Power button, the changed menu settings may notbe saved. ■If there is no operation during the specified time, the LCD will be turned off automatically tosave battery life. Refer to the [LCD off] menu (p.00) for more information. [ Lightly press the shutter button] [ Press the shutter button ]Things to Watch Out for When Taking Pictures](https://usermanual.wiki/Hanwha-Techwin/PRO815.Users-Manual-4-of-7/User-Guide-572123-Page-3.png)
![《36》■You can select various shooting mode.■When you select RAW, TIFF file format,you can’t select the continuous shooting,Bracket shooting, interval shooting.■Drive mode●Single shooting ( ) : Takes one picture only.●Continuous shooting ( ) : Images will be taken continuously until the shutter buttons isreleased.●High speed continuous shooting ( ) : This takes 2.5 shots of images continuously persecond.●Ultra High speed continuous shooting ( ) : This takes 10 shots of images continuouslyper second. After completing thecontinuous shooting, images are savedwith playing back the captured images.Maximum shots are 30 and the image sizeis fixed as 1024X768 ( ).●Auto Exposure Bracket ( ) : Use this menu if it is hard to decide exposure of the object.●Auto Focus Bracket ( ) : Use this menu if it is hard to decide distance of the object.●White Balance Bracket ( ) : Use this menu if it is hard to decide white balance of the object.●Interval shooting ( ) : You can take animals or changes of nature at a set interval.■How to set the drive mode●Selecting the Single/ Continuous/ High speed continuous/ Ultra High speed continuous shooting1. Press the Drive button and drive mode icon will display on the LCD.2. Select a desired drive mode by rotating the Rear jog dial (JOG 2).2825[ Drive mode menu ]JOG2[ Still image mode ]Drive button](https://usermanual.wiki/Hanwha-Techwin/PRO815.Users-Manual-4-of-7/User-Guide-572123-Page-5.png)

![《39》●How to set the interval shooting1. Select the Interval shooting icon [ ] by rotating the Rear jog dial (JOG2).2. Press the shutter button to capture an image.Images are taken at a set interval.- After taking a picture, the camera power is turned offautomatically.- After set time, the camera power is turned onautomatically and the second image is taken.- Images are taken at set number of shots and set interval continuously.3. After completing the interval shooting, the camera power is turned off automatically.●How to set the interval shooting1. Press the Menu button and select the [P] menu tab.2. Press the Right button and select the [Interval/Time]menu by pressing the Up/ Down button.3. Press the Right button and select a desired menu bypressing the Up/ Down button.- Interval time : 1 ~60 Min. (1 intervals)4. Press the OK button to set the setting5. Select the [Interval/Number] menu. 6. Press the Right button and select a desired menu bypressing the Up/Down button.- Number of interval shooting : 2 ~ 997. Press the OK button to set the setting.JOG2●If you press the power button during the interval shooting (camera power is off),the interval shooting is cancelled.●You can’t select the interval shooting in the Auto recording mode and movie clip mode.●If you select RAW, TIFF file format, you can’t select the interval shooting.●You can set the number of interval shots over number of shots remaining but the imagesare taken to the number of shots remaining.●We recommend that you use full charged battery or AC adapter when you take theinterval shooting.INFORMATIONDrive button채도 조정샤프니스음성 메모인터벌/시간인터벌/촬영매수사용자 설정컬러 스페이스1분샤프니스음성 메모인터벌/시간인터벌/촬영매수사용자 설정컬러 스페이스SaveMyset2장[ Selecting the interval time ][ Selecting the number of interval shooting ]](https://usermanual.wiki/Hanwha-Techwin/PRO815.Users-Manual-4-of-7/User-Guide-572123-Page-8.png)
![《40》■This function is used when the photographerwould also like to be in the image.■How to use the Self-timer/ Remote button1. Press the self-timer button and a self-timer icon willdisplay on the LCD.2. Select a desired self-timer by rotating the Rear jog dial(JOG2).3. Press the OK button to set the setting.- Selecting a self-timer :An image will be taken after the specified time haselapsed and the self-timer function will be maintained.- Selecting a remote controller :An image is taken by the shutter button of the remotecontroller instead of the shutter button of the camera.- Canceling the self-timer :Though the self-timer function will be maintained aftertaking an image, rotating the mode or pressing the playmode button cancels the self-timer function.■Self-timer/ Remote mode- Off( ) : Self-timer function is off.- 2 Sec. Self-timer ( ) : Pressing the shutter button will allow an interval of 2seconds before the image is taken.- 10 Sec. Self-timer ( ) : Pressing the shutter button will allow an interval of 10seconds before the image is taken.- Double Self-timer ( ) : A picture will be taken after about 10 seconds and 2seconds later a second picture will be taken.- Remote controller ( ) : Image is taken by Pressing the shutter button ofremote control.- 2 Sec. Remote controller ( ) : Pressing the shutter button of remote control will allowan interval of 2 seconds before the image is taken.2825JOG2[ Self-timer/ Remote controller icon ][ Selecting the 2 Sec. self-timer ]Self-timer/ Remote button](https://usermanual.wiki/Hanwha-Techwin/PRO815.Users-Manual-4-of-7/User-Guide-572123-Page-9.png)