Hanwha Techwin PRO815 Digital Camera User Manual H1 en 002 v03
Samsung Techwin Co Ltd Digital Camera H1 en 002 v03
UserManual.wiki
>
Hanwha Techwin
>
PRO815 User Manual
>
Users Manual 5 of 7
Contents
1.
Users Manual 1 of 7
2.
Users Manual 2 of 7
3.
Users Manual 3 of 7
4.
Users Manual 4 of 7
5.
Users Manual 5 of 7
6.
Users Manual 6 of 7
7.
Users Manual 7 of 7
Users Manual 5 of 7
Navigation menu
Upload a User Manual
Namespaces
Wiki Guide
HTML
PDF
Info
Views
User Manual
Discussion / Help
Navigation
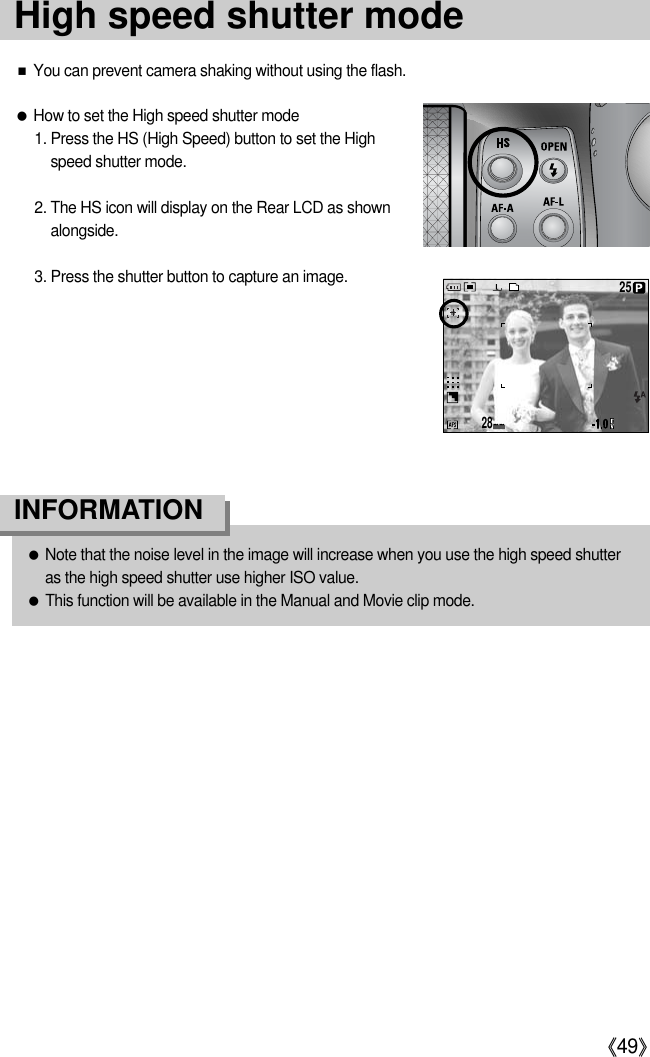
![《41》[ Shutter button on the remote control ]●Remote control rangeWhen you take an image by using the remotecontrol, refer to the illustrations shown alongsideabout the remote control range.●Replacing batteries for the remote controlMake sure the + polarity is toward the top and the - polarity is toward the bottom whileinstalling batteries for the remote control. Assemble the cover into the remote control as thedirection of remote control. Rotate the cover as shown below. Replace battery for the remotecontrol in the local service centre. Use the CR 2025 3V battery.●If you operate the Mode dial and Self-timer button during the self-timer operation, the self-timer function is cancelled.●Use a tripod to prevent the camera from shaking.INFORMATION●Though you select a remote controller icon, you can take an image by shutter button ofthe camera.●If you select the 2 Sec. remote controller icon and press the shutter button of the camera,the image will be taken after 2 seconds.●When you select RAW and TIFF file type, you can’t select the double self-timer.INFORMATIONSelf-timer/ Remote button](https://usermanual.wiki/Hanwha-Techwin/PRO815.Users-Manual-5-of-7/User-Guide-572124-Page-1.png)
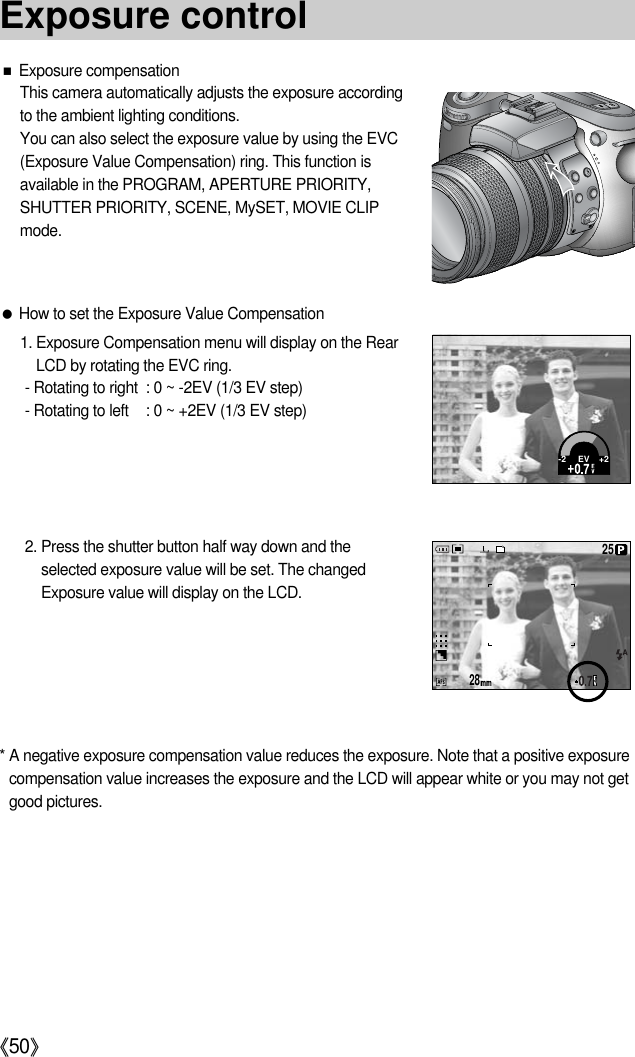
![《42》■You can select the ISO sensitivity whentaking pictures.The speed or specific light-sensitivity of acamera is rated by ISO numbers.■ISO- AUTO ( ) :The camera's sensitivity is automatically changed by variables such as lighting value orsubject brightness.- 50, 100, 200, 400, 800 :You can increase the shutter speed while the same amount of light is present, by increasingthe ISO sensitivity. However, the image may be saturated in high luminance. The higher theISO value, the higher the camera’s sensitivity to light is and therefore the greater its capacityto take pictures in dark conditions. However, the noise level in the image will increase as theISO value increases, making the image appear coarse.■How to set the ISO1. Press the ISO button and an ISO icon will display on the LCD.2. Select a desired icon by rotating the Rear jog dial (JOG2).3. Press the OK button to set the setting.2825JOG2[ ISO icons ] [ Selecting ISO 100 ]ISO button](https://usermanual.wiki/Hanwha-Techwin/PRO815.Users-Manual-5-of-7/User-Guide-572124-Page-2.png)
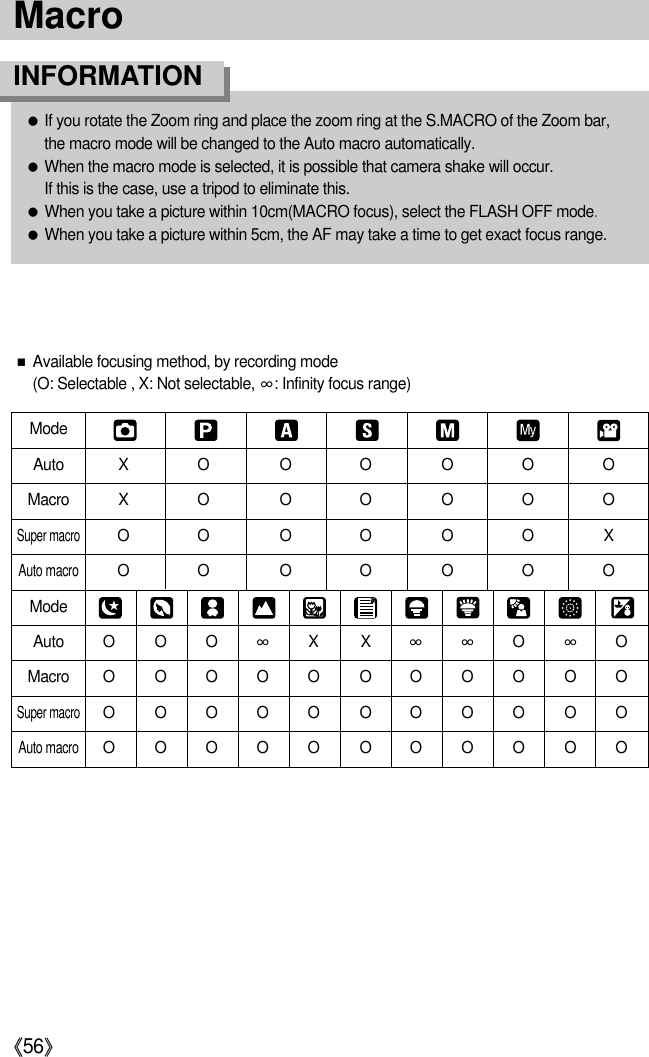
![《43》■If you cannot obtain suitable exposureconditions, you can change the meteringmethod to take brighter pictures.■Metering methods- Multi metering ( ) :Exposure will be calculated based on the each parts of the LCD divided into several parts.This is suitable for general use.- CWA (Center Weighted Average) metering ( ) :Exposure will be calculated based on an average of the available light in the image area.However, the calculation will be biased towards the centre of the image area.This is suitable for taking a small object like a flower or insects.- Spot metering ( ) :Only the cross marked area in the centre of the LCD will be metered for light.This is suitable when the subject in the centre is exposed correctly, regardless of the backlighting.※The + mark will be displayed in case of selecting the Spot metering menu. ■How to set the metering mode1. Press the metering button and a metering icon will display on the LCD.2. Select a desired icon by rotating the Rear jog dial (JOG2).3. Press the OK button to set the setting.2825JOG2[ Metering icons ] [ Selecting the spot metering ]Metering button](https://usermanual.wiki/Hanwha-Techwin/PRO815.Users-Manual-5-of-7/User-Guide-572124-Page-3.png)
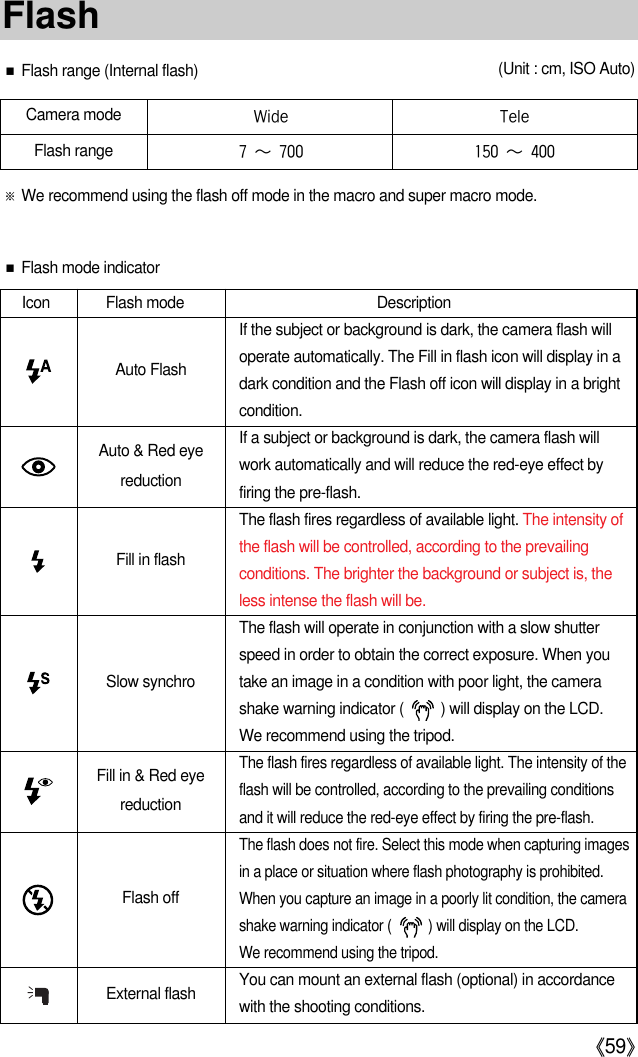
![《44》■You can change the zoom rate by rotatingthe Zoom ring.●This camera has a 15X optical zoom and a2X and 4X digital zoom function. Using bothwill offer a total zoom ratio of 30X or 60X.282511025[ Wide ] [ Tele ]110252825[ Tele ] [ Wide ]●Optical Zoom WIDERotate the Zoom ring to left. This will zoom out from the subjecti.e. the subject will appear further away.●Optical Zoom TELERotate the Zoom ring to right. This will zoom into the subject i.e.the subject will appear nearer.Zoom operation](https://usermanual.wiki/Hanwha-Techwin/PRO815.Users-Manual-5-of-7/User-Guide-572124-Page-4.png)
![《45》●Images taken using the digital zoom may take a little longer for the camera to process.Allow time for this to take place.●The digital zoom cannot be used in movie clip shots.●You may notice a decrease in image quality when using the digital zoom.●The higher optical and digital zoom, the more camera shake can be take place. When you select a higher optical or digital zoom, we recommend using the tripod. ●Take care not to press the lens as this may cause a camera malfunction.●Do not pull the lens by hand or do not rotate the zoom ring quickly.It may cause a camera malfunction. Please be careful when using the lens.INFORMATION●Digital zoomPressing the Digital zoom button will enlarge the subject asshown below.[ Off ] [ Digital zoom 2X ] [ Digital zoom 4X ]PressingtheZoombuttonPressing the Zoom buttonPressingtheZoombutton28252825x2.02825x4.0Zoom operation](https://usermanual.wiki/Hanwha-Techwin/PRO815.Users-Manual-5-of-7/User-Guide-572124-Page-5.png)
![《46》■You can select a proper focus mode by switching the focus switch.●AF-A : Changing the focus frameYou can change the focus frame size and position according to the subject size and positionby pressing the AF-A button. This function is available in the AF-S, AF-C mode.- Wide AF : This is useful when taking wide range of frame.- Modifying the Spot AF position : The frame will be yellowed and the frame can be changedits position.- Setting the Spot AF position : The frame turns white and the frame position will be set.2825282528252825[ Moving Left/ Right the frame ][ Moving Up/ Down the frame ]2825[ Wide AF ] [ Setting Spot AF ] [ Spot AF ]AF-AbuttonAF-AbuttonFront jog dial (JOG1)Rear jog dial (JOG2)Focusing](https://usermanual.wiki/Hanwha-Techwin/PRO815.Users-Manual-5-of-7/User-Guide-572124-Page-6.png)
![《47》●AF-C : Continuous Auto FocusThis is suitable for taking moving subject. The camerakeeps focusing the subject during the shutter button ispressed halfway down.※Note that using the Continuous Auto Focus uses morebattery than the Single Auto Focus.※This function will not be available in the Auto recordingmode and Scene mode except for the [Children] and[Close-up] scene mode.●AF-L : Focus lockTo focus on the subject positioned outside of the centre,use this button. This function is available in the AF-Smode.- How to use the focus lock1. Ensure the subject in the centre of the auto focusframe.2. Press the AF-L button. The frame turns green andFocus lock icon ( ) will display.It means the camera is focused on the subject.3. Recompose the picture and press the shutter button. After taking an image, the Focuslock function will be cancelled.※This function will not be available in the [Children] and [Close-up] scene mode.●AF-S : Single Auto FocusThis is suitable for taking a still image. Whenever theshutter button is pressed, the camera is focused on thesubject automatically.282528252825Focusing](https://usermanual.wiki/Hanwha-Techwin/PRO815.Users-Manual-5-of-7/User-Guide-572124-Page-7.png)
![《48》●MF : Manual FocusWhere the automatic focusing is not available, for example,in very dark conditions, use the manual focus.Please becareful when using the manual focus as the picture can beblurred easily.※When you use the manual focus, the centre of the LCDis enlarged.※This function will not be available in the auto recordingand scene modes.●How to set the direct MF in the Program modeYou can change the focus even though the camera is focused on a subject by rotating thefocus ring. This function is available in the AF-S mode.1. Press the Menu button and select [P] menu tab.2. Press the Right button and select [Direct MF] menu bypressing the Up/ Down button.3. Press the Right button and select a desired sub menuby pressing the Up/ Down button.- [Off] : You can’t change the focus manually.- [On] : You can change the focus manually.4. Select the [On] sub menu. Press the OK button to setthe change and [DM] icon will display on the Rear LCD. 5. Pressing the shutter button half way down, change thefocus by rotating the Focus ring.- To move the focus closer, rotate the Focus ring to right.- To move the focus farther, rotate the Focus ring to left.Save MysetFlash Synchro.Flash Pop-upDirect MFSpot AE pointSizeQualityOnOff2825[ Direct MF menu ][ Selecting Direct MF ]Focusing](https://usermanual.wiki/Hanwha-Techwin/PRO815.Users-Manual-5-of-7/User-Guide-572124-Page-8.png)
![《51》■Exposure lockThis camera automatically adjusts the exposureaccording to the ambient lighting conditions. You canchange the exposure value manually by using the AE-L(Auto Exposure Lock) button in a lighting condition wherethere are exposure differences between a subject andbackground.●How to set the Exposure Value Compensation1. Ensure the subject in the centre of the auto focus frame.2. Move the focus frame to a subject that has desired exposure value.3. Press the AE-L button and exposure value will be fixed. A exposure lock icon( ) willdisplay on the LCD.4. Recompose the picture and press the shutter button. After taking an image, the Focus lockfunction will be cancelled.[ Screen for shooting ] [ Focus to the object andpress the AE-L button ][ Refocus and fully pressthe shutter button ]282528252825Exposure control](https://usermanual.wiki/Hanwha-Techwin/PRO815.Users-Manual-5-of-7/User-Guide-572124-Page-11.png)
![《52》■5-function button activate the following.- Up button : While the menu is showing, press the Up button to move up the submenucursor. When the menu is not displayed on the LCD monitor, the UP buttonoperates as the white balance button.- Down button : While the menu is showing, press the Down button to move down thesubmenu cursor. When the menu is not showing, you can use the Downbutton to take macro pictures.- Left button : When the menu is displayed on the LCD monitor, pressing the Left buttonmakes the cursor shift to the left tab.When the menu is not displayed on the LCD monitor, the Left button operatesas the FLASH button.- Right button : When the menu is displayed on the LCD monitor, pressing the Right buttonmakes the cursor shift to the right tab.When the menu is not displayed on the LCD monitor, you can execute afunction that was set in the [Custom set] menu by pressing this button.- MENU/OK button : If the menu is displayed, use the 5-Function buttons to change the datavalues and for your changes to be accepted.If the menu is not displayed, press the MENU/OK button to display amenu for the current camera mode on the LCD. Press the button againto return to the previous state.5-function button](https://usermanual.wiki/Hanwha-Techwin/PRO815.Users-Manual-5-of-7/User-Guide-572124-Page-12.png)
![《53》■The white balance control allows you to adjust the colours toappear more natural looking.●How to set the white balance1. Press the WB (Up) button and a white balanceicon will display on the LCD monitor.2. Select a desired white balance by rotating theRear jog dial (JOG2).AUTO : The camera automatically selects the appropriate whitebalance settings, depending on the prevailing lightingconditions.DAYLIGHT : For taking images outside.CLOUDY : For taking images under a cloudy and overcast sky.Fluorescent H : For shooting under daylight fluorescent types of three-wayfluorescent lighting.Fluorescent L : Shooting under white fluorescent lighting.TUNGSTEN : For shooting under tungsten (standard light bulb) lighting.CUSTOM : Allows the user to set the white balance according to theshooting condition. (CUSTOM 1, CUSTOM 2)Colour temperature K : You can set a proper colour temperature.Different lighting conditions may cause a colour cast on your images.JOG2[ White balance icons ]White balance](https://usermanual.wiki/Hanwha-Techwin/PRO815.Users-Manual-5-of-7/User-Guide-572124-Page-13.png)
![《54》●How to set the custom white balanceWhite balance settings may vary slightly depending on the shooting environment. You canselect the most appropriate white balance setting for a given shooting environment by settingup the custom white balance.1. Select the CUSTOM ( ) menu of the WhiteBalance.You can select CUSTOM 1 or CUSTOM 2 whitebalance.2. Place a sheet of white paper in front of the camera sothat the LCD shows only white, and then press theSHUTTER button.3. The value you set will be saved.- The custom white balance value will be applied, startingwith the next picture you take.- The user configured white balance will remain effectiveuntil it is overwritten.●How to set the colour temperatureColour temperature is a simplified way to characterize thelight source. Low colour temperature implies warmer light(more red) while high colour temperature implies a colderlight (more blue).1. Select the colour temperature (K) by rotating the Rearjog dial (JOG2).2. Select a desired colour temperature (K) by rotating the Front jog dial (JOG1).- Approx. 3000 K : Incandescent lamp- Approx. 4000 K : Out door shooting around themorning or evening- Approx. 5000 K : Sunny daylight shooting- Approx. 6000 K : Electronic photo flash- Approx. 10000 K : Blue sky3. Press the WB button to set the setting.- After pressing the WB button, the colour temperatureicon will display.- The user configured white balance will remain effectiveuntil it is overwritten.White paperJOG2Measure : SHUTTERJOG2JOG1 3000 K 10000 K 6000K [ Colour temperature icon ][ Selecting a colour temperature ]White balance](https://usermanual.wiki/Hanwha-Techwin/PRO815.Users-Manual-5-of-7/User-Guide-572124-Page-14.png)
![《55》■When the menu is not showing, you can use the MACRO/DOWN button to take macro pictures.1. Press the Macro (Down) button and the macro icon willdisplay on the LCD.2. Select a desired macro icon by rotating the Rear jog dial(JOG2).3. Press the Macro (Down) button to set the setting.1. Rotate the Zoom ring and place the zoom ring at the S.MACRO of the Zoom bar.2. Press the Macro (Down) button and the macroicon will display on the LCD.3. Select the super macro icon ( ) byrotating the Rear jog dial (JOG2).4. Press the Macro (Down) button to set the setting.●How to set the super macro●How to set the macro■Types of focus modes and focus rangesJOG2JOG2[ Macro icons ][ Selecting the super macro ]Unit : cmWide Tele Wide Tele Wide Tele Wide TeleFocustypeFocusrange 50~∞350~∞10~70 150~370 10~∞150~∞Macro Super macro Auto macroAuto3~70(Focus range : 50 ~ 100m)MacroZoom ring](https://usermanual.wiki/Hanwha-Techwin/PRO815.Users-Manual-5-of-7/User-Guide-572124-Page-15.png)
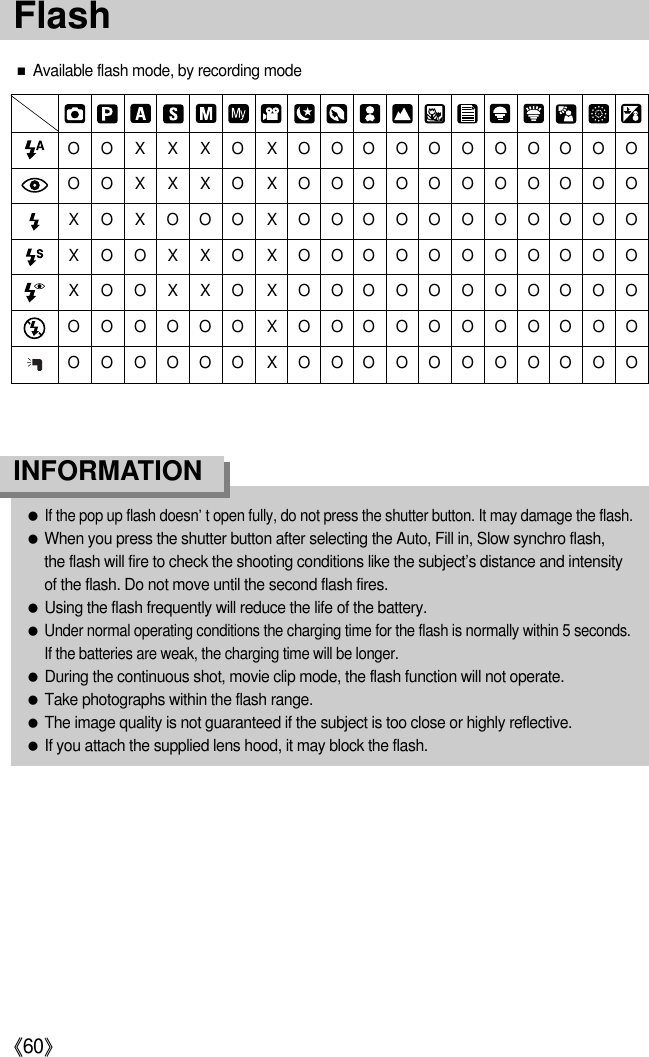
![《57》■You can select a flash according to the shooting conditions.●How to set the pop-up flash1. Press the Menu button and select the [P] menu tab.2. Press the Right button and select [Pop-up] menu bypressing the Up/ Down button.3. Press the Right button and select a desired menu bypressing the Up/ Down button.- [Auto] : The flash will pop-up by pressing the shutterbutton half way down in accordance with thelighting condition.- [Manual] : The flash off mode will be selected and theflash will not pop-up automatically. To use the flash, press the Pop-up flash button.4. Press the OK button to set the setting.●How to set the flash mode1. Press the Flash button (Left) and flash mode iconsdisplay on the LCD.2. Select a desired flash icon by rotating the Rear jog dial(JOG2).3. Press the Flash button to set the setting.Color SpaceSave MysetFlash Synchro.Flash Pop-upDirect MFSpot AE pointSizeAutoManualColor SpaceSave MysetFlash Synchro.Flash Pop-upDirect MFSpot AE pointSizeManualAutoJOG2[ Flash mode icons ]※When you select the [Manual] menu, press the Pop-up flash button to use the flash.※Do not open the pop-up flash by force. It may cause breakdown of the flash. Press the Pop-up button to open the flash.Flash](https://usermanual.wiki/Hanwha-Techwin/PRO815.Users-Manual-5-of-7/User-Guide-572124-Page-17.png)
![《58》●Flash compensation : The intensity of the flash will becontrolled, according to the lightingconditions.1. Press the Pop-up flash button and the flash will pop up.2. Press the Pop-up flash button again and a gauge willdisplay as shown alongside.3. Rotate the Front jog dial (JOG1) to select a desiredintensity of flash.4. Press the shutter button half way down to set the setting.The intensity of flash will display on the LCD.CustomColor SpaceSave MysetFlash Synchro.Flash Pop-upDirect MFSpot AE point1st Curtain2nd CurtainCustomColor SpaceSave MysetFlash Synchro.Flash Pop-upDirect MFSpot AE point1st Curtain2nd Curtain1. Press the Menu button and select the [P] menu tab.2. Press the Right button and select the [Flash Synchronization]menu by pressing the Up/ Down button.3. Press the Right button and select a desired menu bypressing the Up/ Down button.- [1st curtain] : The flash fires right after the shutter fullyopens.- [2nd curtain] : The flash fires just before the shuttercloses.4. Press the OK button to set the setting.●Flash synchronization : You can select a flash timing to take a desired image (In case of theProgram mode)28230FlashJOG1-2FLASH+2+0.7 FL](https://usermanual.wiki/Hanwha-Techwin/PRO815.Users-Manual-5-of-7/User-Guide-572124-Page-18.png)
![《62》●How to set the Custom settings in the Program mode1. Press the Menu button and select the [P] menu tab.2. Press the Right button and select the [Custom] menu bypressing the Up/ Down button.3. Press the Right button and select a desired sub menuby pressing the Up/ Down button.- Size- Quality- Effect- Sharpness- Voice memo- LCD brightness※The sharpness can't be saved in the Auto mode. The sharpness and voice memo can't be saved in theMovie clip mode.4. Press the OK button to set the setting.■You can save your preferences in the [Custom] menu and load it by pressing the Custom button.●How to use the Custom button1. After selecting a desired sub menu in the [Custom]menu, press the Custom button.2. The selected menu will display on the LCD.3. Select a desired sub menu by rotating the Rear jog dial(JOG2) and press the OK button to set the setting.Voice MemoInterval/TimeInterval/NumberCustomColor SpaceSave MysetFlash Synchro.Voice MemoLCD BrightnessSizeQualityEffectVoice MemoInterval/TimeInterval/NumberCustomColor SpaceSave MysetFlash Synchro.Voice MemoLCD BrightnessSizeQualityEffectJOG2[ Size sub menu ]Custom settings[ Program mode ]](https://usermanual.wiki/Hanwha-Techwin/PRO815.Users-Manual-5-of-7/User-Guide-572124-Page-22.png)
![《64》■You can check the recording status in the LCD. Pressing the Display/ Information button will change the display asshown below.■Some information will not display in the AUTO, MOVIE CLIPand SCENE mode.28252825※Information displayed on the Finder LCD is the same as its information on the Rear LCD.■Histogram shows you the distribution of brightness inrecorded images. If the bars in the histogram are highertowards the right, the image may be too bright. If the barsare higher on the left, the image may be too dark. If thelighting conditions are too bright to check the subject byusing the LCD, checking the histogram will enable moreprecise exposure control for the shots.■Self-examinationThe last captured image displays on the left side of the LCD and pre-view image displays onthe right side of the LCD. You can compare with the two images to take next shot. PixelDark BrightDistribution of brightnessPressing the ( )buttonPressing the ( )button[ Normal display ] [ Image only ] [ Image & Full information ]7525282825Pressing the ( )buttonPressing the ( )button[ Self-examination ][ Grid mark ] [ Histogram ]Display/ Information button ( )](https://usermanual.wiki/Hanwha-Techwin/PRO815.Users-Manual-5-of-7/User-Guide-572124-Page-24.png)
![《65》Sub menu Icon Description[Children][Landscape][Close up][Sunset][Dawn][Backlight][Firework][Beach & Snow]■Select the [Scene] submenu to automatically configure optimal settings, depending on theselected scene.■This function is only available in the SCENE Mode. Refer to page 00 for more information.To take a picture of fast moving objects, for example, children.[Portrait] To take a picture of a person.[Night]Use this for shooting still images at night or in other dark conditions.Close-up shooting for small objects such as plants and insects.For taking pictures of sunsets.To take pictures of distant scenery.Daybreak scenes.Portrait without shadows caused by backlight.Firework scenes.[Text] Use this mode to shoot a document.For ocean, lake, beach and snowscape scenes.●When [Night], [Landscape], [Close up], [Text], [Sunset], [Dawn] and [Firework] scenemode are selected, it is possible that camera shake will occur. In this case, take care ofthe camera shaking.●In the [Children] and [Close up] scene mode, the Continuous Automatic Focusing (CAF)function will be activated and the CAF icon is displayed at the bottom of the LCD.INFORMATIONJOG2SCENE button](https://usermanual.wiki/Hanwha-Techwin/PRO815.Users-Manual-5-of-7/User-Guide-572124-Page-25.png)
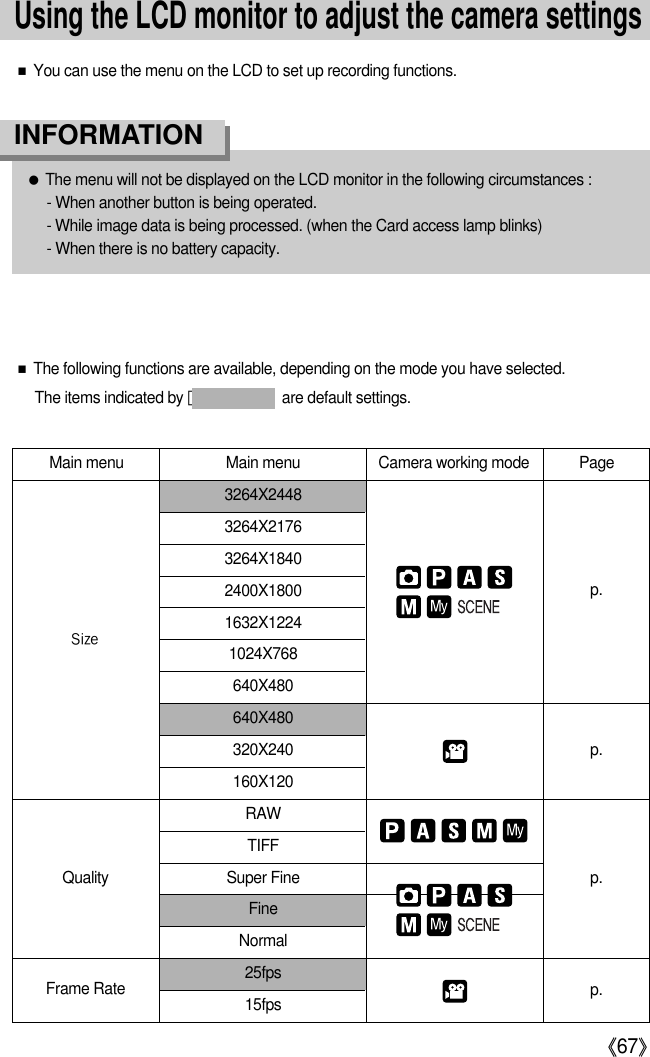

![《70》■You can select the image size appropriate for your application.With Menu button With Jog dial Icon3264X2448 L3264X2176 3:23264X1840 16:92400X1800 M11632X1224 M21024X768 S1640X480 S2640X480 640320X240 320160X120 160Still imageMovie clip●The higher the resolution, the lower the number of available shots will be because highresolution images require more memory than lower resolution images.INFORMATIONModeSizeFlash Pop-upDirect MFSpot AE pointSizeQualityEffectContrast1024×768640×4803264×24483264×21763264×1840[ Program mode ]Size](https://usermanual.wiki/Hanwha-Techwin/PRO815.Users-Manual-5-of-7/User-Guide-572124-Page-30.png)
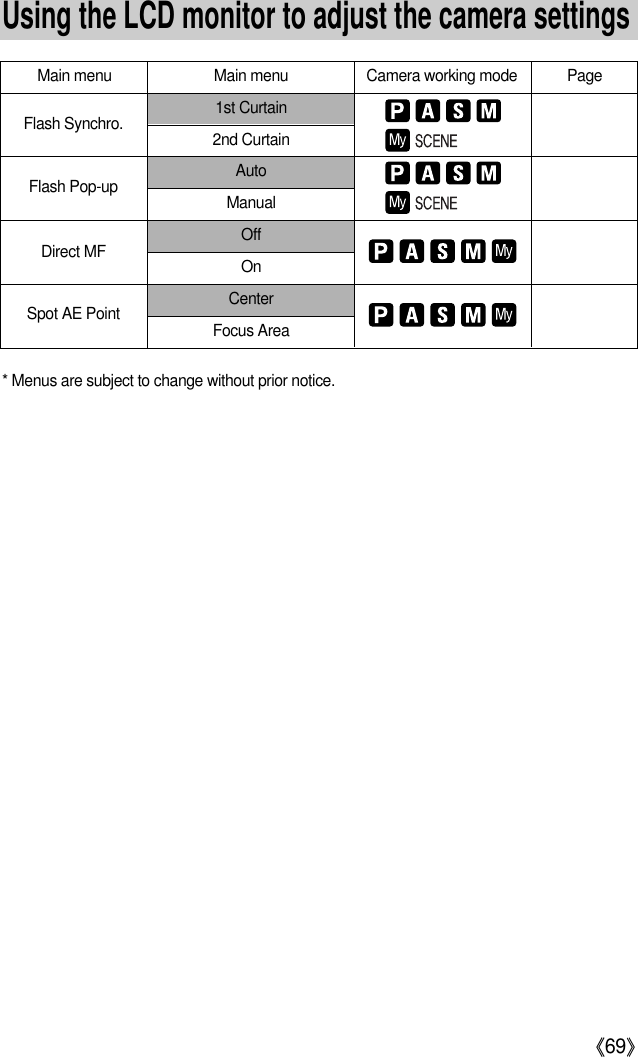
![《71》■You can select the compression ratio appropriate for your application of the captured images.The higher the compression ratio, the lower the picture quality.Mode Icon RAW TIFFSub menu RAW TIFF S. Fine Fine Normal 25FPS 15FPSFile format dng tif jpeg jpeg jpeg avi aviStill image mode Movie clip mode●A RAW file contains the original image information. To edit this file format, you have touse supplied software to edit it.●The RAW and TIFF file format are for professionals and provides the best quality.However, large file size reduces number of available pictures to take and increasessaving time to the memory card.●A [Processing...] message is displayed while saving a RAW or TIFF file to the memory card.●When you select a RAW or TIFF file type, the image size is fixed as 3264X2448( ).●The RAW and TIFF file format can’t be selected in the SCENE mode.●This file format complies with the DCF (Design rule for Camera File system).●JPEG (Joint Photographic Experts Group) : JPEG is the image compression standarddeveloped by the Joint Photographic Experts Group. This type of compression is mostcommonly used for compressing photos and graphics because it can compress the filesefficiently without damaging the data.INFORMATIONDirect MFSpot AE pointSizeQualityEffectContrastSaturationTIFFSuper FineFineNormalRAW[ Program mode ]Quality](https://usermanual.wiki/Hanwha-Techwin/PRO815.Users-Manual-5-of-7/User-Guide-572124-Page-31.png)
![《72》■By using the camera's digital processor, it is possible to add special effects to your images.[Normal] : No effect is added to the image.[B & W] : Converts the image to black and white.[Sepia] : Captured images will be stored in a sepia tone (a gradient of yellowish browncolours).[Negative] : Save the image in negative mode.[ Program mode ] [ Movie clip mode ]Spot AE pointSizeQualityEffect ContrastSaturationSharpnessNegativeNormalB & WSepiaSizeFrame RateEffectContrastSaturationCustomNegativeNormalB & WSepiaEffect](https://usermanual.wiki/Hanwha-Techwin/PRO815.Users-Manual-5-of-7/User-Guide-572124-Page-32.png)
![《73》■You can change the distinction between light and dark part of images.■You can make images with marked differences in light and shadow softer, and those withless differences more vivid.●How to set the contrast in the Program mode1. Press the Menu button and select the [P] menu tab.2. Press the Right button and select the [Contrast] menuby pressing the Up/ Down button.3. Press the Right button and select a desired menu bypressing the Up/ Down button.- You can see the changes by pressing the Up/ button.- Setting range : +2 ~ 0 ~ -24. Press the OK button to set the settingSizeQualityEffectContrastSaturationSharpnessVoice Memo1SizeQualityEffectContrastSaturationSharpnessVoice Memo0Contrast](https://usermanual.wiki/Hanwha-Techwin/PRO815.Users-Manual-5-of-7/User-Guide-572124-Page-33.png)
![《74》■You can change the saturation of images.●How to set the saturation in the Program mode1. Press the Menu button and select the [P] menu tab.2. Press the Right button and select the [Saturation] menuby pressing the Up/ Down button.3. Press the Right button and select a desired menu bypressing the Up/ Down button.- Setting range : +2 ~ 0 ~ -24. Press the OK button to set the setting.QualityEffectContrastSaturationSharpnessVoice MemoInterval/Time1QualityEffectContrastSaturationSharpnessVoice MemoInterval/Time0Saturation](https://usermanual.wiki/Hanwha-Techwin/PRO815.Users-Manual-5-of-7/User-Guide-572124-Page-34.png)
![《75》■You can adjust the sharpness of the picture you want to take.You cannot check the sharpness effect on the LCD beforeyou take a picture, because this function is applied onlywhen the captured image is stored on the memory.Sub menu Icon DescriptionThe edges of the image are softened.This effect is suitable for editing images on your PC.The edges of the image are sharp.This is suitable for printing.The edges of the image are emphasized. The edges will appearsharp, but noise may occur in the recorded image.VividNormalSoft[ Program mode ]EffectContrastSaturationSharpnessVoice MemoInterval/TimeInterval/NumberSoftNormalVividSharpness](https://usermanual.wiki/Hanwha-Techwin/PRO815.Users-Manual-5-of-7/User-Guide-572124-Page-35.png)
![《76》■You can add your voice-over to a stored image.●Recording a voice memo in the Program mode1. Press the Menu button and select the [P] menu tab.2. Press the Right button and select the [Voice Memo]menu by pressing the Up/ Down button.3. Press the Right button and select a desired menu bypressing the Up/ Down button.- [Off] : cancels the voice memo.- [One Pic] : the voice memo is added to a stored imageonly.- [All Pics] : the voice memo is added to all stored image.4. Press the OK button to set the setting.5. If the voice memo indicator is displayed on the LCD, the setting is complete. Press theshutter button. The picture is stored on the memory card.6. Voice memo will be recorded for ten seconds from the moment the picture is stored. In themiddle of the sound recording, pressing the shutter button will stop the voice memo.●A distance of 40cm between you and the camera (microphone) is the best distance torecord sound.INFORMATIONContrastSaturationSharpnessVoice MemoInterval/TimeInterval/NumberCustomAll PicsOffOne Pic28230Stop:SHUTTER[ Preparing for voice memo ] [ Recording voice memo ][ Program mode ]Voice memo](https://usermanual.wiki/Hanwha-Techwin/PRO815.Users-Manual-5-of-7/User-Guide-572124-Page-36.png)
![《77》■You can select how the colours are reproduced (sRGB, Adobe RGB) on the monitor or printer.■Adobe RGB has more colour spectra than sRGB and it is suitable for printing and computergraphics.●How to set the Colour space in the Program mode1. Press the Menu button. And select the [P] menu tab.2. Press the Right button and select the [Color space]menu by pressing the Up/ Down button.3. Press the Right button and select a desired menu bypressing the Up/ Down button.- sRGB/Adobe RGB4. Press the OK button to set the setting.Interval/TimeInterval/NumberCustomColor SpaceSave MysetFlash Synchro.Flash Pop-upAdobe RGBsRGBInterval/TimeInterval/NumberCustomColor SpaceSave MysetFlash Synchro.Flash Pop-upsRGBAdobe RGBColour space](https://usermanual.wiki/Hanwha-Techwin/PRO815.Users-Manual-5-of-7/User-Guide-572124-Page-37.png)
![《78》■Use the MySET mode to save frequently used camera settings (Save Myset) and use it later(Load Myset).●Saving the camera configuration : Available in the PROGRAM, A, S, M shooting mode andMySET mode.1. Use the camera buttons and menu to set desired cameraconfiguration.2. Press the menu button in any mode except AUTO, MOVIECLIP and SCENE mode. Select the [P] menu tab.3. Press the Right button and select the [Save Myset] menuby pressing the Up/ Down button.4. Press the Right button and select desired MySET slotnumber to save by pressing the Up/ Down button.5. Press the OK button and a confirmation window willdisplay. Select [Yes] menu and press the OK button to save the current configuration in theselected MySET slot and close the menu.●Loading the saved camera configuration: available in the MySET shooting mode.1. Turn the Mode dial to select the MySET shooting modeand press the Menu button.2. Press the Menu button and select the [ ] menu.3. Press the Right button and select the [Load Myset] menuby pressing the Up/ Down button. 4. Press the Right button and select a MySET slot numberto load by pressing the Up/ Down button.5. Press the OK button and a confirmation window willdisplay. Select the [Yes] menu and press the OK button to set the setting.* The current MySET slot number is displayed in the top left of the LCD.※Saving is available for the following camera functions.Functions using the camera buttons - Macro, flash, white balance, ISO, Exposure value,Aperture value and Shutter speed.Functions using the menu screen - Size, quality, effect and sharpness.[ Program mode ][ MySET mode ]Interval/NumberCustomColor SpaceSave MysetFlash Synchro.Flash Pop-upDirect MFMyset 3Myset 1Myset 2Set:OKCustomColor SpaceSave MysetLoad MysetFlash Synchro.Flash Pop-upDirect MFMyset 3Myset 1Myset 2Set:OKSave/ Load a specific camera configuration (MySET)](https://usermanual.wiki/Hanwha-Techwin/PRO815.Users-Manual-5-of-7/User-Guide-572124-Page-38.png)
![《79》Flash Synchro.Flash Pop-upDirect MFSpot AE pointSizeQualityEffectCenterFocus Area■You can select a spot AE point where the brightness is calculated.●How to set the spot AE point in the Program mode1. Select the spot metering mode (p.00).2. Press the Menu button and select the [P] menu tab.3. Press the Right button and select the [Spot AE point]menu by pressing the Up/ Down button.4. Press the Right button and select a desired menu bypressing the Up/ Down button.- [Center] : The brightness is calculated based on the +marked area placed on the centre of the RearLCD. Select this menu when the subject is inthe backlight shooting condition or in theshadow.- [Focus Area] : The brightness is calculated based on where the auto focus frame is placed.If there is gap of brightness between the subject and centre part of the LCD,select this menu.5. Press the OK button to set the setting.JOG2Spot AE point](https://usermanual.wiki/Hanwha-Techwin/PRO815.Users-Manual-5-of-7/User-Guide-572124-Page-39.png)
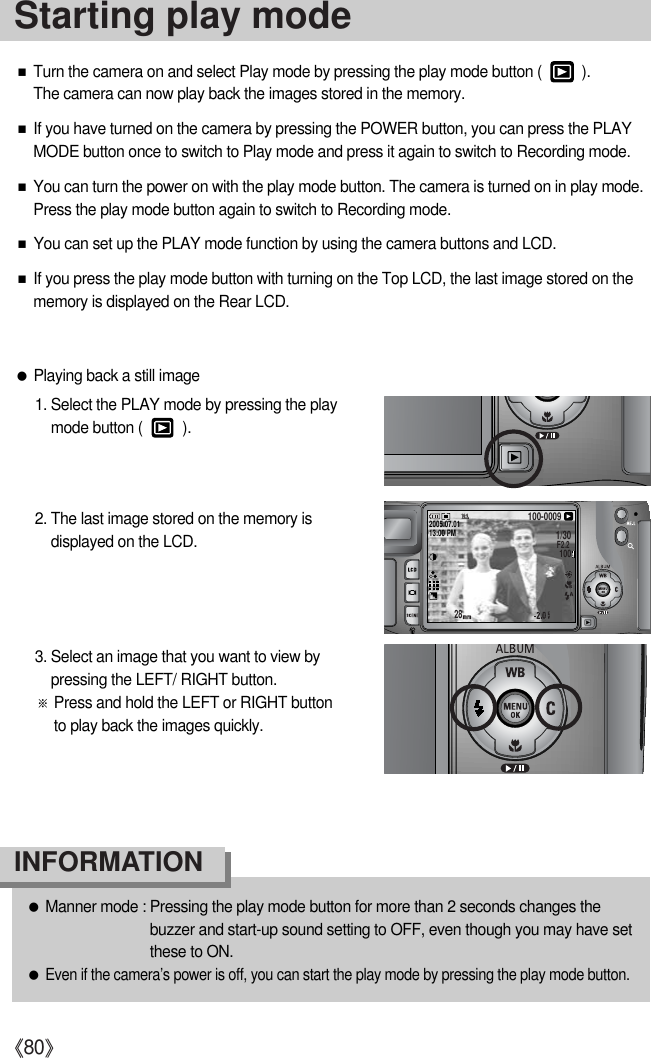
![《81》■Playing back a movie clipSteps from 1-2 are the same as those to play back a stillimage.3. Select the recorded movie clip that you want to play backby using the Left/ Right button.4. Press the Play & Pause button ( ) to play back a movie clip file.- To play back or pause a movie clip. Press the Play &Pause button.- To rewind the movie clip while it is playing, press the Leftbutton. To fast forward the movie clip, press the Rightbutton.- Whenever you press the Left/ Right button while the movieclip is playing the rewinding/ fast forwarding speed will be2, 4, 8 times faster.Pressing the Play & Pause button will reduce the speed.- To stop playback of the movie clip, press the Play & Pause button, and then press the Leftor Right button.●How to capture the movie clipSteps 1-2 are the same as those for playing back a stillimage.3. Select the recorded movie clip that you want to playback by using the Left/ Right button.4. Press the Play & Pause button to play back the movie clip.5. Press the Play & Pause button while playing the movieclip. Then press the Shutter button.6. The paused movie clip is saved in a new file name.* The captured movie clip file has same size as the originalmovie clip (640X480, 320X240, 160X120).[ Pause ]100-000800:00:09PAUSE?100-000800:00:09PLAY?[ Press the shutter button ]■Movie clip capture function : capture still images from the movie clip.Capture:SHUTTERStarting play mode](https://usermanual.wiki/Hanwha-Techwin/PRO815.Users-Manual-5-of-7/User-Guide-572124-Page-41.png)