Hanwha Techwin PRO815 Digital Camera User Manual H1 en 002 v03
Samsung Techwin Co Ltd Digital Camera H1 en 002 v03
Contents
Users Manual 5 of 7
《41》
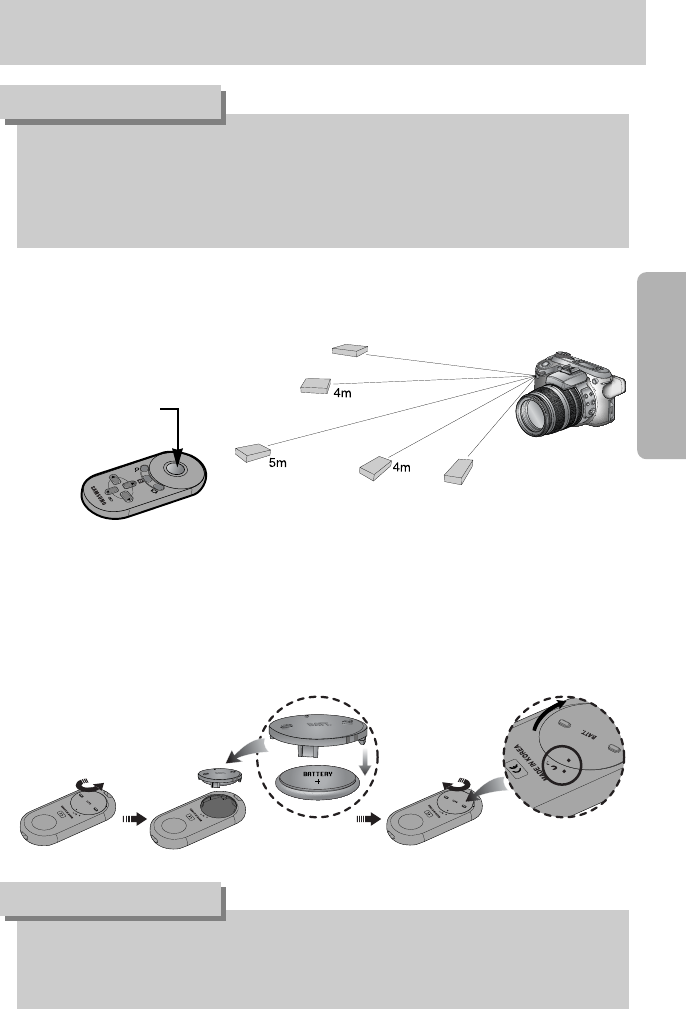
[ Shutter button
on the remote control ]
●Remote control range
When you take an image by using the remote
control, refer to the illustrations shown alongside
about the remote control range.
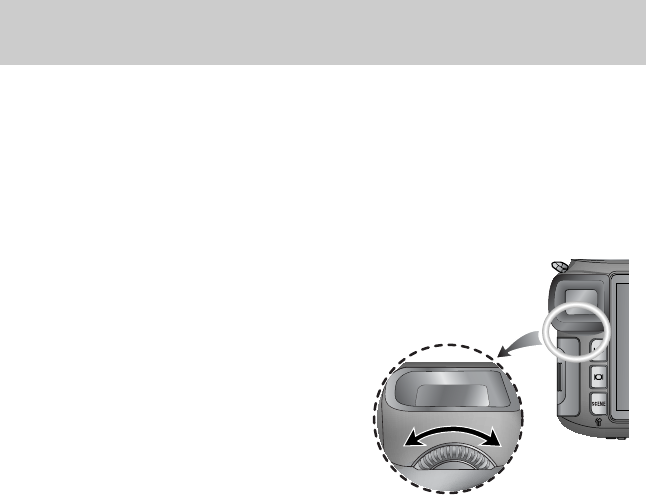
●Replacing batteries for the remote control
Make sure the + polarity is toward the top and the - polarity is toward the bottom while
installing batteries for the remote control. Assemble the cover into the remote control as the
direction of remote control. Rotate the cover as shown below. Replace battery for the remote
control in the local service centre. Use the CR 2025 3V battery.
●If you operate the Mode dial and Self-timer button during the self-timer operation, the self-
timer function is cancelled.
●Use a tripod to prevent the camera from shaking.
INFORMATION
●Though you select a remote controller icon, you can take an image by shutter button of
the camera.
●If you select the 2 Sec. remote controller icon and press the shutter button of the camera,
the image will be taken after 2 seconds.
●When you select RAW and TIFF file type, you can’t select the double self-timer.
INFORMATION
Self-timer/ Remote button
《42》
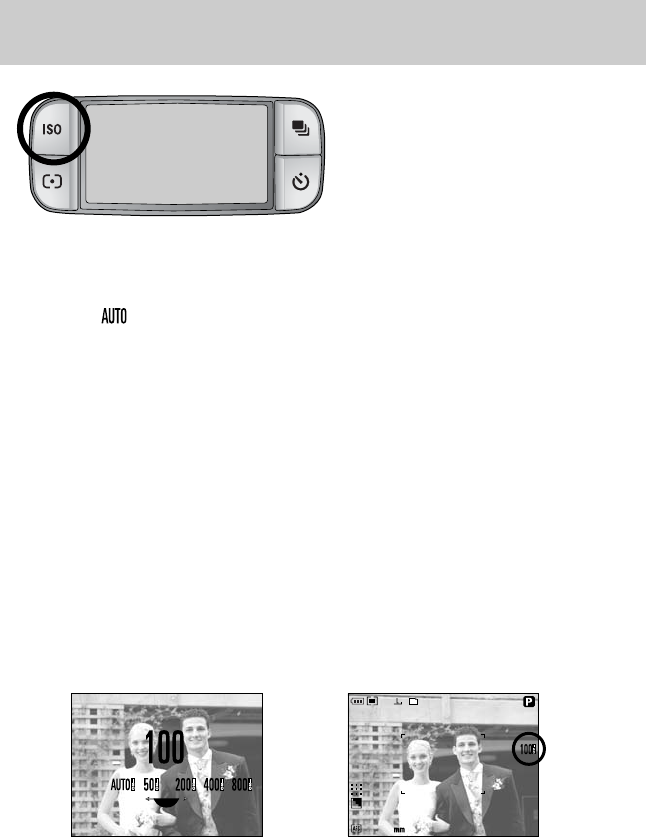
■You can select the ISO sensitivity when
taking pictures.
The speed or specific light-sensitivity of a
camera is rated by ISO numbers.
■ISO
- AUTO ( ) :
The camera's sensitivity is automatically changed by variables such as lighting value or
subject brightness.
- 50, 100, 200, 400, 800 :
You can increase the shutter speed while the same amount of light is present, by increasing
the ISO sensitivity. However, the image may be saturated in high luminance. The higher the
ISO value, the higher the camera’s sensitivity to light is and therefore the greater its capacity
to take pictures in dark conditions. However, the noise level in the image will increase as the
ISO value increases, making the image appear coarse.
■How to set the ISO
1. Press the ISO button and an ISO icon will display on the LCD.
2. Select a desired icon by rotating the Rear jog dial (JOG2).
3. Press the OK button to set the setting.
28
25
JOG2
[ ISO icons ] [ Selecting ISO 100 ]
ISO button
《43》
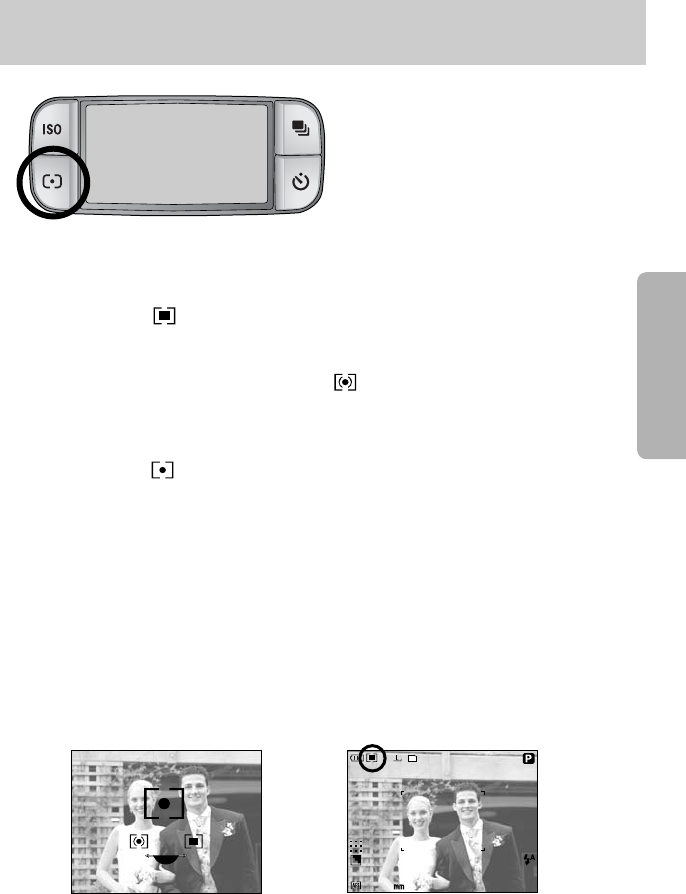
■If you cannot obtain suitable exposure
conditions, you can change the metering
method to take brighter pictures.
■Metering methods
- Multi metering ( ) :
Exposure will be calculated based on the each parts of the LCD divided into several parts.
This is suitable for general use.
- CWA (Center Weighted Average) metering ( ) :
Exposure will be calculated based on an average of the available light in the image area.
However, the calculation will be biased towards the centre of the image area.
This is suitable for taking a small object like a flower or insects.
- Spot metering ( ) :
Only the cross marked area in the centre of the LCD will be metered for light.
This is suitable when the subject in the centre is exposed correctly, regardless of the back
lighting.
※The + mark will be displayed in case of selecting the Spot metering menu.
■How to set the metering mode
1. Press the metering button and a metering icon will display on the LCD.
2. Select a desired icon by rotating the Rear jog dial (JOG2).
3. Press the OK button to set the setting.
28
25
JOG2
[ Metering icons ] [ Selecting the spot metering ]
Metering button
《44》
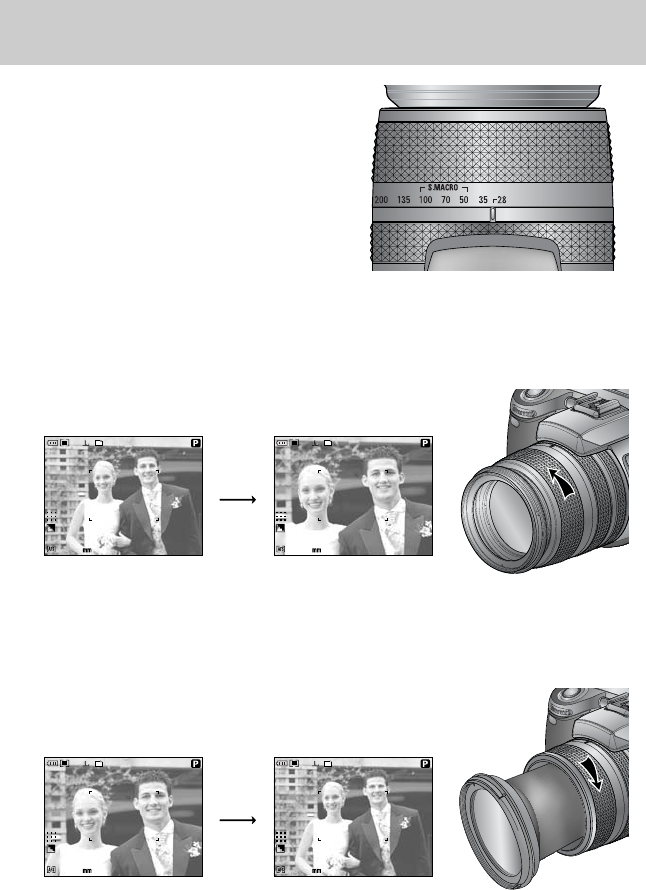
■You can change the zoom rate by rotating
the Zoom ring.
●This camera has a 15X optical zoom and a
2X and 4X digital zoom function. Using both
will offer a total zoom ratio of 30X or 60X.
28
25
110
25
[ Wide ] [ Tele ]
110
25
28
25
[ Tele ] [ Wide ]
●Optical Zoom WIDE
Rotate the Zoom ring to left. This will zoom out from the subject
i.e. the subject will appear further away.
●Optical Zoom TELE
Rotate the Zoom ring to right. This will zoom into the subject i.e.
the subject will appear nearer.
Zoom operation
《45》
●Images taken using the digital zoom may take a little longer for the camera to process.
Allow time for this to take place.
●The digital zoom cannot be used in movie clip shots.
●You may notice a decrease in image quality when using the digital zoom.
●The higher optical and digital zoom, the more camera shake can be take place.
When you select a higher optical or digital zoom, we recommend using the tripod.
●Take care not to press the lens as this may cause a camera malfunction.
●Do not pull the lens by hand or do not rotate the zoom ring quickly.
It may cause a camera malfunction. Please be careful when using the lens.
INFORMATION
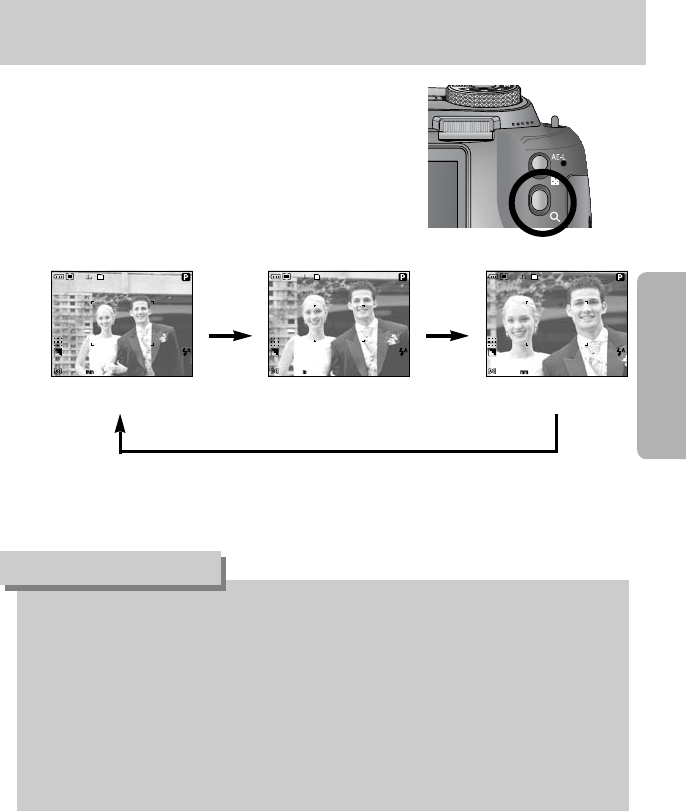
●Digital zoom
Pressing the Digital zoom button will enlarge the subject as
shown below.
[ Off ] [ Digital zoom 2X ] [ Digital zoom 4X ]
Pressing
theZoom
button
Pressing the Zoom button
Pressing
theZoom
button
28
25
28
25
x2.0
28
25
x4.0
Zoom operation
《46》
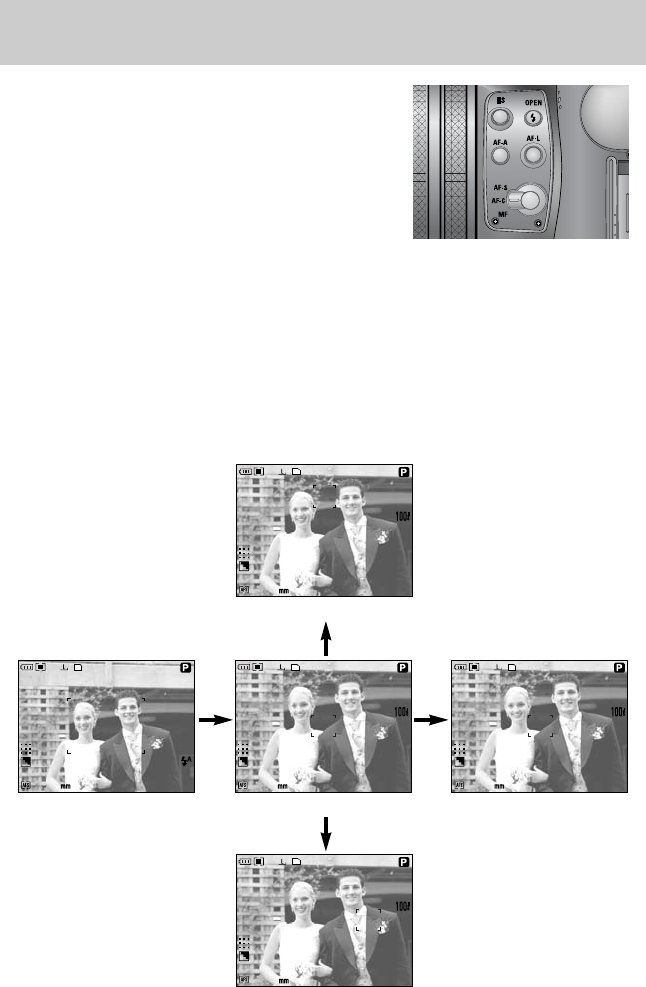
■You can select a proper focus mode by switching
the focus switch.
●AF-A : Changing the focus frame
You can change the focus frame size and position according to the subject size and position
by pressing the AF-A button. This function is available in the AF-S, AF-C mode.
- Wide AF : This is useful when taking wide range of frame.
- Modifying the Spot AF position : The frame will be yellowed and the frame can be changed
its position.
- Setting the Spot AF position : The frame turns white and the frame position will be set.
28
25
28
25
28
25
28
25
[ Moving Left/ Right the frame ]
[ Moving Up/ Down the frame ]
28
25
[ Wide AF ] [ Setting Spot AF ] [ Spot AF ]
AF-A
button
AF-A
button
Front jog dial (JOG1)
Rear jog dial (JOG2)
Focusing
《47》
●AF-C : Continuous Auto Focus
This is suitable for taking moving subject. The camera
keeps focusing the subject during the shutter button is
pressed halfway down.
※Note that using the Continuous Auto Focus uses more
battery than the Single Auto Focus.
※This function will not be available in the Auto recording
mode and Scene mode except for the [Children] and
[Close-up] scene mode.
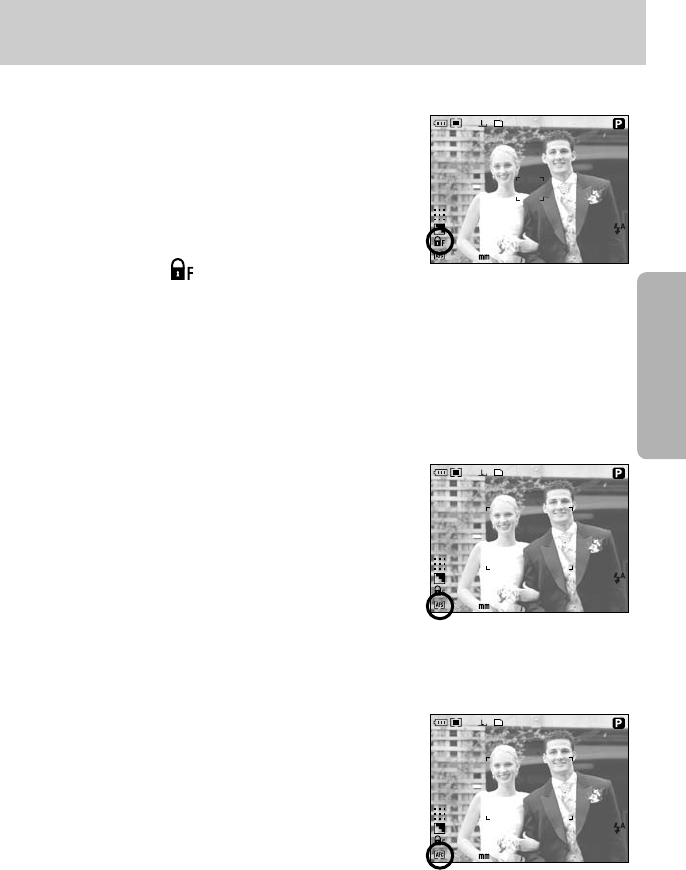
●AF-L : Focus lock
To focus on the subject positioned outside of the centre,
use this button. This function is available in the AF-S
mode.
- How to use the focus lock
1. Ensure the subject in the centre of the auto focus
frame.
2. Press the AF-L button. The frame turns green and
Focus lock icon ( ) will display.
It means the camera is focused on the subject.
3. Recompose the picture and press the shutter button. After taking an image, the Focus
lock function will be cancelled.
※This function will not be available in the [Children] and [Close-up] scene mode.
●AF-S : Single Auto Focus
This is suitable for taking a still image. Whenever the
shutter button is pressed, the camera is focused on the
subject automatically.
28
25
28
25
28
25
Focusing
《48》
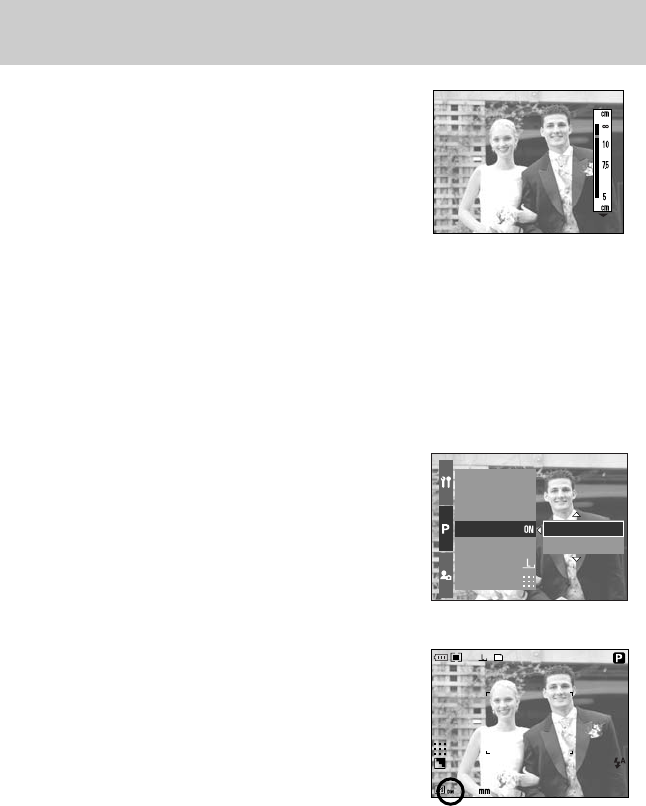
●MF : Manual Focus
Where the automatic focusing is not available, for example,
in very dark conditions, use the manual focus.
Please be
careful when using the manual focus as the picture can be
blurred easily.
※When you use the manual focus, the centre of the LCD
is enlarged.
※This function will not be available in the auto recording
and scene modes.
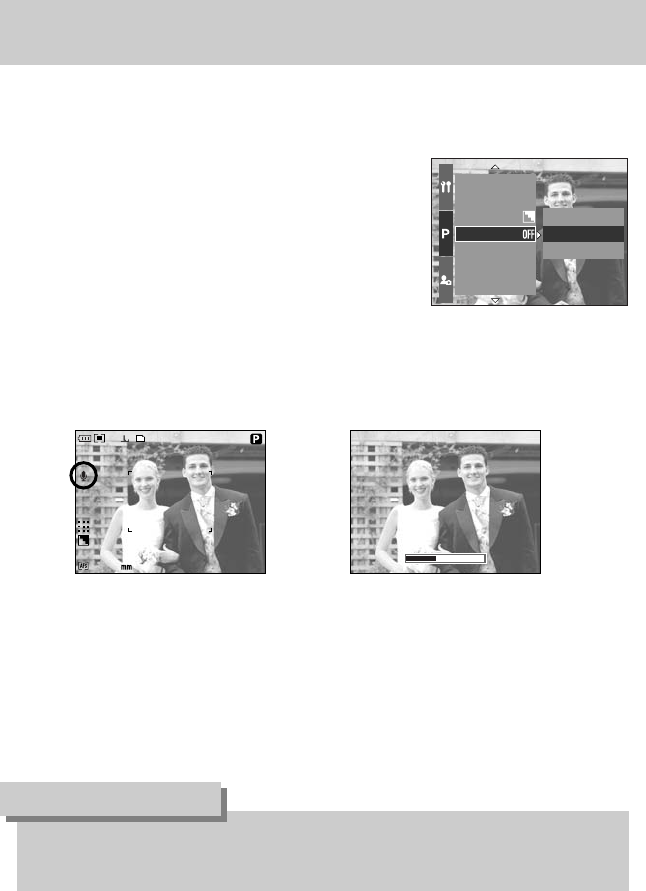
●How to set the direct MF in the Program mode
You can change the focus even though the camera is focused on a subject by rotating the
focus ring. This function is available in the AF-S mode.
1. Press the Menu button and select [P] menu tab.
2. Press the Right button and select [Direct MF] menu by
pressing the Up/ Down button.
3. Press the Right button and select a desired sub menu
by pressing the Up/ Down button.
- [Off] : You can’t change the focus manually.
- [On] : You can change the focus manually.
4. Select the [On] sub menu. Press the OK button to set
the change and [DM] icon will display on the Rear LCD.
5. Pressing the shutter button half way down, change the
focus by rotating the Focus ring.
- To move the focus closer, rotate the Focus ring to right.
- To move the focus farther, rotate the Focus ring to left.
Save Myset
Flash Synchro.
Flash Pop-up
Direct MF
Spot AE point
Size
Quality
On
Off
28
25
[ Direct MF menu ]
[ Selecting Direct MF ]
Focusing
《49》
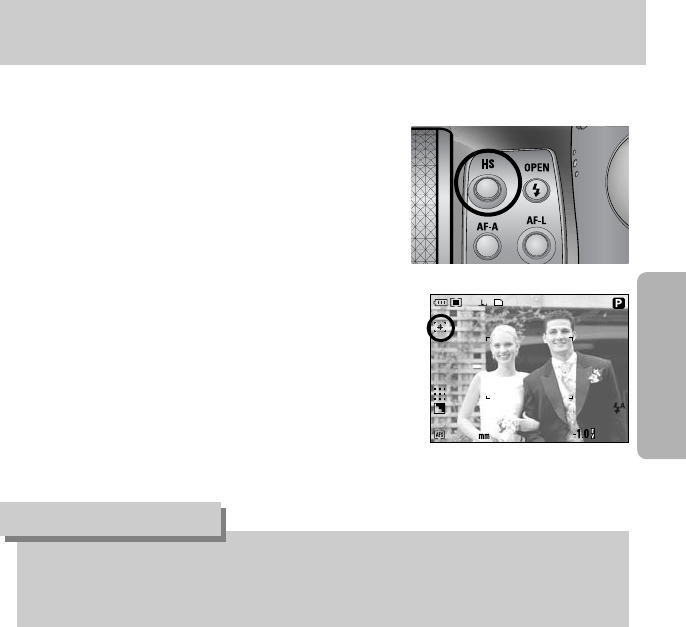
■You can prevent camera shaking without using the flash.
●How to set the High speed shutter mode
1. Press the HS (High Speed) button to set the High
speed shutter mode.
2. The HS icon will display on the Rear LCD as shown
alongside.
3. Press the shutter button to capture an image.
●Note that the noise level in the image will increase when you use the high speed shutter
as the high speed shutter use higher ISO value.
●This function will be available in the Manual and Movie clip mode.
INFORMATION
28
25
High speed shutter mode
《50》
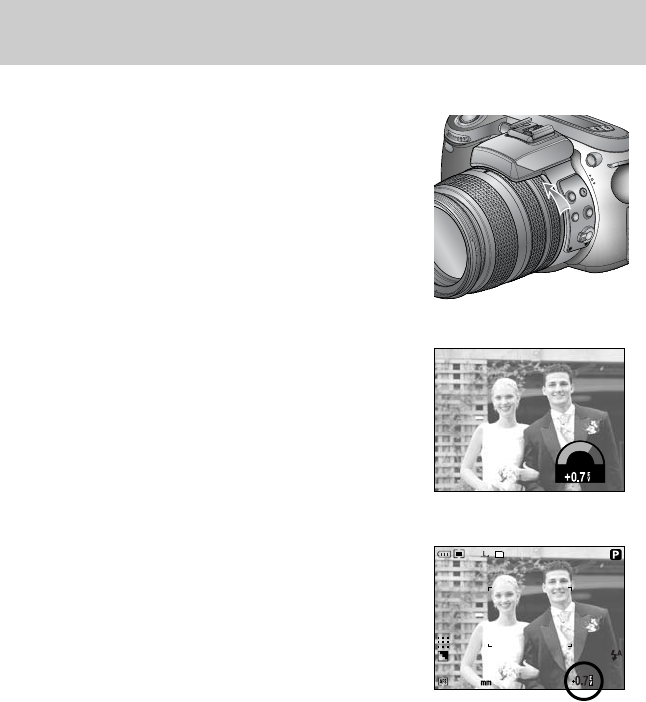
■Exposure compensation
This camera automatically adjusts the exposure according
to the ambient lighting conditions.
You can also select the exposure value by using the EVC
(Exposure Value Compensation) ring. This function is
available in the PROGRAM, APERTURE PRIORITY,
SHUTTER PRIORITY, SCENE, MySET, MOVIE CLIP
mode.
* A negative exposure compensation value reduces the exposure. Note that a positive exposure
compensation value increases the exposure and the LCD will appear white or you may not get
good pictures.
●How to set the Exposure Value Compensation
1. Exposure Compensation menu will display on the Rear
LCD by rotating the EVC ring.
- Rotating to right : 0 ~ -2EV (1/3 EV step)
- Rotating to left : 0 ~ +2EV (1/3 EV step)
2. Press the shutter button half way down and the
selected exposure value will be set. The changed
Exposure value will display on the LCD.
28
25
-2 EV +2
Exposure control
《51》
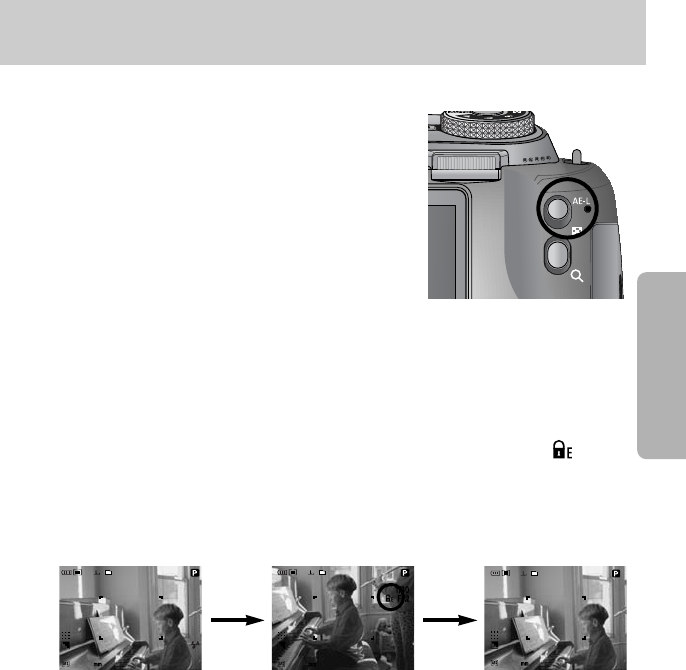
■Exposure lock
This camera automatically adjusts the exposure
according to the ambient lighting conditions. You can
change the exposure value manually by using the AE-L
(Auto Exposure Lock) button in a lighting condition where
there are exposure differences between a subject and
background.
●How to set the Exposure Value Compensation
1. Ensure the subject in the centre of the auto focus frame.
2. Move the focus frame to a subject that has desired exposure value.
3. Press the AE-L button and exposure value will be fixed. A exposure lock icon( ) will
display on the LCD.
4. Recompose the picture and press the shutter button. After taking an image, the Focus lock
function will be cancelled.
[ Screen for shooting ] [ Focus to the object and
press the AE-L button ]
[ Refocus and fully press
the shutter button ]
28
25
28
25
28
25
Exposure control

《52》
■5-function button activate the following.
- Up button : While the menu is showing, press the Up button to move up the submenu
cursor. When the menu is not displayed on the LCD monitor, the UP button
operates as the white balance button.
- Down button : While the menu is showing, press the Down button to move down the
submenu cursor. When the menu is not showing, you can use the Down
button to take macro pictures.
- Left button : When the menu is displayed on the LCD monitor, pressing the Left button
makes the cursor shift to the left tab.
When the menu is not displayed on the LCD monitor, the Left button operates
as the FLASH button.
- Right button : When the menu is displayed on the LCD monitor, pressing the Right button
makes the cursor shift to the right tab.
When the menu is not displayed on the LCD monitor, you can execute a
function that was set in the [Custom set] menu by pressing this button.
- MENU/OK button : If the menu is displayed, use the 5-Function buttons to change the data
values and for your changes to be accepted.
If the menu is not displayed, press the MENU/OK button to display a
menu for the current camera mode on the LCD. Press the button again
to return to the previous state.
5-function button
《53》
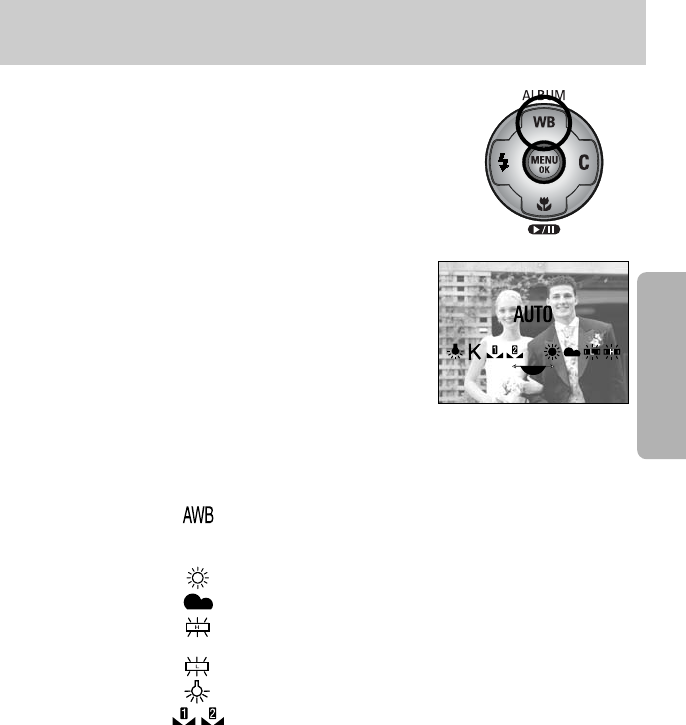
■The white balance control allows you to adjust the colours to
appear more natural looking.
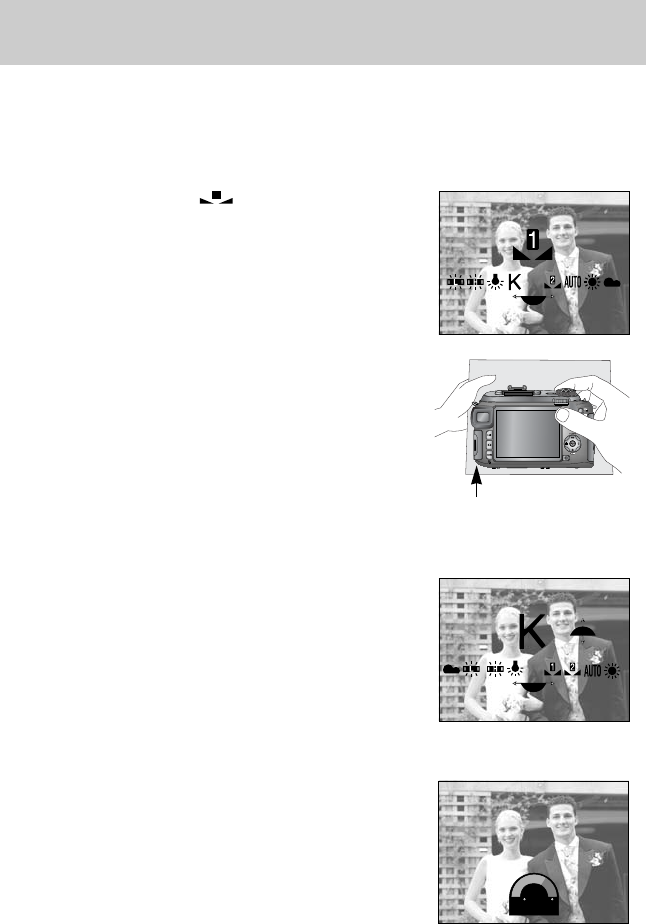
●How to set the white balance
1. Press the WB (Up) button and a white balance
icon will display on the LCD monitor.
2. Select a desired white balance by rotating the
Rear jog dial (JOG2).
AUTO : The camera automatically selects the appropriate white
balance settings, depending on the prevailing lighting
conditions.
DAYLIGHT : For taking images outside.
CLOUDY : For taking images under a cloudy and overcast sky.
Fluorescent H : For shooting under daylight fluorescent types of three-way
fluorescent lighting.
Fluorescent L : Shooting under white fluorescent lighting.
TUNGSTEN : For shooting under tungsten (standard light bulb) lighting.
CUSTOM : Allows the user to set the white balance according to the
shooting condition. (CUSTOM 1, CUSTOM 2)
Colour temperature K : You can set a proper colour temperature.
Different lighting conditions may cause a colour cast on your images.
JOG2
[ White balance icons ]
White balance
《54》
●How to set the custom white balance
White balance settings may vary slightly depending on the shooting environment. You can
select the most appropriate white balance setting for a given shooting environment by setting
up the custom white balance.
1. Select the CUSTOM ( ) menu of the White
Balance.
You can select CUSTOM 1 or CUSTOM 2 white
balance.
2. Place a sheet of white paper in front of the camera so
that the LCD shows only white, and then press the
SHUTTER button.
3. The value you set will be saved.
- The custom white balance value will be applied, starting
with the next picture you take.
- The user configured white balance will remain effective
until it is overwritten.
●How to set the colour temperature
Colour temperature is a simplified way to characterize the
light source. Low colour temperature implies warmer light
(more red) while high colour temperature implies a colder
light (more blue).
1. Select the colour temperature (K) by rotating the Rear
jog dial (JOG2).
2. Select a desired colour temperature (K) by rotating
the Front jog dial (JOG1).
- Approx. 3000 K : Incandescent lamp
- Approx. 4000 K : Out door shooting around the
morning or evening
- Approx. 5000 K : Sunny daylight shooting
- Approx. 6000 K : Electronic photo flash
- Approx. 10000 K : Blue sky
3. Press the WB button to set the setting.
- After pressing the WB button, the colour temperature
icon will display.
- The user configured white balance will remain effective
until it is overwritten.
White paper
JOG2
Measure : SHUTTER
JOG2
JOG1
3000 K 10000 K
6000K
[ Colour temperature icon ]
[ Selecting a colour temperature ]
White balance
《55》
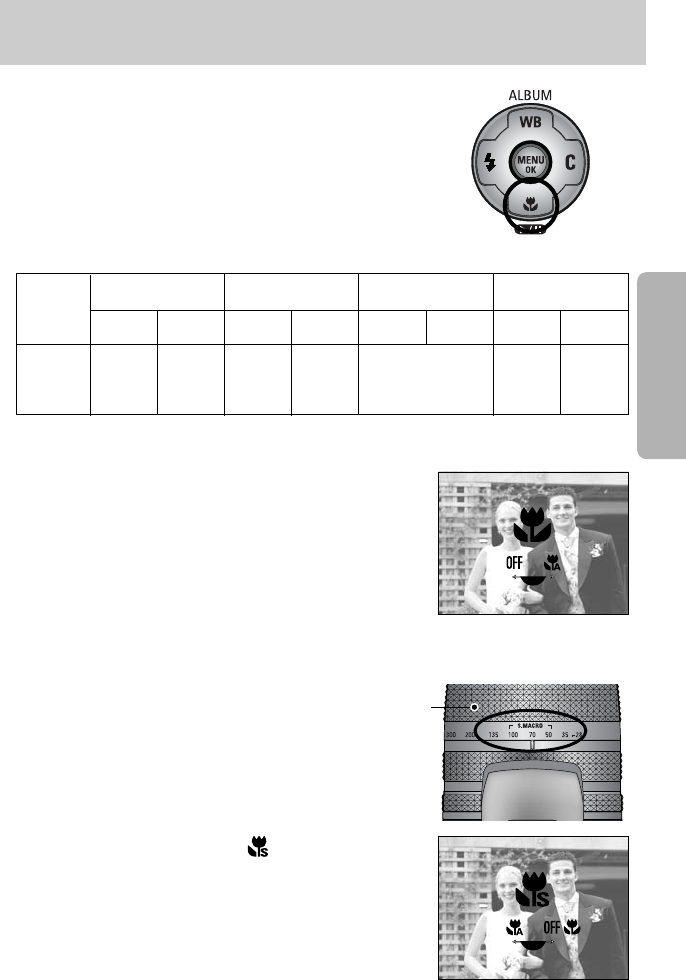
■When the menu is not showing, you can use the MACRO/
DOWN button to take macro pictures.
1. Press the Macro (Down) button and the macro icon will
display on the LCD.
2. Select a desired macro icon by rotating the Rear jog dial
(JOG2).
3. Press the Macro (Down) button to set the setting.
1. Rotate the Zoom ring and place the zoom ring
at the S.MACRO of the Zoom bar.
2. Press the Macro (Down) button and the macro
icon will display on the LCD.
3. Select the super macro icon ( ) by
rotating the Rear jog dial (JOG2).
4. Press the Macro (Down) button to set
the setting.
●How to set the super macro
●How to set the macro
■Types of focus modes and focus ranges
JOG2
JOG2
[ Macro icons ]
[ Selecting the super macro ]
Unit : cm
Wide Tele Wide Tele Wide Tele Wide Tele
Focus
type
Focus
range 50~∞350~∞10~70 150~370 10~
∞
150~
∞
Macro Super macro Auto macroAuto
3~70
(Focus range : 50 ~ 100m)
Macro
Zoom ring
《56》
■Available focusing method, by recording mode
(O: Selectable , X: Not selectable, ∞: Infinity focus range)
●If you rotate the Zoom ring and place the zoom ring at the S.MACRO of the Zoom bar,
the macro mode will be changed to the Auto macro automatically.
●When the macro mode is selected, it is possible that camera shake will occur.
If this is the case, use a tripod to eliminate this.
●When you take a picture within 10cm(MACRO focus), select the FLASH OFF mode.
●When you take a picture within 5cm, the AF may take a time to get exact focus range.
INFORMATION
XOOOOOO
XOOOOOO
OOOOOOX
OOOOOOO
Mode
Auto
Macro
Super macro
Auto macro
Mode
Auto
Macro
Super macro
Auto macro
OOO∞XX∞∞O∞O
OOOOOOOOOOO
OOOOOOOOOOO
OOOOOOOOOOO
Macro
《57》
■
You can select a flash according to the shooting conditions.
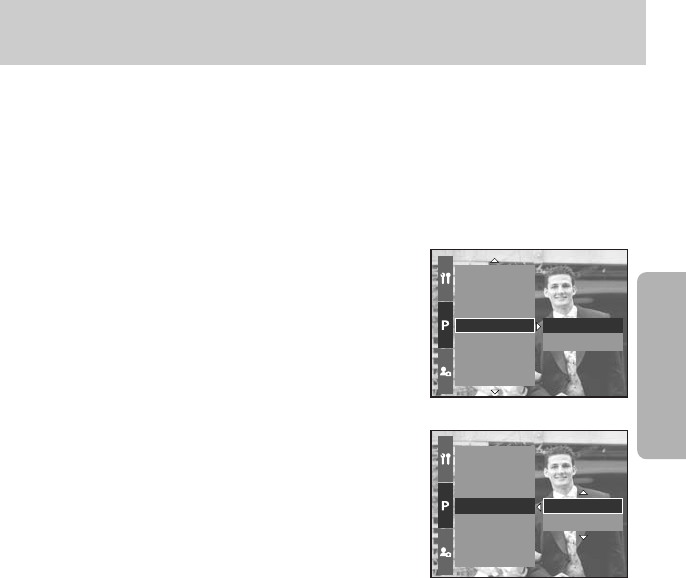
●How to set the pop-up flash
1. Press the Menu button and select the [P] menu tab.
2. Press the Right button and select [Pop-up] menu by
pressing the Up/ Down button.
3. Press the Right button and select a desired menu by
pressing the Up/ Down button.
- [Auto] : The flash will pop-up by pressing the shutter
button half way down in accordance with the
lighting condition.
- [Manual] : The flash off mode will be selected and the
flash will not pop-up automatically. To use
the flash, press the Pop-up flash button.
4. Press the OK button to set the setting.
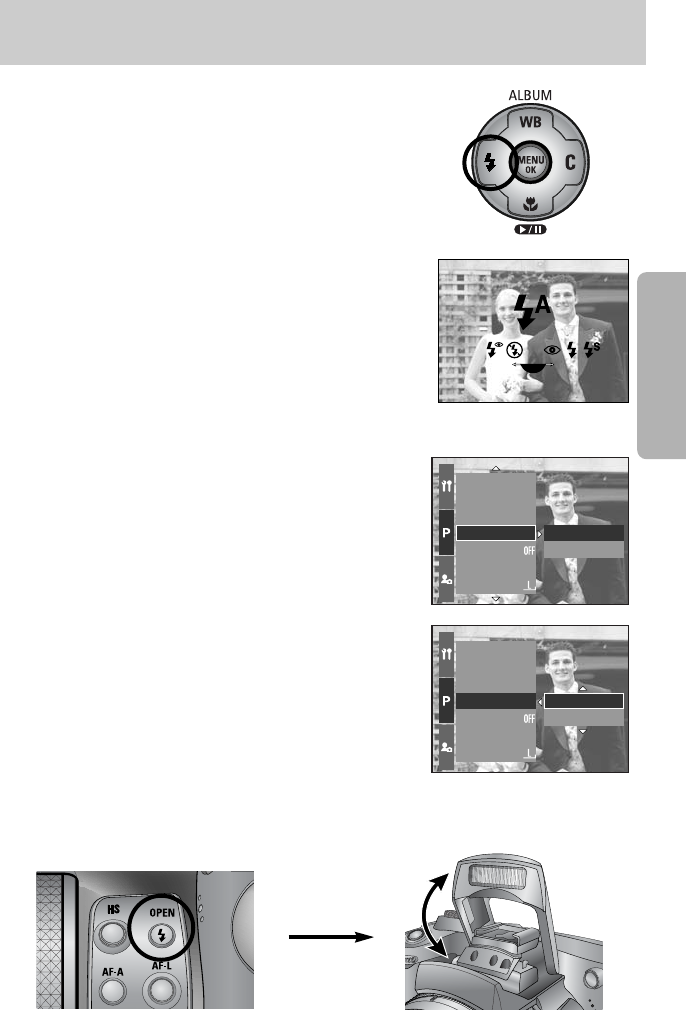
●How to set the flash mode
1. Press the Flash button (Left) and flash mode icons
display on the LCD.
2. Select a desired flash icon by rotating the Rear jog dial
(JOG2).
3. Press the Flash button to set the setting.
Color Space
Save Myset
Flash Synchro.
Flash Pop-up
Direct MF
Spot AE point
Size
Auto
Manual
Color Space
Save Myset
Flash Synchro.
Flash Pop-up
Direct MF
Spot AE point
Size
Manual
Auto
JOG2
[ Flash mode icons ]
※When you select the [Manual] menu, press the Pop-up flash button to use the flash.
※Do not open the pop-up flash by force. It may cause breakdown of the flash. Press the Pop-
up button to open the flash.
Flash
《58》
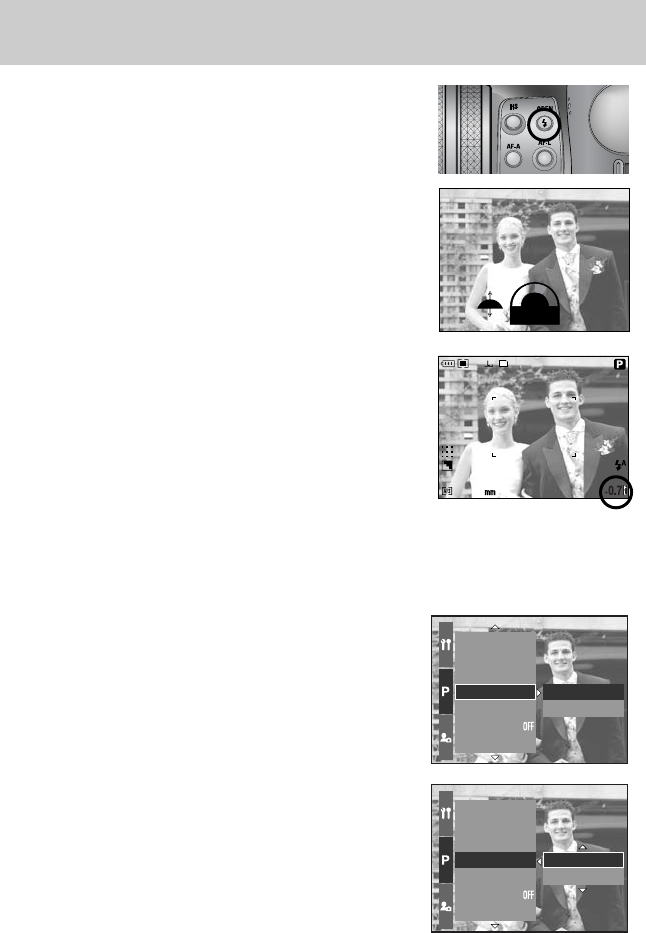
●Flash compensation : The intensity of the flash will be
controlled, according to the lighting
conditions.
1. Press the Pop-up flash button and the flash will pop up.
2. Press the Pop-up flash button again and a gauge will
display as shown alongside.
3. Rotate the Front jog dial (JOG1) to select a desired
intensity of flash.
4. Press the shutter button half way down to set the setting.
The intensity of flash will display on the LCD.
Custom
Color Space
Save Myset
Flash Synchro.
Flash Pop-up
Direct MF
Spot AE point
1st Curtain
2nd Curtain
Custom
Color Space
Save Myset
Flash Synchro.
Flash Pop-up
Direct MF
Spot AE point
1st Curtain
2nd Curtain
1. Press the Menu button and select the [P] menu tab.
2.
Press the Right button and select the [Flash Synchronization]
menu by pressing the Up/ Down button.
3. Press the Right button and select a desired menu by
pressing the Up/ Down button.
- [1st curtain] : The flash fires right after the shutter fully
opens.
- [2nd curtain] : The flash fires just before the shutter
closes.
4. Press the OK button to set the setting.
●Flash synchronization : You can select a flash timing to take a desired image (In case of the
Program mode)
28
230
Flash
JOG1
-2
FLASH
+2
+0.7 F
L
《59》
■Flash range (Internal flash)
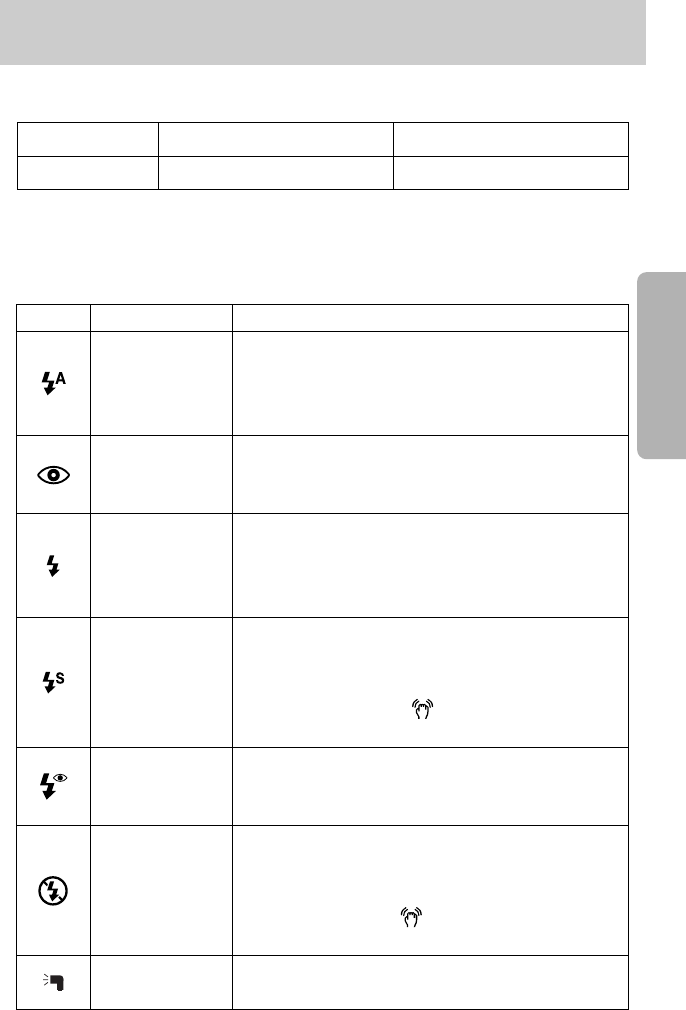
■Flash mode indicator
(Unit : cm, ISO Auto)
Icon Flash mode Description
If the subject or background is dark, the camera flash will
operate automatically. The Fill in flash icon will display in a
dark condition and the Flash off icon will display in a bright
condition.
If a subject or background is dark, the camera flash will
work automatically and will reduce the red-eye effect by
firing the pre-flash.
The flash fires regardless of available light. The intensity of
the flash will be controlled, according to the prevailing
conditions. The brighter the background or subject is, the
less intense the flash will be.
The flash will operate in conjunction with a slow shutter
speed in order to obtain the correct exposure. When you
take an image in a condition with poor light, the camera
shake warning indicator ( ) will display on the LCD.
We recommend using the tripod.
The flash fires regardless of available light. The intensity of the
flash will be controlled, according to the prevailing conditions
and it will reduce the red-eye effect by firing the pre-flash.
The flash does not fire. Select this mode when capturing images
in a place or situation where flash photography is prohibited.
When you capture an image in a poorly lit condition, the camera
shake warning indicator ( ) will display on the LCD.
We recommend using the tripod.
You can mount an external flash (optional) in accordance
with the shooting conditions.
Auto Flash
Auto & Red eye
reduction
Fill in flash
Slow synchro
Fill in & Red eye
reduction
Flash off
External flash
※We recommend using the flash off mode in the macro and super macro mode.
Flash
Wide Tele
7~700 150~400
Camera mode
Flash range
《60》
●
If the pop up flash doesn’t open fully, do not press the shutter button. It may damage the flash.
●When you press the shutter button after selecting the Auto, Fill in, Slow synchro flash,
the flash will fire to check the shooting conditions like the subject’s distance and intensity
of the flash. Do not move until the second flash fires.
●Using the flash frequently will reduce the life of the battery.
●
Under normal operating conditions the charging time for the flash is normally within 5 seconds.
If the batteries are weak, the charging time will be longer.
●During the continuous shot, movie clip mode, the flash function will not operate.
●Take photographs within the flash range.
●The image quality is not guaranteed if the subject is too close or highly reflective.
●If you attach the supplied lens hood, it may block the flash.
INFORMATION
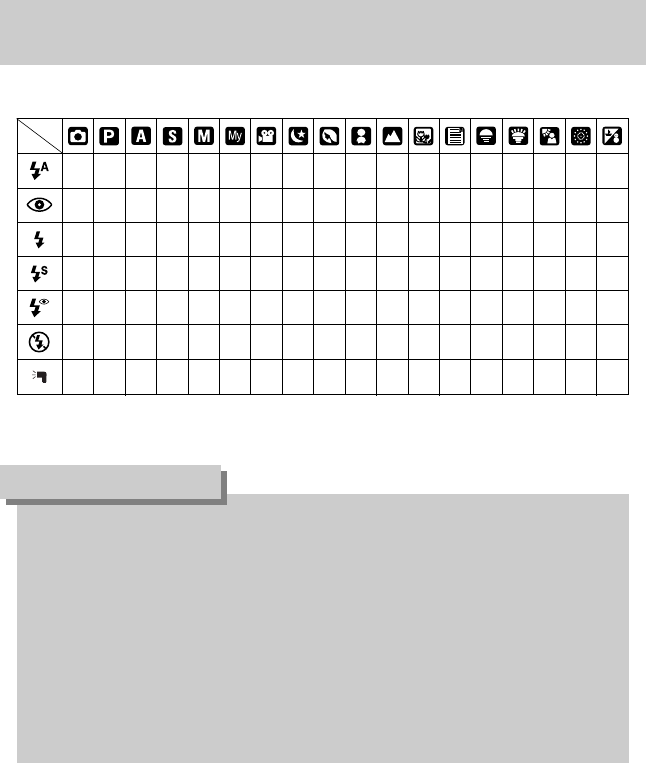
OOXXXOXOOOOOOOOOOO
OOXXXOXOOOOOOOOOOO
XOXOOOXOOOOOOOOOOO
XOOXXOXOOOOOOOOOOO
XOOXXOXOOOOOOOOOOO
OOOOOOXOOOOOOOOOOO
OOOOOOXOOOOOOOOOOO
■Available flash mode, by recording mode
Flash
《61》
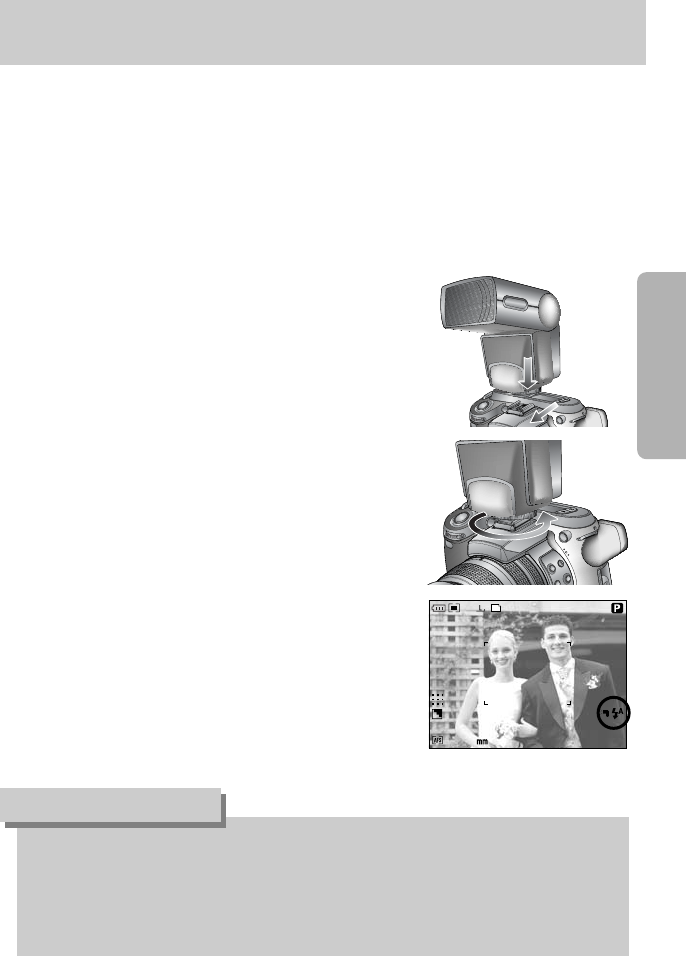
■You can mount an external flash in accordance with the shooting conditions.
■If the external flash is mounted, you can’t use the internal flash.
■When the external flash is mounted, it is possible that camera shake will occur.
We recommend using a tripod to eliminate this.
■Refer to the user manual of the external flash (optional) for more information.
●With attaching the external flash, you can change the intensity of the flash by pressing
the Flash compensation button.
●
The camera may not function properly when using a flash manufactured by another company.
●
We recommend using the exclusive external flash (SEF-42) and using a flash manufactured by
another company is not covered by the Samsung warranty.
INFORMATION
1. Turn off the flash power and mount it to the hot shoe.
2. Settle the flash by rotating the knob of flash as shown
alongside.
3. The external flash icon will display on the LCD as
shown alongside.
28
25
●How to use the external flash
External flash (optional)
《62》
●How to set the Custom settings in the Program mode
1. Press the Menu button and select the [P] menu tab.
2. Press the Right button and select the [Custom] menu by
pressing the Up/ Down button.
3. Press the Right button and select a desired sub menu
by pressing the Up/ Down button.
- Size
- Quality
- Effect
- Sharpness
- Voice memo
- LCD brightness
※The sharpness can't be saved in the Auto mode.
The sharpness and voice memo can't be saved in the
Movie clip mode.
4. Press the OK button to set the setting.
■
You can save your preferences in the [Custom] menu and load it by pressing the Custom button.
●How to use the Custom button
1. After selecting a desired sub menu in the [Custom]
menu, press the Custom button.
2. The selected menu will display on the LCD.
3. Select a desired sub menu by rotating the Rear jog dial
(JOG2) and press the OK button to set the setting.
Voice Memo
Interval/Time
Interval/Number
Custom
Color Space
Save Myset
Flash Synchro.
Voice Memo
LCD Brightness
Size
Quality
Effect
Voice Memo
Interval/Time
Interval/Number
Custom
Color Space
Save Myset
Flash Synchro.
Voice Memo
LCD Brightness
Size
Quality
Effect
JOG2
[ Size sub menu ]
Custom settings
[ Program mode ]
《63》
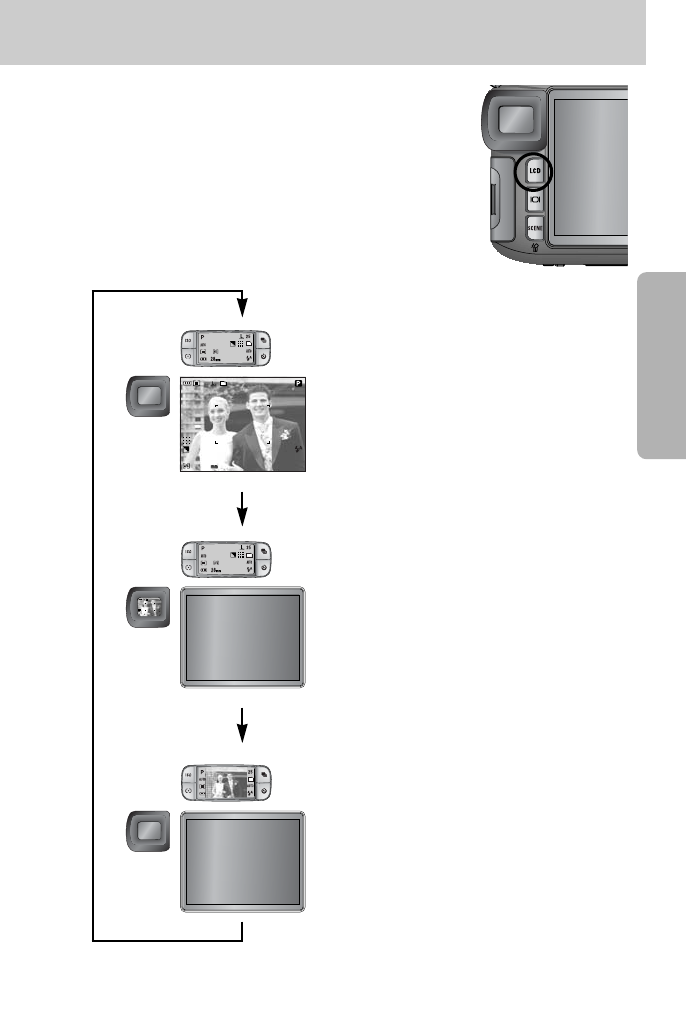
■You can change display of the Rear LCD, Finder LCD and
Top LCD.
■Refer to page 00 for more information about each LCD.
●How to change the display status
- Rear LCD is on
- Top LCD is on (Icon)
- Finder LCD is off
Pressing
the LCD
button
Pressing the
LCD button
Pressing the
LCD button
- Rear LCD is off
- Top LCD is on (Icon)
- Finder LCD is on
- Rear LCD is off
- Top LCD is on (Icon, Pre-view)
- Finder LCD is off
28
25
28
25
LCD button
※If you select the Play mode or PictBridge when the top LCD is on, the top LCD is turned off
and the Rear LCD is turned on automatically.
《64》
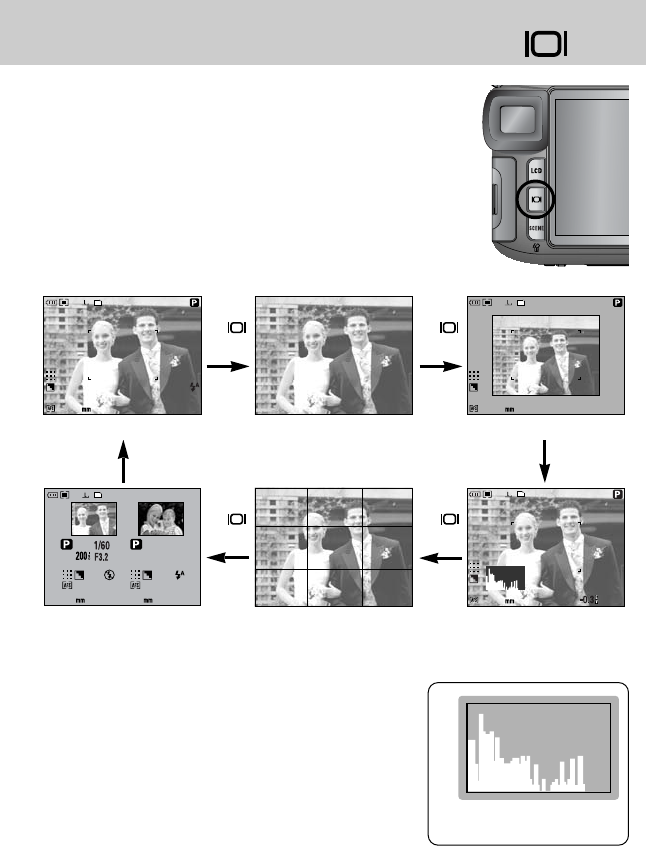
■You can check the recording status in the LCD. Pressing
the Display/ Information button will change the display as
shown below.
■Some information will not display in the AUTO, MOVIE CLIP
and SCENE mode.
28
25
28
25
※Information displayed on the Finder LCD is the same as its information on the Rear LCD.
■Histogram shows you the distribution of brightness in
recorded images. If the bars in the histogram are higher
towards the right, the image may be too bright. If the bars
are higher on the left, the image may be too dark. If the
lighting conditions are too bright to check the subject by
using the LCD, checking the histogram will enable more
precise exposure control for the shots.
■Self-examination
The last captured image displays on the left side of the LCD and pre-view image displays on
the right side of the LCD. You can compare with the two images to take next shot.
Pixel
Dark Bright
Distribution of brightness
Pressing
the ( )
button
Pressing
the ( )
button
[ Normal display ] [ Image only ] [ Image & Full information ]
75
25
28
28
25
Pressing
the ( )
button
Pressing
the ( )
button
[ Self-examination ][ Grid mark ] [ Histogram ]
Display/ Information button ( )
《65》
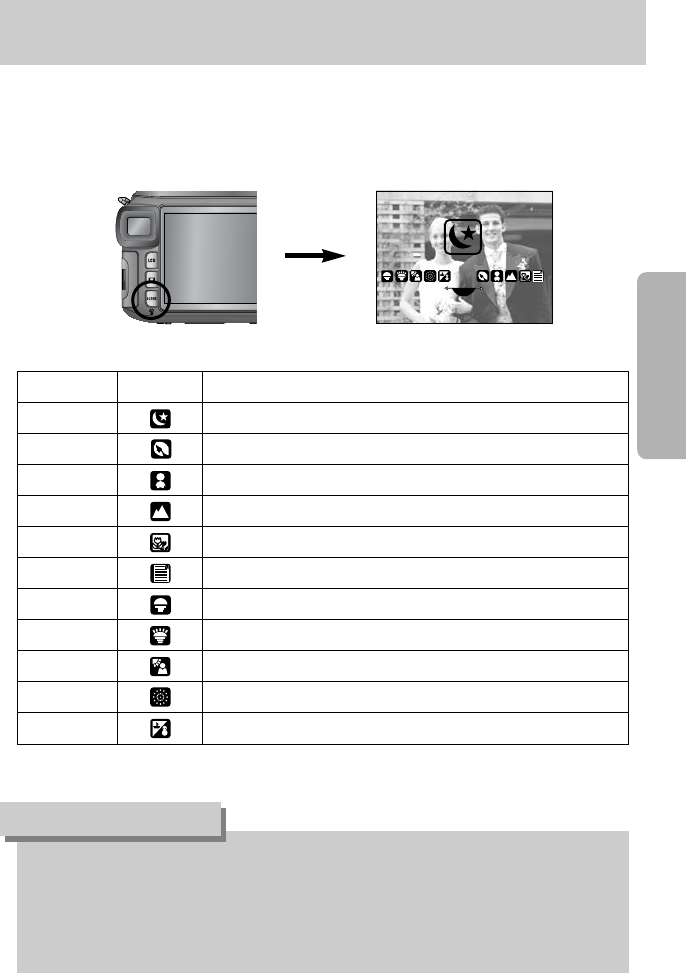
Sub menu Icon Description
[Children]
[Landscape]
[Close up]
[Sunset]
[Dawn]
[Backlight]
[Firework]
[Beach & Snow]
■Select the [Scene] submenu to automatically configure optimal settings, depending on the
selected scene.
■This function is only available in the SCENE Mode. Refer to page 00 for more information.
To take a picture of fast moving objects, for example, children.
[Portrait] To take a picture of a person.
[Night]
Use this for shooting still images at night or in other dark conditions.
Close-up shooting for small objects such as plants and insects.
For taking pictures of sunsets.
To take pictures of distant scenery.
Daybreak scenes.
Portrait without shadows caused by backlight.
Firework scenes.
[Text] Use this mode to shoot a document.
For ocean, lake, beach and snowscape scenes.
●When [Night], [Landscape], [Close up], [Text], [Sunset], [Dawn] and [Firework] scene
mode are selected, it is possible that camera shake will occur. In this case, take care of
the camera shaking.
●In the [Children] and [Close up] scene mode, the Continuous Automatic Focusing (CAF)
function will be activated and the CAF icon is displayed at the bottom of the LCD.
INFORMATION
JOG2
SCENE button
《66》
■You can see the Finder LCD clearly by rotating the diopter.
■The range is from -4 to +2 dpt.
●Diopter
1. Select the Finder LCD by pressing the LCD
button (p.00).
2. While looking though the Finder LCD, rotate the
diopter to the left or the right.
3. When you can see the Finder LCD clearly,
adjustment is complete.
Diopter
《67》
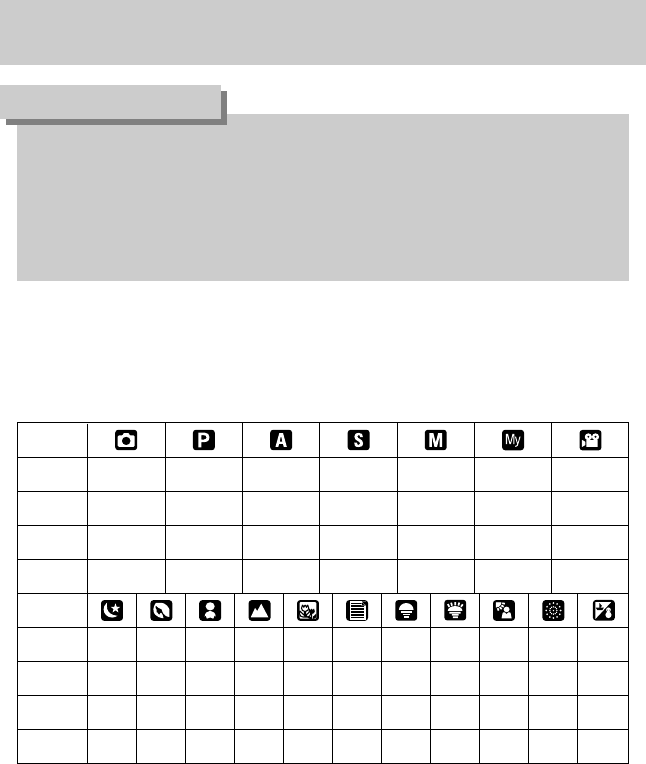
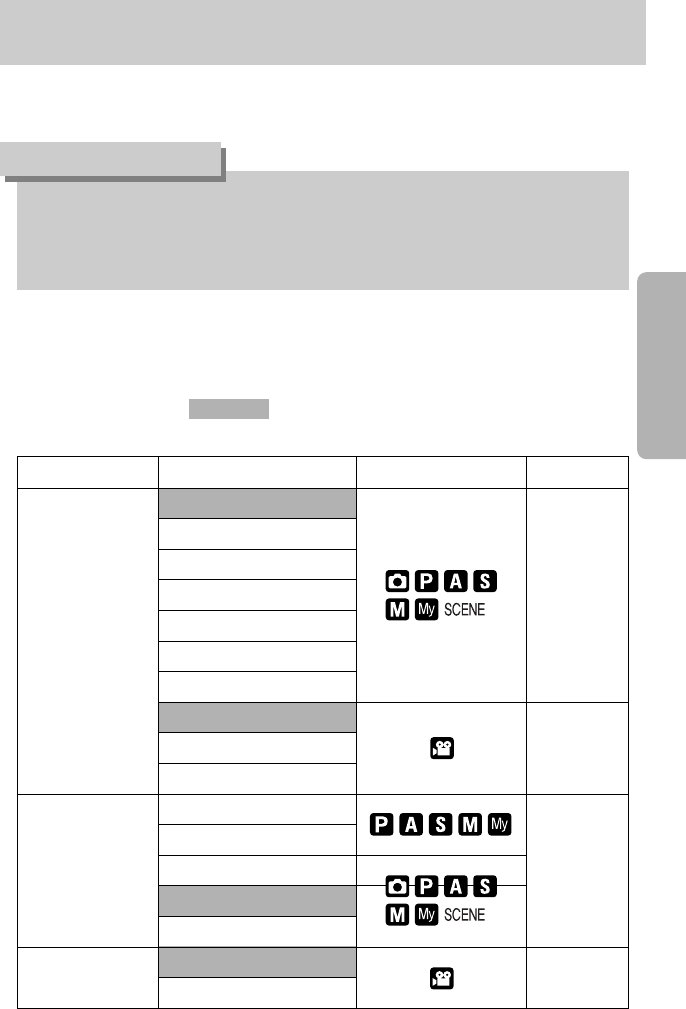
■You can use the menu on the LCD to set up recording functions.
■The following functions are available, depending on the mode you have selected.
The items indicated by are default settings.
●The menu will not be displayed on the LCD monitor in the following circumstances :
- When another button is being operated.
- While image data is being processed. (when the Card access lamp blinks)
- When there is no battery capacity.
INFORMATION
Main menu Main menu Camera working mode Page
3264X2448
3264X2176
3264X1840
2400X1800
1632X1224
1024X768
640X480
640X480
320X240
160X120
RAW
TIFF
Super Fine
Fine
Normal
25fps
15fps
Frame Rate p.
p.
p.
p.
Size
Quality
Using the LCD monitor to adjust the camera settings
《68》
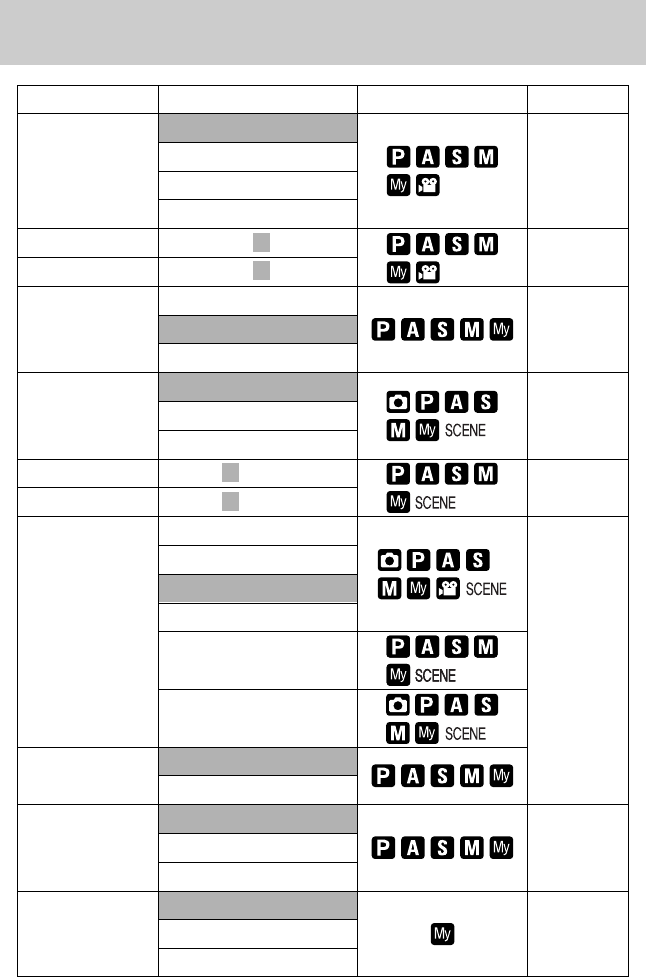
Main menu Main menu Camera working mode Page
Normal
B & W
Sepia
Negative
Contrast +2 ~ 0 ~ -2
Saturation +2 ~ 0 ~ -2
Soft
Normal
Vivid
Off
One Pic
All Pics
Interval/Time 1 ~ 60min
Interval/Number 2 ~ 99pics
LCD Brightness
Size
Quality
Effect
sRGB
Adobe RGB
Myset 1
Myset 2
Myset 3
Myset 1
Myset 2
Myset 3
Sharpness
Voice memo
Effect
Custom
Color Space
Save Myset
Load Myset
Using the LCD monitor to adjust the camera settings
Sharpness
Voice memo

《69》
Main menu Main menu Camera working mode Page
1st Curtain
2nd Curtain
Auto
Manual
Off
On
Center
Focus Area
* Menus are subject to change without prior notice.
Flash Synchro.
Flash Pop-up
Direct MF
Spot AE Point
Using the LCD monitor to adjust the camera settings
《70》
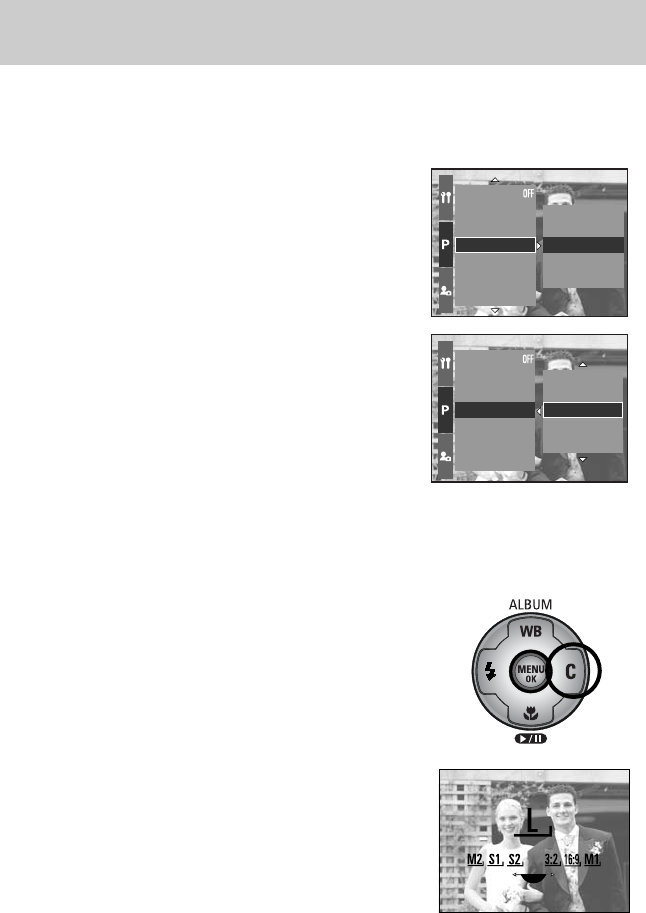
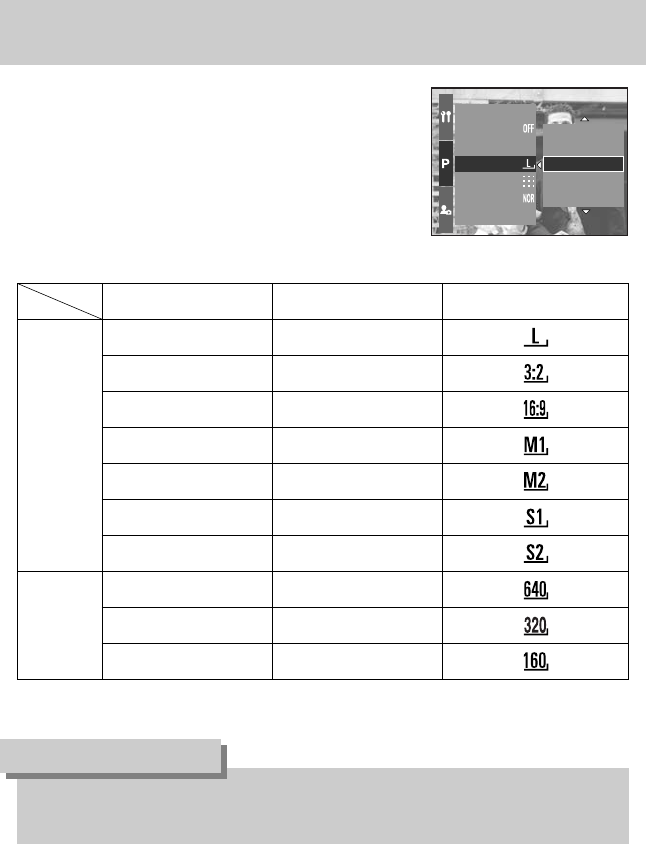
■You can select the image size appropriate for your application.
With Menu button With Jog dial Icon
3264X2448 L
3264X2176 3:2
3264X1840 16:9
2400X1800 M1
1632X1224 M2
1024X768 S1
640X480 S2
640X480 640
320X240 320
160X120 160
Still image
Movie clip
●The higher the resolution, the lower the number of available shots will be because high
resolution images require more memory than lower resolution images.
INFORMATION
Mode
Size
Flash Pop-up
Direct MF
Spot AE point
Size
Quality
Effect
Contrast
1024×768
640×480
3264×2448
3264×2176
3264×1840
[ Program mode ]
Size
《71》
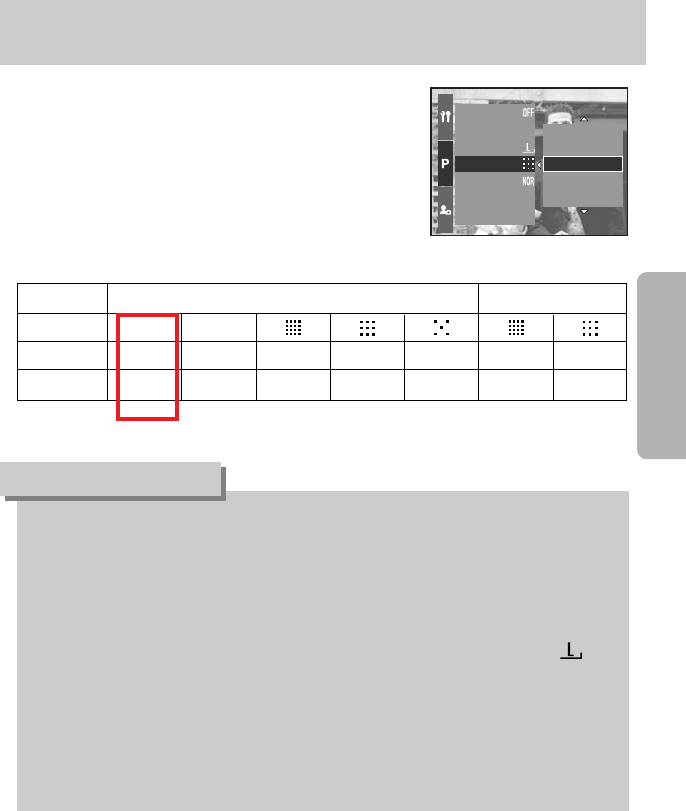
■You can select the compression ratio appropriate for
your application of the captured images.
The higher the compression ratio, the lower the picture quality.
Mode
Icon RAW TIFF
Sub menu RAW TIFF S. Fine Fine Normal 25FPS 15FPS
File format dng tif jpeg jpeg jpeg avi avi
Still image mode Movie clip mode
●A RAW file contains the original image information. To edit this file format, you have to
use supplied software to edit it.
●The RAW and TIFF file format are for professionals and provides the best quality.
However, large file size reduces number of available pictures to take and increases
saving time to the memory card.
●
A [Processing...] message is displayed while saving a RAW or TIFF file to the memory card.
●When you select a RAW or TIFF file type, the image size is fixed as 3264X2448( ).
●The RAW and TIFF file format can’t be selected in the SCENE mode.
●This file format complies with the DCF (Design rule for Camera File system).
●JPEG (Joint Photographic Experts Group) : JPEG is the image compression standard
developed by the Joint Photographic Experts Group. This type of compression is most
commonly used for compressing photos and graphics because it can compress the files
efficiently without damaging the data.
INFORMATION
Direct MF
Spot AE point
Size
Quality
Effect
Contrast
Saturation
TIFF
Super Fine
Fine
Normal
RAW
[ Program mode ]
Quality
《72》
■By using the camera's digital processor, it is possible to add special effects to your images.
[Normal] : No effect is added to the image.
[B & W] : Converts the image to black and white.
[Sepia] : Captured images will be stored in a sepia tone (a gradient of yellowish brown
colours).
[Negative] : Save the image in negative mode.
[ Program mode ] [ Movie clip mode ]
Spot AE point
Size
Quality
Effect
Contrast
Saturation
Sharpness
Negative
Normal
B & W
Sepia
Size
Frame Rate
Effect
Contrast
Saturation
Custom
Negative
Normal
B & W
Sepia
Effect
《73》
■You can change the distinction between light and dark part of images.
■You can make images with marked differences in light and shadow softer, and those with
less differences more vivid.
●How to set the contrast in the Program mode
1. Press the Menu button and select the [P] menu tab.
2. Press the Right button and select the [Contrast] menu
by pressing the Up/ Down button.
3. Press the Right button and select a desired menu by
pressing the Up/ Down button.
- You can see the changes by pressing the Up/ button.
- Setting range : +2 ~ 0 ~ -2
4. Press the OK button to set the setting
Size
Quality
Effect
Contrast
Saturation
Sharpness
Voice Memo
1
Size
Quality
Effect
Contrast
Saturation
Sharpness
Voice Memo
0
Contrast

《74》
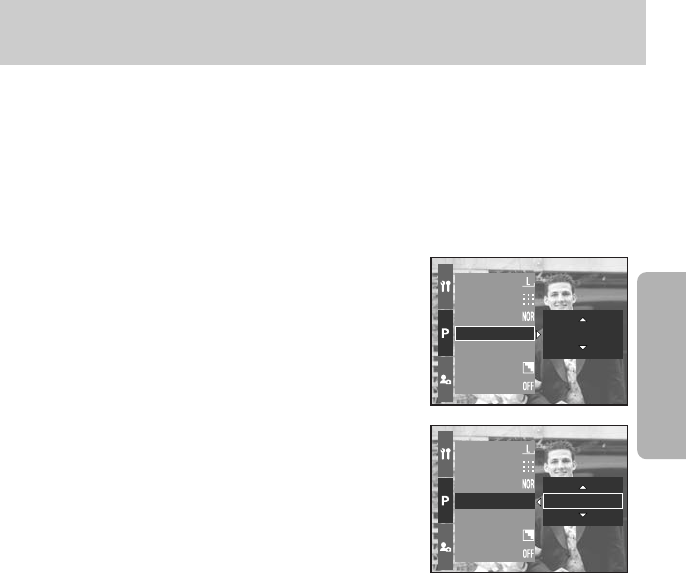
■You can change the saturation of images.
●How to set the saturation in the Program mode
1. Press the Menu button and select the [P] menu tab.
2. Press the Right button and select the [Saturation] menu
by pressing the Up/ Down button.
3. Press the Right button and select a desired menu by
pressing the Up/ Down button.
- Setting range : +2 ~ 0 ~ -2
4. Press the OK button to set the setting.
Quality
Effect
Contrast
Saturation
Sharpness
Voice Memo
Interval/Time
1
Quality
Effect
Contrast
Saturation
Sharpness
Voice Memo
Interval/Time
0
Saturation
《75》
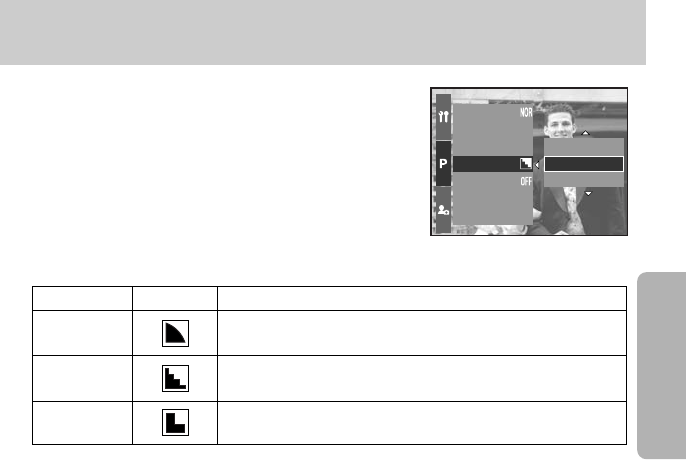
■
You can adjust the sharpness of the picture you want to take.
You cannot check the sharpness effect on the LCD before
you take a picture, because this function is applied only
when the captured image is stored on the memory.
Sub menu Icon Description
The edges of the image are softened.
This effect is suitable for editing images on your PC.
The edges of the image are sharp.
This is suitable for printing.
The edges of the image are emphasized. The edges will appear
sharp, but noise may occur in the recorded image.
Vivid
Normal
Soft
[ Program mode ]
Effect
Contrast
Saturation
Sharpness
Voice Memo
Interval/Time
Interval/Number
Soft
Normal
Vivid
Sharpness
《76》
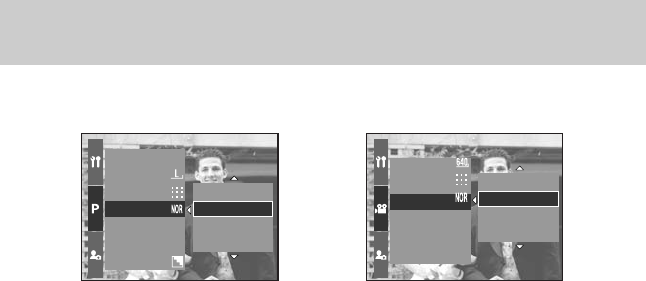
■You can add your voice-over to a stored image.
●Recording a voice memo in the Program mode
1. Press the Menu button and select the [P] menu tab.
2. Press the Right button and select the [Voice Memo]
menu by pressing the Up/ Down button.
3. Press the Right button and select a desired menu by
pressing the Up/ Down button.
- [Off] : cancels the voice memo.
- [One Pic] : the voice memo is added to a stored image
only.
- [All Pics] : the voice memo is added to all stored image.
4. Press the OK button to set the setting.
5. If the voice memo indicator is displayed on the LCD, the setting is complete. Press the
shutter button. The picture is stored on the memory card.
6. Voice memo will be recorded for ten seconds from the moment the picture is stored. In the
middle of the sound recording, pressing the shutter button will stop the voice memo.
●A distance of 40cm between you and the camera (microphone) is the best distance to
record sound.
INFORMATION
Contrast
Saturation
Sharpness
Voice Memo
Interval/Time
Interval/Number
Custom
All Pics
Off
One Pic
28
230
Stop:SHUTTER
[ Preparing for voice memo ] [ Recording voice memo ]
[ Program mode ]
Voice memo
《77》
■
You can select how the colours are reproduced (sRGB, Adobe RGB) on the monitor or printer.
■Adobe RGB has more colour spectra than sRGB and it is suitable for printing and computer
graphics.
●How to set the Colour space in the Program mode
1. Press the Menu button. And select the [P] menu tab.
2. Press the Right button and select the [Color space]
menu by pressing the Up/ Down button.
3. Press the Right button and select a desired menu by
pressing the Up/ Down button.
- sRGB/Adobe RGB
4. Press the OK button to set the setting.
Interval/Time
Interval/Number
Custom
Color Space
Save Myset
Flash Synchro.
Flash Pop-up
Adobe RGB
sRGB
Interval/Time
Interval/Number
Custom
Color Space
Save Myset
Flash Synchro.
Flash Pop-up
sRGB
Adobe RGB
Colour space
《78》
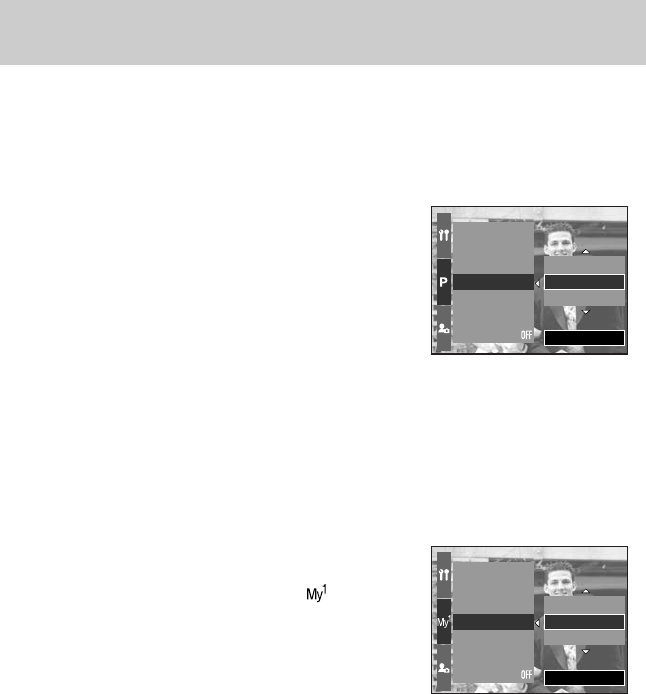
■Use the MySET mode to save frequently used camera settings (Save Myset) and use it later
(Load Myset).
●Saving the camera configuration : Available in the PROGRAM, A, S, M shooting mode and
MySET mode.
1. Use the camera buttons and menu to set desired camera
configuration.
2.
Press the menu button in any mode except AUTO, MOVIE
CLIP and SCENE mode. Select the [P] menu tab.
3. Press the Right button and select the [Save Myset] menu
by pressing the Up/ Down button.
4. Press the Right button and select desired MySET slot
number to save by pressing the Up/ Down button.
5. Press the OK button and a confirmation window will
display. Select [Yes] menu and press the OK button to save the current configuration in the
selected MySET slot and close the menu.
●Loading the saved camera configuration: available in the MySET shooting mode.
1. Turn the Mode dial to select the MySET shooting mode
and press the Menu button.
2. Press the Menu button and select the [ ] menu.
3. Press the Right button and select the [Load Myset] menu
by pressing the Up/ Down button.
4. Press the Right button and select a MySET slot number
to load by pressing the Up/ Down button.
5. Press the OK button and a confirmation window will
display. Select the [Yes] menu and press the OK button
to set the setting.
* The current MySET slot number is displayed in the top left of the LCD.
※
Saving is available for the following camera functions.
Functions using the camera buttons - Macro, flash, white balance, ISO, Exposure value,
Aperture value and Shutter speed.
Functions using the menu screen - Size, quality, effect and sharpness.
[ Program mode ]
[ MySET mode ]
Interval/Number
Custom
Color Space
Save Myset
Flash Synchro.
Flash Pop-up
Direct MF
Myset 3
Myset 1
Myset 2
Set:OK
Custom
Color Space
Save Myset
Load Myset
Flash Synchro.
Flash Pop-up
Direct MF
Myset 3
Myset 1
Myset 2
Set:OK
Save/ Load a specific camera configuration (MySET)
《79》
Flash Synchro.
Flash Pop-up
Direct MF
Spot AE point
Size
Quality
Effect
Center
Focus Area
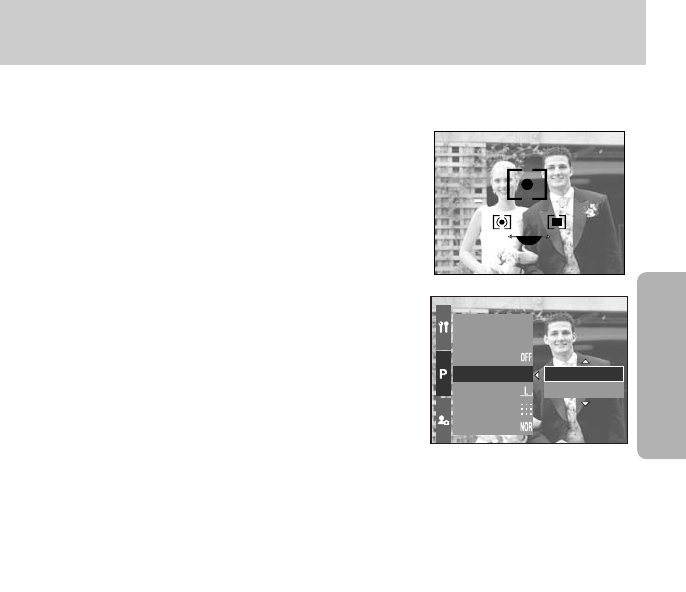
■You can select a spot AE point where the brightness is calculated.
●How to set the spot AE point in the Program mode
1. Select the spot metering mode (p.00).
2. Press the Menu button and select the [P] menu tab.
3. Press the Right button and select the [Spot AE point]
menu by pressing the Up/ Down button.
4. Press the Right button and select a desired menu by
pressing the Up/ Down button.
- [Center] : The brightness is calculated based on the +
marked area placed on the centre of the Rear
LCD. Select this menu when the subject is in
the backlight shooting condition or in the
shadow.
- [Focus Area] : The brightness is calculated based on where the auto focus frame is placed.
If there is gap of brightness between the subject and centre part of the LCD,
select this menu.
5. Press the OK button to set the setting.
JOG2
Spot AE point

《80》
■Turn the camera on and select Play mode by pressing the play mode button ( ).
The camera can now play back the images stored in the memory.
■If you have turned on the camera by pressing the POWER button, you can press the PLAY
MODE button once to switch to Play mode and press it again to switch to Recording mode.
■You can turn the power on with the play mode button. The camera is turned on in play mode.
Press the play mode button again to switch to Recording mode.
■You can set up the PLAY mode function by using the camera buttons and LCD.
■If you press the play mode button with turning on the Top LCD, the last image stored on the
memory is displayed on the Rear LCD.
●Playing back a still image
1. Select the PLAY mode by pressing the play
mode button ( ).
2. The last image stored on the memory is
displayed on the LCD.
3. Select an image that you want to view by
pressing the LEFT/ RIGHT button.
※Press and hold the LEFT or RIGHT button
to play back the images quickly.
100-0009
F2.2
1/30
100
2005.07.01
13:00PM
28
100-0009
2005.07.01
13:00 PM
1/30
F2.2
100
●Manner mode : Pressing the play mode button for more than 2 seconds changes the
buzzer and start-up sound setting to OFF, even though you may have set
these to ON.
●
Even if the camera’s power is off, you can start the play mode by pressing the play mode button.
INFORMATION
Starting play mode
《81》
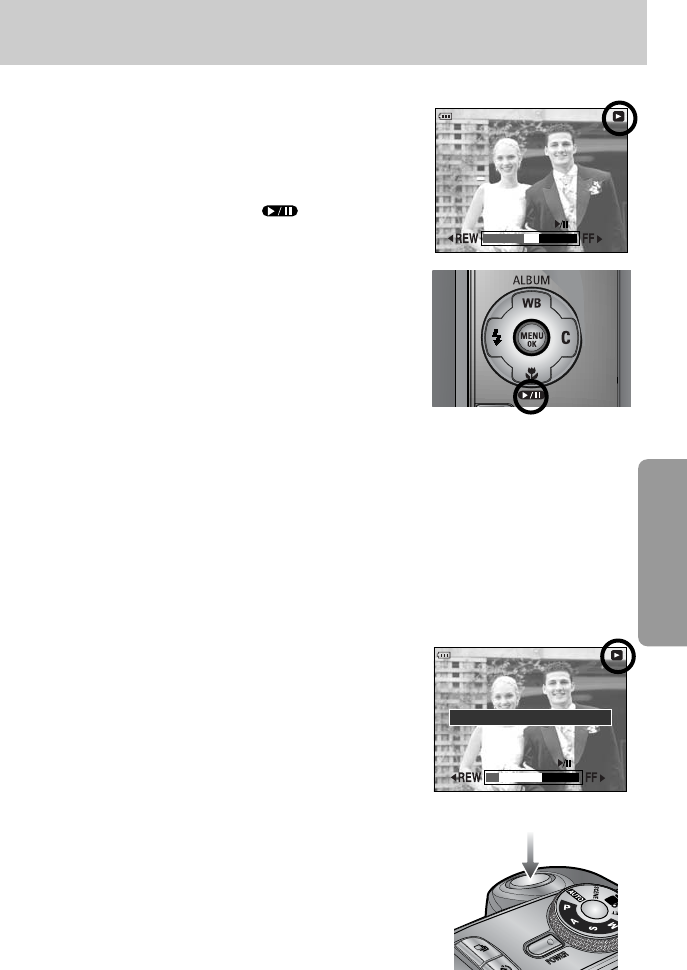
■Playing back a movie clip
Steps from 1-2 are the same as those to play back a still
image.
3. Select the recorded movie clip that you want to play back
by using the Left/ Right button.
4. Press the Play & Pause button ( ) to play back
a movie clip file.
- To play back or pause a movie clip. Press the Play &
Pause button.
- To rewind the movie clip while it is playing, press the Left
button. To fast forward the movie clip, press the Right
button.
- Whenever you press the Left/ Right button while the movie
clip is playing the rewinding/ fast forwarding speed will be
2, 4, 8 times faster.
Pressing the Play & Pause button will reduce the speed.
- To stop playback of the movie clip, press the Play & Pause button, and then press the Left
or Right button.
●How to capture the movie clip
Steps 1-2 are the same as those for playing back a still
image.
3. Select the recorded movie clip that you want to play
back by using the Left/ Right button.
4. Press the Play & Pause button to play back the movie clip.
5. Press the Play & Pause button while playing the movie
clip. Then press the Shutter button.
6. The paused movie clip is saved in a new file name.
* The captured movie clip file has same size as the original
movie clip (640X480, 320X240, 160X120).
[ Pause ]
100-0008
00:00:09
PAUSE?
100-0008
00:00:09
PLAY?
[ Press the shutter button ]
■Movie clip capture function : capture still images from the movie clip.
Capture:SHUTTER
Starting play mode