Hanwha Techwin PRO815 Digital Camera User Manual H1 en 002 v03
Samsung Techwin Co Ltd Digital Camera H1 en 002 v03
Contents
Users Manual 3 of 7
《24》
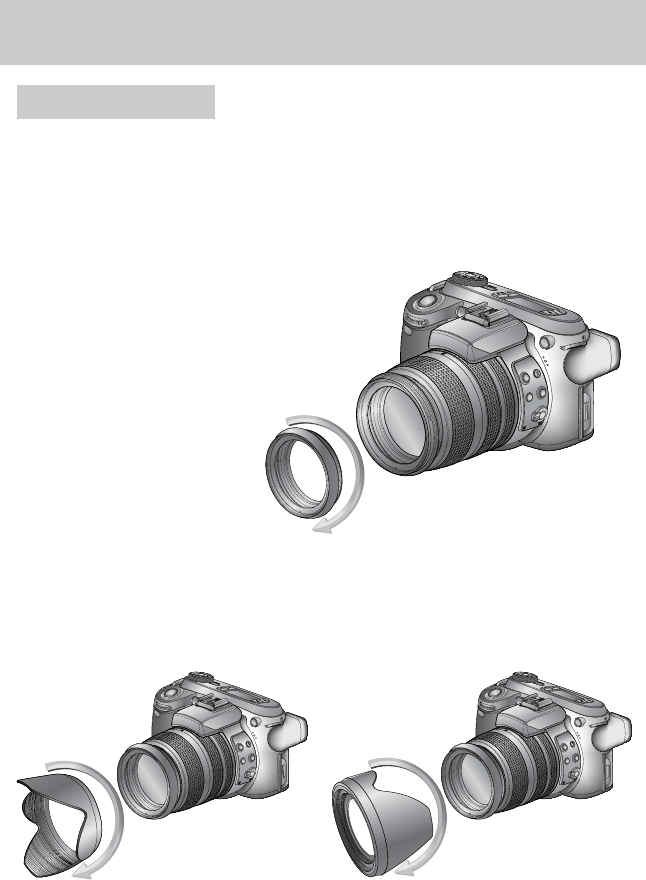
■When you shoot in direct or bright lighting conditions, the image quality will be deteriorated
caused by unnecessary light. In this case, use the lens hood to reduce the image quality
deterioration caused by unnecessary light.
1. Attach the lens adapter to the camera by turning
the lens adapter clockwise as shown alongside.
※You can use a general purpose filter (φ72mm)
after attaching the lens adapter.
2. Attach the lens hood by turning it clockwise.
[ 후드 촬영 시 ][ 후드 보관 시 ]
Before using the camera
Attaching the lens hood
《25》
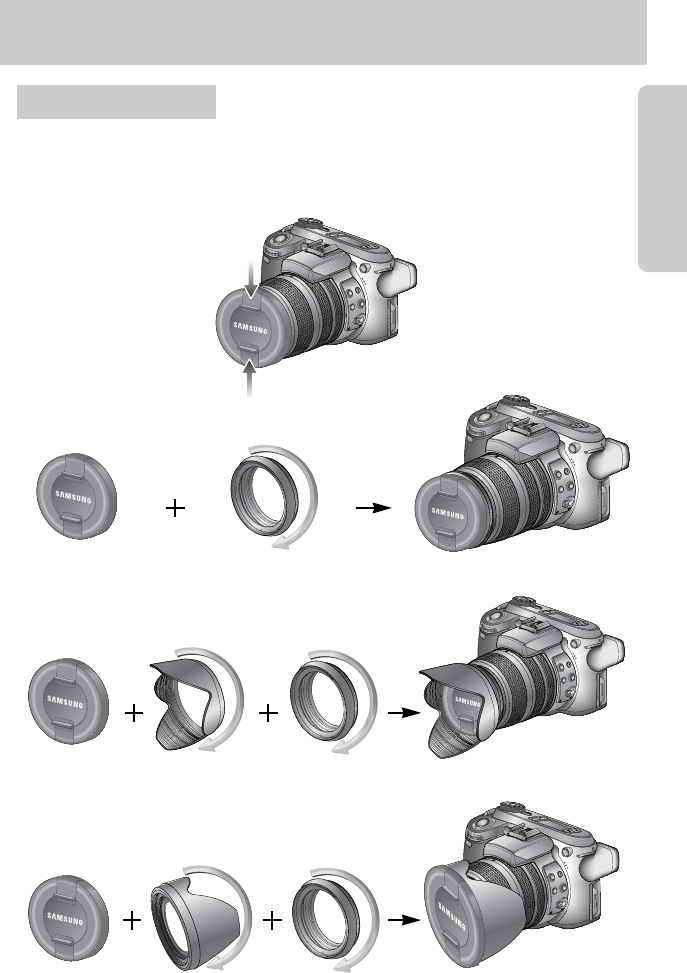
■When you don’t use the camera, attach the lens cap.
You can attach the lens cap as show below.
Attaching the lens cap
Before using the camera
《26》
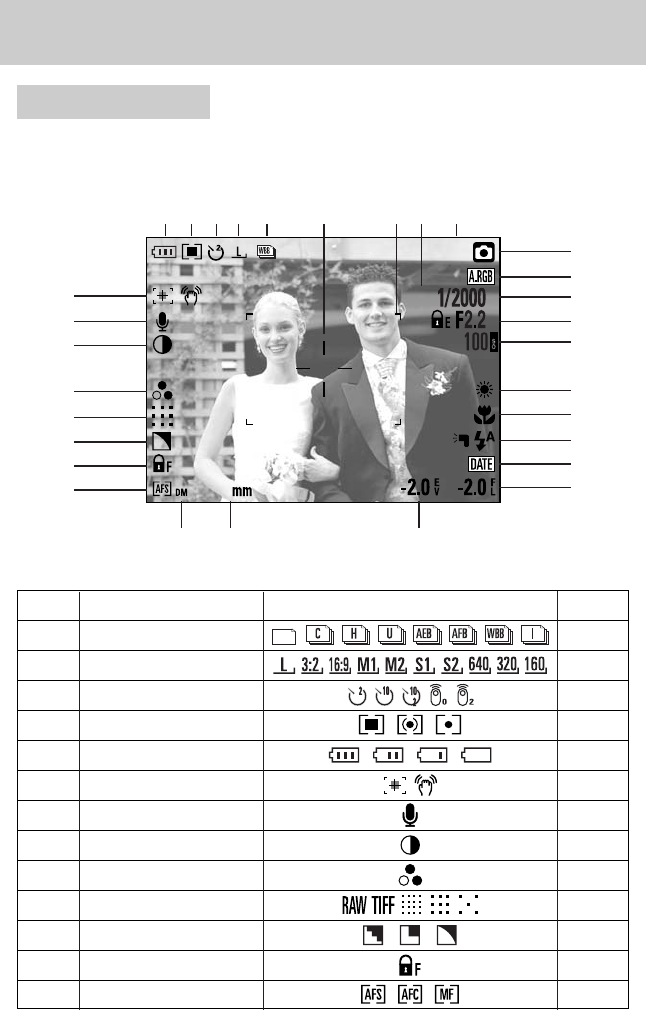
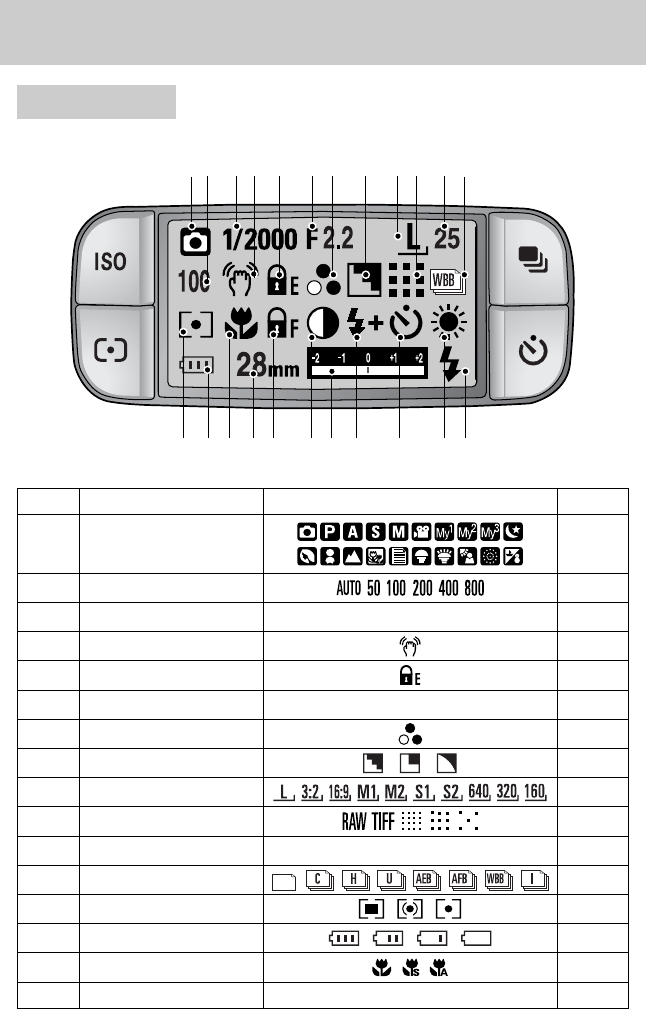
No. Description Icons Page
1Drive modes p.16
2Image size p.11~12
3
Self-timer/Remote controller
p.52
4Metering p.34
5Battery status p.37
6
High speed shutter mode/Camera shake warning
p.32
7 Voice memo p.33
8 Contrast p.51
9Definition p.43
10 Image quality p.44
11 Sharpness p.53
12 Focus Lock
13 Focus mode p.28
[ Image & Full status ]
28
25
x4.0
⑥
⑦
⑧
⑨
⑩
⑪
⑫
⑬⑰
⑲
⑱
⑳
⑭ ⑯⑮
⑤ ④ ③ ② ①
■The LCD displays information about the shooting functions and selections.
■Refer to page 00 for more information about selecting the LCD.
Rear LCD/ Finder LCD
LCD indicator
《27》
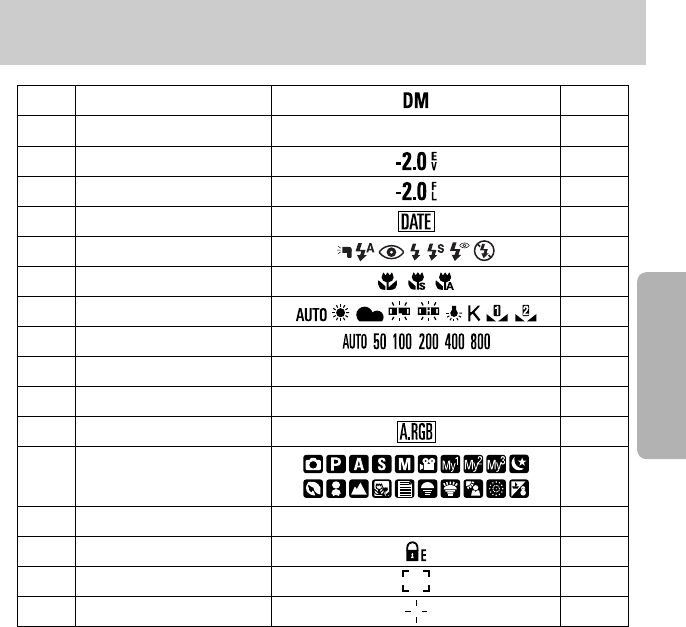
14 Direct MF
15 Focal length/Digital zoom
28mmX4.0
p.42
16 Exposure compensation p.41
17 Flash power compensation p.41
18 Date imprint p.40
19 Flash p.50
20 Macro p.49
21 White balance
22 ISO
23 Aperture value F2.2
24 Shutter speed 1/2000
25 Colour space
27
Number of available shots remaining
25
28 Exposure lock
29 Auto focus frame
30 Spot zone
26 Recording mode
LCD indicator
《28》
①② ③ ④ ⑤ ⑥ ⑦ ⑧ ⑨ ⑩ ⑪ ⑫
⑬⑭⑮⑯⑰ ⑱⑲ ⑳
No. Description Icons Page
2ISO p.11~12
3Shutter speed 1/2000 p.52
4Camera shake warning p.34
5Exposure lock p.37
6Aperture value F2.2 p.32
7Definition p.33
8Sharpness p.51
9Image size p.43
10 Image quality p.44
11 Number of shots remaining 25 p.53
12 Drive mode
13 Metering p.28
14 Battery status
15 Macro p.42
16 Focal length 28mm
1Recording mode
p.16
Top LCD
LCD indicator

《29》
17 Focus lock/ Focus mode p.41
18 Contrast p.40
19 Compensation indicator p.50
20 Flash power compensation p.49
21 Self-timer
22 White balance
23 Flash
Recording mode
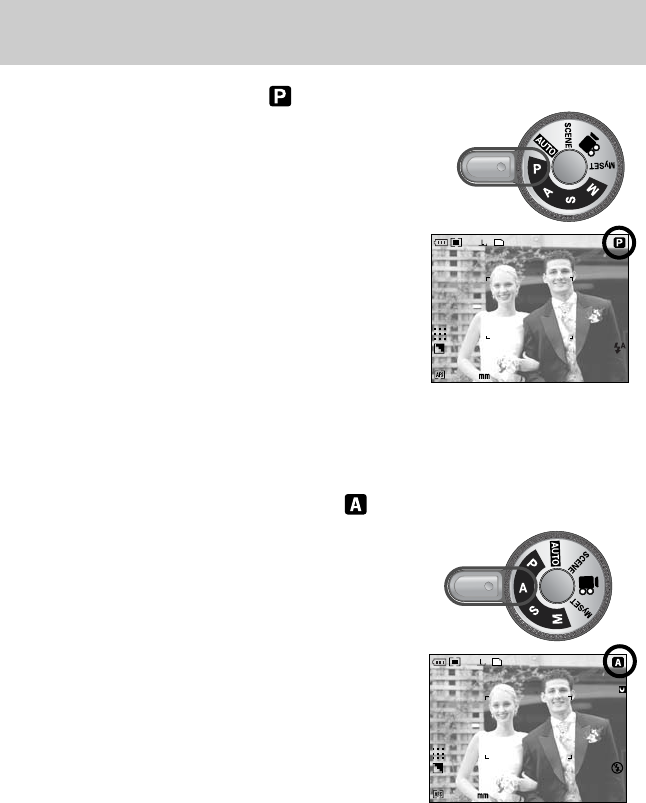
Please select this mode for quick and easy picture taking with minimal user interaction.
1. Insert the battery and memory card. (p.16).
2. Press the power button to turn on the camera.
(Date & Time will display for about 3 Sec. and
disappear.)
3. Select the AUTO mode by rotating the mode dial.
4. Point the camera towards the subject and compose the
image by using the LCD.
5. Press the shutter button to capture an image.
■How to use the AUTO ( ) mode
28
25
[ AUTO mode ]
●If the auto focus frame turns to red when you press the shutter button down half way, it
means that the camera cannot focus on the subject. Should this be the case, the camera
is unable to capture an image clearly.
INFORMATION
LCD indicator
《30》
■How to use the PROGRAM mode ( )
Selecting the automatic mode will configure the camera
with optimal settings. You can still manually configure all
functions except the aperture value and shutter speed.
Step 1~2 are the same as those for AUTO mode.
3. Select the PROGRAM mode by rotating the mode dial.
4. Press the menu button to configure advanced functions
(p.00).
5. Point the camera towards the subject and compose
the image by using the LCD.
6. Press the shutter button to capture an image.
28
25
[ PROGRAM mode ]
28
25
F2.2
[ Aperture priority mode ]
■How to use the APERTURE PRIORITY mode ( )
Set the aperture value for automatic exposure depends on
the brightness of the object by automatic shutter speed
setting in the camera.
Step 1~2 are the same as those for AUTO mode.
3. Select the APERTURE PRIORITY mode by rotating
the mode dial.
4. Select the desired aperture value by rotating the Rear
jog dial (JOG2).
5. Point the camera towards the subject and compose
the image by using the LCD.
6. Press the shutter button to capture an image.
* Smaller Aperture values make the object sharp but blur
the background. Larger Aperture values make both
the object and background sharp.
Recording mode
《31》
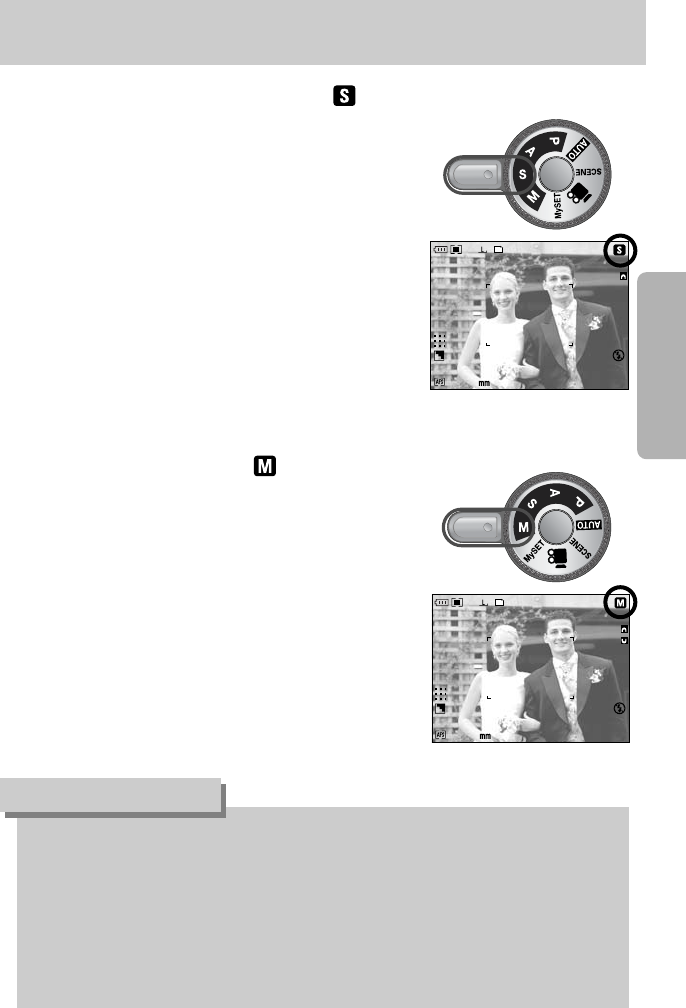
■How to use the SHUTTER PRIORITY mode ( )
Set the shutter speed for automatic exposure depends on
the brightness of the object by automatic aperture value
setting in the camera.
Step 1~2 are the same as those for AUTO mode.
3. Select the SHUTTER PRIORITY mode by rotating
the mode dial.
4. Select the desired shutter speed by rotating the Front
jog dial (JOG1).
5. Point the camera towards the subject and compose
image by using the LCD.
6. Press the shutter button to capture an image.
* High Shutter speeds can capture a moving object in a still
image as if the object is not moving. Low Shutter speeds
can capture a moving object with an ‘active’ effect.
28
25
1/125
[ Shutter Priority mode ]
■How to use the MANUAL mode ( )
The user can manually set both the aperture value and
the shutter speed.
Step 1~2 are the same as those for AUTO mode.
3. Select the MANUAL mode by rotating the mode dial.
4. Select the desired shutter speed or aperture value
by rotating a jog dial.
- Front jog dial (JOG1) : Selecting the shutter speed
- Rear jog dial (JOG2) : Selecting the aperture value
5. Point the camera towards the subject and compose the
image by using the LCD.
6. Press the shutter button to capture an image.
28
25
1/125
F2.2
[ Manual mode ]
●In the manual mode, you can change the aperture value and shutter speed after fixing the
Exposure value by rotating the EVC ring.
●Available shutter speed, by the aperture value
- Over F2.2 : 30.0~1/6000 Sec.
- Over F3.2 : 30.0 ~ 1/2000 Sec.
- Over F4.0 : 30.0 ~ 1/2500 Sec.
- Over F5.0 : 30.0 ~ 1/3200 Sec.
- Over F7.1 : 30.0 ~ 1/4000 Sec.
INFORMATION
Recording mode