Hanwha Techwin PRO815 Digital Camera User Manual H1 en c v03
Samsung Techwin Co Ltd Digital Camera H1 en c v03
Contents
Users Manual 2 of 7
《12》
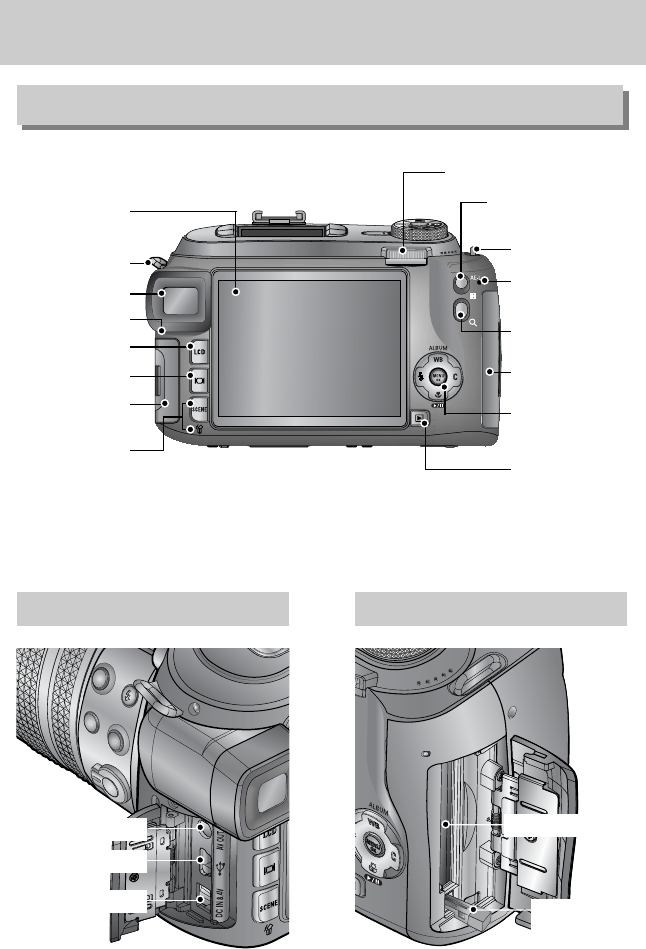
Back
Connectors Memory card slot
Strap eyslet
AV jack
USB connector
DC-IN jack
Finder LCD
Diopter adjustment ring
Card access lamp
LCD button
Display/Informationbutton
Connector cover
SCENE/
Delete button
Back LCD
Memory card slot cover
Memory card
eject lever
Memory card slot
5-function button
Play mode button
Digital zoom / Enlargement button
Strap eyelet
AE Lock (AE-L) button/
Thumbnail button
Rear Jog dial (JOG 2)
Identification of features
《13》
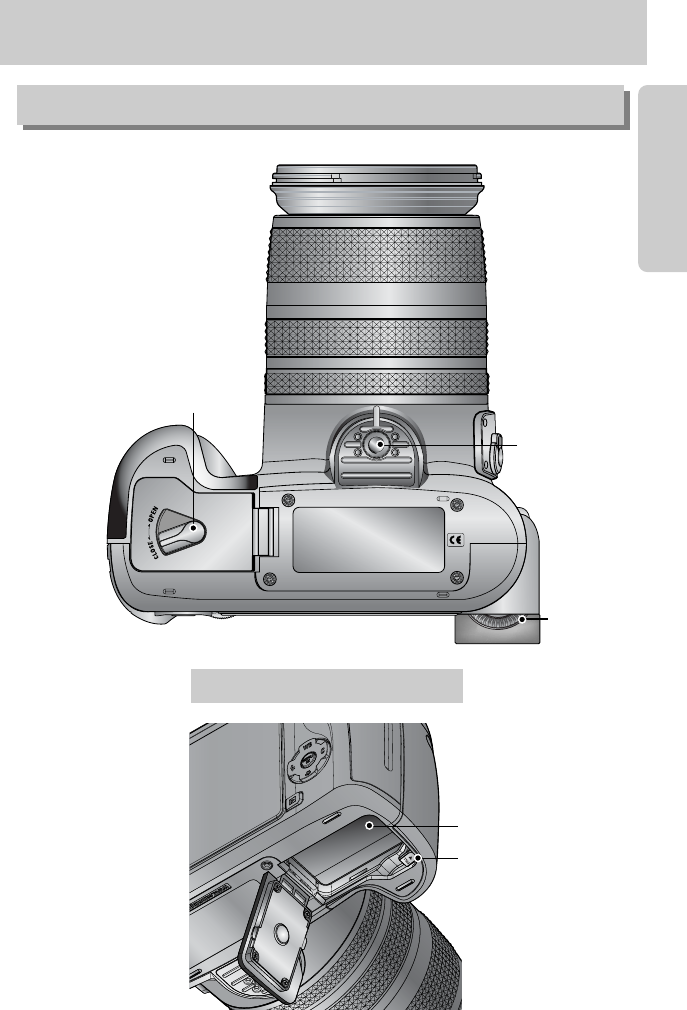
Bottom
Battery chamber
Battery chamber
cover & lock
Tripod socket
Battery holder
Battery chamber
Identification of features
Diopter
adjustment
ring
《14》
Identification of features
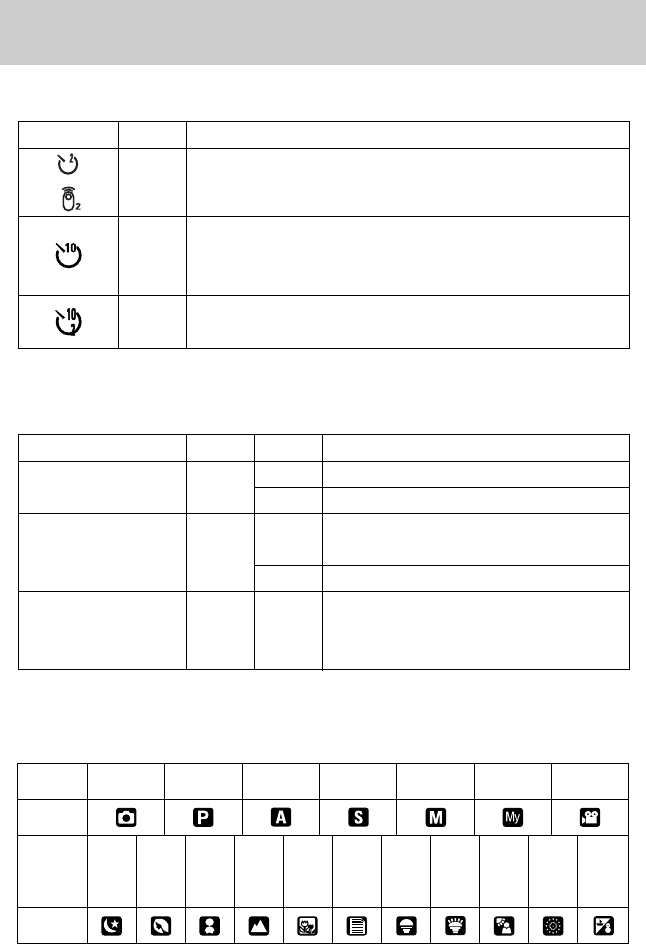
■Self-timer lamp
■Camera Status Lamp
Icon Status Description
- For the first 7 seconds, the lamp blinks at 1 second intervals.
- For the final 3 seconds, the lamp blinks quickly at 0.25-second
intervals.
A picture will be taken after about 10 seconds and 2 seconds later
a second picture will be taken.
Blinking
Blinking
Blinking
Lamp Colour Status Description
On Power on
Blinking BlinkingWhen the LCD is turned off
Charging is complete
(Pressing the shutter button half way down)
The flash is being charged
When the memory card is being used
Red Blinking PC mode - When the data is transmitting
-
When the USB cable is connected
Card access lamp
■Mode icon
Mode AUTO
PROGRAM
A priority S priority MANUAL MySET
MOVIE CLIP
Icon
Icon
NIGHT
PORTRAIT
CHILDREN
LANDSCAPE
CLOSE-UP
TEXT
SUNSET
DAWN
BACKLIGHT
BEACH&
SNOW
FIREWORKS
Mode
For the 2 seconds, the lamp blinks quickly at 0.25-second
intervals.
Flash status lamp
Mode dial lamp Green
Red
On
Blinking
《15》
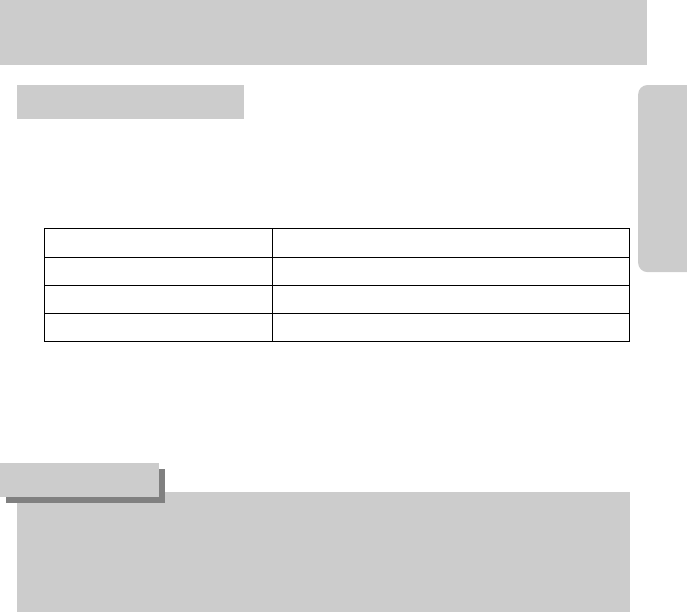
■There are two ways in which to provide the camera with power. You can use batteriy or
alternatively, you can use an exclusive AC adapter.
■Specification of SLB-1974 rechargeable battery
※To buy the exclusive AC adapter (SAC-81, DC 8.4V 1.5A), contact your nearest Samsung
dealer or Samsung service centre.
Connecting to a Power Source
●Please ensure that you use the exclusive battery with the correct specification for the
camera. Failure to do may affect your warranty.
●When you disconnect the AC adapter or remove the battery, turn off the camera power
first. The data can be damaged.
CAUTION
Before using the camera
Model SLB-1974
Type Lithium Ion
Lithium Ion 1900mAh
Charging time Approx. 150MIN (Using the SBC-L4)
《16》
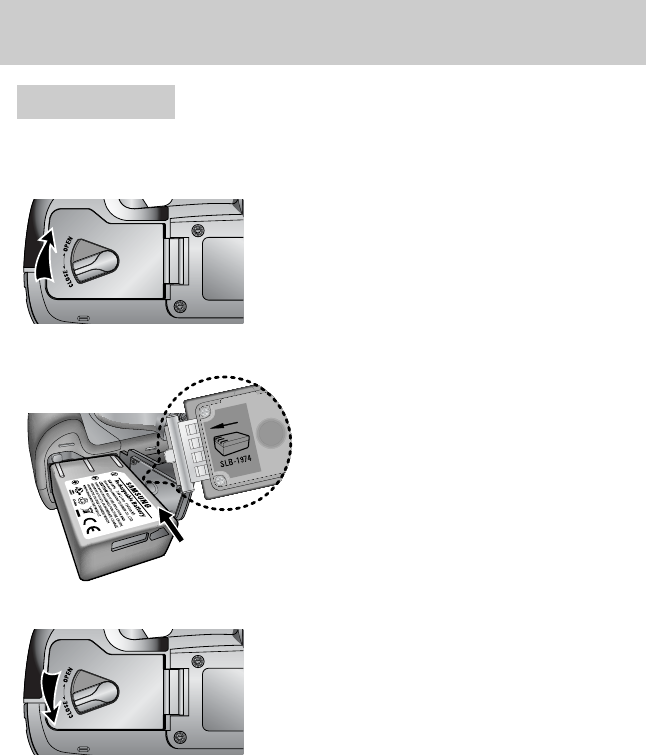
Using the battery : If the camera does not turn on after you have inserted battery,
please check whether the battery is inserted with the correct
polarity (+/-).
1. Turn the battery chamber lock in the direction
of the arrow (OPEN) and open the battery
chamber cover.
2. Insert the battery taking note of the polarity
(+/-).
3. Close the battery chamber cover and turn
the battery chamber lock in the direction of
the arrow (CLOSE).
Before using the camera
《17》
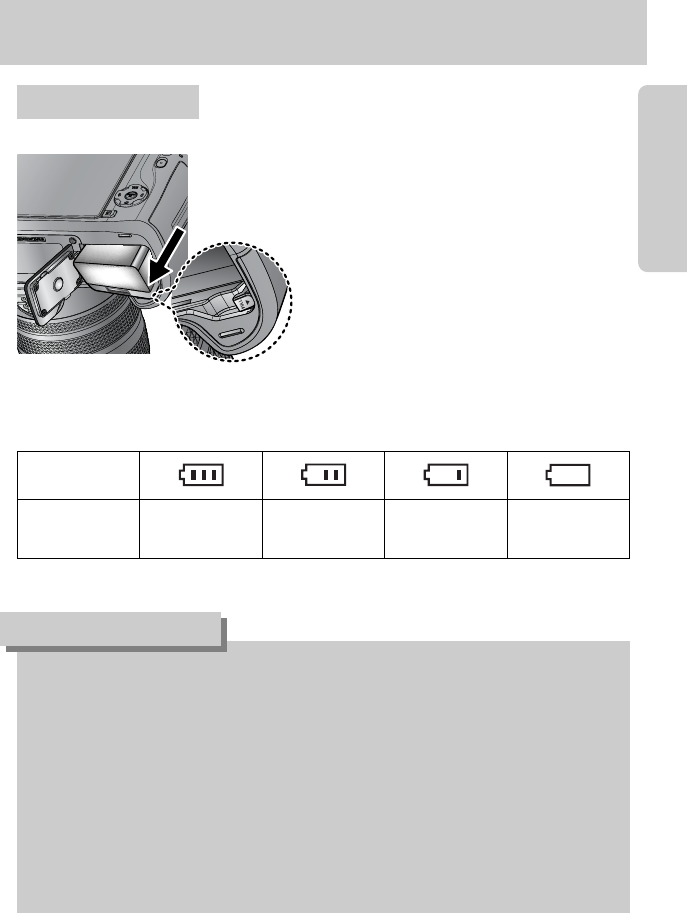
Battery status
Battery indicator
The battery is
fully charged
Prepare new
battery
There is low battery capacity
(Warning indicator will display).
There is no battery capacity
(Red colour : Change the battery).
■There are 4 indicators for battery condition that are displayed on the LCD monitor.
Removing the battery
1. Turn off the camera. Turn the battery chamber lock in the
direction of the OPEN mark and open the battery chamber
cover.
2. Move the battery holder aside and the battery
will be released.
3. Take out the battery and close the battery
chamber cover. Turn the battery chamber
lock in the direction of the CLOSE mark.
Important information about battery usage.
●When the camera is not used, turn off the camera power.
●Please remove the battery if the camera will not be used for long periods.
Battery can lose power over time and are prone to leaking if kept inside the camera.
●Low temperatures (below 0℃) can affect the performance of the battery and you may
experience reduced battery life.
●Battery will usually recover at normal temperatures.
●During extended use of the camera, the camera body may become warm.
This is perfectly normal.
●If the battery has low capacity, the camera power will not be turned on.
In this case, change the battery with new one.
INFORMATION
Before using the camera
《18》
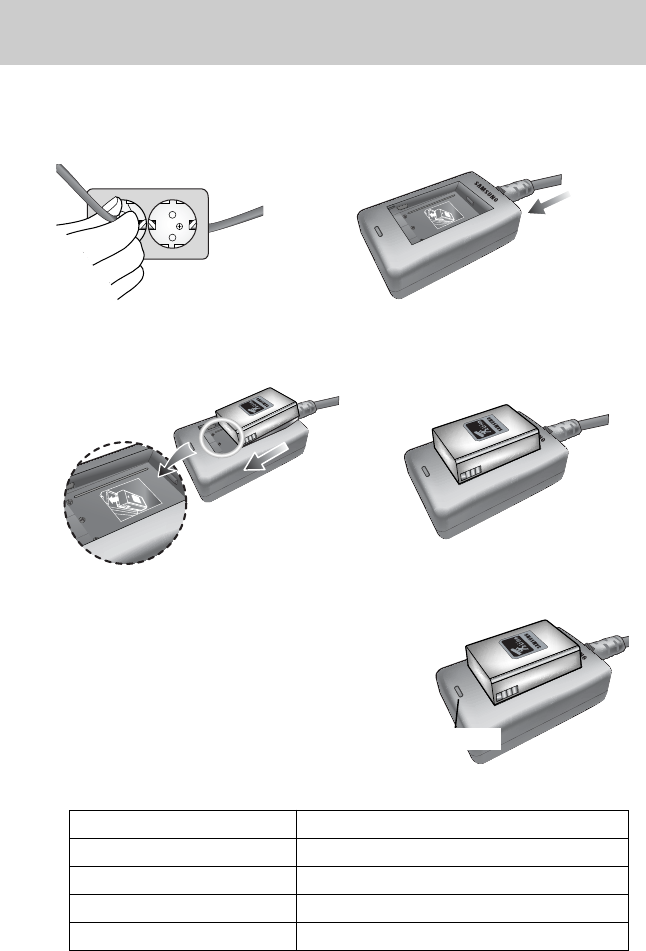
1. Plug the AC cord’s power plug into the wall outlet and insert the AC cord into the charger.
※If the charging LED doesn’t blink as red or blinks as
yellow, please check whether the battery is inserted
with the correct polarity (+/-).
※Check the battery charging status with the Charging
LED of the charger.
Status LED
Being charged Red LED is on
Charging is complete Green LED is on
Charging is paused Yellow LED is on
Charging error Yellow LED is blinking
Charging LED
■How to charge the rechargeable battery
2. Place the battery in the charger as shown alongside.
Before using the camera
《19》
●Always turn off the power before taking the AC adapter out of the mains supply.
●As with all mains powered devices, safety is important. Ensure that neither the camera
nor adapter comes into contact with water or metallic materials.
●Please ensure that you use an AC adapter (SAC-81, DC 8.4V) with the correct
specification for the camera. Failure to do so may affect your warranty.
DANGER
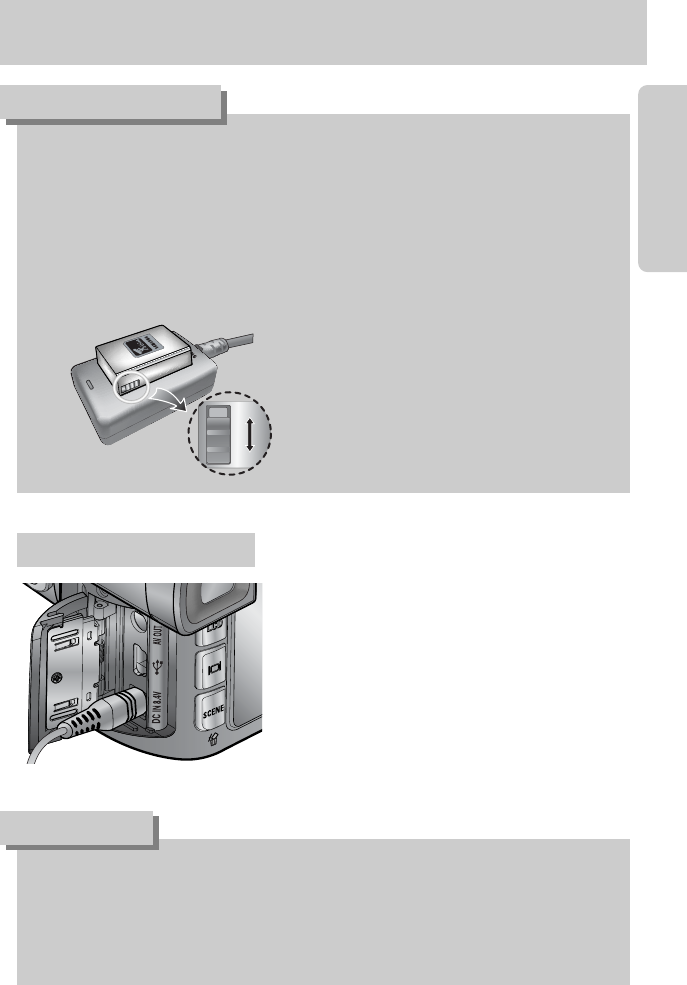
If you have access to a mains supply, using an AC
Adapter (SAC-81, DC 8.4V) allows the camera to
be used for long periods of time. Plug the adapter
into the DC-IN jack on the camera. Remove the
battery from the camera when using an AC
adapter.
AC adapter (SAC-81, DC 8.4V)
Before using the camera
●The proper operating temperature of the charger is 0°C ~ 40°C. When you charge the
battery under/over the proper operating temperature, the charger may not operate
(Yellow LED is on). Charging will restart at the operating temperature and this is not
camera malfunction.
●Samsung warrants the charger for a period of one year and the Lithium Ion battery for a
period of six months from the original date of purchase of the product.
●Wear and tear on the lithium battery is not covered by the Samsung warranty.
If the battery duration shortens considerably, you should purchase a new battery.
●Slide the switch as you please to indicate
something like flash charging status.
This switch has yellow and black mark.
INFORMATION

《20》
●Be sure to format the memory card (see p. 79) if you are using a newly purchased memory
for the first time, if it contains data that the camera cannot recognize, or if it contains images
captured with a different camera.
●Turn off the camera power whenever the memory card is being inserted or removed.
●Repeated use of the memory card will eventually reduce the memory card s performance.
Should this be the case, you will need to purchase a new memory card. Wear and tear on the
memory card is not covered by the Samsung warranty.
●The memory card is an electronic precision device.
Do not bend, drop or subject the memory card to any heavy impact.
●Do not store the memory card in an environment with strong electronic or magnetic fields,
e.g. near loud speakers or TV receivers.
●Please do not use or store in an environment where there are extremes in temperature.
●Please keep the memory card in its case when not in use.
●During and after periods of extended use, you may notice that the memory card is warm.
This is perfectly normal.
●Do not use a memory card that is used in another digital camera.
To use the memory card in this camera, format first the memory card by using this camera.
●Do not use a memory card formatted by another digital camera or memory card reader.
●If the memory card is subjected to any of the following, the recorded data may become
corrupted :
- When the memory card is used incorrectly.
- If the power is switched off or the memory card is removed while recording,
deleting(formatting) or reading.
●Samsung cannot be held responsible for lost data.
●It is advisable to copy important data onto other media as back-up e.g. floppy disks, hard
disks, CD etc.
●If there is insufficient memory available
: A [Card Full!] message will appear and the camera will not operate. To optimise the amount
of memory in the camera, replace the memory card or delete unnecessary images stored
on the memory.
Instructions on how to use the memory card
Before using the camera
《21》
●When the memory card slot cover opens, the camera can't be turned on by pressing the
power button.
●Don’t remove the memory card when the Card access lamp is blinking as this may cause
damage to data in the memory card.
●If the memory card slot cover is opened during the data is being saved, a warning alarm
sounds and the camera power is turned off after saving the data.
INFORMATION
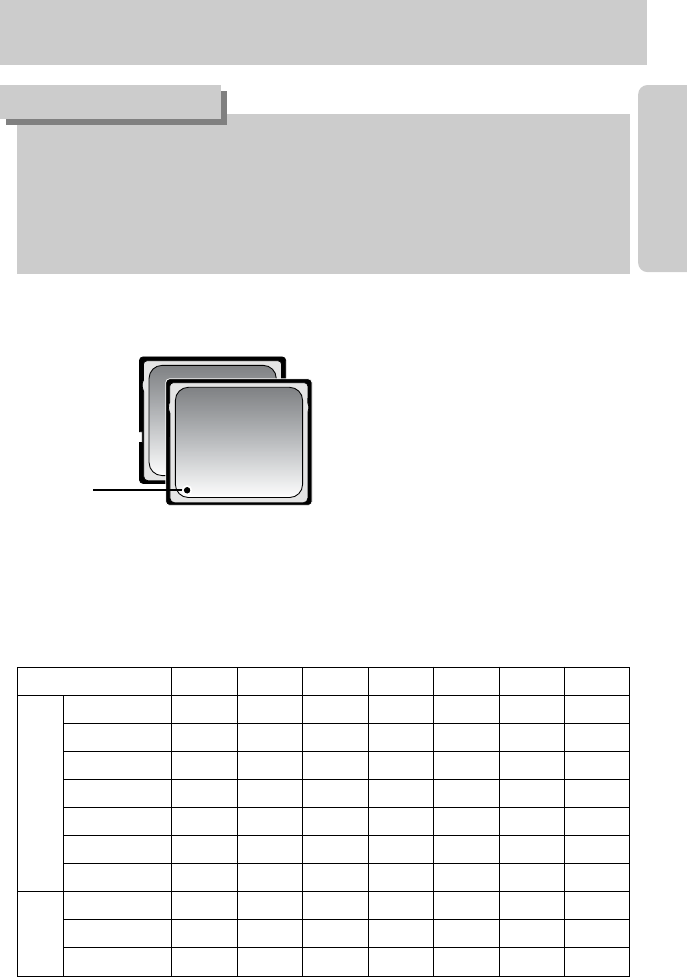
【CF (CompactFlash) memory card 】
RAW TIFF
S.FINE FINE
NORMAL
25FPS 15FPS
3264X2448
3215
29 42 - -
3264X2176
--17
33 47 - -
3264X1840
--20
38 54 - -
2400X1800
--
27 51 71 - -
1632X1224
--
54 95 126 - -
1027X768
--
112 171 207 - -
640X480
--
295 454 554 - -
640X480
--
--
1Min. 02Sec. 1Min. 44Sec.
320X240 - - - -
3Min. 07Sec. 5Min. 12Sec.
160X120 - - - -
7Min. 17Sec.
12Min. 08Sec.
Still
image
Movie
clip
■The camera can use CF (CompactFlash) card.
Some CF cards are not compatible with this
camera. We recommend a same kind of CF
card provided with this camera.
■When using a 64MB memory, the specified shooting capacity will be as follows.
These figures are approximate as image capacities can be affected by variables such as
subject matter.
Recorded image size
Label
Before using the camera
《22》
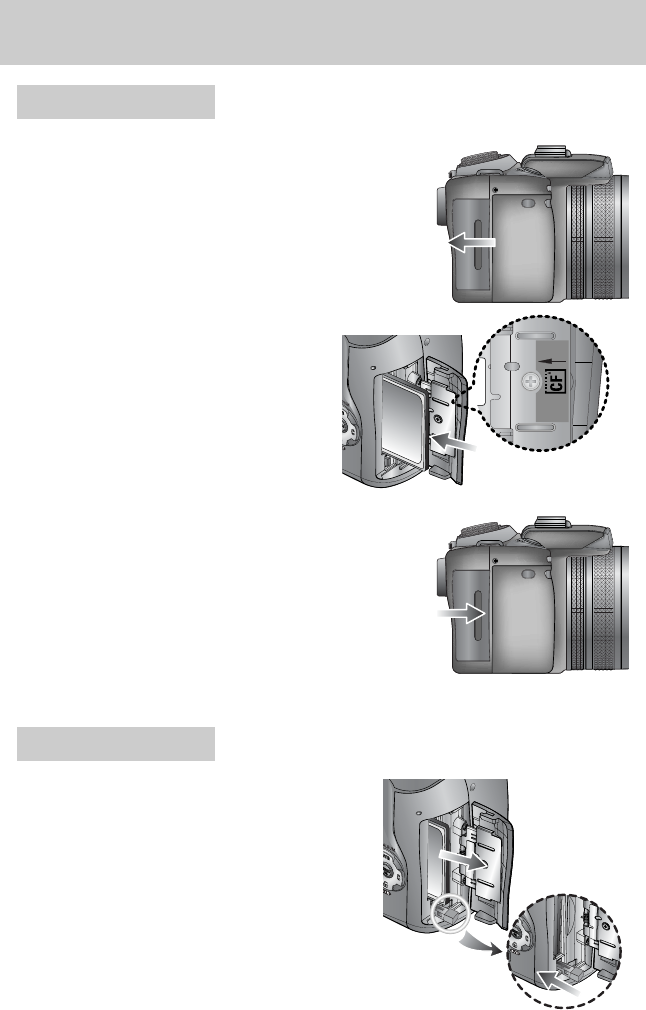
1. Turn off the camera power by using the power
button. Open the memory card slot cover.
Press the memory card eject lever and the lever will
pop up. Press the lever again and then the memory
card will be released.
2. Remove the memory card and close the memory
card slot cover.
3. To close, push the memory card slot cover until you
hear a click.
If the memory card does not slide in smoothly, do not
attempt to insert it by force. Check the direction of
insertion, and then insert it correctly. Do not insert the
memory card the wrong way round. Doing so may
damage the memory card slot.
2. Insert the memory card as shown on the
memory slot cover.
1. Turn off the camera’s power and pull the memory card
slot cover in the direction of the arrow to open.
Inserting the memory card
Removing the memory card
Before using the camera
《23》
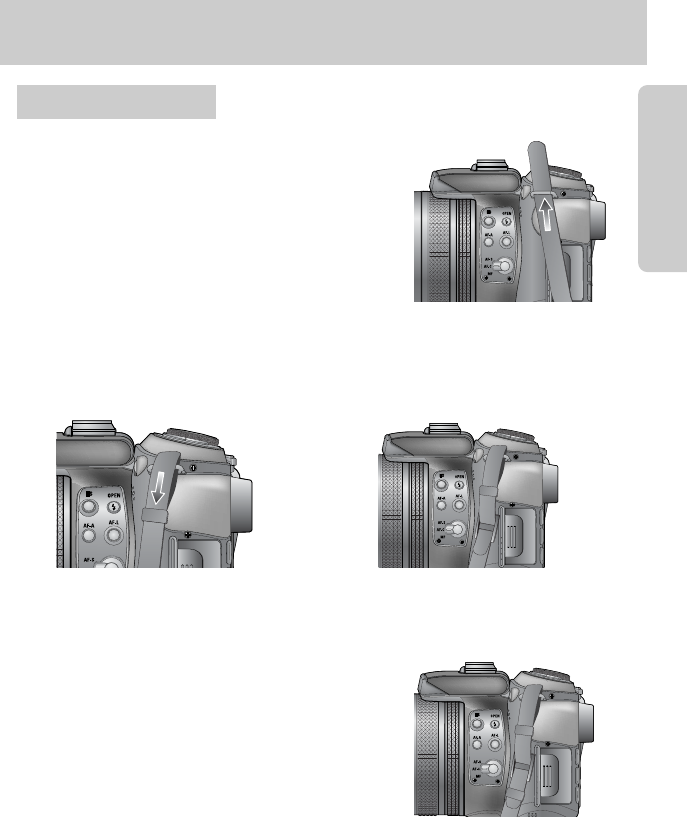
1. Thread the strap through the strap eyelet on the
camera as shown alongside.
3. Fasten the strap as shown alongside.
4. Repeat steps 1 ~ 3 to attach the other end of the strap to the other eyelet.
2. Tread the strap through the strap ring as shown alongside.
Attaching the strap
Before using the camera