Hisense Electric LCDD0008 Part15 Subpart B-LCD TV User Manual W9HLCDD0008 3
Hisense Electric Co., Ltd. Part15 Subpart B-LCD TV W9HLCDD0008 3
Contents
- 1. W9HLCDD0008_User Manual 1
- 2. W9HLCDD0008_User Manual 2
- 3. W9HLCDD0008_User Manual 3
W9HLCDD0008_User Manual 3
23
Advanced Features
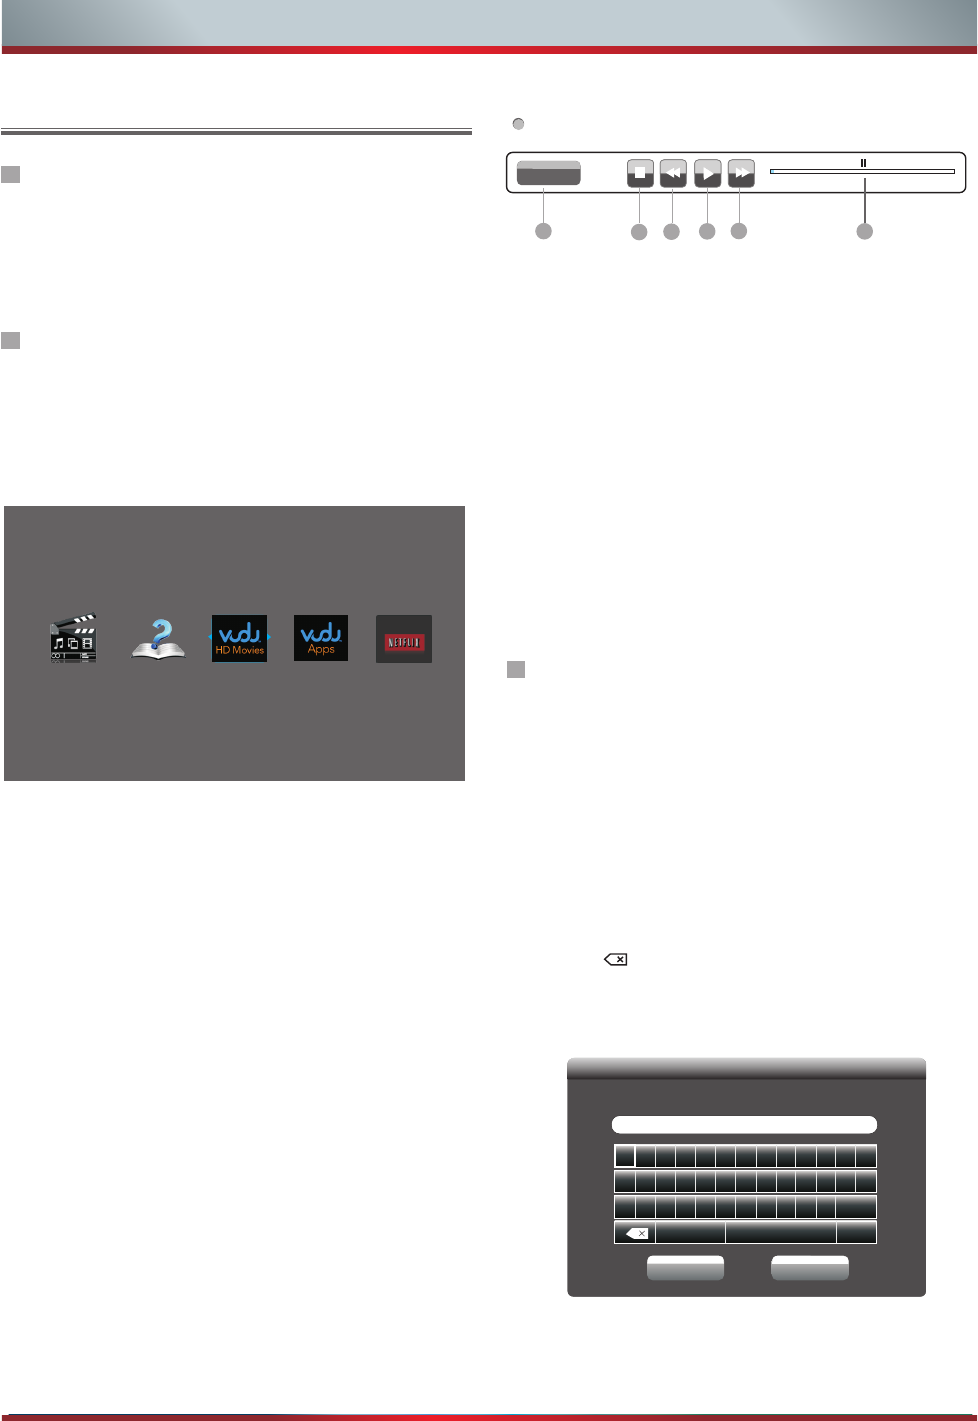
Tool Bar
Chapters 0:00:57 1:29:19
1 2 345 6
1. Chapters
Then press [ENTER] button to enter and press
3. Fast backward
Then press [ENTER] button to select the backward
speed. You can press [◄◄] button to achieve the
function.
4. Play/Pause
You can press [►II] button to play/pause
when there is no control bar on the screen.
5. Fast forward
Then press [ENTER] button to select the forward
speed. You can press [►►] button to achieve the
function.
6. Progress bar
The progress bar when playing.
[◄/►] button to select the chapter.
directly
How to Input the Email Address
cdef
1. Press [▲/▼/◄/►] button to move the cursor to the
address bar and press [ENTER] button to confirm.
2. Press [ENTER] button to display the keyboard.
There are some shortcuts on the bottom of the keyboard
so that you can input part of the address often used
directly.
Other keys are used as the keyboard of your computer.
3. Press [▲/▼/◄/►] button to move the cursor to the
characters you want to select and then press [ENTER]
button to confirm.
If you want to delete one character, move the cursor to
Back key and press [ENTER] button to confirm.
4. Move the cursor to Done key and press [ENTER] button
to confirm if you have completed the address input.
Then the new address will appear on the address bar.
Shortcuts
n o p q r s t u v w x y z
Symbols
Enter your email address to begin enjoying VUDU!
Space Shift
.com
0 1 2 3 4 5 6 7 8 9 @
a b c d e f g h I j k l m
Enter your email address
Cancel Done
Enter email address
VUDU HD Movies
VUDU is an on-demand service that offers high-
definition movies on Web.
For enjoying more movies, please register and log in
to your account.
1. Press the [HICAST@] button to display network
main menu.
2. Press [◄/►] button to select the VUDU HD Movies
icon and press [ENTER] to enter it, or press [VUDU]
button to enter directly.
efer to “How to Input the Email
Address”
Press [▲/▼/◄/►] button to move the cursor to
select service items in the VUDU HD Movies
home page, and press [ENTER] button to confirm.
6. In the process of watching a movie, press [ENTER]
button to display/exit the tool bar, press [◄/►]
button to select the function icon, and press
[ENTER] button to confirm.
7. Press [RETURN] button to return the upper menu, or
press [EXIT] button to close the menu.
3. Select the Sign Up icon on the VUDU HD Movies
interface, and press [ENTER] to enter.
4. Enter your email address to start your VUDU
experience. ( R
)
5.
Brief introduction
Operation instructions
You can access the VUDU HD Movies by the following
methods:
Press Enter to launch VUDU Movies.
Advanced Features
VuDu Apps provides customers with access to a
wide range of Internet services and applications
including streaming video, music on demand, photo
browsing, social networking and more.
VUDU Apps supports the development of
responsive apps designed specifically for use on
home HD televisions.
VUDU Apps uses a unique, cloud-based
architecture optimized for consumer electronics
devices, including delivering the latest applications
to consumers without the need for software
downloads or frequent firmware updates.
Devices featuring VUDU Apps* will begin shipping
to consumers since the first quarter of this year.
VUDU Apps** allows you to see app updates while
watching live television.
VUDU Apps
The VUDU Apps is a store for downloading
applications to be used on VUDU Apps. It allows you
to easily access certain website.
Users can enjoy a variety of contents like videos,
music, photos, games, useful information etc. using
downloaded applications.
You can access the VUDU Apps by the following
methods:
1. Press the [HICAST@] button to display network
main menu.
2. Press [◄/►] button to select the VUDU Apps icon
and press [ENTER] to enter it.
3. Press [◄/►/▲/▼] button to select the widget you
want to access, and press [ENTER] to enter it.
4. You can press [RETURN] to return the upper menu
or press [EXIT] button to close the Widgets display.
15
MY FAVORITES
MOST POPULAR
BROWSE BY GENRE
SHOW TICKER
INFO & SETTINGS
NEWEST
Action Menu
VuDu Apps - The applications platform for connected
TVs
Brief introduction
Operation instructions
VUDU Apps home page
Stops playback and displays the movie title screen
(springboard).
Sets pauses and still pictures. Press F or d to return to
playback.
Displays the TrickPlay screen and fast forwards
playback.
Displays the TrickPlay screen and reverses playback.
ENTER Displays the TrickPlay screen and pauses
playback.
Displays the TrickPlay screen, advances one frame
forward, and pauses playback.
Displays the TrickPlay screen, advances one frame
backward, and pauses playback.
RETURN Displays Netf ix home screen.
EXIT Closes the Netf ix home screen and switches the
TV to INPUT mode.
Displays the TrickPlay screen and pauses
playback.
Buttons Description
Stops playback and displays the movie
title screen (springboard).
Sets pauses and still pictures. Press F or d
to return to playback.
Displays the TrickPlay screen and fast
forwards playback.
Displays the TrickPlay screen and reverses
playback.
ENTER
EXIT
Play the next video.
Play the previous video.
Return to the upper menu.
Close the menu.
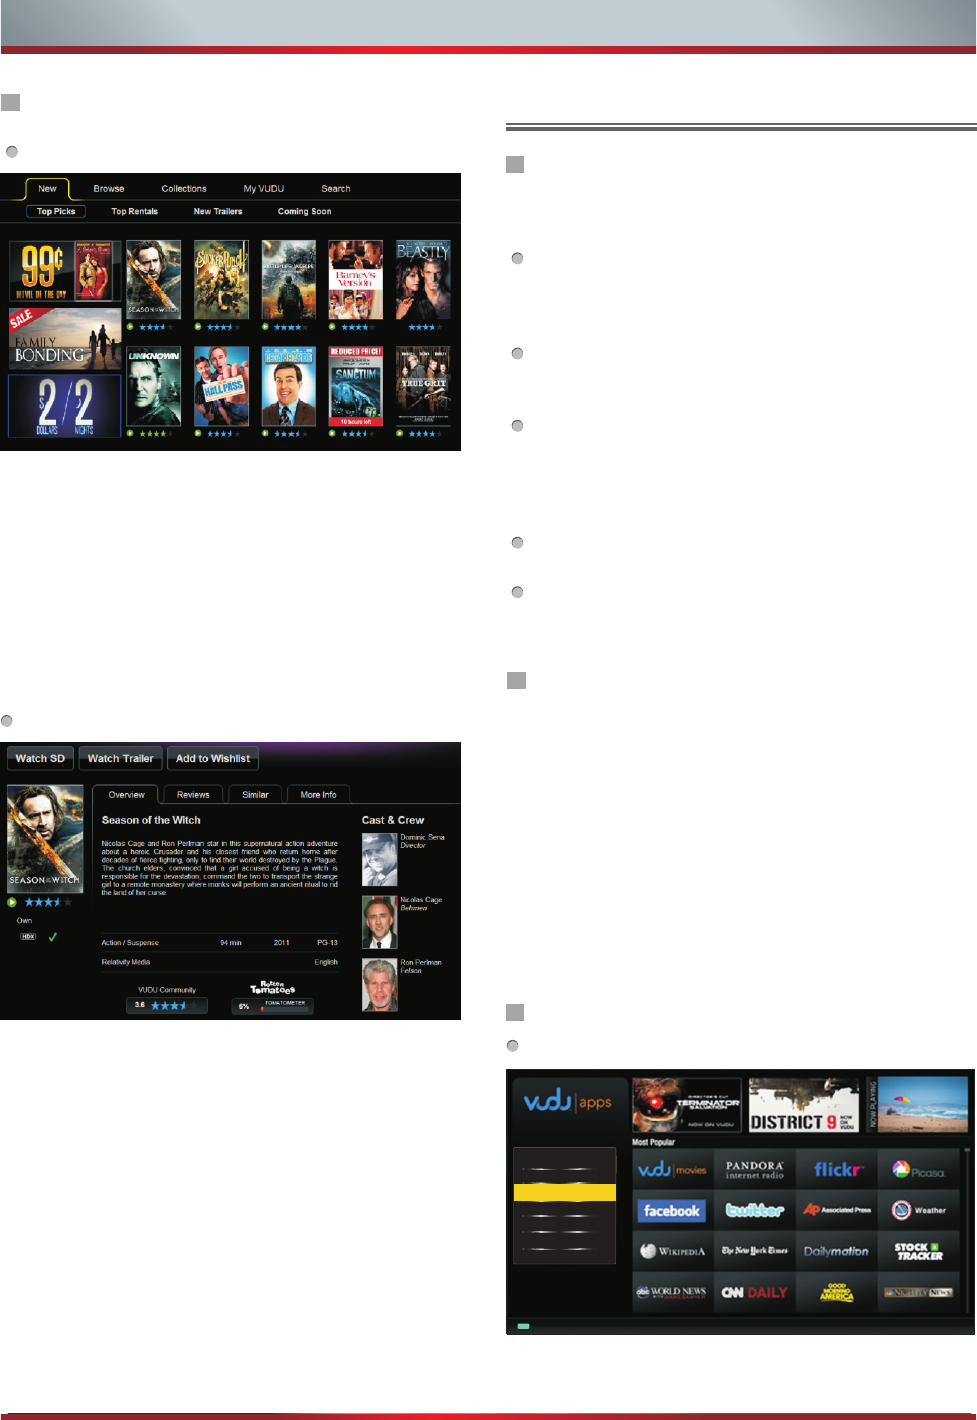
Website instructions
Website instructions
New: The latest movies
Top Picks: Mostly picked up movies
Top Rentals: Mostly rented movies
New Trailers: Latest trailers
Coming Soon: The movies can be picked soon
Browse: Browse all the movies in VUDU
Collections: Browse the classified movies
My VUDU: The movies user bought or rented
Search: Search movies in VUDU
VUDU HD Movies home page
VUDU HD Movies subpage
Rent/Own: To rent or buy current movie
Watch Trailer: To watch trailer of the current movie
2 Minute Preview: To preview current movie for 2
minutes
Add to Wishlist: Add current movie to your wishlist
Rate/share: To rate current movie or share it to your
friends in Facebook or Twiter
Overview: The overview of current movie
Cast&Crew: The cast and crew of current movies and
find their related movies
Reviews: The reviews of current movie
Similar: The similar types of movies
More Info: The detail information of current movie
24

Advanced Features
Brief introduction
Operation instructions
1. Press the [HICAST@] button to display network
main menu.
2. Press [◄/►] button to select the Netflix icon and
press [ENTER] to enter it, or press [NETFLIX]
button to enter Netflix website directly.
efer to “How to Input the Email Address”
Press [▲/▼/◄/►] button to move the cursor to
select service items in the Netflix home page, and
[ENTER] button to confirm.
3. Input Email and Password in following window to
sign in. ( R )
4.
My favorites: The user's favorite Apps
Most popular: The most popular Apps in VUdU
Newest: The newest Apps in VUdU
Browse by genre: Browse Apps by genre
Show Ticker: Show the Apps at the bottom of screen
while watching TV
Info&settings: VUDU Apps system information
Netflix
Others
This function allows you to enjoy Netflix through the
Internet. Netflix is an online DVD and Blu-ray Disc
rental service, offering rental-by mail and streaming
instantly to Netflix members.
For more information on Netflix visit
http://www.netflix.com/help or login to your Netflix
account and click "Help" at the top of the page.
The playing fluency and picture quality depend on
the network speed and original bit rate.
Illustrations are examples and may differ from the
actual Netflix screens. The display and operations
may change as a result of a software update. Use
Netflix without configuring a proxy server. Part or
all of Netflix may not be available when connecting
to the Internet via a proxy server.
NOTE
5. In the process of watching a movie, press
operational buttons to control the movie.
6 Press [RETURN] button to return the upper menu, or
press [EXIT] button to close the menu.
VUDU customer care: When you need to talk live
with someone, contact VUDU customer care at 1-
888-554-8838. To learn more about VUDU, visit the
frequently Asked questions at
www.vudu.com/support.
Netflix customer service: US: (866) 716-0414
Canada: (866) 348-2353
If you encounter any other issues during activation,
refer to the following online resources:
Suggestions for you: The movies suggested for you
by Netflix
New Arrivals: The new movies in Netflix
Genres: Browse movies in different genres
Instant Queue: Movie wishlist
Search: Search movies in Netflix
Website instructions
VUDU HD Movies home page
25
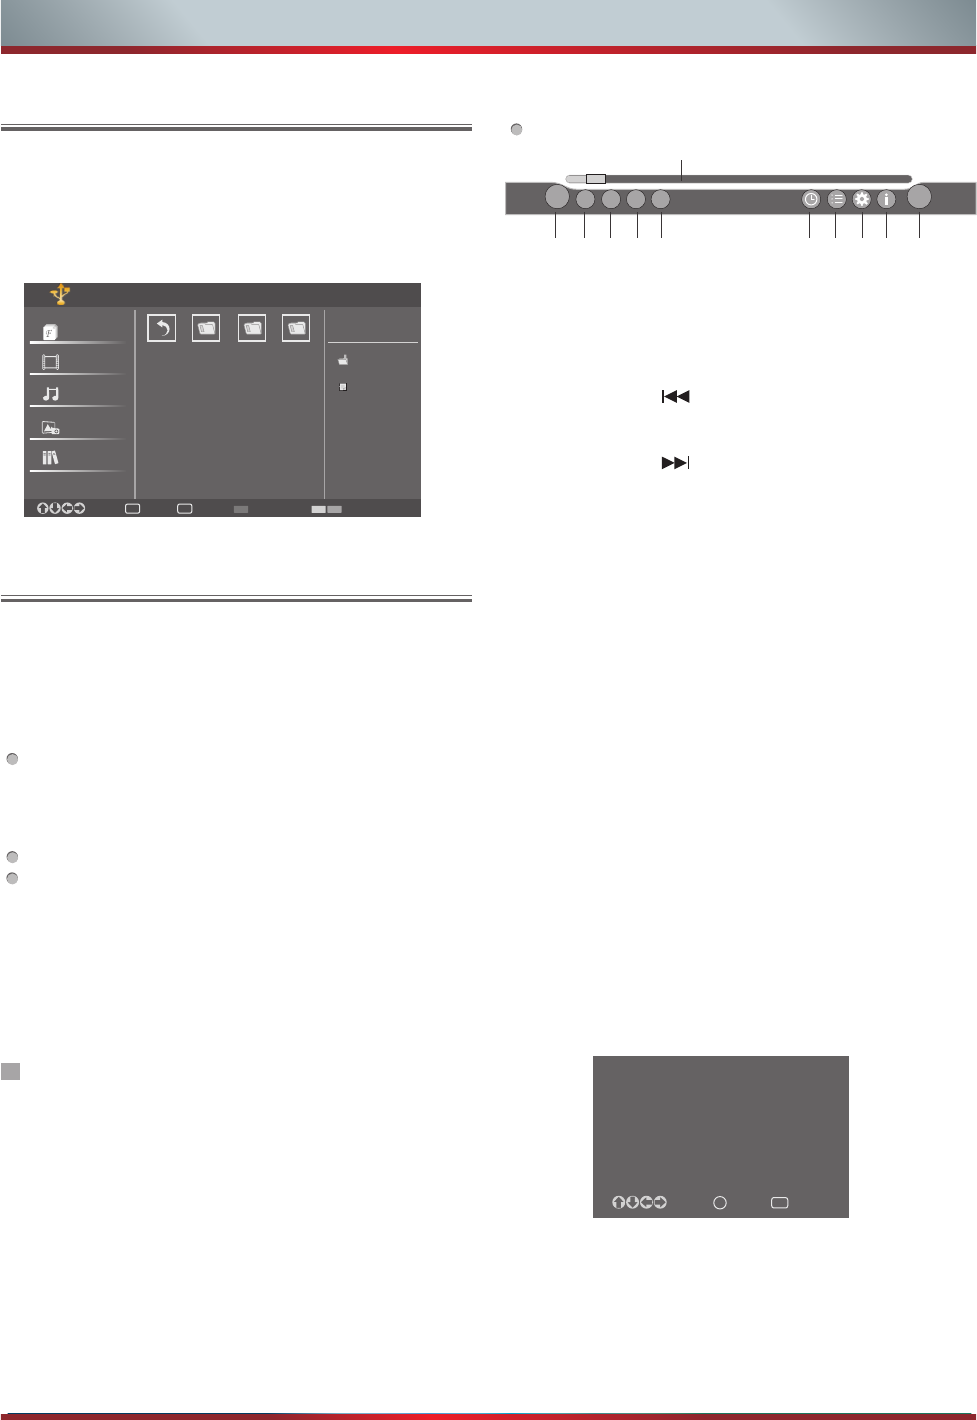
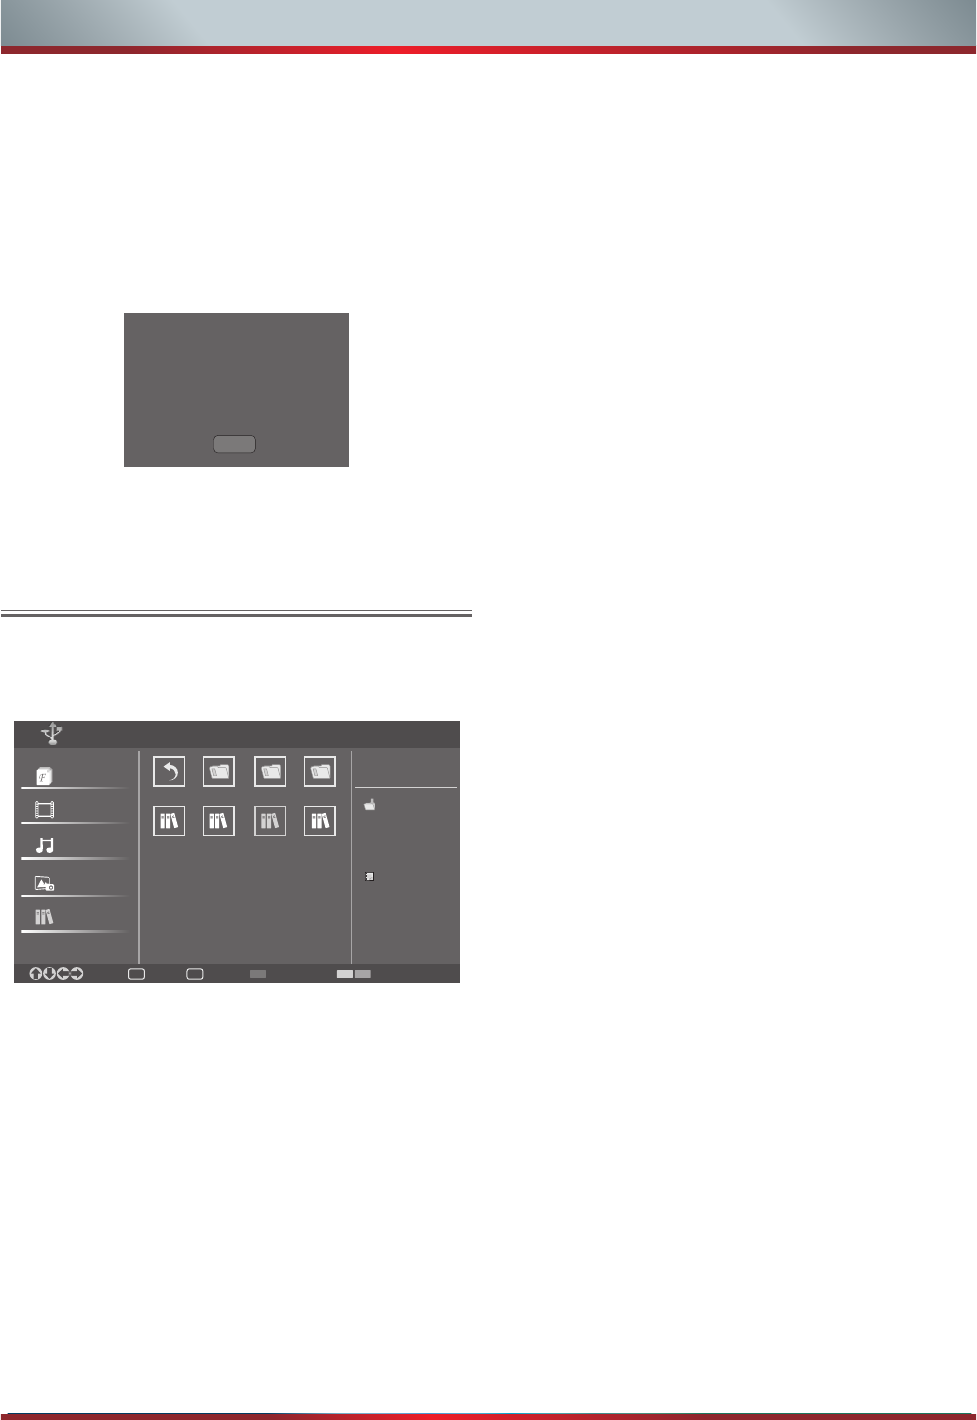
View the shared files on TV
1. Press Media button to enter the DMP mode directly.
2. The DMP menu appears on the screen as follow .
Then you can view the shared folders.
Digital Media Play
All
Video
Music
Picture
Book
Select OK Enter Exit Return
DMP C:
Information
Return F1 F2 F3
.txt Blood.. .mp3 .png
35
Please note that Hisense will not assume any responsibility for any lost data and cannot guarantee perfect compatibility
with all mass storage devices.Be sure to insert the USB disk or mobile hard disk with standard USB2.0 port.
▪ Press Media button to enter the main menu (If you want to exit DMP,
you can press Source button to switch to other sources)
▪ Press Red button to switch the media type.
▪ Press Yellow/Blue to turn to the previous/next page.
1. Press ▲/▼/◄/► to select the folder/file you want to open and then
press OK to enter/play the folder/file.
2. Press Exit to return to the previous directory.
Enjoy Video Files
1. Press Red button to switch to All or Video.
2. Press ▲/▼/◄/► to select the video you want to view.
3. Press OK to play the video.
4. Press ■/Exit to exit the video and return to the previous directory.
5. Press Info button to display/exit the video control bar.
6. Press ◄/► to select the function icon and then press OK to confirm.
Function of icons:
1) The progress bar when playing.
2) Play/Pause. You can press ►II directly to play/pause when there is no control bar on the screen.
3) Play the previous video. You can press directly to achieve the function when no control bar display
on the screen.
4) Play the next video. You can press to achieve the function when no control bar display on the screen.
5) Fast backward. Then press OK to select the backward speed. You can press ◄◄ to achieve the function.
6) Fast forward. Then press OK to select the forward speed. You can press ►► to achieve the function.
7) Select time to play
1. Press ◄/► to select the position you want to set.
2. Press 0~9 to set the time and press ▲/▼/◄/► to adjust it.
3. Press OK to confirm and the video will to play at the time you have set.
8) Play list
1. Press Yellow/Blue button to page and press ▲/▼ to select the video.
2. Press OK to confirm. And press Exit to exit the menu.
I◄
II
I◄
►►
►►
■
►
►
1
2 3 4 5 6 7 8 9 10 11
Media Type Page Up/Down
00:00:36/00:20:01
I◄
II
I◄
►►
►►
■
►
►
1
2 3 4 5 6 7 8 9 10 11
00:00:36/00:20:01
01/01
Enjoy Video Files
1. Press Red button to switch to All or Video.
2. Press ▲/▼/◄/► to select the video you want to view.
3. Press OK to play the video.
4. Press ■/Exit to exit the video and return to the previous directory.
5. Press Info button to display/exit the video control bar.
6. Press ◄/► to select the function icon and then press OK to confirm.
Function of icons:
1) The progress bar when playing.
2) Play/Pause. You can press ►II directly to play/pause when there is no control bar on the screen.
3) Play the previous video. You can press directly to achieve the function when no control bar display
on the screen.
4) Play the next video. You can press to achieve the function when no control bar display on the screen.
5) Fast backward. Then press OK to select the backward speed. You can press ◄◄ to achieve the function.
6) Fast forward. Then press OK to select the forward speed. You can press ►► to achieve the function.
7) Select time to play
1. Press ◄/► to select the position you want to set.
2. Press 0~9 to set the time and press ▲/▼/◄/► to adjust it.
3. Press OK to confirm and the video will to play at the time you have set.
8) Play list
1. Press Yellow/Blue button to page and press ▲/▼ to select the video.
2. Press OK to confirm. And press Exit to exit the menu.
All
Video
Music
Picture
Book
Select OK Enter Exit Return
Information
Media Type Page Up/Down
01/01
Return F1 F2 F3
DMP C:\
All
Video
Music
Picture
Book
Select OK Enter Exit Return
Information
Media Type Page Up/Down
01/01
Return F1 F2 F3
DMP C:\
You can see more operation of DMP in the next chapter.
You can press Zoom button to change the aspect ratio( ) while playing
the video.
Normal , Full Screen , Original Size
You can press Zoom button to change the aspect ratio( ) while playing
the video.
Normal , Full Screen , Original Size
Repeat
Picture Mode
Subtitle Selection
AUDIO I
Once
User
NO
I/I
Option Set
Select OK Enter Exit Exit
Repeat
Picture Mode
Subtitle Selection
AUDIO I
Once
User
NO
I/I
Option Set
Select OK Enter Exit Exit
9) Options
1. Press ▲/▼ to select the options in the menu.
2. Press ◄/► to select the settings.
3. Press OK to confirm.
10) Program info
Allows you to view the program information.
11) Stop playback
26
Advanced Features
1. Press [INPUT] button to select the DMP and press
[ENTER] button to enter DMP mode.
2. The DMP menu appears on the screen as follow.
Then you can view the shared folders.
You can see more operation of DMP in the next chapter.
View the shared files on TV
Digital Media Play
Please note that Hisense will not assume any
responsibility for any lost data and cannot guarantee
perfect compatibility with all mass storage devices. Be
sure to insert the USB disk or mobile hard disk with
standard USB2.0 port.
Press [INPUT] button to display the INPUT menu,
press [▲/▼] button to highlight the DMP source,
then press [ENTER] button to confirm. (If you want
to exit DMP, you can press EXIT button or press
INPUT button to switch to other sources).
Press Red button to switch the media type.
Press Yellow/Blue to turn to the previous/next
page.
1. Press [▲/▼/◄/►] button to select the folder/file you
want to open and then press OK to enter/play the
folder/file.
2. Press Exit to return to the previous directory.
Enjoy Video Files
1. Press [Red] button to switch to All or Video.
2. Press [▲/▼/◄/►] to select the video you want to
view.
3. Press [ENTER] button to play the video.
4. Press [■/Exit] button to exit the video and return to
the previous directory.
5. Press Info button to display/exit the video control
bar.
6. Press [◄/►] button to select the function icon and
then press [ENTER] to confirm.
1. The progress bar when playing.
2. Play/Pause.
You can press [►II] button directly to play/pause
when there is no control bar on the screen.
3. Play the previous video.
You can press [ ] button directly to achieve the
function when no control bar display on the screen.
4. Play the next video.
You can press [ ] button to achieve the function
when no control bar display on the screen.
5. Fast backward.
Then press [ENTER] button to select the backward
speed. You can press [◄◄] button to achieve the
function.
6. Fast forward.
Then press [ENTER] button to select the forward
speed. You can press [►►] button to achieve the
function.
7. Select time to play
1) Press [◄/►] button to select the position you
want to set.
2) Press 0~9 to set the time and press [▲/▼/◄/►]
button to adjust it.
3) Press [ENTER] button to confirm and the video
will to play at the time you have set.
8. Play list
1) Press [Yellow/Blue] button to page and press [▲
/▼] button to select the video.
2) Press [ENTER] button to confirm. And press
[EXIT] button to exit the menu.
9. Options
1) Press [▲/▼] button to select the options in the
menu.
2) Press [◄/►] button to select the settings.
3) Press [ENTER] button to confirm.
10. Program info
It allows you to view the program information.
11. Stop playback
Tool Bar
Advanced Features
27
You can press Zoom button to change the aspect
ratio( ) while
playing the video.
Normal , Full Screen , Original Size
NOTE
Playable format list
Photo
Music
Video
JPG
Mp3
MPEG1(.dat), MPEG2(.mpg/.ts),
XVID (.avi), H.264(.mov/.ts/.mkv)
Playable format
Files Format
1. Press [Red] button to switch to All or Music.
2. Press [▲/▼/◄/►] button to select the music you
want to view.
3. Press [ENTER] to play the music.
4.All the music is listed on the left. Press [▲/▼] button
to select the music and press [►] button to mark it.
You can press [Yellow/Blue] button to turn to the
previous /next page.
-Press [Green] button to select the Mode:
Mark/All/Single.
5. Press Exit to exit the music playback interface.
All
Video
Picture
Book
Music
Select OK Enter Exit Return Media Type Page Up/Down
DMP C:
Information
Return F1 F2 F3
a1.mp3 a2.mp3 a3.mp3 a4.mp3
a3.mp3
00:04:13
01/01
Select Exit Return
Current Playing: a3.mp3
Title: a3
Artist:
Album:
Genre: Other
Year:
Duration:00:04:13
Next:
a1.mp3
a2.mp3
a3.mp3
a4.mp3
►
►
Mode: None
Status: Play
00:00:24/00:04:13
MarkMode Page Up/Down ►II Play/Pause
01/01
Enjoy Music Files
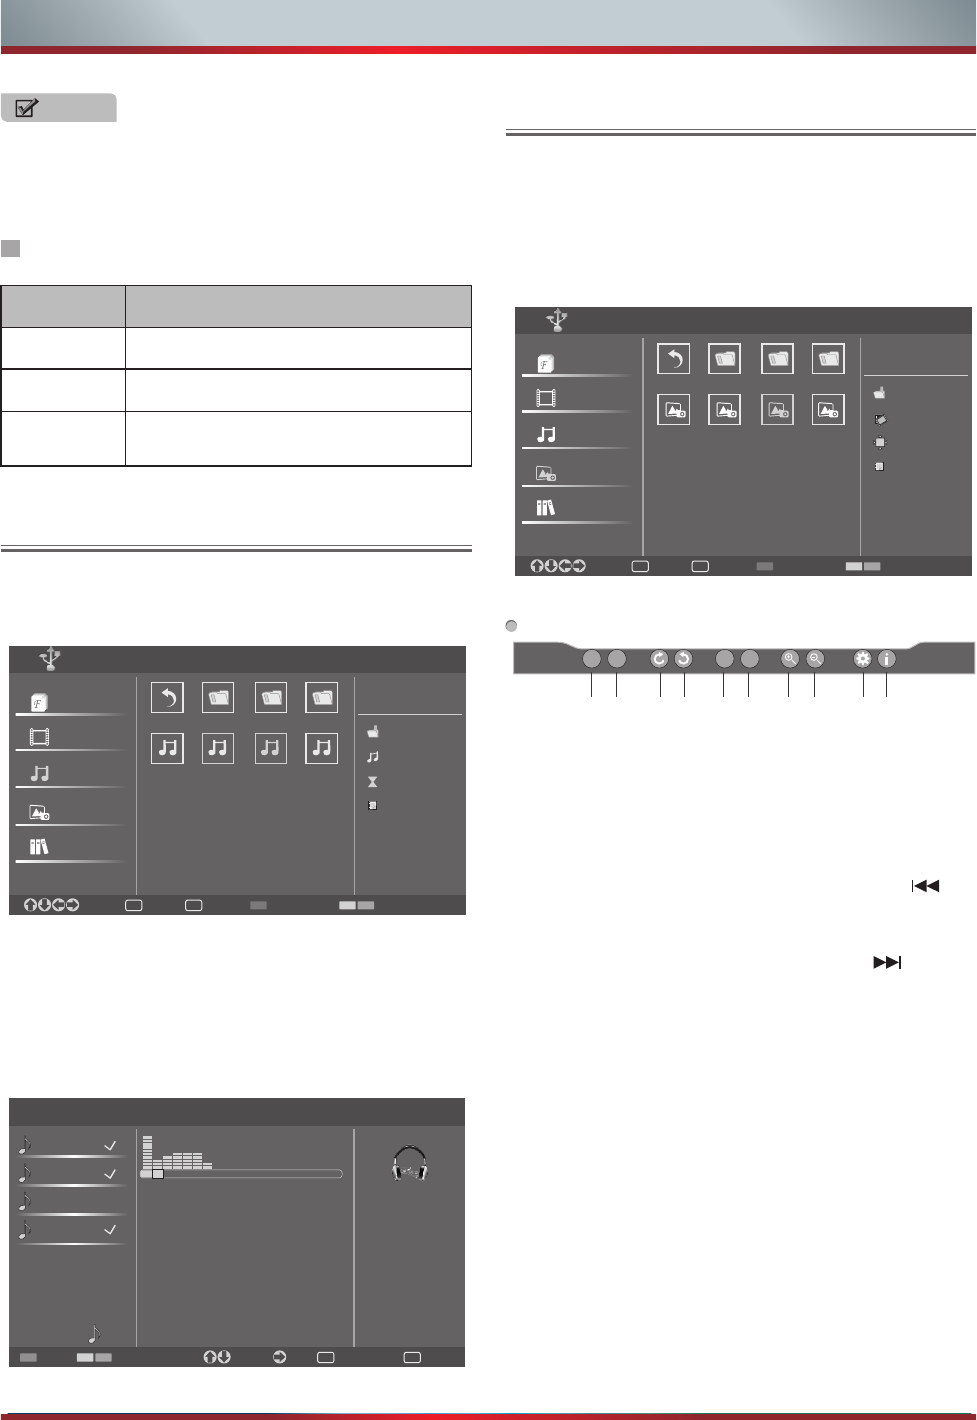
Browse the Pictures
1. Press [Red] button to switch to All or Picture.
2. Press [▲/▼/◄/►] button to select the picture you
want to view.
3. Press [ENTER] to browse the picture.
4. Press [■/EXIT] button to exit the picture and return
to the previous directory.
Tool Bar
All
Video
Music
Book
Picture
Select OK Enter Exit Return Media Type Page Up/Down
DMP C:
Information
Return F1 F2 F3
a1.jpg a2.jpg a3.jpg a4.jpg
a3.jpg
640:480
01/04
I◄
I◄
1 2 3 4 7 8 9 105 6
II ■
When browsing the pictures
Press [ENTER] button to display/exit the picture
control bar, and press [◄/►] button to select the
function icon and then press [ENTER] button to
confirm.
1. Browse the previous picture. You can press[ ]
button directly to achieve the function when no
control bar displays on the screen.
2. Browse the next picture. You can press [ ] button
directly to achieve the function when no control bar
displays on the screen.
3. Allows the picture to rotate 90 degrees clockwise.
4. Allows the picture to rotate 90 degrees
anticlockwise.
5. Play/pause. You can press [ENTER] button directly
when no control bar on the screen.
6. Stop browsing the picture. You can press [■] button
directly when no control bar on the screen.
7. Zoom in the picture.
8. Zoom out the picture.
9. Option Set. Press [▲/▼] button to select the options
and press [◄/►] button to set them.
Speed - Allows you to browse the picture at
different speed.
Effect - Allows you to set how the picture appears
on the screen.
Background Music - Allows you to enjoy the music
when browsing the pictures if it is set On.
10.Picture info. Allows you to view the picture
information.
Advanced Features
28
Speed
Effect
Background Music
Fast
None
On
Option Set
Enter
All
Video
Music
Picture
Book
Select OK Enter Exit Return Media Type Page Up/Down
DMP C:
Information
Return F1 F2 F3
a1.txt a2.txt a3.txt a4.txt
a3.txt
01/01
Browse the Text Files
1. Press [Red] button to switch to All or Book.
2. Press [▲/▼/◄/►] button to select the text you want
to view.
3. Press [ENTER] button to confirm.
4. Press [■/Exit] button to exit it and return to the
previous directory.
When something appears wrong with your TV refer to below chart. If the proposed remedy's do not work , then
unplug the AC cord from wall, wait at least 60 seconds, plug AC back in and then turn on the TV. If the problem
still cannot be solved, please contact the help line provided on the warranty card or a professional technician.
29
Other Information
Trouble Shooting
Yes, this is normal. That is the TV searching for previous setting information and
initializing the TV.
If black and white picture first unplug TV from AC outlet and replug after 60 seconds.
Check Color Setting if picture is black and white.
An electrical appliance may be affecting TV set. Turn off any appliances, if
interference goes away, move appliance farther away from TV.
Insert the power plug of the TV set into another power outlet.
If using an external antenna, check the direction, position and connection of the
antenna.
Adjust the direction of your antenna or reset or fine tune the channel.
Check if there is interfering source nearby, such as appliance or electric tool.
"Click" sound can be caused when the room temperature changes. This change causes the
television cabinet to inflate or contract, which makes the sound. This is normal and TV is OK.
The Closed Caption function is set in the text mode. To remove it, access Closed
Caption from the menu screen and change the Mode setting from text to either CC1
or off .
" "
" " " "
" "
No sound or picture.
I have connected an external
source to my TV and I get no
picture and/or sound.
When I turn on my television, there
is a few second delay before the
picture appears. Is this normal?
Sound but no picture or black and
white picture.
Sound and picture distorted or
appear wavy.
Sound and picture is blurry or cuts
out momentarily.
Horizontal/vertical stripe on picture
or picture is shaking.
The plastic cabinet makes a
clicking type of sound." "
Black square appears in the center
of my television screen?
Picture is normal, but no sound.
SYMPTOMS POSSIBLE SOLUTIONS
Check if the power cord is in the AC outlet and if it has electricity.
Check if you have pressed [POWER] button on the TV or [POWER] button on the
remote control.
Check to see if LED light is either red or blue. If illuminated, power to TV is OK.
Check the volume settings.
Check if Mute mode is set “on”.
Check for the correct output connection on the external source and for the correct
input connection on the TV.
Make sure you have made the correct selection for the input mode for the incoming
signal.
That would indicate that the MTS mode on your unit is set to SAP mode. We suggest
setting the MTS mode to either Stereo or Mono . For further instruction, please see
Audio Adjust or MTS/SAP in your user manual.
SAP is Second Audio Program. It's a second audio channel that is usually used for a
second language or descriptive audio for the visually impaired.
MTS stands for Multichannel Television Sound, a standard that allows the encoding
of 3 channels of audio within a standard NTSC (analog) video signal to a television. A
television that is able to receive MTS Stereo allows you to watch television with
stereo sound.
" "
" " " "
" " " ”
On some channels getting another
language or sometimes no sound at
all.
Check the cable connection for an incoming signal. Make sure the signal is coming
OK. Best way to confirm signal is to use another TV and/or contact your cable
company.
Reprogram your channels. Press [MENU] button on your TV remote control, change
Input Source setting to “Cable”, then use “Auto Channels Search” to reprogram your
channels.
Check network physical connection, make sure connection is correct.
Enter "menu","Settings","Network","Configuration" , make sure configuration is
correct according to your network service provider.
Enter "menu", "Settings", "Network", "Configuration", "Connection Test" item to make
sure that network connection test is successful.
Check network connection is correct, both physically and configuration.
Enter "menu", "Settings", "Network", "Configuration", "Connection Test" item to make
sure that network connection test is successful.
For VUDU: Enter "menu", "Settings", "Network", "Configuration", "Applications",
"VUDU", "Deactivation" item to reset VUDU account.
For Netflix: Enter "menu", "Settings", "Network", "Configuration", "Applications",
"Netflix", "Deactivation" item to reset Netflix account.
After switching to Cable, please auto program the channels. The TV will “remember” all
the channels then the TV will allow you to surf the channels with buttons.
V
[CH / V]
Confirm that TV still has power and is operational.
Change the batteries in the remote control.
Check if the batteries are correctly installed.
Clean the front of the remote control (LED window).
If using a universal remote, be sure to select the TV mode on the remote.
If the remote still does not work:
-remove and reinstall the batteries correctly to reset the remote or install new batteries.
-press TV and then Power to turn on the TV. With a universal remote if you have reset
or changed the batteries you will need to reprogram the remote for the other units.
Check if there is obstruction between the remote control and the TV.
TIP: If you have a digital camera/camera phone, you can aim the front of the remote at
camera lenses (at this time, the camera should set on camera mode, not play mode).
Observe the camera screen while pressing a button on the remote control; you should
see flashing light on the screen. If there is no light observed, the remote control is not
working. You need to repair or replace the remote control.
Not getting all of my cable channels
on the television or I'm only getting
13 channels.
V
[CH / V] don't work when I set the
Channel to Cable? They work with
the Air setting?
Remote control does not work.
Network connection fail.
Connect VUDU/netflix fail.
DLNA does not work.
Log out VUDU/Netflix or change log
in account.
30
Other Information
SYMPTOMS POSSIBLE SOLUTIONS
For VUDU:
1. Press [EXIT] button on remote to exit VUDU.
2. Enter "menu", "Settings", "Network", "Configuration", "Applications", "VUDU",
"Deactivation" item to reset VUDU account.
For Netflix:
1. Press [EXIT] button on remote to exit VUDU.
2. Enter "menu", "Settings", "Network", "Configuration", "Applications", "Netflix",
"Deactivation" item to reset Netflix account.
Check network connection is correct, both physically and configuration.
Make sure DLNA server (PC or Mac) has shared media content and allow TV to
access shared media.
Enter "menu", "Settings", "Network", "Applications", turn on "DLNA".
Enter DMP source to find shard contents. The method is that select "DMP" source by
using [INPUT] button on remote or press [HICAST@] button and then select "Multi-
Media" Icon.
Trouble Shooting
General
Features, appearance and specifications are subject to change without notice.
NOTE
31
Other Information
F40K26EW
Width: ( )
Height: ( )
Depth: ( )
37.3 inches 948 mm
23.2 inches 589 mm
1.5 inches 39 mm
Width: ( )
Height: ( )
Depth: ( )
37.3 inches 948 mm
25.8 inches 655 mm
9.9 inches 251 mm
NTSC
ATSC, 8-VSB, Clear-QAM
Temperature: 41 ~95 (5°C~ 35°C), Humidity: 20%-80% RH°F °F
Atmospheric pressure: 86kPa-106kPa
1080I/60Hz, 1080P/60Hz
VGA(640×480/60Hz), SVGA(800×600/60Hz)
YUV/60Hz (480I, 480P, 720P, 1080I, 1080P)
Model Name
Dimension
Without stand
With stand
Weight
With stand
Without stand
LCD Panel Minimum
size(diagonal)
Screen resolution
Power consumption
Audio power
Power supply
Receiving systems
Analog
Environmental conditions
Component Input
VGA Input
HDMI
75 W
7 W+7 W
120V ~60 Hz
Digital
1920 1080×
40 inches
32.2 lbs 14.6 kg
37.5 lbs 17.0 kg
( )
( )
480I, 480P, 720P/60Hz
XGA (1024×768/60Hz)
RGB/60Hz (640×480, 800×600, 1024×768)