Honeywell 1981A Barcode Scanner User Manual 14C0587R 1981i 3 2015 02 10
Honeywell International Inc Barcode Scanner 14C0587R 1981i 3 2015 02 10
Contents
- 1. 14C0587R-1981i-User Manual-1-2015-02-10
- 2. 14C0587R-1981i-User Manual-2-2015-02-10
- 3. 14C0587R-1981i-User Manual-3-2015-02-10
14C0587R-1981i-User Manual-3-2015-02-10

9 - 1
9
Interface Keys
Keyboard Function Relationships
The following Keyboard Function Code, Hex/ASCII Value, and Full ASCII “CTRL”+ relationships apply to all terminals that can
be used with the scanner. Refer to page 2-16 enable Control + X (Control + ASCII) Mode.
The last five characters in the Full ASCII “CTRL”+ column ( [ \ ] 6 - ), apply to US only. The following chart indicates the equiva-
lents of these five characters for different countries.
Function Code HEX/ASCII Value Full ASCII (CTRL + X Mode)
NUL 00 @
SOH 01 A
STX 02 B
ETX 03 C
EOT 04 D
ENQ 05 E
ACK 06 F
BEL 07 G
BS 08 H
HT 09 I
LF 0A J
VT 0B K
FF 0C L
CR 0D M
SO 0E N
SI 0F O
DLE 10 P
DC1 11 Q
DC2 12 R
DC3 13 S
DC4 14 T
NAK 15 U
SYN 16 V
ETB 17 W
CAN 18 X
EM 19 Y
SUB 1A Z
ESC 1B [
FS 1C \
GS 1D ]
RS 1E ^
US 1F _
Country Codes
United States [\]6-
Belgium [ < ] 6 -
Scandinavia 8<96-
France ^8$6=
Germany à + 6 -
Italy \ + 6 -
Switzerland <. . 6 -
United Kingdom [ ¢ ] 6 -
Preliminary draft_1

9 - 2
Denmark 8 \ 9 6 -
Norway 8 \ 9 6 -
Spain [ \ ] 6 -
Country Codes
Preliminary draft_1

9 - 3
Supported Interface Keys
ASCII HEX
IBM PC/AT and
Compatibles,
USB PC
Keyboard
Apple Mac/iMac
Supported Keys
NUL 00 Reserved Reserved
SOH 01 Enter (KP) Enter/Numpad Enter
STX 02 Cap Lock CAPS
ETX 03 ALT make ALT make
EOT 04 ALT break ALT break
ENQ 05 CTRL make CNTRL make
ACK 06 CTRL break CNTRL break
BEL 07 CR/Enter RETURN
BS 08 Reserved APPLE make
HT 09 Tab TAB
LF 0A Reserved APPLE break
VT 0B Tab TAB
FF 0C Delete Del
CR 0D CR/Enter RETURN
SO 0E Insert Ins Help
SI 0F Escape ESC
DLE 10 F11 F11
DC1 11 Home Home
DC2 12 Print Prnt Scrn
DC3 13 Back Space BACKSPACE
DC4 14 Back Tab LSHIFT TAB
NAK 15 F12 F12
SYN 16 F1 F1
ETB 17 F2 F2
CAN 18 F3 F3
EM 19 F4 F4
SUB 1A F5 F5
ESC 1B F6 F6
FS 1C F7 F7
GS 1D F8 F8
RS 1E F9 F9
US 1F F10 F10
DEL 7F BACKSPACE
Preliminary draft_1

9 - 4
Preliminary draft_1

10 - 1
10
Utilities
To Add a Test Code I.D. Prefix to All Symbologies
This selection allows you to turn on transmission of a Code I.D. before the decoded symbology. (See the Symbology Charts,
beginning on page A-1) for the single character code that identifies each symbology.) This action first clears all current prefixes,
then programs a Code I.D. prefix for all symbologies. This is a temporary setting that will be removed when the unit is power
cycled.
Show Decoder Revision
Scan the bar code below to output the decoder revision.
Show Scan Driver Revision
Scan the bar code below to output the scan driver revision. The scan driver controls image capture.
Show Software Revision
Scan the bar code below to output the current software revision, unit serial number, and other product information for both the
scanner and base.
Show Data Format
Scan the bar code below to show current data format settings.
Add Code I.D. Prefix to
All Symbologies (Temporary)
Show Decoder Revision
Show Scan Driver Revision
Show Software Revision
Data Format Settings
DFMBK3?.
Preliminary draft_1
10 - 2
Test Menu
When you scan the Test Menu On code, then scan a programming code in this manual, the scanner displays the content of a
programming code. The programming function will still occur, but in addition, the content of that programming code is output to
the terminal.
Note: This feature should not be used during normal scanner operation.
TotalFreedom
TotalFreedom is an open system architecture that makes it possible for you create applications that reside on your scanner.
Decoding apps and Data Formatting apps can be created using TotalFreedom. For further information about TotalFreedom, go
to our website at www.honeywellaidc.com.
Application Plug-Ins (Apps)
Any apps that you are using can be turned off or on by scanning the following bar codes. Apps are stored in groups: Decoding,
and Formatting. You can enable and disable these groups of apps by scanning that group’s On or Off bar code below. You can
also scan the List Apps bar code to output a list of all your apps.
Note: You must reset your device in order for the apps setting to take effect.
On
* Off
* Decoding Apps On
Decoding Apps Off
* Formatting Apps On
Formatting Apps Off
List Apps
Preliminary draft_1

10 - 3
EZConfig-Scanning Introduction
EZConfig-Scanning provides a wide range of PC-based programming functions that can be performed on a scanner connected
to your PC's COM port. EZConfig-Scanning allows you to download upgrades to the scanner's firmware, change programmed
parameters, and create and print programming bar codes. Using EZConfig-Scanning, you can even save/open the program-
ming parameters for a scanner. This saved file can be e-mailed or, if required, you can create a single bar code that contains all
the customized programming parameters and mail or fax that bar code to any location. Users in other locations can scan the
bar code to load in the customized programming.
To communicate with a scanner, EZConfig-Scanning requires that the PC have at least one available serial communication port,
or a serial port emulation using a physical USB port. If you are using the serial port and RS232 cable, an external power supply
is required. When using a USB serial port emulation, only a USB cable is required.
EZConfig-Scanning Operations
The EZConfig-Scanning software performs the following operations:
Scan Data
Scan Data allows you to scan bar codes and display the bar code data in a window. Scan Data lets you send serial
commands to the scanner and receive scanner response that can be seen in the Scan Data window. The data dis-
played in the Scan Data window can either be saved in a file or printed.
Configure
Configure displays the programming and configuration data of the scanner. The scanner's programming and configu-
ration data is grouped into different categories. Each category is displayed as a tree item under the "Configure" tree
node in the application explorer. When one of these tree nodes is clicked, the right-hand side is loaded with the
parameters' form belonging to that particular category. The "Configure" tree option has all the programming and con-
figuration parameters specified for a scanner. You can set or modify these parameters as required. You can later write
the modified settings to the scanner, or save them to a dcf file.
Imaging
Imaging provides all the image-related functions that a 2D Scanner can perform. You can capture an image using the
current settings, and the image will be displayed in an image window. Images captured from the scanner can be saved
to files in different image formats. You can modify the image settings and save the image settings to an INI file, which
can be loaded later to capture new images. Imaging also lets you preview the images continuously captured by the
scanner.
Installing EZConfig-Scanning from the Web
Note: EZConfig-Scanning requires .NET software. If .NET is not installed on your PC, you will be prompted to install it
during the EZConfig-Scanning installation.
1. Access the Honeywell web site at www.honeywellaidc.com
2. Click on the Resources tab. Select Software.
3. Click on the dropdown for Select Product Number. Click on your product number.
4. Click on the listing for EZConfig-Scanning.
5. When prompted, select Save File, and save the files to the c:\windows\temp directory.
6. Once you have finished downloading the file, exit the web site.
7. Using Explorer, go to the c:\windows\temp file.
8. Double click on the Setup.exe file. Follow the screen prompts to install the EZConfig-Scanning program.
9. If you’ve selected the defaults during installation, you can click on Start Menu-All Programs-Honeywell-EZConfig-
Scanning.
Preliminary draft_1
10 - 4
Resetting the Factory Defaults
If you aren’t sure what programming options are in your scanner, or you’ve changed some options and want to restore the scan-
ner to factory default settings, first scan the Remove Custom Defaults bar code, then scan Activate Defaults. This resets the
scanner to the factory default settings.
Note: If using a cordless system, scanning the Activate Defaults bar code also causes both the scanner and the base or Access
Point to perform a reset and become unlinked. The scanner must be placed in its base to re-establish the link before any
setup codes are entered. If using an Access Point, the linking bar code must be scanned. See Cordless System
Operation beginning on page 3-1 for additional information.
The Menu Commands, beginning on page 11-4 list the factory default settings for each of the commands (indicated by an aster-
isk (*) on the programming pages).
This selection erases all your settings and resets the scanner to the original factory defaults. It also disables all plugins.
!
Remove Custom Defaults
Activate Defaults
Preliminary draft_1

11 - 1
11
Serial Programming Commands
The serial programming commands can be used in place of the programming bar codes. Both the serial commands and the
programming bar codes will program the scanner. For complete descriptions and examples of each serial programming com-
mand, refer to the corresponding programming bar code in this manual.
The device must be set to an RS232 interface (see page 2-1). The following commands can be sent via a PC COM port using
terminal emulation software.
Conventions
The following conventions are used for menu and query command descriptions:
parameterA label representing the actual value you should send as part of a command.
[option] An optional part of a command.
{Data} Alternatives in a command.
bold Names of menus, menu commands, buttons, dialog boxes, and windows that appear on the screen.
Menu Command Syntax
Menu commands have the following syntax (spaces have been used for clarity only):
Prefix [:Name:] Tag SubTag {Data} [, SubTag {Data}] [; Tag SubTag {Data}] […] Storage
Prefix Three ASCII characters: SYN M CR (ASCII 22,77,13).
:Name: This command is only used with cordless devices. It is used to specify whether you’re communicating with the base or
the scanner. To send information to the scanner (with the base connected to host), use :Xenon: The default factory
setting for a Xenon scanner is Xenon scanner. This setting is changed by using the BT_NAM command, which accepts
alphanumeric values. If the name is not known, a wildcard (*) can be used :*:.
Note: Since the base stores all work group settings and transfers to them to scanner once they are linked, changes are typically
done to the base and not to the scanner.
Tag A 3 character case-insensitive field that identifies the desired menu command group. For example, all RS232
configuration settings are identified with a Tag of 232.
SubTag A 3 character case-insensitive field that identifies the desired menu command within the tag group. For example, the
SubTag for the RS232 baud rate is BAD.
Data The new value for a menu setting, identified by the Tag and SubTag.
Storage A single character that specifies the storage table to which the command is applied. An exclamation point (!) performs
the command’s operation on the device’s volatile menu configuration table. A period (.) performs the command’s
operation on the device’s non-volatile menu configuration table. Use the non-volatile table only for semi-permanent
changes you want saved through a power cycle.
Query Commands
Several special characters can be used to query the device about its settings.
^What is the default value for the setting(s).
?What is the device’s current value for the setting(s).
*What is the range of possible values for the setting(s). (The device’s response uses a dash (-) to indicate a
continuous range of values. A pipe (|) separates items in a list of non-continuous values.)
:Name: Field Usage (Optional)
This command returns the query information from the scanner.
Tag Field Usage
When a query is used in place of a Tag field, the query applies to the entire set of commands available for the particular
storage table indicated by the Storage field of the command. In this case, the SubTag and Data fields should not be used
because they are ignored by the device.
Preliminary draft_1

11 - 2
SubTag Field Usage
When a query is used in place of a SubTag field, the query applies only to the subset of commands available that match the
Tag field. In this case, the Data field should not be used because it is ignored by the device.
Data Field Usage
When a query is used in place of the Data field, the query applies only to the specific command identified by the Tag and
SubTag fields.
Concatenation of Multiple Commands
Multiple commands can be issued within one Prefix/Storage sequence. Only the Tag, SubTag, and Data fields must be
repeated for each command in the sequence. If additional commands are to be applied to the same Tag, then the new
command sequence is separated with a comma (,) and only the SubTag and Data fields of the additional command are
issued. If the additional command requires a different Tag field, the command is separated from previous commands by a
semicolon (;).
Responses
The device responds to serial commands with one of three responses:
ACK Indicates a good command which has been processed.
ENQ Indicates an invalid Tag or SubTag command.
NAK Indicates the command was good, but the Data field entry was out of the allowable range for this Tag and SubTag
combination, e.g., an entry for a minimum message length of 100 when the field will only accept 2 characters.
When responding, the device echoes back the command sequence with the status character inserted directly before each
of the punctuation marks (the period, exclamation point, comma, or semicolon) in the command.
Examples of Query Commands
In the following examples, a bracketed notation [ ] depicts a non-displayable response.
Example: What is the range of possible values for Codabar Coding Enable?
Enter: cbrena*.
Response: CBRENA0-1[ACK]
This response indicates that Codabar Coding Enable (CBRENA) has a range of values from 0 to 1 (off and on).
Example: What is the default value for Codabar Coding Enable?
Enter: cbrena^.
Response: CBRENA1[ACK]
This response indicates that the default setting for Codabar Coding Enable (CBRENA) is 1, or on.
Example: What is the device’s current setting for Codabar Coding Enable?
Enter: cbrena?.
Response: CBRENA1[ACK]
This response indicates that the device’s Codabar Coding Enable (CBRENA) is set to 1, or on.
Example: What are the device’s settings for all Codabar selections?
Enter: cbr?.
Response: CBRENA1[ACK],
SSX0[ACK],
CK20[ACK],
CCT1[ACK],
MIN2[ACK],
MAX60[ACK],
DFT[ACK].
Preliminary draft_1

11 - 3
This response indicates that the device’s Codabar Coding Enable (CBRENA) is set to 1, or on;
the Start/Stop Character (SSX) is set to 0, or Don’t Transmit;
the Check Character (CK2) is set to 0, or Not Required;
concatenation (CCT) is set to 1, or Enabled;
the Minimum Message Length (MIN) is set to 2 characters;
the Maximum Message Length (MAX) is set to 60 characters;
and the Default setting (DFT) has no value.
Trigger Commands
You can activate and deactivate the scanner with serial trigger commands. First, the scanner must be put in Manual Trigger
Mode by scanning a Manual Trigger Mode bar code (page 4-6), or by sending a serial menu command for triggering (page 4-7).
Once the scanner is in serial trigger mode, the trigger is activated and deactivated by sending the following commands:
Activate: SYN T CR
Deactivate: SYN U CR
The scanner scans until a bar code has been read, until the deactivate command is sent, or until the serial time-out has been
reached (see "Read Time-Out" on page 4-7 for a description, and the serial command on page 11-12).
Resetting the Custom Defaults
If you want the custom default settings restored to your scanner, scan the Activate Custom Defaults bar code below. This
resets the scanner to the custom default settings. If there are no custom defaults, it will reset the scanner to the factory default
settings. Any settings that have not been specified through the custom defaults will be defaulted to the factory default settings.
Note: If using a cordless system, scanning this bar code also causes both the scanner and the base or Access Point to perform
a reset and become unlinked. The scanner must be placed in its base to re-establish the link. If using an Access Point,
the linking bar code must be scanned. See Cordless System Operation beginning on page 3-1 for additional information.
The charts on the following pages list the factory default settings for each of the commands (indicated by an asterisk (*) on the
programming pages).
Activate Custom Defaults
Preliminary draft_1
11 - 4
Menu Commands
Selection Setting
* Indicates default
Serial Command
# Indicates a numeric entry
Page
Product Default Settings
Setting Custom Defaults Set Custom Defaults MNUCDP 1-11
Save Custom Defaults MNUCDS 1-11
Resetting the Custom Defaults Activate Custom Defaults DEFALT 1-12
Resetting the Factory Defaults -
cordless scanners
Factory Default Settings:
All Application Groups
PAPDFT& 3-20
Resetting the Custom Defaults -
cordless scanners
Custom Default Settings:
All Application Groups
PAPDFT 3-21
Programming the Interface
Plug and Play Codes Keyboard Wedge:
IBM PC AT and Compatibles with
CR suffix (not supported by Granit
1980i)
PAP_AT 2-1
Laptop Direct Connect with CR
suffix
PAPLTD 2-1
RS232 Serial Port PAP232 2-1
Plug and Play Codes:
RS485
IBM Port 5B Interface PAPP5B 2-2
IBM Port 9B HHBCR-1 Interface PAP9B1 2-2
IBM Port 17 Interface PAPP17 2-2
IBM Port 9B HHBCR-2 Interface PAP9B2 2-2
RS485 Packet Mode On RTLPDF1 2-2
RS485 Packet Mode Off RTLPDF0 2-2
RS485 Packet Length (20-256) RTLMPS 2-3
Plug and Play Codes: IBM SurePos USB IBM SurePos Handheld PAPSPH 2-3
USB IBM SurePos Tabletop PAPSPT 2-3
Plug and Play Codes: USB USB Keyboard (PC) PAP124 2-3
USB Keyboard (Mac) PAP125 2-3
USB Japanese Keyboard (PC) TRMUSB134 2-3
USB HID PAP131 2-4
USB Serial TRMUSB130 2-4
CTS/RTS Emulation On USBCTS1 2-4
CTS/RTS Emulation Off* USBCTS0 2-4
ACK/NAK Mode On USBACK1 2-4
ACK/NAK Mode Off* USBACK0 2-4
Remote MasterMind for USB ReM Off REMIFC0 2-4
ReM On REMIFC1 2-4
Preliminary draft_1

11 - 5
Plug and Play Codes Verifone Ruby Terminal PAPRBY 2-5
Gilbarco Terminal PAPGLB 2-5
Honeywell Bioptic Aux Port PAPBIO 2-5
Datalogic Magellan Aux Port PAPMAG 2-6
NCR Bioptic Aux Port PAPNCR 2-6
Wincor Nixdorf Terminal PAPWNX 2-6
Wincor Nixdorf Beetle PAPBTL 2-6
Program Keyboard
Country
*U.S.A. KBDCTY0 2-7
Albania KBDCTY35 2-7
Azeri (Cyrillic) KBDCTY81 2-7
Azeri (Latin) KBDCTY80 2-7
Belarus KBDCTY82 2-7
Belgium KBDCTY1 2-7
Bosnia KBDCTY33 2-7
Brazil KBDCTY16 2-7
Brazil (MS) KBDCTY59 2-7
Bulgaria (Cyrillic) KBDCTY52 2-8
Bulgaria (Latin) KBDCTY53 2-8
Canada (French legacy) KBDCTY54 2-8
Canada (French) KBDCTY18 2-8
Canada (Multilingual) KBDCTY55 2-8
Croatia KBDCTY32 2-8
Czech KBDCTY15 2-8
Czech (Programmers) KBDCTY40 2-8
Czech (QWERTY) KBDCTY39 2-8
Czech (QWERTZ) KBDCTY38 2-8
Denmark KBDCTY8 2-8
Dutch (Netherlands) KBDCTY11 2-9
Estonia KBDCTY41 2-9
Faroese KBDCTY83 2-9
Finland KBDCTY2 2-9
France KBDCTY3 2-9
Gaelic KBDCTY84 2-9
Germany KBDCTY4 2-9
Greek KBDCTY17 2-9
Greek (220 Latin) KBDCTY64 2-9
Greek (220) KBDCTY61 2-9
Greek (319 Latin) KBDCTY65 2-9
Greek (319) KBDCTY62 2-10
Greek (Latin) KBDCTY63 2-10
Greek (MS) KBDCTY66 2-10
Greek (Polytonic) KBDCTY60 2-10
Selection Setting
* Indicates default
Serial Command
# Indicates a numeric entry
Page
Preliminary draft_1

11 - 6
Hebrew KBDCTY12 2-10
Hungarian (101 key) KBDCTY50 2-10
Hungary KBDCTY19 2-10
Iceland KBDCTY75 2-10
Irish KBDCTY73 2-10
Italian (142) KBDCTY56 2-10
Italy KBDCTY5 2-10
Japan ASCII KBDCTY28 2-11
Kazakh KBDCTY78 2-11
Kyrgyz (Cyrillic) KBDCTY79 2-11
Latin America KBDCTY14 2-11
Latvia KBDCTY42 2-11
Latvia (QWERTY) KBDCTY43 2-11
Lithuania KBDCTY44 2-11
Lithuania (IBM) KBDCTY45 2-11
Macedonia KBDCTY34 2-11
Malta KBDCTY74 2-11
Mongolian (Cyrillic) KBDCTY86 2-11
Norway KBDCTY9 2-12
Poland KBDCTY20 2-12
Polish (214) KBDCTY57 2-12
Polish (Programmers) KBDCTY58 2-12
Portugal KBDCTY13 2-12
Romania KBDCTY25 2-12
Russia KBDCTY26 2-12
Russian (MS) KBDCTY67 2-12
Russian (Typewriter) KBDCTY68 2-12
SCS KBDCTY21 2-12
Serbia (Cyrillic) KBDCTY37 2-12
Serbia (Latin) KBDCTY36 2-13
Slovakia KBDCTY22 2-13
Slovakia (QWERTY) KBDCTY49 2-13
Slovakia (QWERTZ) KBDCTY48 2-13
Slovenia KBDCTY31 2-13
Spain KBDCTY10 2-13
Spanish variation KBDCTY51 2-13
Sweden KBDCTY23 2-13
Switzerland (French) KBDCTY29 2-13
Switzerland (German) KBDCTY6 2-13
Tatar KBDCTY85 2-13
Turkey F KBDCTY27 2-14
Turkey Q KBDCTY24 2-14
Ukrainian KBDCTY76 2-14
Selection Setting
* Indicates default
Serial Command
# Indicates a numeric entry
Page
Preliminary draft_1

11 - 7
United Kingdom KBDCTY7 2-14
United Stated (Dvorak right) KBDCTY89 2-14
United States (Dvorak left) KBDCTY88 2-14
United States (Dvorak) KBDCTY87 2-14
United States (International) KBDCTY30 2-14
Uzbek (Cyrillic) KBDCTY77 2-14
Keyboard Conversion *Keyboard Conversion Off KBDCNV0 2-15
Convert all Characters to Upper
Case
KBDCNV1 2-16
Convert all Characters to Lower
Case
KBDCNV2 2-16
Keyboard Style *Regular KBDSTY0 2-14
Caps Lock KBDSTY1 2-15
Shift Lock KBDSTY2 2-15
Automatic Caps Lock KBDSTY6 2-15
Emulate External
Keyboard
KBDSTY5 2-15
Control Character Output *Control Character Output Off KBDNPE0 2-16
*Control Character Output On KBDNPE1 2-16
Keyboard Modifiers *Control + X Off KBDCAS0 2-16
DOS Mode Control + X KBDCAS1 2-16
Windows Mode Control + X KBDCAS2 2-16
Windows Mode Prefix/Suffix Off KBDCAS3 2-17
*Turbo Mode Off KBDTMD0 2-17
Turbo Mode On KBDTMD1 2-17
*Numeric Keypad Off KBDNPS0 2-17
Numeric Keypad On KBDNPS1 2-17
*Auto Direct Connect Off KBDADC0 2-17
Auto Direct Connect On KBDADC1 2-17
Baud Rate 300 BPS 232BAD0 2-18
600 BPS 232BAD1 2-18
1200 BPS 232BAD2 2-18
2400 BPS 232BAD3 2-18
4800 BPS 232BAD4 2-18
9600 BPS 232BAD5 2-18
19200 BPS 232BAD6 2-18
38400 BPS 232BAD7 2-18
57600 BPS 232BAD8 2-18
*115200 BPS 232BAD9 2-18
Word Length: Data Bits, Stop Bits,
and Parity
7 Data, 1 Stop, Parity Even 232WRD3 2-19
7 Data, 1 Stop, Parity None 232WRD0 2-19
7 Data, 1 Stop, Parity Odd 232WRD6 2-19
7 Data, 2 Stop, Parity Even 232WRD4 2-19
Selection Setting
* Indicates default
Serial Command
# Indicates a numeric entry
Page
Preliminary draft_1
11 - 8
7 Data, 2 Stop, Parity None 232WRD1 2-19
7 Data, 2 Stop, Parity Odd 232WRD7 2-19
8 Data, 1 Stop, Parity Even 232WRD5 2-19
*8 Data, 1 Stop, Parity None 232WRD2 2-19
8 Data, 1 Stop, Parity Odd 232WRD8 2-19
8 Data, 1 Stop, Parity Mark 232WRD14 2-19
RS232 Receiver Time-out Range 0 - 300 seconds 232LPT### 2-20
RS232 Handshaking *RTS/CTS Off 232CTS0 2-20
Flow Control, No Timeout 232CTS1 2-20
Two-Direction Flow Control 232CTS2 2-20
Flow Control with Timeout 232CTS3 2-20
RS232 Timeout 232DEL#### 2-20
*XON/XOFF Off 232XON0 2-21
XON/XOFF On 232XON1 2-21
*ACK/NAK Off 232ACK0 2-21
ACK/NAK On 232ACK1 2-21
Scanner-Bioptic Packet Mode *Packet Mode Off 232PKT0 2-21
Packet Mode On 232PKT2 2-2
Scanner-Bioptic ACK/NAK Mode *Bioptic ACK/NAK Off 232NAK0 2-22
Bioptic ACK/NAK On 232NAK1 2-22
Scanner-Bioptic ACK/NAK Timeout ACK/NAK Timeout
*5100
232DLK##### 2-22
Cordless System Operation
Note: This section applies only to cordless systems. It does not apply to corded scanners.
Base Power Communication
Indicator
*On :*:BASRED1 3-5
Off :*:BASRED0 3-5
Reset Scanner Reset Scanner RESET_ 3-6
Scanning While in Base Cradle Scanning in Cradle Off BT_SIC0 3-6
*Scanning in Cradle On (CCB01-
010BT default)
BT_SIC1 3-6
Shut Down Scanner in Cradle BT_SIC2 3-6
Base Charging Modes Base Charge Off BASCHG0 3-7
*External or Interface Cable Power BASCHG1 3-7
External Power Only BASCHG2 3-7
Paging Mode *On BEPPGE1 3-7
Off BEPPGE0 3-7
Paging Pitch Range 400 - 9000 Hz (*1000) BEPPFQ#### 3-7
Beeper Pitch - Base Error *Razz (250) (min 200Hz) BASFQ2250 3-8
Medium (3250) BASFQ23250 3-8
High (4200) (max 9000Hz) BASFQ24200 3-8
Number of Beeps - Base Error *1 BASERR3 3-8
Range 1 - 9 BASERR# 3-8
Scanner Report Scanner Report RPTSCN 3-8
Selection Setting
* Indicates default
Serial Command
# Indicates a numeric entry
Page
Preliminary draft_1

11 - 9
Scanner Address Scanner Address BT_LDA 3-9
Base Address Base Address :*:BASLDA 3-9
Scanner Modes Charge Only Mode :*:BASLNK0 3-9
*Charge and Link Mode :*:BASLNK1 3-9
Locked Link Mode BASCON0,DNG1 3-10
*Open Link Mode BASCON1,DNG1 3-10
Unlink Scanner BT_RMV 3-10
Override Locked Scanner BT_RPL1 3-10
Out-of-Range Alarm Base Alarm Duration (Range 1 -
3000 sec (*0))
BASORD 3-11
Scanner Alarm Duration (Range 1
- 3000 sec (*0))
BT_ORD 3-11
Alarm Sound Type Base Alarm Type BASORW 3-11
Scanner Alarm Type BT_ORW 3-11
Scanner Power Time-Out Timer Timer (0-7200 seconds) BT_LPT0 3-12
200 Seconds BT_LPT200 3-12
400 Seconds BT_LPT400 3-12
900 Seconds BT_LPT900 3-12
3600 Seconds BT_LPT3600 3-12
7200 Seconds BT_LPT7200 3-12
Flexible Power Management *Full Power BT_TXP100 3-13
Medium Power BT_TXP35 3-13
Medium Low Power BT_TXP5 3-13
Low Power BT_TXP1 3-13
Batch Mode Automatic Batch Mode BATENA1 3-13
*Batch Mode Off BATENA0 3-13
Inventory Batch Mode BATENA2 3-14
Persistent Batch Mode BATENA3 3-14
Batch Mode Beep Off BATBEP0 3-14
*On BATBEP1 3-14
Batch Mode Storage *Flash Storage BATNVS1 3-14
RAM Storage BATNVS0 3-14
Batch Mode Quantity *Off BATQTY0 3-15
On BATQTY1 3-15
Selection Setting
* Indicates default
Serial Command
# Indicates a numeric entry
Page
Preliminary draft_1

11 - 10
Quantity Codes 0 BATNUM0 3-15
*1 BATNUM1 3-16
2 BATNUM2 3-16
3 BATNUM3 3-16
4 BATNUM4 3-16
5 BATNUM5 3-16
6 BATNUM6 3-16
7 BATNUM7 3-16
8 BATNUM8 3-16
9 BATNUM9 3-16
Batch Mode Output Order *FIFO BATLIF0 3-16
LIFO BATLIF1 3-16
Total Records Total Records BATNRC 3-17
Delete Last Code Delete Last Code BATUND 3-17
Clear All Codes Clear All Codes BATCLR 3-17
Transmit Records to Host Transmit Inventory Records BAT_TX 3-17
Batch Mode Transmit Delay *Off BATDLY0 3-17
Short (ms) BATDLY250 3-17
Medium (ms) BATDLY500 3-18
Long (ms) BATDLY1000 3-18
Multiple Scanner
Operation
Multiple Scanner Operation BASCON2,DNG3 3-18
Scanner Name Name 1-7 BT_NAM##### 3-18
Reset RESET_ 3-19
Scanner Name BT_NAM 3-19
Application Work Group
Selections
*Group 0 GRPSEL0 3-20
Group 1-6 GRPSEL# 3-20
Resetting the Factory Defaults: All
Application Work Groups
Factory Default Settings:
All Work Groups
PAPDFT& 3-20
Resetting the Custom Defaults: All
Application Work Groups
Custom Default Settings:
All Work Groups
PAPDFT 3-21
Bluetooth Connection Bluetooth HID Keyboard Connect PAPBTH 3-21
Bluetooth HID Keyboard
Disconnect
PAPSPP 3-23
Bluetooth Serial Port - PCs/
Laptops
BT_TRM0;BT_DNG5 3-23
BT Connection - PDA/Mobility
Systems Device
BT_TRM0;BT_DNG1 3-23
Bluetooth PIN Code BT_PIN 3-23
Bluetooth PIN Code Bluetooth PIN BT_PIN 3-23
Auto Reconnect Mode *Auto Reconnect On BT_ACM1 3-24
Auto Reconnect Off BT_ACM0 3-24
Maximum Link Attempts Maximum Link Attempts BT_MLA 3-25
Relink Time-Out Relink Time-Out BT_RLT 3-25
Selection Setting
* Indicates default
Serial Command
# Indicates a numeric entry
Page
Preliminary draft_1

11 - 11
Host Command Acknowledgment Host ACK On HSTACK1 3-27
*Host ACK Off HSTACK0 3-27
Input/Output Selections
Power Up Beeper Power Up Beeper Off - Scanner BEPPWR0 4-1
*Power Up Beeper On - Scanner BEPPWR1 4-1
Power Up Beeper Off - Cordless
Base
BASPWR0 4-1
Power Up Beeper On - Cordless
Base
BASPWR1 4-1
Beep on BEL Character Beep on BEL On BELBEP1 4-1
*Beep on BEL Off BELBEP0 4-1
Trigger Click On BEPTRG1 4-2
*Off BEPTRG0 4-2
Beeper - Good Read Off BEPBEP0 4-2
*On BEPBEP1 4-2
Beeper Volume - Good Read Off BEPLVL0 4-2
Low BEPLVL1 4-2
Medium BEPLVL2 4-2
*High BEPLVL3 4-2
Beeper Pitch - Good Read
(Frequency)
Low (1600) (min 400Hz) BEPFQ11600 4-3
*Medium - Xenon (2700 Hz) BEPFQ12700 4-3
*Medium - Granit (3200 Hz) BEPFQ13200 4-3
High (4200) (max 9000Hz) BEPFQ14200 4-3
Vibrate - Good Read Vibrate - Good Read Off TFBGRD0 4-3
*Vibrate - Good Read On TFBGRD1 4-3
Vibrate Duration Duration
(100 - 2,000 ms) *300
TFBDUR#### 4-3
Beeper Pitch - Error (Frequency) *Razz (250) (min 200Hz) BEPFQ2800 4-4
Medium (3250) BEPFQ23250 4-4
High (4200) (max 9000Hz) BEPFQ24200 4-4
Beeper Duration - Good Read *Normal Beep BEPBIP0 4-4
Short Beep BEPBIP1 4-4
LED - Good Read Off BEPLED0 4-4
*On BEPLED1 4-4
Number of Beeps - Error *1 BEPERR3 4-5
Range 1 - 9 BEPERR# 4-5
Number of Beeps - Good Read *1 BEPRPT1 4-5
Range 1 - 9 BEPRPT# 4-5
Beeper Volume Max Beeper Volume Max PAPBLM 4-5
Good Read Delay *No Delay DLYGRD0 4-5
Short Delay (500 ms) DLYGRD500 4-5
Medium Delay (1000 ms) DLYGRD1000 4-5
Long Delay (1500 ms) DLYGRD1500 4-6
Selection Setting
* Indicates default
Serial Command
# Indicates a numeric entry
Page
Preliminary draft_1

11 - 12
User-Specified Good Read Delay Range 0 - 30,000 ms DLYGRD##### 4-6
Manual Trigger Modes *Manual Trigger - Normal PAPHHF 4-6
Manual Trigger - Enhanced PAPHHS 4-6
LED Illumination - Manual Trigger Off PWRNOL0 4-6
Low PWRNOL100 4-6
Medium (Xenon only) PWRNOL120 4-6
*High PWRNOL150 4-6
Serial Trigger Mode Read Time-Out
(0 - 300,000 ms) *30,000
TRGSTO#### 4-7
Presentation Mode Presentation Mode PAPTPR 4-7
LED Illumination - Presentation
Mode
Off PWRLDC0 4-8
Low PWRLDC100 4-8
*High PWRLDC150 4-8
Presentation LED Behavior After
Decode
*LEDs On TRGPCK1 4-8
LEDs Off TRGPCK0 4-8
Presentation Sensitivity Range 0-20 (*1) TRGPMS## 4-8
Presentation Centering Window Presentation Centering On PDCWIN1 4-9
*Presentation Centering Off PDCWIN0 4-9
Left of Presentation Centering
Window (*40%)
PDCLFT### 4-10
Right of Presentation Centering
Window (*60%)
PDCRGT### 4-10
Top of Presentation Centering
Window (*40%)
PDCTOP### 4-9
Bottom of Presentation Centering
Window (*60%)
PDCBOT### 4-10
In-Stand Sensor Mode Sensor On TRGSSW1 4-10
Sensor Off TRGSSW0 4-10
CodeGate *CodeGate Off Out-of-Stand AOSCGD0. 4-10
CodeGate On Out-of-Stand AOSCGD1. 4-11
Streaming Presentation Streaming Presentation Mode -
Normal
PAPSPN 4-11
Streaming Presentation Mode -
Enhanced
PAPSPE 4-11
Mobile Phone Read Mode Hand Held Scanning - Mobile
Phone
PAPHHC 4-11
Streaming Presentation - Mobile
Phone
PAPSPC 4-11
Hands Free Time-Out Range 0 - 300,000 ms TRGPTO###### 4-12
Reread Delay Short (500 ms) DLYRRD500 4-12
*Medium (750 ms) DLYRRD750 4-12
Long (1000 ms) DLYRRD1000 4-12
Extra Long (2000 ms) DLYRRD2000 4-12
User-Specified Range 0 - 30,000 ms DLYRRD##### 4-12
Selection Setting
* Indicates default
Serial Command
# Indicates a numeric entry
Page
Preliminary draft_1

11 - 13
2D Reread Delay *2D Reread Delay Off DLY2RR0 4-13
Short (1000ms) DLY2RR1000 4-13
Medium (2000ms) DLY2RR2000 4-13
Long (3000ms) DLY2RR3000 4-13
Extra Long (4000ms) DLY2RR4000 4-13
Character Activation Mode *Off HSTCEN0 4-13
On HSTCEN1 4-13
Activation Character (Range 0-
255) *12 [DC2]
HSTACH### 4-14
*Do Not End Character Activation
After Good Read
HSTCGD0 4-14
End Character Activation After
Good Read
HSTCGD1 4-14
Character Activation Timeout
(Range 1 - 300,000) *30,000 ms
HSTCDT###### 4-14
Character Deactivation Mode *Off HSTDEN0 4-14
On HSTDEN1 4-14
Deactivation Character (Range 0-
255) *14 [DC4]
HSTDCH### 4-15
Illumination Lights *Lights On SCNLED1 4-15
Lights Off SCNLED0 4-15
Aimer Delay 200 milliseconds SCNDLY200 4-15
400 milliseconds SCNDLY400 4-15
*Off (no delay) SCNDLY0 4-15
User-Specified Aimer Delay Range 0 - 4,000 ms SCNDLY#### 4-16
Aimer Mode Off SCNAIM0 4-16
*Interlaced SCNAIM2 4-16
Centering Window Centering On DECWIN1 4-17
*Centering Off DECWIN0 4-17
Left of Centering Window (*40%) DECLFT### 4-17
Right of Centering Window (*60%) DECRGT### 4-18
Top of Centering Window (*40%) DECTOP### 4-17
Bottom of Centering Window
(*60%)
DECBOT### 4-17
Preferred Symbology On PRFENA1 4-18
*Off PRFENA0 4-18
High Priority Symbology PRFCOD## 4-18
Low Priority Symbology PRFBLK## 4-19
Preferred Symbology Timeout
(*500) Range 100-3000
PRFPTO#### 4-19
Preferred Symbology Default PRFDFT 4-19
Output Sequence Editor Enter Sequence SEQBLK 4-21
Default Sequence SEQDFT 4-21
Selection Setting
* Indicates default
Serial Command
# Indicates a numeric entry
Page
Preliminary draft_1
11 - 14
Partial Sequence Transmit Partial Sequence SEQTTS1 4-21
*Discard Partial Sequence SEQTTS0 4-21
Require Output Sequence Required SEQ_EN2 4-22
On/Not Required SEQ_EN1 4-22
*Off SEQ_EN0 4-22
Multiple Symbols On SHOTGN1 4-22
*Off SHOTGN0 4-22
No Read On SHWNRD1 4-22
*Off SHWNRD0 4-22
Video Reverse Video Reverse Only VIDREV1 4-23
Video Reverse and Standard Bar
Codes
VIDREV2 4-23
*Video Reverse Off VIDREV0 4-23
Working Orientation *Upright ROTATN0 4-24
Vertical, Bottom to Top (Rotate
CCW 90°)
ROTATN1 4-24
Upside Down ROTATN2 4-24
Vertical, Top to Bottom (Rotate CW
90°)
ROTATN3 4-24
Prefix/Suffix Selections
Add CR Suffix to All Symbologies VSUFCR 5-2
Prefix Add Prefix PREBK2## 5-2
Clear One Prefix PRECL2 5-2
Clear All Prefixes PRECA2 5-2
Suffix Add Suffix SUFBK2## 5-2
Clear One Suffix SUFCL2 5-2
Clear All Suffixes SUFCA2 5-2
Function Code Transmit *Enable RMVFNC0 5-3
Disable RMVFNC1 5-3
Intercharacter Delay Range 0 - 1000 (5ms increments) DLYCHR## 5-3
User Specified
Intercharacter Delay
Delay Length
0 - 1000 (5ms increments)
DLYCRX## 5-4
Character to Trigger Delay DLY_XX## 5-4
Interfunction Delay Range 0 - 1000 (5ms increments) DLYFNC## 5-4
Intermessage Delay Range 0 - 1000 (5ms increments) DLYMSG## 5-4
Data Formatter Selections
Data Format Editor *Default Data Format (None) DFMDF3 6-1
Enter Data Format DFMBK3## 6-2
Clear One Data Format DFMCL3 6-2
Clear All Data Formats DFMCA3 6-2
Selection Setting
* Indicates default
Serial Command
# Indicates a numeric entry
Page
Preliminary draft_1

11 - 15
Data Formatter Data Formatter Off DFM_EN0 6-12
*Data Formatter On,
Not Required,
Keep Prefix/Suffix
DFM_EN1 6-12
Data Format Required,
Keep Prefix/Suffix
DFM_EN2 6-12
Data Formatter On,
Not Required,
Drop Prefix/Suffix
DFM_EN3 6-12
Data Format Required,
Drop Prefix/Suffix
DFM_EN4 6-12
Data Format Non-Match Error Tone *Data Format Non-Match Error
Tone On
DFMDEC0 6-13
Data Format Non-Match Error
Tone Off
DFMDEC1 6-13
Primary/Alternate Data Formats Primary Data Format ALTFNM0 6-13
Data Format 1 ALTFNM1 6-13
Data Format 2 ALTFNM2 6-13
Data Format 3 ALTFNM3 6-13
Single Scan Data Format Change Single Scan-Primary
Data Format
VSAF_0 6-14
Single Scan-Data Format 1 VSAF_1 6-14
Single Scan-Data Format 2 VSAF_2 6-14
Single Scan-Data Format 3 VSAF_3 6-14
Symbologies
All Symbologies All Symbologies Off ALLENA0 7-1
All Symbologies On ALLENA1 7-1
Codabar Default All Codabar
Settings
CBRDFT 7-2
Off CBRENA0 7-2
*On CBRENA1 7-2
Codabar Start/Stop Char. *Don’t Transmit CBRSSX0 7-2
Transmit CBRSSX1 7-2
Codabar Check Char. *No Check Char. CBRCK20 7-2
Validate, But Don’t Transmit CBRCK21 7-2
Validate, and Transmit CBRCK22 7-2
Codabar Concatenation *Off CBRCCT0 7-3
On CBRCCT1 7-3
Require CBRCCT2 7-3
Codabar Message Length Minimum (2 - 60) *4 CBRMIN## 7-3
Maximum (2 - 60) *60 CBRMAX## 7-3
Code 39 Default All Code 39
Settings
C39DFT 7-4
Off C39ENA0 7-4
*On C39ENA1 7-4
Selection Setting
* Indicates default
Serial Command
# Indicates a numeric entry
Page
Preliminary draft_1

11 - 16
Code 39 Start/Stop Char. *Don’t Transmit C39SSX0 7-4
Transmit C39SSX1 7-4
Code 39 Check Char. *No Check Char. C39CK20 7-4
Validate, But Don’t
Transmit
C39CK21 7-4
Validate,
and Transmit
C39CK22 7-4
Code 39 Message Length Minimum (0 - 48) *0 C39MIN## 7-5
Maximum (0 - 48) *48 C39MAX## 7-5
Code 39 Append *Off C39APP0 7-5
On C39APP1 7-5
Code 32 Pharmaceutical (PARAF) *Off C39B320 7-5
On C39B321 7-5
Code 39 Full ASCII *Off C39ASC0 7-6
On C39ASC1 7-6
Code 39 Code Page C39DCP 7-6
Interleaved 2 of 5 Default All Interleaved
2 of 5 Settings
I25DFT 7-7
Off I25ENA0 7-7
*On I25ENA1 7-7
Interleaved 2 of 5 Check Digit *No Check Char. I25CK20 7-7
Validate, But Don’t
Transmit
I25CK21 7-7
Validate, and Transmit I25CK22 7-7
Interleaved 2 of 5 Message Length Minimum (2 - 80) *4 I25MIN## 7-7
Maximum (2 - 80) *80 I25MAX## 7-7
NEC 2 of 5 Default All NEC
2 of 5 Settings
N25DFT 7-8
Off N25ENA0 7-8
*On N25ENA1 7-8
NEC 2 of 5 Check Digit *No Check Char. N25CK20 7-8
Validate, But Don’t
Transmit
N25CK21 7-8
Validate, and Transmit N25CK22 7-8
NEC 2 of 5 Message Length Minimum (2 - 80) *4 N25MIN## 7-9
Maximum (2 - 80) *80 N25MAX## 7-9
Code 93 Default All Code 93
Settings
C93DFT 7-9
Off C93ENA0 7-9
*On C93ENA1 7-9
Code 93 Message Length Minimum (0 - 80) *0 C93MIN## 7-9
Maximum (0 - 80) *80 C93MAX## 7-9
Code 93 Append On C93APP1 7-10
*Off C93APP0 7-10
Selection Setting
* Indicates default
Serial Command
# Indicates a numeric entry
Page
Preliminary draft_1

11 - 17
Code 93 Code Page Code 93 Code Page C93DCP 7-10
Straight 2 of 5 Industrial Default All Straight 2 of 5 Industrial
Settings
R25DFT 7-11
*Off R25ENA0 7-11
On R25ENA1 7-11
Straight 2 of 5 Industrial Message
Length
Minimum (1 - 48) *4 R25MIN## 7-11
Maximum (1 - 48) *48 R25MAX## 7-11
Straight 2 of 5 IATA Default All Straight 2 of 5 IATA
Settings
A25DFT 7-12
Straight 2 of 5 IATA *Off A25ENA0 7-12
On A25ENA1 7-12
Straight 2 of 5 IATA Message
Length
Minimum (1 - 48) *4 A25MIN## 7-12
Maximum (1 - 48) *48 A25MAX## 7-12
Matrix 2 of 5 Default All Matrix 2 of 5
Settings
X25DFT 7-13
*Off X25ENA0 7-13
On X25ENA1 7-13
Matrix 2 of 5 Message Length Minimum (1 - 80) *4 X25MIN## 7-13
Maximum (1 - 80) *80 X25MAX## 7-13
Code 11 Default All Code 11
Settings
C11DFT 7-14
*Off C11ENA0 7-14
On C11ENA1 7-14
Code 11 Check Digits Required 1 Check Digit C11CK20 7-14
*2 Check Digits C11CK21 7-14
Code 11 Message Length Minimum (1 - 80) *4 C11MIN## 7-14
Maximum (1 - 80) *80 C11MAX## 7-14
Code 128 Default All Code 128
Settings
128DFT 7-15
Off 128ENA0 7-15
*On 128ENA1 7-15
ISBT Concatenation *Off ISBENA0 7-15
On ISBENA1 7-15
Code 128 Message Length Minimum (0 - 80) *0 128MIN## 7-15
Maximum (0 - 80) *80 128MAX## 7-15
Code 128 Append *On 128APP1 7-16
Off 128APP0 7-16
Code 128 Code Page Code 128 Code Page (*2) 128DCP## 7-16
GS1-128 Default All GS1-128 Settings GS1DFT 7-17
*On GS1ENA1 7-17
Off GS1ENA0 7-17
GS1-128 Message Length Minimum (1 - 80) *1 GS1MIN## 7-17
Maximum (0 - 80) *80 GS1MAX## 7-17
Selection Setting
* Indicates default
Serial Command
# Indicates a numeric entry
Page
Preliminary draft_1

11 - 18
Telepen Default All Telepen
Settings
TELDFT 7-18
*Off TELENA0 7-18
On TELENA1 7-18
Telepen Output *AIM Telepen Output TELOLD0 7-18
Original Telepen Output TELOLD1 7-18
Telepen Message Length Minimum (1 - 60) *1 TELMIN## 7-18
Maximum (1 - 60) *60 TELMAX## 7-18
UPC-A Default All
UPC-A Settings
UPADFT 7-19
Off UPAENA0 7-19
*On UPAENA1 7-19
UPC-A Check Digit Off UPACKX0 7-19
*On UPACKX1 7-19
UPC-A Number System Off UPANSX0 7-19
*On UPANSX1 7-19
UPC-A 2 Digit Addenda *Off UPAAD20 7-20
On UPAAD21 7-20
UPC-A 5 Digit Addenda *Off UPAAD50 7-20
On UPAAD51 7-20
UPC-A Addenda Required *Not Required UPAARQ0 7-20
Required UPAARQ1 7-20
UPC-A Addenda
Separator
Off UPAADS0 7-20
*On UPAADS1 7-20
UPC-A/EAN-13 with Extended
Coupon Code
*Off CPNENA0 7-21
Allow Concatenation CPNENA1 7-21
Require Concatenation CPNENA2 7-21
Coupon GS1 DataBar Output GS1 Output Off CPNGS10 7-21
GS1 Output On CPNGS11 7-21
UPC-E0 Default All UPC-E
Settings
UPEDFT 7-22
Off UPEEN00 7-22
*On UPEEN01 7-22
UPC-E0 Expand *Off UPEEXP0 7-22
On UPEEXP1 7-22
UPC-E0 Addenda Required Required UPEARQ1 7-22
*Not Required UPEARQ0 7-22
UPC-E0 Addenda Separator *On UPEADS1 7-23
Off UPEADS0 7-23
UPC-E0 Check Digit Off UPECKX0 7-23
*On UPECKX1 7-23
UPC-E0 Leading Zero Off UPENSX0 7-23
*On UPENSX1 7-23
Selection Setting
* Indicates default
Serial Command
# Indicates a numeric entry
Page
Preliminary draft_1

11 - 19
UPC-E0 Addenda 2 Digit Addenda On UPEAD21 7-23
*2 Digit Addenda Off UPEAD20 7-23
5 Digit Addenda On UPEAD51 7-23
*5 Digit Addenda Off UPEAD50 7-23
UPC-E1 *Off UPEEN10 7-24
On UPEEN11 7-24
EAN/JAN-13 Default All EAN/
JAN Settings
E13DFT 7-24
Off E13ENA0 7-24
*On E13ENA1 7-24
Convert UPC-A to EAN-13 UPC-A Converted to EAN-13 UPAENA0 7-24
Do not Convert UPC-A UPAENA1 7-24
EAN/JAN-13 Check Digit Off E13CKX0 7-25
*On E13CKX1 7-25
EAN/JAN-13 2 Digit Addenda 2 Digit Addenda On E13AD21 7-25
*2 Digit Addenda Off E13AD20 7-25
5 Digit Addenda On E13AD51 7-25
*5 Digit Addenda Off E13AD50 7-25
EAN/JAN-13 Addenda Required *Not Required E13ARQ0 7-25
Required E13ARQ1 7-25
EAN/JAN-13 Addenda
Separator
Off E13ADS0 7-26
*On E13ADS1 7-26
ISBN Translate *Off E13ISB0 7-26
On E13ISB1 7-26
EAN/JAN-8 Default All EAN/
JAN 8 Settings
EA8DFT 7-27
Off EA8ENA0 7-27
*On EA8ENA1 7-27
EAN/JAN-8 Check Digit Off EA8CKX0 7-27
*On EA8CKX1 7-27
EAN/JAN-8 Addenda *2 Digit Addenda Off EA8AD20 7-27
2 Digit Addenda On EA8AD21 7-27
*5 Digit Addenda Off EA8AD50 7-27
5 Digit Addenda On EA8AD51 7-27
EAN/JAN-8 Addenda Required *Not Required EA8ARQ0 7-28
Required EA8ARQ1 7-28
EAN/JAN-8 Addenda
Separator
Off EA8ADS0 7-28
*On EA8ADS1 7-28
MSI Default All MSI Settings MSIDFT 7-29
*Off MSIENA0 7-29
On MSIENA1 7-29
Selection Setting
* Indicates default
Serial Command
# Indicates a numeric entry
Page
Preliminary draft_1

11 - 20
MSI Check Character *Validate Type 10, but Don’t
Transmit
MSICHK0 7-29
Validate Type 10 and
Transmit
MSICHK1 7-29
Validate 2 Type 10 Chars, but Don’t
Transmit
MSICHK2 7-29
Validate 2 Type 10 Chars and
Transmit
MSICHK3 7-29
Validate Type 11 then Type 10
Char, but Don’t Transmit
MSICHK4 7-29
Validate Type 11 then Type 10
Char and Transmit
MSICHK5 7-30
Disable MSI Check Characters MSICHK6 7-30
MSI Message Length Minimum (4 - 48) *4 MSIMIN## 7-30
Maximum (4 - 48) *48 MSIMAX## 7-30
GS1 DataBar Omnidirectional Default All
GS1 DataBar Omnidirectional
Settings
RSSDFT 7-31
Off RSSENA0 7-31
*On RSSENA1 7-31
GS1 DataBar Limited Default All GS1 DataBar Limited
Settings
RSLDFT 7-31
Off RSLENA0 7-31
*On RSLENA1 7-31
GS1 DataBar Expanded Default All GS1 DataBar
Expanded Settings
RSEDFT 7-32
Off RSEENA0 7-32
*On RSEENA1 7-32
GS1 DataBar Expanded Msg.
Length
Minimum (4 - 74) *4 RSEMIN## 7-32
Maximum (4 - 74) *74 RSEMAX## 7-32
Trioptic Code *Off TRIENA0 7-32
On TRIENA1 7-32
Codablock A Default All Codablock A Settings CBADFT 7-33
*Off CBAENA0 7-33
On CBAENA1 7-33
Codablock A Msg. Length Minimum (1 - 600) *1 CBAMIN### 7-33
Maximum (1 - 600) *600 CBAMAX### 7-33
Codablock F Default All Codablock F Settings CBFDFT 7-34
*Off CBFENA0 7-34
On CBFENA1 7-34
Codablock F Msg. Length Minimum (1 - 2048) *1 CBFMIN#### 7-34
Maximum (1 - 2048) *2048 CBFMAX#### 7-34
PDF417 Default All PDF417 Settings PDFDFT 7-35
*On PDFENA1 7-35
Off PDFENA0 7-35
Selection Setting
* Indicates default
Serial Command
# Indicates a numeric entry
Page
Preliminary draft_1

11 - 21
PDF417 Msg. Length Minimum (1-2750) *1 PDFMIN#### 7-35
Maximum (1-2750) *2750 PDFMAX#### 7-35
MacroPDF417 *On PDFMAC1 7-36
Off PDFMAC0 7-36
MicroPDF417 Default All Micro PDF417 Settings MPDDFT 7-36
On MPDENA1 7-36
*Off MPDENA0 7-36
MicroPDF417 Msg. Length Minimum (1-366) *1 MPDMIN### 7-36
Maximum (1-366) *366 MPDMAX### 7-36
GS1 Composite Codes On COMENA1 7-36
*Off COMENA0 7-36
UPC/EAN Version On COMUPC1 7-37
*Off COMUPC0 7-37
GS1 Composite Codes Msg. Length Minimum (1-2435) *1 COMMIN#### 7-37
Maximum (1-2435) *2435 COMMAX#### 7-37
GS1 Emulation GS1-128 Emulation EANEMU1 7-37
GS1 DataBar Emulation EANEMU2 7-36
GS1 Code Expansion Off EANEMU3 7-38
EAN8 to EAN13 Conversion EANEMU4 7-38
*GS1 Emulation Off EANEMU0 7-38
TCIF Linked Code 39 On T39ENA1 7-38
*Off T39ENA0 7-38
QR Code Default All QR Code Settings QRCDFT 7-38
*On QRCENA1 7-38
Off QRCENA0 7-38
QR Code Msg. Length Minimum (1-7089) *1 QRCMIN#### 7-39
Maximum (1-7089) *7089 QRCMAX#### 7-39
QR Code Append *On QRCAPP1 7-39
Off QRCAPP0 7-39
QR Code Page QR Code Page (*3) QRCDCP## 7-39
Data Matrix Default All Data Matrix Settings IDMDFT 7-40
*On IDMENA1 7-40
Off IDMENA0 7-40
Data Matrix Msg. Length Minimum (1-3116) *1 IDMMIN#### 7-40
Maximum (1-3116) *3116 IDMMAX#### 7-40
Data Matrix Append *On IDMAPP1 7-40
Off IDMAPP0 7-40
Data Matrix Code Page Data Matrix Code Page (*51) IDMDCP## 7-40
MaxiCode Default All MaxiCode Settings MAXDFT 7-41
On MAXENA1 7-41
*Off MAXENA0 7-41
MaxiCode Msg. Length Minimum (1-150) *1 MAXMIN### 7-41
Maximum (1-150) *150 MAXMAX### 7-41
Selection Setting
* Indicates default
Serial Command
# Indicates a numeric entry
Page
Preliminary draft_1
11 - 22
Aztec Code Default All Aztec Code Settings AZTDFT 7-42
*On AZTENA1 7-42
Off AZTENA0 7-42
Aztec Code Msg. Length Minimum (1-3832) *1 AZTMIN#### 7-42
Maximum (1-3832) *3832 AZTMAX#### 7-42
Aztec Append *On AZTAPP1 7-42
Off AZTAPP0 7-42
Aztec Code Page Aztec Code Page (*51) AZTDCP## 7-42
Chinese Sensible (Han Xin) Code Default All Han Xin Code Settings HX_DFT 7-43
On HX_ENA1 7-43
*Off HX_ENA0 7-43
Chinese Sensible (Han Xin) Code
Msg. Length
Minimum (1-7833) *1 HX_MIN#### 7-43
Maximum (1-7833) *7833 HX_MAX#### 7-43
Postal Codes - 2D
2D Postal Codes *Off POSTAL0 7-44
Single 2D Postal Codes Australian Post On POSTAL1 7-44
British Post On POSTAL7 7-44
Canadian Post On POSTAL30 7-44
Intelligent Mail Bar Code On POSTAL10 7-44
Japanese Post On POSTAL3 7-44
KIX Post On POSTAL4 7-44
Planet Code On POSTAL5 7-44
Postal-4i On POSTAL9 7-44
Postnet On POSTAL6 7-45
Postnet with B and B’ Fields On POSTAL11 7-45
InfoMail On POSTAL2 7-45
Selection Setting
* Indicates default
Serial Command
# Indicates a numeric entry
Page
Preliminary draft_1

11 - 23
Combination 2D Postal Codes InfoMail and British Post On POSTAL8 7-45
Intelligent Mail Bar Code and
Postnet with B and B’ Fields On
POSTAL20 7-45
Postnet and Postal-4i On POSTAL14 7-45
Postnet and Intelligent Mail Bar
Code On
POSTAL16 7-45
Postal-4i and Intelligent Mail Bar
Code On
POSTAL17 7-45
Postal-4i and Postnet with B and B’
Fields On
POSTAL19 7-45
Planet and Postnet On POSTAL12 7-45
Planet and Postnet with B and B’
Fields On
POSTAL18 7-46
Planet and Postal-4i On POSTAL13 7-46
Planet and Intelligent Mail Bar
Code On
POSTAL15 7-46
Planet, Postnet, and Postal-4i On POSTAL21 7-46
Planet, Postnet, and Intelligent
Mail Bar Code On
POSTAL22 7-46
Planet, Postal-4i, and Intelligent
Mail Bar Code On
POSTAL23 7-46
Combination 2D Postal Codes
(continued)
Postnet, Postal-4i, and Intelligent
Mail Bar Code On
POSTAL24 7-46
Planet, Postal-4i, and Postnet with
B and B’ Fields On
POSTAL25 7-46
Planet, Intelligent Mail Bar Code,
and Postnet with B and B’ Fields
On
POSTAL26 7-46
Postal-4i, Intelligent Mail Bar
Code, and Postnet with B and B’
Fields On
POSTAL27 7-46
Planet, Postal-4i, Intelligent Mail
Bar Code, and Postnet On
POSTAL28 7-47
Planet, Postal-4i, Intelligent Mail
Bar Code, and Postnet with B and
B’ Fields On
POSTAL29 7-46
Planet Code Check Digit Transmit PLNCKX1 7-47
*Don’t Transmit PLNCKX0 7-47
Postnet Check Digit Transmit NETCKX1 7-47
*Don’t Transmit NETCKX0 7-47
Australian Post Interpretation Bar Output AUSINT0 7-48
Numeric N Table AUSINT1 7-48
Alphanumeric C Table AUSINT2 7-48
Combination N and C Tables AUSINT3 7-48
Selection Setting
* Indicates default
Serial Command
# Indicates a numeric entry
Page
Preliminary draft_1
11 - 24
Postal Codes - Linear
China Post (Hong Kong 2 of 5) Default All China Post (Hong Kong
2 of 5) Settings
CPCDFT 7-48
*Off CPCENA0 7-48
On CPCENA1 7-48
China Post (Hong Kong 2 of 5) Msg.
Length
Minimum (2 - 80) *4 CPCMIN## 7-48
Maximum (2 - 80) *80 CPCMAX## 7-48
Korea Post Default All Korea Post Settings KPCDFT 7-49
*Off KPCENA0 7-49
On KPCENA1 7-49
Korea Post Msg. Length Minimum (2 - 80) *4 KPCMIN## 7-49
Maximum (2 - 80) *48 KPCMAX## 7-49
Korea Post Check Digit Transmit Check Digit KPCCHK1 7-49
*Don’t Transmit Check Digit KPCCHK0 7-49
Imaging Default Commands
Image Snap Default all Imaging Commands IMGDFT 8-1
Imaging Style - Decoding SNPSTY0 8-1
*Imaging Style - Photo SNPSTY1 8-1
Imaging Style - Manual SNPSTY2 8-1
Beeper On SNPBEP1 8-1
*Beeper Off SNPBEP0 8-1
*Wait for Trigger Off SNPTRG0 8-2
Wait for Trigger On SNPTRG1 8-2
*LED State - Off SNPLED0 8-2
LED State - On SNPLED1 8-2
Exposure (1-7874 microseconds) SNPEXP 8-2
*Gain - None SNPGAN1 8-2
Gain - Medium SNPGAN2 8-2
Gain - Heavy SNPGAN4 8-2
Gain - Maximum SNPGAN8 8-2
Target White Value (0-255) *125 SNPWHT### 8-3
Delta for Acceptance (0-255) *25 SNPDEL### 8-3
Update Tries (0-10) *6 SNPTRY## 8-3
Target Set Point Percentage (1-99)
*50
SNPPCT## 8-3
Selection Setting
* Indicates default
Serial Command
# Indicates a numeric entry
Page
Preliminary draft_1

11 - 25
Image Ship *Infinity Filter - Off IMGINF0 8-4
Infinity Filter - On IMGINF1 8-4
*Compensation Off IMGCOR0 8-4
Compensation On IMGCOR1 8-4
*Pixel Depth - 8 bits/pixel
(grayscale)
IMGBPP8 8-4
Pixel Depth - 1 bit/pixel (B&W) IMGBPP1 8-4
*Don’t Sharpen Edges IMGEDG0 8-5
Sharpen Edges (0-23) IMGEDG## 8-5
*File Format - JPEG IMGFMT6 8-5
File Format - KIM IMGFMT0 8-5
File Format - TIFF binary IMGFMT1 8-5
File Format - TIFF binary group 4,
compressed
IMGFMT2 8-5
File Format - TIFF grayscale IMGFMT3 8-5
File Format - Uncompressed
binary
IMGFMT4 8-5
File Format - Uncompressed
grayscale
IMGFMT5 8-5
File Format - BMP IMGFMT8 8-5
*Histogram Stretch Off IMGHIS0 8-5
Histogram Stretch On IMGHIS1 8-5
*Noise Reduction Off IMGFSP0 8-6
Noise Reduction On IMGFSP1 8-6
Image Ship (continued) Invert Image around X axis IMGNVX1 8-6
Invert Image around Y axis IMGNVY1 8-6
Rotate Image none IMGROT0 8-7
Rotate Image 90° right IMGROT1 8-7
Rotate Image 180° right IMGROT2 8-7
Rotate Image 90° left IMGROT3 8-7
JPEG Image Quality (0-100) *50 IMGJQF### 8-7
*Gamma Correction Off IMGGAM0 8-7
Gamma Correction On (0-1000) IMGGAM### 8-7
Image Crop - Left (0-843) *0 IMGWNL### 8-8
Image Crop - Right (0-843) *843 IMGWNR### 8-8
Image Crop - Top (0-639) *0 IMGWNT### 8-8
Image Crop - Bottom (0-639) *639 IMGWNB### 8-8
Image Crop - Margin (1-238) *0 IMGMAR### 8-8
Protocol - None (raw) IMGXFR0 8-8
Protocol - None (default USB) IMGXFR2 8-8
Protocol - Hmodem Compressed IMGXFR3 8-8
Protocol - Hmodem IMGXFR4 8-8
Ship Every Pixel IMGSUB1 8-8
Selection Setting
* Indicates default
Serial Command
# Indicates a numeric entry
Page
Preliminary draft_1
11 - 26
Image Ship (continued) Ship Every 2nd Pixel IMGSUB2 8-8
Ship Every 3rd Pixel IMGSUB3 8-9
*Document Image Filter Off IMGUSH0 8-9
Document Image Filter On (0-255) IMGUSH### 8-9
*Don’t Ship Histogram IMGHST0 8-9
Ship Histogram IMGHST1 8-9
Image Size Compatibility Force VGA Resolution IMGVGA1 8-10
*Native Resolution IMGVGA0 8-10
Intelligent Signature Capture Optimize On DECBND1 8-10
*Optimize Off DECBND0 8-10
Utilities
Add Code I.D. Prefix to All Symbologies (Temporary) PRECA2,BK2995C80! 10-1
Show Decoder Revision REV_DR 10-1
Show Scan Driver Revision REV_SD 10-1
Show Software Revision REVINF 10-1
Show Data Format DFMBK3? 10-1
Test Menu On TSTMNU1 10-2
*Off TSTMNU0 10-2
Application Plug-Ins (Apps) *Decoding Apps On PLGDCE1 10-2
Decoding Apps Off PLGDCE0 10-2
*Formatting Apps On PLGFOE1 10-2
Formatting Apps Off PLGFOE0 10-2
List Apps PLGINF 10-2
Resetting the Factory Defaults Remove Custom Defaults DEFOVR 10-4
Activate Defaults DEFALT 10-4
Selection Setting
* Indicates default
Serial Command
# Indicates a numeric entry
Page
Preliminary draft_1

12 - 1
12
Product Specifications
Xenon 1900/1910 Corded Scanner Product Specifications
Xenon 1902/1912 Cordless Scanner Product Specifications
Parameter Specification
Dimensions (Typical):
Height 6.3 inches (16cm)
Length 4.1 inches (10.41cm)
Width 2.8 inches (7.11cm)
Weight 5.2 ounces (147.42g)
Illumination LED:
Peak Wavelength 624nm + 18nm (red LED)
IEC 62471: “Exempt Risk Group”
442nm, 552nm (white LED)
IEC 62471: “Exempt Risk Group”
Aiming:
Peak Wavelength Laser 650nm
IEC 60825-1: “Class 2”
Peak Wavelength LED 624nm + 18nm
IEC 62471: “Exempt Risk Group”
Optical Power Laser <1mW
Image Size 838 x 640 pixels
Skew Angle +65°
Pitch Angle +45°
Motion Tolerance:
Streaming Presentation Trigger up to 240 inches per second for 13 mil UPC
Symbol Contrast Grade 1.0 (20% or greater)
Voltage Requirements 4 - 5.5 VDC at input connector
Current Draw @5VDC
B&W
Color
Scanning Standby
470mA, 2.35W 90mA, .45W
490mA, 2.45W 90mA, .45W
Power Supply Noise Rejection Maximum 100mV peak to peak, 10 to 100 kHz
Temperature Ranges:
Operating +32°F to +122°F (0°C to 50°C)
Storage -40°F to +158°F (-40°C to 70°C)
Humidity 0 to 95% non-condensing
Mechanical Drop Operational after 50 drops from 6 feet
(1.83m) to concrete at 23°C
Vibration Withstands 5G peak from 22 to 300 Hz
ESD Tolerance Up to 15kV direct air
Up to 8 kV indirect coupling plane
Parameter Specification
Dimensions (Typical):
Height 6.3 inches (160cm)
Length 4.1 inches (10.41cm)
Width 2.8 inches (7.11cm)
Weight 7.5 ounces (212.62g)
Preliminary draft_1

12 - 2
*Storage outside of this temperature range could be detrimental to battery life.
Granit 1910i Industrial Corded Scanner Product Specifications
Illumination LED:
Peak Wavelength 624nm + 18nm (red LED)
IEC 62471: “Exempt Risk Group”
442nm, 552nm (white LED)
IEC 62471: “Exempt Risk Group”
Aiming:
Peak Wavelength Laser 650nm
IEC 60825-1: “Class 2”
Peak Wavelength LED 624nm + 18nm
IEC 62471: “Exempt Risk Group”
Optical Power Laser <1mW
Image Size 838 x 640 pixels
Skew Angle +65°
Pitch Angle +45°
Motion Tolerance:
Streaming Presentation Trigger up to 240 inches per second for 13 mil UPC
Symbol Contrast Grade 1.0 (20% or greater)
Battery:
Lithium Ion 1800 mAHr minimum
Number of Scans Up to 50,000 per charge
Expected Hours of Operation 14
Expected Charge Time 4.5 hours
Radio:
Frequency 2.4 to 2.5 GHz (ISM Band) Frequency Hopping Bluetooth v.2.1
Range 33 ft. (10 m) typical
Data Rate Up to 1 MBps
Temperature Ranges:
Operating 32° F to +122° F (0° C to 50° C)
Storage* -40°F to +158°F (-40°C to 70°C)
Humidity Up to 95% non-condensing
Mechanical Drop Operational after 50 drops from 6 feet
(1.8 m) to concrete
Vibration Withstands 5G peak from 22 to 300 Hz
ESD Sensitivity Up to 15kV direct air
Up to 8 kV indirect coupling plane
Sealant Rating IP41
Parameter Specification
Dimensions (Typical):
Height 7.7 in. (19.45cm)
Length 5.2 in. (13.31cm)
Width 2.9 in. (7.5cm)
Weight 10.6 oz. (300g)
Illumination LED:
Peak Wavelength 656nm (hyper red LED)
IEC 62471: “Exempt Risk Group”
(Continued)Parameter Specification
Preliminary draft_1
12 - 3
Granit 1911i Industrial Cordless Scanner Product Specifications
Aiming:
Peak Wavelength Laser 650nm
IEC 60825-1: “Class 2”
Optical Power Laser <1mW
Image Size 838 x 640 pixels
Skew Angle +65°
Pitch Angle +45°
Motion Tolerance:
Streaming Presentation Trigger:
13 mil UPC
240 inches per second at 6.5 in. (16.5cm)
150 inches per second at 10 in. (25.4cm)
Symbol Contrast Grade 1.0 (20% or greater)
Voltage Requirements 4 - 5.5 VDC at input connector
Current Draw @5VDC Scanning Standby
470mA, 2.35W 100mA, .5W
Power Supply Noise Rejection Maximum 100mV peak to peak, 10 to 100 kHz
Temperature Ranges:
Operating -22°F to +122°F (-30°C to 50°C)
Storage -40°F to +158°F (-40°C to 70°C)
Humidity 0 to 95% non-condensing
Mechanical Drop Operational after 50 drops from 6.5 feet
(1.98m) to concrete at 23°, -30°, and 50°C
Vibration Complies with MIL-STD-810G, Method 514.6, Annex C
ESD Tolerance Up to 20kV direct air
Up to 8 kV indirect coupling plane
Sealant Rating IP65
Parameter Specification
Dimensions (Typical):
Height 7.7 in. (19.45cm)
Length 5.2 in. (13.31cm)
Width 2.9 in. (7.5cm)
Weight 13.8 oz. (390g)
Illumination LED:
Peak Wavelength 656nm (hyper red LED)
IEC 62471: “Exempt Risk Group”
Aiming:
Peak Wavelength Laser 650nm
IEC 60825-1: “Class 2”
Optical Power Laser <1mW
Image Size 838 x 640 pixels
Skew Angle +65°
Pitch Angle +45°
Motion Tolerance:
Streaming Presentation Trigger:
13 mil UPC
240 inches per second at 6.5 in. (16.5cm)
150 inches per second at 10 in. (25.4cm)
Symbol Contrast Grade 1.0 (20% or greater)
Battery:
(Continued)Parameter Specification
Preliminary draft_1

12 - 4
*Storage outside of this temperature range could be detrimental to battery life.
Granit 1980i Industrial Full Range Corded Scanner Product Specifications
Lithium Ion 1800 mAHr minimum
Number of Scans Up to 50,000 per charge
Expected Hours of Operation 14
Expected Charge Time 4.5 hours
Radio:
Frequency 2.4 to 2.5 GHz (ISM Band) Frequency Hopping Bluetooth v.2.1
Range 330 ft. (100m) typical
Data Rate Up to 1 MBps
Temperature Ranges:
Operating while not charging -4°F to + 122°F (-20°C to 50°C)
Operating while charging 41°F to + 104°F (5°C to 40°C)
Storage* -40°F to +158°F (-40°C to 70°C)
Humidity Up to 95% non-condensing
Mechanical Drop Operational after 50 drops from 6.5 feet
(1.98m) to concrete at 23°, -30°, and 50°C
Vibration Complies with MIL-STD-810G, Method 514.6, Annex C
ESD Sensitivity Up to 20kV direct air
Up to 8 kV indirect coupling plane
Sealant Rating IP65
Parameter Specification
Dimensions (Typical):
Height 7.7 in. (19.45cm)
Length 5.2 in. (13.31cm)
Width 2.9 in. (7.5cm)
Weight <12.7 oz. (360g)
Illumination LED:
Peak Wavelength 617nm (hyper red LED)
IEC 62471: “Exempt Risk Group”
Aiming:
Peak Wavelength Laser 650nm
IEC 60825-1: “Class 2”
Optical Power Laser <1mW
Image Size 1280 x 800 pixels
Skew Angle +75°
Pitch Angle +45°
Motion Tolerance:
Streaming Presentation Trigger:
13 mil UPC
9 inches per second
Symbol Contrast 40% or greater
Voltage Requirements 4 - 5.5 VDC at input connector
Current Draw @5VDC Scanning Standby
470mA, 2.35W 100mA, .5W
Power Supply Noise Rejection Maximum 100mV peak to peak, 10 to 100 kHz
Temperature Ranges:
Operating -22°F to +122°F (-30°C to 50°C)
(Continued)Parameter Specification
Preliminary draft_1

12 - 5
Granit 1981i Industrial Full Range Cordless Scanner Product Specifications
Storage -40°F to +158°F (-40°C to 70°C)
Humidity 0 to 95% non-condensing
Mechanical Drop Operational after 50 drops from 6.5 feet
(1.98m) to concrete at 23°, -30°, and 50°C
Vibration Complies with MIL-STD-810G, Method 514.6, Annex C
ESD Tolerance Up to 20kV direct air
Up to 8 kV indirect coupling plane
Sealant Rating IP65
Parameter Specification
Dimensions (Typical):
Height 7.7 in. (19.45cm)
Length 5.2 in. (13.31cm)
Width 2.9 in. (7.5cm)
Weight <15.9 oz. (450g)
Illumination LED:
Peak Wavelength 617nm (hyper red LED)
IEC 62471: “Exempt Risk Group”
Aiming:
Peak Wavelength Laser 650nm
IEC 60825-1: “Class 2”
Optical Power Laser <1mW
Image Size 1280 x 800 pixels
Skew Angle +75°
Pitch Angle +45°
Motion Tolerance:
Streaming Presentation Trigger:
13 mil UPC
9 inches per second
Symbol Contrast 40% or greater
Battery:
Lithium Ion 1800 mAHr minimum
Number of Scans Up to ??? per charge
Expected Hours of Operation 8
Expected Charge Time 4.5 hours
Radio:
Frequency 2.4 to 2.5 GHz (ISM Band) Frequency Hopping Bluetooth v.2.1
Range 330 ft. (100m) typical
Data Rate Up to 1 MBps
Temperature Ranges:
Operating while not charging -4°F to + 122°F (-20°C to 50°C)
Operating while charging 41°F to + 104°F (5°C to 40°C)
Storage* -40°F to +158°F (-40°C to 70°C)
Humidity Up to 95% non-condensing
(Continued)Parameter Specification
Preliminary draft_1

12 - 6
*Storage outside of this temperature range could be detrimental to battery life.
CCB01-010BT Charge Base Product Specifications
CCB02-100BT Industrial Charge Base Product Specifications
Mechanical Drop Operational after 50 drops from 6.5 feet
(1.98m) to concrete at 23°, -30°, and 50°C
Vibration Complies with MIL-STD-810G, Method 514.6, Annex C
ESD Sensitivity Up to 20kV direct air
Up to 8 kV indirect coupling plane
Sealant Rating IP65
Parameter Specification
Dimensions (Typical):
Height 3.2 inches (8.13cm)
Length 5.19 inches (13.18cm)
Width 3.98 inches (10.11cm)
Weight 6.3 oz (179g)
Voltage: 4.5 to 5.5 volts
Current Draw:
Host Terminal Port 500mA
Aux Power Port 1A
Charge Time 5 hours
Radio:
Frequency 2.4 to 2.5 GHz (ISM Band) Frequency Hopping Bluetooth v.2.1
Range 33 ft. (10 m) typical
Data Rate Up to 1 MBps
Temperature Ranges:
Operating 32° F to +122° F (0° C to +50° C)
Battery Charge 41° F to +104° F (5° C to +40° C)
Storage -40° F to +158° F (-40° C to +70° C)
Humidity Up to 95% non-condensing
Mechanical Drop Operational after 50 drops from 3.28 feet
(1 m) to concrete
Vibration 5G Peak from 22Hz to 300Hz
ESD Sensitivity Up to 15kV direct air
Up to 8 kV indirect coupling plane
Parameter Specification
Dimensions (Typical):
Height 2.6 in. (6.6cm)
Length 9.8 in. (24.98mm)
Width 4.05 in. (10.28cm)
Weight 10.05 oz. (285g)
Voltage: 4.5 to 5.5 volts
Current Draw:
Host Terminal Port 500mA
Aux Power Port 1A
(Continued)Parameter Specification
Preliminary draft_1

12 - 7
Charge Time 5 hours
Radio:
Frequency 2.4 to 2.5 GHz (ISM Band) Frequency Hopping Bluetooth v.2.1
Range 330 ft. (100m) typical
Data Rate Up to 1 MBps
Temperature Ranges:
Operating -4° F to +122° F (-20° C to +50° C)
Battery Charge 41° F to +104° F (5° C to +40° C)
Storage -40° F to +158° F (-40° C to +70° C)
Humidity Up to 95% non-condensing
Mechanical Drop Operational after 50 drops from 3.94 feet
(1.2m) to concrete
Vibration Complies with MIL-STD-810G, Method 514.6, Annex C
ESD Sensitivity Up to 20kV direct air
Up to 8 kV indirect coupling plane
(Continued)Parameter Specification
Preliminary draft_1
12 - 8
Depth of Field Charts
Xenon B&W Scanner Typical Performance
Xenon B&W Scanner Guaranteed Performance
Focus High Density (HD) Standard Range (SR) Extended Range (ER)
Symbology Near Distance Far Distance Near Distance Far Distance Near Distance Far Distance
5 mil Code 39 in. .2 3.8 1.6 5.3 3.7 8
mm 5.1 96.5 40.6 134.6 94 203.2
13 mil UPC in. .5 6.5 .3 16.7 1 20.7
mm 12.7 165.1 7.6 424.2 25.4 525.8
20 mil Code 39 in. .6 8.6 .4 24.6 123.5
mm 15.2 218.4 10.2 624.8 25.4 596.9
6.7 mil PDF417 in. .4 4 .7 62.8 9.2
mm 10.2 101.6 17.8 152.4 71.1 233.7
10 mil Data Matrix in. .3 4.2 .8 7 2.5 11.3
mm 7.6 106.7 20.3 177.8 63.5 287
20 mil QR Code in. .7 7 .5 14.8 .7 19
mm 17.8 177.8 12.7 375.9 17.8 482.6
Resolution (1D Code 39) 3 mil (.076mm) 5 mil (.127mm) 5 mil (.127mm)
Resolution (2D Data Matrix) 5 mil (.127mm) 6.7 mil (.170mm) 7.5 mil (.191mm)
Focus High Density (HD) Standard Range (SR) Extended Range (ER)
Symbology Near Distance Far Distance Near Distance Far Distance Near Distance Far Distance
5 mil Code 39 in. .3 3.3 2.1 5.1 4.2 7.8
mm 7.62 83.8 53.3 129.5 106.7 198.1
13 mil UPC in. .7 6.1 .4 15.6 1.1 19.7
mm 17.8 154.9 10.2 396.2 27.9 500.4
20 mil Code 39 in. .7 7.8 .5 20.2 1.5 25
mm 17.8 198.1 12.7 513.1 38.1 635
6.7 mil PDF417 in. .5 3.8 .9 5.8 3.3 8.7
mm 12.7 96.5 22.9 147.3 83.8 221
10 mil Data Matrix in. .4 3.8 .9 6.6 3.4 10.3
mm 10.2 96.5 22.9 167.6 86.4 261.6
20 mil QR Code in. 1.2 6.4 .7 13 .9 18
mm 30.5 162.6 17.8 330.2 22.9 457.2
Resolution (1D Code 39) 3 mil (.076mm) 5 mil (.127mm) 5 mil (.127mm)
Resolution (2D Data Matrix) 5 mil (.127mm) 6.7 mil (.170mm) 7.5 mil (.191mm)
Preliminary draft_1

12 - 9
Xenon Color Scanner (Model COL) Typical Performance
Xenon Color Scanner (Model COL) Guaranteed Performance
Focus High Density (HD) Standard Range (SR)
Symbology Near Distance Far Distance Near Distance Far Distance
5 mil Code 39 in. 03.6 1.1 5.2
mm 091.4 27.9 132.1
13 mil UPC in. .4 5.9 .4 16.2
mm 10.2 149.9 10.2 411.5
20 mil Code 39 in. .4 8.4 .5 22
mm 10.2 213.4 12.7 558.8
6.7 mil PDF417 in. 03.8 .4 6
mm 096.5 10.2 152.4
10 mil Data Matrix in. 04.2 .5 7
mm 0106.7 12.7 177.8
20 mil QR Code in. .4 6.8 .6 13.4
mm 10.2 172.7 15.2 340.4
Resolution (1D Code 39) 3 mil (.076mm) 5 mil (.127mm)
Resolution (2D Data Matrix) 5 mil (.127mm) 6.7 mil (.170mm)
Focus High Density (HD) Standard Range (SR)
Symbology Near Distance Far Distance Near Distance Far Distance
5 mil Code 39 in. 03.3 1.7 4.9
mm 083.8 43.2 124.5
13 mil UPC in. .6 5.2 .4 14.5
mm 15.2 132.1 10.2 368.3
20 mil Code 39 in. .5 7.4 .5 17.5
mm 12.7 188 12.7 444.5
6.7 mil PDF417 in. 03.4 .5 5.7
mm 086.4 12.7 144.8
10 mil Data Matrix in. 0 4 .8 6.4
mm 0101.6 20.3 162.6
20 mil QR Code in. .7 6.2 .7 12.3
mm 17.8 157.5 17.8 312.4
Resolution (1D Code 39) 3 mil (.076mm) 5 mil (.127mm)
Resolution (2D Data Matrix) 5 mil (.127mm) 6.7 mil (.170mm)
Preliminary draft_1

12 - 10
Granit 1910i/1911i Scanner Typical Performance
Granit 1910i/1911i Scanner Guaranteed Performance
Focus Extended Range (ER)
Symbology Near Distance Far Distance
5 mil Code 39 in. 3.6 7.4
mm 91.4 188
20 mil Code 39 in. .6 29.5
mm 15.2 749.3
100% UPC in. .6 21.4
mm 15.2 543.6
6.7 mil PDF417 in. 2.7 8.9
mm 68.6 226.1
10 mil Data Matrix in. 2.8 10.3
mm 71.1 261.6
20 mil QR Code in. .8 19.5
mm 20.3 495.3
Resolution (1D Code 39) 5 mil (.127mm)
Resolution (2D Data Matrix) 7.5 mil (.191mm)
Focus Extended Range (ER)
Symbology Near Distance Far Distance
5 mil Code 39 in. 3.8 7.2
mm 96.5 182.9
20 mil Code 39 in. 128.7
mm 25.4 729
100% UPC in. .6 21.7
mm 15.2 551.2
6.7 mil PDF417 in. 38.5
mm 76.2 215.9
10 mil Data Matrix in. 3.1 9.7
mm 78.7 246.4
20 mil QR Code in. .9 19.8
mm 22.9 502.9
Resolution (1D Code 39) 5 mil (.127mm)
Resolution (2D Data Matrix) 7.5 mil (.191mm)
Preliminary draft_1
12 - 11
Granit 1980i/1981i Scanner Typical Performance
Granit 1980i/1981i Scanner Guaranteed Performance
Focus Extended Range (ER)
Symbology Near Distance Far Distance
5 mil Code 39 in.
mm
20 mil Code 39 in.
mm
100% UPC in.
mm
6.7 mil PDF417 in.
mm
10 mil Data Matrix in.
mm
20 mil QR Code in.
mm
Resolution (1D Code 39) 5 mil (.127mm)
Resolution (2D Data Matrix) 7.5 mil (.191mm)
Focus Extended Range (ER)
Symbology Near Distance Far Distance
5 mil Code 39 in.
mm
20 mil Code 39 in.
mm
100% UPC in.
mm
6.7 mil PDF417 in.
mm
10 mil Data Matrix in.
mm
20 mil QR Code in.
mm
Resolution (1D Code 39) 5 mil (.127mm)
Resolution (2D Data Matrix) 7.5 mil (.191mm)
Preliminary draft_1
12 - 12
Standard Connector Pinouts
Note: The following pin assignments are not compatible with Honeywell legacy products. Use of a cable with improper pin
assignments may lead to damage to the unit. Use of any cables not provided by the manufacturer may result in damage
not covered by your warranty.
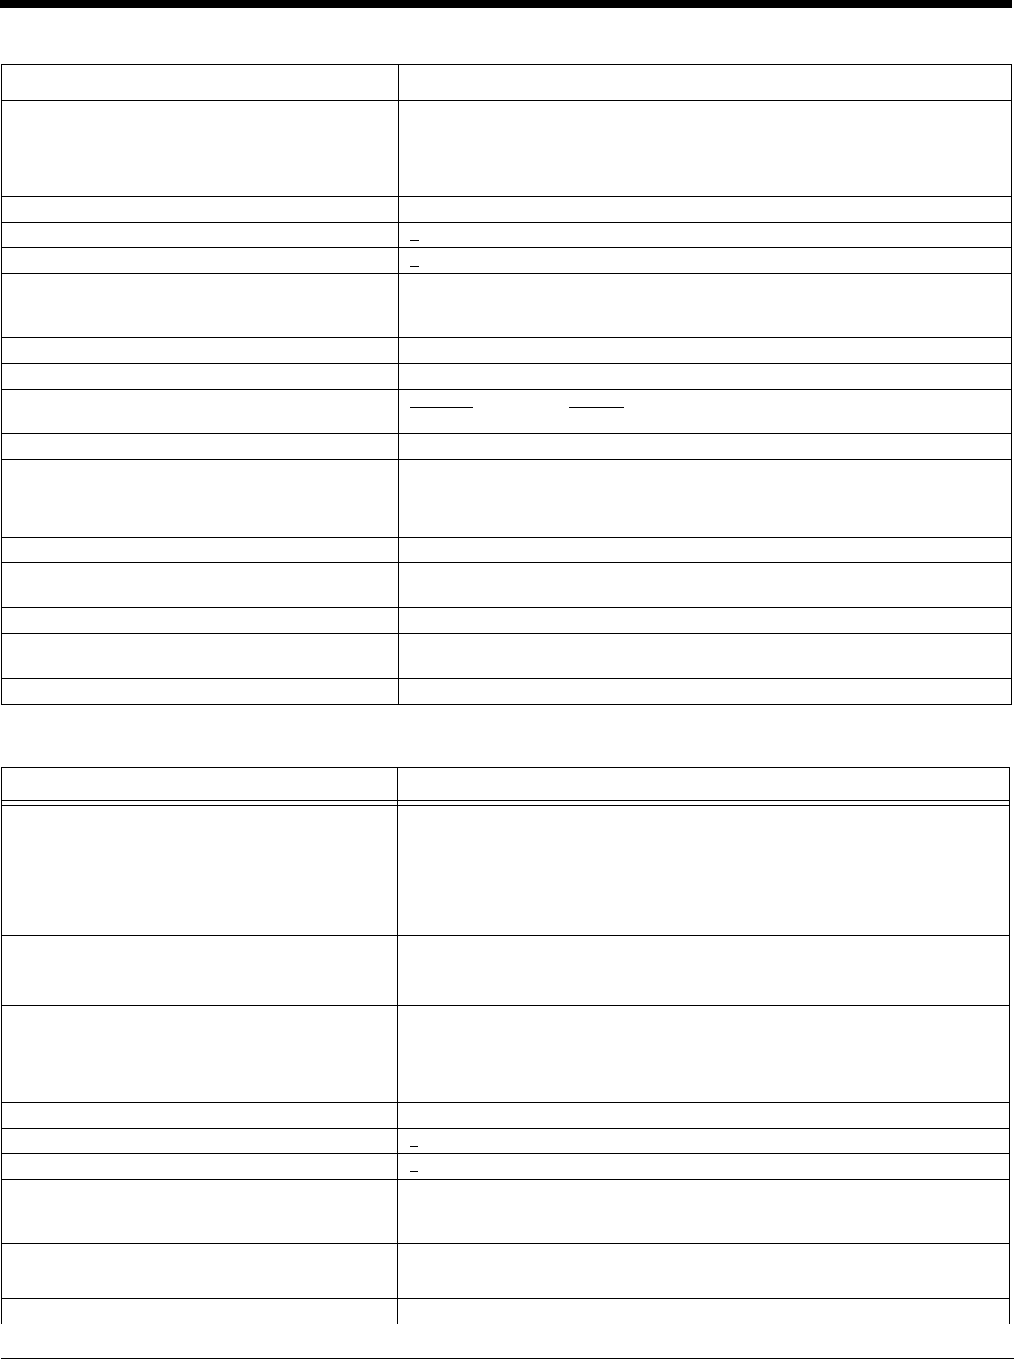
Keyboard Wedge
10 Pin RJ41 Modular Plug - connects to the base
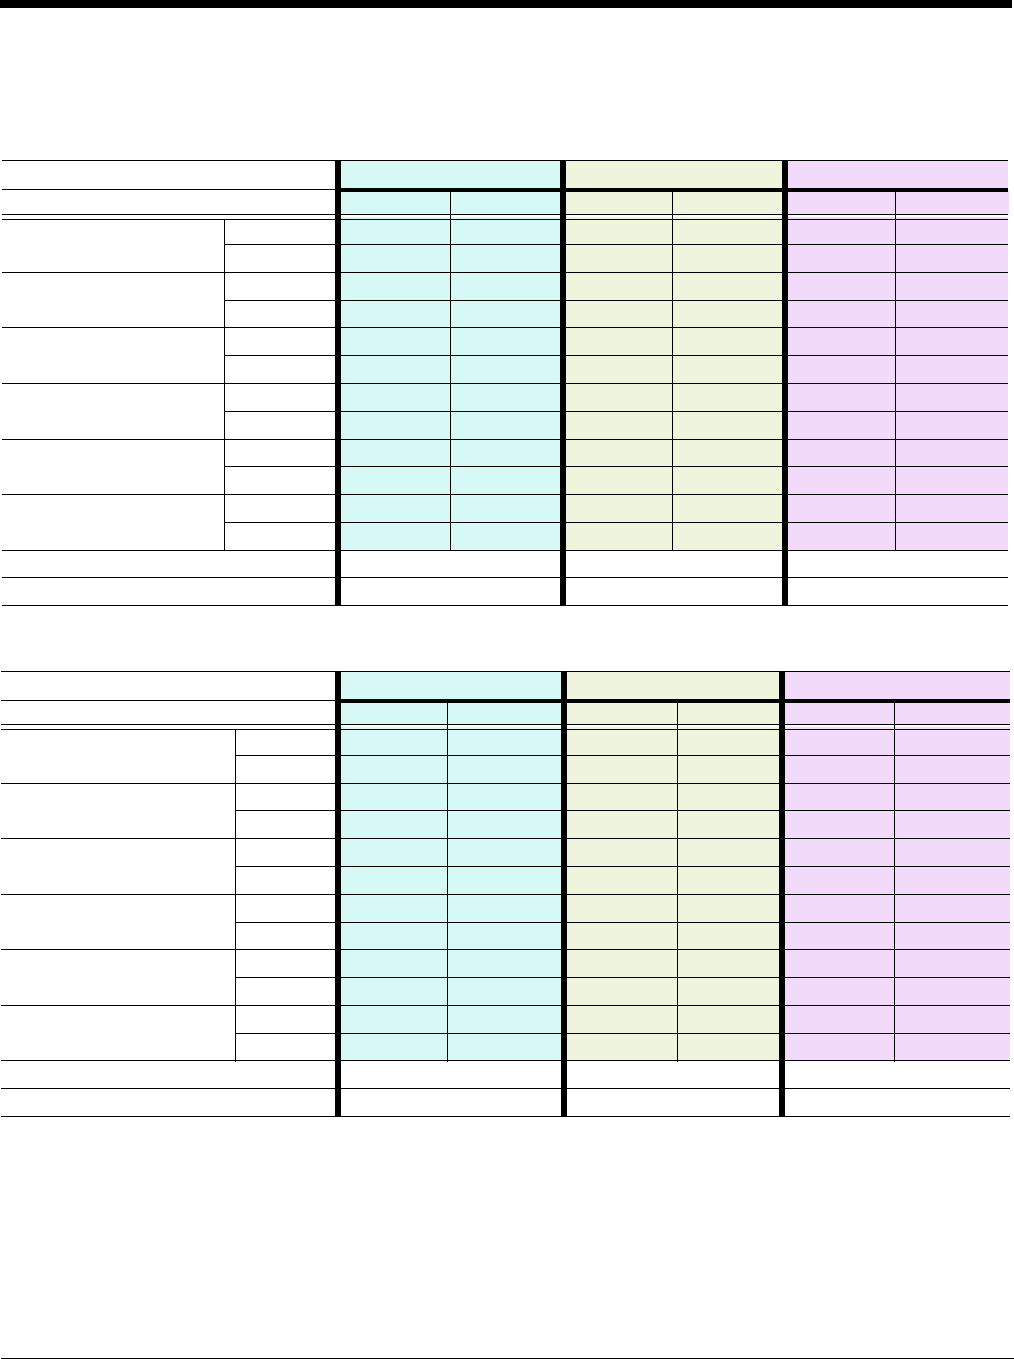
Serial Output
10 Pin RJ41 Modular Plug - connects to the base
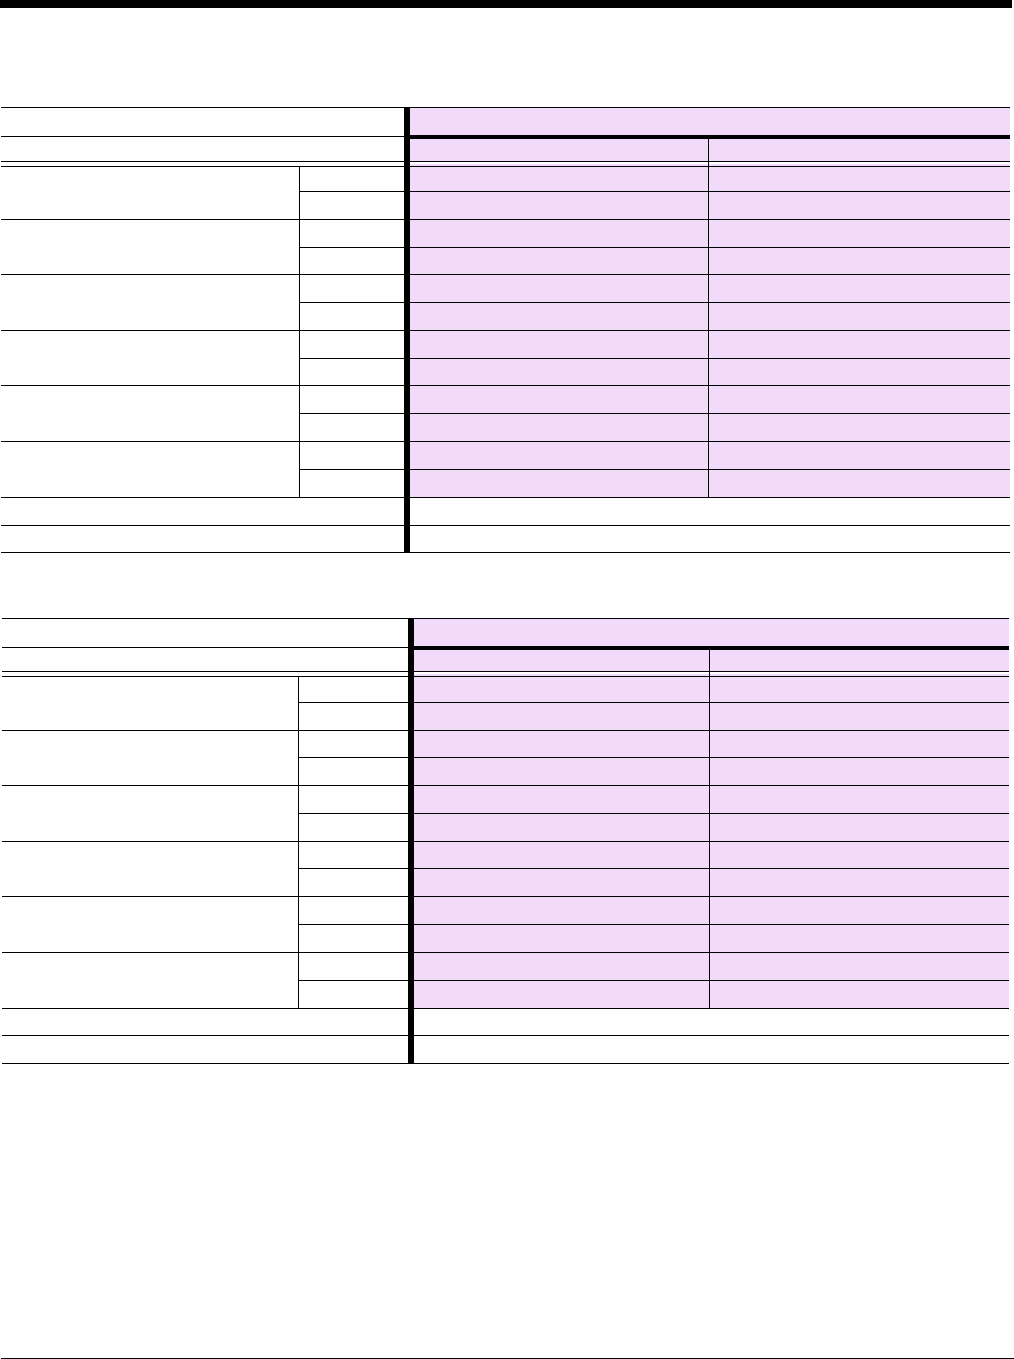
RS485 Output
10 Pin RJ41 Modular Plug - connects to the base
Note: RS485 signal conversion is performed in the cable.
1 Cable shield
2 Cable select
3 Supply ground
4 Terminal data
5 Terminal clock
6 Keyboard clock
7+5V power
8 Keyboard data
9
10
1 Cable shield
2 Cable select
3 Supply ground
4 Transmit data
5 Receive data - serial data to scanner
6CTS
7 +5V power
8RTS
9
10
1 Cable shield
2 Cable select
3 Supply ground
4 Transmit data
5 Receive data - serial data to scanner
6
7+5V power
8 Transmit Enable
9
10
Preliminary draft_1
12 - 13
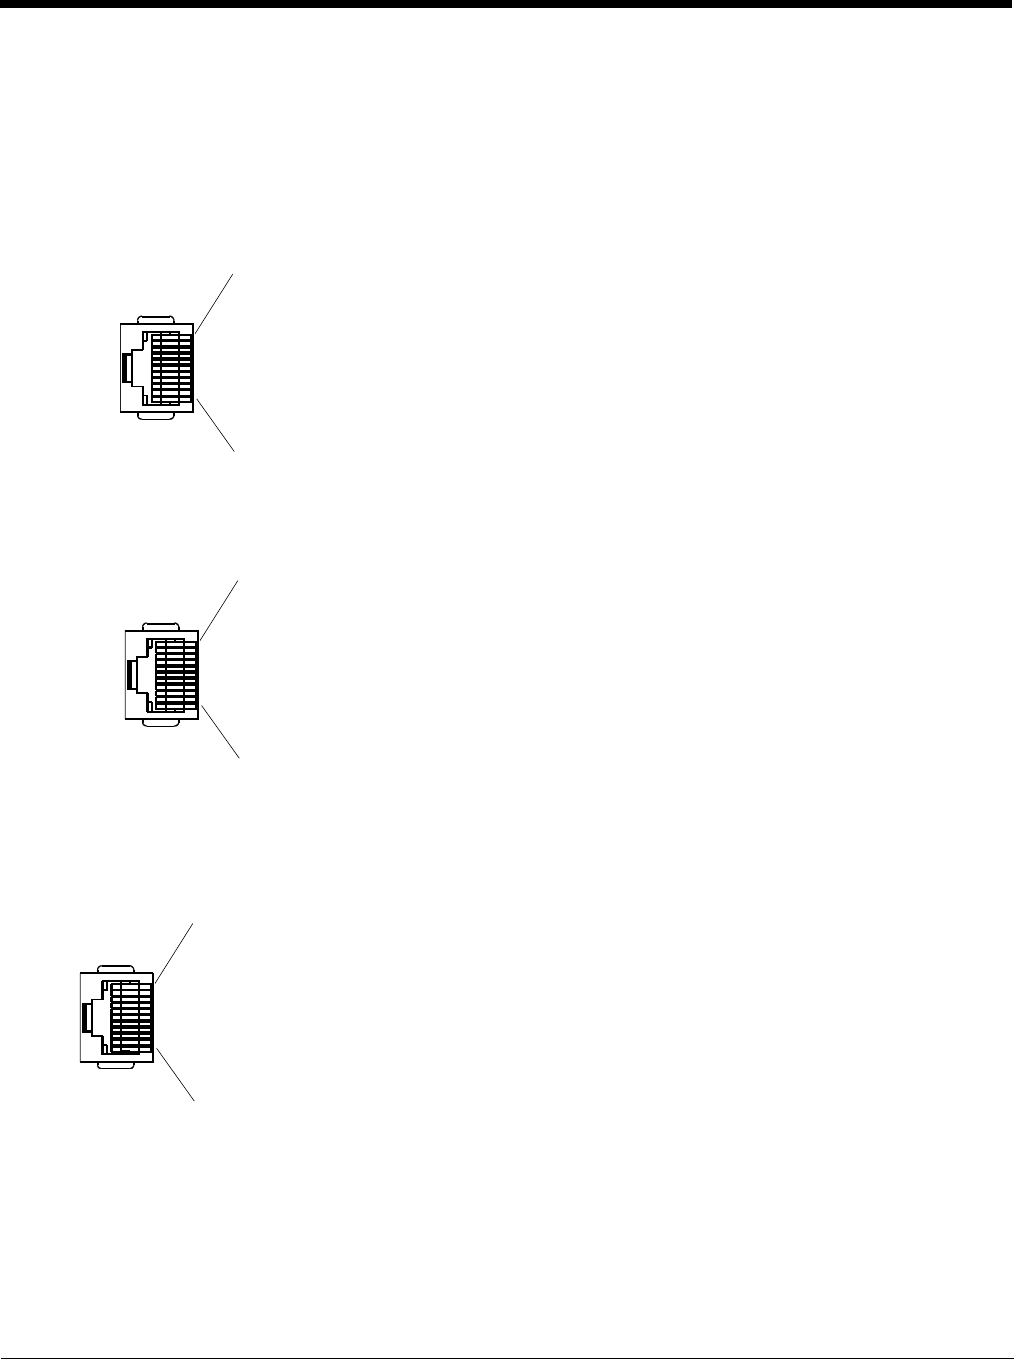
USB
10 Pin Modular Plug - connects to the base
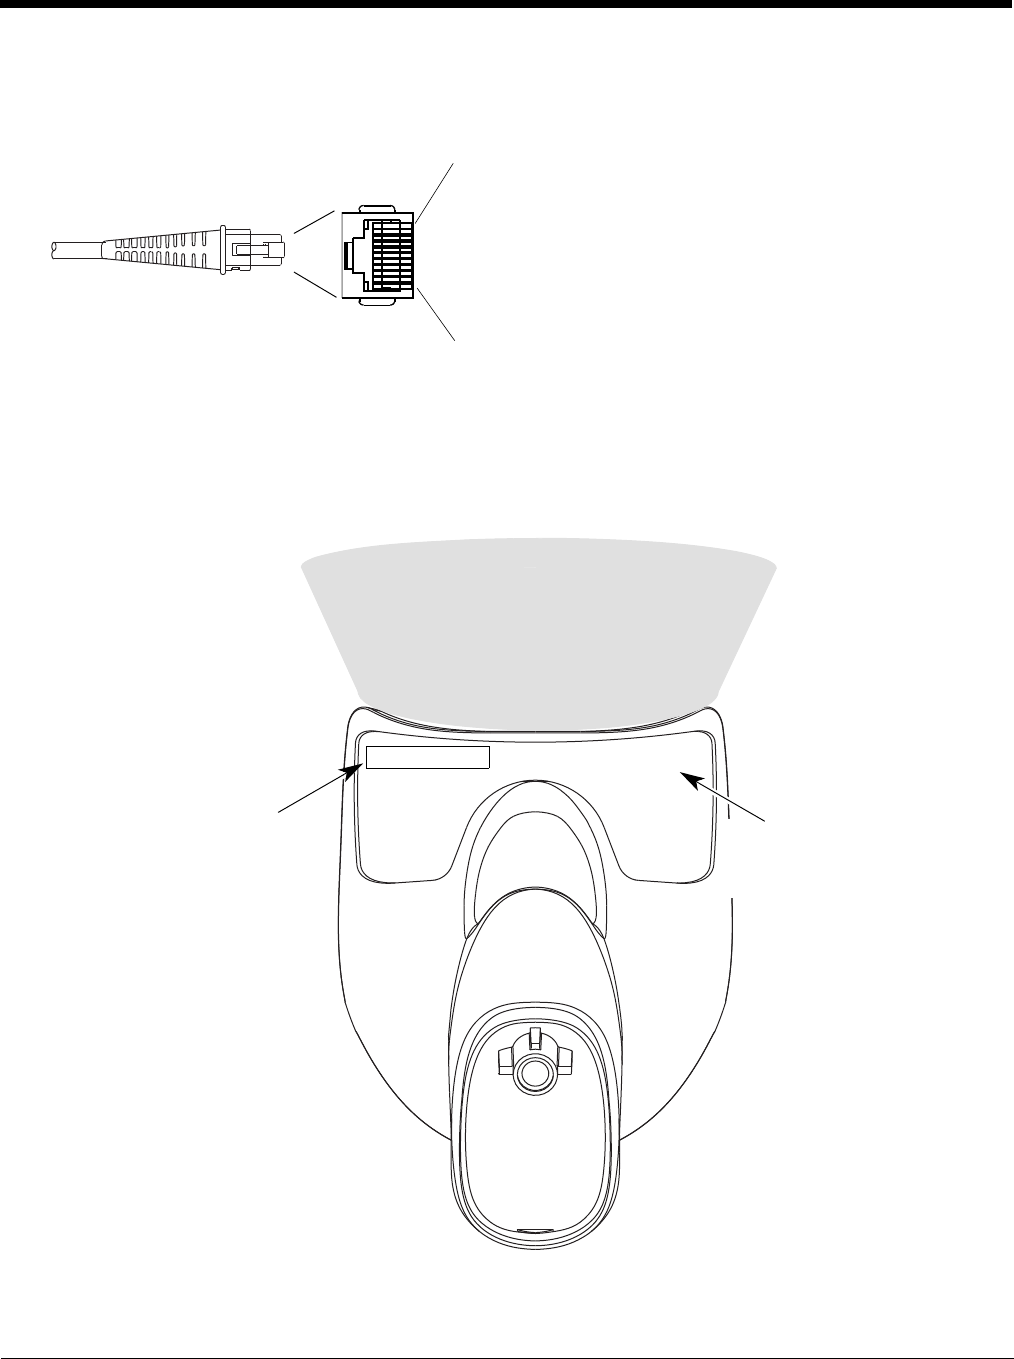
Required Safety Labels
1 Cable shield
2 Cable select
3 Supply ground
4
5
6
7 +5V power
8
9Data +
10 Data -
Xenon 1900/1910/1902/1912 Scanner
Compliance
Label
location
Part
Number, Serial
Number and
Revision
Information
location
Illumination output
Preliminary draft_1

12 - 14
CCB01-010BT Base
Part Number,
Serial
Number and
Revision
Information
location
Compliance
Label
locations
Preliminary draft_1
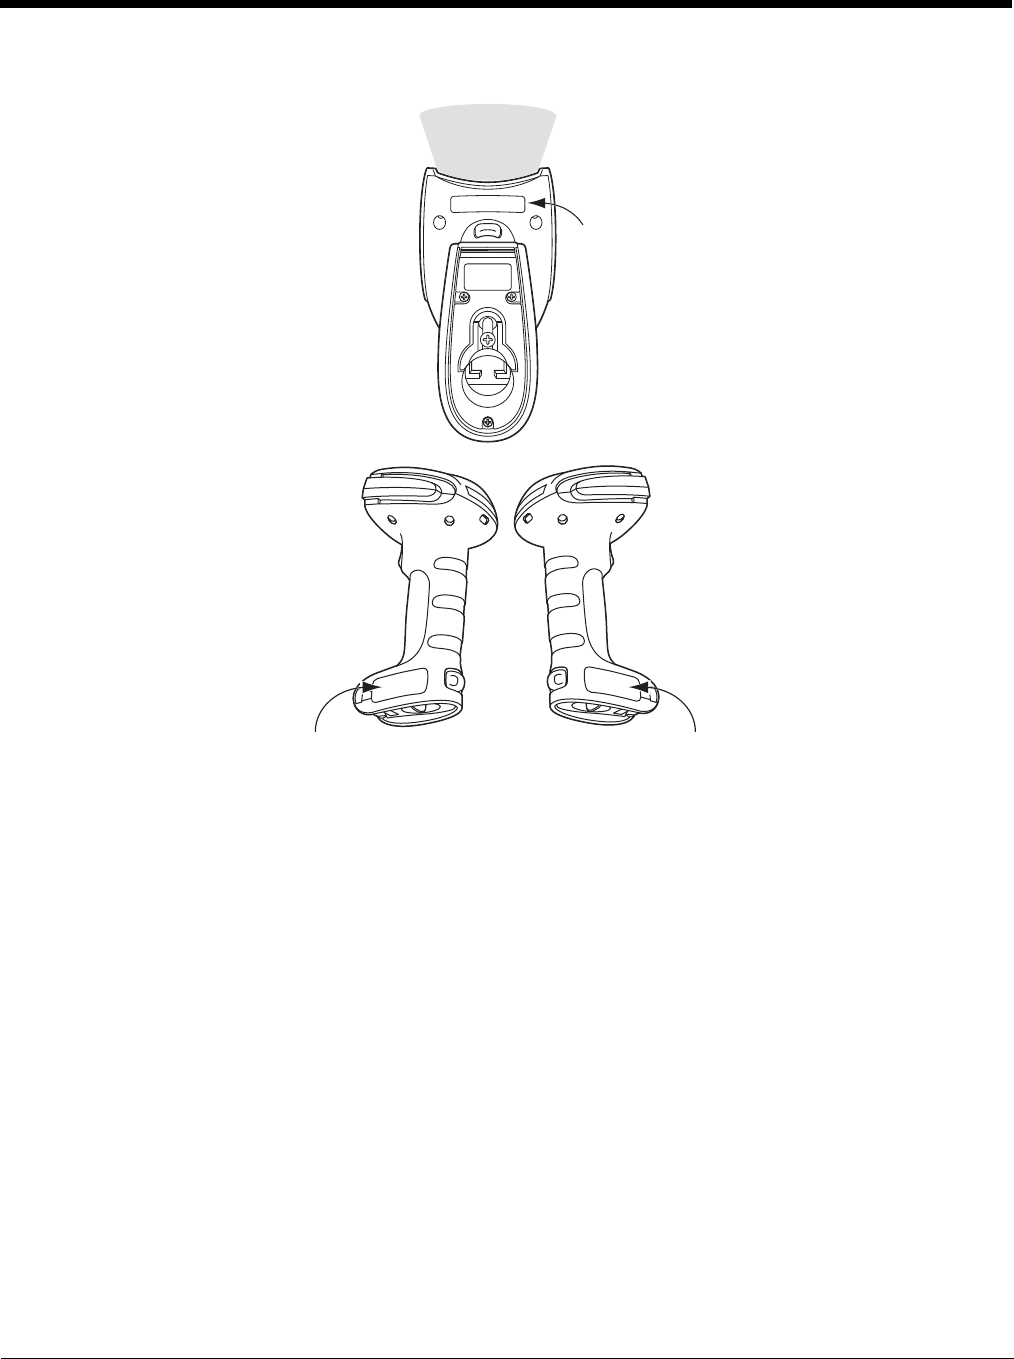
12 - 15
Granit 1910i/1911i/1980i/1981i Scanner
Laser Label location
Illumination
output
Part Number, Serial
Number and Revision
Information location
Compliance
label location
Preliminary draft_1

12 - 16
CCB02-100BT Base
Compliance
Label
locations
Preliminary draft_1
13 - 1
13
Maintenance
Repairs
Repairs and/or upgrades are not to be performed on this product. These services are to be performed only by an authorized
service center (see Customer Support on page 14-1).
Maintenance
Your device provides reliable and efficient operation with a minimum of care. Although specific maintenance is not required, the
following periodic checks ensure dependable operation:
Cleaning the Scanner
The scanner or base’s housing may be cleaned with a soft cloth or tissue dampened with water (or a mild detergent-water
solution.) If a detergent solution is used, rinse with a clean tissue dampened with water only.
Cleaning the Window
Reading performance may degrade if the scanner’s window is not clean. If the window is visibly dirty, or if the scanner isn’t
operating well, clean the window with one of the cleaning solutions listed for Health Care Housing, below.
Health Care Housing
Some configurations of Xenon scanners are available with an external plastic housing that is designed to resist the effects
of harsh chemicals in a health care environment. The plastic is crystalline in nature, which helps prevent chemicals from
seeping through the housing.
Important! The following cleaning solutions have been tested to assure safe cleaning of your scanner’s disinfectant-ready
housing. They are the only solutions approved for use with these scanners. Damage caused by the use of cleaners other
than those listed below may not be covered by the warranty.
• Sani-Cloth® HB wipes
• Sani-Cloth® Plus wipes
• Super Sani-Cloth® wipes
• Isopropyl Alcohol wipes (70%)
• CaviWipes™
•Virex
® 256
•409
® Glass and Surface Cleaner
• Windex® Blue
•Clorox
® Bleach – 10%
• Gentle dish soap and water
Do not submerge the scanner in water. The scanner’s
housing is not watertight.
Do not use abrasive wipes or tissues on the scanner’s
window – abrasive wipes may scratch the window. Never
use solvents (e.g., acetone) on the housing or window –
solvents may damage the finish or the window.
!Caution:
Do not submerge the scanner in water. The scanner’s
housing is not watertight.
Do not use abrasive wipes or tissues on the scanner’s
window – abrasive wipes may scratch the window. Never
use solvents (e.g., acetone) on the housing or window –
solvents may damage the finish or the window.
Preliminary draft_1
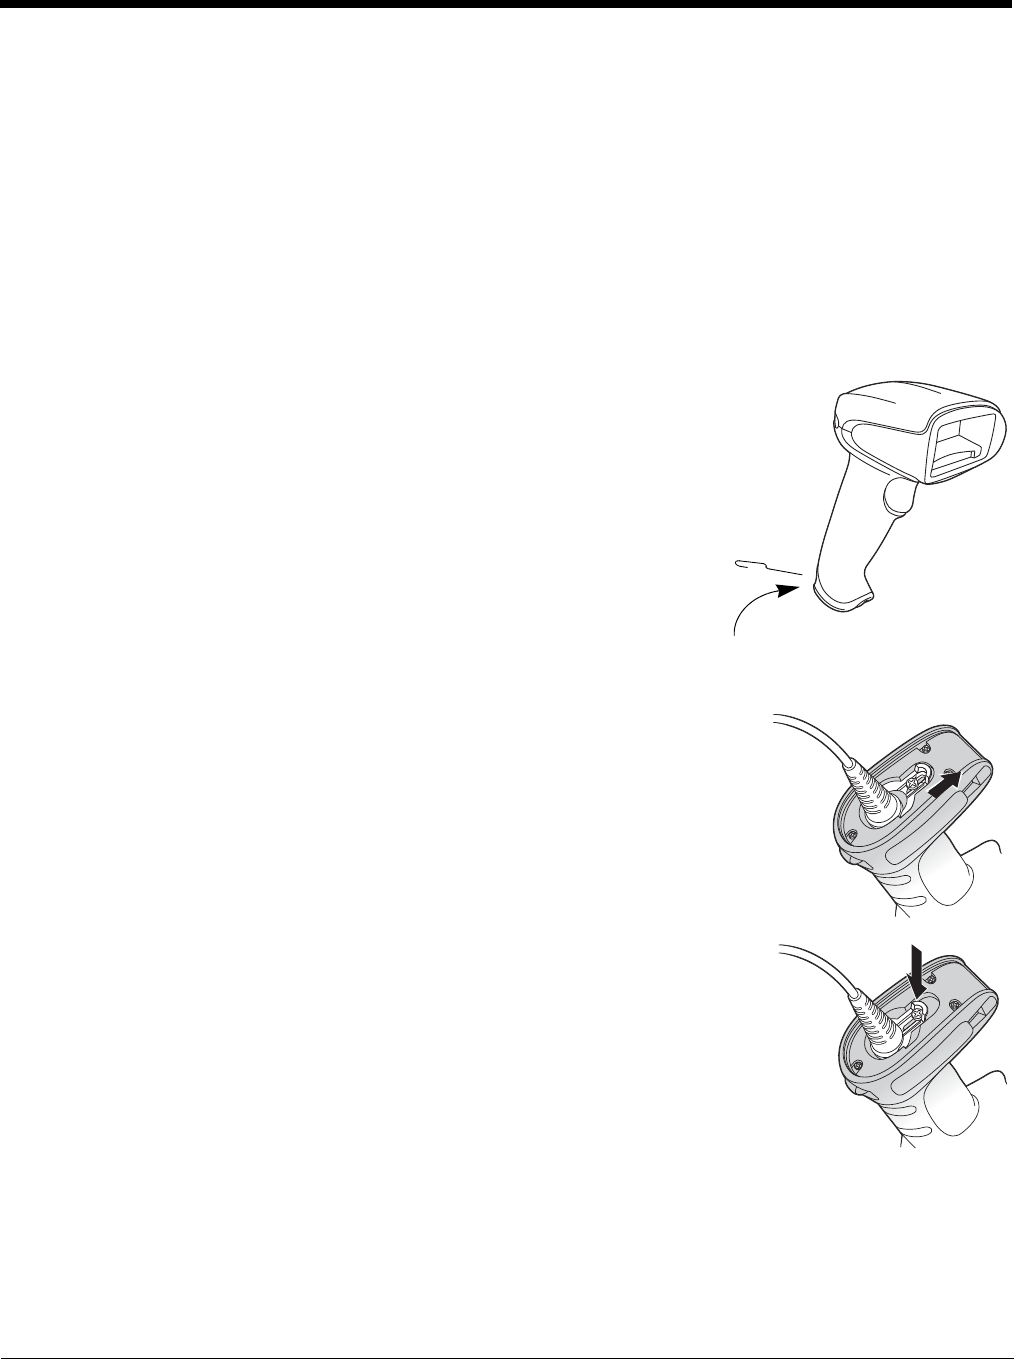
13 - 2
Inspecting Cords and Connectors
Inspect the interface cable and connector for wear or other signs of damage. A badly worn cable or damaged connector
may interfere with scanner operation. Contact your distributor for information about cable replacement. Cable replacement
instructions are on page 13-2.
Replacing Cables in Corded Scanners
The standard interface cable is attached to the scanner with an 10-pin modular connector. When properly seated, the connec-
tor is held in the scanner’s handle by a flexible retention tab. The interface cable is designed to be field replaceable.
• Order replacement cables from Honeywell or from an authorized distributor.
• When ordering a replacement cable, specify the cable part number of the original interface cable.
Replacing a Xenon Interface Cable
1. Turn the power to the host system OFF.
2. Disconnect the scanner’s cable from the terminal or computer.
3. Locate the small hole on the back of the scanner’s handle. This is the cable
release.
4. Straighten one end of a paper clip.
5. Insert the end of the paper clip into the small hole and press in. This depresses
the retention tab, releasing the connector. Pull the connector out while
maintaining pressure on the paper clip, then remove the paper clip.
6. Replace with the new cable.
Insert the connector into the opening and press firmly. The connector is keyed to
go in only one way, and will click into place.
Replacing a Granit Interface Cable
1. Turn the power to the host system OFF.
2. Disconnect the scanner’s cable from the terminal or computer.
3. Unscrew the locking plate on the bottom of the scanner.
4. Slide the locking plate away from the connector and pull the cable out of the scanner.
5. Replace with the new cable.
Insert the connector into the opening and press firmly.
6. Slide the locking plate over the base of the connector to secure the cable, and screw the
plate into place.
Replacing Cables and Batteries in Cordless Systems
Replacing an Interface Cable in a Base
1. Turn the power to the host system OFF.
2. Disconnect the base’s cable from the terminal or computer.
3. Turn the base upside down.
Cable
Release
Preliminary draft_1
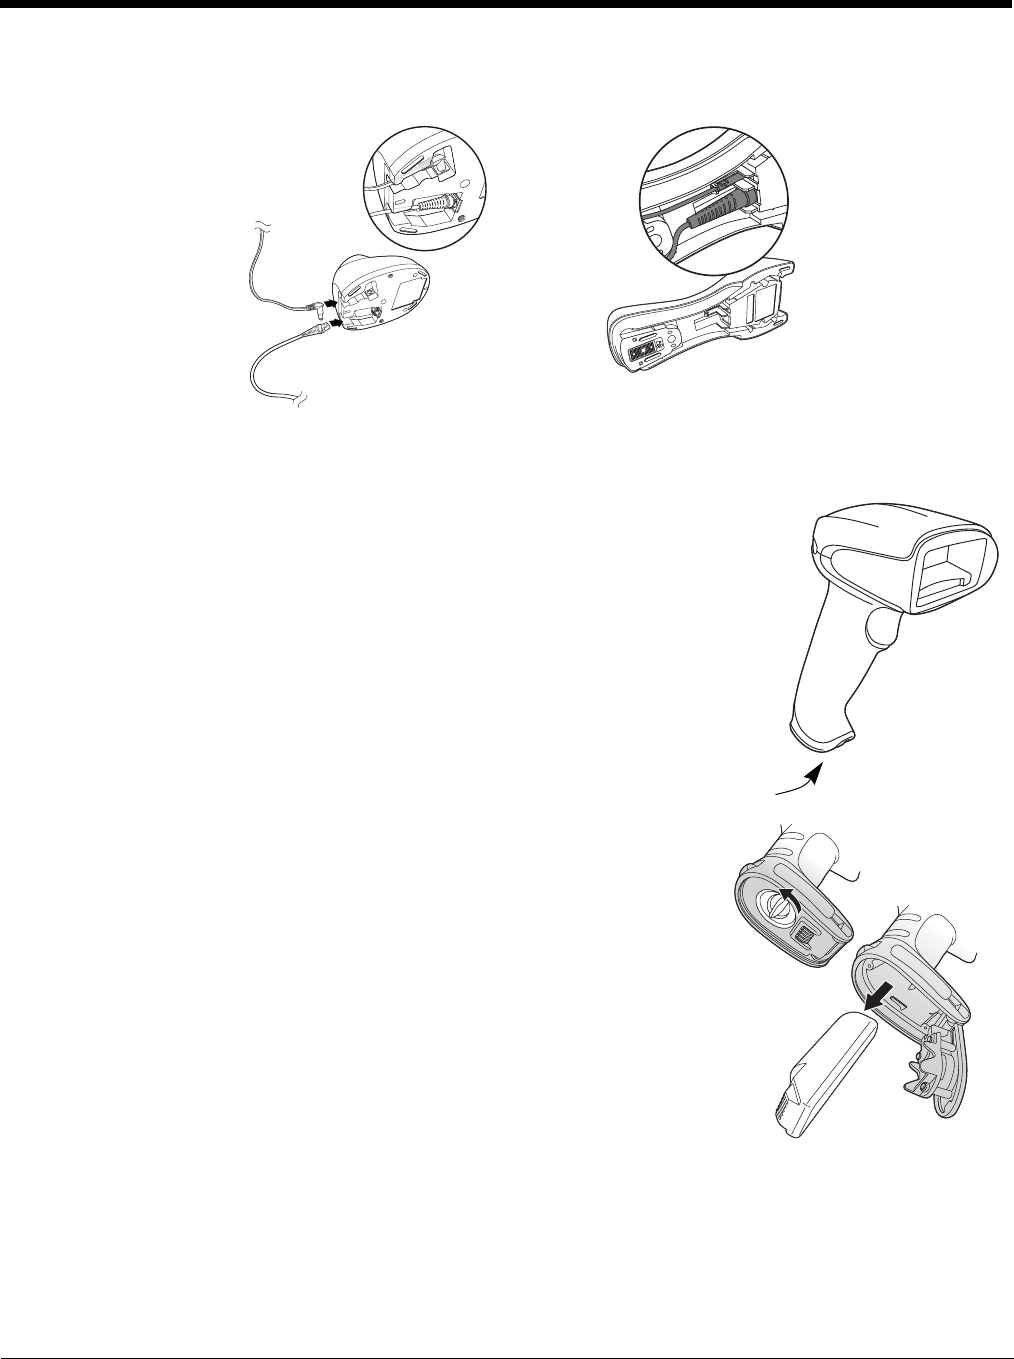
13 - 3
4. Pull the connector out while maintaining pressure on the connector release clip.
5. Replace with the new cable.
Insert the connector into the opening and press firmly. The connector is keyed to go in only one way, and will click into
place.
Changing a Xenon Scanner Battery
1. Use a Phillips head screwdriver to remove the screw from the end cap.
2. Remove the end cap and remove the battery from the handle.
3. Insert replacement battery.
4. Replace end cap and screw.
Changing a Granit Scanner Battery
1. Twist the tab in the bottom of the end cap and open the hinged battery door.
(When new, the battery door may stick. Use pliers to twist the tab and open the
door until it loosens up.)
2. Remove the battery from the handle.
3. Insert replacement battery.
4. Close the battery door and twist the tab to lock it.
Note: The battery door is designed to pop off the hinge if the scanner is dropped while
changing a battery. If this occurs, simply snap it back on.
Troubleshooting a Corded Scanner
The scanner automatically performs self-tests whenever you turn it on. If your scan-
ner is not functioning properly, review the following Troubleshooting Guide to try to iso-
late the problem.
Is the power on? Is the aimer on?
If the aimer isn’t illuminated, check that:
• The cable is connected properly.
• The host system power is on (if external power isn’t used).
• The trigger works.
CCB01-010BT Base : CCB02-100BT Base :
End Cap
Preliminary draft_1

13 - 4
Is the scanner having trouble reading your symbols?
If the scanner isn’t reading symbols well, check that the symbols:
• Aren’t smeared, rough, scratched, or exhibiting voids.
• Aren’t coated with frost or water droplets on the surface.
• Are enabled in the scanner or in the decoder to which the scanner connects.
Is the bar code displayed but not entered?
The bar code is displayed on the host device correctly, but you still have to press a key to enter it (the Enter/Return key or
the Tab key, for example).
• You need to program a suffix. Programming a suffix enables the scanner to output the bar code data plus the key you
need (such as “CR”) to enter the data into your application. Refer to Prefix/Suffix Overview on page 5-1 for further
information.
Does the scanner read the bar code incorrectly?
If the scanner reads a bar code, but the data is not displayed correctly on the host screen:
• The scanner may not be programmed for the appropriate terminal interface.
For example, you scan “12345” and the host displays “@es%.”
Reprogram the scanner with the correct Plug and Play bar code. See Programming the Interface beginning on page 2-1.
• The scanner may not be programmed to output your bar code data properly.
For example, you scan “12345” and the host displays “A12345B.”
Reprogram the scanner with the proper symbology selections. See Chapter 7.
The scanner won’t read your bar code at all.
1. Scan the sample bar codes in the back of this manual. If the scanner reads the sample bar codes, check that your bar
code is readable.
Verify that your bar code symbology is enabled (see Chapter 7).
2. If the scanner still can’t read the sample bar codes, scan All Symbologies On, page 7-1.
If you aren’t sure what programming options have been set in the scanner, or if you want the factory default settings
restored, refer to Resetting the Factory Defaults on page 10-4.
Troubleshooting a Cordless System
Troubleshooting a Base
Note: Visit the Services and Support section of our website (www.honeywellaidc.com) to check for the latest software for
both the scanner and the base.
If your base is not functioning properly, review the following troubleshooting guidelines to try to isolate the problem.
Is the red LED on?
If the red LED isn’t illuminated, check that:
• The power cable is connected properly and there is power at the power source.
• The host system power is on (if external power isn’t used).
Is the green LED on?
If the green LED isn’t illuminated, check that:
• The scanner is correctly placed in the base.
• There is external power or 12 volt host power.
• Charge mode is turned on. (See "Beeper and LED Sequences and Meaning" on page 3-5)
• The battery is not bad or deeply discharged. In some cases, the scanner’s battery may trickle charge to bring it into an
acceptable level and then transition to a normal charge cycle.
Troubleshooting a Cordless Scanner
Note: Make sure that your scanner’s battery is charged.
Visit the Services and Support section of our website (www.honeywellaidc.com) to check for the latest software for
both the scanner and the base or Access Point.
Preliminary draft_1

13 - 5
Is the scanner having trouble reading your symbols?
If the scanner isn’t reading symbols well, check that the symbols:
• Aren’t smeared, rough, scratched, or exhibiting voids.
• Aren’t coated with frost or water droplets on the surface.
• Are enabled in the base or Access Point to which the scanner connects.
Is the bar code displayed but not entered into the application?
The bar code is displayed on the host device correctly, but you still have to press a key to enter it (the Enter/Return key or
the Tab key, for example).
• You need to program a suffix. Programming a suffix enables the scanner to output the bar code data plus the key you
need (such as “CR”) to enter the data into your application. Refer to Prefix/Suffix Overview on page 5-1 for further
information.
Does the scanner read the bar code incorrectly?
If the scanner reads a bar code, but the data is not displayed correctly on the host screen:
• The base or Access Point may not be programmed for the appropriate terminal interface. For example, you scan “12345”
and the host displays “@es%.”
Reprogram the base/Access Point with the correct Plug and Play bar code. See Programming the Interface beginning on
page 2-1.
• The bas or Access Pointe may not be programmed to output your bar code data properly. For example, you scan “12345”
and the host displays “A12345B.”
Reprogram the base/Access Point with the proper symbology selections. See Chapter 7.
The scanner won’t read your bar code at all.
• Scan the sample bar codes in the back of this manual. If the scanner reads the sample bar codes, check that your bar
code is readable.
Verify that your bar code symbology is enabled (see Chapter 7).
If the scanner still can’t read the sample bar codes, scan All Symbologies on page 7-1.
Preliminary draft_1

13 - 6
Preliminary draft_1

14 - 1
14
Customer Support
Technical Assistance
If you need assistance installing or troubleshooting your device, please contact us by using one of the methods below:
Knowledge Base: www.hsmknowledgebase.com
Our Knowledge Base provides thousands of immediate solutions. If the Knowledge Base cannot help, our Technical Support
Portal (see below) provides an easy way to report your problem or ask your question.
Technical Support Portal: www.hsmsupportportal.com
The Technical Support Portal not only allows you to report your problem, but it also provides immediate solutions to your
technical issues by searching our Knowledge Base. With the Portal, you can submit and track your questions online and send
and receive attachments.
Web form: www.hsmcontactsupport.com
You can contact our technical support team directly by filling out our online support form. Enter your contact details and the
description of the question/problem.
Telephone: www.honeywellaidc.com/locations
For our latest contact information, please check our website at the link above.
Product Service and Repair
Honeywell International Inc. provides service for all of its products through service centers throughout the world. To obtain war-
ranty or non-warranty service, please visit www.honeywellaidc.com and select Support > Contact Service and Repair to see
your region's instructions on how to obtain a Return Material Authorization number (RMA #). You should do this prior to return-
ing the product.
Limited Warranty
Honeywell International Inc. ("HII") warrants its products to be free from defects in materials and workmanship and to conform to
HII’s published specifications applicable to the products purchased at the time of shipment. This warranty does not cover any
HII product which is (i) improperly installed or used; (ii) damaged by accident or negligence, including failure to follow the proper
maintenance, service, and cleaning schedule; or (iii) damaged as a result of (A) modification or alteration by the purchaser or
other party, (B) excessive voltage or current supplied to or drawn from the interface connections, (C) static electricity or electro-
static discharge, (D) operation under conditions beyond the specified operating parameters, or (E) repair or service of the prod-
uct by anyone other than HII or its authorized representatives.
This warranty shall extend from the time of shipment for the duration published by HII for the product at the time of purchase
("Warranty Period"). Any defective product must be returned (at purchaser’s expense) during the Warranty Period to HII factory
or authorized service center for inspection. No product will be accepted by HII without a Return Materials Authorization, which
may be obtained by contacting HII. In the event that the product is returned to HII or its authorized service center within the
Warranty Period and HII determines to its satisfaction that the product is defective due to defects in materials or workmanship,
HII, at its sole option, will either repair or replace the product without charge, except for return shipping to HII.
EXCEPT AS MAY BE OTHERWISE PROVIDED BY APPLICABLE LAW, THE FOREGOING WARRANTY IS IN LIEU OF ALL
OTHER COVENANTS OR WARRANTIES, EITHER EXPRESSED OR IMPLIED, ORAL OR WRITTEN, INCLUDING, WITHOUT
LIMITATION, ANY IMPLIED WARRANTIES OF MERCHANTABILITY OR FITNESS FOR A PARTICULAR PURPOSE, OR
NON-INFRINGEMENT.
HII’S RESPONSIBILITY AND PURCHASER’S EXCLUSIVE REMEDY UNDER THIS WARRANTY IS LIMITED TO THE
REPAIR OR REPLACEMENT OF THE DEFECTIVE PRODUCT WITH NEW OR REFURBISHED PARTS. IN NO EVENT
SHALL HII BE LIABLE FOR INDIRECT, INCIDENTAL, OR CONSEQUENTIAL DAMAGES, AND, IN NO EVENT, SHALL ANY
LIABILITY OF HII ARISING IN CONNECTION WITH ANY PRODUCT SOLD HEREUNDER (WHETHER SUCH LIABILITY
ARISES FROM A CLAIM BASED ON CONTRACT, WARRANTY, TORT, OR OTHERWISE) EXCEED THE ACTUAL AMOUNT
PAID TO HII FOR THE PRODUCT. THESE LIMITATIONS ON LIABILITY SHALL REMAIN IN FULL FORCE AND EFFECT
EVEN WHEN HII MAY HAVE BEEN ADVISED OF THE POSSIBILITY OF SUCH INJURIES, LOSSES, OR DAMAGES. SOME
STATES, PROVINCES, OR COUNTRIES DO NOT ALLOW THE EXCLUSION OR LIMITATIONS OF INCIDENTAL OR CONSE-
QUENTIAL DAMAGES, SO THE ABOVE LIMITATION OR EXCLUSION MAY NOT APPLY TO YOU.
Preliminary draft_1

14 - 2
All provisions of this Limited Warranty are separate and severable, which means that if any provision is held invalid and unen-
forceable, such determination shall not affect the validity of enforceability of the other provisions hereof. Use of any peripherals
not provided by the manufacturer may result in damage not covered by this warranty. This includes but is not limited to: cables,
power supplies, cradles, and docking stations. HII extends these warranties only to the first end-users of the products. These
warranties are non-transferable.
The duration of the limited warranty for the Xenon 1900 and 1910 scanners is five (5) years.
The duration of the limited warranty for the Xenon 1902 and 1912 scanners and CCB01-010BT Charge Base is three (3) years.
The duration of the limited warranty for the Granit 1910i and 1911i scanners and CCB02-100BT Charge Base is three (3) years.
The duration of the limited warranty for the Xenon or Granit battery is one (1) year.
Preliminary draft_1

A - 1
A
Reference Charts
Symbology Charts
Note: “m” represents the AIM modifier character. Refer to International Technical Specification, Symbology Identifiers, for AIM
modifier character details.
Prefix/Suffix entries for specific symbologies override the universal (All Symbologies, 99) entry.
Refer to Data Editing beginning on page 5-1 and Data Formatting beginning on page 6-1 for information about using Code ID
and AIM ID.
Linear Symbologies
AIM Honeywell
Symbology ID Possible modifiers
(m)ID Hex
All Symbologies 99
Codabar ]Fm0-1 a 61
Code 11 ]H3 h 68
Code 128 ]Cm0, 1, 2, 4 j 6A
Code 32 Pharmaceutical (PARAF) ]X0 < 3C
Code 39 (supports Full ASCII mode) ]Am0, 1, 3, 4, 5, 7 b 62
TCIF Linked Code 39 (TLC39) ]L2 T 54
Code 93 and 93i ]Gm0-9, A-Z,
a-m
i69
EAN ]Em0, 1, 3, 4 d 64
EAN-13 (including Bookland EAN) ]E0 d 64
EAN-13 with Add-On ]E3 d 64
EAN-13 with Extended Coupon Code ]E3 d 64
EAN-8 ]E4 D 44
EAN-8 with Add-On ]E3 D 44
GS1
GS1 DataBar ]em0y79
GS1 DataBar Limited ]em{ 7B
GS1 DataBar Expanded ]em}7D
GS1-128 ]C1 I 49
2 of 5
China Post (Hong Kong 2 of 5) ]X0 Q 51
Interleaved 2 of 5 ]Im0, 1, 3 e 65
Matrix 2 of 5 ]X0 m 6D
NEC 2 of 5 ]X0 Y 59
Straight 2 of 5 IATA ]Rm0, 1, 3 f 66
Straight 2 of 5 Industrial ]S0 f 66
MSI ]Mm0, 1 g 67
Telepen ]Bmt74
UPC 0, 1, 2, 3, 8, 9, A, B, C
Preliminary draft_1
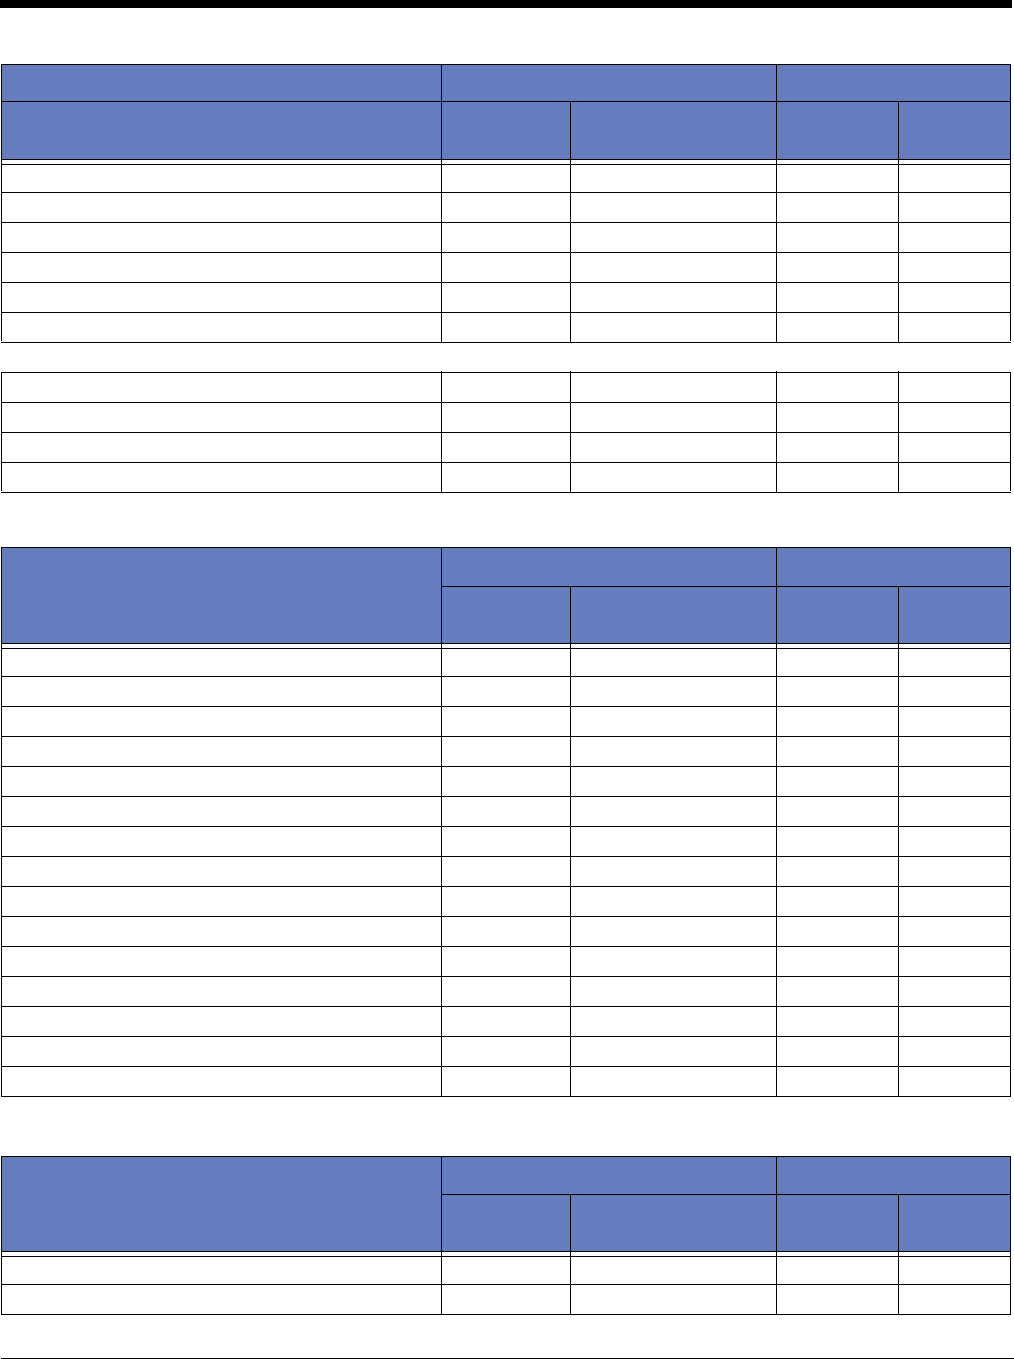
A - 2
2D Symbologies
Postal Symbologies
UPC-A ]E0 c 63
UPC-A with Add-On ]E3 c 63
UPC-A with Extended Coupon Code ]E3 c 63
UPC-E ]E0 E 45
UPC-E with Add-On ]E3 E 45
UPC-E1 ]X0 E 45
Add Honeywell Code ID 5C80
Add AIM Code ID 5C81
Add Backslash 5C5C
Batch mode quantity 535
AIM Honeywell
Symbology ID Possible modifiers
(m)ID Hex
All Symbologies 99
Aztec Code ]zm0-9, A-C z 7A
Chinese Sensible Code (Han Xin Code) ]X0 H 48
Codablock A ]O6 0, 1, 4, 5, 6 V 56
Codablock F ]Om0, 1, 4, 5, 6 q 71
Code 49 ]Tm0, 1, 2, 4 l 6C
Data Matrix ]dm0-6 w 77
GS1 ]em0-3 y 79
GS1 Composite ]em0-3 y 79
GS1 DataBar Omnidirectional ]em0-3 y 79
MaxiCode ]Um0-3 x 78
PDF417 ]Lm0-2 r 72
MicroPDF417 ]Lm0-5 R 52
QR Code ]Qm0-6 s 73
Micro QR Code ]Qms73
AIM Honeywell
Symbology ID Possible modifiers
(m)ID Hex
All Symbologies 99
Australian Post ]X0 A 41
AIM Honeywell
Symbology ID Possible modifiers
(m)ID Hex
Preliminary draft_1
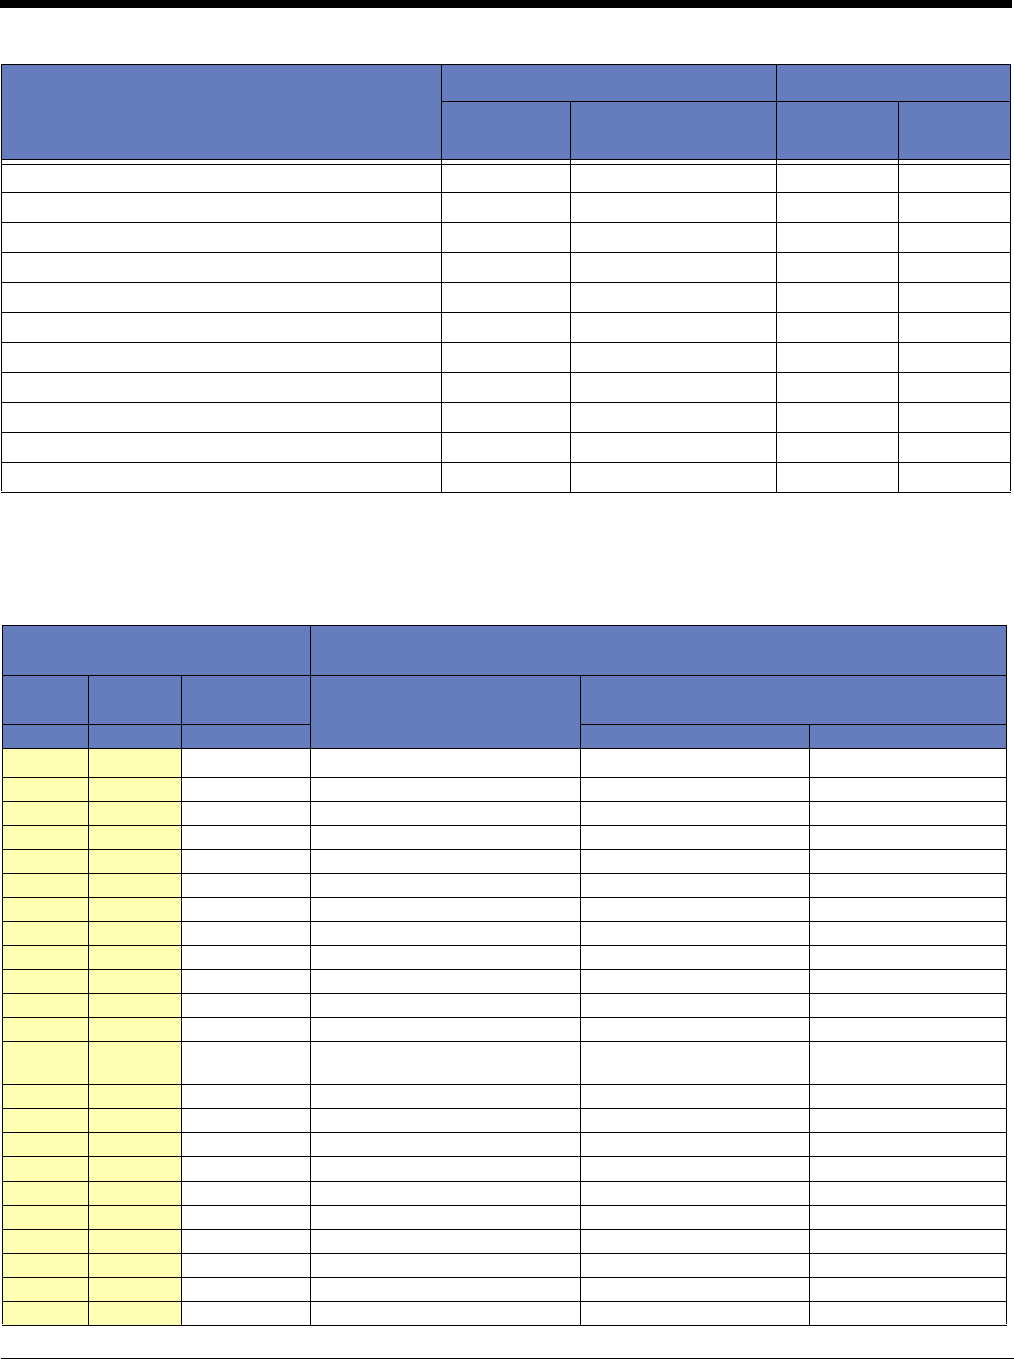
A - 3
ASCII Conversion Chart (Code Page 1252)
In keyboard applications, ASCII Control Characters can be represented in 3 different ways, as shown below. The CTRL+X func-
tion is OS and application dependent. The following table lists some commonly used Microsoft functionality. This table applies
to U.S. style keyboards. Certain characters may differ depending on your Country Code/PC regional settings.
British Post ]X0 B 42
Canadian Post ]X0 C 43
China Post ]X0 Q 51
InfoMail ]X0 , 2c
Intelligent Mail Bar Code ]X0 M 4D
Japanese Post ]X0 J 4A
KIX (Netherlands) Post ]X0 K 4B
Korea Post ]X0 ? 3F
Planet Code ]X0 L 4C
Postal-4i ]X0 N 4E
Postnet ]X0 P 50
Non-printable ASCII control
characters
Keyboard Control + ASCII (CTRL+X) Mode
Control + X Mode Off (KBDCAS0)
Windows Mode Control + X Mode On (KBDCAS2)
DEC HEX Char CTRL + X CTRL + X function
000 NUL Reserved CTRL+ @
101 SOH NP Enter CTRL+ A Select all
202 STX Caps Lock CTRL+ B Bold
303 ETX ALT Make CTRL+ C Copy
404 EOT ALT Break CTRL+ D Bookmark
505 ENQ CTRL Make CTRL+ E Center
606 ACK CTRL Break CTRL+ F Find
707 BEL Enter / Ret CTRL+ G
808 BS (Apple Make) CTRL+ H History
909 HT Tab CTRL+ I Italic
10 0A LF (Apple Break) CTRL+ J Justify
11 0B VT Tab CTRL+ K hyperlink
12 0C FF Delete CTRL+ L list,
left align
13 0D CR Enter / Ret CTRL+ M
14 0E SO Insert CTRL+ N New
15 0F SI ESC CTRL+ O Open
16 10 DLE F11 CTRL+ P Print
17 11 DC1 Home CTRL+ Q Quit
18 12 DC2 PrtScn CTRL+ R
19 13 DC3 Backspace CTRL+ S Save
20 14 DC4 Back Tab CTRL+ T
21 15 NAK F12 CTRL+ U
22 16 SYN F1 CTRL+ V Paste
AIM Honeywell
Symbology ID Possible modifiers
(m)ID Hex
Preliminary draft_1
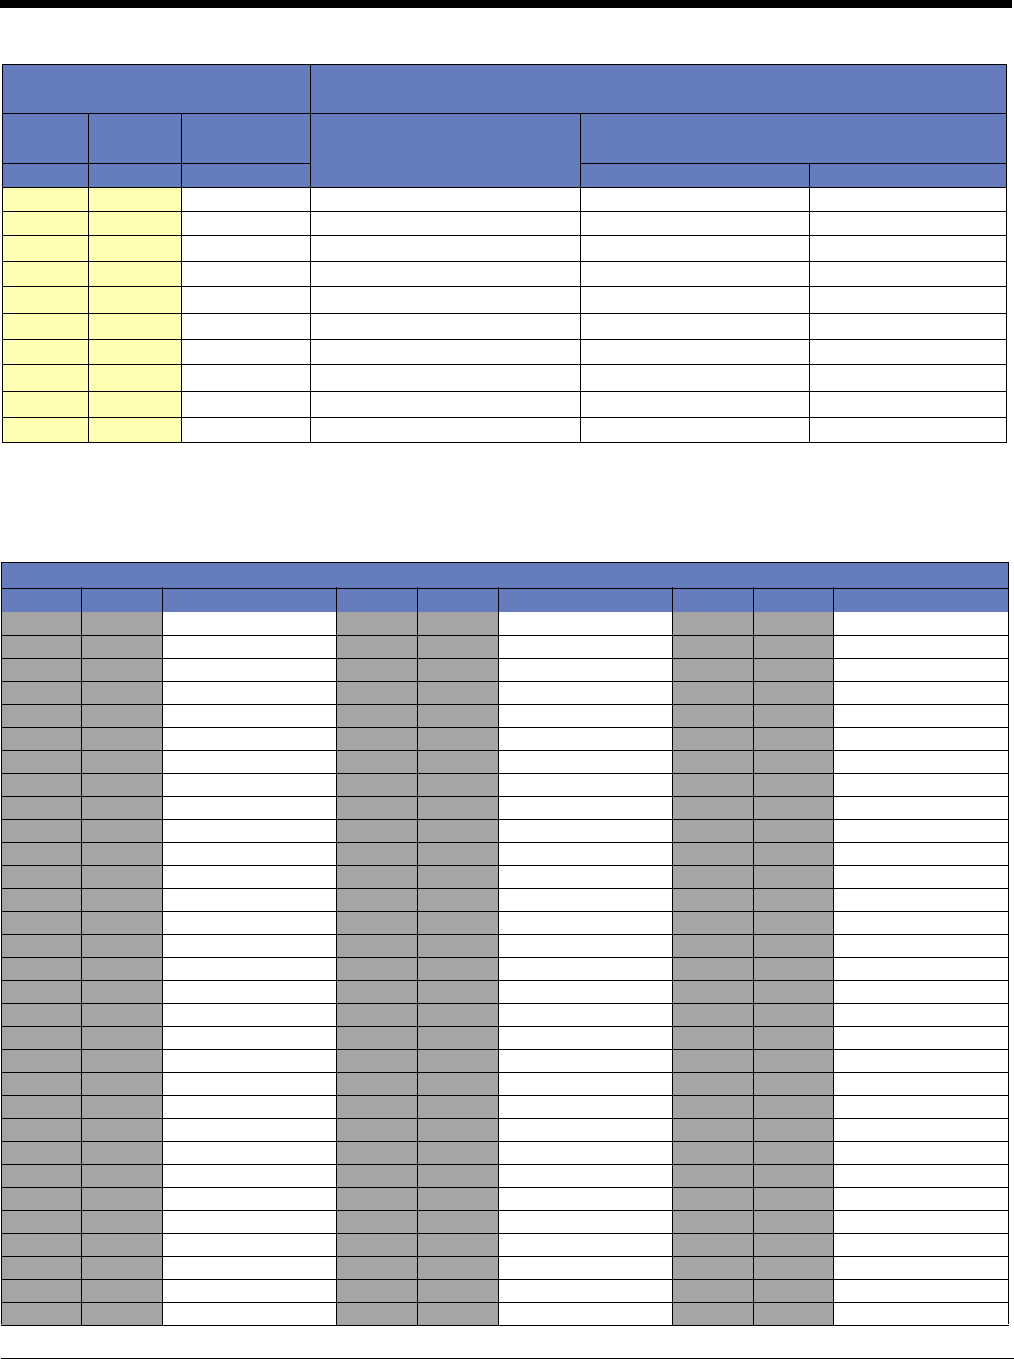
A - 4
Lower ASCII Reference Table
Note: Windows Code page 1252 and lower ASCII use the same characters.
23 17 ETB F2 CTRL+ W
24 18 CAN F3 CTRL+ X
25 19 EM F4 CTRL+ Y
26 1A SUB F5 CTRL+ Z
27 1B ESC F6 CTRL+ [
28 1C FS F7 CTRL+ \
29 1D GS F8 CTRL+ ]
30 1E RS F9 CTRL+ ^
31 1F US F10 CTRL+ -
127 7F ⌂NP Enter
Printable Characters
DEC HEX Character DEC HEX Character DEC HEX Character
32 20 <SPACE> 64 40 @96 60 `
33 21 !65 41 A97 61 a
34 22 "66 42 B98 62 b
35 23 #67 43 C99 63 c
36 24 $68 44 D100 64 d
37 25 %69 45 E101 65 e
38 26 &70 46 F102 66 f
39 27 '71 47 G103 67 g
40 28 (72 48 H104 68 h
41 29 )73 49 I105 69 i
42 2A *74 4A J106 6A j
43 2B +75 4B K107 6B k
44 2C ,76 4C L108 6C l
45 2D -77 4D M109 6D m
46 2E .78 4E N110 6E n
47 2F /79 4F O111 6F o
48 30 080 50 P112 70 p
49 31 181 51 Q113 71 q
50 32 282 52 R114 72 r
51 33 383 53 S115 73 s
52 34 484 54 T116 74 t
53 35 585 55 U117 75 u
54 36 686 56 V118 76 v
55 37 787 57 W119 77 w
56 38 888 58 X120 78 x
57 39 989 59 Y121 79 y
58 3A :90 5A Z122 7A z
59 3B ;91 5B [123 7B {
60 3C <92 5C \124 7C |
61 3D =93 5D ]125 7D }
62 3E >94 5E ^126 7E ~
Non-printable ASCII control
characters
Keyboard Control + ASCII (CTRL+X) Mode
Control + X Mode Off (KBDCAS0)
Windows Mode Control + X Mode On (KBDCAS2)
DEC HEX Char CTRL + X CTRL + X function
Preliminary draft_1

A - 5
63 3F ?95 5F _127 7F ⌂
Extended ASCII Characters
DEC HEX CP 1252 ASCII Alternate Extended PS2 Scan Code
128 80 ۂ
up arrow ↑0x48
129 81 üdown arrow ↓0x50
130 82 ‚é
right arrow →0x4B
131 83 ĉ
left arrow ←0x4D
132 84 „äInsert 0x52
133 85 …àDelete 0x53
134 86 †åHome 0x47
135 87 ‡çEnd 0x4F
136 88 ˆ ê Page Up 0x49
137 89 ‰ ë Page Down 0x51
138 8A Š è Right ALT 0x38
139 8B ‹ ï Right CTRL 0x1D
140 8C ΔReserved n/a
141 8D ìReserved n/a
142 8E Ž Ä Numeric Keypad Enter 0x1C
143 8F Å Numeric Keypad / 0x35
144 90 ÉF1 0x3B
145 91 ‘æF2 0x3C
146 92 ’ÆF3 0x3D
147 93 “ôF4 0x3E
148 94 ”öF5 0x3F
149 95 •òF6 0x40
150 96 –ûF7 0x41
151 97 —ùF8 0x42
152 98 ˜ÿF9 0x43
153 99 ™ÖF10 0x44
154 9A šÜF11 0x57
155 9B ݢF12 0x58
156 9C œ £ Numeric Keypad + 0x4E
157 9D ¥ Numeric Keypad - 0x4A
158 9E ž₧Numeric Keypad * 0x37
159 9F ŸƒCaps Lock 0x3A
160 A0 á Num Lock 0x45
161 A1 ¡íLeft Alt 0x38
162 A2 ¢óLeft Ctrl 0x1D
163 A3 £úLeft Shift 0x2A
164 A4 ¤ñRight Shift 0x36
165 A5 ¥ÑPrint Screen n/a
166 A6 ¦ªTab 0x0F
167 A7 §ºShift Tab 0x8F
168 A8 ¨¿Enter 0x1C
169 A9 ©⌐Esc 0x01
170 AA ª¬Alt Make 0x36
171 AB «½Alt Break 0xB6
172 AC ¬¼Control Make 0x1D
173 AD ¡Control Break 0x9D
174 AE ®«Alt Sequence with 1 Character 0x36
Printable Characters (Continued)
DEC HEX Character DEC HEX Character DEC HEX Character
Preliminary draft_1

A - 6
175 AF ¯»Ctrl Sequence with 1 Character 0x1D
176 B0 °░
177 B1 ±▒
178 B2 ²▓
179 B3 ³│
180 B4 ´┤
181 B5 µ╡
182 B6 ¶╢
183 B7 ·╖
184 B8 ¸╕
185 B9 ¹╣
186 BA º║
187 BB »╗
188 BC ¼╝
189 BD ½╜
190 BE ¾╛
191 BF ¿┐
192 C0 À└
193 C1 Á┴
194 C2 Â┬
195 C3 Ã├
196 C4 Ä─
197 C5 Åí
198 C6 Æ╞
199 C7 Ç╟
200 C8 È╚
201 C9 É╔
202 CA Ê╩
203 CB Ë╦
204 CC Ì╠
205 CD Í═
206 CE Î╬
207 CF Ï╧
208 D0 Ð╨
209 D1 Ñ╤
210 D2 Ò╥
211 D3 Ó╙
212 D4 Ô╘
213 D5 Õ╒
214 D6 Ö╓
215 D7 ×╫
216 D8 Ø╪
217 D9 Ù┘
218 DA Ú┌
219 DB Û█
220 DC Ü▄
221 DD Ý▌
222 DE Þ▐
223 DF ß▀
224 E0 àα
225 E1 áß
226 E2 âΓ
Extended ASCII Characters (Continued)
DEC HEX CP 1252 ASCII Alternate Extended PS2 Scan Code
Preliminary draft_1
A - 7
ISO 2022/ISO 646 Character Replacements
Code pages define the mapping of character codes to characters. If the data received does not display with the proper charac-
ters, it may be because the bar code being scanned was created using a code page that is different from the one the host pro-
gram is expecting. If this is the case, select the code page with which the bar codes were created. The data characters should
then appear properly.
227 E3 ãπ
228 E4 äΣ
229 E5 åσ
230 E6 æµ
231 E7 çτ
232 E8 èΦ
233 E9 éΘ
234 EA êΩ
235 EB ëδ
236 EC ì∞
237 ED íφ
238 EE îε
239 EF ï∩
240 F0 ð≡
241 F1 ñ±
242 F2 ò≥
243 F3 ó≤
244 F4 ô⌠
245 F5 õ⌡
246 F6 ö÷
247 F7 ÷≈
248 F8 ø°
249 F9 ù·
250 FA ú·
251 FB û√
252 FC üⁿ
253 FD ý²
254 FE þ■
255 FF ÿ
Code Page Selection Method/Country Standard Keyboard Country Honeywell Code Page
Option
United States
(standard ASCII)
ISO/IEC 646-IRV n/a 1
Automatic National Character
Replacement
ISO/IEC 2022 n/a 2 (default)
Binary Code page n/a n/a 3
Default “Automatic National Character replacement” will select the below Honeywell Code Page options for Code128, Code
39 and Code 93.
United States ISO/IEC 646-06 0 1
Canada ISO /IEC 646-121 54 95
Canada ISO /IEC 646-122 18 96
Japan ISO/IEC 646-14 28 98
Extended ASCII Characters (Continued)
DEC HEX CP 1252 ASCII Alternate Extended PS2 Scan Code
Preliminary draft_1

A - 8
China ISO/IEC 646-57 92 99
Great Britain (UK) ISO /IEC 646-04 7 87
France ISO /IEC 646-69 3 83
Germany ISO/IEC646-21 4 84
Switzerland ISO /IEC 646-CH 6 86
Sweden / Finland (extended Annex C) ISO/IEC 646-11 2 82
Ireland ISO /IEC 646-207 73 97
Denmark ISO/IEC 646-08 8 88
Norway ISO/IEC 646-60 9 94
Italy ISO/IEC 646-15 5 85
Portugal ISO/IEC 646-16 13 92
Spain ISO/IEC 646-17 10 90
Spain ISO/IEC 646-85 51 91
Code Page Selection Method/Country Standard Keyboard Country Honeywell Code Page
Option
Preliminary draft_1

A - 9
Dec 35 36 64 91 92 93 94 96 123 124 125 126
Hex 23 24 40 5B 5C 5D 5E 60 7B 7C 7D 7E
US 0 1 # $ @ [ \ ] ^ ` { | } ~
CA 54 95 # $ à â ç ê î ô é ù è û
CA 18 96 # $ à â ç ê É ô é ù è û
JP 28 98 # $ @ [ ¥ ] ^ ` { | } ⎯
CN 92 99 # ¥ @ [ \ ] ^ ` { | } ⎯
GB 787 £ $ @ [ \ ] ^ ` { | } ˜
FR 383 £ $ à ° ç § ^ µ é ù è ¨
DE 484 # $ § Ä Ö Ü ^ ` ä ö ü ß
CH 686 ù $ à é ç ê î ô ä ö ü û
SE/FI 282 # ¤ É Ä Ö Å Ü é ä ö å ü
DK 888 # $ @ Æ Ø Å ^ ` æ ø å ˜
NO 994 # $ @ Æ Ø Å ^ ` æ ø å ¨
IE 73 97 £ $ Ó É Í Ú Á ó é í ú á
IT 585 £ $ § ° ç é ^ ù à ò è ì
PT 13 92 # $ § Ã Ç Õ ^ ` ã ç õ °
ES 10 90 # $ § ¡ Ñ ¿ ^ ` ° ñ ç ˜
ES 51 91 # $ · ¡ Ñ Ç ¿ ` ´ ñ ç ¨
COUNTRY
Country Keyboard
Honeywell
CodePage
ISO / IEC 646 National Character Replacements
Preliminary draft_1
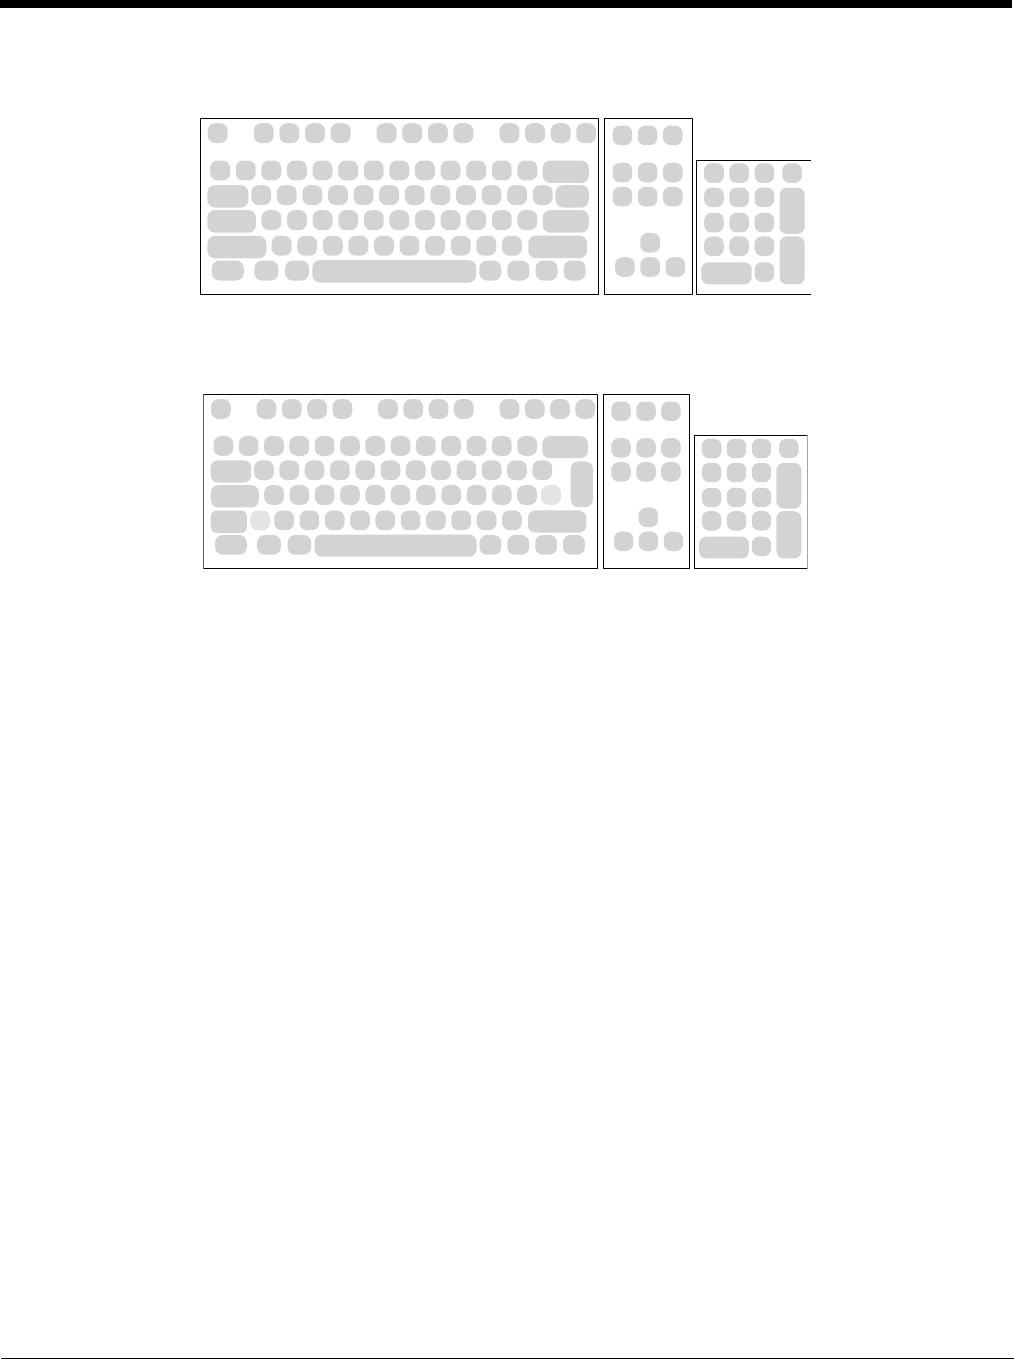
A - 10
Unicode Key Maps
6E 70 71 72 73 74 75 76 77 78 79 7A 7B 7C 7D 7E
4B 50 55
4C 51 56
01 02 03 04 05 06 07 08 09 0A 0B 0C 0D 0F
10 11 12 13 14 15 16 17 18 19 1A 1B 1C 1D
1E
2C
1F 20 21 22 23 24 25 26 27 28 29 2B
392E 2F 30 31 32 33 34 35 36 37
53
4F 54 59
3A 3B 3C 3E 3F 38 40
3D
5A 5F 64
5B 60 65
5C 61 66
5D 62 67
63 68
69
6A
6C
104 Key U.S. Style Keyboard
6E 70 71 72 73 74 75 76 77 78 79 7A 7B 7C 7D 7E
4B 50 55
4C 51 56
01 02 03 04 05 06 07 08 09 0A 0B 0C 0D 0F
10 11 12 13 14 15 16 17 18 19 1A 1B 1C
1E
2C
1F 20 21 22 23 24 25 26 27 28 29
2B
392E 2F 30 31 32 33 34 35 36 37
53
4F 54 59
3A 3B 3C 3E 3F 38 40
3D
5A 5F 64
5B 60 65
5C 61 66
5D 62 67
63 68
69
6A
6C
2A
2D
105 Key European Style Keyboard
Preliminary draft_1
Sample Symbols
UPC-A
0 123456 7890 Interleaved 2 of 5
Code 128
EAN-13
Code 39
Codabar
1234567890
Code 128
9 780330 290951
BC321
A13579B
Code 93
123456-9$
Code 2 of 5
123456
6543210
RSS-14
(01)00123456789012
Matrix 2 of 5
Preliminary draft_1
Sample Symbols
Aztec
MaxiCode
Micro PDF417
Package Label
Test Message
Test Message
PDF417
Postnet
Code 49
Car Registration
Zip Code
1234567890
Data Matrix
QR Code
Test Symbol
Numbers
Preliminary draft_1
Programming Chart
0
1
2
3
4
5
6
7
8
9
Preliminary draft_1

Preliminary draft_1
Programming Chart
Note: If you make an error while scanning the letters or digits (before scanning Save), scan Discard, scan the correct letters or
digits, and Save again.
A
B
C
D
E
F
Save
Discard
Reset
Preliminary draft_1
FCC Part 15 Statement
This device complies with part 15 of the FCC Rules. Operation is subject to the following two conditions:
1. This device may not cause harmful interference.
2. This device must accept any interference received, including interference that may cause undesired operation.
Caution: Any changes or modifications made to this equipment not expressly approved by Honeywell may void the FCC authorization to operate this equipment.
FCC Interference Statement
This equipment has been tested and found to comply with the limits for a Class B digital device, pursuant to Part 15 of the FCC Rules. These limits are designed to provide reasonable protection against harmful interference in a residential installation. This equipment generates, uses and can radiate radio frequency energy and, if not installed
and used in accordance with the instructions, may cause harmful interference to radio communications. However, there is no guarantee that interference will not occur in a particular installation. If this equipment does cause harmful interference to radio or television reception, which can be determined by turning the equipment off and on,
the user is encouraged to try to correct the interference by one or more of the following measures:
• Reorient or relocate the receiving antenna.
• Increase the separation between the equipment and receiver.
• Connect the equipment into an outlet on a circuit different from that to which the receiver is connected.
• Consult the dealer or an experienced radio/TV technician for help.
RF Exposure
The equipment complies with FCC RF exposure limits set forth for an uncontrolled environment. The equipment must not be co-located or operating in conjunction with any other antenna or transmitter.
Canadian Compliance
This ISM device complies with Canadian RSS-210.
Operation is subject to the following conditions:
1. This device may not cause harmful interference.
2. This device must accept any interference received, including interference that may cause undesired operation.
Conformité à la règlementation canadienne
Cet appareil ISM est conforme à la norme CNR-210 du Canada.
Son fonctionnement est assujetti aux conditions suivantes :
1. Cet appareil ne doit pas causer de brouillage préjudiciable.
2. Cet appareil doit pouvoir accepter tout brouillage reçu, y compris le brouillage pouvant causer un fonctionnement indésirable.
Use only shielded data cables with
this system. This unit has been tested
with cables less than 3 meters.
Cables greater than 3 meters may not
meet class B performance.
Utiliser uniquement des câbles de
données blindés avec ce système.
L’appareil a été testé avec des
câbles de moins de 3 mètres. Les
câbles de longueur supérieure à 3
mètres peuvent ne pas satisfaire à la
performance de la classe B.
Utilisez uniquement des câbles de
données blindés avec ce système.
Ce dispositif a été testé avec des
câbles de moins de 3 mètres. Il est
possible que les câbles de plus de 3
mètres ne permettent pas d’atteindre
des performances de classe B.
Utilizzare solo cavi dati schermati
con questo sistema. Questa unità è
stata testata con cavi di lunghezza
inferiore a 3 metri. I cavi di
lunghezza superiore a 3 metri
potrebbero non essere conformi alle
prestazioni di classe B.
Für dieses System nur abgeschirmte
Datenkabel verwenden. Dieses
System wurde mit Kabeln unter 3
Metern Länge geprüft. Kabel mit einer
Länge von über 3 Metern erfüllen
möglicherweise nicht die Richtlinien
der Klasse B.
Utilice sólo cables de datos blindados
con este sistema. Esta unidad se ha
probado con cables de longitud
inferior a 3 metros. Cables
superiores a 3 metros quizá no
satisfagan los requisitos de
rendimiento de la clase B.
Use únicamente cables protegidos
para datos con este sistema. Esta
unidad ha sido evaluada con cables
de menos de 3 metros. Es posible
que los cables de más de 3 metros no
cumplan con el desempeño de clase
B.
Use somente cabos de dados
blindados com este sistema. Esta
unidade foi testada com cabos com
menos de 3 metros. Cabos com mais
de 3 metros não atendem o
desempenho de classe B.
此系统仅能使用屏蔽数据电缆。 此设
备是以短于 3 米的电缆进行的测试。
长度超过 3 米的电缆可能无法满足 B
级性能。
此系統只能使用包覆的資料傳輸線。
此裝置是使用不到 3 公尺長的電纜進
行測試。 超過 3 公尺長的電纜可能無
法達到 B 級裝置效能。
このシステムにはシールド付きデー
タケーブルのみを使用してくださ
い。この装置は長さ 3 m 以下のケー
ブルでテストされています。 3 m 以
上のケーブルはクラス Bの性能を満
たさない場合があります。
이 시스템에는 차폐된 데이터 케이블
만 사용하십시오 . 본 장치는 3 미터
미만의 케이블로 테스트를 받았습니
다. 3 미터를 초과하는 케이블을 사
용하면 Class B 성능을 만족시키지 못
할 수 있습니다 .
Используйте с этой системой только
экранированные кабели передачи
данных. Это устройство прошло
испытания с использованием
кабелей длиной менее 3 метров.
Рабочие характеристики кабелей
длиной свыше 3 м могут не
соответствовать классу В.
The CE marking
indicates compliance
with the following
directives:
• 1995/5/EC R&TTE
• 2011/65/EU RoHS
(Recast)
In addition, complies to 2006/95/EC
Low Voltage Directive, when shipped
with recommended power supply.
European contact:
Hand Held Products Europe B.V.
Nijverheidsweg 9-13
5627 BT Eindhoven
The Netherlands
Honeywell shall not be liable for use
of our product with equipment (i.e.,
power supplies, personal computers,
etc.) that is not CE marked and does
not comply with the Low Voltage
Directive.
Le marquage CE
indique la conformité
avec les directives
suivantes :
• 1995/5/CE R & TTE
• 2011/65/UE – RoHS
(Refonte)
De plus, ce produit est conforme à la
Directive européenne 2006/95/CE
relative aux basses tensions lorsqu’il
est expédié avec le bloc
d’alimentation recommandé.
Personne-ressource en Europe :
Hand Held Products Europe B.V.
Nijverheidsweg 9-13
5627 BT Eindhoven
Les Pays-Bas
Honeywell ne sera pas tenu
responsable de l’utilisation de ses
produit avec de l’équipement (c’est-à-
dire, blocs d’alimentation, ordinateurs
personnels, etc.) qui ne porte pas la
marque CE et n’est pas conforme à
la Directive sur les basses tensions.
Le marquage CE
indique la conformité
aux directives
suivantes :
• 1995/5/CE R & TTE
• 2011/65/UE RoHS
(refonte)
De plus, indique la conformité à la
directive 2006/95/CE Basse tension,
lorsque le dispositif est livré avec
l’alimentation électrique
recommandée. Contact en Europe :
Hand Held Products Europe B.V.
Nijverheidsweg 9-13
5627 BT Eindhoven
Pays-Bas
Honeywell ne saurait aucunement
être tenu responsable en cas
d’utilisation de ce produit avec des
équipements (dispositifs
d’alimentation, ordinateurs
personnels, etc.) qui ne portent pas
la marque CE et ne sont pas
conformes à la directive basse
tension.
La marcatura CE indica
conformità alle seguenti
direttive:
• Direttiva R&TTE
1995/5/CE
• Direttiva RoHS 2011/
65/UE (rifusione)
È inoltre conforme ai sensi della
Direttiva bassa tensione 2006/95/CE,
se spedito con l'alimentatore
consigliato. Contatto in Europa:
Hand Held Products Europe B.V.
Nijverheidsweg 9-13
5627 BT Eindhoven
Paesi Bassi
Honeywell non sarà ritenuta
responsabile per l’uso del prodotto
con apparecchiature (ovvero
alimentatori, computer, ecc.) senza il
marchio CE e che non siano conformi
alla Direttiva bassa tensione.
Die CE-Kennzeichnung
signalisiert die
Konformität mit
folgenden Richtlinien:
• 1995/5/EG R&TTE
• 2011/65/EU RoHS
(Recast)
Weiterhin entspricht dieses Produkt
der Niederspannungsrichtlinie 2006/
95/EG, wenn es mit dem
empfohlenen Netzteil geliefert wird.
Ansprechpartner Europa:
Hand Held Products Europe B.V.
Nijverheidsweg 9-13
5627 BT Eindhoven
Niederlande
Honeywell haftet nicht für den
Einsatz des Produkts mit Geräten
(z. B. Netzteilen, Personalcomputern
usw.), die kein CE-Zeichen tragen
und die Anforderungen der
Niederspannungsrichtlinie nicht
erfüllen.
La marca CE indica el
cumplimiento de las
siguientes normativas:
• 1995/5/EC R&TTE
• 2011/65/EU RoHS
(Refundida)
Asimismo, cumple la normativa de
bajo voltaje 2006/95/EC cuando se
envía con la fuente de alimentación
recomendada. Contacto europeo:
Hand Held Products Europe B.V.
Nijverheidsweg 9-13
5627 BT Eindhoven
Países Bajos
Honeywell no asumirá
responsabilidad por el uso de sus
productos con equipos (p. ej., fuentes
de alimentación, computadoras
personales, etc.) que no presenten la
marca CE y no cumplan con la
Directiva sobre baja tensión.
La indicación CE indica
el cumplimiento con las
siguientes directivas:
• 1995/5/EC R&TTE
• 2011/65/EU RoHS
(Reformulada)
Además, cumple con la directiva de
bajo voltaje 2006/95/EC cuando se
envía con la fuente de poder
recomendada. Contacto europeo:
Hand Held Products Europe B.V.
Nijverheidsweg 9-13
5627 BT Eindhoven
Países Bajos
Honeywell no asumirá
responsabilidad por el uso de sus
productos con equipos (p. ej., fuentes
de alimentación, computadoras
personales, etc.) que no presenten la
marca CE y no cumplan con la
Directiva sobre baja tensión.
A marca CE indica
conformidade com as
seguintes diretivas:
• 1995/5/EC R&TTE
• 2011/65/EU RoHS
(Reformulação)
Além disso, o produto está em
conformidade com a Diretiva para
baixa tensão 2006/95/EC, quando
fornecido com a fonte de alimentação
recomendada. Contato na Europa:
Hand Held Products Europe B.V.
Nijverheidsweg 9-13
5627 BT Eindhoven
Holanda
A Honeywell não poderá ser
responsabilizada pelo uso do produto
com equipamentos (por exemplo,
fonte de energia, computadores
pessoais, etc.) que não apresentem
a marca CE e não sejam compatíveis
com a Diretiva de baixa tensão.
CE 标记表示符合以下
指令:
• 1995/5/EC R&TTE
• 2011/65/EU RoHS
(新版)
此外,在随附建议的电源时,设备还
符合 2006/95/EC 低电压指令的要
求。欧洲联系信息:
Hand Held Products Europe B.V.
Nijverheidsweg 9-13
5627 BT Eindhoven
The Netherlands
如果通过没有 CE 标记且不符合低电
压指令的设备 (如,电源、个人计算
机等)使用我们的产品, Honeywell
不负任何责任。
CE 標記表示符合下列
指令:
• 1995/5/EC R&TTE
• 2011/65/EU RoHS
(重訂)
此外,出廠時如附帶建議的電源,亦
符合 2006/95/EC 低電壓指令。歐洲
聯絡資訊:
Hand Held Products Europe B.V.
Nijverheidsweg 9-13
5627 BT Eindhoven
The Netherlands
若將未標示 CE 及不符合低電壓指令
的設備 ( 即電源供應器、個人電腦等
等) 與我們的產品搭配使用,
Honeywell 概不負責。
CE マークは、本装置が
次の指令に準拠してい
ることを示します。
• 1995/5/EC R&TTE
• 2011/65/EU RoHS (
改正 )
また、推奨電源付きで出荷されてい
る場合は、2006/95/EC Low Voltage
Directive にも準拠しています。欧州
でのお問い合わせ :
Hand Held Products Europe B.V.
Nijverheidsweg 9-13
5627 BT Eindhoven
The Netherlands
CE マークがなく、Low Voltage
Directive に適合しない機器(電源
装置、パーソナル・コンピュータな
ど)とともに当社の製品を使用した
場合、Honeywell は一切の責任を負
いません。
CE 마크는 다음 지침을
준수함을 나타냅니다 .
• 1995/5/EC R&TTE
• 2011/65/EU RoHS
(Recast)
또한 , 권장 전원 공급장치와 함께 배
송된 경우에는 2006/95/EC Low
Voltage Directive( 저전압 지침 )를
준수합니다 . 유럽 연락처 :
Hand Held Products Europe B.V.
Nijverheidsweg 9-13
5627 BT Eindhoven
The Netherlands
Honeywell 는 Low Voltage Directive
의 조항을 준수하지 않고 CE 기호를
획득하지 않은 장비 ( 예 : 전원 공급
장치 , PC 등 ) 와 함께 당사 제품을
사용함으로써 발생하는 어떠한 문제
에도 책임을 지지 않습니다 .
Маркировка CE
означает
соответствие
требованиям
следующих директив:
• 1995/5/EC
Директива о радио- и
телекоммуникационно
м оборудовании
• 2011/65/EU
Директива RoHS
(исправленная)
Кроме того, соответствует
требованиям директивы по
низковольтному оборудованию
2006/95/EC при поставке с
рекомендованным источником
питания. Контактное лицо в
Европе:
Hand Held Products Europe B.V.
Nijverheidsweg 9-13
5627 BT Eindhoven
The Netherlands
Компания Honeywell не несет
ответственность за использование
нашего товара с оборудованием
(например, источниками питания,
персональными компьютерами)
без маркировки СЕ, которое не
соответствует Директиве по
низкому напряжению.
Class II Catégorie II Classe II Klasse II Clase II II 类 第 II 類 Class II
CAUTION: Improper
battery replacement or
incompatible device usage
may result in risk of burns,
fire, explosion, or other
hazard. Dispose of lithium-ion
batteries according to local
regulations.
ATTENTION : Un
remplacement inadéquat
de la batterie ou une
utilisation incompatible de
l'appareil peut présenter
des risques de brulures, d'incendie,
d'explosion ou d'autres dangers.
Jetez les piles en lithium-ion
conformément aux régulations
locales.
MISE EN GARDE : Le
remplacement incorrect de
la pile ou l'usage d'un
appareil non compatible
peut représenter des
risques de brûlures, d'incendie,
d'explosion ou d'autres dangers.
Éliminez les piles lithium-ion usagées
conformément aux réglementations
locales.
Attenzione. La sostituzione
inadeguata delle batterie o
un uso incompatibile del
dispositivo possono
causare rischi di ustioni,
incendi, esplosioni o altri pericoli.
Smaltire le batterie agli ioni di litio in
conformità ai regolamenti locali.
VORSICHT. Ungeeignete
Ersatz-Akkus oder nicht
kompatible Gerätenutzung
kann zu Verbrennungen,
Feuer, Explosion oder
anderen Gefahren führen. Entsorgen
Sie die Lithium-Ionen-Batterien
gemäß den lokalen Richtlinien.
PRECAUCIÓN: El
reemplazo inadecuado de
la batería o el uso de un
dispositivo incompatible
pueden dar como resultado
quemaduras, un incendio, explosión u
otros riesgos. Descarte todas las
baterías de litio según las
regulaciones locales.
PRECAUCIÓN: El
reemplazo inadecuado de
la batería o el uso de un
dispositivo incompatible
puede presentar riesgo de
quemaduras, incendio, explosión, u
otro tipo de riesgos. Deseche las
baterías de iones de litio de acuerdo
a las normativas locales.
CUIDADO: a substituição
incorreta da bateria ou o
uso de um dispositivo
incompatível pode resultar
em riscos de queimaduras,
incêndio, explosão ou outros perigos.
Descarte as baterias de íon de lítio de
acordo com as regulamentações
locais.
注意:电池更换不当或者用
于不兼容的设备可能导致燃
烧、起火、爆炸或其他危
险。请按照当地规定处置锂
电池。
注意:不適當的電池更換或
者與不相容的裝置搭配使
用,可能導致燃燒、火災、
爆炸或其他危險。請依照當
地法規處置鋰電池。
注意 : 誤った電池交換また
は互換性の無いデバイスの
使用により、やけど、発
火、爆発などの危険をお引
きおこす可能性がありま
す。リチウムイオン電池の廃棄につ
いては、地域の規則に従ってくださ
い。
주의 : 배터리를 부적절하게
교체하거나 호환되지 않는
장비를 사용하게 되면 , 화
상, 화재, 폭발, 기타 위험
이 발생할 수 있습니다 . 지
역 규정에 따라 리튬 이온 배터리를
처분하십시오 .
ВНИМАНИЕ:Вслучае
неправильнойзамены
аккумулятораили
использования
несовместимого
устройствасуществуетопасность
ожога,пожара,взрыва,атакже
другихнесчастныхслучаев.
Утилизациялитий‐ионных
аккумуляторовдолжна
производитьсявсоответствиис
местныминормативами.
LED Safety Statement
LEDs have been tested and classified
as “EXEMPT RISK GROUP” to the
standard: IEC 62471:2006.
Norme de sécurité sur les
DEL
Les DEL ont été testées et classées
en tant que « GROUPE DE RISQUE
EXEMPT » par rapport à la norme :
IEC 62471:2006.
Norme de sécurité DEL
Les DEL ont été testées et classées «
GROUPE SANS RISQUE » selon la
norme : CEI 62471:2006.
Disposizione di sicurezza
LED
I LED sono stati testati e classificati
come "GRUPPO ESENTE DA
RISCHI" rispetto allo standard: IEC
62471:2006.
Hinweis zur Lasersicherheit
Die LEDs wurden geprüft und gemäß
der Norm IEC 62471:2006 unter
„EXEMPT RISK GROUP“ eingestuft.
Declaración de seguridad
del LED
Los LED se han probado y clasificado
como “GRUPO EXENTO DE
RIESGOS” según la normativa: IEC
62471:2006.
Declaración de seguridad
del LED
Las LED han sido evaluadas y
clasificadas como “GRUPO LIBRE
DE RIESGOS” según la norma: IEC
62471:2006.
Declaração de segurança do
LED
Os LEDs foram testados e
classificados como “GRUPO DE
RISCO ISENTO” conforme a norma:
IEC 62471:2006.
LED 安全声明
LED 经测试属于 IEC 62471:2006 标
准的 “豁免风险组 ”(EXEMPT RISK
GROUP)。
LED 安全聲明
LED 經測試被列為 IEC 62471:2006
標準的 「豁免風險組」 (EXEMPT
RISK GROUP)。
LED の安全性について
LED はIEC 62471:2006 安全規格に
対してテスト済みで、「EXEMPT
RISK GROUP ( リスクグループ除外
)」に分類されています。
LED 안전 고지 사항
LED 는 표준 IEC 62471:2006 에 대해
테스트되어 "EXEMPT RISK GROUP"
으로 분류되었습니다 .
Заявление о безопасности
светодиода
Светодиоды прошли испытания и
отнесены к «БЕЗРИСКОВОЙ ГРУППЕ»
согласно стандарту МЭК 62471:2006.
CB Scheme
Certified to CB Scheme IEC 60950-1,
Second Edition.
Plan OC (organismes de
certification)
Certifié CB CEI 60950-1, deuxième
édition.
Schéma OC
Certifié selon la norme CEI 60950-1
seconde édition (schéma OC).
Schema CB
Certificato in base allo Schema CB
IEC 60950-1, seconda edizione.
CB-Zertifizierung
CB-zertifiziert gemäß IEC 60950,
Second Edition.
Esquema CB
Se ha certificado que cumple el
esquema CB IEC 60950-1, segunda
edición.
Esquema CB
Se ha certificado que cumple con el
esquema CB IEC 60950-1, segunda
edición.
Esquema CB
Certificação CB Scheme IEC 60950-
1, Segunda edição.
CB 方案
已通过 CB 方案 IEC 60950-1 第二版
的认证。
CB Scheme
經過認證符合 CB Scheme IEC
60950-1 標準第二版。
CB Scheme
CB Scheme IEC 60950-1, Second
Edition に認定されています。
CB Scheme
CB Scheme IEC 60950-1, Second
Edition 인증을 받았습니다 .
Схема CB
Сертификация согласно схеме CB
МЭК 60950-1, издание второе.
Patents
For patent information, please refer to
www.hsmpats.com.
Brevets
Veuillez consulter le site
www.hsmpats.com pour obtenir des
renseignements au sujet du brevet.
Brevets
Pour plus d’informations sur les
brevets, visitez la page
www.hsmpats.com.
Brevetti
Per i dettagli sui brevetti, fare
riferimento al sito Web
www.hsmpats.com.
Patente
Patentinformationen sind unter
www.hsmpats.com erhältlich.
Patentes
Para obtener información sobre las
patentes, visite www.hsmpats.com.
Patentes
Para obtener información sobre
patentes, consulte
www.hsmpats.com.
Patentes
Para obter informações sobre
patente, consulte www.hsmpats.com.
专利
有关专利信息,请参阅
www.hsmpats.com。
專利
相關專利資訊請參閱
www.hsmpats.com 中的說明。
特許
特許情報については、
www.hsmpats.com を参照してくだ
さい。
특허
특허 정보는 www.hsmpats.com 를 참
조하십시오 .
Патенты
Информация о патентах приведена
на веб-странице www.hsmpats.com.
Honeywell Scanning &
Mobility Product
Environmental Information
Refer to www.honeywellaidc.com/
environmental for the RoHS / REACH
/ WEEE information.
Renseignements relatifs à
l’environnement à propos
des produits Honeywell de
balayage et de mobilité
Reportez-vous à la page
www.honeywellaidc.com/
environmental pour obtenir des
renseignements concernant les
directives RoHS/REACH/WEEE..
Informations
environnementales sur les
produits Honeywell
Scanning & Mobility
Reportez-vous au site
www.honeywellaidc.com/
environmental pour obtenir les
informations sur les directives RoHS/
REACH/WEEE.
Informazioni ambientali
relative al prodotto
Honeywell Scanning &
Mobility
Consultare il sito web
www.honeywellaidc.com/
environmental per informazioni su
RoHS/REACH/RAEE.
Honeywell Scanning &
Mobility – Informationen zur
Umweltverträglichkeit von
Produkten
Unter www.honeywellaidc.com/
environmental finden Sie
Informationen über RoHS/REACH/
WEEE.
Información ambiental del
producto Honeywell
Scanning & Mobility
Consulte www.honeywellaidc.com/
environmental para obtener
información sobre RoHS/REACH/
WEEE.
Información ambiental de
producto Honeywell
Scanning & Mobility
Consulte la información RoHS/
REACH/WEEE en
www.honeywellaidc.com/
environmental.
Informações ambientais
sobre produtos da
Honeywell Scanning &
Mobility
Consulte a página
www.honeywellaidc.com/
environmental para obter
informações sobre as normas RoHS/
REACH/WEEE.
Honeywell Scanning &
Mobility 产品环境信息
有关 RoHS / REACH / WEEE 信息,
请参阅 www.honeywellaidc.com/
environmental 。
Honeywell Scanning &
Mobility 產品環境資訊
請參閱 www.honeywellaidc.com/
environmental 以瞭解 RoHS /
REACH / WEEE 資訊。
Honeywell Scanning &
Mobility 製品の環境情報
RoHS / REACH / WEEE に関する情
報については、
www.honeywellaidc.com/
environmentalを参照してください。
Honeywell 스캐닝 및 모바일
제품 환경 정보
RoHS / REACH / WEEE 정보는
www.honeywellaidc.com/
environmental 에서 참조하십시오 .
Экологическая
информация о продукции
Honeywell Scanning &
Mobility
Информация о соответствии
требованиям RoHS / REACH /
WEEE приведена на сайте
www.honeywellaidc.com/
environmental.
םיככוסמ םינותנ ילבכב שמתשהל שי ,וז תכרעמב
תוחפ לש ךרואב םילבכ םע קדבנ הז רישכמ .דבלב
מ-3 לע הלוע םכרואש םילבכש ןכתיי .םירטמ3
םירישכמ לש םיעוציבה תושירדב ודמעי אל םירטמ
גרדמ ה
B.
ﻢﺗ .مﺎﻈﻨﻟا اﺬﻫ ﻊﻣ ﺢﻔﺼﳌا تﺎﻧﺎﻴﺒﻟا تﻼﺑﺎﻛ ﻂﻘﻓ مﺪﺨﺘﺳا
.رﺎﺘﻣأ 3 ﻦﻋ ﺎﻬﻟﻮﻃ ﻞﻘﻳ تﻼﺑﺎﻛ ﺔﻄﺳاﻮﺑ ةﺪﺣﻮﻟا هﺬﻫ رﺎﺒﺘﺧا
ﻊﻣ رﺎﺘﻣأ 3 ﻦﻋ ﺎﻬﻟﻮﻃ ﺪﻳﺰﻳ ﻲﺘﻟا تﻼﺑﺎﻜﻟا ﻖﺑﺎﻄﺘﺗ ﻻ ﺪﻗ
.B ﺔﺌﻔﻟا ءادأ
تﺎﻬﻴﺟﻮﺘﻟﺎﺑ ماﺰﺘﻟﻻا ﱃإ CE ﺔﻣﻼﻋ
:ﺔﻴﻟﺎﺘﻟا
• 1995/5/EC R&TTE
• 2011/65/EU RoHS
(ﺔﻏﺎﻴﺼﻟا ةدﺎﻋإ)
ﺾﻔﺨﻨﳌا ﺪﻬﺠﻟا ﻪﻴﺟﻮﺘﺑ ماﺰﺘﻟﻻا ﻢﺘﻳ ،ﻚﻟذ ﱃإ ﺔﻓﺎﺿﻹﺎﺑ
.ﻪﺑ ﴅﻮﳌا ﺔﻗﺎﻄﻟا رﺪﺼﻣ ﻊﻣ ﻦﺤﺸﻟا ﺪﻨﻋ 2006/95/EC
:ﺔﻴﺑوروﻷا لﺎﺼﺗﻻا ﺔﻬﺟ
Hand Held Products Europe B.V.
Nijverheidsweg 9-13
5627 BT Eindhoven
The Netherlands
ﻊﻣ ﺞﺘﻨﳌا ماﺪﺨﺘﺳا ﺔﻴﻟوﺆﺴﻣ Honeywell ﺔﻛﴍ ﻞﻤﺤﺘﺗ ﻻ
،ﺔﻴﺼﺨﺸﻟا ﺮﺗﻮﻴﺒﻤﻜﻟا ةﺰﻬﺟأو ،ﺔﻗﺎﻄﻟا ردﺎﺼﻣ ﻞﺜﻣ) تاﺪﻌﳌا
ﺪﻬﺠﻟا تﺎﻬﻴﺟﻮﺘﺑ مﺰﺘﻠﺗ ﻻو CE ﺔﻣﻼﻋ ﻞﻤﺤﺗ ﻻ ﻲﺘﻟا (ﺦﻟإ
.ﺾﻔﺨﻨﳌا
תיוותCE דמוע רצומהש הדיעמ
תושירדב תויחנה:םיאבה םינקתה
1995/5/EC R&TTE
2011/65/EU RoHS (Recast)
ב דמוע רצומה ,ףסונבה תייחנה תושירד-
2006/95/EC
קפוסמ אוה םא ,ךומנ חתמ אשונב
ילמשחה חתמבהץלמומ.
תיפוריאה תוגיצנה םע רשק תריציל:
Hand Held Products Europe B.V.
Nijverheidsweg 9-13
5627 BT Eindhoven
The Netherlands
תרבחHoneywell שומיש ןיגב תוירחאב אשית אל
םיבשחמ ,למשח ילבכ ,ונייהד) דויצ םע ונלש רצומב
ניאש ('ויכו םיישיאואשונ תיוותCE
ניאוו דמוע
תושירדב.ךומנ חתמ אשונב היחנהה תוארוה
!
!
!
!
!
!
!
!
!
!
!
!
!
!
הללוסב הללוסה תפלחה :תוריהז הניאש
המיאתמל םורגל הלולע לע .ץוציפ תנכס
החמומ ידיב עצבתהל הללוסה תכלשה
לע וא םירזחוממ םירמוחב לופיטב הרשכה רבעש
ןיא .םינכוסמ םירמוח תכלשהב לפטמה החמומ ידי
הפשאב התוא ךילשהל וא הללוסה תא ףורשל
.הליגרה
!
ﺢﻴﺤﺻ ﺮﻴﻏ ﻞﻜﺸﺑ ﺕﺎﻳﺭﺎﻄﺒﻟﺍ ﻞﻳﺪﺒﺗ ﻥﺇ :ﻩﺎﺒﺘﻧﺍ ﻭﺃ
ﻝﺎﻤﻌﺘﺳﺍﺮﻁﺎﺨﻣ ﻰﻟﺇ ﻱﺩﺆﻳ ﺪﻗ ﻢﺋﻼﻣ ﺮﻴﻏ ﻞﻜﺸﺑ ﺯﺎﻬﺠﻟﺍ
ﻕﻭﺮﺣ .ﺮﻁﺎﺨﻤﻟﺍ ﻦﻣ ﺎﻫﺮﻴﻏ ﻭﺃ ﺭﺎﺠﻔﻧﺍ ﻭﺃ ﻖﻳﺮﺣ ﻭﺃ
ﻡﻮﻴﺜﻴﻟ ﺕﺎﻳﺭﺎﻄﺒﻟﺍ ﻦﻣ ﺺّﻠﺨﺘﻟﺍ- .ﺔﻴﻠﺤﻤﻟﺍ ﺔﻤﻈﻧﻸﻟ ﺎﻘﻓﻭ ﻥﻮﻳﺃ
תרהצה תוחיטב- תורונLED
ה תורונ-LED" וגווסו וקדבנ "ןוכיס תולוטנכ
:ןקתל םאתהב
IEC 62471:2006
LED ﺔﻣﻼﺳ نﺎﻴﺑ
ﺔﻋﻮﻤﺠﻤﻛ” ﺎﻬﻔﻴﻨﺼﺗﻭ LED ﺢﻴﺑﺎﺼﻣ ﺭﺎﺒﺘﺧﺍ ﰎ
:ﺭﺎﻴﻌﻤﻠﻟ ﺎﹰﻘﻓﻭ “ﺮﻄﳋﺍ ﻦﻣ ﺺﻠﺨﺘﻟﺍ
.IEC 62471:2006
CB Schemeה ןקתל םאתהב רשואמ רצומIEC
60950-1 ןוגרא לשCB Scheme ,.הינש הרודהמ
CB Scheme
CB ﻂﻄﺨﻣ
.ﻲﻧﺎﺜﻟا
راﺪﺻﻹا ،CB IEC 60950-1 ﻂﻄﺨﻣ ﺪﻤﺘﻌﻣ
םיטנטפ
טנרטניאה רתאב ןייע ,םיטנטפ לע עדימל
www.hsmpats.com
عاﱰﺧﻻا تاءاﺮﺑ
عﻮﺟﺮﻟا ﻰﺟﺮُﻳ ،عاﱰﺧﻻا ةءاﺮﺑ ﺺﺨﺗ تﺎﻣﻮﻠﻌﻣ ﲆﻋ لﻮﺼﺤﻠﻟ
.www.hsmpats.com ﱃإ
Honeywell ﺔﻛﴍ ﻦﻣ ﺔﻣﺪﻘﳌا ﻞﻘﻨﺘﻟاو
ئﻮﻀﻟا ﺢﺴﳌا تﺎﺠﺘﻨﳌ ﺔﻴﺌﻴﺒﻟا تﺎﻣﻮﻠﻌﳌا
تﺎﻬﻴﺟﻮﺗ لﻮﺣ تﺎﻣﻮﻠﻌﻣ ﲆﻋ لﻮﺼﺤﻠﻟ
www.honeywellaidc.com/environmental
ﱃإ عﻮﺟﺮﻟا ﻰﺟﺮُﻳ
.RoHS / REACH / WEEE
תודוא םיטרפל ירצומ לש יתביבסה עדימה
Honeywell Scanning & Mobility ןייעל שי ,
:תבותכב טנרטניאה רתאב
www.honeywellaidc.com/environmental for
the RoHS / REACH / WEEE information.

RegSht-1452 Rev B
1/15
UL and C-UL Statement
UL and C-UL listed: UL 60950-1, Second Edition and CSA
C22.2 No.60950-1-07, Second Edition.
Norme UL et C-UL
Homologué UL et C-UL : UL 60950-1, seconde édition et CSA
C22.2 No. 60950-1-07, seconde édition.
If the following label is attached to your product, the product
meets Korean agency approval:
이 기기는 가정용 (B 급 ) 전자파적합기기로서 주
로 가정에서 사용하는 것을 목적으로 하며 ,
모든 지역에서 사용할 수 있습니다 .
This product is EMC B grade equipment, intended
for residential use. This equipment can be used
in any area.
依據標準 : 低功率射頻電機技術規範 : LP00002
NCC standard: Low power frequency electric
machineries technical standard: LP0002
根據交通部低功率管理辦法規定:
第十二條
經型式認證合格之低功率射頻電機,非經許可,公司、商號或
使用者均不得擅自
變更頻率、加大功率或變更原設計之特性及功能。
第十四條
低功率射頻電機之使用不得影響飛航安全及干擾合法通信;經
發現有干擾現象
時,應立即停用,並改善至無干擾時方得繼續使用。
前項合法通信,指依電信規定作業之無線電信。低功率射頻電
機須忍受合法通信
或工業、科學及醫療用電波輻射性電機設備之干擾。
有毒有害物质名称及含量的标识格式 (Names and Content of Hazardous Substances or Elements)
部件名称 (Parts Name) 有毒有害物质或元素 (Toxic and Hazardous Substances or Elements)
铅(Pb) 汞(Hg) 镉(Cd) 六价铬 (Cr6+) 多溴联苯 (PBB) 多溴二苯醚 (PBDE)
成像式二维条码阅读器 (2D Imager) xooooo
印刷电路板 (PCB) xooooo
外壳 (Housing) oooooo
连线 (Cables) oooooo
电池 (Battery) oooooo
o: 表示该有毒有害物质在该部件所有均质材料中的含量均在 SJ/T11363-2006 标准规定的限量要求以下 (Indicates that this toxic or hazardous substance contained in all of the homogeneous materials for this part is below the limit requirement in China’s SJ/T11363-2006.)
x: 表示该有毒有害物质至少在该部件的某一均质材料中的含量超出 SJ/T11363-2006 标准规定的限量要求 (Indicates that this toxic or hazardous substance contained in at least one of the homogeneous materials for this part is above the limit requirement in China’s SJ/T11363-2006. )
This document was prepared and executed in the English
language. In the event this document is translated into another
language and a conflict arises between the English version and
a non-English version, the English version shall prevail, it being
recognized and acknowledged that the English language
version most clearly expresses the intent of the parties. Any
notice or communication given in connection with this document
must include a version in the English language.
Ce document a été préparé et exécuté dans la langue anglaise.
Dans l’éventualité où le document serait traduit dans une autre
langue et qu'un litige survenait entre la version en anglais et la
version autre qu'en anglais, la version en anglais prévaudra,
étant confirmé et reconnu que la version en anglais exprime de
façon plus précise l’intention des parties. Tout avis ou toute
communication relatif à ce document doit inclure une version en
anglais.
Ce document a été préparé et finalisé en anglais. Si ce
document est traduit dans une autre langue et si un conflit
survient entre la version en anglais et la version traduite, la
version en anglais prévaudra tant il est reconnu et établi qu’elle
exprime le plus clairement les intentions des parties. Tout avis
ou communication produit en relation avec ce document doit
comporter une version en anglais.
Questo documento è stato preparato e redatto in lingua inglese.
In caso di traduzione in altre lingue, nell’eventualità sorgano
conflitti fra la versione non inglese e quella inglese, prevarrà
quest’ultima in quanto viene riconosciuto e accettato che la
versione in lingua inglese esprime più chiaramente gli accordi
fra le parti. Qualsiasi notifica o comunicazione inviata in
rapporto a questo documento deve includere una versione in
lingua inglese.
Dieses Dokument wurde in englischer Sprache erstellt und
ausgefertigt. Wenn dieses Dokument in eine andere Sprache
übersetzt wird, und ein Konflikt zwischen der englischen und
nicht-englischen Fassung auftritt, hat die englische Fassung
Vorrang, da die Parteien anerkennen, dass die Fassung in
englischer Sprache ihren Absichten am deutlichsten Ausdruck
verleiht. Alle Hinweise oder Mitteilungen in Zusammenhang mit
diesem Dokument müssen auch in einer Fassung in englischer
Sprache erfolgen.
Originalmente, este documento se creó y redactó en inglés. En
caso de que se traduzca a otro idioma y surja un conflicto entre
la versión en inglés y la versión en otro idioma, prevalecerá la
versión en inglés. Se reconoce y admite que, en la versión en
inglés, expresa la intención de las partes con más claridad.
Cualquier aviso o comunicación proporcionada en relación con
este documento debe incluir una versión en inglés.
Este documento se preparó y redactó en inglés. En caso de que
se traduzca a otro idioma y surja algún conflicto entre la versión
en inglés y la del idioma extranjero, prevalecerá la versión en
inglés, dado que se reconoce y admite que la versión en inglés
expresa más claramente la intención de las partes. Cualquier
aviso o comunicación proporcionada en relación con este
documento deberá incluir una versión en inglés.
Este documento foi preparado e feito em língua inglesa. Se este
documento for traduzido para outro idioma e surgirem conflitos
entre a versão em inglês e a versão no outro idioma, a versão
em inglês prevalecerá, sendo reconhecido e atestado que a
versão em língua inglesa expressa mais claramente a intenção
das partes. Qualquer comunicação ou aviso relacionado a este
documento deve conter a versão em inglês.
本文档以英文撰写。如果本文档的其他语言版本与英文版本存
在冲突,则以英文版本为准。各方一致认可和同意英文版本最
清楚地表达了各自的意图。任何与本文档相关的声明或沟通,
都应包括英文版本。
本文件的原稿是以英文撰寫。 如果本文件翻譯為其他語言,而
英文版和非英文版之間產生衝突,應以英文版為準,並且各方
一致認同並確認英文版最能夠清楚地表達各方的意圖。 凡是所
有與本文件有關之公告或通訊,都必須包含英文的版本。
本書は英語で作成され発行されています。 本書を他の言語に
翻訳し、英語版と英語以外の版に矛盾が生じた場合は、関係
者の意図を最も明確に表すものが英語版であることを認識お
よび承諾し、英語版が優先するものとします。 さらに、本書
に関連して与えられる告知や通知は、すべて英語版を含むも
のとします。
본 문서는 영어로 준비되어 작성된 것입니다. 본 문서를 다른 언
어로 번역했는데 영문본과 번역본 사이에 상충하는 부분이 발생
하는 경우에는 영문본이 우선하며, 영문본이 양쪽 당사자의 의
도를 가장 명확하게 표현하고 있음을 인식하고 확인합니다. 본
문서와 관련한 모든 고지 또는 전달 사항에는 영문본이 동봉되
어야 합니다.
Данный документ был подготовлен и выполнен на
английском языке. При переводе данного документа на
другой язык, в случае возникновения противоречий между
английской версией и версией на другом языке, английская
версия имеет преимущественную силу. Данным
признается, что версия документа на английском языке
наиболее четко выражает намерения сторон. Любые
уведомления или письма, направляемые в связи с данным
документом, должны включать в себя версию на
английском языке.
REFER TO WWW.HONEYWELLAIDC.COM/WARRANTY_INFORMATION FOR YOUR
PRODUCT’S WARRANTY INFORMATION. CONSULTEZ WWW.HONEYWELLAIDC.COM/WARRANTY_INFORMATION POUR
OBTENIR DES RENSEIGNEMENTS AU SUJET DE LA GARANTIE DE VOTRE
PRODUIT.
POUR PLUS D’INFORMATIONS SUR LA GARANTIE DE VOTRE PRODUIT, VISITEZ LE
SITE WWW.HONEYWELLAIDC.COM/WARRANTY_INFORMATION.
VISITARE IL SITO WEB WWW.HONEYWELLAIDC.COM/WARRANTY_INFORMATION
PER INFORMAZIONI SULLA GARANZIA DEL PROPRIO PRODOTTO. GARANTIE-INFORMATIONEN FÜR IHR PRODUKT FINDEN SIE UNTER
WWW.HONEYWELLAIDC.COM/WARRANTY_INFORMATION. CONSULTE WWW.HONEYWELLAIDC.COM/WARRANTY_INFORMATION PARA
OBTENER INFORMACIÓN DE GARANTÍA SOBRE SU PRODUCTO.
VISITE WWW.HONEYWELLAIDC.COM/WARRANTY_INFORMATION PARA OBTENER
INFORMACIÓN DE LA GARANTÍA DEL PRODUCTO. VISITE WWW.HONEYWELLAIDC.COM/WARRANTY_INFORMATION E OBTENHA
INFORMAÇÕES ADICIONAIS SOBRE A GARANTIA DO SEU PRODUTO. 有关产品的保修信息,请访问 WWW.HONEYWELLAIDC.COM/
WARRANTY_INFORMATION。
若需您產品的保固資訊,請參閱 WWW.HONEYWELLAIDC.COM/
WARRANTY_INFORMATION。
製品の保証については、WWW.HONEYWELLAIDC.COM/WARRANTY_INFORMATION
を参照してください。
제품의 보증 정보에 대한 내용은 WWW.HONEYWELLAIDC.COM/
WARRANTY_INFORMATION 을 참조하십시오 .
ДЛЯ ПОЛУЧЕНИЯ ИНФОРМАЦИИ О ГАРАНТИИ НА ВАШ ТОВАР ЗАЙДИТЕ НА
ВЕБСАЙТ WWW.HONEYWELLAIDC.COM/WARRANTY_INFORMATION.
הפשל םגרותי הז ךמסמש הרקמב .תילגנאה הפשב קפוהו ךרענ הז ךמסמ
הלגתתו תרחא ,תמגרותמה הסרגהו תילגנאב הסרגה תועמשמ ןיב הריתס
הסרגה יכ םידדצה לע םכסומ .תעבוקה הסרגה היהת תילגנאב הסרגה
העדוה לכ .םידדצה תנווכ תא רתויב רורבה ןפואב תאטבמ תילגנאה הפשב
.תילגנאה הפשב הסרגה תא לולכל תבייח הז ךמסמל רשקהב רסמיתש
اﺬﻫ ﺔﻤﺟﺮﺗ اذإ .ﺔﻳﺰﻴﻠﺠﻧﻹا ﺔﻐﻠﻟﺎﺑ هﺬﻴﻔﻨﺗو ﺪﻨﺘﺴﳌا اﺬﻫ داﺪﻋإ ﻢﺗ
راﺪﺻإو يﺰﻴﻠﺠﻧﻹا راﺪﺻﻹا فﻼﺘﺧا كﺎﻨﻫ نﺎﻛو ىﺮﺧأ تﺎﻐﻟ ﱃإ ﺪﻨﺘﺴﳌا
راﺪﺻﻹا نإ ﺚﻴﺣ ،يﺰﻴﻠﺠﻧﻹا راﺪﺻﻹا ﰲ ءﺎﺟ ماﺰﺘﻟﻻا ﻰﺟ ُ ،ﺮﺧآ
نأ ﺐﺠﻳ .فاﺮﻃﻷا ﺔﻴﻧ ﻦﻋ ﺔﺣاﴏو حﻮﺿﻮﺑ ﱪﻌﻳ يﺬﻟا ﻮﻫ يﺰﻴﻠﺠﻧﻹا
ﺔﻐﻠﻟﺎﺑ راﺪﺻإ ﲆﻋ ﺪﻨﺘﺴﳌا اﺬﻬﺑ ﺔﻠﺻ تاذ تﻻﺎﺼﺗا وأ تارﺎﻌﺷإ ﺔﻳأ ﻞﻤﺸﺗ
.ﺔﻳﺰﻴﻠﺠﻧﻹا
WWW.HONEYWELLAIDC.COM/ רתאב ןייע ,ךלש רצומה תוירחא אשונב עדימל
.WARRANTY_INFORMATION
WWW.HONEYWELLAIDC.COM/WARRANTY_ ﱃإ عﻮﺟﺮﻟا ﻰﺟﺮُﻳ
.ﺞﺘﻨﳌا لﻮﺣ تﺎﻣﻮﻠﻌﻣ ﲆﻋ لﻮﺼﺤﻠﻟ INFORMATION