Honeywell 51306799 Wireless Field Interface User Manual WFI UG
Honeywell International Inc. Wireless Field Interface WFI UG
Contents
- 1. User Manual
- 2. Manual
- 3. User Guide
- 4. Installation Guide
User Guide

Table of Contents
Part No.: Rev01 Wireless Field Interface
User’s Manual 1 - 1
CHAPTER 1 Introduction . . . . . . . . . . . . . . . . . . . . . . . . . . . . . . . . . . . . . . . . . . . . . . . . . 1-1
1.1 About this guide . . . . . . . . . . . . . . . . . . . . . . . . . . . . . . . . . . . . . . . . . . . . . 1-1
1.2 Intended audience. . . . . . . . . . . . . . . . . . . . . . . . . . . . . . . . . . . . . . . . . . . . 1-1
1.3 Prerequisite skills . . . . . . . . . . . . . . . . . . . . . . . . . . . . . . . . . . . . . . . . . . . . 1-1
1.4 Required Honeywell documentation . . . . . . . . . . . . . . . . . . . . . . . . . . . . . 1-1
1.5 What is new in this controlled release . . . . . . . . . . . . . . . . . . . . . . . . . . . 1-2
1.6 Overview of Wireless Field Interface devices. . . . . . . . . . . . . . . . . . . . . . 1-2
CHAPTER 2 Configuration . . . . . . . . . . . . . . . . . . . . . . . . . . . . . . . . . . . . . . . . . . . . . . . . 2-1
2.1 Configuring OneWireless infrastructure. . . . . . . . . . . . . . . . . . . . . . . . . . 2-2
2.1.1 Configuring WDM using the First Time Configuration Wizard . . . . . . . . . . . . 2-2
2.1.2 Provision the devices using over-the-air provisioning method . . . . . . . . . . . 2-8
2.1.2.1 Removing the provisioning key from Wireless Field Interface gauge . . . . . 2-12
2.2 Configuring Wireless Field Interface device . . . . . . . . . . . . . . . . . . . . . 2-14
2.2.1 Loading the Device Description file . . . . . . . . . . . . . . . . . . . . . . . . . . . . . . 2-14
2.2.2 Configuring routing assignment . . . . . . . . . . . . . . . . . . . . . . . . . . . . . . . . . 2-14
2.2.3 Configuring Wireless Field Interface device channels . . . . . . . . . . . . . . . . 2-15
2.2.3.1 Configure Mode and Scale . . . . . . . . . . . . . . . . . . . . . . . . . . . . . . . . . . . . . 2-15
2.2.3.2 Add channels to publication groups. . . . . . . . . . . . . . . . . . . . . . . . . . . . . . . 2-16
2.2.3.3 Remove channels from publication groups . . . . . . . . . . . . . . . . . . . . . . . . . 2-16
2.2.4 Activating Wireless Field Interface device in OneWireless Network . . . . . 2-17
2.2.4.1 Activate ENRAF Ethernet UDP interface on the OneWireless user interface . 2-
17
2.2.4.2 Configure CIU Prime and CIU Plus using the Ensite Pro configuration tool 2-18
2.2.4.3 Monitor performance of ENRAF interface . . . . . . . . . . . . . . . . . . . . . . . . . 2-19
2.2.5 Configuring field devices . . . . . . . . . . . . . . . . . . . . . . . . . . . . . . . . . . . . . . 2-19
2.2.5.1 Configure field device properties . . . . . . . . . . . . . . . . . . . . . . . . . . . . . . . . . 2-19
2.2.5.2 Configure publication rate . . . . . . . . . . . . . . . . . . . . . . . . . . . . . . . . . . . . . . 2-19
2.3 Configuring the protocol tunneling . . . . . . . . . . . . . . . . . . . . . . . . . . . . . 2-22
2.3.1 Configure Wireless Field Interface device interface . . . . . . . . . . . . . . . . . . 2-23
2.3.2 Configure ENRAF serial interface . . . . . . . . . . . . . . . . . . . . . . . . . . . . . . . 2-23
2.3.2.1 Serial interface connection . . . . . . . . . . . . . . . . . . . . . . . . . . . . . . . . . . . . . 2-24
2.3.3 Configure ENRAF Ethernet/UDP interface . . . . . . . . . . . . . . . . . . . . . . . . . 2-26
2.3.3.1 Install and configure the Lantronix device . . . . . . . . . . . . . . . . . . . . . . . . . . 2-26
2.3.3.2 Assign IP address to the Lantronix device . . . . . . . . . . . . . . . . . . . . . . . . . 2-27
2.3.3.3 Configure Standard Serial Tunnel settings on the Lantronix device . . . . . . 2-28
CHAPTER 3 Firmware Upgrade. . . . . . . . . . . . . . . . . . . . . . . . . . . . . . . . . . . . . . . . . . . . 3-1
3.1 Upgrading the WDM firmware . . . . . . . . . . . . . . . . . . . . . . . . . . . . . . . . . . 3-1
3.2 Verifying the WDM firmware revision . . . . . . . . . . . . . . . . . . . . . . . . . . . . 3-2
3.3 Upgrading the Wireless Field Interface device firmware. . . . . . . . . . . . . 3-3
3.4 Upgrading the FDAP/access point firmware. . . . . . . . . . . . . . . . . . . . . . . 3-4
3.5 Upgrading the Wireless Field Interface device firmware using the
Engauge service tool3-5

Table of Contents
Wireless Field Interface Part No.: Rev01
1 - 2 User’s Manual
CHAPTER 4 Operations . . . . . . . . . . . . . . . . . . . . . . . . . . . . . . . . . . . . . . . . . . . . . . . . . . 4-1
4.1 Reading the Wireless Field Interface device information from SmartView
4-2
Introduction - About this guide
Part No.: Rev01 Wireless Field Interface
User’s Manual 1 - 1
CHAPTER 1 INTRODUCTION
The following topics describe what is new in the controlled release and
the overview of the Wireless Field Interface device.
1.1 About this guide
This document describes how to provision, configure, operate, and
monitor an ISA100 wireless interface network using the Wireless Field
Interface devices. This guide assists you in understanding, and
planning the standalone OneWireless Network.
1.2 Intended audience
This guide is intended for Service Engineers, Operators, and
Technicians who are responsible for planning, configuring,
administering, and operating the Wireless Field Interface devices using
the OneWireless Network.
1.3 Prerequisite skills
It is assumed that you are familiar with the operation of the OneWireless
Network.
1.4 Required Honeywell documentation
The following documents and sources contain additional information
required for deploying OneWirelessNetwork. It is recommended to have
these documents readily available for reference.
You can download Honeywell documentation from
http://www.honeywellprocess.com.
You can download Honeywell ENRAF documentation from
http://www.honeywellenraf.com.
Document Description
ISA100 SmartRadar FlexLine User’s Guide
This document provides the information
about provisioning, configuring, operating,
and monitoring an ISA100 wireless field
device network using the SmartRadar
FlexLine field devices.
OneWireless Wireless Device Manager
User's Guide
This document describes the procedures
to provision, configure, operate, and
monitor an ISA100 Wireless wireless field
device network using the Wireless Device
Manager.
Ensite Pro Configuration Tool
This document describes how to work with
the configuration tool Ensite Pro.

Introduction - What is new in this controlled release
Wireless Field Interface Part No.: Rev01
1 - 2 User’s Manual
1.5 What is new in this controlled release
This release supports the following enhancements in Wireless Field
Interface field devices.
Provides the ability to configure the publishing rate of the transducer
blocks.
Provides the ability to support deployment of the security keys to the
Wireless Field Interface field devices, using over-the-air provisioning.
Provides the ability to upgrade the Application Firmware on the CAN-
1WL board using the over-the-air firmware upgrade feature.
Provides the ability to support GPU and FlexConn protocol tunnel
support with Engauge service tool.
Supports Honeywell Enraf 854 ATG servo gauge for reading level of
the process value.
1.6 Overview of Wireless Field Interface field devices
The Wireless Field Interface is a box that can be installed next to an
installed Servo/Radar gauge. The Wireless Field Interface retrieves
information from this gauge and sends it wirelessly to the supervisory
level.

Configuration -
Part No.: Rev01 Wireless Field Interface
User’s Manual 2 - 1
CHAPTER 2 CONFIGURATION
The following topics describe how to configure the OneWireless
infrastructure, the Wireless Field Interface devices, and the protocol
tunneling.
Configuration - Configuring OneWireless infrastructure
Wireless Field Interface Part No.: Rev01
2 - 2 User’s Manual
2.1 Configuring OneWireless infrastructure
2.1.1 Configuring WDM using the First Time Configuration Wizard
After installing the WDM, you need to configure the WDM to enable it to
function in the OneWireless Network. The First Time Configuration
Wizard guides you through the initial configuration of the WDM. The
First Time Configuration Wizard appears ONLY when you log on to
the OneWireless user interface for the first time or after the WDM is
deleted (returning to factory defaults).
Considerations
The following are some of the network configuration rules that you must
follow while configuring the network properties.
FDN and PCN must be on separate subnets.
FDN IP address must be outside the FDAP IP address range.
FDN subnet mask must include FDN IP address and FDAP IP
address range.
Default PCN gateway must be on the same subnet as PCN.
WARNING! If you are performing a migration, skip this section and
proceed with the tasks available in the OneWireless
Migration User’s Guide.
To configure WDM using the First Time Configuration Wizard
1. Log on to the OneWireless user interface using the default User ID and
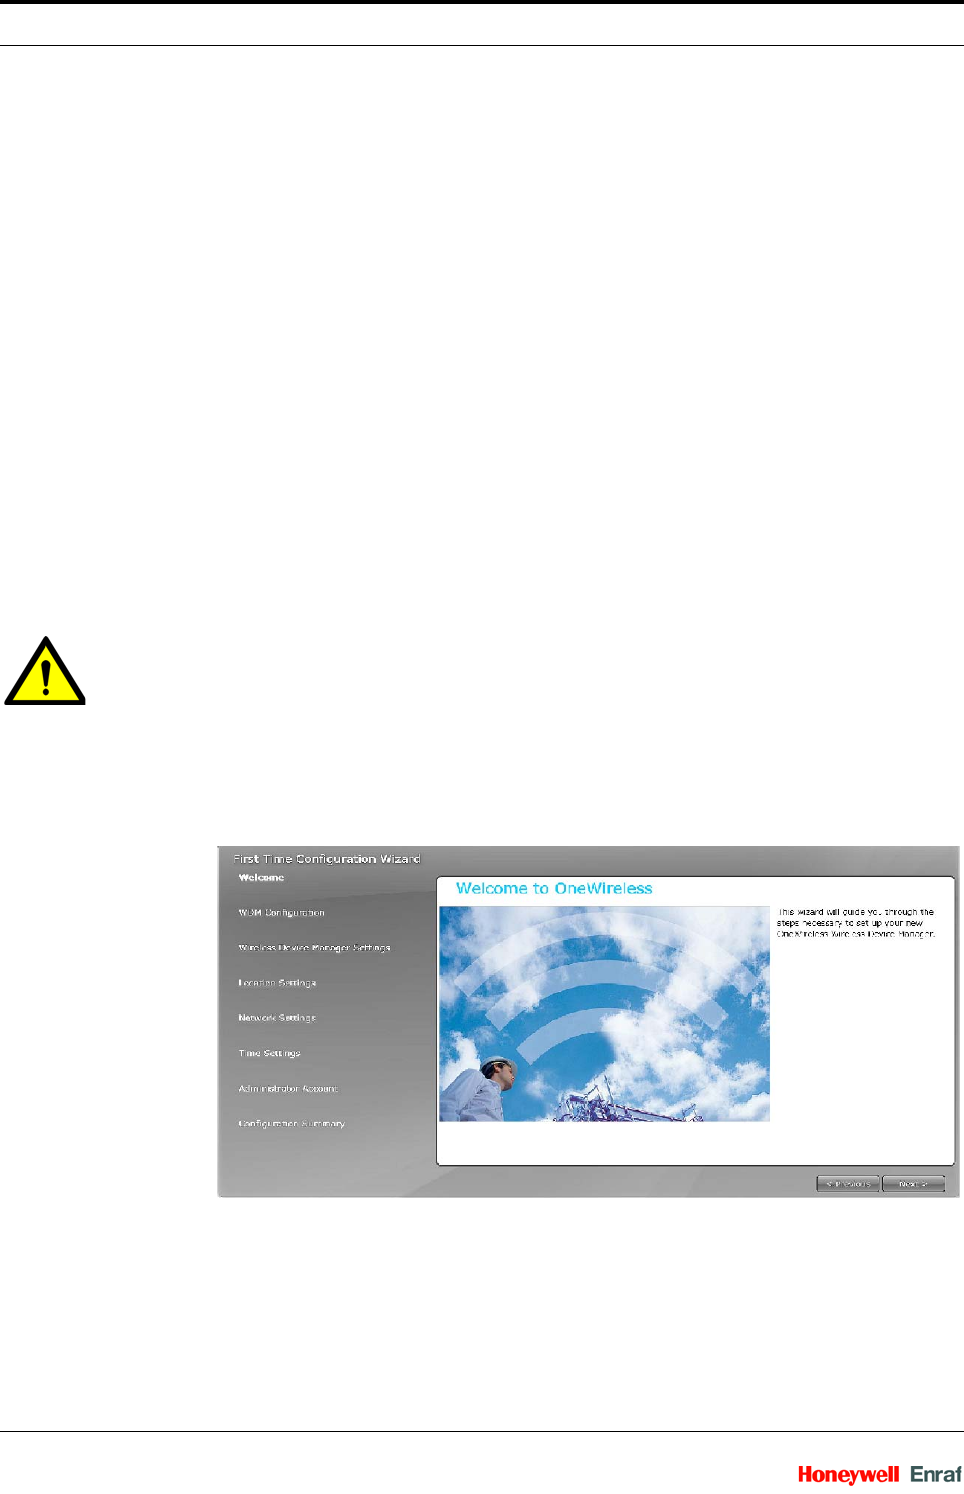
Password. The First Time Configuration Wizard appears.
2. On the Welcome page of the First Time Configuration Wizard, click Next.
Configuration - Configuring OneWireless infrastructure
Part No.: Rev01 Wireless Field Interface
User’s Manual 2 - 3
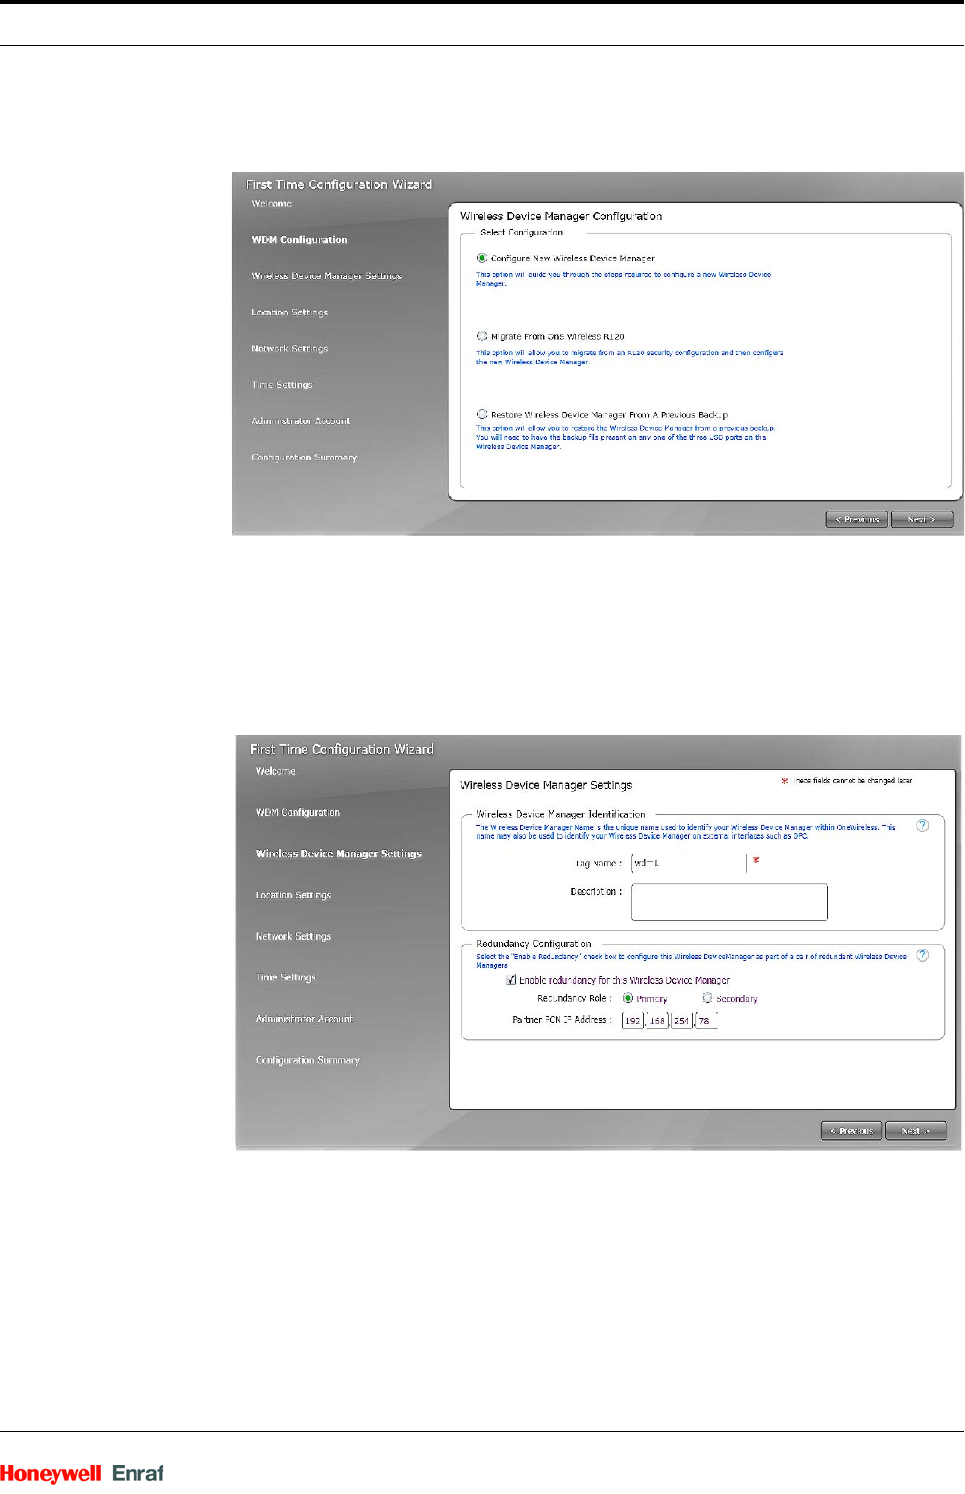
3. On the Wireless Device Manager Configuration page, click Configure
New Wireless Device Manager and click Next.
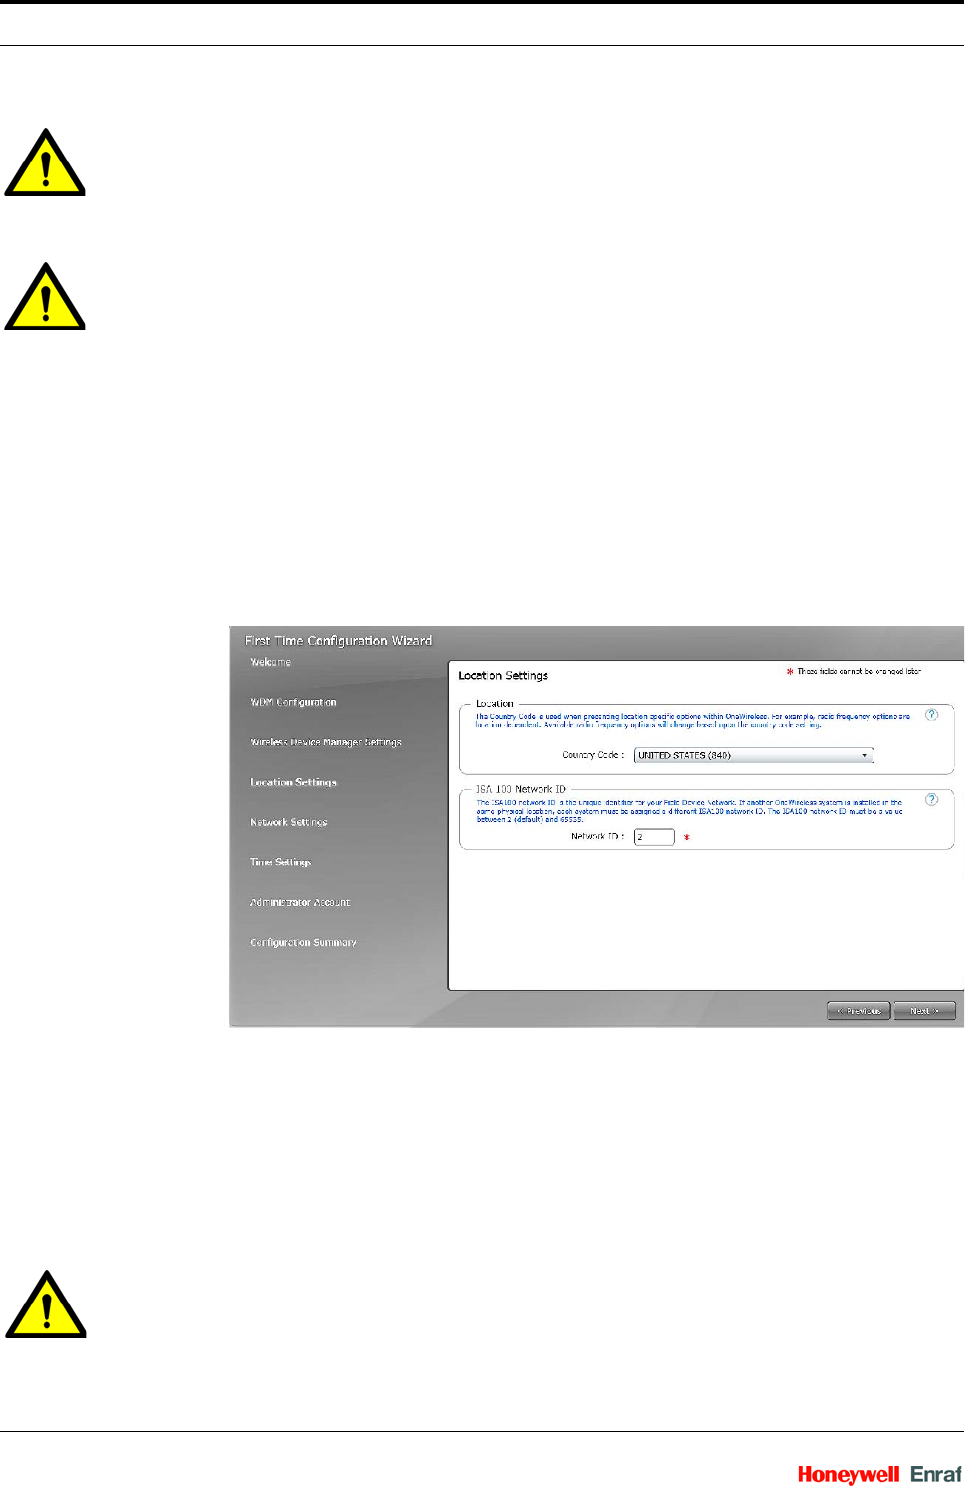
4. On the Wireless Device Manager Settings page, type the WDM Tag
Name and the Description.
The Tag Name is the unique name that is used to identify the WDM. It can be
up to 16 characters long and must begin with an alphabetic character. Do not
use special characters in the Tag Name; underscore is the only acceptable
character. After completing the initial configuration, you cannot change the
WDM name. The Description can be up to 255 characters long.
5. If you need to configure redundant WDM, then under Redundancy Config-
uration, configure the following:
a) Select Enable redundancy for this Wireless Device Manager check box.
b) Click the Redundancy Role, as required. You can select either Primary
or Secondary option depending on the redundancy role.
c) In the Partner PCN IP Address box, type the IP address of the partner
WDM.
Configuration - Configuring OneWireless infrastructure
Wireless Field Interface Part No.: Rev01
2 - 4 User’s Manual
WARNING! When redundancy is enabled, the primary WDM is assigned
physical ID A and the secondary WDM is assigned physical ID
B. The physical IDs are displayed in the UI during normal
operation. Tagging the physical hardware with matching labels
makes it easy to distinguish the WDMs later.
6. Click Next. The Location Settings page appears.
WARNING! If you have selected the Redundancy Role as Secondary
in the Wireless Device Manager Settings page, then the
Location Settings page options are disabled.
7. Under Location, select the Country Code.
The country code is used to define any location-specific settings within the
OneWireless Network. For example, radio frequency options are location
dependent and vary depending on the country code setting. After completing
the first time configuration, you cannot modify the Country Code.
8. Under ISA 100 Network ID, type the Network ID.
The ISA100 Network ID is the unique identifier for the network. It must contain a
value between 2 (default) and 65535. After completing the first time configu-
ration, you cannot change the Network ID.
9. Click Next.
The Network Settings page appears.
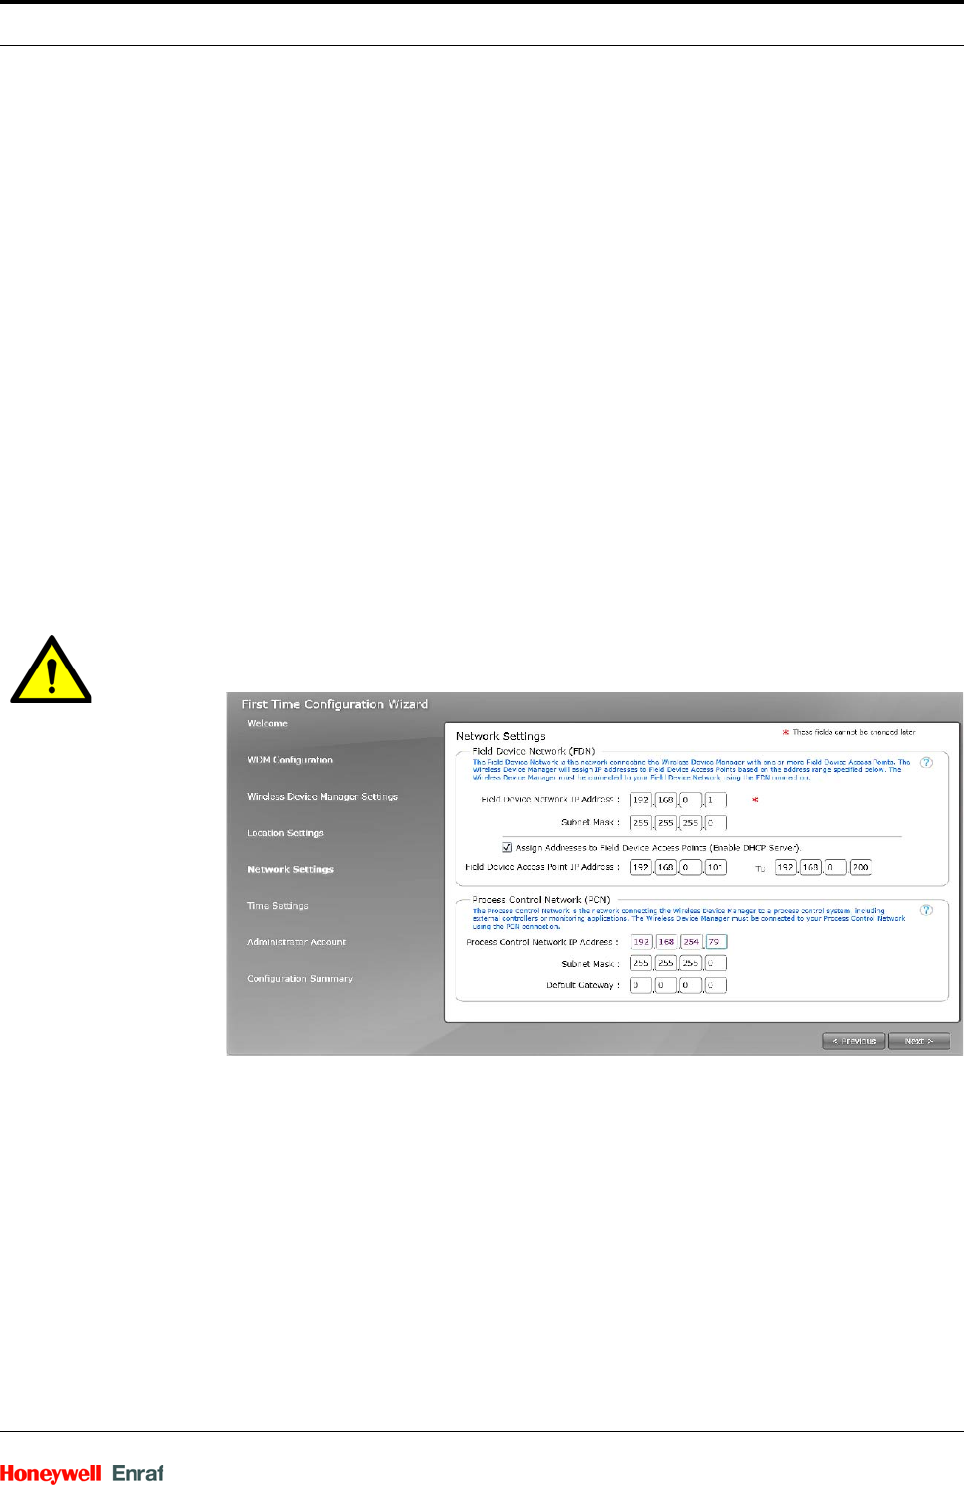
10. Under Field Device Network (FDN), configure the network settings for the
wireless field device network as follows.
a) Field Device Network IP Address: These settings are used to
configure the wireless field device network Ethernet connection
for the WDM. This is used for communication with FDAP.
WARNING! After completing the initial configuration, you cannot
change the Field Device Network IP Address specified in
the First Time Configuration Wizard.
b) Subnet Mask: A subnet mask identifies the bits of an IP address
that are reserved for the network address. For example, if the IP
Configuration - Configuring OneWireless infrastructure
Part No.: Rev01 Wireless Field Interface
User’s Manual 2 - 5
address of a particular node is 192.168.2.3 with a subnet mask of
255.255.255.0, the subnet mask indicates that the first 24 bits of
the address represent the network address. The last 8 bits can be
used for individual node addresses on that network.
c) Assign Addresses to Field Device Access Points (Enable
DHCP Server): Select this check box to enable the WDM to act
as the DHCP Server. Ensure you do not select the check box if
the network has another DHCP Server. It is recommended to
enable the WDM to act as the DHCP Server.
d) Field Device Access Point IP Address: This option is enabled
only if you have selected the Enable DHCP Server check box.
Accept the default range or configure the IP address range
according to the network settings in the plant network. The WDM
that acts as the DHCP Server assigns IP addresses based on the
range specified. Ensure that the IP addresses of the Access
Points are not within the DHCP address range.
If you do not enable DHCP Server during the first time configu-
ration, it is possible to enable this at a later stage using the
Property Panel.
WARNING! DHCP server configuration option is disabled on a
secondary WDM.
11. Under Process Control Network (PCN), configure the process control network
settings as follows.
Process Control Network IP Address: The process control network
settings are used to configure the process control network Ethernet
connections for the WDM. This is used for communication with moni-
toring applications and external controllers.
Subnet Mask
Default gateway: Used to access the subnets outside the PCN
subnet. This is an optional configuration option.
12. Click Next.
The Network Time page appears.
Configuration - Configuring OneWireless infrastructure
Wireless Field Interface Part No.: Rev01
2 - 6 User’s Manual
WARNING! The network time settings configuration is disabled on the
secondary WDM. Upon synchronization, the secondary
WDM syncs time from primary over the FDN interface.
WARNING! Network time settings configuration is disabled on the
secondary WDM. Upon synchronization, the secondary
WDM syncs time from primary over the FDN interface.
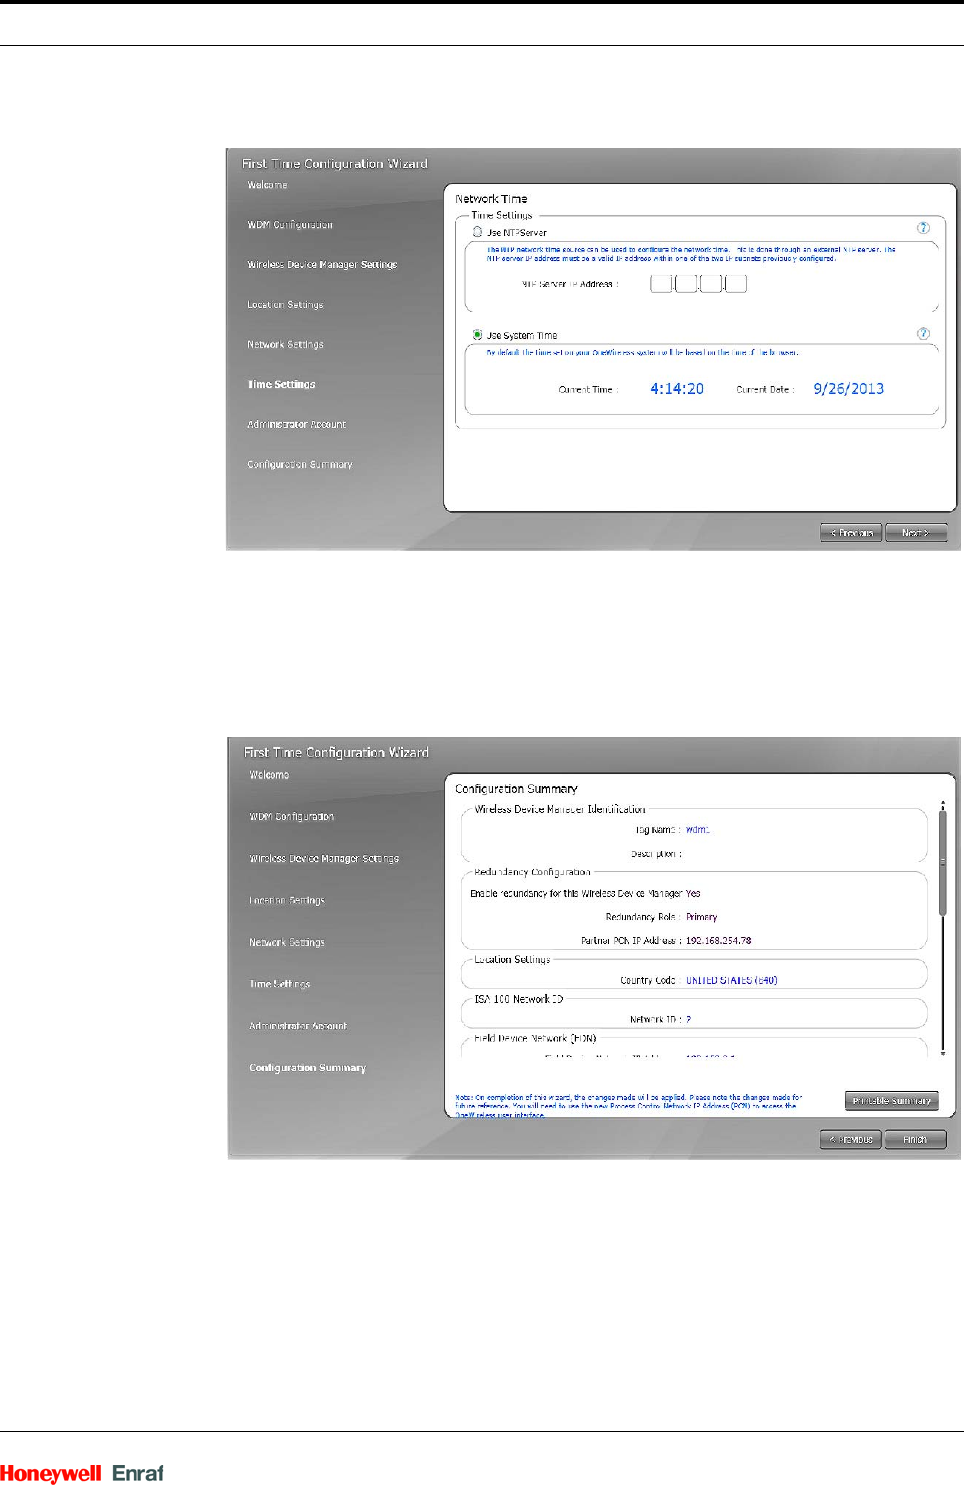
13. Click Use NTPServer or Use System Time, as required.
You can use either the NTP server or system time to configure the network
time of the OneWireless Network.
NOTE: By default, the network time is configured as the
system time. Consider the following while configuring
an external NTP server.
NTP server should be on the PCN or FDN.
NTP server IP address must be within FDN or PCN subnet unless a
default gateway has been configured on the PCN subnet and the
NTP server is accessible through the default gateway.
NTP server IP address should not overlap with the FDN and PCN IP
addresses.
NTP server IP address should not overlap with FDAP IP address
range, if DHCP Server is enabled.
14. If you are selecting NTP server, enter the NTP Server IP Address and click
Next. The Administrator Information page appears.
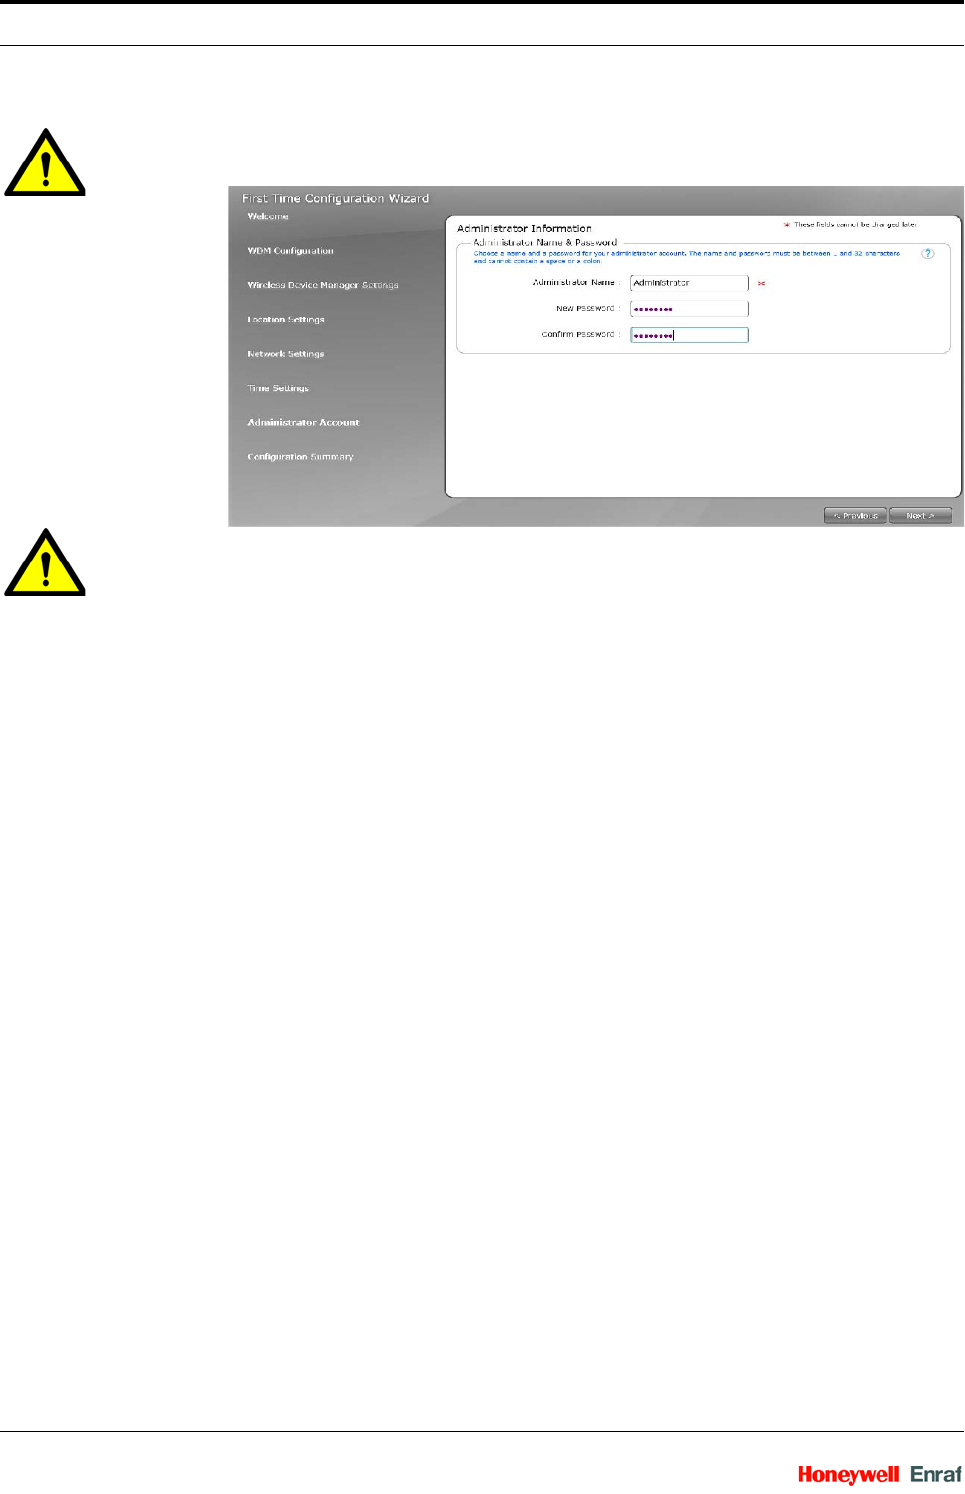
15. Type the user name and password in the Administrator Name, New
Password, and Confirm Password fields.
The default user name configured for the WDM is administrator. You
can change the default user name in the First Time Configuration
Wizard, if required. However, you cannot change the user name after
completing the initial configuration.
The password must contain at least one character and can contain up
to 32 characters. It should not start or end with a space and must not
contain single quote (‘).
Configuration - Configuring OneWireless infrastructure
Part No.: Rev01 Wireless Field Interface
User’s Manual 2 - 7
16. Click Next.
The Configuration Summary page appears which displays the summary
of all the configuration information specified in the First Time Configuration
Wizard. An incorrect entry is indicated by a warning icon. Hovering the
mouse over the icon displays a tooltip with the information about the
incorrect entry.
17. Verify the WDM settings, correct errors if any, and then click Finish.
If there are any errors in the configuration information that you have
provided, then the system does not allow you to click Finish.
18. On the Browser Redirect dialog box, click OK.
The wizard redirects the Web browser to the revised process control
network IP address.

Configuration - Configuring OneWireless infrastructure
Wireless Field Interface Part No.: Rev01
2 - 8 User’s Manual
WARNING! If you are configuring the WDM to use the same
process control network IP address, then the wizard
redirects the Web browser. If you have configured
the WDM using a different PCN IP subnet than the
computer, then you need to reconfigure the network
settings of the computer to access the user interface
using the IP address on the new subnet.
2.1.2 Provision the devices using over-the-air provisioning method
Devices in the OneWireless Network can be provisioned using over-the-
air provisioning method. WDM provisions the access points and the
access points that are enabled to function as provisioning devices can
provision the field devices. To enable over-the-air provisioning
capability, you must enable this feature in the user interface.
Any access point that is in the factory default state, when connected to
the OneWireless Network can join the network as an unprovisioned
device. In this state, the WDM contains only the basic details about the
device such as the Tag Name, EUI64, and Radio Revision. Also, there
is no active data communication between the WDM and the device in
the unprovisioned state. You can accept or reject an unprovisioned
device using the user interface. If accepted, the WDM sends the
provisioning data to the device and the device transitions to provisioning
state. A device with the new security data sends join request to the
WDM.
To provision the access points using over-the-air provisioning method
1. On the Selection Panel, select the WDM.
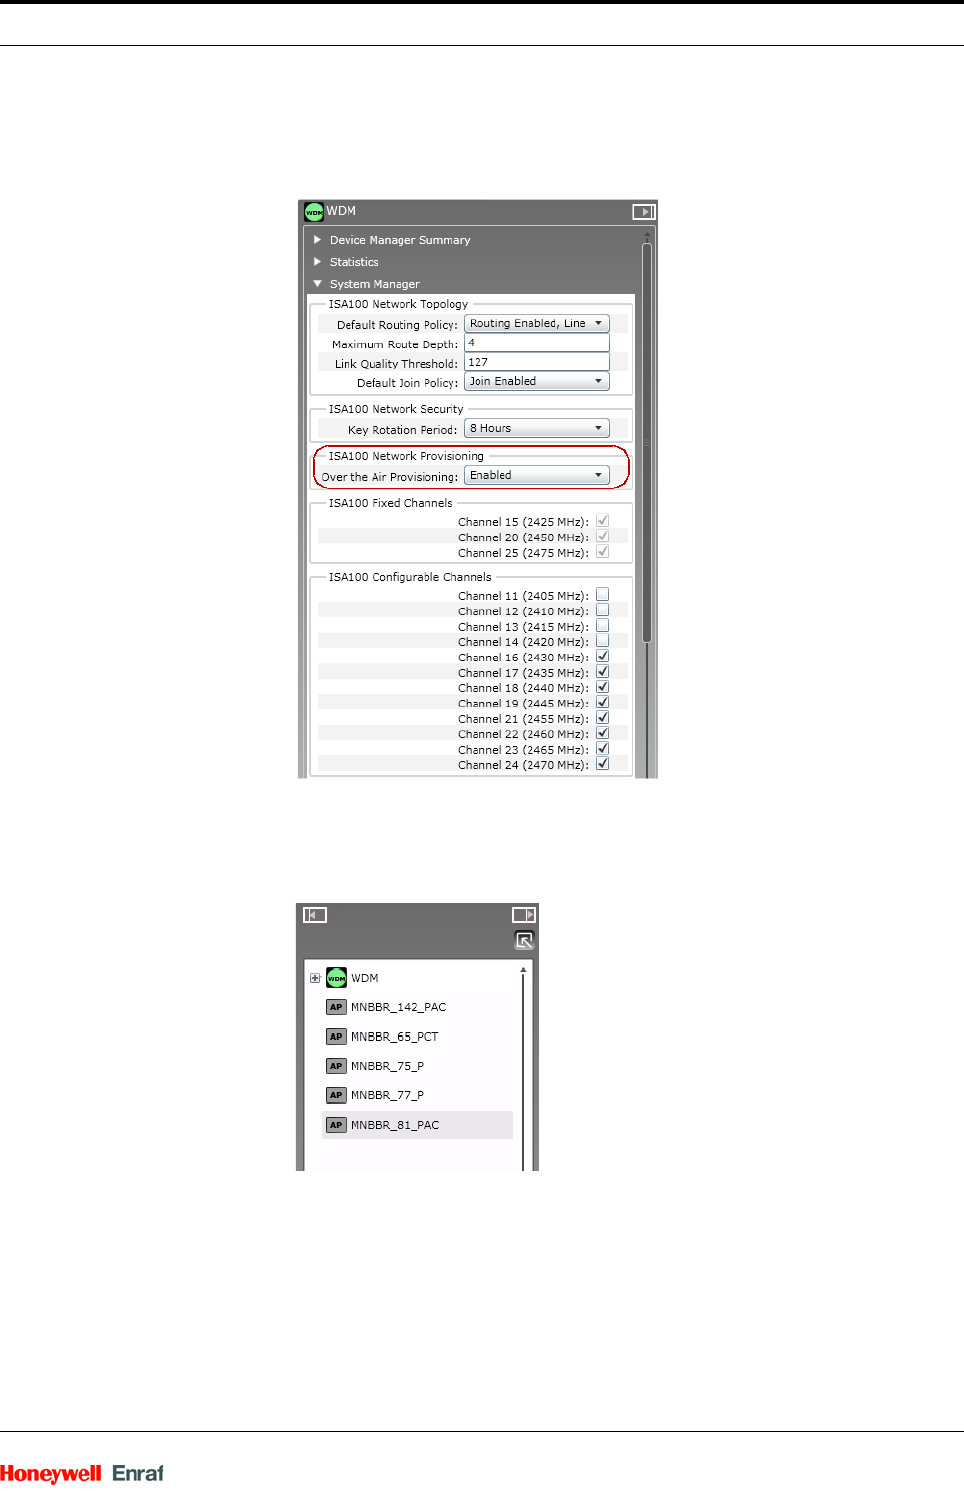
2. On the Property Panel, expand System Manager.
Configuration - Configuring OneWireless infrastructure
Part No.: Rev01 Wireless Field Interface
User’s Manual 2 - 9
3. Under ISA100 Network Provisioning, in the Over the Air Provisioning
group, select Enabled. The WDM is enabled for over-the-air provisioning
support.
4. Click Apply.
The unprovisioned access points start appearing in the Selection Panel.
You can filter the device list to view only the unprovisioned access points in
the network.
5. On the ribbon bar, in the Filter group, click Device Status > Un-Provi-
sioned.
6. Expand the extended Selection Panel to view the available device
parameters.
7. Select the required access point in the Selection Panel or the map view and
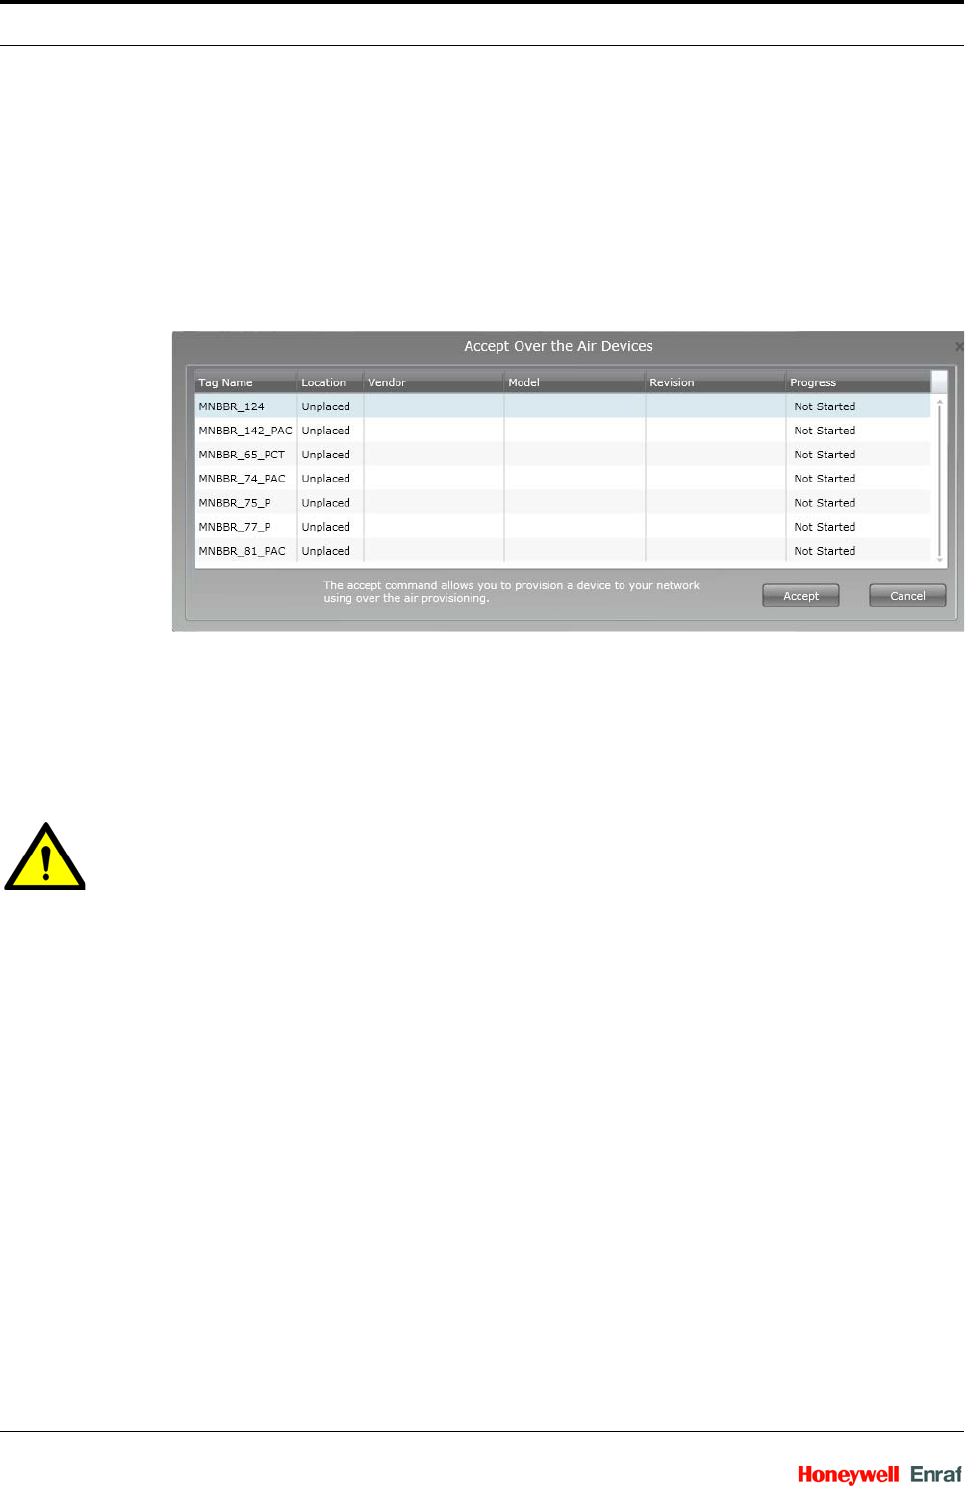
then click Accept on the ribbon bar.
Configuration - Configuring OneWireless infrastructure
Wireless Field Interface Part No.: Rev01
2 - 10 User’s Manual
NOTE: You can select multiple access points using the Selection
Panel or the map view. Use SHIFT+click to select multiple
items in a successive list. Use CTRL+click to select multiple
items not in succession. It is recommended that you select
and accept only 10 devices at a time.
The Accept Over the Air Devices dialog box appears. The dialog box
displays all the unprovisioned access points that you have selected for
enabling over-the-air provisioning.
8. Click Accept.
The Progress column displays the status as In Progress, Provi-
sioning, and then Completed when complete. Do not close the
dialog box when over-the-air provisioning is initiated for devices.
9. Click Close.
The Accept Over the Air Devices dialog box closes.
WARNING! R220 Wireless Field Interface devices can only be provisioned
using the over-the-air provisioning method.
To provision Wireless Field Interface devices using over-the-air
provisioning method
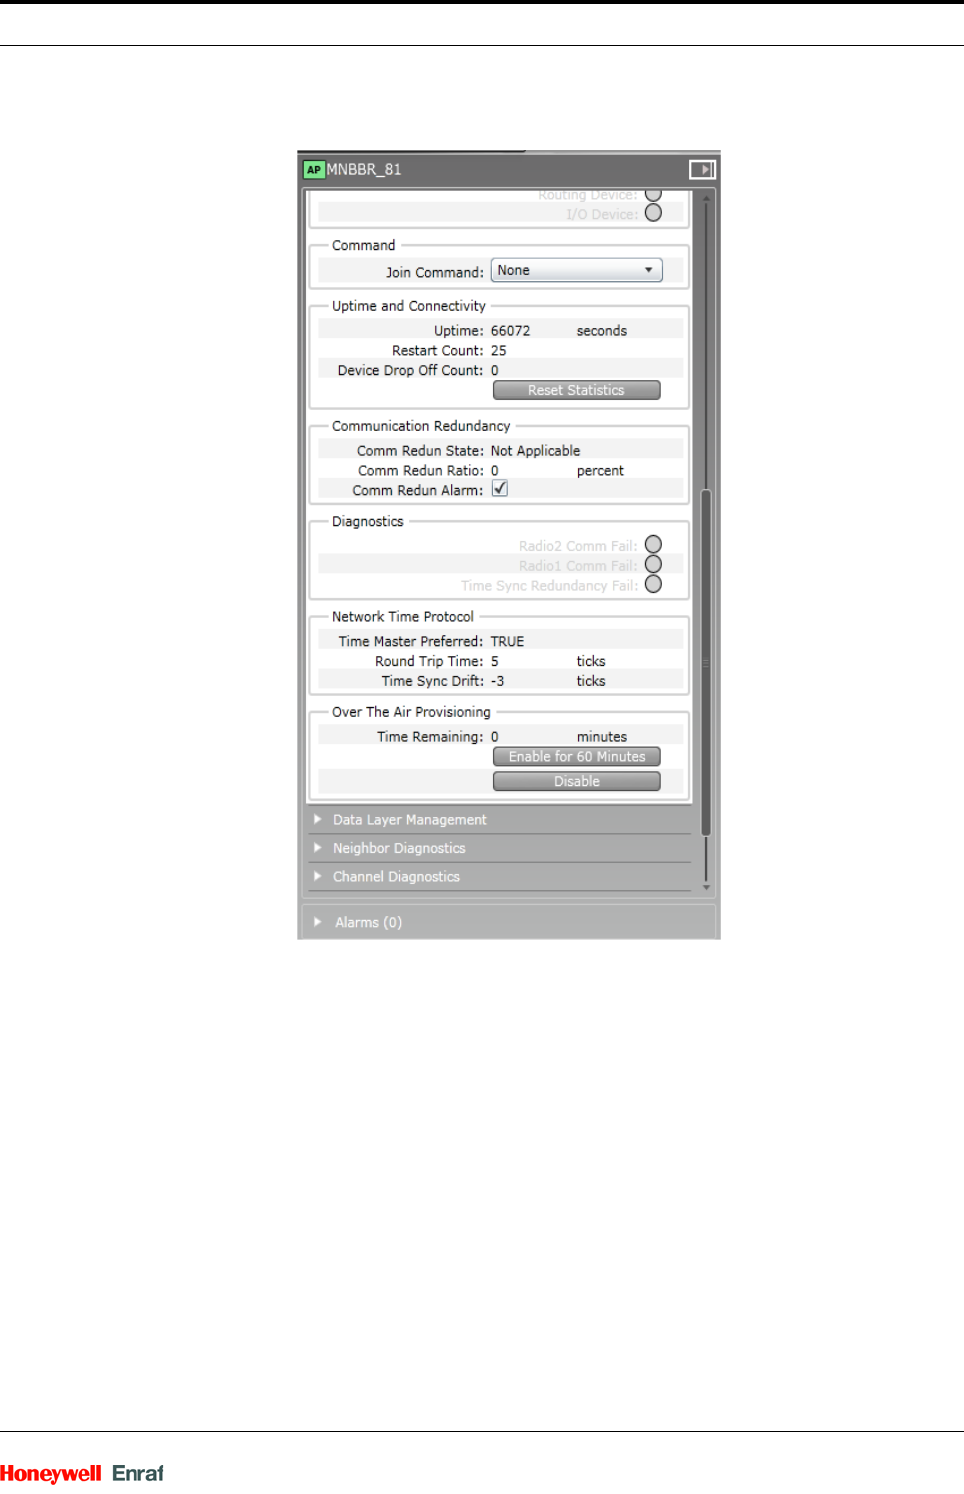
1. On the Selection Panel, select the access point.
2. On the Property Panel, expand Device Management.
Configuration - Configuring OneWireless infrastructure
Part No.: Rev01 Wireless Field Interface
User’s Manual 2 - 11
3. Under Over The Air Provisioning, click Enable for 60 Minutes.
The access point functions as a provisioning device for 60 minutes. The
unprovisioned Wireless Field Interface devices that are in the factory default
state start appearing in the Selection Panel. Note that if you do not accept
or reject the devices within 60 minutes, the devices automatically disappear
from the user interface.
4. To filter the Wireless Field Interface device list:
On the ribbon bar, in the Filter group, click Device Status > Un-Provi-
sioned.
The unprovisioned devices appear in the Selection Panel. The extended
Selection Panel enables you to view the available device parameters.
The device establishes a communication link with the access point after it
attains the unprovisioned state. This link persists even if the device is not provi-
sioned using the connected access point. If the device needs to be provisioned
using a different access point, reject the device and then delete it from the user

Configuration - Configuring OneWireless infrastructure
Wireless Field Interface Part No.: Rev01
2 - 12 User’s Manual
interface, so that the device can rejoin through a different access point for provi-
sioning.
5. Select the required Wireless Field Interface device in the Selection Panel or
the map view and then click Accept on the ribbon bar.
NOTE: You can select multiple access points using the Selection
Panel or the map view. Use SHIFT+click to select multiple
items in a successive list. Use CTRL+click to select multiple
items not in succession. It is recommended that you
select and accept only 10 devices at a time.
The Accept Over the Air Devices dialog box appears. The dialog box
displays all the unprovisioned devices that you have selected for enabling
over-the-air provisioning.
NOTE: To reject a device from joining the network using over-the-
air provisioning method.
Select the required device and click Reject in the ribbon bar. The
Reject Over the Air Devices dialog box displays.
Click Reject.
The Progress column displays the status as In Progress, and then
Completed, when complete.
Click Close.
The Reject Over the Air Devices dialog box closes.
6. Click Accept.
The Progress column displays the status as In Progress, Provi-
sioning, and then Completed, when complete. Do not close the
dialog box when over-the-air provisioning is initiated for devices.
7. Click Close.
The Accept Over the Air Devices dialog box closes.
All the field devices that you have selected for over-the-air provisioning are
provisioned.
NOTE: By default, the selected Wireless Field Interface devices
are provisioned and joined as line powered routers. Select
Device Management > Routing Assignment > Routing
Disabled to disable the routing field devices to function as
line powered routers.
2.1.2.1 Removing the provisioning key from Wireless Field Interface gauge
To enable the Wireless Field Interface gauge to join another network,
you must remove the security configuration on the device and then
reprovision the device using over-the-air provisioning.
To remove the provisioning key from Wireless Field Interface gauge
1. On SmartView, press the UP ARROW and DOWN ARROW simultaneously
(MENU push buttons) to view the menu items on the display.

Configuration - Configuring OneWireless infrastructure
Part No.: Rev01 Wireless Field Interface
User’s Manual 2 - 13
2. On the display, scroll to the commands item using the MENU buttons.
3. Press the LEFT ARROW and RIGHT ARROW (SELECT push buttons) simulta-
neously. You are prompted to enter the password. The default password for
SmartView is AAAAAA.
4. Use the MENU push buttons to enter the password and then press the
SELECT push buttons. The list of commands appears.
5. Scroll to select the CAN-1WL FlexConn board name and then press the
SELECT push buttons.
6. Scroll to select board and then press the SELECT push buttons.
7. Scroll to select Restore Default then press the SELECT push buttons. The provi-
sioning key on the Wireless Field Interface gauge is now removed.

Configuration - Configuring Wireless Field Interface device
Wireless Field Interface Part No.: Rev01
2 - 14 User’s Manual
2.2 Configuring Wireless Field Interface device
2.2.1 Loading the Device Description file
A Device Description (DD) file is usually a zip file that is available on the
disk supplied in the Honeywell Process Solutions website. It contains
information about the device type, commands that are supported by the
device, and other device-specific data. A DD file for a particular field
device is used to describe the device and to interpret messages and the
device status.
WARNING! To ensure consistency in the channel names, load the DD
files before the device joins the network.
To load the Device Description file
1. On the ribbon bar, in the Maintenance group, click Templates. The Load
DD File dialog box appears.
2. Click Load DD File.
3. Browse to the directory location of the DD file.
4. Select the DD file and click Open.
5. The DD file is uploaded to the WDM and an upload success message
appears.
6. Click Close to close the Load DD File dialog box.
7. Repeat steps to load the DD files for all the device types.
2.2.2 Configuring routing assignment
After joining the network for the first time, a field device capable of
operating as a router and an I/O device initializes its routing assignment
based on the current default routing policy. It is possible to override the
default routing policy by configuring routing assignment for field
devices. Configuring device routing assignment results in restarting the
device with a new role.
Considerations
Device routing assignment can be configured only for devices that
are capable of operating as routers and I/O devices.
To configure routing assignment
1. On the Selection Panel, select the field device.
2. On the Property Panel, expand Device Management.
3. Select Routing Assignment, as appropriate.
The following are the Routing Assignment options available.
Routing Disabled — Disables the ability of a routing field device to
function as a router. The field device can function only as an I/O
device.

Configuration - Configuring Wireless Field Interface device
Part No.: Rev01 Wireless Field Interface
User’s Manual 2 - 15
Routing Enabled — Enables the routing field device to function as a
router and an I/O device. The default join policy configured is Follow
System Manager Policy.
Not Applicable
– Does not apply to devices that are capable of operating as
access points.
– Does not apply to devices that are only capable of operating as
routers.
4. Select one of the following Join Assignment options, as required.
The Join Assignment overrides the system manager join policy. This is
applicable only for routing field devices.
Join Disabled — Disables device-join through this device.
Join Enabled — Enables device-join through this device.
Follow System Manager Policy — Enables the device to follow the
system manager join policy. Device-join through this device depends
on the configured system manager join policy.
The Join Status is a read-only parameter that indicates the resultant join
state for all the devices.
Access Points, FDAP access points, and FDAP routers have the
Join Assignment permanently set to Join Enabled.
Non-routing field devices have the Join Assignment permanently
set to Join Disabled.
Routing field devices have the default Join Assignment set to
Follow System Manager Policy.
By default, the selected Wireless Field Interface devices are provisioned
and joined as line powered routers. Select Device Management > Routing
Assignment > Routing Disabled to disable the routing field devices to
function as line powered routers.
5. Click Apply.
2.2.3 Configuring Wireless Field Interface device channels
2.2.3.1 Configure Mode and Scale
To configure Scale
1. On the Selection Panel, select the Wireless Field Interface device channel.
2. On the Property Panel, expand Process Variable to view the following
read-only parameters in the OneWireless user interface.
WARNING! The configuration of the engineering units should be
performed using the Engauge tool only. The parameter values
of the sensor cards get reflected in the OneWireless user
interface as read-only parameters.
EU at 100%: Specifies the high range PV value in Engineering Units.
EU at 0%: Specifies the low range PV value in Engineering Units.
Configuration - Configuring Wireless Field Interface device
Wireless Field Interface Part No.: Rev01
2 - 16 User’s Manual
Units Index: Specifies the unit of the measurement value. The value
varies according to the sensor type selected for a channel. For
example, the process value of the TII-XR sensor card is displayed as
CH01_AI_1 and the Units Index is set to m.
3. Click Apply.
NOTE: After applying the changes, the newly configured values
appear under the Scale panel.
To configure Mode
1. On the Property Panel, expand Mode.
2. In the Target list, select the mode as required.
3. The mode types available are Normal, OOS, and Auto.
4. Click Apply.
2.2.3.2 Add channels to publication groups
Perform the following steps to enable/disable the PV publication
capability of field devices.
To add channels to publication groups
1. On the Selection Panel, select the Wireless Field Interface device channel.
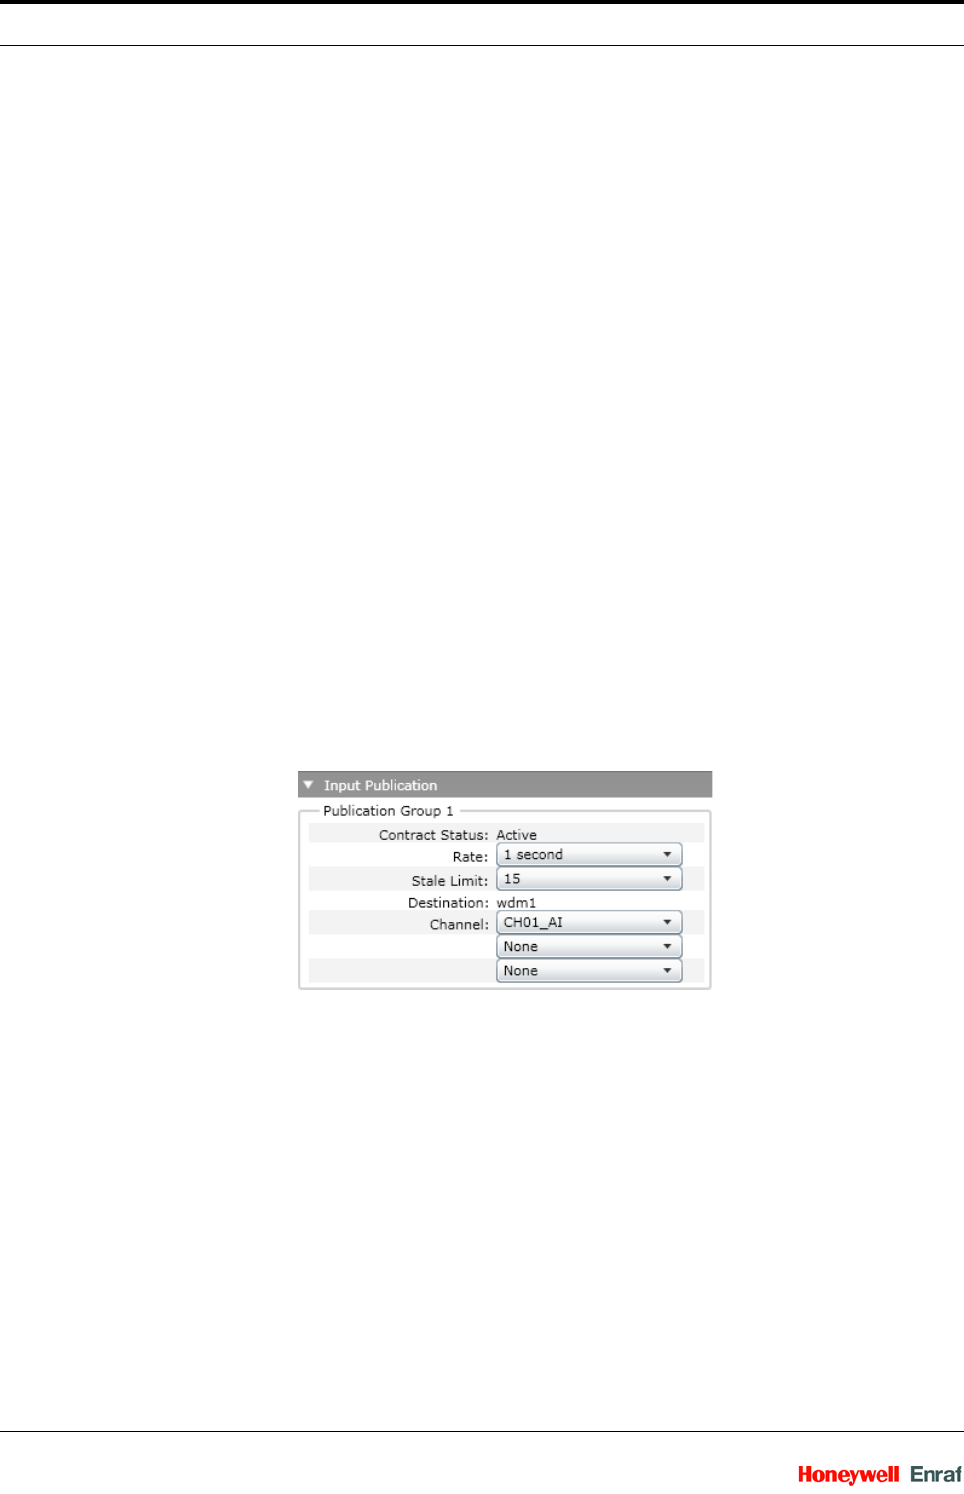
2. On the Property Panel, expand Input Publication panel.
3. In the Channel drop-down list, select the channels for which data publication
needs to be enabled.
NOTE: To disable data publication, select None in the Channel
list.
4. Click Apply.
2.2.3.3 Remove channels from publication groups
To remove channels from publication groups
1. On the Selection Panel, select the Wireless Field Interface device channel.
2. On the Property Panel, expand Input Publication.
3. For the channel to be deleted from the publication group, click None in the
Channel drop-down list.
4. Click Apply.
Configuration - Configuring Wireless Field Interface device
Part No.: Rev01 Wireless Field Interface
User’s Manual 2 - 17
2.2.4 Activating Wireless Field Interface device in OneWireless Network
The ISA100 Wireless field devices maintain a database of process
configuration, identification, and diagnostic information in memory.
WDM allows accessing this information from the Wireless Field
Interface client applications (CIU Prime hardware or Engauge
software). This enables monitoring the ISA100 Wireless field devices
like any other field device.
OneWireless Network uses serial communication interface to support data transmission
between the applications and the WDM. It also uses Ethernet/UDP interface for data
transmission.
2.2.4.1 Activate ENRAF Ethernet UDP interface on the OneWireless user interface
To activate ENRAF Ethernet/UDP interface on the OneWireless user
interface
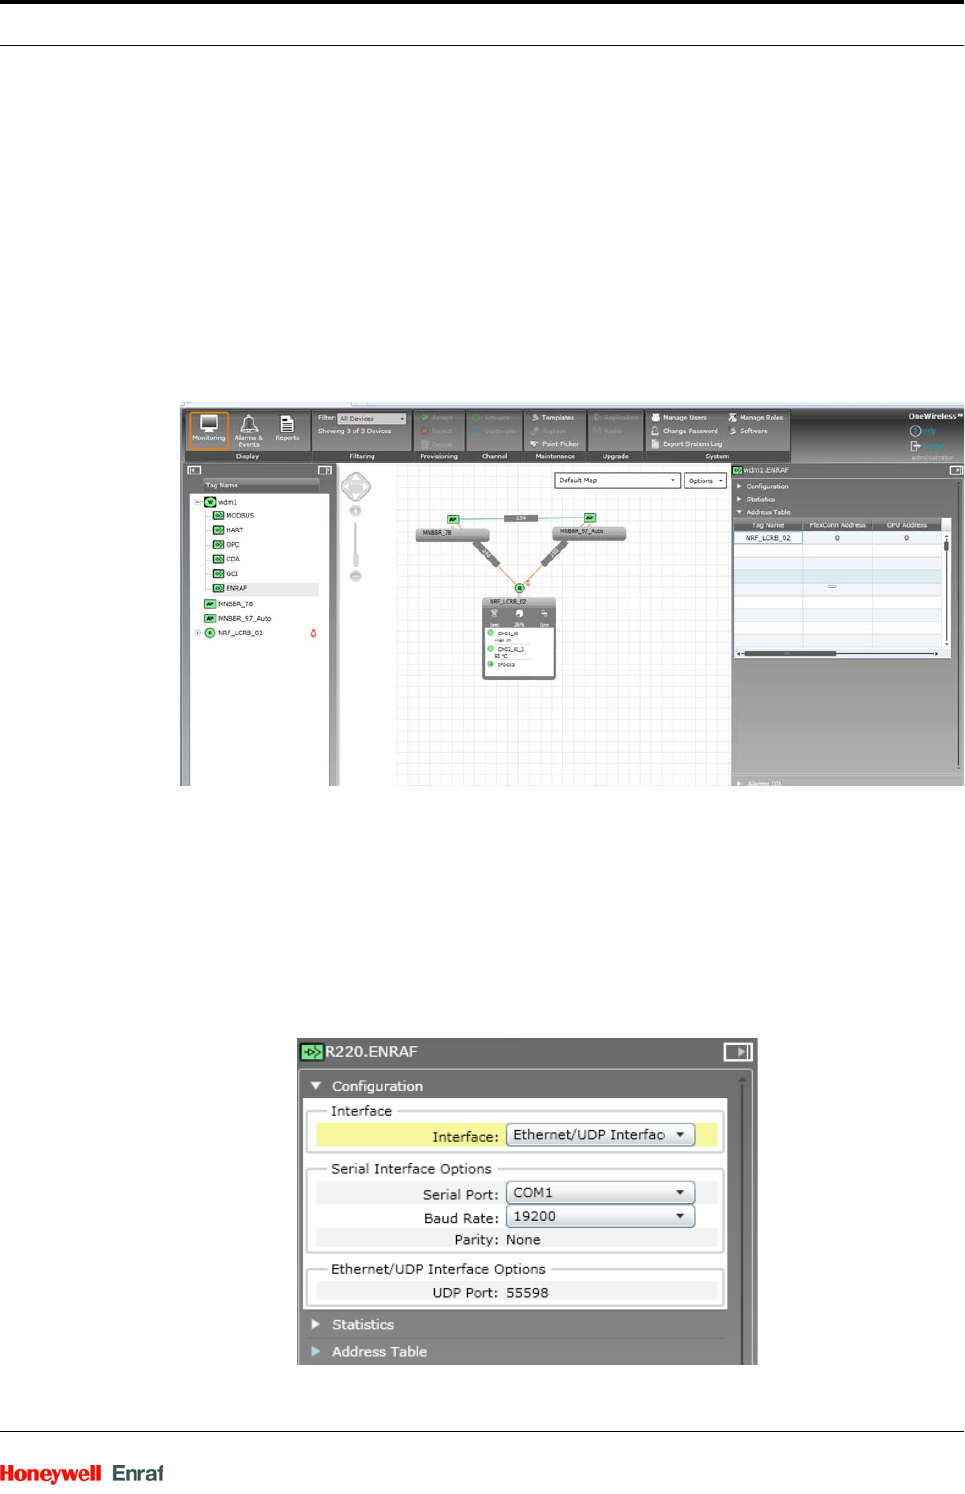
1. On the Selection Panel, expand the WDM icon and select ENRAF.
2. On the Property Panel, expand Configuration panel.
3. In the Interface list, click Ethernet/UDP Interface.
Configuration - Configuring Wireless Field Interface device
Wireless Field Interface Part No.: Rev01
2 - 18 User’s Manual
4. Under the Ethernet/UDP Interface Options, the UDP port number of the
port on which the WDM is connected is displayed.
5. Click Apply.
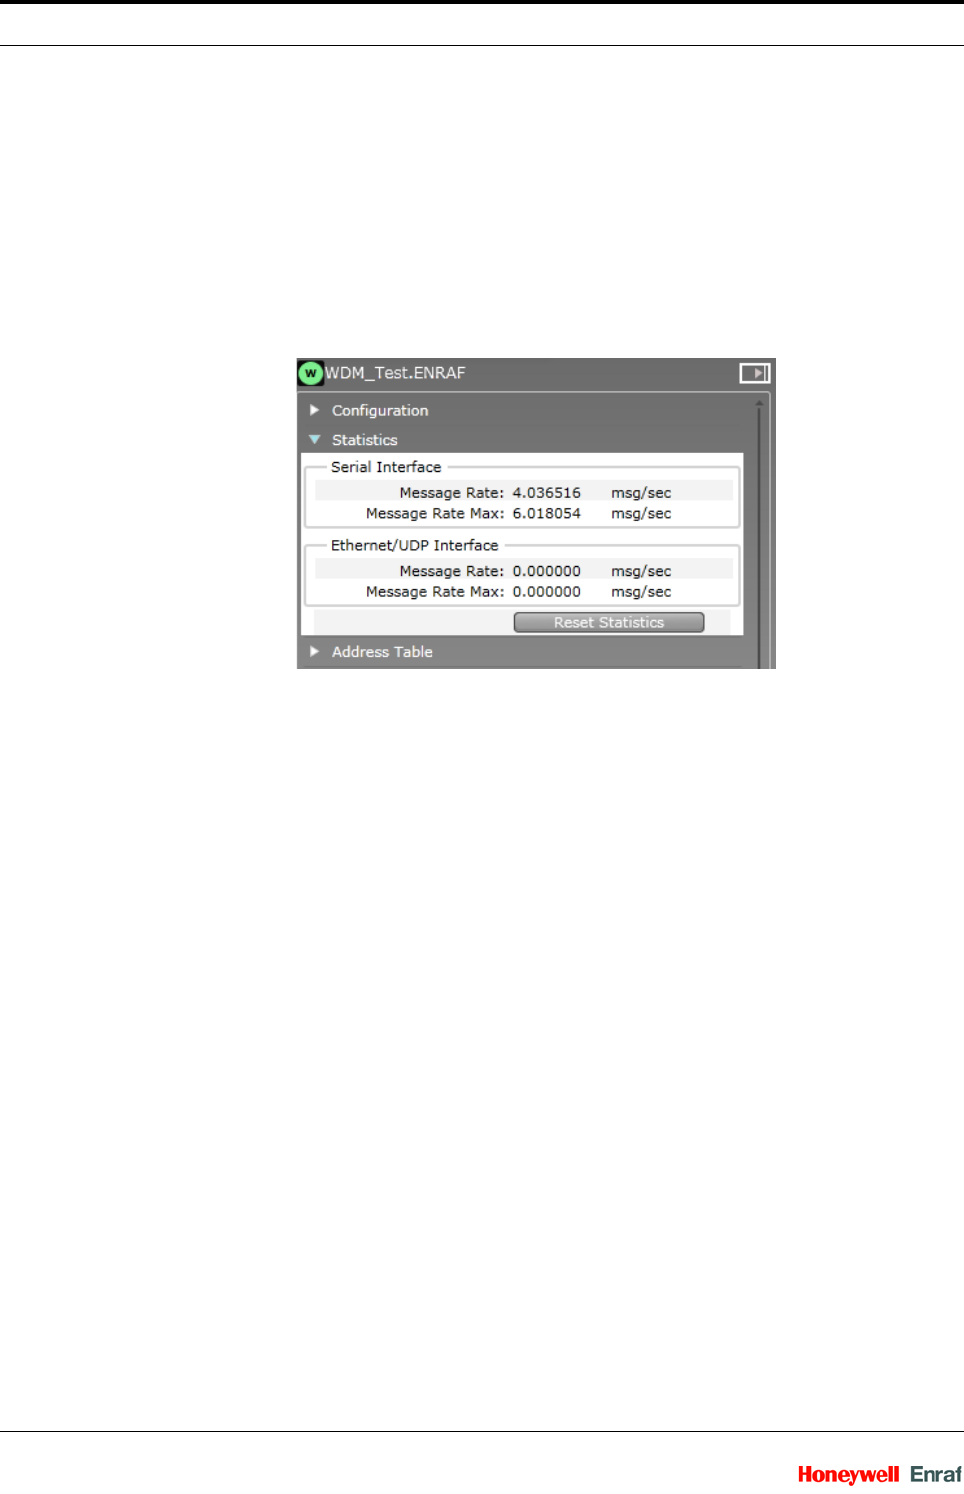
2.2.4.2 Monitor performance of ENRAF interface
To monitor performance of ENRAF interface
1. On the Selection Panel, select the ENRAF interface.
2. On the Property Panel, expand Statistics.
3. Verify the following attributes to monitor the performance of the ENRAF
interface.
Message Rate: Number of messages processed by the interface, per
second.
Message Rate Max: Maximum number of messages processed by
the interface, per second.
4. Click Reset Statistics to reset all the ENRAF interface statistics.
2.2.5 Configuring field devices
2.2.5.1 Configure field device properties
To configure tag name and description
1. On the Selection Panel, select the field device.
2. On the Property Panel, expand Field Device Summary.
3. Type the required Tag Name.
NOTE: You can change the Tag Name by double-clicking the
field device name in the Selection Panel.
4. Type the required Description.
5. Click Apply.
2.2.5.2 Configure publication rate
The publication data for input and output field devices can be configured
using the Input Publication panel in the Property Panel. Depending on

Configuration - Configuring Wireless Field Interface device
Part No.: Rev01 Wireless Field Interface
User’s Manual 2 - 19
the device type, a field device can have an Input Publication panel. This
is determined by the DD file for the field device.
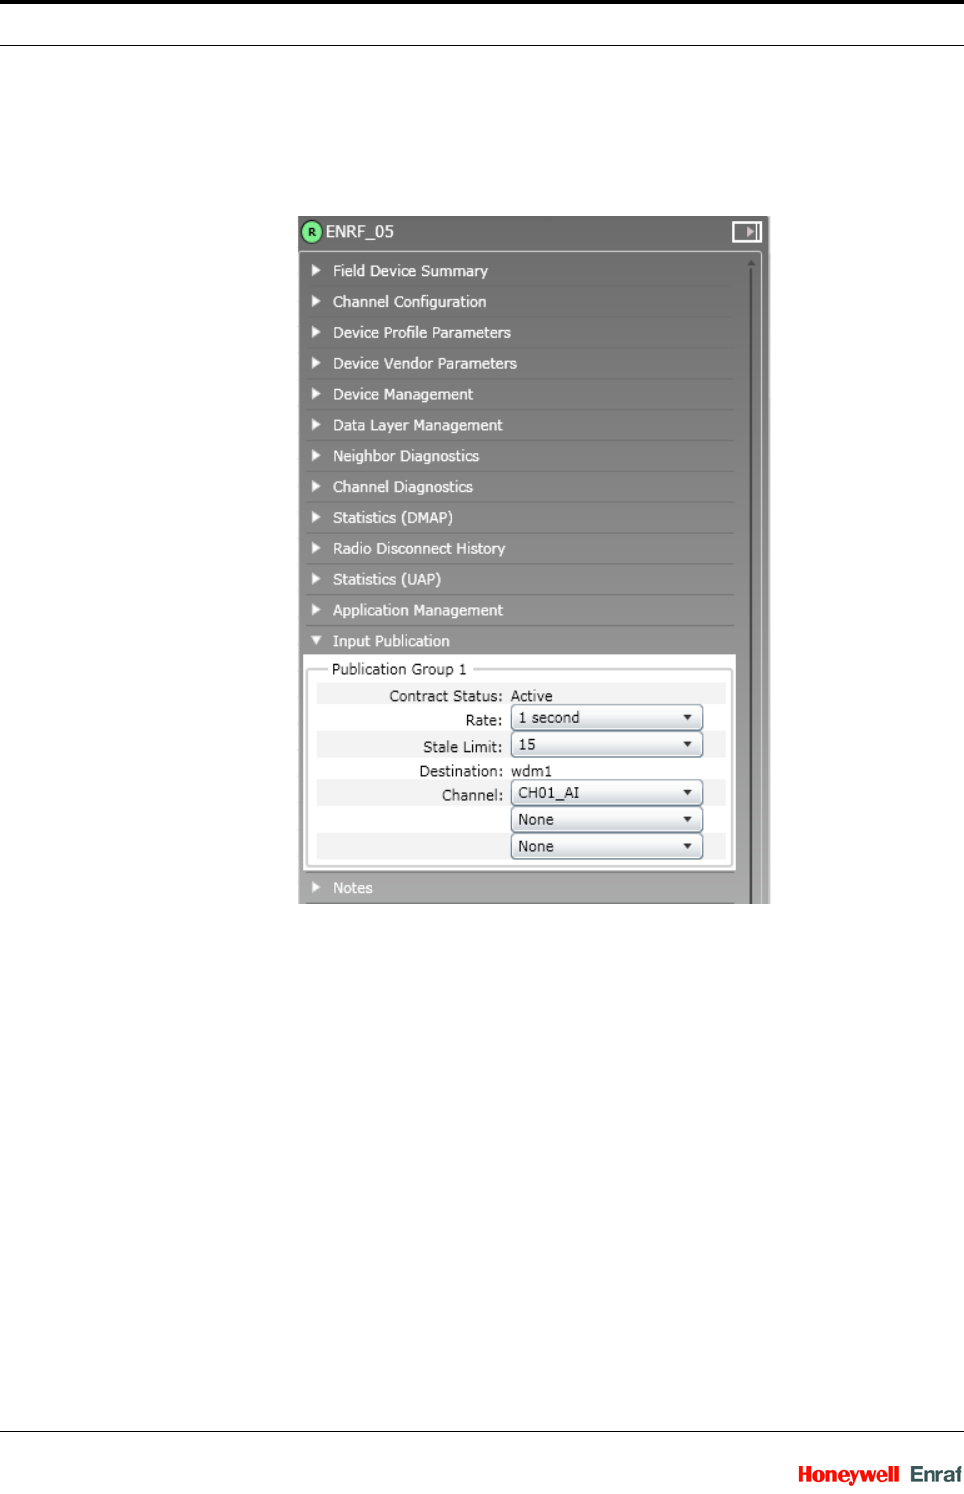
The Input Publication panel contains the following configuration options.
Contract Status — A contract is a communication resource
(bandwidth) allocation between two devices on the ISA100 network.
The following are the status values that are displayed depending on
the status of the contract.
• Not Configured - No contract established due to
incorrect configuration of the device.
• Activating - Contract establishment is in progress.
• Active- Contract is active.
• Active, Negotiated Down - If a device requests a
contract for periodic publications at a fast rate (such as 1
second) and if the communication resources are not
available, the contract is negotiated down to a slower
publication period (such as 5 seconds).
• Terminating - Contract termination is in progress.
• Failed - Contract establishment is failed.
• Inactive - Contract is inactive.
Rate – The rate at which a field device publishes data.
NOTE: Honeywell recommends that you set the Rate as 10
seconds.
Stale Limit – Defines the maximum number of stale input values that
can be received before the input status is set to Bad. It is recom-
mended that for 1 second publication period, the stale limit should be
set to 15 seconds. For all other publication periods (5 seconds, 10
seconds, 30 seconds, and 1 minute), the stale limit should be set to 5
Destination – Destination of publication for output devices .
Channel – The list of channels for which the publication configuration
applies.
NOTE: When a device joins the network, the WDM automatically
configures its publication period as 30 seconds.
Configuration - Configuring Wireless Field Interface device
Wireless Field Interface Part No.: Rev01
2 - 20 User’s Manual
To configure publication rate and stale limit
1. On the Selection Panel, select the field device.
2. On the Property Panel, expand Input Publication.
3. In the Rate field, select the publication rate, as appropriate.
4. In the Stale Limit field, select the stale limit, as appropriate.
5. Click Apply.
Configuration - Configuring the protocol tunneling
Part No.: Rev01 Wireless Field Interface
User’s Manual 2 - 21
2.3 Configuring the protocol tunneling
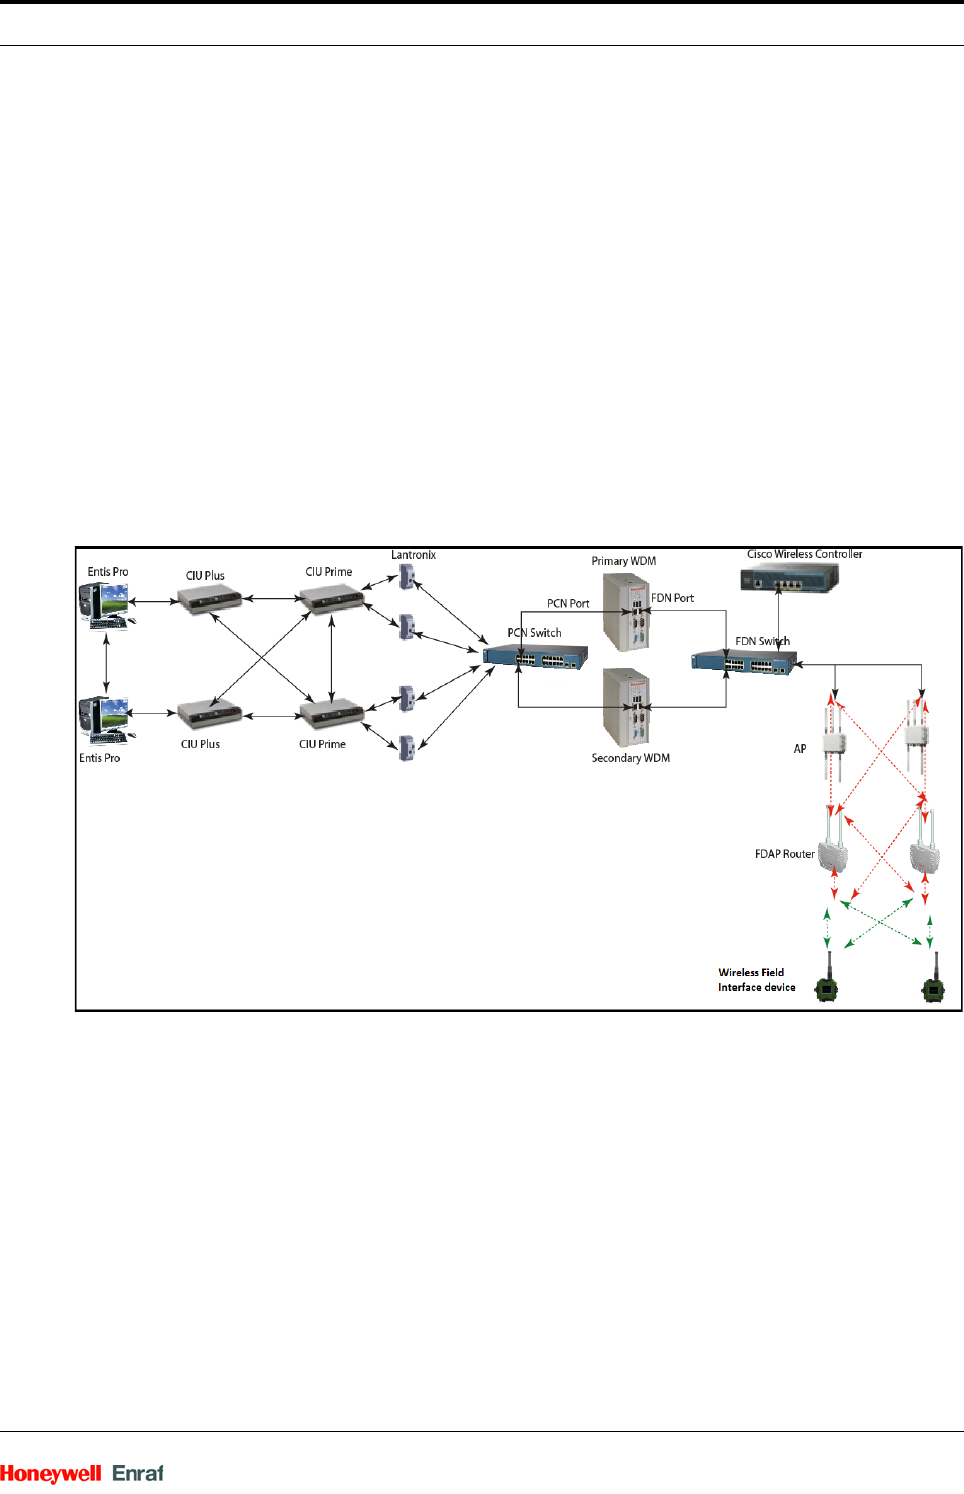
This release of ISA100 Flexline R220 supports integration with
OneWireless R220. OneWireless R220 WDM supports GPU and
Flexconn protocol tunnel. The Applications (Engauge tool/CIU Prime)
that support GPU and Flexconn protocol tunnel, communicate with the
WDM for configuring and monitoring the ISA100 Flexline R220 devices.
Protocol tunneling can be established for the Wireless Field Interface
device in the following two ways.
1. Serial tunneling through RS-232 or RS-485
2. Ethernet/UDP tunnelling
The serial RS-232 is configured on COM1 of the WDM and serial RS-485 is
configured on COM2 of the WDM. Redundancy is not supported with the serial
RS-232 protocol tunneling. Multiple clients are supported with the Ethernet/
UDP.
Configuration - Configuring the protocol tunneling
Wireless Field Interface Part No.: Rev01
2 - 22 User’s Manual
2.3.1 Configure Wireless Field Interface device interface
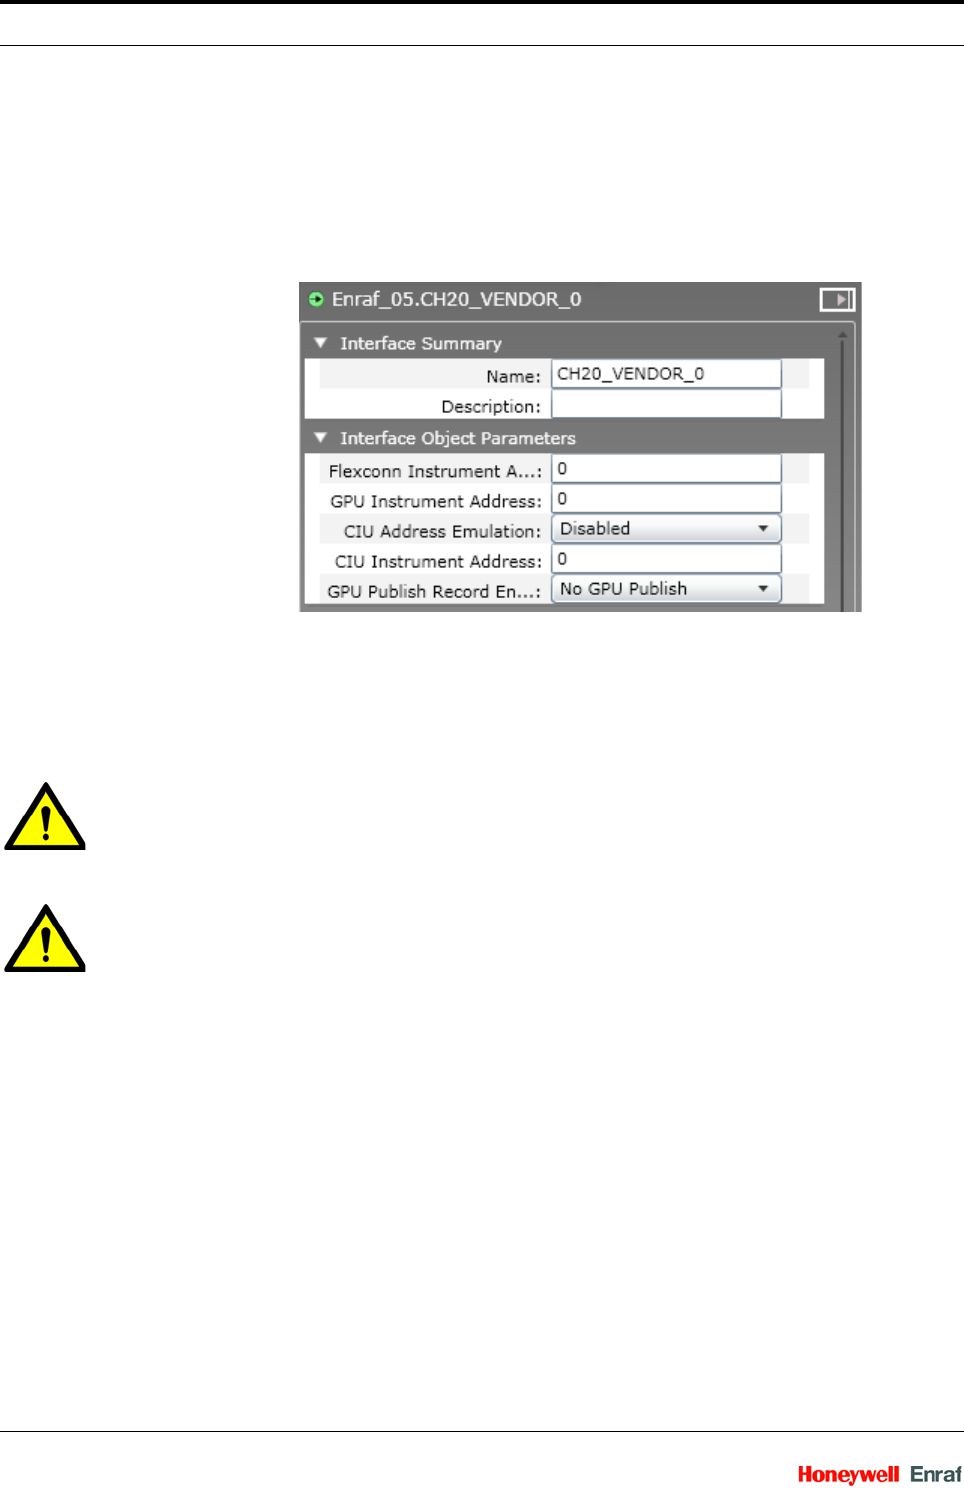
To configure Interface Summary and Interface Object Parameters
1. On the Selection Panel, select the field device.
2. On the Property Panel, expand Interface Summary and Interface Object
Parameters.
3. Under Interface Summary, enter the following read/write parameter details.
a) Name — Type the required name for the channel.
b) Description — Type the required description for the channel.
4. Under Interface Object Parameters, enter the following details.
a) Flexconn Instrument Address — Enter the address of the instrument
for FlexConn messages.
WARNING! Each instrument must have a unique FlexConn
address
b) GPU Instrument Address — Enter the address of the instrument for
GPU messages .
WARNING! Each instrument must have a unique GPU address.
c) CIU Address Emulation — Select Enabled or Disabled from the drop-
down list.
d) CIU Instrument Address — Enter the CIU instrument address.
2.3.2 Configure ENRAF serial interface
To access the field device data, you need to configure the Enraf
interface from the OneWireless user interface.
Prerequisites
Ensure the following:
The Wireless Field Interface devices are connected to the WDM
using a serial cable.
The Wireless Field Interface devices are joined in the ISA100
Wireless network.
Configuration - Configuring the protocol tunneling
Part No.: Rev01 Wireless Field Interface
User’s Manual 2 - 23
The GPU address and the FlexConn address configured for a
Wireless Field Interface device should be unique for each device in
the network.
For more information regarding the GPU address and the FlexConn
address, refer to the section “Configure Wireless Field Interface
device interface” on page 29.
If RS-232 serial communication is required, then connect the RS-232
serial cable between the COM1 port of the WDM and the client .
If RS-485 serial communication is required, then connect the RS-485
serial cable between the COM2 port of the WDM and the client .
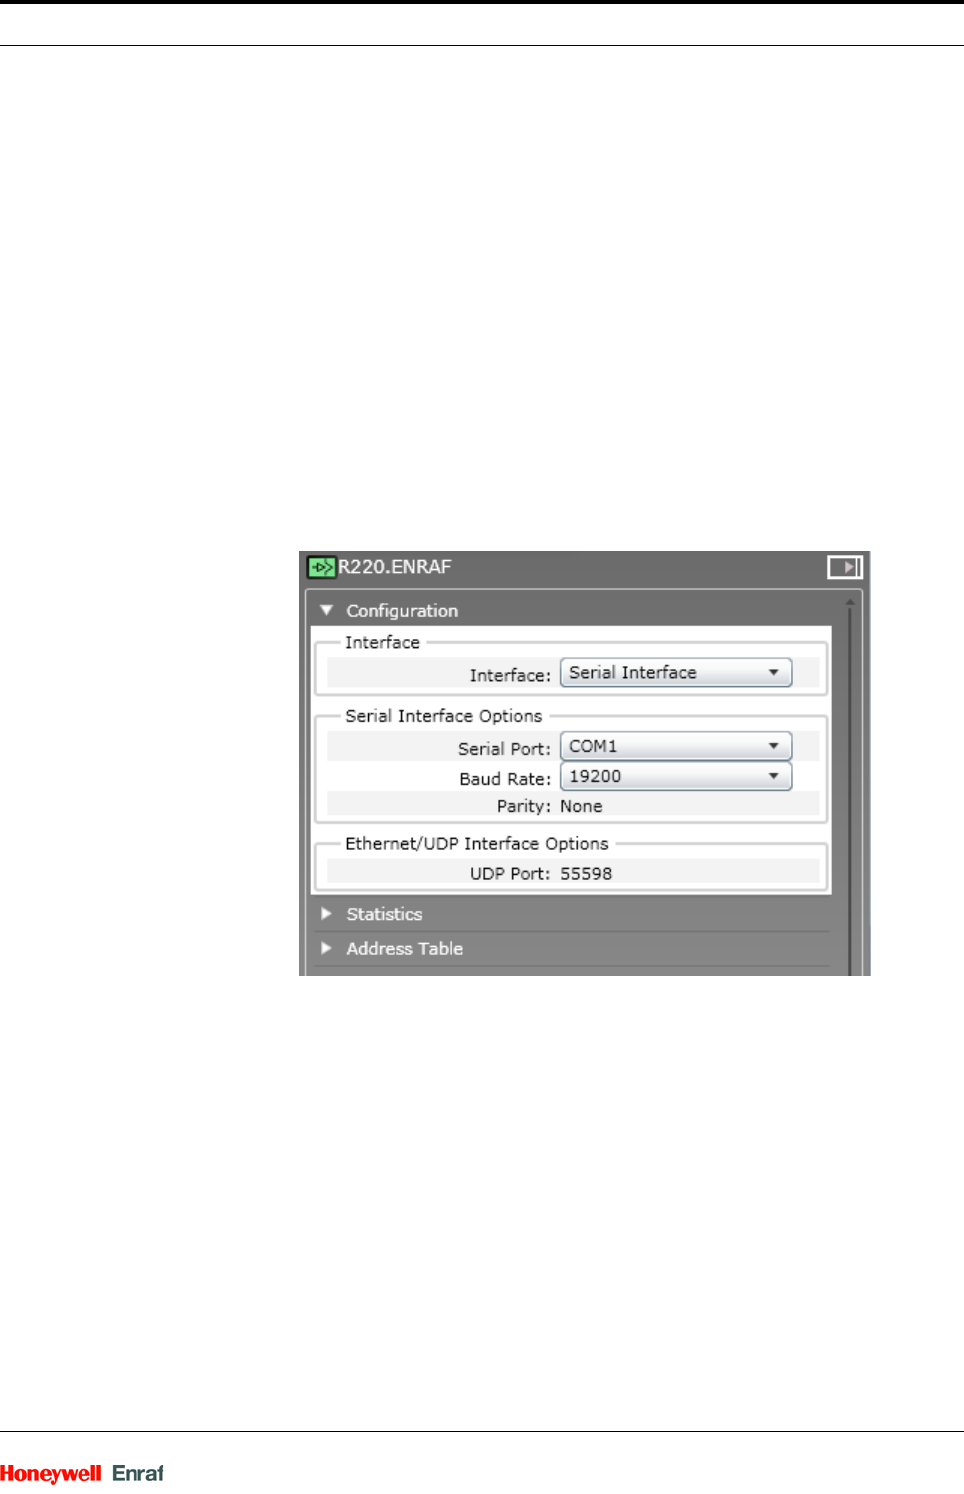
To configure ENRAF serial interface
1. On the Selection Panel, expand the WDM icon and select ENRAF.
2. On the Property Panel, expand Configuration panel.
3. In the Interface list, click Serial Interface.
4. Configure the following under Serial Interface Options.
Serial Port: Select the serial port on which the serial cable is
connected. The available options are COM1 and COM2.
Baud Rate: Select 19200 as the baud rate for ENRAF serial
interface.
Parity: This is a read-only parameter and displays the value as
None.
5. Click Apply.
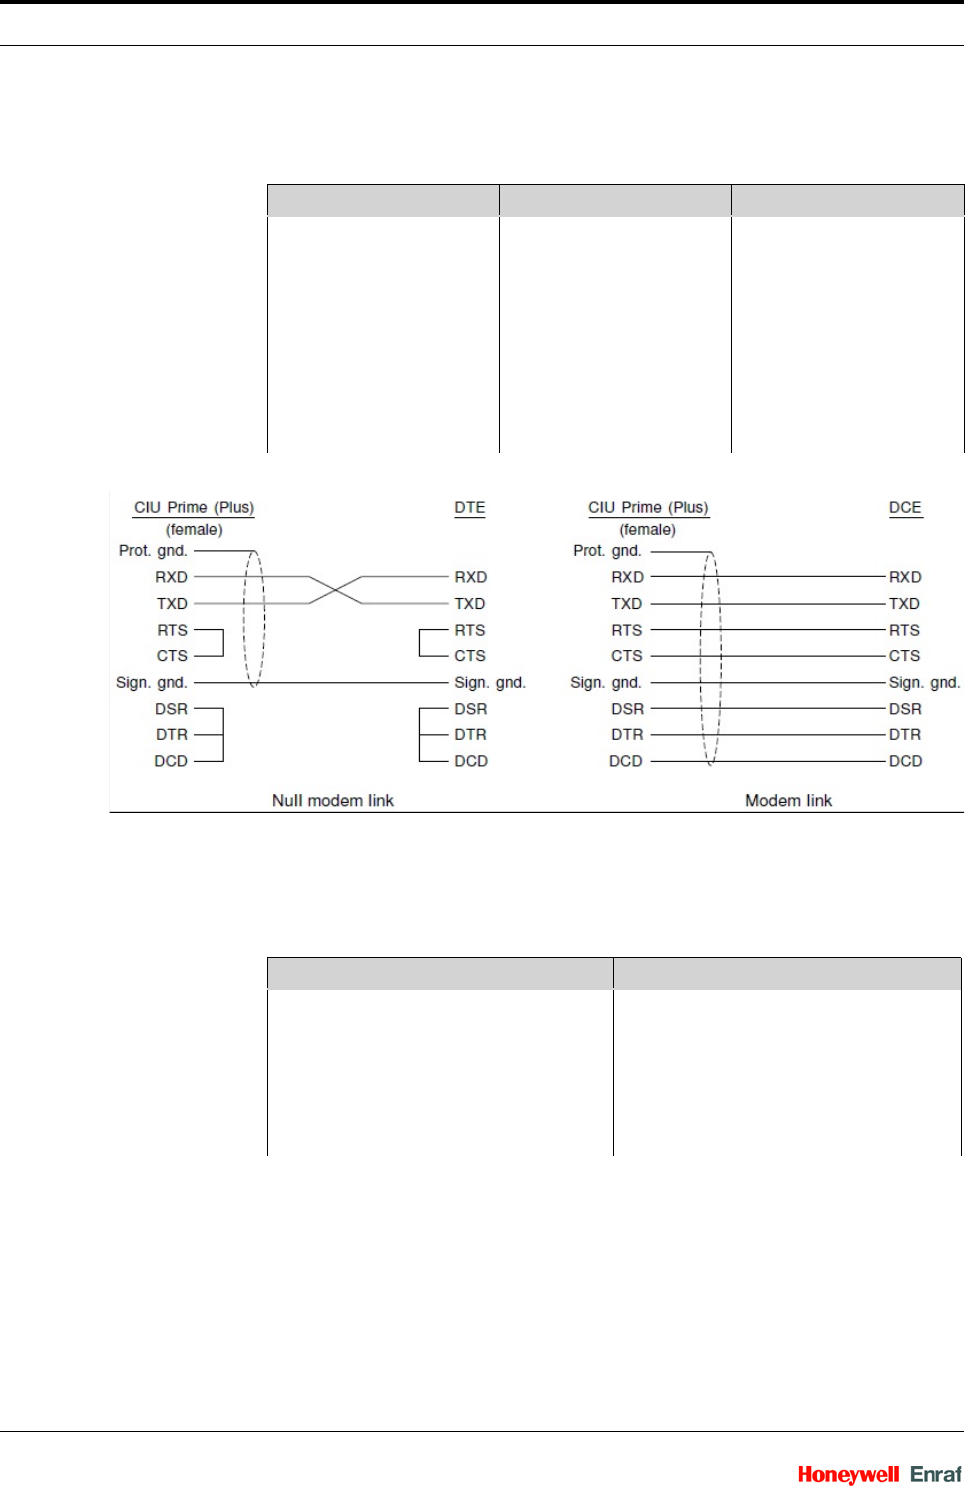
2.3.2.1 Serial interface connection
For serial interface connection, connect a serial cable from the interface
client to the serial port on the WDM.
Rs-232
Configuration - Configuring the protocol tunneling
Wireless Field Interface Part No.: Rev01
2 - 24 User’s Manual
For RS-232, select the serial port on which the serial cable is connected as
COM1.
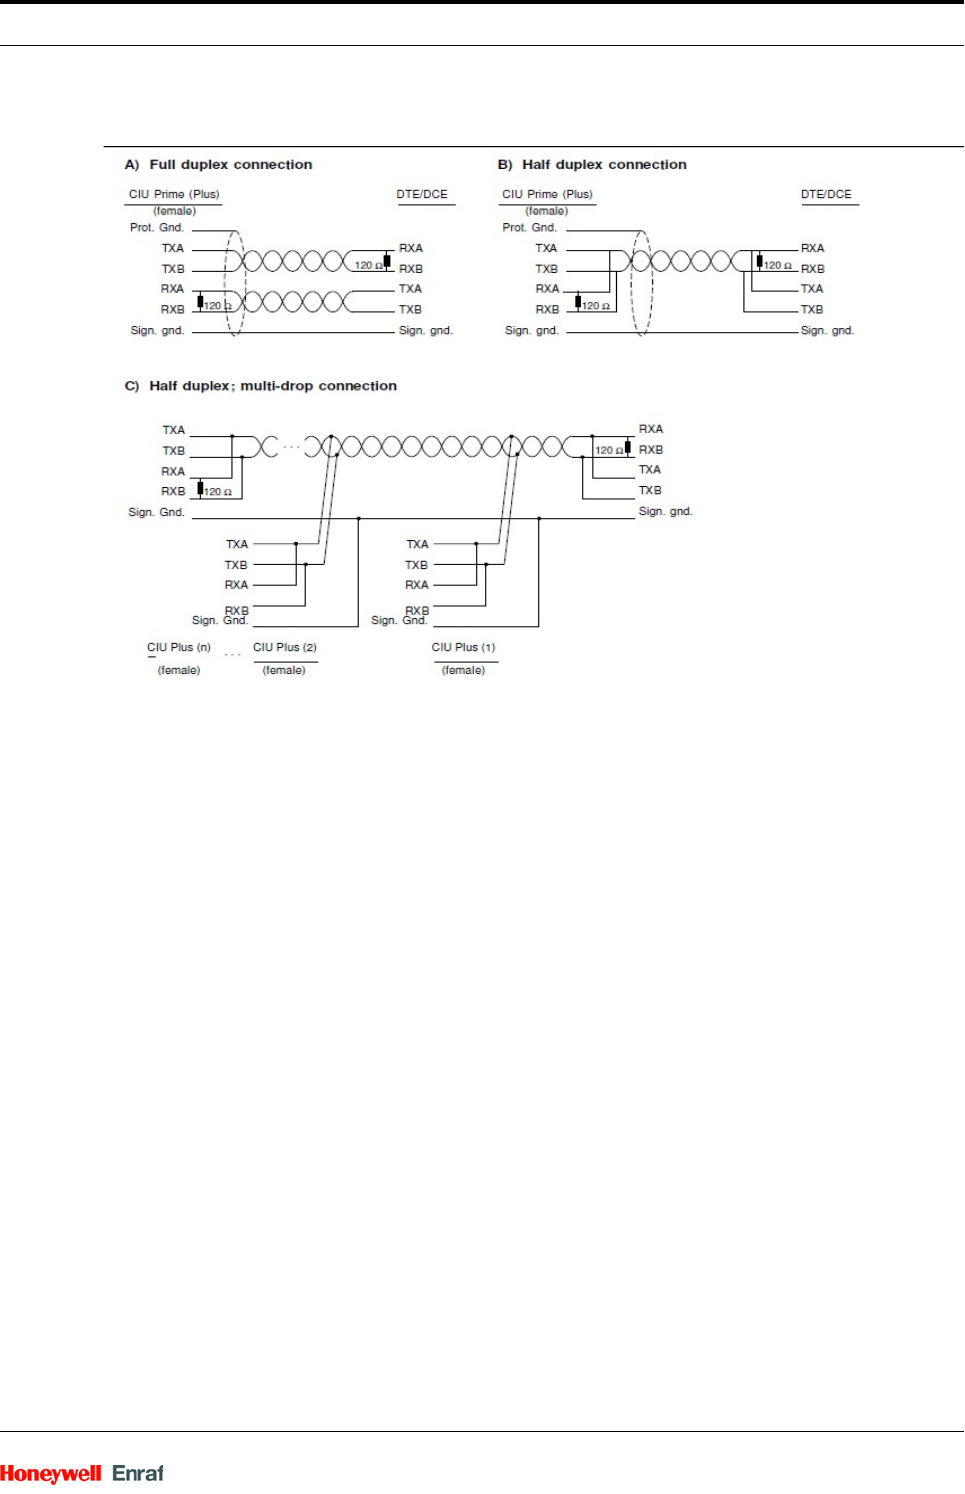
RS-485
The Modbus, HART, and Wireless Field Interface (ENRAF) interfaces supports
RS-485. For RS-485, select the serial port on which the serial cable is
connected as COM2.
Signal Name Pin number
9 pins 25 pins
Protective ground Chassis 1
DCD 1 8
RXD 2 3
TXD 3 2
DTR 4 20
Signal ground 5 7
DSR 6 6
RTS 7 4
CTS 8 5
Signal Name Pin number
9 pins
Protective ground Chassis
RXA 2
RXB 8
TXA 3
TXB 7
Signal ground 5
Configuration - Configuring the protocol tunneling
Part No.: Rev01 Wireless Field Interface
User’s Manual 2 - 25
2.3.3 Configure ENRAF Ethernet/UDP interface
You can convert Ethernet/UDP interface by using a Lantronix device or
a serial-to-Ethernet/UDP driver. Following are the high-level tasks to be
performed.
Install and configure the Lantronix device.
Assign an IP address to the Lantronix device.
Configure the Standard Serial Tunnel firmware settings on the
Lantronix device.
Activate ENRAF Ethernet/UDP interface on the OneWireless user
interface.
For more information, refer to section “Overview of Wireless Field
Interface devices” on page 9.
2.3.3.1 Install and configure the Lantronix device
Install the Lantronix DeviceInstaller software on the Wireless Field
Interface client machine using the documentation and media packaged
with the device. After installing the DeviceInstaller software, assign an
IP address to the Lantronix device.

Configuration - Configuring the protocol tunneling
Wireless Field Interface Part No.: Rev01
2 - 26 User’s Manual
2.3.3.2 Assign IP address to the Lantronix device
Perform the following steps to assign or reassign an IP address to the
Lantronix device.
To assign or reassign an IP address to the Lantronix device
1. From the Start menu, open Lantronix DeviceInstaller.
2. Click Device > Assign IP Address.
3. When prompted for device identification, enter the MAC address of the
Lantronix device and click Next. The MAC address is located on a sticker
on the side of the device.
4. When prompted for the assignment method, choose Assign a specific IP
address to assign a static IP address to the Lantronix device and click
Next.
5. Enter the IP address, subnet mask, and default gateway for the Lantronix
device and click Next.
6. Click Assign.
The device now uses the new IP address and has network access.

Configuration - Configuring the protocol tunneling
Part No.: Rev01 Wireless Field Interface
User’s Manual 2 - 27
2.3.3.3 Configure Standard Serial Tunnel settings on the Lantronix device
Configure Standard Serial Tunnel firmware to enable it to properly
tunnel Wireless Field Interface device messages from the RS-232 serial
port to the Ethernet port of the WDM.
To configure Standard Serial Tunnel settings on the Lantronix device
1. From the Start menu, open Lantronix DeviceInstaller.
2. In the Lantronix Devices tree on the left pane, select the Lantronix Xpress-
DR or Lantronix Xpress-DR-IAP device name.
3. On the Telnet Configuration tab, click Connect.
4. When prompted, press Enter to go to the setup mode.
5. On the Main menu, press 1 on the keyboard to configure channel 1 and set
the configuration parameters as follows:
Baud Rate = 19200
I/F Mode = 4C
Flow = 00
Port Number = 34568
Connect Mode = CC
Datagram Mode = 01
The Remote IP Address can be entered only when the Datagram
Mode is set to 01.
Remote IP Address = IP Address of the WDM
Remote Port = 55598
Packet Control = 00
Send Character 1 = 00
Send Character 2 = 00
6. Press 9 on the keyboard, to save and exit the Lantronix main menu.

Configuration - Configuring the protocol tunneling
Wireless Field Interface Part No.: Rev01
2 - 28 User’s Manual
Firmware Upgrade - Upgrading the WDM firmware
Part No.: Rev01 Wireless Field Interface
User’s Manual 3 - 1
CHAPTER 3 FIRMWARE UPGRADE
The following topics describe how to upgrade the firmware of the WDM
and the Wireless Field Interface field devices.
3.1 Upgrading the WDM firmware
Download the latest OneWireless installation package (WDM firmware)
from the Honeywell Process Solutions website.
CAUTION! Upgrading the WDM firmware makes the WDM
offline for some time. During this operation, all the
devices drop and join the network again. Once
initiated, you cannot terminate the firmware upgrade
operation. The WDM must not be turned on while the
upgrade is in progress.
Prerequisites
Ensure that the speed/duplex setting for the switch port to which the
WDM is connected is set to Auto.
To upgrade the WDM firmware
1. On the Selection Panel, select the WDM.
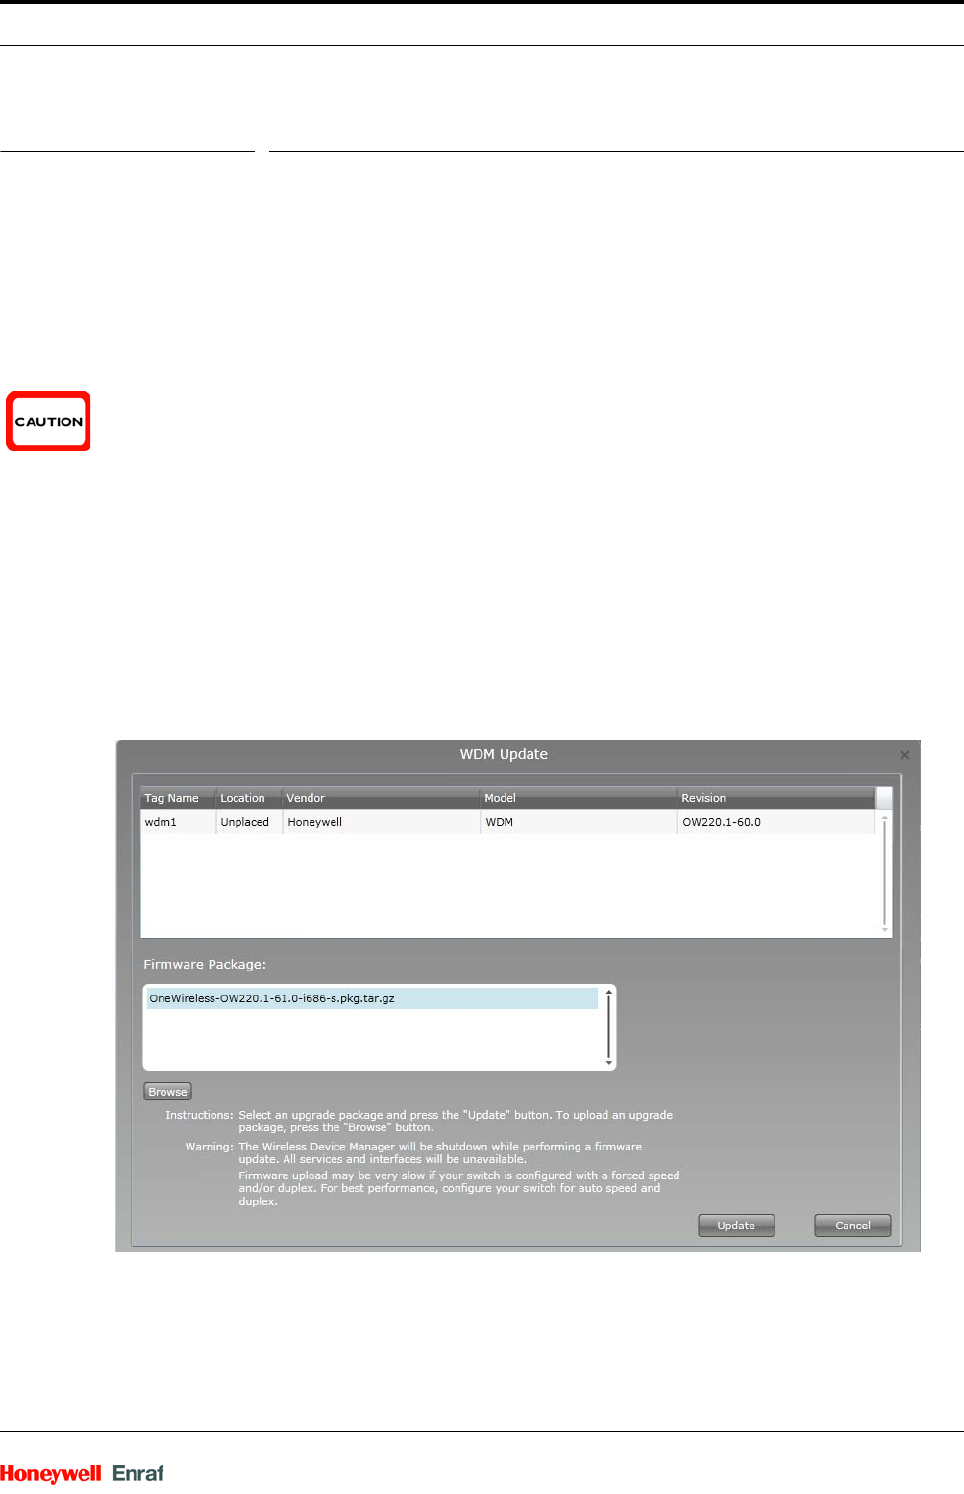
2. On the ribbon bar, in the Upgrade group, click Application. The
WDM Update dialog box appears.
3. Click Browse to navigate to the directory location of the Platform
firmware file and click Open. The WDM firmware file has a .tar.gz
extension.

Firmware Upgrade - Verifying the WDM firmware revision
Wireless Field Interface Part No.: Rev01
3 - 2 User’s Manual
The WDM Update dialog box displays the upload status. Once
complete, the Firmware File box displays the uploaded firmware file
4. Click Update.
The firmware upgrade starts and once complete, the user interface displays
a message indicating the result of firmware upgrade operation.
WARNING! At times, the update may take longer than expected
and the result of the upgrade may not be displayed.
Instead, a “Page not available” error may appear. In
such cases, wait for a minute and then redirect the
browser to “https:// <ipaddress>/restartzfs.html” for
viewing the result. Do not remove or reboot the WDM
during the upgrade process. After the WDM upgrade
from R210 to R220 is complete, the WDM reboots
automatically.
5. Close and restart the web browser.
6. Log on to the user interface again.
7. Verify the upgraded version of the WDM firmware as follows:
a) On the Selection Panel, select the WDM.
b) On the Property Panel, expand Device Manager Summary.
c) Under Identification, verify the Revision.
3.2 Verifying the WDM firmware revision
To verify the WDM firmware revision
1. On the Selection Panel of the OneWireless user interface, select the
WDM.
2. On the Property Panel, expand Device Manager Summary.
3. Under Identification group, review the firmware version displayed in
the Revision field.
Firmware Upgrade - Upgrading the Wireless Field Interface device
Part No.: Rev01 Wireless Field Interface
User’s Manual 3 - 3
3.3 Upgrading the Wireless Field Interface device firmware
The devices at the farthest hop level must be upgraded first.
CAN-1WL FlexConn board firmare
1. On the Selection Panel of the OneWireless user interface, select the
field device.
You can select multiple devices of the same type using the Selection
Panel or the map view. Use SHIFT +click to select multiple items in a
successive list. Use CTRL+click to select multiple items not in
succession.
2. On the ribbon bar, in the Upgrade group, click Application. The
Application Firmware Upgrade dialog box appears.
3. In the Available Firmware Files list, select the required firmware
upgrade files.
By default, the firmware upgrade file appears in the list. If the file is
not available in the list, perform the following steps to open the
firmware file.
a) Click Add to browse to the directory location of the firmware upgrade file.
b) Click Open.
4. Click Upgrade.
The Application Firmware Upgrade dialog box appears.
The Firmware Upgrade Status dialog box displaying the status of
the upgrade appears. Closing the dialog box allows the upgrade
operation to run in the background. The upgrade status is displayed
in the status bar. Click the firmware upgrade status box to open the
dialog box again. If multiple users are simultaneously upgrading
different device firmware, all the users can view the progress of all
the device upgrades.
5. Close the Firmware Upgrade Status dialog box.
6. Verify the upgraded version of the firmware is as follows:
a) On the Selection Panel of the OneWireless user interface, select
the field device.
b) On the Property Panel, expand Device Manager Summary.
c) Under Identification group, review the firmware version
displayed in the Sensor Revision field.
Firmware Upgrade - Upgrading the FDAP/access point firmware
Wireless Field Interface Part No.: Rev01
3 - 4 User’s Manual
Radio firmware
1. On the Selection Panel of the OneWireless user interface, select the
field device.
You can select multiple devices of the same type using the Selection
Panel or the map view. Use SHIFT +click to select multiple items in a
successive list. Use CTRL+click to select multiple items not in
succession.
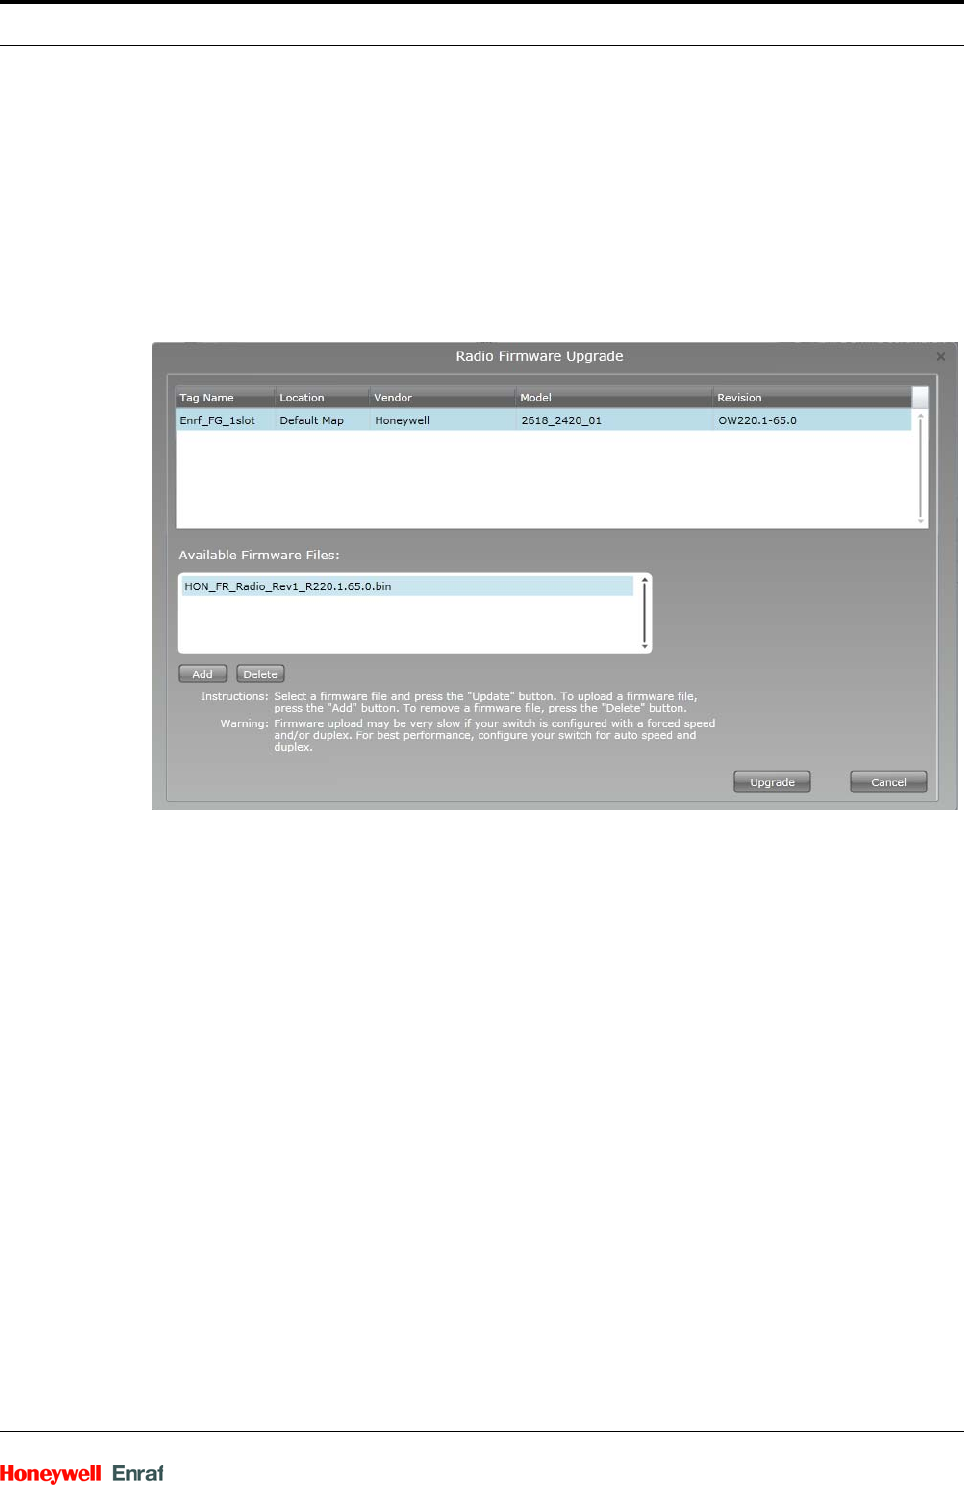
2. On the ribbon bar, in the Upgrade group, click Radio. The Radio
Firmware Upgrade dialog box appears.
3. In the Available Firmware Files list, select the required firmware
upgrade files.
By default, the firmware upgrade file appears in the list. If the file is
not available in the list, perform the following steps to open the
firmware file.
a) Click Add to browse to the directory location of the firmware upgrade file.
b) Click Open.
4. Click Upgrade.
The Radio Firmware Upgrade dialog box appears.
The Firmware Upgrade Status dialog box displaying the status of
the upgrade appears. Closing the dialog box allows the upgrade
operation to run in the background. The upgrade status is displayed
in the status bar. Click the firmware upgrade status box to open the
dialog box again. If multiple users are simultaneously upgrading
different device firmware, all the users can view the progress of all
the device upgrades.
5. Close the Firmware Upgrade Status dialog box.
6. Verify the upgraded version of the firmware is as follows:
a) On the Selection Panel of the OneWireless user interface, select
the field device.
b) On the Property Panel, expand Device Manager Summary.
c) Under Identification group, review the firmware version
displayed in the Sensor Revision field.
3.4 Upgrading the FDAP/access point firmware
Download the latest OneWireless installation package from the
Honeywell Process Solutions website.
Firmware Upgrade - Upgrading the FDAP/access point firmware
Part No.: Rev01 Wireless Field Interface
User’s Manual 3 - 5
To upgrade the FDAP/access point firmware
1. On the Selection Panel, select the FDAP/access point.
You can select multiple devices using the Selection Panel or the map
view. Use SHIFT+click to select multiple items in a successive list.
Use CTRL+click to select multiple items not in succession.
2. On the ribbon bar, in the Upgrade group, click Radio. The Radio
Firmware Upgrade dialog box appears.
3. In the Available Firmware Files list, select the required firmware
upgrade file.
By default, the firmware upgrade file appears in the list. If the file is
not available in the list, perform the following steps to open the
firmware file.
a) Click Add to browse to the directory location of the firmware upgrade file.
b) Click Open.
4. Click Upgrade.
The Firmware Upgrade Status dialog box appears. The Progress
column displays the progress of the upgrade.
NOTE: • To abort any firmware upgrade operation, click the
Abort Upgrade icon adjacent to the upgrade
status.
• To remove the devices for which the firmware
upgrade has been completed, click the Clear
Upgrade icon adjacent to the upgrade status.
5. Close the Firmware Upgrade Status dialog box.
Firmware Upgrade - Upgrading the Wireless Field Interface device
Wireless Field Interface Part No.: Rev01
3 - 6 User’s Manual
3.5 Upgrading the Wireless Field Interface device firmware
using the Engauge service tool
The Engauge service tool is used for upgrading the Wireless Field
Interface device firmware. For more information regarding the Engauge
service tool, refer to the Service Manual SmartRadar FelxLine.
Perform one of the following methods to upgrade the firmware based on
the boards which need to be upgraded:
1. The sensor boards (HCM-BPM, FII-SMV) can be upgraded through
the Engauge tool using the protocol tunnel.
2. HCI-1WL (CAN-1WL) board can also be upgraded through the
OneWireless user interface through the Application Firmware
Upgrade.
WARNING! The HCI-1WL (CAN-1WL) board should not be
upgraded using the Engauge tool. This results in the
Wireless Field Interface device dropping from the
network permanently and it also damages the card.
Considerations
Following are some of the considerations for upgrading the device
firmware.
You can upgrade only the application firmware or radio firmware of a
device at a time.
You can upgrade only the firmware of three devices simultaneously
from the OneWireless user interface.
Starting the radio firmware upgrade operation of lower hop and upper
hop devices simultaneously, results in the failure of upgrade
operation of the lower hop device. When the devices are in different
hops, it is recommended to perform the upgrade of only one device
at a time.
Upgrading the radio firmware of a device, which routes communi-
cation between other devices, results in communication failure .
To upgrade the Wireless Field Interface device firmware for the
cards using Engauge service tool
1. Double-click the module icon’s in the Engauge’s explorer, to select
each FlexConn module.
The board descriptor is then loaded with the tab pages. Select the
tab pages, to enter the settings of the specific module.
2. On the Engauge service tool explorer, select the required FlexConn
module on the left panel.
3. Right-click the FlexConn module and choose Firmware Update.
Firmware Upgrade - Upgrading the Wireless Field Interface device
Part No.: Rev01 Wireless Field Interface
User’s Manual 3 - 7
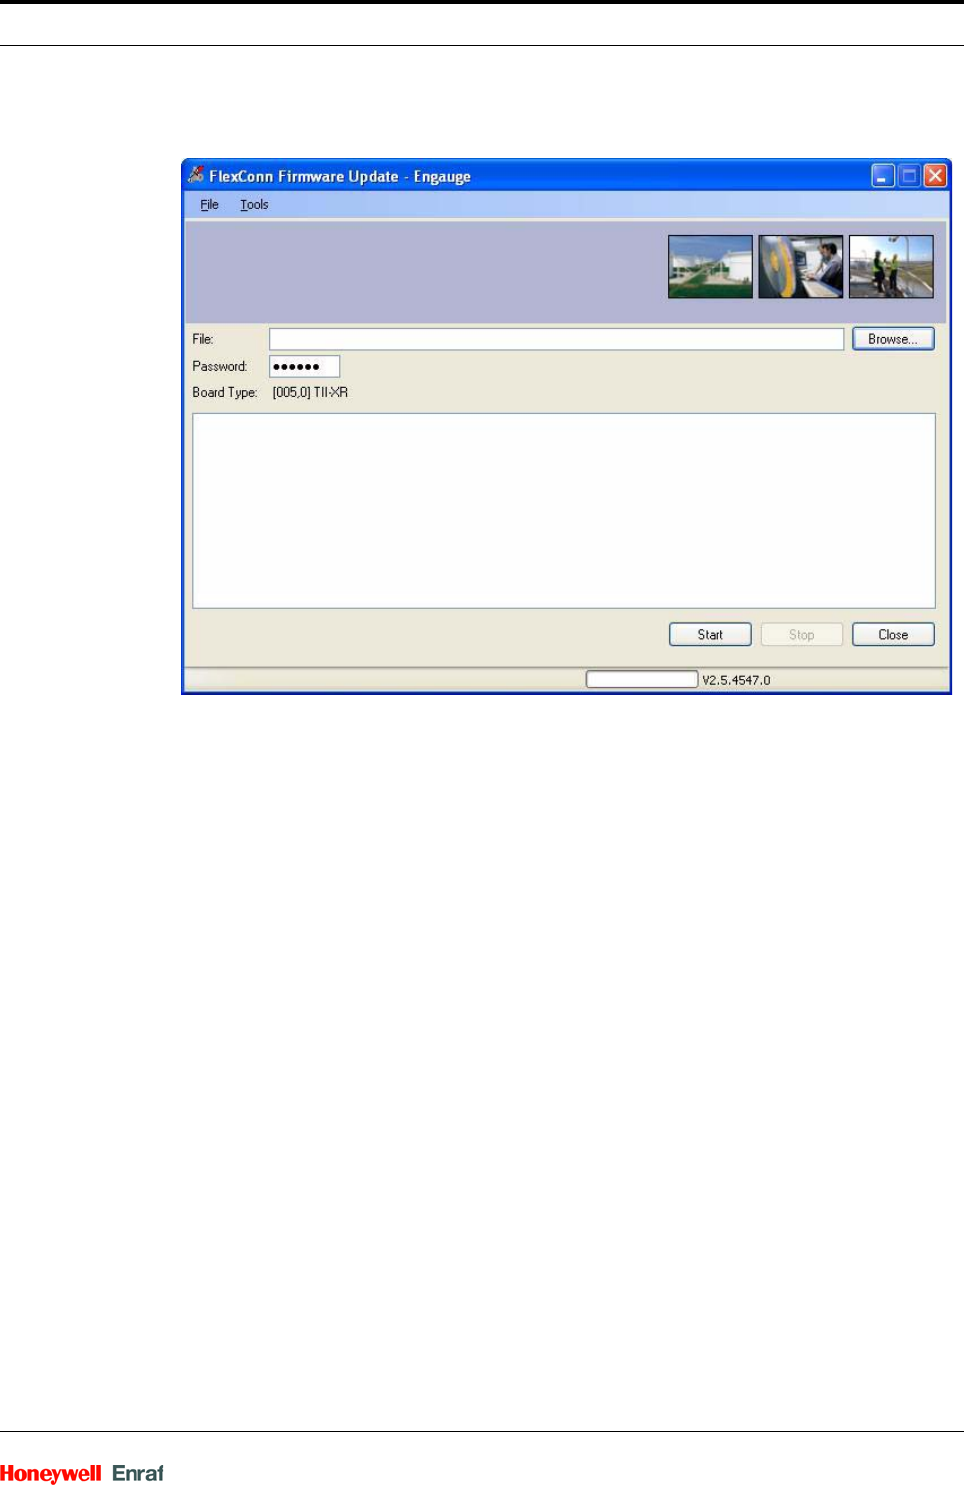
The FlexConn Firmware Update — Engauge dialog box appears.
4. Depending on the firmware type, the available upgrade files appear
by default. Select the required file from the list of upgrade files.
If the file is not available in the list, perform the following steps.
a) Click Browse to browse to the directory location of the firmware upgrade
file.
b) Click Open.
5. Click Start.
The upgrade status is displayed in the status bar.
6. Close the FlexConn Firmware Update — Engauge dialog box.
7. Enter the Time Out value in the Engauge tool as 9999 ms.

Firmware Upgrade - Upgrading the Wireless Field Interface device
Wireless Field Interface Part No.: Rev01
3 - 8 User’s Manual

Operations -
Part No.: Rev01 Wireless Field Interface
User’s Manual 4 - 1
CHAPTER 4 OPERATIONS
The following topic describes how to read the Wireless Field Interface
field device information from SmartView.

Operations - Reading the Wireless Field Interface field device information
Wireless Field Interface Part No.: Rev01
4 - 2 User’s Manual
4.1 Reading the Wireless Field Interface field device infor-
mation from SmartView
To read the Wireless Field Interface field device information from
SmartVie.
1. On SmartView, press the UP ARROW and DOWN ARROW simulta-
neously (MENU push buttons) to view the menu items on the display.
2. On the display, scroll to the commands item using the MENU
buttons.
3. Press the LEFT ARROW and RIGHT ARROW (SELECT push
buttons) simultaneously. You are prompted to enter the password.
The default password for SmartView is AAAAAA.
4. Use the MENU push buttons to enter the password and then press
the SELECT push buttons. The list of commands appears.
5. Scroll to select the CAN-1WL FlexConn board name and then press
the SELECT push buttons.
6. Scroll to select board and then press the SELECT push buttons.
7. Scroll to select Read Dev Param then press the SELECT push
buttons.
8. On the display, scroll to the commissioning item using the MENU
buttons.
9. Scroll to select the CAN-1WL FlexConn board name and then press
the SELECT push buttons.
The details available on the SmartView are as follows:
Board Serial No
Network Address
Device revision
CAN-1WL Build
Tx Power Level
Radio Mode
SD Card Status
Key Tx Status
Radio Diag1
Radio Diag2
Device Diag1
Device Diag2
Connected Gauge status
Connected Gauge type