Huawei Technologies U3310 WCDMA/GPRS/GSM/EDGE Mobile Phone with BT User Manual U3300
Huawei Technologies Co.,Ltd WCDMA/GPRS/GSM/EDGE Mobile Phone with BT U3300
Contents
- 1. User Manual Part 1
- 2. User Manual Part 2
- 3. User Manual Part 3
- 4. User Manual Part 4
User Manual Part 3

Calls
14
• Picture mode: To switch display.
• Image quality: To set the image quality to fine qual-
ity or more smooth.
• Play file: To play a media file.
• Handsfree/Earpiece: Switch between the loud-
speaker mode and the earpiece mode.
• Record: To record a video clip. A recorded video
clip is saved to the My Files/Videos directory.
• Other Applications: To access the Contacts
screen, the Messaging screen, the Calls screen
or the Calendar screen.
Calls
The recently dialed calls, received calls and missed
calls are saved automatically.
Select Calls in the main menu and then press the
left/right scroll key to select All calls , Missed ,
Received or Dialed . Then select Options for
the following options.
• Send message: To send a message or MMS.
• Save number: To save the numbers of the selected
record.
• Call: To make a voice call or a video call.
• Display mode: You can select Normal to display all
records or select Simple to ignore the duplicated
records.
• Delete: To delete the selected record.
• Mark/Unmark: To mark/unmark a record or all
records.
• Calls status: To display the information on voice
calls, video calls and data services. In the voice
call, video call and data page, you can select Reset
to clear all records.
15
4Text Input
You can use the keypad to enter alphanumeric char-
acters and symbols. For example, you can add
entries to the contacts, write messages or schedule
events on the calendar.
Note
While entering text:
• Press to switch between input meth-
ods. Press and hold the key to
enable or disable the T9 input mode.
• Press to display the symbols list.
Press and hold the key to set the
input language.
• Press to delete the letter before the
cursor.
T9® Input Method
With the T9 input method, you can easily and quickly
enter words. T9 is a predictive text entry mode. It
allows you to easily and quickly enter words. Press
the relevant key that corresponds to the desired letter
and T9 will offer you candidate words.
Press each key carrying the desired letter once, and
then the predictive text scheme will present the can-
didate words composed by the letters you have
entered in the drop-down menu.
For example, to enter the word "good" with the T9
input method, follow these steps.
1Press successively the keys , , , and
which "g", "o", "o", and "d" belong to, and
the candidate words "good", "home" etc. com-
posed by these letters will be shown in the drop-
down menu.
2Use the up/down scroll key to select "good".
Then press to enter a space for entering the
next word.
Note
Press repeatedly and you will see "T9
Abc", "T9 abc" and "T9 ABC" on the upper
left corner of the screen successively. It indi-
cates the words to be entered will be in
lower case, first letter capitalized or in upper
case.
Traditional Input Method
When T9 input method is off, you can use the tradi-
tional input method for entering alphabetic charac-
"123" Numeric Input Method
16
ters. Repeatedly press the key that carries the letter
to be entered when it appears on the screen.
For example, to enter the word "Hello" with the tradi-
tional input method, follow these steps.
1Press that carries "h" repeatedly and all let-
ters carried by this key will be displayed succes-
sively on the screen. You can scroll through this
list and select the character you want. Stop when
you see an "h" on the screen.
2After entering the first letter, you can directly
press another key (except ) to enter the next
letter. If the next desired letter is on the same
key as the current one, wait until the cursor
appears to the right of the current letter and then
you can enter the next one.
3Enter "e", "l", "l" and "o" in the same way.
Note
Press repeatedly and you will see
"abc", "Abc" or "ABC" on the upper left cor-
ner of the screen successively. It indicates
the words to be entered will be in lower
case, first letter capitalized or in upper case.
"123" Numeric Input Method
In a text editing screen, press and hold the character/
number keys to enter corresponding numeric charac-
ters.
You can also press successively the key to
switch to the "123" numeric input method, and enter
corresponding numeric characters by pressing the
character/number keys.
Symbol Input Method
You can press to display the symbols list and
then select Recent to display recent symbols.
You can also press to input the commonly-used
symbols in a text editing screen.
Input Different Languages
In a text editing screen, Press and hold the key
to set the language for the text.

17
5Contacts
Contacts enables you to save and manage such
information as phone numbers and addresses of your
contacts. You can save such information in your
phone or your SIM card. You can also assign fre-
quently-used numbers to speed dialing keys for your
convenience.
Making Calls from the Contacts
You can make a voice/video call with a contact
selected from the contacts list.
1In the Contacts screen, press the left/right scroll
key to select Contacts.
2Select a contact and select Options > Call.
Then, you can select Voice Call or Video Call to
make a call. Alternatively, you can select Edit
before call to edit the number before making the
call.
Searching for a Contact
You can find a contact from the contacts list easily
and quickly by using this function on the Contacts
screen. Select Options > Search, and then enter the
contact name you are searching for. The contact is
displayed.
You can also use quick search in the contacts list
screen. You can find a contact by entering the initials
of the first name or the last name of the contact. For
example, to find a contact named "Alice Green",
enter the initials "a" or "g". This contact is displayed in
the candidate list.
Viewing Contacts in Phone/SIM
In the Contacts screen, select Options > View con-
tacts in phone/View contacts in SIM. You can dis-
play the contacts list saved in the phone or that in the
SIM card. You can also select Options > Settings to
set the default contact list displayed in the contact
screen.
Other Operations
In the Contacts screen, select Options for the fol-
lowing options.

Groups
18
• Details: To view the detailed information of the con-
tact.
• Call: To make a voice call, a video call or edit before
call.
• Send message: To send a message or Email to the
selected contact.
• Add new contact: To create a new contact.
• Management: To back up your contacts from your
phone to a memory card or from your memory card
to your phone.
• Search: To find a contact from the contacts list.
• Send contact: To send a contact to other devices
supporting Message or Bluetooth.
• Copy to SIM/Copy to phone:To Copy one or more
contacts from your phone to the SIM card or from
your SIM card to the phone.
• Delete: To delete the selected contact.
• Mark/Unmark: To mark/unmark a record or all
records in your phone and SIM card.
• View contacts in Phone/SIM: To display the con-
tacts list saved in the phone or that in the SIM card.
• Speed Dial Number: To assign often-used numbers
to speed dialing keys "2" to "9".
• My business card: To save your own information to
a Business Card.
• Settings: To set the default contact list displayed in
the contact screen, to sort the contacts on the
Contacts screen.
• Memory status: To view the memory status of both
your phone and SIM card.
Groups
You can rename a group, add group members, or
delete a group member.
Adding/Deleting Group Members
You can add a member to a group in your phone or
delete a member from it.
1In the Contacts screen, press the left/right scroll
key to select Groups.
2Select a group and press to view the details.
3Select Options > Add new users. Select a con-
tact and press Add. The member you added is
displayed in the group member list.

Groups
19
Contacts
5
To delete a group member, select a member from the
group member list, and then select Options >
Remove.
Managing a Group
1In the Contacts screen, press the left/right scroll
key to select Groups.
2Select a group and select Options for the follow-
ing options.
• Details: to view the details of a group.
• Rename: to change the name of a group.
• Send Message: to send a message or mail to
all members of a group.
• Remove all members: to delete all members of
the group.
20
6Messaging
Messages
The maximum content for a single text message is
160 characters. If the characters you enter exceed
this limit, the text is divided into two or more continu-
ous messages when it is sent.
Creating a Message
With this option, you can create new SMS, MMS, and
Email.
1Select Messaging > Create message in the
main menu.
•Message: To access the SMS or MMS editing
screen.
•From template: To edit the SMS or MMS from
template.
•Email: To access the email editing screen.
2After editing the message, press or select
Options > Send to to add a recipient’s number.
3 Press or select Options > Send to send the
message.
Messages Mailboxes
The phone provides four mailboxes for messages,
namely, Inbox, Drafts, Outbox and Sent.
◆ Inbox
You can save the received messages in Inbox.
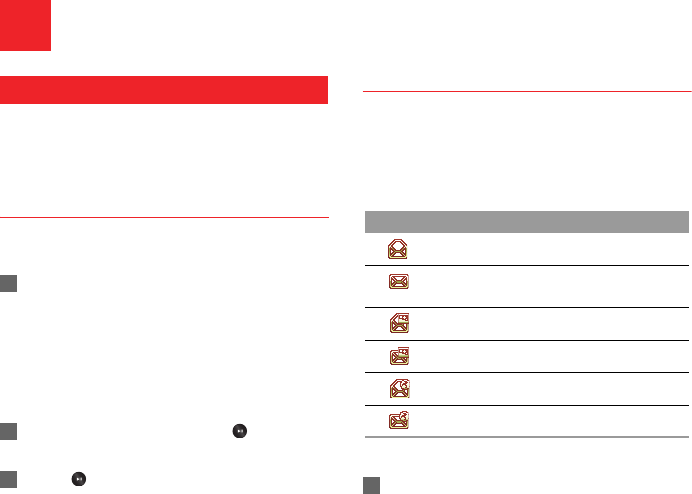
Icons in Inbox
Viewing Messages in Inbox
1Select Messaging > Inbox.
Icon Description
a read SMS or a read message report
an unread SMS or an unread message
report
a read MMS
an unread MMS
A read Push message
An unread Push message
Messages
21
Messaging
6
2Press the up/down scroll key to view the mes-
sages and then press to view the details.
3You can select Options for the following opera-
tions.
• Play: To play the multimedia message.
• Reply: To reply the message.
• Forward: To forward the message.
• Delete: To delete the message.
• Call sender: To call the message sender by a
voice call or a video call.
• Info.: To view the details of the message.
• Save text: To save the text of the MMS.
• Save as template: To save this message as a
template.
◆ Drafts
The Draft box is used to save the messages you cre-
ated and saved.
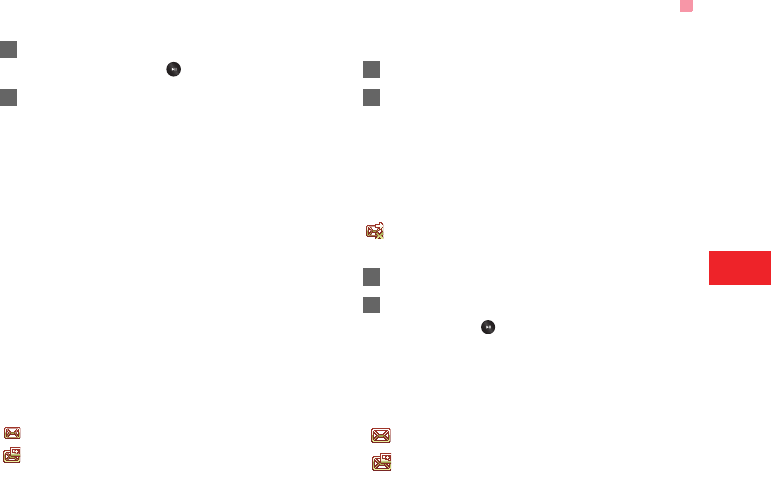
Icons in Drafts
: A text message saved to the phone.
: A multimedia message to the phone.
Viewing and Editing Messages in the Draft
1Select Messaging > Drafts.
2Press the up/down scroll key to select a mes-
sage and press to edit it.
◆ Outbox
Outbox is used to save the messages that failed to
be sent.
Icons in Outbox.
: A message that fails to be sent.
Viewing and Editing Messages in the Outbox
1Select Messaging > Outbox.
2Press the up/down scroll key to select a mes-
sage and press to edit it.
◆ Sent
Sent is used to save the messages that have been
sent successfully.
Icons in Sent
: A text message has been sent.
: A multimedia message has been sent.

Email
22
Viewing Messages in Sent
1Select Messaging > Sent.
2Press the up/down scroll key to select a mes-
sage and press to view the details.
3You may select Options to do the same opera-
tions as those of Inbox.
Message Settings
You can change the message settings by performing
the following steps.
1Select Messaging > Settings > SMS & MMS
from the main menu.
2Set the parameters related to messages:
• Receiving settings: To set parameters related
to retrieval of messages.
• Sending settings: To set parameters related to
sending messages.
• Signature: To set whether your signature will
be sent along with the message. You can edit
the signature while creating a new message.
• Font size: To set the size of the character
entered in the message.
• Reply settings: To set whether to reply to a
message with the original text.
• MMS Account: To set the MMS account.
• Voice Mail: The voice mail number is already
preset for you in the phone.
• Save unknow number: To prompt whether to
save the number after a call ends or message.
Email
Before sending an email, please set an email account
first. For details, please refer to "Email Settings" on
page 24.
Creating an Email
1Select Messaging > Email from the main menu.
Select Options > New Email to access the
email editing screen.
2Select 【To】 or 【Cc】and press .
Email
23
Messaging
6
•Select Add from contacts or Add from group
to select an email address.
•Select Enter recipient to directly enter the
email address.
3In the email editing screen, select Subject and
press to edit the contents.
4In the email editing screen, select the Message
text box to edit the content.
5In the email editing screen, select Options >
Add attachment to attach picture, music, video,
or eBook.
6In the email editing screen, select Options >
Send to send the email.
Mailboxes
Your Phone provides five mailboxes for email,
namely, Inbox, Drafts, Sent, Outbox and Blocked.
◆ Inbox
All Emails received are saved in the inbox.
Icons in Inbox
: A read email.
: An unread email.
Viewing and Editing Emails in Inbox
1Select an email and press to view the con-
tent.
2In the Details screen, select Options for the fol-
lowing operations:
• Reply: To reply to the email sender.
• Reply all: To reply to the email sender and all
email receivers except the replier.
• Add to contacts: To save the details of the
sender to the contacts.
• Forward: To forward the selected email.
• Delete: To delete the selected email.
• Call sender: To call the email sender by a voice
call or a video call.
◆ Drafts
The saved new emails are saved in the drafts.
Icons in Drafts
: Emails to be sent.