Hyundai IBT LT32AW000 32" LCD Monitor User Manual 1
Hyundai IBT Corp. 32" LCD Monitor 1
Contents
- 1. Users Manual 1 of 3
- 2. Users Manual 2 of 3
- 3. Users Manual 3 of 3
Users Manual 2 of 3

FCC ID : PJILT32AW000
REPORT NO. : HCT-F04-0601 HYUNDAI C–TECH
ATTACHMENT E -2.
- USER’S MANUAL -

Connecting Indoor/Outdoor TV Antenna (UHF/VHF) .................... 23
Connecting to the antenna input connection
on the external equipment ......................................................... 24
Before connecting the video connections to external devices ... 25
Connecting VCR, Cable/Satellite Receiver .................................. 26
Connecting a DTV Receiver or DVD player ................................. 27
Playing Back a Tape Recorded on a Camcorder ......................... 28
Connecting to a PC ..................................................................... 29
Resolution Supported in PC ........................................................ 30
Connections
HYUNDAI WIDE LCD TV
23
CONNECTIONS
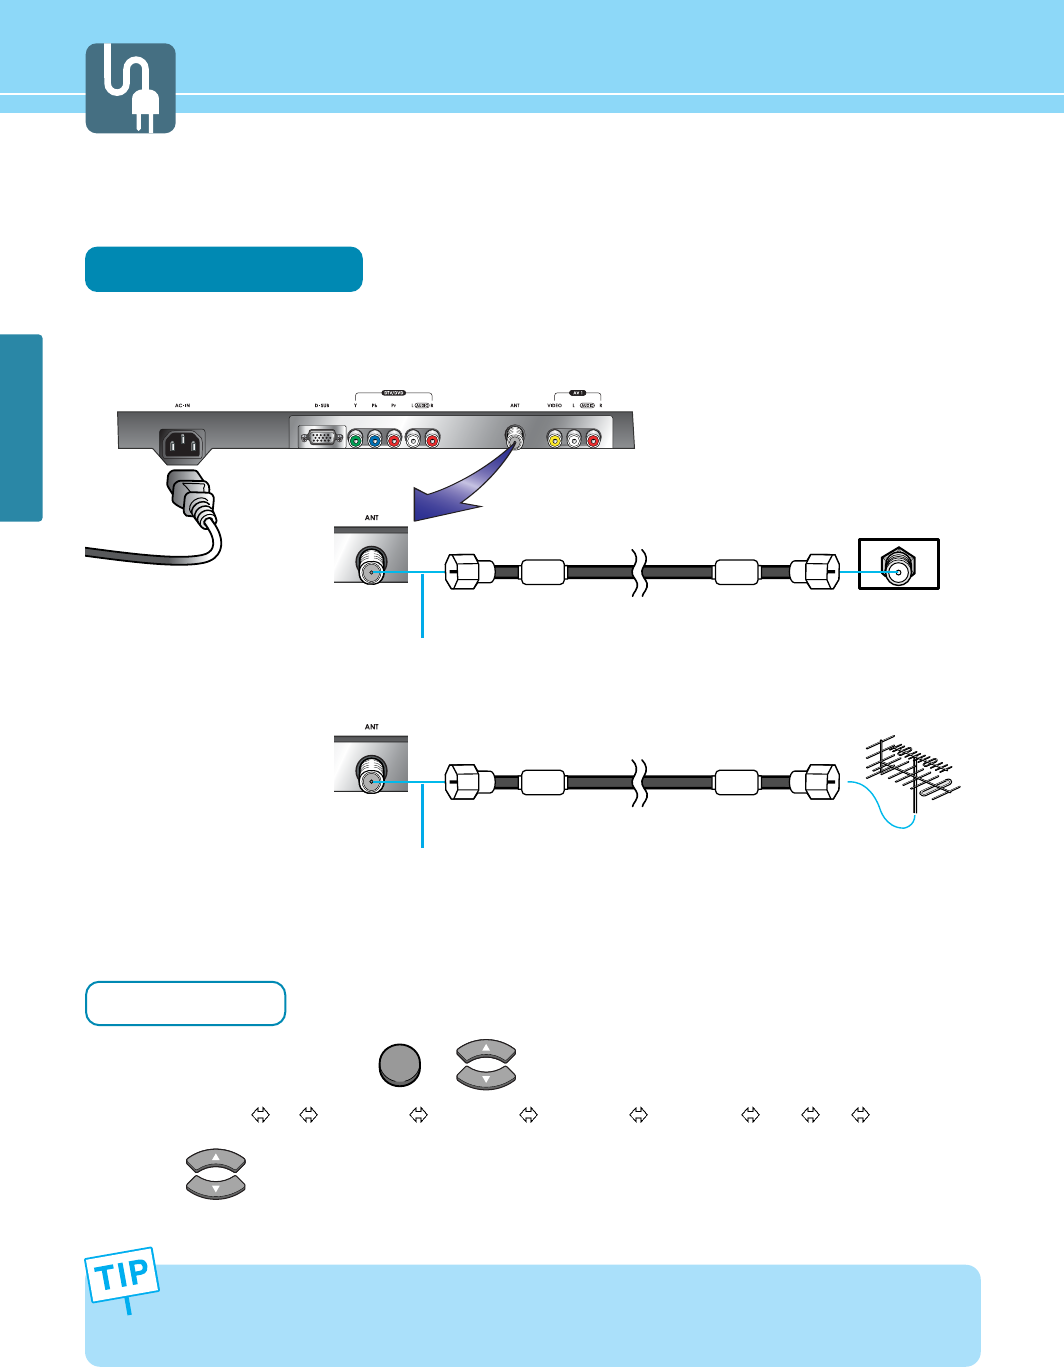
Connecting Indoor/Outdoor TV Antenna(UHF/VHF)
Connection Method
Ensure to connect an antenna cable to the antenna input connection.
How to Watch
Turn on your LCD TV and press or on remote control unit to select TV.
You can select TV AV1 VIDEO AV2 VIDEO AV3 VIDEO AV3 S-VHS DTV PC in order.
Press or Numeric keys to select the desired channels.
1
2
• When inserting a 75-ohm coaxial cable into the input connection, ensure the wire tip not to bend.
• If you experience poor signal reception, we recommend you purchase a signal amplifier for better picture
quality.
INPUT
outdoor antenna
indoor antenna
Antenna cable
Antenna cable
Coaxial cable
Coaxial cable
Power Cable
HYUNDAI LCD TV HQL260WR/320WR
)=,17
;>1,-7
>1,-7
:4
)6<7=<
)6<16
24
CONNECTIONS
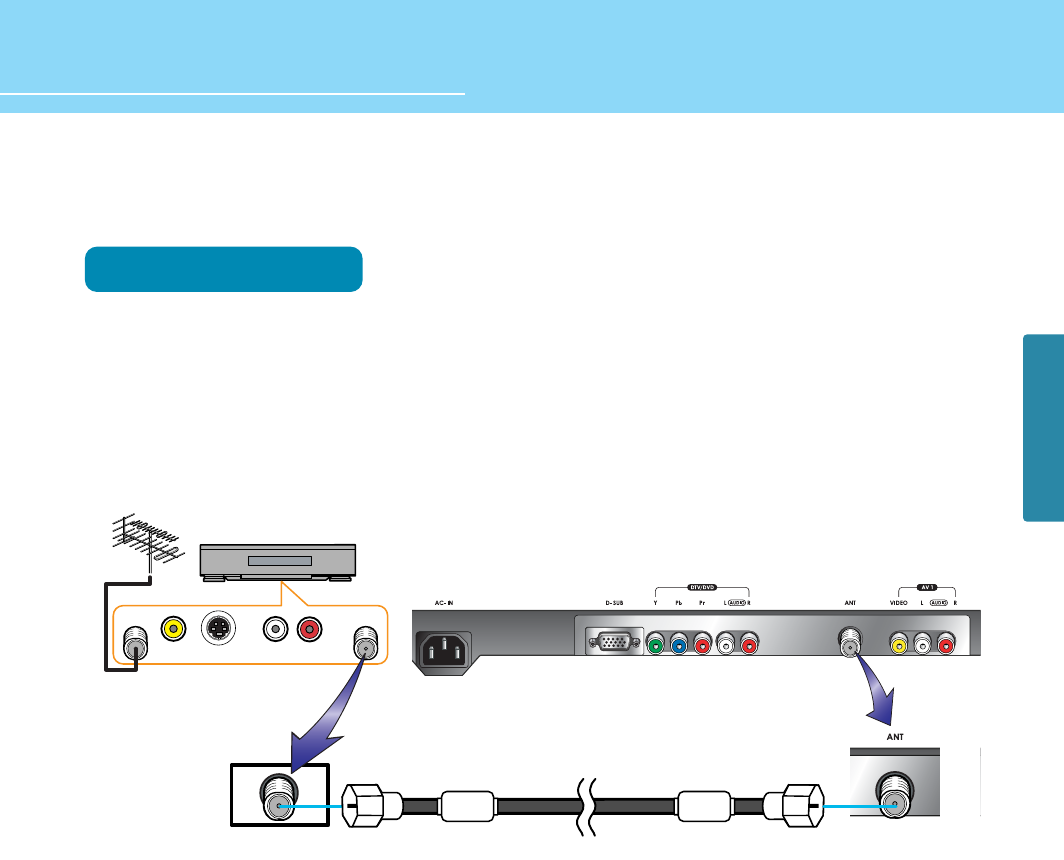
Connecting to the Antenna Input Connection on the External Equipment
Connection Method
Connect an antenna cable to VCR/Cable/Satellite Receiver with the antenna input.
Use a coaxial cable to connect VCR/Cable/Satellite Receiver's antenna output to the antenna input on your
LCD TV.
1
2
Coaxial cable
VCR/Cable Receiver
CONNECTIONS
25
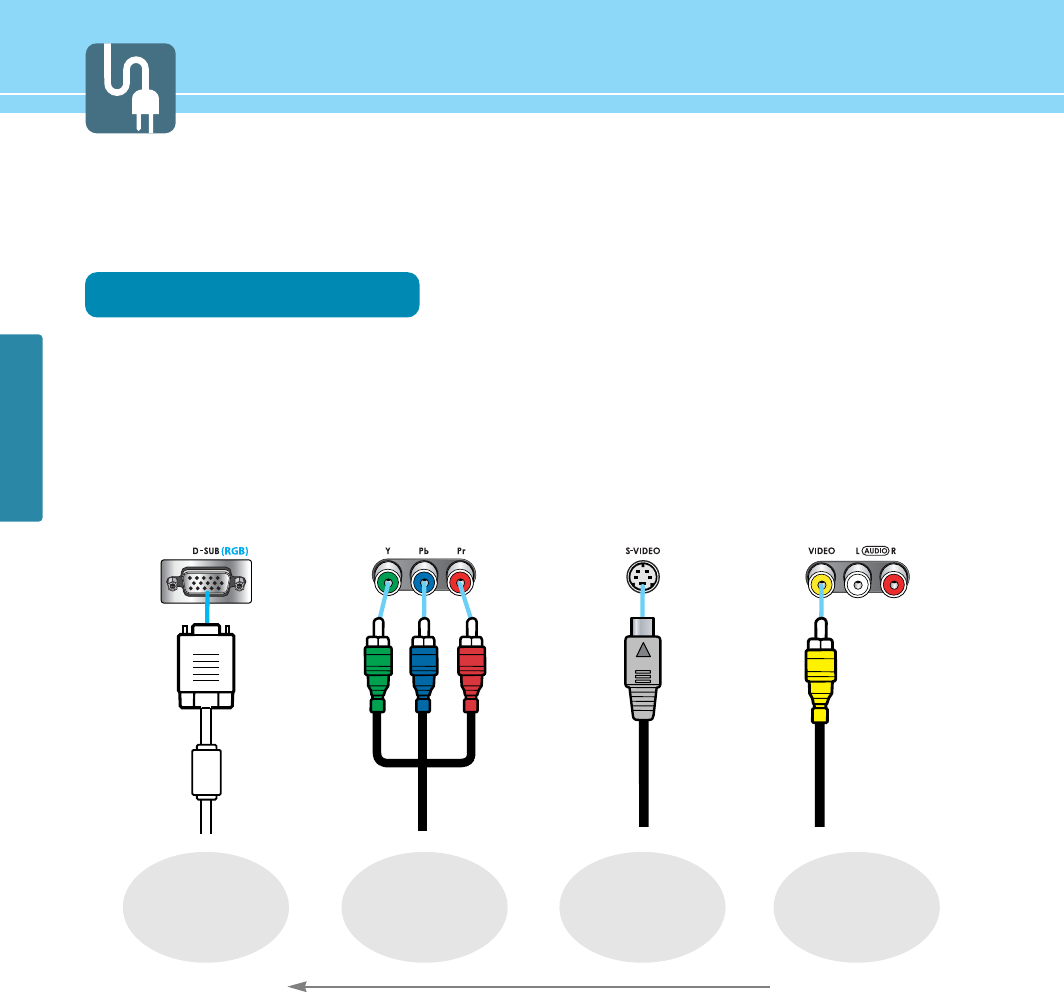
Before connecting the video connections to external devices .....
Please make sure to read the following information on connection to enjoy best picture quality.
Video/Audio connectors
Types of video/audio cable :
➀ 15-Pin D-Sub ➁ COMPONENT ➂ S-VIDEO ➃ COMPOSITE
Best picture quality is displayed in the following order.
COMPONENT15 Pin-D-Sub >>>
S-VIDEO COMPOSITE
The superior picture quality starts from the far left side.
HYUNDAI LCD TV HQL260WR/320WR
CONNECTIONS
26
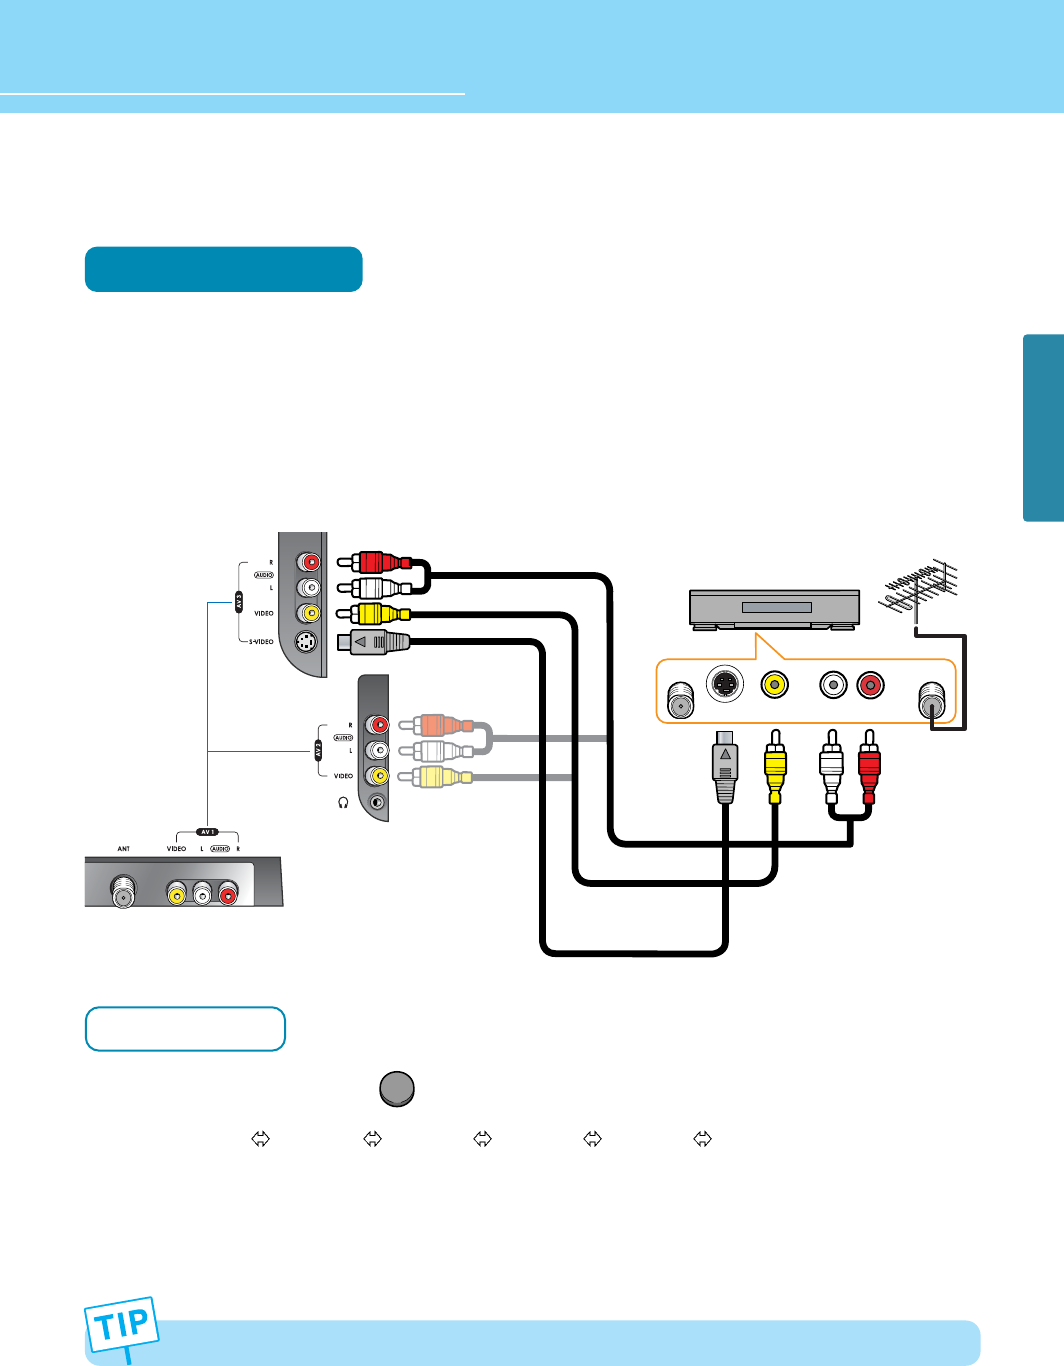
Connecting a VCR, Cable/Satellite Receiver
Connection Method
Connect Video/S-Video cable between Video/S-Video output terminal of VCR or Cable/Satellite receiver and
Video/S-Video input terminal of LCD TV.
(Connect cables and terminal in the same colors)
Connect Audio cable (left:white color, right:red color) between Audio output terminal of VCR or cable/satellite
receiver and Audio input terminal of LCD TV.
(Connect cables and terminal in the same colors)
How to Watch
Turn on your LCD TV and press on remote control unit to select Video or S-Video.
You can select AV3 S-VHS AV3 VIDEO AV2 VIDEO AV1 VIDEO TV in order.
VCR play : Turn on the VCR and insert a tape and play it.
Cable/Satellite receiver : Turn on the receiver and select a channel.
Read a user manual of VCR, Cable/Satellite Receiver for more details.
1
2
1
2
Use S-video cables for better picture quality.
)=,17>1,-7
;>1,-7
:4
)6<16
)6<7=<
OR
Audio Cable
VIDEO Cable or
S-VIDEO Cable
VCR/Cable Receiver
VIDEO
27
CONNECTIONS
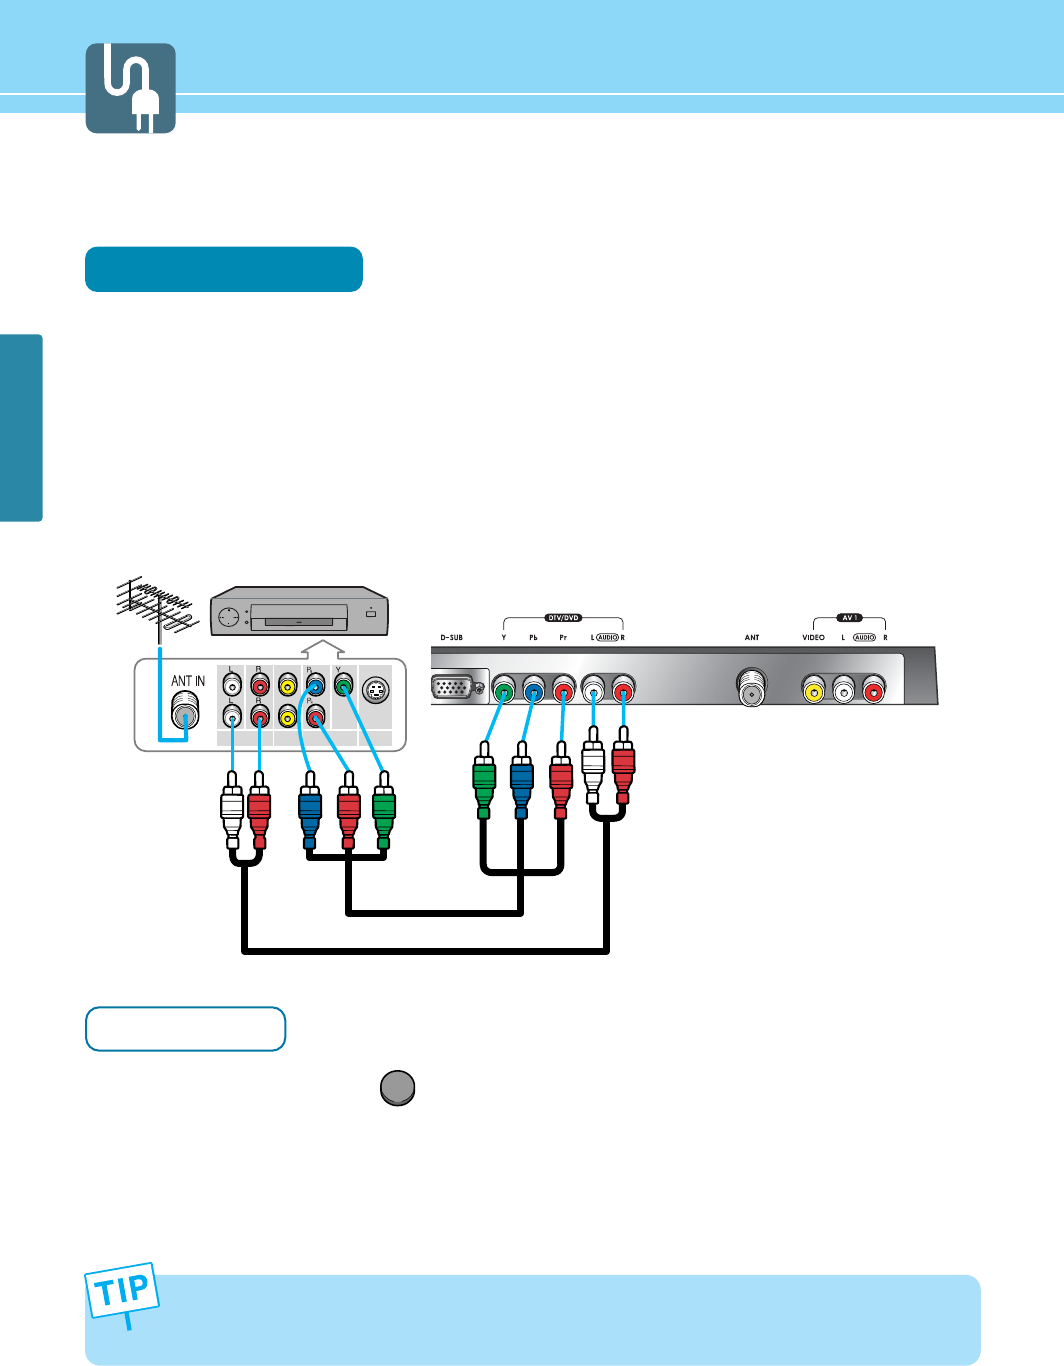
Connecting a DTV Receiver or DVD Player
Connection Method
Connect video cables(Y, Pb, Pr) between output terminals(Y, Pb, Pr) of DTV receiver or DVD player and the
input terminals(Y, Pb, Pr) of DTV/DVD(480i/480p/720p/1080i) on the rear of LCD TV.
(Connect cables and terminal in the same colors)
Connect Audio cable between Audio output terminal of DTV receiver or DVD player and Audio input terminal
for DTV/DVD Audio on the rear of LCD TV.
(Connect cables and terminal in the same colors)
How to Watch
Turn on your LCD TV and press on remote control unit to select DTV or DVD.
Turn on a DTV receiver or DVD player and use it.
Read the user manual of DTV receiver or DVD player for more details.
1
- Output terminal mark(Y, Pb, and Pr) of DVD player may be written as Y, B-Y, R-Y/Y-Cb-Cr / Y-Pb-Pr. (It depends
on DVD player)
- To watch digital broadcast, you have to separately purchase a digital set-top box and connect it to LCD TV.
2
DTV
1
2
)=,17
>1,-7 ;>1,-7
+75876-6<>1,-7
DTV receiver
/DVD Player
Audio Cable
VIDEO(Y, Pb, Pr) Cable
HYUNDAI LCD TV HQL260WR/320WR
CONNECTIONS
28
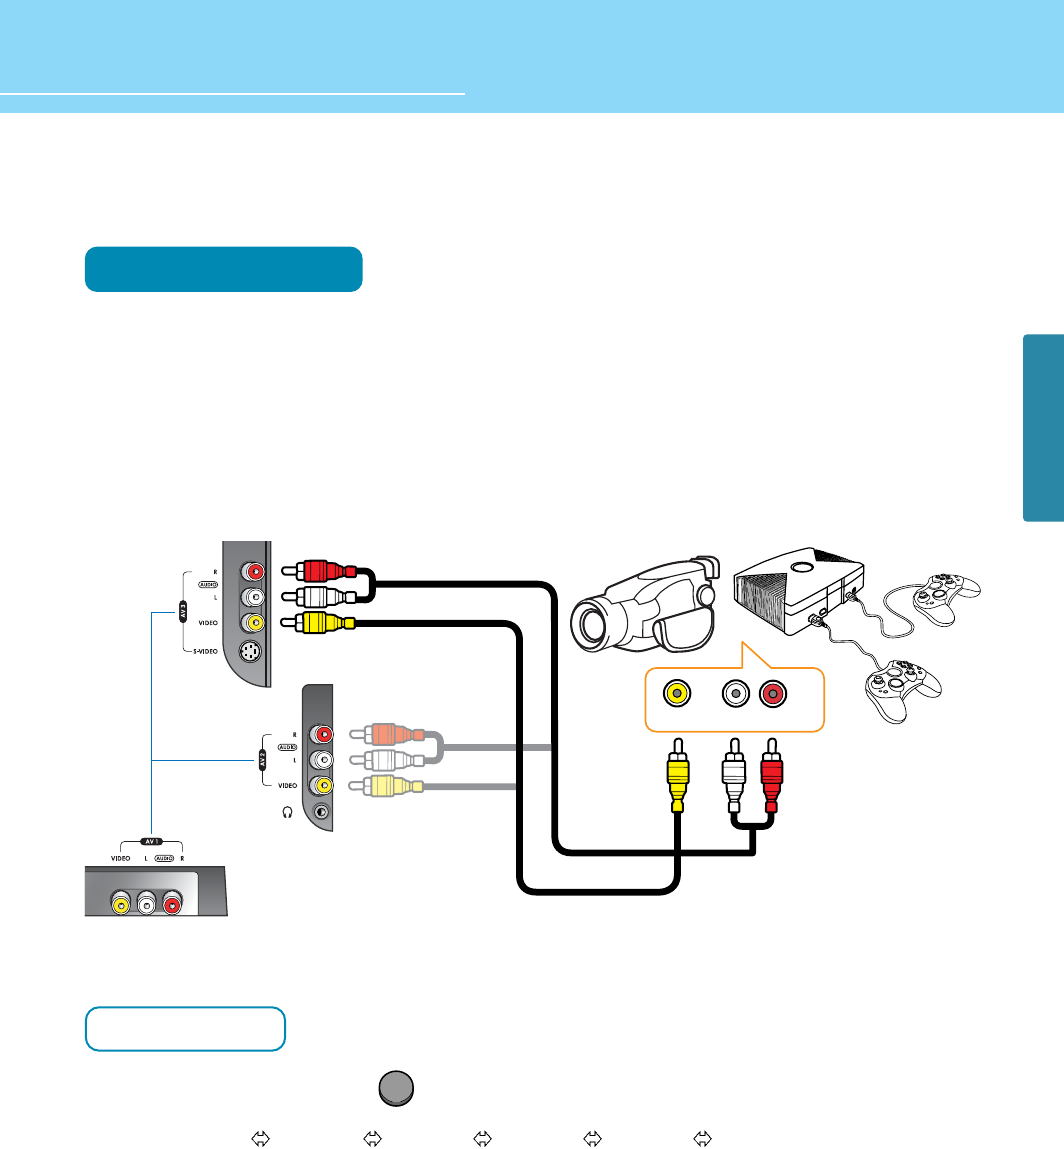
Playing Back a Tape Recorded On a Camcorder
Connection Method
Connect Video cable between Video output terminal of Camcoder/Game player and Video input terminal of
LCD TV.
(Connect cables and terminal in the same colors)
Connect Audio cable (left:white color, right:red color) between Audio output terminal of Camcoder/Game
player and Audio input terminal of LCD TV.
(Connect cables and terminal in the same colors)
How to Watch
Turn on your LCD TV and press on remote control unit to select Video.
You can select AV3 S-VHS AV3 VIDEO AV2 VIDEO AV1 VIDEO TV in order.
Turn on a Game player or Camcorder and use it.
Read the user manual of Game player or Camcorder for more details.
1
2
1
2
VIDEO
)=,17>1,-7
:4
Game PlayerCamcorder
Audio Cable
VIDEO Cable
OR
CONNECTIONS
29
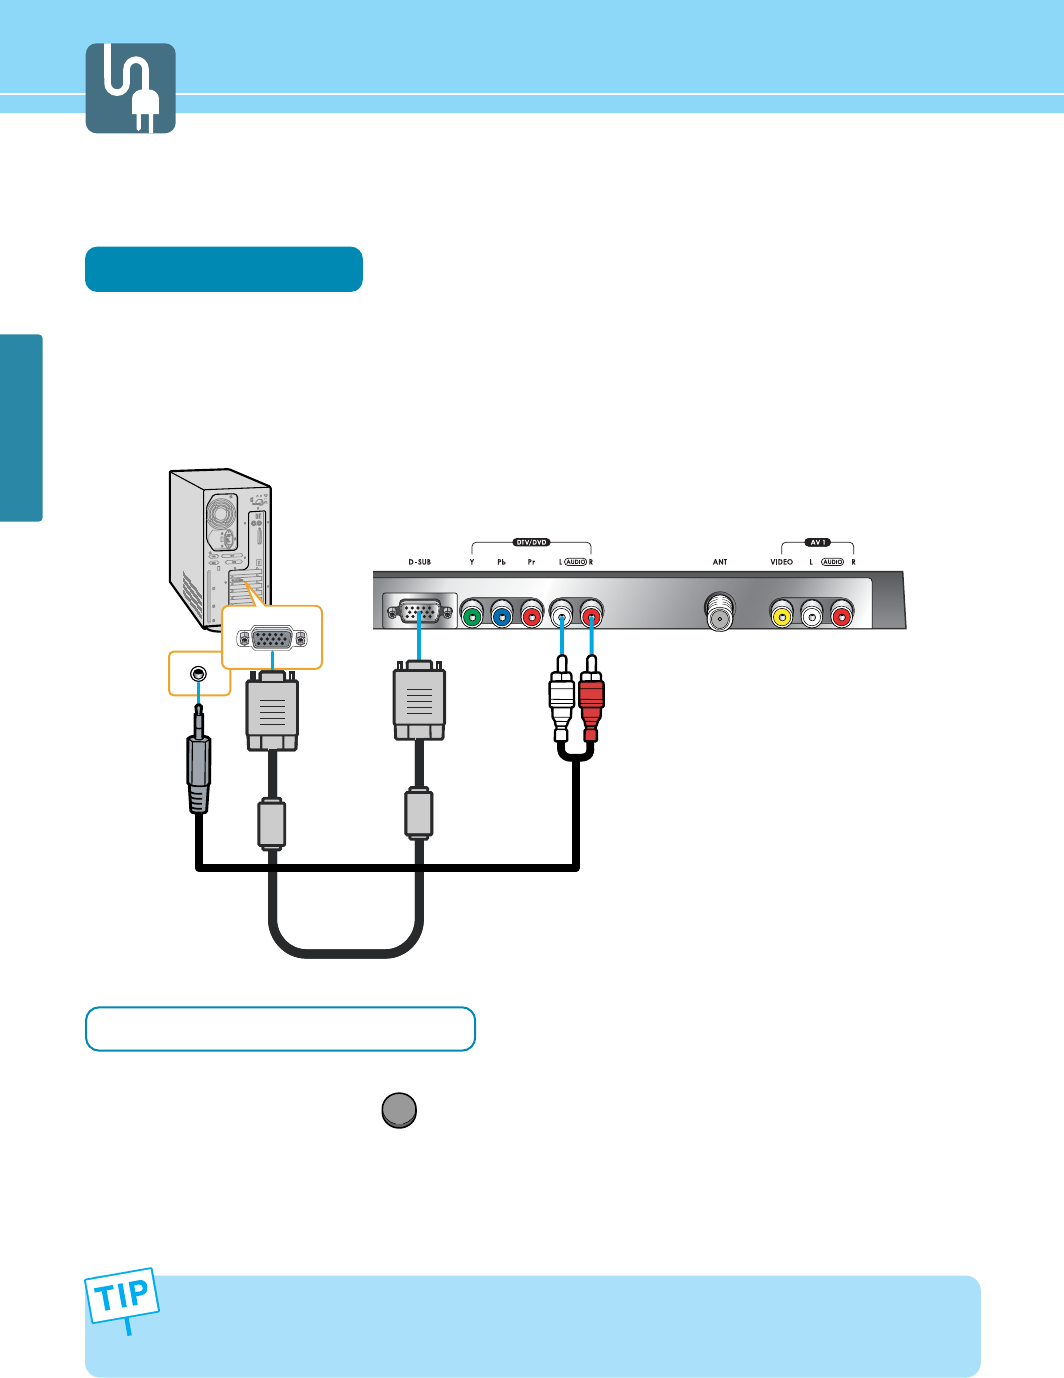
Connecting to a PC
Connection Method
Connect PC signal cable(15 pins D-SUB) between output terminal of PC and the D-SUB input terminal of
a LCD TV.
Connect Audio cable between Audio output terminal of PC and Audio input terminal for PC of LCD TV.
(Connect cables and terminal in the same colors)
When Using as a PC Monitor
Turn on your LCD TV and press on remote control unit to select PC.
Turn on the PC and use it. (Refer to next page on the back for the supported resolutions for PC)
- This product supports plug-and-play function.
- We recommend the above method if the satellite receiver supports DTV signal with D-SUB(15 pin) cable for the
better quality picture.
- The audio port of the PC and the DTV/DVD uses with commonness.
1
2
1
2
PC
Audio Cable
D-SUB Cable
(15pin)
HYUNDAI LCD TV HQL260WR/320WR
CONNECTIONS
30
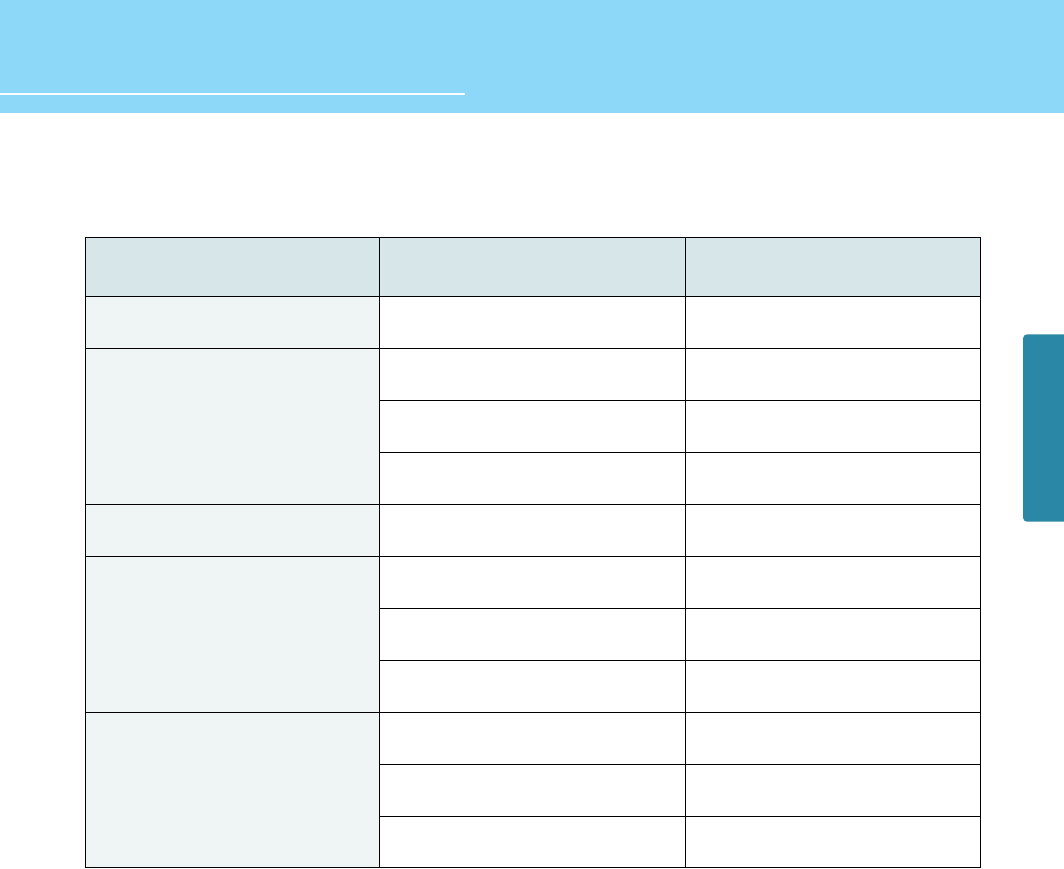
Resolutions Supported in PC
* Recommended Resolution is 1024x768@60Hz
* Max Resolution is 1024x768@75Hz
Resolution
31.47
31.47
37.86
37.50
31.47
37.88
48.08
46.88
48.36
56.48
60.02
Vertical frequency
70.09
59.94
72.80
75.00
70.08
60.32
72.18
75.00
60.00
70.07
75.03
640 x 350
720 x 400
800 x 600
1024 x 768
640 x 480
Horizontal frequency

31
CONNECTIONS

How to Select the Picture Mode .................................................33
How to Set the Desired Picture ...................................................34
How to Set PIP [Mode] ................................................................35
How to Set the Geometry (In PC mode) ......................................37
How to Set the Geometry (In DTV mode) ....................................38
Picture Setup
HYUNDAI WIDE LCD TV
33
PICTURE SETUP
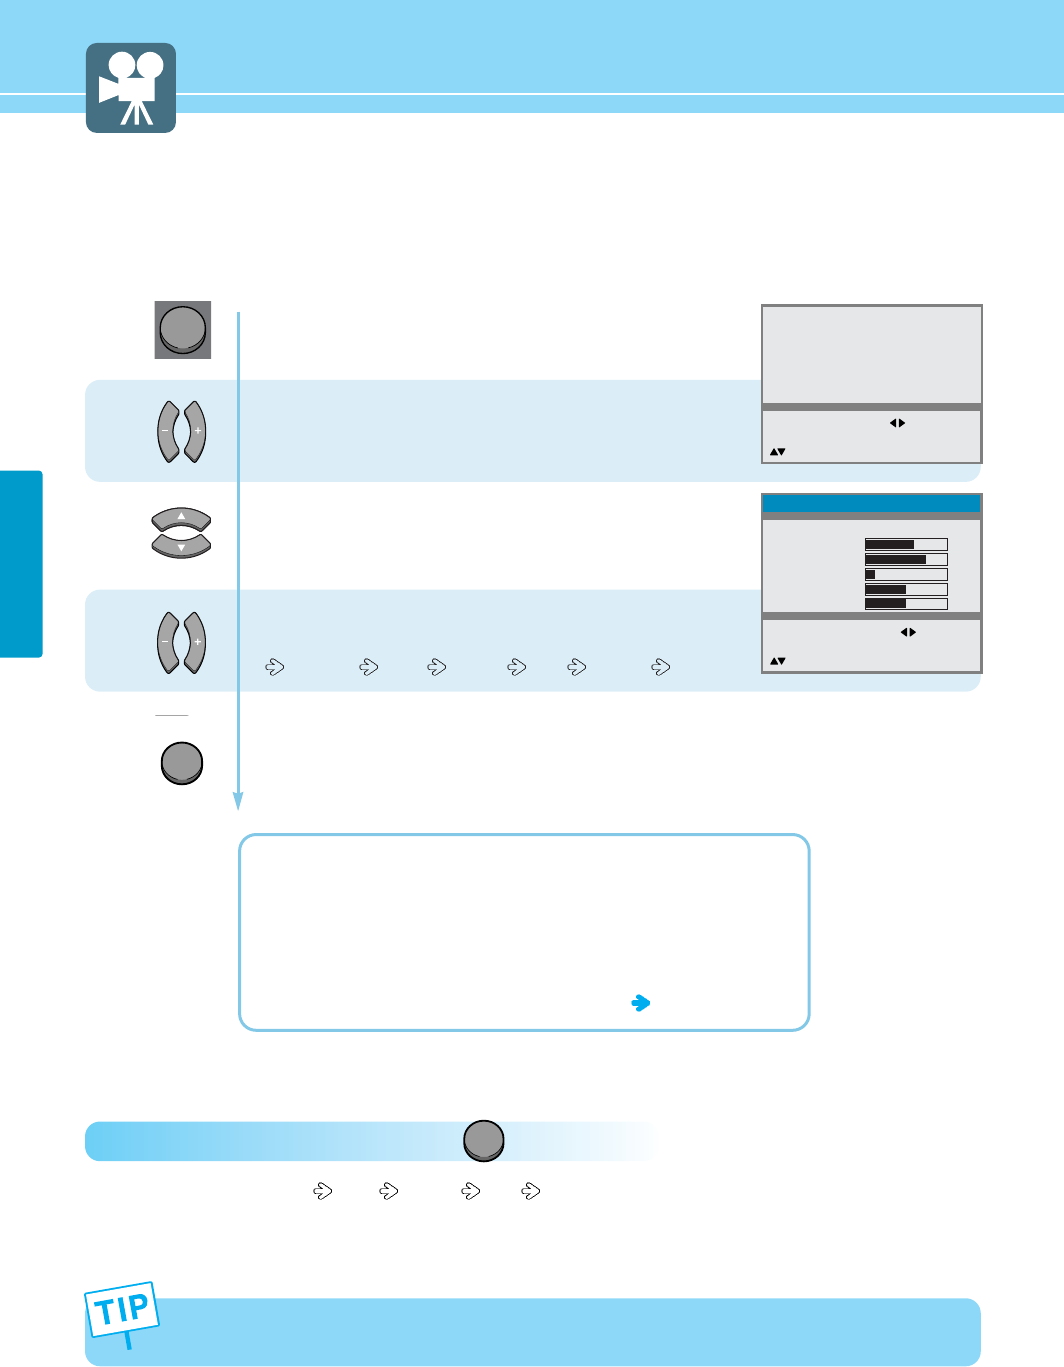
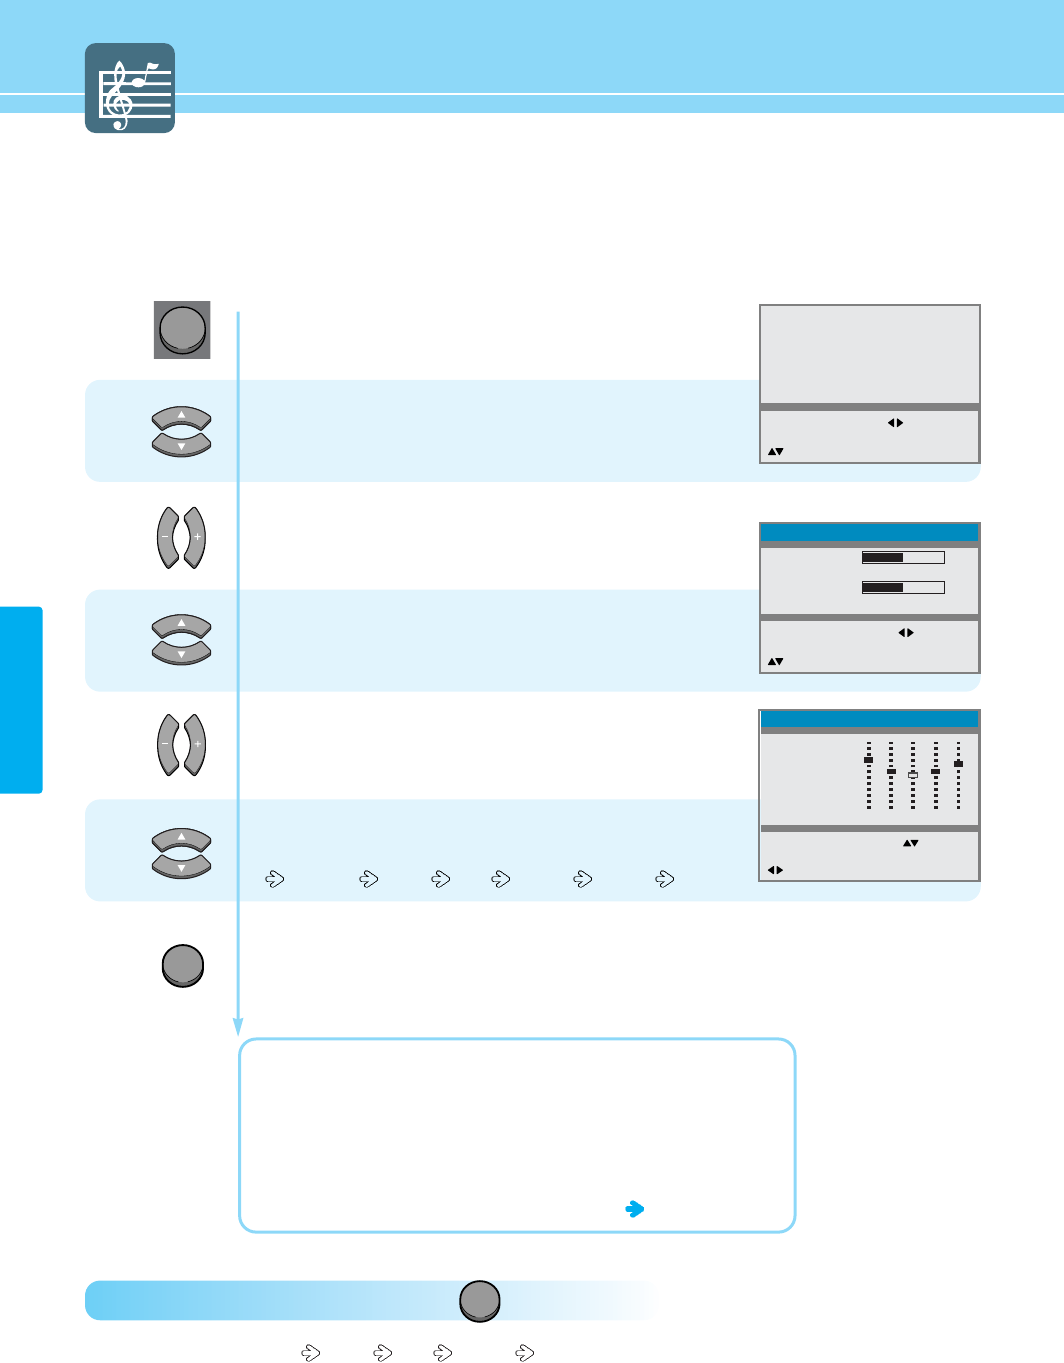
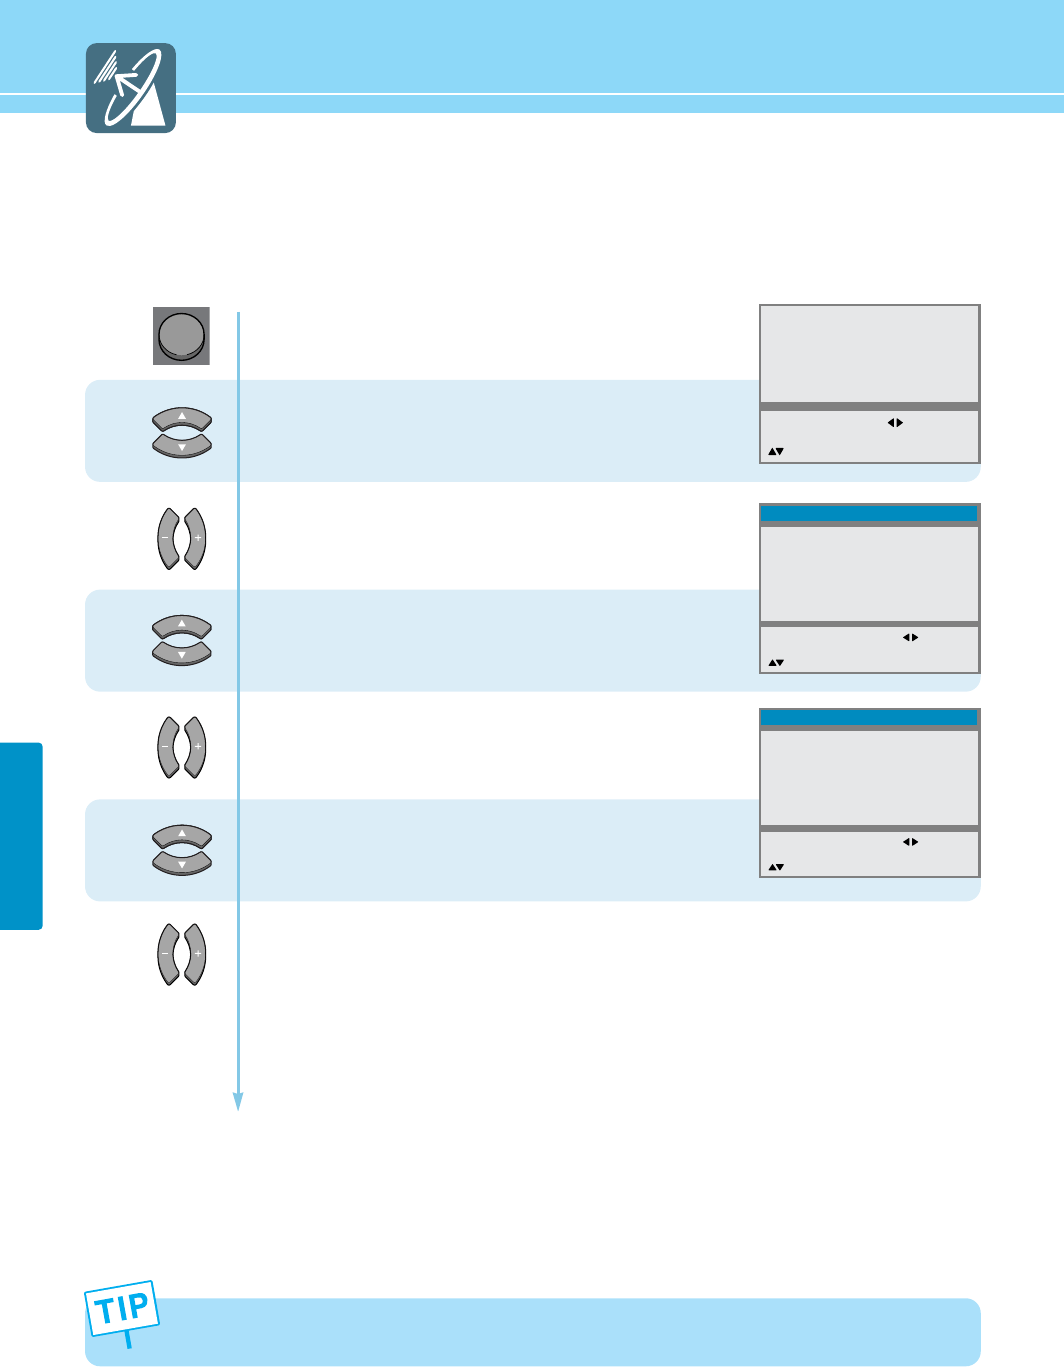
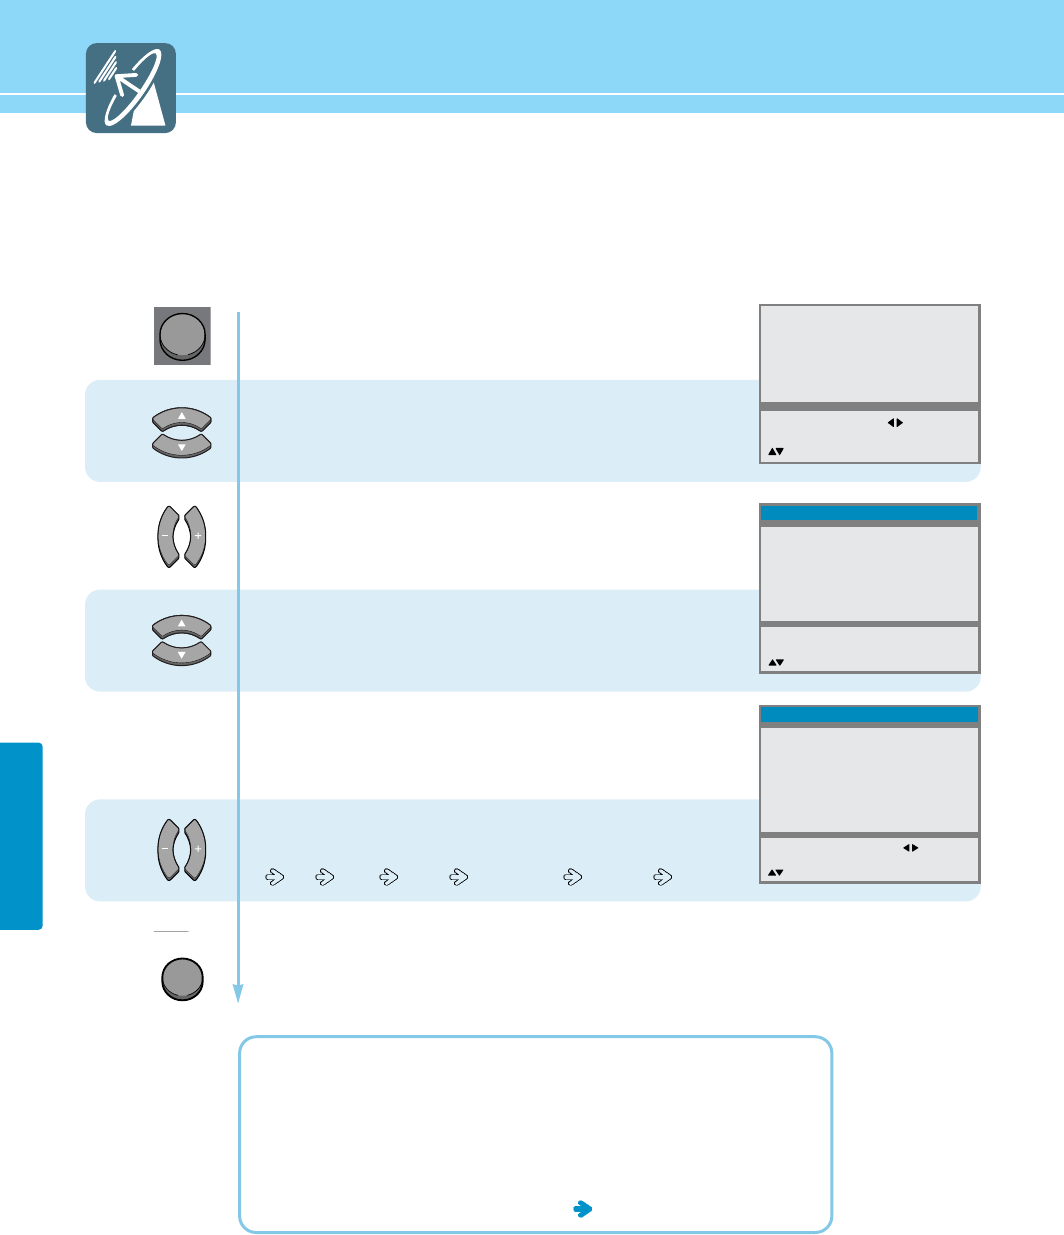
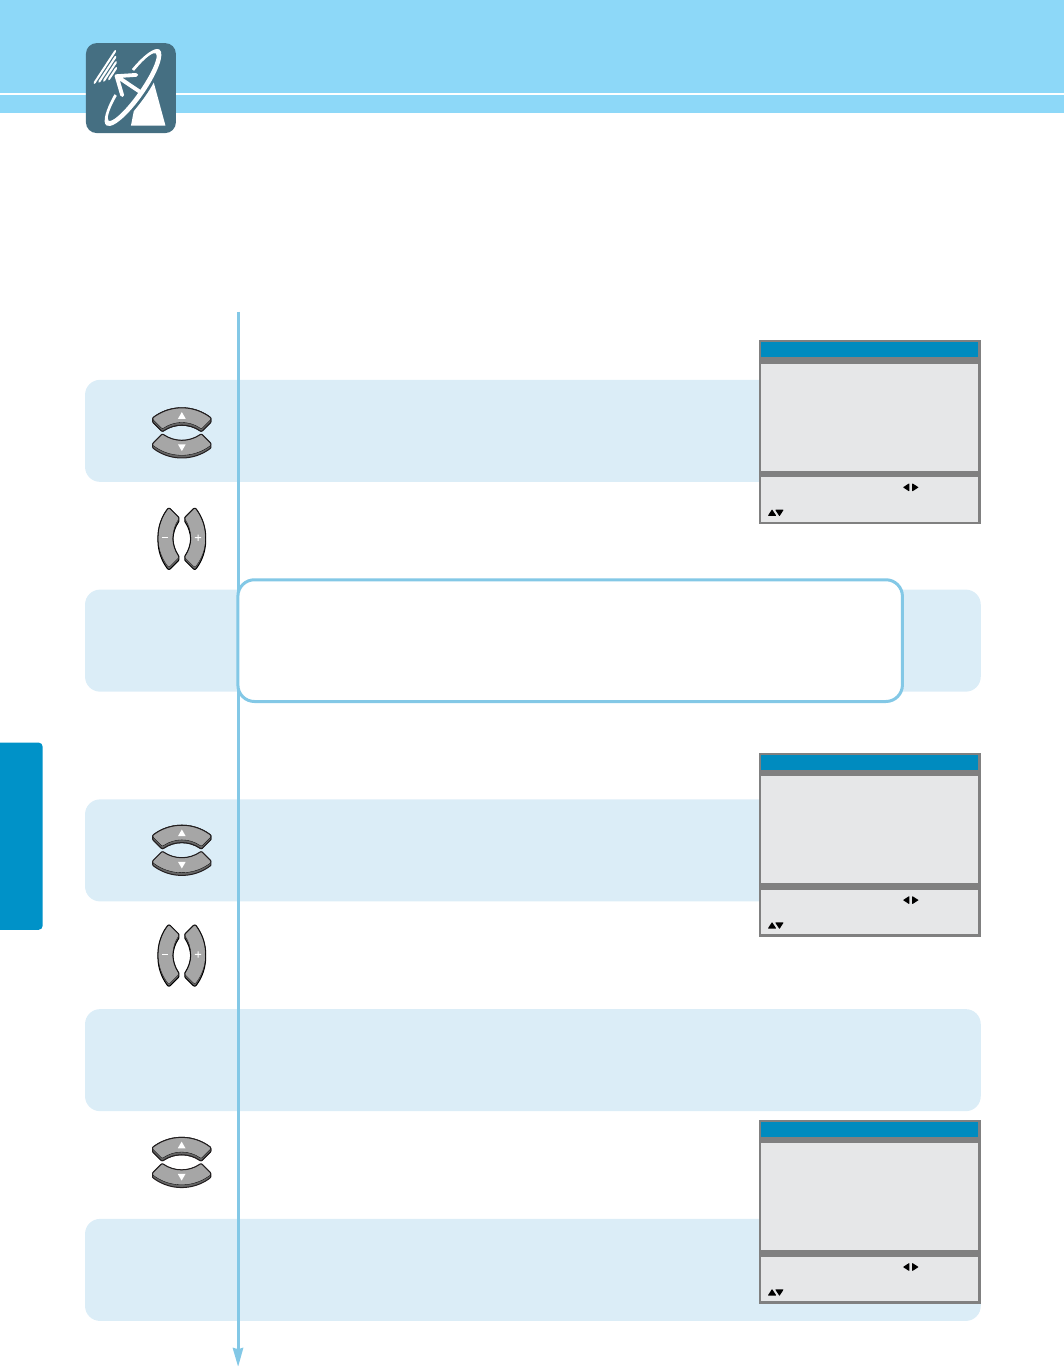
Press Menu button.
Menu items appear on the screen.
Press Left, Right or OK button to select
“Picture”.
Press Up and Down buttons to move to
“Mode”.
Press Left and Right buttons, then the menu
changes in order below.
Standard Sport Natural Mild Custom
Press MENU button after the setting is done, and Menu goes to the previous menu.
If the INPUT button is pressed, the menu disappears.
STANDARD : For general contents. It fits most video contents.
SPORT : For a clear display or watch sports.
NATURAL : For movies or live music.
MILD : For a soft display.
CUSTOM : When the user wants to set the values see the next page
1
2
3
How to Select the Picture Mode
Users can adjust picture mode automatically according to the input mode(TV, Video1·2·3, S-Video, DVD/DTV, PC).
How To Directly Select Picture Mode : Press button.
- Users can select Standard Sport Natural Mild Custom, when the input mode is TV, Video1/2/3, S-Video,
DVD/DTV, PC.
P.MODE
Picture
Sound
Clock
Install
Language
Advanced
MENU : Previous : Select
INPUT : Exit OK : Select
: Position
Standard
61
70
14
50
0
Mode
Contrast
Brightness
Sharpness
Color
Tint
MENU : Previous : Select
INPUT : Exit
: Position
Picture
In the user’s mode, the users can adjust at thier preference Contrast, Brightness, Sharpness, Color, Tint(Hue)
in Standard, Sport, Natural, or Mild mode.
MENU
INPUT
34
PICTURE SETUP
HYUNDAI LCD TV HQL260WR/320WR
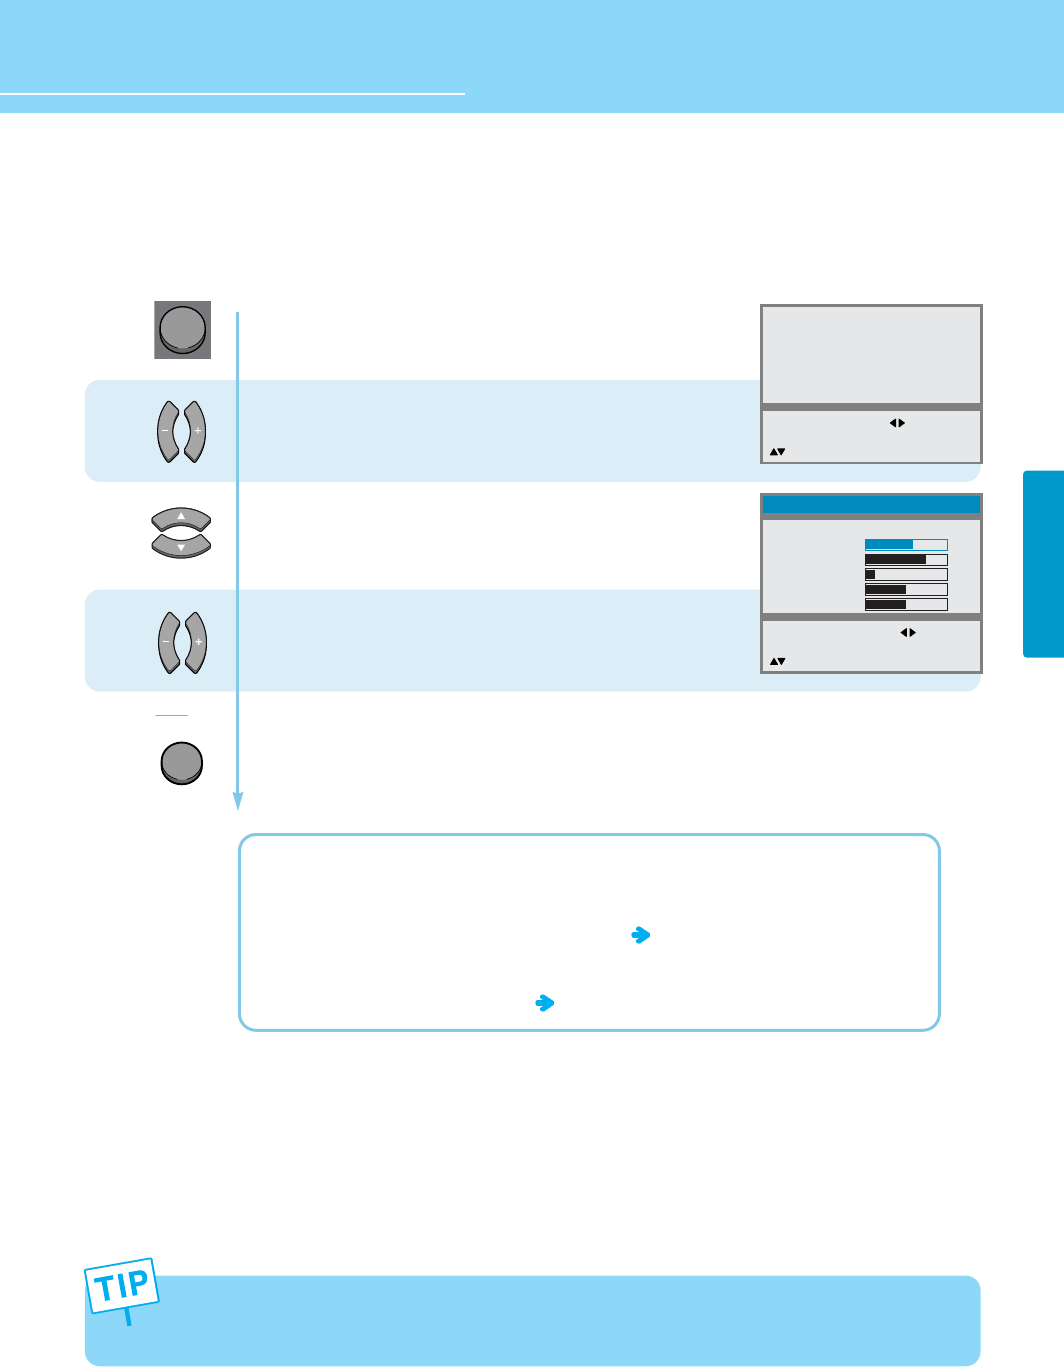
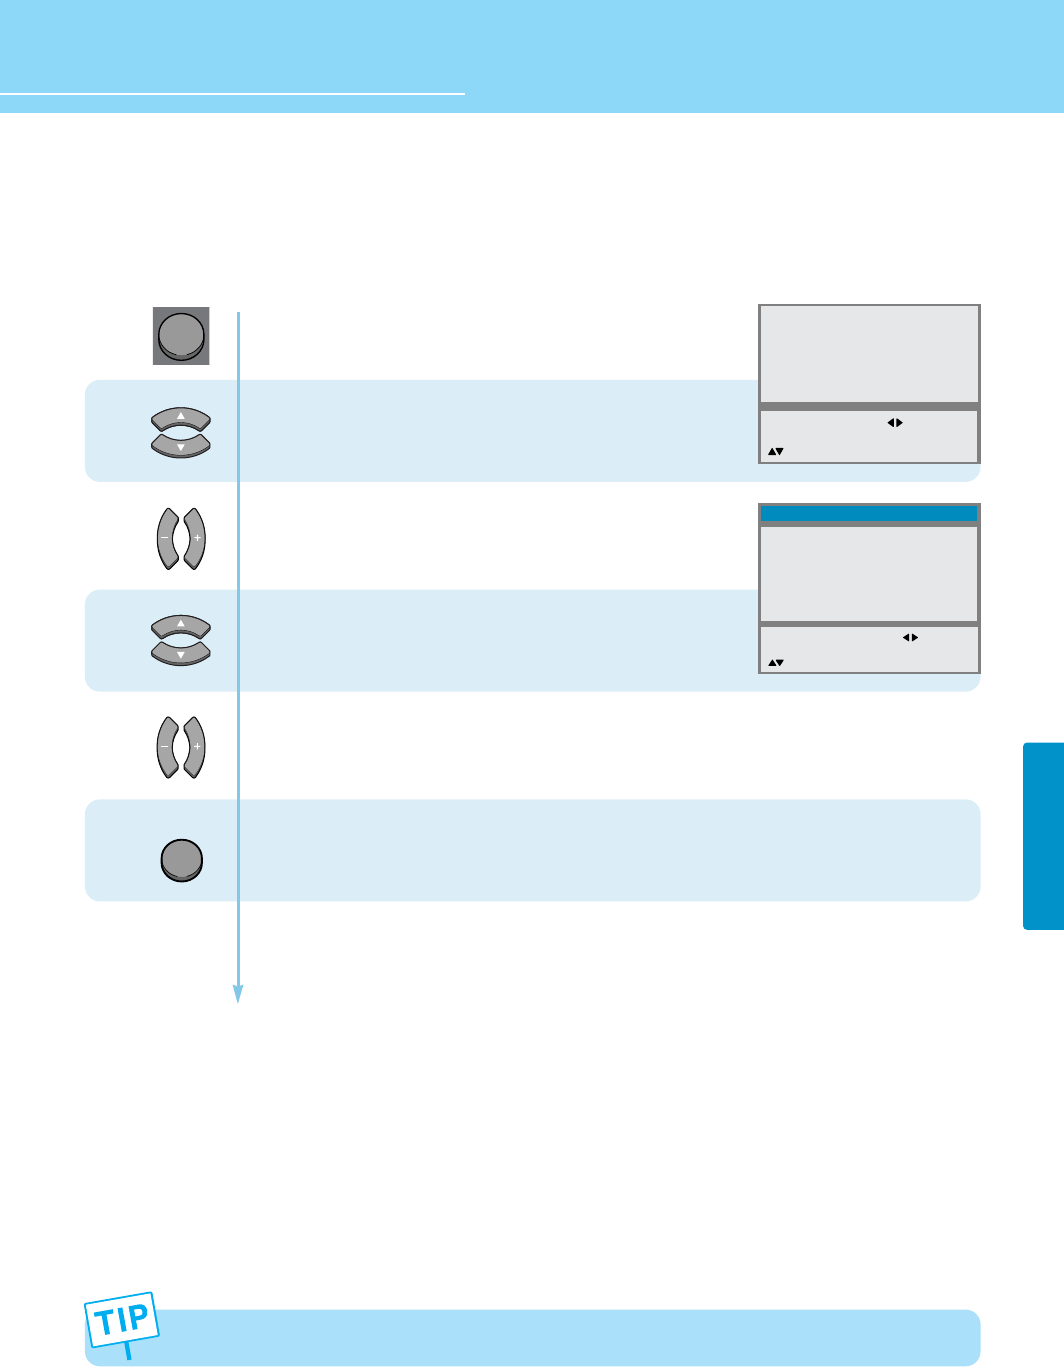
How to Set the Desired Picture
Users can manually adjust the picture in their own ways.
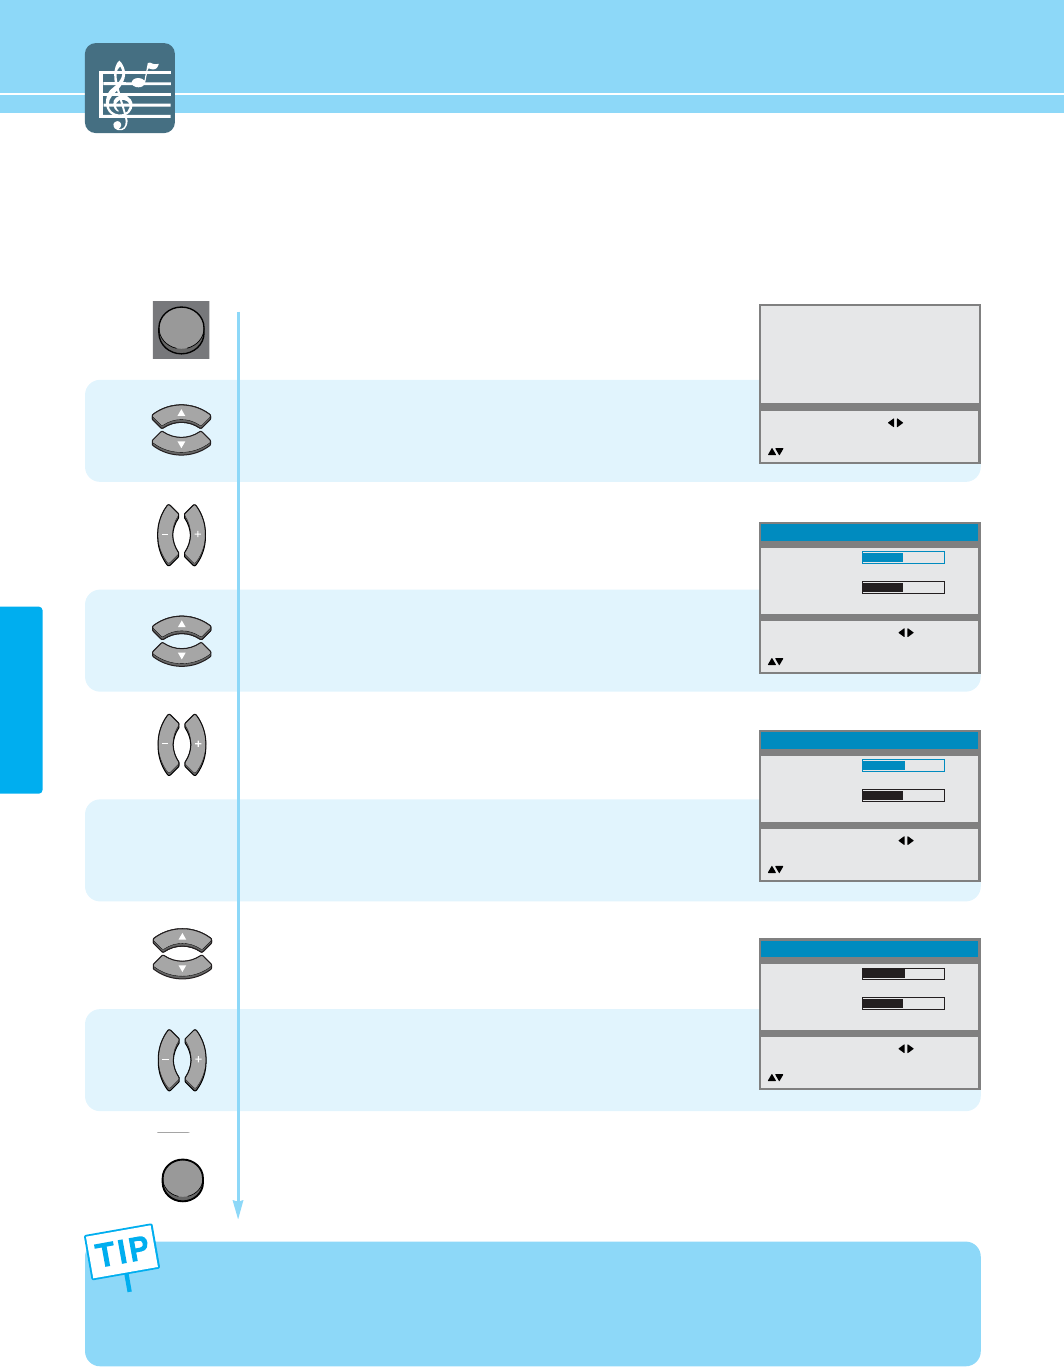
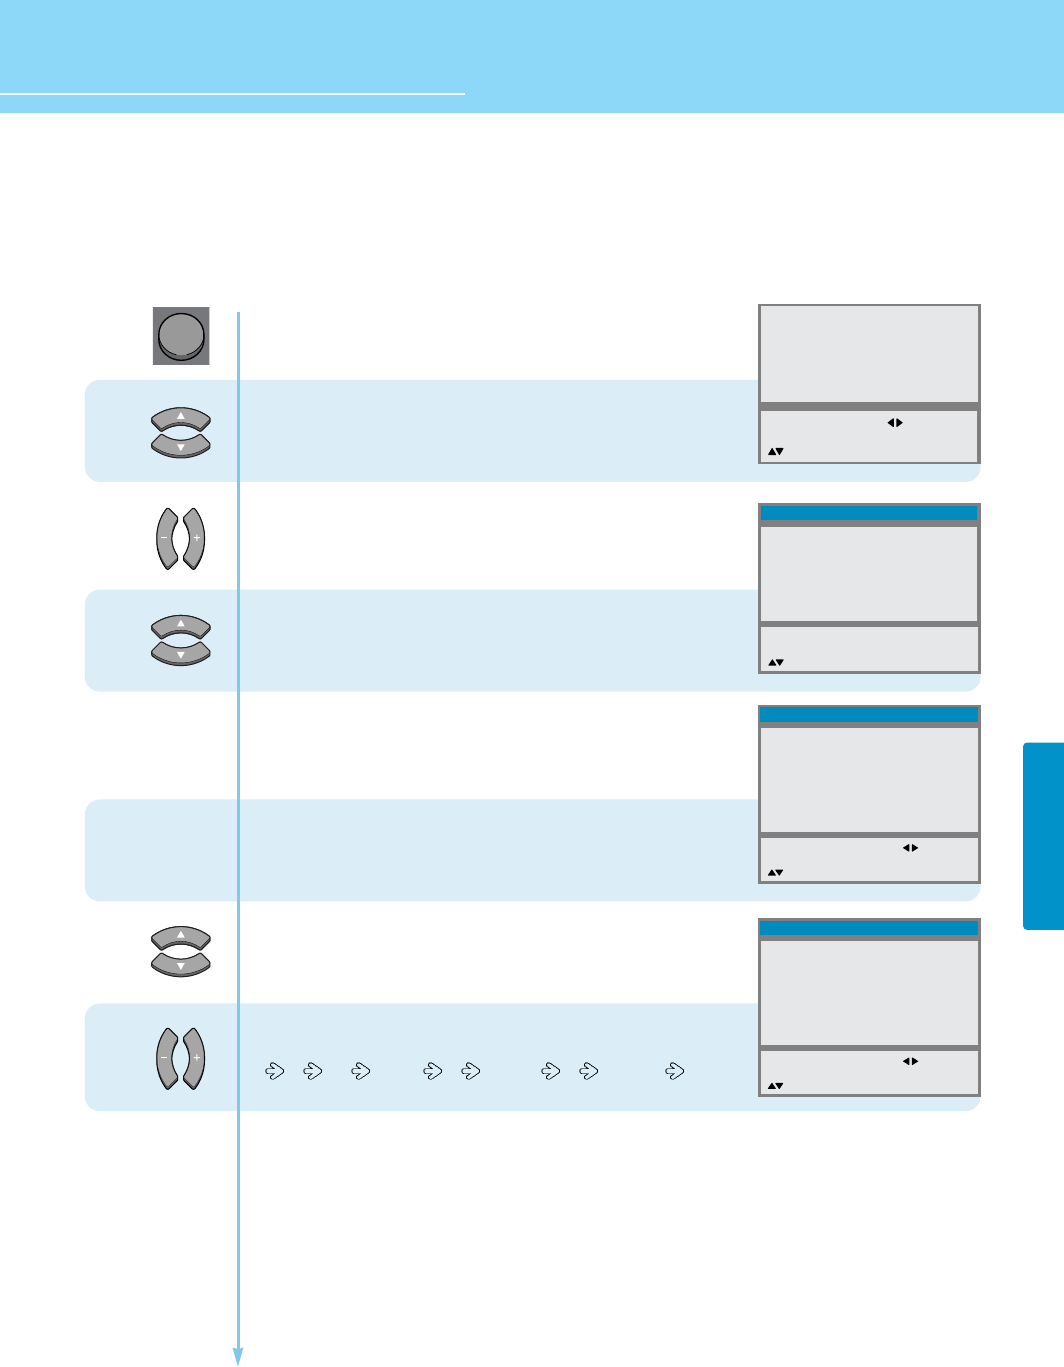
Press Menu button.
Menu items appear on the screen.
Press Left, Right or OK button to select
“Picture”.
Press Up and Down buttons to Choose
one of the items listed.
Press Left and Right buttons to adjust.
Press MENU button after the setting is done, and Menu goes to the previous menu.
If the INPUT button is pressed, the menu disappears.
CONTRAST : Adjust the brightness and darkness of object and background.
BRIGHTNESS : Adjust the brightness of the entire picture.
SHARPNESS : Adjust clarity of outline of objects. This is not applied to DTV, PC mode.
COLOR : Adjust colors into deeper or lighter colors.
TINT(HUE) : Adjust colors naturally. This is not applied to PC mode.
If you adjust the Picture in step 3 while it is in Standard, Sports, Natural or Mild mode, the mode will change
to Custom mode.
*Adjustments menu may be different according to the input source.
1
2
3
Picture
Sound
Clock
Install
Language
Advanced
MENU : Previous : Select
INPUT : Exit OK : Select
: Position
Custom
61
70
14
50
0
MENU : Previous :
Adjust
INPUT : Exit
: Position
Picture
Mode
Contrast
Brightness
Sharpness
Colour
Tint
MENU
INPUT

How to Set PIP [Mode]
- You can watch another device's image in the PIP while watching the TV, S-Video, DTV or VIDEO in the main image.
- This function is available only with the remote control.
35
PICTURE SETUP
Press the PIP button.
You will see the PIP at the upper right corner.
Press the INPUT button, then input source
changes in order below.
TV AV1 VIDEO AV2 VIDEO AV3 VIDEO
AV3 S-VHS DTV PC
In case of TV mode, you can change the main or PIP TV channel
by pressing the Up and Down buttons.
Press the Position button, then position
changes in order below.
Right Up Right Down Left Down
Left Up Center
Press the SIZE button.
The PIP will change among 6 different sizes
whenever you press this button.
Press the P.MODE button, then PIP picture mode
changes in order below.
Standard Sport Natural Mild Custom
5
4
3
1
2
PP
PPII
IIPP
PP
MM
MMaa
aaii
iinn
nn
- Main and sub pictures cannot have the same input source.
- While PIP is on, any change to Picture or Geometry in the OSD control menu is applied only for the PIP function. If you
wish to make adjustment to Picture or Geometry in the main image, please make sure the PIP function is off.
INPUT
SIZE
P.MODE
POSITION
PIP
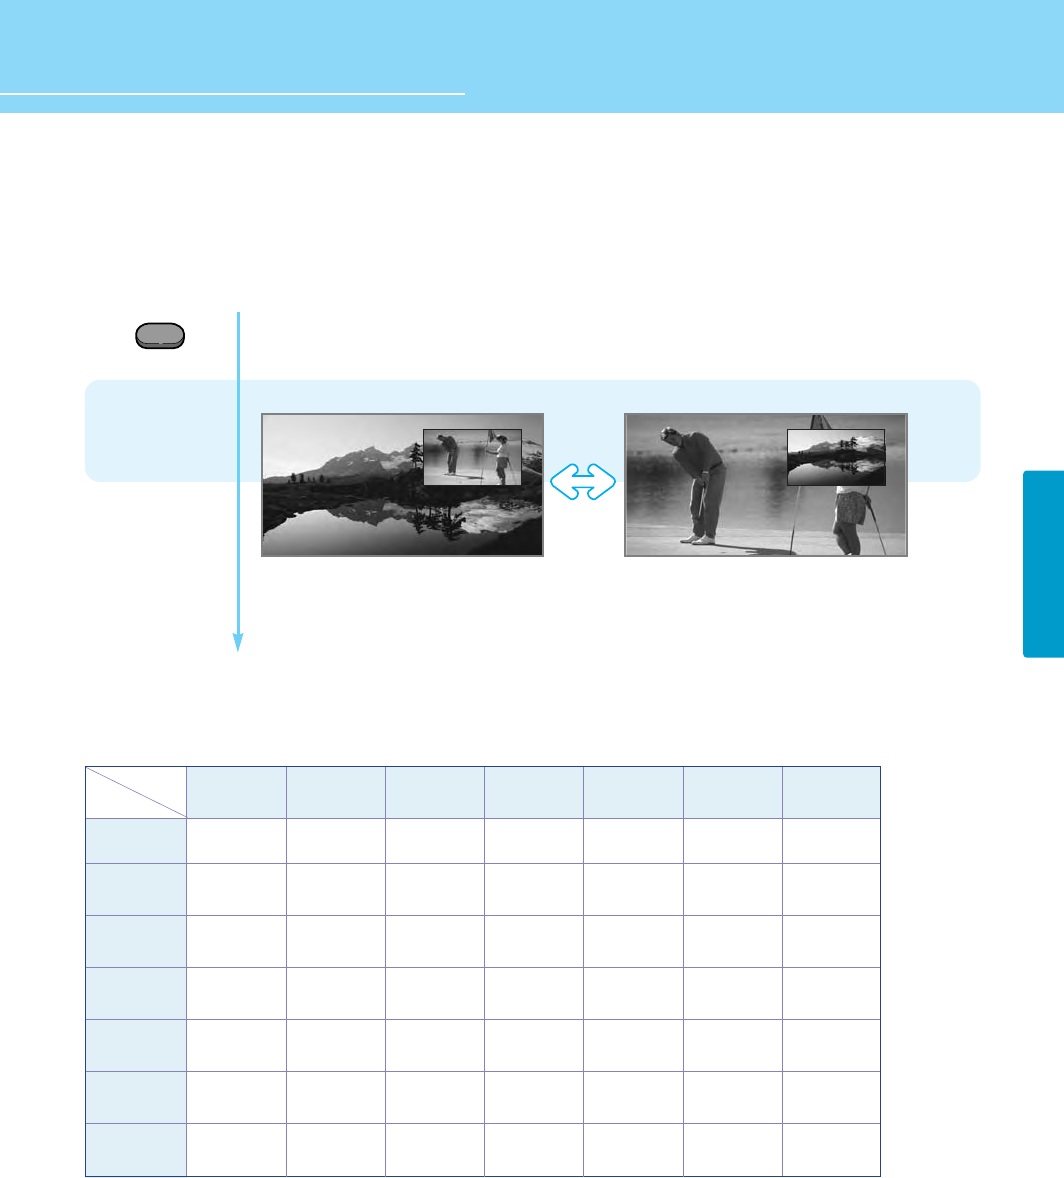
Supported PIP Table
PIP : O →Supported, X →Not Supported
36
PICTURE SETUP
HYUNDAI LCD TV HQL260WR/320WR
Press the SWAP button.
The Main image and PIP image will switch with each other
whenever you press this button.
SWAP
PIP
Main
PIP
Main
PC
X
X
O
O
O
O
O
DTV
X
X
O
O
O
O
O
PC
DTV
TV
AV1 Video
AV2 Video
AV3 Video
AV3 S-VHS
Sub
Main AV3 S-VHS
O
O
O
O
O
O
X
AV3 Video
O
O
O
O
O
X
O
AV2 Video
O
O
O
O
X
O
O
AV1 Video
O
O
O
X
O
O
O
TV
O
O
X
O
O
O
O
37
PICTURE SETUP
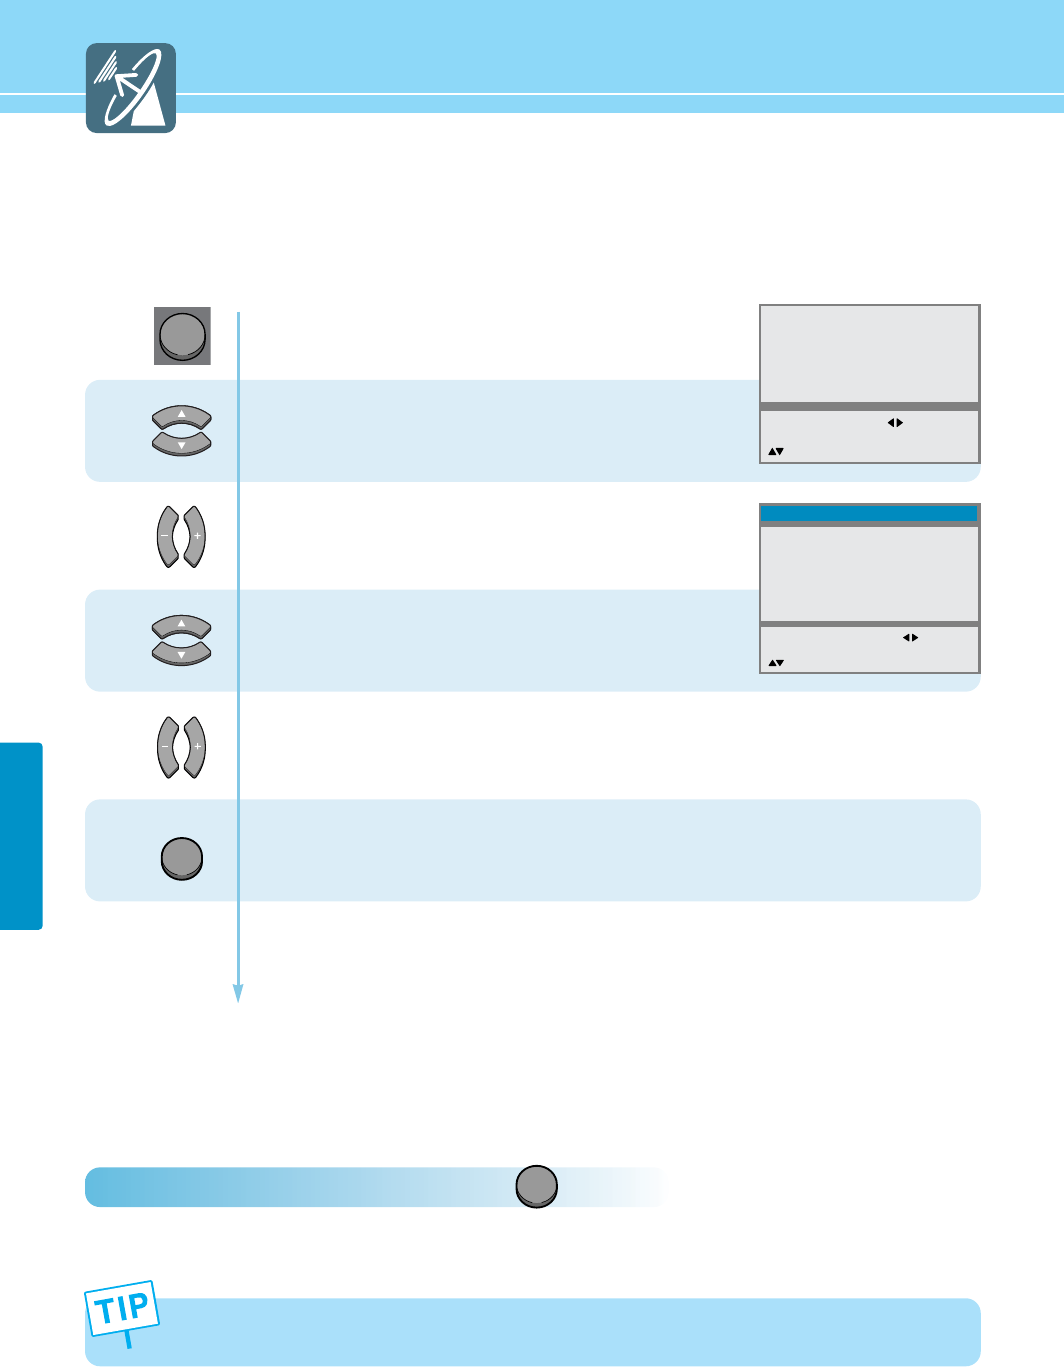
Press Menu button.
Menu items appear on the screen.
Press Up and Down buttons to move to
“Geometry”.
Press Left, Right or OK button to select
“Geometry”.
Geometry menu appears.
Press Up and Down buttons to Choose
one of the items listed.
Press Left and Right buttons to adjust.
Press MENU button after the setting is done, and Menu goes to the previous menu.
If the INPUT button is pressed, the menu disappears.
H. SIZE : To adjust the horizontal size of the picture.
H. POSITION : To adjust the horizontal position of the picture.
V. POSITION : To adjust the vertical position of the picture.
PHASE : To adjust to eliminate the shake of picture.
RELOAD : To set the Geometry to the default.
1
2
3
4
How to Set the Geometry (In PC mode)
This function allows you to tune your screen in PC Input Mode.
Geometry
Picture
Sound
Clock
Language
Advanced
MENU : Previous : Select
INPUT : EXIT OK : Select
: Position
H.Size
H.Position
V.Position
Phase
Reload
MENU : Previous : Adjust
INPUT : Exit
: Position
Geometry
100
128
26
16
INPUT
MENU

HYUNDAI LCD TV HQL260WR/320WR
38
PICTURE SETUP
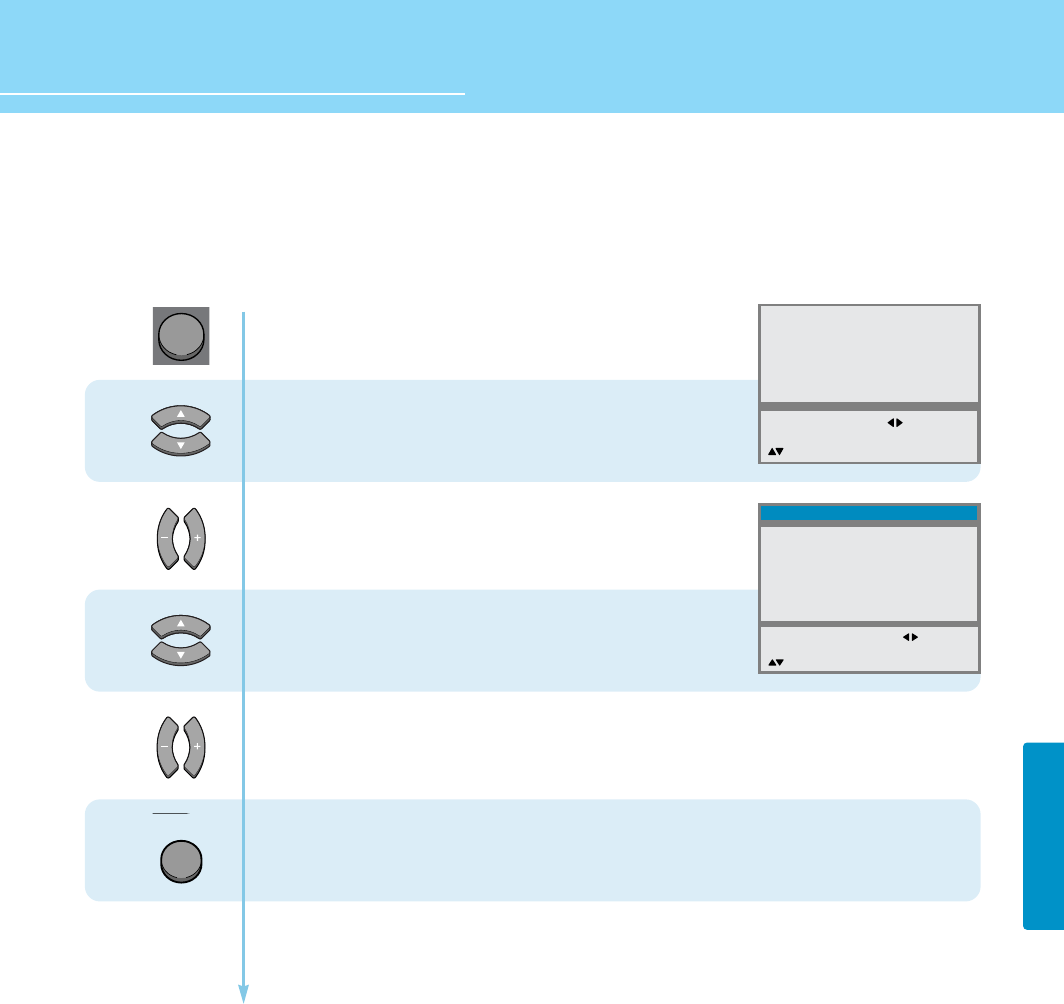
Press Menu button.
Menu items appear on the screen.
Press Up and Down buttons to move to
“Geometry”.
Press Left, Right or OK button to select
“Geometry”.
Geometry menu appears.
Press Up and Down buttons to Choose
one of the items listed.
Press Left and Right buttons to adjust.
Press MENU button after the setting is done, and Menu goes to the previous menu.
If the INPUT button is pressed, the menu disappears.
H. SIZE : To adjust the horizontal size of the picture.
H. POSITION : To adjust the horizontal position of the picture.
V. POSITION : To adjust the vertical position of the picture.
RELOAD : To set the Geometry to the default.
1
2
3
4
How to Set the Geometry (In DTV mode)
This function allows you to tune your screen in DTV Input Mode.
Geometry
Picture
Sound
Clock
Language
Advanced
MENU : Previous : Select
INPUT : EXIT OK : Select
: Position
H.Size
H.Position
V.Position
Reload
MENU : Previous : Adjust
INPUT : Exit
: Position
Geometry
100
128
33
INPUT
MENU

39
PICTURE SETUP

How to Select the Audio Mode .................................................. 41
How to Set the Desired Audio .................................................... 42
How to Set the Balance, Volume and Source ............................ 43
How to Select SRS WOW(Surround) .......................................... 44
How to Listen to Stereo Sound / SAP ......................................... 45
Sound Setup
HYUNDAI WIDE LCD TV
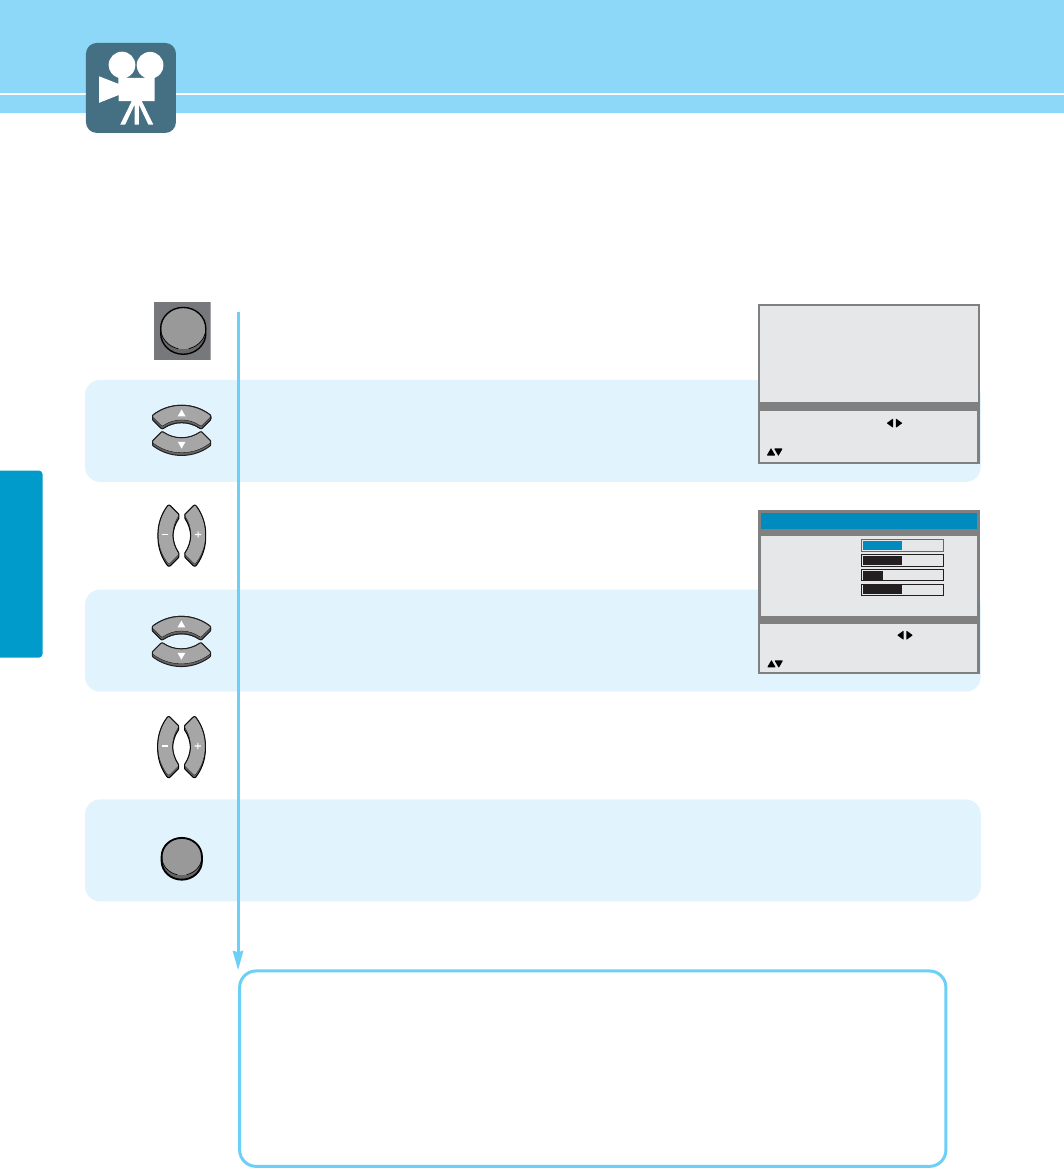
How to Select the Audio Mode
- Users can adjust sound mode automatically as users want.
- In SRS On mode, Equalizer in Sound Menu is not activated.
How To Directly Select Sound Mode : Press button.
Users can select Standard Music Film Speech Custom in order.
41
SOUND SETUP
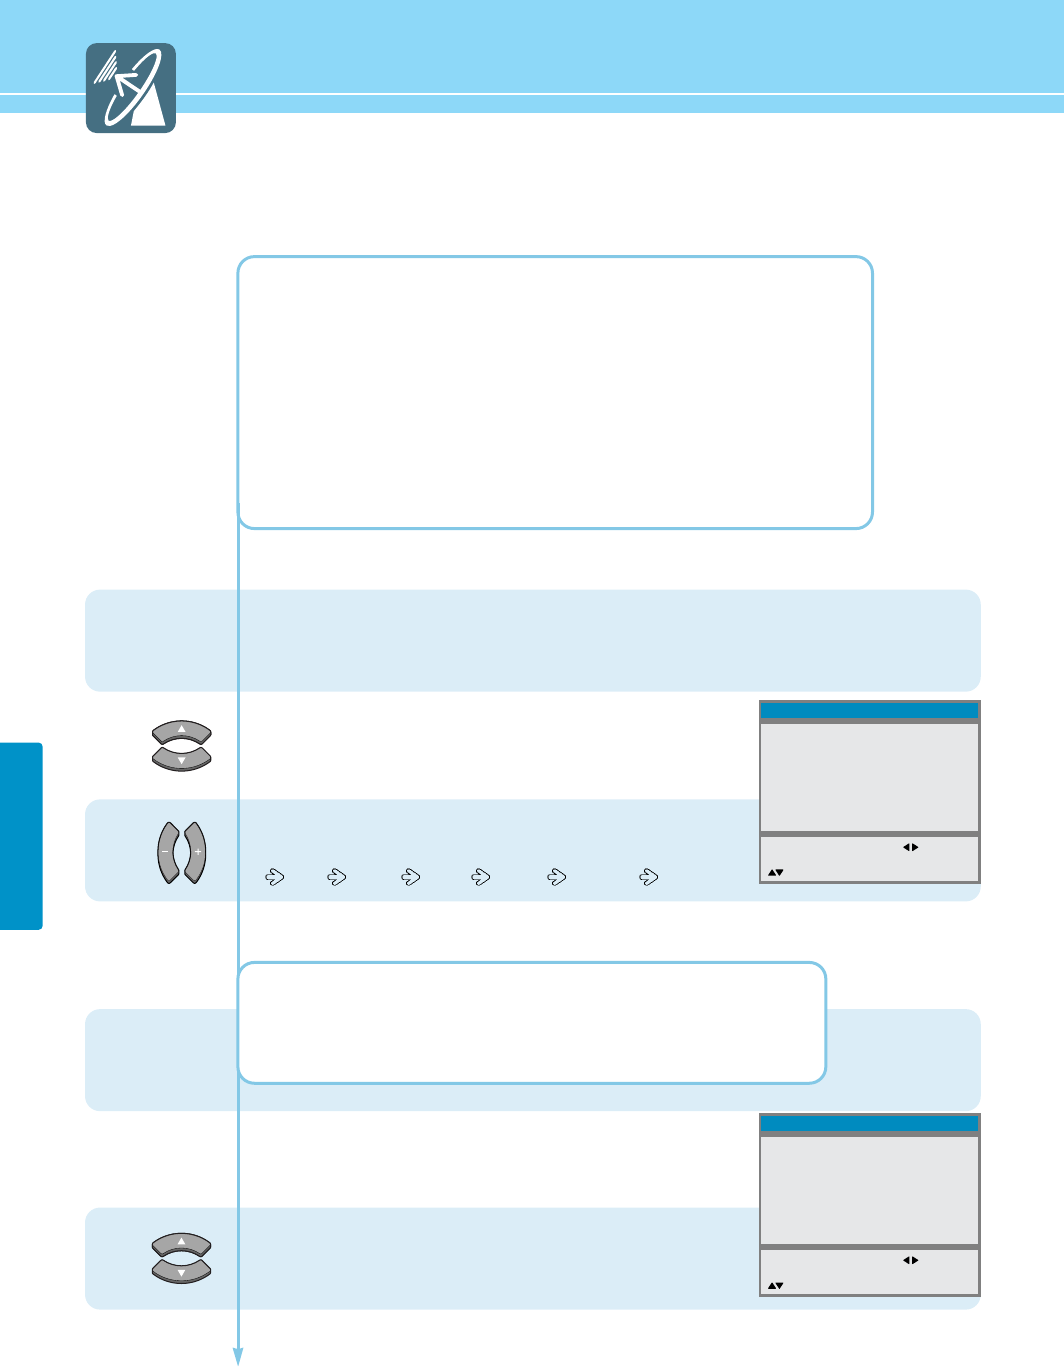
Press Menu button.
Menu items appear on the screen.
Press Up and Down buttons to move to
“Sound” .
Press Left, Right or OK button to select
“Sound”.
Press Up and Down buttons to move to
“Equalizer”.
Press Left, Right or OK button to select
“Equalizer”.
Press Up and Down buttons, then the mode
changes in order below.
Standard Music Film Speech Custom
Press MENU button after the setting is done, and Menu goes to the previous menu.
If the INPUT button is pressed, the menu disappears.
STANDARD : For the general sound. This fits most audio contents.
MUSIC : For enjoying original sound.
FILM : For grandiose sound.
SPEECH : For the clear sound.
CUSTOM : When the user wants to set the value see the next page
1
2
MENU
3
4
5
Picture
Sound
Clock
Install
Language
Advanced
MENU : Previous : Select
INPUT : Exit OK : Select
: Position
Balance
Equalizer
Volume
Input Source
MENU : Previous : Select
INPUT : Exit
: Position
Sound
0
50
Main
Mode
>>
Standard
Music
Film
Speech
Custom
MENU : Previous : Select
INPUT : Exit
: Position
100
Equalizer
300
1K
3K
10K
INPUT
S.MODE

HYUNDAI LCD TV HQL260
How to Set the Desired Audio
Users can manually adjust the sound in thier own ways.
42
SOUND SETUP
HYUNDAI LCD TV HQL260WR/320WR
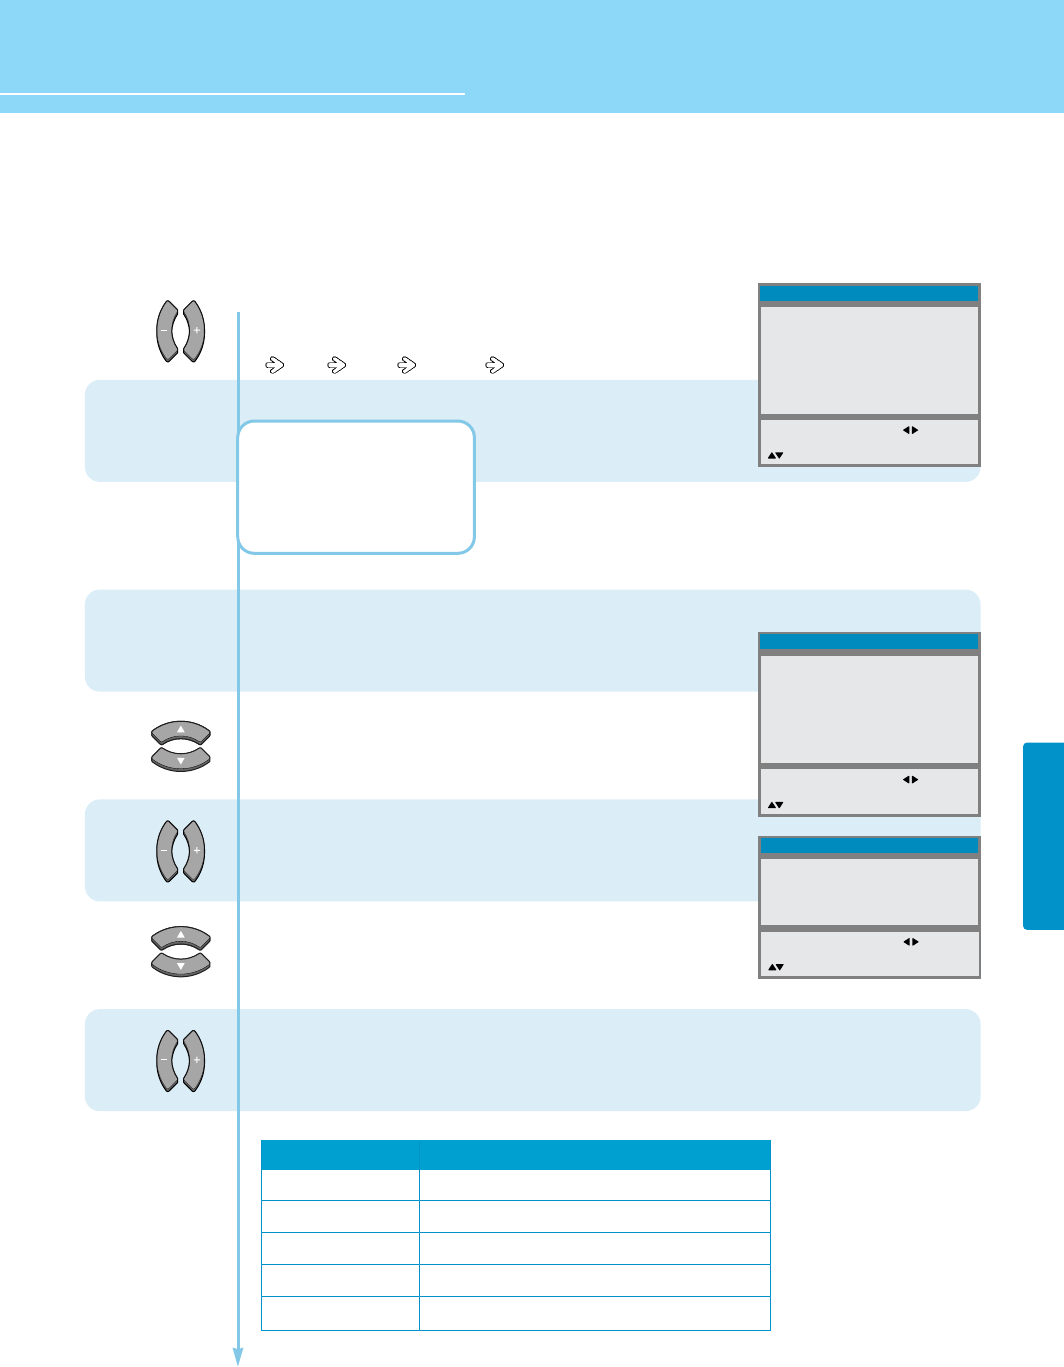
Press Menu button.
Menu items appear on the screen.
Press Up and Down buttons to move to
“Sound”.
Press Left, Right or OK button to select
“Sound”.
Press Up and Down buttons to move to
“Equalizer”.
Press Left, Right or OK button to select
“Equalizer”.
Press Left and Right buttons to
choose one of the items listed.
100 300 1K 3K 10K
Then Press Up and Down buttons to adjust.
Press MENU button after the setting is done, and Menu goes to the previous menu.
If the INPUT button is pressed, the menu disappears.
MENU
1
2
3
4
5
6
If you adjust the frequency (100Hz, 300Hz, 1KHz, 3KHz, 10KHz) in Standard, Music, Film or Speech mode, the
mode will change to Custom mode.
Picture
Sound
Clock
Install
Language
Advanced
MENU : Previous : Select
INPUT : Exit OK : Select
: Position
Balance
Equalizer
Volume
Input Source
MENU : Previous : Select
INPUT : Exit
: Position
Sound
0
50
Main
Mode
Standard
Music
Film
Speech
>>
Custom
MENU : Previous : Adjust
INPUT : Exit
: Position
100
Equalizer
300
1K
3K
10K
INPUT
SOUND SETUP
43
How to Set the Balance, Volume and Sound Source
Press Menu button.
Menu items appear on the screen.
Press Up and Down buttons to move to
“Sound”.
Press Left, Right or OK button to select
“Sound”.
Press Up and Down buttons to move to
“Balance” or “Volume”.
Then Press Left and Right buttons to adjust.
If you need to select the sound source,
go to step 5
Press Up and Down buttons to move to
“Input Source”.
Press Left and Right buttons,
then input source changes to “Main/Pip”.
Press MENU button after the setting is done, and Menu goes to the previous menu.
If the INPUT button is pressed, the menu disappears.
MENU
1
2
3
4
5
6
Picture
Sound
Clock
Install
Language
Advanced
MENU : Previous : Select
INPUT : Exit OK : Select
: Position
Balance
Equalizer
Volume
Input Source
MENU : Previous : Select
INPUT : Exit
: Position
Sound
0
50
Main
Balance
Equalizer
Volume
Input Source
MENU : Previous : Adjust
INPUT : Exit
: Position
Sound
R5
50
Main
Balance
Equalizer
Volume
Input Source
MENU : Previous : Select
INPUT : Exit
: Position
Sound
R5
50
Main
INPUT
- You can listen to the main picture's sound when the PIP is off even if you select PIP mode sound.
- You will have sound only through the headphones, not the speakers, if you connect headphones. (mute) You
can adjust the headphones' volume by pressing thebutton.
- When you would like to have sound through the headphones, if you connect a set of headphones to your TV,
the volume level will be decreased automatically without concerrning the previous volume setting.
HYUNDAI LCD TV HQL260WR/320WR
44
SOUND SETUP
How to Select SRS WOW(Surround)
- You can enjoy the spectacular, clear and crisp sound.
- This function is available only with the remote control.
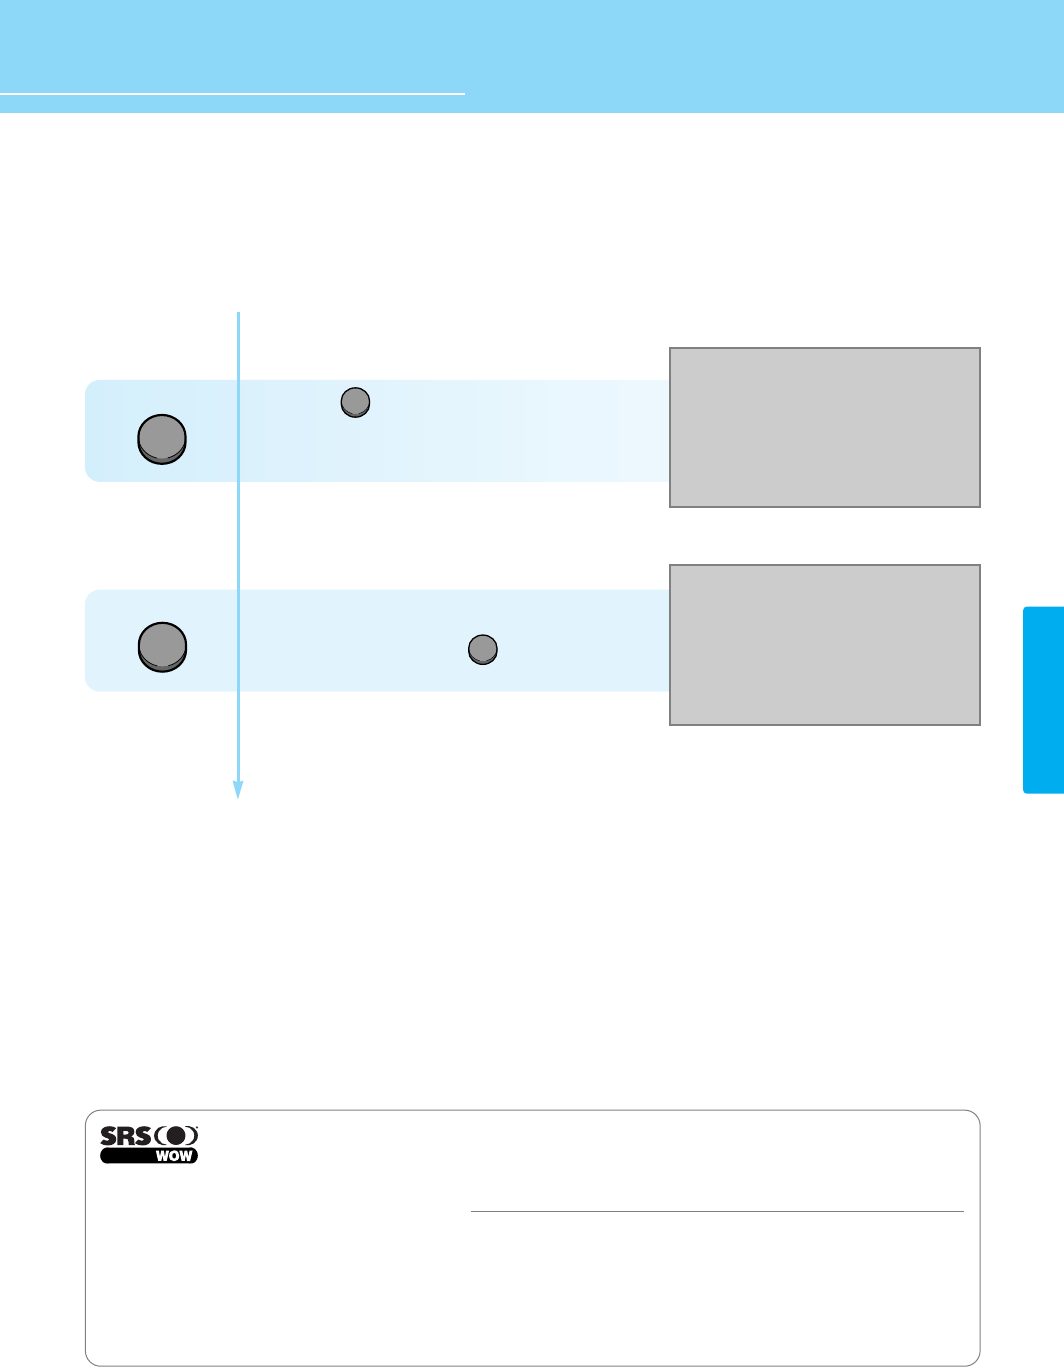
Press the button on the remote control
to select SRS WOW.
Then SRS WOW changes to “On/Off”.
*In SRS On mode, Equalizer in Sound Menu
is not activated.
*In SRS On mode, pressing on the
remote control displays "SRS working".
S.MODE
S.EFFECT
is a trademark of SRS Labs, Inc.
WOW technology is incorporated under license from SRS Labs, Inc.
Remarkable Enhancement for Mono or Stereo Playback
WOWTM‚ is an award-winning, patented technology that significantly enhances the quality of mono and stereo audio material. It creates the
perception of improved dynamics and bass performance over standard speakers or headphones.
WOW makes up for the limitations inherent in smaller speakers and headphones by providing a panoramic three-dimensional audio image
that extends the sound in both the horizontal and vertical planes well beyond the speakers or headphones themselves. As a result,
manufacturers of small audio devices, televisions, wireless and personal/portable products can dramatically improve their product’s audio
performance without enlarging the speaker size. The enriching effects of WOW are especially noticeable on digitally compressed mono or
stereo audio in formats such as MP3, WMA and audio CD in which the “tinny” hollow sound is greatly reduced.
SRS On
SRS working
S.EFFECT
S.MODE
45
SOUND SETUP
How to Listen to Stereo Sound / SAP
- Depending on the particular program being broadcast, you can listen to stereo, mono, or a Secondary Audio
Program. (SAP audio is usually a foreign-language translation. Sometimes SAP has unrelated information like
news or weather.)
- This function is available only with the remote control.
• If the signal reception conditions deteriorate, setting to Mono will make your listening condition better.
• If the stereo signal is weak and automatic mode switching occurs, then the current mode is switched to the
Mono.
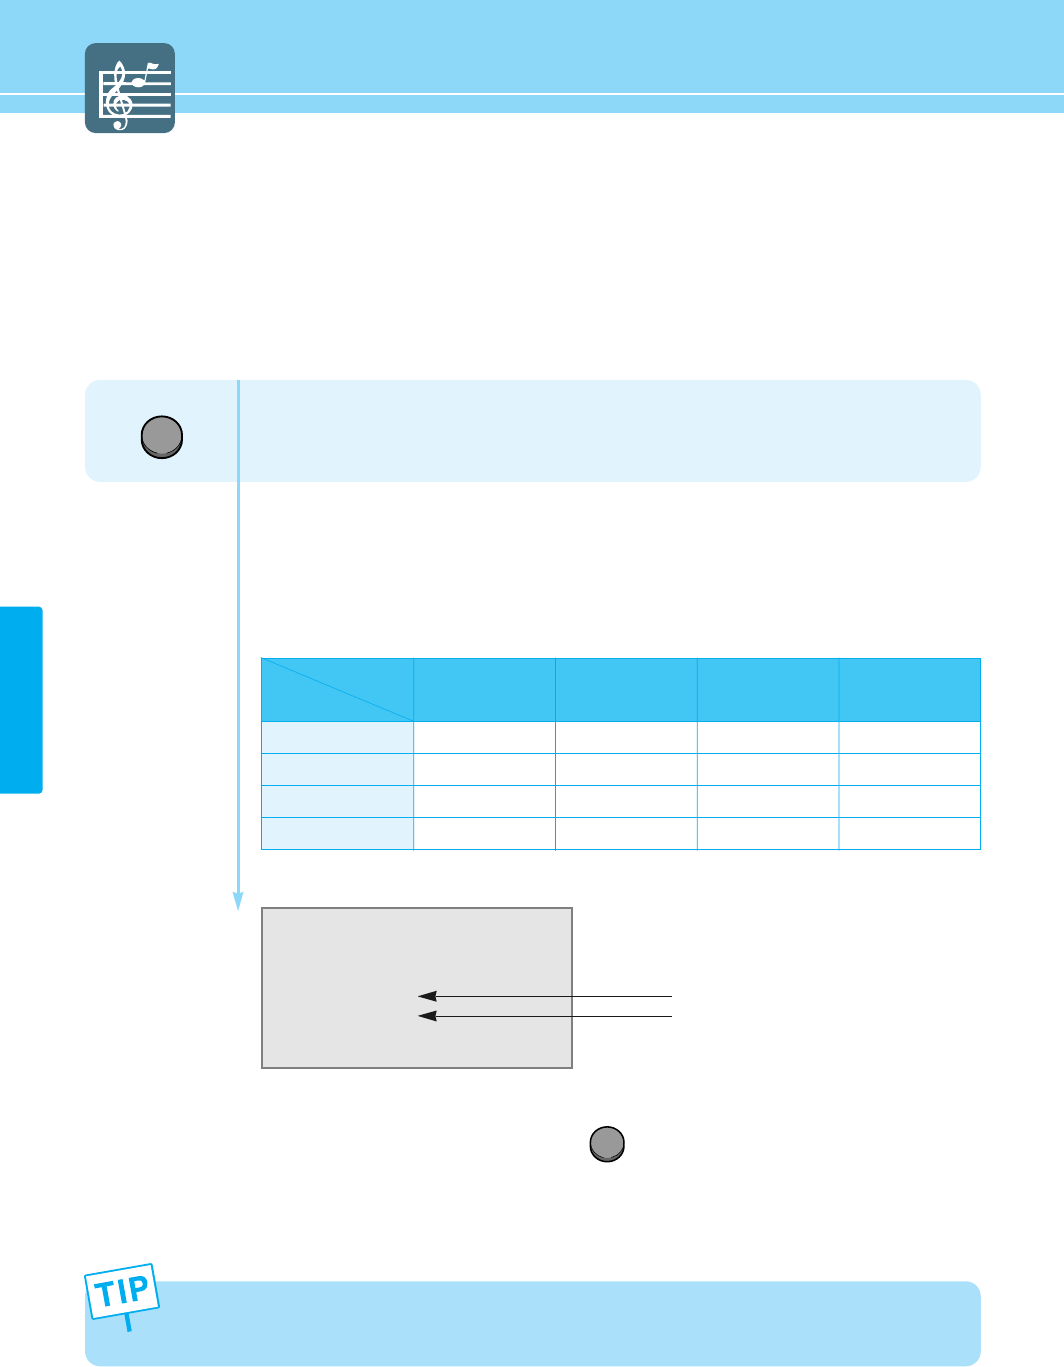
Press the MTS button on the remote control to select Stereo Sound / SAP.
You can select sound options (Mono, Stereo, SAP, Mono+SAP) depending on the broadcasting
signal by pressing MTS button on the remote control.
STEREO : Choose Stereo for channels that are broadcasting in stereo.
MONO : Choose Mono for channels that are broadcasting in mono, or if you are having
difficulty receiving a stereo signal.
SAP : Choose SAP to listen to the Secondary Audio Program, which is usually a foreign-
language translation.
Mono
Stereo
1. Displays present received sound state.
2. When you select sound options using the button.
1
2
MTS
MTS
Option
Broadcasting M+SAP
M
S
M+SAP
M+SAP
SAP
M
M
SAP
SAP
S
M
S
M
S
M
M
M
M
M
M
S
M+SAP
S+SAP

How to Store Channel Automatically ......................................... 47
How to Set Channel Fine Tuning ............................................... 48
How to Add/Erase Channel ........................................................ 49
Using the LNA(Low-Noise-Amplifier) Feature ............................ 50
How to Select the Parental Lock Mode ...................................... 51
How to Set the Desired Parental Lock ....................................... 52
Channel Setup
HYUNDAI WIDE LCD TV
CHANNEL SETUP
47
How to Store Channel Automatically
You can scan channels available to you automatically.
First of all, you can select the Air or Cable before setup the Channel Searching.
1
2
3
If you press the MENU button in the middle of Auto tuning, the first stored channel will be displayed, and the
Auto tuning stops.
4
5
6
Press Menu button.
Menu items appear on the screen.
Press Up and Down buttons to move to
“Install”.
Press Left, Right or OK button to select
“Install”.
Press Up and Down buttons to move to “Select”.
Press Left and Right buttons to select
“TV/CATV”
Press Up and Down buttons to move to “Auto Tuning”.
Press Left, Right or OK button,
then it will be stored the searched channels.
After completing Channel Searching, It will return to the previous channel.
Picture
Sound
Clock
Install
Language
Advanced
MENU : Previous : Select
INPUT : Exit OK : Select
: Position
Auto tunning
Select
Channel
Fine Tunning
LNA
Add/Erase
Parental Lock
CATV
5
73.25
Off
Erase
- - - -
MENU : Previous : Select
INPUT : Exit
: Position
Install
Auto tunning
Select
Channel
Fine Tunning
LNA
Add/Erase
Parental Lock
CATV
5
73.25
Off
Erase
- - - -
MENU : Previous : Access
INPUT : Exit OK : Access
: Position
Install
MENU
HYUNDAI LCD TV HQL260WR/320WR
CHANNEL SETUP
48
Band limit of the fine tuning is ± 2Mbyte.
How to Set Channel Fine Tuning
If the signal is weak or distorted, you may have to fine tune the channel manually.
1
2
3
4
Press Menu button.
Menu items appear on the screen.
Press Up and Down buttons to move to
“Install”.
Press Left, Right or OK buttons to select
“Install”.
Press Up and Down buttons to move to “Fine Tuning”.
Press Left and Right buttons to adjust screen.
Channel Number is current channel.
The fine tuned channels are automatically stored.
Press MENU button after the setting is done, and Menu goes to the previous menu.
If the INPUT button is pressed, the menu disappears.
Picture
Sound
Clock
Install
Language
Advanced
MENU : Previous : Select
INPUT : Exit OK : Select
: Position
Auto tunning
Select
Channel
Fine Tunning
LNA
Add/Erase
Parental Lock
CATV
10
193.25
Off
Erase
- - - -
MENU : Previous :
Adjust
INPUT : Exit
: Position
Install
MENU
INPUT
When Channel Display Color is green, this indicates the current channel has been stored (Add). When Channel
Display Color is red, this indicates the current channel has not been stored (Erase).
ADD/ERASE
49
CHANNEL SETUP
How to Add/Erase Channel
This function allows you to manually store or erase the desired channels while watching a program.
How To Directly Select ADD/ERASE Channel : Press button.
The selection will switch whenever you press the Add/Erase button on the remote control.
1
2
3
4
Press Menu button.
Menu items appear on the screen.
Press Up and Down buttons to move to
“Install”.
Press Left, Right or OK buttons to select
“Install”.
Press Up and Down buttons to move to “Add/Erase”.
Channel Number is current channel.
Press Left and Right buttons to select
“Add/Erase”.
Press MENU button after the setting is done, and Menu goes to the previous menu.
If the INPUT button is pressed, the menu disappears.
Picture
Sound
Clock
Install
Language
Advanced
MENU : Previous : Select
INPUT : Exit OK : Select
: Position
Auto tunning
Select
Channel
Fine Tunning
LNA
Add/Erase
Parental Lock
CATV
5
193.31
On
Erase
- - - -
MENU : Previous : Select
INPUT : Exit
: Position
Install
MENU
INPUT
HYUNDAI LCD TV HQL260WR/320WR
50
CHANNEL SETUP
Using the LNA(Low-Noise-Amplifier) Feature
If the signal is weak or distorted, you use this function.
1
2
3
4
Press Menu button.
Menu items appear on the screen.
Press Up and Down buttons to move to
“Install”.
Press Left, Right or OK buttons to select
“Install”.
Press Up and Down buttons to move to “LNA”.
Press Left and Right buttons to select
“On/Off”.
Press MENU button after the setting is done, and Menu goes to the previous menu.
If the INPUT button is pressed, the menu disappears.
Picture
Sound
Clock
Install
Language
Advanced
MENU : Previous : Select
INPUT : Exit OK : Select
: Position
Auto tunning
Select
Channel
Fine Tunning
LNA
Add/Erase
Parental Lock
CATV
5
193.31
Off
Erase
- - - -
MENU : Previous : Select
INPUT : Exit
: Position
Install
MENU
INPUT
51
CHANNEL SETUP
How to Select the Parental Lock Mode
The V-Chip feature automatically locks out programs that are deemed inappropriate for children. The user must
enter a Password before any of the V-Chip restrictions are set up or changed.
Note : When the V-chip feature is activated, the PIP and auto channel program features do not function.
1
2
3
5
Press Menu button.
Menu items appear on the screen.
Press Up and Down buttons to move to
“Install”.
Press Left, Right or OK buttons to select
“Install”.
Press Up and Down buttons to move to
“Parental Lock”.
Enter your 4-digit password.
(The default password for a new TV set is “0119”.)
Then new menu apears.
Press Left and Right button,
then the menu changes in order below.
Off Child Youth Young Adult Custom
Press MENU button after the setting is done, and Menu goes to the previous menu.
If the INPUT button is pressed, the menu disappears.
OFF : Parental lock is disabled. All programs are unblocked from viewing.
CHILD : The permitted Maximum ratings are TV-Y, TV-G, G.
YOUTH : The permitted Maximum ratings are TV-PG, PG.
YOUNG ADULT : The permitted Maximum ratings are TV-14, PG-13.
CUSTOM : Select to set ratings manually. see the next page
Picture
Sound
Clock
Install
Language
Advanced
MENU : Previous : Select
INPUT : Exit OK : Select
: Position
Auto tunning
Select
Channel
Fine Tunning
LNA
Add/Erase
Parental Lock
CATV
5
193.31
On
Add
- - - -
MENU : Previous 0-9 : Insert
INPUT : Exit
: Position
Install
Parental Lock
Movie Rating
Genenal
Children
Content Block
Not Rated
AV Sources
Change Password
Off
Unblock
Unblock
Unblock
Unblock
Unblock
- - - -
MENU : Previous : Select
INPUT : Exit
: Position
Install
MENU
INPUT
4
HYUNDAI LCD TV HQL260WR/320WR
CHANNEL SETUP
52
How to Set the Desired Parental Lock
Users can manually adjust the Parental Lock in their own ways.
1
2
3
6
5
Press Menu button.
Menu items appear on the screen.
Press Up and Down buttons to move to
“Install”.
Press Left, Right or OK buttons to select
“Install”.
Press Up and Down buttons to move to
“Parental Lock”.
Enter your 4-digit password.
(The default password for a new TV set is “0119”.)
Then new menu apears.
Go to step 5, if you need to set restrictions using
the MPAA ratings system.
Press Up and Down to move to
“Movie Rating”.
Press Left and Right button,
then the menu changes in order below.
G PG PG-13 R NC-17 X Unblock
Countinued on next page ......
Picture
Sound
Clock
Install
Language
Advanced
MENU : Previous : Select
INPUT : Exit OK : Select
: Position
Auto tunning
Select
Channel
Fine Tunning
LNA
Add/Erase
Parental Lock
CATV
5
193.31
On
Add
# # # -
MENU : Previous 0-9 : Insert
INPUT : Exit
: Position
Install
MENU
Parental Lock
Movie Rating
Genenal
Children
Content Block
Not Rated
AV Sources
Change Password
Off
Unblock
Unblock
Unblock
Unblock
Unblock
- - - -
MENU : Previous : Select
INPUT : Exit
: Position
Install
Parental Lock
Movie Rating
Genenal
Children
Content Block
Not Rated
AV Sources
Change Password
Custom
Unblock
Unblock
Unblock
Unblock
Unblock
- - - -
MENU : Previous : Select
INPUT : Exit
: Position
Install
4
CHANNEL SETUP
53
...... Continued from previous page.
8
Parental Lock
Movie Rating
Genenal
Children
Content Block
Not Rated
AV Sources
Change Password
Custom
PG-13
Unblock
Unblock
Unblock
Unblock
- - - -
MENU : Previous : Select
INPUT : Exit
: Position
Install
Parental Lock
Movie Rating
Genenal
Children
Content Block
Not Rated
AV Sources
Change Password
Custom
PG-13
TV-G
Unblock
Unblock
Unblock
- - - -
MENU : Previous : Select
INPUT : Exit
: Position
Install
7
9
G: All children and General audience.
PG : Parental guidance suggested.
PG-13 : Parental guidance for children under 13.
R: Restricted viewing, parental guidance is suggested for children under 17.
NC-17 : No children under age 17.
X: Adults only.
Unblock : Not rated.
Go to step 7, if you need to set restrictions using
the TV guidelines (Age-Based).
Press Up and Down buttons to move to
“General”.
Press Left and Right button,
then the menu changes in order below.
TV-G TV-PG TV-14 TV-MA Unblock
TV-G : General audience. TV-PG : Parental guidance suggested.
TV-14: Parents strongly cautioned. TV-MA : Mature audience.
Unblock : Not rated.
Go to step 9,
if you need to set TV Program for Children.
Press Up and Down buttons to move to
“Children”.
Countinued on next page ......
HYUNDAI LCD TV HQL260WR/320WR
CHANNEL SETUP
54
...... Continued from previous page.
10
14
13
Parental Lock
Movie Rating
Genenal
Children
Content Block
Not Rated
AV Sources
Change Password
Custom
PG-13
TV-G
Unblock
Unblock
Unblock
- - - -
MENU : Previous : Select
INPUT : Exit
: Position
Install
11
12
Parental Lock
Movie Rating
Genenal
Children
Content Block
Not Rated
AV Sources
Change Password
Custom
PG-13
TV-G
TV-Y7
Unblock
Unblock
- - - -
MENU : Previous : Select
INPUT : Exit
: Position
Install
F Violence
Dialogue
Langugae
Sex Scenes
Violence
Unblock
Unblock
Unblock
Unblock
Unblock
MENU : Previous : Select
INPUT : Exit
: Position
Content Block
Sub-ratings
F Violence
Dialogue
Language
Sex Scenes
Violence
Restrictive ratings
TV-T7 -> Unblock
TV PG -> TV-14 -> Unblock
TV PG -> TV-14 -> TV-MA -> Unblock
TV-PG -> TV-14 -> TV-MA -> Unblock
TV-PG -> TV-14 -> TV-MA -> Unblock
Press Left and Right button,
then the menu changes in order below.
TV-Y TV-Y7 Unblock
TV-Y : Young children.
TV-Y7: Child 7 and over.
Unblock : Not rated.
Go to step 11, if you need to set restrictions using
the TV guidelines (Content -Based)
Press Up and Down buttons to move to
“Content Block”.
Press Left and Right button,
then Content Block menu appears.
Press Up and Down button to Choose
one of the items listed.
Press Left and Right buttons to set.
You can select one of the restriction ratings in the each sub-rating mode.
Countinued on next page ......
CHANNEL SETUP
55
...... Continued from previous page.
14
15
16
Parental Lock
Movie Rating
Genenal
Children
Content Block
Not Rated
AV Sources
Change Password
Custom
PG-13
TV-G
TV-Y7
Unblock
Unblock
- - - -
MENU : Previous : Select
INPUT : Exit
: Position
Install
Parental Lock
Movie Rating
Genenal
Children
Content Block
Not Rated
AV Sources
Change Password
Custom
PG-13
TV-G
TV-Y7
Block
Unblock
- - - -
MENU : Previous : Select
INPUT : Exit
: Position
Install
Parental Lock
Movie Rating
Genenal
Children
Content Block
Not Rated
AV Sources
Change Password
Custom
PG-13
TV-G
TV-Y7
Block
Unblock
# # # #
MENU : Previous : Select
INPUT : Exit
: Position
Install
17
18
19
Press the Menu Button and Go to step 14,
if you need to set Block/ Unblock of Not rated program.
Press Up and Down buttons to move to
“Not Rated”.
Press Left and Right buttons to select
“Unblock/Block”.
BLOCK : When TV signal or movies display without restriction ratings,
TV or Movies signal will be blocked, and a blank screen will be displayed.
UNBLOCK : When TV signal or movies display without restriction ratings,
All signals will be unblocked, and you can view any other program
Press the Menu Button and Go to step 16,
if you need to set Block/ Unblock the AV Sources.
Press Up and Down buttons to move to
“AV Source”.
Press Left and Right buttons to select
“Unblock/Block”.
*Block - Blocks all AV sources. Unblock - Unblock all AV sources.
Go to step 18, if you need to set changing the Password.
Press Up and Down buttons to move to
“Change Password”.
Enter your new 4-digit password by using the numeric keys.
When “Repeat Password” appears,
enter your new password again.
Countinued on next page ......

HYUNDAI LCD TV HQL260WR/320WR
CHANNEL SETUP
If you forget the password, enter the defult password.
The defult password “0119” (On the Remote Control)
This message should be printed on a separate page of paper or on a page of the manual that can be removed
by a parent and put in a safe place where the children cannot find this message!!
56

57
CHANNEL SETUP